tibco® fulfillment order management installation and
TRANSCRIPT
TIBCO® Fulfillment Order ManagementInstallation and ConfigurationSoftware Release 4.0July 2017
Two-Second Advantage®
Important Information
SOME TIBCO SOFTWARE EMBEDS OR BUNDLES OTHER TIBCO SOFTWARE. USE OF SUCHEMBEDDED OR BUNDLED TIBCO SOFTWARE IS SOLELY TO ENABLE THE FUNCTIONALITY (ORPROVIDE LIMITED ADD-ON FUNCTIONALITY) OF THE LICENSED TIBCO SOFTWARE. THEEMBEDDED OR BUNDLED SOFTWARE IS NOT LICENSED TO BE USED OR ACCESSED BY ANYOTHER TIBCO SOFTWARE OR FOR ANY OTHER PURPOSE.
USE OF TIBCO SOFTWARE AND THIS DOCUMENT IS SUBJECT TO THE TERMS ANDCONDITIONS OF A LICENSE AGREEMENT FOUND IN EITHER A SEPARATELY EXECUTEDSOFTWARE LICENSE AGREEMENT, OR, IF THERE IS NO SUCH SEPARATE AGREEMENT, THECLICKWRAP END USER LICENSE AGREEMENT WHICH IS DISPLAYED DURING DOWNLOADOR INSTALLATION OF THE SOFTWARE (AND WHICH IS DUPLICATED IN THE LICENSE FILE)OR IF THERE IS NO SUCH SOFTWARE LICENSE AGREEMENT OR CLICKWRAP END USERLICENSE AGREEMENT, THE LICENSE(S) LOCATED IN THE “LICENSE” FILE(S) OF THESOFTWARE. USE OF THIS DOCUMENT IS SUBJECT TO THOSE TERMS AND CONDITIONS, ANDYOUR USE HEREOF SHALL CONSTITUTE ACCEPTANCE OF AND AN AGREEMENT TO BEBOUND BY THE SAME.
This document contains confidential information that is subject to U.S. and international copyright lawsand treaties. No part of this document may be reproduced in any form without the writtenauthorization of TIBCO Software Inc.
TIBCO, Two-Second Advantage, TIBCO ActiveMatrix BusinessWorks, TIBCO Runtime Agent, TIBCOAdministrator, and TIBCO Enterprise Message Service are either registered trademarks or trademarksof TIBCO Software Inc. in the United States and/or other countries.
Enterprise Java Beans (EJB), Java Platform Enterprise Edition (Java EE), Java 2 Platform EnterpriseEdition (J2EE), and all Java-based trademarks and logos are trademarks or registered trademarks ofOracle Corporation in the U.S. and other countries.
All other product and company names and marks mentioned in this document are the property of theirrespective owners and are mentioned for identification purposes only.
THIS SOFTWARE MAY BE AVAILABLE ON MULTIPLE OPERATING SYSTEMS. HOWEVER, NOTALL OPERATING SYSTEM PLATFORMS FOR A SPECIFIC SOFTWARE VERSION ARE RELEASEDAT THE SAME TIME. SEE THE README FILE FOR THE AVAILABILITY OF THIS SOFTWAREVERSION ON A SPECIFIC OPERATING SYSTEM PLATFORM.
THIS DOCUMENT IS PROVIDED “AS IS” WITHOUT WARRANTY OF ANY KIND, EITHER EXPRESSOR IMPLIED, INCLUDING, BUT NOT LIMITED TO, THE IMPLIED WARRANTIES OFMERCHANTABILITY, FITNESS FOR A PARTICULAR PURPOSE, OR NON-INFRINGEMENT.
THIS DOCUMENT COULD INCLUDE TECHNICAL INACCURACIES OR TYPOGRAPHICALERRORS. CHANGES ARE PERIODICALLY ADDED TO THE INFORMATION HEREIN; THESECHANGES WILL BE INCORPORATED IN NEW EDITIONS OF THIS DOCUMENT. TIBCOSOFTWARE INC. MAY MAKE IMPROVEMENTS AND/OR CHANGES IN THE PRODUCT(S)AND/OR THE PROGRAM(S) DESCRIBED IN THIS DOCUMENT AT ANY TIME.
THE CONTENTS OF THIS DOCUMENT MAY BE MODIFIED AND/OR QUALIFIED, DIRECTLY ORINDIRECTLY, BY OTHER DOCUMENTATION WHICH ACCOMPANIES THIS SOFTWARE,INCLUDING BUT NOT LIMITED TO ANY RELEASE NOTES AND "READ ME" FILES.
Copyright © 2010-2017 TIBCO Software Inc. All rights reserved.
TIBCO Software Inc. Confidential Information
2
TIBCO® Fulfillment Order Management Installation and Configuration

Contents
Figures . . . . . . . . . . . . . . . . . . . . . . . . . . . . . . . . . . . . . . . . . . . . . . . . . . . . . . . . . . . . . . . . . . . . . . . . . . . . . . . . . . . . . . . . . . . . 5
TIBCO Documentation and Support Services . . . . . . . . . . . . . . . . . . . . . . . . . . . . . . . . . . . . . . . . . . . . . . . . . . . . . . . . .6
Installation Overview . . . . . . . . . . . . . . . . . . . . . . . . . . . . . . . . . . . . . . . . . . . . . . . . . . . . . . . . . . . . . . . . . . . . . . . . . . . . . . . 7
Operating System and Database Requirements . . . . . . . . . . . . . . . . . . . . . . . . . . . . . . . . . . . . . . . . . . . . . . . . . . . . . . . . . . . . . . . . . . . . . . . . 7
Required Products . . . . . . . . . . . . . . . . . . . . . . . . . . . . . . . . . . . . . . . . . . . . . . . . . . . . . . . . . . . . . . . . . . . . . . . . . . . . . . . . . . . . . . . . . . . . . . . . . . . . .8
Required Third-Party Products . . . . . . . . . . . . . . . . . . . . . . . . . . . . . . . . . . . . . . . . . . . . . . . . . . . . . . . . . . . . . . . . . . . . . . . . . . . . . . . . . . . . 8
Installing JDK . . . . . . . . . . . . . . . . . . . . . . . . . . . . . . . . . . . . . . . . . . . . . . . . . . . . . . . . . . . . . . . . . . . . . . . . . . . . . . . . . . . . . . . . . . . . . . . . .9
Installing ANT . . . . . . . . . . . . . . . . . . . . . . . . . . . . . . . . . . . . . . . . . . . . . . . . . . . . . . . . . . . . . . . . . . . . . . . . . . . . . . . . . . . . . . . . . . . . . . . 10
Required TIBCO Products . . . . . . . . . . . . . . . . . . . . . . . . . . . . . . . . . . . . . . . . . . . . . . . . . . . . . . . . . . . . . . . . . . . . . . . . . . . . . . . . . . . . . . . 10
Installation Options . . . . . . . . . . . . . . . . . . . . . . . . . . . . . . . . . . . . . . . . . . . . . . . . . . . . . . . . . . . . . . . . . . . . . . . . . . . . . . . . . . . . . . . . . . . . . . . . . . . 10
TIBCO Environment . . . . . . . . . . . . . . . . . . . . . . . . . . . . . . . . . . . . . . . . . . . . . . . . . . . . . . . . . . . . . . . . . . . . . . . . . . . . . . . . . . . . . . . . . . . . . .10
Installation Scenario . . . . . . . . . . . . . . . . . . . . . . . . . . . . . . . . . . . . . . . . . . . . . . . . . . . . . . . . . . . . . . . . . . . . . . . . . . . . . . . . . . . . . . . . . . . . . 11
Installation Environment Variables . . . . . . . . . . . . . . . . . . . . . . . . . . . . . . . . . . . . . . . . . . . . . . . . . . . . . . . . . . . . . . . . . . . . . . . . . . . . . . . . 11
Installer Disk Space Requirements in Temporary Area . . . . . . . . . . . . . . . . . . . . . . . . . . . . . . . . . . . . . . . . . . . . . . . . . . . . . . . . . . . . . . . . .12
Installation Registry History and Log Files . . . . . . . . . . . . . . . . . . . . . . . . . . . . . . . . . . . . . . . . . . . . . . . . . . . . . . . . . . . . . . . . . . . . . . . . . . . . .12
Installation and Deployment Options . . . . . . . . . . . . . . . . . . . . . . . . . . . . . . . . . . . . . . . . . . . . . . . . . . . . . . . . . . . . . . . 14
Typical or Custom Install . . . . . . . . . . . . . . . . . . . . . . . . . . . . . . . . . . . . . . . . . . . . . . . . . . . . . . . . . . . . . . . . . . . . . . . . . . . . . . . . . . . . . . . . . . . . . .14
Installation Modes . . . . . . . . . . . . . . . . . . . . . . . . . . . . . . . . . . . . . . . . . . . . . . . . . . . . . . . . . . . . . . . . . . . . . . . . . . . . . . . . . . . . . . . . . . . . . . . . . . . . 14
GUI Mode . . . . . . . . . . . . . . . . . . . . . . . . . . . . . . . . . . . . . . . . . . . . . . . . . . . . . . . . . . . . . . . . . . . . . . . . . . . . . . . . . . . . . . . . . . . . . . . . . . . . . . . 14
Console Mode . . . . . . . . . . . . . . . . . . . . . . . . . . . . . . . . . . . . . . . . . . . . . . . . . . . . . . . . . . . . . . . . . . . . . . . . . . . . . . . . . . . . . . . . . . . . . . . . . . . 15
Silent Mode . . . . . . . . . . . . . . . . . . . . . . . . . . . . . . . . . . . . . . . . . . . . . . . . . . . . . . . . . . . . . . . . . . . . . . . . . . . . . . . . . . . . . . . . . . . . . . . . . . . . . .15
Installing TIBCO Fulfillment Order Management . . . . . . . . . . . . . . . . . . . . . . . . . . . . . . . . . . . . . . . . . . . . . . . . . . . . . 16
Installing in GUI Mode . . . . . . . . . . . . . . . . . . . . . . . . . . . . . . . . . . . . . . . . . . . . . . . . . . . . . . . . . . . . . . . . . . . . . . . . . . . . . . . . . . . . . . . . . . . . . . . . 16
Installing in Console Mode . . . . . . . . . . . . . . . . . . . . . . . . . . . . . . . . . . . . . . . . . . . . . . . . . . . . . . . . . . . . . . . . . . . . . . . . . . . . . . . . . . . . . . . . . . . .19
Installing in Silent Mode . . . . . . . . . . . . . . . . . . . . . . . . . . . . . . . . . . . . . . . . . . . . . . . . . . . . . . . . . . . . . . . . . . . . . . . . . . . . . . . . . . . . . . . . . . . . . . 19
Uninstalling TIBCO Fulfillment Order Management . . . . . . . . . . . . . . . . . . . . . . . . . . . . . . . . . . . . . . . . . . . . . . . . . . . . . . . . . . . . . . . . . . . . 20
Post-Installation Tasks . . . . . . . . . . . . . . . . . . . . . . . . . . . . . . . . . . . . . . . . . . . . . . . . . . . . . . . . . . . . . . . . . . . . . . . . . . . . 21
Post-Installation Task 1: Backing up the OMS Database Schema . . . . . . . . . . . . . . . . . . . . . . . . . . . . . . . . . . . . . . . . . . . . . . . . . . . . . . 21
Post-Installation Task 2: Copying Dependencies . . . . . . . . . . . . . . . . . . . . . . . . . . . . . . . . . . . . . . . . . . . . . . . . . . . . . . . . . . . . . . . . . . . . . . .21
Post-Installation Task 3: Creating the Database . . . . . . . . . . . . . . . . . . . . . . . . . . . . . . . . . . . . . . . . . . . . . . . . . . . . . . . . . . . . . . . . . . . . . . . 22
Creating an OMS Oracle Database for the Admin User . . . . . . . . . . . . . . . . . . . . . . . . . . . . . . . . . . . . . . . . . . . . . . . . . . . . . . . . . . . 22
Creating an OMS Oracle Database for the Default Tenant . . . . . . . . . . . . . . . . . . . . . . . . . . . . . . . . . . . . . . . . . . . . . . . . . . . . . . . . .23
Creating an OCS Oracle Database . . . . . . . . . . . . . . . . . . . . . . . . . . . . . . . . . . . . . . . . . . . . . . . . . . . . . . . . . . . . . . . . . . . . . . . . . . . . . . . 23
Creating an OMS PostgreSQL Database for the Admin User and Default Tenant . . . . . . . . . . . . . . . . . . . . . . . . . . . . . . . . . . .23
Creating an OCS PostgreSQL Database . . . . . . . . . . . . . . . . . . . . . . . . . . . . . . . . . . . . . . . . . . . . . . . . . . . . . . . . . . . . . . . . . . . . . . . . . 24
Post-Installation Task 4: Creating the TIBCO EMS Channel . . . . . . . . . . . . . . . . . . . . . . . . . . . . . . . . . . . . . . . . . . . . . . . . . . . . . . . . . . . .25
3
TIBCO® Fulfillment Order Management Installation and Configuration
Post-Installation Task 5: Integrating with TIBCO Fulfillment Subscriber Inventory . . . . . . . . . . . . . . . . . . . . . . . . . . . . . . . . . . . . . . . 25
Post-Installation Task 6: Backing up TDS-AF_Orchestrator_ForDesigner.projlib . . . . . . . . . . . . . . . . . . . . . . . . . . . . . . . . . . . . . . . . 26
Post-Installation Task 7: Starting the TIBCO FOM Engines . . . . . . . . . . . . . . . . . . . . . . . . . . . . . . . . . . . . . . . . . . . . . . . . . . . . . . . . . . . . 26
Configuring and Verifying Installation . . . . . . . . . . . . . . . . . . . . . . . . . . . . . . . . . . . . . . . . . . . . . . . . . . . . . . . . . . . . . . 27
Configuring the Database and Messaging Through Configurator . . . . . . . . . . . . . . . . . . . . . . . . . . . . . . . . . . . . . . . . . . . . . . . . . . . . . . .27
Database Configuration Properties . . . . . . . . . . . . . . . . . . . . . . . . . . . . . . . . . . . . . . . . . . . . . . . . . . . . . . . . . . . . . . . . . . . . . . . . . . . . . . . 28
Restarting the Server . . . . . . . . . . . . . . . . . . . . . . . . . . . . . . . . . . . . . . . . . . . . . . . . . . . . . . . . . . . . . . . . . . . . . . . . . . . . . . . . . . . . . . . . . . . . . . . . .31
Verifying Installation . . . . . . . . . . . . . . . . . . . . . . . . . . . . . . . . . . . . . . . . . . . . . . . . . . . . . . . . . . . . . . . . . . . . . . . . . . . . . . . . . . . . . . . . . . . . . . . . . . 31
TIBCO Fulfillment Order Management Upgrade . . . . . . . . . . . . . . . . . . . . . . . . . . . . . . . . . . . . . . . . . . . . . . . . . . . . . .36
Upgrade from Version 3.0.2 HF-4 to Version 4.0 . . . . . . . . . . . . . . . . . . . . . . . . . . . . . . . . . . . . . . . . . . . . . . . . . . . . . . . . . . . . . . . . . . . . . . .36
Converting from a Non-Partitioned Database to a Partitioned Database . . . . . . . . . . . . . . . . . . . . . . . . . . . . . . . . . . . . . . . . . . . 36
Preparing Messages for the Upgrade . . . . . . . . . . . . . . . . . . . . . . . . . . . . . . . . . . . . . . . . . . . . . . . . . . . . . . . . . . . . . . . . . . . . . . . . . . . . . . . . . 39
Backing Up the Database . . . . . . . . . . . . . . . . . . . . . . . . . . . . . . . . . . . . . . . . . . . . . . . . . . . . . . . . . . . . . . . . . . . . . . . . . . . . . . . . . . . . . . . . . . . . .41
Installing TIBCO Fulfillment Order Management 4.0 . . . . . . . . . . . . . . . . . . . . . . . . . . . . . . . . . . . . . . . . . . . . . . . . . . . . . . . . . . . . . . . . . . . 41
Creating Databases for TIBCO Fulfillment Order Management 4.0 . . . . . . . . . . . . . . . . . . . . . . . . . . . . . . . . . . . . . . . . . . . . . . . . . . . . .41
Migrating the Database . . . . . . . . . . . . . . . . . . . . . . . . . . . . . . . . . . . . . . . . . . . . . . . . . . . . . . . . . . . . . . . . . . . . . . . . . . . . . . . . . . . . . . . . . . . . . . . 42
Merging 3.0.2HF-4 Configurations to 4.0 Configurations . . . . . . . . . . . . . . . . . . . . . . . . . . . . . . . . . . . . . . . . . . . . . . . . . . . . . . . . . . . . . . . 42
Upgrading the TIBCO EMS Channel . . . . . . . . . . . . . . . . . . . . . . . . . . . . . . . . . . . . . . . . . . . . . . . . . . . . . . . . . . . . . . . . . . . . . . . . . . . . . . . . . . 46
Shredding the Database Privilege . . . . . . . . . . . . . . . . . . . . . . . . . . . . . . . . . . . . . . . . . . . . . . . . . . . . . . . . . . . . . . . . . . . . . . . . . . . . . . . . . . . . .46
Possible Changes in Process Components . . . . . . . . . . . . . . . . . . . . . . . . . . . . . . . . . . . . . . . . . . . . . . . . . . . . . . . . . . . . . . . . . . . . . . . . . . . .46
Start the TIBCO Fulfillment Order Management 4.0 Environment . . . . . . . . . . . . . . . . . . . . . . . . . . . . . . . . . . . . . . . . . . . . . . . . . . . . . . 46
Installation FAQs and Troubleshooting . . . . . . . . . . . . . . . . . . . . . . . . . . . . . . . . . . . . . . . . . . . . . . . . . . . . . . . . . . . . . .48
4
TIBCO® Fulfillment Order Management Installation and Configuration
Figures
TIBCO Installation Welcome Screen . . . . . . . . . . . . . . . . . . . . . . . . . . . . . . . . . . . . . . . . . . . . . . . . . . . . . . . . . . . . . . . . . . . . . . . . . . . . . . . . . . . 16
TIBCO Installation Home Screen . . . . . . . . . . . . . . . . . . . . . . . . . . . . . . . . . . . . . . . . . . . . . . . . . . . . . . . . . . . . . . . . . . . . . . . . . . . . . . . . . . . . . . .17
TIBCO Installation Components Screen . . . . . . . . . . . . . . . . . . . . . . . . . . . . . . . . . . . . . . . . . . . . . . . . . . . . . . . . . . . . . . . . . . . . . . . . . . . . . . . 18
Pre-Install Summary Screen . . . . . . . . . . . . . . . . . . . . . . . . . . . . . . . . . . . . . . . . . . . . . . . . . . . . . . . . . . . . . . . . . . . . . . . . . . . . . . . . . . . . . . . . . . . 19
JMS Connection Parameters for Orchestrator . . . . . . . . . . . . . . . . . . . . . . . . . . . . . . . . . . . . . . . . . . . . . . . . . . . . . . . . . . . . . . . . . . . . . . . . . 32
Starting Processes . . . . . . . . . . . . . . . . . . . . . . . . . . . . . . . . . . . . . . . . . . . . . . . . . . . . . . . . . . . . . . . . . . . . . . . . . . . . . . . . . . . . . . . . . . . . . . . . . . . . . .33
Order View . . . . . . . . . . . . . . . . . . . . . . . . . . . . . . . . . . . . . . . . . . . . . . . . . . . . . . . . . . . . . . . . . . . . . . . . . . . . . . . . . . . . . . . . . . . . . . . . . . . . . . . . . . . . . . 34
Plan Grid View . . . . . . . . . . . . . . . . . . . . . . . . . . . . . . . . . . . . . . . . . . . . . . . . . . . . . . . . . . . . . . . . . . . . . . . . . . . . . . . . . . . . . . . . . . . . . . . . . . . . . . . . . . 35
Plan Gantt View . . . . . . . . . . . . . . . . . . . . . . . . . . . . . . . . . . . . . . . . . . . . . . . . . . . . . . . . . . . . . . . . . . . . . . . . . . . . . . . . . . . . . . . . . . . . . . . . . . . . . . . . . 35
5
TIBCO® Fulfillment Order Management Installation and Configuration
TIBCO Documentation and Support Services
Documentation for this and other TIBCO products is available on the TIBCO Documentation site. Thissite is updated more frequently than any documentation that might be included with the product. Toensure that you are accessing the latest available help topics, visit:
https://docs.tibco.com
Product-Specific Documentation
The following documents for this product can be found on the TIBCO Documentation site:
● TIBCO Fulfillment Order Management Installation and Configuration Guide
● TIBCO Fulfillment Order Management User's Guide
● TIBCO Fulfillment Order Management Administration Guide
● TIBCO Fulfillment Orchestration Suite Getting Started Guide
● TIBCO Fulfillment Orchestration Suite Best Practices Guide
● TIBCO Fulfillment Order Management Concepts and Architecture Guide
● TIBCO Fulfillment Order Management Web Services Guide
● TIBCO Fulfillment Order Management Release Notes
How to Contact TIBCO Support
For comments or problems with this manual or the software it addresses, contact TIBCO Support:
● For an overview of TIBCO Support, and information about getting started with TIBCO Support,visit this site:
http://www.tibco.com/services/support
● If you already have a valid maintenance or support contract, visit this site:
https://support.tibco.com
Entry to this site requires a user name and password. If you do not have a user name, you canrequest one.
How to Join TIBCO Community
TIBCO Community is an online destination for TIBCO customers, partners, and resident experts. It is aplace to share and access the collective experience of the TIBCO community. TIBCO Community offersforums, blogs, and access to a variety of resources. To register, go to the following web address:
https://community.tibco.com
6
TIBCO® Fulfillment Order Management Installation and Configuration
Installation Overview
TIBCO® Fulfillment Order Management provides advanced order provisioning and fulfillment features.
This chapter provides information about the system requirements in terms of operating systems anddisk space, the recommended setup for TIBCO Fulfillment Order Management installation, variablesand properties required, and important files necessary to perform the post-install log analysis.
The following are links to detailed information for preinstall requirements and settings, and the installand post-install steps.
Preinstall
To ensure that you have a good experience installing TIBCO Fulfillment Order Management, it isalways recommended to check whether your computer is ready for the installation. The pre-installsection gives you the prerequisites to install TIBCO Fulfillment Order Management.
1. Operating System and Database Requirements on page 7: This section provides you withinformation about the platforms that TIBCO Fulfillment Order Management supports.
2. Required Products on page 8: TIBCO Fulfillment Order Management requires a number ofsoftware components to be installed. For a complete list of versions and platforms supported, seethe TIB_af_4.0.0_readme.txt file. Install and configure them in the mentioned order.
3. Installation Options on page 10: This section provides you with information about the options forinstalling TIBCO Fulfillment Order Management.
4. Installation Registry History and Log Files on page 12: These files inform you about:
a. The log files, which contain important data about installation and uninstallation of TIBCOFulfillment Order Management.
b. Where you can find the log files, and post-installation.
c. Nomenclature of the log files.
d. Details about the log data.
Install
● Installation and Deployment Options: TIBCO Fulfillment Order Management supports differentinstallation modes. This chapter provides you with information about the available installationmodes, the flow of the installation, and post-install steps you need to perform.
● Installing TIBCO Fulfillment Order Management: Step-by-step instructions are provided to helpyou install TIBCO Fulfillment Order Management using different installation modes. This chapteralso describes the steps required to uninstall TIBCO Fulfillment Order Management.
Post-install
Post-Installation Tasks on page 21: After you complete the installation of TIBCO Fulfillment OrderManagement, you should complete the post-installation tasks. The post-installation tasks list theconfiguration and deployment steps of the components that you have just installed.
Operating System and Database RequirementsTIBCO Fulfillment Order Management supports the following platforms and databases:
Operating System
Red Hat Enterprise Linux Server 6.x, 7.x 64-bit on x86-64
7
TIBCO® Fulfillment Order Management Installation and Configuration
Partitioned Database
Oracle 12c EE (Oracle 12.1.x), single and RAC
PostgreSQL 9.6.x
For version number details, refer to the product readme document.
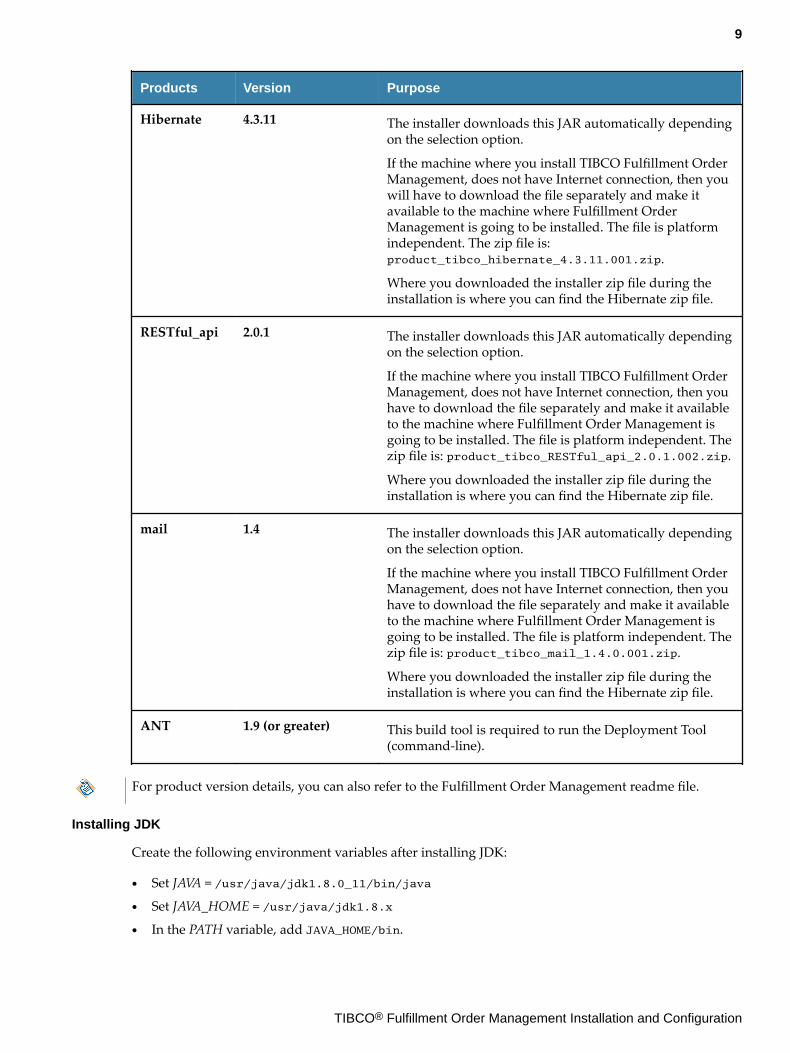
Required ProductsYou must install the third-party products and TIBCO products listed in this section.
Required Third-Party ProductsThe following table lists the required third-party products:
Required Third-Party Products
Products Version Purpose
JDK 1.8 (or greater) A Java Development Kit (JDK) is a program developmentenvironment which you can use for writing Java appletsand applications.
This is required for OMS and Jeopardy ManagementSystem (henceforth, referred to as JeoMS).
See below the JDK installation details.
OracleDatabase
or
12c (or greater)A database is required by TIBCO Fulfillment OrderManagement to store data.
The database server can be installed on a separate machinebased on the installation requirement.PostgreSQL
Database9.6.x
Databasedriver(needed onlyif you areusing anOracledatabase)
ojdbc7.jar for OracleDatabase 12c
This is required on the machine where TIBCO FulfillmentOrder Management is installed.
The driver is used to connect to and query the Oracleserver.
The driver (ojdbc7.jar) can be found in the Oracle databaseinstallation or it can be downloaded directly from theOracle website.
8
TIBCO® Fulfillment Order Management Installation and Configuration
Products Version Purpose
Hibernate 4.3.11 The installer downloads this JAR automatically dependingon the selection option.
If the machine where you install TIBCO Fulfillment OrderManagement, does not have Internet connection, then youwill have to download the file separately and make itavailable to the machine where Fulfillment OrderManagement is going to be installed. The file is platformindependent. The zip file is:product_tibco_hibernate_4.3.11.001.zip.
Where you downloaded the installer zip file during theinstallation is where you can find the Hibernate zip file.
RESTful_api 2.0.1 The installer downloads this JAR automatically dependingon the selection option.
If the machine where you install TIBCO Fulfillment OrderManagement, does not have Internet connection, then youhave to download the file separately and make it availableto the machine where Fulfillment Order Management isgoing to be installed. The file is platform independent. Thezip file is: product_tibco_RESTful_api_2.0.1.002.zip.
Where you downloaded the installer zip file during theinstallation is where you can find the Hibernate zip file.
mail 1.4 The installer downloads this JAR automatically dependingon the selection option.
If the machine where you install TIBCO Fulfillment OrderManagement, does not have Internet connection, then youhave to download the file separately and make it availableto the machine where Fulfillment Order Management isgoing to be installed. The file is platform independent. Thezip file is: product_tibco_mail_1.4.0.001.zip.
Where you downloaded the installer zip file during theinstallation is where you can find the Hibernate zip file.
ANT 1.9 (or greater) This build tool is required to run the Deployment Tool(command-line).
For product version details, you can also refer to the Fulfillment Order Management readme file.
Installing JDK
Create the following environment variables after installing JDK:
● Set JAVA = /usr/java/jdk1.8.0_11/bin/java
● Set JAVA_HOME = /usr/java/jdk1.8.x
● In the PATH variable, add JAVA_HOME/bin.
9
TIBCO® Fulfillment Order Management Installation and Configuration

Installing ANT
Create the following environment variables after installing ANT:
● Set ANT_HOME for example /usr/ant/1.9.x
● In the PATH variable, add ANT_HOME/bin.
Required TIBCO ProductsThe Fulfillment Order Management requires some TIBCO products.
Required TIBCO Products for TIBCO Fulfillment Order Management
The following table lists the required TIBCO products for TIBCO Fulfillment Order Management:
The TIBCO Fulfillment Order Management installer does not verify if the required products areinstalled. Nonetheless, those products have to be installed before TIBCO Fulfillment OrderManagement is installed.
It is possible to install several TIBCO products at once, and let the installer installs the products in theright order. Just unzip all the TIBCO products in a single directory. The only caveat is that some TIBCOproducts use a later version of the TIBCO Universal installer. So, if you decide to install all the productat once, make sure to unzip TIBCO Fulfillment Order Management (that uses the latest TIBCOuniversal installer version) the last.
Required TIBCO Products for TIBCO Fulfillment Order Management
Product & Version Purpose For more information, refer to:
TIBCO EnterpriseMessage Service™ 8.3.x
Standards-based messagingsoftware that can serve as thebackbone of an SOA byproviding Java Message Service(JMS)-compliantcommunications across a widerange of platforms andapplication technologies.
EMS is a pre-requisitebut is not a part of theTIBCO FulfillmentOrder Managementproduct license.
TIBCO Enterprise Message Service™Installation
Installation OptionsDepending on how you want to use TIBCO Fulfillment Order Management there are different ways toinstall it.
First, there is the concept of TIBCO environment that you need to understand before we explain thedifferent ways to use this application and the corresponding installation options.
TIBCO EnvironmentThe TIBCO environment is a directory where one or more TIBCO products are installed. It is also calledinstallation directory or TIBCO home, because it will correspond to the environment variable$TIBCO_HOME.
10
TIBCO® Fulfillment Order Management Installation and Configuration
The installer prompts you to specify or create a TIBCO environment. An environment consists of aname, description, and directory on the disk. Each TIBCO environment is isolated so the same softwarecan be installed into the different environments safely (e.g. different versions of the same software). Youcan also install multiple TIBCO products into the same environment.
Each time you run the installer, it will ask you which TIBCO environment to use. An installer installs oruninstalls a product from a TIBCO environment. If you want to install several times a same product,then you will have to do it in different TIBCO environment. Each time, you will have to run the installer(an installation session only deals with one single TIBCO environment).
Before installing a product in a particular TIBCO environment, the installer verifies that all thedependencies are already installed in that TIBCO environment.
By default the installer suggests to use the following directories as TIBCO environment (i.e.TIBCO_HOME):
● For root users, the default installation directory is /opt/tibco.● For non-root users, the default installation directory is /myhome/tibco, where myhome is the home
directory of the user.You can choose any other directory. For performance reasons, it is recommended to install the producton a local disk (as opposed to network mounted or NFS partition).
Installation ScenarioTIBCO Fulfillment Order Management is made of several sub-systems or components. Each of thosecomponents have a specific responsibility. Here is a brief list of the major components:
● Order Management Server● Offer and Price Engine● Order Capture System● Orchestrator● Automated Order Plan DevelopmentFor a complete list of all the components and their detailed role and relationships, see TIBCO FulfillmentOrder Management Concepts and Architecture and TIBCO Fulfillment Order Management User's Guide.
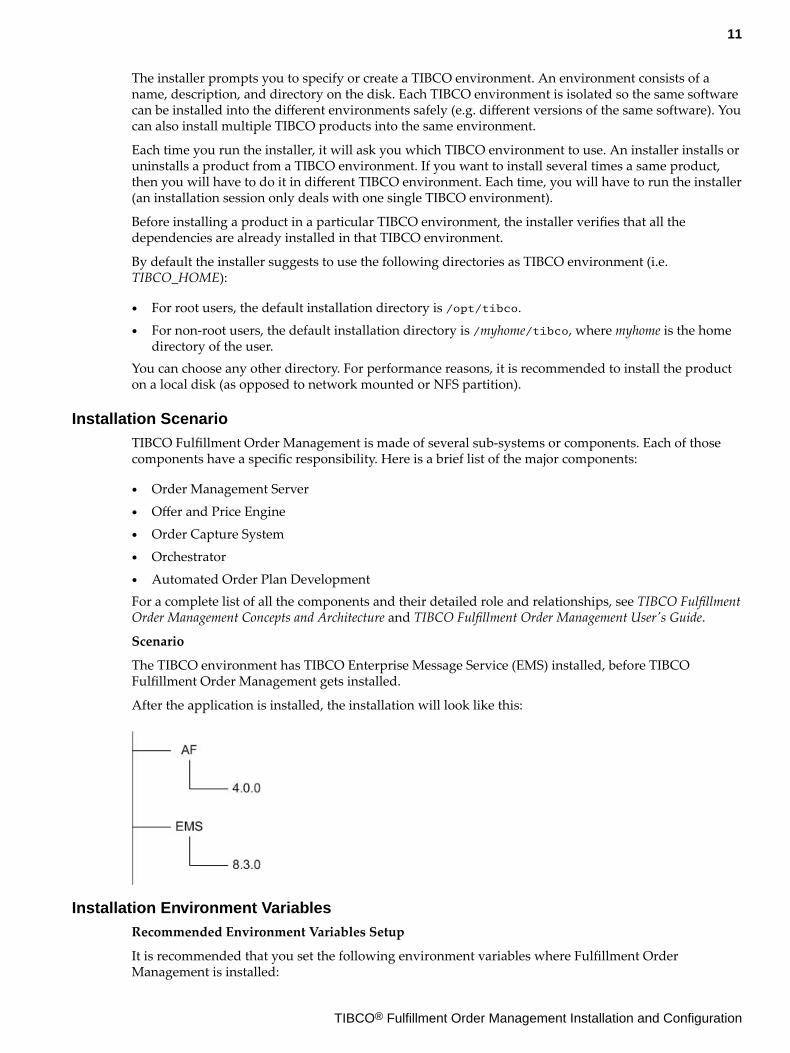
Scenario
The TIBCO environment has TIBCO Enterprise Message Service (EMS) installed, before TIBCOFulfillment Order Management gets installed.
After the application is installed, the installation will look like this:
Installation Environment VariablesRecommended Environment Variables Setup
It is recommended that you set the following environment variables where Fulfillment OrderManagement is installed:
11
TIBCO® Fulfillment Order Management Installation and Configuration
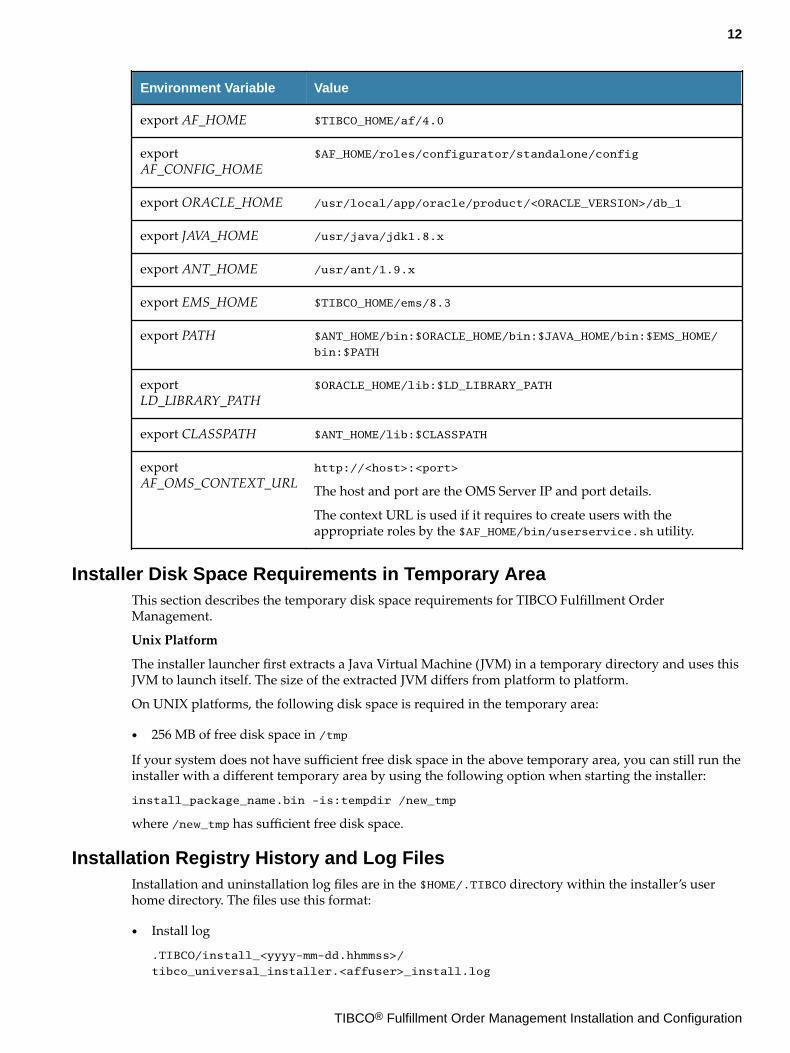
Environment Variable Value
export AF_HOME $TIBCO_HOME/af/4.0
exportAF_CONFIG_HOME
$AF_HOME/roles/configurator/standalone/config
export ORACLE_HOME /usr/local/app/oracle/product/<ORACLE_VERSION>/db_1
export JAVA_HOME /usr/java/jdk1.8.x
export ANT_HOME /usr/ant/1.9.x
export EMS_HOME $TIBCO_HOME/ems/8.3
export PATH $ANT_HOME/bin:$ORACLE_HOME/bin:$JAVA_HOME/bin:$EMS_HOME/
bin:$PATH
exportLD_LIBRARY_PATH
$ORACLE_HOME/lib:$LD_LIBRARY_PATH
export CLASSPATH $ANT_HOME/lib:$CLASSPATH
exportAF_OMS_CONTEXT_URL
http://<host>:<port>
The host and port are the OMS Server IP and port details.
The context URL is used if it requires to create users with theappropriate roles by the $AF_HOME/bin/userservice.sh utility.
Installer Disk Space Requirements in Temporary AreaThis section describes the temporary disk space requirements for TIBCO Fulfillment OrderManagement.
Unix Platform
The installer launcher first extracts a Java Virtual Machine (JVM) in a temporary directory and uses thisJVM to launch itself. The size of the extracted JVM differs from platform to platform.
On UNIX platforms, the following disk space is required in the temporary area:
● 256 MB of free disk space in /tmp
If your system does not have sufficient free disk space in the above temporary area, you can still run theinstaller with a different temporary area by using the following option when starting the installer:
install_package_name.bin -is:tempdir /new_tmp
where /new_tmp has sufficient free disk space.
Installation Registry History and Log FilesInstallation and uninstallation log files are in the $HOME/.TIBCO directory within the installer’s userhome directory. The files use this format:
● Install log
.TIBCO/install_<yyyy-mm-dd.hhmmss>/
tibco_universal_installer.<affuser>_install.log
12
TIBCO® Fulfillment Order Management Installation and Configuration
● Uninstall log
.TIBCO/uninstall_<yyyy-mm-dd.hhmmss>/
tibco_universal_installer.<affuser>_uninstall.log
The installation and uninstallation log files log the history and maintain the registry files in the $HOME/InstallShield directory.
Do not edit, rename, move, or remove the files in the $HOME/InstallShield directory.
13
TIBCO® Fulfillment Order Management Installation and Configuration
Installation and Deployment Options
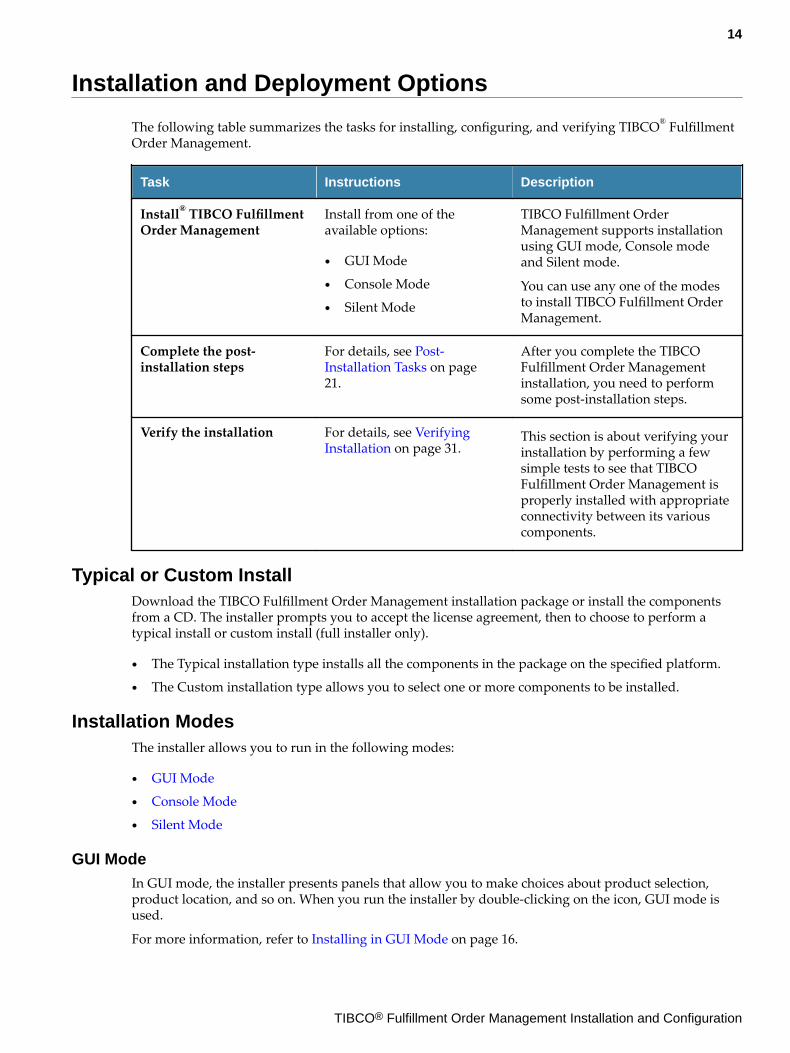
The following table summarizes the tasks for installing, configuring, and verifying TIBCO® FulfillmentOrder Management.
Task Instructions Description
Install® TIBCO FulfillmentOrder Management
Install from one of theavailable options:
● GUI Mode
● Console Mode
● Silent Mode
TIBCO Fulfillment OrderManagement supports installationusing GUI mode, Console modeand Silent mode.
You can use any one of the modesto install TIBCO Fulfillment OrderManagement.
Complete the post-installation steps
For details, see Post-Installation Tasks on page21.
After you complete the TIBCOFulfillment Order Managementinstallation, you need to performsome post-installation steps.
Verify the installation For details, see VerifyingInstallation on page 31.
This section is about verifying yourinstallation by performing a fewsimple tests to see that TIBCOFulfillment Order Management isproperly installed with appropriateconnectivity between its variouscomponents.
Typical or Custom InstallDownload the TIBCO Fulfillment Order Management installation package or install the componentsfrom a CD. The installer prompts you to accept the license agreement, then to choose to perform atypical install or custom install (full installer only).
● The Typical installation type installs all the components in the package on the specified platform.
● The Custom installation type allows you to select one or more components to be installed.
Installation ModesThe installer allows you to run in the following modes:
● GUI Mode
● Console Mode
● Silent Mode
GUI ModeIn GUI mode, the installer presents panels that allow you to make choices about product selection,product location, and so on. When you run the installer by double-clicking on the icon, GUI mode isused.
For more information, refer to Installing in GUI Mode on page 16.
14
TIBCO® Fulfillment Order Management Installation and Configuration
Console ModeConsole mode allows you to run the installer from the command prompt or terminal window.
For more information, refer to Installing in Console Mode.
Silent ModeSilent mode either installs using default settings or uses a response file that was saved during an earlierinstallation. Silent mode installs without prompting you for information.
For more information, refer to Installing in Silent Mode.
15
TIBCO® Fulfillment Order Management Installation and Configuration
Installing TIBCO Fulfillment Order Management
This section describes the installation and uninstallation of TIBCO® Fulfillment Order Managementusing TIBCO Universal Installer.
Installing in GUI ModeThe following procedure explains how to install TIBCO® Fulfillment Order Management in GUI mode:
1. Open the physical media or download the TIBCO Fulfillment Order Management product package.
2. Extract the TIBCO Fulfillment Order Management product archive file to a temporary directory.
3. Navigate to the temporary directory that contains the universal installer.
4. Run TIBCOUniversalInstaller-(platform).bin (the name of the executable depends on the platform,the ends with the .bin extension).
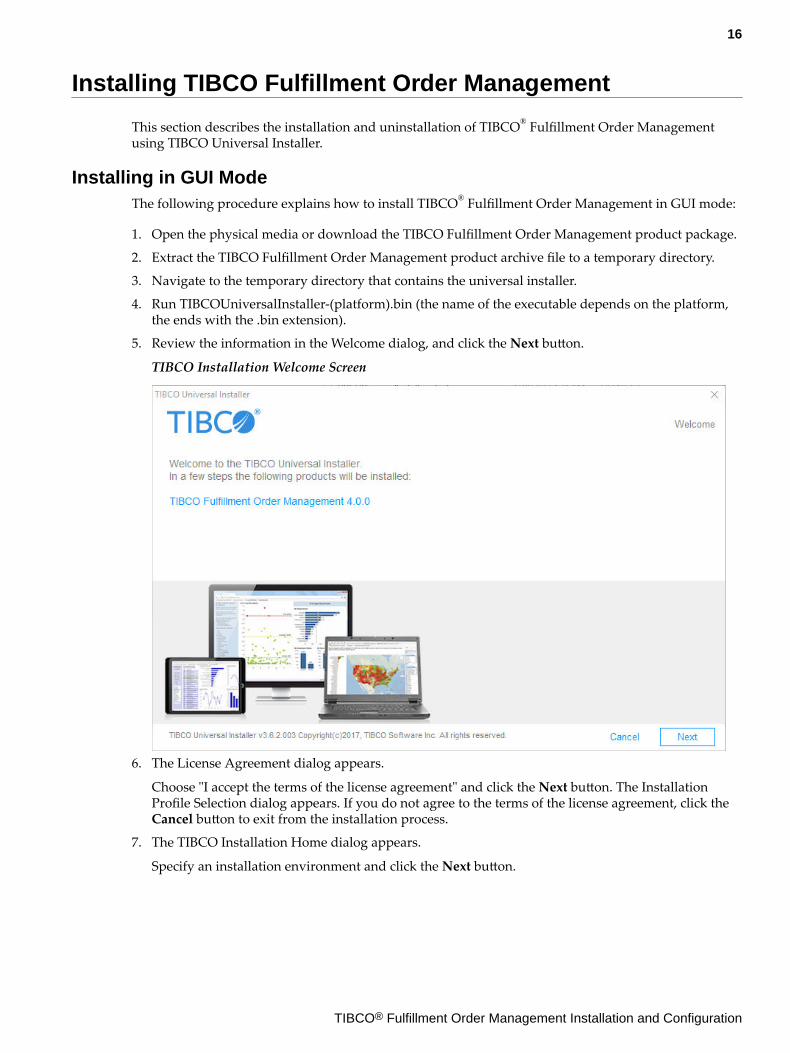
5. Review the information in the Welcome dialog, and click the Next button.
TIBCO Installation Welcome Screen
6. The License Agreement dialog appears.
Choose "I accept the terms of the license agreement" and click the Next button. The InstallationProfile Selection dialog appears. If you do not agree to the terms of the license agreement, click theCancel button to exit from the installation process.
7. The TIBCO Installation Home dialog appears.
Specify an installation environment and click the Next button.
16
TIBCO® Fulfillment Order Management Installation and Configuration
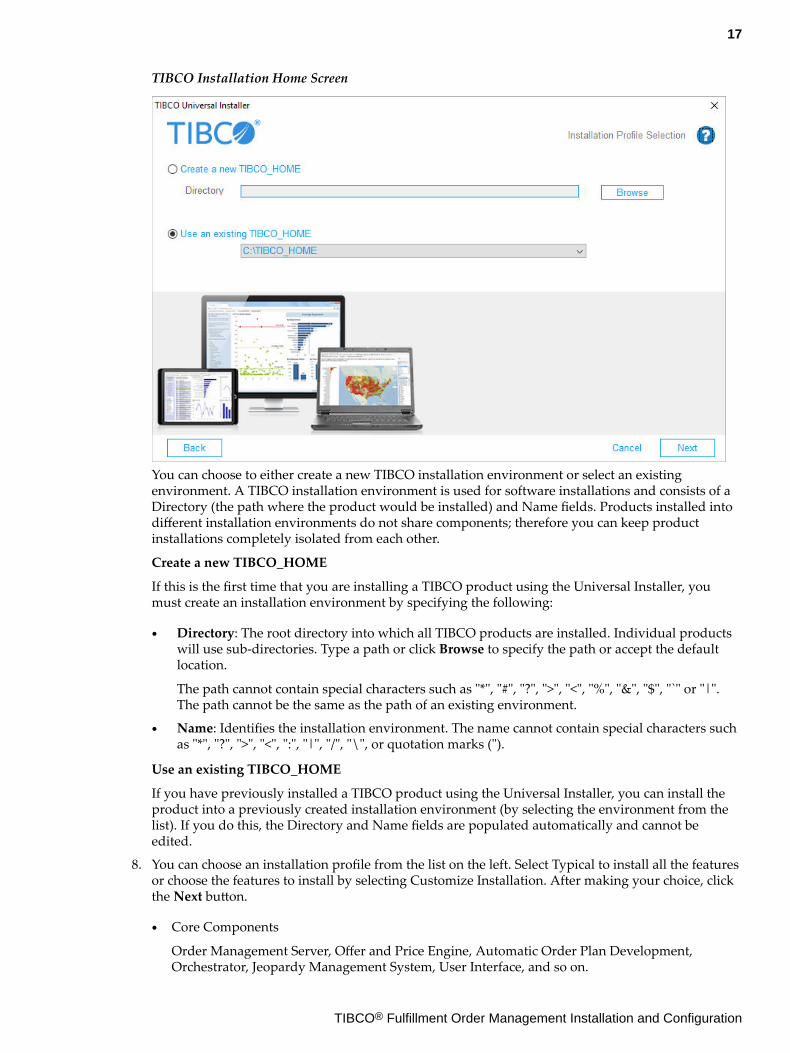
TIBCO Installation Home Screen
You can choose to either create a new TIBCO installation environment or select an existingenvironment. A TIBCO installation environment is used for software installations and consists of aDirectory (the path where the product would be installed) and Name fields. Products installed intodifferent installation environments do not share components; therefore you can keep productinstallations completely isolated from each other.
Create a new TIBCO_HOME
If this is the first time that you are installing a TIBCO product using the Universal Installer, youmust create an installation environment by specifying the following:
● Directory: The root directory into which all TIBCO products are installed. Individual productswill use sub-directories. Type a path or click Browse to specify the path or accept the defaultlocation.
The path cannot contain special characters such as "*", "#", "?", ">", "<", "%", "&", "$", "`" or "|".The path cannot be the same as the path of an existing environment.
● Name: Identifies the installation environment. The name cannot contain special characters suchas "*", "?", ">", "<", ":", "|", "/", "\", or quotation marks (").
Use an existing TIBCO_HOME
If you have previously installed a TIBCO product using the Universal Installer, you can install theproduct into a previously created installation environment (by selecting the environment from thelist). If you do this, the Directory and Name fields are populated automatically and cannot beedited.
8. You can choose an installation profile from the list on the left. Select Typical to install all the featuresor choose the features to install by selecting Customize Installation. After making your choice, clickthe Next button.
● Core Components
Order Management Server, Offer and Price Engine, Automatic Order Plan Development,Orchestrator, Jeopardy Management System, User Interface, and so on.
17
TIBCO® Fulfillment Order Management Installation and Configuration
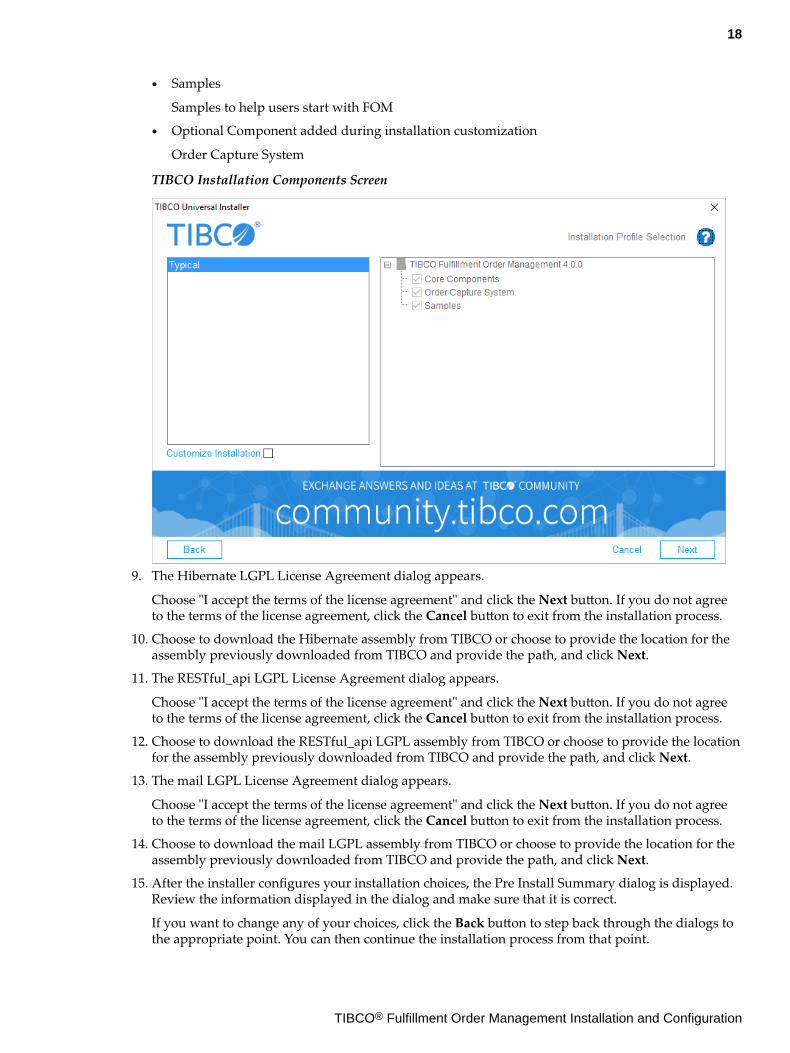
● Samples
Samples to help users start with FOM
● Optional Component added during installation customization
Order Capture System
TIBCO Installation Components Screen
9. The Hibernate LGPL License Agreement dialog appears.
Choose "I accept the terms of the license agreement" and click the Next button. If you do not agreeto the terms of the license agreement, click the Cancel button to exit from the installation process.
10. Choose to download the Hibernate assembly from TIBCO or choose to provide the location for theassembly previously downloaded from TIBCO and provide the path, and click Next.
11. The RESTful_api LGPL License Agreement dialog appears.
Choose "I accept the terms of the license agreement" and click the Next button. If you do not agreeto the terms of the license agreement, click the Cancel button to exit from the installation process.
12. Choose to download the RESTful_api LGPL assembly from TIBCO or choose to provide the locationfor the assembly previously downloaded from TIBCO and provide the path, and click Next.
13. The mail LGPL License Agreement dialog appears.
Choose "I accept the terms of the license agreement" and click the Next button. If you do not agreeto the terms of the license agreement, click the Cancel button to exit from the installation process.
14. Choose to download the mail LGPL assembly from TIBCO or choose to provide the location for theassembly previously downloaded from TIBCO and provide the path, and click Next.
15. After the installer configures your installation choices, the Pre Install Summary dialog is displayed.Review the information displayed in the dialog and make sure that it is correct.
If you want to change any of your choices, click the Back button to step back through the dialogs tothe appropriate point. You can then continue the installation process from that point.
18
TIBCO® Fulfillment Order Management Installation and Configuration

Pre-Install Summary Screen
16. When you are satisfied with your choices, click the Install button.
17. The Post Install Summary dialog appears which summarizes the installation process. Click theFinish button to complete the installation process and close the installer window.
18. Complete the post-installation tasks described in Post-Installation Tasks on page 21.
Installing in Console ModeThe following procedure lists the steps to install TIBCO Fulfillment Order Management in consolemode:
1. Open the physical media or download the TIBCO Fulfillment Order Management product package.
2. Extract the TIBCO Fulfillment Order Management product archive file to a temporary directory.
3. Using a console window, navigate to the temporary directory that contains the universal installerand run the installer using this command line:bash-4.00$ ./TIBCOUniversalInstaller-<os>.bin -console
4. Complete the installation by responding to the console window prompts.
Installing in Silent ModeThe TIBCOUniversalInstaller.silent file is packaged in the directory that contains the universalinstaller. Edit the file with information for your environment before launching the silent installation.The file includes comments that describe the installation properties you can set.
While you can use the TIBCOUniversalInstaller.silent file, it is a good practice to copy the file to adifferent name and then edit the file for silent mode. Modify the following details in the silent file:
● installationRoot
● Set the createNewEnvironment value to be false.
● environmentName
19
TIBCO® Fulfillment Order Management Installation and Configuration
● environmentDesc
Change other optional parameter values as required.
Save the silent file.
If errors occur during installation, they will be listed in the installation log file, which is located in the$HOME/.TIBCO directory.
The following procedure lists the steps to install TIBCO Fulfillment Order Management in silent mode.
1. Open the physical media or download the TIBCO Fulfillment Order Management product package.
2. Extract the TIBCO Fulfillment Order Management product archive file to a temporary directory.
3. Using a console window, navigate to the temporary directory that contains the universal installer.
4. Copy the TIBCOUniversalInstaller.silent file and name the file.
5. Using a text editor, open the TIBCOUniversalInstaller.silent file, and update the installlocation and the list of features to install.
6. Run the installer:
TIBCOUniversalInstaller-<os>.bin -silent
When installation completes, a line similar to the following is written to the installer log file:
Install, com.tibco.installer.util.TIBCOInstaller, dbg.Debug, The installation has
completed. Please check the log file for additional information.
7. Complete the post-installation tasks described in Post-Installation Tasks on page 21.
Uninstalling TIBCO Fulfillment Order ManagementTo uninstall Fulfillment Order Management from the supported UNIX platform, navigate to the$TIBCO_HOME/tools/universal_installer directory and run the TIBCOUniversalInstaller-<os-type>.bin script.
20
TIBCO® Fulfillment Order Management Installation and Configuration

Post-Installation Tasks
This section gives an overview of the steps you need to perform upon successful installation of TIBCO®
Fulfillment Order Management. Each post-installation step given below must be finished before youperform the next step.
Complete the following steps in the given order to configure the installed components:
1. Back up the OMS database Schema.
2. Copy OMS dependencies.
3. Create the Database.
4. Create the TIBCO EMS channel.
5. Integrate with TIBCO Fulfillment Subscriber Inventory.
6. Back up TDS-AF_Orchestrator_ForDesigner.projlib.
7. Start TIBCO Fulfillment Order Management services.
Use the HTML documentation to copy and past code snippets in to the XML files.
Post-Installation Task 1: Backing up the OMS Database SchemaBack up the OMS database schema so that the OMS database can be restored if the application has to beuninstalled for some reason.
Post-Installation Task 2: Copying DependenciesOMS does not ship with all the required 3rd party dependencies. A copyLib.sh script is providedunder $AF_HOME/roles. This script runs under each service and copies the required dependencies.
1. Provide the path from where the dependencies have to be copied. Do this by setting the followingvariables in copyLib.sh:
● JDBC_JAR_PATH● EMS_JAR_PATH_tibjms● EMS_JAR_PATH_jms● EMS_JAR_PATH_tibcrypt● HIBERNATE_JAR_PATH● RESTFUL_API_JAR_PATH● MAIL_JAR_PATH
The copyLib.sh should look similar to this:#!/usr/bin/env bash # for Oracle DB export JDBC_JAR_PATH=/data/oracle12c/app/oracle12c/product/12.1.0/dbhome_1/jdbc/lib/ojdbc7.jar # for Postgres DB export JDBC_JAR_PATH=/opt/PostgreSQL/pgJDBC/postgresql-42.0.0.jre7.jar export EMS_JAR_PATH_tibjms=/opt/tibco/ems/8.3/lib/tibjms.jar export EMS_JAR_PATH_jms=/opt/tibco/ems/8.3/lib/jms-2.0.jar export EMS_JAR_PATH_tibcrypt=/opt/tibco/ems/8.3/lib/tibcrypt.jar export HIBERNATE_JAR_PATH=/opt/tibco/af/4.0/lib/hibernateLibs/*.jar export RESTFUL_API_JAR_PATH=/opt/tibco/af/4.0/lib/RESTful_api/javax.ws.rs-api-2.0.1.jar export MAIL_JAR_PATH=/opt/tibco/af/4.0/lib/mail/mail-1.4.jar DIR="$( cd "$( dirname "${BASH_SOURCE[0]}" )" && pwd )"
21
TIBCO® Fulfillment Order Management Installation and Configuration
echo "$DIR" for role in `find $DIR/../roles/*/standalone/bin/copyLib.sh` do echo "##############Copying for $role ###################" sh $role done
Alternatively, you can set them as system properties. Each variable will point to the .jar file to becopied. See the example in the copyLib.sh script for clarification.
2. After setting the variables, run the copyLib.sh script.
Post-Installation Task 3: Creating the DatabaseIf this is your first time installing TIBCO Fulfillment Order Management, create the database andmessaging by executing the provided scripts. You can create the database for the admin database userand the default tenant for an Oracle or PostgreSQL database.
To execute the SQL scripts, you should have appropriate permission.
If you are using an Oracle database, you must set the ORACLE database system NLS_CHARACTERSETparameter to UTF-8.
OMS Database
● Oracle Database: Admin User Database and Default Tenant Database
● PostgreSQL Database: Admin User and Default Tenant Database
OCS Database
● Oracle Database
● PostgreSQL Database
Creating an OMS Oracle Database for the Admin UserCreate an OMS Oracle database for the admin user by running the provided scripts.
Procedure
1. Create the table space by modifying the file to assign proper table space name and location of thefile including the .dbf extension in the file $AF_HOME/db/oracle/oms/CreateTableSpace.sql.
2. Create the user and assign the table space by modifying the file $AF_HOME/db/oracle/oms/createOMSUser.sql and assign the proper username and password for every user and the tablespace to the user with proper quota size in the file.
3. Connect to SQL PLUS as an OMS database user. Execute the following SQL files in order:
1. Execute $AF_HOME/db/oracle/oms/OMS_AdminDatabase_DDL.sql passing the tablespacenameas an input parameter.
For example,
● SQL> @$AF_HOME/db/oracle/oms/OMS_AdminDatabase_DDL.sql
<<admintablespacename>>
2. Execute $AF_HOME/db/oracle/oms/OMS_Admin_SeedData.sql.
For example,
● SQL> @$AF_HOME/db/oracle/oms/OMS_Admin_SeedData.sql
22
TIBCO® Fulfillment Order Management Installation and Configuration
Creating an OMS Oracle Database for the Default TenantCreate an OMS Oracle database for the default tenant by running the provided scripts.
Procedure
1. Create the table space by modifying the file to assign proper table space name and location of thefile including the .dbf extension in the file $AF_HOME/db/oracle/oms/CreateTableSpace.sql.
2. Create the user and assign the table space by modifying the file $AF_HOME/db/oracle/oms/createOMSUser.sql, and assign the proper username and password for every user and the tablespace to the user with proper quota size in the file.
3. Connect to SQL PLUS as an OMS database user. Execute the following SQL files in order:
1. Execute $AF_HOME/db/oracle/oms/OMS_DDL.sql passing the tablespacename as an inputparameter.
For example,
● SQL> @$AF_HOME/db/oracle/oms/OMS_DDL.sql <<omstablespacename>>
2. Execute $AF_HOME/db/oracle/oms/OMS_SeedData.sql.
For example,
● SQL> @$AF_HOME/db/oracle/oms/OMS_SeedData.sql
Creating an OCS Oracle DatabaseCreate a table space and execute the $AF_HOME/db/oracle/ocs/OCS_SCEMA_DDL.sql script.
1. Create the table space by modifying the file to assign proper table space name and location of thefile including the .dbf extension in the file $AF_HOME/db/oracle/oms/CreateTableSpace.sql.
2. Create the user and assign the table space by modifying the file $AF_HOME/db/oracle/oms/createOMSUser.sql and assign the proper username and password for every user and the tablespace to the user with proper quota size in the file.
3. Connect to SQL PLUS as an OCS database user. Execute the following SQL files in order:
a. Execute $AF_HOME/db/oracle/oms/OCS_SCHEMA_DDL.sql passing the tablespacename as aninput parameter.
For example,
● SQL> @$AF_HOME/db/oracle/oms/OCS_SCHEMA_DDL.sql <<tablespacename>>
Creating an OMS PostgreSQL Database for the Admin User and Default TenantCreate a PostgreSQL database for the admin user and default tenant user by configuring and executingthe $AF_HOME/db/postgreSQL/oms/setup.sh script.
Procedure
1. Open setup.sh in a suitable editor and update the following values in the script:
Property Update the Value for
PG_HOST PostgreSQL database host
23
TIBCO® Fulfillment Order Management Installation and Configuration

Property Update the Value for
PGPORT PostgreSQL port
pg_super_user_name PostgreSQL superuser name
pg_super_user_password PostgreSQL superuser password
Based on the following details, two new database users, schemas, databases andtablespaces will be created.
pg_oms_user New default tenant user
pg_oms_password Password for the default tenant
pg_oms_database Default tenant database name
pg_oms_schema Default tenant schema
pg_oms_tablespace Default tenant tablespace
pg_oms_tablespace_location Default tenant tablespace location
pg_admin_user New OMS admin user
This is not the administrator user.This is a OMS user which wouldhold tables related to the clusteradministration.
pg_admin_password Password for the OMS admin user
pg_admin_database OMS admin database name
pg_admin_schema OMS admin schema
pg_admin_tablespace OMS admin tablespace
pg_admin_tablespace_location OMS admin tablespace location
2. Save and close the file.3. Execute the setup.sh script.
Creating an OCS PostgreSQL DatabaseCreate a PostgreSQL table space and execute the $AF_HOME/db/postgreSQL/ocs/ocs_schema_ddl.sql script.
Procedure
1. Create a table space for the OCS database by running the following script: $AF_HOME/db/postgreSQL/oms/dbscripts/create_tablespace.sql.
2. Create the database user for OCS by running the following script: $AF_HOME/db/postgreSQL/oms/dbscripts/create_user.sql.
24
TIBCO® Fulfillment Order Management Installation and Configuration
3. Run the following script: $AF_HOME/db/PostgreSQL/ocs/ocs_schema_ddl.sql.
Or you can copy ocs_schema_ddl.sql to $AF_HOME/db/postgreSQL/oms/dbscripts and runsetup.sh or setup.cmd from $AF_HOME/db/postgreSQL/oms/.
Post-Installation Task 4: Creating the TIBCO EMS ChannelThe TIBCO EMS channel needs to be created in order to start the TIBCO Fulfillment OrderManagement 4.0 micro-services. In order to create the TIBCO EMS channels, execute the tibemsadmincommand.
1. Go to $EMS_HOME/bin and execute the following command:$ tibemsadmin -server tcp://localhost:7222 -user admin -script $AF_HOME/ems/AF_CreateEMSChannel.txt
Post-Installation Task 5: Integrating with TIBCO Fulfillment SubscriberInventory
TIBCO Fulfillment Order Management provides an inbuilt integration with TIBCO FulfillmentSubscriber Inventory. In order to use this component, configure the following properties in theConfigValues_OMS.xml file within the existing parent category "Orchestrator Configuration" and sub-category "Generic Configuration":
Procedure
1. The value of the following property should be set to true in order to enable integration withFulfillment Subscriber Inventory:<ConfValue description="Merge inventory in AOPD request" name="Merge inventory in AOPD request" propname="com.tibco.fom.oms.afi.aopd.merge.inventory" sinceVersion="3.0" visibility="Advanced" <ConfBool default="false" value="false"/></ConfValue>
2. The value of this property should be set in the format hostname:port indicating the server locationwhere Fulfillment Subscriber Inventory is deployed:<ConfValue description="Inventory service address" isHotDeployable="true" name="Host/Port for Inventory Service" propname="com.tibco.fom.oms.afi.aopd.merge.inventory.hostport" readonly="false" sinceVersion="3.0" visibility="Basic"> <ConfString default="localhost:8080" value="localhost:8080"/></ConfValue>
3. The value of this property should be set to the TIBCO Fulfillment Subscriber Inventory user withadministrator privileges. The username should be of the format username@enterprise_name:<ConfValue description="Inventory service username" isHotDeployable="true" name="Inventory service username" propname="com.tibco.fom.oms.afi.aopd.merge.inventory.username" readonly="false" sinceVersion="3.0" visibility="Basic"> <ConfString default="admin@enterprise" value="admin@enterprise"/></ConfValue>
4. The value of this property should be set to the password corresponding to the TIBCO FulfillmentSubscriber Inventory user being used to fetch inventory information:<ConfValue description="Inventory service password" isHotDeployable="true" name="Inventory service password" propname="com.tibco.fom.oms.afi.aopd.merge.inventory.password" readonly="false" sinceVersion="3.0" visibility="Basic"> <ConfString default="admin" value="admin"/> </ConfValue>
25
TIBCO® Fulfillment Order Management Installation and Configuration
Post-Installation Task 6: Backing up TDS-AF_Orchestrator_ForDesigner.projlib
Take a back up of TDS-AF_Orchestrator_ForDesigner.projlib, present under $AF_HOME/be/projectLibs directory, in TestHarness, and then import the new projlib in TestHarness to get theupdated $AF_HOME/schemas/schema/orchestrator/sharedResources/schemas/applicationProperties/planApplicationProperties.sharedjmsapp ororderApplicationProperties in which the application does not have "ns" any more and "nm" isoptional.
Post-Installation Task 7: Starting the TIBCO FOM EnginesStart the TIBCO Fulfillment Order Management engines you are using (AOPD, OCS, omsServer,OMSUI, and OPE):
● Go to $AF_HOME/roles/<AOPD, OCS, omsServer, OMSUI, and OPE>/standalone/bin andrun ./start.sh.
26
TIBCO® Fulfillment Order Management Installation and Configuration

Configuring and Verifying Installation
After installation and post-installation tasks, a set of steps are supposed to be performed to ensuresuccessful installation of TIBCO Fulfillment Order Management. Configuring and verifying installationdeals with tasks like configuring the database and messaging, restarting the server, and verifying theinstallation.
Configuring the Database and Messaging Through ConfiguratorYou can configure the database for the default tenant and the admin database user for an Oracle orPostgreSQL database and configure the TIBCO EMS channel through FOM Configurator.
The database client and TIBCO EMS must be present on the machine where Configurator is deployed.Set the EMS_HOME and ORACLE_HOME (if using an Oracle database) environment variables andmake sure they point to TIBCO EMS and the Oracle client respectively.
Procedure
1. Go to $AF_HOME/roles/configurator/standalone/bin and run ./start.sh.
2. Start Configurator on a compatible browser with the following URL: http://<<IP>>:<<PORT>>and log into Configurator. The default port is 9090, and the default user name and password isadmin. You can change this user in $AF_HOME/roles/configurator/standalone/config/ConfigLogin.info.
3. Select Order Management System from the Select Configuration drop-down menu.
4. Click Messaging Configuration on the left side panel to configure the messaging.
5. After configuring the messaging, click the Advanced tab, and click Data Source Configuration toconfigure the OMS database for the admin user.
6. Click Data Source Configuration Default Tenant to configure the OMS database for the defaulttenant.
7. Click Archive Data Source Configuration to configure the OMS archive database.
8. Click OMS Persistence to configure the OMS Oracle or PostgreSQL database.
9. Click OMS User Interface to configure the OMS server host, OMS server port, and OMSUI port.
10. Click Web Service Configuration to configure the web service HTTP port.
11. Select OCS from the Select Configuration drop-down menu.
12. Select Member1 from left side panel, click the Advanced tab, and click OCS catalog directories toconfigure the catalog directory location.
13. From the same OCS Advanced tab, configure pricing host, pricing port, eligibility host, eligibilityport, OMSUI host and OMSUI port.
14. Click OCS Database to configure the database for the Order Capture System service.
See Database Configuration Properties for the OMS and OCS database configuration propertiesspecifically for an Oracle and PostgreSQL database.
27
TIBCO® Fulfillment Order Management Installation and Configuration

Database Configuration PropertiesThe following OMS and OCS database properties are the database configurations specifically for anOracle and a PostgreSQL database.
OMS Admin Data Source Configuration Properties
Property NameOracle Database PropertyValue
PostgreSQL DatabaseProperty Value
Pooled Data Source DriverClass Name
oracle.jdbc.driver.OracleD
river
org.postgresql.Driver
Pooled Data Source Port 1521 (default) 5432 (default)
Pooled Data Source Database orcl (default) admindb (default)
Pooled Data Source Username aff_admin (default) adminuser (default)
Pooled Data Source Schema N/A adminschema (default)
Pooled Data Source URL jdbc:oracle:thin:@//$
{com.tibco.af.oms.pooledDa
taSource.host}:$
{com.tibco.af.oms.pooledDa
taSource.port}/$
{com.tibco.af.oms.pooledDa
taSource.database}
jdbc:postgresql://$
{com.tibco.af.oms.pooledD
ataSource.host}:$
{com.tibco.af.oms.pooledD
ataSource.port}/$
{com.tibco.af.oms.pooledD
ataSource.database}?
currentSchema=$
{com.tibco.af.oms.pooledD
ataSource.postgres.schema
}
Pooled Data Source ValidationQuery
select 1 from dual SELECT 1
Pooled Database ConnectionProperty
oracle.jdbc.ReadTimeout=12
0000
N/A
OMS Default Tenant Data Source Configuration Properties
Property NameOracle Database PropertyValue
PostgreSQL DatabaseProperty Value
Pooled Data Source DriverClass Name
oracle.jdbc.driver.OracleD
river
org.postgresql.Driver
Pooled Data Source Port 1521 (default) 5432 (default)
Pooled Data Source Database orcl (default) fomdb (default)
Pooled Data Source Username aff_oms (default) fomuser (default)
Pooled Data Source Schema N/A fomschema (default)
28
TIBCO® Fulfillment Order Management Installation and Configuration

Property NameOracle Database PropertyValue
PostgreSQL DatabaseProperty Value
Pooled Data Source URL jdbc:oracle:thin:@//$
{com.tibco.af.oms.pooledDa
taSource.host}:$
{com.tibco.af.oms.pooledDa
taSource.port}/$
{com.tibco.af.oms.pooledDa
taSource.database}
jdbc:postgresql://$
{com.tibco.af.oms.pooledD
ataSource.host}:$
{com.tibco.af.oms.pooledD
ataSource.port}/$
{com.tibco.af.oms.pooledD
ataSource.database}?
currentSchema=$
{com.tibco.af.oms.pooledD
ataSource.postgres.schema
}
Pooled Data Source ValidationQuery
select 1 from dual SELECT 1
Pooled Database ConnectionProperty
oracle.jdbc.ReadTimeout=12
0000
N/A
OMS Archive Data Source Configuration Properties
Property NameOracle Database PropertyValue
PostgreSQL DatabaseProperty Value
Pooled Data Source DriverClass Name
oracle.jdbc.driver.OracleD
river
org.postgresql.Driver
Pooled Data Source Port 1521 (default) 5432 (default)
Pooled Data Source URL jdbc:oracle:thin:@//$
{com.tibco.af.oms.pooledDa
taSource.host}:$
{com.tibco.af.oms.pooledDa
taSource.port}/$
{com.tibco.af.oms.pooledDa
taSource.database}
jdbc:postgresql://$
{com.tibco.af.oms.pooledD
ataSource.host}:$
{com.tibco.af.oms.pooledD
ataSource.port}/$
{com.tibco.af.oms.pooledD
ataSource.database}?
currentSchema=$
{com.tibco.af.oms.pooledD
ataSource.postgres.schema
}
Pooled Data Source ValidationQuery
select 1 from dual SELECT 1
OMS Data Persistence Configuration Properties
Property NameOracle Database PropertyValue
PostgreSQL DatabaseProperty Value
Database Type oracle postgres
29
TIBCO® Fulfillment Order Management Installation and Configuration

Property NameOracle Database PropertyValue
PostgreSQL DatabaseProperty Value
com.tibco.af.hibernate.dialect org.hibernate.dialect.Orac
le10gDialect
org.hibernate.dialect.Pos
tgreSQLDialect
Pooled Data Source URL jdbc:oracle:thin:@//$
{com.tibco.af.oms.pooledDa
taSource.host}:$
{com.tibco.af.oms.pooledDa
taSource.port}/$
{com.tibco.af.oms.pooledDa
taSource.database}
jdbc:postgresql://$
{com.tibco.af.oms.pooledD
ataSource.host}:$
{com.tibco.af.oms.pooledD
ataSource.port}/$
{com.tibco.af.oms.pooledD
ataSource.database}?
currentSchema=$
{com.tibco.af.oms.pooledD
ataSource.postgres.schema
}
Pooled Data Source ValidationQuery
select 1 from dual SELECT 1
OCS Data Source Configuration Properties
Property NameOracle Database PropertyValue
PostgreSQL DatabaseProperty Value
Pooled Data Source DriverClass Name
oracle.jdbc.driver.OracleD
river
org.postgresql.Driver
Pooled Data Source Port 1521 (default) 5432 (default)
Pooled Data Source Database orcl (default) ocsdb (default)
Pooled Data Source Username aff_ocs (default) ocsuser (default)
Pooled Data Source Schema forpostgres
N/A ocsschema (default)
Pooled Data Source URL jdbc:oracle:thin:@//$
{com.tibco.af.oms.pooledDa
taSource.host}:$
{com.tibco.af.oms.pooledDa
taSource.port}/$
{com.tibco.af.oms.pooledDa
taSource.database}
jdbc:postgresql://$
{com.tibco.af.oms.pooledD
ataSource.host}:$
{com.tibco.af.oms.pooledD
ataSource.port}/$
{com.tibco.af.oms.pooledD
ataSource.database}?
currentSchema=$
{com.tibco.af.oms.pooledD
ataSource.postgres.schema
}
Pooled Data Source ValidationQuery
select 1 from dual SELECT 1
30
TIBCO® Fulfillment Order Management Installation and Configuration
Property NameOracle Database PropertyValue
PostgreSQL DatabaseProperty Value
Hibernate dialect org.hibernate.dialect.Orac
le10gDialect
org.hibernate.dialect.Pos
tgreSQLDialect
Hibernate Default Catalog aff_ocs (default) Ocsuser (default)
Restarting the Server
1. To restart the OMS server go to the $AF_HOME/roles/omsServer/standalone/bin directory andstop the service by running:$./stop.sh
2. Restart the service by running:$./start.sh
1. To restart the Configurator service go to the $AF_HOME/roles/configurator/standalone/bindirectory and stop the service by running$./stop.sh
2. Restart the service by running:$./start.sh
Verifying InstallationThis section provides instructions for verifying that TIBCO Fulfillment Order Management hasinstalled correctly and for verifying the connectivity between various components. TheAF_TestHarness project referred in this section is intended for testing only.
You must have TIBCO ActiveMatrix BusinessWorks installed on your machine to use the TestHarness.
Procedure
1. After performing installation and post-installation steps for TIBCO Fulfillment Order Managementengines, start and verify that the following server has been started or deployed without any errors.To start the OMS server, perform the following steps:
1. To start the server, run the following command:
$cd $AF_HOME/roles/omsServer/standalone/bin$./start.sh
2. Open the AF_TestHarness project available in $AF_HOME/samples/TestHarness/AF_TestHarness.zip using TIBCO Designer. Import AF_Orchestrator_ForDesigner.projlibavailable under the $AF_HOME/be/projectLibs directory. Save the project asAF_TestHarness_Test to localize all the resources from the imported libraries and to update therequired global variables values.
3. Change the values of global variables related to JMS connection parameters for Orchestrator and thetest harness output directory path as shown in the following figures.
31
TIBCO® Fulfillment Order Management Installation and Configuration
JMS Connection Parameters for Orchestrator
The AF_TestHarness project contains several BW processes integrating with AF Orchestrator orOMS Server components over the JMS channels as according to the following list. These are the stubprocesses just to show how the integration is done, and to have an end-to-end run.
● process component stubs (execute, suspend, activate)
● error handler stub
● pre-qualification failed handler stub
● status notification subscriber stubs
All these processes log the relevant details (for example, execution request payload) in differentfiles. These files are created under the directory named as orderref of the corresponding order.These directories are created under a parent directory whose path is configured in testhHarness/outputPath global variable.
4. Start the following starter processes in TIBCO Designer.
32
TIBCO® Fulfillment Order Management Installation and Configuration
Starting Processes
Orchestrator Notifications Listener Processes:
● utilities/notifications/orderAmendmentNotification.process
● utilities/notifications/orderLineNotification.process
● utilities/notifications/orderNotification.process
● utilities/notifications/planDevelopmentNotification.process
● utilities/notifications/planItemNotification.process
● utilities/notifications/planNotification.process
These processes subscribe to the various notification events from the Orchestrator. Using theseevents the exact state of the order/plan can be known.
The publishing of status change notifications for each entity is not enabled in Orchestratorout of the box. In order to subscribe to the status change notifications using the abovementioned processes, the notification publishing must be enabled for each entity using therespective flags. These flags are available in the Orchestrator Configuration > GenericConfiguration category in the Configurator UI.
Orchestrator Task Stubs:
● utilities/stubs/planItemActivateStub
● utilities/stubs/planItemExecuteStub
● utilities/stubs/planItemSuspendStub
The process planItemExecuteStub is a dummy process component implementation. It calls a defaultprocess that gets and sets plan/planItem data using JMS based data acess interfaces and finallysends an execution success response to Orchestrator. The planItemSuspendStub andplanItemActivateStub processes are used for testing the order amendments functionality.
5. Verify that the following queues or topics are up and have listeners:
● tibco.aff.oms.ordersService
● tibco.aff.catalog.planfragment.request
33
TIBCO® Fulfillment Order Management Installation and Configuration
● tibco.aff.catalog.product.request
6. Publish the following models:
Model Send Model on Queue Sample Located In
Product Model tibco.aff.catalog.product.reques
t
$AF_HOME/samples/Models/
ProductModel.xml
Plan FragmentModel
tibco.aff.catalog.planfragment.r
equest
$AF_HOME/samples/Models/
PlanFragmentModel.xml
To send the model on the queue, the content of the model should be sent on the queue.
7. Use only UTF-8 encoding type in the web service request.
Submit a dummy order through SOAP1over HTTP 2, or SOAP over JMS to the OMS serveraccording to the SubmitOrderRequest sample located at $AF_HOME/samples/Webservice/SubmitOrderRequest.xml. Use the WSDL available at $AF_HOME/schemas/wsdl/http/OrderServiceHTTP.wsdl or $AF_HOME/schemas/wsdl/jms/OrderServiceJMS.wsdl to submitorders. For instance, http://localhost:8080/api/orderService?wsdl.
8. Verify that the jobs of various processes selected in the test harness are created. TheplanItemExecute stub acts as the basic process component which processes and responds to theexecution request sent by Orchestrator for each plan item.
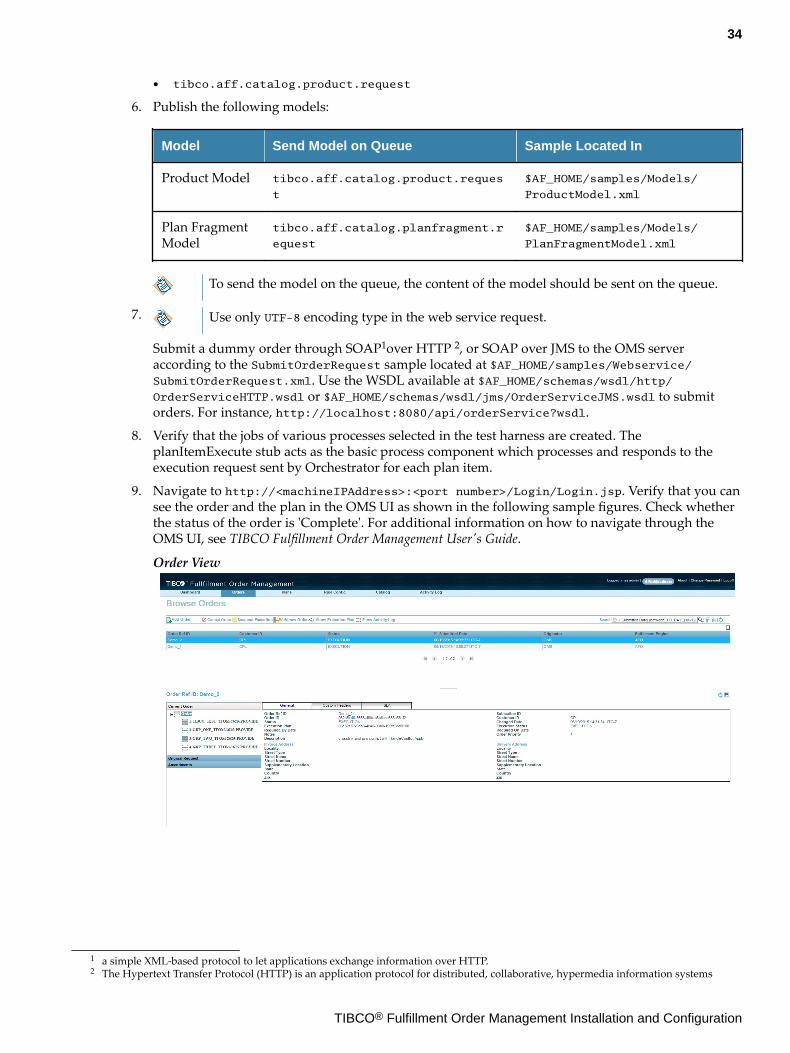
9. Navigate to http://<machineIPAddress>:<port number>/Login/Login.jsp. Verify that you cansee the order and the plan in the OMS UI as shown in the following sample figures. Check whetherthe status of the order is 'Complete'. For additional information on how to navigate through theOMS UI, see TIBCO Fulfillment Order Management User's Guide.
Order View
1 a simple XML-based protocol to let applications exchange information over HTTP.2 The Hypertext Transfer Protocol (HTTP) is an application protocol for distributed, collaborative, hypermedia information systems
34
TIBCO® Fulfillment Order Management Installation and Configuration

Plan Grid View
Plan Gantt View
35
TIBCO® Fulfillment Order Management Installation and Configuration
TIBCO Fulfillment Order Management Upgrade
This section is relevant for users who have TIBCO Fulfillment Order Management 3.0.2 version withhotfix 4 to fulfill the orders and are now upgrading the software to the new version TIBCO FulfillmentOrder Management 4.0. While it is important to upgrade the software or environment to the morerecent versions to exploit more efficient approach and processes for business benefits, it is equallyimportant to preserve the business data during the system upgrade. This chapter provides all thenecessary steps and precautions to be taken while migrating from TIBCO Fulfillment OrderManagement 3.0.2 HF-4 to TIBCO Fulfillment Order Management 4.0.
Upgrade from Version 3.0.2 HF-4 to Version 4.0The following are the major steps required for migrating from TIBCO Fulfillment Order Management3.0.2 HF-4 to 4.0:
Users must install TIBCO Fulfillment Order Management 3.0.2 HF-4 on top of version 3.0.2.
Because TIBCO Fulfillment Order Management 4.0 and onwards only supports partitioned databases,users must ensure that the TIBCO Fulfillment Order Management 3.0.2 HF-4 database gettingupgraded is a partitioned database. For steps on partitioning the database, see Converting from a Non-Partitioned Database to a Partitioned Database.
1. Prepare TIBCO Fulfillment Order Management 3.0.2 HF-4 for the upgrade.
2. Backup the database.
3. Install TIBCO Fulfillment Order Management 4.0.
4. Create databases for TIBCO Fulfillment Order Management 4.0.
5. Migrate the database.
6. Create the TIBCO EMS channel.
7. Shred out the database privilege (optional).
8. Review the possible changes in process components.
9. Start the TIBCO Fulfillment Order Management 4.0 environment.
Converting from a Non-Partitioned Database to a Partitioned DatabaseExecute $AF_HOME/db/oms/nonpartition-to-partition-migration.sql to convert your non-partitioned database to a partitioned database.
Prerequisites
1. The TIBCO Fulfillment Order Management 3.0.2 database is non-partitioned.
2. Execute privileges on the DBMS_REDEFINITION package (granted toEXECUTE_CATALOG_ROLE)
3. User running the script requires the following privileges:
● CREATE ANY TABLE
● ALTER ANY TABLE
● DROP ANY TABLE
● LOCK ANY TABLE
● SELECT ANY TABLE
36
TIBCO® Fulfillment Order Management Installation and Configuration
● CREATE ANY TRIGGER
● CREATE ANY INDEX
OR database admin privileges.
Procedure
● Go to the $AF_HOME/db/oms directory and execute the nonpartition-to-partition-migration.sql script as:SQL> @nonpartition-to-partition-migration.sql <user name> <table space name>
Result
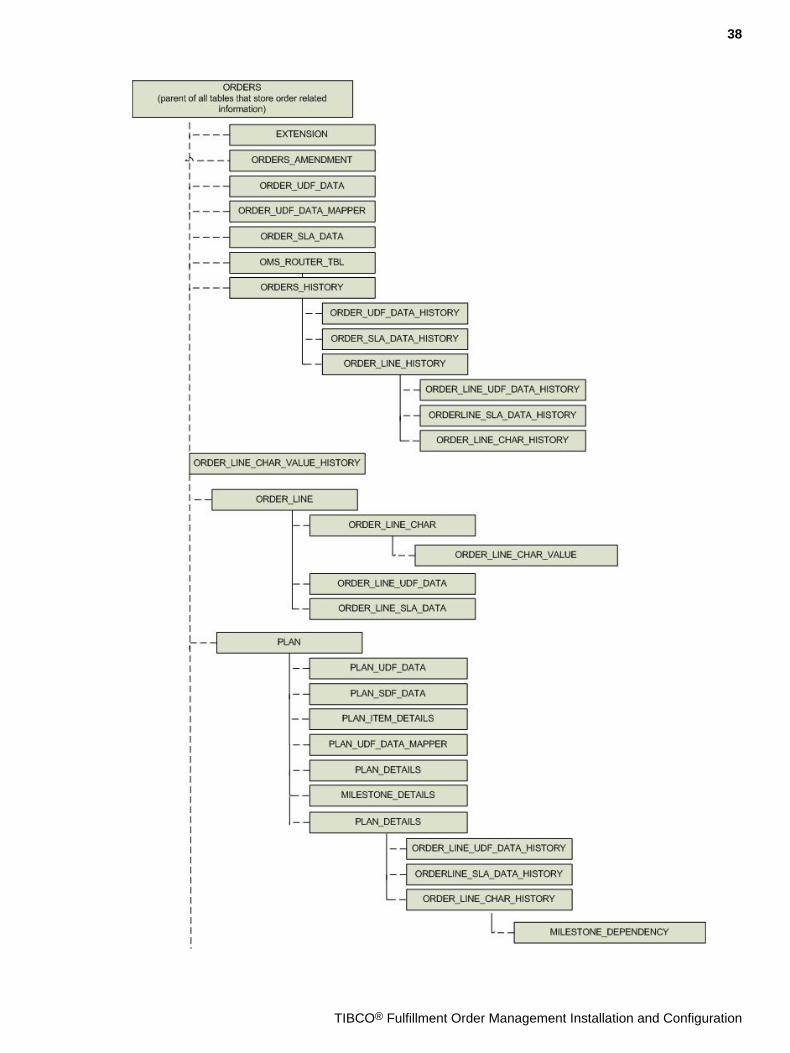
After running the script, slight modification is done to the existing table relationships to create ahierarchy tree in the OMS database where the ORDERS table is now a parent of all the order relatedtables. The ORDERS table is RANGE partitioned on the basis of the "partition date" column. This is anew column introduced as part of partition migration. This column has the same value of the submitteddate and is populated upon order submission.
The following image shows how the OMS tables are related to each other. For example, the childrelationship between ORDERS and ORDERS_AMENDMENT signifies foreign key constraint from theORDERS to ORDERS_AMENDMENT table.
37
TIBCO® Fulfillment Order Management Installation and Configuration
38
TIBCO® Fulfillment Order Management Installation and Configuration
With a partitioned database, whenever a database purge is needed, the database admin can perform a"drop partition" activity to clean up the database. Dropping partitions from the ORDERS table cascadesthe drop partition event to all its child tables and removes all the order related data from all the tablesfor that partition.
For more information, see "Database Partitioning" in the TIBCO Fulfillment Order ManagementAdministration Guide.
Preparing Messages for the UpgradeThis topic describes all the necessary steps that must be carried out before starting the upgrade toTIBCO Fulfillment Order Management 4.0.
The messages, corresponding to the in-process orders in 3.0.2 HF-4, will not be allowed to remain in thepending state on the respective queues. These messages must be processed using TIBCO FulfillmentOrder Management 3.0.2 HF-4 before upgrading. However there are couple of queues on whichmessages will be pending.
1. Stop the northbound system (for example, Siebel CRM) which sends the order request messages toTIBCO Fulfillment Order Management for fulfillment. Doing this ensures that there will not be anynew order messages coming on the queue tibco.aff.oms.ordersService. All the existingmessages must be processed by the OMS server component in 3.0.2 HF-4.
2. Stop the southbound process component systems which are integrated with Fulfillment OrderManagement for processing various requests for plan items such as execute request, suspendrequest, activate request, and milestone release request. Doing this ensures that there will be no newmessages coming on the following queues. All the existing messages must be processed byOrchestrator in 3.0.2 HF-4.
● tibco.aff.orchestrator.planItem.execute.reply
● tibco.aff.orchestrator.planItem.suspend.reply
● tibco.aff.orchestrator.planItem.milestone.notify.request
This also ensures that there will not be any new messages coming from process components on thefollowing queues associated with the JMS based data access interfaces which are used to get theorder data and get or set the plan/plan item data from OMS. All the existing messages must beprocessed by OMS server in 3.0.2 HF-4.
● tibco.aff.tds.order.read.request
● tibco.aff.tds.plan.request
● tibco.aff.tds.plan.read.request
Keep the TIBCO Fulfillment Order Management 3.0.2 HF-4 components running for the appropriatetime duration to let them process all pending messages associated with the in-flight orders on theirinbound queues. The details for all the important queues are as follows:
1. Ensure that there are no messages pending on the following queues related to the various types oforder requests submitted to Orchestrator:
● tibco.aff.orchestrator.order.submit
● tibco.aff.orchestrator.order.suspend
● tibco.aff.orchestrator.order.activate
● tibco.aff.orchestrator.order.withdraw
2. If the order feasibility check is enabled in the Orchestrator configuration, ensure that there are nomessages pending on the following queues. The external feasibility provider component shouldprocess all the request messages and Orchestrator should process all the reply messages.
39
TIBCO® Fulfillment Order Management Installation and Configuration
● tibco.aff.orchestrator.provider.order.feasibility.request
● tibco.aff.orchestrator.provider.order.feasibility.reply
3. Ensure that there are no messages pending on any of the following queues that are used for theintegration between Orchestrator and the standalone AOPD components for execution plangeneration. There will not be messages on any of these queues if AOPD component is deployed inAOPD_colocated mode which is specified as default in the $AF_HOME/config/profiles.properties file.
● tibco.aff.orchestrator.provider.order.opd.request
● tibco.aff.ocv.events.plan.new.request
● tibco.aff.ocv.events.plan.amend.request
● tibco.aff.ocv.events.newplan.reply
● tibco.aff.ocv.events.amendplan.reply
● tibco.aff.orchestrator.provider.order.opd.reply
4. If order prequalification handling is enabled in Orchestrator configuration, ensure that there are nomessages pending on the following queues. The external prequalification failed request handlershould process all the request messages and Orchestrator should process all the reply messages.
● tibco.aff.orchestrator.provider.order.prequal.failed.request
● tibco.aff.orchestrator.provider.order.prequal.failed.reply
5. Ensure that there are no messages pending on any of the following queues that are used forintegration between Orchestrator and the external plan item error handler component forprocessing the failed plan item requests.
● tibco.aff.orchestrator.provider.planItem.failed.request
● tibco.aff.orchestrator.provider.planItem.failed.reply
6. Ensure that there are no messages pending on the following queue that is used by the externalsystems to release the external dependencies on the plan items. All the messages must be processedby Orchestrator.
● tibco.aff.orchestrator.planItem.externalDependency.release.request
7. Ensure that there are no messages pending on the following queue that are used by Orchestrator forinternal processing.
● tibco.aff.orchestrator.cache.addEvent
● tibco.aff.orchestrator.cache.cleanup
Considering the pending messages on all the earlier mentioned queues are processed by the respectiveTIBCO Fulfillment Order Management components, there will be messages pending only on thefollowing queues. These are the outbound queues for Orchestrator to send various requests for planitems to the process components. The messages on these queues will be processed once the processcomponent systems are started after the upgrade.
● tibco.aff.orchestrator.planItem.execute.request
● tibco.aff.orchestrator.planItem.suspend.request
● tibco.aff.orchestrator.planItem.activate.request
● tibco.aff.orchestrator.planItem.milestone.release.request
If the requestReply header property was set to false in the GetOrder, GetPlan, GetPlanItem, SetPlan orSetPlanItem data access requests, there will be messages pending on either of the following queues oron the queues passed as replyTo destinations in the requests. These are also the outbound queues for
40
TIBCO® Fulfillment Order Management Installation and Configuration

the OMS server and the pending messages on these queues will also be processed once the processcomponent systems are started after the upgrade.
● tibco.aff.tds.order.reply
● tibco.aff.tds.plan.reply
After ensuring that no further processing is going on in any of the servers of TIBCO Fulfillment OrderManagement 3.0.2 HF-4, they can be shut down. Also, shutdown all the external components, such asfeasibility provider, pre-qualification failed request handler, external OPD, plan item error handlercomponent, and so on.
Backing Up the DatabaseSince the upgrade involves changes in the database, make sure to backup the OMS database instancethat has been used by TIBCO Fulfillment Order Management 3.0.2 HF-4.
Installing TIBCO Fulfillment Order Management 4.0This topic describes Fulfillment Order Management 4.0 installation for the migration process.
1. To install Fulfillment Order Management 4.0, see Installing in GUI Mode, Installing in ConsoleMode, or Installing in Silent Mode.
Fulfillment Order Management 4.0 is installed at the $TIBCO_HOME/af/4.0 location. Henceforth, itis referred to as $AF_HOME.
2. Update the environment variables as per TIBCO Fulfillment Order Management 4.0 installation. Forexample:
● export AF_HOME = /opt/tibco/af/4.0
● export AF_CONFIG_HOME = $AF_HOME/roles/configurator/standalone/config
Creating Databases for TIBCO Fulfillment Order Management 4.0For TIBCO Fulfillment Order Management 4.0, you are required to have two databases: the admindatabase and the default tenant database. You are required to create a new admin database, and thebacked up TIBCO Fulfillment Order Management 3.0.2 HF-4 database is used as the default tenantdatabase.
Oracle SE databases are not supported for TIBCO Fulfillment Order Management 4.0 migration.
Procedure
1. Create the admin database by executing $AF_HOME/db/oracle/oms/OMS_AdminDatabase_DDL.sql
The "admin" database is just a naming convention that is used for this newly createddatabase. The user for the admin database should have the usual database rights asmentioned in $AF_HOME/db/oracle/oms/createOMSUser.sql.
2. Grant the existing database user on TIBCO Fulfillment Order Management 3.0.2 HF-4 the rights tocreate a database link by logging into the Oracle database as sysdba and execute: SQL> GRANT CREATE DATABASE LINK TO <fom-302-db-user>;
Your 3.0.2 HF-4 database will be migrated to the default tenant database.
41
TIBCO® Fulfillment Order Management Installation and Configuration
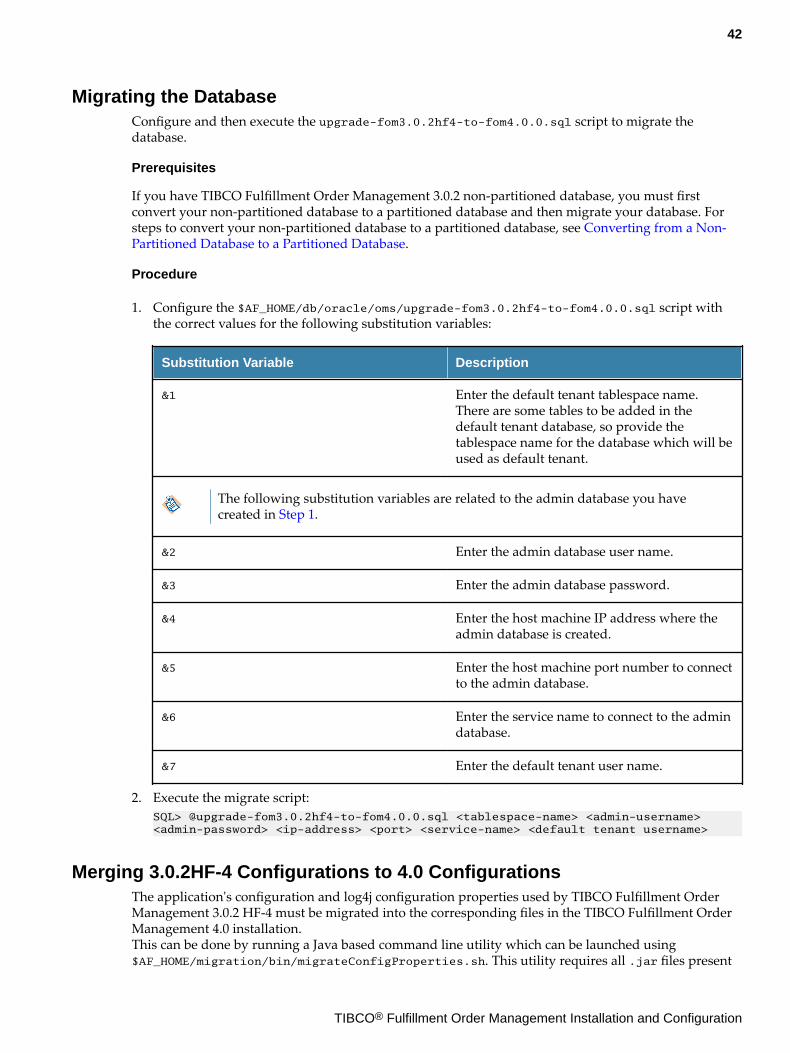
Migrating the DatabaseConfigure and then execute the upgrade-fom3.0.2hf4-to-fom4.0.0.sql script to migrate thedatabase.
Prerequisites
If you have TIBCO Fulfillment Order Management 3.0.2 non-partitioned database, you must firstconvert your non-partitioned database to a partitioned database and then migrate your database. Forsteps to convert your non-partitioned database to a partitioned database, see Converting from a Non-Partitioned Database to a Partitioned Database.
Procedure
1. Configure the $AF_HOME/db/oracle/oms/upgrade-fom3.0.2hf4-to-fom4.0.0.sql script withthe correct values for the following substitution variables:
Substitution Variable Description
&1 Enter the default tenant tablespace name.There are some tables to be added in thedefault tenant database, so provide thetablespace name for the database which will beused as default tenant.
The following substitution variables are related to the admin database you havecreated in Step 1.
&2 Enter the admin database user name.
&3 Enter the admin database password.
&4 Enter the host machine IP address where theadmin database is created.
&5 Enter the host machine port number to connectto the admin database.
&6 Enter the service name to connect to the admindatabase.
&7 Enter the default tenant user name.
2. Execute the migrate script:SQL> @upgrade-fom3.0.2hf4-to-fom4.0.0.sql <tablespace-name> <admin-username> <admin-password> <ip-address> <port> <service-name> <default tenant username>
Merging 3.0.2HF-4 Configurations to 4.0 ConfigurationsThe application's configuration and log4j configuration properties used by TIBCO Fulfillment OrderManagement 3.0.2 HF-4 must be migrated into the corresponding files in the TIBCO Fulfillment OrderManagement 4.0 installation.This can be done by running a Java based command line utility which can be launched using$AF_HOME/migration/bin/migrateConfigProperties.sh. This utility requires all .jar files present
42
TIBCO® Fulfillment Order Management Installation and Configuration

in the $AF_HOME/migration/lib directory. The utility refers to the following two files from the$AF_HOME/migration/config directory:
● migrationIgnore.properties - This file contains the property name of the configurationproperties which are ignored during the migration. By default, there are only two configurationproperties which are ignored.
● MigrationLog4j.xml - This file contains the log4j configurations for the utility with the default loglevel set at INFO level. It can be changed to DEBUG for more granular logging.
This utility migrates the application's configuration properties for the following components in thementioned files:
● OmsServer and Orchestrator - $AF_HOME/roles/configurator/standalone/config/ConfigValues_OMS.xml
● AOPD - $AF_HOME/roles/configurator/standalone/config/ConfigValues_AOPD.xml
● JEOMS - $AF_HOME/roles/configurator/standalone/config/ConfigValues_JEOMS.xml
● OPE - $AF_HOME/roles/configurator/standalone/config/ConfigValues_OPE.xml
It also migrates the log4j configuration properties for the following components in the mentionedfiles:
● OmsServer, Orchestrator and JEOMS - $AF_HOME/roles/configurator/standalone/config/OMSServerLog4j.xml
● AOPD - $AF_HOME/roles/configurator/standalone/config/AOPDLog4j.xml
● OMSUI - $AF_HOME/roles/configurator/standalone/config/OMSUILog4j.xml
● OPE - $AF_HOME/roles/configurator/standalone/config/OPELog4j.xml
The utility writes the logs in the $AF_HOME/migration/logs/fom-property-migration.log file.
Procedure
1. Set the following three environment variables before running the utility. The utility fails with anerror message if any of the following environment variables are not set:a) JAVA_HOME- Path of Java installation, for example, /opt/Java/jdk1.8.0b) AF_HOME- Path of FOM 4.0.0 installation directory, for example, /opt/tibco/af/4.0c) OLD_AF_HOME- Path of FOM 3.0.2 installation directory, for example, /opt/tibco/af/3.0
2. Run the $AF_HOME/migration/bin/migrateConfigProperties.sh script.
3. If you were not using any custom values for the following properties, you must change the value forthese properties:a) Change the value for
name="GetOrderRequest receiver dead queue"
propname="com.tibco.fom.oms.tds.getorderrequest.receiver.deadqueue"
to
value="tibco.aff.oms.tds.order.read.request.dead"
b) Change the value for
name="GetPlan/GetPlanItem Request receiver dead queue"
propname="com.tibco.fom.oms.tds.getplanrequest.receiver.deadqueue"
to
value="tibco.aff.oms.tds.plan.read.request.dead"
c) Change the value for
43
TIBCO® Fulfillment Order Management Installation and Configuration
name="SetPlan/SetPlanItem Request receiver dead queue"
propname="com.tibco.fom.oms.tds.setplanrequest.receiver.deadqueue"
to
value="tibco.aff.oms.tds.plan.request.dead"
d) Change the value for
name="Cron Expression"
propname="com.tibco.af.oms.summaryDataCollection.scheduled.cronExpress"
to
value="0 0/10 * * * ?"
4. If you will be using containerized TIBCO Fulfillment Order Management services (using Dockercontainers to run the TIBCO Fulfillment Order Management services), then you must change thevalue for the following properties:
You need to make these changes even if you have custom values for the properties.
a) Change the value for
name="Discount catalog poller and WS directory"
propname="com.tibco.fom.oms.afi.offline.discount.directory"
to
value="/home/tibuser/tibco/af/discount"
b) Change the value for
name="Discount catalog import success poller and WS directory"
propname="com.tibco.fom.oms.afi.offline.discount.importsuccess.directory"
to
value="/home/tibuser/tibco/af/discount-success"
c) Change the value for
name="Discount catalog import failure poller and WS directory"
propname="com.tibco.fom.oms.afi.offline.discount.importfailure.directory"
to
value="/home/tibuser/tibco/af/discount-failure"
d) Change the value for
name="Price catalog poller and WS directory"
propname="com.tibco.fom.oms.afi.offline.price.directory"
to
value="/home/tibuser/tibco/af/price"
e) Change the value for
name="Price catalog import success poller and WS directory"
propname="com.tibco.fom.oms.afi.offline.price.importsuccess.directory"
to
value="/home/tibuser/tibco/af/price-success"
f) Change the value for
name="Price catalog import success poller and WS directory"
propname="com.tibco.fom.oms.afi.offline.price.importsuccess.directory"
to
value="/home/tibuser/tibco/af/price-failure"
g) Change the value for
44
TIBCO® Fulfillment Order Management Installation and Configuration

name="Action catalog poller and WS directory"
propname="com.tibco.fom.oms.afi.offline.action.directory"
to
value="/home/tibuser/tibco/af/action"
h) Change the value for
name="Action catalog import success poller and WS directory"
propname="com.tibco.fom.oms.afi.offline.action.importsuccess.directory"
to
value="/home/tibuser/tibco/af/action-success"
i) Change the value for
name="Action catalog import failure poller and WS directory"
propname="com.tibco.fom.oms.afi.offline.action.importfailure.directory"
to
value="/home/tibuser/tibco/af/action-failure"
j) Change the value for
name="Planfragment catalog poller and WS directory"
propname="com.tibco.fom.oms.afi.offline.planfragment.directory"
to
value="/home/tibuser/tibco/af/planfragment"
k) Change the value for
name="Planfragment catalog import success poller and WS directory"
propname="com.tibco.fom.oms.afi.offline.planfragment.importsuccess.directory"
to
value="/home/tibuser/tibco/af/planfragment-success"
l) Change the value for
name="Planfragment catalog import failure poller and WS directory"
propname="com.tibco.fom.oms.afi.offline.planfragment.importfailure.directory"
to
value="/home/tibuser/tibco/af/planfragment-failure"
m) Change the value for
name="Product catalog poller and WS directory"
propname="com.tibco.fom.oms.afi.offline.product.directory"
to
value="/home/tibuser/tibco/af/product"
n) Change the value for
name="Product catalog import success poller and WS directory"
propname="com.tibco.fom.oms.afi.offline.product.importsuccess.directory"
to
value="/home/tibuser/tibco/af/product-success"
o) Change the value for
name="Product catalog import failure poller and WS directory"
propname="com.tibco.fom.oms.afi.offline.product.importfailure.directory"
to
value="/home/tibuser/tibco/af/product-failure"
45
TIBCO® Fulfillment Order Management Installation and Configuration

Upgrading the TIBCO EMS ChannelTo upgrade the EMS Channels and add new TDS dead queues from 3.0.2 HF-4 to 4.0, execute the script$AF_HOME/ems/FOM_UpgradeEMSChannel_3.0.2HF4_to_4.0.0.txt.
Shredding the Database PrivilegeNow that you have completed the upgrade, you can shred out the database privilege given to thedatabase user. This is an optional task.
Procedure
● Log into the Oracle database as sysdba and execute:SQL> REVOKE CREATE DATABASE LINK FROM <fom-db-user>;
Possible Changes in Process ComponentsThis topic describes the changes that might need to be done in process component systems.
The codes and messages being returned in the responses of JMS based data access interfaces -GetOrder, GetPlan, GetPlanItem, SetPlan, and SetPlanItem - have been changed in TIBCO FulfillmentOrder Management. This has been done to make them consistent across all the interfaces, in messageheader and payload too. If the process component systems implementation has any logic on the basis ofthese values then it must be updated with the new ones. See the topic "Data Access Interfaces" in TIBCOFulfilment Order Management Users Guide for the details of the codes and messages being returned byeach interface in various situations.
Start the TIBCO Fulfillment Order Management 4.0 EnvironmentThis topic covers the steps to start the Fulfillment Order Management 4.0 environment:
Additional Configurations
Perform any additional configuration changes that are required using the Configurator web UI.
For example, Offer and Price Engine (OPE) requires the price and discount models for itsfunctionalities. So the offline catalog directories for loading these models in the application should beconfigured here.
Post-Installation Tasks
Perform the steps mentioned in the Post-Installation Tasks topic.
Cluster Setup
The migrated database already contains the cluster members that were running in the TIBCOFulfillment Order Management 3.0.2 HF-4 environment. For running additional micro-services in acluster or setting up a new cluster, refer to the "Deployment Topologies" section in the TIBCOFulfillment Order Management Administration Guide.
Start all required server instances to start the configured TIBCO Fulfillment Order Managementmembers in the cluster. Upon starting up, the engines will load the existing data models (product andaction) from the database. As per the model loading configurations (online or offline), the additionaldata models will be loaded in the application and will also be stored into the database as explained inthe "Data Models" section in TIBCO Fulfillment Order Management Administration Guide.
Monitor the logs of each member to ensure that all the members have started successfully. At this stagethe TIBCO Fulfillment Order Management 4.0 environment is ready to process any incoming requests,but since there are no pending messages, processing will not occur.
46
TIBCO® Fulfillment Order Management Installation and Configuration
Start External Components
Start the external components which integrate with Orchestrator through EMS and the ones that werestopped before the upgrade. This includes the following components:
1. Feasibility provider
2. Prequalification failed handler
3. External dependency releasing systems
4. Plan item error handler
Start Southbound Process Components
Start the process component system. The process components will start processing the plan item,execute, suspend, activate, and milestone release messages pending on the four outbound queues ofOrchestrator and will also send the corresponding reply messages to Orchestrator. Orchestrator willprocess the incoming reply messages to move the state of the corresponding plan items appropriately.Based on this, it will also schedule the requests for the further plan items in the execution plan to fulfillthe orders. With this way, the orders that were in-progress in Fulfillment Order Management 3.0.2 HF-4before the upgrade will be processed in TIBCO Fulfillment Order Management 4.0.
Start Northbound System
Start the northbound systems (for example, Siebel) to submit the new orders to be fulfilled usingFulfillment Order Management 4.0.
Update DOMAINMEMBERS Table
Update the value of the IS_STATIC column as per your own environment for each member in thecluster.
Start the TIBCO Fulfillment Order Management 4.0 Micro-Services
To start each micro-service, navigate to $AF_HOME/roles/<AOPD, OCS, omsServer, OMSUI, andOPE>/standalone/bin and run ./start.sh.
47
TIBCO® Fulfillment Order Management Installation and Configuration
Installation FAQs and Troubleshooting
This section can help you troubleshoot some common error messages that you may receive.
What should I do if the Enterprise Message Service destination creation fails while configuringFulfillment Order Management?
If TIBCO Enterprise Message Service is not installed on the same machine as Fulfillment OrderManagement, the destination creation fails. Create the destinations manually using the EnterpriseMessage Service Administration utility on the machine where Enterprise Message Service is installed.
For details, see $AF_HOME/ems/AF_CreateEMSChannel.txt (for non-OMS component). Another scriptis used for OMS located at $AF_HOME/ems/OMS_EmsConfiguration.txt.
What should I do when I get the "ORA-00942: table or view does not exist" error. I have created OMSdatabase using the Database Wizard and see the tables created correctly in the database. What couldbe the problem?
Ensure you have configured the hibernate.default_catalog property correctly. This property can beconfigured using the Configurator UI and is located at the following path: "Order management System-> Member 1 -> Persistence -> hibernate.default_catalog. The value of this property should be thedatabase user name of the OMS database.
What should I do if I get the following error related to the Oracle driver?
SEVERE: Error while registering Oracle JDBC Diagnosability MBean.
javax.management.MalformedObjectNameException: Invalid character ' ' in value part ofproperty
at javax.management.ObjectName.construct(ObjectName.java:602)
at javax.management.ObjectName.<init>(ObjectName.java:1394)
This could be an Oracle driver issue. Try downloading the drivers from OTN again. A patch has beenadded for fixing this issue. To know whether you have the patch, run:
java -jar ojdbc6.jar
● If the ojdbc6.jar contains the patch, the following is displayed:
Oracle 11.1.0.6.0-Production+ JDBC 4.0 complied with JDK6
● If the ojdbc6.jar does not contain the patch, the following is displayed:
Oracle 11.1.0.6.0-Production JDBC 4.0 complied with JDK6
What should I do to get the Hibernate component if the servers where Fulfillment OrderManagement will be deployed do not have Internet connectivity?
Download the product_tibco_hibernate_3.6.9.001.zip file from the http://public.tibco.com/pub/tibco_oss/hibernate/product_tibco_hibernate_3.6.9.001.zip location.
What should I do if I see the ORACLE related errors during migration?
Set of ORACLE errors are bound to occur if other scripts have already been executed. For example,purge scripts. Such ORACLE errors have been added to the ignore list and they do not cause themigration to fail. However, any error other than the defined list results in the database migrationfailure.
All the errors are logged in the $AF_HOME/migration/log/DBmigration<<dd-mm-yyhr:min:dec>>.log file:
48
TIBCO® Fulfillment Order Management Installation and Configuration
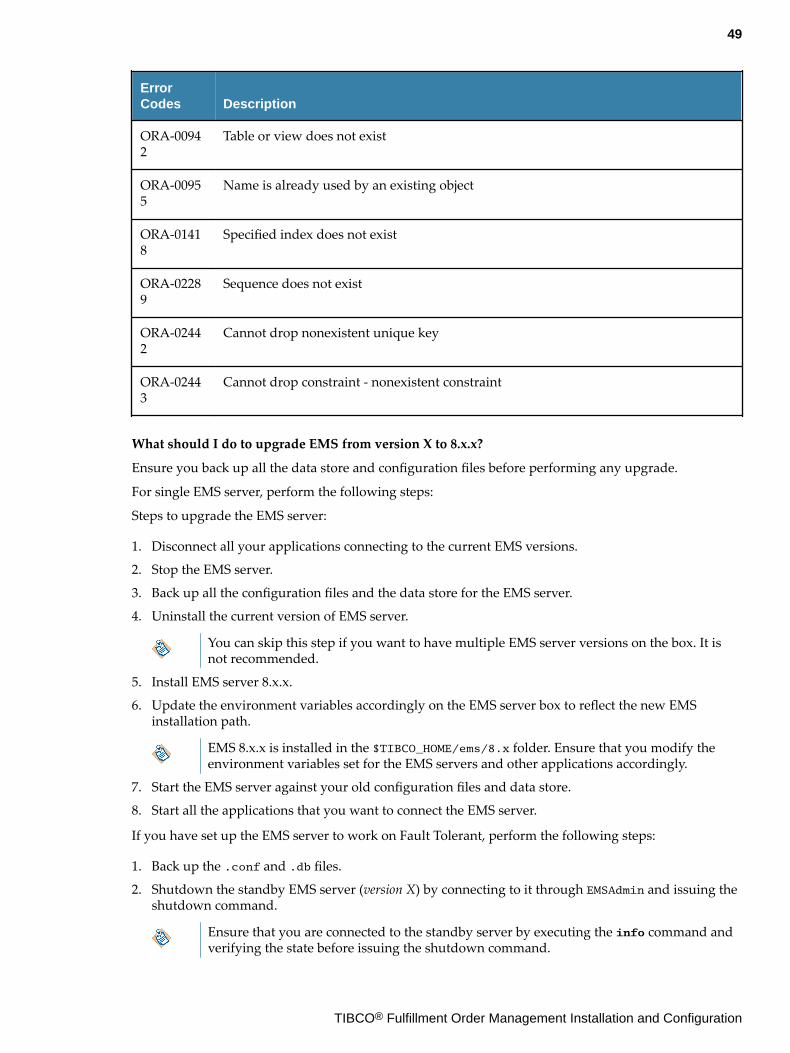
ErrorCodes Description
ORA-00942
Table or view does not exist
ORA-00955
Name is already used by an existing object
ORA-01418
Specified index does not exist
ORA-02289
Sequence does not exist
ORA-02442
Cannot drop nonexistent unique key
ORA-02443
Cannot drop constraint - nonexistent constraint
What should I do to upgrade EMS from version X to 8.x.x?
Ensure you back up all the data store and configuration files before performing any upgrade.
For single EMS server, perform the following steps:
Steps to upgrade the EMS server:
1. Disconnect all your applications connecting to the current EMS versions.
2. Stop the EMS server.
3. Back up all the configuration files and the data store for the EMS server.
4. Uninstall the current version of EMS server.
You can skip this step if you want to have multiple EMS server versions on the box. It isnot recommended.
5. Install EMS server 8.x.x.
6. Update the environment variables accordingly on the EMS server box to reflect the new EMSinstallation path.
EMS 8.x.x is installed in the $TIBCO_HOME/ems/8.x folder. Ensure that you modify theenvironment variables set for the EMS servers and other applications accordingly.
7. Start the EMS server against your old configuration files and data store.
8. Start all the applications that you want to connect the EMS server.
If you have set up the EMS server to work on Fault Tolerant, perform the following steps:
1. Back up the .conf and .db files.
2. Shutdown the standby EMS server (version X) by connecting to it through EMSAdmin and issuing theshutdown command.
Ensure that you are connected to the standby server by executing the info command andverifying the state before issuing the shutdown command.
49
TIBCO® Fulfillment Order Management Installation and Configuration
3. Restart the standby version 8.x.x EMS server having the same configuration setup as that of thestandby server. This locks the database files and becomes the standby server. The standby serverthen runs with the EMS version X.
4. Shutdown active version X EMS server by connecting to it through EMSAdmin and issuing theshutdown command.
This step activates the standby server, resulting in the shared state conversion to the 8.x.xversion. The active server then runs with the 8.x.x version.
5. View the active server log file to verify that the original standby server has been successfullyactivated.
6. To ensure that applications remain connected and they are processing messages, wait for a fewminutes.
7. Restart the previously active EMS server in standby mode with the 8.x.x EMS version with the sameconfiguration file of the previous active EMS server (version X).
8. To fail back to the original server, shut down the active server.
This step is optional. To ensure that both the EMS servers are able to become active duringfailover, start the standby EMS server to make both EMS servers run in FT mode.
What should I do if I get the following error message?"Resource Bundle Not found as perlocale - java.util.MissingResourceException: Can't find bundle for base name
com.tibco.mdm.properties.activecatalog.HierarchyMessages" in OMS-UI startup logs.
Ignore this message
What should I do if I want to run the spring boot service on IPv4 only?
Set the following parameter in order to change the network interface:export _JAVA_OPTIONS="-Djava.net.preferIPv4Stack=true"
50
TIBCO® Fulfillment Order Management Installation and Configuration