timber!|readingpillow - rachelrossi.design · puttingthepillowtogether 3 (11)place rectanglecon top...
TRANSCRIPT
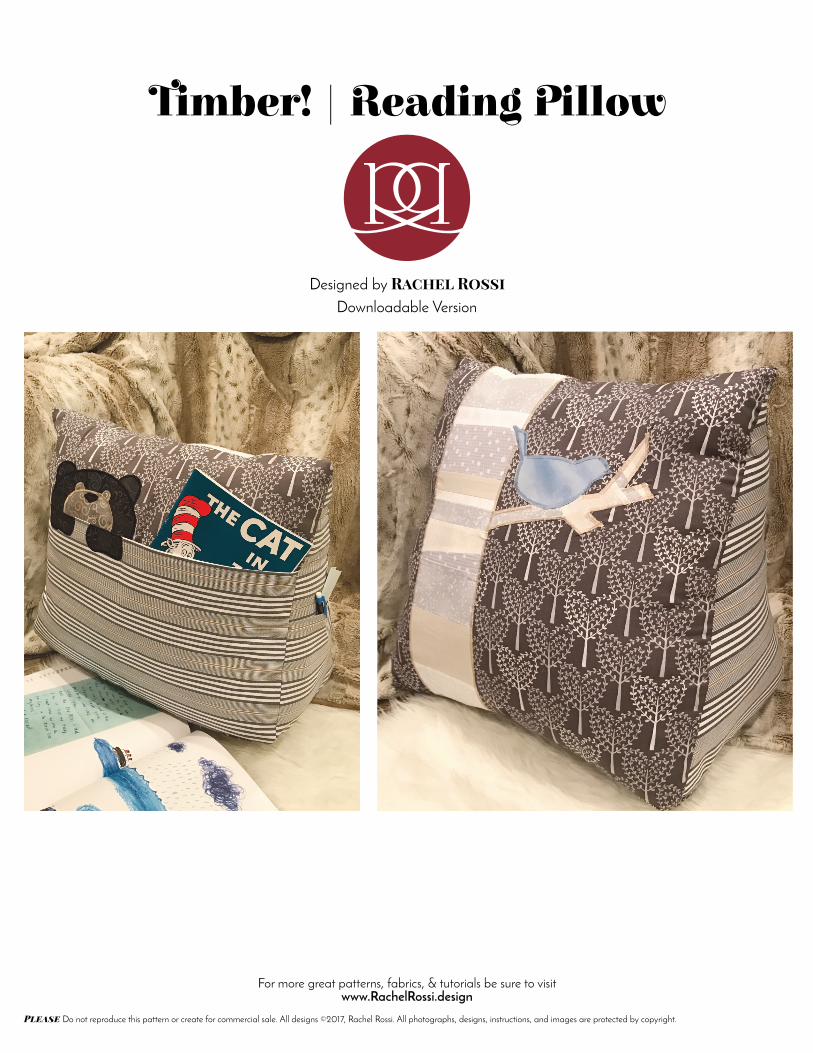
Timber! | Reading Pillow
Designed by Rachel RossiDownloadable Version
For more great patterns, fabrics, & tutorials be sure to visitwww.RachelRossi.design
Please Do not reproduce this pattern or create for commercial sale. All designs ©2017, Rachel Rossi. All photographs, designs, instructions, and images are protected by copyright.
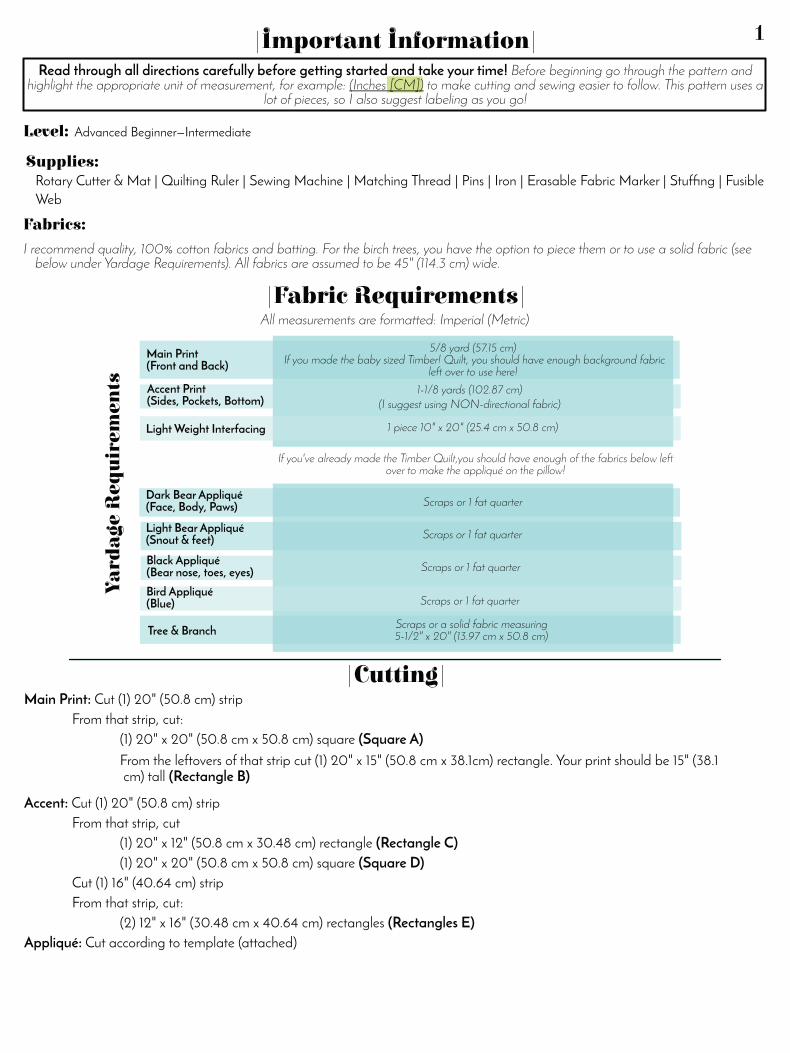
|Important Information|Read through all directions carefully before getting started and take your time! Before beginning go through the pattern and
highlight the appropriate unit of measurement, for example: (Inches [CM]) to make cutting and sewing easier to follow. This pattern uses alot of pieces, so I also suggest labeling as you go!
Level: Advanced Beginner—Intermediate
Supplies:Rotary Cutter & Mat | Quilting Ruler | Sewing Machine | Matching Thread | Pins | Iron | Erasable Fabric Marker | Stuffing | FusibleWeb
Fabrics:
I recommend quality, 100% cotton fabrics and batting. For the birch trees, you have the option to piece them or to use a solid fabric (seebelow under Yardage Requirements). All fabrics are assumed to be 45" (114.3 cm) wide.
1
All measurements are formatted: Imperial (Metric)
Main Print: Cut (1) 20" (50.8 cm) stripFrom that strip, cut:
(1) 20" x 20" (50.8 cm x 50.8 cm) square (Square A)From the leftovers of that strip cut (1) 20" x 15" (50.8 cm x 38.1cm) rectangle. Your print should be 15" (38.1cm) tall (Rectangle B)
Accent: Cut (1) 20" (50.8 cm) stripFrom that strip, cut
(1) 20" x 12" (50.8 cm x 30.48 cm) rectangle (Rectangle C)(1) 20" x 20" (50.8 cm x 50.8 cm) square (Square D)
Cut (1) 16" (40.64 cm) stripFrom that strip, cut:
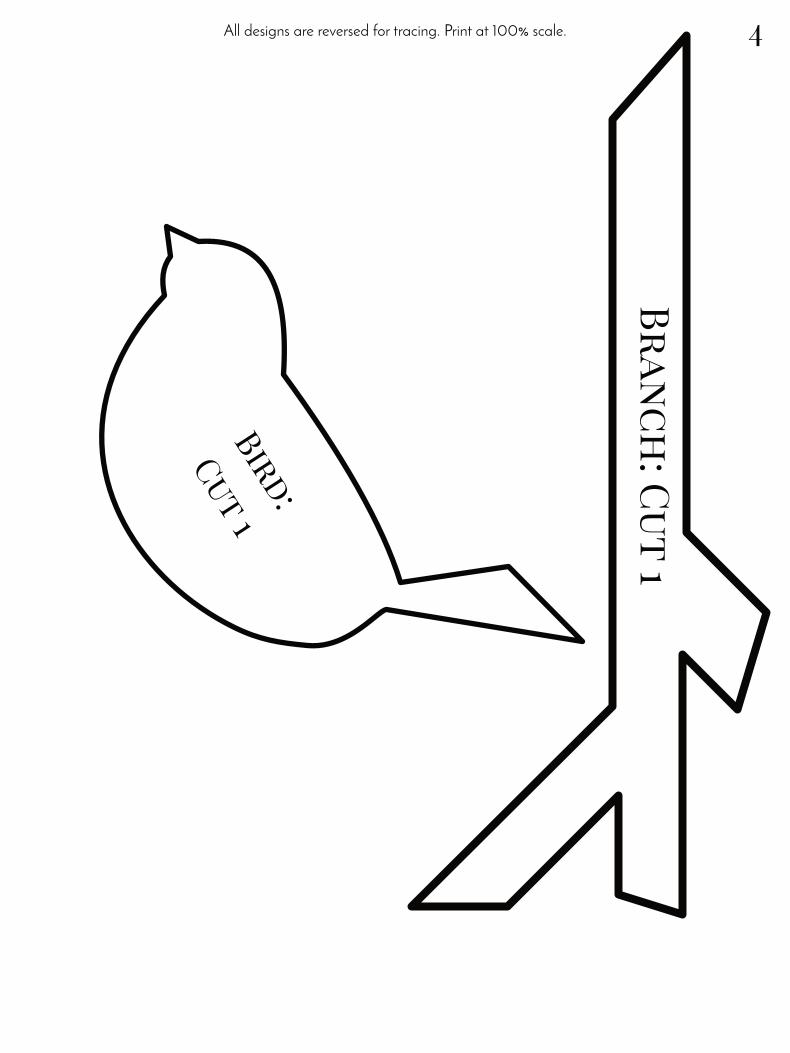
(2) 12" x 16" (30.48 cm x 40.64 cm) rectangles (Rectangles E)Appliqué: Cut according to template (attached)
|Cutting|
|Fabric Requirements|
Bird Appliqué(Blue)
Yardage
Requirem
ents
Main Print(Front and Back)
Black Appliqué(Bear nose, toes, eyes)
Tree & Branch
Light Bear Appliqué(Snout & feet)
Accent Print(Sides, Pockets, Bottom)
Dark Bear Appliqué(Face, Body, Paws)
5/8 yard (57.15 cm)If you made the baby sized Timber! Quilt, you should have enough background fabric
left over to use here!
Scraps or 1 fat quarter
Scraps or 1 fat quarter
If you've already made the Timber Quilt,you should have enough of the fabrics below leftover to make the appliqué on the pillow!
Scraps or 1 fat quarter
Light Weight Interfacing 1 piece 10" x 20" (25.4 cm x 50.8 cm)
1-1/8 yards (102.87 cm)(I suggest using NON-directional fabric)
Scraps or 1 fat quarter
Scraps or a solid fabric measuring5-1/2" x 20" (13.97 cm x 50.8 cm)
v
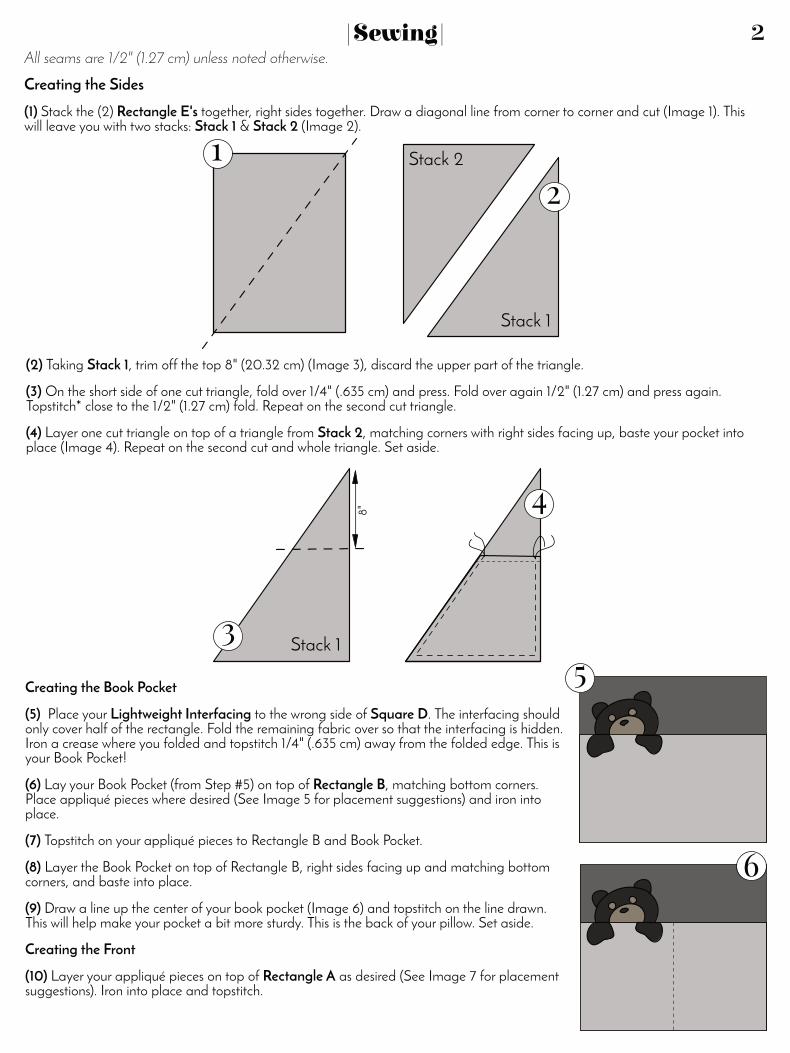
2All seams are 1/2" (1.27 cm) unless noted otherwise.
Creating the Sides
(1) Stack the (2) Rectangle E's together, right sides together. Draw a diagonal line from corner to corner and cut (Image 1). Thiswill leave you with two stacks: Stack 1 & Stack 2 (Image 2).
(2) Taking Stack 1, trim off the top 8" (20.32 cm) (Image 3), discard the upper part of the triangle.
(3) On the short side of one cut triangle, fold over 1/4" (.635 cm) and press. Fold over again 1/2" (1.27 cm) and press again.Topstitch* close to the 1/2" (1.27 cm) fold. Repeat on the second cut triangle.
(4) Layer one cut triangle on top of a triangle from Stack 2, matching corners with right sides facing up, baste your pocket intoplace (Image 4). Repeat on the second cut and whole triangle. Set aside.
Stack 2
Stack 1
Creating the Book Pocket
(5) Place your Lightweight Interfacing to the wrong side of Square D. The interfacing shouldonly cover half of the rectangle. Fold the remaining fabric over so that the interfacing is hidden.Iron a crease where you folded and topstitch 1/4" (.635 cm) away from the folded edge. This isyour Book Pocket!
(6) Lay your Book Pocket (from Step #5) on top of Rectangle B, matching bottom corners.Place appliqué pieces where desired (See Image 5 for placement suggestions) and iron intoplace.
(7) Topstitch on your appliqué pieces to Rectangle B and Book Pocket.
(8) Layer the Book Pocket on top of Rectangle B, right sides facing up and matching bottomcorners, and baste into place.
(9) Draw a line up the center of your book pocket (Image 6) and topstitch on the line drawn.This will help make your pocket a bit more sturdy. This is the back of your pillow. Set aside.
Creating the Front
(10) Layer your appliqué pieces on top of Rectangle A as desired (See Image 7 for placementsuggestions). Iron into place and topstitch.
|Sewing|
Stack 1
8"
12
3
4
5
6
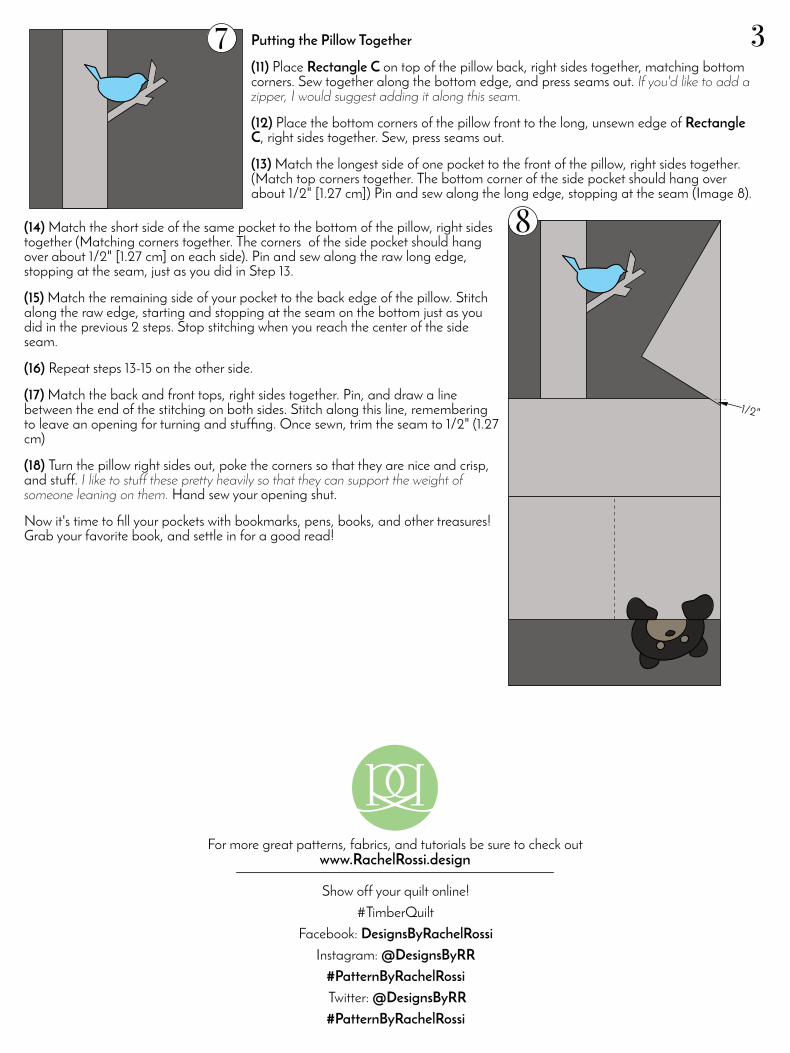
3Putting the Pillow Together
(11) Place Rectangle C on top of the pillow back, right sides together, matching bottomcorners. Sew together along the bottom edge, and press seams out. If you'd like to add azipper, I would suggest adding it along this seam.
(12) Place the bottom corners of the pillow front to the long, unsewn edge of RectangleC, right sides together. Sew, press seams out.
(13) Match the longest side of one pocket to the front of the pillow, right sides together.(Match top corners together. The bottom corner of the side pocket should hang overabout 1/2" [1.27 cm]) Pin and sew along the long edge, stopping at the seam (Image 8).
(14) Match the short side of the same pocket to the bottom of the pillow, right sidestogether (Matching corners together. The corners of the side pocket should hangover about 1/2" [1.27 cm] on each side). Pin and sew along the raw long edge,stopping at the seam, just as you did in Step 13.
(15) Match the remaining side of your pocket to the back edge of the pillow. Stitchalong the raw edge, starting and stopping at the seam on the bottom just as youdid in the previous 2 steps. Stop stitching when you reach the center of the sideseam.
(16) Repeat steps 13-15 on the other side.
(17) Match the back and front tops, right sides together. Pin, and draw a linebetween the end of the stitching on both sides. Stitch along this line, rememberingto leave an opening for turning and stuffing. Once sewn, trim the seam to 1/2" (1.27cm)
(18) Turn the pillow right sides out, poke the corners so that they are nice and crisp,and stuff. I like to stuff these pretty heavily so that they can support the weight ofsomeone leaning on them. Hand sew your opening shut.
Now it's time to fill your pockets with bookmarks, pens, books, and other treasures!Grab your favorite book, and settle in for a good read!
Show off your quilt online!#TimberQuilt
Facebook: DesignsByRachelRossiInstagram: @DesignsByRR
#PatternByRachelRossiTwitter: @DesignsByRR#PatternByRachelRossi
For more great patterns, fabrics, and tutorials be sure to check outwww.RachelRossi.design
7
1/2"
8
4
Branch:Cut1
All designs are reversed for tracing. Print at 100% scale.
Bird:
Cut1
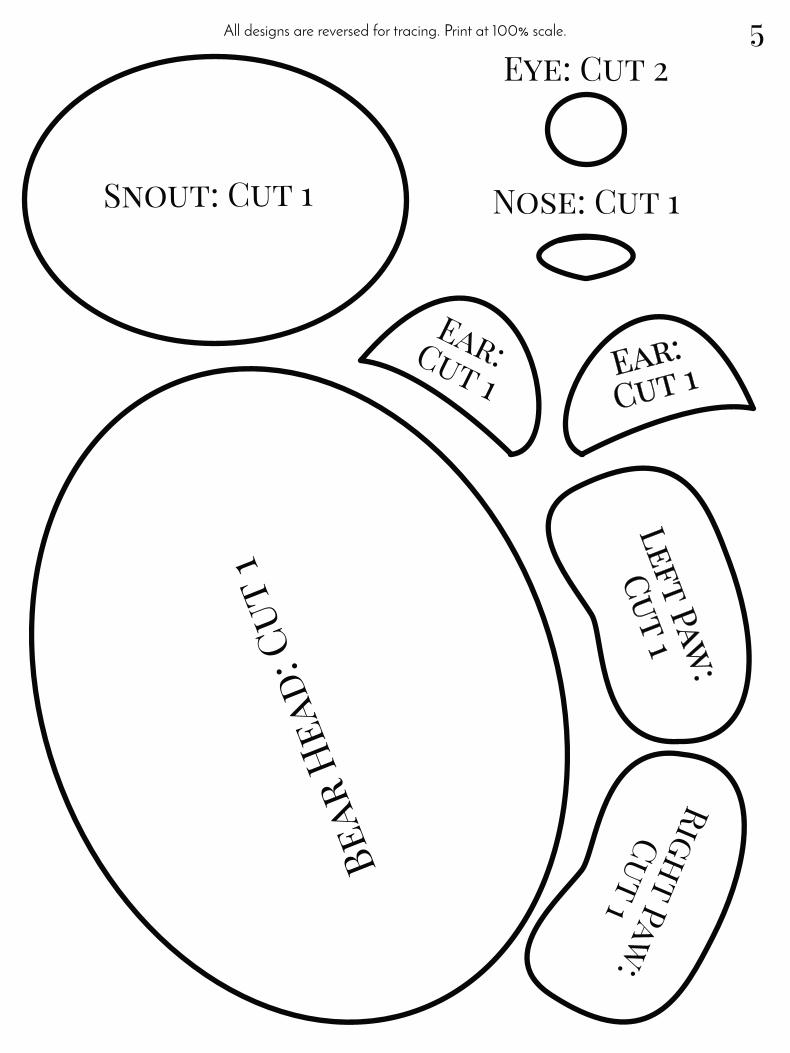
5All designs are reversed for tracing. Print at 100% scale.
Snout: Cut 1
Bear
Head:Cut
1
Ear:Cut 1
Ear:Cut 1
Eye: Cut 2Righ
tPaw
:Cut
1Nose: Cut 1
LeftPaw
:
Cut1