time keeper - sru | slippery rock university keeper version: 101603 ... click on the variant icon...
TRANSCRIPT

Time Keeper Version: 101603
Copyright 2003, Pennsylvania State System of Higher Education
All Rights Reserved
TIME KEEPER

Time Keeper Version: 101603
Copyright 2003, Pennsylvania State System of Higher Education
All Rights Reserved
i
TABLE OF CONTENTS
❑ CATS Initial Screen ............................................................................................. 1
Overview ......................................................................................................... 1
Objective ......................................................................................................... 1
Menu path ....................................................................................................... 1
Transaction code ............................................................................................. 1
Procedure (step-by-step) ................................................................................. 1
Practice assignment ......................................................................................... 5
Summary/Review ............................................................................................ 5
❑ CADO – Display Time Sheet .............................................................................. 6
❑ Printing A Time Statement ................................................................................ 14
❑ Personal Work Schedule .................................................................................... 19
❑ Appendix A: Transaction Quick-View ............................................................. 26
CATS Initial Screen ...................................................................................... 27

Time Keeper Version: 101603
Copyright 2003, Pennsylvania State System of Higher Education
All Rights Reserved
1
CATS INITIAL SCREEN
OVERVIEW
Managers and/or timekeepers input data into time sheets via the CATS (Cross-
Application Time Sheets) screen. Time data is stored in the CATS database and is
available for reporting. When someone (manager, supervisor, timekeeper) needs to
maintain time sheet information for an employee or group(s) of employees, he/she must
first enter data into the fields on the “Time Sheet: Initial Screen.” After doing so, the
system displays the Cross-Application Time Sheet in Data Entry mode.
OBJECTIVE
You will learn how to use CATS to maintain employee time sheets in this exercise.
MENU PATH
Human Resources Time Management Time Sheet Time Data CAT2 - Enter
TRANSACTION CODE
CAT2
PROCEDURE
Note: Procedural sequence numbers (1, 2, 2.1, etc.) denote an ACTION that you
should perform for proper execution of this exercise.
1. Logon to the SAP system and follow the Menu Path shown above.

Time Keeper Version: 101603
Copyright 2003, Pennsylvania State System of Higher Education
All Rights Reserved
2
2. On the screen “Time Sheet: Initial Screen,” enter information in the fields as
specified in the table below:
Field Name Description User Action and Values Comments
Data entry profile
The data entry profile determines the method of data entry, the layout of the data entry screen, and the following factors: - Whether times can be entered for individual employees or for groups of employees - Which data can be maintained (confirmations, services, etc.) - Whether time sheet data is entered on a daily, weekly or monthly basis - Whether or not the data entered is subject to approval
Will automatically be populated with SSHE-P.
Key date The Key date field will default to the current date. This date will trigger the pay week that will automatically appear on the “Time Sheet:: Data Entry View”.
Change date to match pay week you need to access.
Any date during a particular pay week can be used.
2.1. Select the employee by clicking in the blank field to the left of the employee‟s
personnel number. Click on the Enter Times icon at the top left of the
screen.

Time Keeper Version: 101603
Copyright 2003, Pennsylvania State System of Higher Education
All Rights Reserved
3
3. The “Time Sheet: Data Entry View” screen includes 7 days, or 1 pay week. The
„Data Entry‟ field gives you the begin/end dates for the pay week you are entering
information for. If you are inputting information for an entire biweekly pay
period, you need to access two “Time Sheet: Data Entry View” transactions. This
can be done by:
Using the „Key Date‟ field on the “Time Sheet: Initial Screen”, or
Using the front/back arrows at the top of the “Time Sheet: Data Entry
View”.
Pay week begin/end dates
Front/back arrows to move
from pay week to pay week

Time Keeper Version: 101603
Copyright 2003, Pennsylvania State System of Higher Education
All Rights Reserved
4
3.1. Complete the required fields as specified in the table below.
Field Name Description User Action and Values Comments
LT 1. Clock – „Target hours‟ indicates the totals for the scheduled hours on a weekly and daily basis and the scheduled from/to times for the daily work schedule.
2. E – „Totals Line‟ indicates the weekly and daily totals for additional attendances/absences. As each new attendance/absence line is added, this row will be updated to include all activity totals.
1. This information automatically defaults unless the employee is hourly.
2. This information automatically defaults based on input of additional attendances/absences for salaried employees, or all hours worked for hourly employees.
1. You have the option of „hiding‟ this field by selecting the F7 key.
2. You have the option of „hiding this field by selecting the F6 key.
A/A Attendances/Absences. Use the drop down box for applicable attendances/absences permissible for the employee‟s personnel sub area (bargaining unit).
Day and From/To
1. Each day in the pay week will be listed along with the calendar date. This column will reflect the total hours for the attendance/activity based on the input for the from/to fields.
2. Enter the starting time/ending time for the attendance/activity.
Required when additional attendances/absences are necessary for salaried employees, or to compensate hourly employees for attendances/absences.
If a full day of leave is taken, you have the option of just entering the total number of hours instead of the from/to information.
3.2. Click the “Save” button, .
Note: While on this screen, you can perform various functions. For example under the
Edit Menu, you can Insert lines (Ctrl + F4), Delete lines (Shift + F2), Copy lines
(F5), Split lines (Ctrl + F3), and create New lines (Ctrl +F5). Moreover, you can
Select all (Shift + F7), Deselect all (Shift + F8), Sort ascending (Ctrl + F8), Sort
descending (Ctrl + F9), Check entries (Ctrl + F6), and Reset entries (Ctrl + F11).
In regards to times, you can Distribute hours (Ctrl + Shift + F1), turn Target hours
(F7) and Weekdays (F8) on and off, etc.
Also from this screen, you can view detailed time data, display the time data in
various views (Data Entry, Release, and Variable), Check the log, etc.

Time Keeper Version: 101603
Copyright 2003, Pennsylvania State System of Higher Education
All Rights Reserved
5
PRACTICE ASSIGNMENT
To be provided by Instructor
SUMMARY/REVIEW
In this exercise, you learned how to maintain employee time sheets in CATS. A “Quick-
View” of the step-by-step procedure for this transaction is available in Appendix B.

Time Keeper Version: 101603
Copyright 2003, Pennsylvania State System of Higher Education
All Rights Reserved
6
CADO – DISPLAY TIME SHEET
A fast, easy way for a Time Administrator or Supervisor to review CATS input for an
individual employee or a group of employees is to access CADO – Display Time Sheet.
1. Initiate action by typing „CADO‟ in the transaction box at the top of the screen;
Transaction
box

Time Keeper Version: 101603
Copyright 2003, Pennsylvania State System of Higher Education
All Rights Reserved
7
2. Executing the report:
- If you have a variant saved, click on the „Variant‟ icon. The variant can be
created for each time supervisor and saved to include the personnel numbers
for his/her timeadministrator code; or,
- If pernr(s) aren‟t included in a variant, enter the pernr(s) for the employee‟s
records you want to review along with the dates for the period you want to
review.
- Execute.
„Variant‟
icon
Period dates

Time Keeper Version: 101603
Copyright 2003, Pennsylvania State System of Higher Education
All Rights Reserved
8
3. A listing of attendances/absences input via CATS will be returned.

Time Keeper Version: 101603
Copyright 2003, Pennsylvania State System of Higher Education
All Rights Reserved
9
4. To display more detail on an individual line:
- Highlight the particular line of entry
- Click on the „Choose Detail‟ icon on the toolbar.
- Detail includes the start/end times of the attendance/absence.
„Choose Detail‟
icon

Time Keeper Version: 101603
Copyright 2003, Pennsylvania State System of Higher Education
All Rights Reserved
10
5. Modifying the CADO: You can modify the CADO to add/delete/rearrange the
columns of information to be included on this report. This modification can be
saved so that whenever the CADO report is accessed, the preferred format is
always used, making this a much easier reporting tool for supervisors to use.
- To edit the CADO report, highlight any column, right click on the mouse and
select „Show‟.
„Show‟
Time Keeper Version: 101603
Copyright 2003, Pennsylvania State System of Higher Education
All Rights Reserved
11
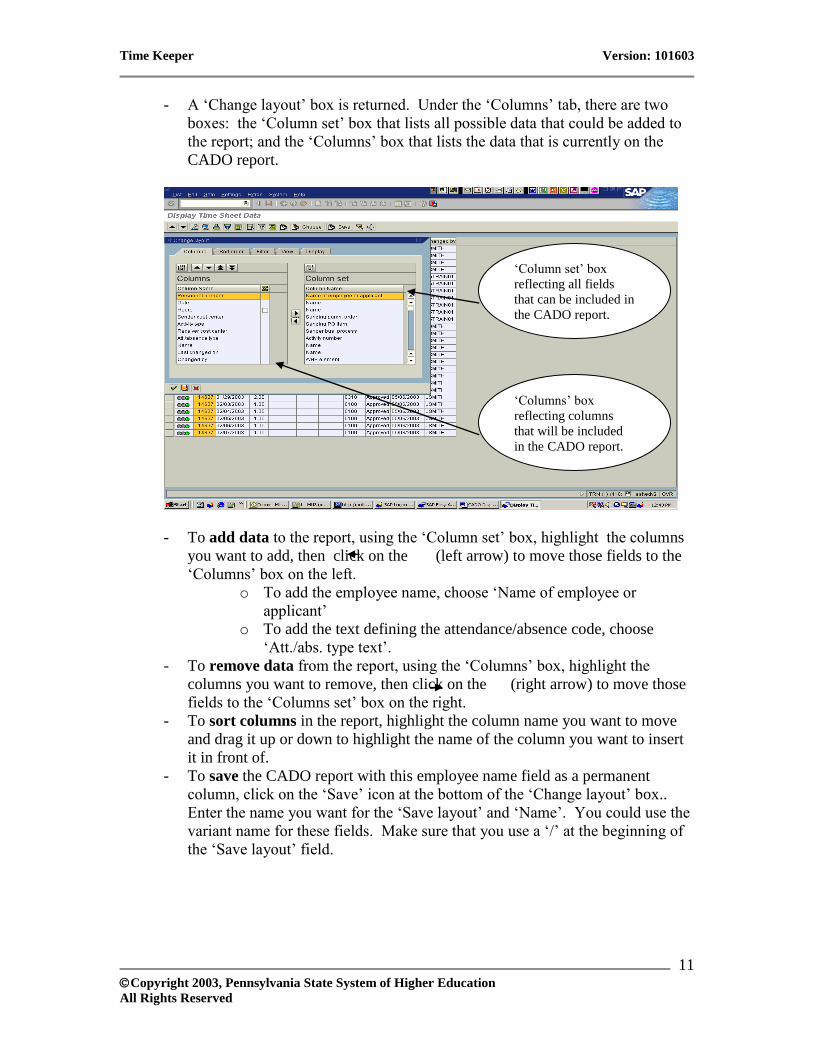
- A „Change layout‟ box is returned. Under the „Columns‟ tab, there are two
boxes: the „Column set‟ box that lists all possible data that could be added to
the report; and the „Columns‟ box that lists the data that is currently on the
CADO report.
- To add data to the report, using the „Column set‟ box, highlight the columns
you want to add, then click on the (left arrow) to move those fields to the
„Columns‟ box on the left.
o To add the employee name, choose „Name of employee or
applicant‟
o To add the text defining the attendance/absence code, choose
„Att./abs. type text‟.
- To remove data from the report, using the „Columns‟ box, highlight the
columns you want to remove, then click on the (right arrow) to move those
fields to the „Columns set‟ box on the right.
- To sort columns in the report, highlight the column name you want to move
and drag it up or down to highlight the name of the column you want to insert
it in front of.
- To save the CADO report with this employee name field as a permanent
column, click on the „Save‟ icon at the bottom of the „Change layout‟ box..
Enter the name you want for the „Save layout‟ and „Name‟. You could use the
variant name for these fields. Make sure that you use a „/‟ at the beginning of
the „Save layout‟ field.
„Column set‟ box
reflecting all fields
that can be included in
the CADO report.
„Columns‟ box
reflecting columns
that will be included
in the CADO report.

Time Keeper Version: 101603
Copyright 2003, Pennsylvania State System of Higher Education
All Rights Reserved
12
- Click on the green check at the bottom of the „Change layout‟ box.
„Save layout field‟
begins with a „/‟.
„Name‟ field.

Time Keeper Version: 101603
Copyright 2003, Pennsylvania State System of Higher Education
All Rights Reserved
13
- You should now have the CADO report written to your specific needs.

Time Keeper Version: 101603
Copyright 2003, Pennsylvania State System of Higher Education
All Rights Reserved
14
PRINTING A TIME STATEMENT
1. Access PT61 – Time Statement: Human Resources > Time Management >
2. Click on the variant icon and select the variant you need. If no variant is already
created, create a variant to include basic information you need to access the
applicable time sheet(s).
3. Required fields:
a. Date range:
- When the pay period spans two months, Start Date should be the
beginning of the pay period. The End Date must be the last day of the
month the pay period ends in. (ie: pay period 2/22/2003 through
3/07/2003 will use the start/end dates of 02/22/2003 – 01/31/2003.)
- When the full pay period falls under one month, the Start Date must be
the first of the month. The End Date must be the last
day of the month. (ie: pay period 3/07/2003 through 3/21/2003
will use the start/end dates of 03/01/2003 – 03/31/2003.)
Variant icon

Time Keeper Version: 101603
Copyright 2003, Pennsylvania State System of Higher Education
All Rights Reserved
15
b. Search parameters to identify the employees you want, such as:
- Personnel number: The personnel number(s) can be added each time
you need to run a Time Statement. If you regularly run Time
Statements for a specific group of people, you can add those numbers
to a variant so that they are always included when you access that
variant.
- Time administrator
c. Form name: always use „ZTF0‟
4. Ways to select multiple employees:
a. Click on the on the Personnel number line;
- Based on the tab you choose, you can use:
- Single Val to type in the multiple employee numbers you want time
statements for;
- Ranges to type in a range of employee numbers

Time Keeper Version: 101603
Copyright 2003, Pennsylvania State System of Higher Education
All Rights Reserved
16
b. Click on the on the Personnel number line;
- If you have a list of personnel numbers maintained on a spreadsheet
(ie: excel), you can import that list to produce time statements for
those employees:
- Go to your spreadsheet and „copy‟ the list of personnel numbers;
- Click on the „Import from Text file‟ icon at the bottom of the box;
- Click on the „Upload from clip board‟ icon at the bottom of the box.
„Upload from
clip board‟ icon

Time Keeper Version: 101603
Copyright 2003, Pennsylvania State System of Higher Education
All Rights Reserved
17
5. Execute.
Completed and
ready to execute.

Time Keeper Version: 101603
Copyright 2003, Pennsylvania State System of Higher Education
All Rights Reserved
18
6. To print, click on the print icon.
a. Output device: „LOCL‟
b. Spool Options: click in the boxes for „Print immediately‟ and „Delete
after output‟.
c. Click on the „Continue‟ button at the top of the screen.
d. Click on the green checkmark in the box that appears on the screen.

Time Keeper Version: 101603
Copyright 2003, Pennsylvania State System of Higher Education
All Rights Reserved
19
PERSONAL WORK SCHEDULE
The PT63, „Personal Work Schedule‟ report is an excellent tool to see the assigned work
schedule detail on individual employees for specific time periods. This report should be
used to verify that the correct work schedule is assigned to employees. For those
employees working a „rotating‟ work schedule, this report should be used to be sure that
the employee is in the correct place in the work schedule, comparing the calendar date
with the correct shift.
This report can also be used to „post‟ work schedules in a department where employees
are assigned to rotating shifts.
The PT63 should be shared with individual departments prior to „go-live‟ as a
verification that all employees are assigned to the correct work schedule.
1. At the SAP Easy Access Screen, type in „PT63‟ in the transaction box, and enter.
Transaction
box

Time Keeper Version: 101603
Copyright 2003, Pennsylvania State System of Higher Education
All Rights Reserved
20
2. Create a „variant‟ to specify the employees you want to have included in the report.
When creating a variant, you need to:
- Select the option you want for the „Period‟. Choose specific time periods such
as „Today‟, „Current Month‟, „Current Year‟. You also have the option to
click on the „Other Period‟ button, then enter the time period you want by
filling in the From and To dates.
- Under the „Selection‟ block, you can access an individual employee work
schedule, multiple employee work schedules, all employee work schedules
within a specific Time Administrator Code, or all employees within multiple
Time Administrator Codes.
In this screen print example, a specific time period was chosen for all employees
under a specific Time Administrator Code.
When you have the fields completed for the information you want, execute.

Time Keeper Version: 101603
Copyright 2003, Pennsylvania State System of Higher Education
All Rights Reserved
21
3. The report will be sorted, by employee.

Time Keeper Version: 101603
Copyright 2003, Pennsylvania State System of Higher Education
All Rights Reserved
22
4. Modifying the PT63: You can modify the PT63 to add/delete/rearrange the columns
of information to be included on this report. This modification can be saved so that
whenever the PT63 report is accessed, the preferred format is always used, making
this a much easier reporting tool for supervisors to use.
- To edit the PT63 report, highlight any column, right click on the mouse and
select „Show‟.
Show

Time Keeper Version: 101603
Copyright 2003, Pennsylvania State System of Higher Education
All Rights Reserved
23
- A „Change layout‟ box is returned. Under the „Columns‟ tab, there are two
boxes: the „Column set‟ box that lists all possible data that could be added to
the report; and the „Columns‟ box that lists the data that is currently on the
PT63 report.
„Column set‟ box
reflecting all fields
that can be included in
the CADO report.
„Columns‟ box
reflecting columns
that will be included
in the CADO report.

Time Keeper Version: 101603
Copyright 2003, Pennsylvania State System of Higher Education
All Rights Reserved
24
- To add data to the report, using the „Column set‟ box, highlight the columns
you want to add, then click on the (left arrow) to move those fields to the
„Columns‟ box on the left.
- To remove data from the report, using the „Columns‟ box, highlight the
columns you want to remove, then click on the (right arrow) to move those
fields to the „Columns set‟ box on the right.
- To sort columns in the report, highlight the column name you want to move
and drag it up or down to highlight the name of the column you want to insert
it in front of.
- To save the PT63 report with this employee name field as a permanent
column, click on the „Save‟ icon at the bottom of the „Change layout‟ box..
Enter the name you want for the „Save layout‟ and „Name‟. You could use the
variant name for these fields. Make sure that you use a „/‟ at the beginning of
the „Save layout‟ field.
- Click on the green check at the bottom of the „Change layout‟ box.
„Save layout field‟
begins with a „/‟.
„Name‟ field.

Time Keeper Version: 101603
Copyright 2003, Pennsylvania State System of Higher Education
All Rights Reserved
25
- You should now have the CADO report written to your specific needs.

Time Keeper Version: 101603
Copyright 2003, Pennsylvania State System of Higher Education
All Rights Reserved
26
APPENDIX A
TRANSACTION QUICK-VIEW

Time Keeper Version: 101603
Copyright 2003, Pennsylvania State System of Higher Education
All Rights Reserved
27
CATS INITIAL SCREEN
Human Resources Time Management Time Sheet Time Data CAT2 - Enter
1. Navigate to the “Time Sheet: Initial Screen” by following menu path above or
entering Transaction Code – CAT2.
2. Complete the required fields (i.e., Data entry profile, Key date, Personnel no.).
Select the employee by clicking in the blank field to the left of the employee‟s
personnel number. Click on the Enter Times icon at the top left of the screen.
3. The “Time Sheet: Data Entry View” screen includes 7 days, or 1 pay week. The
„Data Entry‟ field gives you the begin/end dates for the pay week you are entering
information for. If you are inputting information for an entire biweekly pay
period, you need to access two “Time Sheet: Data Entry View” transactions. This
can be done by:
Using the „Key Date‟ field on the “Time Sheet: Initial Screen”, or
Using the front/back arrows at the top of the “Time Sheet: Data Entry
View”.
3. Enter information into the required fields (i.e., LT, A/A, Day and From/To).
4. Click the “Save” button, .
Note: While on this screen, you can perform various functions. For example under the
Edit Menu, you can Insert lines (Ctrl + F4), Delete lines (Shift + F2), Copy lines
(F5), Split lines (Ctrl + F3), and create New lines (Ctrl +F5). Moreover, you can
Select all (Shift + F7), Deselect all (Shift + F8), Sort ascending (Ctrl + F8), Sort
descending (Ctrl + F9), Check entries (Ctrl + F6), and Reset entries (Ctrl + F11).
In regards to times, you can Distribute hours (Ctrl + Shift + F1), turn Target hours
(F7) and Weekdays (F8) on and off, etc.
Also from this screen, you can view detailed time data, display the time data in
various views (Data Entry, Release, and Variable), check the log, etc.