timeline of historical book and time in history
TRANSCRIPT

Timeline of Historical Book and Time in History By Mary Ann Stahr, Ph.D.
SUMMARY: Students will choose a nonfiction or historical fiction book within a specific timeframe (determined by course content). After reading the book, students will construct a timeline comparing the course of history as seen through the author of the book and actual events that take place in history. A brief reflective essay will also be assigned. This lesson can be adapted to any time in history or any grade level. The only adjustment would be the level and subject of the book. Students were given six weeks to read the book. Time is given in class for SSR (Sustained Silent Reading) and students also read at home. Student handouts, directions, rubric and assignment example are attached.
Analyze Learners: This lesson was taught to 9th graders of all abilities. Differentiation was
addressed by staff aiding students in matching their reading level and interest to the book used for the assignment. Reading level is determined by the Scholastic Reading Inventory. The media specialist individually discussed with students their likes, dislikes and any specific interests. (OTES: Standard 3: Assessment)
Standards: Social Studies Common Core - Grades 9 & 10 and Standards for the 21st
Century Learner- Grades 9 & 10 (OTES: Standard 4: Instruction)
Common Core Literacy Standards for History Ninth/Tenth Grades
Common Core Crosswalk AASL Standards
CC9-10RH/SS1 Cite specific textual evidence to support analysis of primary and secondary sources, attending to such features as the date and origin of the information.
Learning target: Student will* correctly cite his/her chosen book using MLA format.
CC9-10RH/SS2 Determine the central ideas or information of a primary or secondary source; provide an accurate summary of how key events or ideas develop over the course of the text.
Learning target: Student will take notes using one or more note-taking strategies, focusing on the time frame.
2.1.1 Continue an inquiry-based research process by applying critical thinking skills (analysis, synthesis, evaluation, organization) to information and knowledge in order to construct new understandings, draw conclusions, and create new knowledge.
Learning Target: Student will locate main events in U.S. history that occurred during the time frame of chosen book.
2.1.3 Use strategies to draw conclusions from information and apply knowledge to curricular areas, real world situations, and further investigations.
Learning Target: Student will correlate the time periods from their book and U.S. history.
4.1.3 Respond to literature and creative expressions of ideas in various formats and genres.
Learning Target: Student will construct a timeline labeling key events of the above time periods.
CC9-10RH/SS3 Analyze in detail a series of events described in a text; determine whether earlier events caused later ones or simply preceded them.
Learning Target: Student will compose a reflective essay determining the impact of U.S. history on the personal life of a character in their chosen book.
*”Student will” can be changed to “I can.”

Timeline of Historical Book and Time in History By Mary Ann Stahr, Ph.D.
Select Strategies, Technology, Media and Materials:
Strategies: The teacher will present the assignment and provide that attached timeline
example. Students know their reading level (Lexile) and will locate a book of their own
choosing that is challenging but not too difficult. The media specialist will provide a
bibliography of historical fictions books and demonstrate to students how to find a
nonfiction book within the time period. Individual conferencing to locate a book will be
available to the students. (OTES: Standard 1: Students)
Technology: Students have their choice of tools to create their timeline. Microsoft Word
(Auto Shapes and SmartArt), Adobe Photoshop, and Paint are available on the school
computers. Software used for completion of product is chosen by the individual student.
Students may also create their timeline by hand. (OTES: Standard 2: Resources)
Media and Materials: Student will select a book they are interested in within their Lexile
and assigned time period. Student handout explaining the project, the rubric and lesson on
choosing the right book are attached. (OTES: Standard 2: Resources)
Utilize Technology, Media and Materials: Students will select their book and their software
for creation of timeline. The teacher will prepare the students 1) by giving an overview of
the assignment, 2) giving the rationale of the importance of reading fiction and nonfiction
and determining how it impacts lives and events, 3) reading the example of a completed
assignment and 4) going over the rubric with the students. (Lesson Delivery: OTES:
Standard 2: Content; Standard 4: Instruction)
Require Learner participation: After selecting their book, students will have six weeks to
read their book during SSR in class and at home for homework. They will be encouraged to
identify key events in the book, organize the information and correlate with key events in
American History. Students will select their media to create a timeline and following the
rubric, generate their product. Students will write a brief, reflective essay. (See rubric).
Evaluate and Revise: Rubric is attached. After completion of project, student feedback and
teacher observation will determine any adjustments.
ATTACHMENTS:
Lesson Plan: Finding the Right Book at the Right Time Student Handouts: Time Traveler Assignment
Time Traveler Rubric
How to Create a Timeline
Create your Works Cited Using Word 2007
Example of Completed Essay
Example of Completed Timeline

Time Traveler
ASSIGNMENT: You are going to travel back in time with a person/character from a nonfiction/fiction book of your
choice. As you read your book, take notes on the important dates and experiences as your person/character moves
through time.
When you have completed your book, create a timeline of the above dates and experiences. You will then
research significant events in history that correspond to the time period of your person/character’s life. An
example is attached.
BOOK CHOICE: You may look in our library media center, the public library or your home for a nonfiction or fiction book to
read.
Nonfiction: Biographies, autobiographies or history that takes place in the 1847 to 1930 era (200 page minimum)..
Biographies can be found on the nonfiction shelves in the 921 section. They are organized in alphabetical order. For example,
a biography on Abraham Lincoln is 921 LIN. Historical books from that time frame can be located in sections 940 to 976. Ask
Dr. Stahr for help and suggestions.
Fiction: A historical fiction book set in the 1847 to 1930 time period (200 page minimum). A bibliography of our school’s
historical fiction is attached. You may also look elsewhere. If you’re not sure if the book is historical fiction, ask Mrs.
Keplinger or Dr. Stahr.
TIMELINE: Every timeline will look different and cover various time periods. Some may take place over fifty years, others over
one year. You may draw by hand or computer generate.
General Guidelines: You timeline may be a vertical or horizontal graphic design that labels the events from your book and
the corresponding time in history in a chronological order. Be creative! Check out the rubric on the flip side for the
components you will be graded on.
BOOK SUMMARY: One paragraph that gives an overview of the book.
REFLECTIVE ESSAY: Three to five paragraphs that address the following: what events in history most impacted the life of
your person/character? What did you learn about this history period? Did you like the book? Why or why not?

Name ________________
Block ________
Time Traveler Rubric
Parts Attributes Possible Points
Your Points
Content Short summary (one paragraph) of book (5 points)
Pick a main character/person from your book. List ten sequential events from the
person’s life. (20 points)
List ten (10) events from history that occurred during the above
character’s/person’s life. (20 points)
Write a short reflection on how the time frame impacted the character’s/person’s
life. (15 points)
60
Lines
Units of Measure
Arrowed; horizontal or vertical; may represent/enhance the topic; ruled
Clear depiction
Equal intervals
Uniform size
10
Graphics/illustration/Color Arouse interest
Accentuate the key events or concepts
Used sparingly
10
Labels Correct spelling and grammar
Concise
Uniform size
10
Credits Correct MLA citation of your resources (use Word references for ease) 10
Total Points 100
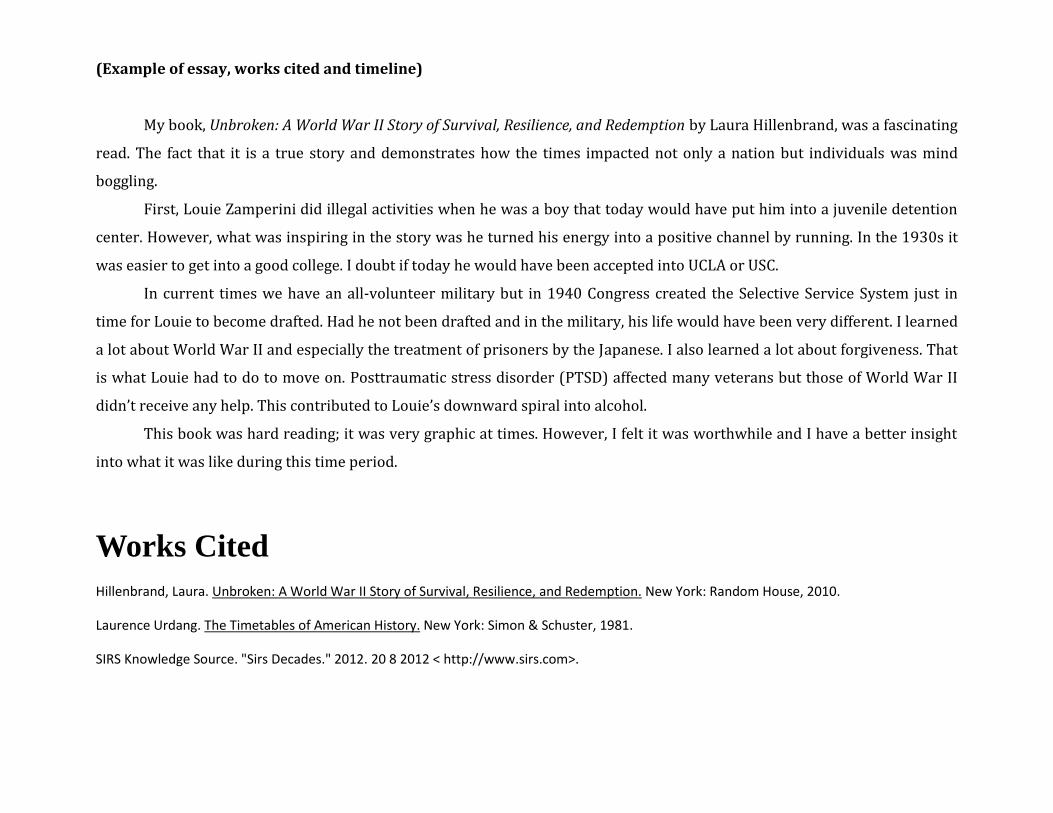
(Example of essay, works cited and timeline)
My book, Unbroken: A World War II Story of Survival, Resilience, and Redemption by Laura Hillenbrand, was a fascinating
read. The fact that it is a true story and demonstrates how the times impacted not only a nation but individuals was mind
boggling.
First, Louie Zamperini did illegal activities when he was a boy that today would have put him into a juvenile detention
center. However, what was inspiring in the story was he turned his energy into a positive channel by running. In the 1930s it
was easier to get into a good college. I doubt if today he would have been accepted into UCLA or USC.
In current times we have an all-volunteer military but in 1940 Congress created the Selective Service System just in
time for Louie to become drafted. Had he not been drafted and in the military, his life would have been very different. I learned
a lot about World War II and especially the treatment of prisoners by the Japanese. I also learned a lot about forgiveness. That
is what Louie had to do to move on. Posttraumatic stress disorder (PTSD) affected many veterans but those of World War II
didn’t receive any help. This contributed to Louie’s downward spiral into alcohol.
This book was hard reading; it was very graphic at times. However, I felt it was worthwhile and I have a better insight
into what it was like during this time period.
Works Cited
Hillenbrand, Laura. Unbroken: A World War II Story of Survival, Resilience, and Redemption. New York: Random House, 2010.
Laurence Urdang. The Timetables of American History. New York: Simon & Schuster, 1981.
SIRS Knowledge Source. "Sirs Decades." 2012. 20 8 2012 < http://www.sirs.com>.

Unbroken: A World War II Story of Survival, Resilience, and Redemption by Laura Hillenbrand
The true story of Louie Zamperini is incredible! First he was a juvenile delinquent growing up in California. During high school
he began to run and was very successful and even ran in the 1936 Olympics. His running career was interrupted by World War II.
Louie’s plane crashed into the ocean but he and two other airmen survived on a raft for over 40 days only to be imprisoned by the
Japanese.
by Mary Ann Stahr Ph.D
1917
Louis Zamperini was born to Italian-immigrant parents.
The U.S. declared war on Gremany April 2, 1917 after being provoked by German submarine warfare.
1932
Louie starts running high school track and breaks school records.
Franklin D. Roosevelt was elected in the 1932 presidential election promising his "New Deal".
1935
University Californina Los Angeles (UCLA) recruits Louie for their track team.
The Social Security Act was signed into law by President Roosevelt on August 14, 1935.
1936 Louie Zamperini ran the the 5,000-meter for an American record in 1936 Olympics.
The 1936 Olympics took place in Berlin. The Nazis used to prove they were the Master Race.
1940
Louie's dream of earning a gold medal in the 1940 Olympics ends.
Congress creates the Selective Service System, the first U.S. peacetime program for mantitory military service.
1943 Louie's plane, The Green Hornet, crashed into the Pacific Ocean. Three crew mates survived for 47 days.
U.S. bombers sink Japanese comvoy of 22 ships at the Battle of Bismark Sea.
1944
Louie is sent to a secret prisoner of war camp at Yokohama, near Tokyo.
U.S. Marines take hold of the Marshalls and Marianas, island groups in the Pacific.
1945
Louie is released from the prisoner of was camp after WW II ends.
U.S. President Harry Truman ordered that atomic bombs be dropped on Hiroshima and Nagasaki in August 1945.
1998 Winter Olympics. Louie ( then in his 80s) carried the Olympic torch. Part of his running route took him past his old prison camp at Naoetsu.
Two articles of impeachment, charging President Clinton with lying and obstructing justice covering up his affair with Lewinsky.
2012
Louie still lives!!!
President Obama begins withdrawing troops from Iraq and Afghanistan.
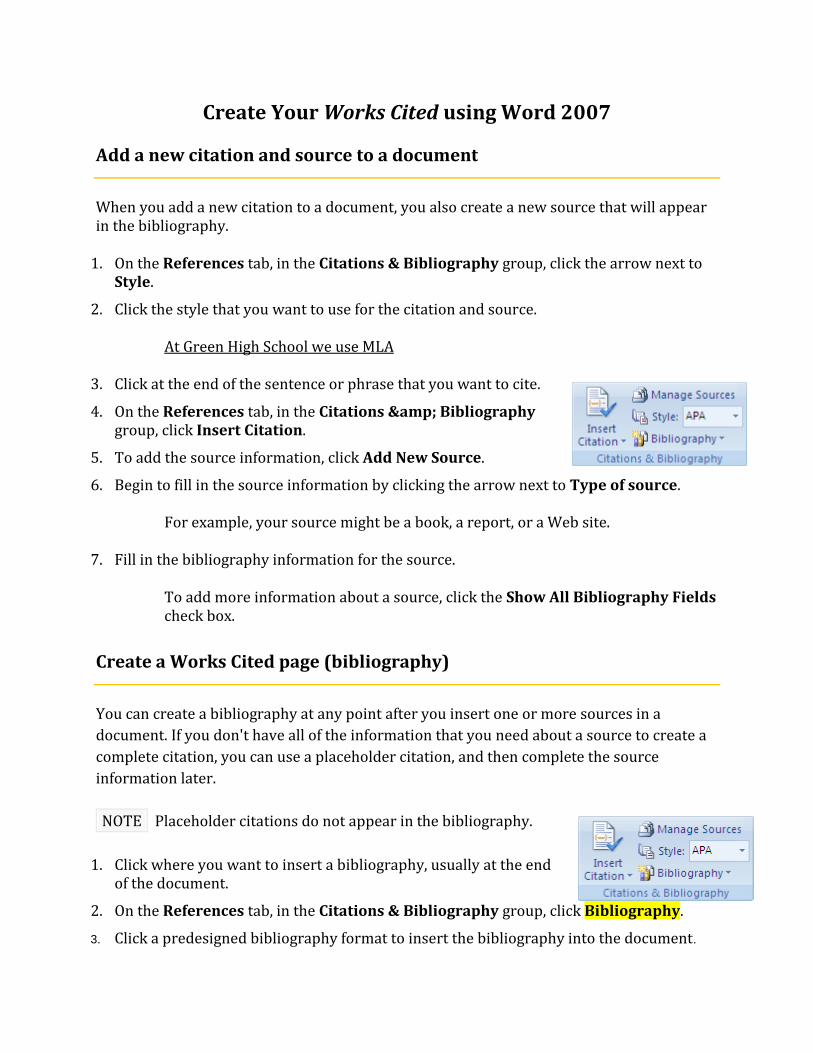
Create Your Works Cited using Word 2007
Add a new citation and source to a document
When you add a new citation to a document, you also create a new source that will appear in the bibliography.
1. On the References tab, in the Citations & Bibliography group, click the arrow next to Style.
2. Click the style that you want to use for the citation and source.
At Green High School we use MLA
3. Click at the end of the sentence or phrase that you want to cite.
4. On the References tab, in the Citations & Bibliography group, click Insert Citation.
5. To add the source information, click Add New Source.
6. Begin to fill in the source information by clicking the arrow next to Type of source.
For example, your source might be a book, a report, or a Web site.
7. Fill in the bibliography information for the source.
To add more information about a source, click the Show All Bibliography Fields check box.
Create a Works Cited page (bibliography)
You can create a bibliography at any point after you insert one or more sources in a
document. If you don't have all of the information that you need about a source to create a
complete citation, you can use a placeholder citation, and then complete the source
information later.
NOTE Placeholder citations do not appear in the bibliography.
1. Click where you want to insert a bibliography, usually at the end of the document.
2. On the References tab, in the Citations & Bibliography group, click Bibliography.
3. Click a predesigned bibliography format to insert the bibliography into the document.

Technical Hints to Help You with Your Timeline Project
How you create your timeline is entirely up to you. Just make sure you
follow the rubric to insure a good grade. I do have two suggestions is you’d
like to computer generate your timeline.
SmartArt
What to consider when you create a SmartArt graphic
Before you create your SmartArt graphic, visualize what type and layout are best for
displaying your data. What do you want to convey with your SmartArt graphic? Do you
want a certain look? Since you can quickly and easily switch layouts, try different layouts
(across types) until you find the one that best illustrates your message. Your graphic should
be clear and easy to follow. Experiment with different types by using the table below as a
starting point. The table is intended to help you get started and is not an exhaustive list.
PURPOSE OF GRAPHIC GRAPHIC TYPE
Show non-sequential information List
Show steps in a process or timeline Process
Show a continual process Cycle
Show a decision tree Hierarchy
Create an organization chart Hierarchy
Illustrate connections Relationship
Show how parts relate to a whole Matrix
Show proportional relationships with the largest component on the top or bottom Pyramid
Also, consider the amount of text that you have, because the amount of text often
determines the layout that you use and how many shapes you need in the layout. In
general, SmartArt graphics are most effective when the number of shapes and the amount
of text are limited to key points. Larger amounts of text can distract from the visual appeal
of your SmartArt graphic and make it harder to convey your message visually. However,
some layouts, such as Trapezoid List in the List type, work well with larger amounts of text.
Some layouts for SmartArt graphics contain a fixed number of shapes. For example,
the Counterbalance Arrows layout in the Relationship type is designed to show two
opposing ideas or concepts. Only two shapes can contain text, and the layout cannot be
changed to display more ideas or concepts.
If you need to convey more than two ideas, switch to another layout that has more
than two shapes for text, such as the Basic Pyramid layout in the Pyramid type. Keep in

mind that changing layouts or types can alter the meaning of your information. For
example, a layout with arrows pointing to the right, such as Basic Process in the Process
type, has a different meaning from a SmartArt graphic with arrows going in a circle, such as
Continuous Cycle in the Cycle type.
Create a SmartArt graphic and add text to it
On the Insert tab, in the Illustrations group, click SmartArt.
In the Choose a SmartArt Graphic dialog box, click the type and layout that you want.
Enter your text by doing one of the following:
Click [Text] in the Text pane, and then type your text.
Copy text from another location or program, click [Text] in the Text pane, and then paste
your text.
Notes:
If the Text pane is not visible, click the control.
To add text in an arbitrary position close to or on top of your SmartArt graphic, on the
Insert tab, in the Text group, click Text Box to insert a text box (text box: A movable,
resizable container for text or graphics. Use text boxes to position several blocks of text on
a page or to give text a different orientation from other text in the document.). If you want
only the text in your text box to appear, right-click your text box, click Format Shape or
Format Text Box, and then set the text box to have no background color and no border.
Click in a box in the SmartArt graphic, and then type your text. For best results, use this
option after you add all of the boxes that you want.
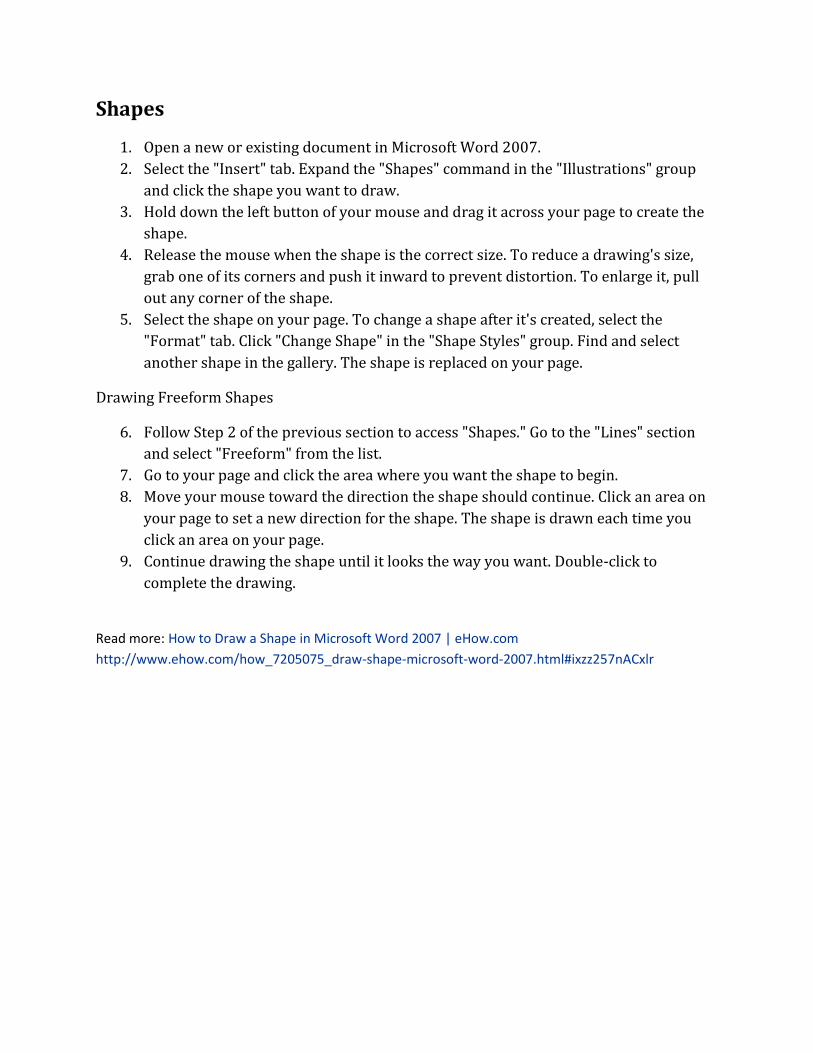
Shapes
1. Open a new or existing document in Microsoft Word 2007.
2. Select the "Insert" tab. Expand the "Shapes" command in the "Illustrations" group
and click the shape you want to draw.
3. Hold down the left button of your mouse and drag it across your page to create the
shape.
4. Release the mouse when the shape is the correct size. To reduce a drawing's size,
grab one of its corners and push it inward to prevent distortion. To enlarge it, pull
out any corner of the shape.
5. Select the shape on your page. To change a shape after it's created, select the
"Format" tab. Click "Change Shape" in the "Shape Styles" group. Find and select
another shape in the gallery. The shape is replaced on your page.
Drawing Freeform Shapes
6. Follow Step 2 of the previous section to access "Shapes." Go to the "Lines" section
and select "Freeform" from the list.
7. Go to your page and click the area where you want the shape to begin.
8. Move your mouse toward the direction the shape should continue. Click an area on
your page to set a new direction for the shape. The shape is drawn each time you
click an area on your page.
9. Continue drawing the shape until it looks the way you want. Double-click to
complete the drawing.
Read more: How to Draw a Shape in Microsoft Word 2007 | eHow.com
http://www.ehow.com/how_7205075_draw-shape-microsoft-word-2007.html#ixzz257nACxlr