timesheet system ver 1 - eiltimesheet.eil.co.in/(x(1)s(2q3c2c55bn13vb45jzrnmu45))/tss_user... ·...
TRANSCRIPT

0 15-11-2010 Issued for implementation PSS RKS DKK
Rev. No Date Purpose Prepared by Reviewed by
Approved by
Format No. 5-2000-0600-F8 Rev. 1 Copyrights EIL – All rights reserved
Document No. 7502-3342-UM-5037
Rev. No.0 Page 1 of 22
User Manual
TIMESHEET SYSTEM VER 1.0

Format No. 5-2000-0600-F8 Rev. 1 Copyrights EIL – All rights reserved
Document No. 7502-3342-UM-5037
Rev. No.0 Page 2 of 22
User Manual
INDEX 1. INTRODUCTION .................................................................................................................. 3 2. FEATURES ........................................................................................................................... 3 3. SYSTEM REQUIREMENT .................................................................................................. 3 4. BRIEF SYSTEM DETAILS .................................................................................................. 3 5. OPERATING DETAILS ....................................................................................................... 3 6. ERROR MESSAGES ......................................................................................................... 22

Format No. 5-2000-0600-F8 Rev. 1 Copyrights EIL – All rights reserved
Document No. 7502-3342-UM-5037
Rev. No.0 Page 3 of 22
User Manual
1. INTRODUCTION The Timesheet system accounts for the complete management of the expenditure of hours. The Timesheet system is a solution for both head office that need to manage hours spent against budget in terms of deliverables; and project sites where activity based hours are often manually re-processed for payroll purposes. Timesheet data is entered by individuals against a work breakdown structure (WBS) either over the internet via a browser or directly if connected to the Local Area Network. Timesheet system manages: - Job Allocation - Job Authorization - Team Building/Approver’s hierarchy - Manhour booking - Out of Pocket - Leave Applications
2. FEATURES
• It’s a online system accessible at anywhere, anytime for a user in EIL network or having internet connectivity.
• Independent to user location.
3. SYSTEM REQUIREMENT If the system is in EIL network then user is required internet explorer only. If the system is not in EIL network then it requires internet connection.
4. BRIEF SYSTEM DETAILS
There are main three modules in this system as: 1. T/S filling module 2. Job Module 3. Leave Module OPERATING DETAILS
1. T/S filling Module
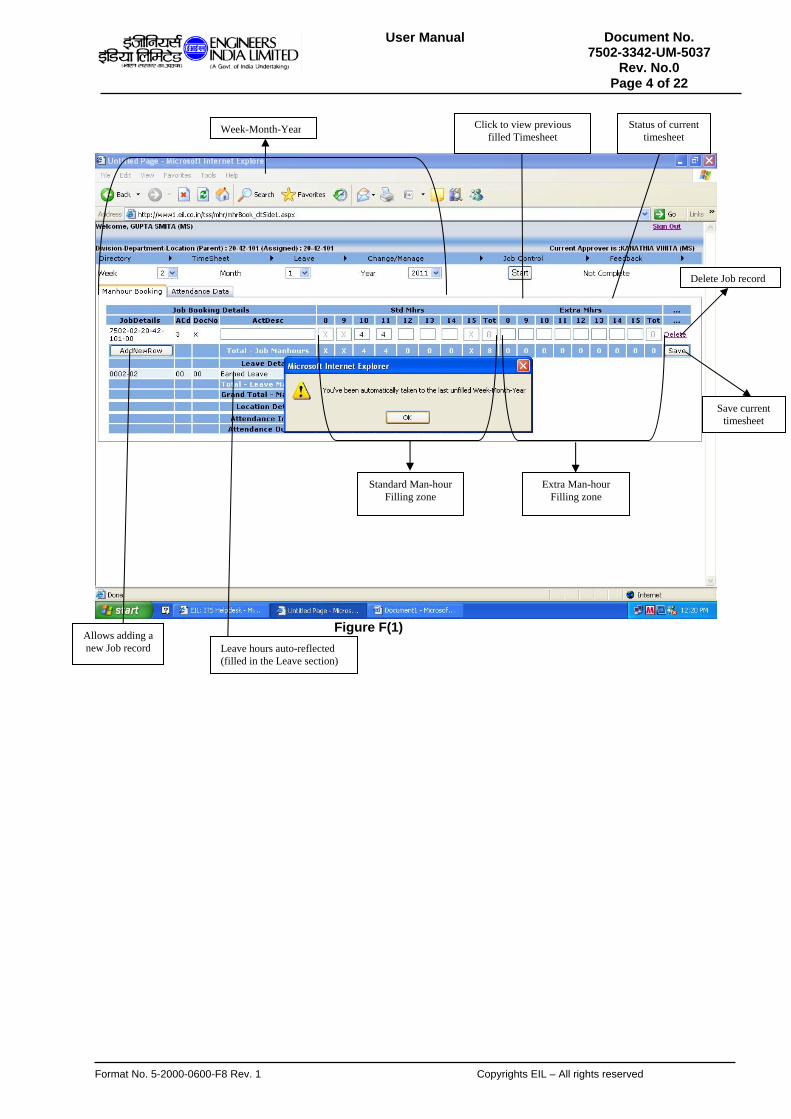
How to Fill the Web-Based Timesheet System Expand the timesheet menu item of the menu bar, to find the options available for filling and approval of timesheets filled for Job-hours put in. 1. Filling:
− To fill the man‐hours, click on this menu‐item − Once clicked would intelligently bring you to the last unfilled/incomplete week of the
month year i.e. the last pending timesheet would be available to you for filling. (as shown in the Fig‐F(1))
− Standard Man‐hours and extra man‐hours can be booked on the Jobs listed.
Format No. 5-2000-0600-F8 Rev. 1 Copyrights EIL – All rights reserved
Document No. 7502-3342-UM-5037
Rev. No.0 Page 4 of 22
User Manual
Figure F(1)
−
Week-Month-Year Click to view previous filled Timesheet
Status of current timesheet
Delete Job record
Save current timesheet
Allows adding a new Job record Leave hours auto-reflected
(filled in the Leave section)
Standard Man-hour Filling zone
Extra Man-hour Filling zone
Format No. 5-2000-0600-F8 Rev. 1 Copyrights EIL – All rights reserved
Document No. 7502-3342-UM-5037
Rev. No.0 Page 5 of 22
User Manual
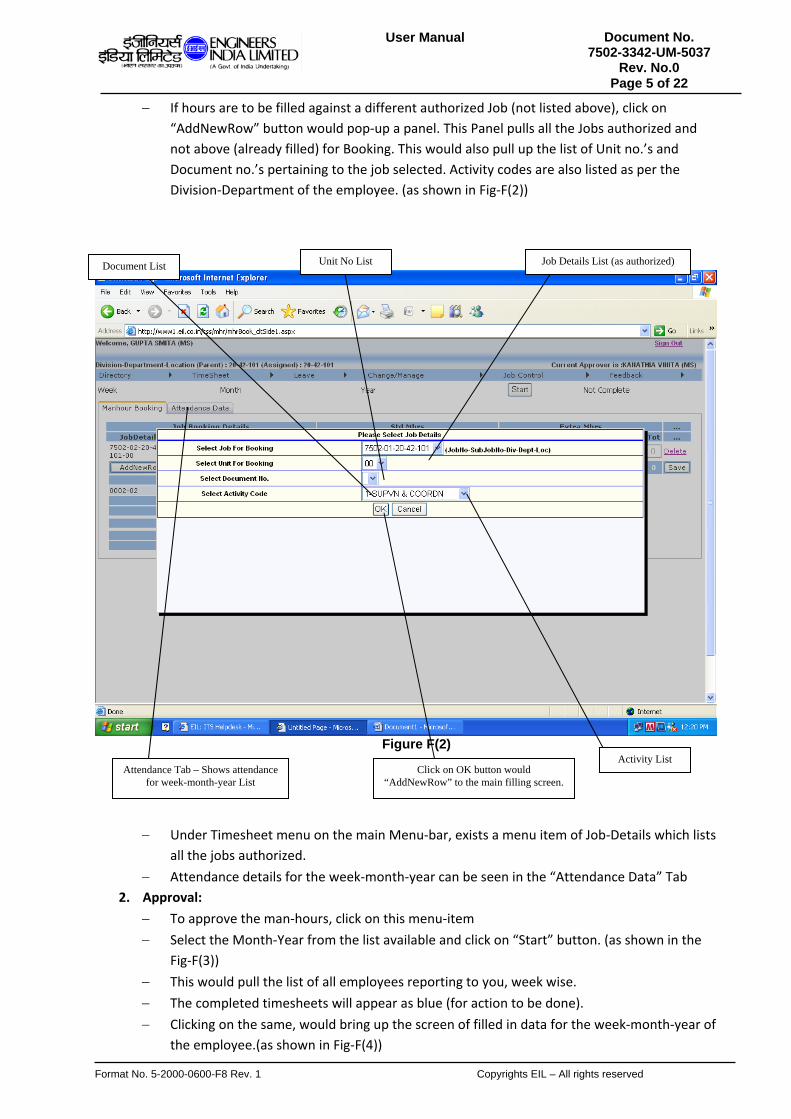
− If hours are to be filled against a different authorized Job (not listed above), click on “AddNewRow” button would pop‐up a panel. This Panel pulls all the Jobs authorized and not above (already filled) for Booking. This would also pull up the list of Unit no.’s and Document no.’s pertaining to the job selected. Activity codes are also listed as per the Division‐Department of the employee. (as shown in Fig‐F(2))
Figure F(2)
− Under Timesheet menu on the main Menu‐bar, exists a menu item of Job‐Details which lists all the jobs authorized.
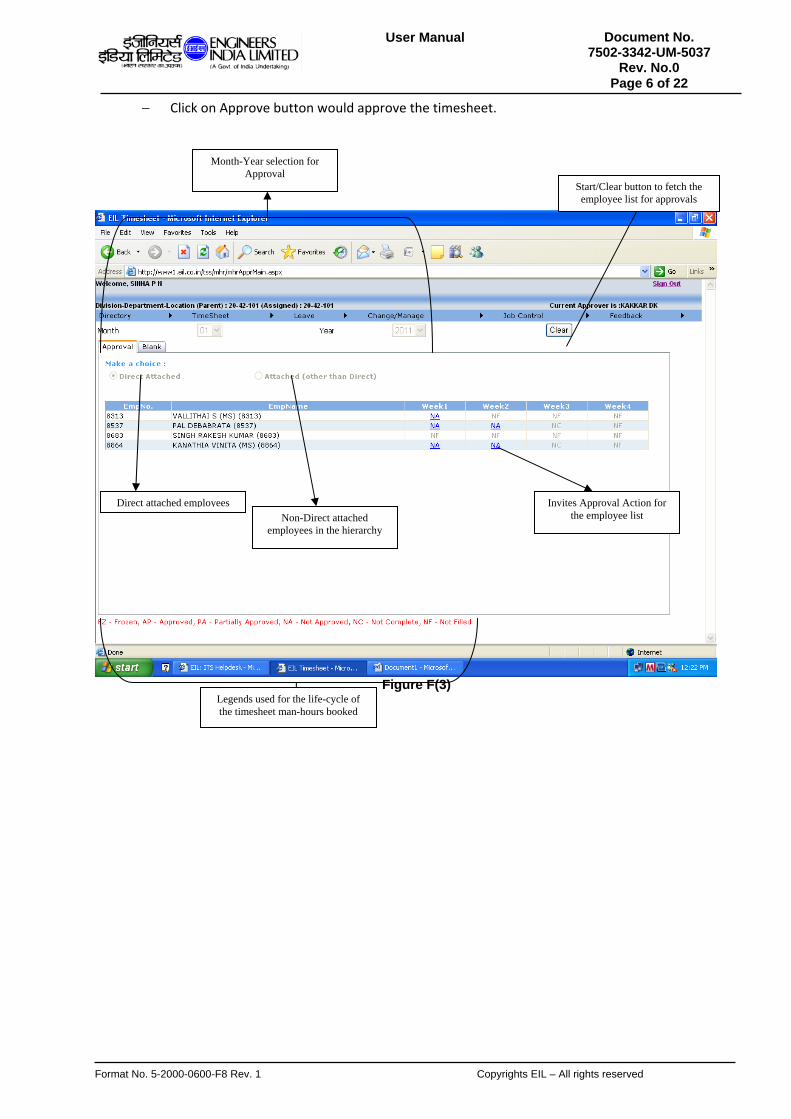
− Attendance details for the week‐month‐year can be seen in the “Attendance Data” Tab 2. Approval:
− To approve the man‐hours, click on this menu‐item − Select the Month‐Year from the list available and click on “Start” button. (as shown in the
Fig‐F(3)) − This would pull the list of all employees reporting to you, week wise. − The completed timesheets will appear as blue (for action to be done). − Clicking on the same, would bring up the screen of filled in data for the week‐month‐year of
the employee.(as shown in Fig‐F(4))
Document List Unit No List Job Details List (as authorized)
Activity List Click on OK button would
“AddNewRow” to the main filling screen. Attendance Tab – Shows attendance
for week-month-year List
Format No. 5-2000-0600-F8 Rev. 1 Copyrights EIL – All rights reserved
Document No. 7502-3342-UM-5037
Rev. No.0 Page 6 of 22
User Manual
− Click on Approve button would approve the timesheet.
Figure F(3)
Legends used for the life-cycle of the timesheet man-hours booked
Direct attached employees Non-Direct attached
employees in the hierarchy
Invites Approval Action for the employee list
Month-Year selection for Approval
Start/Clear button to fetch the employee list for approvals

Format No. 5-2000-0600-F8 Rev. 1 Copyrights EIL – All rights reserved
Document No. 7502-3342-UM-5037
Rev. No.0 Page 7 of 22
User Manual
Figure F(4)
3. Disapproval: − To disapprove the man‐hours, click on this menu‐item − Select the Month‐Year from the list available and click on “Start” button. (as shown in the
Fig‐F(5)) − This would pull the list of all employees reporting to you, week wise. − The approved timesheets will appear as blue (for action to be done). − Clicking on the same, would bring up the screen of filled in data for the week‐month‐year of
the employee.(as shown in Fig‐F(6)) − Click on Disapprove button would disapprove the timesheet.
Pop-up screen for week-month-year of employee for approval
Button to click to approve the timesheet

Format No. 5-2000-0600-F8 Rev. 1 Copyrights EIL – All rights reserved
Document No. 7502-3342-UM-5037
Rev. No.0 Page 8 of 22
User Manual
Figure F(5)
Month-Year selection for Disapproval Start/Clear button to fetch the
employee list for disapprovals
Direct attached employeesNon-Direct attached
employees in the hierarchy
Invites Disapproval Action for the employee list
Legends used for the life-cycle of the timesheet man-hours booked

Format No. 5-2000-0600-F8 Rev. 1 Copyrights EIL – All rights reserved
Document No. 7502-3342-UM-5037
Rev. No.0 Page 9 of 22
User Manual
Figure F(6)
Pop-up screen for week-month-year of employee for disapproval
Button to click to disapprove the timesheet

Format No. 5-2000-0600-F8 Rev. 1 Copyrights EIL – All rights reserved
Document No. 7502-3342-UM-5037
Rev. No.0 Page 10 of 22
User Manual
2. Job Module Manage Employee Module: This screen is available to all HOD(s) as well as time sheet approver to manage the employees down below them. Figure shown below shows various blocks to understand the module structure.
Logged User Logged User PDDL, ADDL
All names which are appearing in black represents employee has same ADDL as of approver ADDL
All names which are appearing in blue represents employee has ADDL not same as on approver ADDL
This tree is showing approver hierarchy including all level down below
This list contain all employee who have been given self approval or has been given to other department for job completion
This dropdown will appear only in case of HOD of multiple dept else direct the tree

Format No. 5-2000-0600-F8 Rev. 1 Copyrights EIL – All rights reserved
Document No. 7502-3342-UM-5037
Rev. No.0 Page 11 of 22
User Manual
To get the popup appear on the screen please click on the employee on whom you want to exercise option, depending upon it profile tab will appear inside pop up window as shown in the screen.
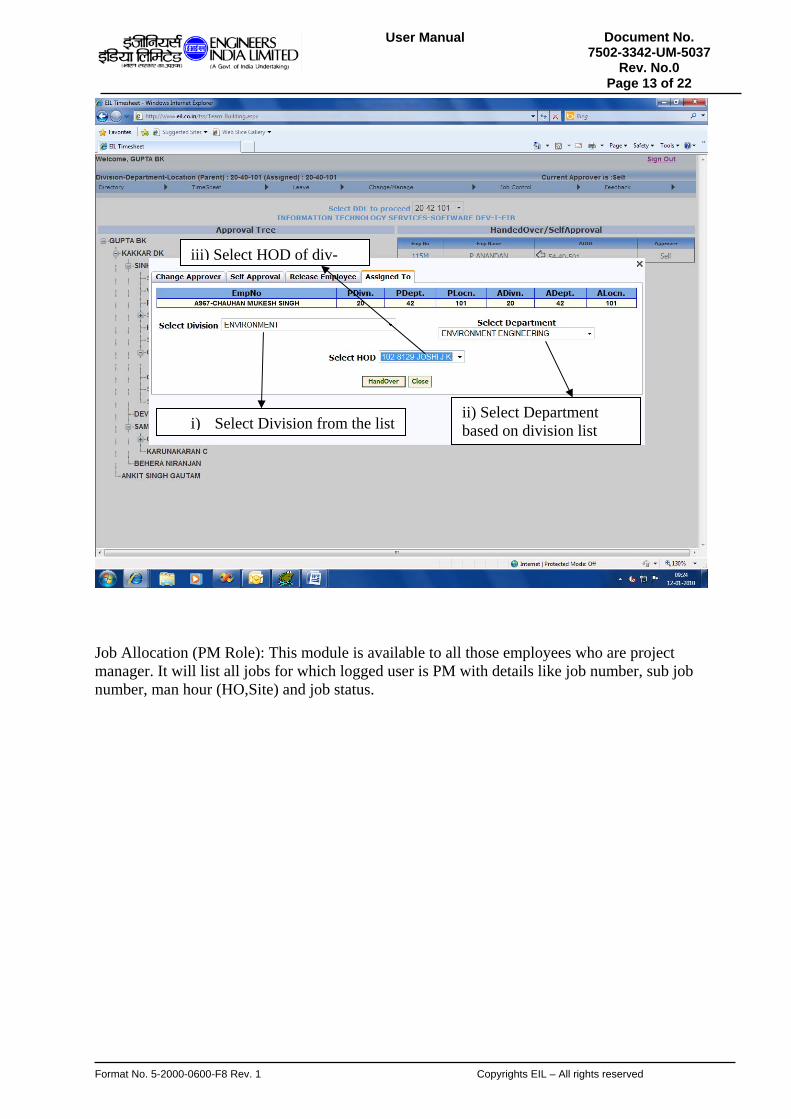
A) Change Approver: At any time HOD/approver can change the approver of employee by selecting the employee from tree and selecting new approver for him.
Pop up window showing tabs to exercise different options on selected employee
Selected Tab showing change approver option
Approver

Format No. 5-2000-0600-F8 Rev. 1 Copyrights EIL – All rights reserved
Document No. 7502-3342-UM-5037
Rev. No.0 Page 12 of 22
User Manual
B) Release Employee (HOD): This option is only valid to those employees who have come from other department and can be released back to their original PDDL HOD from where they have been assigned.
c) Assign Employee (HOD): This option can be exercised to assign employee to other department HOD on request for man power utilization.
Employee can’t be released as
Employee will be released to its PDDL
Format No. 5-2000-0600-F8 Rev. 1 Copyrights EIL – All rights reserved
Document No. 7502-3342-UM-5037
Rev. No.0 Page 13 of 22
User Manual
Job Allocation (PM Role): This module is available to all those employees who are project manager. It will list all jobs for which logged user is PM with details like job number, sub job number, man hour (HO,Site) and job status.
i) Select Division from the listii) Select Department based on division list
iii) Select HOD of div-

Format No. 5-2000-0600-F8 Rev. 1 Copyrights EIL – All rights reserved
Document No. 7502-3342-UM-5037
Rev. No.0 Page 14 of 22
User Manual
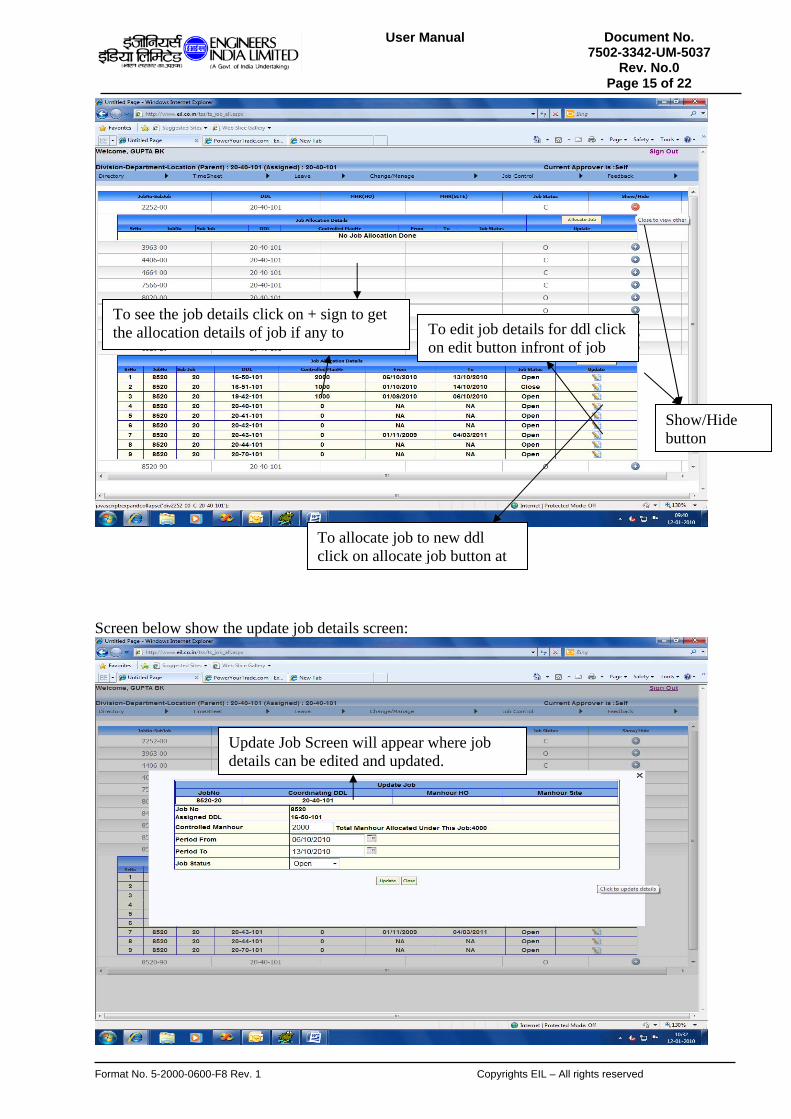
To get the details of parent job click on show/hide button, DDL details along with controlled man hours and from-to date of the job. Facility of editing existing job as well as allocating the new job to DDL can be performed as shown below.
This screen will appear if logged user is PM for some of the jobs, listing job details like job-subjob number, coordinating ddl, man hour (HO, SITE) and job
Format No. 5-2000-0600-F8 Rev. 1 Copyrights EIL – All rights reserved
Document No. 7502-3342-UM-5037
Rev. No.0 Page 15 of 22
User Manual
Screen below show the update job details screen:
To see the job details click on + sign to get the allocation details of job if any to
Show/Hide button
To edit job details for ddl click on edit button infront of job
To allocate job to new ddl click on allocate job button at
Update Job Screen will appear where job details can be edited and updated.
Format No. 5-2000-0600-F8 Rev. 1 Copyrights EIL – All rights reserved
Document No. 7502-3342-UM-5037
Rev. No.0 Page 16 of 22
User Manual
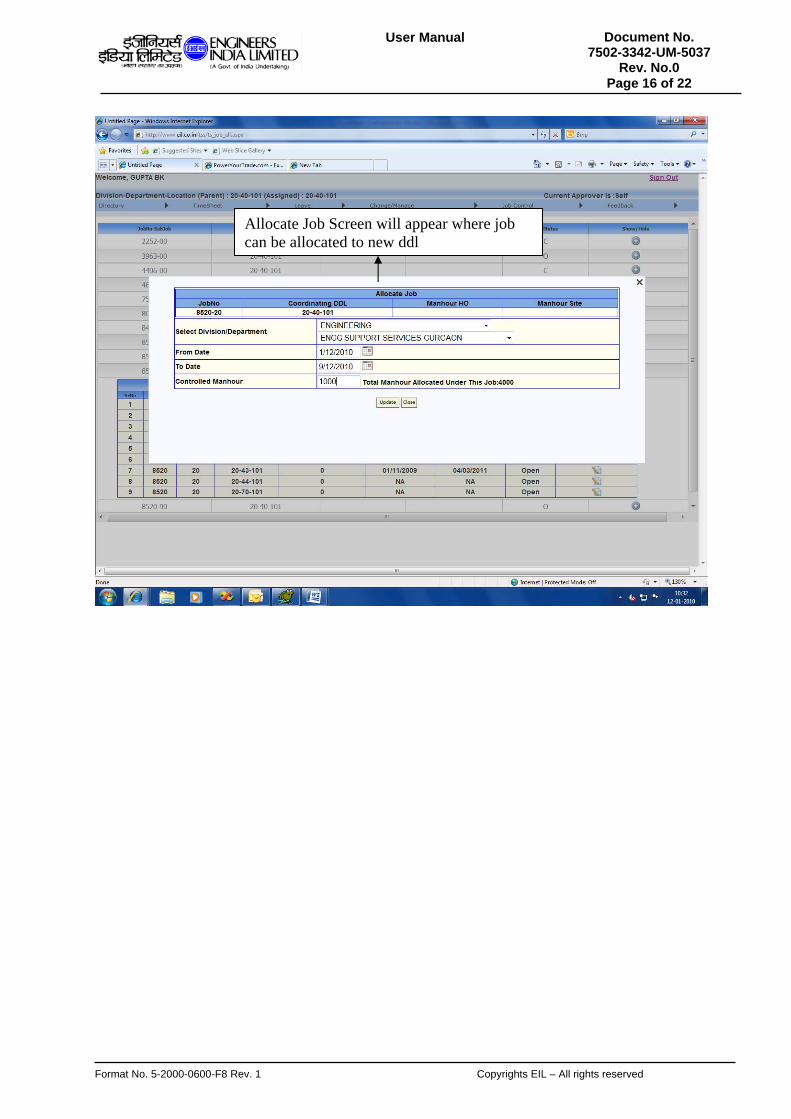
Allocate Job Screen will appear where job can be allocated to new ddl

Format No. 5-2000-0600-F8 Rev. 1 Copyrights EIL – All rights reserved
Document No. 7502-3342-UM-5037
Rev. No.0 Page 17 of 22
User Manual
Job Wise Authorization: This module is used by HOD to allocate the job to its employee or to update the job details for already allocated job to employee.
This dropdown represents all job for which the logged user is HOD
This table represents the detail of all employees who all are authorized to work on the selected job
To edit job details for employee click on edit button in front of
Format No. 5-2000-0600-F8 Rev. 1 Copyrights EIL – All rights reserved
Document No. 7502-3342-UM-5037
Rev. No.0 Page 18 of 22
User Manual
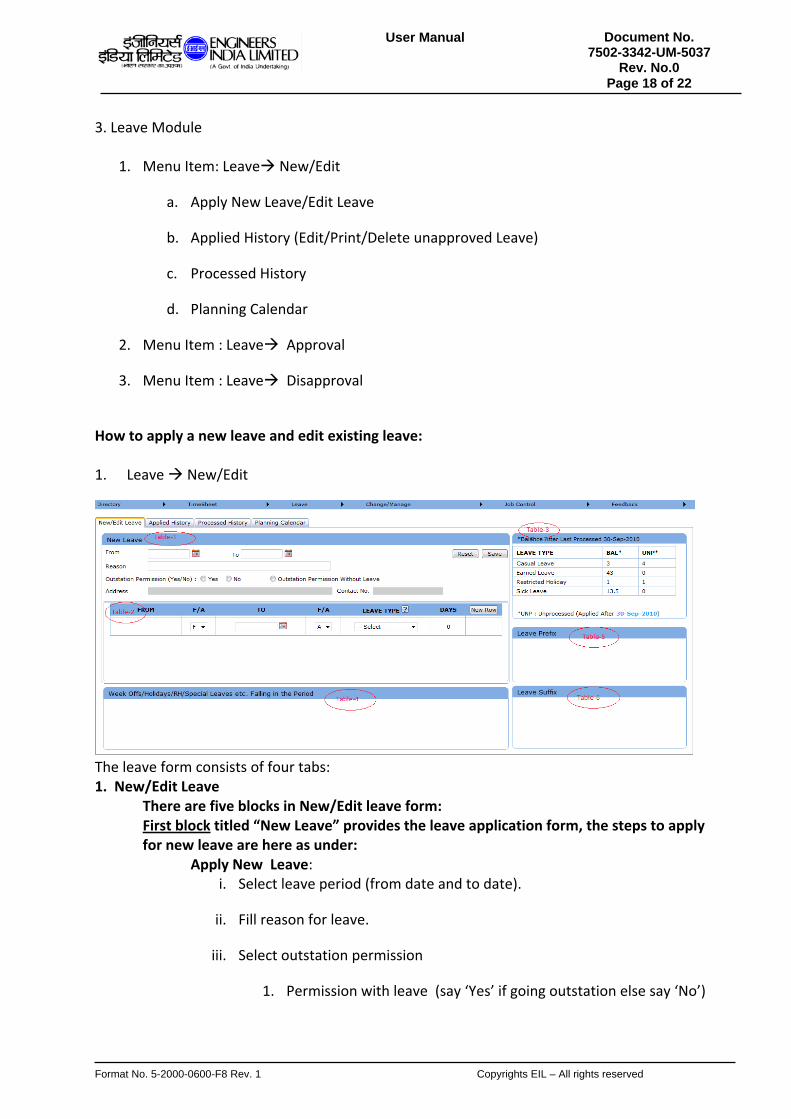
3. Leave Module
1. Menu Item: Leave New/Edit
a. Apply New Leave/Edit Leave
b. Applied History (Edit/Print/Delete unapproved Leave)
c. Processed History
d. Planning Calendar
2. Menu Item : Leave Approval
3. Menu Item : Leave Disapproval
How to apply a new leave and edit existing leave: 1. Leave New/Edit
The leave form consists of four tabs: 1. New/Edit Leave There are five blocks in New/Edit leave form: First block titled “New Leave” provides the leave application form, the steps to apply
for new leave are here as under: Apply New Leave:
i. Select leave period (from date and to date).
ii. Fill reason for leave.
iii. Select outstation permission
1. Permission with leave (say ‘Yes’ if going outstation else say ‘No’)
Format No. 5-2000-0600-F8 Rev. 1 Copyrights EIL – All rights reserved
Document No. 7502-3342-UM-5037
Rev. No.0 Page 19 of 22
User Manual
2. Permission without leave (say ‘Outstation permission without leave’)
iv. Fill Address and contact no (in case of outstation permission)
v. Select right To date, from F/A, to F/A and Select leave type.
vi. Click on ‘New Row’ Button if you want to combine any other leave. (Onclicking this button a new row will be added below and repeat above step to combine leave.) New row will be added only if Period to date is greater than the last leave to date.
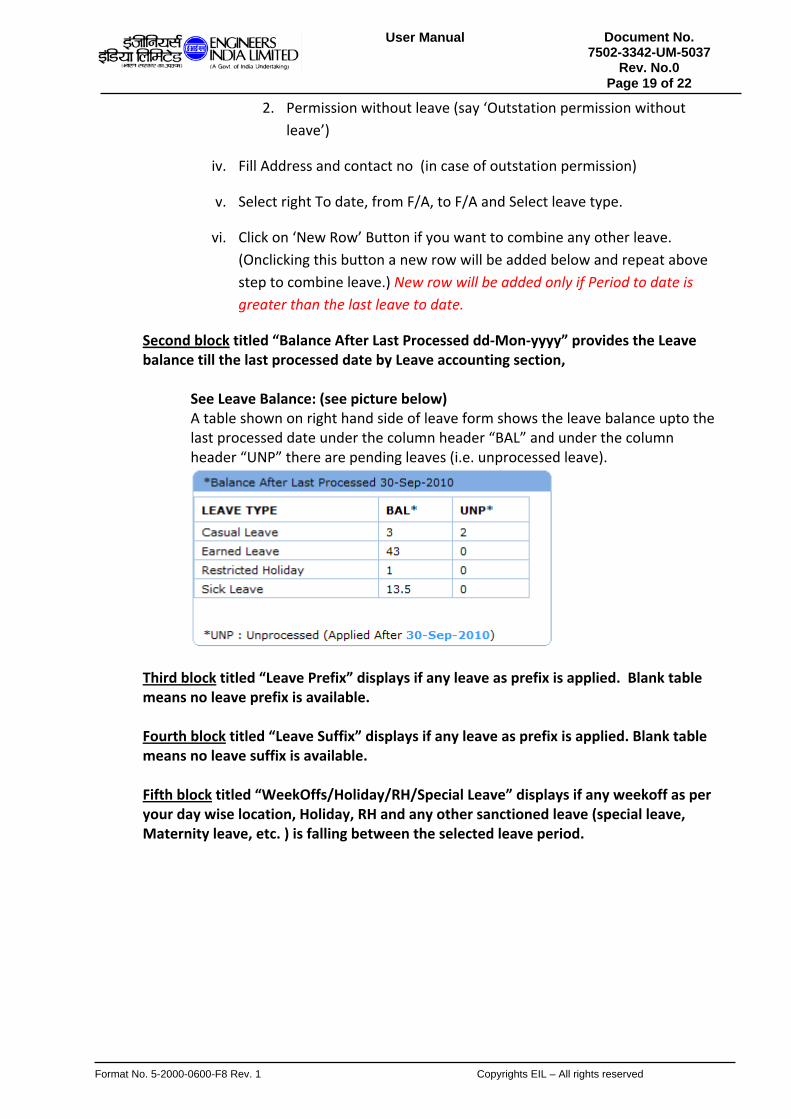
Second block titled “Balance After Last Processed dd‐Mon‐yyyy” provides the Leave balance till the last processed date by Leave accounting section,
See Leave Balance: (see picture below) A table shown on right hand side of leave form shows the leave balance upto the last processed date under the column header “BAL” and under the column header “UNP” there are pending leaves (i.e. unprocessed leave).
Third block titled “Leave Prefix” displays if any leave as prefix is applied. Blank table means no leave prefix is available. Fourth block titled “Leave Suffix” displays if any leave as prefix is applied. Blank table means no leave suffix is available. Fifth block titled “WeekOffs/Holiday/RH/Special Leave” displays if any weekoff as per your day wise location, Holiday, RH and any other sanctioned leave (special leave, Maternity leave, etc. ) is falling between the selected leave period.

Format No. 5-2000-0600-F8 Rev. 1 Copyrights EIL – All rights reserved
Document No. 7502-3342-UM-5037
Rev. No.0 Page 20 of 22
User Manual
2. Applied History (Edit/Print/Delete Leave) : The grid like below
It contains three buttons if the leave is not approved and freezed (accounted):
1. Edit Button : if you click on this you are going to edit the selected leave. (can change the leave type, leave dates etc.)
2. Print Button : If you wants to take printout of leave applied the choose this.
3. Delete Button : This is used to delete the leave selected (this
deletes leave after confirmation from you.)

Format No. 5-2000-0600-F8 Rev. 1 Copyrights EIL – All rights reserved
Document No. 7502-3342-UM-5037
Rev. No.0 Page 21 of 22
User Manual
3. Processed History: This shows the processed (accounted) leave history (same as on EIL Portal).
4. Planning Calendar : This shows the location wise and year wise CH/Week Off (in red color), RH (in blue color).
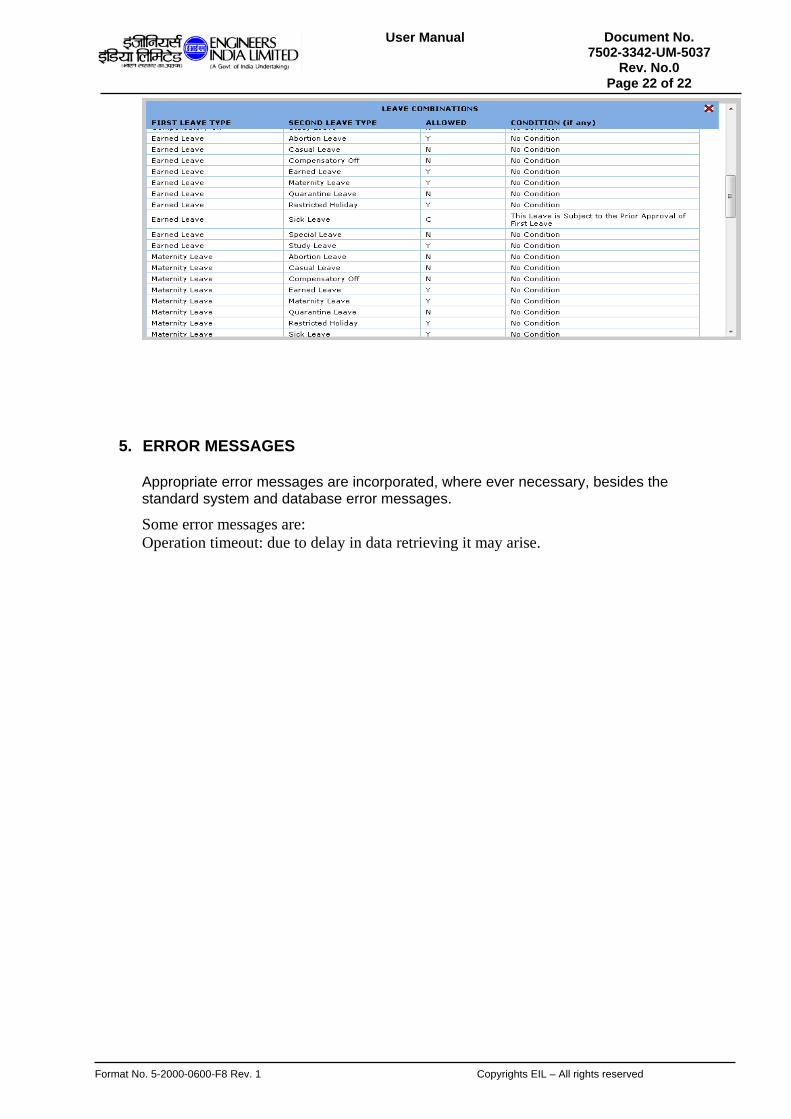
Remember : When you want to apply leaves in combination:
a. The leave combination must be a valid combination. (for ex. Casual Leave and Sick Leave cannot be combined.)
b. If you want to apply for same type of leave in continuation then combine them in upper row.
c. You can refer to the help provided for leave combinations by clicking on question mark image link just adjacent to the “LEAVE TYPE” text (see picture below)
Format No. 5-2000-0600-F8 Rev. 1 Copyrights EIL – All rights reserved
Document No. 7502-3342-UM-5037
Rev. No.0 Page 22 of 22
User Manual
5. ERROR MESSAGES
Appropriate error messages are incorporated, where ever necessary, besides the standard system and database error messages.
Some error messages are: Operation timeout: due to delay in data retrieving it may arise.