timetabling training course - university of · pdf filefacility cmis timetabling software...
TRANSCRIPT

Facility CMIS Timetabling Software
Timetabling Training Course
Part 1 – Entering Events September 2004

1. LOGGING IN AND CONNECTING TO CMIS ........................................................................2
2. CMIS STRUCTURES AND DATA LISTS.................................................................................3
3. COURSE STRUCTURES AND HOW TO CHECK THEM.....................................................6
4. THE TIMETABLE VIEW ...........................................................................................................8
5. WEEK RANGES.........................................................................................................................10
6. ROOM BOOKINGS…………………………………………………………...……………….11 7. USEFUL FEATURES .................................................................................................................21
8. EVENT SPECIFICATIONS ......................................................................................................25
9. TIME CONSTRAINTS...............................................................................................................26
10. CLASS GROUP VS. UNIT BASED...........................................................................................32
11. UNIT PLANNING (UNIT BASED TIMETABLES)................................................................33
12. SETS .............................................................................................................................................37
13. PARENT/CHILD RELATIONSHIPS.......................................................................................39
14. CLASS GROUP PLANNING (CLASS GROUP BASED TIMETABLING).........................41
15. TAKING AN EXTRACT AND USING FACILITY TIMETABLER ....................................48
16. TRANSFERRING TIMETABLE STYLES AND CELL STYLES ........................................49
17. PRINTING FROM CMIS...........................................................................................................50
18. EXPORTING TO WORD AND EXCEL.............................................................................51
APPENDIX I.........................................................................................................................................52
APPENDIX II .......................................................................................................................................53
APPENDIX III......................................................................................................................................54
APPENDIX IV......................................................................................................................................55
1

1. Logging in and connecting to CMIS From the start menu select ‘Corporate Systems’ then ‘CMIS’. This will load in the following window:
From ‘File’ select your CMIS file. This will then start connection to the database (click ‘OK’ when it says that conformity has been verified) and load in the data. A small log-in screen will appear asking for your user name and password. Enter both in CAPITALS. You will then see a screen that looks like this:
(NB. This picture shows only 1 toolbar at the top as you can remove all the extraneous toolbars by going to ‘View’ and un-ticking all views except ‘Toolbar’) To check that you have connected properly the Database; Connected? should say ‘Yes’ and Validated? should say ‘No’. The Selected data set should read the year that you wish to use. If it does not you can change it by going to ‘Data’ then ‘selected data set’ on the top menu bar. Click on the data set you wish to use and then press the ‘Select’ button. CMIS will then load up this dataset.
2

2. CMIS Structures and Data lists CMIS has large lists of resources that have been inputted into it over the course of its use. Some data items are regularly imported from other databases and others are adjusted manually as information is passed across. The following is a list of data items and how they are updated: Data item Example Input / Update method Room Anglesea A0-31
Seminar room Capacity 30
Updated by SMO from local timetabler knowledge: Change of use, change of capacity, exam capacity, change of name.
Room equipment Data projector Updated by SMO from local timetabler knowledge. Room features Black out, wheelchair
access Updated by SMO from local timetabler knowledge.
Lecturers Jeannie Carter, JC Part time Dept: SMO
Created by SMO on request from timetabler
Courses C0001 BA Accounting Automatically downloaded from HEMIS
Course structure Which units and whether they are compulsory or optional
Automatically downloaded from HEMIS
Units Name, code, local code Automatically downloaded from HEMIS
Class groups Sportsci year 1 group S Created by timetabler Students Name, course, year Automatically downloaded from HEMIS Student - unit choice Core and options Automatically downloaded from HEMIS Student – class group Class group association Link created by timetablers Timetable event Lecture for core unit Created by timetabler Constraint Not Monday Created by SMO, applied to resource by timetabler Restriction Maximum 8 hours/week Applied to resource by timetabler Week range 11-20,24-25 (sem1) Created by SMO, applied to event by timetabler Event Specification Only Monday Created by SMO, applied to event by timetabler Downloads from HEMIS take place automatically each night. All data items and data structures can be viewed under the ‘Data’ section of the top menu bar. All of these will provide lists which can be manipulated, printed and exported in exactly the same way. The list of data items that are most useful is: Data – Resources - Buildings Data – Resources - Rooms Data – Resources – Room features and equipment Data – Resources – Lecturers Data – Academic – Departments Data – Academic – Courses Data – Academic – Units Data – Academic – Class groups Data – Academic – Course structure Data – Academic – Associations Data – Academic – Relationships Data – Academic – Advanced Data – Student – Student unit associations Data – Student – Registers Data – constraints Data – week ranges Data – event specifications
3

For example: Data – Resources - Rooms will provide this window:
All the lists have common features and can be manipulated in the same way:
• Sorting Data lists By clicking on the title of a particular column, the table will then be sorted, alphabetically and numerically on that column. If you click once more on the title it will reverse the ordering.
• Filtering Data lists Data can be filtered to show particular details in several ways. Right clicking within the list display will give a drop down menu and from this the ‘Filter’ option can be selected. From this there are several options which appear. The first 2 will relate to the data item that was under the cursor when you right clicked and will allow you to show only resources from that list which have the same property, or the reverse: all resources without that property (for example if your cursor was over room type ‘LAB’ on the room list you could filter to records with Type = LAB, or filter to records without Type = LAB). You can continue to apply filters to narrow the display even further (such as also requesting only POOLED space to show which will then only show POOLED LABs) There is an option to clear the current filter (you will notice on the window at the top right that it will state if there is a filter in place, Filter: all data means that no filter is in place) or to edit the current filter – this will allow you to apply more than one filter at once and also allow more specific filters such as numeric clauses along the lines of ‘greater than’ or ‘less than or equal to’. NB. It will also tell you what your current filter is, which is useful as some tables do not display what filter is currently in place. Please always check that there is not a filter in place if you cannot see something which you think you should be able to – there is often an unmarked filter in place.
4

• Modifying column displays You can also get column data displayed in several ways. By right clicking and choosing ‘modify column details’ the following window will appear:
This will allow you to manipulate the view in several ways. If you click on a name on the left you can then use the ‘up’ and ‘down’ buttons on the right to move it up or down the list – this list determines the order of the columns in the list display, with the uppermost name being the furthest left column. The status, width and contents columns can be clicked on to adjust between options, such as ‘visible’ and ‘hidden’. If for a particular item its status is hidden then it will not appear on the data list, however, clicking on hidden will change it to visible, which will mean it will be displayed on the list. Width refers to the width of the column when displayed and contents cycles through long, short and id code (eg for a unit the long code is its full name, the short code is its HEMIS ‘U’ number and its id code would be the local short code). If you enter something in the ‘Label’ column then that will be the column heading, otherwise the ‘Name’ entry will be used as the title. You can adjust parts of the column individually without having to go to this table. When right clicking there are several options which allow you to do the above to the column that the cursor is over, ‘Hide Column’, Content, Width and Alignment. You can also ‘Define default sort’ which allows you to give the primary column for sorting (otherwise it will be on the first column in the list whether it is visible or hidden).
• Printing lists All columnar lists can be easily printed. Right click anywhere within the data list and select ‘printing’ from the drop down menu. From this are 4 options which allow you to set up the page style, configure the size of letters and format the table, preview the print and print a copy. Selecting ‘print’ will print out the list that you are currently viewing. ‘Modify column details’ will allow you to change the layout of columns printed in a similar way to adjusting how the columns appear on screen.
5

3. Course structures and how to check them. Calling up Data - Course Management – Course Structure OR Planning - Course Structure will bring up the following window:
The top section of the dialog box allows you to select a course. By default, all coany text is typed in the Search field, then only courses which contain the string inwill be included in the in the drop down list. A year and instance may be selected As an example C0006 has been entered in the Search field and by clicking on thebutton BA (HONS) BUSINESS ADMINISTRATION; BA BUS ADMIN; is displaye
The compulsory units for year one will be displayed.
6
Note the Instance Drop Down list. Instances should be used in conjunction with courses to define multiple deliveries of the same unit.
urses are included. If either code or name .
Course drop down d
If the Instance button is pressed and Sem1 selected then only compulsory units for semester 1 will show.

By clicking on the Available radio button the following will be displayed. This list view is divided in two windows . The left hand window displays the group(s).
Clicking on the group(s) in the left hand window will display the units within the group.
By clicking the Sub group radio button any units that have been Course/Subgroup Associated will be displayed.
7

Course – unit structures are automatically brought across from HEMIS each evening SMO recommend checking that Course – unit structures are the same on HEMIS and CMIS. This can easily be done by requesting the following Impromptu report for each course from department admin: L:\corporate\COGNOS\REPORTS\units\Basic\COURSE1 This can then be compared with the above drop down window.
4. The Timetable View If you go to ‘Timetable’ on the main menu bar and select ‘Timetable’ from the bottom of the drop down menu a blank timetable screen will be dislayed:
There are 3 sections to the screen now. The top half is the timetable view, bottom left is the list view and the bottom right is the clash view. All can be resized to suit you. By right clicking in the top half of the screen you will get a drop down menu. From this, about half way down, select ‘Filter’. This will then call up a filter window which will allow you to enter what you wish to see:
You can enter in as many or as few fields as you wish, depending on how defined you want the information.
8
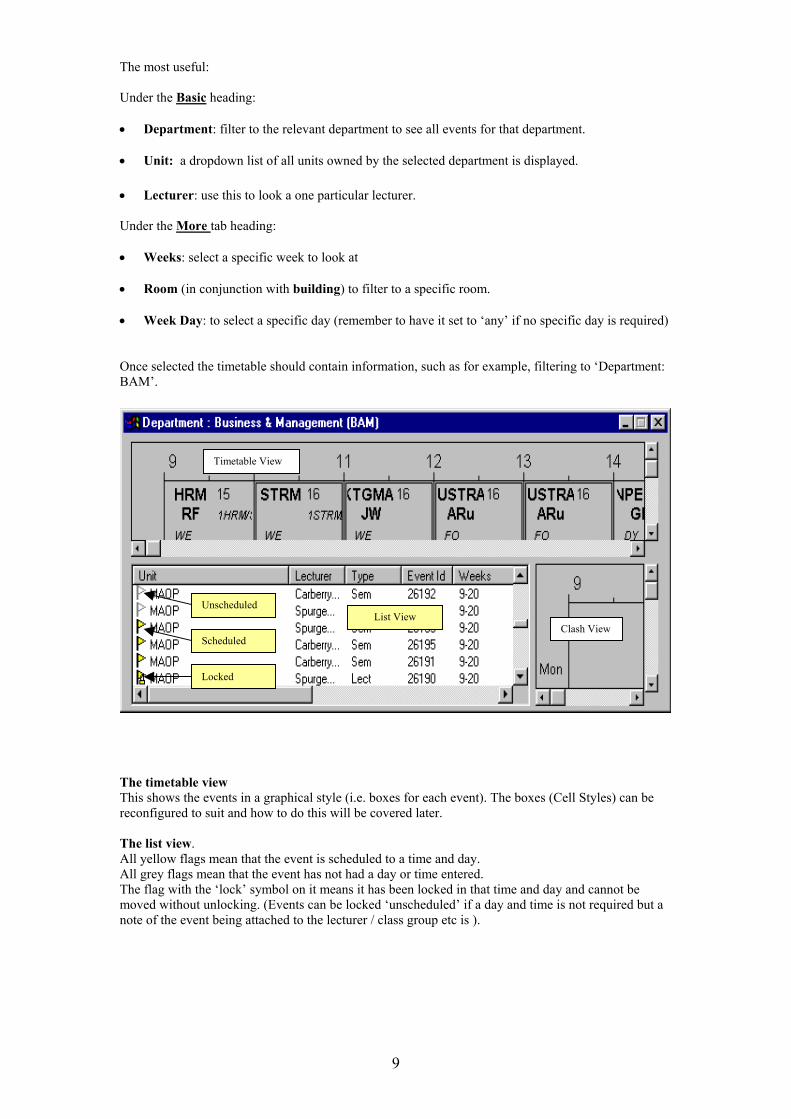
The most useful: Under the Basic heading: • Department: filter to the relevant department to see all events for that department. • Unit: a dropdown list of all units owned by the selected department is displayed. • Lecturer: use this to look a one particular lecturer. Under the More tab heading: • Weeks: select a specific week to look at • Room (in conjunction with building) to filter to a specific room. • Week Day: to select a specific day (remember to have it set to ‘any’ if no specific day is required) Once selected the timetable should contain information, such as for example, filtering to ‘Department: BAM’.
Locked
Scheduled
Unscheduled List View
Clash View
Timetable View
The timetable view This shows the events in a graphical style (i.e. boxes for each event). The boxes (Cell Styles) can be reconfigured to suit and how to do this will be covered later. The list view. All yellow flags mean that the event is scheduled to a time and day. All grey flags mean that the event has not had a day or time entered. The flag with the ‘lock’ symbol on it means it has been locked in that time and day and cannot be moved without unlocking. (Events can be locked ‘unscheduled’ if a day and time is not required but a note of the event being attached to the lecturer / class group etc is ).
9

5. Week Ranges CMIS uses academic weeks, starting at the week including 1st August as being week 1. So the first week of term for Oct 2004, beginning 11th October, is in fact week 11 in CMIS. Most events will run for one week or a series of several weeks. CMIS can replicate this. ‘Data’ – ‘week ranges’ shows some week ranges that have already been created and if applicable, should be used when you create events (if you do this then it is easy to copy the data into next years database, and adjusting the week pre-set week range to the new teaching weeks will adjust all events with that range in, rather than having to go into each event and change the weeks individually). Weeks can be entered into an event by hand, just typing in the weeks you wish the event to occur, or by entering a pre-set range. If the typed in range matches an existing pre-set week range a small box will pop up once you okay the event – to select it, just highlight the top most week range showing in the box and select it. This will automatically attach the correct pre-set week range to the event. Week entries can be typed using a comma to separate individual weeks or a hyphen to indicate a continuous run of weeks, for example: Typed into week range Meaning 1 Week 1 inclusive 1-10 Weeks 1 to 10 inclusive 1,2,3,4 or 1-4 Weeks 1 to 4 inclusive 1,3,5,8 Weeks 1,3,5 and 8 only 1-4, 6-9, 11,14 Weeks 1-4 and 6-9, 11 and 14 inclusive If left blank by accident All weeks 1-52 inclusive You can also select the weeks you wish to use by clicking on the ‘Weeks’ button and then holding down control button whilst clicking the weeks that you wish the event to happen in from the scroll list at the bottom (by ticking the ‘use dates for selection, instead of numbers’ box, it will display the first date of each week rather than the academic week number if this is preferable). Please make sure all events have week ranges in them. Most teaching events will use either the semester 1 or semester 2, ‘12 week STANDARD teaching period’ week ranges. These have a week range ID of 973 and 974 respectively.
10

6. Room booking / “one off” Event booking There are 3 ways to book a room. The first two were used extensively with version 1 and can still be used. A new booking system has been introduced in version 2. 1. If you know what room you wish to book: Filter to the room you wish to use. (Filter/More Tab/Building/Room) Right click within the timetable view. Select ‘new event’ and the following box should appear:
This is a standard ‘event window’ which you will use to display each events details. You need to fill in the following appropriate data (some of it may appear automatically, such as time, day and room, but double check all data to ensure its correct). Day Start (using 24 hour time) Mins (Length of event in minutes) Weeks (clicking on ‘Weeks’ tab on right hand side brings up list of week dates rather than a week number to select from) * In Live it is advisable to set the Weeks radio button to Contain Any. Source – must always be set to ‘1 off’ Units – if known, can enter department, unit, unit subgroup and type of event (ie. Lecture, seminar, etc). Lecturer – can be added if known. Class Groups – added if known / needed. Rooms – will already be included. Details – free text box to list who is attending or other appropriate info Owner – must always have your department – do not leave blank! NB remember to click ‘new’ after entering details otherwise it will not be remembered in the event! Click ‘OK’ to finish 11
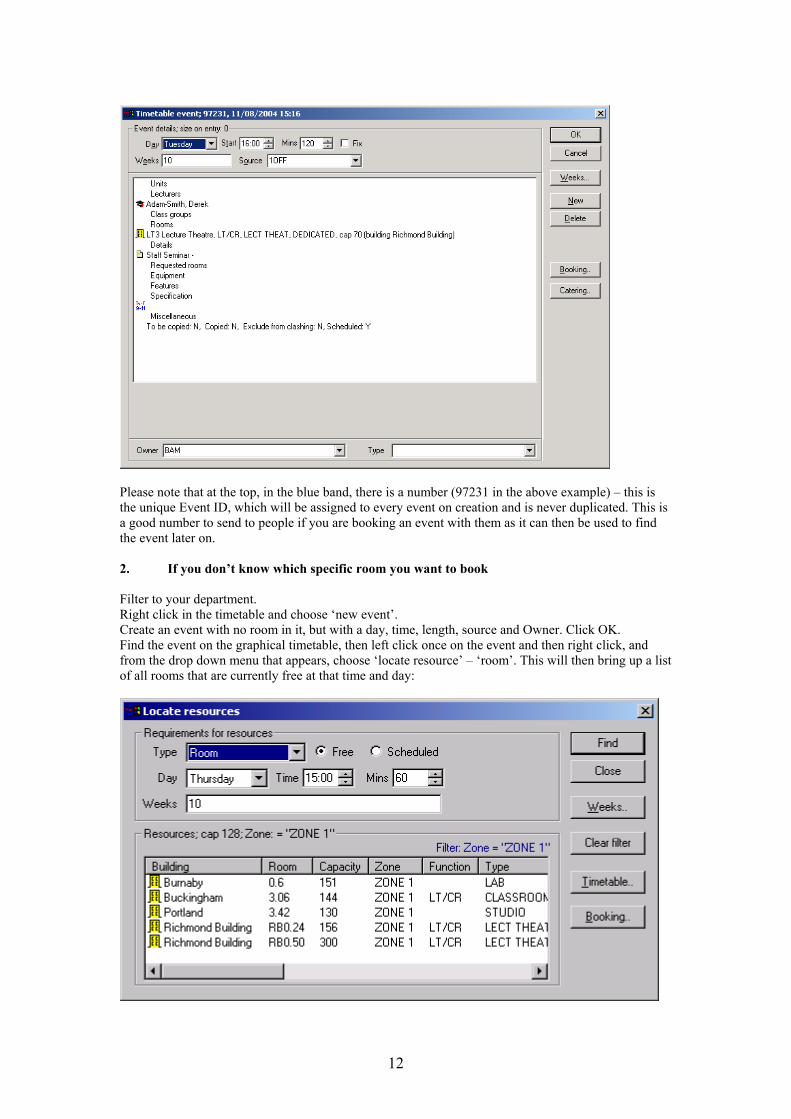
Please note that at the top, in the blue band, there is a number (97231 in the above example) – this is the unique Event ID, which will be assigned to every event on creation and is never duplicated. This is a good number to send to people if you are booking an event with them as it can then be used to find the event later on. 2. If you don’t know which specific room you want to book
Filter to your department. Right click in the timetable and choose ‘new event’. Create an event with no room in it, but with a day, time, length, source and Owner. Click OK. Find the event on the graphical timetable, then left click once on the event and then right click, and from the drop down menu that appears, choose ‘locate resource’ – ‘room’. This will then bring up a list of all rooms that are currently free at that time and day:
12
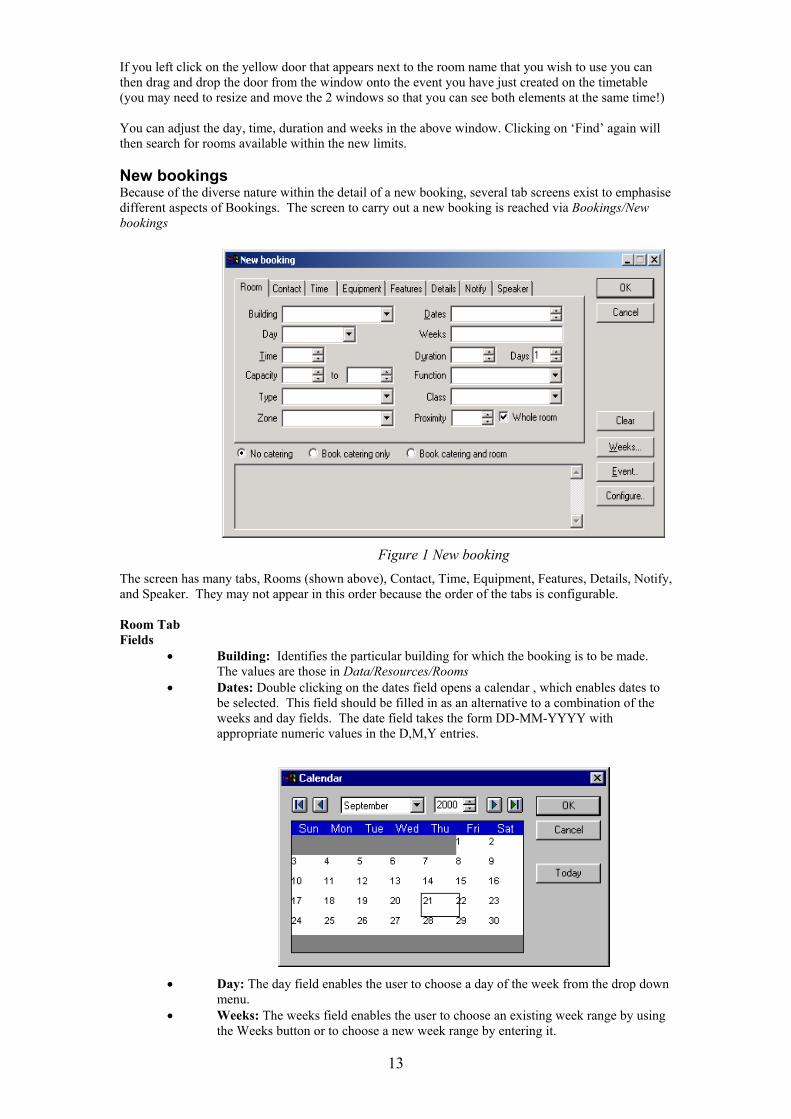
If you left click on the yellow door that appears next to the room name that you wish to use you can then drag and drop the door from the window onto the event you have just created on the timetable (you may need to resize and move the 2 windows so that you can see both elements at the same time!) You can adjust the day, time, duration and weeks in the above window. Clicking on ‘Find’ again will then search for rooms available within the new limits. New bookings Because of the diverse nature within the detail of a new booking, several tab screens exist to emphasise different aspects of Bookings. The screen to carry out a new booking is reached via Bookings/New bookings
Figure 1 New booking
The screen has many tabs, Rooms (shown above), Contact, Time, Equipment, Features, Details, Notify, and Speaker. They may not appear in this order because the order of the tabs is configurable. Room Tab Fields
• Building: Identifies the particular building for which the booking is to be made. The values are those in Data/Resources/Rooms
• Dates: Double clicking on the dates field opens a calendar , which enables dates to be selected. This field should be filled in as an alternative to a combination of the weeks and day fields. The date field takes the form DD-MM-YYYY with appropriate numeric values in the D,M,Y entries.
• Day: The day field enables the user to choose a day of the week from the drop down
menu. • Weeks: The weeks field enables the user to choose an existing week range by using
the Weeks button or to choose a new week range by entering it.
13

• Time: The time field allows a particular start time to be chosen using the 24 hour clock with a colon separator (13:00) or simply an integer for a whole number of hours
• Duration: Duration allows the selection of an event length in hours to be selected. It is also in the format HH:MM or simply a number if only hours.
• Days: Days allows duration of more than one day and is an integer value. • Capacity: Capacity allows the integer range of capacity to be entered, i.e. a
minimum and a maximum size which might be acceptable • Function: This field enables a room category to limit the search. The list of room
categories was entered under Data/Classifications/Room function. • Type: This field enables a room type to limit the search. The list of room types was
entered under Data/Classifications/Room type. • Class: This field enables a room classification to limit the search. The list of room
classes was entered under Data/Classifications/Room classification. • Zone: Zone enables a zone to be selected. Acceptable zones were determined in
Data/Classification/Room travel zone. • Proximity: as yet this field has not been developed for general use. • Whole Room: Whole room restricts the search to whole rooms as opposed to room
parts (breakdown). The radio buttons offer No catering, book catering only and book catering and room Buttons • OK: The OK button attempts to accept the data provided and proceed to make a
booking. Various warnings may be given if the data is incomplete.
Warning message
If the data is appropriate, various rooms will be displayed which are available and meet the currently set criteria of the opening and other tab screens. The matching rooms screen is dealt with in the next section. • Cancel: This button exits the screen without taking any action on the partial data
present on the screen. • Clear: This button clears the entries form the screen enabling a new entry to be
made if appropriate. • Weeks: This button provides the existing week ranges to be entered into the
weeks field if appropriate. • Event: Do not use this. • Configure: Do not use this.
Time tab The time tab enables the time of the event to be considered in more detail.
14

The fields time, duration, day, week and dates are duplicate copies of those on the Room Tab. The extra fields Publish and to enable the time of the event as published to be different to the time the room is booked providing time for setting up before the event and clearing up after the event. Thus;
• Publish: The official starting time of the event using the 24-hour clock and separating hours and minutes by a colon.
• To: The official finish time of the event. Additional buttons Since the normal times may have been entered on the Room tab, additional information may be added in the Time tab. Hence the need for the new buttons
• Add: Add adds extra times and dates which will make use of the same room booked in the first event showing on the list view.
• Remove: Remove takes one line of the list view, which is highlighted and removes it.
• Modify: The modify button takes information displayed on the screen and changes an existing record.
Equipment and Features tabs The equipment tab enables equipment to be associated with the room booked
Equipment tab
• Equip: The drop down list shows the nature of equipment, which can be booked. The original values were declared in Data/Resources/Equipment labels.
• Units: The Units field accepts an integer value for the number of the item selected under Equipment
• Moving: These optional fields on the equipment screen only enable control of movement of equipment.
• Adjacent field: The particular item of equipment of the set already described by the (the nature of) Equipment field. The original values will have been added in the Data/Resources/Equipment labels.
The features screen performs a similar function for features to that achieved above for Equipment (labels)
15

Note how your request criteria is built in this window
Features tab
• Feature: The drop down menu list shows the nature of the features, which can be booked. The original values were declared in Data/Resources/Features
• Units: The units field accepts an integer value for the number of the item selected under Features.
Details tab
Details tab
• Source: The source can be entered here. It will be one of the allowed sources created under Data/Classifications/Sources. Always use 1OFF
• Booking id: Using this screen a specific id can be entered otherwise the system will generate its own.
• Status: The Status is the current nature of the events (e.g. provisional, confirmed etc.). The possible values for booking status have been established as Provisional, Confirmed and Cancelled.
• Published: As well as the published times being set up on the Time tab, they can be entered on this screen or previously entered values observed in the appropriate boxes.
• Notify: The period before the booking in days can be set up. • Cost: If a cost structure has not been set up for various rooms and a cost
must be applied for this particular booking, it can be applied on this screen. • Details/Notes: The Details tab allows new information to be entered in the
details field and in the Notes larger field and revision of earlier information. • Copy forward: The user has the option to copy forward to the next dataset
(year). • Adjacent box: The user can amend the date to which it is copied (either by
direct entry or by using <F9> and the calendar.
16

Notify tab: Not used Speaker tab: Not used Choice of rooms Once all the criteria of the booking have been entered, the next step is to select a room or several rooms that meet the requirements. The list of potential rooms will be shown once OK is clicked on any of the screen of New Bookings
As can be seen, the rooms, which match the criteria, are Vid1 and Vid2 To book the room, proceed as follows:
• Select the room in the list view. • Click on the Book button. The room is now booked. • Click of Finished.
The booking has been completed using most of the available tabs. All of the necessary information has been entered in for the booking to be complete. It is NOT essential to add information into each tab in order to complete a booking. The minimum requirement is the day, the time, the duration and the capacity of the room.
Examples Booking a room Example 1 – One off booking A room is required on the 18 Aug from 2pm to 5pm for at least 20 people. The room must have Black out blinds.
• Click on Bookings • Select New booking. • Click on the Room tab • Double click on the Dates field
A calendar appears. • Select the 18 Aug 2004. • Click on OK. • Enter 14 in the Time field. • Enter a duration of 3 hours • Type 20 in the left hand Capacity field. • Click on the Features tab. • From the feature drop down menu, select Black out.
17

Features needed
• Click on the Add button. • The feature should appear in the list view. • Click on the Details tab and select 1OFF from the Source drop down list. • Click on Ok. • This will produce a list of all the rooms that match the set criteria. • Select a room in the list view. • Click on the Book button. A warning message will appear to say that the room has been booked, and the booking reference is given.
It is advisable to note down the Booking Id number
The booking Id number The room has now been booked. Click on OK in the room booking message window. The booking can now be verified and viewed by clicking on the Timetable button in the Matching rooms display. This will bring up a graphical display. Once you’re happy that the room has been booked and the details correct, close the graphic screen down. Click on the Finished in the matching rooms window. Click on Cancel to close the New bookings window.
Example 2 – A particular day over a series of weeks A room is required every other Wednesday from 1pm for 1 hour, for at most 40 people. The first week is week 11 i.e. commencing the 16th Aug 2004. (NB the database needs to have an appropriate weeks field already entered).
• Select Booking. • Click on New booking. • Select Wednesday from the Day drop down list. • Click on the Weeks button. • Select Odd weeks from the list. (S1 odd weeks) • Click on the select button. • Type 13 in the Times field. • Type 1 in the Duration field. • Type 40 in the right hand Capacity field. • Click on the OK button.
18
• A list of available rooms is displayed. Select a room.
Click on the Book button. The warning message appears, saying that the room has been booked.
The booking completed message
• Verify the booking by clicking the Timetable button • Click on Finished and then on Cancel to close the windows.
•
Example 3 – A series of disjoint days
A room is required on Tuesday12 October, Friday 22 October and Wednesday 27 October, all from 10am to 12 noon. The events must be in a Class room.
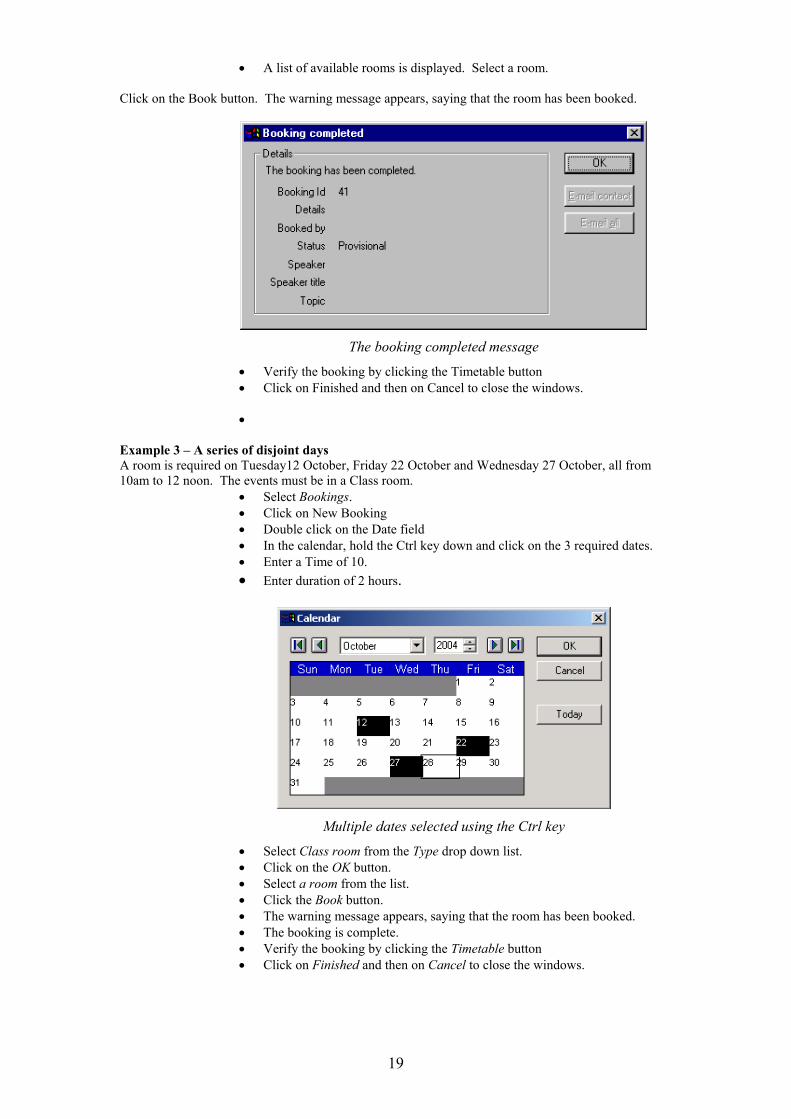
• Select Bookings. • Click on New Booking • Double click on the Date field • In the calendar, hold the Ctrl key down and click on the 3 required dates. • Enter a Time of 10. • Enter duration of 2 hours.
Multiple dates selected using the Ctrl key
• Select Class room from the Type drop down list. • Click on the OK button. • Select a room from the list. • Click the Book button. • The warning message appears, saying that the room has been booked. • The booking is complete. • Verify the booking by clicking the Timetable button • Click on Finished and then on Cancel to close the windows.
19

Multiple date booking
Example 4 – Vague time limits A room is required on the 26 November for 2 consecutive hours. It must be within the zone 20. It can be for any time that day.
• Select Bookings • Click on New bookings • Double click on the Date field. • Select 26 November • Click on OK • Enter duration of 2 hours. • Select 20 from the Zone drop down list. • Details Tab – One Off
Zone selection from drop-down list
• Any room that is available that meets the criteria. Scroll to the right- there is a list of times at which the room is free. The next step is to pick an available slot.
20

Room available from specification
• Click on the selected room. • Click on the Book button. • Click on the Available slots drop down list. • There are 2 slots in which this booking can fit, 09:00am – 12:30 and
13:00pm – 18:00pm. (this will depend on the data being used and the set-up) • Select the 09:00 for 03:30 until 12:30. • Change the start time to 10am.
7. Useful features Once you have entered your event and are back in a timetable view, there are many things you are able to do to manipulate the event or look at other related events: Firstly, left click once on an event to select it. This will highlight it (usually it goes black). Double clicking on the event will call up the event window once more, however, it is not always necessary to do this to change parts of the event. ‘Left click’ features To extend the length of your event: Move the cursor so that it sits on the left or right edge of the event. A double-headed arrow should now appear and you can now hold down the left mouse button and drag it to the new length. To move your event: Left click and hold within the event on the timetable and then drag the mouse – a ‘shadow’ image will then follow you and you can position this in the day and time that you require. ‘Right click’ features Right clicking once an event is selected results in a drop down menu, which has many useful features, some of which are: Place event at…..: If once you have selected your event you move your cursor to a new day and time (say wed 10am), when you right click the drop down menu will show this as ‘Place event at 10am Wednesday’. This then allows you to create an exact duplicate of the event, but at this new day and time, without adjusting the original event in any way. Move event to….: If you move your cursor to the new day and time that you wish the event to appear at, it will then move the current event to this new time. 21

Edit event This acts exactly as if you had double left clicked on the event – it brings up the event window and allows you to alter parts. Delete event: Exactly what you expect – it deletes the event and its gone for good, no retrieval! Locked This locks an event in place, which means it cannot be moved or altered without unlocking first. This is very useful to avoid moving an important event by accident. Be careful though – it is possible to lock an event which hasn’t been given a day or time and this will keep it out of the auto-scheduling process and it will not be automatically given a day or time. This can be a useful feature if you wish to have something associated with a course or lecturer but don’t want it to actually appear on their timetable (it will still appear in lists, just not visual displays). Locate resource Extremely useful, as explained in the ‘1 off booking’ section above. This is not just limited to rooms, but can also be used for lecturers, classgroups, units and equipment. It will only show what is available within the restrictions of the event currently highlighted (ie rooms available at that time, with any requested equipment or of a specific size). Filter History If you keep filtering between several sets of information, say a group of rooms, rather than keep on right clicking, selecting ‘Filter’ and entering the details of a previous room again, ‘Filter History’ brings up a list of past filters you have looked at on this timetable and select one of them. When you select it, it will then change the filter to that configuration for you and show the associated view. Configuration This opens a drop down box with several options which allow you to change the look of your timetable and the block ‘cells’ within it. Further information will be covered later, and further help can be found on the SMO website in the help sheets section: http://web.port.ac.uk/departments/smo/ under the ‘configuring the graphical timetable’ heading. Printing This also leads to several selections to allow you to print in various ways. Again this will be covered later and in the help sheet section of the SMO website: http://web.port.ac.uk/departments/smo/ under ‘printing and print settings’. Switch to…. This is a useful feature, that on selection brings up a list of all the resources used in your event (such as unit, classgroup, lecturer, building and room). If you select one of the items in the list, it will change the timetable to display that resources timetable. Jump to… This is similar to the above function of switch to, except that it will create a new timetable showing that resource. This is useful, but you can end up with many timetables listed under ‘Timetables’ on the main menu. You can delete these using ‘Timetables’ – ‘edit timetable views’ and then deleting these extraneous ones. Bulk Changes to timetable events There are instances where it is necessary to add, remove, and change elements on events that we have created. Often the same amendments need to be made to a number of events. To make these amendments one event at a time is very time consuming. Instead the Bulk Function operation can be used to make changes to a number of events at the same time. The Bulk Function can be found in both CMIS and TTCMIS. These amendments can be made to any element shown in the Timetable event window.
22

In the first example let’s say that we have events where no lecturer information was available when we entered the data.
• In the list view highlight the events that need to be amended.
• Right click and choose Timetabling • From the sub menu choose Bulk • Select Add Element from the drop-down menu
In the Timetable event window click on the Lecturer
• Choose the lecturer in the normal way from the drop-down menu • Click New • Click OK
The lecturer will now be added to the selected events and shown in the list view.
23
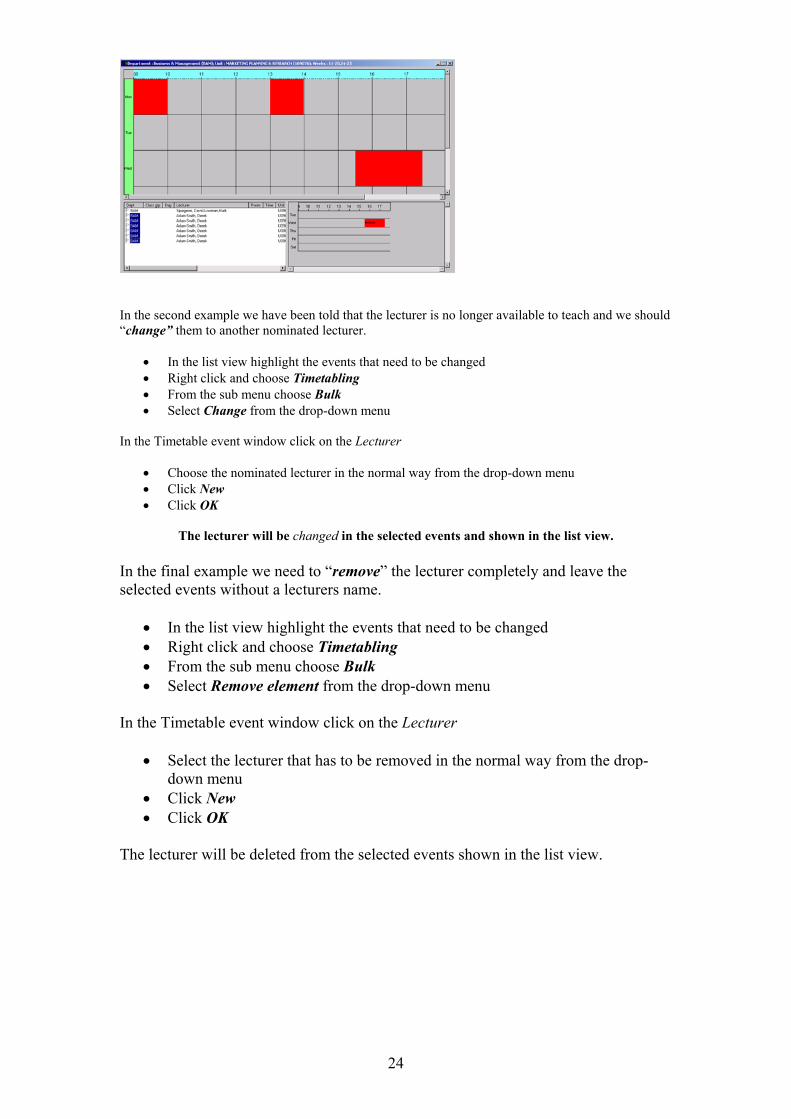
In the second example we have been told that the lecturer is no longer available to teach and we should “change” them to another nominated lecturer.
• In the list view highlight the events that need to be changed • Right click and choose Timetabling • From the sub menu choose Bulk • Select Change from the drop-down menu
In the Timetable event window click on the Lecturer
• Choose the nominated lecturer in the normal way from the drop-down menu • Click New • Click OK
The lecturer will be changed in the selected events and shown in the list view.
In the final example we need to “remove” the lecturer completely and leave the selected events without a lecturers name.
• In the list view highlight the events that need to be changed • Right click and choose Timetabling • From the sub menu choose Bulk • Select Remove element from the drop-down menu
In the Timetable event window click on the Lecturer
• Select the lecturer that has to be removed in the normal way from the drop-down menu
• Click New • Click OK
The lecturer will be deleted from the selected events shown in the list view.
24

8. Event Specifications If you do not know the exact day and time of the event (i.e. It is a teaching event which can happen any time within the week, or within certain limits within that week) then it will need an event specification. If your event already has a specific day and time, then instead of entering an event specification you should ‘fix’ your event (by ticking the ‘fix’ box in an event situated next to minutes box). Event specs are extremely useful for creating a timetable. If you did not enter a day and time or an event spec, theoretically CMIS could assign your event to any time Monday to Sunday 1am to midnight. By assigning an event spec you are defining the times within which normal teaching for this event could occur. SMO has already created many event specs. If one does not apply to your teaching it can be easily created on request. To select an event spec for an already created event, click on ‘event specification’ within the event and click on the ‘Edit’ button to the right. This will bring up the following window:
Click on the id that fits and then click the ‘select’ button. The event specs are set up for the standard teaching week of Mon, Tues, Thursday 9am-6pm, Wed 9am-1pm and Fri9am to 5pm. Some event relate purely to one day or a combination of half days, although most events will fall into 1 hour standard, 2 hour standard etc. Event specifications allow more freedom in timetabling by only applying to the event they are attached to. Constraints (which will be covered in greater detail later) can be applied to a resource in general and therefore constrain every event with that resource in it – however, this can lead to problems as it is possible to put 2 resources into an event which have mutually exclusive constraints (i.e. A class group which can only be taught on a Monday and a room which is only available on a Friday).
25
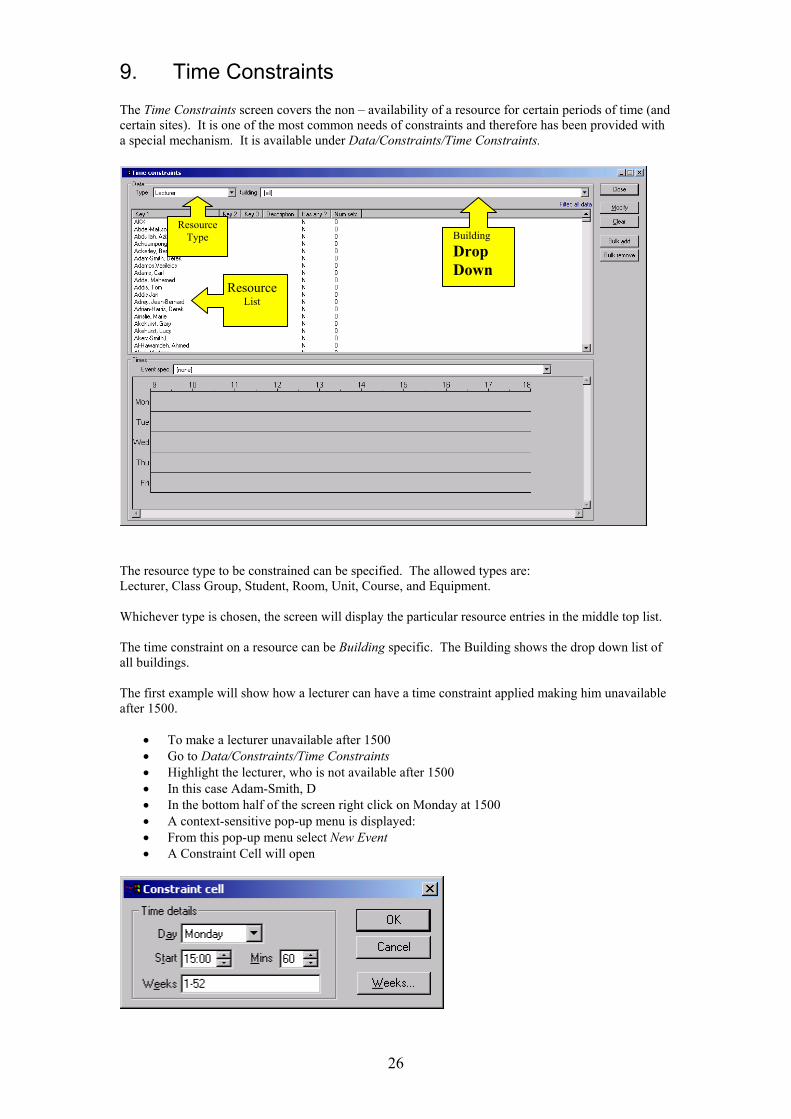
9. Time Constraints The Time Constraints screen covers the non – availability of a resource for certain periods of time (and certain sites). It is one of the most common needs of constraints and therefore has been provided with a special mechanism. It is available under Data/Constraints/Time Constraints.
The resource type to be constrained can be specified. The allowed types are: Lecturer, Class Group, Student, Room, Unit, Course, and Equipment. Whichever type is chosen, the screen will display the particular resource entries in the middle top list. The time constraint on a resource can be Building specific. The Building shows the drop down list of all buildings. The first example will show how a lecturer can have a time constraint applied making him unavailable after 1500.
• To make a lecturer unavailable after 1500 • Go to Data/Constraints/Time Constraints • Highlight the lecturer, who is not available after 1500 • In this case Adam-Smith, D • In the bottom half of the screen right click on Monday at 1500 • A context-sensitive pop-up menu is displayed: • From this pop-up menu select New Event • A Constraint Cell will open
Resource List
ResourceType Building
Drop Down
26

The Constraint Cell screen which opens will initially open with Monday 1500 and 60 minutes showing as the default Mins.
• Change the Mins to 180 to represent the period from 1500-1800 • Click on the Weeks button and accept the entry 1-52 for all weeks • Accept the OK button and an event for Monday will appear on the screen • Make sure that event is highlighted and move the cursor to Tuesday at 1500 • Right click and accept Place Event at 1500
A new constraint event on Tuesday will appear;
• Repeat the process for Wednesday, Thursday and Friday and the screen will appear as the bottom half of the screen below.
• Once satisfied that the time constraint has been constituted, click on the Modify button and the top screen will reflect the change as shown below.
The lower part of this dialog box contains a timetable view of the type used to display all timetable information in Facility CMIS. The time slot in which any timetable event is scheduled is shown by the presence of a cell in that location in the display. The appearance and contents of a timetable view are entirely under the user’s control. Different cell styles may be used for different types of timetabling to display relevant information. The procedure for creating and customising timetable views and cell styles is described in part 4 (Options and Configuration) of the reference manual.
• If a resource is unavailable [U], then it will never be considered for scheduling at that time • If a resource is restricted [R], it will be considered for scheduling when the Analysis mode is
employed in TTCMIS. • If a resource is variable [V], then the resource will be left free for at least one period of a
number of consecutive periods within the same day. • By default the resource will be [U] unavailable.
To change the setting the user needs to add an item, Time Slot Type to the cell style. Double clicking on the cell will then change the setting from unavailable to restricted. Double clicking again will change the cell to variable.
Remember how to add a new cell? You’ll need it for the next bit. • Right click anywhere in the lower part of the dialog box • A content sensitive pop-up menu is displayed • Choose Configuration/Edit Cell Style
27

The Edit Timetable Cell Style box will be displayed.
• Right click anywhere in the white Items in style box • A content sensitive pop-up menu is displayed • Choose New Item
A new cell will appear as a grey square. Left click on the new cell and drag it to fit between the guide lines.
It is probably helpful if the cell style used while these time constraints are built are Cell Styles – time slot type: A new expression, Time slot type has been added to the available list in Timetable Cell Styles. The expression displays whether a time constraint is unavailable [U], restricted [R] or variable [V]. The expression is selected in the normal way. It should be added to the cell style used in the timetable view for Time Constraints. The Expression component box is opened by:
• Right clicking in the lower dialog box • Selecting Configuration • Select Edit Cell Style • Highlight the Cell Item • Click on the Expression button.
This cell is the Time SlotType
28

Select Time Slot
Time constraints can be applied to any resource over any week within the chosen data set. The time range in which the time constraint applies must be specified in this dialog box. A time range is specified by scheduling one or more constraint events on the timetable view shown at the bottom of the dialog box.
• Follow the same procedure above to open the Expression Component Box
This cell is the Weeks Type
29

Select Week Type
Another example of a Time Constraint would be if you have a lecturer that must have a lunch hour between say 1100 and 1400 but they don’t mind when. This can be achieved by following the same procedure as in the first example.
Remember to double click in the cell to change the default setting to V for variable
Remember if a resource is [V] variable then the resource will be left free for at least one period of a number of consecutive periods.
30

WOW!
Clearly this is very time consuming and you may have noticed the Bulk Add button.
• Highlight the lecturers you wish to apply the time constraint to • Create the new events • Remember to change the cell type to variable [V] • Click on the Bulk Add button • Click Modify
The same Time Constraints have been added to all the lecturers you chose. One more example. Lets say you have a specialist lecturer who travels to the University on Monday morning. Teaches Monday afternoon and evening. Stays the night in Portsmouth and teaches all day on Tuesday. Because they teach on Monday evening they would like to avoid a 0900 start unless it was unavoidable. Again use the same procedure as in the first example:
• Highlight the lecturer you wish to apply the time constraint to • Create the new events • Remember to change the resource to [V] [U] [R]
[R] Restricted. It will be considered for scheduling
[U] Unavailable for scheduling
Happy with the Time Constraints ----- click MODIFY Timetables tend to auto-schedule much more easily when there are less constraints and more event specifications and time constraints.
31

10. Class group vs. Unit based Which style of timetabling to use? This depends on the structure of your degree path and how you wish to group students to attend units. Also the whole year needs to be the same as it is difficult to auto-schedule both together. Class groups will allow you to easily print a timetable for a specific group of students. It will allow you to attach them to a non-unit event (such as a personal tutorial or one off meeting) with ease. Class groups do not work well for large option courses as you will have to keep dividing the class group into further subgroups to allow options to run at the same time. Unit based allows more flexibility of subgroups as you are not specifying which students attend the event until after scheduling. They are quicker to set up using ‘planning’. However when auto-scheduling the program may assume a clash when there isn’t one (as it looks at all events for a unit for clashes) – if class grouped you know exactly which tutorial group they are attending and can easily see at a glance if there is a clash or not. Class groups Unit Based Advantages Advantages Easy to attach to non-unit events Quick and easy to generate all events using
‘planning’ Easy to print timetables Easy to check all unit subgroups created Easy to check clashing Less constrained as no specific students
attached Easy to filter to specific group of students Can ‘student fit’ easily
Disadvantages Disadvantages Does not work well with ‘option heavy’ courses. Takes time to set up Hard to print clear timetable due to showing
all possible options. OK after student fitting Must be careful to include in all events Need to ‘course – unit subgroup associate’ to
clean up data Constraining TT by ‘forcing’ specific set of students into that event – lack of freedom that is available through ‘student fit’
32

11. Unit planning (unit based timetables) Follow this for non-class group based inputting. To create events which will be timetabled you will need the following information: • Units being taught in this semester. • Number of students likely to attend. • How the unit is being taught (lectures, tutorials, seminars, practicals, etc) and what size each of
these components will be (eg Lecture = all, seminar = group of 20 etc) • Which zones, rooms or types of room you require for each type. • The lecturers for each event. • Any specifications to attach to each event (this course is only available for Monday, so the event
must have a ‘1 hour Monday only’ spec). • Any special requirements (powerpoint projector, specific software, etc) Starting inputting First off you will need to know the number of students on this unit. You can enter the number in 2 places: Data – Academic- Units can be used to do all units one by one in a single place (remember to leave any units that you intend to be solely class group as zero as the students need to be associated with the classgroup not the unit).
Or Planning – unit requirements
You will see from the diagram above that every unit will be shown twice; one for Sem 1 instance and another for Sem2. Obviously if your timetabling in sem1 then you select sem1 instance and Sem2 Instance in Sem 2. You will still have to select a week range for the event. INSTANCES: Instances are used in conjunction with units to define multiple deliveries of units. For example the unit U01230 LACU is taught in both semesters but to different degree pathways. By selecting an instance LACU can occur more than once. “i.e.” Sem1 and Sem2. The advantage of this is that when attaching students to sub groups students who take LACU in semester 2 will not be attached to semester 1 events.
33

Highlight the unit you want (with the correct instance) . You can then enter the number of students in ‘estimated students’. Press ‘Modify’ Then click on ‘Activities’. This will take you to the following screen:
Fill in as appropriate with the following proviso: Do each type of teaching at a time for that unit ie. All lectures, then all tutorials, then all practicals. For ease I’ve divided the box into four sections: Top left: Module Type: choose the appropriate unit type (lecture, tutorial, seminar, practical etc) Weeks: click on the button to the right and select a week range that already exists if possible. Weekly time: enter the time in hours and minutes. For example: For a 1 hour event put 1 in the weekly time and 1 in the adjacent box. For 2 x 2 hour events put 4 in the weekly time and 2 in the adjacent box. This corresponds to the number of activities per week. Or you can enter the Total time and it will divide it up equally between the number of weeks you’ve entered. Top right: If the event is going to be a lecture that everyone attached to the unit attends then leave the entire top right section empty (and chose the ‘lecture’ from ‘module type’ in the top left) In fact any event where all the students attached attend in a single lesson it can be left blank (eg. The students all attend a lecture and then there are 5 tutorials – for the lecture leave it blank, but for the tutorials do as follows:) To split the unit into several equal events then the top right section needs to be filled as follows (choose ‘seminar’ say in ‘module type’ top left) Either: enter the size of a typical seminar in the ‘Size(s)’ box Or Enter how many seminar groups you want in the ‘Groups’ box The program will automatically give you the other. (you can input different group sizes, by in ‘sizes’ putting ALL the groups in separately with a coma between the size, eg 25,30,30,35,45) In ‘Code’ enter what you want to call it, such as ‘Sem A’. Make sure the ‘Inc’ box is ticked. When you finally create these events it will automatically call them Sem A, Sem B etc as it changes the last digit (if you called it Tut A it would give Tut A, Tut B etc).
34

(NB. If you then wanted to set up the same number of practical groups and wanted the same students who went to Tut 1 to go to the same practical, then rather than entering a new code and new sizes / groups, just click in the circle marked ‘reuse groups’. Then click ‘Groups ’ button on the right. This will bring up a mini screen with as follows:
Highlight the groups you wish to reuse (which will usually be all of them), then click ‘Add’ then ‘OK’ and it will create another batch of events with the same subgroup code so that the same students go to both events!) Details can be filled in under the ‘Details section’ or by pressing ‘More’ and entering the details in the ‘Timetable Event Box’. Pool: this allows you to use a preset pool of lecturers. (this takes some setting up as you need to define max and min teaching hours etc for all lecturers involved and then create groups of lecturers who can teach that unit so the program can decide which lecturer best fits that event). Specification: This must always be entered! Chose the specification that fits the length of the event, such as 1 hour standard or 2 hours standard etc. Some specs are even more specific (such as 1 hour Monday or Tuesday only). It is far easier to use these event specs than constraints as they apply only to this event and not the entire unit. SMO can create any event spec you require. Lecturer: if you are creating multiple events (such as 5 tutorials) and you want different lecturers for each then just leave this blank and fill in each one individually after they have been created. Source: Again, this must be filled. Most of the time choose ‘import’ as these events are going to be standard unit related events (using info derived from HEMIS) ‘1 off’ tends to only be used when booking special events. Owner: Must be filled! Enter your own departments code. Do not leave blank as otherwise your event will not show if you filter to your department and may become lost amongst all the other events. Requests section: All 4 boxes in this section can be filled in as appropriate or not…. Function: LT/CL means it will look for any teaching space that is a classroom or a lecture theatre Type: If you want a specific room type, such as IT suite, chemical LAB, etc
35

You cannot request a zone from the ‘Details Box’ you can do this by clicking on the ‘More’ button
hen click on ‘requested room’, a few more boxes will appear, select the appropriate zone in ‘zone’
which will bring up a standard event screen:
Tand then click ‘New’. This will select the zone. Click ‘OK’ to drop back to the previous screen (it may request you to enter the owner and source
ou can of course put further information in whilst in the event screen – just remember it will apply to
hen you have entered everything in the ‘unit component screen’ click ‘N
before allowing you to drop back, just enter them and click OK again). Yevery event if you are creating multiple unit groups at the time! W ew’ and it will create the
at a later stage you want to adjust something (such as now putting in the different lecturers for the is
number of events requested. Iftutorials) you can do so in the usual timetable view, (and clicking on the event in the list window). Thwill adjust each individual event rather than bulk change it.
36
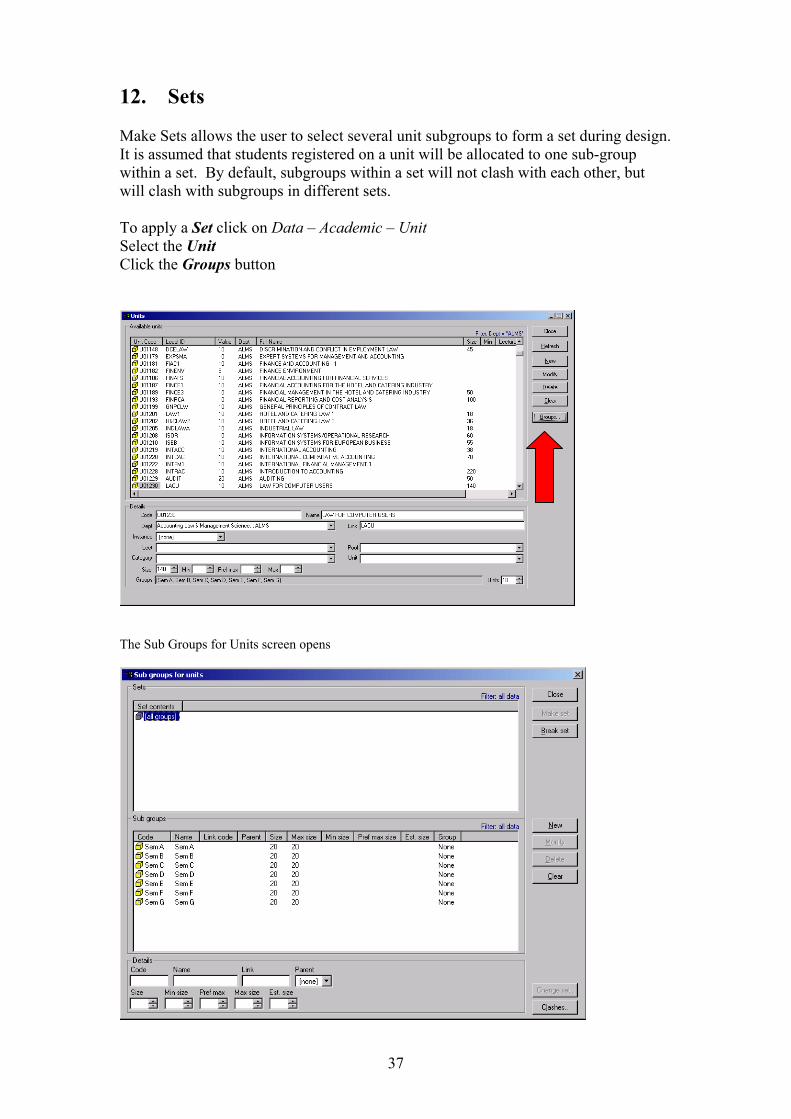
12. Sets Make Sets allows the user to select several unit subgroups to form a set during design. It is assumed that students registered on a unit will be allocated to one sub-group within a set. By default, subgroups within a set will not clash with each other, but will clash with subgroups in different sets. To apply a Set click on Data – Academic – Unit Select the Unit Click the Groups button
The Sub Groups for Units screen opens
37

Using the <Ctrl> key highlight the groups and click the ‘Make Set’ button.
At the end of this process the set of groups will appear in the upper screen. Close the Sub Group for Units window and in the Units window click ‘Modify’ to save changes. All units that have sub groups must have their groups made into Sets If at a later stage you want to adjust something (such as now putting in the different lecturers for the tutorials) you can do so in the usual timetable view, (and clicking on the event in the list window). This will adjust each individual event rather than bulk change it. If you find you need to add or lose a unit subgroup (or change its size) then this can easily be done through ‘Data – Academic – units’. Select the unit you want then click on the ‘Groups’ button. The Sub groups for units screen will then appear: It will then give a list of all subgroups available. If you wish to add one, select another identical subgroup, then in the boxes under the list change the suffix number and click ‘New’. To adjust a size, just change the number and then click ‘Modify’. Then click ‘OK’ and most importantly, when it drops you back to the screen with the list of units click ‘MODIFY’ otherwise it will not save the operation!! Once you have entered all your events for that unit you can select a new unit in the ‘unit requirements’ screen and create similar subgroups to before. You can in this screen also click on the ‘Timetable’ button to take you to the timetable view to see this unit. There should be nothing in the view, but in the bottom left hand section (list view) there will be a list of the events for that unit, with grey flags beside them denoting that they have not yet been given a day and time. Double clicking on any of these events will bring up the ‘Timetable Event’ window and the details can be altered as desired.
38

13. Parent/Child relationships.
It is possible to define a parent and child relationship between subgroups. When parent and child relationships are defined, the system is being instructed that the same students will be allocated to parent and child groups. The user selects the group which is to be the “parent” group for the chosen sub-group from the dropdown field menu. Defining a parent and child relationship changes the rules for clash checking between sets of unit subgroups. With no parent-child relationships defined, in the example below, events involving groups A1, A2 and A3 will not be allowed to run at the same time as group B, and events containing groups B1, B2 or B3 will not be allowed to run at the same time as group A.
Parent-child subgroups
If Group A in the example above is defined as the parent for groups A1, A2 and A3 it’s likely that it must not clash with them in a timetabling sense. Therefore event A cannot take place when A1, A2 and A3 events are happening and vice versa. Events containing groups A1, A2 and A3 would be allowed to run at the same time. Thus a 360-intake group for a unit (instance) might consist of two 180 size main subgroups (Group A and B) and each main subgroup consists of three smaller subgroups each of 60 students. (A1, A2, A3, B1, B2, B3)
A1 (60) A (180) A2 (60) A3 (60) Main (360) B1 (60) B (180) B2 (60) B3 (60)
In this context A is a ‘parent’ of A1, A2, A3 and B is a ‘parent’ of B1, B2 and B3. 39

For certain complexities of subgroups the use of sets and parents will not be sufficient to describe the situation on the ground or the user will need reassurance that the clashing mechanism will operate as the user expected. This can be observed and if necessary changed by using the Clashes button at the bottom of the right hand side of the screen. This displays in graphical form the clash structure for the unit. In this example shown related to the example of two main subgroups each divided into three smaller groups, the clash table below is displayed. In this clashes screen, a particular item can be highlighted and by right clicking the choice of Edit or Delete is offered.
Sub group clashing for unit
Clicking on Edit gives a small drop down of [default] or Clash or no clash [default] returns the item to the rules of parents or sets. Clash will prevent the 2 subgroups occurring at the same time in the same week range. No clash will allow the 2 subgroups occurring to coexist at the same time in the same week range. Once the value is entered, clicking onto another position, implements the change. Where a change has occurred which is not consistent with the standard structure implied by the setting on the previous screen the lettering will read ‘N (C )’ or ‘C (N )’ to denote the change. The screen permits the user to zoom in or out of parts of the clash matrix by permitting a change in the % value at the bottom right of the screen making the information appear bigger or smaller as appropriate. Once the user is satisfied that the clashes screen holds the correct information, the screen is closed, by using the Close button on that screen. The subgroups screen can them be Closed and the main screen ‘Modify’ used to ensure the record has been changed. This screen maybe printed from the grey edge area on the right.
40

14. Class group Planning (class group based timetabling) NB. If you wish to use class groups you will need to do so for the entire level. E.g. You can use a class group based model for year one and then a unit based model for years 2 and 3. However you cannot do half of your courses class group and half unit based within a single level. The main advantage of class groups is that they can easily be attached to non-unit related events. i.e. you can set up a ‘personal tutorial’ event and attach them to it, which can then be easily timetabled at the same time as all the other class grouped events, even though no unit is affiliated with that event. This is not so easy under unit based timetables. To create events to be timetabled you will need the following information • Course code and numbers of students on that course. • How many course subgroups (i.e. class groups) you wish for each year of that course. • Units that each course attends and how that unit is taught (lecture, tutorial, practical etc) • How many class groups will attend each type (e.g., all for the lecture and singly for the tutorial) • Which zones, rooms or type of rooms you require for each type of event. • The lecturer for each event • Any specifications to attach to each event (class group A are only available Mondays so the event
must have a ‘1 hour Monday only’ spec.) • Any special requirements (PowerPoint projector, specific software etc). Creating class groups First go to ‘Data- Academic- Class groups’ You will see the following screen:
Select the course you want to subgroup in ‘Crs’ and find the relevant name in the drop down menu. Enter a year. Now enter a code that you will readily associate with that class group and give it a meaningful name. Make sure you also enter the correct Dept that the course belongs to. Enter the size. Then click ‘NEW’. In a similar way to unit subgroups, class groups can be further divided allowing you to divide a class group into 2 (or more) smaller groups so that they can be split between options if necessary.
41

This dialog is accessed via the Data/Academic/Class groups dialog by either clicking the Subgroups button or by double clicking on the required class group in the list view window.
Again, as with unit subgroups, Class group subgroups can be made into sets during design. By default, subgroups within a set will not clash with each other, but will clash with subgroups in different sets.
42

Having now set up your class groups for all courses you can now create the events in Timetabler (you can create them in live CMIS, but this can be slower as each input will be checked against the information held in the database). See later on for information on extracting and using Timetabler.
• Creating class group events for a single unit NB. There are 2 ways that class groups can appear in events. You can enter just the course and year or you can enter the course year and class group. If you enter just the course and year it will show on the class groups timetable only if when you filter you tick the box on the basic tab under class groups which says ‘Also include full unit’. To create events with class groups in one unit select ‘Planning’ – ‘Units and class groups’. By entering the Course, Year and Department a list of units that fit the criteria will be displayed.
Select the required unit from the list and then click the ‘Components’ button. This will take you to the following screen:
43

Fill in this window as appropriate as follows: Type – select lecture, seminar, practical. Weeks – type in the week range or click on the ‘weeks’ button and select the required range. Weekly time – enter the length of the event (such as ‘1’ for a one hour lecture) – the total time will be automatically filled. If you wish to have 2 one hour lectures that the same class groups go to then type in ‘2’ in the weekly time, but change the number in the small box next to it to ‘2’ as well. This second number is the number of divisions that the weekly time is divided into. The above 4 sections could have been entered in the first ‘unit and class group’ window if you so wished. Spec – enter an event specification. Lect – enter the lecturer if known or if you wish. Source – you must select either ‘1 off’ or ‘import’. Mostly this should be ‘import’. Owner – you must enter your department. The Requests section can have as much info placed in it as you wish (to enter a zone you will need to select the ‘More’ button and enter a zone under the ‘requested room’ space that appears in the event window). Now to add the class groups: Click on the ‘class group’ button. This will bring up the following window:
Click on the ‘Others’ button and this will bring up a list of all the class groups available to you. Highlight the ones you wish to see and possibly use in the event and then click ‘Show’. These will now appear in the left hand side of the above (class groups) window. From this list you will then be able to highlight the class groups you actually wish to appear in the events. To allocate these class groups to events you need to do 2 different things, depending on whether you wish to create one event (such as a lecture) with all class groups attending that one event, or you wish to create several events (such as a tutorial) with one class group in each event.
44

• For a lecture: Highlight all the class groups you wish to use and then click the ‘Combine’ button. This will list the class groups on a single line with a ‘+’ sign between each one:
Now click OK. This will take you back to the ‘units and class groups components’ window, but with the class groups entered as follows:
Now click ‘New’ and the event will be created.
45

• For a seminar / tutorial / practical session:
Highlight the class groups that you wish to be in the tutorials – one class group to each tutorial. This time click the ‘add’ button. They will now appear as separate class groups in the right hand side of the window:
Click ‘OK’. This will take you back to the ‘units and class groups components window, but with the class groups entered as follows:
Clicking ‘New’ will now create 5 separate tutorials, each one with a different class group in it. If you wish to create seminars which have 2 class groups in each one, then on the ‘class groups’ window highlight the pair of class groups you wish and click ‘combine’. Continue highlighting pairs and ‘combining’ until you have all the groupings you wish. Then click ‘OK’ and ‘New’ to create the events with the pairs of class groups in.
46

• Creating events for several units for a group of class groups. If you have a set of units that the same set of class groups will attend you can create all the events for them of that type in one operation: Select ‘Planning’ – ‘Units and class groups’. In the window that appears select all the units that you wish to create events for and then make sure that under the list of units you tick the box marked ‘create separate events’. If you do not tick this it will add all the units into the same event, ticking the box ensures that there will be a separate event for each unit.
Must tick!
Having selected your units and ticked the box click on ‘Components’ and follow the above instructions as for a single unit.
47

15. Taking an Extract and Using Facility Timetabler Before you can use ‘Timetabler’, which is an ‘offline’ version of the timetabling program, you need to provide it with a current ‘snapshot’ (an extract) of all the information that is contained within Live CMIS. Before you can use Timetabler for the first time you will need to create a folder on your “L” or “N” drive. The example below shows the directory and sub folders where this extract was saved. SMO have agreed a file name format as follows: Timetablers initials followed by the day and date in the dd:mm:yy format. The example CB17/08/04.ttd was taken by Chris Bailey on 17th August 2004. So first of all to extract your info from Live CMIS, from the top menu select: ‘Database – extract timetable to file’
Tick the same boxes as shown above and then ‘BROWSE’ to the appropriate location on your L: or N: drive. Once the pathway and filename are correct, by clicking OK, your extract will be saved as whatever the last part of the address is (in this case CB17/08/04.ttd). Make sure it saves as a .ttd file otherwise the program wont recognise it! You can, if you wish, close CMIS. NB. If you want to create more class groups you will need to do so in live and then extract again. You will not be able to create the class groups in timetabler (ttcmis), although you can amend and create both class groups and unit subgroups. Open up ttcmis from the Start menu on your PC. Now select ‘file – open’ and find the location that you saved the extract and highlight it. This will take a few moments as it loads the file in. A screen will then appear similar to the first screen in Live CMIS and it will tell you when it was extracted, by whom and what dataset it was extracted from. To create events for a unit based timetable you can go to ‘Planning – unit requirements’ and follow the instructions in the previous section ‘Unit planning’ Or to create class group based events, once it has loaded go to ‘Timetable’ – ‘department’ or whatever timetable name you use (the last section on the drop down menu will have a list of timetable views) It will then show a timetable view in the same way that live CMIS does, except it will be blank. Right click in the top display part of this window and select ‘filter’, ‘department’ and then chose your department.
48
You can now create class group events in the same way as in the previous section ‘Class group planning’. NB. Once you have finished in Timetabler you will need to save the changes, zip up the file and then send the saved file to SMO for re-integration. SMO will then insert your work back into the live database. Always send the extract back within one day of taking it to avoid discrepancies.
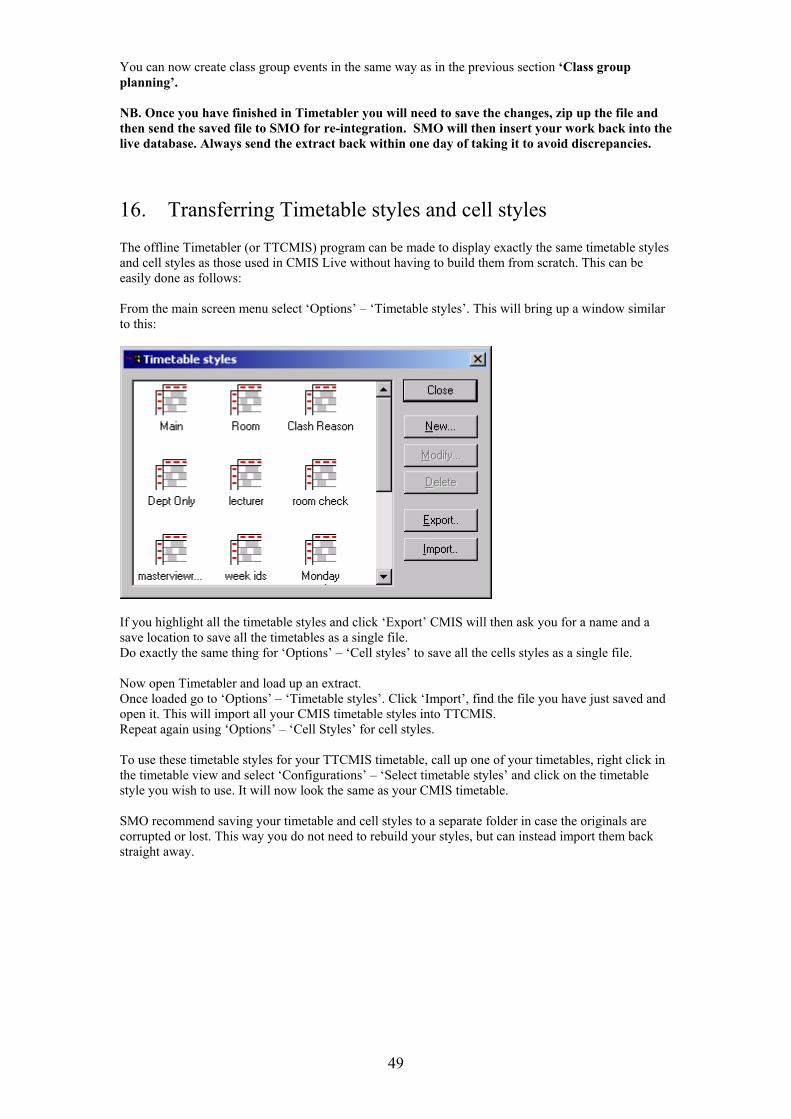
16. Transferring Timetable styles and cell styles The offline Timetabler (or TTCMIS) program can be made to display exactly the same timetable styles and cell styles as those used in CMIS Live without having to build them from scratch. This can be easily done as follows: From the main screen menu select ‘Options’ – ‘Timetable styles’. This will bring up a window similar to this:
If you highlight all the timetable styles and click ‘Export’ CMIS will then ask you for a name and a save location to save all the timetables as a single file. Do exactly the same thing for ‘Options’ – ‘Cell styles’ to save all the cells styles as a single file. Now open Timetabler and load up an extract. Once loaded go to ‘Options’ – ‘Timetable styles’. Click ‘Import’, find the file you have just saved and open it. This will import all your CMIS timetable styles into TTCMIS. Repeat again using ‘Options’ – ‘Cell Styles’ for cell styles. To use these timetable styles for your TTCMIS timetable, call up one of your timetables, right click in the timetable view and select ‘Configurations’ – ‘Select timetable styles’ and click on the timetable style you wish to use. It will now look the same as your CMIS timetable. SMO recommend saving your timetable and cell styles to a separate folder in case the originals are corrupted or lost. This way you do not need to rebuild your styles, but can instead import them back straight away.
49

17. Printing from CMIS
For a much more detailed coverage of how to print and how to change all the settings please refer to the help sheet on the SMO web page: http://web.port.ac.uk/departments/smo/ named ‘Printing and print settings’. There are 2 main different ways of printing out timetable views and 2 different ways of printing out list views. Firstly, Timetable views:
• Single timetable view Having called up the appropriate timetable and filtered to the resources you wish to see, right click anywhere within the timetable view. Select ‘Printing’ then ‘Print’. This will then bring up the usual print window that allows you to select how many copies you wish to print. If you choose ‘Print’ – ‘Modify print settings’ and ‘Print’ – ‘Print set up’ you can adjust various settings to change the style of the printout.
• Multiple timetable views If you wish to print out several timetables en masse, or even combine several timetables into a single timetable then you can go to the Main screen menu and choose ‘Timetable’ – ‘Printouts’ – ‘New printouts’. There are several tabs that can be used to adjust the style of the printout but the main areas of concern are: ‘Data’ tab – choose your type of focus (resource). I.e. Class groups. Highlight all the class groups you wish to print out, be sure to click the correct radio button – either ‘separate timetables’ for a single timetable for each class group, or ‘combine timetables’ for one timetable with all the class groups included. You must also choose a ‘style for printing’ if this is left blank nothing will print! Choose your usual ‘timetable style’ that you use for viewing timetables. ‘Conditions’ tab – Enter the week range you wish to see here (or select via the ‘Weeks’ button). ‘Size’ tab – under the individual timetable options select the correct radio button – either ‘fit’ to print it out within the printable areas as set at the top of this section, or overflow, to print over several pages if necessary. (Fit will shrink all events to ensure they fit onto 1 page, overflow will keep the events the same size and continue onto another page if there is not enough space) Secondly, List views
• Single list view As above for the single timetable view, right click anywhere within the list view, select ‘Printing’ – ‘print’.
• Multiple list views As above for the multiple timetable views, except ensure that under the ‘Advanced’ tab you tick ‘Columnar printouts instead of graphical timetables’.
50

18. Exporting to Word and Excel To export information from a list/table form is CMIS is easy once the correct settings have been established. In the list view that you wish to copy, right click and then choose “Exporting – Settings.” Make sure the bock is ticked next to “Include column headings before columns” and that the Delimiter box has “Tab stop” selected, as shown below.
Then click OK Now choose “Exporting” – “Exporting” and then click the “Clipboard” button on the small window that appears. This will save the info to the clipboard, allowing you to paste it into other documents. For WORD Open up Word and open a new document. Right click in the document and select “paste”. Highlight all the text that has appeared and then from the main menu select “Table” – “insert table” and Word will create a table around the data with each item in it’s own cell. You can now adjust and sort as you require. For EXCEL Open Excel and click once in the grid at point A1. (Don’t highlight the cell, just click as if you are ready to write in that box) Right click and choose “Paste” from the dropdown menu. This will put the information from the CMIS list into Excel. Each piece of info is given it’s own section in Excel, under the correct column heading. You can now adjust and sort as you require.
51

Appendix I
Timetabling approaches Constructing a timetable – order of approach Things to get in motion early – • Course – unit structure on HEMIS (and also in CMIS once transferred across) • Approx numbers in each class group, course or unit • Unit delivery – type of events, where, when, who, special equipment • SMO recommends you construct a spreadsheet showing all courses, which units are compulsory
and optional for each and how each unit is taught (who teaches it, preferences, delivery, etc). First things to enter • Construct class groups • Enter unit sizes (create subgroups if you wish although planning can do this for you) Entering events (this can be done offline in TTCMIS) • Enter all unit based events • Enter non-unit based events (personal tutorials, induction week etc) • Construct blocks, links, orderings and exclusions • Enter Restrictions and Time constraints • Ensure course – unit structure entered and correct Once all events are entered you will need to ask to visit SMO so that the data can be validated. Only validated data can then be auto-scheduled Check all events have the following: One of these: • Room • Requested zone + room type • Requested Zone + function • Requested Building + room type • Requested Building + function • Requested Zone + equipment • Requested Room And all of these • A source • An event specification or a Day and Time (event can be fixed if it has day and time and week) • A week range • An owner • A length Most events will also have a lecturer and a unit, possibly with a unit subgroup or a classgroup.
52

Appendix II
Timetabling considerations First of all you need to decide if you wish to use class groups or unit groups when creating the timetable. It is possible to use unit based for 1 level and class group for another, but I don’t recommend using both within the same level. Class groups For each course you will need to decide on how many class groups there are and what size they will be (its best to chose a size that fits your smallest room size – such as if you use a particular lab for teaching that holds 15, then your class groups are 15’s) The advantage of class groups is that they can easily be attached to events such as personal tutorials and the same group of students can be kept together. It is also useful for 1st year students where exact numbers are not known and individual timetables are not producible. However unit based is easier to use for other years, especially where smaller groups go to different options rather than keeping together as a single cohort. Units The style of unit delivery needs to be listed by component (e.g. lecture and tutorial) For each component of this delivery the following is needed: • Length of each component • Room requirements (lecture theatre, classroom, lab etc) • Size of each event (tutorials of 20, lecture of 120 etc) • Lecturer • Week pattern for teaching (all semester, every other week, 1 off etc) • Event specification (e.g. This lecture must be on a Monday due to part time students attending) Curriculum delivery • Do you want the unit/ event to be taught at the same time as another? (Blocking) • Is there an order to teaching (the tutorial must occur 2 hours after the lecture) (Ordering) • Is this unit linked to another so that the same group of students need to be taught by the same
lecturer for both events / the same room is required for both events? (Links) • Do 2 or more units need to be taught so that their times don’t overlap, even though they are not
core units? (Exclusions)
Other considerations • Lecturer constraints and restrictions (teach for only 4 days a week, lunchtime, etc) • Course constraints (Part time only taught on Mondays) • Course – unit structure: is this correct on HEMIS? If not auto-scheduling of events will not work. • Student – unit associations (option choices etc) correct on HEMIS? If not event sizes will be
wrong and individual student fitting and timetables will not be achievable.
53

Appendix III Unit Planning Quick Summary • Select screen: ‘Planning’ – ‘Unit requirements’ • Highlight unit wanted, enter number of ‘estimated students’ • Click on ‘Activities’ • Create events for all of one module type at a time - Select appropriate name or values for the
following: Module Type Weeks (973 / 974 are the standard 12 week S1 and S2 teaching weeks) Weekly time Enter a Size or a number of Groups require and enter a Code for a multiple group. (make sure ‘Inc’ is ticked) to reuse groups select ‘Reuse’ and then click ‘Groups’. ‘Add’ all the required groups to your selection and click OK. • Details section: you must fill in the following: Specification Owner Source (usually ‘Import’ at this stage) You can fill in Lecturer if the same one teaches all subunit events – (if not add individually later) • Requests section: Fill in the following as required: Building Function Room Type To request a Zone or a specific Room. Click on ‘More’ and then select in the appropriate area. • Then to create the events you MUST click: ‘New’ • Now redo for next unit type e.g. all practicals To adjust individual events click on ‘Events’ or ‘Timetable’ buttons and then double click on each event in turn to add specifics such as lecturers to tutorials. • Return to Unit Requirements window and select next unit.
54

Appendix IV Class groups summary • Create subgroups in ‘Data’- ‘Academic’- ‘Class groups’ • Extract live database and integrate into Timetabler
• Select ‘Planning’ – ‘Unit and class groups’ • Select unit(s) required • Ensure ‘create separate groups’ box is ticked • Click on ‘Components’ button. • Enter all necessary details for first type of event. • Click ‘Class groups’ button. • Click ‘others’ button. • Highlight required class groups. Click ‘Show’ • Highlight class groups in new window. • Click ‘combine’ to add all class groups to single event. • Click ‘Add’ to add one class group separately to each seminar event. • Click ‘New’ to create event(s). • Click on ‘Components’ button again to add new type of event or select new unit.
55