tinderbox 1 2.1v1 user guide - amazon web...
TRANSCRIPT
USER GUIDE
Tind
Tinderbox 1 on Nuke
er Box1 The Foundry
Visual Effects Software The Foundry

©2008 The Foundry Visionmongers Ltd. All rights reserved.Tinderbox 1 User GuideThis manual, as well as the software described in it, is furnished under license and may only be used or copied in accordance with the terms of such license. This manual is provided for informational use only and is subject to change without notice. The Foundry assumes no responsibility or liability for any errors of inaccuracies that may appear in this book.
No part of this manual may be reproduced, stored in a retrieval system, or transmitted in any form without the prior written permission of The Foundry.
The Foundry logo is a trademark of The Foundry Visionmongers Ltd. Nuke is a registered trademark of The Foundry Visionmongers Ltd. All other products or brands are trademarks or registered trademarks of their respective companies or organisations.
Software engineering Mailys Levassort.
Product testing Martin Rose and Michael Zannetou.
Writing and layout design Eija Narvanen using Adobe FrameMaker.
Proof reading Eija Narvanen.
The Foundry Tinder Box1
iii
Contents
Introduction About this User Guide. . . . . . . . . . . . . . . . . . . . . . . . . . . . . . 5
OFX Plug-ins . . . . . . . . . . . . . . . . . . . . . . . . . . . . . . . . . . . . . 5
New Features . . . . . . . . . . . . . . . . . . . . . . . . . . . . . . . . . . . . 6
System Requirements . . . . . . . . . . . . . . . . . . . . . . . . . . . . . . 6
Installing Tinderbox . . . . . . . . . . . . . . . . . . . . . . . . . . . . . . . 6
Install Directory . . . . . . . . . . . . . . . . . . . . . . . . . . . . . . . . . . 7
Generic Install Directory . . . . . . . . . . . . . . . . . . . . . . . . . . . . 8
Moving the Plug-ins Directory . . . . . . . . . . . . . . . . . . . . . . . 8
Licensing Tinderbox . . . . . . . . . . . . . . . . . . . . . . . . . . . . . . . 8
Other Foundry Products . . . . . . . . . . . . . . . . . . . . . . . . . . . . 9
Tinderbox Controls About . . . . . . . . . . . . . . . . . . . . . . . . . . . . . . . . . . . . . . . . . 11
Process . . . . . . . . . . . . . . . . . . . . . . . . . . . . . . . . . . . . . . . . 13
Light . . . . . . . . . . . . . . . . . . . . . . . . . . . . . . . . . . . . . . . . . . 15
Camera . . . . . . . . . . . . . . . . . . . . . . . . . . . . . . . . . . . . . . . . 19
Filtering. . . . . . . . . . . . . . . . . . . . . . . . . . . . . . . . . . . . . . . . 21
Blending . . . . . . . . . . . . . . . . . . . . . . . . . . . . . . . . . . . . . . . 23
Matte Component . . . . . . . . . . . . . . . . . . . . . . . . . . . . . . . . 26
Attenuation. . . . . . . . . . . . . . . . . . . . . . . . . . . . . . . . . . . . . 26
(Source) Crops. . . . . . . . . . . . . . . . . . . . . . . . . . . . . . . . . . . 28
Matte Crops . . . . . . . . . . . . . . . . . . . . . . . . . . . . . . . . . . . . 30
Tinderbox 1 T_Beam . . . . . . . . . . . . . . . . . . . . . . . . . . . . . . . . . . . . . . . . 31
T_Blur . . . . . . . . . . . . . . . . . . . . . . . . . . . . . . . . . . . . . . . . . 35
T_Caustic . . . . . . . . . . . . . . . . . . . . . . . . . . . . . . . . . . . . . . . 38
T_Deflicker. . . . . . . . . . . . . . . . . . . . . . . . . . . . . . . . . . . . . . 44
T_Degrain . . . . . . . . . . . . . . . . . . . . . . . . . . . . . . . . . . . . . . 49
The Foundry Tinderbox 3

iv
T_Diffuse . . . . . . . . . . . . . . . . . . . . . . . . . . . . . . . . . . . . . . . 52
T_DirBlur . . . . . . . . . . . . . . . . . . . . . . . . . . . . . . . . . . . . . . . 54
T_Distorto . . . . . . . . . . . . . . . . . . . . . . . . . . . . . . . . . . . . . . 58
T_Droplet. . . . . . . . . . . . . . . . . . . . . . . . . . . . . . . . . . . . . . . 62
T_Etch . . . . . . . . . . . . . . . . . . . . . . . . . . . . . . . . . . . . . . . . . 65
T_Grad . . . . . . . . . . . . . . . . . . . . . . . . . . . . . . . . . . . . . . . . . 70
T_HeatHaze . . . . . . . . . . . . . . . . . . . . . . . . . . . . . . . . . . . . . 75
T_Lens . . . . . . . . . . . . . . . . . . . . . . . . . . . . . . . . . . . . . . . . . 78
T_Pattern. . . . . . . . . . . . . . . . . . . . . . . . . . . . . . . . . . . . . . . 81
T_Rays . . . . . . . . . . . . . . . . . . . . . . . . . . . . . . . . . . . . . . . . . 85
T_Sky . . . . . . . . . . . . . . . . . . . . . . . . . . . . . . . . . . . . . . . . . . 91
T_Starburst . . . . . . . . . . . . . . . . . . . . . . . . . . . . . . . . . . . . . 98
T_Tile . . . . . . . . . . . . . . . . . . . . . . . . . . . . . . . . . . . . . . . . . 103
Appendix A Release Notes . . . . . . . . . . . . . . . . . . . . . . . . . . . . . . . . . . 107
Appendix B End User License Agreement . . . . . . . . . . . . . . . . . . . . . . 109
Index A-Z . . . . . . . . . . . . . . . . . . . . . . . . . . . . . . . . . . . . . . . . . . 117
Tinderbox 3 The Foundry

About this User Guide
INTRODUCTION 5
INTRODUCTION
Welcome to Tinderbox 1 for Nuke. Our plug-ins have been developed for the most demanding professionals in the post production industry. Many of the software engineers at The Foundry have worked in television or film, and know only too well the exacting requirements of this field. We are delighted to bring these tools to digital artists using Nuke. We hope you enjoy using them as much as we do.
About this User Guide
This User Guide tells you how to install the plug-ins and remove the watermark with a license key. It gives information on each of the plug-ins in this set with hints and tips at the end of most plug-ins to suggest creative or practical uses of the effect.
Controls common to many of the Tinderbox plug-ins are described in the chapter Tinderbox Controls and referenced from the plug-ins.
OFX Plug-ins These plug-ins have been written and compiled to the OFX plug-in standard. OFX is an open plug-in API for 2D visual effects. For a current list of supported host systems, see http://www.thefoundry.co.uk.
For technical information on OFX for developers, see openfx.sourceforge.net
The Foundry Tinderbox 1

INTRODUCTION6New Features
New Features To read about the new features, improvements, and fixed bugs in this release, see the “Release Notes” on page 107 of Appendix A.
System Requirements
Tinderbox 1 plugs into Nuke 5.1 running on Mac OS X, Windows XP, or Linux.
Installing Tinderbox
Tinderbox 1 for Nuke is available as a download from our web site http://www.thefoundry.co.uk.
Tinderbox on Linux Follow these instructions if you wish to install Tinderbox on a Linux machine running Nuke.
1. Download one of the following files from our web site at www.thefoundry.co.uk:
Tinderbox1_2.1v1_Nuke-linux-x86-release-32.tgz
Tinderbox1_2.1v1_Nuke-linux-x86-release-64.tgz
Which file you should download depends on whether you are using a 32- or 64-bit version of Nuke.
2. Move the downloaded file to the following directory (create the directory if it does not yet exist):
/usr/OFX/
3. In the above mentioned directory, extract the files from the archive using one of the following commands. This will create a Nuke subdirectory (if one doesn’t already exist).
tar xvzf Tinderbox1_2.1v1_Nuke-linux-x86-release-32.tgz
tar xvzf Tinderbox1_2.1v1_Nuke-linux-x86-release-64.tgz
Which command you use depends on which file you downloaded from our web site.
Tinderbox 1 The Foundry

Install Directory
INTRODUCTION 7
4. Proceed to “Licensing Tinderbox” on page 8.
Tinderbox on Mac OS X Follow these instructions if you wish to install Tinderbox on a Mac running Nuke.
1. Download the file from our web site at www.thefoundry.co.uk.
2. Double-click on the dmg file to unpack it, then double-click on the pkg file to launch the installer. Follow the on-screen instructions to install the plug-ins.
3. Proceed to “Licensing Tinderbox” on page 8.
Tinderbox on Windows Follow these instructions if you wish to install Tinderbox on a Windows machine running Nuke.
1. Download one of the following files from our web site at www.thefoundry.co.uk:
Tinderbox1_2.1v1_Nuke-win-x86-release-32.exe
Tinderbox1_2.1v1_Nuke-win-x86-release-64.exe
Which file you should download depends on whether you are using a 32- or 64-bit version of Nuke.
2. Double-click on the exe file to launch the installer. Follow the on-screen instructions to install the plug-ins.
3. Proceed to “Licensing Tinderbox” on page 8.
Install Directory A host-specific directory is searched first for the Tinderbox plug-in and then the general OFX plug-in directory.
For Nuke on Windows this is:C:\Program Files\Common Files\OFX\Nuke\ orC:\Program Files (x64)\Common Files\OFX\Nuke\
For Linux:
The Foundry Tinderbox 1

INTRODUCTION8Generic Install Directory
/usr/OFX/Nuke/
For Mac OS X:/Library/OFX/Nuke/
Generic Install Directory
After looking in the host-specific directory for a Tinderbox plug-in, we search in the generic OFX plug-in directory as follows.
For Windows:C:\Program Files\Common Files\OFX\Plugins\C:\Program Files (x64)\Common Files\OFX\Plugins\
For Linux:/usr/OFX/Plugins/
For Mac OS X:/Library/OFX/Plugins/
Moving the Plug-ins Directory
You can put the OFX plug-ins anywhere as long as you set the environment variable OFX_PLUGIN_PATH to point to it.
Licensing Tinderbox
Without a valid license key, the Tinderbox plug-ins will fail to run.
The license key is a sequence of numbers and letters, stored in a plain text file, that unlocks Tinderbox. License keys can be created for a particular computer enabling those plug-ins to run only on that computer. These are called node locked
Tinderbox 1 The Foundry

Other Foundry Products
INTRODUCTION 9
licenses. We also supply floating licenses that will unlock Tinderbox on any networked computer connected to a machine running the Foundry license server.
Tools to install license keys, manage floating licenses, and diagnose license problems can be downloaded from our web site, http://www.thefoundry.co.uk/licensing.
Other Foundry Products
The Foundry is a leading developer of plug-in visual effects for film and video post production. Its products include Nuke, Furnace, Tinder, Tinderbox, Keylight, and Ocula and run on a variety of compositing platforms. For the full list of products and supported platforms, see our web site at http://www.thefoundry.co.uk.
Nuke is an Academy Award® winning compositor. It has been used to create extraordinary images on scores of feature films including The Dark Knight, The Golden Compass, Iron Man, Transformers, King Kong, and Pirates of the Caribbean: At World’s End.
Furnace is a collection of film tools. Many of the algorithms utilise motion estimation technology to speed up common compositing tasks. Plug-ins include wire removal, rig removal, steadiness, deflicker, degrain and regrain, retiming, and texture tools.
Keylight is an award winning blue/green screen keyer giving results that look photographed, not composited. The Keylight algorithm was developed by the Computer Film Company, who were honoured with a technical achievement award for digital compositing from the Academy of Motion Picture Arts and Sciences.
The Foundry Tinderbox 1

INTRODUCTION10Other Foundry Products
Ocula is a collection of tools that solve common problems with stereoscopic imagery, improve productivity in post production, and ultimately help to deliver a more rewarding 3D-stereo viewing experience.
Visit The Foundry’s web site at http://www.thefoundry.co.uk for further details.
Tinderbox 1 The Foundry

About
TINDERBOX CONTROLS 11
TINDERBOX CONTROLS
This chapter describes the controls that are common to many Tinderbox plug-ins.
About To display the on-line help, click on About as shown in Figure 1.
To hide the help dialog, just click on OK. The help (Figure 2) gives a short description of the plug-in, the exact version number of Tinderbox, and the location of this User Guide. This online help is designed to give you a brief description of the plug-in and a quick start if required. More detailed
Figure 1. About.
The Foundry Tinderbox 1

TINDERBOX CONTROLS12About
information on the plug-in is contained in this User Guide.
Figure 2. Help.
Tinderbox 1 The Foundry

Process
TINDERBOX CONTROLS 13
Process Controls which of the channels will be affected by the effect. The options can be a subset or all of the following. The most common are at the top of the list. Figure 3 shows an image of a polar bear with triangular alpha channel composited over a flower. T_Blur has then been applied with the most common processing options shown in Figure 4 to Figure 6.
• RGBA - the red, green, blue and alpha channels are processed. Figure 4.
• RGB - only the red, green and blue channels are processed. Figure 5.
• Alpha - only the alpha channel is processed. Figure 6.
• Grey - this affects the result of (R+G+B)/3.
• Red - only the red channel will be affected.
• Green - only the green channel will be affected.
• Blue - only the blue channel will be affected.
Figure 3. Two layer composite. Figure 4. RGBA.
Figure 5. RGB. Figure 6. Alpha.
The Foundry Tinderbox 1

TINDERBOX CONTROLS14Process
• Luminance - the luminance of the image will be affected.
• HSL - the hue, saturation, and lightness will be affected.
• Lightness - only the lightness will be affected.
• U - only the U video signal will be affected.
• V - only the V video signal will be affected.
• Chroma - the U and V channels will be affected.
You should note that some plug-ins operate on the alpha channel of the source image, like T_Blur in the example above, and other plug-ins generate their own alpha replacing any alpha that was part of the source image. You can see this in Figure 7 where T_Caustic has been applied to the polar bear layer and the triangular alpha channel is ignored.
Figure 7. RGBA processing with T_Caustic.
Tinderbox 1 The Foundry

Light
TINDERBOX CONTROLS 15
Light Some plug-ins include controls for adding lighting.
Light Type
• None - no lights are used. Lighting parameters are switched off.
Figure 8. None.
The Foundry Tinderbox 1

TINDERBOX CONTROLS16Light
• Infinite - simulates the parallel rays from a distant light source, like the sun.
Light Elevation - effectively controls the height of the light source above the image plane. Elevation changes the angle between the image plane and a line from the light source to the image centre.
Light Direction - the direction of the light source. If set to 90 the light appears to come from the right. If set to 180
Figure 9. Infinite.
Figure 10. Elevation = 5. Figure 11. Elevation = 30.
Tinderbox 1 The Foundry

Light
TINDERBOX CONTROLS 17
the light appears to come from the bottom of the screen.
Colour - the colour of the specular highlights.
Strength - the amount of reflected specular light.
Fall-off - controls how tight (Figure 16) or diffuse (Figure 15) the highlights are on the surface. This equates to
Figure 12. Direction = 90. Figure 13. Direction = 270.
Figure 14. Specular Colour.
The Foundry Tinderbox 1

TINDERBOX CONTROLS18Light
the apparent shininess of the surface.
Figure 15. Low Fall-off.
Figure 16. High Fall-off.
Tinderbox 1 The Foundry

Camera
TINDERBOX CONTROLS 19
Camera Some plug-ins include camera controls allowing you to move around the generated effect. The camera model used depends on the plug-in. For example, Tinderbox 1 T_Sky employs a camera which only allows for rotations in 3 degrees of freedom, since the sky is of a sufficient distance from the camera in question that no parallax should be observed in any kind of tracking movement. However, in a plug-in such as Tinderbox 3 T_Particles, the camera model allows for movement as well as rotation in 3 planes.
Our plug-ins employ a two point camera model with an origin target point. In the camera parameters, only the controls relevant to the current plug-in are enabled and displayed.
Controls Angle of View - this governs the width (as a degree) of the scene visible.
X Rotation - the rotation around the X axis of the camera head
Y Rotation - the rotation around the Y axis of the camera head
Z Rotation - the rotation around the Z axis of the camera head
X Position - the translation along the x axis
Y Position - the translation along the y axis
Z Position - the translation along the z axis
Clip Near & Clip Far - to aid rendering on some plug-ins we
The Foundry Tinderbox 1

TINDERBOX CONTROLS20Camera
employ a pair of planes which specify the limits of interest in terms of an axis through the camera and lens. Objects moving in front of the Clip Near or behind the Clip Far are determined as out of the area of interest and are thus not rendered.
Tinderbox 1 The Foundry

Filtering
TINDERBOX CONTROLS 21
Filtering Filtering is used to control the quality of your processed images by reducing the jagged lines characteristic of pixel devices. As with all image processing, you have a trade off between quality and time. Filtering will increase the quality of your image but will also increase the time it takes to process the image.
Filtering quality is chosen from a popup menu. The options given in the popup menu are:
• Low - highly distorted images may show jaggies. This is the fastest option.
• Medium - uses a bilinear filter.
• High - uses a MIP bilinear filter. This is the slowest option.
Depending on the effect being filtered, the High filtering option may over-soften the image. To combat this, the Filter Sharpness control can be used to compensate. The default value of 1 is normal sharpness, increasing it will sharpen up the result, decreasing it will soften further.
Figure 17. Low, Medium and High Filtering.
The Foundry Tinderbox 1

TINDERBOX CONTROLS22Filtering
Note Filter Sharpness only has an effect when using the High filtering option.
Tinderbox 1 The Foundry
Blending
TINDERBOX CONTROLS 23
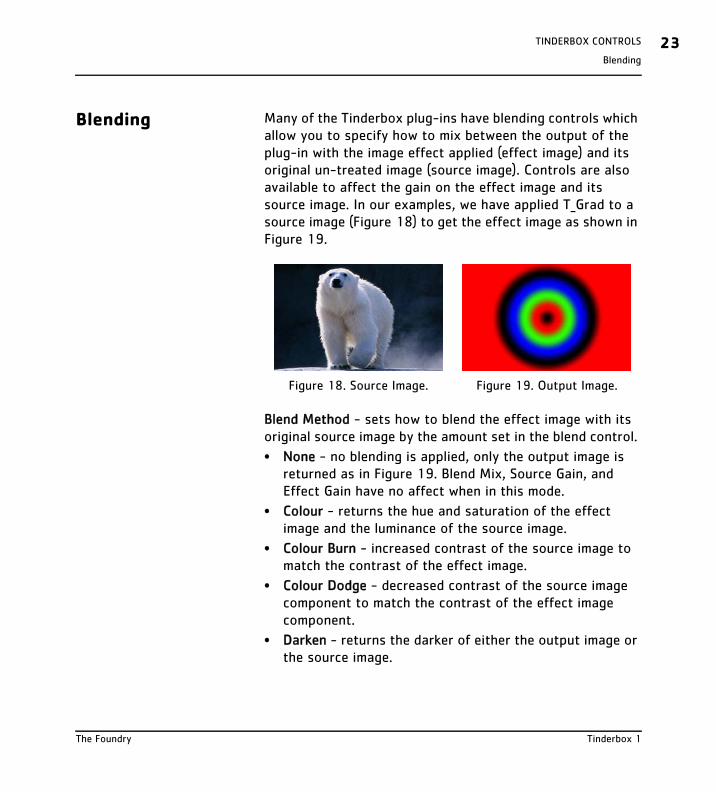
Blending Many of the Tinderbox plug-ins have blending controls which allow you to specify how to mix between the output of the plug-in with the image effect applied (effect image) and its original un-treated image (source image). Controls are also available to affect the gain on the effect image and its source image. In our examples, we have applied T_Grad to a source image (Figure 18) to get the effect image as shown in Figure 19.
Blend Method - sets how to blend the effect image with its original source image by the amount set in the blend control.
• None - no blending is applied, only the output image is returned as in Figure 19. Blend Mix, Source Gain, and Effect Gain have no affect when in this mode.
• Colour - returns the hue and saturation of the effect image and the luminance of the source image.
• Colour Burn - increased contrast of the source image to match the contrast of the effect image.
• Colour Dodge - decreased contrast of the source image component to match the contrast of the effect image component.
• Darken - returns the darker of either the output image or the source image.
Figure 18. Source Image. Figure 19. Output Image.
The Foundry Tinderbox 1

TINDERBOX CONTROLS24Blending
• Difference - subtracts the source image from the effect image.
• Exclusion - similar to darken but produces results with lower contrast.
• Hard Light - combination of multiply and screen (inverse multiply) depending on the magnitude of the components. Opposite of overlay and not at all related to Soft Light.
• Hue - takes the hue of the effect image and the saturation and value of the source image.
• Lighten - takes the brightest component of the effect image and the source image.
• Linear Burn - decreased brightness of the source image to match the brightness of the effect image.
• Linear Dodge - increased brightness of the source image component to match the brightness of the effect image colour.
• Linear Light - combination of linear burn and linear dodge, depending on the magnitude of the components. Less than half white is burned by decreasing the brightness, more than half grey is dodged by increasing the brightness.
• Luminosity - takes the luminance of the effect image and the hue and saturation of the source image.
• Multiply - multiplies the effect image and source image components together.
• Overlay - mixes colours while preserving highlights and shadows.
• Saturation - takes the saturation of the effect image and the hue and value of the source image.
• Screen - produces a bleaching effect. Light colours have more of an effect than dark colours. (A+B)-(A*B) or if you prefer 1-((1-A)*(1-B)) which is like combining the negatives of the two shots and "printing" the result.
Tinderbox 1 The Foundry

Blending
TINDERBOX CONTROLS 25
• Soft Light - diffused spotlight effect. Less than half white is colour dodged and more than half white is colour burned.
• Mix - blends the effect image and the source image.
• Composite - the amount of mix between the effect image and its source image is set to the values of the effect image’s alpha channel. Where the alpha channel is 1, the effect image will be shown. Where the alpha channel is 0, the source image will be shown.
Blend Mix - sets the amount of mix between the effect image and its source image. A value of 1 will show just the effect image. A value of 0 will show just the source image.
Source Gain - sets the brightness of the original image. The result of this is used in the blend. The Source Gain also affects the alpha of the image. Setting Source Gain to 0.5 will half the brightness of the original image and will also half the value of its alpha.
Effect Gain - sets the brightness of the effect image. The result of this is used in the Blend. The Effect Gain also affects the alpha of the image. Setting Effect Gain to 0.5 will half the brightness of the effect image and will also half the value of its alpha.
Clamp Values 0 to1 - some blending methods will produce undesirable results on floating point images where the pixel values stray outside the range 0 to 1. Switch this on to fix this problem.
The Foundry Tinderbox 1
TINDERBOX CONTROLS26Matte Component
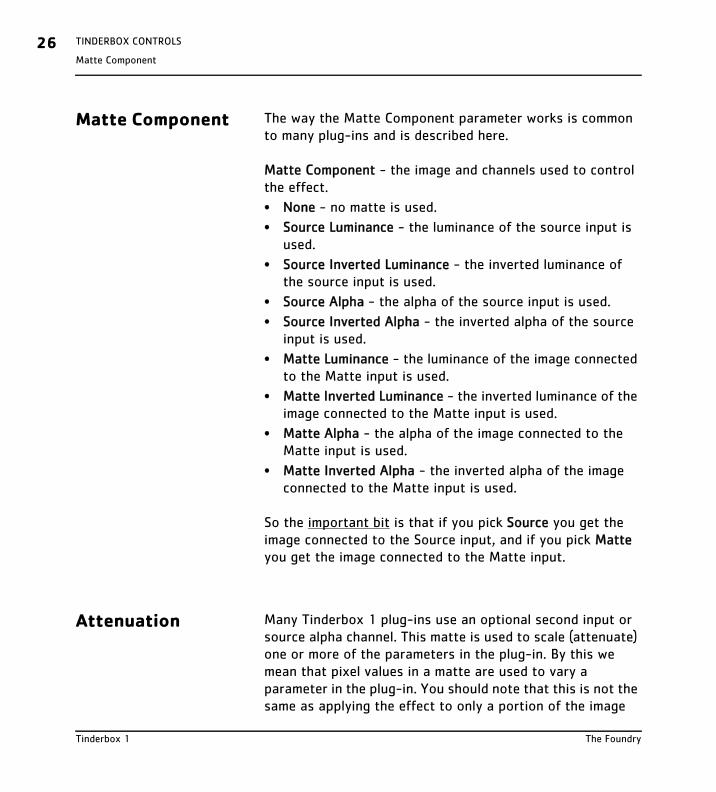
Matte Component The way the Matte Component parameter works is common to many plug-ins and is described here.
Matte Component - the image and channels used to control the effect.
• None - no matte is used.
• Source Luminance - the luminance of the source input is used.
• Source Inverted Luminance - the inverted luminance of the source input is used.
• Source Alpha - the alpha of the source input is used.
• Source Inverted Alpha - the inverted alpha of the source input is used.
• Matte Luminance - the luminance of the image connected to the Matte input is used.
• Matte Inverted Luminance - the inverted luminance of the image connected to the Matte input is used.
• Matte Alpha - the alpha of the image connected to the Matte input is used.
• Matte Inverted Alpha - the inverted alpha of the image connected to the Matte input is used.
So the important bit is that if you pick Source you get the image connected to the Source input, and if you pick Matte you get the image connected to the Matte input.
Attenuation Many Tinderbox 1 plug-ins use an optional second input or source alpha channel. This matte is used to scale (attenuate) one or more of the parameters in the plug-in. By this we mean that pixel values in a matte are used to vary a parameter in the plug-in. You should note that this is not the same as applying the effect to only a portion of the image
Tinderbox 1 The Foundry

Attenuation
TINDERBOX CONTROLS 27
using masks or a track matte.
Let’s consider the plug-in T_Tile that takes an image like Figure 20 and scales and repeats it as shown in Figure 21.
If we attenuate this effect with the matte should in Figure 22 then where the matte is black on the left, none of the effect will be applied. Where the matte is white the full scaling factor in T_Tile will be applied. Values in between are scaled accordingly as shown in Figure 23.
Figure 20. Source Image. Figure 21. Tile.
Figure 22. Matte. Figure 23. Attenuating Scale.
The Foundry Tinderbox 1

TINDERBOX CONTROLS28(Source) Crops
(Source) Crops Many Tinderbox plug-ins require access to pixels that lie off the edge of the source image. For example, T_Blur needs to use pixels off the sides when blurring at the edges. Figure 24 shows black pixels being dragged in from the sides which happens if the X Method (for left and right edges) and Y Method (for top and bottom edges) are set to Colour. By setting the X and Y methods to Reflect you can overcome this problem, as shown in Figure 28.
Figure 24. Look at the border. Here the X Method and Y Method = Colour.
Tinderbox 1 The Foundry

(Source) Crops
TINDERBOX CONTROLS 29
In addition, there are controls to crop the image.The X and Y methods control the behaviour of the image at the crop boundaries. This is usually at the edge of the composition but can be brought into the picture with the Left, Right, Top and Bottom crop tools.
X Method - how to treat the left and right edges.
• Colour - see Figure 26.
• Repeat - repeats the last line of pixels. Figure 27.
Figure 25. X Method and Y Method = Reflect.
Figure 26. Colour. Figure 27. Repeat.
The Foundry Tinderbox 1

TINDERBOX CONTROLS30Matte Crops
• Reflect - mirrors the image at the crop line. Figure 28
• Wrap - tiles the image at the crop line. Figure 29.
Y Method - how to treat the top and bottom edges.
Edge Colour - the colour used at the crop boundary if the edge method is set to Colour. The transparency of this colour is set using the alpha value of this colour. In Figure 26 the edge colour is black.
Left - the left crop position.
Right - the right crop position.
Bottom - the bottom crop position.
Top - the top crop line.
Matte Crops This is only available where there is the option of selecting a Matte within a Tinderbox plug-in. Matte Crops work in exactly the same way as Source Crops described above but apply to the Matte.
Figure 28. Reflect. Figure 29. Wrap.
Tinderbox 1 The Foundry

T_Beam
TINDERBOX 1 31
TINDERBOX 1
T_Beam
Introduction T_Beam draws a spotlight in 3D space. The position of the light source can be animated and the beam can be rotated in all directions. The beam can either be composited over the underlying image, blended with its source image, or used to generate a new image.
Inputs T_Beam has one input - a source image.
Controls Process - sets which channels to process. See “Process” on page 13.
Position - the screen position of the light emitting disc.
Rotation - the direction of the beam. With a value of 0 the beam points right. With a value of 180 the beam points left.
Figure 30. St. Paul’s Cathedral. Figure 31. St.Paul’s lit up.
The Foundry Tinderbox 1
TINDERBOX 132T_Beam
With a value of 270 the beam points away from the camera. With a value of 90 the beam points towards the camera.
Elevation - the vertical pitch of the beam. With a value of 0 the beam will be horizontal. 90 points up, and -90 points down.
Form This groups the properties of the light beam.
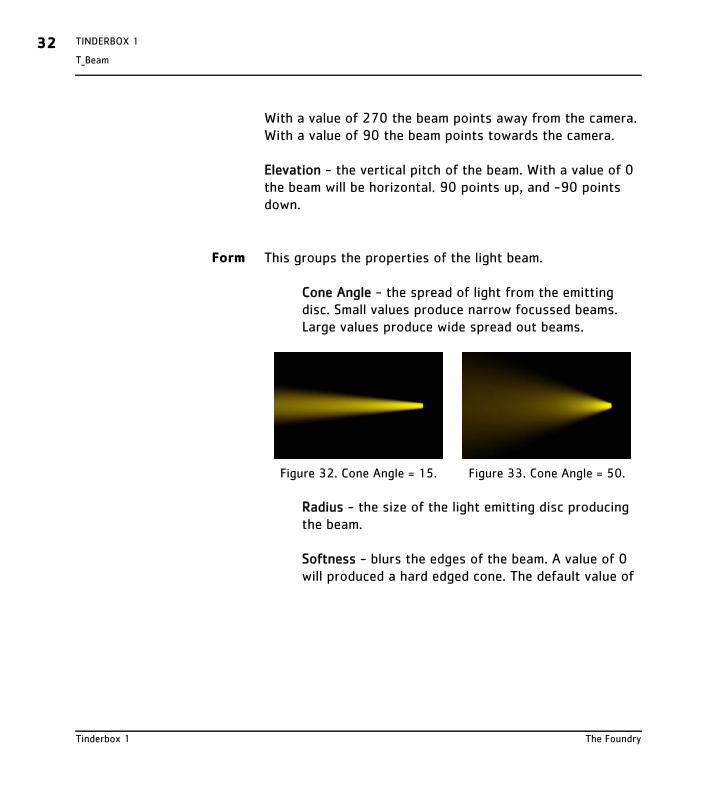
Cone Angle - the spread of light from the emitting disc. Small values produce narrow focussed beams. Large values produce wide spread out beams.
Radius - the size of the light emitting disc producing the beam.
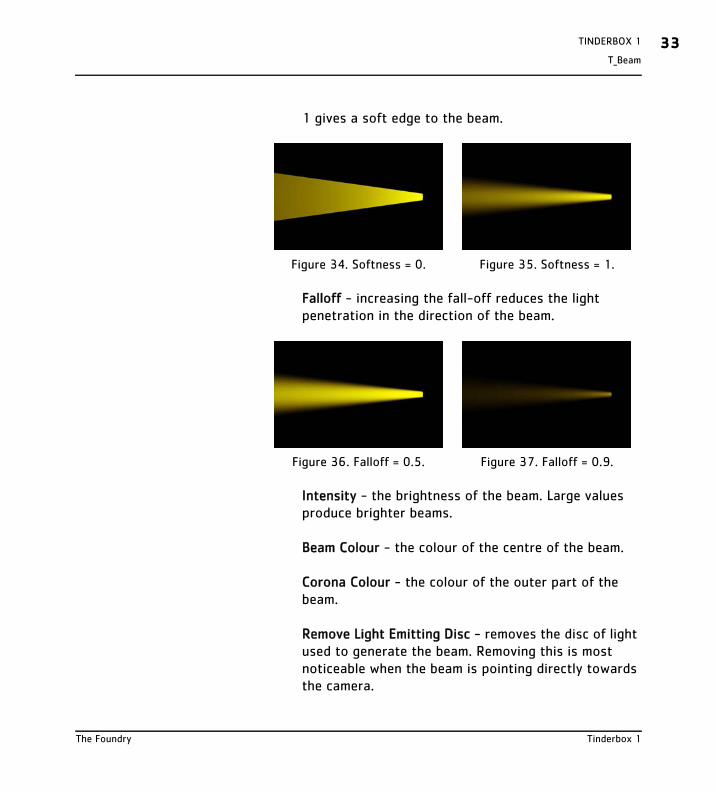
Softness - blurs the edges of the beam. A value of 0 will produced a hard edged cone. The default value of
Figure 32. Cone Angle = 15. Figure 33. Cone Angle = 50.
Tinderbox 1 The Foundry
T_Beam
TINDERBOX 1 33
1 gives a soft edge to the beam.
Falloff - increasing the fall-off reduces the light penetration in the direction of the beam.
Intensity - the brightness of the beam. Large values produce brighter beams.
Beam Colour - the colour of the centre of the beam.
Corona Colour - the colour of the outer part of the beam.
Remove Light Emitting Disc - removes the disc of light used to generate the beam. Removing this is most noticeable when the beam is pointing directly towards the camera.
Figure 34. Softness = 0. Figure 35. Softness = 1.
Figure 36. Falloff = 0.5. Figure 37. Falloff = 0.9.
The Foundry Tinderbox 1

TINDERBOX 134T_Beam
Filtering - the quality of the anti-aliasing used when processing the effect. Most noticeable when Softness is 0. See “Filtering” on page 21.
Blending How to mix between the source image and the effect. See “Blending” on page 23.
Crops Cropping tools and edge methods. See “(Source) Crops” on page 28.
About Click the button to display the on-line help, Tinderbox version number and the location of this user guide. See “About” on page 11.
Tinderbox 1 The Foundry

T_Blur
TINDERBOX 1 35
T_Blur
Description T_Blur is a time constant, sub-pixel, gaussian blur. T_Blur can operate on the rgba channels, individual colour channels or just the chroma. It can be used to defocus or sharpen an image. It’s fast even for very large blurs.
Inputs T_Blur has one input - a source image.
Controls Process - sets which channels to process. See “Process” on page 13.
Mode - sets whether to blur or sharpen the image.
• Blur - softens the image.
Figure 38. Source Image. Figure 39. Blur.
The Foundry Tinderbox 1

TINDERBOX 136T_Blur
• Sharpen - emphasizes the edges within the image.
Radius - the strength of the blur. Increase these values to increase the blur effect. You can also use this parameter to control the horizontal and vertical weighting of the effect. A high w value with a low h value produces horizontal blur, and a high h value with a low w value produces vertical blur.
Blending How to mix between the source image and the effect. See “Blending” on page 23.
Crops Cropping tools and edge methods. See “(Source) Crops” on page 28.
Figure 40. Source Image. Figure 41. Sharpen.
Figure 42. A high Radius h value. Figure 43. A high Radius w value.
Tinderbox 1 The Foundry

T_Blur
TINDERBOX 1 37
About Click the button to display the on-line help, Tinderbox version number and the location of this user guide. See “About” on page 11.
Hints & Tips Sharpening the chroma enhances the chroma in areas of the image with strong colour variations whilst leaving flat areas relatively unchanged. This can be useful in sharpening the edges of the subject before key pulling.
See also Tinderbox 2 T_LensBlur for defocussing with highlight blooming, Tinderbox 1 T_DirBlur for a directional blur, Tinderbox 2 T_RadialBlur to smear pixels out from a centre, and Tinderbox 3 T_GradientBlur to soften along gradient vectors.
The Foundry Tinderbox 1

TINDERBOX 138T_Caustic
T_Caustic
Description T_Caustic simulates the patterns created when light rays are reflected or refracted by a curved surface. Caustics can often be seen at the bottom of a swimming pool in bright sunlight or on objects viewed underwater.
Inputs T_Caustic has two inputs - a source image and a height matte.
Controls Process - sets which channels to process. See “Process” on page 13.
Figure 44. T_Caustic.
Tinderbox 1 The Foundry

T_Caustic
TINDERBOX 1 39
Size - zooms into or away from the caustics.
Fractals - the detail in the caustic lines.
Focus - alter this to bring the caustic lines into focus.
Seed - this number generates a number sequence that is used to randomly vary the caustics pattern.
Speed - the rate at which the caustics move.
Samples - increasing this value will increase the quality of the caustic lines.
Figure 45. Size = 15. Figure 46. Size = 50.
Figure 47. Focus = 1. Figure 48. Focus = 3.
The Foundry Tinderbox 1
TINDERBOX 140T_Caustic
Background - the colour of the background.
Foreground - the colour of the caustics.
Foreground Brightness - the amount of reflected light emitted from the caustics. The higher this value, the brighter the caustic lines.
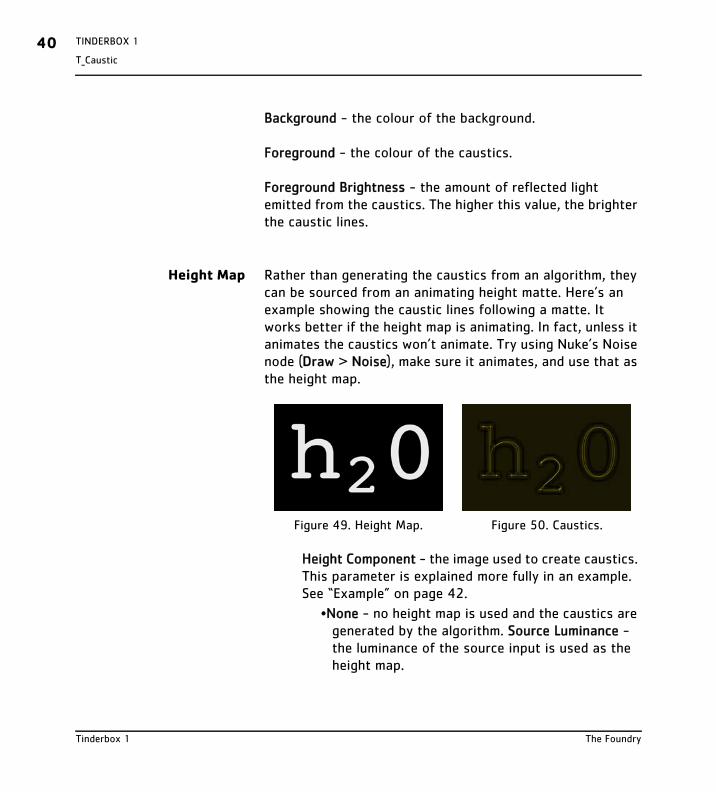
Height Map Rather than generating the caustics from an algorithm, they can be sourced from an animating height matte. Here’s an example showing the caustic lines following a matte. It works better if the height map is animating. In fact, unless it animates the caustics won’t animate. Try using Nuke’s Noise node (Draw > Noise), make sure it animates, and use that as the height map.
Height Component - the image used to create caustics. This parameter is explained more fully in an example. See “Example” on page 42.
•None - no height map is used and the caustics are generated by the algorithm. Source Luminance - the luminance of the source input is used as the height map.
Figure 49. Height Map. Figure 50. Caustics.
Tinderbox 1 The Foundry

T_Caustic
TINDERBOX 1 41
•Source Inverted Luminance - the inverted luminance of the source input is used as the height map.
•Source Alpha - the alpha of the source input is used as the height map.
•Source Inverted Alpha - the inverted alpha of the source input is used as the height map.
•Height Luminance - the luminance of the image connected to the Matte input is used as the height map.
•Height Inverted Luminance - the inverted luminance of the image connected to the Matte input is used as the height map.
•Height Alpha - the alpha of the image connected to the Matte input is used as the height map.
•Height Inverted Alpha - the inverted alpha of the image connected to the Matte input is used as the height map.
Softness - the blur applied to the height map.
Blending How to mix between the source image and the effect. See “Blending” on page 23.
Source Crops Cropping tools and edge methods. See “(Source) Crops” on page 28.
Height Crops Controls the behaviour of the edges of the height map. These parameters work in the same way as the Matte Crops parameters in several other Tinderbox 1 plug-ins. See
The Foundry Tinderbox 1
TINDERBOX 142T_Caustic
“Matte Crops” on page 30.
About Click the button to display the on-line help, Tinderbox version number and the location of this user guide. See “About” on page 11.
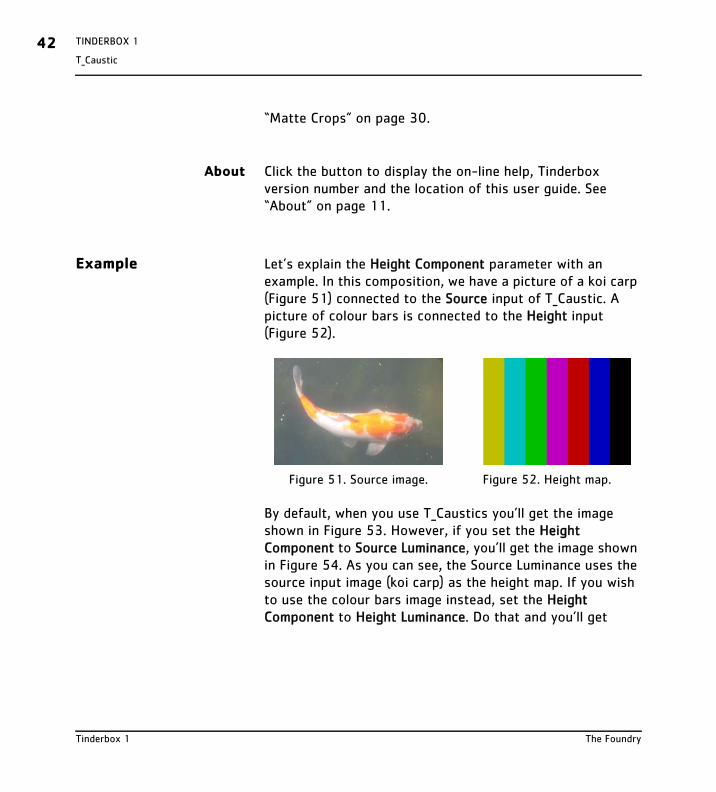
Example Let’s explain the Height Component parameter with an example. In this composition, we have a picture of a koi carp (Figure 51) connected to the Source input of T_Caustic. A picture of colour bars is connected to the Height input (Figure 52).
By default, when you use T_Caustics you’ll get the image shown in Figure 53. However, if you set the Height Component to Source Luminance, you’ll get the image shown in Figure 54. As you can see, the Source Luminance uses the source input image (koi carp) as the height map. If you wish to use the colour bars image instead, set the Height Component to Height Luminance. Do that and you’ll get
Figure 51. Source image. Figure 52. Height map.
Tinderbox 1 The Foundry

T_Caustic
TINDERBOX 1 43
Figure 55.
Hints & Tips T_Caustic can be used to generate mattes for use with other plug-ins. Try using a caustics matte with Tinderbox 1 T_Distorto.
Figure 53. T_Caustics.
Figure 54. Height Component = Source Luminance.
Figure 55. Height Component = Height Luminance.
The Foundry Tinderbox 1

TINDERBOX 144T_Deflicker
T_Deflicker
Description T_Deflicker is designed to reduce spatially variable flicker from a sequence. Most current flicker reduction tools are global, that is, they try to reduce the same amount of flicker from the whole of the image. If only parts of an image are flickering this technique will fail as it will reduce the flicker from one part but introduce it in another. The difficulty in automatically correcting for spatial variable flicker is differentiating between flicker and motion. It is worth repeating that this plug-in will reduce flicker in most cases, but it is unlikely to remove all traces of flicker.
In this plug-in we divide the image up into blocks and adjust the contrast and brightness in these regions to correct complex localised flicker. We also analyse motion vectors between the current and reference frames and use a global luminance change for blocks that have significant motion.
Inputs T_Deflicker has two inputs - a source image and a matte.
Quick Start The only decision that’s worth making at the start is whether to deflicker relative to the previous frame of the sequence or to a specified frame. To decide this you’ll need to look carefully at the flickering clip. If the flicker is in a part of the image that is not moving much, then choose Specified Frame as the Reference method. For example, you may have a locked off shot with action in the foreground, but the flicker is only in one of the corners in the static background. For
Tinderbox 1 The Foundry

T_Deflicker
TINDERBOX 1 45
most other circumstances, choose Previous Frame. For example, if the camera is panning then everything is moving.
If you have chosen to deflicker to the previous frame, render using the defaults. With this method you may see a drift in the mean luminance value during the render. You can correct for this by increasing the Feedback, however, this will reduce the amount of flicker removed.
If you have chosen to deflicker to a single frame, switch Reference Method to Specified Frame, select a Reference Frame, and render.
Tuning If the sequence still flickers, there are one or two changes you can make to try to improve the result. To put this in context, it’s worth explaining a little more about the algorithm. Our deflicker fits a block based model to the image. We split the source and reference images into multiple blocks of size Block Size measured in pixels. We then try and modify the brightness and contrast (the flicker parameters) of the source block to make it equal to the brightness and contrast of the reference block. In practise, if there is motion in the sequence the pixels in the two blocks will not be the same which will result in incorrect flicker parameters. To minimise this effect, when the image is divided into blocks they are overlapped by a small region. To this region we apply the flicker parameters calculated for both adjacent blocks. If the results from these two calculations are not consistent we assume that the parameters have been calculated incorrectly due to motion and we discard them both, replacing them with the global brightness and contrast parameters for the whole image. The criterion for discarding parameters is set by Motion
The Foundry Tinderbox 1

TINDERBOX 146T_Deflicker
Threshold. So, if you think the flicker is only in parts of the image that are static, it is quite safe to increase this value.
Having obtained a reliable set of flicker parameters for each block, these are then smoothed using a combing technique. The number of smoothing iterations is set by Smoothness.
Controls Reference Method – the comparison frame to deflicker against.
• Previous Frame - removes flicker from the current frame by comparing it with the previous frame’s deflickered output. Note, this won’t work for distributed renders as it relies on the previous frame result being in memory.
• Specified Frame - removes flicker from the current frame by comparing it with a specified frame.
Reference Frame - the frame used as a comparison if Reference Method is set to Specified Frame.
Feedback – when the Reference Method is set to Previous Frame, feedback trades off the colour drift against the amount of flicker removed. You should try and keep this value as low as possible to remove as much flicker as possible. If you’re getting colour drift, increase this parameter although doing this will remove less flicker. If the Reference Method is Specified Frame, this parameter is not available.
Block Size – the size of the blocks in pixels that are analysed for flicker. Smaller blocks will allow more complex flicker to be modelled but will produce less accurate and robust results and will take longer to render.
Tinderbox 1 The Foundry
T_Deflicker
TINDERBOX 1 47
Weight Threshold – the threshold value for plain areas above which blocks are discarded due to the lack of reliable flicker data. If your results are poor, it’s worth decreasing this value.
Motion Threshold – the threshold value below which localised deflicker is abandoned in favour of a global deflicker because of motion in the frame. The algorithm has difficulty distinguishing between luma flicker on an area of the image that has no movement and on areas that have movement but no flicker. This threshold determines at what point we force the deflicker to be global because there’s too much movement.
Setting Motion Threshold to 0 will turn off localised deflicker for all moving objects and apply global luminance changes to reduce the flicker.
If you’re getting errors (colour changes) around areas that are moving, then you should lower the Motion Threshold value. If parts of the frame that are static are not being deflickered, then you should increase the Motion Threshold value.
Smoothness – the number of times the flicker parameters are smoothed between blocks.
Matte Component - a mask can be used to define an area that should be ignored in the deflicker calculations. White parts of the matte are used and black areas ignored. See “Matte Component” on page 26.
The Foundry Tinderbox 1

TINDERBOX 148T_Deflicker
Blending How to mix between the source image and the effect. See “Blending” on page 23.
Source Crops Cropping tools and edge methods. See “(Source) Crops” on page 28.
Matte Crops Cropping tools and edge methods. See “Matte Crops” on page 30.
About Click the button to display the on-line help, Tinderbox version number and the location of this user guide. See “About” on page 11.
Tinderbox 1 The Foundry

T_Degrain
TINDERBOX 1 49
T_Degrain
Description This plug-in is used to remove grain from an image. The aim is to remove as much grain as possible whilst doing as little damage to the image as possible.
The plug-in uses spatial filtering to average pixels within the same frame. This can lead to the blurring of the image and so, to keep this to a minimum, a wavelet based technique is used that decomposes the image into a number of different frequencies and scales before attempting to remove the grain.
It does not use any temporal information to reduce grain.
Inputs T_Degrain has one input - a source image.
Figure 56. Test Image showing close-up of the Grain Structure.
The Foundry Tinderbox 1

TINDERBOX 150T_Degrain
Quick Start Position the sample region over a plain area of the image as shown in Figure 58.
Warning! It is very important to position the selection box over a region with little image detail. Failure to do this will give poor results as the algorithm will think the image detail is grain and remove it.
Warning! Do not use T_Degrain in proxy mode. You should always work in full resolution mode when using this plug-in.
If either not enough grain has been removed or the picture has been softened by removing too much grain it will be necessary to tune the parameters. Increasing Tune will remove more grain, reducing it will remove less. You may find it useful to view the grain using the Output parameter’s Grain option. This will display the grain that is being subtracted from the image. It is scaled by Exaggerate Grain to make it more obvious. Only grain should be visible in this image. If you can see a lot of picture detail it means the degrainer is working too hard and removing too much image which will lead to a soft result.
Controls Tune - the amount of grain removed or retained. Increasing this parameter will remove more grain and decreasing it will leave more in.
Figure 57. Bad Sample Region. Figure 58. Good Sample Region.
Tinderbox 1 The Foundry

T_Degrain
TINDERBOX 1 51
Sample Sample Frame - the frame analysed for grain.
Sample Rectangle BL - the bottom left corner position of the rectangle used to define the area sampled for grain.
Sample Rectangle TR- the top right corner position of the rectangle used to define the area sampled for grain.
Output - sets what to display.
• Preview - degrains just the region inside the sample box. This is quicker than degraining the whole image and should be used when tuning the grain. Do remember to switch it back to Result before you render a sequence.
• Result - shows the degrained image.
• Grain - shows the grain that is being removed. It is multiplied by the Exaggerate Grain value to make it more visible.
Exaggerate Grain - scales the grain before it is displayed by Output - Grain. This is just to make any artifacts more visible.
About Click the button to display the on-line help, Tinderbox version number and the location of this user guide. See “About” on page 11.
Hints & Tips See also Tinderbox 2 T_Grain to add grain to images.
The Foundry Tinderbox 1

TINDERBOX 152T_Diffuse
T_Diffuse
Description T_Diffuse randomly scatters pixels around in an image. It gives a frosted glass look.
Inputs T_Diffuse has two inputs - a source image and a matte.
Controls Process - sets which channels to process. See “Process” on page 13.
Radius - the amount of scattering. The higher the value, the further the pixels will scatter. You can also use this parameter to control the horizontal and vertical weighting of the effect.
Freeze Diffusion - switch this on to keep the same diffusion pattern from frame to frame. This gives you a frosted glass look.
Matte Component - the image and channels used to control the attenuation of scattering. See “Matte Component” on page 26.
Figure 59. Source Image. Figure 60. T_Diffuse.
Tinderbox 1 The Foundry

T_Diffuse
TINDERBOX 1 53
Blending How to mix between the source image and the effect. See “Blending” on page 23.
Source Crops Cropping tools and edge methods. See “(Source) Crops” on page 28.
Matte Crops Cropping tools and edge methods. See “Matte Crops” on page 30.
About Click the button to display the on-line help, Tinderbox version number and the location of this user guide. See “About” on page 11.
Hints & Tips Freeze the diffusion to give the effect of viewing through frosted glass.
The Foundry Tinderbox 1

TINDERBOX 154T_DirBlur
T_DirBlur
Description T_DirBlur smears an image in a given direction.
Inputs T_DirBlur has two inputs - a source image and a matte that can be used to attenuate the blurring.
Controls Process - sets which channels to process. See “Process” on page 13.
Mode
• Directional Blur - in this mode, the direction of the blur is explicitly set by the Rotation angle of the Directional Blur properties.
• Track Blur - in this mode, the direction of the blur is taken from the Position data of the Track Blur properties. This mode is useful if you wish to track the movement of an object and use that motion vector to set the direction and strength of the directional blur.
Figure 61. Source Image. Figure 62. T_DirBlur.
Tinderbox 1 The Foundry

T_DirBlur
TINDERBOX 1 55
Directional Blur These settings are used when Mode is set to Directional Blur.
Rotation - sets the direction of the blur calibrated in degrees.
Length - controls the amount of blur applied.
Track Blur These settings are used when Track Blur mode is selected. This method sets the amount and direction of blurring from a cursor position animating in time and space. Only if the Position value is animating, will blur be visible.
Set up the track data as follows:
1. Move to the start of the clip on the timeline.
2. In the viewer, move the crosshair on top of a point in the image. You may want to follow an object, for example.
3. In the T_DirBlur controls, click the animation button next to Position and select Set key.
4. Move to a new frame and reposition the crosshair. Repeat this to the end of the clip.
The position of the track will interpolate across the clip following the motion of the object and the directional blur will be applied in the direction of the motion. You should note that to see any blurring in Track Mode, the track points position has to be animated and moving.
Position - the position of the track point on the screen.
Scale - the amount of blur applied.
The Foundry Tinderbox 1

TINDERBOX 156T_DirBlur
Bias - weights the smearing forward or backward along the blur vector. Using the bias you can get the blur to trail behind a moving object rather than being centered on it.
Blur Profile - defines the weighting of the pixels that are blended together in each blur line.
• Box - weighs each pixel equally. Faster than Gaussian.
• Gaussian - weighs each pixel using a gaussian distribution. Pixels at the end of the line have less effect than pixels in the middle of the line. Slower than Box.
Filtering - switching this on improves the quality of the effect, but will slow down the rendering time. See “Filtering” on page 21.
Dither - switch this on to add noise to reduce colour banding.
Matte Component- the image and channels used to control the blurring. See “Matte Component” on page 26.
Blending How to mix between the source image and the effect. See “Blending” on page 23.
Source Crops Cropping tools and edge methods. See “(Source) Crops” on page 28.
Matte Crops Cropping tools and edge methods. See “Matte Crops” on page 30.
Tinderbox 1 The Foundry

T_DirBlur
TINDERBOX 1 57
About Click the button to display the on-line help, Tinderbox version number and the location of this user guide. See “About” on page 11.
Hints & Tips T_DirBlur can be used to simulate motion blur on a moving object. You can use the Tracker node to track a point on the image and link the tracking data to T_DirBlur’s Position parameter.
The Foundry Tinderbox 1

TINDERBOX 158T_Distorto
T_Distorto
Description T_Distorto distorts an image using a matte. The amount of distortion corresponds to the brightness of the matte, and the distortion takes the form of a scale, translation or rotation of the image. Where the matte is black there is no distortion. Where the matte is white the full distortion is applied. A matte with smooth changes in luminance will gently ramp in the distortion to give fluid like effects.
Inputs T_Distorto has two inputs - a source image and a matte.
Controls Process - sets which channels to process. See “Process” on page 13.
Distortion Source Sets which image to use as the distortion matte and controls its position. The behaviour at the edges of the image is controlled by the Matte Crops parameters.
Distort With - the image and channels used to control the distortion. This parameter works in the same way
Figure 63. Source Image. Figure 64. T_Distorto.
Tinderbox 1 The Foundry
T_Distorto
TINDERBOX 1 59
as the Matte Component parameters in several of the other Tinderbox 1 plug-ins. See “Matte Component” on page 26.
Position - the centre of the matte.
Rotation - the rotation of the matte.
Scale - the size of the matte.
•x - the horizontal size.
•y - the vertical size.
Softness - blurs the matte before applying the distortion. Use this to gradually ramp in the distortion. You can also use this parameter to control the horizontal and vertical weighting of the effect if you click the 2 button to display the w and h values separately.
Strength - the amount of distortion applied based on the settings under Deformation Transform.
Deformation Transform Sets the type of distortion applied to the image.
Deformation Position - the deformation offset.
Deformation Rotation - the deformation rotation.
Deformation Scale - the overall deformation scale.
•x - the deformation scale horizontally.
•y - the deformation scale vertically.
The Foundry Tinderbox 1

TINDERBOX 160T_Distorto
Source Transform Controls the position of the source image. The behaviour at the edges of the image is controlled by the Source Crops parameters.
Source Position - the centre of the source image.
Source Rotation - the rotation of the source image.
Source Scale - the overall scale factor.
•x - the horizontal scale.
•y - the vertical scale.
Display
• Source - shows the transformations of the source image.
• Distortion Source - shows the transformations of the distorting source (matte).
• Result - shows the result of the deformations.
Filtering - the quality of the anti-aliasing used when processing the effect. (See “Filtering” on page 21.)
Filter Sharpness - sharpens the image when Filtering is set to High. (See “Filtering” on page 21.)
Blending How to mix between the source image and the effect. See “Blending” on page 23.
Source Crops Cropping tools and edge methods. See “(Source) Crops” on page 28.
Tinderbox 1 The Foundry

T_Distorto
TINDERBOX 1 61
Matte Crops Cropping tools and edge methods. See “Matte Crops” on page 30.
About Click the button to display the on-line help, Tinderbox version number and the location of this user guide. See “About” on page 11.
Hints & Tips T_Distorto is used extensively in post production to fake and control reflections in curved surfaces. Computer generated 3D objects need to interact with their surroundings to give the impression the scene has been filmed and not created from separate elements. T_Distorto enables compositors to control reflections at the compositing stage rather than taking the video footage and using it as environment maps in 3D.
Figure 65. Still. Figure 66. T_Distorto.
The Foundry Tinderbox 1

TINDERBOX 162T_Droplet
T_Droplet
Description T_Droplet is a distorting plug-in that creates a ring of waves simulating the effect of a droplet of water splashing into a fluid.
Inputs T_Droplet has two inputs - a source image and a matte.
Controls Process - sets which channels to process. See “Process” on page 13.
Position - the centre of the circular waves.
Radius - the distance of the rings from the centre position. You can also use this parameter to control the horizontal and vertical weighting of the effect. Giving w and h different values will squeeze the rings into an ellipse.
Amount - the strength of the distortion.
Wavelength - the distance between the peaks of each wave that are inside the ring.
Figure 67. Source Image. Figure 68. Droplet.
Tinderbox 1 The Foundry

T_Droplet
TINDERBOX 1 63
Number of Waves - sets the number of waves which make up the ring.
Rotation - the rotation on the droplet rings. Rotation is only visible if the droplet rings have been squeezed into an ellipse using the Radius parameter.
Mode - how to distort the image.
• Squeeze - distorts by squeezing pixels in and out of the centre.
• Shift - distorts by pushing the pixels in a direction.
• Zigzag - distorts by pushing the pixels around the ring.
Shift Angle - the direction to shift the pixels in. Shift Angle is used in combination with the Shift mode.
Light See “Light” on page 15.
Light Type
• None - no lights are used. Lighting parameters are switched off.
• Infinite - simulates the parallel rays from a distant light source, like the sun.
Light Elevation - the height of the light source above the image plane.
Light Direction - the direction of the light source.
Colour - the light colour.
Strength - the brightness of the light source.
The Foundry Tinderbox 1

TINDERBOX 164T_Droplet
Fall-off - controls how quickly the light fades away with distance from the light source.
Filtering - the quality of the anti-aliasing used when processing the effect. (See “Filtering” on page 21.)
Filter Sharpness - sharpens the image when Filtering is set to High. (See “Filtering” on page 21.)
Matte Component - the image and channels used to control the Amount so that the distortions can be attenuated. See “Matte Component” on page 26.
Blending How to mix between the source image and the effect. See “Blending” on page 23.
Source Crops Cropping tools and edge methods. See “(Source) Crops” on page 28.
Matte Crops Cropping tools and edge methods. See “Matte Crops” on page 30.
About Click the button to display the on-line help, Tinderbox version number and the location of this user guide. See “About” on page 11.
Hints & Tips See also Tinderbox 1 T_Lens and Tinderbox 2 T_Ripple.
Tinderbox 1 The Foundry

T_Etch
TINDERBOX 1 65
T_Etch
Description T_Etch simulates a hand drawn picture using charcoal. Lines are drawn along edges and cross hatching is used to fill in regions.
Inputs T_Etch has one input - a source image.
Controls Process - sets which channels to process. See “Process” on page 13.
Etch Method
• Outline and Shade - applies both the Outline and Shading parameters to give the complete effect.
• Outline - only applies the Outline parameters. The result is of a sketched outline of the objects within the image.
• Shade - only applies the Shading parameters. The result is of a charcoal drawing without heavily defined object edges.
Figure 69. Source Image. Figure 70. T_Etch.
The Foundry Tinderbox 1

TINDERBOX 166T_Etch
Outlines Controls for drawing along edges.
Outline Edge Threshold - determines what is an edge and therefore whether a line is drawn. If this value is high, areas of the image with little contrast will be considered to be an edge, therefore will be outlined. If this value is low, only areas of the image with high contrast will be outlined.
Outline Pen Pressure - controls the pressure at which the strokes are applied. The lower the value the lighter the lines. The higher the value, the darker the lines. This does not change the width of the lines.
Outline Softness - controls the softness of the lines. When set high, this gives the impression that a fat charcoal stick was used and less lines will be shown. When set low, this gives the impression that a thin charcoal stick was used and more detail will be shown.
Outline Stroke Length - sets the length of the straight lines that form the outlines.
Outline Stroke Separation - controls the gap between the lines drawn. The lower this value, the more lines will be drawn, resulting in a stronger outline of objects.
Shading Controls for filling in between the edges.
Shading Edge Threshold - determines what is an edge and therefore whether a line is drawn. If this value is high, more of the image is considered to be an edge,
Tinderbox 1 The Foundry

T_Etch
TINDERBOX 1 67
therefore less of the image is shaded. If this value is low, less of the image is considered an edge, therefore more of the image is shaded.
Shading Pen Pressure - controls the pressure at which the strokes are applied. The lower the value the lighter the lines. The higher the value, the darker the lines. This does not change the width of the lines.
Shading Softness - controls the softness of the lines. When set high, this gives the impression that a fat charcoal stick was used and less areas of the image will be shaded. When set low, this gives the impression that a thin charcoal stick was used and more areas of the image will be shaded.
Shading Stroke Length - sets the length of the lines that form the cross hatched shading pattern.
Shading Stroke Separation - controls the gap between the shading lines. The lower this value, the more lines will be drawn, resulting in denser shading.
Seed - random number generator that sets the shading pattern.
Random Seed Method - determines how the seed number varies.
• Seed with Frame - the pattern changes with each frame.
• Fixed Seed - the pattern does not change.
• Seed with Pixel - the pattern changes according to varying pixel values.
Blank Threshold - determines whether shading is applied in
The Foundry Tinderbox 1

TINDERBOX 168T_Etch
areas of little variation. Note The amount of the image which is considered to have little
variation is affected by the Edge Threshold controls in Outlines and Shading.
Paper - sets the background colour.
Pen - the colour of the lines and shading. By adjusting the alpha value, you can control the transparency of the lines drawn by the pen.
Note Changing the alpha value will only take effect if Process is set to RGBA or Alpha.
Blending How to mix between the source image and the effect. See “Blending” on page 23.
Crops Cropping tools and edge methods. See “(Source) Crops” on page 28.
About Click the button to display the on-line help, Tinderbox version number and the location of this user guide. See “About” on page 11.
Tinderbox 1 The Foundry

T_Etch
TINDERBOX 1 69
Hints & Tips A variety of effects can be created by using T_Etch with different blending methods.
T_Etch can be used to accentuate the edges of objects within an image. Use T_Etch in Outline mode with a Fixed Seed and set Blend Method to Multiply.
Figure 71. Source Image. Figure 72. T_Etch with Blend Method Colour Dodge.
Figure 73. Nelson’s Column. Figure 74. T_Etch with Blend Method Difference.
The Foundry Tinderbox 1

TINDERBOX 170T_Grad
T_Grad
Description T_Grad creates colour gradients. Gradients are often used as mattes to control other effects. The result of T_Grad can either be blended with the source image or used to generate a new image or matte.
Inputs T_Grad has one input - a source image.
Controls Process - sets which channels to process. Selecting RGBA will produce an alpha based on the alpha values set under the Start Colour, End Colour, Colours 1-5 Colour, and Colours 1-6 Colour parameters.
Figure 75. Directional T_Grad. Figure 76. Circular T_Grad.
Tinderbox 1 The Foundry

T_Grad
TINDERBOX 1 71
Gradient Type - sets the gradient pattern.
• Directional - Figure 77.
• Circular - Figure 78.
• Radial - Figure 80.
• Polygonal - Figure 79
Cyclic Gradient - repeats the colour gradient by the number defined by Copies. In this case, the two end colours will be forced to be the same. Changing one will change the other. Switching this on when there are no intermediary colours set in the colour ramp will result in a single colour image.
Smooth Gradient - use cubic interpolation between adjacent colours to produce a smoother ramp. When it is switched off a linear interpolation is used, which can give hard edges
Figure 77. Directional. Figure 78. Circular.
Figure 79. Polygonal. Figure 80. Radial.
The Foundry Tinderbox 1

TINDERBOX 172T_Grad
between colours.
Number of Colours - the number of individual colours in the gradient. The gradient can contain up to 10 colours in addition to the Start Colour and the End Colour.
Start Colour - the first colour in the gradient.
End Colour - the last colour in the gradient.
Colours 1-5 - the position and colour of the first five colours in the gradient (after the Start Colour). How many of these are available depends on the Number of Colours value.
Colours 6-10 - the position and colour of the last five colours in the gradient (before the End Colour). How many of these are available depends on the Number of Colours value.
Phase - offsets the position of the colour ramp in the effect. Phase only has an effect when in Cyclic Gradient mode.
Copies - the number of times to repeat the colour ramp in the effect. If you are repeating the colour ramp in an effect when Cyclic Gradient is switched off, you will get a harsh colour transition between the cycles.
Figure 81. Copies = 1. Figure 82. Copies = 2.
Tinderbox 1 The Foundry

T_Grad
TINDERBOX 1 73
Dithered - adds noise to the gradient to reduce the effect of colour banding between smoothly shaded colours.
Start - one end of the Directional gradient. Also the centre position of Circular, Radial, and Polygonal gradients.
Stop - the other end of the Directional gradient.
Radius - the size of the circular gradient when mode is set to Circular or Polygonal. You can also use this parameter to control the horizontal and vertical weighting of the effect. Number of Sides - the number of sides (max 12) of the polygon when in Polygonal mode.
Rotation - controls the rotation of the gradient. Rotation only works when in Circular, Radial or Polygonal mode. When in Circular mode, Rotation will only have an effect if the gradient has been squeezed into an ellipse using the Radius w and h values.
Blending How to mix between the source image and the effect. See “Blending” on page 23.
Crops Cropping tools and edge methods. See “(Source) Crops” on page 28.
About Click the button to display the on-line help, Tinderbox version number and the location of this user guide. See “About” on page 11.
The Foundry Tinderbox 1

TINDERBOX 174T_Grad
Hints & Tips T_Grad can be used to create mattes which can then be used to control other effects such as colour correction or blurs.
Figure 83. Circular Matte. Figure 84. Used with T_DirBlur.
Tinderbox 1 The Foundry

T_HeatHaze
TINDERBOX 1 75
T_HeatHaze
Description T_HeatHaze simulates the distortion of an image that is characteristic of viewing it through hot air.
Inputs T_HeatHaze has two inputs - a source image and a matte that can be used to attenuate the displacement.
Controls Process - sets which channels to process. See “Process” on page 13.
Displacement - the amount of image warping.
Speed - how fast to move the haze in the direction of travel.
Franticness - how fast the haze will boil. The higher this value is set, the hotter it will appear.
Wavelength - the distance between wave peaks. The higher this value is set, the smoother the distortion. You can also
Figure 85. Heat Haze - although hard to see on a static image.
The Foundry Tinderbox 1

TINDERBOX 176T_HeatHaze
use this parameter to control the horizontal and vertical weighting of the effect.
Layers - the number of layers of heat haze which are blended together.
Wave Count - the number of waves used over the entire image.
Direction - the direction the heat haze will appear to travel.
Distort Matte - switch this on to apply the effect to the matte before using it.
Matte Component - the image and channels used to control the attenuation of the Displacement parameter. See “Matte Component” on page 26.
Filtering - the quality of the anti-aliasing used when processing the effect. (See “Filtering” on page 21.)
Filter Sharpness - sharpens the image when Filtering is set to High. (See “Filtering” on page 21.)
Blending How to mix between the source image and the effect. See “Blending” on page 23.
Source Crops Cropping tools and edge methods. See “(Source) Crops” on page 28.
Tinderbox 1 The Foundry

T_HeatHaze
TINDERBOX 1 77
Matte Crops Cropping tools and edge methods. See “Matte Crops” on page 30.
About Click the button to display the on-line help, Tinderbox version number and the location of this user guide. See “About” on page 11.
Hints & Tips Heat haze is usually visible in the distance and not on objects in the foreground. To simulate realistic heat haze, create a matte of any foreground objects and use this to only apply the effect to the background.
The Foundry Tinderbox 1

TINDERBOX 178T_Lens
T_Lens
Description T_Lens is a distorting plug-in that creates a fish-eye lens effect. The bulge can be applied into or out of the image using the Lens parameter.
Inputs T_Lens has two inputs - a source image and a matte.
Controls Process - sets which channels to process. See “Process” on page 13.
Position - the position of the lens centre.
Radius - the width and height of the lens used to create the effect. You can also use this parameter to control the horizontal and vertical weighting of the effect.
Lens - the strength of the effect. Large values bend the image more. Negative values squeeze the image instead of expanding it.
Figure 86. Source Image. Figure 87. T_Lens.
Tinderbox 1 The Foundry

T_Lens
TINDERBOX 1 79
Rotation - the rotation of the effect. Rotation is only visible if the Radius w and h values are not the same.
Light See “Light” on page 15.
Type
• None - no lights are used. Lighting parameters are switched off.
• Infinite - simulates the parallel rays from a distant light source, like the sun.
Light Elevation - the height of the light source above the image plane.
Light Direction - the direction of the light source.
Colour - the light colour.
Strength - the brightness of the light source.
Fall-off - controls how quickly the light fades away
Figure 88. Lens = 80. Figure 89. Lens = -40.
The Foundry Tinderbox 1

TINDERBOX 180T_Lens
with distance from the light source.
Filtering - the quality of the anti-aliasing used when processing the effect. See “Filtering” on page 21.
Filter Sharpness - sharpens the image when Filtering is set to High.
Matte Component - the image and channels used to control the attenuation of the Lens parameter. See “Matte Component” on page 26.
Blending How to mix between the source image and the effect. See “Blending” on page 23.
Source Crops Cropping tools and edge methods. See “(Source) Crops” on page 28.
Matte Crops Cropping tools and edge methods. See “Matte Crops” on page 30.
About Click the button to display the on-line help, Tinderbox version number and the location of this user guide. See “About” on page 11.
Hint & Tips See also Tinderbox 1 T_Droplet and Tinderbox 2 T_Ripple.
Tinderbox 1 The Foundry

T_Pattern
TINDERBOX 1 81
T_Pattern
Description T_Pattern generates various patterns to wipe between the image connected to the Source input and the image connected to the WipeTo input.
T_Pattern can also be used to generate mattes.
Inputs T_Pattern has two inputs - a front and back image.
Controls Type
• Generator - renders a black and white matte.
• Wipe - transition between source and underlying layers.
Figure 90. Venetian Grid. Figure 91. Venetian Fan.
Figure 92. Generator. Figure 93. Wipe.
The Foundry Tinderbox 1

TINDERBOX 182T_Pattern
Mode - controls which pattern is used.
• Simple Wipe - simple horizontal or vertical soft edged wipes (or any angle).
• Stripe Top to Bottom.
• Stripe Left to Right - these patterns paint a sequence of stripes across the image.
• Venetian Top to Bottom - Figure 94.
• Venetian Left to Right.
• Snake Top to Bottom.
• Snake Left to Right - like Stripe, but alternating the direction of the stripe on each pass.
• Clock - a clock wipe.
• Venetian Circle - Figure 95.
• Venetian Square.
• Venetian Fan - Figure 91.
• Venetian Grid - Figure 90.
Wipe - controls the percentage of the wipe between the Source and WipeTo inputs.
Rotation - rotates the pattern.
Number of Passes - for all patterns which are made up of
Figure 94. Venetian Top to Bottom.
Figure 95. Venetian Circle.
Tinderbox 1 The Foundry

T_Pattern
TINDERBOX 1 83
bands, this controls the number of bands used.
Softness - softens the edge of the wipe.
Uniformity - for Venetian wipes, this will control whether the bands scale uniformly or not. At 1, the scaling is uniform. At 0.5, the bands on one edge of the effect will scale earlier, giving a “trickle venetian” effect.
Scaling sets the scaling controls.
Scale - scales the wipe effect when autoscale is off.
X Scale - scales the source image horizontally.
Y Scale - scales the source image vertically.
Autoscale - when this is on, the effect is scaled during rotation so that it still covers the full screen dimensions, When this is off, the scale of the wipe is controlled by the user.
Blending How to mix between the source image and the effect. See “Blending” on page 23.
Source Crops Cropping tools and edge methods. See “(Source) Crops” on page 28.
WipeTo Crops Cropping tools and edge methods. These are the same as the Matte Crops controls in several other Tinderbox 1 plug-ins,
The Foundry Tinderbox 1

TINDERBOX 184T_Pattern
except that they apply to the image connected to the WipeTo input. See “Matte Crops” on page 30.
About Click the button to display the on-line help, Tinderbox version number and the location of this user guide. See “About” on page 11.
Tinderbox 1 The Foundry

T_Rays
TINDERBOX 1 85
T_Rays
Description T_Rays creates a backlit ray effect. The rays are sourced from selected areas of the image’s luminance, or a matte. The colour of the rays can come from the source image or a fixed colour. Figure 97 shows Tinderbox Rays applied to a picture of the London Eye on the south bank of the river Thames.
Inputs T_Rays has two inputs - a source image and a matte defining the source of the rays.
Controls Process - sets which channels to process. See “Process” on page 13.
Source Position - where the rays come from.
Colour Method - determines the ray colour.
• Source - takes the colours of the rays from the source image.
Figure 96. Source Image. Figure 97. T_Rays.
The Foundry Tinderbox 1

TINDERBOX 186T_Rays
• Colouring - takes the colours of the rays from user selected colours.
Gain - the brightness of the rays. Increase this for brighter rays.
Ray Length - the length of the rays. Increase this for longer rays.
Colours This controls the colours of the rays if Colour Method is set to Colouring.
Number of Colours - the number of colours used to colour the rays when Colour Method is set to Colouring.
Highlight - the colour of the brightest part of the rays.
Figure 98. Source. Figure 99. Colouring.
Figure 100. Gain = 0.75. Figure 101. Gain = 1.25.
Tinderbox 1 The Foundry

T_Rays
TINDERBOX 1 87
Colour 1 to Colour 5 - the colours used to colour the rays.
Scintillation Controls the flickering or shimmering of the rays. This movement can be controlled in three ways.
1. Set the Scintillation Speed to give a random breakup in the rays.
2. Animate the Phase to rotate the shimmer around the Source Position.
3. Animate the Source Position and switch on Change with Position. This moves the shimmer with the ray source. The Speed setting controls the rate of movement of the shimmer pattern in relation to the source position.
Scintillates - switches the effect on and off.
Scintillation Amount - the strength of flicker.
Scintillation Speed - the rate of flicker.
Scintillation Detail - the number of lines that form the
Figure 102. Scintillation off. Figure 103. Scintillation on.
The Foundry Tinderbox 1

TINDERBOX 188T_Rays
flicker.
Phase - animating the phase will rotate the shimmer around the source position.
Scintillation Pattern - changes the pattern of the scintillation.
Change with Position - switch this on to control the flicker as a function of the Source Position. You’ll need to animate the Source Position.
Speed - controls the rate of shimmer if animating using the Change with Position.
By default the rays are sourced from the luminance of the source image, but you can specify another image instead using these matte controls. When making adjustments to these controls it is useful to turn on Show Matte. Rays will emanate from white areas of the matte.
Matte Component - the image and channels used to control the source of the rays. See “Matte Component” on page 26.
Matte Clip Min - pixels at or below this luminance value are set to be black.
Figure 104. Detail = 0. Figure 105. Detail = 200.
Tinderbox 1 The Foundry

T_Rays
TINDERBOX 1 89
Matte Clip Max - pixels at or above this luminance value are set to be white.
Show Matte - switch this on to display the source of the rays. You should look at this when setting up the effect so that you can see clearly where the rays will come from. You need to switch Blending to None to see the matte properly.
Blending How to mix between the source image and the effect. See “Blending” on page 23.
Source Crops Cropping tools and edge methods. See “(Source) Crops” on page 28.
Matte Crops Cropping tools and edge methods. See “Matte Crops” on page 30.
Crop Output to Project Window - switch this on to only render the visible rays. Switch it off to render the rays beyond the viewer window. The former is much quicker to render, but if the rays are translated further down the tree you’ll get unwanted black edges where there should be rays.
Figure 106. Blend Method = None.
Figure 107. Blend Method = Lighten.
The Foundry Tinderbox 1

TINDERBOX 190T_Rays
About Click the button to display the on-line help, Tinderbox version number and the location of this user guide. See “About” on page 11.
Tinderbox 1 The Foundry

T_Sky
TINDERBOX 1 91
T_Sky
Description T_Sky generates realistic evolving sky backgrounds. This plug-in has a great number of parameters which can give a wide variety of results.
Inputs T_Sky has one input - a source image.
Controls Process - sets which channels to process. See “Process” on page 13.
Presets - this provides some suggested values for different
Figure 108. Preset - Moon. Figure 109. Preset - Cirrus.
Figure 110. Preset - Sunny. Figure 111. Preset - First Light.
The Foundry Tinderbox 1

TINDERBOX 192T_Sky
effects. These can be used as a starting point when using T_Sky.
Red Shift - the amount of red light in the atmosphere. This is useful for sky simulations at dawn or sunset.
Camera Controls for the built-in camera.
Angle of View - the field of view of the camera. This affects how much of the sky is visible through the camera.
X Rotation - rotation of the camera around the x axis.
Y Rotation - rotation of the camera around the y axis.
Z Rotation - rotation of the camera around the z axis.
Exposure - the amount of ambient light entering the camera.
Noise - the amount of noise added to the image.
Sun There are three components of the sun. The sun itself, the bright glow around the sun (corona) and the radial light streaks that simulate the internal reflections and refractions of bright light within the camera lens (lens flares).
Sun Colour - the colour of the sun.
Sun Brightness - the intensity of the light emitted from the sun.
Tinderbox 1 The Foundry

T_Sky
TINDERBOX 1 93
Sun Direction - the location of the sun in the sky.
Sun Elevation - the height of the sun in the sky.
Sun Fall-off - the extent to which the brightness of the sun fades away with distance.
Corona Brightness - the intensity of the light glow around the sun.
Corona Fall-off - the extent to which the brightness of the corona light fades away with distance.
Corona Haze - switch this on to enable the corona glow to illuminate the haze in the atmosphere. This will result in the corona lighting the foreground objects rather than being in the background.
Figure 112. Fall-off = 200. Figure 113. Fall-off = 2000.
Figure 114. Corona Brightness = 0.
Figure 115. Corona Brightness = 500.
The Foundry Tinderbox 1

TINDERBOX 194T_Sky
Flare The light flares.
Spokes - the number of flares around the sun.
Flare Brightness - the intensity of the light flares.
Flare Fall-off - the extent to which the brightness of the flares fade away with distance.
Rotation - the rotation of the flares around the sun.
Flare Sharpness - the spikiness of the flares A value of 2 will give sharp spikes.
Clouds Controls for the clouds.
Size - the size of the clouds.
Count - the number of clouds in each tile. Note The size of each tile is set under Tile Scale.
Edge Detail - the complexity of the cloud edges.
Cloud Colour - the colour of the clouds.
Figure 116. Sharpness = 0.2. Figure 117. Sharpness = 2.
Tinderbox 1 The Foundry

T_Sky
TINDERBOX 1 95
Cloud Brightness - the luminance of the clouds.
Sharpness - the cloud definition.
Density - the thickness of the clouds. A value of zero removes all clouds.
Cloud Direction - the direction of the cloud drift.
Speed - how fast the clouds move.
Speed Variance - the variation in speed of different clouds.
Bump Scale - the apparent depth of the clouds. Increase this for cumulus clouds.
Bump Soft - the cloud softness which affects the reflected light.
Light Edges - switch this on for under cloud lighting.
Height - the height of the clouds.
Under Lighting - the amount of light reflected from the underside of the clouds.
Tile Scale - the size of each tile repeated across the sky.
Streaky - switch this on to generate cirrus clouds.
Seed - this number generates a number sequence that is used to randomly vary the cloud pattern.
The Foundry Tinderbox 1
TINDERBOX 196T_Sky
Atmosphere The sky or atmosphere is actually a rendered dome with the camera at the centre. You may find it helpful to think of this model when you are altering parameters.
Ambient Brightness - controls the amount of light in the atmosphere.
Zenith Colour - the colour of the sky when you look directly upwards.
Horizon Colour - the colour of the sky at the horizon.
Fog Fog parameters.
Haze Brightness - the brightness of the fog.
Distance - the distance between the fog and camera.
Haze Fall-off - the extent to which the brightness of the fog falls away with distance. The higher this value, the shorter the distance the fog brightness will penetrate.
Source - the colour of the fog.
• Colour - the colour of the fog is taken from the Haze Colour parameter.
• Horizon Colour - the colour of the fog is taken from the Atmosphere - Horizon Colour.
Haze Colour - the colour of the fog when Source is set to Colour.
Tinderbox 1 The Foundry
T_Sky
TINDERBOX 1 97
Blending How to mix between the source image and the effect. See “Blending” on page 23.
Crops Cropping tools and edge methods. See “(Source) Crops” on page 28.
About Click the button to display the on-line help, Tinderbox version number and the location of this user guide. See “About” on page 11.
Hints & Tips As well as using T_Sky to create complete new skies, it can be used to add detail and contrast to an existing sky.
The Foundry Tinderbox 1

TINDERBOX 198T_Starburst
T_Starburst
Description T_Starburst adds sparkles to the highlights of your image.
There is also a mode to add random sparkles regardless of the highlights in the image.
Inputs T_Starburst has two inputs - a source image and a matte.
Controls Process - sets which channels to process. See “Process” on page 13.
Presets - activates a number of popular starburst effects.
Mode - determines where the sparkles are positioned.
• Starburst - adds sparkles to highlights.
• Sparkles - adds randomly positioned sparkles.
Radius - defines the width and length of the spokes of the sparkles. You can use this parameter to control the horizontal and vertical weighting of the effect.
Figure 118. Source Image. Figure 119. T_Starburst.
Tinderbox 1 The Foundry

T_Starburst
TINDERBOX 1 99
Threshold - defines which areas of the source are considered to be highlights. Increasing this value will restrict the sparkles only to the very brightest highlights.
Gain - the brightness of the highlights.
Rotation - the angle of the highlight spokes.
Spoke Count - the number of spokes per sparkle. Lots of spokes and a gap gives a haloed glow effect as shown in Figure 121.
Gap - the distance between the centre of the starburst and the point at which rays are drawn. Increase this to get a gap around the sparkle centre. See Figure 121.
Chromatic Aberration - the defects in the lens surface that cause the image to display colour fringing.
Keep Spoke Brightness - switch this on to preserve the luminance of the spokes.
Figure 120. Source Image. Figure 121. T_Starburst.
The Foundry Tinderbox 1

TINDERBOX 1100T_Starburst
Sparkles Controls the random sparkles if mode is set to Sparkle.
Sparkles are added to the image in random positions rather than on highlights.
Density - the number of sparkles. Increase this to pack more sparkles into your image.
Average Sparkle Size - the size of the sparkle core. The actual size varies.
Brightness Variation - how much the brightness of the sparkles varies.
Sparkliness - the rate of flicker. To stop the flickering set this to zero.
Movement Speed - the rate at which the sparkles move. Set this to zero to get the sparkles to flicker in the same position, like fairy lights on a Christmas tree.
Figure 122. Random Sparkles with a Matte.
Tinderbox 1 The Foundry
T_Starburst
TINDERBOX 1 101
Coloured Sparkles - switch this on for coloured sparkles.
Seed - this number generates a number sequence that is used to randomly vary the sparkles.
Matte Controls Matte Component - the image and channels used to control the gain on the sparkles. See “Matte Component” on page 26.
Matte Clip Min - pixels at or below this luminance value are set to be black.
Matte Clip Max - pixels at or above this luminance value are set to be white.
Show Matte - switch this on to display the source of the sparkles. You should look at this when setting up the effect so that you can see clearly where the sparkles will appear. You need to switch Blending to None to see the matte properly.
Blending How to mix between the source image and the effect. See “Blending” on page 23.
Source Crops Cropping tools and edge methods. See “(Source) Crops” on page 28.
Matte Crops Cropping tools and edge methods. See “Matte Crops” on page 30.
The Foundry Tinderbox 1

TINDERBOX 1102T_Starburst
About Click the button to display the on-line help, Tinderbox version number and the location of this user guide. See “About” on page 11.
Hints & Tips T_Starburst can be used to add subtle highlights to moving water. Keep the Radius small and the Threshold high for a subtle effect.
T_Starburst can give some great effects when applied to car headlights on night footage.
Figure 123. Car Headlights at Night.
Figure 124. Lights Enhanced with T_Starburst.
Tinderbox 1 The Foundry

T_Tile
TINDERBOX 1 103
T_Tile
Description T_Tile translates, rotates, scales and shears the source image. The edge controls can then be used to repeat the pattern to form regular tiles as shown in Figure 126.
Inputs T_Tile has two inputs - a source image and a matte that can be used to attenuate the distortions.
Controls Process - sets which channels to process. See “Process” on page 13.
Position - the centre position of the tile.
Rotation - the rotation of the image tile.
Scale - the overall size.
X Scale - the horizontal size of the tile.
Y Scale - the vertical size of the tile.
Figure 125. Source Image. Figure 126. Tile.
The Foundry Tinderbox 1

TINDERBOX 1104T_Tile
X Shear - the amount of horizontal shear.
Y Shear - the amount of vertical shear.
Filtering - the quality of the anti-aliasing used when processing the effect. (See “Filtering” on page 21.)
Filter Sharpness - sharpens the image when Filtering is set to High. (See “Filtering” on page 21.)
Matte Component - the image and channels used to control the attenuation of the effect. See the below figures and “Matte Component” on page 26.
Figure 127. X Shear = 25. Figure 128. Y Shear = 25.
Figure 129. Matte. Figure 130. Attenuating Scale.
Tinderbox 1 The Foundry

T_Tile
TINDERBOX 1 105
Blending How to mix between the source image and the effect. See “Blending” on page 23.
Source Crops Cropping tools and edge methods.
See “(Source) Crops” on page 28.
Matte Crops Controls the behaviour of the edges of the matte image. See “Matte Crops” on page 30.
About Click the button to display the on-line help, Tinderbox version number and the location of this user guide. See “About” on page 11.
Figure 131. Blending = Mix. Figure 132. Blending = Difference.
Figure 133. Reflect. Figure 134. Wrap.
The Foundry Tinderbox 1

TINDERBOX 1106T_Tile
Hints & Tips You can use the Source Crops to produce an interesting reveal for objects. Set the X or Y Method to Repeat and animate the crops. In the below figures, the Y Method has been set to Repeat.
Figure 135. Crop and Repeat. Figure 136. Crop and Repeat.
Tinderbox 1 The Foundry

Release Notes
APPENDIX A 107
APPENDIX A
Release Notes This section describes the requirements, new features, improvements, fixed bugs, and known bugs & workarounds for each release of Tinderbox 1.
Tinderbox 1 (2.1v1) This is the first release of Tinderbox 1 on Nuke.
Release Date
December 2008
Requirements
Nuke 5.1 for Windows XP, Mac OS X, or Linux.
New Features
In this release, there are 18 plug-ins.
Improvements
This section will describe improvements to existing features in later versions.
Fixed Bugs
This section will describe fixed bugs in later versions.
Known Bugs & Workarounds
• BUG ID 5479 - Changing the format of an image sequence changes the position of any Viewer widgets if they have been left in their default position. If you want a widget to
The Foundry Tinderbox 1

APPENDIX A108Release Notes
appear in the default position again (for example, in the centre of the frame), you need to move it there manually.
• BUG ID 5517 - T_Distorto and T_Etch do not support tiles and therefore some memory errors might appear with large images. The workaround is to give Nuke full access to memory and/or to avoid having several other applications running at the same time.
Tinderbox 1 The Foundry

End User License Agreement
APPENDIX B 109
APPENDIX B
End User License Agreement
IMPORTANT: BY INSTALLING THIS SOFTWARE YOU ACKNOWLEDGE THAT YOU HAVE READ THIS AGREEMENT, UNDERSTAND IT AND AGREE TO BE BOUND BY ITS TERMS AND CONDITIONS. IF YOU DO NOT AGREE TO THE TERMS OF THIS AGREEMENT DO NOT INSTALL, COPY OR USE THE SOFT-WARE.
This END USER SOFTWARE LICENSE AGREEMENT (this "Agreement") is made by and between The Foundry Visionmongers Ltd., a company registered in England and Wales, ("The Foundry"), and you, as either an individual or a single entity ("Licensee").
In consideration of the mutual covenants contained herein and for other good and valuable consid-eration (the receipt and sufficiency of which is acknowledged by each party hereto) the parties agree as follows:
SECTION 1. GRANT OF LICENSE.
Subject to the limitations of Section 2, The Foundry hereby grants to Licensee a limited, non-trans-ferable and non-exclusive license to install and use a machine readable, object code version of this software program (the "Software") and the accompanying user guide and other documentation (col-lectively, the "Documentation") solely for Licensee's own internal business purposes (collectively, the "License"); provided, however, Licensee's right to install and use the Software and the Documenta-tion is limited to those rights expressly set out in this Agreement.
SECTION 2. RESTRICTIONS ON USE.
Licensee is authorized to use the Software in machine readable, object code form only, and Licensee shall not: (a) assign, sublicense, transfer, pledge, lease, rent, share or export the Software, the Doc-umentation or Licensee's rights hereunder; (b) alter or circumvent the copy protection mechanisms in the Software or reverse engineer, decompile, disassemble or otherwise attempt to discover the source code of the Software; (c) modify, adapt, translate or create derivative works based on the Software or Documentation; (d) use, or allow the use of, the Software or Documentation on any project other than a project produced by Licensee (an "Authorized Project"); (e) allow or permit any-one (other than Licensee and Licensee's authorized employees to the extent they are working on an
The Foundry Tinderbox 1

APPENDIX B110End User License Agreement
Authorized Project) to use or have access to the Software or Documentation; (f) copy or install the Software or Documentation other than as expressly provided for herein; or (g) take any action, or fail to take action, that could adversely affect the trademarks, service marks, patents, trade secrets, copyrights or other intellectual property rights of The Foundry or any third party with intellectual property rights in the Software (each, a "Third Party Licensor"). Furthermore, for purposes of this Section 2, the term "Software" shall include any derivatives of the Software.
Licensee shall install and use only a single copy of the Software on one computer, unless the Soft-ware is installed in a "floating license" environment, in which case Licensee may install the Software on more than one computer; provided, however, Licensee shall not at any one time use more copies of the Software than the total number of valid Software licenses purchased by Licensee.
Furthermore, the Software can be licensed on an "interactive" or "non-interactive" basis. Licensee shall be authorized to use a non-interactive version of the Software for rendering purposes only (i.e., on a CPU, without a user, in a non-interactive capacity) and shall not use such Software on workstations or otherwise in a user-interactive capacity. Licensee shall be authorized to use an interactive version of the Software for both interactive and non-interactive rendering purposes, if available.
Finally, if the Software is an "Educational Version," Licensee may use it only for the purpose of train-ing and instruction, and for no other purpose. Educational Versions of the Software may not be used for commercial, professional or for-profit purposes.
SECTION 3. BACK-UP COPY.
Notwithstanding Section 2, Licensee may store one copy of the Software and Documentation off-line and off-site in a secured location owned or leased by Licensee in order to provide a back-up in the event of destruction by fire, flood, acts of war, acts of nature, vandalism or other incident. In no event may Licensee use the back-up copy of the Software or Documentation to circumvent the usage or other limitations set forth in this Agreement.
SECTION 4. OWNERSHIP.
Licensee acknowledges that the Software and Documentation and all intellectual property rights relating thereto are and shall remain the sole property of The Foundry and the Third Party Licensors. Licensee shall not remove, or allow the removal of, any copyright or other proprietary rights notice included in and on the Software or Documentation or take any other action that could adversely affect the property rights of The Foundry or any Third Party Licensor. To the extent that Licensee is authorized to make copies of the Software or Documentation under this Agreement, Licensee shall
Tinderbox 1 The Foundry

End User License Agreement
APPENDIX B 111
reproduce in and on all such copies any copyright and/or other proprietary rights notices provided in and on the materials supplied by The Foundry hereunder. Nothing in this Agreement shall be deemed to give Licensee any rights in the trademarks, service marks, patents, trade secrets, copyrights or other intellectual property rights of The Foundry or any Third Party Licensor, and Licensee shall be strictly prohibited from using the name, trademarks or service marks of The Foundry or any Third Party Licensor in Licensee's promotion or publicity without The Foundry's express written approval.
SECTION 5. LICENSE FEE.
Licensee understands that the benefits granted to Licensee hereunder are contingent upon Lic-ensee's payment in full of the license fee payable in connection herewith (the "License Fee").
SECTION 6. TAXES AND DUTIES.
Licensee agrees to pay, and indemnify The Foundry from claims for, any local, state or national tax (exclusive of taxes based on net income), duty, tariff or other impost related to or arising from the transaction contemplated by this Agreement.
SECTION 7. LIMITED WARRANTY.
The Foundry warrants that, for a period of ninety (90) days after delivery of the Software: (a) the machine readable electronic files constituting the Software and Documentation shall be free from errors that may arise from the electronic file transfer from The Foundry and/or its authorized reseller to Licensee; and (b) to the best of The Foundry's knowledge, Licensee's use of the Software in accordance with the Documentation will not, in and of itself, infringe any third party's copyright, patent or other intellectual property rights. Except as warranted, the Software and Documentation is being provided "as is." THE FOREGOING LIMITED WARRANTY IS IN LIEU OF ALL OTHER WARRAN-TIES OR CONDITIONS, EXPRESS OR IMPLIED, AND The Foundry DISCLAIMS ANY AND ALL IMPLIED WARRANTIES OR CONDITIONS, INCLUDING, WITHOUT LIMITATION, ANY IMPLIED WARRANTY OF TITLE, NON-INFRINGEMENT, MERCHANTABILITY OR FITNESS FOR A PARTICULAR PURPOSE, REGARDLESS OF WHETHER The Foundry KNOWS OR HAS REASON TO KNOW OF LICENSEE'S PARTIC-ULAR NEEDS. The Foundry does not warrant that the Software or Documentation will meet Lic-ensee's requirements or that Licensee's use of the Software will be uninterrupted or error free. No employee or agent of The Foundry is authorized to modify this limited warranty, nor to make addi-tional warranties. No action for any breach of the above limited warranty may be commenced more than one (1) year after Licensee's initial receipt of the Software. To the extent any implied warran-
The Foundry Tinderbox 1

APPENDIX B112End User License Agreement
ties may not be disclaimed under applicable law, then ANY IMPLIED WARRANTIES ARE LIMITED IN DURATION TO NINETY (90) DAYS AFTER DELIVERY OF THE SOFTWARE TO LICENSEE.
SECTION 8. LIMITED REMEDY.
The exclusive remedy available to the Licensee in the event of a breach of the foregoing limited war-ranty, TO THE EXCLUSION OF ALL OTHER REMEDIES, is for Licensee to destroy all copies of the Software, send The Foundry a written certification of such destruction and, upon The Foundry's receipt of such certification, The Foundry will make a replacement copy of the Software available to Licensee.
SECTION 9. INDEMNIFICATION.
Licensee agrees to indemnify, hold harmless and defend The Foundry and The Foundry's affiliates, officers, directors, shareholders, employees, authorized resellers, agents and other representatives (collectively, the "Released Parties") from all claims, defense costs (including, but not limited to, attorneys' fees), judgments, settlements and other expenses arising from or connected with the operation of Licensee's business or Licensee's possession or use of the Software or Documentation.
SECTION 10. LIMITED LIABILITY.
In no event shall the Released Parties' cumulative liability to Licensee or any other party for any loss or damages resulting from any claims, demands or actions arising out of or relating to this Agree-ment (or the Software or Documentation contemplated herein) exceed the License Fee paid to The Foundry or its authorized reseller for use of the Software. Furthermore, IN NO EVENT SHALL THE RELEASED PARTIES BE LIABLE TO LICENSEE UNDER ANY THEORY FOR ANY INDIRECT, SPECIAL, INCI-DENTAL, PUNITIVE, EXEMPLARY OR CONSEQUENTIAL DAMAGES (INCLUDING DAMAGES FOR LOSS OF BUSINESS OR LOSS OF PROFITS) OR THE COST OF PROCUREMENT OF SUBSTITUTE GOODS OR SERVICES, REGARDLESS OF WHETHER THE RELEASED PARTIES KNOW OR HAVE REASON TO KNOW OF THE POSSIBILITY OF SUCH DAMAGES AND REGARDLESS OF WHETHER ANY REMEDY SET FORTH HEREIN FAILS OF ITS ESSENTIAL PURPOSE. No action arising out of or related to this Agreement, regardless of form, may be brought by Licensee more than one (1) year after Licensee's initial receipt of the Software; provided, however, to the extent such one (1) year limit may not be valid under applicable law, then such period shall limited to the shortest period allowed by law.
Tinderbox 1 The Foundry

End User License Agreement
APPENDIX B 113
SECTION 11. TERM; TERMINATION.
This Agreement is effective upon Licensee's acceptance of the terms hereof (by clicking on the "Accept" button) and Licensee's payment of the License Fee, and the Agreement will remain in effect until termination. If Licensee breaches this Agreement, The Foundry may terminate the License granted hereunder by notice to Licensee. In the event the License is terminated, Licensee will either return to The Foundry all copies of the Software and Documentation in Licensee's possession or, if The Foundry directs in writing, destroy all such copies. In the later case, if requested by The Foundry, Licensee shall provide The Foundry with a certificate signed by an officer of Licensee con-firming that the foregoing destruction has been completed.
SECTION 12. CONFIDENTIALITY.
Licensee agrees that the Software and Documentation are proprietary and confidential information of The Foundry and that all such information and any communications relating thereto (collectively, "Confidential Information") are confidential and a fundamental and important trade secret of The Foundry. Licensee shall disclose Confidential Information only to Licensee's employees who are working on an Authorized Project and have a "need-to-know" such Confidential Information, and shall advise any recipients of Confidential Information that it is to be used only as authorized in this Agreement. Licensee shall not disclose Confidential Information or otherwise make any Confidential Information available to any other of Licensee's employees or to any third parties without the express written consent of The Foundry. Licensee agrees to segregate, to the extent it can be rea-sonably done, the Confidential Information from the confidential information and materials of others in order to prevent commingling. Licensee shall take reasonable security measures, which such mea-sures shall be at least as great as the measures Licensee uses to keep Licensee's own confidential information secure (but in any case using no less than a reasonable degree of care), to hold the Software, Documentation and any other Confidential Information in strict confidence and safe cus-tody. The Foundry may request, in which case Licensee agrees to comply with, certain reasonable security measures as part of the use of the Software and Documentation. Licensee acknowledges that monetary damages may not be a sufficient remedy for unauthorized disclosure of Confidential Information, and that The Foundry shall be entitled, without waiving any other rights or remedies, to such injunctive or equitable relief as may be deemed proper by a court of competent jurisdiction.
SECTION 13. INSPECTION.
Licensee shall advise The Foundry on demand of all locations where the Software or Documentation is used or stored. Licensee shall permit The Foundry or its authorized agents to inspect all such locations during normal business hours and on reasonable advance notice.
The Foundry Tinderbox 1
APPENDIX B114End User License Agreement
SECTION 14. NONSOLICITATION.
Licensee agrees not to solicit for employment or retention, and not to employ or retain, any of The Foundry's current or future employees who were or are involved in the development and/or creation of the Software.
SECTION 15. U.S. GOVERNMENT LICENSE RIGHTS.
The Software, Documentation and/or data delivered hereunder are subject to the terms of this Agreement and in no event shall the U.S. Government acquire greater than RESTRICTED/LIMITED RIGHTS. At a minimum, use, duplication or disclosure by the U.S. Government is subject to the appli-cable restrictions of: (i) FAR §52.227-14 ALTS I, II and III (June 1987); (ii) FAR §52.227-19 (June 1987); (iii) FAR §12.211 and 12.212; and/or (iv) DFARS §227.7202-1(a) and DFARS §227.7202-3.
The Software is the subject of the following notices:
* Copyright (c) 2007 The Foundry Visionmongers, Ltd.. All Rights Reserved.
* Unpublished-rights reserved under the Copyright Laws of the United Kingdom.
SECTION 16. SURVIVAL.
Sections 2, 4, 5, 6, 7, 8, 9, 10, 12, 13, 14, 15, 16, 17 and 18 shall survive any termination or expi-ration of this Agreement.
SECTION 17. IMPORT/EXPORT CONTROLS.
To the extent that any Software made available hereunder is subject to restrictions upon export and/or reexport from the United States, Licensee agrees to comply with, and not act or fail to act in any way that would violate, the applicable international, national, state, regional and local laws and regulations, including, without limitation, the United States Foreign Corrupt Practices Act, the Export Administration Act and the Export Administration Regulations, as amended or otherwise modified from time to time, and neither The Foundry nor Licensee shall be required under this Agree-ment to act or fail to act in any way which it believes in good faith will violate any such laws or reg-ulations.
Tinderbox 1 The Foundry

End User License Agreement
APPENDIX B 115
SECTION 18. MISCELLANEOUS.
This Agreement is the exclusive agreement between the parties concerning the subject matter hereof and supersedes any and all prior oral or written agreements, negotiations, or other dealings between the parties concerning such subject. This Agreement may be modified only by a written instrument signed by both parties. If any action is brought by either party to this Agreement against the other party regarding the subject matter hereof, the prevailing party shall be entitled to recover, in addition to any other relief granted, reasonable attorneys' fees and expenses of litigation. Should any term of this Agreement be declared void or unenforceable by any court of competent jurisdic-tion, such declaration shall have no effect on the remaining terms of this Agreement. The failure of either party to enforce any rights granted hereunder or to take action against the other party in the event of any breach hereunder shall not be deemed a waiver by that party as to subsequent enforce-ment of rights or subsequent actions in the event of future breaches. This Agreement shall be gov-erned by, and construed in accordance with English Law.
Copyright (c) 2008 The Foundry Visionmongers Ltd. All Rights Reserved. Do not duplicate.
The Foundry Tinderbox 1

APPENDIX B116End User License Agreement
Tinderbox 1 The Foundry

A-Z
INDEX 117
INDEX
A-Z
AAbout... 11Ambient Lighting 17Aspect 13Attenuation 26
BBlending 23
Blend 25Effect Gain 25Method 23Source Gain 25
Bulge 78
CCamera 19Caustics 38Charcoals 65Clamp 0-1 (32bpc) 25Clock Wipe 82Clouds 94Crops
Colour 29Reflect 30Repeat 29Wrap 30
Ddeflicker 44Defocus. See Blurs
EEdge Methods 29
The Foundry Tinderbox 3

INDEX118A-Z
End User License Agreement 109Environment Maps 61environment variable 8
FFilter Sharpness 21Filtering 21
High 21Low 21Medium 21
Fish-eye Lens 78flicker 44Fog 96Frosted Glass 53
HHaze 93Heat Haze 75Help 11
IInstalling Tinder 6
KKeylight 9
LLicensing Tinder 8Light Rays 38
See also T_RaysLighting 15
Ambient 17
MMatte 26Matte Layer 26Matte Layer Crops 30Moving the Install Directory 8
Tinderbox 3 The Foundry

A-Z
INDEX 119
OOFX 5OFX_PLUGIN_PATH 8On-line Help 11
PPixel Scattering 52Process 13
RRays 85Release Notes 107release notes 109Reset 13
SSharpening an image 35Shearing. See T_TileSky 91Source Crops 28Sparkles 98Spotlight 31Sun 92
TT_Beam 31T_Blur 35T_Caustic 38T_Deflicker 44T_Degrain 49T_Diffuse 52T_DirBlur 54T_Distorto 58T_Droplet 62T_Etch 65T_Grad 70T_HeatHaze 75T_Lens 78T_Pattern 81T_Rays 85
The Foundry Tinderbox 3

INDEX120A-Z
T_Sky 91T_Starburst 98T_Tile 103The Foundry 9Tinder 9, 10Tinderbox 9Type 13
WWater
See T_CausticSee T_Droplet
wavelet 49web site 9Wipes. See T_Patternwww.thefoundry.co.uk 9
Tinderbox 3 The Foundry