tip: the upper bolt points down, and the assembly instructions
TRANSCRIPT
ASSEMBLY INSTRUCTIONS
Adjustable Gate Frame System for Vinyl FencingRanch Rail or Privacy Fence
Thank you for your purchase of our all steel frame Adjust-A-Gate (AGII) Vinyl Gate Kit.
This kit comes complete with all components necessary to install a single gate up to a 72” opening (between latch and hinge post). If wider gate openings are required, please contact your supplier or call1-800-955-2879 for assistance.
You will fi nd throughout these assembly instructions “Helpful Hints” to assist with the installation of your gate frame. Please read all instructions completely prior to beginning the installation.
Before You Begin: Separate and familiarize yourself with all parts included in your AGII gate kit.
PARTS LIST: 1- Vertical Hinge Gate Frame with U Channel Receivers 1- Vertical Latch Gate Frame with U Channel Receivers 2- (3 or 4 with rail gates) 6’ Long Spreader Bars 2- Plastic Square Post Caps 2- Post Hinges 2- Frame Hinges 2- Post Stabilizer Hinge Brackets 2- Hinge Bolts 1- Latch Catch 1- Striker Bar 1- Diagonal Adjustable Truss Cable 1- Truss Cable S Hook and cable clamp 4- (6 or 8 with rail gates) 1.5” Wide Vinyl Lower Rail Stabilizer Bracket 4- (6 or 8 with rail gates) 2.0” Wide Vinyl Lower Rail Stabilizer Bracket Stainless Steel Self Tapping Screws
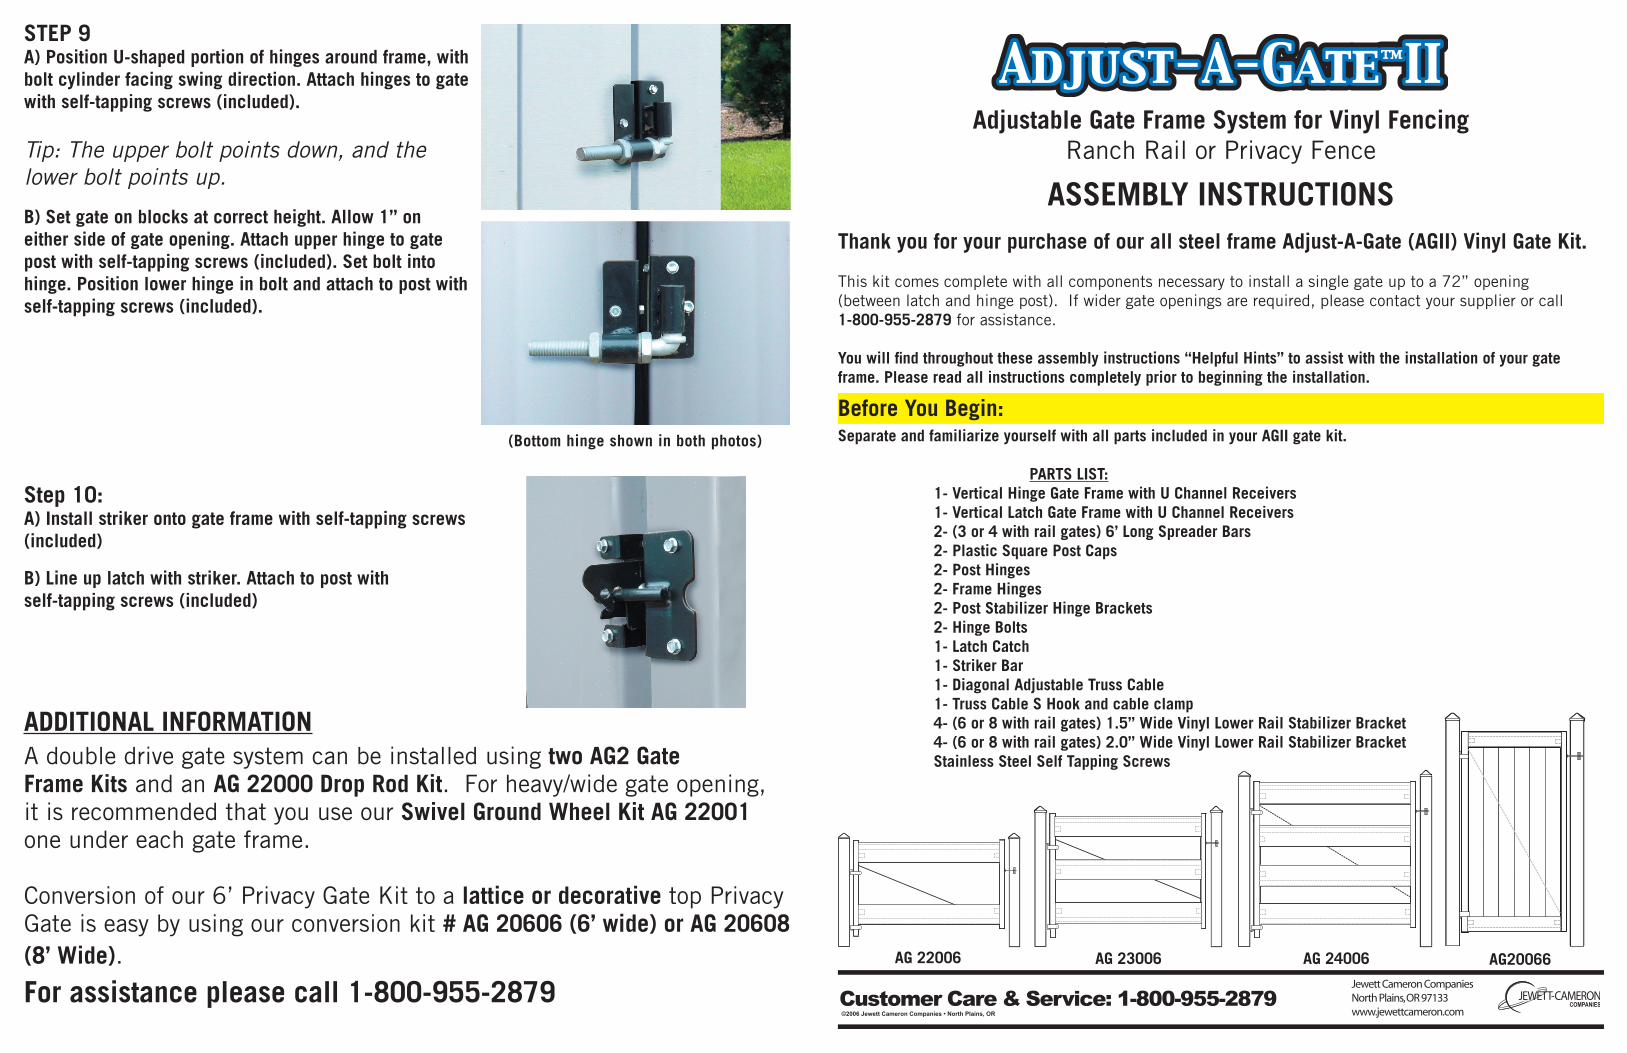
STEP 9A) Position U-shaped portion of hinges around frame, with bolt cylinder facing swing direction. Attach hinges to gate with self-tapping screws (included).
Tip: The upper bolt points down, and the lower bolt points up.
B) Set gate on blocks at correct height. Allow 1” oneither side of gate opening. Attach upper hinge to gate post with self-tapping screws (included). Set bolt into hinge. Position lower hinge in bolt and attach to post with self-tapping screws (included).
Step 10:A) Install striker onto gate frame with self-tapping screws (included)
B) Line up latch with striker. Attach to post withself-tapping screws (included)
AG 22006 AG 23006 AG 24006 AG20066
ADDITIONAL INFORMATIONA double drive gate system can be installed using two AG2 Gate Frame Kits and an AG 22000 Drop Rod Kit. For heavy/wide gate opening, it is recommended that you use our Swivel Ground Wheel Kit AG 22001 one under each gate frame.
Conversion of our 6’ Privacy Gate Kit to a lattice or decorative top Privacy Gate is easy by using our conversion kit # AG 20606 (6’ wide) or AG 20608 (8’ Wide).
For assistance please call 1-800-955-2879
(Bottom hinge shown in both photos)

STEP 5:The AGII vinyl gate frame is designed to accommodate a 1.5” to 2.0” wide vinyl rail. Once the size of the vinyl rail has been determined, select the appropriate vinyl rail stabilizer bracket and install next to each Uchannel receivers using 2 stainless steel screws for each bracket. (stainless screws require a 5/16 nut driver)
STEP 6:You are now ready to cut the vinyl rails and install on your frame kit. Cut the vinyl rails 1/4” longer than the spreader bars. Please insure this cut is square avoiding unnecessary gaps between the vertical hinge and latch steel gate frames and vinyl rails.
VERY IMPORTANT“Helpful Hint” Do not install latch side vertical frame until all vinyl rails and/or boards have been positioned onto the hinge steel frame and spreader bars. Now install the vertical latch frame.
STEP 7:You will install one stainless screw with decorative cap at each rail/vertical frame intersection. There areadditional screws and caps provided for middlevinyl / steel rail attachment on wider gate frames (This is optional).
“Helpful Hint” We have found using a commonmotorcycle tie down strap around the middle of the gate frame will stabilizes the frame and vinyl while installing the stainless steel screws with decorative caps in each rail inter-section.
STEP 8:Installing diagonal truss cable: The turnbuckle will be at the hinge top corner of the gate frame with the S hook at the latch bottom side of the gate frame. Open turnbuckle to maximum length. Pull diagonal vinyl coated cable to bot-tom latch corner and measure 6” additional cable length and Trim off extra cable. Strip vinyl coating from cable and create a loop using the cable clamp provided and attach to the S hook.
“Helpful Hint” Do not over tighten truss cable until gate has been com-pletely installed. This truss cable is used for a final adjustment to insure an aligned gate frame with the top of the fence.
STEP 1:After securely installing your hinge and latch posts,measure the exact space between posts.
“Helpful Hint” Measure the distance between thetops AND bottoms of your posts to insure that theposts are parallel and level.
STEP 2:Once the gate opening measurement has beendetermined, deduct 6.25” from this measurement. This will be the final length that the upper and lowerspreader bars will be once cut.Example: For a 48” opening, the spreader bar willbe cut 41.75”.
“Helpful Hint” The 6.25”reduction takes intoaccount the vertical hingeand latch frame and 1” forhinges and 1” latch.
STEP 3:Using a common file, deburr the cut end of thespreader bar to insure an easy fit over the receiver“U” channels. “Helpful Hint” It is recommended that the cut endof the spreader bar be painted to prevent rust.
STEP 4:Locate vertical hinge frame and install spreaderbars over “U” channel receivers(2 on privacy gates 2, 3 or 4 on rail gates)
“Helpful Hint” Please note that there is a top andbottom for both vertical hinge and latch frames;they are marked with a label.