tips and techniques for autocad 2004 - augi · tips and techniques for autocad 2004 ... he holds a...
TRANSCRIPT

December 2-5, 2003 ◊ MGM Grand Hotel Las Vegas
Tips and Techniques for AutoCAD 2004®
Speaker: J.C. Malitzke
Code: GD33-2
This class will introduce both new and experienced users to many of the capabilities, features, tips, and techniques in AutoCAD® 2004. If you're still using earlier versions of AutoCAD or if you're looking to enhance your productivity with AutoCAD 2004, this session is for you. Learn to use features and commands such as the multiple design environment (MDE), right-click shortcut menus, hyperlinks, web-aware file access, partial open and partial load, polar and object tracking, quick dimensioning, and much more! See first-hand how these and other features can work for you.
About the Speaker: J.C. Malitzke is department chair of the Computer Integrated Technologies Department at Moraine Valley Community College in the greater Chicagoland area. He manages and teaches AutoCAD® and has been instrumental in the college’s awards from Autodesk. He was a founding member of the Autodesk® Training Center Executive Committee, which consults with Autodesk on training matters. In 2002, he was selected by the Illinois Drafting Educators Association as Educator of the Year. He presents at numerous conferences, and this is his 10th year presenting at Autodesk University®. He holds a bachelor's degree in Education and a master's degree in Industrial Technology from Illinois State University

AutoCAD 2004®, Most Compelling Features for Educators!
2
With the new features and commands in AutoCAD 2004, you will need to make decisions on how you will use them. We will explore many commands and features that can work for you.
Overall Performance
AutoCAD 2004 has increased speed. Our loads are faster and our file size is smaller.
• Faster operations over a network o Opening files 33% faster than in AutoCAD 2002 o Saving files 66% faster than in AutoCAD 2002
• Smaller DWG files o DWG files 52% smaller than in AutoCAD 2002 o Example: A 6.5MB file in AutoCAD Release 14
= 5.2MB in AutoCAD 2000/2000i/2002 = 2.9MB in AutoCAD 2004
Note: the operating systems supported by AutoCAD 2004 are: Windows NT with latest service pack, Windows 2000 Professional and Windows XP.
• New Thumbnails of Drawing Files o Using Windows thumbnails is a fast and easy way to preview you drawings BEFORE loading!

AutoCAD 2004®, Most Compelling Features for Educators
3
• Right Click Enter customization
You can turn on time sensitive Rick Click option in the options dialog box. A quick right click brings back ENTER. A delayed right click (pause) opens the shortcut pop-up menu. Set time in milliseconds.

AutoCAD 2004®, Most Compelling Features for Educators!
4
• Quick New Command (QNEW)
QNEW command will start a new drawing from the current default drawing template file and folder path specified in the OPTIONS dialog box on the Files tab. We set QNEW when we want a default template drawing every time we start a new drawing.
o You can set the STARTUP system variable to 1 (on). o You must have set the FILEDIA system variable to 1 (on).
To Start QNEW you must click New on the File menu or QNEW on the Standard toolbar.

AutoCAD 2004®, Most Compelling Features for Educators
5
• CLOSE
The CLOSE command now works even when in a command!

AutoCAD 2004®, Most Compelling Features for Educators!
6
• Tool Palettes
The Tool Palettes window has tabbed areas that provide a fast and efficient method for the organization of blocks and hatch patterns. Tool Palettes can also contain custom tools provided by third-party developers. Tool Palettes can also be customized from third-party web sites that have i-drop technology enabled.
If you know of an i-drop site that has blocks for downloading, you would just drag and drop from the i-drop web site onto your Tool Palette. (We will demonstrate this.) Also, there is new Tool Palette extension on the Autodesk web site. Check it out!
Tool Palettes are customizable. Right click where the arrow is shown or click on the Properties icon on the lower right of the Tool Palette and you can dock, auto hide (great feature), make the Tool Palette transparent, create a new Tool Palette, rename a Tool Palette and customize the Tool Palette.

AutoCAD 2004®, Most Compelling Features for Educators
7
You can customize the Tool Palettes and Export the Tool Palette for later use or to share with others.
A really cool feature of Tool Palettes is the ability to set properties to each block individually! Just right click on a block in the Tool Palette and set the properties. You can set the insert scale factor, layer and other unique properties. Just drag and drop you block from the Tool Palette into your drawing and you will see these properties effect on the inserted block!
AutoCAD 2004®, Most Compelling Features for Educators!
8
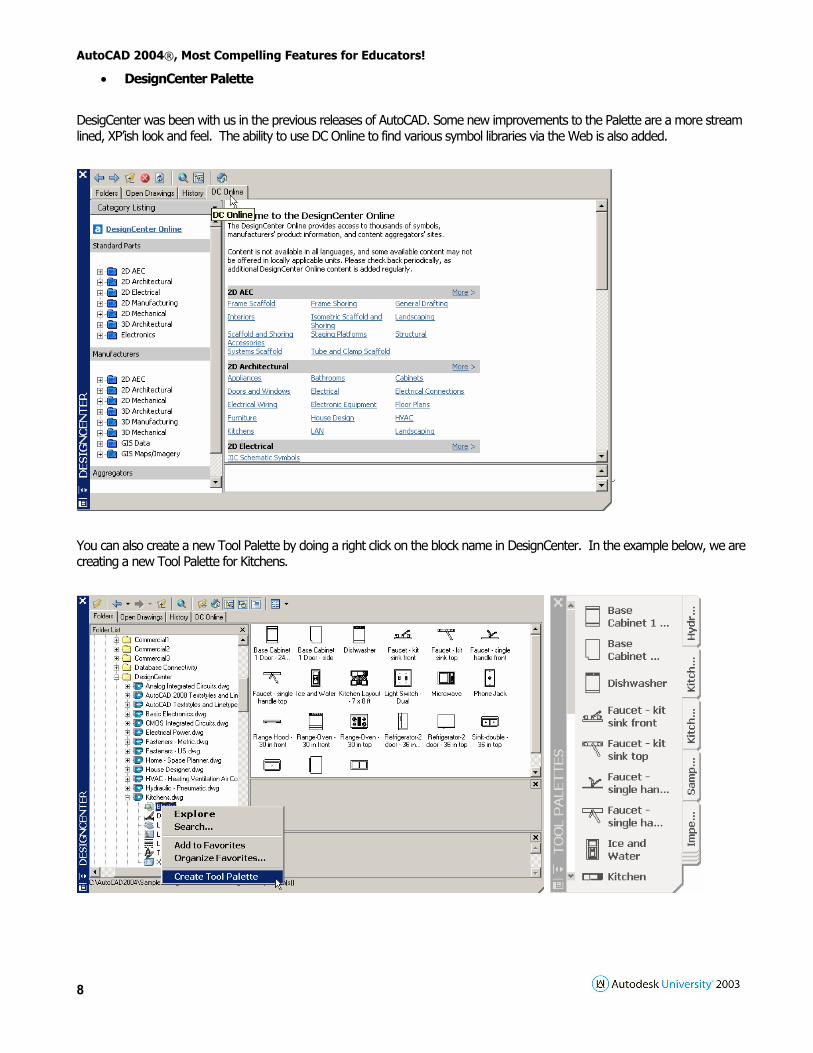
• DesignCenter Palette
DesigCenter was been with us in the previous releases of AutoCAD. Some new improvements to the Palette are a more stream lined, XP’ish look and feel. The ability to use DC Online to find various symbol libraries via the Web is also added.
You can also create a new Tool Palette by doing a right click on the block name in DesignCenter. In the example below, we are creating a new Tool Palette for Kitchens.

AutoCAD 2004®, Most Compelling Features for Educators
9
• The Properties Palette
The Properties Palette has a new look! Check it out!
One of the best features in AutoCAD 2002 and now improved in AutoCAD 2004 is the ability to edit an object by double clicking or a single click on an object. Lines, circle, arcs, etc use the Properties Palette to edit. Give this a try. Your paradigm will change!!! In AutoCAD 2000/2000i/2002/2004 the Properties Palette becomes the focal point for editing. The Properties Window lists the current settings for all object properties when a single object or multiple objects are selected. It also can be used when using the 3DORBIT command. To modify properties using the Properties Window select the object or objects whose properties you want to change. You can leave the Properties Window open while you work on other parts of your drawing.
o Double click on an object o When editing objects in AutoCAD, select the objects FIRST or by using the select objects button,
then go to the Properties Palette to do your edits o Use Quick Select to select objects for editing o The Properties Palette becomes the graphical front end to editing all objects. o Displays the current list of an object or objects o Filtered selection sets using Quick Select o PICKADD o AUTOHIDE the palettes for better use of screen real estate.

AutoCAD 2004®, Most Compelling Features for Educators!
10
• CleanScreen
The CLEANSCREENON and CLEANSCREENOFF commands toggle the viewing screen in AutoCAD. With Cleanscreen turned on, all toolbars, Tool Palettes, the Windows taskbar and the AutoCAD window caption at the top of the screen are removed.

AutoCAD 2004®, Most Compelling Features for Educators
11
• Layout Tabs
You can toggle through the layout tabs using CRTL+PageUp and CTRL+PageDown.
• DRAWORDER and SORTENTS
The DRAWODER command has been changed! When you select multiple objects for reordering, AutoCAD maintains the relative display order of the objects selected. The selection method has no impact on drawing order. When saving a drawing, draworder is maintained! For example: if you have a raster image on top of a vector in your drawing and save the drawing, the draw order is maintained on OPEN.
However, DRAWORDER automatically turns on all Object Sort Methods. (Sets SORTENTS to 127). This is set in the OPTIONS dialog box. This brings back the old method of last drawn object to the top of the data base stack. In other words, if you draw a yellow line and then draw a green line on top of the yellow line and want to erase the green line, you should always get the green line! Why? Because it was the last drawn! For the past few releases of AutoCAD this was not always true! That has what was referred as OctTree and QuadTree spatial indexing. Because of the new defaults, regens and redraw times are slower!

AutoCAD 2004®, Most Compelling Features for Educators!
12
User Interface
New look and feel for toolbars, Tool Palettes, dialog boxes and icons. The User Interface for AutoCAD 2004 has a very subtle and clean look.
There are four toolbars at the top of the screen in AutoCAD 2004. (See Below) (Standard, Styles, Layers and Properties) The Styles toolbar gives you quick and easy access to text styles and dimension styles.
• The Command Line
The command line is now a dynamic window that you can dock on the screen or use as a Tool Palette. You can resize the command line by dragging its corners. The command line can be transparent when not docked! (See below for transparency turned on for the command line and Tool Palettes.

AutoCAD 2004®, Most Compelling Features for Educators
13
• Tool Bar Buttons
If you like the large toolbar buttons, they now have a higher resolution.
• Status Bar and Tray
You can customize the Status Bar and Tray at the bottom of your screen.
• Current drawing Location
The drawing directory is now displayed at the top of the screen.
AutoCAD 2004®, Most Compelling Features for Educators!
14
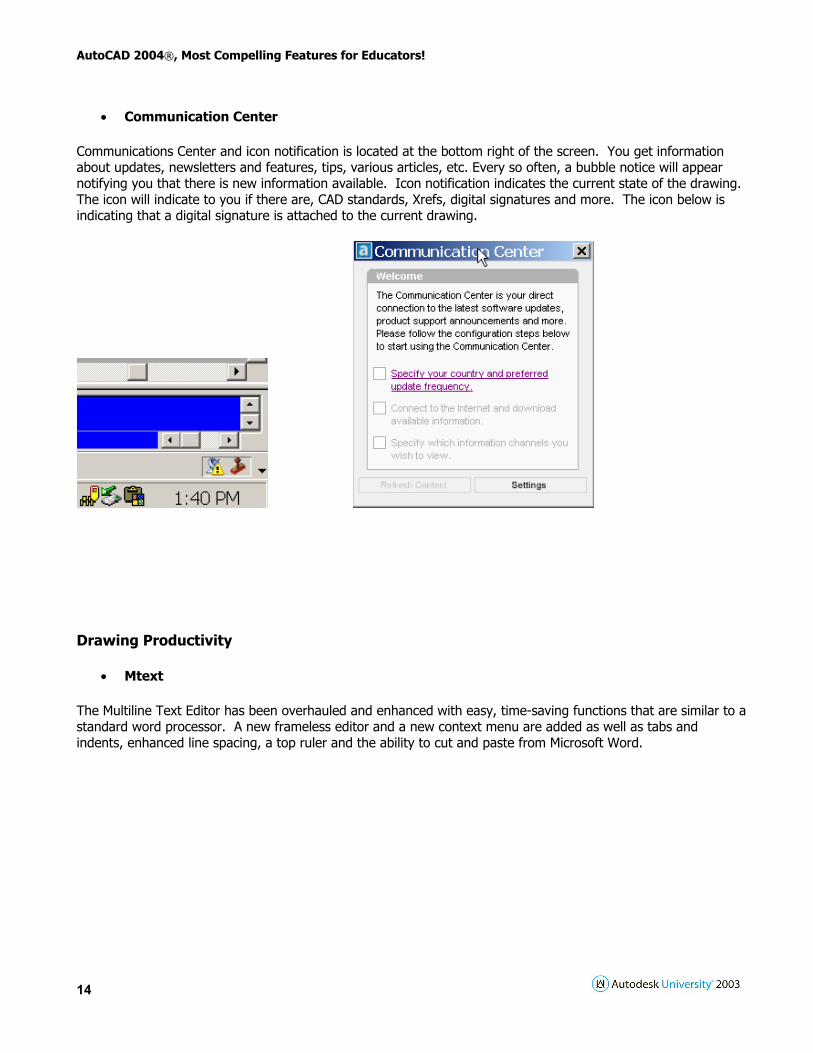
• Communication Center
Communications Center and icon notification is located at the bottom right of the screen. You get information about updates, newsletters and features, tips, various articles, etc. Every so often, a bubble notice will appear notifying you that there is new information available. Icon notification indicates the current state of the drawing. The icon will indicate to you if there are, CAD standards, Xrefs, digital signatures and more. The icon below is indicating that a digital signature is attached to the current drawing.
Drawing Productivity
• Mtext
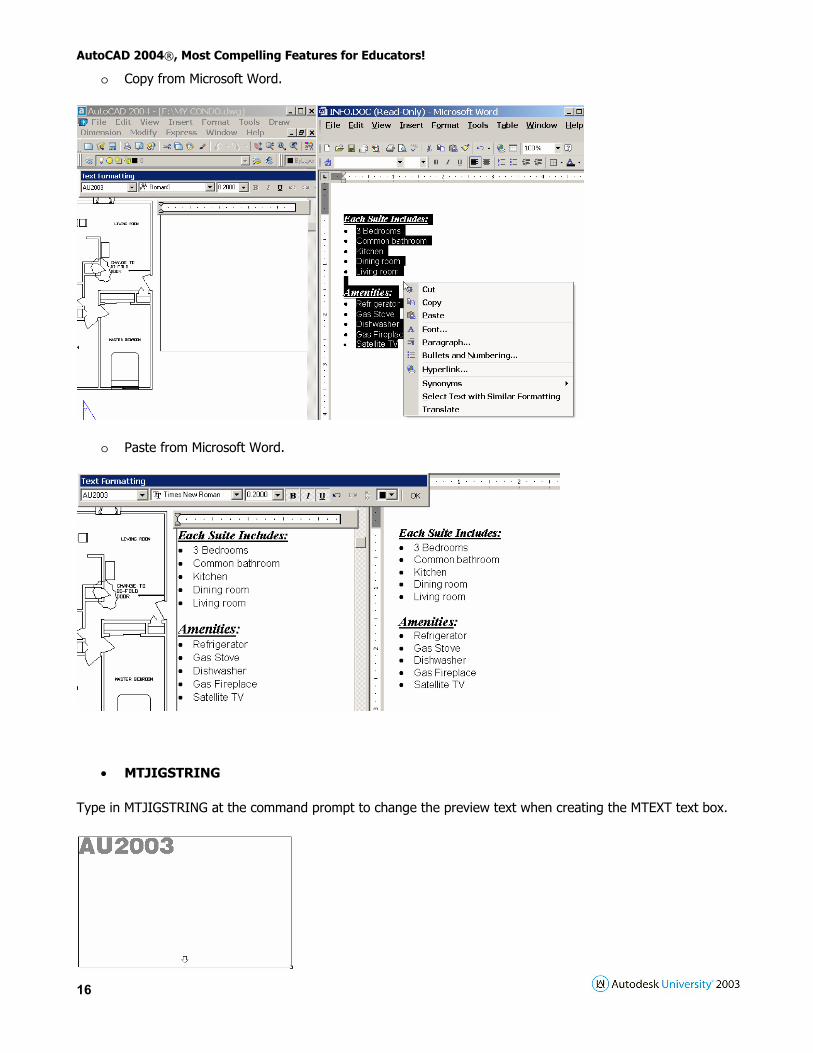
The Multiline Text Editor has been overhauled and enhanced with easy, time-saving functions that are similar to a standard word processor. A new frameless editor and a new context menu are added as well as tabs and indents, enhanced line spacing, a top ruler and the ability to cut and paste from Microsoft Word.

AutoCAD 2004®, Most Compelling Features for Educators
15
o The frameless editor.
o MTEXT with tabs or indents.
AutoCAD 2004®, Most Compelling Features for Educators!
16
o Copy from Microsoft Word.
o Paste from Microsoft Word.
• MTJIGSTRING
Type in MTJIGSTRING at the command prompt to change the preview text when creating the MTEXT text box.

AutoCAD 2004®, Most Compelling Features for Educators
17
• Other text features (from AutoCAD 2002)
o SCALETEXT. This new feature resizes using a relative scale factor, specific text height or by matching properties.
o TEXTSCALE
Enter a base point option for scaling [Existing/Left/Center/Middle/Right/TL/TC/TR/ML/MC/MR/BL/BC/BR] <Existing>: Specify text height Specify new height or [Match object/Scale factor] <.25>:
o JUSTIFYTEXT.
Changes the justification point of selected text objects without changing their locations.
o ‘SPACETRANS. This command is used transparently to convert text heights between Model Space and Paper Space. It is intended to be invoked transparently at a prompt for text height or other length value. For text in model space… From the Command line: text
Current text style: "style1" Text height: 0'-0"
Specify start point of text or [Justify/Style]:
Specify height <0'-0">: '_spacetrans
>>Specify paper space distance <1">: .125
Resuming TEXT command.
Specify height <0'-0">: 20.20989226909908
Specify rotation angle of text <0>:
Enter text: THIS IS TEXT IN Model Space.
• REVCLOUD
The Revcloud has been added to AutoCAD 2004. It creates a polyline of arcs attached together to form a cloud like shaped object. You must specify the length of the arcs to achieve you desired look. You can draw the revision cloud by hand or use existing circles or closed polylines.

AutoCAD 2004®, Most Compelling Features for Educators!
18
• Tracking Tracking is a way for you to locate a point relative to another point in space. The first graphical implementation of tracking was in AutoCAD 2000/2002. (R14 did have tracking, but not graphical!) Tracking has been improved because of its graphical front end. We can see exactly what is happening when we are using any of the varieties of tracking. Tracking consists of the following:
o Tracking Paths –Extension and Alignment o Tracking Points o Temporary Tracking Point o Object Tracking o Polar Tracking o Tracking Tool Tips o TRACKPATH system variable o Status bar changes
A new system variable TRACKPATH is used to display the length or the tracking path. Think of the tracking path as a temporary construction vector showing direction. The default setting is 0. Set the TRACKPATH to 1 to reduce the length of the tracking length. Many beginners set the TRACKPATH to 1. 0 Displays full screen object snap tracking path 1 Displays object snap tracking path only between the alignment point and from point to cursor location 2 Does not display polar tracking path 3 Does not display polar or object snap tracking paths The drawing below had a change order to punch in four new holes and to punch in the two new slots. Using object tracking, extension, center, endpoint and midpoint running osnaps it should take only 30 seconds or less to create the changes. Give this a try!
• Wipeouts
Wipeouts have been added to AutoCAD 2004. A wipeout is a raster image of the background color that covers the drawing area with a blanked specified area created from polygonal objects. You are prompted to specify a polygonal area with a series of picks on the screen or you can convert existing closed polylines or circles into wipeouts. Wipeouts create a frame border. These borders can be left on or turned off.
When plotting a wipeout, make sure your plotter can plot raster images!
AutoCAD 2004®, Most Compelling Features for Educators
19
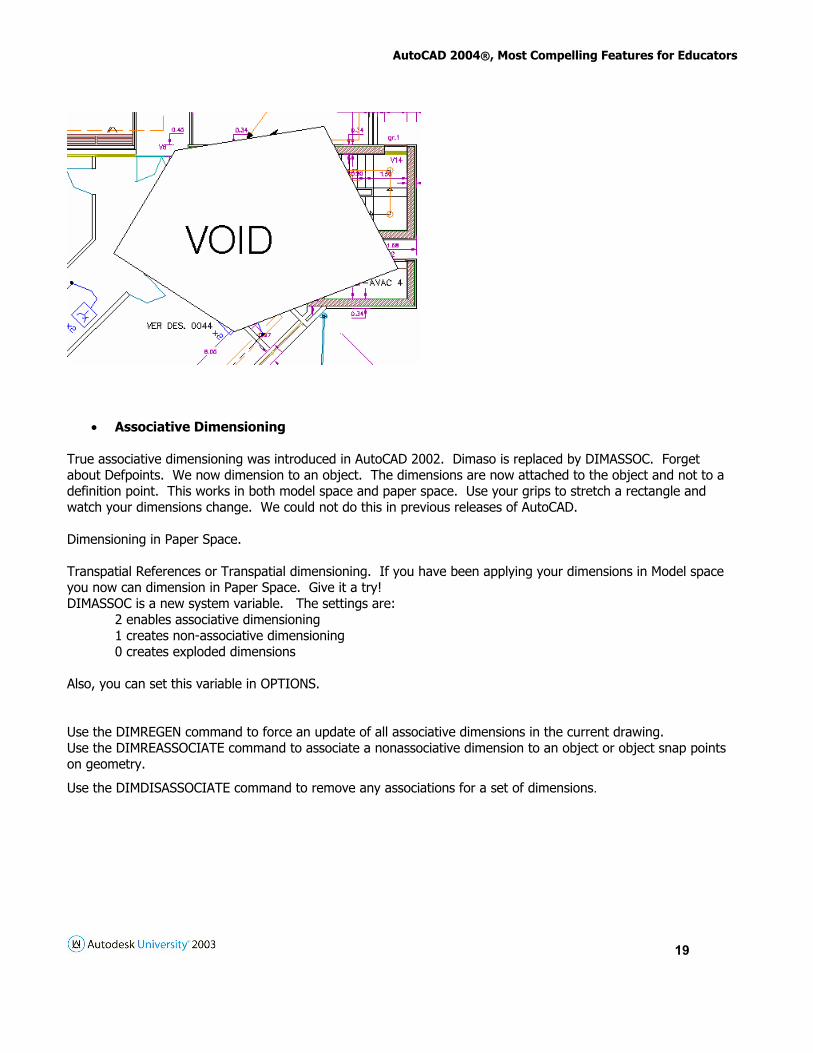
• Associative Dimensioning
True associative dimensioning was introduced in AutoCAD 2002. Dimaso is replaced by DIMASSOC. Forget about Defpoints. We now dimension to an object. The dimensions are now attached to the object and not to a definition point. This works in both model space and paper space. Use your grips to stretch a rectangle and watch your dimensions change. We could not do this in previous releases of AutoCAD. Dimensioning in Paper Space. Transpatial References or Transpatial dimensioning. If you have been applying your dimensions in Model space you now can dimension in Paper Space. Give it a try! DIMASSOC is a new system variable. The settings are: 2 enables associative dimensioning 1 creates non-associative dimensioning 0 creates exploded dimensions Also, you can set this variable in OPTIONS. Use the DIMREGEN command to force an update of all associative dimensions in the current drawing. Use the DIMREASSOCIATE command to associate a nonassociative dimension to an object or object snap points on geometry.
Use the DIMDISASSOCIATE command to remove any associations for a set of dimensions.

AutoCAD 2004®, Most Compelling Features for Educators!
20
• Associative Quick Dimensions
The QDIM command has been enhanced to allow Associated Quick Dimensioning in Model Space. This part has been dimensioned using QDIM with the baseline option.
The part has been moved using grips, 10 units to the right. Notice that the dimensions have changed.

AutoCAD 2004®, Most Compelling Features for Educators
21
• Grips
Grip Editing has been enhanced to allow easier editing of 2D objects. An example of this would be when an object, such as a circle is drawn in a different UCS and needs to be aligned to an object that resides in still another UCS plane.
A new grip has been added called a hover grip. This helps us in selecting grips that are very close together. Also, the grips are now solid. We set grip parameters in OPTIONS.
Grips settings in OPTIONS. Note: many change the cold grip color to cyan instead of blue. It is easier to see on the screen!)

AutoCAD 2004®, Most Compelling Features for Educators!
22
• Multiple Redo/Undo
FINALLY! You can redo and Undo multiple commands. A history is remembered in lists for both Redo and Undo. New drop down menus have been provided for us.
• External Reference Improvements
Enhancements to external references include the Xref Notification Icon in the Communication Center area, an external Xref Manager, the new XOPEN command and modifications to the REFEDIT command. AutoCAD now loads Xrefs in a first ready, first in, sequence.
You can now attach an Xref with a relative path. (This is a preferred method used by many especially when they move drawings around their offices or send drawings with Xrefs to others). When you attach an Xref using a relative path, the Xref's location becomes relative to the host drawing. You must save your host drawing first to its location, then Xref in a drawing using the relative path option.

AutoCAD 2004®, Most Compelling Features for Educators
23
An Xref notification icon is displayed in the communications area when an Xref is attached to a drawing. The Xref notification icon provides the user with a visual clue about the status of Xrefs. If an Xref gets modified and saved by another person, an alert balloon will appear.
The XOPEN command gives you the ability to open an Xref that is currently in your drawing. A separate window opens for you to work with the Xref for modifications or changes. Once you save this drawing the notification balloon should appear to all users that have checked out the Xref. (Note: You can use the XOPEN command for Xref editing and the REFEDIT command for block editing).

AutoCAD 2004®, Most Compelling Features for Educators!
24
• Reference Manager
The Autodesk Reference Manager is a stand-alone application that you can access from the Autodesk program group under from the Windows Start menu. The Reference Manager allows you to manage your Xrefs, the associated fonts, images, plot configurations as well as other drawings. The Autodesk Reference Manager provides tools to list referenced files that are selected to modify their without opening the drawing files in AutoCAD. You can export a report (xls, cvs or xml file) for later use.
• Multiple Fillet and Chamfer
We can now use the Multiple option to fillets or chamfers by not restarting the commands. You simply enter U, for mUltiple. Also, remember that when you set a fillet radius you do not need to restart the fillet command. Chamfers too.
• Match Properties
Match Properties have added Polylines and Viewport objects to the list of special properties that can be “painted”. Use the new Match Properties icon! Right click and go to Settings for the new dialog box.

AutoCAD 2004®, Most Compelling Features for Educators
25
• XLINE
A helpful trick is to create construction geometry with XLINES that are perpendicular to an object.
XLINE t ha t is Perpend ic u la r t o an ob jec t
• The ALIGN command for 2D
You can use the ALIGN command to align raster to vector in a drawing.
If you have an aerial JPEG and the equivalent vector DWG, you insert the raster image and use the ALIGN command using two points and select YES to scale the two points. The vector drawing is on top of the raster drawing. Remember to use DRAWORDER to place the raster image BACK of the vector image.

AutoCAD 2004®, Most Compelling Features for Educators!
26
• Express Tools
The Express Tools are back. When installing AutoCAD, make sure you select the option for installation of these tools. In the past, most businesses installed AutoCAD as a full install; you may want to re-think this! Installing AutoCAD by selecting the Custom Install Option gives your I.T. staff greater control over installation. (Note: this becomes an even more important feature when installing Drawing Security which we will discuss later in this paper.) You need to practice the use of these fine tools on your own. There are many papers that have been published on the Express Tools in AutoCAD.

AutoCAD 2004®, Most Compelling Features for Educators
27
• Multiple Polyline edit When you have more that one Polyline to edit, what did you do? We all know that it took multiple picks to accomplish the task. In AutoCAD 2004, you have the ability to edit more than one polyline at a time!
Polyline Join. You can join polyline that are not joined by using multiple polyline edit, JOIN and set you FUZZ factor greater than the gap between polylines.
• PEDITACCEPT
The PEDIT command has been enhance by a new variable called PEDITACCEPT. By turning PEDITACCEPT to 1 (on), you are no longer prompted to convert (for example a line) to a pline!
• Block Attribute Manager
Block Attribute Manager is used to modify attributes within a block without exploding or redefining the block. Remove an attribute from a block definition, change the attributes text settings, change the order of the attributes, change the attributes tag name, prompt string, default value or properties.
Use the BATTMAN command.

AutoCAD 2004®, Most Compelling Features for Educators!
28
• Enhanced Attribute Editor
Use the EATTEDIT command for editing a single block. Or just double clip on a block that has an attribute attached to it.
• Attribute Extraction
Using the EATTEXT Command, you can create comma-separated file format (.CSV) and tab-separated file format (.TXT ), Microsoft® Excel (XLS), and Microsoft Access (MDB) formats.
The example is an Excel spreadsheet the was inserted into AutoCAD using OLE.

AutoCAD 2004®, Most Compelling Features for Educators
29
• In-Place Reference Editing
How would you like to edit a block that is in your drawing with out exploding it? The feature of In-Place reference editing, you can! What XOPEN is to Xrefs, REFEDIT is to blocks. You can edit the You can:
o Edit geometry in assemblies and layouts o Edit portions or all of a block o Copy geometry from other references o Use dimming feature o XEDIT turns off refediting.
Drawing BEFORE editing.

AutoCAD 2004®, Most Compelling Features for Educators!
30
Updated drawing after REFEDIT.
• Partial Drawing Open and Load (from AutoCAD 2002)
Did you ever wish you could open certain layers of a drawing to work on instead of the entire drawing? Does if take forever to open a large drawing? AutoCAD 2004 to the rescue! You will save load time when partial information is needed. You can then load other parts of a drawing, as more information is needed. You can now Partial Open and Partial Load a drawing.
o Use PARTIALOPEN to partially open a drawing o Use PARTIALOAD to load additional geometrical information into a partially opened drawing o Performance gains are the best when the drawings are 10-100Mb in size o You can specify views and/or layers o Memory requirements are reduced o You can control external reference loading o Spatial & Layer Indexes in Xrefs effect drawing load o The purge command cannot be used on a partially opened drawings o Partially opened drawings are locked
Drawing Security
Password protection and digital signatures have been added to AutoCAD 2004. Drawing Security is available for you to prevent unwanted modifications to your drawings, and to help protect your intellectual property. We can add password protections based on encryption methods that will provide the added security to our drawing data. We can also add digital signatures to our drawings. (Special Note: What if you want to turn off password protection? YOU CAN NOT once you have installed AutoCAD 2004! To turn off security features you must install AutoCAD 2004 using the Custom option and de-select drawing encryption!)

AutoCAD 2004®, Most Compelling Features for Educators
31
(Also, once a password is assigned to a drawing, and if you forget the password, you cannot open the drawing. There are no back doors!) You set security options in the OPTIONS dialog box. Password setting. (See below)

AutoCAD 2004®, Most Compelling Features for Educators!
32
Digital Signature setting. (See below)
CAD Standards
CAD standards was introduced in the previous release of AutoCAD. For AutoCAD 2004 CAD Standards have been enhanced. You can do a CAD Standards Audit, have standards monitoring, Violation Notification and Repair do batch checking of drawings by using the Batch Standards Checker. In AutoCAD 2004 we have live notification of when a standard is violated. A balloon will pop up in the lower right corner of you screen, the communications area explaining that you have a violation. Set up a new cad standards file (DWS), you create a file that defines properties for layers, dimension styles, linetypes, and text styles (these are called plugins) and save it as a .dws file name extension.
You configure the standards and check the standards for one drawing or many drawings.

AutoCAD 2004®, Most Compelling Features for Educators
33
• Batch Standards Checker Dialog Box
The batch checker is used to check more than one drawing and create a punch list that contains non-standard features. The Batch Standards Checker is an external program and is launched for the Windows Start Button.
Drawings, Standards, Plug-ins, Notes, Progress

AutoCAD 2004®, Most Compelling Features for Educators!
34
• Layer Translator
The Layer Translator is used to change a drawing's layers to match layer standards you set.
o Translate from one layering standard or convention to another.
o Force entity color and linetypes to ByLayer.
o Purge unreferenced layers on exit.
o View only the entities that reside on selected layers.
o Use DWG/DWT/DWS files for reference layers.
NOTE: Use the Layer translator to force object color and linetype to bylayer when you loose the bylayer associatively.
AutoCAD 2004®, Most Compelling Features for Educators
35
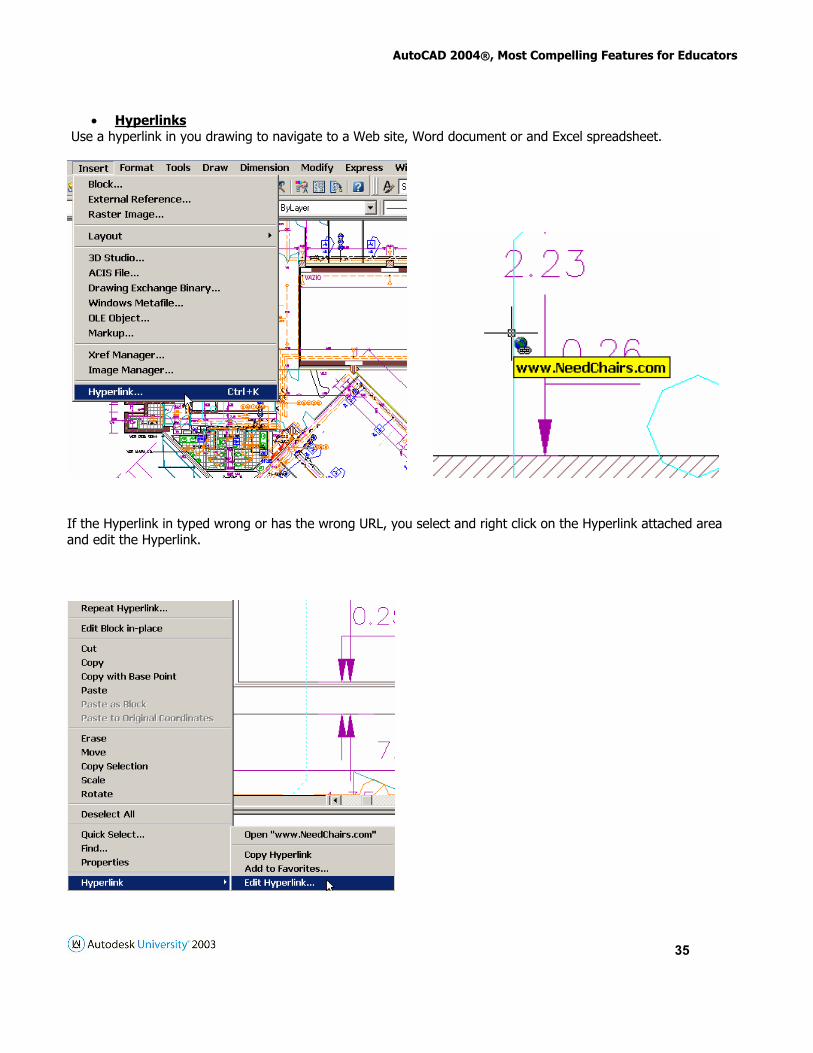
• Hyperlinks Use a hyperlink in you drawing to navigate to a Web site, Word document or and Excel spreadsheet.
If the Hyperlink in typed wrong or has the wrong URL, you select and right click on the Hyperlink attached area and edit the Hyperlink.
AutoCAD 2004®, Most Compelling Features for Educators!
36
Presentation Drawings
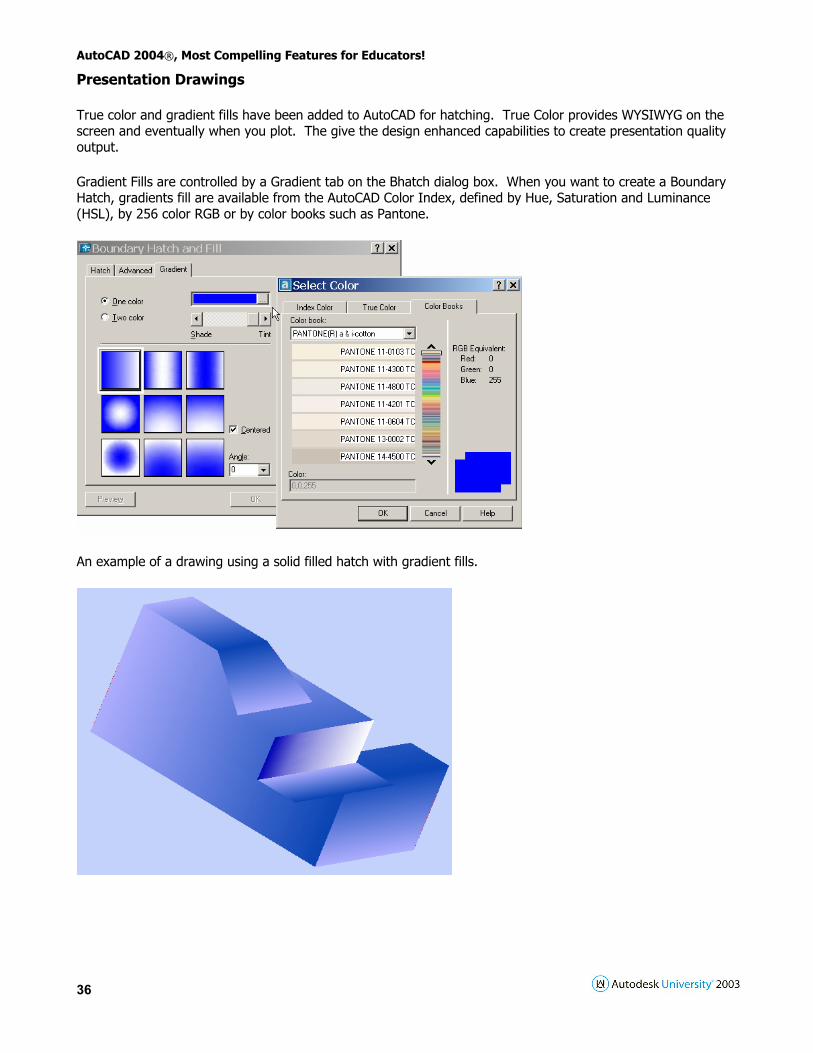
True color and gradient fills have been added to AutoCAD for hatching. True Color provides WYSIWYG on the screen and eventually when you plot. The give the design enhanced capabilities to create presentation quality output.
Gradient Fills are controlled by a Gradient tab on the Bhatch dialog box. When you want to create a Boundary Hatch, gradients fill are available from the AutoCAD Color Index, defined by Hue, Saturation and Luminance (HSL), by 256 color RGB or by color books such as Pantone.
An example of a drawing using a solid filled hatch with gradient fills.

AutoCAD 2004®, Most Compelling Features for Educators
37
The Design Publisher and the Autodesk Express Viewer
The Design Publisher allows you to put together a collection of your drawings and plot them directly to your plotter or printer (for batch plotting usage) or to publish to a DWF (Design Web Format) file. Using the PUBLISH command, you can create a digital set of drawings saved to one DWF file! You can use the new Autodesk Express Viewer to view the file.
Type PUBLISH, at the command prompt in AutoCAD. Select the Add Sheets button and select the drawings you want. (Example C:\GD11-1L folder as shown below.) Press the Select button after you have selected all the drawings you want to publish.
Notice the Layout names and any Page setup that are assigned. Select in the dialog box any layouts with the name; Layout 1 or Layout 2. You can use the Remove button to remove any layouts from the list. You can also assign a password or phrase in the appropriate area. Select the Publish button to publish the drawings to file.

AutoCAD 2004®, Most Compelling Features for Educators!
38
When publishing is complete you will get a Publishing Complete dialog box that will appear. It may find errors! If so, you need to go back and check your drawings for proper layout names, pages setups and how Xref’s are being attached.
To view the DXF file you created, select the View Dwf File button or go to, Windows Start\Programs\Autodesk\Autodesk Express Viewer. Either way will launch the Express Viewer! Select the Next Sheet arrow as shown on the next page to cycle through your published sheets!

AutoCAD 2004®, Most Compelling Features for Educators
39
You can save the list for future use by selecting the Save List… button.

AutoCAD 2004®, Most Compelling Features for Educators!
40
Batch Plotting
You can also use the Design Publisher to act as a batch plotter. The key to batch plotting is to have the page setups properly created and specified. (The dialog box shown below is set to <Default>) If the Page Setups are properly configured in the Publish Drawing Sheets Dialog box, the Design Publisher is a great tool for batch plotting! Also, make sure you have selected the Plotter named in page setups radio button. Look in the Users Guide for AutoCAD 2004, Chapter 30 for Publishing Drawing Sets.
Shaded Viewport Plotting and 3D View Representation
You can plot your 3D objects in a viewport to your plotter by using the Shaded Viewport Plotting feature. This feature provides WYSIWYG hardcopy output of shaded and rendered viewports. You could have 2D viewports and 3D viewports! Select the viewport and right click. Set to Rendered (See below).

AutoCAD 2004®, Most Compelling Features for Educators
41
Below is a plot preview of the 3D object!
When viewing and object in 3D, you can set Obscured lines, Halo gap percentage, Face intersections and Hide precision. (See below).

AutoCAD 2004®, Most Compelling Features for Educators!
42
Once you have made these settings, HIDE the view and your view reflects the settings. (See below).
• Creating a monochrome only PC3 file If you plot to a HP color plotting device and want your drawing to plot in monochrome (black and white) you can attach a monochrome plot style table. However, you can create a monochrome ONLY pc3 file. To do this you must edit the pc3 file and change the color setting. To do this, select Custom Properties-Options-Color Control and check the Convert colors to pure black. Save the new pc3 file with Monochrome as part of the name and you have created a pure monochrome pc3 file plot driver. (See below)

AutoCAD 2004®, Most Compelling Features for Educators
43
Installation/Unique Path Structure
When installing AutoCAD in the past, we usually selected the FULL install option. This option gave us ALL modules of AutoCAD. As we learned with Drawing Security, this option can be changed when installation occurs buy selecting the CUSTOM install method.
After installing AutoCAD 2004 and launching it for the first time, AutoCAD builds a unique mapping structure for search paths, file names and file structure. Below is an example of a unique structure that is created when the user “jc” logs in. This will be repeated for each unique user that logs in. The question you have to ask is, “Is this the structure I want for my business?”
Will you need to create unique profiles for each user? Where do I put my PC3 files, my template files and my CTB files for ALL of my users to access? It will be up to you to decide!

AutoCAD 2004®, Most Compelling Features for Educators!
44

AutoCAD 2004®, Most Compelling Features for Educators
45
Web site for more information
Check out the Autodesk web site for white papers on productivity gains, AutoCAD 2004 features, Installation and other topics. (www.autodesk.com/autocad)
Service packs and other updates are available for AutoCAD 2004.
Also, check out these sites for more information and articles on AutoCAD 2004. (as of October 2003)
• http://www.autodesk.com/lynnallen
• http://www.tenlinks.com (sign up go get their daily newsletter)
Hope you had a great time!