tips and tricks for using microsoft office sharepoint portal
TRANSCRIPT
Tips and Tricks for Using Microsoft Office SharePoint Portal Server 2003
White Paper
Published: February 2004
i
Table of Contents Introduction ................................................................................................. 1
Create a New SharePoint Site....................................................................... 2
Create a New Site ....................................................................................... 2
Add Your Site to the Site Directory and Portal Site Search ................................ 3
Choose a Template for your Site ................................................................... 6
Next Steps for Your New Site ........................................................................ 7
Add Users and Rights to your Hosted SharePoint Site .................................. 8
Alerts ......................................................................................................... 12
Alert for a Particular Page ........................................................................... 12
View My Alerts .......................................................................................... 13
Create a New Document Library or Information List .................................. 14
Create a New List ...................................................................................... 14
Add Items to Your List ............................................................................... 15
Edit a List in Datasheet View ...................................................................... 16
Edit Columns on an Information List .......................................................... 18
Access the Customization Menu .................................................................. 18
Add a Column to a List ............................................................................... 19
Reorder the Columns in a List ..................................................................... 19
Create a New View of a List ........................................................................ 21
Use FrontPage 2003 to Customize a List .................................................... 24
Import an External Spreadsheet as a New List ........................................... 27
Export List Data to a Spreadsheet .............................................................. 29
Add or Remove Web Parts from a Web Part Page ....................................... 31
Add a Web Part to a Page ........................................................................... 31
Close a Web Part ....................................................................................... 33
Delete a Web Part ..................................................................................... 33
Hide a Web Part ........................................................................................ 33
Reconfigure Web Part Page Layout ............................................................ 34
Link Two Web Parts ................................................................................... 35
Link Spreadsheet and Chart Web Parts ........................................................ 35
Remove a Web Part Connection .................................................................. 36
Customize My Site Public View ................................................................... 38
Edit your Profile ........................................................................................ 39
Add a Link to My Links ............................................................................... 40
Customize My Site Private View ................................................................. 43
Add My Inbox Web Part to My Site .............................................................. 43
Configure My Inbox Web Part ..................................................................... 44
Apply a New Theme to My Site .................................................................... 45
ii
Synchronize Exchange Integration Web Parts with Outlook ....................... 47
Create a Meeting Workspace with Office 2003 ........................................... 48
Create a Document Workspace with Office 2003 ........................................ 51
Content Editor, Page Viewer, and Web Capture Web Parts ......................... 54
Content Editor Web Part ............................................................................. 54
Page Viewer Web Part ................................................................................ 56
Web Capture Web Part ............................................................................... 57
Conduct a Simple Search ............................................................................ 59
Explore Search Results .............................................................................. 59
Conduct an Advanced Search ..................................................................... 61
Integrate SharePoint with the Office 2003 Research Pane ......................... 63
Query the SharePoint Portal Server 2003 Research Service ............................ 64
Conclusion .................................................................................................. 66
1
Tips and Tricks for Using Microsoft Office SharePoint Portal Server 2003
White Paper
Published: February 2004
For the latest information, please see the SharePoint Portal Server site on Microsoft Office Online.
Introduction These Tips and Tricks show how to perform a number of basic tasks in a Microsoft®
Office SharePoint™ Portal Server 2003 environment. They can help you learn to use
SharePoint Portal Server and will introduce you to the basic features and principles of
portal site navigation and customization. This document is intended to be a desktop
reference, but it can also form the basis for self-paced or instructor-led training.
Some SharePoint Portal Server features, such as My Sites and the ability to create new
SharePoint sites, may not be available due to your company’s IT policies. SharePoint
Portal Server security can be used to limit the actions that each user can perform. In many
cases, you need the correct rights in order to perform certain tasks. Check with your IT
department for clarification of individual issues.

2
Create a New SharePoint Site SharePoint Portal Server makes it easy to create SharePoint sites. SharePoint sites can
serve a variety of purposes, such as the team Web site for a particular team or division, or
for collaboration on a particular task or project. These steps show you how to create a
SharePoint site from within the portal site.
Create a New Site 1. On your portal site home page, click Sites. The Site Directory, a list of the
different sites contained in the portal site, appears.
2. In the Actions list, click Create Site. The New SharePoint Site page appears.
Creating a new SharePoint site
3. In the Title box, type your new site’s name. It should be a short, descriptive name
that makes it easy for others to find your site.
4. In the Description box, type a brief description of your site. It should explain who
uses the site, and what kind of content people can expect to find there.
5. In the Web Site Address section, in the URL name section, of the area, type
your site’s Web address. The name of the Web server where your site will be
created is already filled out. Beside that, a drop-down menu lists one or more
subareas for site creation. If there are multiple choices, ask your IT department
which one to select.
3
6. In the Your E-mail Address section, type your e-mail address. This designates
you as the owner of the site. As such, you may receive administrative information
from the IT department and user requests for access to the site in addition to
suggestions or questions from site visitors.
7. Click Create.
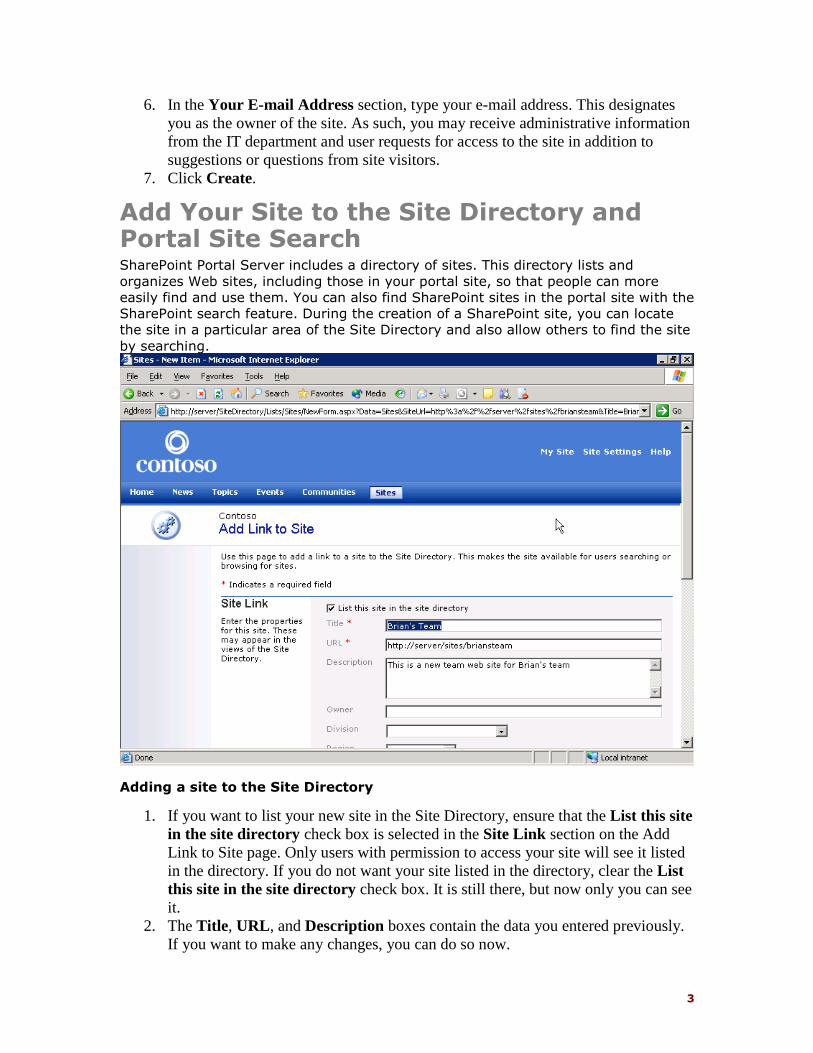
Add Your Site to the Site Directory and Portal Site Search SharePoint Portal Server includes a directory of sites. This directory lists and
organizes Web sites, including those in your portal site, so that people can more
easily find and use them. You can also find SharePoint sites in the portal site with the
SharePoint search feature. During the creation of a SharePoint site, you can locate
the site in a particular area of the Site Directory and also allow others to find the site
by searching.
Adding a site to the Site Directory
1. If you want to list your new site in the Site Directory, ensure that the List this site
in the site directory check box is selected in the Site Link section on the Add
Link to Site page. Only users with permission to access your site will see it listed
in the directory. If you do not want your site listed in the directory, clear the List
this site in the site directory check box. It is still there, but now only you can see
it.
2. The Title, URL, and Description boxes contain the data you entered previously.
If you want to make any changes, you can do so now.
4
3. If you want to list the site owner’s name in the Site Directory, type your name in
the Owner box. If you are not the site owner, type the site owner’s name. This
field tells people who is in charge of the site.
4. If you want to categorize your site by specific criteria, such as company division
or region, click the appropriate list. For example, to categorize by division, select
a division from the Division list. These categories, which are determined and
configured by your IT department, make it easier for people to find your site.
5. If you want to spotlight your site, bringing it to the attention of general portal site
users, select the Spotlight Site check box. A spotlight site is featured in the Site
Directory and in relevant searches. Typically, you want to make a site a spotlight
site only if it is the most important site for a common organizational term such as
a category, product, business unit, etc.
6. If you want your site included in search results when people search for
information through the portal site, select the Include in search results check
box in the Search Results section.
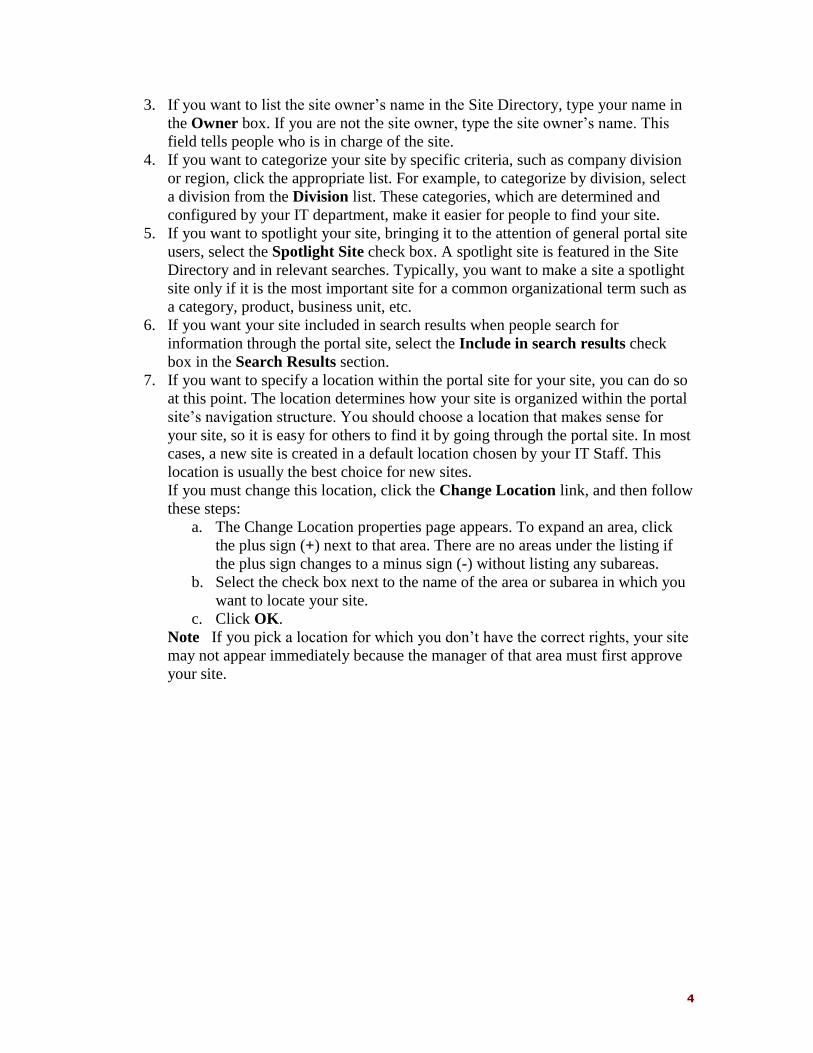
7. If you want to specify a location within the portal site for your site, you can do so
at this point. The location determines how your site is organized within the portal
site’s navigation structure. You should choose a location that makes sense for
your site, so it is easy for others to find it by going through the portal site. In most
cases, a new site is created in a default location chosen by your IT Staff. This
location is usually the best choice for new sites.
If you must change this location, click the Change Location link, and then follow
these steps:
a. The Change Location properties page appears. To expand an area, click
the plus sign (+) next to that area. There are no areas under the listing if
the plus sign changes to a minus sign (-) without listing any subareas.
b. Select the check box next to the name of the area or subarea in which you
want to locate your site.
c. Click OK.
Note If you pick a location for which you don’t have the correct rights, your site
may not appear immediately because the manager of that area must first approve
your site.
5
Selecting a location for your SharePoint site
8. When you finish, click OK.
6
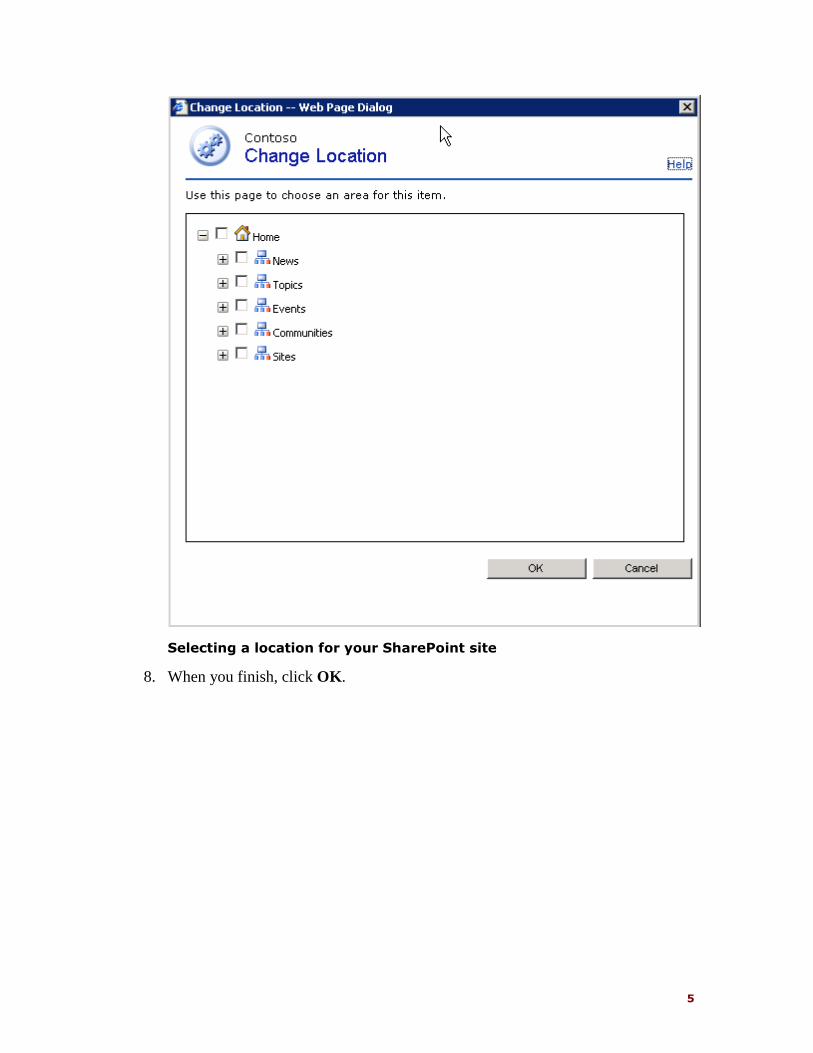
Choose a Template for your Site When you create a SharePoint site, you must choose a template for that site. Each
template contains features and functionality appropriate to a particular purpose or task.
Choosing a template for your SharePoint site
1. Under Template, select a template for your site. This list may include custom
templates created by your IT department. When you select a template, an
explanation of that template appears in the Select a Template area. The list may
include:
Team Site. This is a very flexible type of Web site pre-populated with a
variety of features for collaborating, sharing and publishing information.
This template is a good choice for a wide variety of purposes.
Blank Site. This is a SharePoint site that is not pre-populated with tools.
Choose this template if you intend to do most of the design and
customization of the site yourself.
Document Workspace. This is a SharePoint site pre-populated with tools
related to document collaboration.
Basic Meeting Workspace. This is a SharePoint site pre-populated with
tools related to meeting tasks.
2. After you select your template, click OK. Your new site automatically opens in
the browser.
7
Next Steps for Your New Site After you create your SharePoint site, there are a number of tasks you can perform to
prepare it for your users. These tasks include:
Adding Users and Rights to your Site
After you create your site, you must add users and assign them rights.
Rights determine what actions users can perform on your site. For
example, you may want to allow some users to publish and edit
documents, but allow others only to read documents. For more
information on this task, see “Add Users and Rights to your Hosted
SharePoint Site” later in this white paper.
Creating Document Libraries and Information Lists
Optional backward-compatible document libraries and other types of lists
make it easy to publish useful information on your site. You can use
document libraries to store documents of interest to site users. You can
also easily create lists, such as contact lists, announcements, events,
links, etc.
Creating and Customizing Web Part Pages
Web Part Pages are special Web pages that can contain modular pieces of
data or functionality called Web Parts. Web Parts can be used for a variety
of tasks—from publishing lists and information to providing access to line-
of-business applications or data. You can create Web Part Pages within
your site and add Web Parts to those pages from within your Web
browser.
Customizing the Look and Feel of your Site
There are a number of ways to customize the look and feel of your
SharePoint site. You can use the browser to make some customizations,
such as changing your site’s logo and applying a theme to the site. For
more advanced customizations, such as those involving lists and Web
Parts, you can use Microsoft Office FrontPage® 2003.
8
Add Users and Rights to your Hosted SharePoint Site SharePoint sites use site groups to help manage security. Users are assigned to site
groups to grant them a customizable set of rights appropriate to the tasks they need to
perform. For example, the Reader group is for users who can view content on the site, but
should not be allowed to edit it. The Contributor group is for users who are allowed to
edit content, but do not have total administrative control over the site.
Note You can add users to only one site group at a time. In this exercise, add only users
who will be in the same site group. You can add users to additional site groups later.
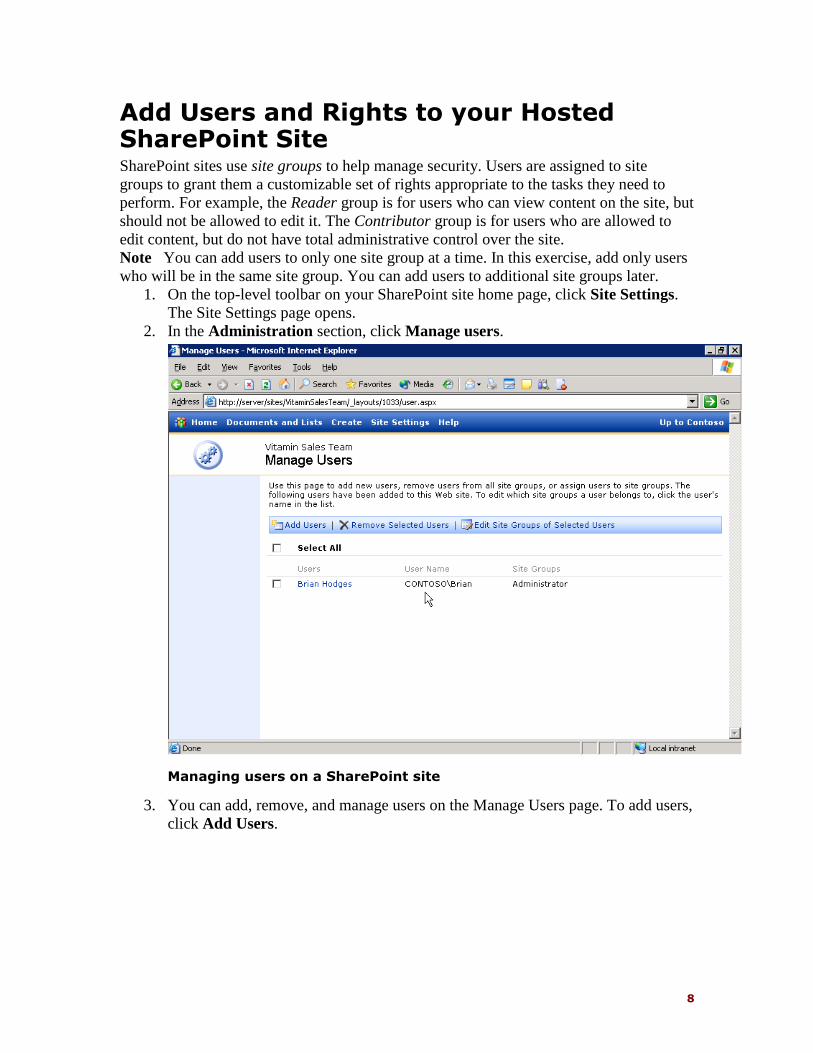
1. On the top-level toolbar on your SharePoint site home page, click Site Settings.
The Site Settings page opens.
2. In the Administration section, click Manage users.
Managing users on a SharePoint site
3. You can add, remove, and manage users on the Manage Users page. To add users,
click Add Users.
9
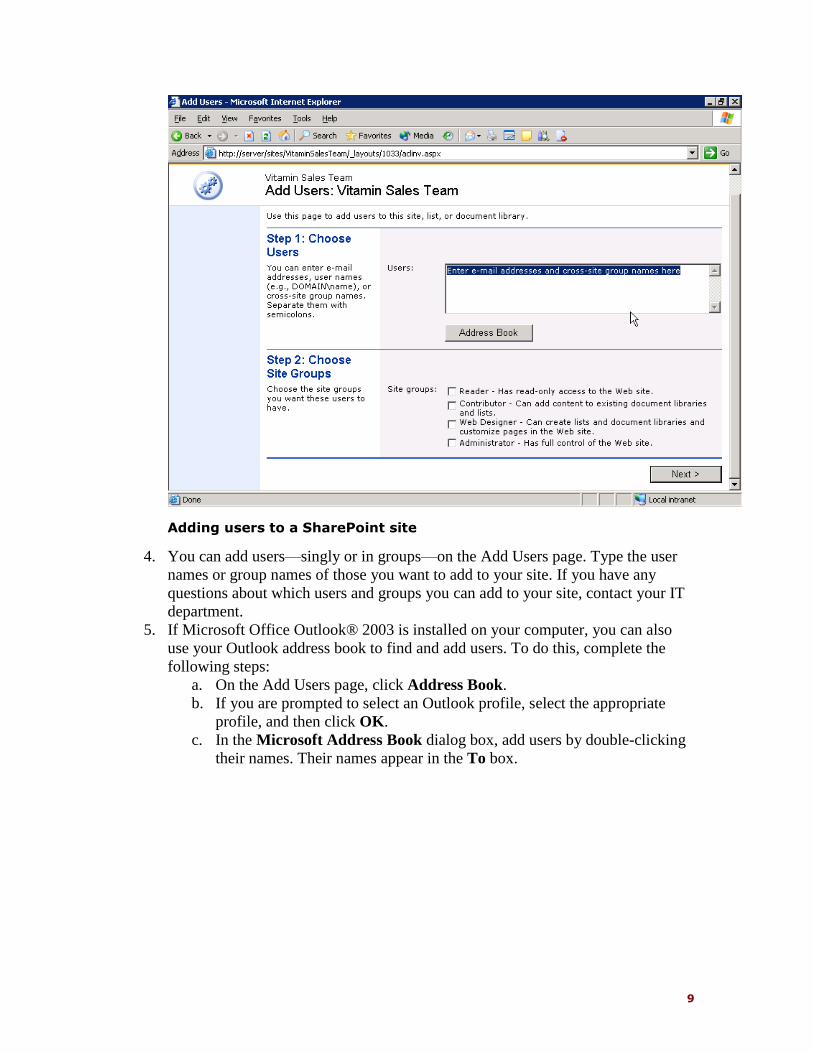
Adding users to a SharePoint site
4. You can add users—singly or in groups—on the Add Users page. Type the user
names or group names of those you want to add to your site. If you have any
questions about which users and groups you can add to your site, contact your IT
department.
5. If Microsoft Office Outlook® 2003 is installed on your computer, you can also
use your Outlook address book to find and add users. To do this, complete the
following steps:
a. On the Add Users page, click Address Book.
b. If you are prompted to select an Outlook profile, select the appropriate
profile, and then click OK.
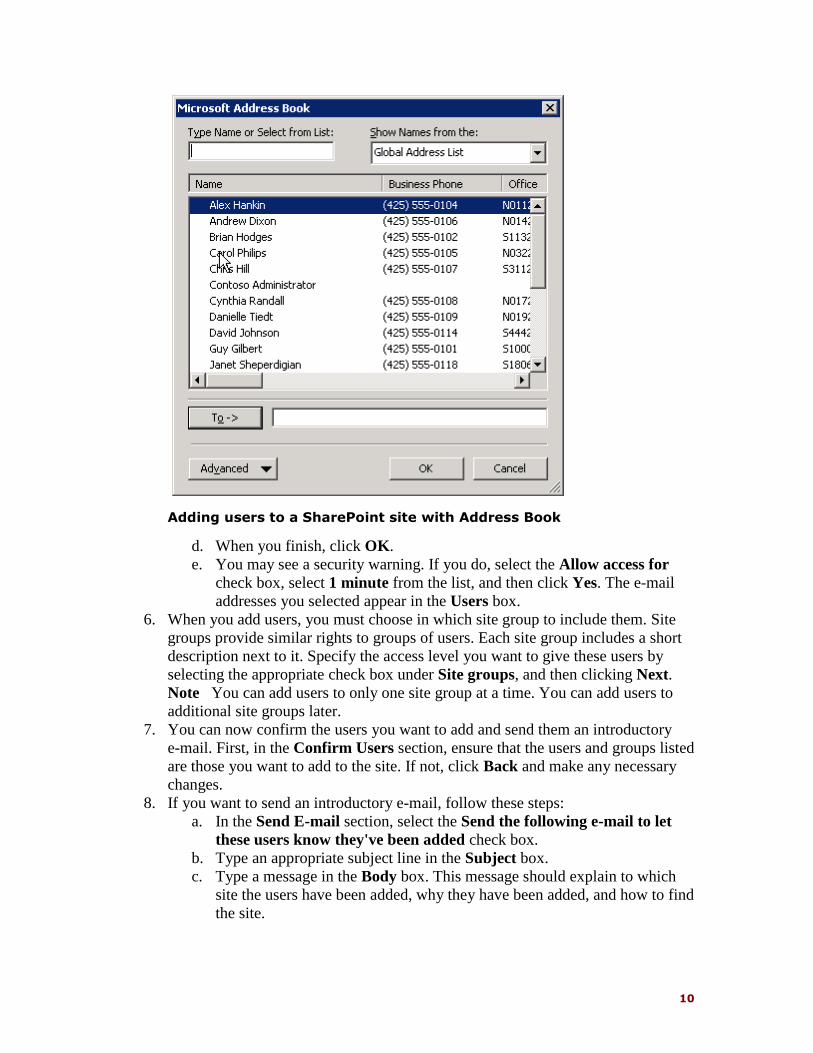
c. In the Microsoft Address Book dialog box, add users by double-clicking
their names. Their names appear in the To box.
10
Adding users to a SharePoint site with Address Book
d. When you finish, click OK.
e. You may see a security warning. If you do, select the Allow access for
check box, select 1 minute from the list, and then click Yes. The e-mail
addresses you selected appear in the Users box.
6. When you add users, you must choose in which site group to include them. Site
groups provide similar rights to groups of users. Each site group includes a short
description next to it. Specify the access level you want to give these users by
selecting the appropriate check box under Site groups, and then clicking Next.
Note You can add users to only one site group at a time. You can add users to
additional site groups later.
7. You can now confirm the users you want to add and send them an introductory
e-mail. First, in the Confirm Users section, ensure that the users and groups listed
are those you want to add to the site. If not, click Back and make any necessary
changes.
8. If you want to send an introductory e-mail, follow these steps:
a. In the Send E-mail section, select the Send the following e-mail to let
these users know they've been added check box.
b. Type an appropriate subject line in the Subject box.
c. Type a message in the Body box. This message should explain to which
site the users have been added, why they have been added, and how to find
the site.

11
9. When you are done, click Finish. The new users are listed on the Manage Users
page.
10. To add users to other site groups, repeat these steps for the each additional site
group.

12
Alerts Alerts are notifications that tell you when a particular piece of information on the portal
site has changed or when new information has been added. You can receive alerts about
pages, lists of information, document libraries, individual documents, news, and search
results. You can receive alerts by e-mail, either individually or in a periodic summary. If
your organization uses My Sites—which allows users to have a personal portal site—you
can also view your current alerts there.
Alert for a Particular Page 1. Using Microsoft Internet Explorer, go to the page containing information you are
interested in.
2. In the Actions list, click Alert Me. The Add Area Alert page opens.
Adding an area to My Alerts
3. In the Title section, type a title for your alert or keep the automatically created
default title.
4. In the Delivery Options section, you can specify how you are notified about
changes to this area.
5. If you want alerts concerning this area included in your alerts summary, select the
My Alerts Summary check box.
6. If you want to receive e-mail alerts, select the E-mail address check box next to
your e-mail address.
13
7. If you want to receive e-mail alerts, you can specify the frequency of alerts by
selecting one of the options under the E-mail address check box. These include
immediate, daily, and weekly summaries.
8. You may also set the advanced options for your alerts by clicking the Advanced
Options link. Advanced options allow you to ask for alerts only when particular
events occur (such as when new items are added or when existing items change).
You can also filter your alerts so that you receive alerts only on particular items.
9. Click OK.
View My Alerts SharePoint Portal Server allows users to have personal portal sites, where they can gather
and publish information of interest. Your personal portal site, or My Site, contains a
summary of all your alerts.
1. While viewing a page in the portal site, click My Site. A summary of your alerts
appears.
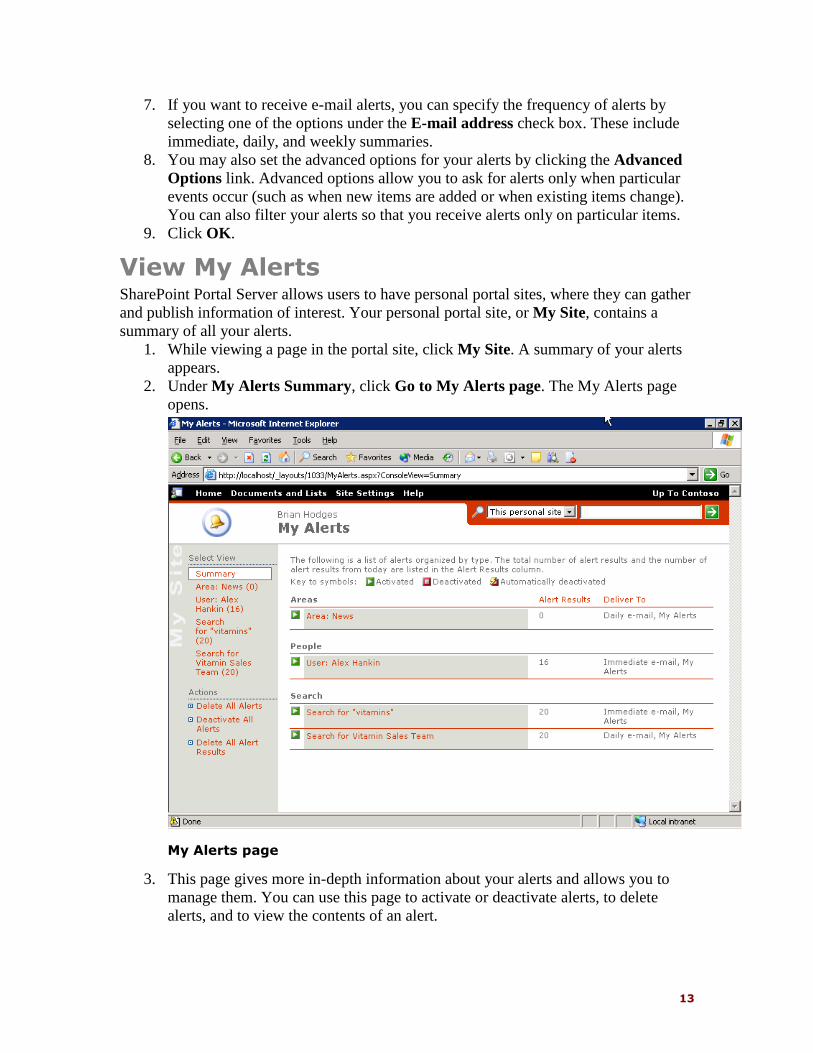
2. Under My Alerts Summary, click Go to My Alerts page. The My Alerts page
opens.
My Alerts page
3. This page gives more in-depth information about your alerts and allows you to
manage them. You can use this page to activate or deactivate alerts, to delete
alerts, and to view the contents of an alert.
14
Create a New Document Library or Information List Microsoft® SharePoint™ Products and Technologies provide lists to publish different
types of information. This can include contact lists, lists of links, announcements,
document libraries, etc.
Both SharePoint Portal Server and Microsoft® Windows® SharePoint™ Services allow
you to create lists and libraries. This section explains how to create a new list on a
SharePoint Portal Server portal site. The steps for creating lists on a team Web site,
workspace, or other site using Windows SharePoint Services may differ slightly, but the
process is essentially the same.
Create a New List In this example, you create a new list of links. The steps for creating other types of lists
may differ slightly, but the process is essentially the same.
1. Using Internet Explorer, go to the page where you want to create a new list.
2. In the Actions list, click Manage Content.
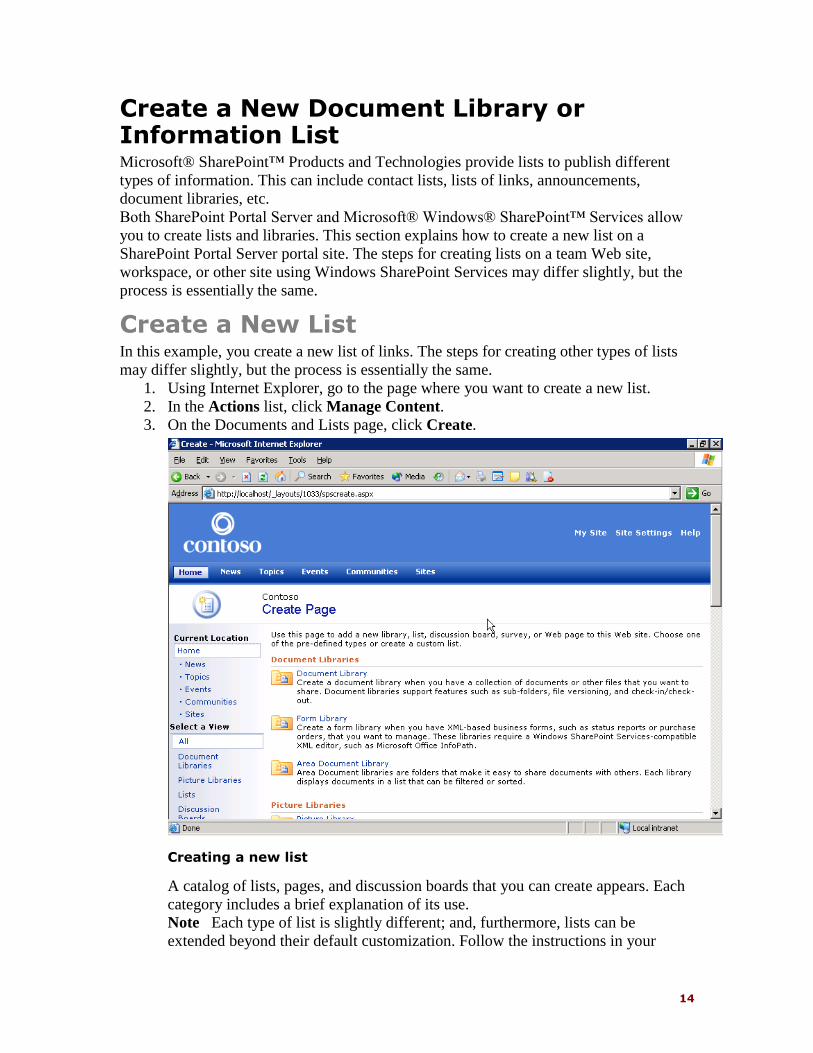
3. On the Documents and Lists page, click Create.
Creating a new list
A catalog of lists, pages, and discussion boards that you can create appears. Each
category includes a brief explanation of its use.
Note Each type of list is slightly different; and, furthermore, lists can be
extended beyond their default customization. Follow the instructions in your
15
browser when creating different types of lists. Nevertheless, the process of
creating and customizing lists is essentially the same.
4. On the Create Page page, click Links. The New List page opens.
5. In the Name and Description section, in the Name box, type a simple name for
your list of links. The name should make clear what type of information the list
contains.
6. In the Description box, type a longer description of your list.
7. Click Create.
Add Items to Your List After you create your list, you can add information to it. In this example, you add
one item at a time to the list of links you just created. The steps for adding
information to other types of lists may vary slightly.
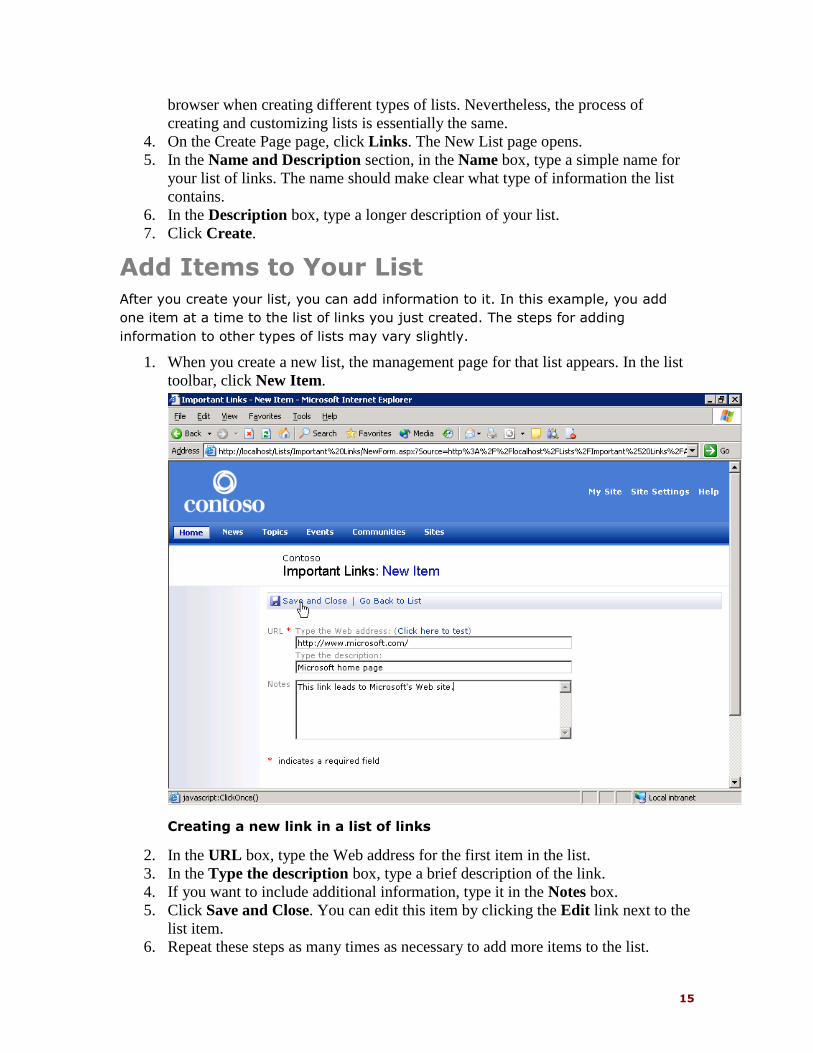
1. When you create a new list, the management page for that list appears. In the list
toolbar, click New Item.
Creating a new link in a list of links
2. In the URL box, type the Web address for the first item in the list.
3. In the Type the description box, type a brief description of the link.
4. If you want to include additional information, type it in the Notes box.
5. Click Save and Close. You can edit this item by clicking the Edit link next to the
list item.
6. Repeat these steps as many times as necessary to add more items to the list.
16
Edit a List in Datasheet View A list on a SharePoint site can have multiple views. Each view is customized for a
particular audience or task. Datasheet view is a good way to rapidly add items to your
lists. Datasheet view makes it easy for list managers to edit and customize lists, for
example, when they are adding a large number of items to a list at one time.
In this exercise, use datasheet view to add items to a list of links. Editing other types of
lists may require steps that vary slightly from those shown here.
1. Using Internet Explorer, go to the page that contains the list you want to manage.
2. In the Actions list, click Manage Content.
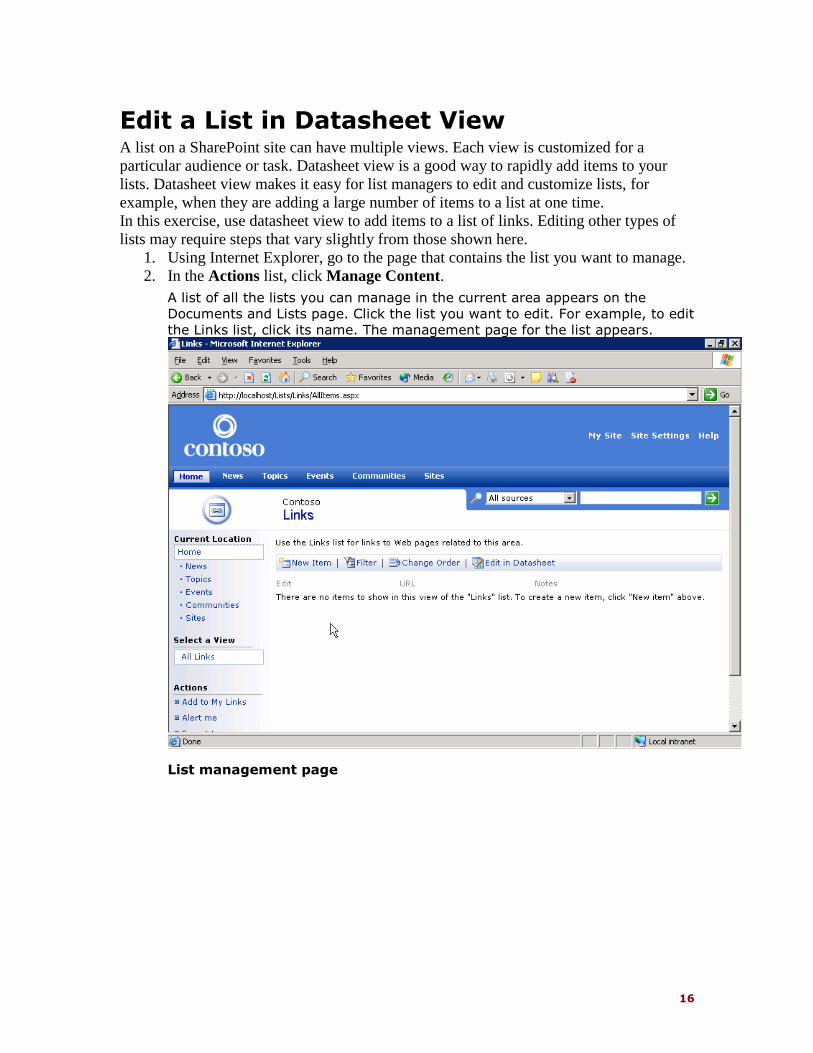
A list of all the lists you can manage in the current area appears on the
Documents and Lists page. Click the list you want to edit. For example, to edit
the Links list, click its name. The management page for the list appears.
List management page
17
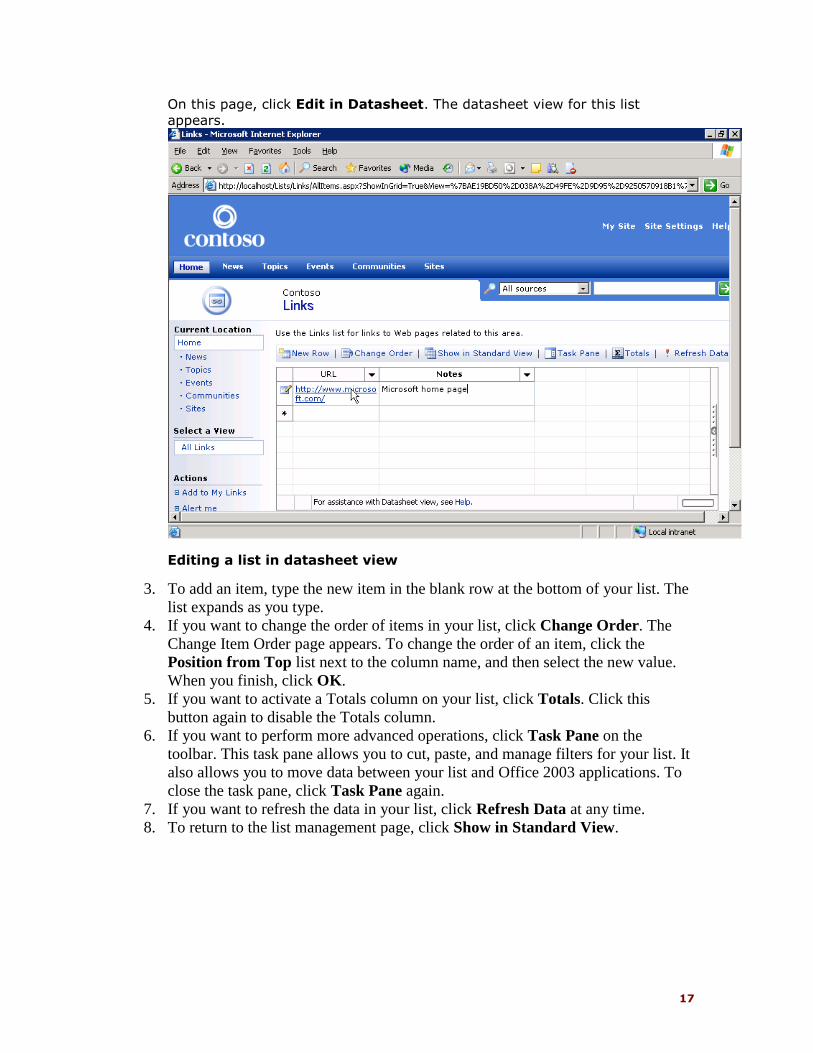
On this page, click Edit in Datasheet. The datasheet view for this list
appears.
Editing a list in datasheet view
3. To add an item, type the new item in the blank row at the bottom of your list. The
list expands as you type.
4. If you want to change the order of items in your list, click Change Order. The
Change Item Order page appears. To change the order of an item, click the
Position from Top list next to the column name, and then select the new value.
When you finish, click OK.
5. If you want to activate a Totals column on your list, click Totals. Click this
button again to disable the Totals column.
6. If you want to perform more advanced operations, click Task Pane on the
toolbar. This task pane allows you to cut, paste, and manage filters for your list. It
also allows you to move data between your list and Office 2003 applications. To
close the task pane, click Task Pane again.
7. If you want to refresh the data in your list, click Refresh Data at any time.
8. To return to the list management page, click Show in Standard View.
18
Edit Columns on an Information List A list can have one or more columns that organize the information in the list. You can
add a new column to the list and change the order in which the columns appear.
Access the Customization Menu In this example, you customize the list of sites included with SharePoint Portal Server.
The steps to customize a different list may vary slightly from those described here.
1. Using Internet Explorer, go to the page that contains the list you want to
customize.
2. In the Actions list, click Manage Content. A directory of all the lists and
information in the current area appears.
3. Find the list you want to customize and click on its name. For example, to
customize the Sites list, click Sites. The list management page opens.
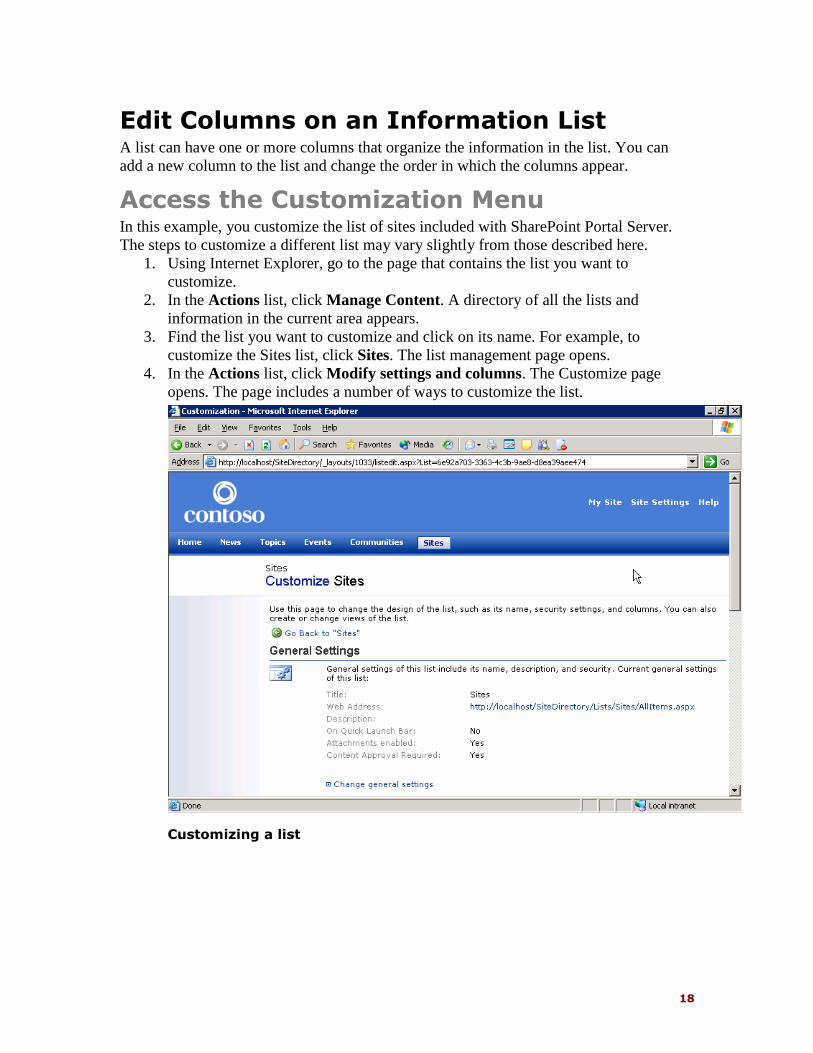
4. In the Actions list, click Modify settings and columns. The Customize page
opens. The page includes a number of ways to customize the list.
Customizing a list
19
Add a Column to a List Lists can include a number of columns containing information. For example, a list of
links will typically contain columns for the name, URL, and description of the links. In
this exercise, we create a new column.
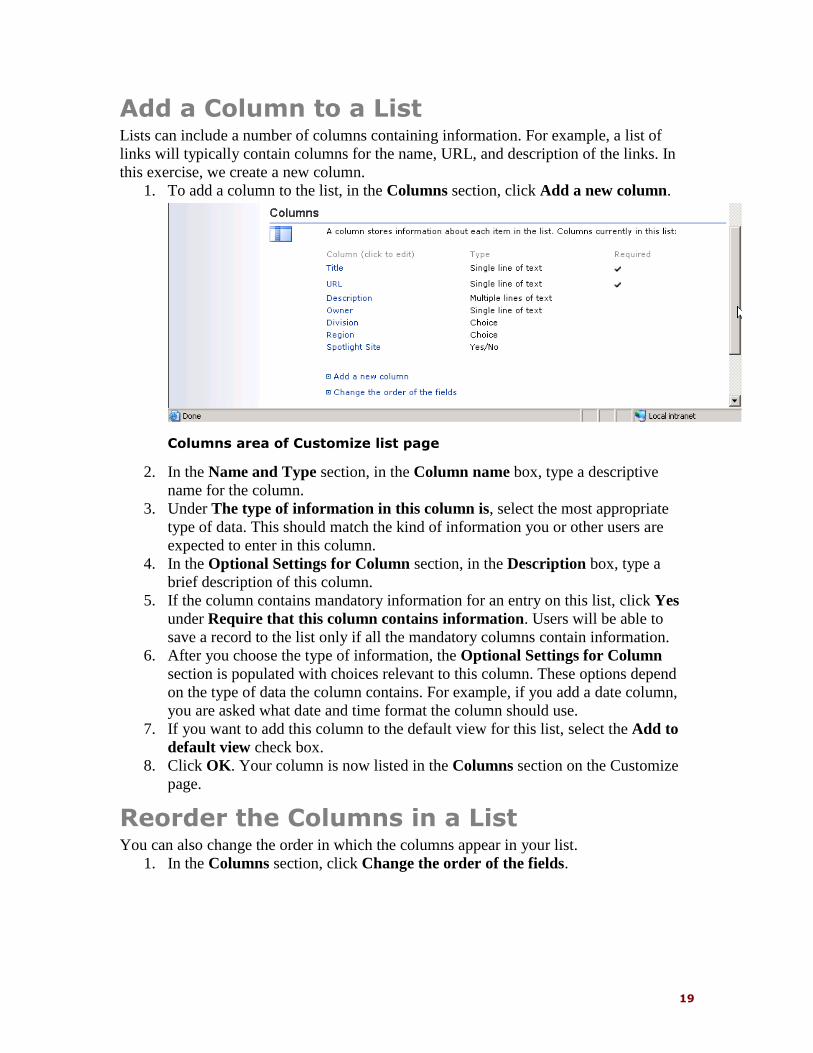
1. To add a column to the list, in the Columns section, click Add a new column.
Columns area of Customize list page
2. In the Name and Type section, in the Column name box, type a descriptive
name for the column.
3. Under The type of information in this column is, select the most appropriate
type of data. This should match the kind of information you or other users are
expected to enter in this column.
4. In the Optional Settings for Column section, in the Description box, type a
brief description of this column.
5. If the column contains mandatory information for an entry on this list, click Yes
under Require that this column contains information. Users will be able to
save a record to the list only if all the mandatory columns contain information.
6. After you choose the type of information, the Optional Settings for Column
section is populated with choices relevant to this column. These options depend
on the type of data the column contains. For example, if you add a date column,
you are asked what date and time format the column should use.
7. If you want to add this column to the default view for this list, select the Add to
default view check box.
8. Click OK. Your column is now listed in the Columns section on the Customize
page.
Reorder the Columns in a List You can also change the order in which the columns appear in your list.
1. In the Columns section, click Change the order of the fields.
20
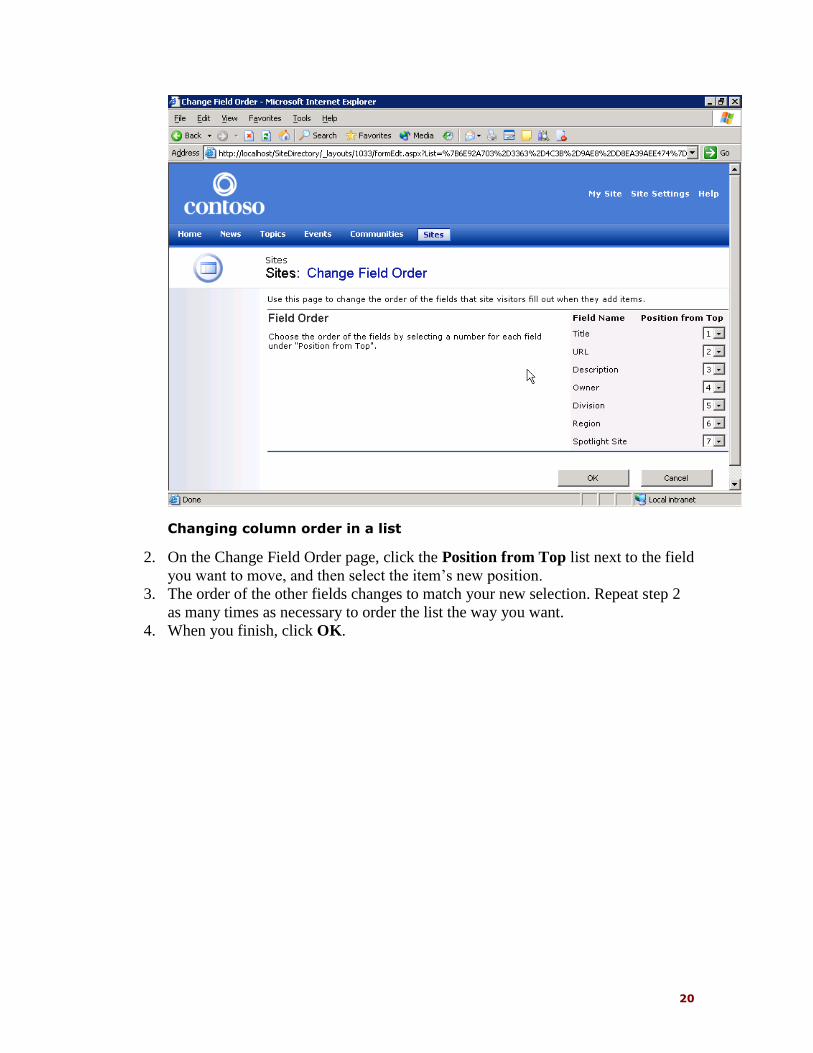
Changing column order in a list
2. On the Change Field Order page, click the Position from Top list next to the field
you want to move, and then select the item’s new position.
3. The order of the other fields changes to match your new selection. Repeat step 2
as many times as necessary to order the list the way you want.
4. When you finish, click OK.
21
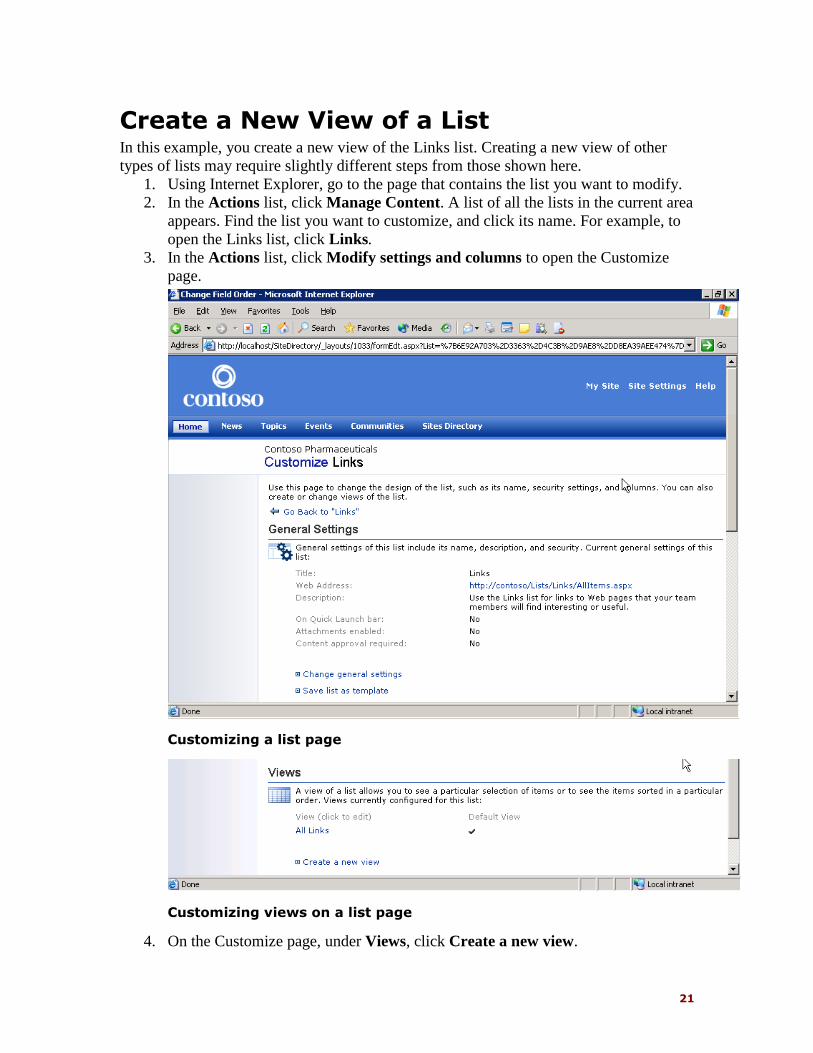
Create a New View of a List In this example, you create a new view of the Links list. Creating a new view of other
types of lists may require slightly different steps from those shown here.
1. Using Internet Explorer, go to the page that contains the list you want to modify.
2. In the Actions list, click Manage Content. A list of all the lists in the current area
appears. Find the list you want to customize, and click its name. For example, to
open the Links list, click Links.
3. In the Actions list, click Modify settings and columns to open the Customize
page.
Customizing a list page
Customizing views on a list page
4. On the Customize page, under Views, click Create a new view.
22
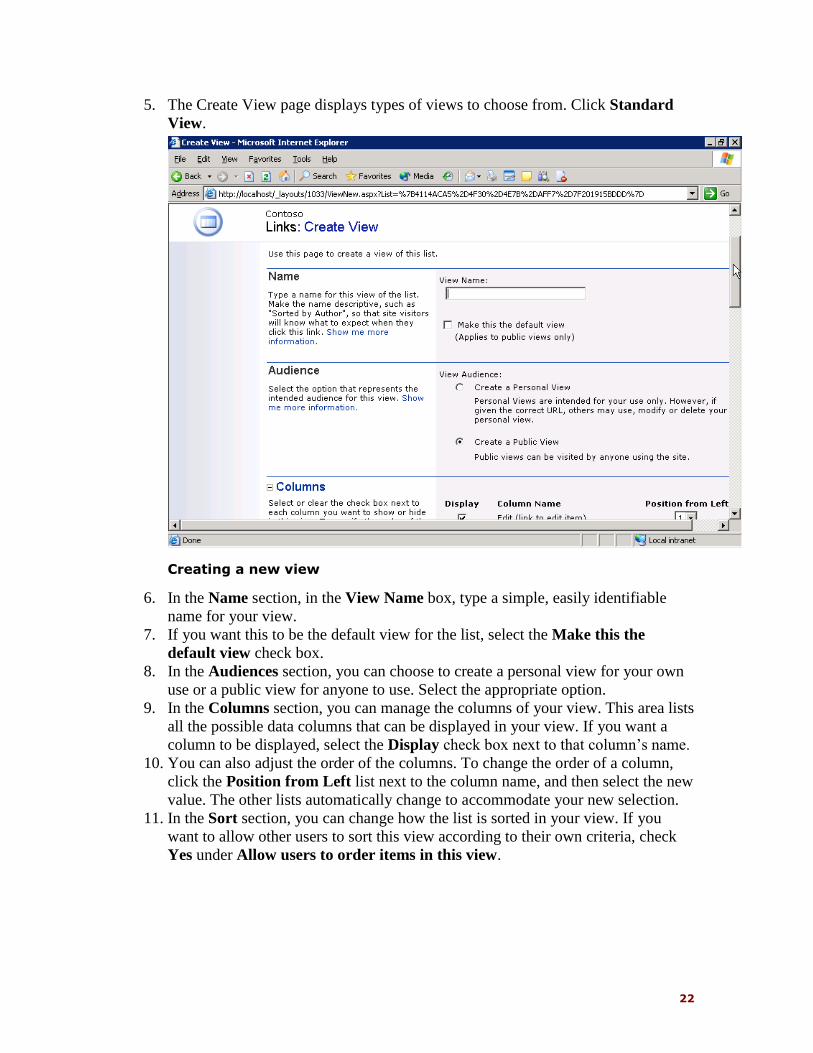
5. The Create View page displays types of views to choose from. Click Standard
View.
Creating a new view
6. In the Name section, in the View Name box, type a simple, easily identifiable
name for your view.
7. If you want this to be the default view for the list, select the Make this the
default view check box.
8. In the Audiences section, you can choose to create a personal view for your own
use or a public view for anyone to use. Select the appropriate option.
9. In the Columns section, you can manage the columns of your view. This area lists
all the possible data columns that can be displayed in your view. If you want a
column to be displayed, select the Display check box next to that column’s name.
10. You can also adjust the order of the columns. To change the order of a column,
click the Position from Left list next to the column name, and then select the new
value. The other lists automatically change to accommodate your new selection.
11. In the Sort section, you can change how the list is sorted in your view. If you
want to allow other users to sort this view according to their own criteria, check
Yes under Allow users to order items in this view.
23
12. You can sort by up to two columns. To create a sort order:
a. To choose the first column to sort, select a column from the First sort by
the column list.
b. To specify how the list is sorted, select Show items in ascending order or
Show items in descending order.
c. If you want to sort by more columns, repeat these steps.
13. If you want to filter the view, select the Show items only when the following is
true option in the Filter section. You can then create a criterion for your filter.
For example, in order to show only items created after a certain date, complete the
following steps:
a. Click the list under Show the items when column, and then select
Created.
b. Click the next list, and then select is greater than.
c. Type a date value in the box just below, for example, 1/27/2003.
d. You can add more columns to your filter by repeating these steps. If you
run out of space in the Filter section, click Show More Columns.
14. If you want to group list items in your view, expand the Group By section. To
create a grouping:
a. Click the list under First group by the column, and then select the
column you want to use as the basis of your grouping.
b. Select either the Show groups in ascending order or Show groups in
descending order option.
c. If you want to group by additional columns, repeat these steps.
d. If you want to collapse groups by default, select the Collapsed option
under By default, show groupings.
15. If you want to include totals for one or more columns in your view, expand the
Totals section. Click the list next to the column or columns you want to total.
Choose the appropriate options from the list.
16. If you want to modify the style of your view, expand the Style section. To change
the style, click one of the options in the View Style list box.
17. In the Item Limit section, you can choose how many list items to display in your
view. To change the limit, replace the number in the Number of items to display
box.
18. When you finish, click OK.
19. To view your list, click the Go Back to link near the top of the Customize page.
24
Use FrontPage 2003 to Customize a List Microsoft Office FrontPage 2003 is the preferred application for designing, editing, and
customizing SharePoint Products and Technologies sites. This section describes how to
use FrontPage 2003 to customize lists on a Windows SharePoint Services site. You can
use this process to customize team Web sites, small divisional portal sites, and document
and meeting workspaces. The steps to customize lists on a SharePoint Portal Server Web
site may vary slightly from those shown here.
In this example, you use FrontPage 2003 to customize the Announcements list on a
Windows SharePoint Services site. Customizing other lists may require slightly different
steps from those shown here.
1. In FrontPage 2003, on the File menu, click Open Site.
2. In the Open Site dialog box, browse to your site or type the name of the Web site
you want to edit under Site name, and then click Open.
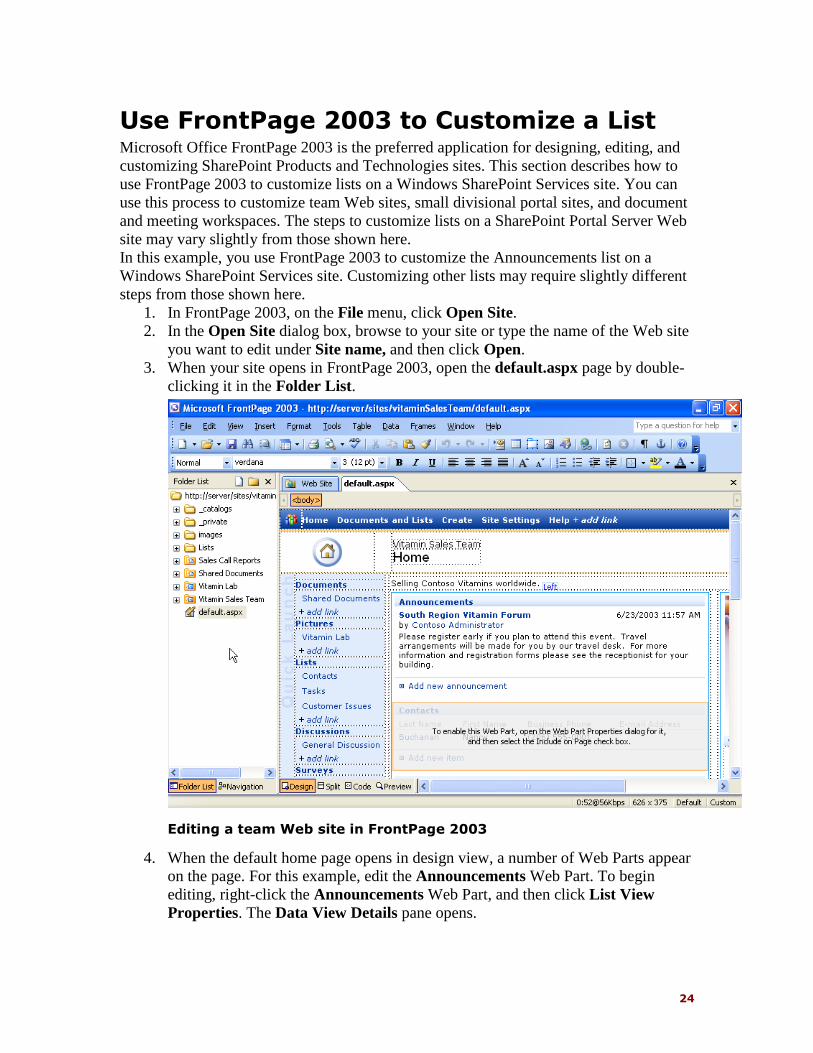
3. When your site opens in FrontPage 2003, open the default.aspx page by double-
clicking it in the Folder List.
Editing a team Web site in FrontPage 2003
4. When the default home page opens in design view, a number of Web Parts appear
on the page. For this example, edit the Announcements Web Part. To begin
editing, right-click the Announcements Web Part, and then click List View
Properties. The Data View Details pane opens.
25
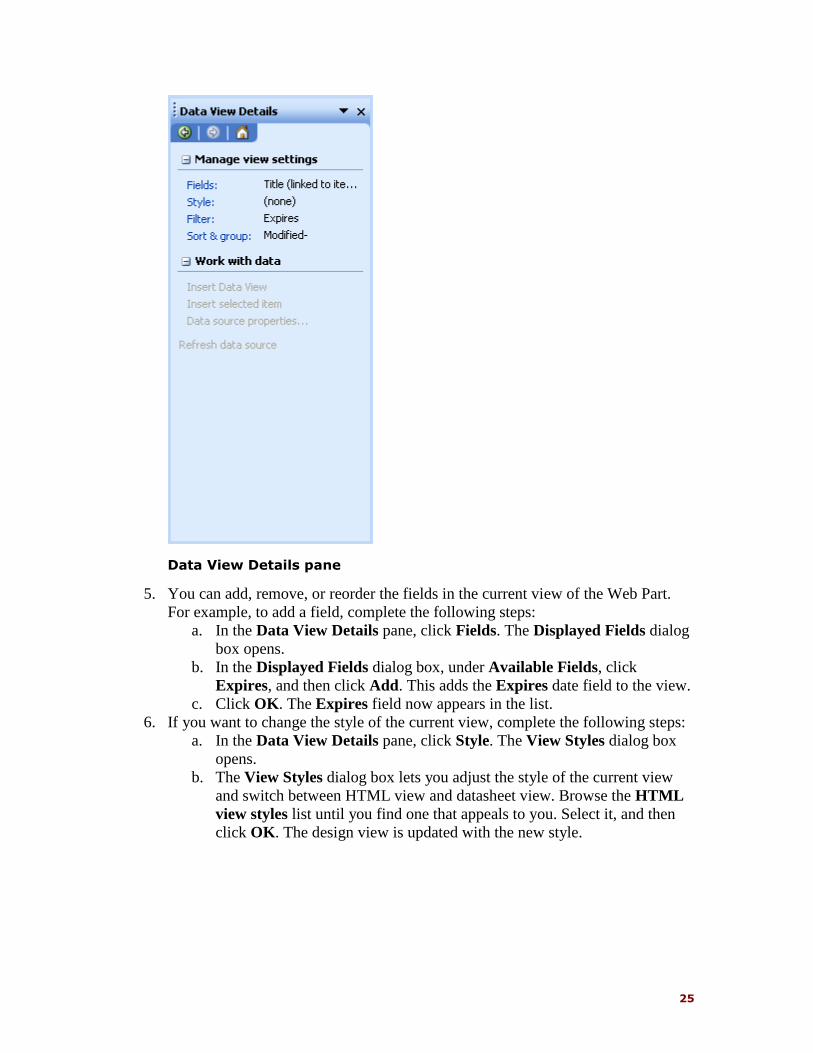
Data View Details pane
5. You can add, remove, or reorder the fields in the current view of the Web Part.
For example, to add a field, complete the following steps:
a. In the Data View Details pane, click Fields. The Displayed Fields dialog
box opens.
b. In the Displayed Fields dialog box, under Available Fields, click
Expires, and then click Add. This adds the Expires date field to the view.
c. Click OK. The Expires field now appears in the list.
6. If you want to change the style of the current view, complete the following steps:
a. In the Data View Details pane, click Style. The View Styles dialog box
opens.
b. The View Styles dialog box lets you adjust the style of the current view
and switch between HTML view and datasheet view. Browse the HTML
view styles list until you find one that appeals to you. Select it, and then
click OK. The design view is updated with the new style.
26
7. If you want to add a filter to the current view, complete the following steps:
a. In the Data View Details pane, click Filter. The Filter Criteria dialog
box opens.
b. Click the Click here to add a new clause area.
c. A new blank clause appears. Click the menu in the Field Name column.
Select the field to which you want to apply the filter.
d. Click the menu in the Comparison column. Select a comparison option.
e. Some comparisons, such as Is Null or Not Null, do not require a value to
be specified. If a value is required, click the text area in the Value column
and select or type a value.
f. It is possible to add more than one filter to a view. Each new filter will be
added as an And filter or an Or filter. This is determined by the value of
the And/Or column in the last filter before the current filter. If you wish
to change this value, click on the And/Or list in the filter immediately
preceding the filter you just created. Select either And or Or.
g. When you finish, click OK. The design view is updated with the new
filter.
8. You may change how the data in the current view is sorted and grouped. To do
this, complete the following steps:
a. In the Data View Details pane, click Sort & Group. The Sort and
Group dialog box opens.
b. If you want to add a sort field, select that field under Available Fields,
and then click Add.
c. If you want to specify whether the sort is in ascending or descending
order, under Sort Properties, select Ascending or Descending.
d. If you want to change the precedence of the sort fields, select a field under
Sort Order, and then click either Move Up or Move Down.
e. When you finish, click OK. The view is updated with your new
properties.
9. When you finish, click Save on the File menu. These changes appear the next
time you open the page in a Web browser.
27
Import an External Spreadsheet as a New List Office 2003 users can import, export, and create SharePoint lists with Microsoft Office
Excel 2003. This exercise shows how to create a list on a SharePoint Portal Server portal
from an Excel 2003 spreadsheet.
Both SharePoint Portal Server and Windows SharePoint Services allow you to import
external spreadsheets. Creating lists on a team Web site, workspace, or other sites using
Windows SharePoint Services may require different steps from those shown here.
For this example, import an existing Excel 2003 spreadsheet into your SharePoint site.
1. Use Internet Explorer, to go to the page where you want the new list to appear.
2. In the Actions list, click Manage Content.
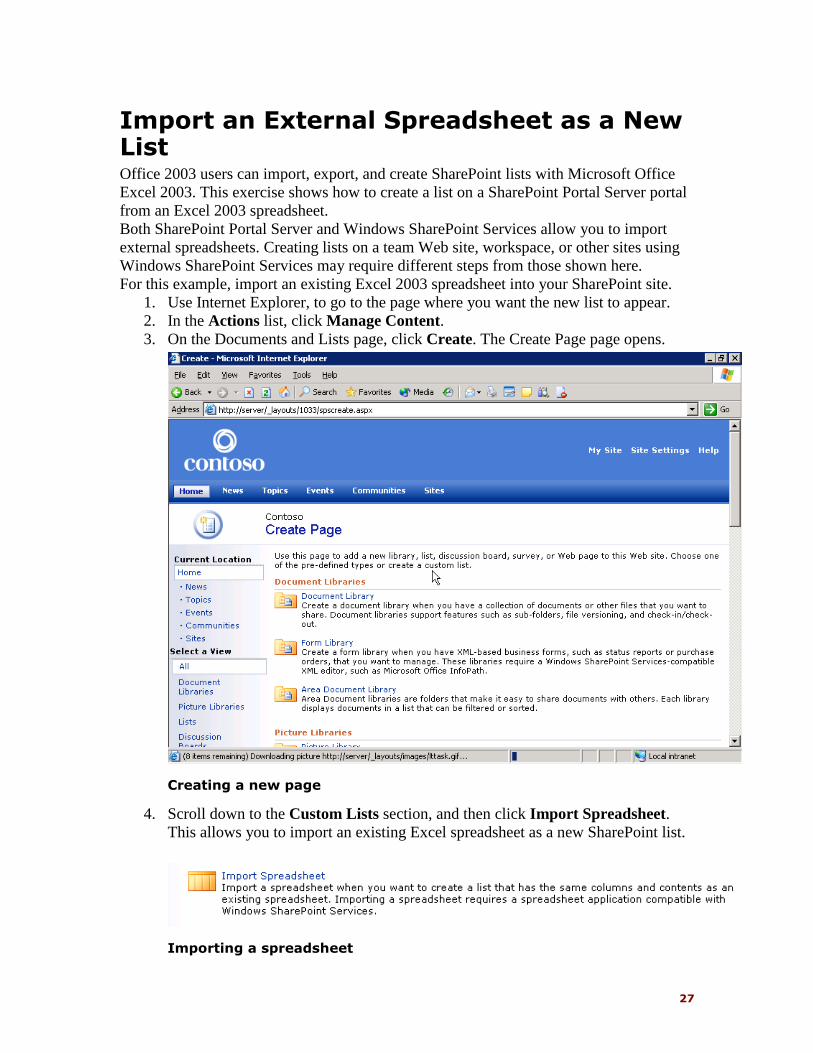
3. On the Documents and Lists page, click Create. The Create Page page opens.
Creating a new page
4. Scroll down to the Custom Lists section, and then click Import Spreadsheet.
This allows you to import an existing Excel spreadsheet as a new SharePoint list.
Importing a spreadsheet
28
5. In the Name and Description section, in the Name, type a simple name for the
new list that helps people understand what information it contains.
6. In the Description box, type a longer description of your list.
7. In the Import from Spreadsheet section, type the location of the file, or click the
Browse button to browse to it.
8. When you are ready, click Import. Your spreadsheet opens so you can specify
which data you want imported into the new list.
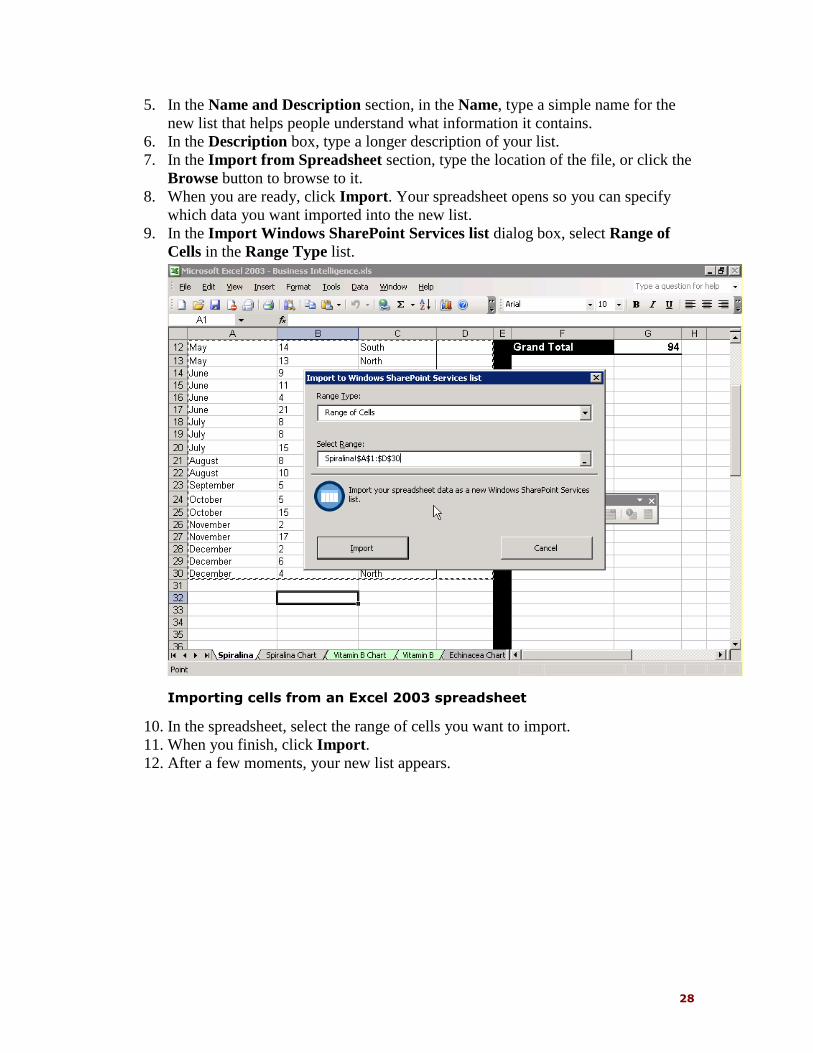
9. In the Import Windows SharePoint Services list dialog box, select Range of
Cells in the Range Type list.
Importing cells from an Excel 2003 spreadsheet
10. In the spreadsheet, select the range of cells you want to import.
11. When you finish, click Import.
12. After a few moments, your new list appears.
29
Export List Data to a Spreadsheet Office 2003 users can import, export, and create SharePoint lists with Excel 2003. This
exercise shows how to export a SharePoint list as an Excel 2003 spreadsheet so you can
work with the data offline.
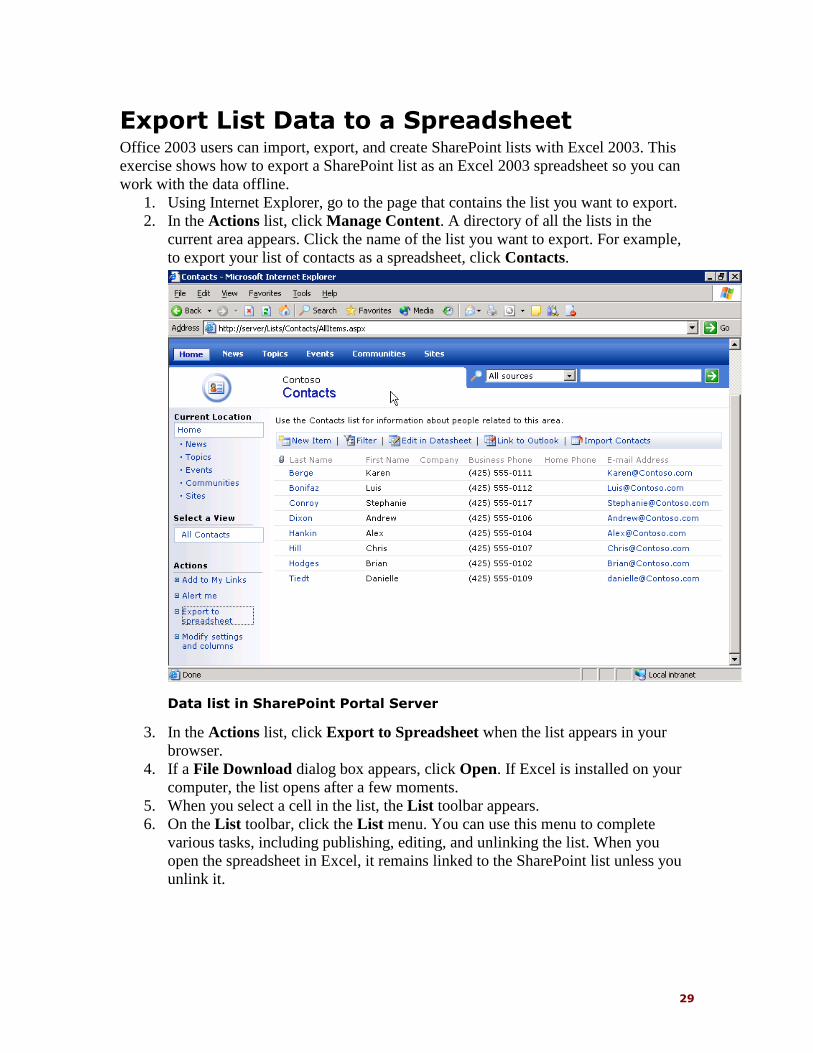
1. Using Internet Explorer, go to the page that contains the list you want to export.
2. In the Actions list, click Manage Content. A directory of all the lists in the
current area appears. Click the name of the list you want to export. For example,
to export your list of contacts as a spreadsheet, click Contacts.
Data list in SharePoint Portal Server
3. In the Actions list, click Export to Spreadsheet when the list appears in your
browser.
4. If a File Download dialog box appears, click Open. If Excel is installed on your
computer, the list opens after a few moments.
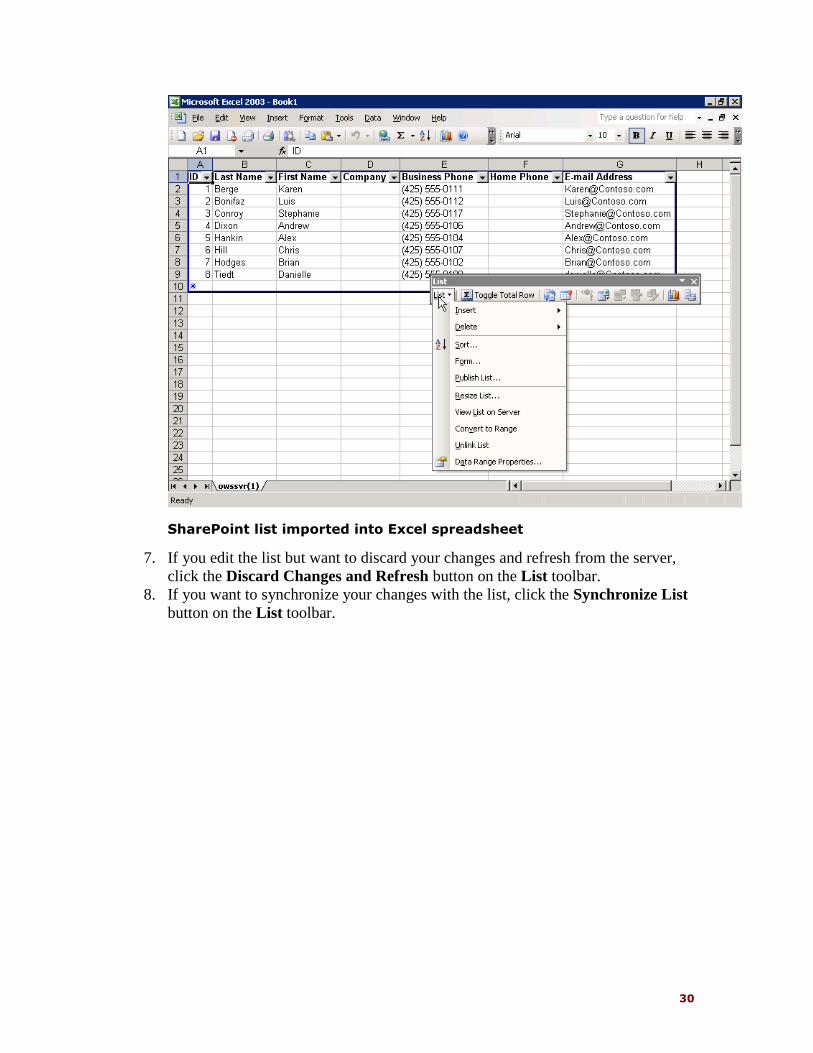
5. When you select a cell in the list, the List toolbar appears.
6. On the List toolbar, click the List menu. You can use this menu to complete
various tasks, including publishing, editing, and unlinking the list. When you
open the spreadsheet in Excel, it remains linked to the SharePoint list unless you
unlink it.
30
SharePoint list imported into Excel spreadsheet
7. If you edit the list but want to discard your changes and refresh from the server,
click the Discard Changes and Refresh button on the List toolbar.
8. If you want to synchronize your changes with the list, click the Synchronize List
button on the List toolbar.
31
Add or Remove Web Parts from a Web Part Page Web Parts are modular, reusable portions of a Web page that provide tools or
information. SharePoint Web sites use special Web pages called Web Part Pages to
contain Web Parts. Users or Web designers can add or remove parts from these pages,
and customize the layout of a Web Parts Page.
Add a Web Part to a Page These steps describe the process for adding a Web Part to a Web Part Page in SharePoint
Portal Server. The steps for performing this task on a Windows SharePoint Services site
may be slightly different.
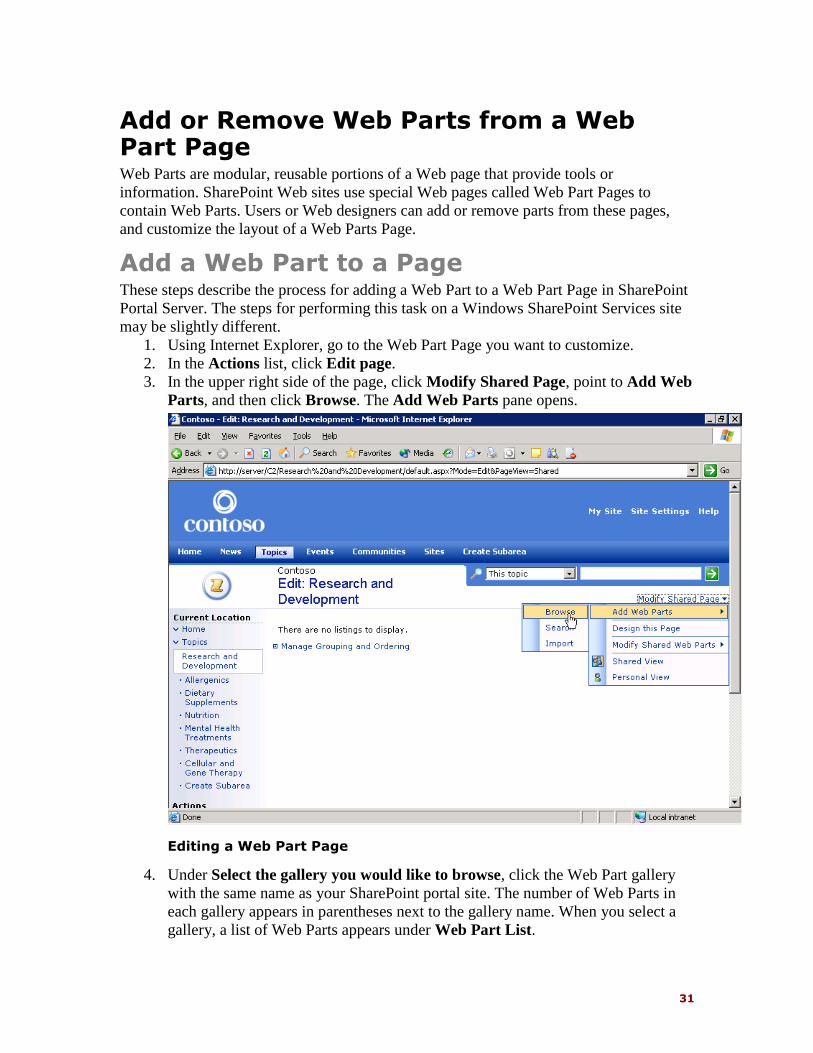
1. Using Internet Explorer, go to the Web Part Page you want to customize.
2. In the Actions list, click Edit page.
3. In the upper right side of the page, click Modify Shared Page, point to Add Web
Parts, and then click Browse. The Add Web Parts pane opens.
Editing a Web Part Page
4. Under Select the gallery you would like to browse, click the Web Part gallery
with the same name as your SharePoint portal site. The number of Web Parts in
each gallery appears in parentheses next to the gallery name. When you select a
gallery, a list of Web Parts appears under Web Part List.
32
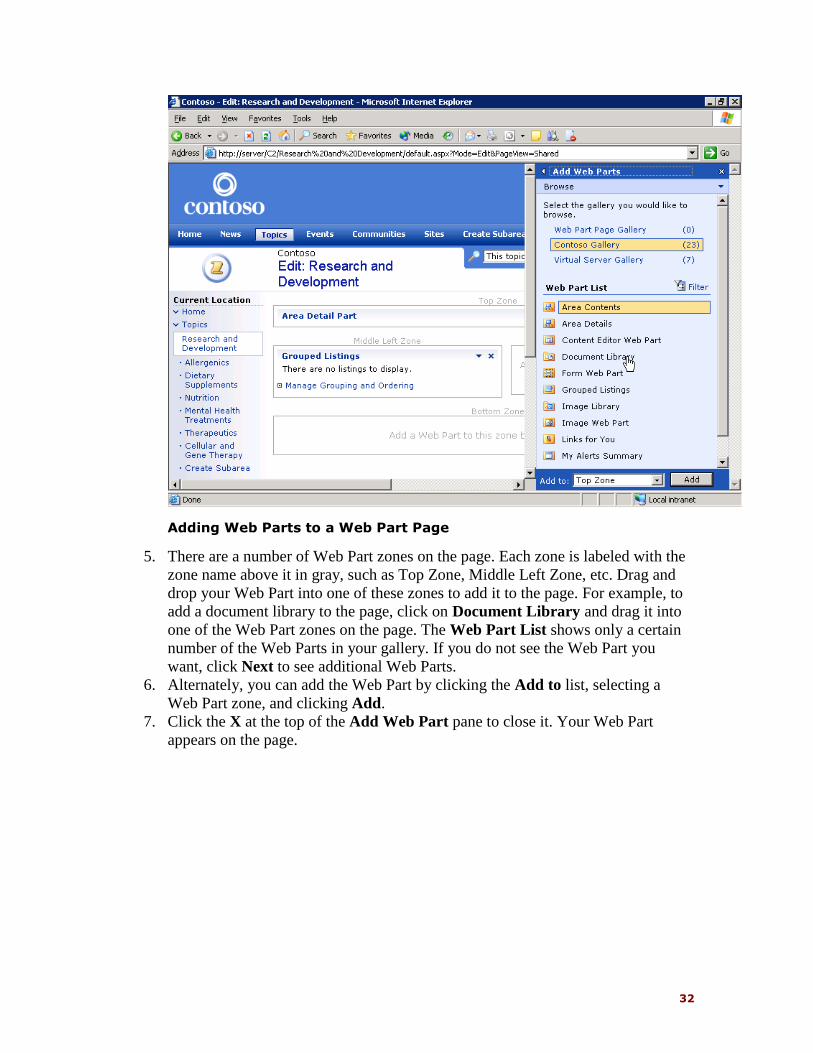
Adding Web Parts to a Web Part Page
5. There are a number of Web Part zones on the page. Each zone is labeled with the
zone name above it in gray, such as Top Zone, Middle Left Zone, etc. Drag and
drop your Web Part into one of these zones to add it to the page. For example, to
add a document library to the page, click on Document Library and drag it into
one of the Web Part zones on the page. The Web Part List shows only a certain
number of the Web Parts in your gallery. If you do not see the Web Part you
want, click Next to see additional Web Parts.
6. Alternately, you can add the Web Part by clicking the Add to list, selecting a
Web Part zone, and clicking Add.
7. Click the X at the top of the Add Web Part pane to close it. Your Web Part
appears on the page.
33
Close a Web Part You can close a Web Part that you do not want to appear on the page. This does not
delete the Web Part permanently, but simply removes it from the display. This is useful
for customizing the appearance of a page without permanently deleting Web Parts that
may contain useful data. Close a Web Part by following these steps:
1. In the Actions list, click Edit Page.
Note If you see View Page in the Actions list, you are in edit mode.
2. On the upper right corner of the Web Part you wish to remove, click the down
arrow.
3. Select Close.
Delete a Web Part Sometimes you do not want to simply remove a Web Part from a page, but to delete it
permanently. This completely deletes the Web Part and any data it contains. Delete a
Web Part by following these steps:
1. In the Actions list, click Edit Page.
Note If you see View Page in the Actions list, you are in edit mode.
2. In the upper right corner of the page, click Modify Shared Page, and then click
Design this Page.
3. Click the down arrow in the upper right corner of the Web Part you would like to
remove, and then click Delete.
4. When the warning appears, click OK.
5. In the Actions list, click View Page to exit edit mode.
Hide a Web Part Sometimes you want to hide a Web Part so that it does not appear on the page, but you do
not want to close it completely or delete it. For example, you may want to hide a Web
Part that is providing data to another Web Part through a Web Part connection if only the
second Web Part is actually of interest to people using a Web Part Page. Hide a Web Part
by following these steps:
1. In the Actions list, click Edit Page.
Note If you see View Page in the Actions list, you are in edit mode.
2. In the upper right corner of the Web Part you want to hide, click the menu button
(a small down arrow), and then click Modify Shared Web Part. The Modify
Shared Web Part pane opens.
3. Scroll down and expand the Layout section by clicking on the small plus sign (+)
next to the word Layout.
4. In the Layout section, clear the check box next to Visible on Page.
5. At the bottom of the pane, click OK.
34
Reconfigure Web Part Page Layout Web Part Pages are very flexible. Not only can you add and remove Web Parts, but you
can also easily change the layout of the page. You can export a Web Part to a file—or
import a Web Part from a file—making it easy to transfer Web Parts between portal sites
or pages.
1. Using Internet Explorer, go to the Web Part Page you want to customize.
2. In the Actions list, click Edit Page. The page appears in edit mode so you can
make changes.
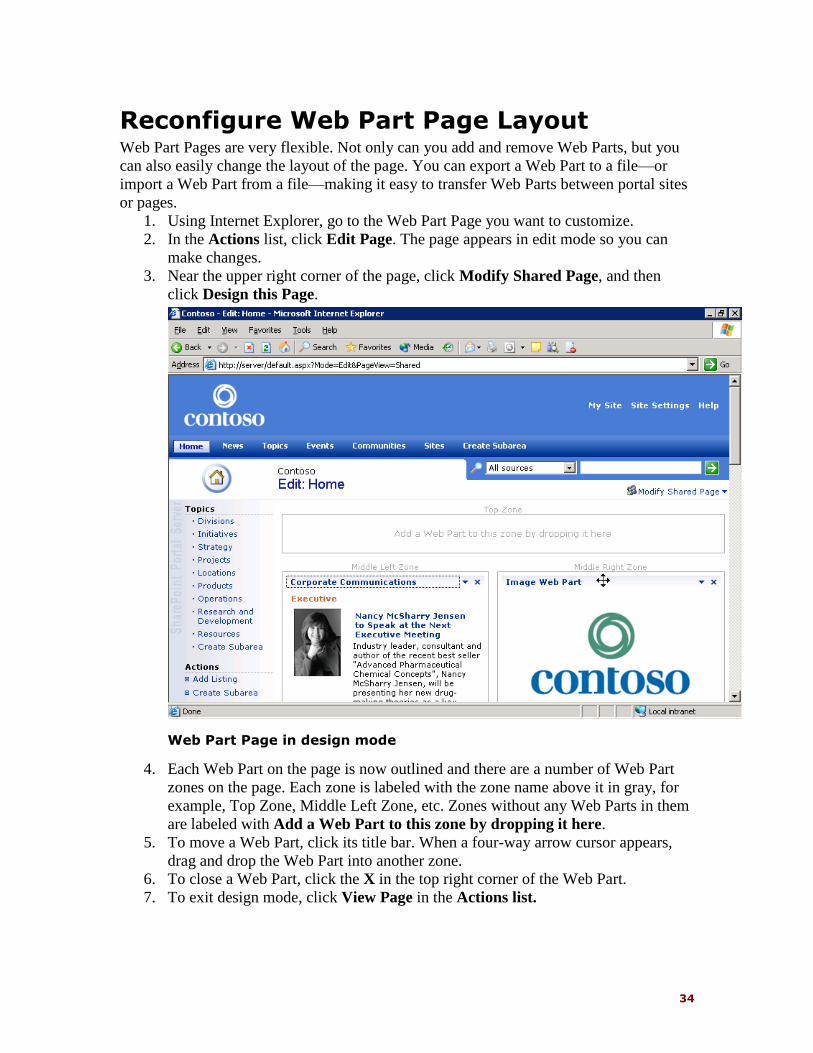
3. Near the upper right corner of the page, click Modify Shared Page, and then
click Design this Page.
Web Part Page in design mode
4. Each Web Part on the page is now outlined and there are a number of Web Part
zones on the page. Each zone is labeled with the zone name above it in gray, for
example, Top Zone, Middle Left Zone, etc. Zones without any Web Parts in them
are labeled with Add a Web Part to this zone by dropping it here.
5. To move a Web Part, click its title bar. When a four-way arrow cursor appears,
drag and drop the Web Part into another zone.
6. To close a Web Part, click the X in the top right corner of the Web Part.
7. To exit design mode, click View Page in the Actions list.
35
Link Two Web Parts You can place a wide variety of Web Parts—including Microsoft Office Spreadsheet and
Microsoft Office PivotChart® controls—into Web Part Pages. These two Web Parts
allow you to place an Excel spreadsheet and chart functionality into a Web Part Page.
This example begins with a Web Part Page that already contains the Office Spreadsheet
Web Part and Office PivotChart controls, and shows how they can be linked to share
data. It is helpful to have an existing Web Page that contains Office Spreadsheet and
Office PivotChart Web controls. To add these Web Parts to a page, see “Add or Remove
Web Parts from a Web Part Page” earlier in this white paper.
1. Using Internet Explorer, go to the page containing the Web Parts you want to link.
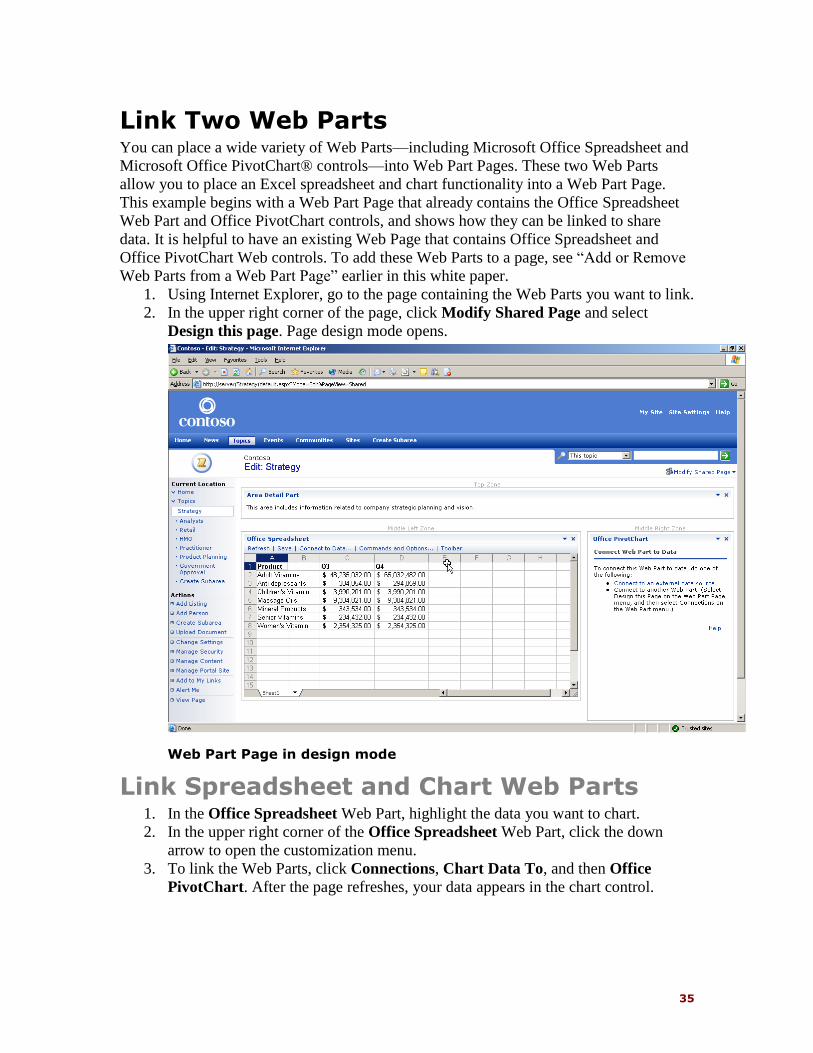
2. In the upper right corner of the page, click Modify Shared Page and select
Design this page. Page design mode opens.
Web Part Page in design mode
Link Spreadsheet and Chart Web Parts 1. In the Office Spreadsheet Web Part, highlight the data you want to chart.
2. In the upper right corner of the Office Spreadsheet Web Part, click the down
arrow to open the customization menu.
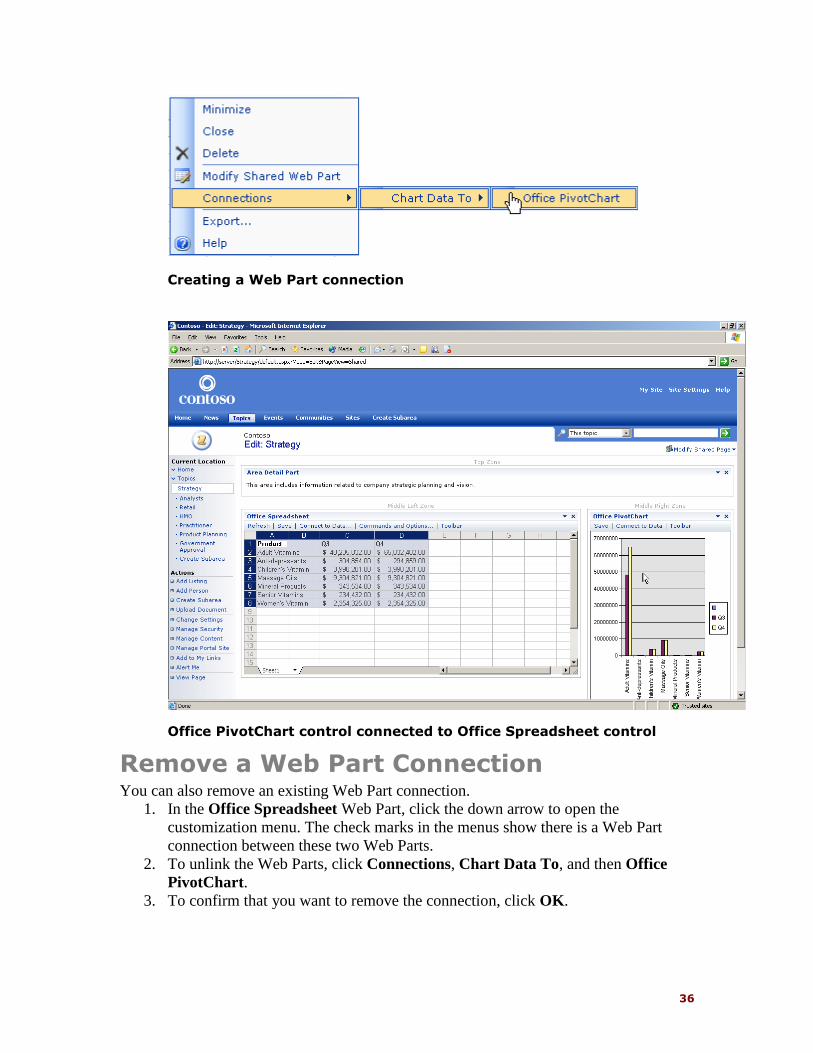
3. To link the Web Parts, click Connections, Chart Data To, and then Office
PivotChart. After the page refreshes, your data appears in the chart control.
36
Creating a Web Part connection
Office PivotChart control connected to Office Spreadsheet control
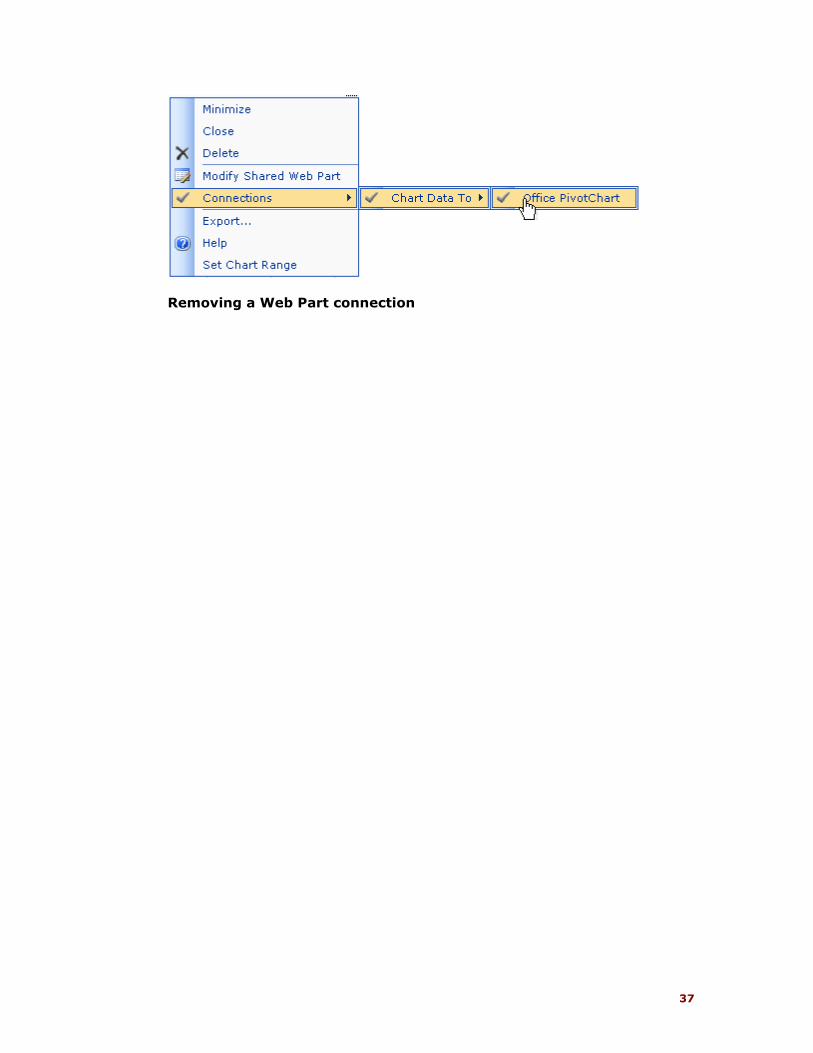
Remove a Web Part Connection You can also remove an existing Web Part connection.
1. In the Office Spreadsheet Web Part, click the down arrow to open the
customization menu. The check marks in the menus show there is a Web Part
connection between these two Web Parts.
2. To unlink the Web Parts, click Connections, Chart Data To, and then Office
PivotChart.
3. To confirm that you want to remove the connection, click OK.
37
Removing a Web Part connection
38
Customize My Site Public View SharePoint Portal Server allows users to have a personal portal site, or My Site, where
they can gather and publish information of interest to them.
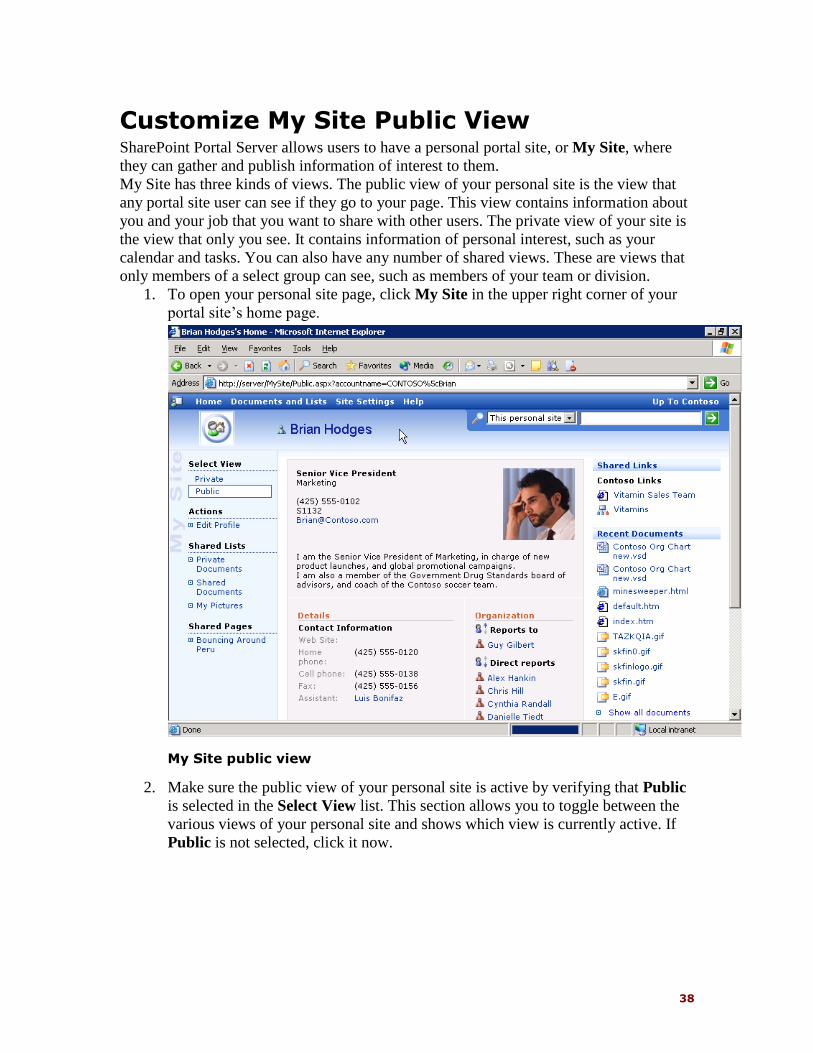
My Site has three kinds of views. The public view of your personal site is the view that
any portal site user can see if they go to your page. This view contains information about
you and your job that you want to share with other users. The private view of your site is
the view that only you see. It contains information of personal interest, such as your
calendar and tasks. You can also have any number of shared views. These are views that
only members of a select group can see, such as members of your team or division.
1. To open your personal site page, click My Site in the upper right corner of your
portal site’s home page.
My Site public view
2. Make sure the public view of your personal site is active by verifying that Public
is selected in the Select View list. This section allows you to toggle between the
various views of your personal site and shows which view is currently active. If
Public is not selected, click it now.
39
Edit your Profile SharePoint Portal Server collects important user information in user profiles. People can
find these profiles through SharePoint search or by going to the public view of a My Site.
You can edit your user profile to control what information is published on the public
view of your personal site.
1. Verify that the public view of your personal site is active. In the Actions list, click
Edit Profile.
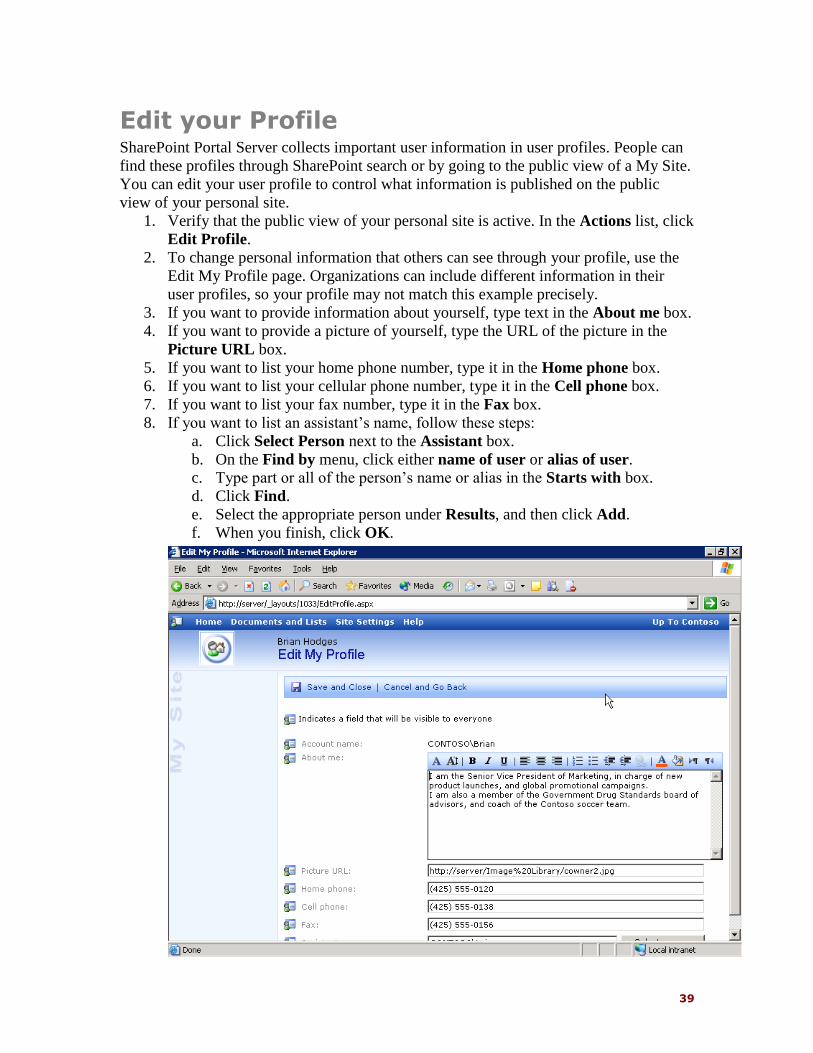
2. To change personal information that others can see through your profile, use the
Edit My Profile page. Organizations can include different information in their
user profiles, so your profile may not match this example precisely.
3. If you want to provide information about yourself, type text in the About me box.
4. If you want to provide a picture of yourself, type the URL of the picture in the
Picture URL box.
5. If you want to list your home phone number, type it in the Home phone box.
6. If you want to list your cellular phone number, type it in the Cell phone box.
7. If you want to list your fax number, type it in the Fax box.
8. If you want to list an assistant’s name, follow these steps:
a. Click Select Person next to the Assistant box.
b. On the Find by menu, click either name of user or alias of user.
c. Type part or all of the person’s name or alias in the Starts with box.
d. Click Find.
e. Select the appropriate person under Results, and then click Add.
f. When you finish, click OK.
40
Editing My Profile
3. When you finish, click Save and Close. The changes you made to your profile
appear in your public view immediately.
Add a Link to My Links The My Links Web Part contains links of personal interest to you. When you add a link
to this list, you can choose to share it on the public or shared views of your site, or to
display it only on the private view. You can also add portal site items to your links by
clicking Add to my Links while you are viewing them.
1. Make sure the private view of your personal site is active by verifying that
Private is selected under Select View. This section allows you to toggle between
the various views of your personal site and shows which view is currently active.
If Private is not active, click it now.
41
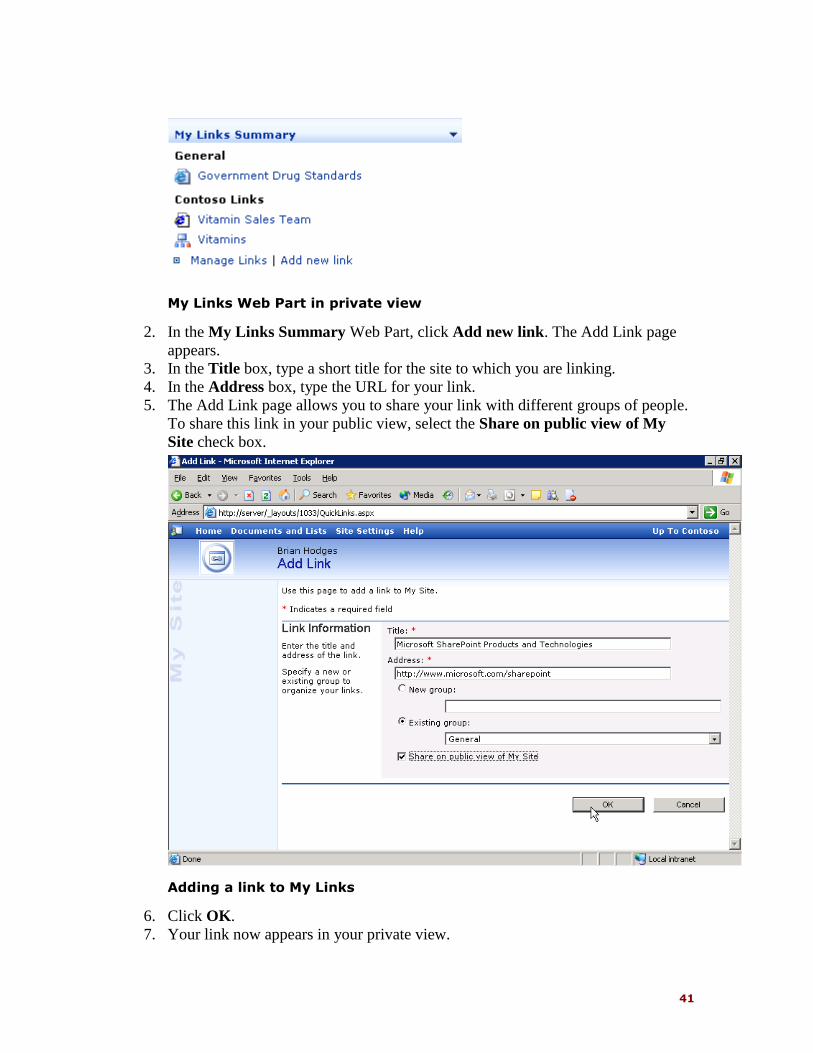
My Links Web Part in private view
2. In the My Links Summary Web Part, click Add new link. The Add Link page
appears.
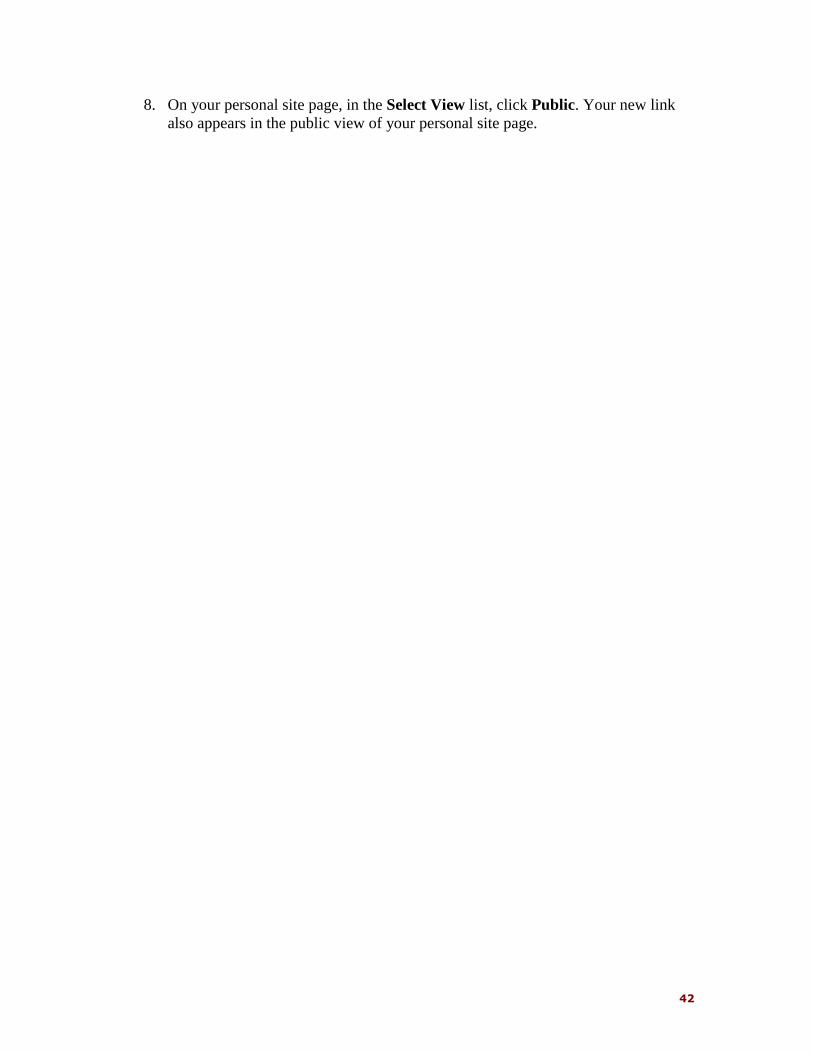
3. In the Title box, type a short title for the site to which you are linking.
4. In the Address box, type the URL for your link.
5. The Add Link page allows you to share your link with different groups of people.
To share this link in your public view, select the Share on public view of My
Site check box.
Adding a link to My Links
6. Click OK.
7. Your link now appears in your private view.
42
8. On your personal site page, in the Select View list, click Public. Your new link
also appears in the public view of your personal site page.

43
Customize My Site Private View SharePoint Portal Server includes a number of Web Parts that enable you to access your
Microsoft Exchange Server Mailbox, Tasks, Folders, and Calendar. By adding these Web
Parts to the private view of your personal site, you can use it to more easily access this
information.
1. In the upper right corner of your portal site’s home page, click My Site. This
opens your personal site page.
2. Make sure the private view of your personal site page is active by verifying that
Private is selected in the Select View list. This section allows you to toggle
between the various views of your personal site and shows which view is
currently active. If Private is not selected, click it now.
My Site private view
Add My Inbox Web Part to My Site 1. On the upper right side of the page, click Modify My Page, point to Add Web
Parts, and then click Browse. The Add Web Parts pane opens.
2. Under Select the gallery you would like to browse, select the gallery that has the
same name as your organization’s portal site. A list of Web Parts appears under
Web Part List.
3. Select the My Inbox Web Part. If you do not see this Web Part in the list, click
Next until it appears.
44
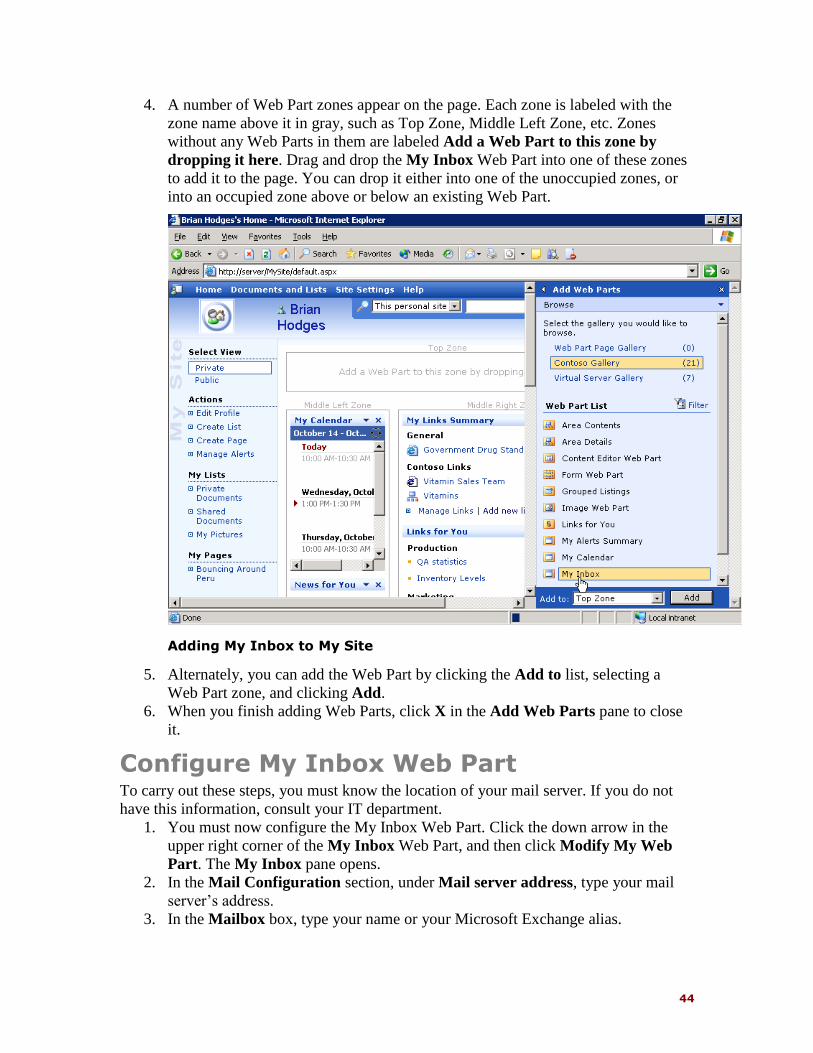
4. A number of Web Part zones appear on the page. Each zone is labeled with the
zone name above it in gray, such as Top Zone, Middle Left Zone, etc. Zones
without any Web Parts in them are labeled Add a Web Part to this zone by
dropping it here. Drag and drop the My Inbox Web Part into one of these zones
to add it to the page. You can drop it either into one of the unoccupied zones, or
into an occupied zone above or below an existing Web Part.
Adding My Inbox to My Site
5. Alternately, you can add the Web Part by clicking the Add to list, selecting a
Web Part zone, and clicking Add.
6. When you finish adding Web Parts, click X in the Add Web Parts pane to close
it.
Configure My Inbox Web Part To carry out these steps, you must know the location of your mail server. If you do not
have this information, consult your IT department.
1. You must now configure the My Inbox Web Part. Click the down arrow in the
upper right corner of the My Inbox Web Part, and then click Modify My Web
Part. The My Inbox pane opens.
2. In the Mail Configuration section, under Mail server address, type your mail
server’s address.
3. In the Mailbox box, type your name or your Microsoft Exchange alias.

45
Configuring My Inbox Web Part
4. If you want to customize the appearance of the My Inbox Web Part, expand the
Appearance section pane by clicking the plus sign (+) next to Appearance. In
this section, you can change the title, height, width, and frame style of the My
Inbox Web Part.
5. If you want to customize the layout of the My Inbox Web Part, expand the
Layout section by clicking the plus sign (+) next to Layout. In this section, you
can chance the visibility and position of the My Inbox Web Part.
6. If you want to change the advanced settings of the My Inbox Web Part, expand
the Advanced section by clicking click the plus sign (+) next to Advanced.
7. When you finish, click OK.
Apply a New Theme to My Site You can also choose to apply a theme to your personal site. Themes are collections of
interface elements, color schemes, and styles. Applying a theme lets you customize the
look and feel of your personal site.
1. On the top-level toolbar on the My Site page, click Site Settings.
2. In the Customization section, click Apply theme to site.
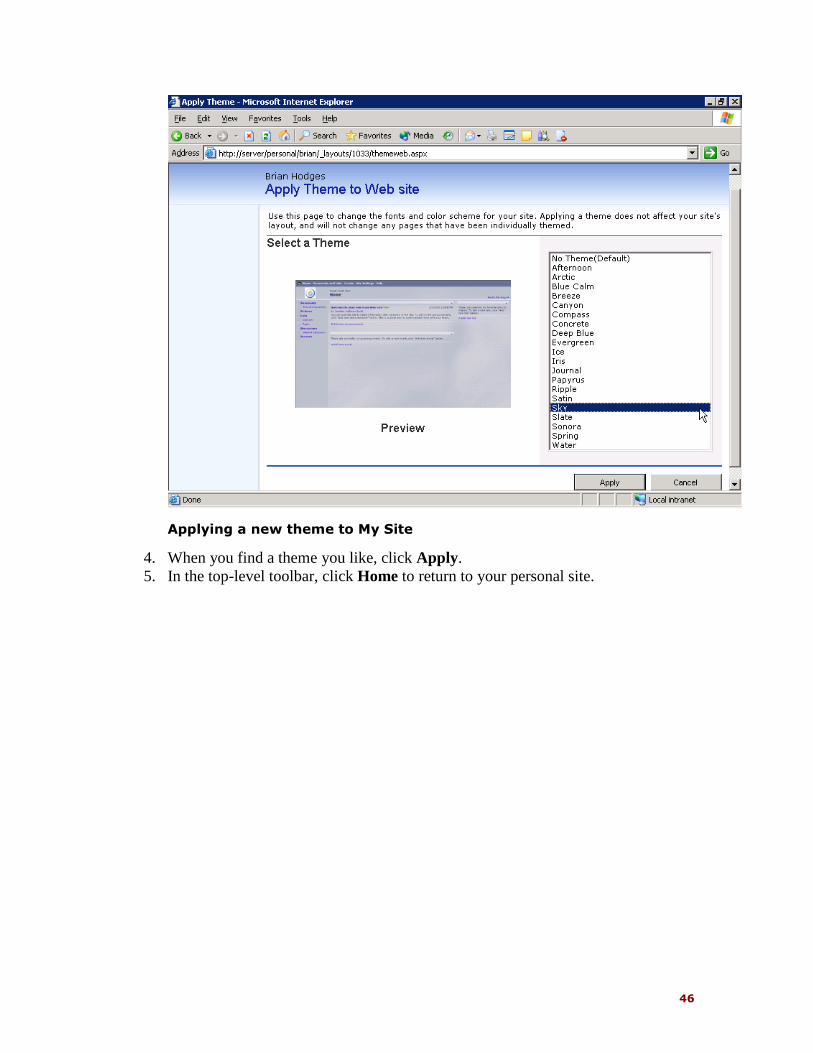
3. To preview a theme, click the theme name in the list. A preview appears in the
Preview area.
46
Applying a new theme to My Site
4. When you find a theme you like, click Apply.
5. In the top-level toolbar, click Home to return to your personal site.
47
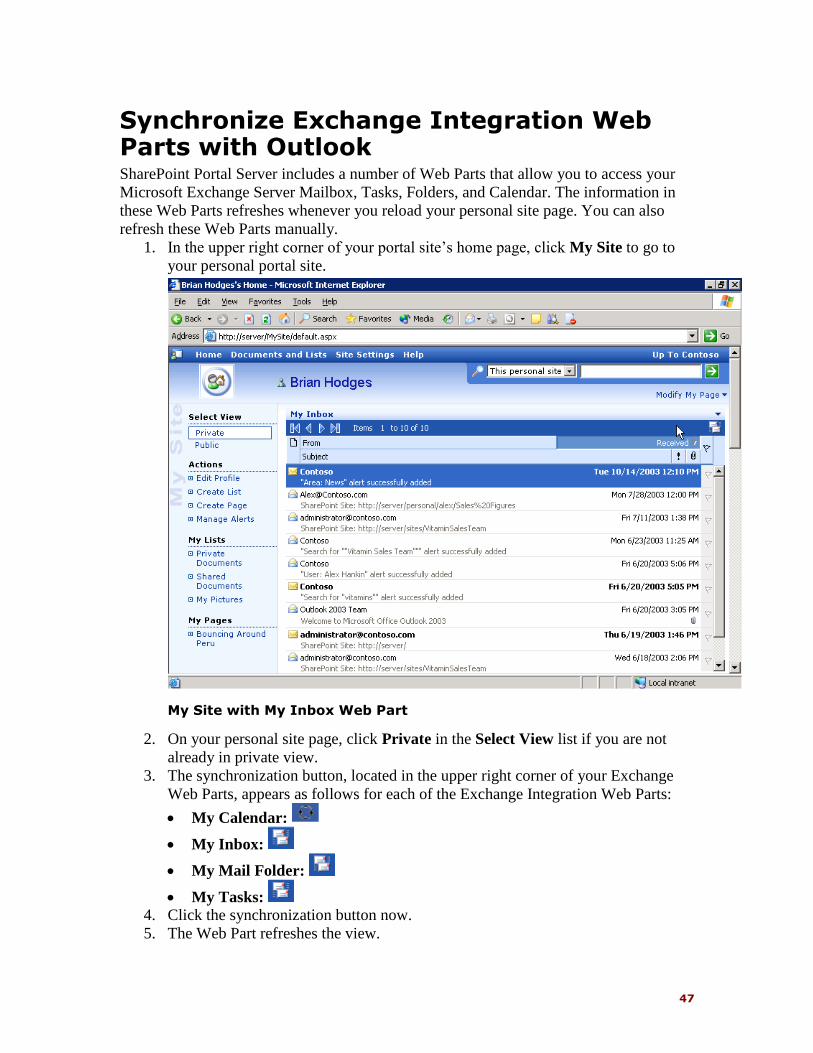
Synchronize Exchange Integration Web Parts with Outlook SharePoint Portal Server includes a number of Web Parts that allow you to access your
Microsoft Exchange Server Mailbox, Tasks, Folders, and Calendar. The information in
these Web Parts refreshes whenever you reload your personal site page. You can also
refresh these Web Parts manually.
1. In the upper right corner of your portal site’s home page, click My Site to go to
your personal portal site.
My Site with My Inbox Web Part
2. On your personal site page, click Private in the Select View list if you are not
already in private view.
3. The synchronization button, located in the upper right corner of your Exchange
Web Parts, appears as follows for each of the Exchange Integration Web Parts:
My Calendar:
My Inbox:
My Mail Folder:
My Tasks: 4. Click the synchronization button now.
5. The Web Part refreshes the view.
48
Create a Meeting Workspace with Office 2003 A meeting workspace is a SharePoint Web site that contains tools and information to aid
meeting participants. It can include a contact list of contributors, related links and
documents, tasks, calendar, etc. From Outlook 2003, you can quickly create a meeting
workspace that is hosted on your company’s portal site.
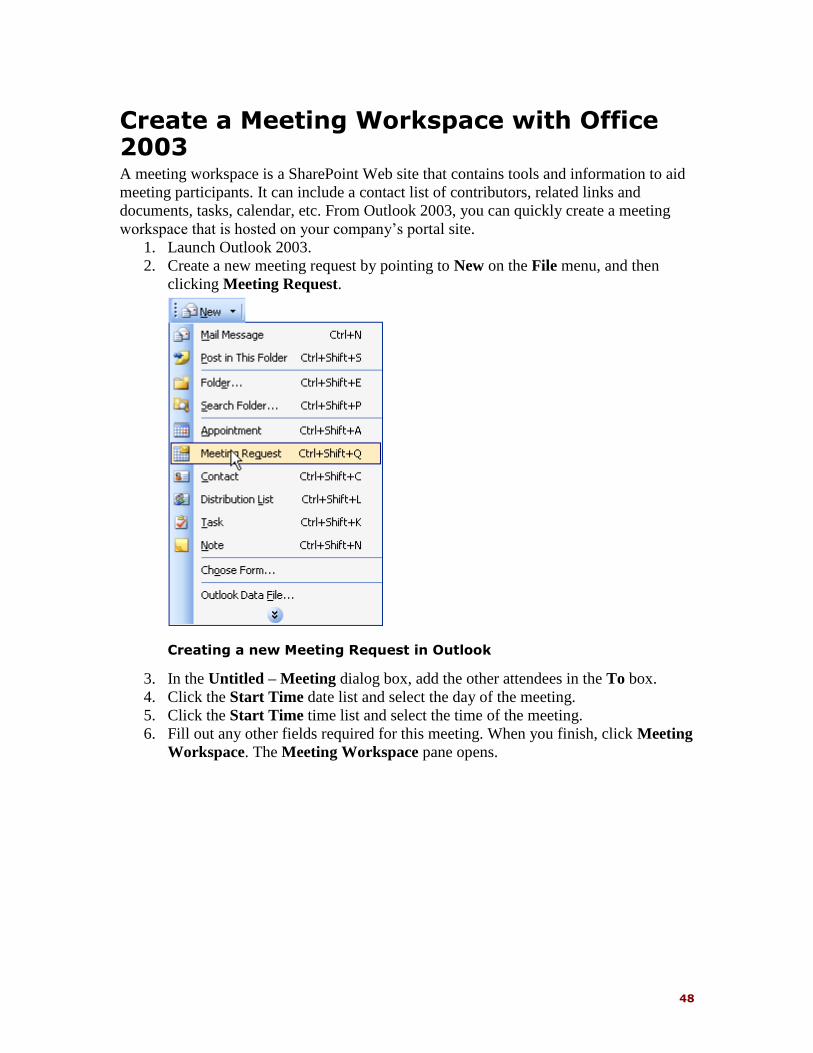
1. Launch Outlook 2003.
2. Create a new meeting request by pointing to New on the File menu, and then
clicking Meeting Request.
Creating a new Meeting Request in Outlook
3. In the Untitled – Meeting dialog box, add the other attendees in the To box.
4. Click the Start Time date list and select the day of the meeting.
5. Click the Start Time time list and select the time of the meeting.
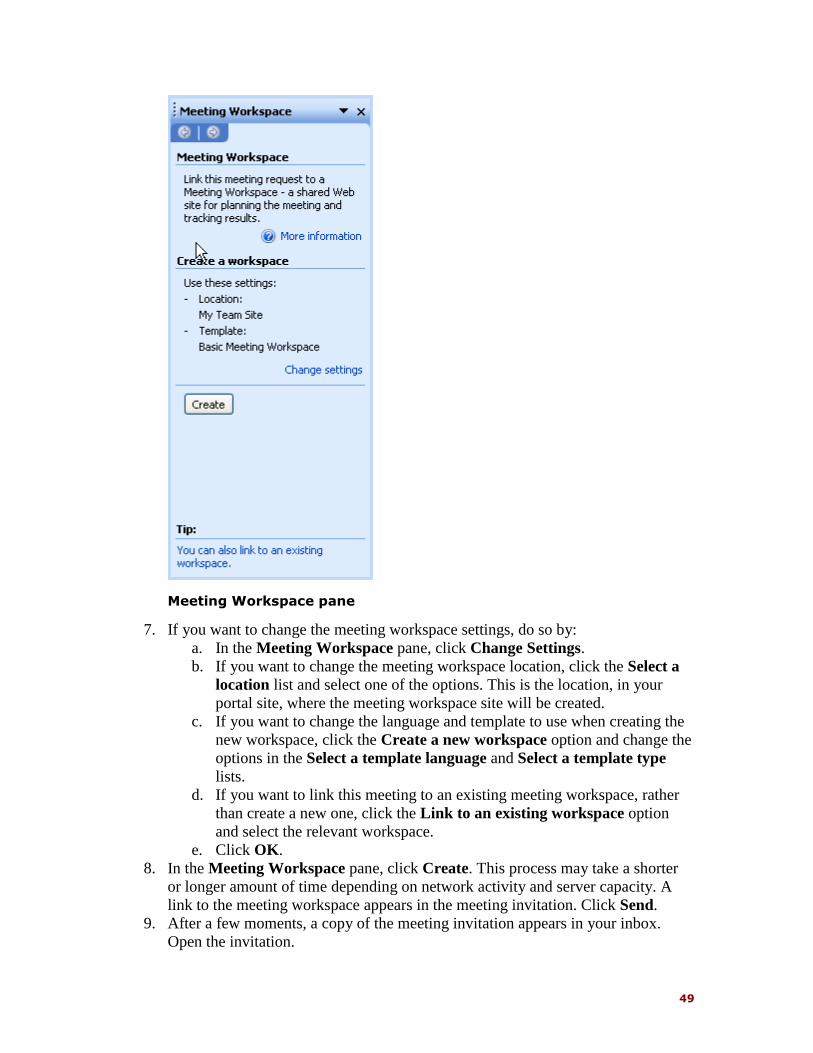
6. Fill out any other fields required for this meeting. When you finish, click Meeting
Workspace. The Meeting Workspace pane opens.
49
Meeting Workspace pane
7. If you want to change the meeting workspace settings, do so by:
a. In the Meeting Workspace pane, click Change Settings.
b. If you want to change the meeting workspace location, click the Select a
location list and select one of the options. This is the location, in your
portal site, where the meeting workspace site will be created.
c. If you want to change the language and template to use when creating the
new workspace, click the Create a new workspace option and change the
options in the Select a template language and Select a template type
lists.
d. If you want to link this meeting to an existing meeting workspace, rather
than create a new one, click the Link to an existing workspace option
and select the relevant workspace.
e. Click OK.
8. In the Meeting Workspace pane, click Create. This process may take a shorter
or longer amount of time depending on network activity and server capacity. A
link to the meeting workspace appears in the meeting invitation. Click Send.
9. After a few moments, a copy of the meeting invitation appears in your inbox.
Open the invitation.

50
10. In your meeting invitation, click the Meeting Workspace link to open it in your
Web browser. The meeting workspace includes a list of attendees, objectives, an
agenda, and a document library.
Note The actual contents of the meeting workspace depend on the template used
to create the workspace.
51
Create a Document Workspace with Office 2003 A document workspace is a SharePoint Web site containing tools and information useful
for collaboration on a document. It can include a list of contributors, related links and
documents, tasks, etc. From within Microsoft Office Word 2003, Microsoft Office
PowerPoint® 2003, and Microsoft Office Excel 2003, you can quickly create a document
workspace that is hosted on your company’s portal site. You can also use Outlook 2003
to create a document workspace by sending a document as a shared attachment.
1. Launch Word 2003 to create a new shared document.
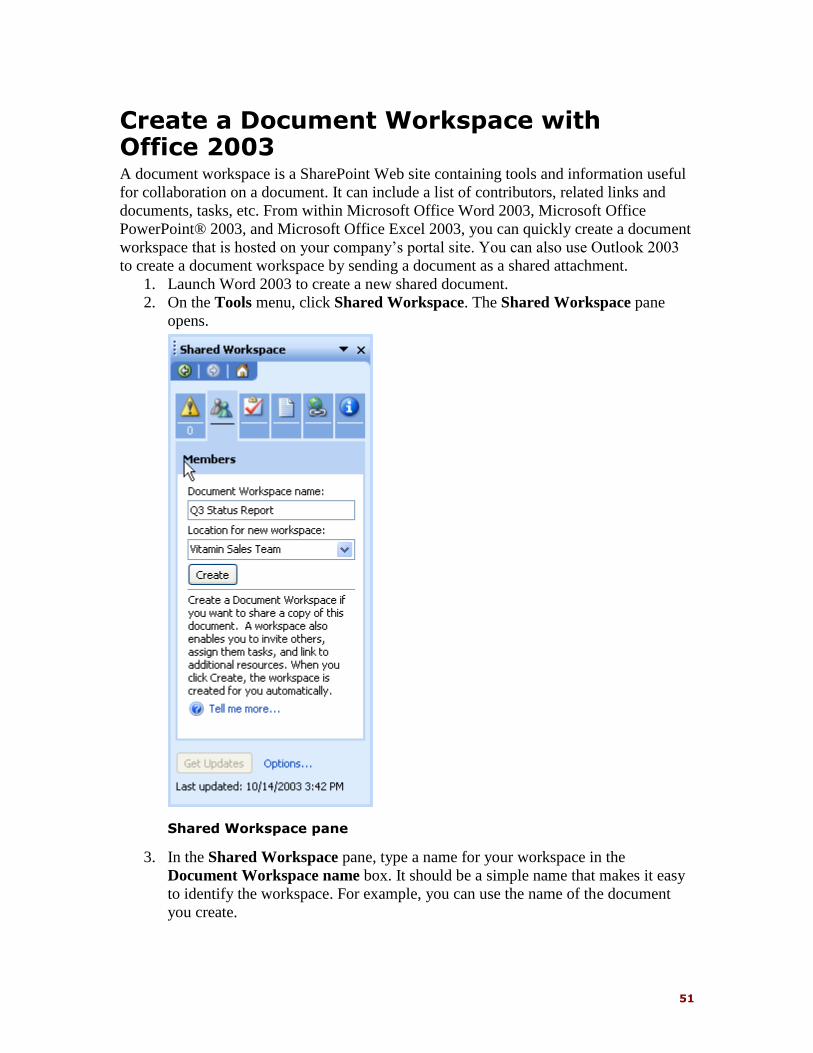
2. On the Tools menu, click Shared Workspace. The Shared Workspace pane
opens.
Shared Workspace pane
3. In the Shared Workspace pane, type a name for your workspace in the
Document Workspace name box. It should be a simple name that makes it easy
to identify the workspace. For example, you can use the name of the document
you create.
52
4. To select a location for your document workspace, click the Location for new
workspace list and select a location. This is the location in your organization’s
portal site where the document workspace will be created.
5. When you finish, click Create.
6. If you are prompted to save the document, click Yes in the dialog box.
7. The contents of the Shared Workspace pane change after the document
workspace is created. You can use this workspace to view and manage status,
members, tasks, documents, links, and information related to this document and
the document workspace.
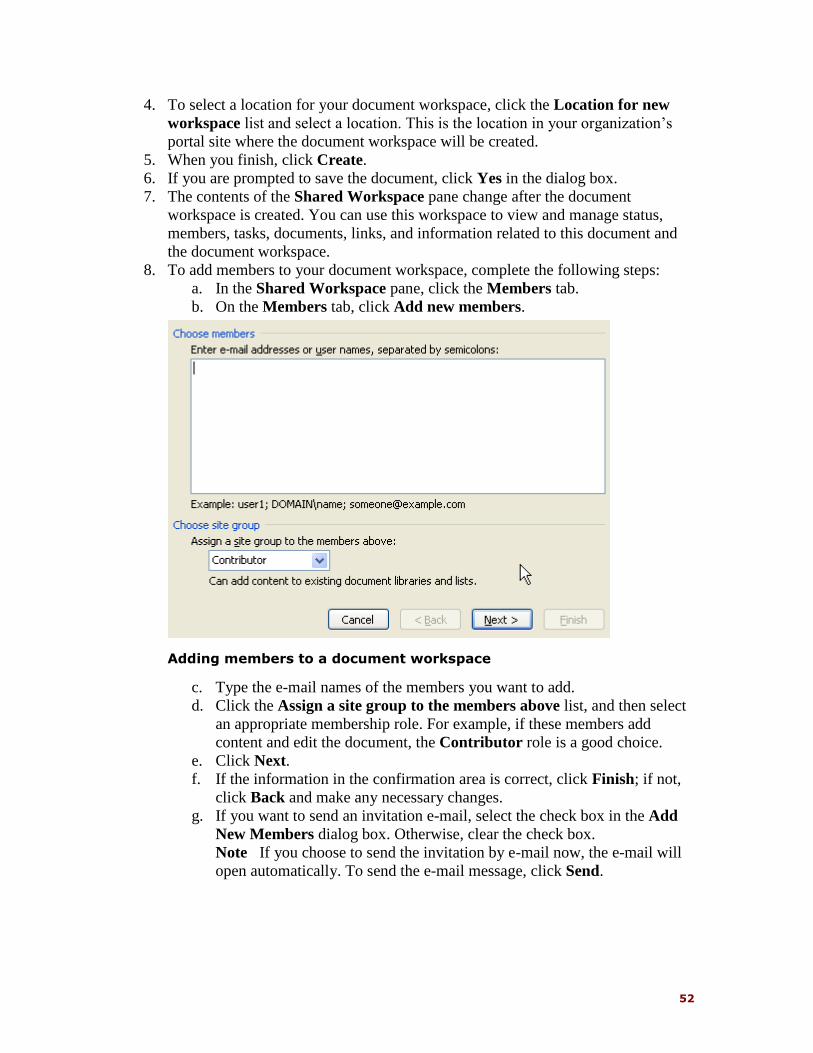
8. To add members to your document workspace, complete the following steps:
a. In the Shared Workspace pane, click the Members tab.
b. On the Members tab, click Add new members.
Adding members to a document workspace
c. Type the e-mail names of the members you want to add.
d. Click the Assign a site group to the members above list, and then select
an appropriate membership role. For example, if these members add
content and edit the document, the Contributor role is a good choice.
e. Click Next.
f. If the information in the confirmation area is correct, click Finish; if not,
click Back and make any necessary changes.
g. If you want to send an invitation e-mail, select the check box in the Add
New Members dialog box. Otherwise, clear the check box.
Note If you choose to send the invitation by e-mail now, the e-mail will
open automatically. To send the e-mail message, click Send.

53
h. Click OK.
i. The new members appear on the Members tab.
9. To view the workspace in a Web browser, click Open site in browser. The
document workspace opens.
10. In the Web browser window, your document workspace includes members, tasks,
shared documents, links, and announcements.
Note The actual contents of the document workspace depend on the template
used to create the workspace.
54
Content Editor, Page Viewer, and Web Capture Web Parts Content Editor, Page Viewer, and Web Capture are three Web Parts that enable you to
include different kinds of information in a Web Part Page. The Content Editor Web Part
lets you write, format, and change rich text and HTML content. The Page Viewer Web
Part contains a view of a particular Web Page. The Web Capture Web Part can contain a
Web Page or a portion of a Web Page.
For these examples, start with a Web Part Page that already contains the appropriate Web
Part. To learn how to insert a Web Part in a Web Part Page, see “Add or Remove Web
Parts from a Web Part Page” earlier in this paper.
Content Editor Web Part The Content Editor Web Part lets you easily place rich text or HTML into a Web Part
Page.
1. Using Internet Explorer, go to the Web Part Page that contains the Web Part you
want to customize.
2. In the Actions list, click Edit Page.
Note If the View Page option appears in the Actions list, you are in edit mode.
3. Click the down arrow on the Content Editor Web Part title bar and select
Modify Shared Web Part. The Content Editor Web Part pane opens. This
pane lets you edit the contents of the Content Editor Web Part and customize the
appearance, layout, and other settings of the Web Part.

55
Content Editor Web Part pane
4. If you want to add rich text to the Web Part, complete these steps:
a. Click Rich Text Editor.
b. In the Rich Text Editor dialog box, type the text you want to appear in
the Web Part. You can apply formatting, such as bold and italics; insert
tables and images; change the orientation of the text; etc.
c. When you finish, click Save.
5. If you want to add HTML code to the Web Part, complete these steps:
a. Click Source Editor.
b. In the Text Entry dialog box, type the HTML code you want to appear in
the Web Part.
c. When you finish, click Save.
6. If you want to link to a text file and display the contents of that file in the Web
Part, complete the following steps:
a. Type your text file’s URL in the To link to a text file, type a URL box.
b. Click Test Link. This will test your link in a Web browser.
7. When you finish, click OK in the Content Editor Web Part pane.
56
Page Viewer Web Part The Page Viewer Web Part displays the content of another Web page, folder, or file
inside the Web Part.
1. Using Internet Explorer, go to the Web Part Page that contains the Web Part you
want to customize.
2. In the Actions list, click Edit Page.
Note If the View Page option appears in the Actions list, you are in edit mode.
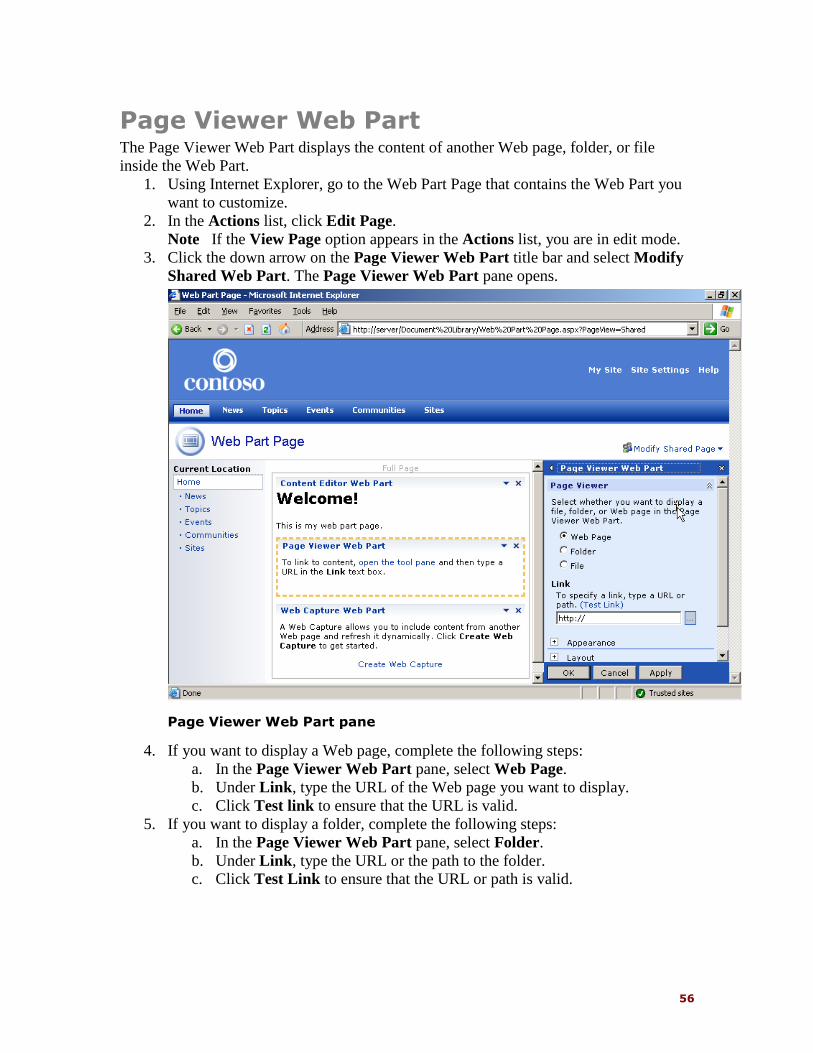
3. Click the down arrow on the Page Viewer Web Part title bar and select Modify
Shared Web Part. The Page Viewer Web Part pane opens.
Page Viewer Web Part pane
4. If you want to display a Web page, complete the following steps:
a. In the Page Viewer Web Part pane, select Web Page.
b. Under Link, type the URL of the Web page you want to display.
c. Click Test link to ensure that the URL is valid.
5. If you want to display a folder, complete the following steps:
a. In the Page Viewer Web Part pane, select Folder.
b. Under Link, type the URL or the path to the folder.
c. Click Test Link to ensure that the URL or path is valid.
57
6. If you want to display a file, complete the following steps:
a. In the Page Viewer Web Part pane, select File.
b. Under Link, type the URL or path to the file, or click Browse to browse
to it.
c. Click Test Link to ensure that the URL or path is valid.
7. When you finish, click OK.
Note You can also use the Appearance and Layout sections in the Web Part pane
to help size and arrange your Web Part on the page so it appears exactly as you want.
Web Capture Web Part The Web Capture Web Part captures content from a Web page or portion of a Web page.
1. Using Internet Explorer, go to the Web Part Page that contains the Web Part you
want to customize.
2. In the Actions list, click Edit Page.
Note If the View Page option appears in the Actions list, you are in edit mode
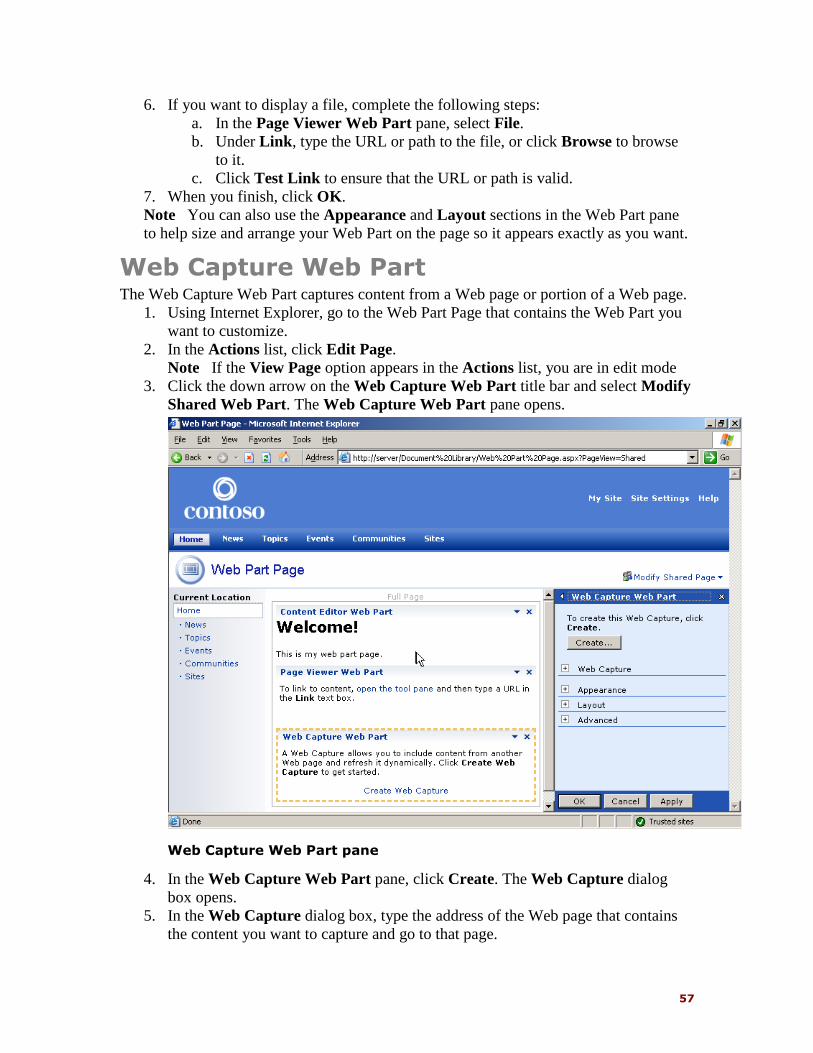
3. Click the down arrow on the Web Capture Web Part title bar and select Modify
Shared Web Part. The Web Capture Web Part pane opens.
Web Capture Web Part pane
4. In the Web Capture Web Part pane, click Create. The Web Capture dialog
box opens.
5. In the Web Capture dialog box, type the address of the Web page that contains
the content you want to capture and go to that page.
58
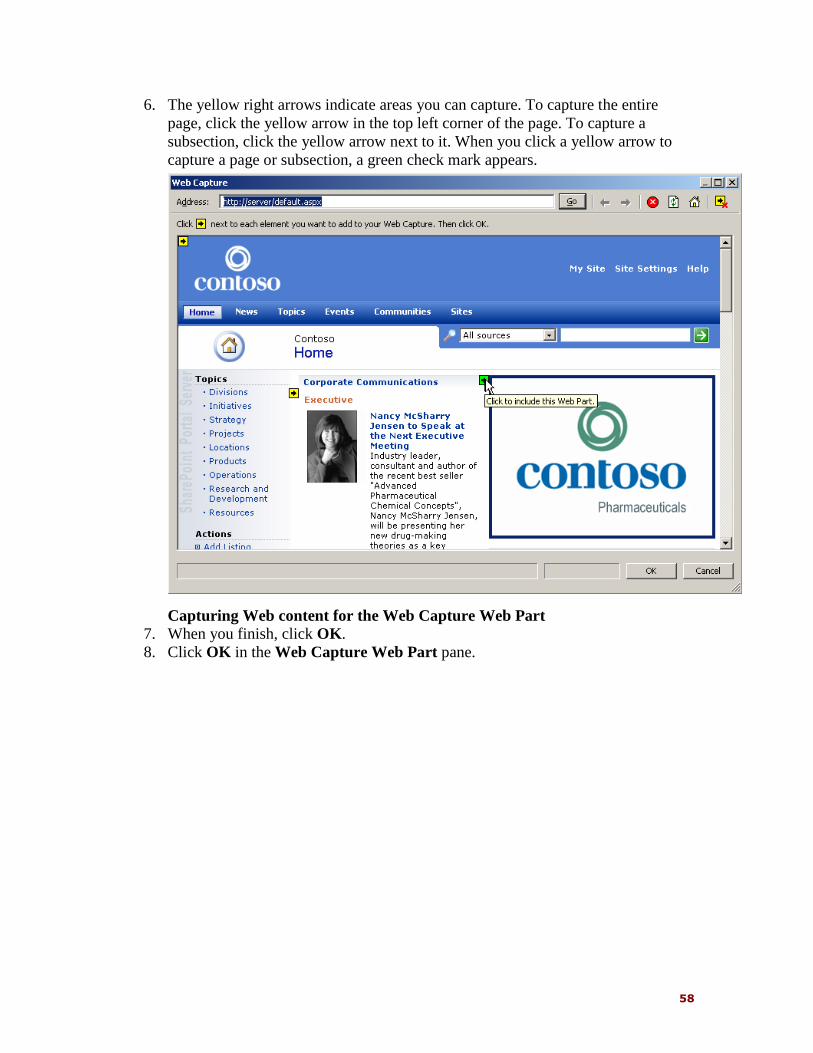
6. The yellow right arrows indicate areas you can capture. To capture the entire
page, click the yellow arrow in the top left corner of the page. To capture a
subsection, click the yellow arrow next to it. When you click a yellow arrow to
capture a page or subsection, a green check mark appears.
Capturing Web content for the Web Capture Web Part
7. When you finish, click OK.
8. Click OK in the Web Capture Web Part pane.
59
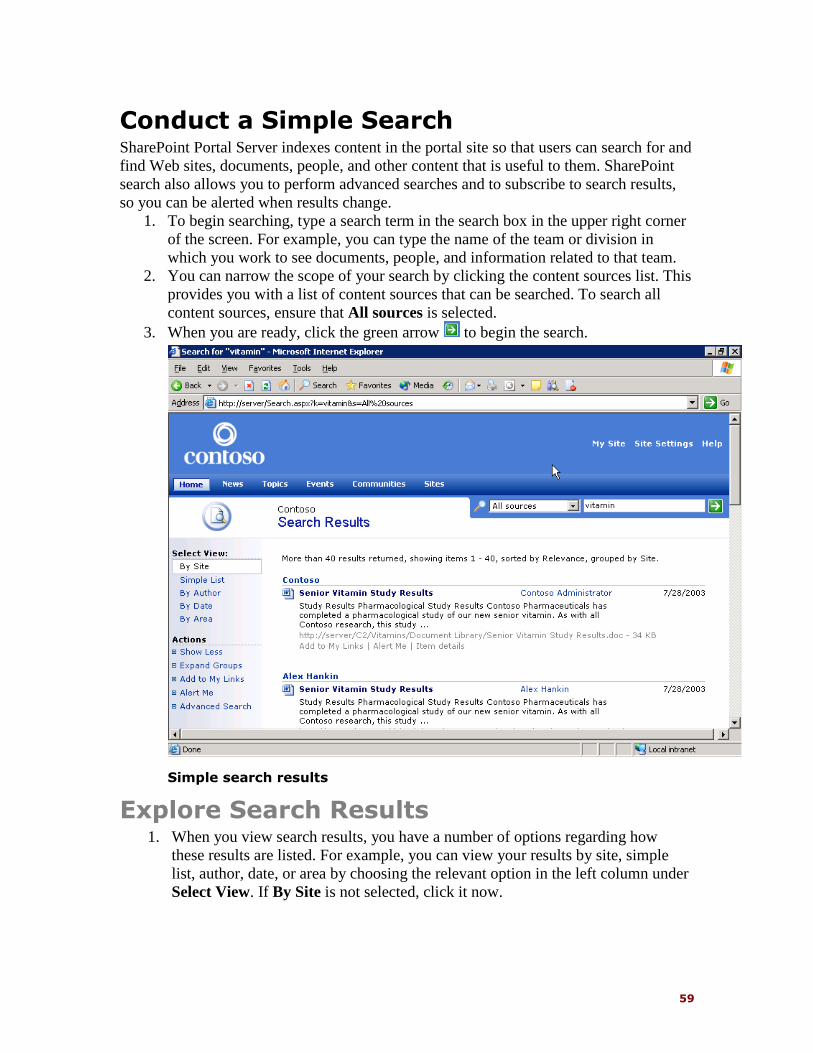
Conduct a Simple Search SharePoint Portal Server indexes content in the portal site so that users can search for and
find Web sites, documents, people, and other content that is useful to them. SharePoint
search also allows you to perform advanced searches and to subscribe to search results,
so you can be alerted when results change.
1. To begin searching, type a search term in the search box in the upper right corner
of the screen. For example, you can type the name of the team or division in
which you work to see documents, people, and information related to that team.
2. You can narrow the scope of your search by clicking the content sources list. This
provides you with a list of content sources that can be searched. To search all
content sources, ensure that All sources is selected.
3. When you are ready, click the green arrow to begin the search.
Simple search results
Explore Search Results 1. When you view search results, you have a number of options regarding how
these results are listed. For example, you can view your results by site, simple
list, author, date, or area by choosing the relevant option in the left column under
Select View. If By Site is not selected, click it now.
60
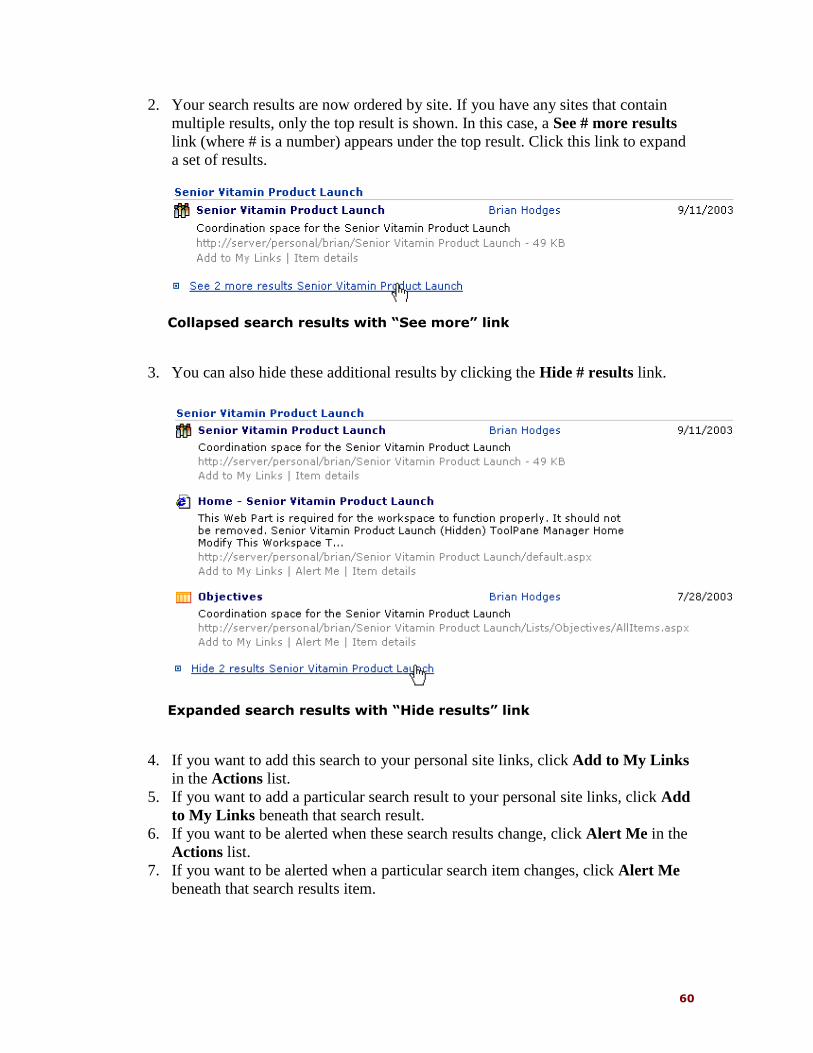
2. Your search results are now ordered by site. If you have any sites that contain
multiple results, only the top result is shown. In this case, a See # more results
link (where # is a number) appears under the top result. Click this link to expand
a set of results.
Collapsed search results with “See more” link
3. You can also hide these additional results by clicking the Hide # results link.
Expanded search results with “Hide results” link
4. If you want to add this search to your personal site links, click Add to My Links
in the Actions list.
5. If you want to add a particular search result to your personal site links, click Add
to My Links beneath that search result.
6. If you want to be alerted when these search results change, click Alert Me in the
Actions list.
7. If you want to be alerted when a particular search item changes, click Alert Me
beneath that search results item.
61
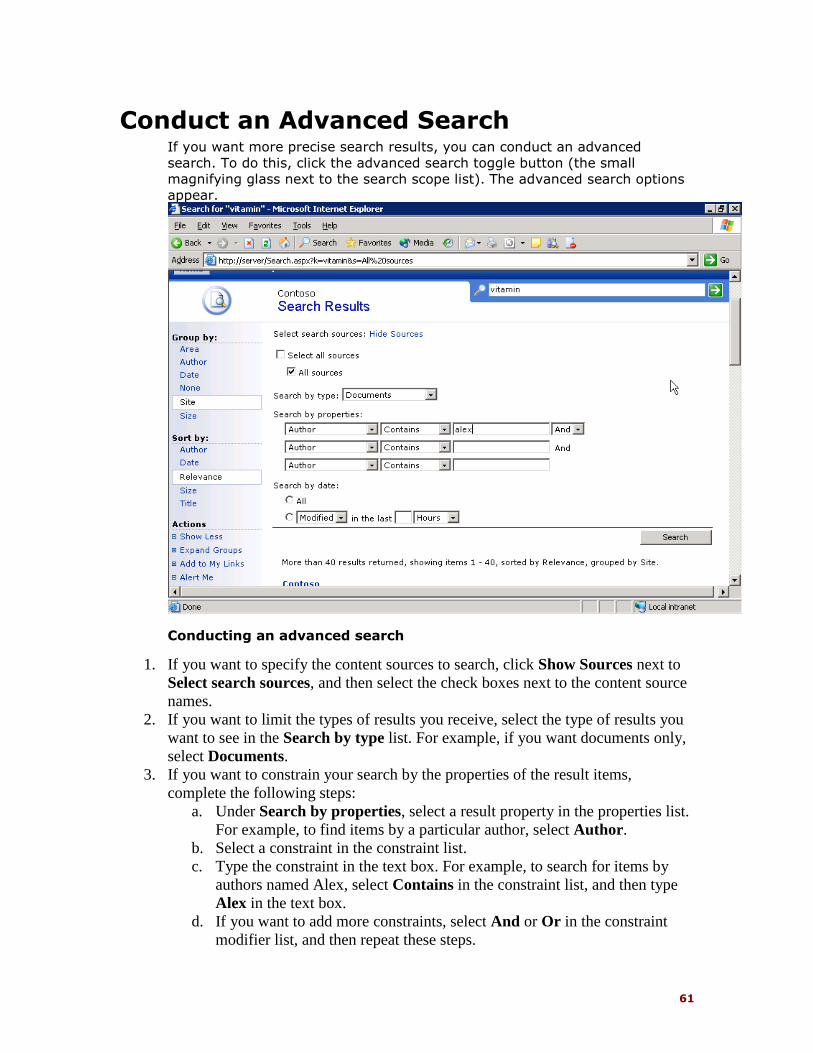
Conduct an Advanced Search If you want more precise search results, you can conduct an advanced
search. To do this, click the advanced search toggle button (the small
magnifying glass next to the search scope list). The advanced search options
appear.
Conducting an advanced search
1. If you want to specify the content sources to search, click Show Sources next to
Select search sources, and then select the check boxes next to the content source
names.
2. If you want to limit the types of results you receive, select the type of results you
want to see in the Search by type list. For example, if you want documents only,
select Documents.
3. If you want to constrain your search by the properties of the result items,
complete the following steps:
a. Under Search by properties, select a result property in the properties list.
For example, to find items by a particular author, select Author.
b. Select a constraint in the constraint list.
c. Type the constraint in the text box. For example, to search for items by
authors named Alex, select Contains in the constraint list, and then type
Alex in the text box.
d. If you want to add more constraints, select And or Or in the constraint
modifier list, and then repeat these steps.

62
4. If you want to also search for items by date, complete the following steps:
a. Under Search by date, select Modified or Created.
b. Click the unit of time list and select a unit.
c. Type the number of previous units by which you want to search in the
amount of time box.
5. When you finish, click Search.
63
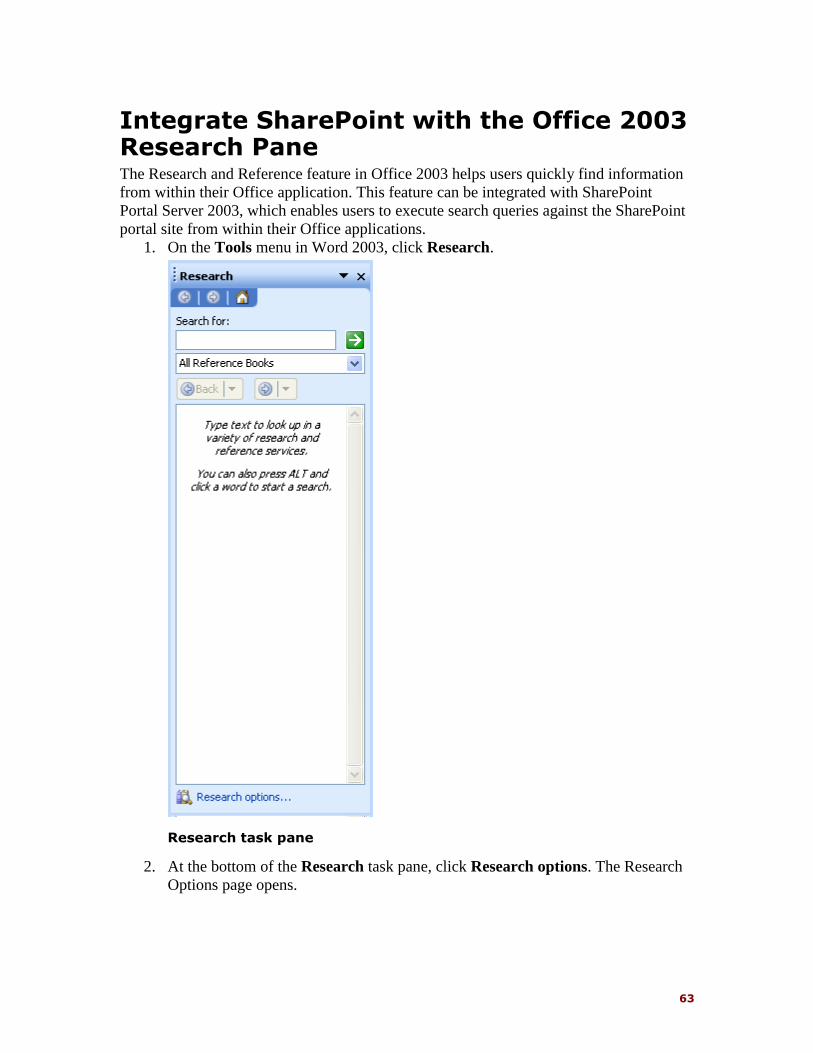
Integrate SharePoint with the Office 2003 Research Pane The Research and Reference feature in Office 2003 helps users quickly find information
from within their Office application. This feature can be integrated with SharePoint
Portal Server 2003, which enables users to execute search queries against the SharePoint
portal site from within their Office applications.
1. On the Tools menu in Word 2003, click Research.
Research task pane
2. At the bottom of the Research task pane, click Research options. The Research
Options page opens.
64
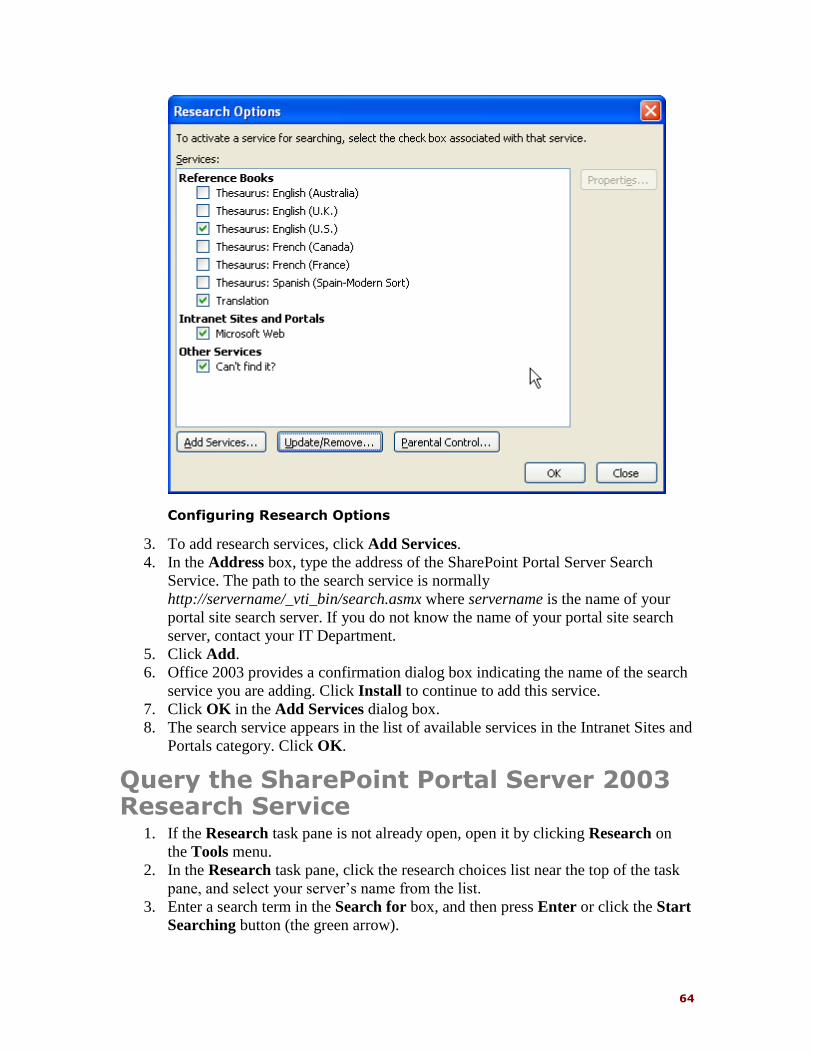
Configuring Research Options
3. To add research services, click Add Services.
4. In the Address box, type the address of the SharePoint Portal Server Search
Service. The path to the search service is normally
http://servername/_vti_bin/search.asmx where servername is the name of your
portal site search server. If you do not know the name of your portal site search
server, contact your IT Department.
5. Click Add.
6. Office 2003 provides a confirmation dialog box indicating the name of the search
service you are adding. Click Install to continue to add this service.
7. Click OK in the Add Services dialog box.
8. The search service appears in the list of available services in the Intranet Sites and
Portals category. Click OK.
Query the SharePoint Portal Server 2003 Research Service
1. If the Research task pane is not already open, open it by clicking Research on
the Tools menu.
2. In the Research task pane, click the research choices list near the top of the task
pane, and select your server’s name from the list.
3. Enter a search term in the Search for box, and then press Enter or click the Start
Searching button (the green arrow).

65
Research results from a SharePoint portal site
4. The search results from the SharePoint Portal Server 2003 server appear in the
search results section of the Research task pane. To open an item from the
results, click the link to the document from the results list.
5. You may see a security warning. Click OK to open the file.
6. The file opens for editing from the source location.
66
Conclusion This white paper provides an introduction to the features and capabilities of SharePoint
Portal Server 2003. SharePoint Products and Technologies offer a variety of additional
features and customizations available to users, Web designers, content managers, and
administrators. These include the ability to create highly customized solutions that are
relevant to your particular tasks and business needs.
For more information on SharePoint Portal Server features and capabilities, visit the
SharePoint Products and Technologies Web site.
67
The information contained in this document represents the current view of Microsoft Corporation
on the issues discussed as of the date of publication. Because Microsoft must respond to
changing market conditions, it should not be interpreted to be a commitment on the part of
Microsoft, and Microsoft cannot guarantee the accuracy of any information presented after the
date of publication.
This White Paper is for informational purposes only. MICROSOFT MAKES NO
WARRANTIES, EXPRESS, IMPLIED OR STATUTORY, AS TO THE INFORMATION IN
THIS DOCUMENT.
Complying with all applicable copyright laws is the responsibility of the user. Without limiting
the rights under copyright, no part of this document may be reproduced, stored in or introduced
into a retrieval system, or transmitted in any form or by any means (electronic, mechanical,
photocopying, recording, or otherwise), or for any purpose, without the express written
permission of Microsoft Corporation.
Microsoft may have patents, patent applications, trademarks, copyrights, or other intellectual
property rights covering subject matter in this document. Except as expressly provided in any
written license agreement from Microsoft, the furnishing of this document does not give you any
license to these patents, trademarks, copyrights, or other intellectual property.
Unless otherwise noted, the example companies, organizations, products, domain names, e-mail
addresses, logos, people, places, and events depicted herein are fictitious, and no association with
any real company, organization, product, domain name, e-mail address, logo, person, place, or
event is intended or should be inferred.
2004 Microsoft Corporation. All rights reserved.
Microsoft, FrontPage, Outlook, PivotChart, PowerPoint, SharePoint, and Windows are either
registered trademarks or trademarks of Microsoft Corporation in the United States and/or other
countries.
The names of actual companies and products mentioned herein may be the trademarks of their
respective owners.