tips and tricks to increase productivity in microsoft...
TRANSCRIPT

Tips and Tricks to Increase Productivity in Microsoft Word

Tips and Tricks to Increase Productivity in Word 2
www.m-e-p.com
Tips and Tricks to Increase Productivity in Microsoft Word
Contents
Customizing the Ribbon .................................................................................................. 3
Customize the Quick Access Toolbar.............................................................................. 4
Quick Parts ...................................................................................................................... 5
Format Painter ................................................................................................................ 6
Headers and Footers ....................................................................................................... 7
Screenshot Tool .............................................................................................................. 8
Remove Image Background ............................................................................................ 9
Use Wrap Points with Images ....................................................................................... 11

Tips and Tricks to Increase Productivity in Word 3
www.m-e-p.com
Customizing the Ribbon
Do you ever wish you had your favorite … and “most used commands” front and center where you like them? For example, on the Home tab, the Styles section takes up a lot of space. If you don’t use it very much, you could eliminate that whole section and move other commands to the Home tab that you use every day.
To make changes to what is displayed on any tab in Word, go to File > Options and click on the
Customize ribbon choice. A window will open as in the example below. Here you can:
Choose from the Word commands where you want them placed on different tabs.
Create a new Tab to fill with
Rearrange the commands that are on current tabs so that they are more convenient for
you.
Use the Add and Remove buttons to transfer the commands to new and different tabs.

Tips and Tricks to Increase Productivity in Word 4
www.m-e-p.com
Customize the Quick Access Toolbar
You learned above how to customize the different tabs in the ribbons to display what you want to view, but you may not be aware of another way to customize your programs so that you can get your work done more quickly… and it’s really right in front of your nose! It’s called the Quick Access Toolbar – and it’s part of Word (and also Excel, PowerPoint and Outlook).
If you’ve ever noticed those tiny icons in the top left of your screen — that’s what we’re referring to. If you think they are a static part of these programs — think again! You can customize the commands to what you want to use so that no matter what tab you’re working in, you’ll have your favorite functions right there in front of you. And it’s really easy!
By default the Quick Access Toolbar shows the Save, Undo, and Repeat options. You can change these or add other commands to make it more convenient for you.
To add new commands to your Quick Access Toolbar there are a few different ways to do this.
Add from the Quick Access Toolbar
Click on the downward arrow in the very right of the
toolbar.
Pick from the list of frequently used options by
clicking on them to add a checkmark. Click any that
are already checked to remove them.
The new command icon will now appear in your
toolbar.
If you don’t see the one in the list that you want to
add, click More Commands.
The options window will open. You can now select
commands from the list and click the Add button to
move them over to the Quick Access Toolbar.
Use the dropdown list under “Choose commands from” to find commands from different tabs on the ribbon.

Tips and Tricks to Increase Productivity in Word 5
www.m-e-p.com
Add from the Command on the Ribbon
Just like in customizing the Ribbon, you can add commands to your toolbar:
Go to the tab where the command is
displayed, hover over it, right-click and
choose Add to Quick Access Toolbar. That’s it!
Not all commands can be added to the toolbar,
but most that you use regularly can be.
In the example to the left, we added Format Painter and Find. And also Insert Picture and Word Count. Play around with this in each of your Office programs to make it as custom as the work that you do!
Quick Parts
Do you ever create Word documents that have content of a repetitive in nature? If you seem to be typing the same or similar content on a regular basis and different types of documents, you can use Quick Parts to save some time. In Word 2010 & 2013, Quick Parts is a feature that lets you save all, or pieces of a document, that you use regularly. It can contain text, images, tables, etc… most anything you can put in a normal document.
To set up your Quick Part, type the content in a
document that you want to save. It can create
text, images, tables, etc…
Highlight the content you want to save to be able
to insert into future documents
Go to the Insert tab, and on the Text section, click
the Quick Part button and drop down to Save Selection to Quick Part Gallery.
Name the Quick Part so that you can identify it

Tips and Tricks to Increase Productivity in Word 6
www.m-e-p.com
later and provide a description.
You can even add new categories. This will help you in the future to find your Quick
Part if you have created several.
Click OK to save it.
To use the Quick Part in an document in the future:
In a Word document, put your cursor in the text area where you want the content to be
added.
Go to the Insert tab and choose Quick Parts. Select the template that you created and
the content will be pasted into your document.
Format Painter
If you’ve ever formatted text just right and then wanted to apply that look to other parts of your document, you may have spent a lot of time clicking to bold, italicize, change font color and size, etc…
Instead of going back to each heading or bulleted list and making several different formatting changes, you can use the Format Painter and literally paint formats to text in your document.
For example, maybe you like your headings to use Small Caps, bold, and a certain shade of blue like this:
THIS IS THE HEADING
Instead of going through each additional heading in the document and applying 3 different formats manually, you can dramatically cut the time it takes for you by using Format Painter.
The Format Painter copies all the format of something you like (such as the type of font, italics, and underlining) and applies it, or “paints” it to other text.
How to Use the Format Painter
Set up the first item the way you want it. Then use the Format Painter for the rest.
To make ONE change at a time in your document:
Highlight the style (or look) you want to copy.

Tips and Tricks to Increase Productivity in Word 7
www.m-e-p.com
Click the Format Painter icon (a picture of a paint brush) in your tool bar on the Home
tab in the Clipboard section. This turns the Format Painter ON to change one item.
Next, find the text to which you want to apply the format. Click anywhere on the word
and it will change the formatting — automatically.
To make MORE THAN ONE change at a time in your document:
Highlight the style (or look) you want to copy.
Double click the Format Painter icon in your tool bar. This turns the Format Painter ON
for the entire paint job.
Next, find the word (or words) to which you want to apply the format. Click anywhere
on the text and it will change the formatting — again, automatically.
Continue clicking on items until all of the text you want to format has been “painted”.
When you’re finished with all the changes, click on Format Painter once again to turn it
OFF.
The difference is if you single-click on the Format Painter icon, you will only be able to “paint” a single item and by double-clicking the icon, you apply that format to multiple items or sections of text.
Headers and Footers
You may be a pro at adding a Header or Footer to your document. All you do is double click in the upper header area or lower footer area and the Header/Footer tab opens. It has wonderful options for adding titles, page numbers, etc... and even provides templates. But what if you have a document that has many pages and you want to vary the Header or Footer (or both)? You may have a report with several sections or chapters and you want to put the Chapter name in the footer instead of having the same footer throughout. One tiny piece of info opens this option up for you. The key is to insert Section breaks into your document and then each section can be individualized.
At the end of the page where you want a different Footer or Header on the next page, go to the Page Layout tab, in the Page Setup section, click on the drop down arrow by Breaks and choose Next Page under Section Breaks

Tips and Tricks to Increase Productivity in Word 8
www.m-e-p.com
Next, click on the Header on the second page and then click on the Link to Previous button in the ribbon to unlink it. Once it has been unlinked you can create a new header without affecting the one in the document on prior pages. (Repeat this step for the footer). You can create as many section breaks in your document as you need.
Screenshot Tool
You don’t need special software to take screenshots if you have Word! In the newer versions this cool option has been built in. Use it to take a picture of a program or document that you have open on your computer, and then save it like an image, or use it in your Word document. To Create a Screenshot of a whole page or program:
Make sure that whatever you are taking a picture of is open (a program, website page
or document) and your Word program.
Click the Insert tab and select the down arrow on the Screenshot button in the
Illustrations section.
Thumbnail images of the programs and documents you have open on your desktop will
be displayed. Click the image you would like.
The picture will be inserted instantly into your Word document. You can use the image
formatting tools to crop, resize, add borders, etc…
To Create a Screen Clipping (only part of a window, program, webpage, etc):
Open the program, website page or document that you would like to capture and your Word program. Make sure every other program or document is minimized in the tool bar.

Tips and Tricks to Increase Productivity in Word 9
www.m-e-p.com
Click the Insert tab and select the down arrow on the Screenshot button in the Illustrations section.
Underneath the thumbnail images of open programs and documents, choose the Screen Clipping button.
Click and drag your mouse across the area of the window that you want to capture. The Screen Clipping tool will display the window you have open right underneath the Word document.
Again, the picture will be inserted instantly into your Word document. You can use the image formatting tools to make changes.
Remove Image Background
If you’ve ever found yourself working with images and just don’t like the background, but don’t have high-end software to modify the image – you can now do it right in Word! It lets you easily take away portions of the image with a few clicks… without additional editing software. For example, you may need to create a poster for an event, update a company brochure or simply add some pizzazz to a report. Including images in these documents can be done easily, but getting a little creative with the graphics can add more impact for your readers. Go from this………… to this with a few clicks! Now you can put Fido in a field, or on the beach!
Tips and Tricks to Increase Productivity in Word 10
www.m-e-p.com
Remove the Background
Why would you want to remove the background from a picture? Maybe you want to:
Isolate the image on a white canvas.
Change the background color.
Strip out an unwanted background scene.
With a Word document open:
Go to the Insert tab and choose Picture (if you have an image saved in your files) or
Clip Art (if you want to use an image from the Microsoft library).
With the image showing in your document, double-click on it to
open the Picture Tools, Format tab.
In the very far left of the tool bar is the Remove Background
option, click on this option to begin the process.
Word will try to determine what the “background” of your
image is and will turn that part of the image pink.
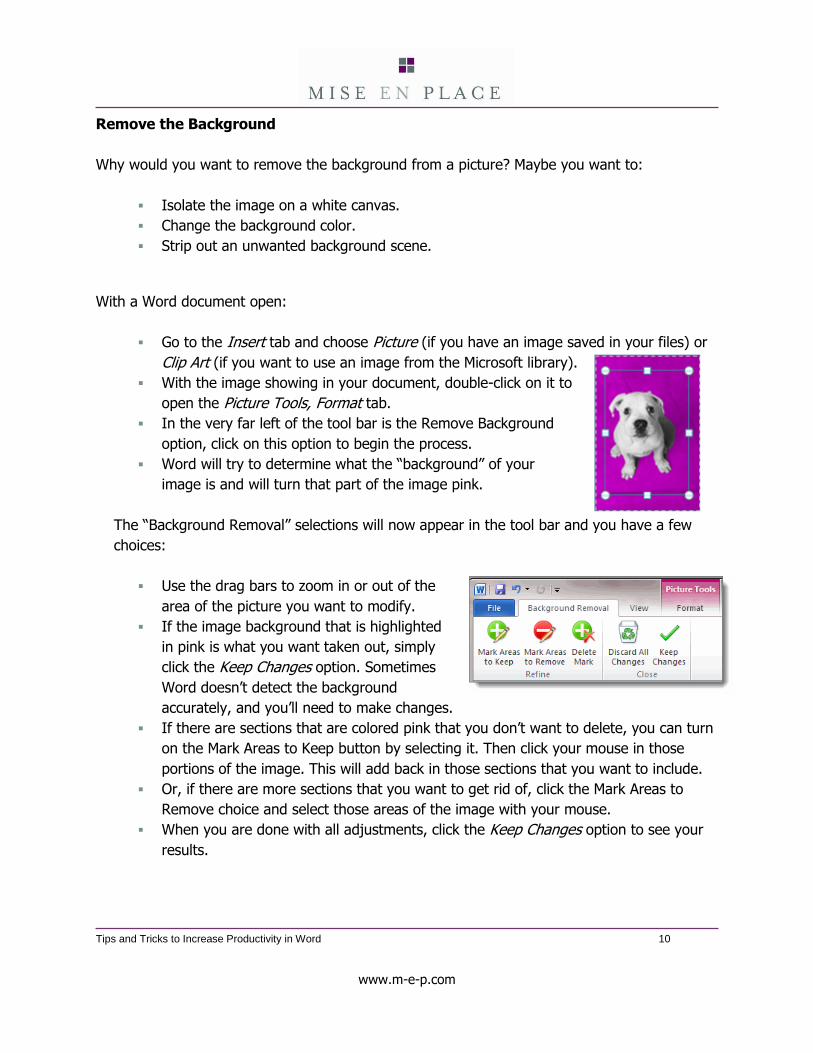
The “Background Removal” selections will now appear in the tool bar and you have a few
choices:
Use the drag bars to zoom in or out of the
area of the picture you want to modify.
If the image background that is highlighted
in pink is what you want taken out, simply
click the Keep Changes option. Sometimes
Word doesn’t detect the background
accurately, and you’ll need to make changes.
If there are sections that are colored pink that you don’t want to delete, you can turn
on the Mark Areas to Keep button by selecting it. Then click your mouse in those
portions of the image. This will add back in those sections that you want to include.
Or, if there are more sections that you want to get rid of, click the Mark Areas to
Remove choice and select those areas of the image with your mouse.
When you are done with all adjustments, click the Keep Changes option to see your
results.

Tips and Tricks to Increase Productivity in Word 11
www.m-e-p.com
Use Wrap Points with Images
Have you ever wanted to give the images in your documents a special look with overlaid text that ordinarily a professional designer with special software could do? You may have tried to create this affect by layering text boxes and using the space bar to inch the characters over manually, but that doesn’t always give you the look you are trying to create. With a cool feature in Word, you can use “wrap points” so that your text flows either INSIDE or OUTSIDE your image. For example, in the example to the right, because of wrap points, the text can actually flow on top of the image without the use of layering a text box on top of the graphic. Image Wrap Points When you want the text to flow around an image in your document, use Wrap Points. By adjusting the controls, called nodes, you can customize how the text looks on one or all sides of the image.
Start by adding an image to your document.
With the image highlighted, on the Pictures Tools
Format tab, in the Arrange section, click the down
arrow under Wrap text. Choose either Square or
Tight.
Then go back to that same drop down window and
click the Edit Wrap Points option.
NOTE: Edit Wrap Points will be grayed out if you don’t
first select either Square or Tight — it only works with
these two options.
The lines around the image will turn red and the
corners will turn into black boxes. These are the nodes
to control how the text wraps.
Click on any of the nodes and drag left, right, up or
down to customize how close you want the text to
wrap around the image.

Tips and Tricks to Increase Productivity in Word 12
www.m-e-p.com
To refine the wrapping even more, add more nodes by clicking anywhere in the red
lines to add a node and then drag the line to define the new definition of the image.
When you’re done, click outside the image area and the nodes will disappear.
If you want to go back a make changes, go back to the Format, Edit Shape and Edit
Wrap Points option.
Visit www.m-e-p.com for more productivity tips, workshops and events. Or call Ann Michael Henry directly at 585.924.8470 for a custom productivity presentation for your organization