tips for style sheets and flash objects in xfa forms - assure
TRANSCRIPT
ADEP Designer - Style Sheets
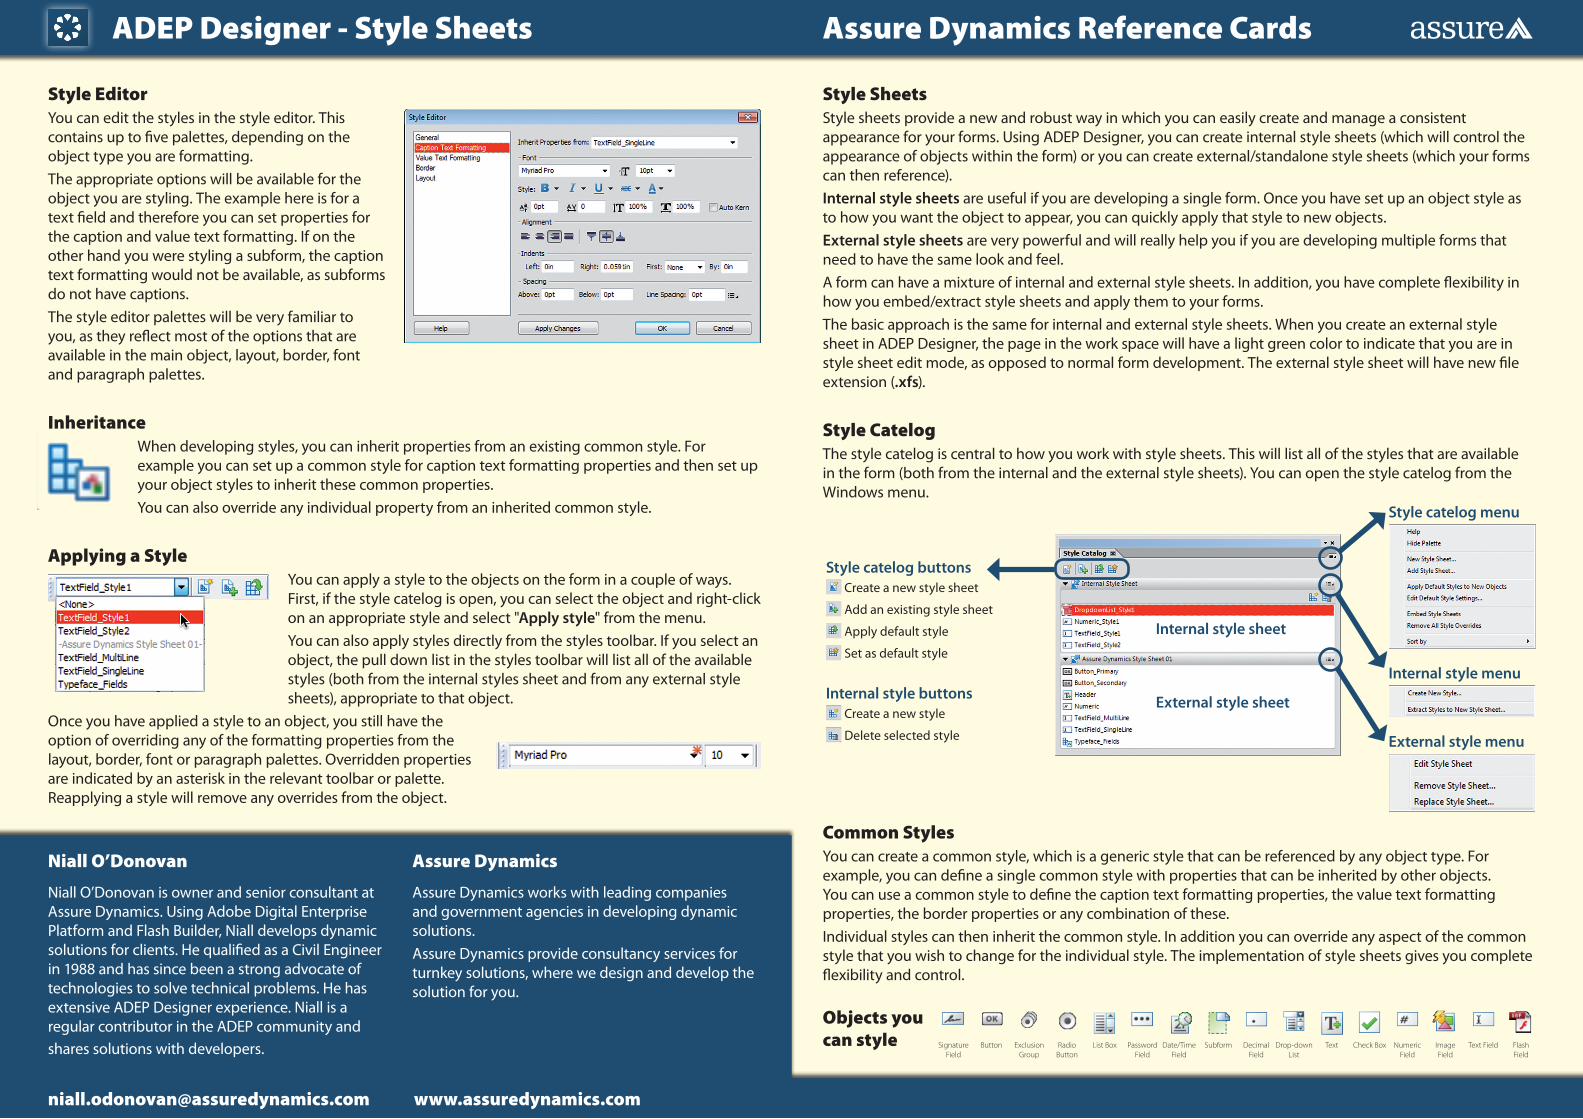
Style EditorYou can edit the styles in the style editor. This contains up to five palettes, depending on the object type you are formatting. The appropriate options will be available for the object you are styling. The example here is for a text field and therefore you can set properties for the caption and value text formatting. If on the other hand you were styling a subform, the caption text formatting would not be available, as subforms do not have captions. The style editor palettes will be very familiar to you, as they reflect most of the options that are available in the main object, layout, border, font and paragraph palettes.
Inheritance When developing styles, you can inherit properties from an existing common style. For example you can set up a common style for caption text formatting properties and then set up your object styles to inherit these common properties. You can also override any individual property from an inherited common style.
Applying a StyleYou can apply a style to the objects on the form in a couple of ways. First, if the style catelog is open, you can select the object and right-click on an appropriate style and select "Apply style" from the menu. You can also apply styles directly from the styles toolbar. If you select an object, the pull down list in the styles toolbar will list all of the available styles (both from the internal styles sheet and from any external style sheets), appropriate to that object.
Once you have applied a style to an object, you still have the option of overriding any of the formatting properties from the layout, border, font or paragraph palettes. Overridden properties are indicated by an asterisk in the relevant toolbar or palette. Reapplying a style will remove any overrides from the object.
Style SheetsStyle sheets provide a new and robust way in which you can easily create and manage a consistent appearance for your forms. Using ADEP Designer, you can create internal style sheets (which will control the appearance of objects within the form) or you can create external/standalone style sheets (which your forms can then reference). Internal style sheets are useful if you are developing a single form. Once you have set up an object style as to how you want the object to appear, you can quickly apply that style to new objects. External style sheets are very powerful and will really help you if you are developing multiple forms that need to have the same look and feel. A form can have a mixture of internal and external style sheets. In addition, you have complete flexibility in how you embed/extract style sheets and apply them to your forms. The basic approach is the same for internal and external style sheets. When you create an external style sheet in ADEP Designer, the page in the work space will have a light green color to indicate that you are in style sheet edit mode, as opposed to normal form development. The external style sheet will have new file extension (.xfs).
Style CatelogThe style catelog is central to how you work with style sheets. This will list all of the styles that are available in the form (both from the internal and the external style sheets). You can open the style catelog from the Windows menu.
Style catelog menu
Internal style menu
External style menu
Internal style sheet
External style sheet
Style catelog buttons
Internal style buttons
Create a new style sheet
Add an existing style sheet
Apply default style
Set as default style
Create a new style
Delete selected style
[email protected] www.assuredynamics.com
Niall O’Donovan
Niall O’Donovan is owner and senior consultant at Assure Dynamics. Using Adobe Digital Enterprise Platform and Flash Builder, Niall develops dynamic solutions for clients. He qualified as a Civil Engineer in 1988 and has since been a strong advocate of technologies to solve technical problems. He has extensive ADEP Designer experience. Niall is a regular contributor in the ADEP community and shares solutions with developers.
Assure Dynamics
Assure Dynamics works with leading companies and government agencies in developing dynamic solutions. Assure Dynamics provide consultancy services for turnkey solutions, where we design and develop the solution for you.
Assure Dynamics Reference Cards
Objects you can style
Common Styles You can create a common style, which is a generic style that can be referenced by any object type. For example, you can define a single common style with properties that can be inherited by other objects. You can use a common style to define the caption text formatting properties, the value text formatting properties, the border properties or any combination of these. Individual styles can then inherit the common style. In addition you can override any aspect of the common style that you wish to change for the individual style. The implementation of style sheets gives you complete flexibility and control.
SignatureField
Button Exclusion Group
Radio Button
List Box Password Field
Date/Time Field
Subform Decimal Field
Drop-down List
Text Check Box Numeric Field
Image Field
Text Field Flash Field

ADEP Designer - Setting up a form for Flash Flash Builder 4.5.0
Basic setup in ADEP Designer
Make sure that you open your form in ADEP Designer (version 10 or above). The Flash object is not available in earlier versions of Designer.
Essentials: • In the File > Form Properties > Defaults set the Target Version to 10.0 or later. Users will need either
Acrobat X or Adobe Reader X (version 10.1.0 or later) to properly view the form. • Save the form as a Dynamic XML Form in the save-as dialog. • Drag a Flash object onto the form and associate with a swf file. In the Object > Field palette, tick Embed
Flash Data. • Size the Flash object to the same aspect ratio as the dimensions of the swf in Flash Builder. • Setup the Flash object as you want it to appear on the form. For example, when how the swf is
activated, deactivated and if it is to appear in a floating window. • Setup a script object, in which you can place functions to communicate with the swf. This will centralise
your script and you can then decide which objects in your form will call the functions.
Basic setup in Flash Builder
Flash Builder 4.5.0 is the official supported version for developing Flash assets (.swf) for ADEP Designer’s Flash object.
Essentials: • If using Flash Builder 4.5.1, make sure you set the Flex Compiler to Flex 4.5.0. • Set the Flex Build Path to Merged into code. This will package all of your code into the .swf. • Include an applicationComplete line to re-size the swf, as the user re-sizes/zooms the PDF:
• You will use ActionScript in Flash Builder to create functions that will communicate with the XFA form.
<s:Application applicationComplete="stage.scaleMode = StageScaleMode.EXACT_FIT;" ... />
Setting up ADEP Designer to send data to the embedded Flash asset (swf)
Once the swf is activated, it will fire its creationComplete script and the updateName() function will be registered in the XFA form. Note:• The Flash object’s classname is exObject. You can invoke the registered function in the swf, using this
script:
• In this script, FlashField is the name of the Flash object. updateName is the function in the swf and empDetails is the single parameter that the function is expecting.
Developing the swf in Flash Builder to receive data from the XFA form
You need to include script in the swf that allows the communication between the XFA form and the swf. You use the ExternalInterface.addCallback() to register the functions: • For example, within the swf we have a function updateName(). In order for the XFA form to see and call
the function, we first need to register it. The following is run at creationComplete:
• The ExternalInterface.addCallback() has two parameters: the first parameter is the name that the XFA form will use to call the function. The second parameter is the name of the function within the swf. For simplicity, we have used the same name in the XFA form and in the swf.
private function start():void { // Setup interface: registering the swf updateName function in the form ExternalInterface.addCallback("updateName" , updateName);}
// Call the registered swf function updateName and pass data
FlashField.ui.exObject.invoke("updateName", empDetails);
Setting up ADEP Designer to receive data from the embedded Flash asset (swf)
The swf will call the photo function and pass through the two parameters from the swf. You can then use this data to update objects in your form:• The parameters have the same name as those used in the swf’s ExternalInterface.call(), but that is just
for convenience. We could have used different names for the parameters in the XFA form.
Developing the swf in Flash Builder to send data to the XFA form
To push data back into the XFA form, you will need to use the ExternalInterface.call() to fire the script in the form: • For example, the following ActionScript function calls the photo function that is in the comms script
object, in the XFA form. The photo function in the XFA form is expecting two parameters:
• Note that you can use a relative reference to the function (photo) in the XFA form’s script object (comms).
private function sendPic():void { ExternalInterface.call("comms.photo" , encodedPhoto, encodedQR);}
function photo(encodedPhoto, encodedQR) {
yourPhoto.rawValue = encodedPhoto;
yourQRCode.rawValue = encodedQR;
} // End of function
www.assuredynamics.com