tiu/asu implementation guide - united states … · 2017-03-22 · tiu/asu implementation guide...
TRANSCRIPT

TIU/ASU
Implementation Guide
August 1999 Revised March 2017
Product Development Office of Information Technology Department of Veterans Affairs
ii Text Integration Utilities V. 1.0 Rev. March 2017
Implementation Guide
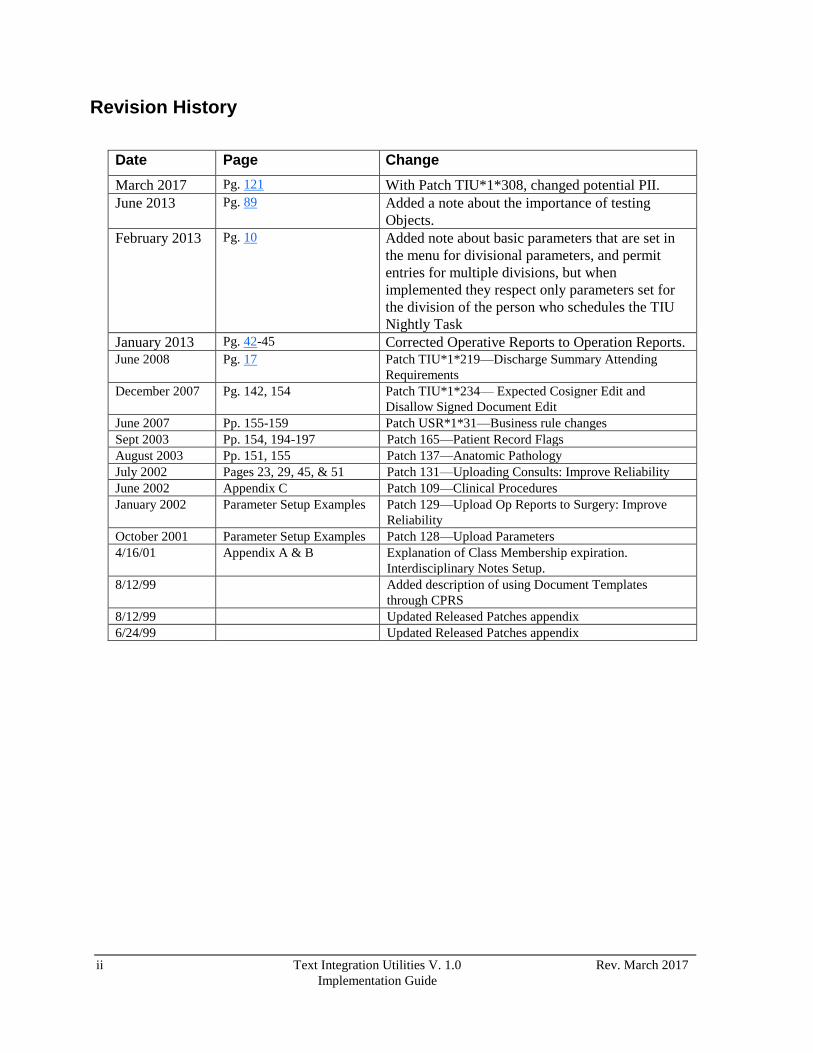
Revision History
Date Page Change
March 2017 Pg. 121 With Patch TIU*1*308, changed potential PII.
June 2013 Pg. 89 Added a note about the importance of testing
Objects.
February 2013 Pg. 10 Added note about basic parameters that are set in
the menu for divisional parameters, and permit
entries for multiple divisions, but when
implemented they respect only parameters set for
the division of the person who schedules the TIU
Nightly Task
January 2013 Pg. 42-45 Corrected Operative Reports to Operation Reports. June 2008 Pg. 17 Patch TIU*1*219—Discharge Summary Attending
Requirements
December 2007 Pg. 142, 154 Patch TIU*1*234— Expected Cosigner Edit and
Disallow Signed Document Edit
June 2007 Pp. 155-159 Patch USR*1*31—Business rule changes
Sept 2003 Pp. 154, 194-197 Patch 165—Patient Record Flags
August 2003 Pp. 151, 155 Patch 137—Anatomic Pathology
July 2002 Pages 23, 29, 45, & 51 Patch 131—Uploading Consults: Improve Reliability
June 2002 Appendix C Patch 109—Clinical Procedures
January 2002 Parameter Setup Examples Patch 129—Upload Op Reports to Surgery: Improve
Reliability
October 2001 Parameter Setup Examples Patch 128—Upload Parameters
4/16/01 Appendix A & B Explanation of Class Membership expiration.
Interdisciplinary Notes Setup.
8/12/99 Added description of using Document Templates
through CPRS
8/12/99 Updated Released Patches appendix
6/24/99 Updated Released Patches appendix
i Text Integration Utilities V. 1.0 Rev January 2013
Implementation Guide
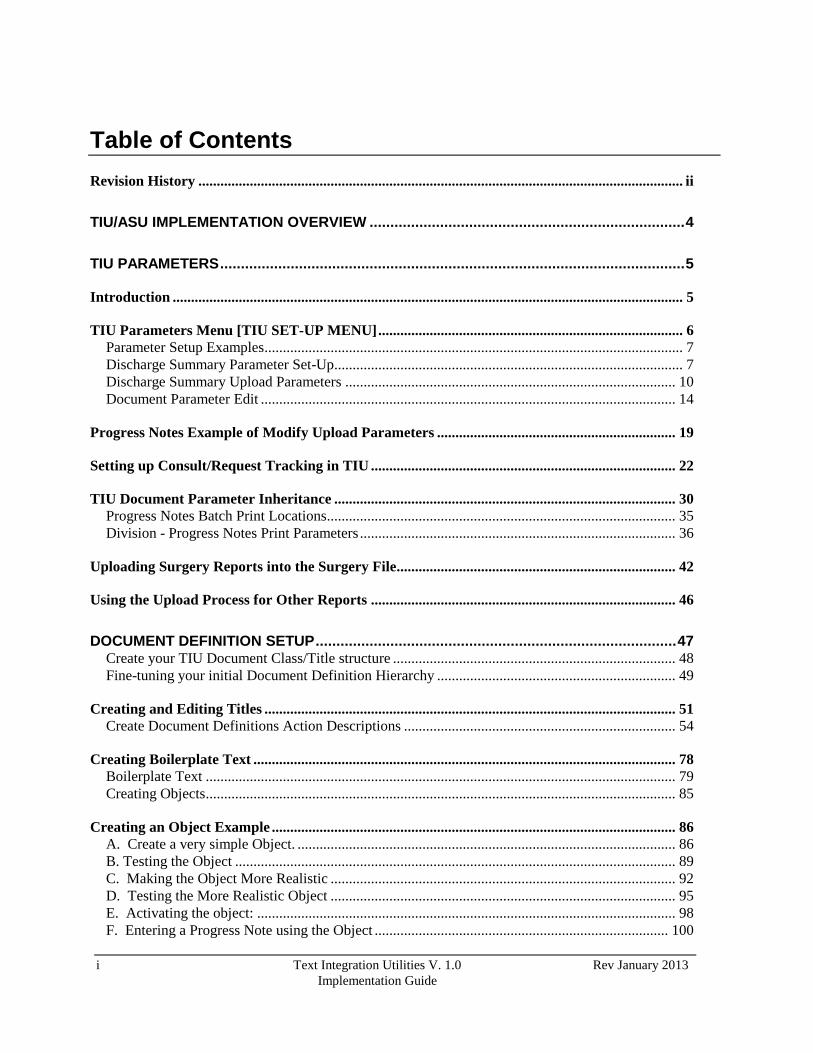
Table of Contents
Revision History .................................................................................................................................... ii
TIU/ASU IMPLEMENTATION OVERVIEW ............................................................................ 4
TIU PARAMETERS ................................................................................................................ 5
Introduction ........................................................................................................................................... 5
TIU Parameters Menu [TIU SET-UP MENU] ................................................................................... 6 Parameter Setup Examples .................................................................................................................. 7 Discharge Summary Parameter Set-Up ............................................................................................... 7 Discharge Summary Upload Parameters .......................................................................................... 10 Document Parameter Edit ................................................................................................................. 14
Progress Notes Example of Modify Upload Parameters ................................................................. 19
Setting up Consult/Request Tracking in TIU ................................................................................... 22
TIU Document Parameter Inheritance ............................................................................................. 30 Progress Notes Batch Print Locations............................................................................................... 35 Division - Progress Notes Print Parameters ...................................................................................... 36
Uploading Surgery Reports into the Surgery File............................................................................ 42
Using the Upload Process for Other Reports ................................................................................... 46
DOCUMENT DEFINITION SETUP ....................................................................................... 47 Create your TIU Document Class/Title structure ............................................................................. 48 Fine-tuning your initial Document Definition Hierarchy ................................................................. 49
Creating and Editing Titles ................................................................................................................ 51 Create Document Definitions Action Descriptions .......................................................................... 54
Creating Boilerplate Text ................................................................................................................... 78 Boilerplate Text ................................................................................................................................ 79 Creating Objects ................................................................................................................................ 85
Creating an Object Example .............................................................................................................. 86 A. Create a very simple Object. ....................................................................................................... 86 B. Testing the Object ........................................................................................................................ 89 C. Making the Object More Realistic .............................................................................................. 92 D. Testing the More Realistic Object .............................................................................................. 95 E. Activating the object: .................................................................................................................. 98 F. Entering a Progress Note using the Object ................................................................................ 100
2 Text Integration Utilities V. 1.0 Rev. March 2017
Implementation Guide
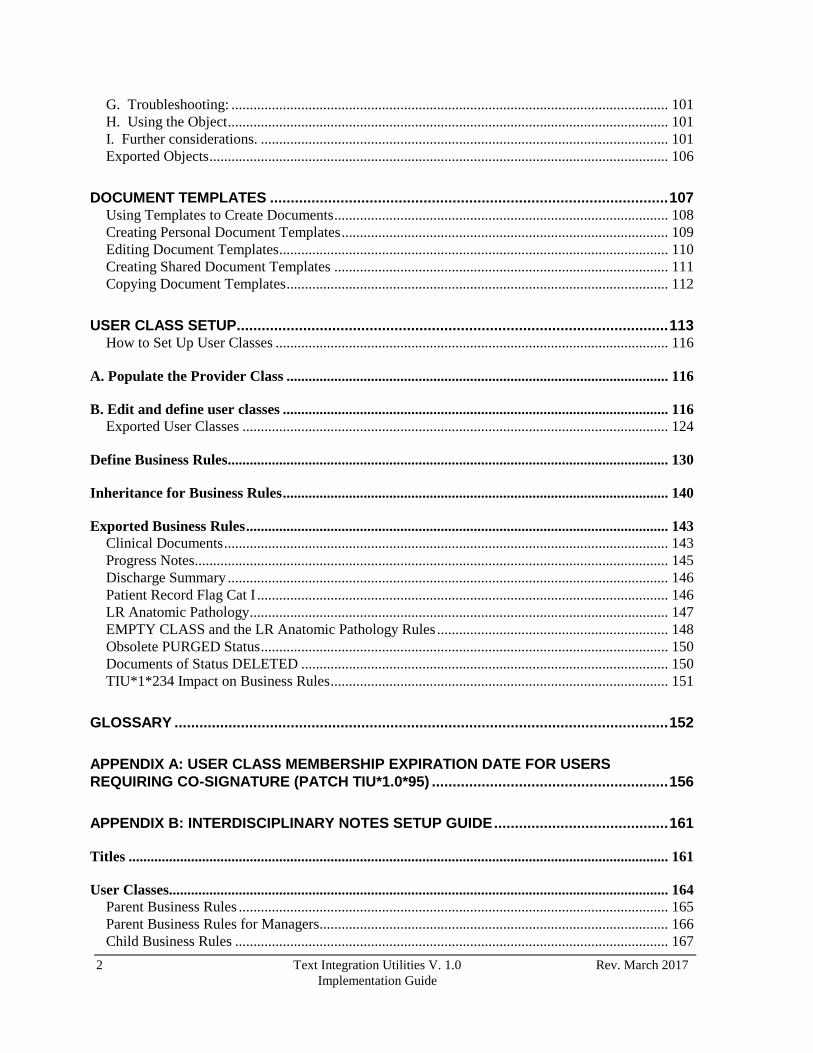
G. Troubleshooting: ....................................................................................................................... 101 H. Using the Object ........................................................................................................................ 101 I. Further considerations. ............................................................................................................... 101 Exported Objects ............................................................................................................................. 106
DOCUMENT TEMPLATES ................................................................................................ 107 Using Templates to Create Documents ........................................................................................... 108 Creating Personal Document Templates ......................................................................................... 109 Editing Document Templates .......................................................................................................... 110 Creating Shared Document Templates ........................................................................................... 111 Copying Document Templates ........................................................................................................ 112
USER CLASS SETUP ........................................................................................................ 113 How to Set Up User Classes ........................................................................................................... 116
A. Populate the Provider Class ........................................................................................................ 116
B. Edit and define user classes ......................................................................................................... 116 Exported User Classes .................................................................................................................... 124
Define Business Rules........................................................................................................................ 130
Inheritance for Business Rules ......................................................................................................... 140
Exported Business Rules ................................................................................................................... 143 Clinical Documents ......................................................................................................................... 143 Progress Notes................................................................................................................................. 145 Discharge Summary ........................................................................................................................ 146 Patient Record Flag Cat I ................................................................................................................ 146 LR Anatomic Pathology .................................................................................................................. 147 EMPTY CLASS and the LR Anatomic Pathology Rules ............................................................... 148 Obsolete PURGED Status ............................................................................................................... 150 Documents of Status DELETED .................................................................................................... 150 TIU*1*234 Impact on Business Rules ............................................................................................ 151
GLOSSARY ....................................................................................................................... 152
APPENDIX A: USER CLASS MEMBERSHIP EXPIRATION DATE FOR USERS
REQUIRING CO-SIGNATURE (PATCH TIU*1.0*95) ......................................................... 156
APPENDIX B: INTERDISCIPLINARY NOTES SETUP GUIDE .......................................... 161
Titles ................................................................................................................................................... 161
User Classes........................................................................................................................................ 164 Parent Business Rules ..................................................................................................................... 165 Parent Business Rules for Managers............................................................................................... 166 Child Business Rules ...................................................................................................................... 167

Rev. March 2017 Text Integration Utilities V. 1.0 3
Implementation Guide
Unsigned Child Notes ..................................................................................................................... 168 Child Business Rules for Managers ................................................................................................ 169 TIU Parameters ............................................................................................................................... 170 Example Interdisciplinary Note ...................................................................................................... 172
Additional Considerations ................................................................................................................ 176
APPENDIX C: CLINICAL PROCEDURES SETUP GUIDE ................................................ 179 Related Manuals .............................................................................................................................. 180 Relation of TIU, Consults and Clinical Procedures ........................................................................ 180
TIU/Clinical Procedures Setup ........................................................................................................ 180
Business Rules .................................................................................................................................... 185
Role of the Interpreter ...................................................................................................................... 187
APPENDIX D: PATIENT RECORD FLAGS ....................................................................... 189 National and Local Flags ................................................................................................................ 189 Documenting PRF ........................................................................................................................... 189 Category I Implementation .............................................................................................................. 190 Consider Category II flags .............................................................................................................. 192 Reviewing Flags .............................................................................................................................. 193
INDEX ................................................................................................................................ 194
4 Text Integration Utilities V. 1.0 Rev. March 2017
Implementation Guide
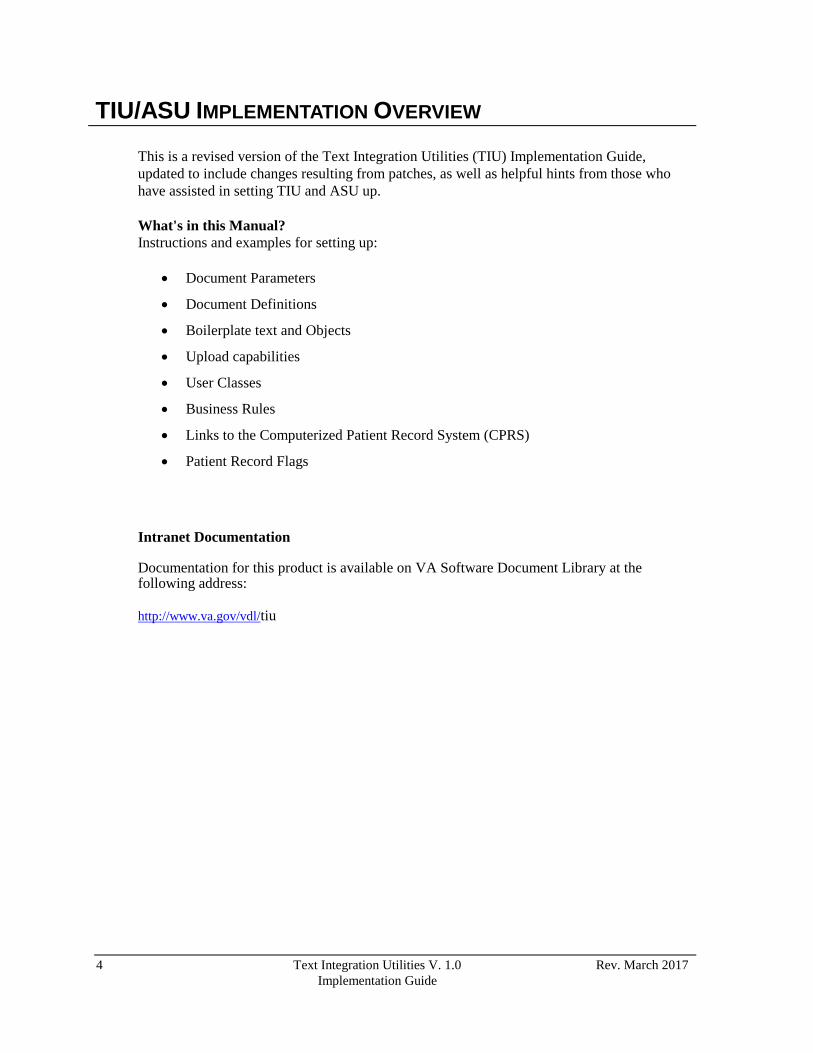
TIU/ASU IMPLEMENTATION OVERVIEW
This is a revised version of the Text Integration Utilities (TIU) Implementation Guide,
updated to include changes resulting from patches, as well as helpful hints from those who
have assisted in setting TIU and ASU up.
What's in this Manual?
Instructions and examples for setting up:
Document Parameters
Document Definitions
Boilerplate text and Objects
Upload capabilities
User Classes
Business Rules
Links to the Computerized Patient Record System (CPRS)
Patient Record Flags
Intranet Documentation Documentation for this product is available on VA Software Document Library at the following address:
http://www.va.gov/vdl/tiu
Rev. March 2017 Text Integration Utilities V. 1.0 5
Implementation Guide
TIU PARAMETERS
Introduction Options on the TIU IRM Maintenance Menu let IRMS Staff set and modify the various
parameters controlling the behavior of the Text Integration Utilities Package, as well as the
definition of TIU documents. TIU is exported with default settings for many of the parameters,
which may be sufficient for your site to get started. Review the parameter settings to see if they
meet your site’s needs.
This menu also contains sub-menus and options for managing the Document Definition
hierarchy and for managing User Classes and Business Rules.
These options are described in the following sections.
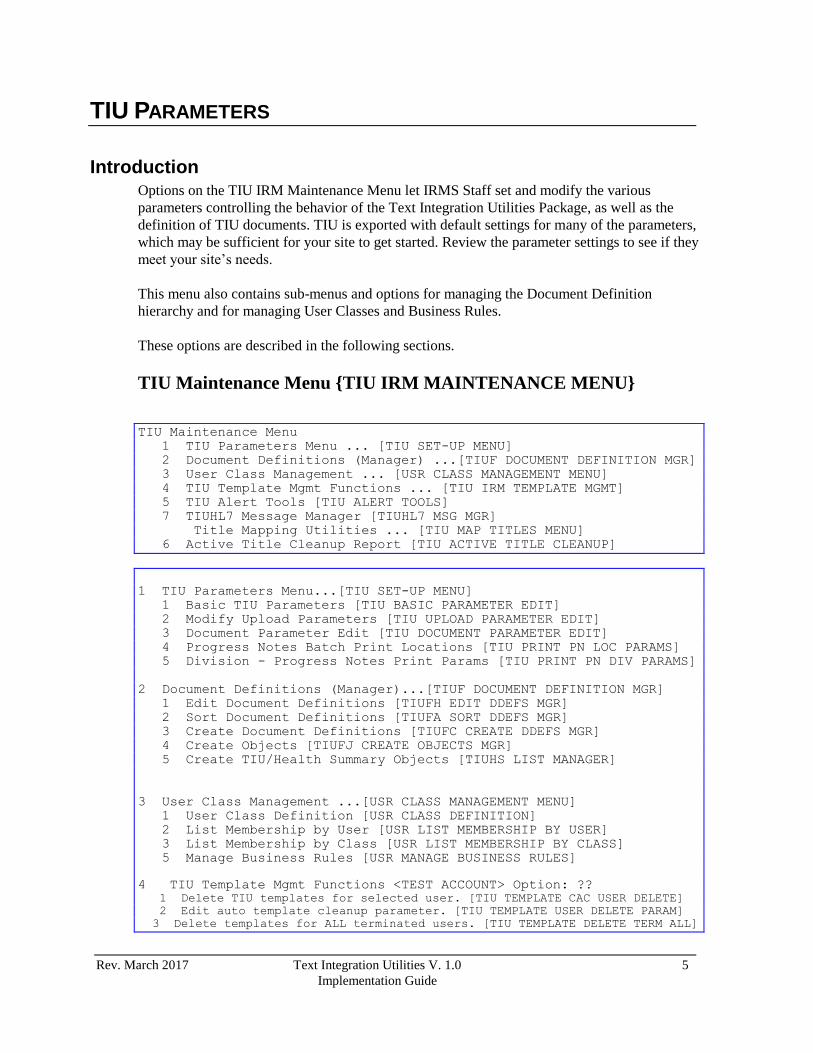
TIU Maintenance Menu {TIU IRM MAINTENANCE MENU}
TIU Maintenance Menu
1 TIU Parameters Menu ... [TIU SET-UP MENU]
2 Document Definitions (Manager) ...[TIUF DOCUMENT DEFINITION MGR]
3 User Class Management ... [USR CLASS MANAGEMENT MENU]
4 TIU Template Mgmt Functions ... [TIU IRM TEMPLATE MGMT]
5 TIU Alert Tools [TIU ALERT TOOLS]
7 TIUHL7 Message Manager [TIUHL7 MSG MGR]
Title Mapping Utilities ... [TIU MAP TITLES MENU]
6 Active Title Cleanup Report [TIU ACTIVE TITLE CLEANUP]
1 TIU Parameters Menu...[TIU SET-UP MENU]
1 Basic TIU Parameters [TIU BASIC PARAMETER EDIT]
2 Modify Upload Parameters [TIU UPLOAD PARAMETER EDIT]
3 Document Parameter Edit [TIU DOCUMENT PARAMETER EDIT]
4 Progress Notes Batch Print Locations [TIU PRINT PN LOC PARAMS]
5 Division - Progress Notes Print Params [TIU PRINT PN DIV PARAMS]
2 Document Definitions (Manager)...[TIUF DOCUMENT DEFINITION MGR]
1 Edit Document Definitions [TIUFH EDIT DDEFS MGR]
2 Sort Document Definitions [TIUFA SORT DDEFS MGR]
3 Create Document Definitions [TIUFC CREATE DDEFS MGR]
4 Create Objects [TIUFJ CREATE OBJECTS MGR]
5 Create TIU/Health Summary Objects [TIUHS LIST MANAGER]
3 User Class Management ...[USR CLASS MANAGEMENT MENU]
1 User Class Definition [USR CLASS DEFINITION]
2 List Membership by User [USR LIST MEMBERSHIP BY USER]
3 List Membership by Class [USR LIST MEMBERSHIP BY CLASS]
5 Manage Business Rules [USR MANAGE BUSINESS RULES]
4 TIU Template Mgmt Functions <TEST ACCOUNT> Option: ?? 1 Delete TIU templates for selected user. [TIU TEMPLATE CAC USER DELETE]
2 Edit auto template cleanup parameter. [TIU TEMPLATE USER DELETE PARAM]
3 Delete templates for ALL terminated users. [TIU TEMPLATE DELETE TERM ALL]
6 Text Integration Utilities V. 1.0 Rev. March 2017
Implementation Guide
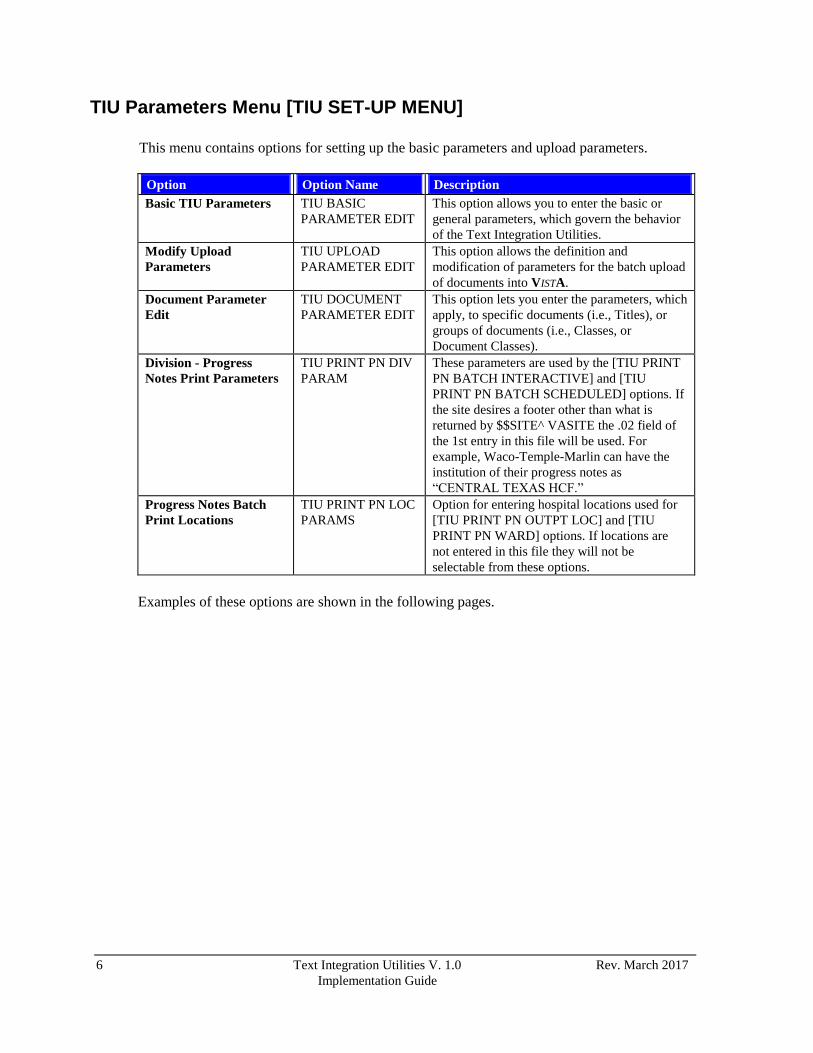
TIU Parameters Menu [TIU SET-UP MENU]
This menu contains options for setting up the basic parameters and upload parameters.
Option Option Name Description
Basic TIU Parameters TIU BASIC
PARAMETER EDIT
This option allows you to enter the basic or
general parameters, which govern the behavior
of the Text Integration Utilities.
Modify Upload
Parameters
TIU UPLOAD
PARAMETER EDIT
This option allows the definition and
modification of parameters for the batch upload
of documents into VISTA.
Document Parameter
Edit
TIU DOCUMENT
PARAMETER EDIT
This option lets you enter the parameters, which
apply, to specific documents (i.e., Titles), or
groups of documents (i.e., Classes, or
Document Classes).
Division - Progress
Notes Print Parameters
TIU PRINT PN DIV
PARAM
These parameters are used by the [TIU PRINT
PN BATCH INTERACTIVE] and [TIU
PRINT PN BATCH SCHEDULED] options. If
the site desires a footer other than what is
returned by $$SITE^ VASITE the .02 field of
the 1st entry in this file will be used. For
example, Waco-Temple-Marlin can have the
institution of their progress notes as
“CENTRAL TEXAS HCF.”
Progress Notes Batch
Print Locations
TIU PRINT PN LOC
PARAMS
Option for entering hospital locations used for
[TIU PRINT PN OUTPT LOC] and [TIU
PRINT PN WARD] options. If locations are
not entered in this file they will not be
selectable from these options.
Examples of these options are shown in the following pages.

Rev. March 2017 Text Integration Utilities V. 1.0 7
Implementation Guide
Parameter Setup Examples
Options: Basic TIU Parameters, Modify Upload Parameters, and Document Parameter Edit
These three options are demonstrated here with examples of Discharge Summary
implementation and Progress Notes implementation. An example for other types of clinical
documents follows.
Discharge Summary Parameter Set-Up
1. If Discharge Summary version 1.0 is already implemented at your site, use VA FileMan to
Print a “Captioned” listing of the existing GMRD SITE PARAMETERS (#128.99) and
GMR REPORT TYPE (#128.1) file entries as follows:
> D P^DII
VA FileMan 21.0
Select OPTION: PRINT FILE ENTRIES
OUTPUT FROM WHAT FILE: 128.99 GMRD SITE PARAMETERS (2 entries)
SORT BY: NUMBER// <Enter>
START WITH NUMBER: FIRST// <Enter>
FIRST PRINT FIELD: [CAPTIONED
Include COMPUTED fields: (N/Y/R/B): NO// <Enter> - No record number (IEN), no
Computed Fields
*************************
Heading (S/C): GMRD SITE PARAMETERS LIST Replace <Enter>
DEVICE: <device name> ANYWHERE RIGHT MARGIN: 80// <Enter>
GMRD SITE PARAMETERS LIST JAN 22,1997 13:53 PAGE 1
---------------------------------------------------------------------------
DIVISION: SALT LAKE DOM ENABLE ELECTRONIC SIGNATURE: YES
CHARACTERS PER LINE: 60 GRACE PERIOD FOR PURGE: 365
GRACE PERIOD FOR SIGNATURE: 5 CHART COPY PRINTER: LTA35
ASCII UPLOAD SOURCE: remote computer RECORD HEADER SIGNAL: $HDR
BEGIN REPORT TEXT SIGNAL: $TXT UPLOAD HEADER FORMAT: captioned
UPLOAD PROTOCOL: KERMIT STAT CHART COPY PRINTER: LASERJET 4SI
REQUIRE AUTHOR TO SIGN: YES
STAT SUMMARIES PRINTED: released and verified
ROUTINE SUMMARIES PRINTED: released and verified
ENABLE CHART COPY PROMPT: YES ENABLE IRT INTERFACE: YES
REQUIRE MAS REVIEW: YES REQUIRE TRANSCRIPTION RELEASE: YES
AMENDMENT SIGNATURE BLOCK: TIUPO,ONE Privacy Act Officer
BLANK CHARACTER STRING: --- ENABLE NOTIFICATIONS DATE: NOV 21, 1994
ALERT RECIPIENT: TIUCOORDINATOR, ONE
ALERT RECIPIENT: TIUCOORDINATOR, TWO
ALERT RECIPIENT: TIUCOORDINATOR,THREE
ALERT RECIPIENT: TIUCOORDINATOR, FOUR

8 Text Integration Utilities V. 1.0 Rev. March 2017
Implementation Guide
Discharge Summary Implementation cont’d DIVISION: SALT LAKE CITY ENABLE ELECTRONIC SIGNATURE: YES
CHARACTERS PER LINE: 60 GRACE PERIOD FOR PURGE: 365
GRACE PERIOD FOR SIGNATURE: 5 CHART COPY PRINTER: LTA35
ASCII UPLOAD SOURCE: remote computer RECORD HEADER SIGNAL: $HDR
BEGIN REPORT TEXT SIGNAL: $TXT UPLOAD HEADER FORMAT: captioned
UPLOAD PROTOCOL: KERMIT STAT CHART COPY PRINTER: LTA35
REQUIRE AUTHOR TO SIGN: YES
STAT SUMMARIES PRINTED: released and verified
ROUTINE SUMMARIES PRINTED: released and verified
ENABLE CHART COPY PROMPT: YES ENABLE IRT INTERFACE: YES
REQUIRE MAS REVIEW: YES REQUIRE TRANSCRIPTION RELEASE: YES
AMENDMENT SIGNATURE BLOCK: TIUPO,ONE Privacy Act Officer
BLANK CHARACTER STRING: --- ENABLE NOTIFICATIONS DATE: NOV 26, 1994
ALERT RECIPIENT: TIUCOORDINATOR, TWO
ALERT RECIPIENT: TIUCOORDINATOR, ONE
Print site parameters for GMR REPORT TYPE File (#128.1) Select OPTION: PRINT FILE ENTRIES
OUTPUT FROM WHAT FILE: GMRD SITE PARAMETERS// 128.1 GMR REPORT TYPE
(2 entries)
SORT BY: NAME// <Enter>
START WITH NAME: FIRST// <Enter>
FIRST PRINT FIELD: [CAPTIONED
Include COMPUTED fields: (N/Y/R/B): NO// <Enter> - No record number (IEN), no
Computed Fields
*************************
Heading (S/C): GMR REPORT TYPE LIST Replace <Enter>
DEVICE: <device name> ANYWHERE RIGHT MARGIN: 80// <Enter>
GMR REPORT TYPE LIST JAN 22,1997 13:54 PAGE 1
-----------------------------------------------------------------------------
NAME: DISCHARGE SUMMARY ABBREVIATION: DCS
LAYGO ALLOWED?: YES TARGET FILE: GMR REPORTS
TARGET TEXT FIELD SUBSCRIPT: 2;TEXT LOOK-UP LINETAG: LOOKUP
LOOK-UP ROUTINE: GMRDFLRU
DEFAULT REPORT FORMAT:
DIAGNOSIS:
OPERATIONS/PROCEDURES:
CAPTION: SOCIAL SECURITY NUMBER ITEM NAME: SSN
FIELD NUMBER: .02 LOOKUP LOCAL VARIABLE NAME: GMRDSSN
EXAMPLE ENTRY: 555-12-1234 CLINICIAN MUST DICTATE: YES
TRANSFORM CODE: S:X?3N1P2N1P4N.E X=$E(X,1,3)_$E(X,5,6)_$E(X,8,12)
CAPTION: DATE OF ADMISSION ITEM NAME: ADMISSION DATE
FIELD NUMBER: .07 LOOKUP LOCAL VARIABLE NAME: GMRDADT
EXAMPLE ENTRY: 03/30/93 CLINICIAN MUST DICTATE: YES
CAPTION: DICTATED BY ITEM NAME: DICTATING PROVIDER
FIELD NUMBER: 1.01 EXAMPLE ENTRY: ONE TIUPROVIDER, M.D.
CLINICIAN MUST DICTATE: YES TRANSFORM CODE: S X=$$INAME^GMRDLIBS(X)
CAPTION: DICTATION DATE ITEM NAME: DICTATION DATE
FIELD NUMBER: 1.03 EXAMPLE ENTRY: 04/03/93

Rev. March 2017 Text Integration Utilities V. 1.0 9
Implementation Guide
Discharge Summary Implementation cont’d CLINICIAN MUST DICTATE: YES
CAPTION: ATTENDING PHYSICIAN ITEM NAME: ATTENDING PHYSICIAN
FIELD NUMBER: 1.09 EXAMPLE ENTRY: SEVEN TIUPROVIDER, M.D.
CLINICIAN MUST DICTATE: YES TRANSFORM CODE: S X=$$INAME^GMRDLIBS(X)
CAPTION: TRANSCRIPTIONIST ITEM NAME: TRANSCRIPTIONIST ID
FIELD NUMBER: 1.05 EXAMPLE ENTRY: T1212
CLINICIAN MUST DICTATE: NO
CAPTION: URGENCY ITEM NAME: STAT OR ROUTINE
FIELD NUMBER: .09 EXAMPLE ENTRY: PRIORITY
CLINICIAN MUST DICTATE: YES
NAME: OPERATIONREPORT ABBREVIATION: OPR
LAYGO ALLOWED?: NO TARGET FILE: SURGERY
TARGET TEXT FIELD SUBSCRIPT: 1.15;12
CAPTION: PATIENT ID ITEM NAME: PATIENT ID
FIELD NUMBER: <Enter> EXAMPLE ENTRY: D4567
CLINICIAN MUST DICTATE: YES
CAPTION: CASE NUMBER ITEM NAME: CASE NUMBER
FIELD NUMBER: .001 EXAMPLE ENTRY: 3546
CLINICIAN MUST DICTATE: YES
CAPTION: SURGERY DATE/TIME ITEM NAME: SURGERY DATE/TIME
FIELD NUMBER: <Enter> EXAMPLE ENTRY: 4/1/94@09:45
CLINICIAN MUST DICTATE: YES
NOTE: In all cases, the examples given are for a site with multiple inpatient
divisions. If you are implementing TIU at a site where this is NOT the case,
only enter the parameters for a single institution.
2. Use the TIU BASIC PARAMETER EDIT option to initialize the electronic signature,
notifications, chart copy prompting, grace periods, and blank character string parameters in a
manner consistent with your current implementation of Discharge Summary:
Select TIU Parameters Menu Option: 1 Basic TIU Parameters
First edit Division-wide parameters:
Select INSTITUTION: 660
1 660 SALT LAKE CITY UT 660
2 660AA SALT LAKE DOM UT VAMC 660AA
CHOOSE 1-2: 1 SALT LAKE CITY
Are you adding 'SALT LAKE CITY' as a new TIU PARAMETERS (the 1ST)? Y (Yes)
ENABLE ELECTRONIC SIGNATURE: Y YES
ENABLE NOTIFICATIONS DATE: 11/26/97 (NOV 26, 1997)
GRACE PERIOD FOR SIGNATURE: 5
GRACE PERIOD FOR PURGE:<Enter>
CHARACTERS PER LINE: 60
OPTIMIZE LIST BUILDING FOR: performance//
SUPPRESS REVIEW NOTES PROMPT: YES//
ENABLE CHART COPY PROMPT: Y YES
BLANK CHARACTER STRING: @@@
Press RETURN to continue...<Enter>
HINT: Use a character string that isn’t likely to
occur in any of your boilerplate templates.
“@@@” is recommended.
10 Text Integration Utilities V. 1.0 Rev. March 2017
Implementation Guide
BASIC PARAMETER EDIT cont’d
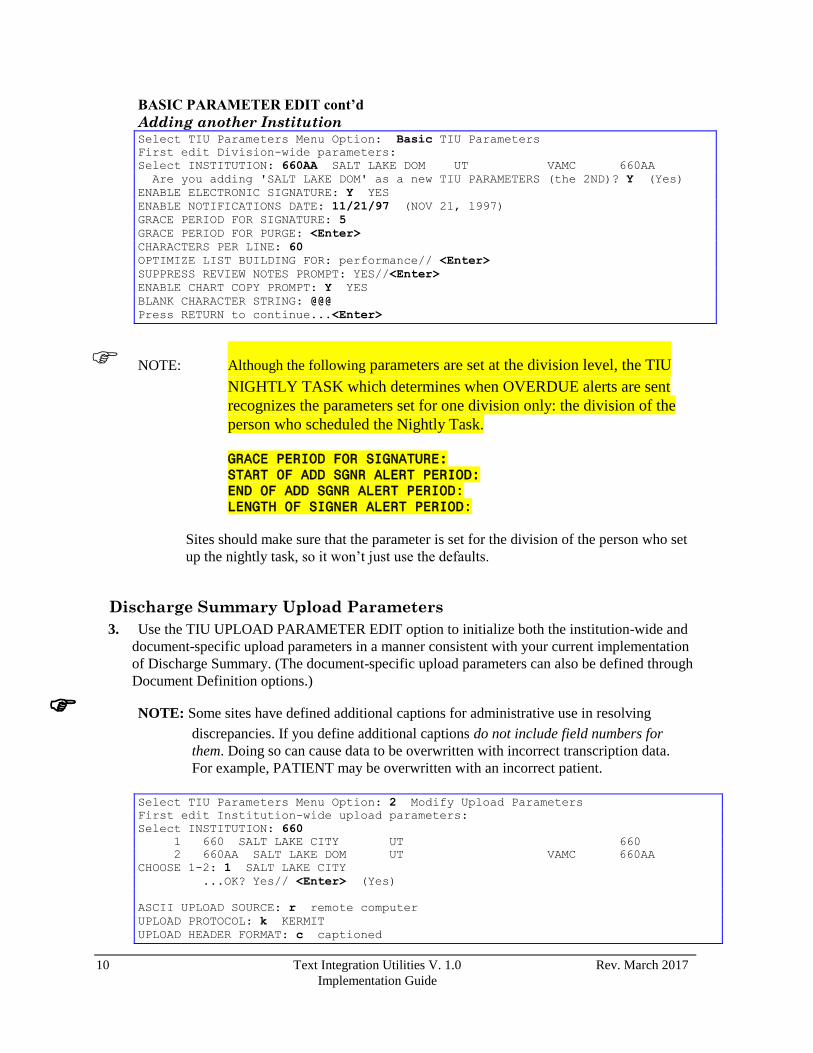
Adding another Institution Select TIU Parameters Menu Option: Basic TIU Parameters
First edit Division-wide parameters:
Select INSTITUTION: 660AA SALT LAKE DOM UT VAMC 660AA
Are you adding 'SALT LAKE DOM' as a new TIU PARAMETERS (the 2ND)? Y (Yes)
ENABLE ELECTRONIC SIGNATURE: Y YES
ENABLE NOTIFICATIONS DATE: 11/21/97 (NOV 21, 1997)
GRACE PERIOD FOR SIGNATURE: 5
GRACE PERIOD FOR PURGE: <Enter>
CHARACTERS PER LINE: 60
OPTIMIZE LIST BUILDING FOR: performance// <Enter>
SUPPRESS REVIEW NOTES PROMPT: YES//<Enter>
ENABLE CHART COPY PROMPT: Y YES
BLANK CHARACTER STRING: @@@
Press RETURN to continue...<Enter>
NOTE: Although the following parameters are set at the division level, the TIU
NIGHTLY TASK which determines when OVERDUE alerts are sent
recognizes the parameters set for one division only: the division of the
person who scheduled the Nightly Task.
GRACE PERIOD FOR SIGNATURE: START OF ADD SGNR ALERT PERIOD: END OF ADD SGNR ALERT PERIOD: LENGTH OF SIGNER ALERT PERIOD:
Sites should make sure that the parameter is set for the division of the person who set
up the nightly task, so it won’t just use the defaults.
Discharge Summary Upload Parameters
3. Use the TIU UPLOAD PARAMETER EDIT option to initialize both the institution-wide and
document-specific upload parameters in a manner consistent with your current implementation
of Discharge Summary. (The document-specific upload parameters can also be defined through
Document Definition options.)
NOTE: Some sites have defined additional captions for administrative use in resolving
discrepancies. If you define additional captions do not include field numbers for
them. Doing so can cause data to be overwritten with incorrect transcription data.
For example, PATIENT may be overwritten with an incorrect patient.
Select TIU Parameters Menu Option: 2 Modify Upload Parameters
First edit Institution-wide upload parameters:
Select INSTITUTION: 660
1 660 SALT LAKE CITY UT 660
2 660AA SALT LAKE DOM UT VAMC 660AA
CHOOSE 1-2: 1 SALT LAKE CITY
...OK? Yes// <Enter> (Yes)
ASCII UPLOAD SOURCE: r remote computer
UPLOAD PROTOCOL: k KERMIT
UPLOAD HEADER FORMAT: c captioned

Rev. March 2017 Text Integration Utilities V. 1.0 11
Implementation Guide
RECORD HEADER SIGNAL: $HDR
BEGIN REPORT TEXT SIGNAL: $TXT
RUN UPLOAD FILER IN FOREGROUND: NO// NO
Now Select upload error alert recipients:
Select ALERT RECIPIENT: CPRSCOORDINATOR, TWO
Are you adding ‘CPRSCOORDINATOR, TWO’ as
a new UPLOAD ERROR ALERT RECIPIENT (the 1ST for this TIU PARAMETERS)? Y
(Yes)
Select ALERT RECIPIENT: CPRSCOORDINATOR, TEN
Are you adding ' CPRSCOORDINATOR, TWEN' as
a new UPLOAD ERROR ALERT RECIPIENT (the 2ND for this TIU PARAMETERS)? Y
(Yes)
Select ALERT RECIPIENT: <Enter>
Now edit the DOCUMENT DEFINITION file:
DOCUMENT DEFINITION: DISCHARGE SUMMARY
1 DISCHARGE SUMMARIES DOCUMENT CLASS
2 DISCHARGE SUMMARY TITLE
3 DISCHARGE SUMMARY CLASS
4 DISCHARGE FINAL DISCHARGE NOTE TITLE
CHOOSE 1-4: 2
ABBREVIATION: DCS
LAYGO ALLOWED?: YES// <Enter>
UPLOAD TARGET FILE: TIU DOCUMENT// <Enter>
Select TARGET TEXT FIELD: REPORT TEXT// <Enter>
UPLOAD LOOK-UP METHOD: D LOOKUP^TIUPUTU// <Enter>
UPLOAD POST-FILING CODE: D FOLLOWUP^TIUPUTU(TIUREC("#"))
Replace <Enter>
UPLOAD FILING ERROR CODE: D GETPAT^TIUCHLP// <Enter>
Select CAPTION: ?
Answer with UPLOAD CAPTIONED ASCII HEADER, or ITEM NAME, or
FIELD NUMBER, or LOOKUP LOCAL VARIABLE NAME
You may enter a new UPLOAD CAPTIONED ASCII HEADER, if you wish
Answer must be 2-40 characters in length.
Select CAPTION: ??
NOTE: Users can choose between two possible kinds of Upload Record
Headers: Captioned or Delimited. Captioned headers should be used
UNLESS the site has a way to generate upload headers automatically.
CAPTION is the caption which the transcriber enters into the captioned
upload record header immediately preceding the item data. It serves to
distinguish one item of data from the next. Example: PATIENT NAME
Select CAPTION: PATIENT SSN
CAPTION: PATIENT SSN// SOCIAL SECURITY NUMBER
ITEM NAME: SSN// <Enter>
FIELD NUMBER: .02// <Enter>
LOOKUP LOCAL VARIABLE NAME: TIUSSN// <Enter>
TRANSFORM CODE: S:X?3N1P2N1P4N.E X=$TR(X,"-/","")
Replace <Enter>
EXAMPLE ENTRY: 555-12-1234// <Enter>
CLINICIAN MUST DICTATE: YES// <Enter>
REQUIRED FIELD?: YES// ??
This field is used to determine whether a given header item is required
by the application (e.g., Author and Attending Physician may be required
for the ongoing processing of a Discharge Summary). Records lacking
required fields WILL be entered into the target file, if possible, but
will generate Missing Field Error Alerts.
Choose from:
1 YES
0 NO
REQUIRED FIELD?: YES// <Enter>

12 Text Integration Utilities V. 1.0 Rev. March 2017
Implementation Guide
Modify Upload Parameters cont’d Select CAPTION: DATE OF ADMISSION
CAPTION: DATE OF ADMISSION// <Enter>
ITEM NAME: ADMISSION DATE// <Enter>
FIELD NUMBER: .07// <Enter>
LOOKUP LOCAL VARIABLE NAME: TIUADT// <Enter>
TRANSFORM CODE: <Enter>
EXAMPLE ENTRY: 03/30/93// <Enter>
CLINICIAN MUST DICTATE: YES// <Enter>
REQUIRED FIELD?: Y YES
Select CAPTION: DIC
1 DICTATED BY
2 DICTATION DATE
CHOOSE 1-2: 1
CAPTION: DICTATED BY// <Enter>
ITEM NAME: DICTATING PROVIDER// <Enter>
FIELD NUMBER: 1202// <Enter>
LOOKUP LOCAL VARIABLE NAME: <Enter>
TRANSFORM CODE: S X=$$INAME^TIULS(X) Replace <Enter>
EXAMPLE ENTRY: ONE TIUPROVIDER, M.D. Replace <Enter>
CLINICIAN MUST DICTATE: YES// <Enter>
REQUIRED FIELD?: YES// <Enter>
Select CAPTION: DICTATION DATE
CAPTION: DICTATION DATE// <Enter>
ITEM NAME: DICTATION DATE// <Enter>
FIELD NUMBER: 1307// <Enter>
LOOKUP LOCAL VARIABLE NAME: TIUDICDT// <Enter>
TRANSFORM CODE: <Enter>
EXAMPLE ENTRY: 04/03/93// <Enter>
CLINICIAN MUST DICTATE: NO// <Enter>
REQUIRED FIELD?: YES// <Enter>
Select CAPTION: ATTENDING PHYSICIAN
CAPTION: ATTENDING PHYSICIAN// <Enter>
ITEM NAME: ATTENDING PHYSICIAN// <Enter>
FIELD NUMBER: 1209// <Enter>
LOOKUP LOCAL VARIABLE NAME: <Enter>
TRANSFORM CODE: S X=$$INAME^TIULS(X) Replace <Enter>
EXAMPLE ENTRY: SEVEN TIUPROVIDER, M.D. Replace <Enter>
CLINICIAN MUST DICTATE: YES// <Enter>
REQUIRED FIELD?: YES// <Enter>
Select CAPTION: TRANSCRIPTIONIST
CAPTION: TRANSCRIPTIONIST// <Enter>
ITEM NAME: TRANSCRIPTIONIST ID// <Enter>
FIELD NUMBER: 1302// <Enter>
LOOKUP LOCAL VARIABLE NAME: <Enter>
TRANSFORM CODE: <Enter>
EXAMPLE ENTRY: T1212// <Enter>
CLINICIAN MUST DICTATE: NO// <Enter>
REQUIRED FIELD?: <Enter>
The header for the DISCHARGE SUMMARY DOCUMENT CLASS is now defined as:

Rev. March 2017 Text Integration Utilities V. 1.0 13
Implementation Guide
Modify Upload Parameters cont’d $HDR: DISCHARGE SUMMARY
SOCIAL SECURITY NUMBER: 555-12-1234
DATE OF ADMISSION: 03/30/93
DICTATED BY: ONE TIUPROVIDER, M.D.
DICTATION DATE: 04/03/93
ATTENDING PHYSICIAN: SEVEN TIUPROVIDER, M.D.
TRANSCRIPTIONIST: T1212
URGENCY: PRIORITY
$TXT
DISCHARGE SUMMARY Text
*** File should be ASCII with width no greater than 80 columns.
*** Use "@@@" for "BLANKS" (word or phrase in dictation that isn't understood).
Press RETURN to continue... <Enter>
1 Basic TIU Parameters
2 Modify Upload Parameters
3 Document Parameter Edit
4 Progress Notes Batch Print Locations
5 Division - Progress Notes Print Params
Modifying parameters for 2nd division Select TIU Parameters Menu Option: <SPACE><Enter> Modify Upload Parameters
First edit Institution-wide upload parameters:
Select INSTITUTION: 660AA SALT LAKE DOM UT VAMC 660AA
...OK? Yes// <Enter> (Yes)
ASCII UPLOAD SOURCE: R remote computer
UPLOAD PROTOCOL: K KERMIT
UPLOAD HEADER FORMAT: C captioned
RECORD HEADER SIGNAL: $HDR
BEGIN REPORT TEXT SIGNAL: $TXT
RUN UPLOAD FILER IN FOREGROUND: NO// <Enter> NO
Now Select upload error alert recipients:
Select ALERT RECIPIENT: TIUCOORDINATOR, ONE
Are you adding ‘TIUCOORDINATOR, ONE' as
a new UPLOAD ERROR ALERT RECIPIENT (the 3RD for this TIU PARAMETERS)? Y
(Yes)
Select ALERT RECIPIENT: TIUCOORDINATOR, TWO
Are you adding ' TIUCOORDINATOR, TWO' as
a new UPLOAD ERROR ALERT RECIPIENT (the 4TH for this TIU PARAMETERS)? Y
(Yes)
Select ALERT RECIPIENT: <Enter>
Now edit the DOCUMENT DEFINITION file:
DOCUMENT DEFINITION: <Enter>
Press RETURN to continue...<Enter>
1 Basic TIU Parameters
2 Modify Upload Parameters
3 Document Parameter Edit
4 Progress Notes Batch Print Locations
5 Division - Progress Notes Print Params
Select TIU Parameters Menu Option:
NOTE: document upload
parameters are independent of
hospital divisions, so they don’t
need to be re-entered in this case.

14 Text Integration Utilities V. 1.0 Rev. March 2017
Implementation Guide
Document Parameter Edit
1. Use the option Document Parameter Edit to define the special processing requirements for
the Discharge Summary Class consistently with those used by your site with Discharge
Summary v1.0
Select TIU Parameters Menu Option: 3 Document Parameter Edit
First edit Institution-wide parameters:
Select DOCUMENT DEFINITION: ??
Choose from:
PROGRESS NOTES
DISCHARGE SUMMARY
This is the Document Definition to which the parameters described in
the current record apply.
NOTE: All parameters are inherited from ancestor classes or document
classes, unless overridden at a subordinate level in the document
definition hierarchy (e.g., if you set the parameter to require release
for class Progress Notes, then all progress note titles will require
release, unless the parameter is set to NO for a subordinate Document
Class or Title for which release should not be required).
Choose from:
60 CHARACTER ENTRY 2 2345 7893 CLASS
ACTIVE MEDICATIONS OBJECT
ADDENDUM TITLE
ADDENDUM DOCUMENT CLASS
ADMISSION ASSESSMENT TITLE
.
.
.
Select DOCUMENT DEFINITION: DISCHARGE SUMMARY CLASS
...OK? Yes// (Yes)
DOCUMENT DEFINITION: DISCHARGE SUMMARY// <Enter>
REQUIRE RELEASE: YES// REQUIRE RELEASE: YES// ??
This parameter determines whether the person entering the document will
be required (and therefore prompted) to release the document from a
draft state, upon exit from the entry/editing process.
Choose from:
1 YES
0 NO
REQUIRE RELEASE: YES// <Enter>

Rev. March 2017 Text Integration Utilities V. 1.0 15
Implementation Guide
Document Parameter Edit cont’d REQUIRE MAS VERIFICATION: ??
This parameter determines whether verification by MAS is required, prior
to public access, and signature of the document.
Choose from:
1 YES
0 NO
REQUIRE MAS VERIFICATION: 1 YES
REQUIRE AUTHOR TO SIGN: ??
This boolean field indicates whether or not the author should sign the
document (e.g., a discharge summary requires the signature of the
attending physician, who may or may not himself be the author), before
the expected cosigner.
Choose from:
1 YES
0 NO
REQUIRE AUTHOR TO SIGN: Y YES
ROUTINE PRINT EVENT(S): ??
These are the processing events (e.g., release, verification, or both)
on which documents of the type specified should be automatically
printed.
Choose from:
R release
V verification
B both
ROUTINE PRINT EVENT(S): B both
STAT PRINT EVENT(S): ??
Indicate the processing event(s) (e.g., release, verification, or both)
on which STAT documents of the specified type will be printed for the
chart to the device indicated.
Choose from:
R release
V verification
B both
STAT PRINT EVENT(S): B both
MANUAL PRINT AFTER ENTRY: ??
Though primarily implemented for PROGRESS NOTES, this parameter may be
useful for any document for which a hard copy is desirable following
entry. If set to YES, the user will be prompted to print a copy
on exit from their preferred editor.
Choose from:
1 YES
0 NO
MANUAL PRINT AFTER ENTRY: N NO
ALLOW CHART PRINT OUTSIDE MAS: ??
This field indicates whether the non-MAS user (e.g., providers) may
print copies of the document for the chart.
Generally, this will be set to YES for PROGRESS NOTES, which are likely
to be printed on the Ward or in the Clinic for immediate inclusion in the
chart, and to NO for DISCHARGE SUMMARIES, which are typically printed
centrally, and for which extraneous or duplicate CHART COPIES are a
particular problem.

16 Text Integration Utilities V. 1.0 Rev. March 2017
Implementation Guide
Document Parameter Edit cont’d Choose from:
1 YES
0 NO
ALLOW CHART PRINT OUTSIDE MAS: N NO
ALLOW >1 RECORDS PER VISIT: NO// ??
This field determines whether a given document may be created more than
once per visit. For example, it may be necessary and appropriate to
enter multiple Nurses Notes for a single hospitalization, although only
one discharge summary may be entered for that care episode.
Choose from:
1 YES
0 NO
ALLOW >1 RECORDS PER VISIT: NO// <Enter>
ENABLE IRT INTERFACE: ??
This enables TIU's interface with Incomplete Record Tracking, which will
update deficiencies when transcription, signature, or cosignature
(review) events are registered for a given document.
Choose from:
0 NO
1 YES
ENABLE IRT INTERFACE: Y YES
IRT DEFICIENCY: DISCHARGE SUMMARY// ??
This field provides for a mapping between the TIU DOCUMENT DEFINITION
and the corresponding IRT DEFICIENCY TYPE (e.g., Document Class
Discharge Summary maps to Deficiency Type Discharge Summary, while
Document type LIPID CLINIC NOTE maps to Deficiency Type DRS PROGRESS
NOTES, etc.).
Choose from:
DISCHARGE SUMMARY
IRT DEFICIENCY: DISCHARGE SUMMARY// <Enter>
SUPPRESS DX/CPT ON NEW VISIT: ??
Please indicate whether to suppress prompting for Diagnostic and
Procedure codes following signature of a document where an Ambulatory or
Telephone visit was created when the document was first entered.
NOTE: If you set this parameter to YES, you will need to capture this
information by some other uniform means (e.g., an AICS encounter form,
etc.) in order to receive workload credit for these visits.
Choose from:
1 YES
0 NO
SUPPRESS DX/CPT ON NEW VISIT: <Enter>
FORCE RESPONSE TO EXPOSURES: ??
This parameter determines whether the user will be forced to enter a Yes
or No response when asked to specify the Service Connection
Classification of a Veteran, when creating a standalone visit (i.e., AO,
IR, or EC).
Choose from:
1 YES
0 NO

Rev. March 2017 Text Integration Utilities V. 1.0 17
Implementation Guide
Document Parameter Edit cont’d FORCE RESPONSE TO EXPOSURES:
ASK DX/CPT ON ALL OPT VISITS: ??
Please indicate whether the Diagnosis and Procedural questions should be
asked on Scheduled Appointments, in addition to Walk-ins and Telephone
(i.e., Standalone) Encounters.
Choose from:
1 YES
0 NO
ASK DX/CPT ON ALL OPT VISITS: EDITOR SET-UP CODE: ??
This is MUMPS code to be executed prior to invoking the user's preferred
editor through ^DIWE. It will ordinarily set local variables to be used
in the editor's header, etc.
EDITOR SET-UP CODE: <Enter>
If document is to be uploaded, specify Filing Alert Recipients:
Select FILING ERROR ALERT RECIPIENTS: TIUCLERK, TWO
Are you adding TIUCLERK, TWO ' as a new FILING ERROR ALERT RECIPIENTS (the 1ST
for this TIU DOCUMENT PARAMETERS)? Y (Yes)
Select FILING ERROR ALERT RECIPIENTS: <Enter>
Now enter the USER CLASSES for which cosignature will be required:
Select USERS REQUIRING COSIGNATURE: ??
You may enter a new USERS REQUIRING COSIGNATURE, if you wish
Please indicate which groups of users (i.e., User Classes) require
cosignature for the type of document in question. For example,
STUDENTS, INTERNS, LPNs, and other user classes may be identified
as requiring a cosignature for PROGRESS NOTES.
NOTE: Users specified as requiring a cosignature for DISCHARGE
SUMMARY documents cannot be selected as Attending Physicians for
these documents. This ensures that users who require a cosignature
cannot cosign these documents.
Choose from:
ALLERGIST
ALLERGY & IMMUNOLOGY
ANESTHESIOLOGIST
ARTHRITIS RESEARCH STUDY MANAG
ARTHRITIS RESEARCH STUDY PROVI
ASSOCIATE CHIEF OF STAFF
ATTENDING PHYSICIAN
AUDIOLOGIST
CARDIOLOGIST
CHAPLAIN
CHIEF RESIDENT
CHIEF, MEDICAL SERVICE
CHIEF, MIS
CHIEF, PSYCHIATRY SERVICE
CHIEF, SURGICAL SERVICE
CLINICAL CLERK
CLINICAL COORDINATOR
CLINICAL COORDINATOR -MGR
CLINICAL DIETITIAN
'^' TO STOP: ^
Select USERS REQUIRING COSIGNATURE: <Enter>
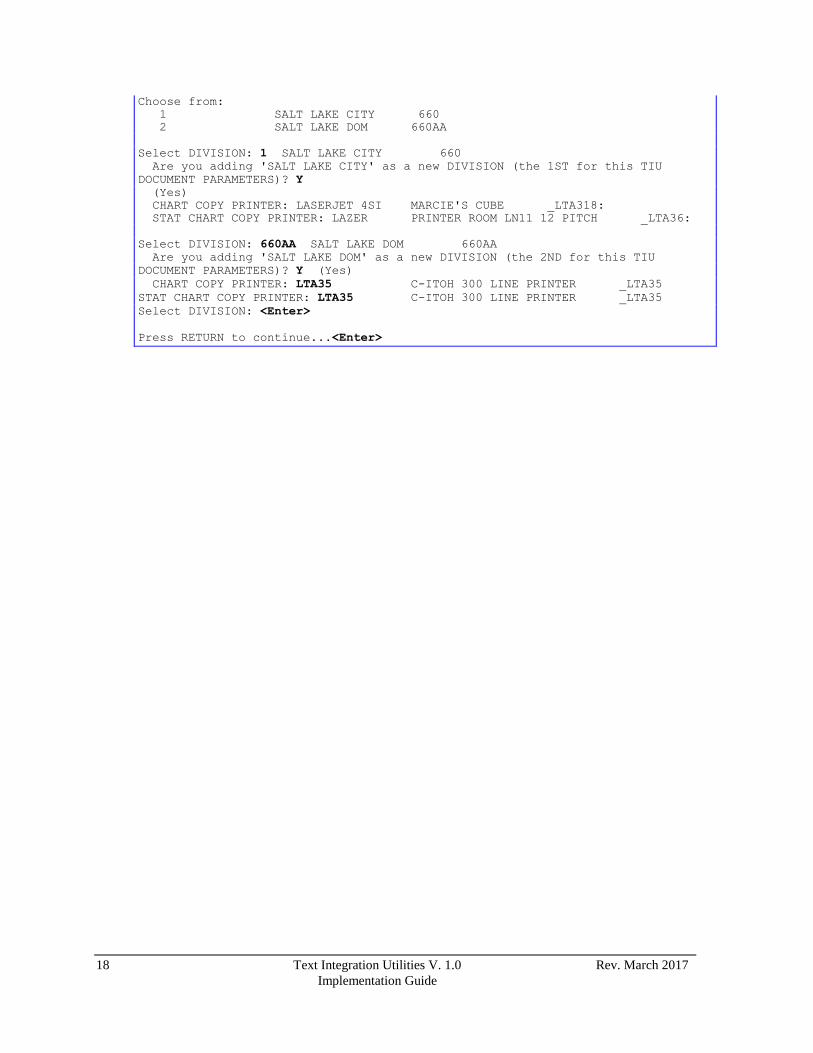
Now enter the DIVISIONAL parameters:
Select DIVISION: ??
This is the Medical Center Division for which the parameters are being
defined.
If your site wishes to route
alerts for filing errors to
different recipients by
document type (Discharge
Summary alerts to one MRT,
Operation Report alerts to
another, etc.), this is where to
specify that.
18 Text Integration Utilities V. 1.0 Rev. March 2017
Implementation Guide
Choose from:
1 SALT LAKE CITY 660
2 SALT LAKE DOM 660AA
Select DIVISION: 1 SALT LAKE CITY 660
Are you adding 'SALT LAKE CITY' as a new DIVISION (the 1ST for this TIU
DOCUMENT PARAMETERS)? Y
(Yes)
CHART COPY PRINTER: LASERJET 4SI MARCIE'S CUBE _LTA318:
STAT CHART COPY PRINTER: LAZER PRINTER ROOM LN11 12 PITCH _LTA36:
Select DIVISION: 660AA SALT LAKE DOM 660AA
Are you adding 'SALT LAKE DOM' as a new DIVISION (the 2ND for this TIU
DOCUMENT PARAMETERS)? Y (Yes)
CHART COPY PRINTER: LTA35 C-ITOH 300 LINE PRINTER _LTA35
STAT CHART COPY PRINTER: LTA35 C-ITOH 300 LINE PRINTER _LTA35
Select DIVISION: <Enter>
Press RETURN to continue...<Enter>

Rev. March 2017 Text Integration Utilities V. 1.0 19
Implementation Guide
Progress Notes Example of Modify Upload Parameters
1 Basic TIU Parameters
2 Modify Upload Parameters
3 Document Parameter Edit
4 Progress Notes Batch Print Locations
5 Division - Progress Notes Print Params
Select TIU Parameters Menu Option: Modify Upload Parameters
First edit Institution-wide upload parameters:
Select INSTITUTION: SALT LAKE CITY
ASCII UPLOAD SOURCE: remote computer// <Enter>
UPLOAD PROTOCOL: KERMIT// <Enter> UPLOAD HEADER FORMAT: captioned// ^
Now edit the DOCUMENT DEFINITION file:
DOCUMENT DEFINITION: PROGRESS NOTES CLASS
ABBREVIATION: PN// <Enter>
LAYGO ALLOWED?: YES// <Enter>
UPLOAD TARGET FILE: TIU DOCUMENT// <Enter>
Select TARGET TEXT FIELD: REPORT TEXT// <Enter>
UPLOAD LOOK-UP METHOD: D LOOKUP^TIUPUTPN// <Enter> UPLOAD POST-FILING CODE: D FOLLOWUP^TIUPUTPN(TIUREC("#"))
Replace <Enter>
UPLOAD FILING ERROR CODE: D GETPN^TIUCHLP//D PNFIX^TIUPNFIX<Enter>
Select CAPTION: LOCATION//<Enter>
CAPTION: LOCATION// <Enter>
ITEM NAME: PATIENT LOCATION// <Enter>
FIELD NUMBER: 1205// <Enter>
LOOKUP LOCAL VARIABLE NAME: TIULOC// <Enter>
TRANSFORM CODE: <Enter>
EXAMPLE ENTRY: MEDICAL-CONSULT 6200 Replace <Enter>
CLINICIAN MUST DICTATE: YES// <Enter>
REQUIRED FIELD?: YES// <Enter> Select CAPTION: AUTHOR
CAPTION: AUTHOR// <Enter>
ITEM NAME: DICTATING PROVIDER//<Enter>
FIELD NUMBER: 1202//<Enter>
LOOKUP LOCAL VARIABLE NAME: <Enter>
TRANSFORM CODE: <Enter>
EXAMPLE ENTRY: TIUPROVIDER,ONE//<Enter>
CLINICIAN MUST DICTATE: YES//<Enter>
REQUIRED FIELD?: YES//<Enter>
Select CAPTION: DATE/TIME OF DICT
CAPTION: DATE/TIME OF DICT Replace<Enter>
ITEM NAME: DICTATION DATE/TIME//<Enter>
FIELD NUMBER: 1307<Enter>
LOOKUP LOCAL VARIABLE NAME: TIUDDT//<Enter>
TRANSFORM CODE: <Enter>
EXAMPLE ENTRY: 5/16/97@09:25//<Enter>
CLINICIAN MUST DICTATE: NO//<Enter>
REQUIRED FIELD?: YES//<Enter>
If there are other titles
under Progress Notes
with distinct upload
parameters, you need to
repeat this setup for
them.

20 Text Integration Utilities V. 1.0 Rev. March 2017
Implementation Guide
Modify Upload Parameters cont’d Select CAPTION: EXPECTED COSIGNER
CAPTION: EXPECTED COSIGNER//<Enter>
ITEM NAME: EXPECTED COSIGNER//<Enter>
FIELD NUMBER: 1208//<Enter>
LOOKUP LOCAL VARIABLE NAME: <Enter>
TRANSFORM CODE: <Enter>
EXAMPLE ENTRY: TIUPROVIDER,SEVEN//<Enter>
CLINICIAN MUST DICTATE: YES//<Enter>
REQUIRED FIELD?: NO//<Enter>
Select CAPTION: SSN
CAPTION: SSN//<Enter>
ITEM NAME: PATIENT SSN//<Enter>
FIELD NUMBER: .02//<Enter>
LOOKUP LOCAL VARIABLE NAME: TIUSSN//<Enter>
TRANSFORM CODE: S X=$TR(X,"-/","")// <Enter>
EXAMPLE ENTRY: 555-12-1234//<Enter>
CLINICIAN MUST DICTATE: YES//<Enter>
REQUIRED FIELD?: YES//<Enter>
Select CAPTION: VISIT/EVENT DATE
CAPTION: VISIT/EVENT DATE//<Enter>
ITEM NAME: VISIT/EVENT DATE/<Enter>/
FIELD NUMBER: .07//<Enter>
LOOKUP LOCAL VARIABLE NAME: TIUVDT//<Enter>
TRANSFORM CODE: <Enter>
EXAMPLE ENTRY: 5/15/97@08:15//<Enter>
CLINICIAN MUST DICTATE: YES//<Enter>
REQUIRED FIELD?: YES//<Enter>
Select CAPTION: TITLE
CAPTION: TITLE//<Enter>
ITEM NAME: TITLE OF NOTE//<Enter>
FIELD NUMBER: .01//<Enter>
LOOKUP LOCAL VARIABLE NAME: TIUTITLE//<Enter>
TRANSFORM CODE: <Enter>
EXAMPLE ENTRY: PULMONARY NOTE//<Enter>
CLINICIAN MUST DICTATE: YES//<Enter>
REQUIRED FIELD?: YES//<Enter>
Select CAPTION:<Enter>
NOTE: Some sites have defined additional captions for administrative use in
resolving discrepancies. If you define additional captions, do not include field
numbers for them. Doing so can cause data to be overwritten with incorrect
transcription data. For example, PATIENT may be overwritten with an
incorrect patient.

Rev. March 2017 Text Integration Utilities V. 1.0 21
Implementation Guide
Modify Upload Parameters cont’d The header for the Progress Notes CLASS is now defined as:
$HDR: PROGRESS NOTES
TITLE: PULMONARY NOTE
SSN: 555-12-1234
VISIT/EVENT DATE: 5/15/97@08:15
AUTHOR: TIUPROVIDER,ONE
TRANSCRIBER: K5420
DATE/TIME OF DICT: 5/16/97@09:25
LOCATION: MEDICAL-CONSULT 6200
EXPECTED COSIGNER: TIUPROVIDER,SEVEN
$TXT
PROGRESS NOTES Text
*** File should be ASCII with width no greater than 80 columns.
*** Use "@@@" for "BLANKS" (word or phrase in dictation that isn't understood).

22 Text Integration Utilities V. 1.0 Rev. March 2017
Implementation Guide
Setting up Consult/Request Tracking in TIU
You can set Consults up as a separate Class (comparable to Discharge Summary or Progress
Notes) or you can define Consults as a document class under Progress Notes. There are pros and
cons to either strategy.
A: Create Consults as an independent CLASS, under Clinical Documents
Pro: 1. Provides a clear separation of Consults from Progress Notes, and minimizes the number
of choices for the end-user.
2. Simple, with few concerns for maintainability (e.g., no question as to whether heritable
methods and properties of Progress Notes were appropriately overridden, etc.).
Con: 1. Not necessarily consistent with the way providers have been documenting their Consult
Results in the past. (i.e., if they've been using PN titles to “result” consults, and
referring to the notes on the 513's in the past, this will be a departure from that practice).
2. Limits flexibility of access to the information. (i.e., if set up this way, they may only
access the data through Integrated Document Management options on the TIU side, and
through the Consults tab of the CPRS chart).
B: Create Consults as a document class under Progress Notes.
Pro: 1. Consistent with the way many providers have been documenting their Consult Results in
the past.
2. Enhances flexibility of access to the information. (allows access to data through any
option in TIU, as well as through either the Consults or Progress Notes tabs of the
CPRS chart).
Con: 1. Does not provide a clear separation of Consults from Progress Notes, and may offer too
many choices for the end-user.
2. Complex, with some concerns for maintainability (e.g., if printing or filing appear
incorrect, may result from heritable methods and properties of Progress Notes not being
appropriately overridden, etc.).

Rev. March 2017 Text Integration Utilities V. 1.0 23
Implementation Guide
TIU, cont’d
Define CONSULTS for TIU/CT Interface
Patch TIU*1.0*4 contains an option that allows you to set Consults up as part of the
Document Definition hierarchy. The following is a description of the option and the other
steps necessary for allowing Consults to be accessed through TIU and CPRS.
1. Select the option Define Consults for TIU/CT Interface and enter the relevant information.
Select OPTION NAME: TIU DEFINE CONSULTS Define CONSULTS for
TIU/CT Interface
Define CONSULTS for TIU/CT Interface
I'm going to create a new Document Definition for CONSULTS now.
GREAT! A new Document Definition has been created for CONSULTS.
Next, you need to decide whether you want CONSULTS to be set up
as a separate CLASS (comparable to DISCHARGE SUMMARY or PROGRESS
NOTES), or whether you want CONSULTS defined as a DOCUMENT CLASS
under PROGRESS NOTES. The benefits of each strategy are outlined
in the POST-INSTALLATION instructions for this patch.
NOTE: If you're not yet CERTAIN which strategy you want your site
to adopt, then quit here, and get consensus first (it's easier to
get permission than forgiveness, in this case)!
Select one of the following:
CL Class
DC Document Class
Define CONSULTS as a CLASS or DOCUMENT CLASS: DC Document Class
Okay, you've indicated that you want to make CONSULTS a Document Class.
Okay to continue? NO// YES
FANTASTIC! Your NEW DOCUMENT CLASS CONSULTS will now be added under
the PROGRESS NOTES Class...
Okay, I'm done...Please finish your implementation of CONSULTS by adding
any Titles as appropriate using the Create Document Definitions Option
under the TIUF DOCUMENT DEFINITION MGR Menu, as described in Step #3 of
the Post-Installation Instructions.
Press RETURN to continue...
24 Text Integration Utilities V. 1.0 Rev. March 2017
Implementation Guide
TIU, cont’d
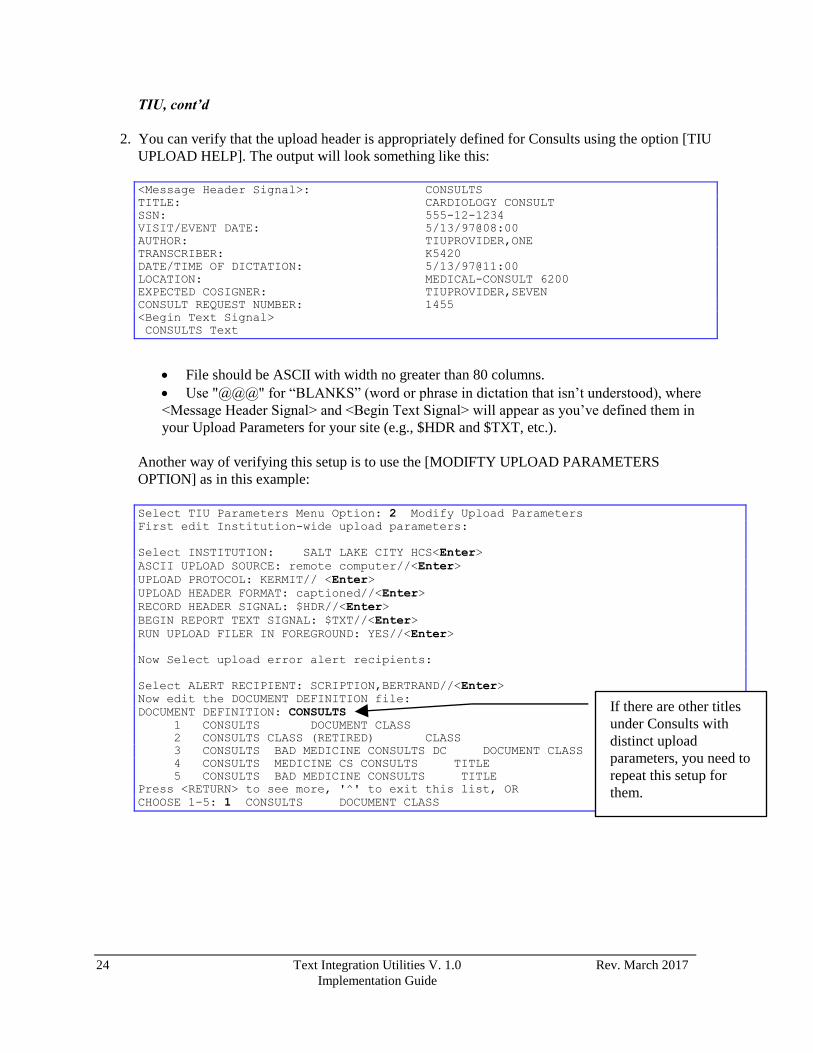
2. You can verify that the upload header is appropriately defined for Consults using the option [TIU
UPLOAD HELP]. The output will look something like this:
<Message Header Signal>: CONSULTS
TITLE: CARDIOLOGY CONSULT
SSN: 555-12-1234
VISIT/EVENT DATE: 5/13/97@08:00
AUTHOR: TIUPROVIDER,ONE
TRANSCRIBER: K5420
DATE/TIME OF DICTATION: 5/13/97@11:00
LOCATION: MEDICAL-CONSULT 6200
EXPECTED COSIGNER: TIUPROVIDER,SEVEN
CONSULT REQUEST NUMBER: 1455
<Begin Text Signal>
CONSULTS Text
File should be ASCII with width no greater than 80 columns.
Use "@@@" for “BLANKS” (word or phrase in dictation that isn’t understood), where
<Message Header Signal> and <Begin Text Signal> will appear as you’ve defined them in
your Upload Parameters for your site (e.g., $HDR and $TXT, etc.).
Another way of verifying this setup is to use the [MODIFTY UPLOAD PARAMETERS
OPTION] as in this example:
Select TIU Parameters Menu Option: 2 Modify Upload Parameters
First edit Institution-wide upload parameters:
Select INSTITUTION: SALT LAKE CITY HCS<Enter>
ASCII UPLOAD SOURCE: remote computer//<Enter>
UPLOAD PROTOCOL: KERMIT// <Enter>
UPLOAD HEADER FORMAT: captioned//<Enter>
RECORD HEADER SIGNAL: $HDR//<Enter>
BEGIN REPORT TEXT SIGNAL: $TXT//<Enter>
RUN UPLOAD FILER IN FOREGROUND: YES//<Enter>
Now Select upload error alert recipients:
Select ALERT RECIPIENT: SCRIPTION,BERTRAND//<Enter>
Now edit the DOCUMENT DEFINITION file:
DOCUMENT DEFINITION: CONSULTS
1 CONSULTS DOCUMENT CLASS
2 CONSULTS CLASS (RETIRED) CLASS
3 CONSULTS BAD MEDICINE CONSULTS DC DOCUMENT CLASS
4 CONSULTS MEDICINE CS CONSULTS TITLE
5 CONSULTS BAD MEDICINE CONSULTS TITLE
Press <RETURN> to see more, '^' to exit this list, OR
CHOOSE 1-5: 1 CONSULTS DOCUMENT CLASS
If there are other titles
under Consults with
distinct upload
parameters, you need to
repeat this setup for
them.
Rev. March 2017 Text Integration Utilities V. 1.0 25
Implementation Guide
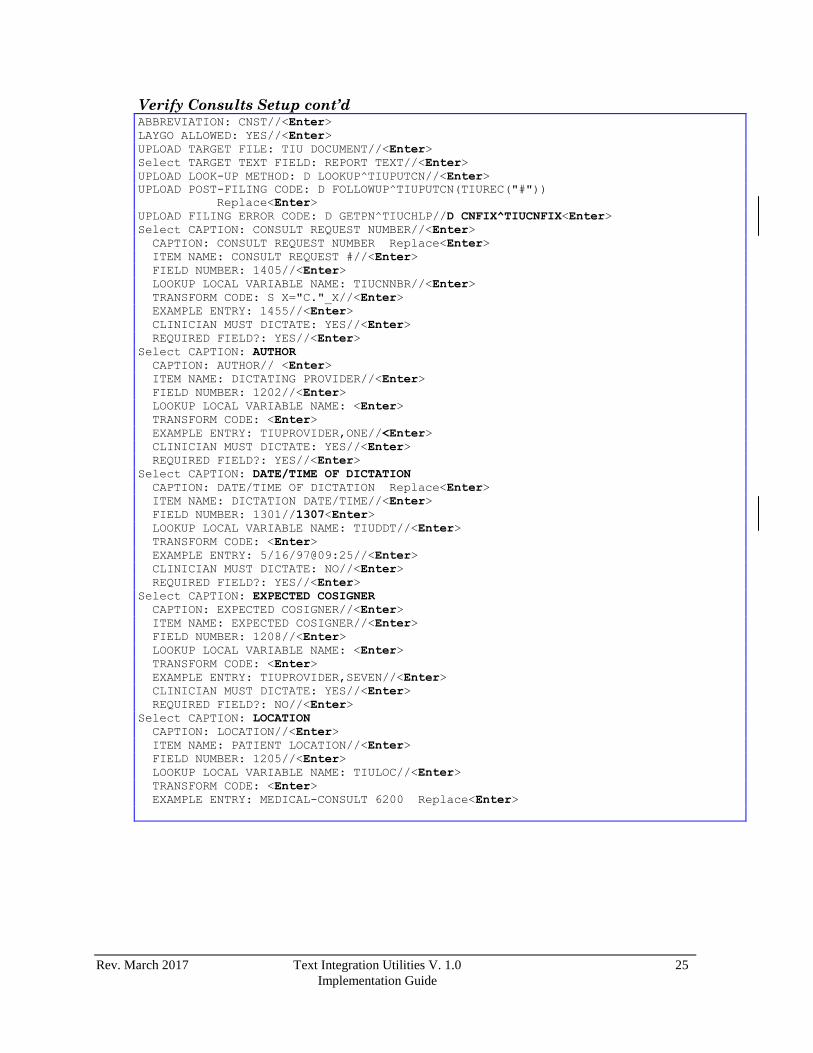
Verify Consults Setup cont’d ABBREVIATION: CNST//<Enter>
LAYGO ALLOWED: YES//<Enter>
UPLOAD TARGET FILE: TIU DOCUMENT//<Enter>
Select TARGET TEXT FIELD: REPORT TEXT//<Enter>
UPLOAD LOOK-UP METHOD: D LOOKUP^TIUPUTCN//<Enter>
UPLOAD POST-FILING CODE: D FOLLOWUP^TIUPUTCN(TIUREC("#"))
Replace<Enter>
UPLOAD FILING ERROR CODE: D GETPN^TIUCHLP//D CNFIX^TIUCNFIX<Enter>
Select CAPTION: CONSULT REQUEST NUMBER//<Enter>
CAPTION: CONSULT REQUEST NUMBER Replace<Enter>
ITEM NAME: CONSULT REQUEST #//<Enter>
FIELD NUMBER: 1405//<Enter>
LOOKUP LOCAL VARIABLE NAME: TIUCNNBR//<Enter>
TRANSFORM CODE: S X="C."_X//<Enter>
EXAMPLE ENTRY: 1455//<Enter>
CLINICIAN MUST DICTATE: YES//<Enter>
REQUIRED FIELD?: YES//<Enter>
Select CAPTION: AUTHOR
CAPTION: AUTHOR// <Enter>
ITEM NAME: DICTATING PROVIDER//<Enter>
FIELD NUMBER: 1202//<Enter>
LOOKUP LOCAL VARIABLE NAME: <Enter>
TRANSFORM CODE: <Enter>
EXAMPLE ENTRY: TIUPROVIDER,ONE//<Enter>
CLINICIAN MUST DICTATE: YES//<Enter>
REQUIRED FIELD?: YES//<Enter>
Select CAPTION: DATE/TIME OF DICTATION
CAPTION: DATE/TIME OF DICTATION Replace<Enter>
ITEM NAME: DICTATION DATE/TIME//<Enter>
FIELD NUMBER: 1301//1307<Enter>
LOOKUP LOCAL VARIABLE NAME: TIUDDT//<Enter>
TRANSFORM CODE: <Enter>
EXAMPLE ENTRY: 5/16/97@09:25//<Enter>
CLINICIAN MUST DICTATE: NO//<Enter>
REQUIRED FIELD?: YES//<Enter>
Select CAPTION: EXPECTED COSIGNER
CAPTION: EXPECTED COSIGNER//<Enter>
ITEM NAME: EXPECTED COSIGNER//<Enter>
FIELD NUMBER: 1208//<Enter>
LOOKUP LOCAL VARIABLE NAME: <Enter>
TRANSFORM CODE: <Enter>
EXAMPLE ENTRY: TIUPROVIDER,SEVEN//<Enter>
CLINICIAN MUST DICTATE: YES//<Enter>
REQUIRED FIELD?: NO//<Enter>
Select CAPTION: LOCATION
CAPTION: LOCATION//<Enter>
ITEM NAME: PATIENT LOCATION//<Enter>
FIELD NUMBER: 1205//<Enter>
LOOKUP LOCAL VARIABLE NAME: TIULOC//<Enter>
TRANSFORM CODE: <Enter>
EXAMPLE ENTRY: MEDICAL-CONSULT 6200 Replace<Enter>

26 Text Integration Utilities V. 1.0 Rev. March 2017
Implementation Guide
Verify Consults Setup cont’d CLINICIAN MUST DICTATE: YES//<Enter>
REQUIRED FIELD?: YES//<Enter>
Select CAPTION: SSN
CAPTION: SSN//<Enter>
ITEM NAME: PATIENT SSN//<Enter>
FIELD NUMBER: .02//<Enter>
LOOKUP LOCAL VARIABLE NAME: TIUSSN//<Enter>
TRANSFORM CODE: S X=$TR(X,"-/","")// <Enter>
EXAMPLE ENTRY: 555-12-1234//<Enter>
CLINICIAN MUST DICTATE: YES//<Enter>
REQUIRED FIELD?: YES//<Enter>
Select CAPTION: VISIT/EVENT DATE
CAPTION: VISIT/EVENT DATE//<Enter>
ITEM NAME: VISIT/EVENT DATE/<Enter>/
FIELD NUMBER: .07//<Enter>
LOOKUP LOCAL VARIABLE NAME: TIUVDT//<Enter>
TRANSFORM CODE: <Enter>
EXAMPLE ENTRY: 5/15/97@08:15//<Enter>
CLINICIAN MUST DICTATE: YES//<Enter>
REQUIRED FIELD?: YES//<Enter>
Select CAPTION: TITLE
CAPTION: TITLE//<Enter>
ITEM NAME: TITLE OF CONSULT//<Enter>
FIELD NUMBER: .01//<Enter>
LOOKUP LOCAL VARIABLE NAME: TIUTITLE//<Enter>
TRANSFORM CODE: <Enter>
EXAMPLE ENTRY: PULMONARY CONSULT//<Enter>
CLINICIAN MUST DICTATE: YES//<Enter>
REQUIRED FIELD?: YES//<Enter>
Select CAPTION:<Enter>
NOTE: Some sites have defined additional captions for administrative use in
resolving discrepancies. If you define additional captions do not include field
numbers for them. Doing so can cause data to be overwritten with incorrect
transcription data. For example, PATIENT may be overwritten with an
incorrect patient.
The header for the CONSULTS DOCUMENT CLASS is now defined as:
$HDR: CONSULTS
TITLE: PULMONARY CONSULT
SSN: 555-12-1234
VISIT/EVENT DATE: 5/15/97@08:15
AUTHOR: TIUPROVIDER,ONE
DATE/TIME OF DICTATION: 5/16/97@09:25
LOCATION: MEDICAL-CONSULT 6200
EXPECTED COSIGNER: TIUPROVIDER,SEVEN
CONSULT REQUEST NUMBER: 1455

Rev. March 2017 Text Integration Utilities V. 1.0 27
Implementation Guide
Verify Consults Setup cont’d $TXT
CONSULTS Text
$EOM
*** File should be ASCII with width no greater than 80 columns.
*** Use "@@@" for "BLANKS" (word or phrase in dictation that isn't understood).
3. Use the Create Document Definitions option [TIUFC CREATE DDEFS MGR], under the IRM
Maintenance Menu option [TIU IRM MAINTENANCE MENU], to construct a new document
definition sub-tree for Consults that looks something like this:
Edit Document Definitions Sep 03, 1997 11:59:04 Page: 1 of 1
BASICS
Name Type
1 CLINICAL DOCUMENTS CL
2 +DISCHARGE SUMMARY CL
3 +PROGRESS NOTES CL
4 CONSULTS DC
5 MEDICINE CONSULTS DC
6 MEDICINE CONSULT TL
7 ENDOSCOPY TL
8 CARDIOLOGY CONSULTS DC
9 CARDIOLOGY COSULT TL
10 ELECTROCARDOGRAM TL
11 ECHOCARDIOGRAM INTERPRETATION TL
12 +ADDENDUM DC
?Help >ScrollRight PS/PL PrintScrn/List +/- >>>
Expand/Collapse Detailed Display/Edit Items: Seq Mnem MenuTxt
Jump to Document Def Status... Delete
Boilerplate Text Name/Owner/PrintName... Copy/Move
Select Action: Quit//

28 Text Integration Utilities V. 1.0 Rev. March 2017
Implementation Guide
TIU, cont’d
The example above suggests a Service-oriented set of document classes with one or more titles
under each. Of course, just like Progress Notes, these can include boilerplate text with embedded
objects. It will probably take some time, with substantial cooperation between your Clinical
Coordinator, IRMS, and the Consulting Services, to develop a complete set of Document
Definitions for Consults at your site.
4. Next, define a set of Document Parameters for the new Consults class, using the Document
Parameter Edit [TIU DOCUMENT PARAMETER EDIT] option under the TIU IRM
MAINTENANCE MENU option, as follows:
1 TIU Parameters Menu ...
2 Document Definitions (Manager) ...
3 User Class Management ...
Select TIU Maintenance Menu Option: 1 TIU Parameters Menu
1 Basic TIU Parameters
2 Modify Upload Parameters
3 Document Parameter Edit
4 Progress Notes Batch Print Locations
5 Division - Progress Notes Print Params
Select TIU Parameters Menu Option: DOCument Parameter Edit
First edit Institution-wide parameters:
Select DOCUMENT DEFINITION: CONSULTS DOCUMENT CLASS
...OK? Yes// <Enter> (Yes)
DOCUMENT DEFINITION: CONSULTS// <Enter>
REQUIRE RELEASE: n NO
REQUIRE MAS VERIFICATION: u UPLOAD ONLY
REQUIRE AUTHOR TO SIGN: y YES
ROUTINE PRINT EVENT(S): <Enter>
STAT PRINT EVENT(S): <Enter>
MANUAL PRINT AFTER ENTRY: y YES
ALLOW CHART PRINT OUTSIDE MAS: y YES
ALLOW >1 RECORDS PER VISIT: n NO
ENABLE IRT INTERFACE: <Enter>
SUPPRESS DX/CPT ON NEW VISIT: <Enter>
EDITOR SET-UP CODE: <Enter>
If document is to be uploaded, specify Filing Alert Recipients:
Select FILING ERROR ALERT RECIPIENTS:
Now enter the USER CLASSES for which cosignature will be required:
Identify local
recipients as
appropriate.

Rev. March 2017 Text Integration Utilities V. 1.0 29
Implementation Guide
Select USERS REQUIRING COSIGNATURE: STUDENT//
Now enter the DIVISIONAL parameters:
Select DIVISION: [optional...you probably won't need to set up
auto-printing devices]
Press RETURN to continue...
5. Finally, use the option to Manage Business Rules, under the User Class Management Menu to
specify the following rules, allowing Linking (or re-linking) of TIU documents with
“requests” in a client application:
1 An UNSIGNED (CLASS) CLINICAL DOCUMENT may be LINKED by An AUTHOR/DICTATOR
2 An UNCOSIGNED (CLASS) CLINICAL DOCUMENT may be LINKED by An EXPECTED
COSIGNER
3 A COMPLETED (CLASS) CLINICAL DOCUMENT may be LINKED by A CHIEF, MIS
4 An UNSIGNED (CLASS) CLINICAL DOCUMENT may be LINKED by A MEDICAL
RECORDS TECHNICIAN
Identify per
local
requirements
30 Text Integration Utilities V. 1.0 Rev. March 2017
Implementation Guide
TIU Document Parameter Inheritance
TIU Document Parameters are set with the option Document Parameter Edi on the TIU
Maintenance Menu:
TIU Maintenance Menu [TIU IRM MAINTENANCE MENU]
TIU Parameters Menu [TIU SET-UP MENU]
Document Parameter Edit [TIU DOCUMENT PARAMETER EDIT]
At present, document parameters are not independently heritable.
Therefore, if one of these parameters is set for a given Document Definition, then all
parameters set at higher Document Definition levels are ignored for that Document
Definition. For example, if you set one of these parameters for the Title POSTOPERATIVE
NOTE, then any other parameters which should hold for POSTOPERATIVE NOTE must also
be explicitly set at that level; they are not inherited from higher levels.
Example:
Suppose you want residents to require cosignature, but only for the Title POSTOPERATIVE
NOTE. To accomplish this, use the option Document Parameter Edit, select Title
POSTOPERATIVE NOTE, and set the parameter USERS REQUIRING COSIGNATURE to
User Class RESIDENT PHYSICIAN. Then residents will require cosignature for the Title
POSTOPERATIVE NOTE.
We show this process in several steps in the screen captures on the next page. We first set the
parameter USERS REQUIRING COSIGNATURE for Title POSTOPERATIVE NOTE,
leaving other parameters alone. Then we look up parameter values for PROGRESS NOTES.
Last, we set previously inherited parameter values for POSTOPERATIVE NOTE:

Rev. March 2017 Text Integration Utilities V. 1.0 31
Implementation Guide
Example: Setting Cosignature Requirement
Select TIU Parameters Menu Option: 3 Document Parameter Edit
First edit Institution-wide parameters:
Select DOCUMENT DEFINITION: POSTOPERATIVE NOTE TITLE
Are you adding 'POSTOPERATIVE NOTE' as
a new TIU DOCUMENT PARAMETERS (the 12TH)? No// Y (Yes)
DOCUMENT DEFINITION: POSTOPERATIVE NOTE// <Enter>
REQUIRE RELEASE: <Enter>
REQUIRE MAS VERIFICATION: <Enter>
REQUIRE AUTHOR TO SIGN: <Enter>
ROUTINE PRINT EVENT(S): <Enter>
STAT PRINT EVENT(S): <Enter>
MANUAL PRINT AFTER ENTRY: <Enter>
ALLOW CHART PRINT OUTSIDE MAS: <Enter>
ALLOW >1 RECORDS PER VISIT: <Enter>
ENABLE IRT INTERFACE: <Enter>
SUPPRESS DX/CPT ON NEW VISIT: <Enter>
EDITOR SET-UP CODE: <Enter>
If document is to be uploaded, specify Filing Alert Recipients:
Select FILING ERROR ALERT RECIPIENTS:
Now enter the USER CLASSES for which cosignature will be required:
Select USERS REQUIRING COSIGNATURE: RESIDENT PHYSICIAN
Are you adding 'RESIDENT PHYSICIAN' as a new USERS REQUIRING
COSIGNATURE (the 1ST for this TIU DOCUMENT PARAMETERS)?
No// Y (Yes)
Select USERS REQUIRING COSIGNATURE:
Now enter the DIVISIONAL parameters:
Select DIVISION:
This accomplishes the goal for residents for POSTOPERATIVE NOTES. But, in creating
this new entry, we have overridden ALL previously inherited document parameter values for
POSTOPERATIVE NOTES.
If we want POSTOPERATIVE NOTE to function like other notes (apart from requiring
cosignature for residents), we’ll need to enter the parameter values for POSTOPERATIVE
NOTE that it previously inherited. Use the option Document Parameter Edit and select Class
PROGRESS NOTES to see what values PROGRESS NOTES has on your system. Don’t
change the values; just take the defaults so you can look at them. Your values may be
different from ours.
32 Text Integration Utilities V. 1.0 Rev. March 2017
Implementation Guide
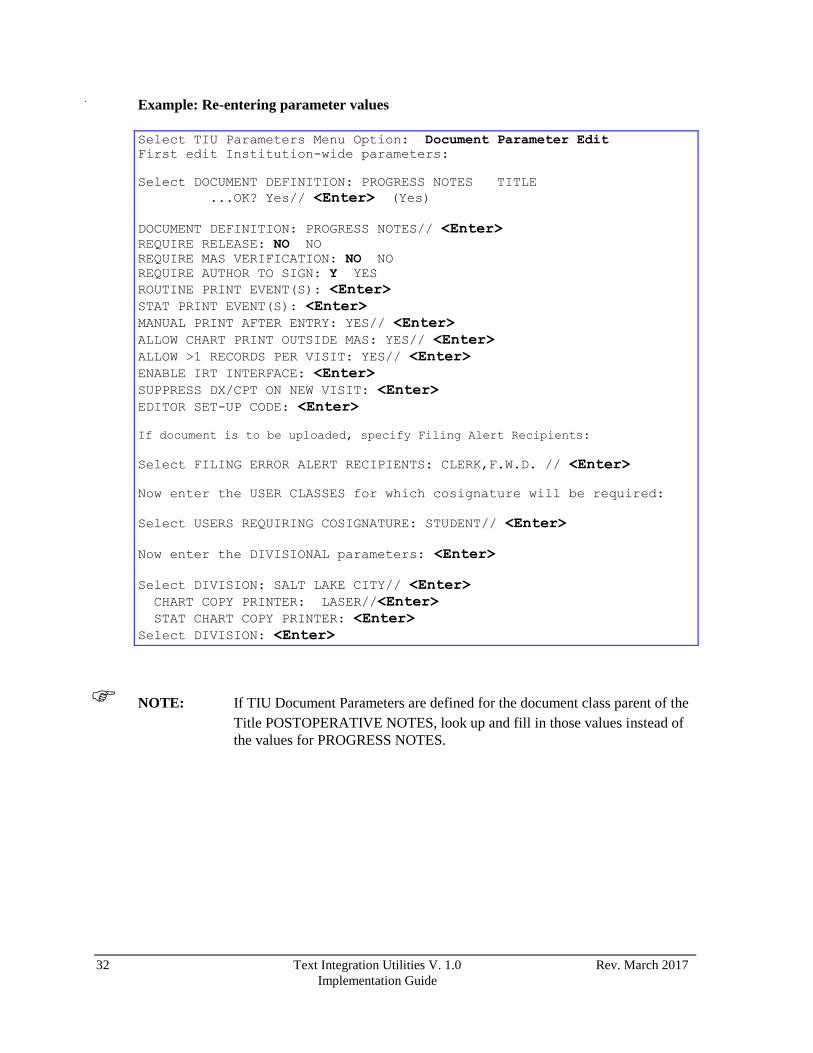
Example: Re-entering parameter values
Select TIU Parameters Menu Option: Document Parameter Edit
First edit Institution-wide parameters:
Select DOCUMENT DEFINITION: PROGRESS NOTES TITLE
...OK? Yes// <Enter> (Yes)
DOCUMENT DEFINITION: PROGRESS NOTES// <Enter> REQUIRE RELEASE: NO NO
REQUIRE MAS VERIFICATION: NO NO
REQUIRE AUTHOR TO SIGN: Y YES
ROUTINE PRINT EVENT(S): <Enter>
STAT PRINT EVENT(S): <Enter>
MANUAL PRINT AFTER ENTRY: YES// <Enter>
ALLOW CHART PRINT OUTSIDE MAS: YES// <Enter>
ALLOW >1 RECORDS PER VISIT: YES// <Enter>
ENABLE IRT INTERFACE: <Enter>
SUPPRESS DX/CPT ON NEW VISIT: <Enter>
EDITOR SET-UP CODE: <Enter> If document is to be uploaded, specify Filing Alert Recipients:
Select FILING ERROR ALERT RECIPIENTS: CLERK,F.W.D. // <Enter>
Now enter the USER CLASSES for which cosignature will be required:
Select USERS REQUIRING COSIGNATURE: STUDENT// <Enter>
Now enter the DIVISIONAL parameters: <Enter>
Select DIVISION: SALT LAKE CITY// <Enter>
CHART COPY PRINTER: LASER//<Enter>
STAT CHART COPY PRINTER: <Enter>
Select DIVISION: <Enter>
NOTE: If TIU Document Parameters are defined for the document class parent of the
Title POSTOPERATIVE NOTES, look up and fill in those values instead of
the values for PROGRESS NOTES.

Rev. March 2017 Text Integration Utilities V. 1.0 33
Implementation Guide
Example, cont’d
Now edit parameters for POSTOPERATIVE NOTE again, and fill in the values your site is
using for PROGRESS NOTES:
Select TIU Parameters Menu Option: Document Parameter Edit
First edit Institution-wide parameters:
Select DOCUMENT DEFINITION: POSTOPERATIVE NOTE TITLE
...OK? Yes// <Enter> (Yes)
DOCUMENT DEFINITION: POSTOPERATIVE NOTE// <Enter> REQUIRE RELEASE: NO NO
REQUIRE MAS VERIFICATION: NO NO
REQUIRE AUTHOR TO SIGN: Y YES
ROUTINE PRINT EVENT(S): <Enter>
STAT PRINT EVENT(S): <Enter> MANUAL PRINT AFTER ENTRY: Y YES
ALLOW CHART PRINT OUTSIDE MAS: Y YES
ALLOW >1 RECORDS PER VISIT: Y YES
ENABLE IRT INTERFACE: <Enter>
SUPPRESS DX/CPT ON NEW VISIT: <Enter>
EDITOR SET-UP CODE: <Enter>
If document is to be uploaded, specify Filing Alert Recipients:
Select FILING ERROR ALERT RECIPIENTS: CPRSCLERK,ONE. OC
MEDICAL RECORD TECHNICIAN
Are you adding 'CLERK,ONE.' as a new FILING ERROR ALERT RECIPIENTS
(the 1ST for this TIU DOCUMENT PARAMETERS)? No// Y (Yes)
Select FILING ERROR ALERT RECIPIENTS:
Now enter the USER CLASSES for which cosignature will be required:
Select USERS REQUIRING COSIGNATURE: RESIDENT PHYSICIAN
// STUDENT
Are you adding 'STUDENT' as a new USERS REQUIRING COSIGNATURE (the
2ND for this TIU DOCUMENT PARAMETERS)? No// Y (Yes)
Select USERS REQUIRING COSIGNATURE: <Enter>
Now enter the DIVISIONAL parameters: <Enter>
Select DIVISION: SALT LAKE CITY 660
Are you adding 'SALT LAKE CITY' as a new DIVISION (the 1ST for this
TIU DOCUMENT PARAMETERS)? No// Y (Yes)
CHART COPY PRINTER: LASER PRINTER ROOM LN11 12 PITCH
_LTA36:
STAT CHART COPY PRINTER:
Select DIVISION:

34 Text Integration Utilities V. 1.0 Rev. March 2017
Implementation Guide
Example, cont’d
Notice that we added User Class STUDENT to the USERS REQUIRING COSIGNATURE
multiple as well as filling in other parameters.
NOTE: We split this edit into two separate steps for clarity, but it is more efficient to
edit all parameters for POSTOPERATIVE NOTE in a single step, assuming
you know what values it previously inherited.
If, in the future, TIU Document Parameters are made independently heritable, then the extra
parameters you add now will become redundant. You shouldn’t have to remove them.
Stub Document Parameters
It follows from what we said earlier about TIU Document Parameter inheritance that stub
parameters are not harmless.
Example: Suppose you enter the following:
Select TIU Parameters Menu Option: Document Parameter Edit
First edit Institution-wide parameters:
Select DOCUMENT DEFINITION: POSTOPERATIVE NOTE TITLE
...OK? Yes// <Enter> (Yes)
DOCUMENT DEFINITION: POSTOPERATIVE NOTE//<Enter>
Now, suppose you delete all values for POSTOPERATIVE NOTE, (or if POSTOPERATIVE
NOTE is new, suppose you don’t enter any values). Then, since POSTOPERATIVE NOTE
still exists as a TIU Document Parameters entry, it overrides any values that it might have
inherited from a higher document definition. To avoid this override, you must delete the
Document Parameter entry POSTOPERATIVE NOTE itself, not just all of its values.

Rev. March 2017 Text Integration Utilities V. 1.0 35
Implementation Guide
Progress Notes Batch Print Locations
Use this option for entering hospital locations used for TIU PRINT PN OUTPT LOC and
TIU PRINT PN WARD options. If locations are not entered in this file they will not be
selectable from these options.
Select TIU Maintenance Menu Option: 1 TIU Parameters Menu
1 Basic TIU Parameters
2 Modify Upload Parameters
3 Document Parameter Edit
4 Progress Notes Batch Print Locations
5 Division - Progress Notes Print Params
Select TIU Parameters Menu Option: 4 Progress Notes Batch Print Locations
Select Clinic or Ward: TELEPHONE TRIAGE - PSYCHIATRY
PROGRESS NOTES DEFAULT PRINTER: LASERJET 4SI// <Enter>
EXCLUDE FROM PN BATCH PRINT: ?
Set to '1' progress notes for this location will not be included
in the progress notes outpatient batch print job [TIU PRINT PN
BATCH].You would do this if you wanted to print the CHART copies
of the notes for this location in the clinic and not in the file
room.
Choose from:
1 YES
EXCLUDE FROM PN BATCH PRINT: YES
Select Clinic or Ward:<Enter>
1 Basic TIU Parameters
2 Modify Upload Parameters
3 Document Parameter Edit
4 Progress Notes Batch Print Locations
5 Division - Progress Notes Print Params
Select TIU Parameters Menu Option: <Enter>
1. DIVISION must be defined in file #8925.94 (TIU DIVISION PRINT PRINT
PARAMETERS FILE).
2. The variable TIUDIV must be defined in the VARIABLE NAME multiple of the OPTION
SCHEDULING FILE (#19.2). TIUDIV should be set to the IEN of the DIVISION in the
MEDICAL CENTER DIVISION FILE (#40.8). This pointer value is also stored in the .01
field of the TIU DIVISION PRINT PARAMETERS FILE (#8925.94).
3. This option must find a valid date in field #1.01 of file #8925.94 to start looping on. If a
valid date is not found, the option will terminate with this message.
4. To assist in troubleshooting, if no notes are found, the DATE/TIME field (#1.01) of file
#8925.94 will not be re-set to the new value (which is NOW) when the option begins
calculating.

36 Text Integration Utilities V. 1.0 Rev. March 2017
Implementation Guide
Division - Progress Notes Print Parameters
These parameters are used by the TIU PRINT PN BATCH INTERACTIVE and TIU
PRINT PN BATCH SCHEDULED options. If your site wants a footer other than what is
returned by $$SITE^ VASITE, the .02 field of the 1st entry in this file will be used. For
example, Waco-Temple-Marlin can have the institution of their progress notes as
“CENTRAL TEXAS HCF.” If there are no TIU Division Parameters and your site has an
Integration Name, the Integration Name will be used.
Select TIU Maintenance Menu Option: 1 TIU Parameters Menu
1 Basic TIU Parameters
2 Modify Upload Parameters
3 Document Parameter Edit
4 Progress Notes Batch Print Locations
5 Division - Progress Notes Print Params
Select TIU Parameters Menu Option: 5 Division - Progress Notes
Print Params
Select Division for PNs Outpatient Batch Print: ?
Answer with TIU DIVISION PRINT PARAMETERS, or NUMBER:
1 SALT LAKE CITY
You may enter a new TIU DIVISION PRINT PARAMETERS, if you
wish. Select the DIVISION these print parameters apply to.
Answer with MEDICAL CENTER DIVISION NUM, or NAME:
1 SALT LAKE CITY 660
Select Division for PNs Outpatient Batch Print: YOUR HOSPITAL
...OK? Yes// <Enter> (Yes)
LOCATION TO PRINT ON FOOTER: ??
The name of this division as it should appear in the footer
of the progress notes and forms printed using the terminal
outpatient sort. This is useful for sites that want
digit something other than what the external value of
this division returned by $$SITE^VASITE. For example, the
Waco division of the Central Texas Health Care System may
want Central Texas HCS- Waco to appear in the footer instead
of WACO VAMC.
LOCATION TO PRINT ON FOOTER: CENTRAL ANYWHERE
PROGRESS NOTES BATCH PRINTER: WARD LASERJET 4SI
NOTE: Patch TIU*1*45 corrected problems related to printing progress notes: as a
result, the value of TIUDIV should be defined as the IEN of an entry in the
TIU DIVISION PRINT PARAMETERS file (#8925.94).

Rev. March 2017 Text Integration Utilities V. 1.0 37
Implementation Guide
Patch TIU*1*20 Patch 20 offers enhancements to allow the printing of chart copies (where permitted) from
the review screen (e.g., the All my unsigned documents option), and to specify a single
printer when multiple notes are signed consecutively from the review screen. It also adds two
new document parameters to conditionally require a YES or NO response to the
Classification questions for exposure to AO, IR, or EC, as they apply, and to ask for
encounter data on ALL Outpatient visits (scheduled as well as stand-alone). It adds action
type protocols to allow the entry/editing of encounter data on demand, from the clinician's
review and browse screens. It eliminates a DEVICE NOT OPEN error when the user exits,
rather than printing upon signature, and finally, it allows for the removal of additional
signers, independent of the user's file access.
Following successful installation of this patch, you may wish to modify the two new
document parameters FORCE RESPONSE ON SC and ASK DX/CPT ON ALL OP VISITS,
for the PROGRESS NOTES CLASS. To make the changes, use the TIU DOCUMENT
PARAMETER EDIT option as shown below:
Select TIU Parameters Menu Option: TIU DOCUMENT PARAMETER EDIT Document
Parameter Edit action
Document Parameter Edit
First edit Institution-wide parameters:
Select DOCUMENT DEFINITION: PROGRESS NOTES CLASS
...OK? Yes// <Enter> (Yes)
DOCUMENT DEFINITION: PROGRESS NOTES// <Enter>
REQUIRE RELEASE: NO// <Enter>
REQUIRE MAS VERIFICATION: NO// <Enter>
REQUIRE AUTHOR TO SIGN: YES// <Enter>
ROUTINE PRINT EVENT(S): <Enter>
STAT PRINT EVENT(S): <Enter>
MANUAL PRINT AFTER ENTRY: YES// <Enter>
ALLOW CHART PRINT OUTSIDE MAS: YES// <Enter>
ALLOW >1 RECORDS PER VISIT: YES// <Enter>
ENABLE IRT INTERFACE: <Enter>
SUPPRESS DX/CPT ON NEW VISIT: <Enter>
FORCE RESPONSE ON SC: YES// ??
This parameter determines whether the user will be forced to enter a
Yes or No response when asked to specify the Service Connection
Classification of a Veteran, when creating a standalone visit (i.e.,
AO, IR, or EC).
Choose from:
1 YES
0 NO
FORCE RESPONSE ON SC: YES// Y YES
ASK DX/CPT ON ALL OP VISITS: YES// ??
Please indicate whether the Diagnosis and Procedural questions should
be asked on Scheduled Appointments, in addition to Walk-ins and
Telephone (i.e., Standalone) Encounters.
Choose from:
1 YES
0 NO
ASK DX/CPT ON ALL OP VISITS: YES// Y YES
EDITOR SET-UP CODE: <Enter>
If document is to be uploaded, specify Filing Alert Recipients:
Select FILING ERROR ALERT RECIPIENTS: CLERK,ONE// <Enter>
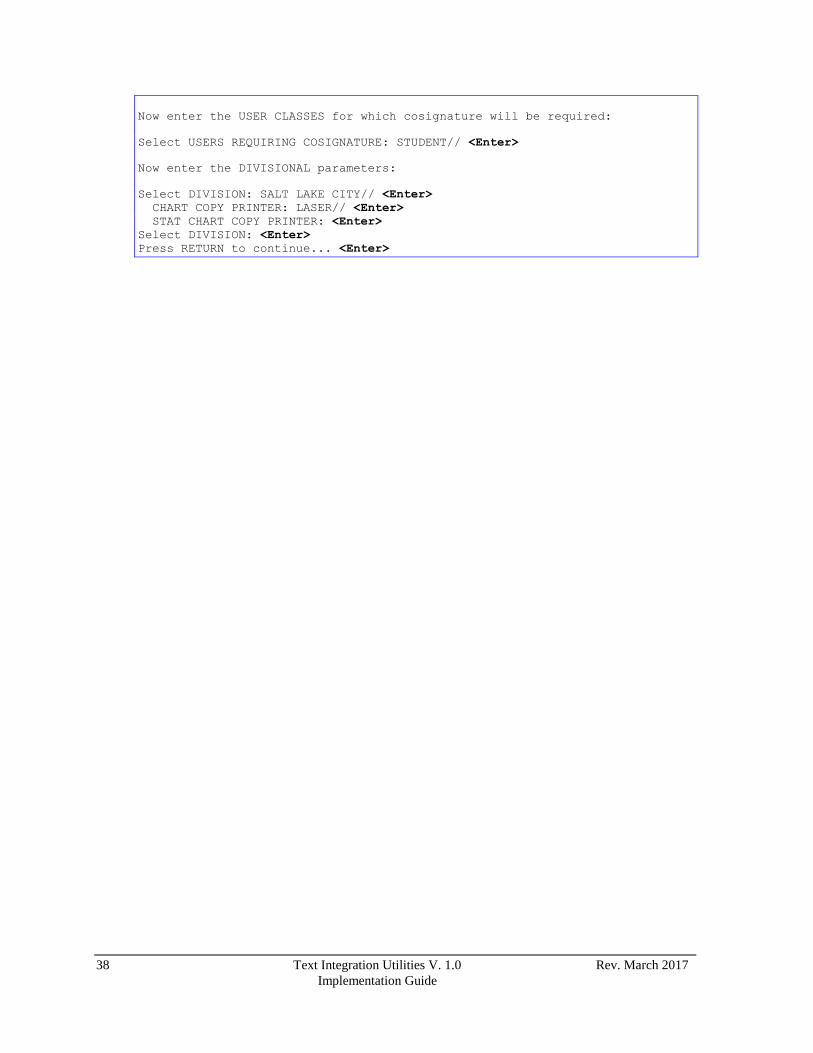
38 Text Integration Utilities V. 1.0 Rev. March 2017
Implementation Guide
Now enter the USER CLASSES for which cosignature will be required:
Select USERS REQUIRING COSIGNATURE: STUDENT// <Enter>
Now enter the DIVISIONAL parameters:
Select DIVISION: SALT LAKE CITY// <Enter>
CHART COPY PRINTER: LASER// <Enter>
STAT CHART COPY PRINTER: <Enter>
Select DIVISION: <Enter>
Press RETURN to continue... <Enter>

Rev. March 2017 Text Integration Utilities V. 1.0 39
Implementation Guide
Patch TIU*1*23: EXEMPT PURGING OF PN ADDENDA This patch resolves two problems with the application of the purge to TIU DOCUMENTS, by
increasing the allowable number of days for retention to 7300 days (20 years), and by
exempting addenda to Progress Notes from purge.
Following installation, you may wish to reset the Basic TIU Parameters, from the TIU IRM
MAINTENANCE MENU OPTION, as shown in the example below:
Select TIU Maintenance Menu Option: TIU Parameters Menu
1 Basic TIU Parameters
2 Modify Upload Parameters
3 Document Parameter Edit
4 Progress Notes Batch Print Locations
5 Division - Progress Notes Print Params
Select TIU Parameters Menu Option: 1 Basic TIU Parameters
First edit Division-wide parameters:
Select INSTITUTION: SALT LAKE CITY
ENABLE ELECTRONIC SIGNATURE: YES// <Enter>
ENABLE NOTIFICATIONS DATE: OCT 1,1996// <Enter>
GRACE PERIOD FOR SIGNATURE: 7// <Enter>
GRACE PERIOD FOR PURGE:??
This is the number of days following transcription for which a
document will be kept, prior to purge. Allowable range is from 90 to
7300 days (20 years).
NOTE: Progress Notes and their addenda are not subject to purge,
regardless of this parameter. IF YOU WANT TO DISABLE PURGING
ALTOGETHER, LEAVE THIS PARAMETER EMPTY (i.e., GRACE PERIOD FOR PURGE
equal to NULL).
GRACE PERIOD FOR PURGE: 7300
CHARACTERS PER LINE: 60// <Enter>
OPTIMIZE LIST BUILDING FOR: performance// <Enter>
SUPPRESS REVIEW NOTES PROMPT: <Enter>
ENABLE CHART COPY PROMPT: YES// <Enter>
BLANK CHARACTER STRING: @@@// <Enter>
Press RETURN to continue... <Enter>
1 Basic TIU Parameters
2 Modify Upload Parameters
3 Document Parameter Edit
4 Progress Notes Batch Print Locations
5 Division - Progress Notes Print Params
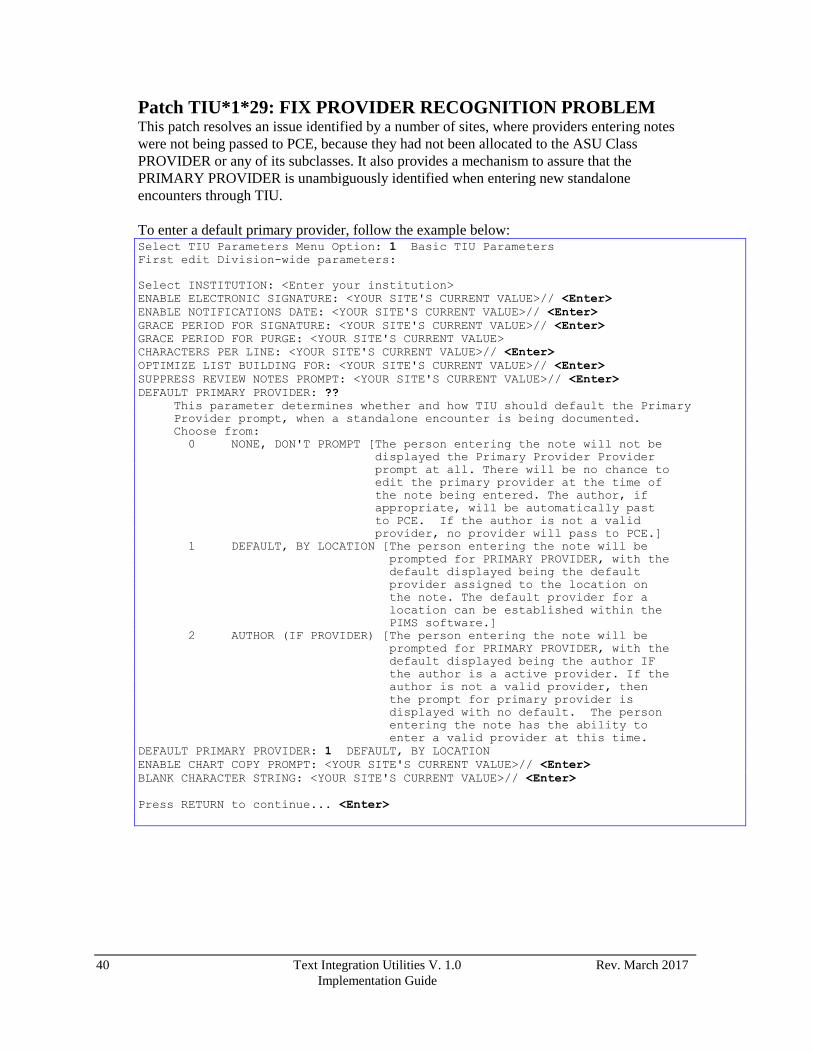
40 Text Integration Utilities V. 1.0 Rev. March 2017
Implementation Guide
Patch TIU*1*29: FIX PROVIDER RECOGNITION PROBLEM This patch resolves an issue identified by a number of sites, where providers entering notes
were not being passed to PCE, because they had not been allocated to the ASU Class
PROVIDER or any of its subclasses. It also provides a mechanism to assure that the
PRIMARY PROVIDER is unambiguously identified when entering new standalone
encounters through TIU.
To enter a default primary provider, follow the example below: Select TIU Parameters Menu Option: 1 Basic TIU Parameters
First edit Division-wide parameters:
Select INSTITUTION: <Enter your institution>
ENABLE ELECTRONIC SIGNATURE: <YOUR SITE'S CURRENT VALUE>// <Enter>
ENABLE NOTIFICATIONS DATE: <YOUR SITE'S CURRENT VALUE>// <Enter>
GRACE PERIOD FOR SIGNATURE: <YOUR SITE'S CURRENT VALUE>// <Enter>
GRACE PERIOD FOR PURGE: <YOUR SITE'S CURRENT VALUE>
CHARACTERS PER LINE: <YOUR SITE'S CURRENT VALUE>// <Enter>
OPTIMIZE LIST BUILDING FOR: <YOUR SITE'S CURRENT VALUE>// <Enter>
SUPPRESS REVIEW NOTES PROMPT: <YOUR SITE'S CURRENT VALUE>// <Enter>
DEFAULT PRIMARY PROVIDER: ??
This parameter determines whether and how TIU should default the Primary
Provider prompt, when a standalone encounter is being documented.
Choose from:
0 NONE, DON'T PROMPT [The person entering the note will not be
displayed the Primary Provider Provider
prompt at all. There will be no chance to
edit the primary provider at the time of
the note being entered. The author, if
appropriate, will be automatically past
to PCE. If the author is not a valid
provider, no provider will pass to PCE.]
1 DEFAULT, BY LOCATION [The person entering the note will be
prompted for PRIMARY PROVIDER, with the
default displayed being the default
provider assigned to the location on
the note. The default provider for a
location can be established within the
PIMS software.]
2 AUTHOR (IF PROVIDER) [The person entering the note will be
prompted for PRIMARY PROVIDER, with the
default displayed being the author IF
the author is a active provider. If the
author is not a valid provider, then
the prompt for primary provider is
displayed with no default. The person
entering the note has the ability to
enter a valid provider at this time.
DEFAULT PRIMARY PROVIDER: 1 DEFAULT, BY LOCATION
ENABLE CHART COPY PROMPT: <YOUR SITE'S CURRENT VALUE>// <Enter>
BLANK CHARACTER STRING: <YOUR SITE'S CURRENT VALUE>// <Enter>
Press RETURN to continue... <Enter>

Rev. March 2017 Text Integration Utilities V. 1.0 41
Implementation Guide
Patch TIU*1*128: INCORRECT PATIENT ON UPLOAD This patch corrects TIU documentation for uploading Operation Reports, and warns against
using field numbers in upload setup for any type of document where field numbers are not
specified in TIU upload documentation. Also, sites that upload Operation Reports are
reminded that transcribed CASE NUMBERS must be accurate.
Patch TIU*1*129: UPLOADING OP REPORTS TO SURGERY:
IMPROVE RELIABILITY This patch introduces a check of the case number during upload. If information on the
transcribed case number does not match the patient social security number and operation date
information, an error is generated along with an alert. You may then edit the transcribed
information before the note gets filed.
This patch may be used as an example for checks for other documents. If your facility uploads
document into files other than the TIU Document File (#8925) or the Surgery File (#130),
your site needs to write custom code using TIU*1*129 as an example.
Patch TIU*1*131: UPLOADING CONSULTS: IMPROVE
RELIABILITY This patch provides cross-checks, which eliminate the possibility of uploading a consult result
for one patient and associating it with a consult request for a different patient. It corrects
problems that arise when documents are uploaded as consult results, but with document titles
from Progress Notes, and vice-versa. It solves problems which occur when a consult is
uploaded erroneously without a consult request. In the process of solving these problems, the
patch provides a new ability to change a document uploaded as a Consult to a Progress Note
during the filing error resolution process.
It also restructures filing error resolution code routines, making it possible for custom code
developers to write their own cross-checks. For guidance in writing custom file resolution
code, see section Applying the Upload Utility to New Document Types of the TIU
Technical Manual.
NOTE: These corrections are not applied until the parameter UPLOAD FILING
ERROR CODE is updated. The upload filing error code must be changed to
D CNFIX^TIUCNFIX for Consults and to D PNFIX^TIUPNFIX for Progress
Notes. See the sections on Modifying Upload Parameters.

42 Text Integration Utilities V. 1.0 Rev. March 2017
Implementation Guide
Uploading Surgery Reports into the Surgery File Operation Reports are uploaded into the Surgery File (#130) for the Surgery Package. Setup
of other reports for storage in other non-TIU files would be similar and subject to similar
notes and warnings concerning field numbers and data consistency checks.
To set up this functionality in TIU, use VA FileMan, along with the TIUFA SORT DDEFS
MGR option to set up OPERATION REPORTS for the upload utility:
1. First, use the VA FileMan Utility - Edit File option to add TIU as an APPLICATION GROUP
to the SURGERY file (#130). This will allow the SURGERY file to pass the screen on the
TARGET FILE field in file 8925.1:
> D P^DII
VA FileMan 21.0
Select OPTION: UTILITY FUNCTIONS
Select UTILITY OPTION: EDIT FILE
MODIFY WHAT FILE: PROTOCOL// 130 SURGERY (2 entries)
NAME: SURGERY// <Enter>
DESCRIPTION: <Enter>
Each entry in the SURGERY file contains information regarding a surgery
case made up of an operative procedure, or multiple operative procedures
for a patient. The file includes the information necessary for creating
the Nurses' Intraoperative Report, Operation Report, and Anesthesia Report
Edit? NO// <Enter>
Select APPLICATION GROUP: TIU
Are you adding 'TIU' as a new APPLICATION GROUP (the 1ST for this FILE)? Y
(Yes)
Select APPLICATION GROUP: <Enter>
DEVELOPER: <Enter>
Select UTILITY OPTION: <Enter>
Select OPTION: <Enter>
> h

Rev. March 2017 Text Integration Utilities V. 1.0 43
Implementation Guide
Uploading Surgery Reports into the Surgery File, cont’d
2. Next, use the TIUFA SORT DDEFS MGR option to create a new document definition for
OPERATION REPORTS:
NOTE: The Sort Option is used rather than the Create Document Definitions option
because the new OPERATION REPORT title has to be an orphan title and is
not created as part of the Document Definition hierarchy. E. g., it is not under
class Progress Notes.
1 TIU Parameters Menu ...
2 Document Definitions (Manager) ...
3 User Class Management ...
Select TIU Maintenance Menu Option: 2 Document Definitions (Manager)
--- Manager Document Definition Menu ---
1 Edit Document Definitions
2 Sort Document Definitions
3 Create Document Definitions
4 Create Objects
Select Document Definitions (Manager) Option: Sort Document Definitions
Select Attribute: (T/O/S/U/P/A): Owner// T Type
Select TYPE: (CL/DC/TL/CO/O/N): TL TITLE
START WITH DOCMT DEF: FIRST// <Enter>........................
Sort by TYPE Jan 23, 1997 10:00:22 Page: 1 of 1
Entries of Type TITLE
Name Type
1 ADDENDUM TL
2 ADMISSION ASSESSMENT TL
3 ADVANCE DIRECTIVE TL
4 ADVERSE REACTION/ALLERGY TL
5 CLINICAL WARNING TL
6 CRISIS TL
7 CRISIS NOTE TL
8 DISCHARGE SUMMARY TL
9 FINAL DISCHARGE NOTE TL
10 GENERAL NOTE TL
11 SOAP - GENERAL NOTE TL
? Help > Scroll Right PS/PL Print Screen/List >>>
Find Boilerplate Text Name/Owner/PrintName...
Change View... Detailed Display/Edit Delete
Create Status... Copy
Select Action: Quit// CR Create
Enter Document Definition Name to add as New Entry: OPERATION REPORT
TYPE: (CL/DC/TL/CO/O): TL TITLE
CLASS OWNER: CLPAC CLINICAL COORDINATOR
STATUS: (I): INACTIVE// <Enter>
Entry added
Delete the Class Owner
if you want a Personal
Owner

44 Text Integration Utilities V. 1.0 Rev. March 2017
Implementation Guide
Uploading Surgery Reports into the Surgery File, cont’d Sort by TYPE Jan 23, 1997 10:03:48 Page: 1 of 1
Entries of Type TITLE
Name Type
1 ADDENDUM TL
2 ADMISSION ASSESSMENT TL
3 ADVANCE DIRECTIVE TL
4 ADVERSE REACTION/ALLERGY TL
5 CLINICAL WARNING TL
6 CRISIS TL
7 CRISIS NOTE TL
8 DISCHARGE SUMMARY TL
9 FINAL DISCHARGE NOTE TL
10 GENERAL NOTE TL
11 OPERATION REPORT TL
12 SOAP - GENERAL NOTE TL
? Help > Scroll Right PS/PL Print Screen/List >>>
Find Boilerplate Text Name/Owner/PrintName...
Change View... Detailed Display/Edit Delete
Create Status... Copy
Select Action: Quit//
3. Now that we have created an orphan OPERATION REPORT title, we use option
MODIFY UPLOAD PARAMETERS to set upload parameters and captions for the new title: Select TIU Parameters Menu Option: ?
1 Basic TIU Parameters
2 Modify Upload Parameters
3 Document Parameter Edit
4 Progress Notes Batch Print Locations
5 Division - Progress Notes Print Params
Enter ?? for more options, ??? for brief descriptions, ?OPTION for help text.
Select TIU Parameters Menu Option: 2 Modify Upload Parameters
First edit Institution-wide upload parameters:
Select INSTITUTION: SALT LAKE CITY HCS
ASCII UPLOAD SOURCE: remote computer// <Enter>
UPLOAD PROTOCOL: KERMIT// <Enter>
UPLOAD HEADER FORMAT: captioned// <Enter>
RECORD HEADER SIGNAL: $HDR// <Enter>
BEGIN REPORT TEXT SIGNAL: $TXT// <Enter>
RUN UPLOAD FILER IN FOREGROUND: YES//<Enter>
Now Select upload error alert recipients:
Select ALERT RECIPIENT: SCRIPTION,TWO// <Enter>
Now edit the DOCUMENT DEFINITION file:
DOCUMENT DEFINITION: OPERATION REPORT TITLE
ABBREVIATION: OPR
LAYGO ALLOWED: NO
UPLOAD TARGET FILE: TIU DOCUMENT
NAME: OPERATION REPORT ABBREVIATION: ORPT
PRINT NAME: OPERATION REPORT TYPE: TITLE
CLASS OWNER: CLINICAL COORDINATOR STATUS: ACTIVE
NATIONAL STANDARD: YES UPLOAD TARGET FILE: TIU DOCUMENT
LAYGO ALLOWED: NO TARGET TEXT FIELD SUBSCRIPT: 2;TEXT
OK TO DISTRIBUTE: YES SUPPRESS VISIT SELECTION: NO
UPLOAD LOOK-UP METHOD: D LOOKUP^TIUPUTS
UPLOAD POST-FILING CODE: D FOLLOWUP^TIUPUTS(+$G(TIUREC("#")))
Be sure to set this to NO so that
the upload process does not
create new entries in the
SURGERY FILE.
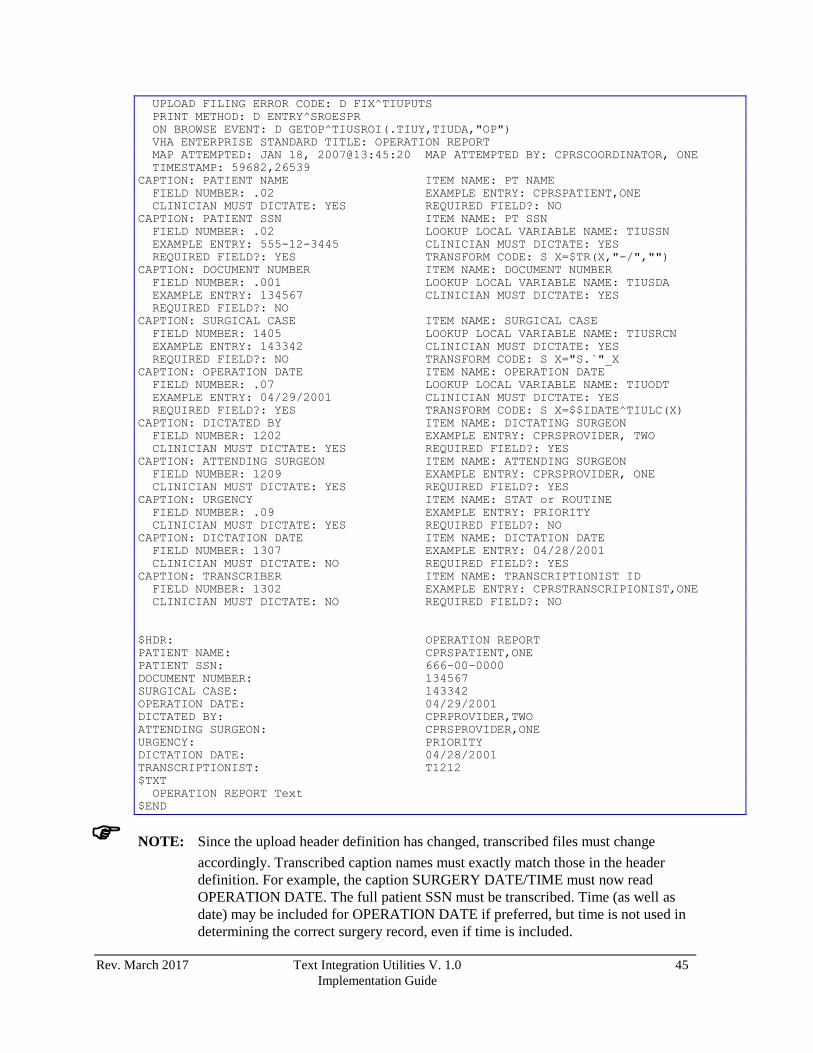
Rev. March 2017 Text Integration Utilities V. 1.0 45
Implementation Guide
UPLOAD FILING ERROR CODE: D FIX^TIUPUTS
PRINT METHOD: D ENTRY^SROESPR
ON BROWSE EVENT: D GETOP^TIUSROI(.TIUY,TIUDA,"OP")
VHA ENTERPRISE STANDARD TITLE: OPERATION REPORT
MAP ATTEMPTED: JAN 18, 2007@13:45:20 MAP ATTEMPTED BY: CPRSCOORDINATOR, ONE
TIMESTAMP: 59682,26539
CAPTION: PATIENT NAME ITEM NAME: PT NAME
FIELD NUMBER: .02 EXAMPLE ENTRY: CPRSPATIENT,ONE
CLINICIAN MUST DICTATE: YES REQUIRED FIELD?: NO
CAPTION: PATIENT SSN ITEM NAME: PT SSN
FIELD NUMBER: .02 LOOKUP LOCAL VARIABLE NAME: TIUSSN
EXAMPLE ENTRY: 555-12-3445 CLINICIAN MUST DICTATE: YES
REQUIRED FIELD?: YES TRANSFORM CODE: S X=$TR(X,"-/","")
CAPTION: DOCUMENT NUMBER ITEM NAME: DOCUMENT NUMBER
FIELD NUMBER: .001 LOOKUP LOCAL VARIABLE NAME: TIUSDA
EXAMPLE ENTRY: 134567 CLINICIAN MUST DICTATE: YES
REQUIRED FIELD?: NO
CAPTION: SURGICAL CASE ITEM NAME: SURGICAL CASE
FIELD NUMBER: 1405 LOOKUP LOCAL VARIABLE NAME: TIUSRCN
EXAMPLE ENTRY: 143342 CLINICIAN MUST DICTATE: YES
REQUIRED FIELD?: NO TRANSFORM CODE: S X="S.`"_X
CAPTION: OPERATION DATE ITEM NAME: OPERATION DATE
FIELD NUMBER: .07 LOOKUP LOCAL VARIABLE NAME: TIUODT
EXAMPLE ENTRY: 04/29/2001 CLINICIAN MUST DICTATE: YES
REQUIRED FIELD?: YES TRANSFORM CODE: S X=$$IDATE^TIULC(X)
CAPTION: DICTATED BY ITEM NAME: DICTATING SURGEON
FIELD NUMBER: 1202 EXAMPLE ENTRY: CPRSPROVIDER, TWO
CLINICIAN MUST DICTATE: YES REQUIRED FIELD?: YES
CAPTION: ATTENDING SURGEON ITEM NAME: ATTENDING SURGEON
FIELD NUMBER: 1209 EXAMPLE ENTRY: CPRSPROVIDER, ONE
CLINICIAN MUST DICTATE: YES REQUIRED FIELD?: YES
CAPTION: URGENCY ITEM NAME: STAT or ROUTINE
FIELD NUMBER: .09 EXAMPLE ENTRY: PRIORITY
CLINICIAN MUST DICTATE: YES REQUIRED FIELD?: NO
CAPTION: DICTATION DATE ITEM NAME: DICTATION DATE
FIELD NUMBER: 1307 EXAMPLE ENTRY: 04/28/2001
CLINICIAN MUST DICTATE: NO REQUIRED FIELD?: YES
CAPTION: TRANSCRIBER ITEM NAME: TRANSCRIPTIONIST ID
FIELD NUMBER: 1302 EXAMPLE ENTRY: CPRSTRANSCRIPIONIST,ONE
CLINICIAN MUST DICTATE: NO REQUIRED FIELD?: NO
$HDR: OPERATION REPORT
PATIENT NAME: CPRSPATIENT,ONE
PATIENT SSN: 666-00-0000
DOCUMENT NUMBER: 134567
SURGICAL CASE: 143342
OPERATION DATE: 04/29/2001
DICTATED BY: CPRPROVIDER,TWO
ATTENDING SURGEON: CPRSPROVIDER,ONE
URGENCY: PRIORITY
DICTATION DATE: 04/28/2001
TRANSCRIPTIONIST: T1212
$TXT
OPERATION REPORT Text
$END
NOTE: Since the upload header definition has changed, transcribed files must change
accordingly. Transcribed caption names must exactly match those in the header
definition. For example, the caption SURGERY DATE/TIME must now read
OPERATION DATE. The full patient SSN must be transcribed. Time (as well as
date) may be included for OPERATION DATE if preferred, but time is not used in
determining the correct surgery record, even if time is included.
46 Text Integration Utilities V. 1.0 Rev. March 2017
Implementation Guide
Using the Upload Process for Other Reports Applying the TIU upload utility to new document types requires some custom code. Each
document type requires its own code for document lookup. For filing error resolution code
document types can either have their own code or they can rely on the generic TIU filing error
resolution process.
NOTE: Do not use filing error resolution code written for a different document type.
Document types may either rely on the generic TIU upload filing error
resolution process or they may use their own custom upload filing error code.
See the section Applying the Upload Utility to New Document Types in the
TIU Technical Manual for guidelines on writing custom filing error
resolution code.
All reports must have their own Lookup Method to perform cross-checks on transcribed data.
Relying on generic TIU upload code to look up the correct target record on the basis of a
single piece of transcribed data is not adequate. A single error in dictation or transcription of
the header data can result in reports being filed in the wrong patient record. The lookup
methods that have been provided with TIU perform double-checks on the upload header data
in order to avoid filing in the wrong patient record and custom upload code must do the same.
NOTE: Use lookup methods provided by TIU only for the document type they are
intended for. If a lookup method has not been provided for a document type
you want to upload, you should write your own lookup method. See the
section Applying the Upload Utility to New Document Types in the TIU
Technical Manual for guidelines on writing custom upload code.

Rev. March 2017 Text Integration Utilities V. 1.0 47
Implementation Guide
DOCUMENT DEFINITION SETUP The Document Definition Hierarchy provides the building blocks for TIU. As a kind of
database or document management system, it is the structure that defines the characteristics of
the actual progress notes, discharge summaries, consults, etc. This database structure enables
documents (Titles) to share or inherit characteristics of the higher levels, class and document
class, such as signature requirements and print characteristics.
Document Definition Categories and Definitions
Name Description Class A group of groups which may contain one or more CLASSES or
DOCUMENT CLASSES. TIU exports a root Class, Clinical
Documents, with the sub-classes Progress Notes and Discharge
Summary.
Document Class A grouping which contains TITLES. Examples of document
classes are: Medical Notes, Nursing Notes, Surgery Notes,
Title A single entity at the lowest level. Titles define the actual
Progress Notes or Discharge Summaries that you write (e.g.,
Endocrinology Notes, OPC/Psychology, Primary Care Notes,
Dr. Jones’ Discharge Summaries, etc.).
Boilerplate Text A kind of template for common types of documents, which may be
composed of either boilerplate text, predefined Objects, or a
combination of the two, to allow quick creation of notes.
Component An individually stored block of text that is predefined for a specific
purpose, such as SOAP components (Subjective, Objective, Assessment,
Plan).
Object A pre-defined placeholder that allows patient-specific text to be inserted
into a document when a user selects a TIU document, such as PATIENT
AGE.

48 Text Integration Utilities V. 1.0 Rev. March 2017
Implementation Guide
Create your TIU Document Class/Title structure
An important feature of TIU is its improved searching and retrieving capabilities across
documents. This is done by a meaningful grouping of Titles to facilitate sorting.
A new grouping in TIU, document class, groups Titles according to Service, product line, or
whatever grouping system your site prefers.
Sit down with hospital staff from relevant services or product lines to create a paper list of
these document classes before you enter them with this option.
Exported Document Classes
The CWAD Titles have already been established as individual Document Classes in order for
the CWAD alert system to work. The corresponding Titles are automatically placed under the
appropriate Document Class.
The Historical Titles Document Class has also been provided. Most sites have many
thousands of General Notes as well as SOAP - General Notes entered in their databases.
These titles will not serve you well in TIU, as they don’t contribute to meaningful sorting.
The Titles conversion routine automatically converts these Titles to the Historical Titles
Document Class and make them inactive. All data is still fully accessible; you just won’t have
numerous notes sorted in no particular category.
Addiction Severity Index (ASI), a patch from the Mental Health Package, automatically
generates a simple, electronically signed Progress Note. ASI is exported as a Document Class
and a Title.
Example of a Document Definition Hierarchy:
Important
Clinical
Documents
Progress Notes Discharge
Summary
Consults
Clinician
Notes
Nursing
Notes
Dietitian
Notes
Interdisciplinary
Child Notes
ICU Nursing
Notes
Cardiology
Nursing Notes
Eye Clinic
Nursing Notes
CLASSES
DOCUMENT
CLASSES
TITLES
CLASS

Rev. March 2017 Text Integration Utilities V. 1.0 49
Implementation Guide
Fine-tuning your initial Document Definition Hierarchy
After installing and converting Progress Notes, you’ll probably need to do some fine-tuning of
the Document Hierarchy before you create any new Document Classes, Titles, or Boilerplate
Text. Look at the report of Titles produced by the option, TITLEs Sorted by Document Class-
Report, on the TIU Maintenance Menu, before proceeding.
Inactivating a Title
When the Titles are converted from Progress Notes File 121.2 to TIU 8925, titles that were
inactive are still inactive in TIU; active titles are converted as active. To be able to fine-tune
Titles (change any parameters or characteristics) you must “inactivate” them. Do this through
the option Edit Document Definition.
Example: Inactivating a Title
When you use Edit Document Definition, you can “drill down” to the Title by using the action
Expand/Collapse or you can use Jump to Document Def to “jump” directly to the Title you
want.
1. Select Edit Document Definitions from your Document Definition Menu.
2. Select the action Expand/Collapse and then entry #4, Progress Notes.
Shortcut: At any “Select Action” prompt, you can type the action abbreviation, then the
= sign and the entry number (e.g., E=4).
Edit Document Definitions Jan 28, 1997 10:46:03 Page: 1 of 1
BASICS
Name Type
1 CLINICAL DOCUMENTS CL
2 +ADDENDUM DC
3 +DISCHARGE SUMMARY CL
4 +PROGRESS NOTES CL
?Help >ScrollRight PS/PL PrintScrn/List +/- >>>
Expand/Collapse Detailed Display/Edit Items:Seq Mnem MenuTxt
Jump to Document Def Status... Delete
Boilerplate Text Name/Owner/PrintName... Copy
Select Action: Quit// E=4

50 Text Integration Utilities V. 1.0 Rev. March 2017
Implementation Guide
Inactivating a Title, cont’d
3. Select E again, then the entry 10.
Edit Document Definitions Jan 28, 1997 10:53:52 Page: 1 of 2
BASICS
+ Name Type
5 ADVANCE DIRECTIVE DC
6 ADVERSE REACTION/ALLERGY DC
7 CRISIS NOTE DC
8 CLINICAL WARNING DC
9 HISTORICAL TITLES DC
10 NURSING NOTES
DC
? Help > Scroll Right PS/PL Print Screen/List >>>
Expand/Collapse Detailed Display/Edit Items:Seq Mnem MenuTxt
Jump to Document Def Status... Delete
Boilerplate Text Name/Owner/PrintName... Copy
Select Action: Next Screen// E=10 Expand/Collapse
4. Select the Status action, enter Inactive at the Status prompt, then enter 11 at the Select
Entry prompt..
Edit Document Definitions Jan 28, 1997 10:53:52 Page: 1 of 2
BASICS
+ Name Type
10 NURSING NOTES DC
11 NURSING-PATIENT EDUCATION NOTE TL
? Help > Scroll Right PS/PL Print Screen/List >>>
Expand/Collapse Detailed Display/Edit Items:Seq Mnem MenuTxt
Jump to Document Def Status... Delete
Boilerplate Text Name/Owner/PrintName... Copy
Select Action: Next Screen// ST Status
Select STATUS: (A/I/T): ?
Documents can be entered on ACTIVE Titles. Only the Owner can enter a
document on TEST Titles. Only INACTIVE Document Definitions can be
edited.
Choose from: ACTIVE INACTIVE TEST
Select STATUS: (A/I/T): I INACTIVE
Selecting Entries for Status INACTIVE. Please select ONE entry. You will
be prompted for another.
at the same time.
Select Entry: (10-11): 11
Entry Inactivated!......
5. Once a Title is inactivated, you can edit the search title (Name), the abbreviation
(acronym), the print Title, the boilerplate, and the owner (personal or User Class).
NOTE: The Title must be re-activated for a clinician or others to write a Progress
Note using this Title.

Rev. March 2017 Text Integration Utilities V. 1.0 51
Implementation Guide
Creating and Editing Titles A basic set of Document Definitions is exported with the TIU package. Patch #44 helps
you begin to set up your Document hierarchy by converting the Progress Notes structure
to TIU files. With the exported set of Titles, you have an adequate base for your users to
begin writing notes and summaries. To refine and adapt the package to your site’s needs,
follow the instructions in this section.
Document Definition Options
Option
Text
Option
Name
Description
Edit Document
Definitions
TIUFH EDIT
DDEFS
This option lets you view and edit entries. Entries are presented
in hierarchy order. Items of an entry are in sequence order, or if
they have no sequence, in alphabetic order by menu text, and
are indented below the entry. Since Objects don’t belong to the
hierarchy, they can’t be viewed or edited using the Edit
Options.
Create
Document
Definitions
TIUFC
CREATE
DDEFS
This option lets you create new entries of any type (Class,
Document Class, Title, Component) except Object, placing
them where they belong in the hierarchy. Although entries can
be created using the Edit and Sort options, the Create option
streamlines the process. This option present entries in hierarchy
order, traversing ONE line of descent, starting with Clinical
Documents at the top.
The Create option permits you to view, edit, and create entries,
but only from within the current line of descent. The Create
Option doesn’t let you copy an entry.
Sort Document
Definitions
TIUFA SORT
DDEFS
This option lets you select sort criteria. It then displays selected
entries in alphabetic order by Name, rather than in hierarchy
order. Depending on sort criteria, entries can include Objects.
The Sort option lets you view and edit entries.
Create Objects TIUFJ
CREATE
OBJECTS
MGR
This option lets you create new objects or edit existing objects.
First you select Start With and Go To values, and the existing
Objects within those values are displayed in alphabetical order.
View Objects TIUFJ VIEW
OBJECTS
CLIN
This option on the Clinician Document Definition menu lets
you view objects by a selected date range, in alphabetical
order.
52 Text Integration Utilities V. 1.0 Rev. March 2017
Implementation Guide
Creating new Document Classes and Titles
Title Conversion All Titles converted to TIU are assigned to the Clinical Coordinator.
Titles that were active will be active in TIU. While editing, adding boilerplate, etc., an Active
Title needs to be made Inactive. When you’re ready to start using it, change the status to
Active, using the Edit Status action in the Edit Document Definitions option.
Hierarchy Levels To create Document Classes or Titles, you need to move to the level of the hierarchy
where that document class or title belongs.
Summary of creating a new Document Class
Select Next Level.
Select the number on the screen for Progress Notes class.
You then see only that level of the hierarchy on the screen, with Progress
Notes bolded.
Select the action Class/Document Class to Create a Document Class.
To create a Title:
Select Next Level plus the number of the new Document Class you created.
The screen shows just that level of the hierarchy with the Document Class
Name bolded.
Select the action Title to Create a Title.
See the examples on the following pages for more detailed instructions.

Rev. March 2017 Text Integration Utilities V. 1.0 53
Implementation Guide
Example 1: Using the Create Document Definitions option
In this example, we create a Progress Note Document Class called Nursing Notes, then a
Title called Nursing Patient Education Notes.
1. Select Document Definitions from your menu.
2. Select Create Document Definitions. A screen appears, similar to the one on the
following page .
NOTE: The Class CLINICAL DOCUMENTS is bolded to show that you’re at that
level of the hierarchy.
Create Document Definitions Oct 30, 1996 15:41:35 Page: 1 of 1
BASICS
Name Type
1 CLINICAL DOCUMENTS CL
2 ADDENDUM DC
3 DISCHARGE SUMMARY CL
4 PROGRESS NOTES CL
New Users. Please enter ‘?NEW’ for Help>
Class/DocumentClass Next Level Detailed Display/Edit
(Title) Restart Status...
(Component) Boilerplate Text Delete
Select Action: Next Level// ?NEW
Help for new users:
The Create Option shows the Hierarchy, with CLINICAL DOCUMENTS at the top. When
the option begins, Clinical Documents is bolded with its current items indented below it. You
can create additional items under Clinical Documents if you so choose.
If you wish to create items under a LOWER entry, you must go down the hierarchy successive
levels until the proper entry is bolded and THEN create your items under the bolded entry.
To go down a level, select action NEXT LEVEL and then select an entry.
To create an entry, select Class/DocumentClass, Title, or Component. Only one of these
actions is selectable at a given time.(Actions enclosed in parentheses are not selectable.)
Enter ? for Help
Enter ?? for detailed help on actions including PRINTING
Enter ??? for detailed help on display
Press RETURN to continue or ‘^’ or “^^” to exit:

54 Text Integration Utilities V. 1.0 Rev. March 2017
Implementation Guide
Example 1: Create Document Definitions, cont’d
3. Press Enter to accept the default of Next Level, so that you can create the Nursing
Notes as a Document Class under Progress Notes.
Create Document Definitions Oct 30, 1996 15:41:35 Page: 1 of 1
NAME BASICS
Name Type
1 CLINICAL DOCUMENTS CL
2 ADDENDUM DC
3 DISCHARGE SUMMARY DC
4 PROGRESS NOTES CL
New Users. Please enter ‘?NEW’ for Help>
Class/DocumentClass Next Level Detailed Display/Edit
(Title) Restart Status...
(Component) Boilerplate Text Delete
Select Action: Next Level// <Enter> Next Level
Create Document Definitions Action Descriptions
Actions are not selectable when they are enclosed in parentheses.
Class/Document Class
This action is selectable only when the highlighted entry is a Class. It lets you create a new
Class or Document Class under the bolded entry.
Title
Create Title is selectable only when the bolded entry is a Document Class. This action lets
you create a new Title under the bolded entry.
Component
This action is selectable only when the bolded entry is a Title. It lets you create a new
Component under the bolded entry. A Title must be Inactive before Components can be
created under it. Subcomponents are created by selecting the action Detailed Display at the
parent Component, and Editing its Items. You can’t create Objects in Create Document
Definitions. Use the option Create Objects or Sort Document Definitions.
Next Level
Your current position in the Hierarchy is marked by the bolded entry. This action lets you
navigate down the Hierarchy by selecting an item under the highlighted entry.
NOTE: Next Level differs from Expand/Collapse in that Next Level changes your
position in the hierarchy and limits future expansion to items of that entry.
Restart
This action takes you back to the original display, with Clinical Documents bolded as the
current position in the hierarchy.

Rev. March 2017 Text Integration Utilities V. 1.0 55
Implementation Guide
Example 1: Create Document Definitions action descriptions, cont’d
Boilerplate Text
Applies to Titles and Components only. This action lets you display and edit the boilerplate
text of an entry. If the entry is a Title, it also displays the boilerplate text of any Components.
If you have the Manager menu, you don’t have to own the entry to edit its boilerplate text.
Detailed Display/Edit
Detailed Display lets you view and edit (if appropriate) details about the entry you select. This
action differs from the Items action in that Detailed Display permits edit of all aspects of the
entry, including Items, but Items looks at the entry ONLY as an Item under its parent and
permits edit of Item characteristics ONLY. Editing is limited if the entry is National. Shared
Components can be viewed through the Edit Document Definitions option but can be edited
only via the Sort option.
Status
Select Status Inactive, Test, or Active.
Select an entry. (If selected Status is Active, you can select multiple entries.)
If the entry is a Class or Document Class, Status is changed to the selected Status
(Inactive, Test, or Active). If the selected Status is Inactive, descendants are also
Inactivated.
If the entry is a Title, the Status is changed and Component Statuses are automatically
changed to the same Status. Exception: Shared Components don’t have a Status and are
not changed.
To change the status of an Object, use the action Basics under Detailed Display, since
Detailed Display shows Titles with the object embedded.
Delete
Deletes the entry from the TIU Document Definition file 8925.1. An entry will first be deleted
as an item wherever it is used as an item.
Can delete if: Can’t delete if:
Inactive status Active Status
Owner In Use by documents.
National entry
Shared Component
Pointed to by Business Rule
If the entry is used or pointed to by an entry in another file (for example if an entry has a
Business Rule which references it), it is the user’s responsibility to delete the entry which
points to it (for example, the Business Rule) before deleting the entry.

56 Text Integration Utilities V. 1.0 Rev. March 2017
Implementation Guide
Example 1: Create Document Definition, cont’d
Objects can be deleted only from the Detailed Display of the Object. This action deletes the
Object from the file. Objects can only be deleted by the owner and only after deactivation.
Object can’t be deleted if they are embedded in Boilerplate Text of any Titles.
4. Select the number of the Clinical Document you want to place your Document Class
under. Select CLINICAL DOCUMENT Item (Line 2-4): 4
5. The following screen appears, displaying only Progress Notes Document Classes. Note
that Progress Notes is bolded, indicating that you are working at that level in the
hierarchy. Select Class/Document Class to create a new document class. Create Document Definitions Oct 30, 1996 15:41:35 Page: 1 of 1
BASICS
Name Type
1 CLINICAL DOCUMENTS CL
2 PROGRESS NOTES CL
3 ADVANCE DIRECTIVE DC
4 ADVERSE REACTION/ALLERGY DC
5 CRISIS NOTE DC
6 CLINICAL WARNING DC
7 HISTORICAL TITLES DC
? Help > Scroll Right PS/PL Print Screen/List +/- >>>
Class/DocumentClass Next Level Detailed Display/Edit
(Title) Restart Status...
(Component) Boilerplate Text Delete
Select Action: Next Level// Cl Class/DocumentClass
6. Answer the following prompts: Enter the Name of a new PROGRESS NOTES: NURSING NOTES
TYPE: (CL/DC): DC DOCUMENT CLASS
STATUS: (A/I): INACTIVE// <Enter>
CLASS OWNER: CLINICAL COORDINATOR Replace <Enter>
SEQUENCE: 6
MENU TEXT: Nursing Notes// <Enter>
Entry Created
If you wish, you may enter another PROGRESS NOTES: <Enter>

Rev. March 2017 Text Integration Utilities V. 1.0 57
Implementation Guide
Example 1: Create Document Definition, cont’d
Explanations for the prompts above:
CLASS OWNER
A Class Owner is a User Class from the USR CLASS file (in ASU) whose members may
edit the entry. An entry may have a Personal OR a Class Owner, but not both. The
program doesn’t prompt for Class Owner if the entry has a Personal Owner.
If the document is owned by a Class rather than by a Person, enter the name of the User
Class whose members may edit the entry. If it’s owned by a Person, you won’t be
prompted for Class Owner. If you want to change a Class Owner to a Personal Owner,
delete the Class Owner by entering '@' at the Class Owner prompt. When Titles were
converted from the old Progress Notes package, they were all given to the Class Owner,
Clinical Coordinator. To enter a different Class Owner, enter the appropriate class after
the //'s. If there are no //'s and the Replace...with editor is being used, enter ... to replace
the whole class and then enter the appropriate class.
Document Definition Ownership has nothing to do with who can USE the entry to enter a
document. It determines responsibility for the Document Definition itself.
An entry can be edited by its owner. (The Manager menu permits override of ownership
so that ownership can be assigned to a clinician (anyone who has the Clinician Menu)
who can then fill in boilerplate text, while the manager can still edit the entry, since there
are many fields the clinician does not have access to.)
STATUS (A/I/T)
Status provides a way of making Document Definitions “offline” to documents.
Document Definitions need to be “offline” if they are new and not ready for use, if they
are being edited, or if they are retired from further use.
Documents can only be entered on ACTIVE Titles.
Only the Owner can enter a document on TEST Titles.
Only INACTIVE Document Definitions can be edited.
SEQUENCE
Sequence, if entered, determines an item’s order under its parent. If items have no
sequence, item order is alphabetic by Menu Text.
Sequence must be between .01 and 999.
MNEMONIC
Mnemonic is a number or abbreviation to select Classes/Document Classes from a menu.
Enter the Sequence number, or 1-4 letters, or nothing if you don't want mnemonics.
Mnemonic is usually numeric with the same value as the Sequence.
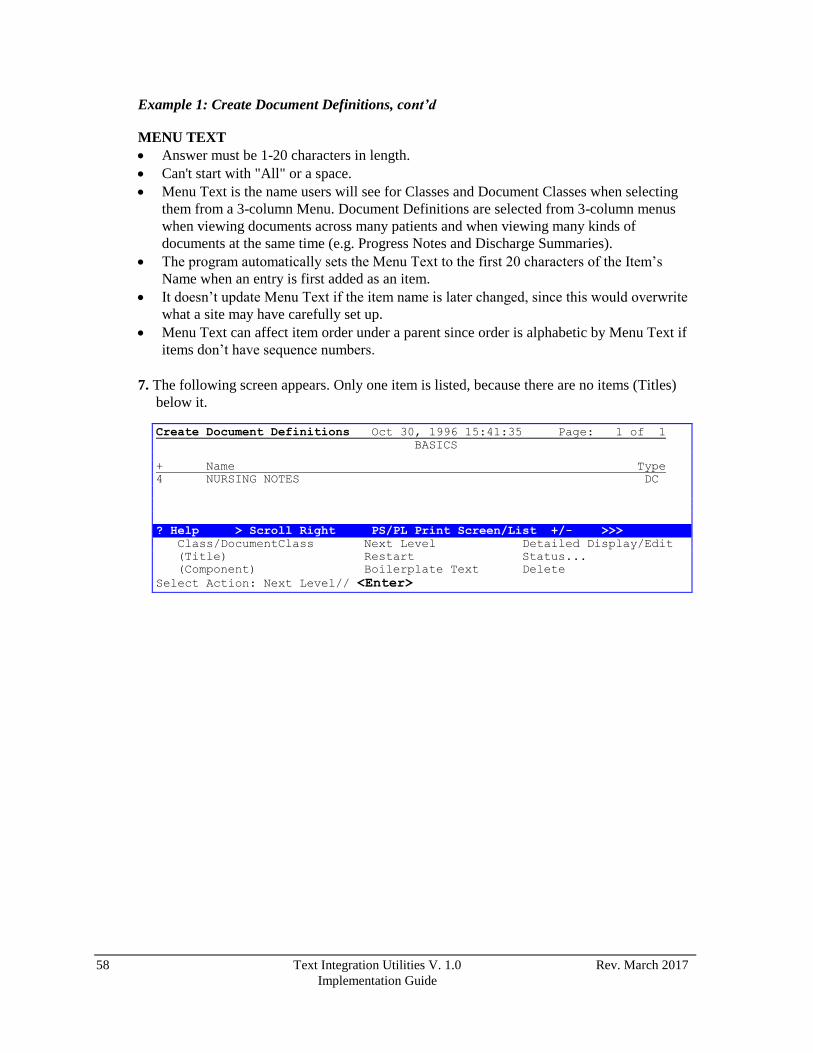
58 Text Integration Utilities V. 1.0 Rev. March 2017
Implementation Guide
Example 1: Create Document Definitions, cont’d
MENU TEXT
Answer must be 1-20 characters in length.
Can't start with "All" or a space.
Menu Text is the name users will see for Classes and Document Classes when selecting
them from a 3-column Menu. Document Definitions are selected from 3-column menus
when viewing documents across many patients and when viewing many kinds of
documents at the same time (e.g. Progress Notes and Discharge Summaries).
The program automatically sets the Menu Text to the first 20 characters of the Item’s
Name when an entry is first added as an item.
It doesn’t update Menu Text if the item name is later changed, since this would overwrite
what a site may have carefully set up.
Menu Text can affect item order under a parent since order is alphabetic by Menu Text if
items don’t have sequence numbers.
7. The following screen appears. Only one item is listed, because there are no items (Titles)
below it.
Create Document Definitions Oct 30, 1996 15:41:35 Page: 1 of 1
BASICS
+ Name Type
4 NURSING NOTES DC
? Help > Scroll Right PS/PL Print Screen/List +/- >>>
Class/DocumentClass Next Level Detailed Display/Edit
(Title) Restart Status...
(Component) Boilerplate Text Delete
Select Action: Next Level// <Enter>

Rev. March 2017 Text Integration Utilities V. 1.0 59
Implementation Guide
Example 1: Create Document Definition, cont’d
8. Select Detailed Display/Edit to see the details of your new Document, and to add
characteristics that you want to apply to all sub-documents (Document Classes or
Titles) for this Document Class.
Detailed Display Oct 30, 1996 15:41:35 Page: 1 of 2
Document Class NURSING NOTE
Basics Note: Inherited Values preceded by *
Name: NURSING NOTE
Abbreviation:
Print Name: NURSING NOTE
Type: DOCUMENT CLASS
IFN: 1086
National
Standard: NO
Status: INACTIVE
Owner: CLINICAL COORDINATOR
In Use: NO
Suppress Visit
Selection: NO
Items
+ ? Help +, - Next, Previous Screen PS/PL
Basics Technical Fields Find
Items: Seq Mnem MenuTxt Upload Quit
(Boilerplate Text) Try
Select Action: Next Screen// <Enter>
Detailed Display Oct 03, 1996 14:12:17 Page: 2 of 2
Document Class NURSING NOTE
+
Item IFN Seq Mnem Menu Text
NURSING NOTE 1087 RAN 4 Nursing Note
Technical Fields Note: Inherited Values preceded by *
Entry Action:
Exit Action:
Edit Template: * [TIU ENTER/EDIT PROGRESS NOTE]
Print Method: * D ENTRY^TIUPRPN
Print Form Header: * Progress Notes
Print Form Number: * Vice SF 509
Print Group: * 2
Visit Linkage Method: * D ENPN^TIUVSIT(.TIU,.DFN,1)
Validation Method: * S TIUASK=$$CHEKPN^TIULD(.TIU,.TIUBY)
Allow Custom Headers: * YES
+ ? Help +, - Next, Previous Screen PS/PL
Basics Technical Fields Find
Items: Seq Mnem MenuTxt Upload Quit
(Boilerplate Text) Try
Select Action: Quit//

60 Text Integration Utilities V. 1.0 Rev. March 2017
Implementation Guide
Example 1: Create Document Definitions cont’d
9. As you can see, you can define the print methods, form headers, templates, and other
characteristics that can apply to many documents (Titles) within a Class or Document
Class.
10. Quit out of Detailed Display, select Next Level and item 8. You can now start adding
Titles to the Document Class you just created.
Select Document Definitions Option: 3 Create Document Definitions.
Create Document Definitions Oct 30, 1996 15:41:35 Page: 1 of 1
BASICS
Name Type
1 CLINICAL DOCUMENTS CL
2 PROGRESS NOTES CL
3 ADVANCE DIRECTIVE DC
4 ADVERSE REACTION/ALLERGY DC
5 CRISIS NOTE DC
6 CLINICAL WARNING DC
7 HISTORICAL TITLES DC
8 NURSING NOTES DC
? Help > Scroll Right PS/PL Print Screen/List +/- >>>
Class/DocumentClass Next Level Detailed Display/Edit
(Title) Restart Status...
(Component) Boilerplate Text Delete
Select Action: Next Level// <Enter>
Select PROGRESS NOTES Item (Line 3-8): 8
11. When the next level is displayed, accept the default of Title.
Create Document Definitions Oct 30, 1996 15:49:15 Page: 1 of 1
BASICS
+ Name Type
2 PROGRESS NOTES CL
3 NURSING NOTES DC
? Help > Scroll Right PS/PL Print Screen/List >>>
Class/DocumentClass Next Level Detailed Display/Edit
(Title) Restart Status...
(Component) Boilerplate Text Delete
Select Action: Title// <Enter> Title

Rev. March 2017 Text Integration Utilities V. 1.0 61
Implementation Guide
Example 1: Create Document Definitions cont’d
12. Answer the following prompts about the new Title.
Enter the Name of a new NURSING NOTES: Nursing-Patient Education Note
CLASS OWNER: CLINICAL COORDINATOR Replace
STATUS: (I): INACTIVE// <Enter> SEQUENCE: 1
MENU TEXT: Nursing-pt Education Replace <Enter>
Entry Created
If you wish, you may enter another NURSING NOTES: <Enter>
13. You can create another Title or edit the one you just created.
14. If you decide to create another Title, enter the name of the new Title at the prompt above
and answer the other prompts, similarly to the example above.
15. If you don’t create another Title and respond to the prompt with <Enter>, the screen re-
displays, showing the new Title. At this point you can edit, delete, perform other actions,
or quit.
Create Docmt Definitions Oct 30, 1996 15:49:15 Page: 1 of 1
BASICS
+ Name Type
3 NURSING NOTES DC
4 NURSING - PT EDUCATION NOTE TL
? Help > Scroll Right PS/PL Print Screen/List >>>
(Class/DocumentClass) Next Level Detailed Display/Edit
Title Restart Status...
Component Boilerplate Text Delete
Select Action: Title//
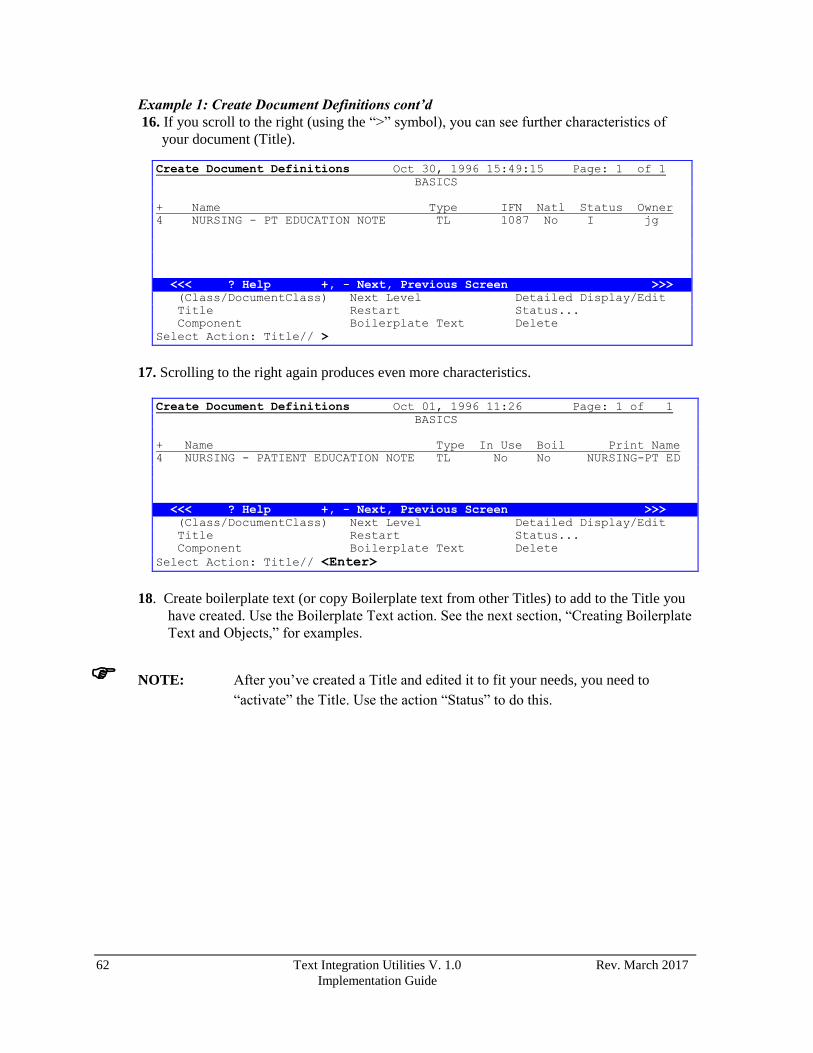
62 Text Integration Utilities V. 1.0 Rev. March 2017
Implementation Guide
Example 1: Create Document Definitions cont’d
16. If you scroll to the right (using the “>” symbol), you can see further characteristics of
your document (Title).
Create Document Definitions Oct 30, 1996 15:49:15 Page: 1 of 1
BASICS
+ Name Type IFN Natl Status Owner
4 NURSING - PT EDUCATION NOTE TL 1087 No I jg
<<< ? Help +, - Next, Previous Screen >>>
(Class/DocumentClass) Next Level Detailed Display/Edit
Title Restart Status...
Component Boilerplate Text Delete
Select Action: Title// >
17. Scrolling to the right again produces even more characteristics.
Create Document Definitions Oct 01, 1996 11:26 Page: 1 of 1
BASICS
+ Name Type In Use Boil Print Name
4 NURSING - PATIENT EDUCATION NOTE TL No No NURSING-PT ED
<<< ? Help +, - Next, Previous Screen >>>
(Class/DocumentClass) Next Level Detailed Display/Edit
Title Restart Status...
Component Boilerplate Text Delete
Select Action: Title// <Enter>
18. Create boilerplate text (or copy Boilerplate text from other Titles) to add to the Title you
have created. Use the Boilerplate Text action. See the next section, “Creating Boilerplate
Text and Objects,” for examples.
NOTE: After you’ve created a Title and edited it to fit your needs, you need to
“activate” the Title. Use the action “Status” to do this.
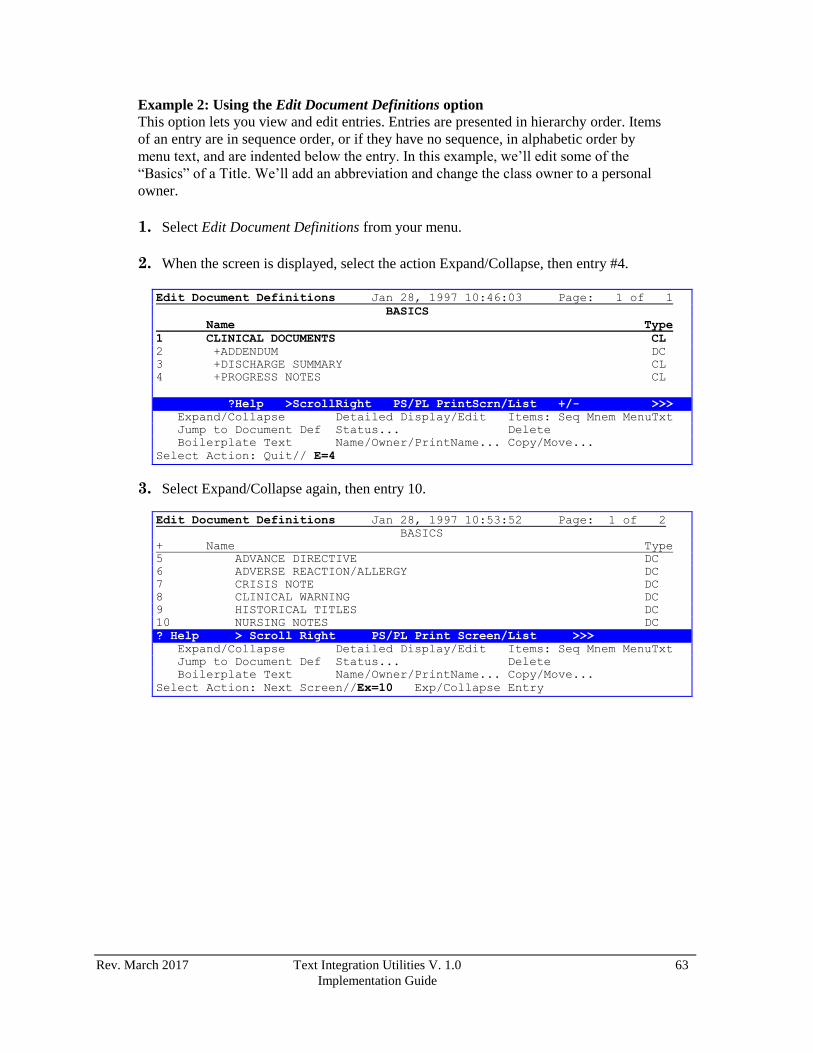
Rev. March 2017 Text Integration Utilities V. 1.0 63
Implementation Guide
Example 2: Using the Edit Document Definitions option
This option lets you view and edit entries. Entries are presented in hierarchy order. Items
of an entry are in sequence order, or if they have no sequence, in alphabetic order by
menu text, and are indented below the entry. In this example, we’ll edit some of the
“Basics” of a Title. We’ll add an abbreviation and change the class owner to a personal
owner.
1. Select Edit Document Definitions from your menu.
2. When the screen is displayed, select the action Expand/Collapse, then entry #4.
Edit Document Definitions Jan 28, 1997 10:46:03 Page: 1 of 1
BASICS
Name Type
1 CLINICAL DOCUMENTS CL
2 +ADDENDUM DC
3 +DISCHARGE SUMMARY CL
4 +PROGRESS NOTES CL
?Help >ScrollRight PS/PL PrintScrn/List +/- >>>
Expand/Collapse Detailed Display/Edit Items: Seq Mnem MenuTxt
Jump to Document Def Status... Delete
Boilerplate Text Name/Owner/PrintName... Copy/Move...
Select Action: Quit// E=4
3. Select Expand/Collapse again, then entry 10.
Edit Document Definitions Jan 28, 1997 10:53:52 Page: 1 of 2
BASICS
+ Name Type
5 ADVANCE DIRECTIVE DC
6 ADVERSE REACTION/ALLERGY DC
7 CRISIS NOTE DC
8 CLINICAL WARNING DC
9 HISTORICAL TITLES DC
10 NURSING NOTES DC
? Help > Scroll Right PS/PL Print Screen/List >>>
Expand/Collapse Detailed Display/Edit Items: Seq Mnem MenuTxt
Jump to Document Def Status... Delete
Boilerplate Text Name/Owner/PrintName... Copy/Move...
Select Action: Next Screen//Ex=10 Exp/Collapse Entry

64 Text Integration Utilities V. 1.0 Rev. March 2017
Implementation Guide
Example 2: Edit Document Definitions, cont’d
Edit Document Definitions Jan 28, 1997 10:53:52 Page: 1 of 2
BASICS
+ Name Type
10 NURSING NOTES DC
11 NURSING-PATIENT EDUCATION NOTE TL
? Help > Scroll Right PS/PL Print Screen/List >>>
Expand/Collapse Detailed Display/Edit Items: Seq Mnem MenuTxt
Jump to Document Def Status... Delete
Boilerplate Text Name/Owner/PrintName... Copy/Move...
Select Action: Next Screen//
4. We now show the Detailed Display/Edit screen, to edit characteristics of the Nursing-
Patient Education Note. Select Det for Detailed Display, then entry 11.
Edit Document Definitions Jan 28, 1997 10:53:52 Page: 1 of 2
BASICS
+ Name Type
10 NURSING NOTES DC
11 NURSING-PATIENT EDUCATION NOTE TL
? Help > Scroll Right PS/PL Print Screen/List >>>
Expand/Collapse Detailed Display/Edit Items: Seq Mnem MenuTxt
Jump to Document Def Status... Delete
Boilerplate Text Name/Owner/PrintName... CopyMove...
Select Action: Next Screen// det=11 Detailed Display/Edit
5. The screen displays the basics and technical fields of the note,
Detailed Display Jan 28, 1997 10:53:52 Page: 1 of 2
Title NURSING-PATIENT EDUCATION NOTE
Basics Note: Inherited Values preceded by *
Name: NURSING-PATIENT EDUCATION NOTE
Abbreviation:
Print Name: NURSING-PATIENT EDUCATION NOTE
Type: TITLE
IFN: 1231
National
Standard: NO
Status: INACTIVE
Owner:
Class Owner: CLINICAL COORDINATOR
In Use: NO
Additional
Signers: * ALLOWED
Suppress Visit
Selection: * NO
+ ? Help +, - Next, Previous Screen
Basics Technical Fields Find
Items: Seq Mnem MenuTxt Upload Quit
Boilerplate Text Try
Select Action: Next Screen// <Enter>
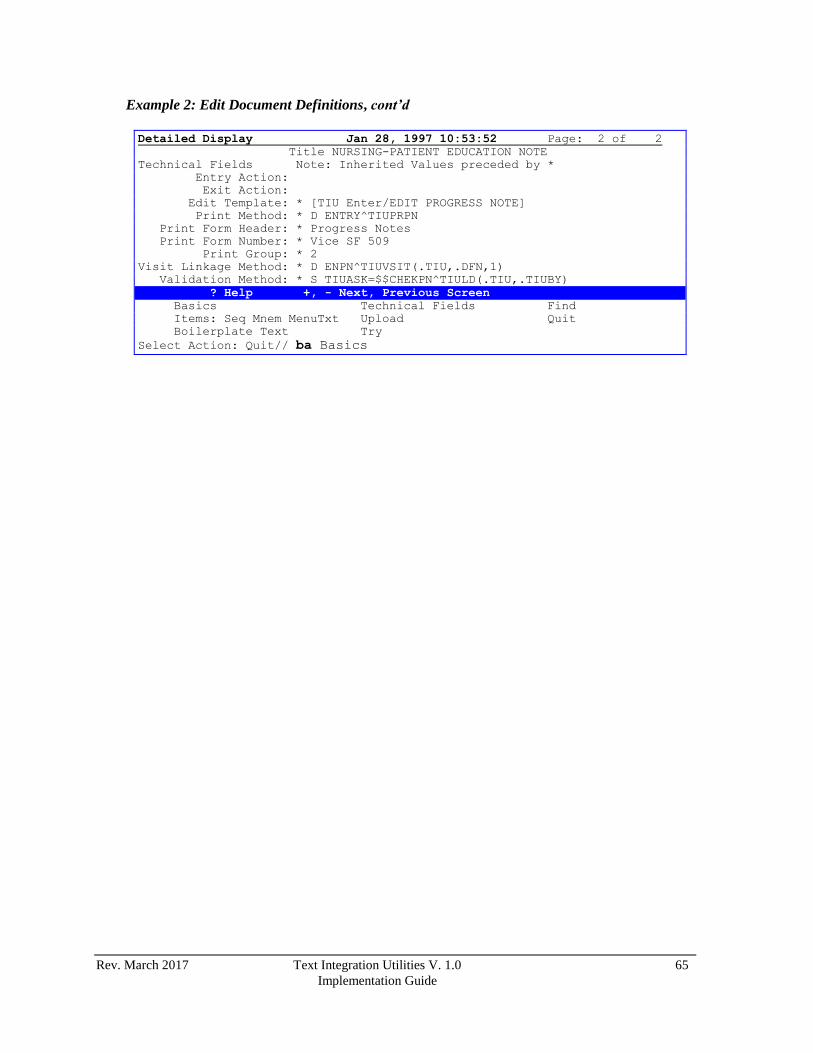
Rev. March 2017 Text Integration Utilities V. 1.0 65
Implementation Guide
Example 2: Edit Document Definitions, cont’d
Detailed Display Jan 28, 1997 10:53:52 Page: 2 of 2
Title NURSING-PATIENT EDUCATION NOTE
Technical Fields Note: Inherited Values preceded by *
Entry Action:
Exit Action:
Edit Template: * [TIU Enter/EDIT PROGRESS NOTE]
Print Method: * D ENTRY^TIUPRPN
Print Form Header: * Progress Notes
Print Form Number: * Vice SF 509
Print Group: * 2
Visit Linkage Method: * D ENPN^TIUVSIT(.TIU,.DFN,1)
Validation Method: * S TIUASK=$$CHEKPN^TIULD(.TIU,.TIUBY)
? Help +, - Next, Previous Screen
Basics Technical Fields Find
Items: Seq Mnem MenuTxt Upload Quit
Boilerplate Text Try
Select Action: Quit// ba Basics

66 Text Integration Utilities V. 1.0 Rev. March 2017
Implementation Guide
Edit Document Definitions Action Descriptions
Only actions unique to the Edit option are described here.
Actions are not selectable when they are enclosed in parentheses.
Expand/Collapse Entry
This action expands or collapses the selected entry to display entry items or to collapse the
entry hierarchy. Entries preceded by + have items and can be expanded.
Jump To Document Def
This action applies to the Edit Document Definitions option only. Select any Document
Definition in the Clinical Document Hierarchy and the action expands the display to include
the selected entry. You can’t jump to Orphans or Objects, since they don’t belong to the
hierarchy. You can’t jump to Shared Components, since they may occur more than once in the
hierarchy. This is a quick way to move down the hierarchy in one step.
Name/Owner/PrintName
This action is available only on the Edit Document Definitions screen. Allows you to edit
Name, Owner, and Print Name.
Copy/Move
OVERVIEW
Copy/Move is a very powerful action and should be used with great care. It is accessible only
through the Document Definitions (Manager) menu [TIUF DOCUMENT DEFINITION
MGR]. Like other actions on the Manager menu, it disregards ownership. Users are expected
to move only titles or documents for which they are responsible.
Under the action Copy/Move, you may choose MT to MOVE TITLE, MD to MOVE
DOCUMENTS, C to COPY, or U to UPDATE DOCUMENTS:
MT: A Title may be moved to a different Document Class when, for example, hospital
services are reorganized. Documents defined by the title are then updated with the new
PARENT DOCUMENT TYPE (field # .04).
MD: ALL documents defined by a given title may be moved to another title, for example,
when a little-used title is eliminated in favor of a broader title.
C: Titles, components, and objects may be copied, for example, when jump-starting a new
Document Definition by copying and then editing the copy. Title and component copies
may be placed under the same parent as the original, placed under a new parent, or left as
orphans.
U: Documents defined by a particular title are updated with the correct PARENT
DOCUMENT TYPE (field # .04).
Action Descriptions, cont'd
When Moving or Copying a title, be aware that changing positions in the hierarchy gives an
entry NEW INHERITED behavior. Accordingly, some moves may not be appropriate. It is
the user's responsibility to determine whether or not a given action is appropriate.

Rev. March 2017 Text Integration Utilities V. 1.0 67
Implementation Guide
DETAILED DESCRIPTION
COPY:
The Copy action prompts for an entry to copy and a new entry name to copy into. This name
must be different from the name of the entry being copied. The action then creates a new entry
with the chosen name and copies the fields in the Document Definition File 8925.1 into the
new entry.
Certain fields require more information on exactly how they are copied:
EMPTY FIELDS - If the original has empty fields, they are copied empty, NOT as
inherited.
STATUS FIELD - If the original has a Status of Active or Test, the entry may be copied,
but the copy has a Status of Inactive.
NATIONAL STANDARD FIELD - If the original is National Standard, the
entry may be copied, but the copy is not National Standard.
SHARED FIELD - If a component is Shared, it may be copied but the copy is not Shared.
If the component has subcomponents, new nonshared subcomponents are created and
added to the copy.
ITEMS FIELD - If the original entry has items, the action prompts for item names to copy
into, creates NEW entries for the items, and adds the NEW items to the copy.
SHARED ITEMS - If a Nonshared entry has a Shared item, the action does NOT copy the
Shared item but merely adds the Shared item to the copy.
TITLES and COMPONENTS can be copied from the Edit Option or the SortOption.
If an entry is copied under the Edit option, you are asked which parent to add the copy to, and
the copy is added as an item to this parent. If no parent is selected, the copy is left as an
orphan.
68 Text Integration Utilities V. 1.0 Rev. March 2017
Implementation Guide
Action Descriptions, cont'd
Copying an Entry to a New Parent:
If you are copying a title, then the parent to which the copy is added must be in the
hierarchy and must be a document class.
If you are copying a component, then the parent to which the copy is added must be in the
hierarchy and must be a title or a component. The parent must be inactive and may not be
National Standard or Shared.
If an entry is copied under the Sort option (not the Edit option), then the title or
component copies are left as orphans.
Although orphan titles or components will not appear in the Document Definition
hierarchy, they can be still be added to a parent through both the Sort and the Edit options
by selecting the action Items for the parent, then the action Add/Create, and then the
orphan item.
Checking Copies:
Copy titles which have been given a new parent should be thoroughly checked before they are
activated since their inherited behavior may have changed.
The check should include Document Definition attributes of the entry (including Upload
characteristics), TIU Document Parameters, and Business Rules. Consider inherited as well as
explicit values. Any other implicit behavior, local or national, that applies to the entry must
also be checked.
Although there is no harm in copying a Title to ANY document class in the hierarchy as long
as the copy is not activated (since the copy has no documents), there is no reason to expect
that such copies will function at all, much less function properly. You should either ensure
that they function properly in every way, or delete such copies from the Document
Definition file.
Copy COMPONENTS that have been given a new parent should also be checked by
thoroughly testing the parent title as above. The copy action leaves the parent title of the copy
component inactive. It is the user's responsibility to test the new parent title and then
reactivate it so it is available to users for entering documents.
NOTE: Although the action Copy could be used to change the behavior of an entry
(i.e. change the copy and inactivate the original), it is better to use the actions
Edit or Move and not clutter up the file with inactive entries.
Most behavior can be edited even when the entry is In Use by documents. Titles can be moved
even when they are In Use by documents.
Copying Objects:
OBJECTS are copied from the Sort Option or the Create Objects Option. Object Abbreviation
and Print Name are not copied, since they must be different from those of the original. If you
don't have programmer access, the Object Method is not copied since it is an M field. Objects
should be thoroughly tested before being activated.
Rev. March 2017 Text Integration Utilities V. 1.0 69
Implementation Guide
Action Descriptions, cont'd
Move Title:
The action Move Title is accessed from the Edit option only, since it involves only entries in
the Document Definition hierarchy.
Move Title permits:
Moving TITLES
Moving between DOCUMENT CLASSES within the same class
Move Title does not permit:
Moving CLASSES or DOCUMENT CLASSES
Moving COMPONENTS
(The same effect can be achieved by deleting the component as an item from its parent,
and adding it as an item to the new parent. This can be done even if the component is In
Use.)
Moving NATIONAL STANDARD titles
Moving titles which are not in the DOCUMENT DEFINITION HIERARCHY
Moving titles between CLASSES
Moving faulty titles (known as faulty to the computer)
Moving titles to faulty DOCUMENT CLASSES
Moves which result in a faulty title
(For example, suppose the Title NURSE NOTE inherits its Print Method from
its document class NIGHT NURSE DOCUMENT CLASS. Suppose DAY NURSE
DOCUMENT CLASS has no Print Method. (This is not a fault since the
titles under it could all have their own Print Methods.) If you move NURSE NOTE from
NIGHT NURSE DOCUMENT CLASS to DAY NURSE DOCUMENT CLASS, then the
title lacks a Print Method and becomes faulty. Documents using the title don't print. In
this case, the title must first be given its own Print Method, and then moved.)
The above restrictions are intended to prevent moves between Document Classes with very
different behavior. However, hierarchies vary, and some structures will still permit risky
moves. For example, if Consults are under Progress Notes, you can move a nonconsult Title
to the Document Class CONSULTS. This sort of move is not advised. Anyone contemplating
such a move should carefully read the paragraphs below on the Consequences of Moves
between Very Different Document Classes.
Moving a title automatically inactivates it. Therefore, managers should move titles only
during off-peak hours. After the title is inactivated and moved under a new Document Class,
the MT action attempts to update the PARENT DOCUMENT TYPE field (#.04) for existing
documents of the title. This may take awhile if there are many documents to update. (If
certain documents were not updated, you must update them later, using the action Update
Documents.) When the action is finished, the title is left INACTIVE.
70 Text Integration Utilities V. 1.0 Rev. March 2017
Implementation Guide
Action Descriptions, cont'd
Checking the Title:
Since the title has changed position within the hierarchy, its behavior may have changed. It is
the user's responsibility to thoroughly check its new behavior, and then to reactivate it so it is
available for entering new documents.
The check should include Document Definition attributes of the entry (including Basic,
Technical, and Upload fields), TIU Document Parameters, and Business Rules. Consider
inherited as well as explicit values. Any other implicit behavior, local or national, that applies
to the entry must also be checked.
It is possible that the Document Definition action TRY might state that an entry looks OK
when it still does not function. For example, the action TRY may quit without continuing on
to let you enter a trial document. In such a case, check the title's Document Definition Fields
against a different title that DOES work. (The TRY action checks that fields exist, but does
not check whether or not they function properly.)
Possible Consequences of Moves between Very Different Document Classes:
Some behaviors are explicit, being determined by parameters, Business Rules, etc. Others are
implicit. For example, a Consult document is linked to a request when it is created, while a
Progress Note document is not. These differences mean, for example, that one document may
belong to a given cross-reference or have a certain field, while another lacks the field and is
not in the cross-reference. Furthermore, the entry may have Business Rules, parameters, etc.,
which are not appropriate in its new position. It may also be lacking necessary ones.
Except for updating the PARENT DOCUMENT TYPE field (#.04) for documents of a title,
the COPY/MOVE actions simply move the entry as is, making no attempt to ensure that it
functions correctly in its new position. It is the user's responsibility to determine whether or
not a move is reasonable, and to make all necessary changes to documents, Document
Definitions, and rules/parameters.
This does NOT mean that all moves are dangerous. The more the difference in behavior and
the greater the number of documents a title has, the greater the risk.
Moves may take awhile if a title has many documents. In the meantime, existing documents
may not function properly, and users may not be able to enter given Titles.
On the other hand there should be little risk in moving, say, a Cardiology/Medicine Service
Progress Note title from Document Class MEDICINE SERVICE to Document Class
CARDIOLOGY.

Rev. March 2017 Text Integration Utilities V. 1.0 71
Implementation Guide
Action Descriptions, cont'd
Move Documents:
Under this action, you select an old title and a new title. The action then attempts to move
ALL the documents of the old title to the new title. After a document is moved, its Parent
Document Type is updated if necessary. If some documents are not available for move/update,
they can be moved later using the same action. The old title is then no longer In Use and can
be deleted if desired.
The old title is inactivated while documents are moved, and left inactive. If you want it
available for entering documents, you must reactivate it.
Move Documents does not permit:
Moving documents from or to titles that have components
Moving documents to a faulty title
Moving documents between CLASSES
Moving SELECTED documents (To move a particular document from one Title to
another, use Hidden Action CT Change Title for that particular document.)
The behavior of documents is determined by their title. Therefore, moving documents from
one title to another can affect their behavior. Users are responsible to make sure the behavior
of the target title is appropriate before moving documents to it. Anyone contemplating a move
between very different titles should carefully read the warnings under the action Move Title,
above.
Update Documents:
This action is intended as a possible follow-up to Move Title. It will usually not be necessary
since Move Title itself attempts to update documents defined by the moved title, giving them
the correct new Parent Document Type. However, if a document is not available, then Move
Title finishes, leaving that document with the old Parent Document Type.This may affect
document behavior. It will cause CWADs to fail to generate alerts, and conversely will cause
nonCWADs to generate CWAD alerts. It may have other consequences in the future. Update
Documents is intended for this situation. It updates every document defined by a certain title
to the correct Parent Document Type. It can be run multiple times if necessary and entails no
risk.

72 Text Integration Utilities V. 1.0 Rev. March 2017
Implementation Guide
Detailed Display/Edit Action Descriptions:
Basics
An entry’s Status must be Inactive in order to edit most basic attributes. Enter ??? to see more
information about the Status. If you have the Manager menu, you don’t need to own an entry
in order to edit it. Managers can edit Name, Abbreviation, Print Name, Type (if not In Use),
Owner, Shared (for Components), Suppress Visit Selection, and Status.
Items: Seq Mnem MenuTxt
Item information (Mnemonic, Sequence, and Menu Text) is displayed for the selected entry.
You may add, edit, or delete appropriate items if they are Inactive and have an Owner. You
can view items of National entries, but only take limited actions on them. Items of Shared
Components can be edited only via the Sort Option. Enter ??? to see Shared. Managers
(persons with Manager menu) can edit items whether or not they own the parent entry.
Boilerplate Text
Boilerplate Text is the optional text a Document Definition may be given. It is displayed as
the default, editable text of a TIU document when a TIU document is entered. Only Titles or
Components may have Boilerplate Text, and only Inactive entries can be edited.
Managers (persons with Manager menu) can edit the boilerplate text of entries regardless of
Ownership, except Shared Components.
Technical Fields
Technical fields are mainly M code (which requires Programmer access), although some are
just very technical, requiring detailed knowledge of the utility. Many Technical Fields can be
inherited from ancestor entries.
Technical fields include: Entry Action, Exit Action, Edit Template, Print Method, Print Form
Header, Print Form Number, Print Group, Visit Linkage Method, Validation Method, and
Allow Custom Form Headers, except for Objects, which have only one technical field: Object
Method.
Upload
TIU permits documents to be dictated and then uploaded into TIU or into other files. Upload
information can be set by this action for TIUF Classes, Document Classes, or Titles, and is
heritable.
Although upload information is heritable, it is NOT displayed by the Document Definition
Utility when it is inherited rather than belonging to the entry itself. To Detailed Display
existing upload information, Detailed Display the entry where such information is set rather
than lower entries. Do NOT set partial information at a lower level; if information is set at all
at a lower level, it must be complete at that level.
Upload information includes basic characteristics such as the file/field which will store the
text of the document, as well as header information for each fixed-field to be uploaded.

Rev. March 2017 Text Integration Utilities V. 1.0 73
Implementation Guide
Detailed Display/Edit Action Descriptions, cont'd
Try
The TRY action is a way to test Boilerplate Text and any embedded Objects. TRY examines
the selected entry for basic problems. If the entry is a Title and checks out OK, you can
choose a patient and enter a document using the entry.
TRY doesn’t require any particular Status, since documents entered during the trial are
deleted immediately after the trial. During the trial, objects function even if inactive in order
to permit testing of objects. (Ordinarily, Object data isn’t retrieved unless the Object is active,
so be sure to activate when ready for use.)
If TRY is selected from the Boilerplate Text Screen,TRY shows which objects are badly
embedded and why. If the entry is okay, you can enter a trial document. When checking
boilerplate text, TRY doesn’t check objects for ambiguity. Ambiguous objects are found by
checking the OBJECT, not the entries the object is embedded in.
For Object, TRY checks the Object Name, Abbreviation, and Print Name to make sure they
aren’t ambiguous so that the right Object is invoked when being used. TRY checks to see if
the Object has an Object Method, but doesn’t check to see if the Object Method functions
correctly.
For Classes, Document Classes, and Components, TRY just checks for basic completeness.
Since the document does show up on Unsigned lists during the time it is being edited, so it’s
best to select test patients for creating and testing boilerplate text.
Find
This action finds text in a list of entries/information displayed. All pages of the current list/
information are searched except unexpanded entries in the Edit Document Definitions Option.
Using the Find action can be a quick way to get to the right page.
Quit
Allows you to quit the current menu level.
Example of Editing Basics Select Action: Next Screen// BA Basics
NAME: NURSING - PATIENT EDUCATION NOTE Replace...<Enter>
ABBREVIATION: PE
PRINT NAME: NURSING-PATIENT EDUCATION// <Enter>
TYPE: (CL/DC): DC// <Enter> DOCUMENT CLASS
CLASS OWNER: CLINICAL COORDINATOR Replace C... With <Enter> Replace <Enter>
PERSONAL OWNER: TIUCAC,ONE jg
SUPPRESS VISIT SELECTION: NO// <Enter>
STATUS: (A/I/T): ACTIVE// <Enter>

74 Text Integration Utilities V. 1.0 Rev. March 2017
Implementation Guide
Explanations for prompts in Edit Basics
NAME
The name of a Document Definition entry (.01 field) must be between 3 and 60 characters long
and may not begin with a punctuation character. Although names can be entered in any case,
they are transformed to upper case before being stored. It functions as the Technical Name of
the entry. Some sites have put KWIC cross-references on it to get, say, all Titles from a given
Service. The .01 name differs from the Print Name, which appears in lists of documents and
functions as the Title of the document. It also differs from Menu Text (1-20 characters), which
is used when selecting documents from menus.
ABBREVIATION
Two to four letters. Abbreviation can be entered at the Select Title prompt when entering a
document. Since all Titles with the given abbreviation will then be listed, Abbreviation can
serve to group Titles.
PRINT NAME
Print Name is used in lists of documents and as the document Title in the Patient Chart.
3-60 Characters.
TYPE: (CL/DC)
Class or Document Class
CLASS OWNER
If the document is owned by a Class rather than by a Person, enter the name of the User
Class whose members may edit the entry. If it’s owned by a Person, delete the Class
Owner by entering '@' at the Class Owner prompt. When Titles were converted from the
old Progress Notes package, they were all given to the Class Owner, Clinical
Coordinator. To enter a different Class Owner, enter the appropriate class after the //'s. If
there are no //'s and the Replace...with editor is being used, enter ... to replace the whole
class and then enter the appropriate class.
Answer with USR CLASS NAME, or ABBREVIATION, or ACTIVE, or DISPLAY
NAME.
Document Definition Ownership has nothing to do with who can USE the entry to enter
a document. It determines responsibility for the Document Definition itself.
An entry can be edited by its owner. (The Manager menu permits override of ownership
so that ownership can be assigned to a clinician (person with Clinician Menu) who can
then fill in boilerplate text, while the manager can still edit the entry, since there are
many fields the clinician doesn’t have access to.)
A Class Owner is a User Class from the USR CLASS file whose members may edit the
entry. An entry may have a Personal OR a Class Owner, not both. The program doesn’t
prompt for Class Owner if the entry has a Personal Owner.

Rev. March 2017 Text Integration Utilities V. 1.0 75
Implementation Guide
Explanations for prompts in Edit Basics, cont'd
SUPPRESS VISIT SELECTION
Enter 1 for YES only if this is an administrative note which creates its own historical
visit. You will NOT receive workload credit for such visits.
For most documents it is very important that the user entering a document select the
appropriate visit to link the document with. However, certain administrative documents
for outpatients have no particular visit that they should be linked with. For example, a
clinician could have a chance encounter with a patient in the corridor and want to
document the discussion, or a clinician could simply want to remind him/herself of
something for a given patient.
Documents for such purposes can be set to automatically create their own historical visit
when they are entered, so that the user is not asked to select a visit.
STATUS: (A/I/T)
A=Active, I=Inactive, T=Test
Documents can be entered on ACTIVE Titles.
Only the Owner can enter a document on TEST Titles.
Only INACTIVE Document Definitions can be edited.

76 Text Integration Utilities V. 1.0 Rev. March 2017
Implementation Guide
Hidden Action Descriptions for all Document Definition options.
Action Description
Next Screen Enter + to move down to the next screen of entries/information. .
Previous Screen Enter the - character to move up to the previous screen of entries/
information.
Up One Line Enter UP to move up a line.
Down A Line Enter DN to move down a line.
Right Enter > to scroll to the right one column when >> shows on the message
bar. Most screens display essential information which can only be seen
by scrolling to the right. You can also enter >=5 for example, to scroll 5
characters to the right, or >=> to scroll to the rightmost position.
Left Enter < to scroll left when << shows on the message bar. Enter < to scroll
left to the next column or enter <=5 to scroll 5 characters to the left, or
enter <=< to scroll to the leftmost column.
First Screen Enter FS to display the first screen of entries/information.
Last Screen Enter LS to display the last screen of entries/information.
Go To Page Enter GO to choose a page to go to. You can also enter GO=3, for
example to go to page 3 in a single step.
Print All document definition printing is done through the hidden actions, Print
Screen and Print List. First locate the data to be printed so that it shows
on the screen, and then select either PS or PL. To locate the appropriate
data use the Edit, Sort, or Create option to list appropriate entries. Edit
Document Definitions shows the hierarchy. Sort Document Definitions
shows sorted document definitions including Orphans, Objects, and
Shared Components. Create Document Definitions shows a particular
line of descent of the hierarchy. Create Objects shows only Objects.To
print information on a single given entry, 1) locate the entry in one of the
above lists, 2) select Detailed Display or Edit Items, 3) select action PS
or PL.
Print Screen Enter PS for Print Screen. It only prints what is currently visible on the
screen, ignoring information that can be moved to horizontally or
vertically (pages), so you should move left/right and up/down to the
desired information before printing.
Print List Enter PL for Print List to print more than one visible screen of
information. Print List prints the entire vertical list of entries/
information, including entries/information not currently visible but which
are displayed when you move up or down. If the action is selected from
the leftmost position of the screen, you’re asked whether to print ALL
columns or only those columns visible on the current leftmost position of
the screen. If you select the action after scrolling to the right, only the
currently visible left/right columns are printed.
Find Finds text in list of entries/information displayed. The action searches all
pages of list/information, but cannot 'see' the expansion for unexpanded
entries in the Edit Document Definitions Option. Can be a quick way to
get to the right page.
Quit Quit takes you out of the current level of the hierarchy and back to the
previous level or menu.

Rev. March 2017 Text Integration Utilities V. 1.0 77
Implementation Guide
Matrix of Actions allowed per Status and Ownership User: For Document Definition, IRMS, Clinical Coordinators, or service managers authorized to maintain the
Document Definition Hierarchy. Only programmers can create objects or edit Technical Fields.
Owner: Either Personal Owner or Class Owner; the person who creates or is assigned responsibility for the
document definition being acted on. Items under the relevant type may have separate owners (that is, A
may own the Document Class, but B could own a Title under the Document Class.
Status: A=Active, I=Inactive, T=Test
Type Status User Actions Limitations
Class,
Document
Class
A Any
Edit Status, Owner
Add new items to Class (Class or Document
Class), or to Document Class (Titles).
Nat’l Standards can’t be
edited.
Must own the items.
I Any Edit Basics and Upload Fields.
I Owner
Delete as entry from file. Entry can’t be In Use.
Title A, T Any
Edit Status and the Owner.
I Any Add items (components).
Edit Basics and Boilerplate Text .
Only owners can add non-
Shared Components.
Item can’t already have a
parent.
I Owner
Delete file entry. If not In Use.
Component A,T Any
Edit the Owner.
I Any Add new items (components).
Edit or delete its items.
Edit Basics and Boilerplate Text.
Users must own items.
I Owner
Delete entry from file.
If not In Use.
Shared
Component
N/A Any
Add entry as an item to a Title or Component.
Owner
Edit Basics and Boilerplate Text.
All parents must be
Inactive.
Object Any
Embed Object in Boilerplate Text.
I Any Edit Owner. Component or Title must
be Inactive.
I
Owner
Edit Object Basics and Technical Fields. Only programmers can
edit Technical Fields.

78 Text Integration Utilities V. 1.0 Rev. March 2017
Implementation Guide
Creating Boilerplate Text Boilerplate Text is similar to a template or overprint. It includes commonly used headings,
phrases, or forms, which can be completed by a clinician or other user. TIU provides the
means for sites and individuals to create specific boilerplate documents for most of the
commonly used progress notes, discharge summaries, or other clinical documents. Also,
boilerplates can be copied and modified by individuals, departments, sites, or between sites.
Objects are names representing executable M-code, which may be “embedded” in the
predefined boilerplate text of titles. This allows patient-specific text to be inserted into a
document when a user selects a TIU document. The Object “PATIENT AGE” may be used
to insert the value of the patient’s age at an arbitrary location within a document. To see a
list of Objects available at your site, use the option Create Objects.
Boilerplate text documents may be composed of static text, Objects, or a combination of the
two. Examples of static test are captions, complete sentences, or section headings for a
SOAP note.
Examples:
1. The boilerplate text document “Dr. Jones’ Clinic Note” contains the following default text
and Objects (the names between the “|” symbols):
The patient is a |PATIENT AGE| year old |PATIENT RACE|
|PATIENT SEX|, who presented to the |VISIT LOCATION| on
|VISIT DATE| with |CHIEF COMPLAINT|.
When Dr. Jones opens this boilerplate document in TIU, values are inserted to replace
Objects.
The patient is a 55 year old white male, who presented to the
Cardiology Clinic on October 27, 1996 with chest pains.

Rev. March 2017 Text Integration Utilities V. 1.0 79
Implementation Guide
Boilerplate Text
2. The Adverse Reaction/Allergies component of a discharge summary is an example of a
more complex Object.
ADVERSE REACTION/ALLERGIES
|ALLERGIES/ADR|
The resulting text may look like this:
ALLERGIES/ADVERSE REACTION:
Milk, Amoxicillin
General Information
Boilerplate text may be added to any title. Boilerplate text is specific to that document
definition and is not Shared. Boilerplate text may contain Objects. Components may also
contain boilerplate text, with embedded Objects.
Objects must always have uppercase names, abbreviations, and print names. When
embedding objects in boilerplate text, use any of these three (the Name, Abbreviation, or
Print Name) enclosed by “|s.” Objects must always be embedded in uppercase. Objects
must initially be written by programmers. (See a description of writing an object on page
67.) Once defined, Objects may be used any number of times within an unlimited number
of different titles.
As sites develop their own Objects, they can be shared with other sites through a mailbox
entitled TIU OBJECTS in SHOP,ALL (reached via FORUM).
NOTE: Object routines used from SHOP,ALL are not supported by the Field Offices.
Use at your own risk!
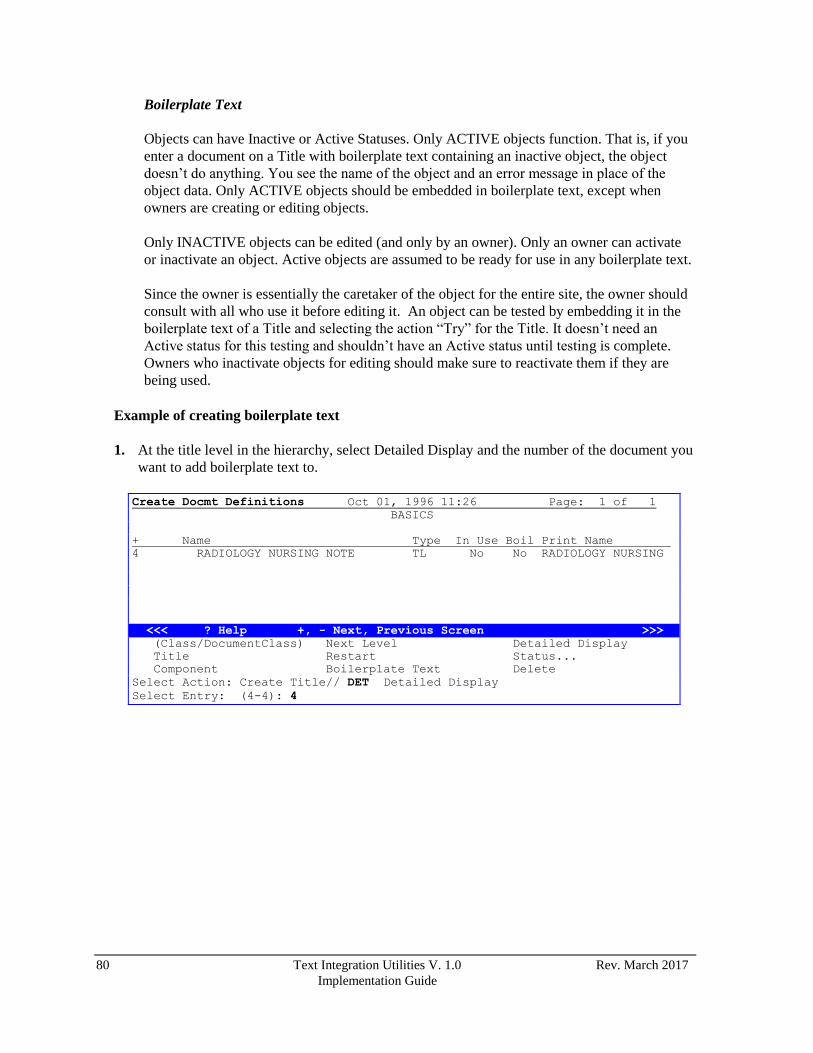
80 Text Integration Utilities V. 1.0 Rev. March 2017
Implementation Guide
Boilerplate Text
Objects can have Inactive or Active Statuses. Only ACTIVE objects function. That is, if you
enter a document on a Title with boilerplate text containing an inactive object, the object
doesn’t do anything. You see the name of the object and an error message in place of the
object data. Only ACTIVE objects should be embedded in boilerplate text, except when
owners are creating or editing objects.
Only INACTIVE objects can be edited (and only by an owner). Only an owner can activate
or inactivate an object. Active objects are assumed to be ready for use in any boilerplate text.
Since the owner is essentially the caretaker of the object for the entire site, the owner should
consult with all who use it before editing it. An object can be tested by embedding it in the
boilerplate text of a Title and selecting the action “Try” for the Title. It doesn’t need an
Active status for this testing and shouldn’t have an Active status until testing is complete.
Owners who inactivate objects for editing should make sure to reactivate them if they are
being used.
Example of creating boilerplate text
1. At the title level in the hierarchy, select Detailed Display and the number of the document you
want to add boilerplate text to.
Create Docmt Definitions Oct 01, 1996 11:26 Page: 1 of 1
BASICS
+ Name Type In Use Boil Print Name
4 RADIOLOGY NURSING NOTE TL No No RADIOLOGY NURSING
<<< ? Help +, - Next, Previous Screen >>>
(Class/DocumentClass) Next Level Detailed Display
Title Restart Status...
Component Boilerplate Text Delete
Select Action: Create Title// DET Detailed Display
Select Entry: (4-4): 4

Rev. March 2017 Text Integration Utilities V. 1.0 81
Implementation Guide
Creating Boilerplate Text cont’d
2. The details of the document are displayed. Select BO for Boilerplate Text.
Detailed Display Oct 01, 1996 11:29:10 Page: 1 of 2
Title RADIOLOGY NURSING NOTE
Basics Note: Inherited Values preceded by *
Name: RADIOLOGY NURSING NOTE
Abbreviation:
Print Name: RADIOLOGY NURSING NOTE
Type: TITLE
IFN: 1087
National
Standard: NO
Status: INACTIVE
Owner: TIUCAC,ONE
In Use: NO
Additional
Signers: * ALLOWED
Suppress Visit
Selection: NO
Items
+ ? Help +, - Next, Previous Screen
Basics Technical Fields Find
Items:Seq Mnem MenuTxt Upload Quit
Boilerplate Text Try
Select Action: Next Screen// BO
3. Your preferred screen editor is displayed (in this case, FileMan Text Editor). Type in the text,
including objects, in your document boilerplate text:
1> NAME: |PATIENT NAME|
2> DOB: |PATIENT DATE OF BIRTH|
3>
4>ALLERGIES: |ALLERGIES/ADR|
5>
6> LIPIDS: |BASELINE LIPIDS|
EDIT Option: <Enter>

82 Text Integration Utilities V. 1.0 Rev. March 2017
Implementation Guide
Creating boilerplate text cont’d
4. To see how this boilerplate text you created will work in a document, select the action Try.
Detailed Display Oct 01, 1996 15:42:01 Page: 2 of 3
Title RADIOLOGY NURSING NOTE
+
No Items
Boilerplate Text
NAME: |PATIENT NAME|
DOB: |PATIENT DATE OF BIRTH|
ALLERGIES: |ALLERGIES/ADR|
LIPIDS: |BASELINE LIPIDS|
Technical Fields Note: Inherited Values preceded by *
+ ? Help +, - Next, Previous Screen
Basics Technical Fields Find
Items:Seq Mnem MenuTxt Upload Quit
Boilerplate Text Try
Select Action: Next Screen// TR Try
5. The following text and prompts appear. The boilerplate text you created appears in the format
of the text editor you use.
Entry Checks out OK. Checking Title on a document. You will not be
permitted to sign the document, and the document will be deleted at the
end of the check.
Be sure to select a TEST PATIENT since the document will show up on
Unsigned lists while you are editing it.
Select Patient: TIUPATIENT,ONE 09-12-44 000000000 YES
SC VETERAN
(2 notes) C: 05/28/96 12:37 (addendum 08/12/96 16:04)
A: Known allergies
This patient is not currently admitted to the facility...
Is this note for INPATIENT or OUTPATIENT care? OUTPATIENT// <Enter>
The following VISITS are available:
1> APR 18, 1996@10:00 GENERAL MEDICINE
2> FEB 21, 1996@08:40 PULMONARY CLINIC
CHOOSE 1-2 or <N>EW VISIT
<RETURN> TO CONTINUE
OR '^' TO QUIT: 1

Rev. March 2017 Text Integration Utilities V. 1.0 83
Implementation Guide
Creating Boilerplate Text cont’d
Creating new progress note...
Patient Location: GENERAL MEDICINE
Date/time of Visit: 04/18/96 10:00
Date/time of Note: NOW
Author of Note: TIUPROVIDER,ONE
...OK? YES// <Enter>
Calling text editor, please wait…
Gathering Allergy Data…
=[ WRAP ]==[ INSERT ]===< Patient: TIUPATIENT,ONE. >==[ <PF1>H=Help ]====
NAME: TIUPATIENT,ONE.
SEX: MALE
DOB: SEP 12,1944
ALLERGIES: Amoxicillin, Aspirin, MILK
LIPIDS: No data available
<======T=======T=======T=======T=======T=======T=======T=======T========
Saving Text……
<Nothing Entered, Radiology Nursing Note Deleted>

84 Text Integration Utilities V. 1.0 Rev. March 2017
Implementation Guide
Example of editing boilerplate text
1. Select Detailed Display from your Create Document Definition option.
Select Action: Next Screen// DET Detailed Display
Select Entry: (50-63): 50
Detailed Display Oct 01, 1996 11:57:11 Page: 1 of 3
Title RADIOLOGY NOTE
Basics Note: Inherited Values preceded by *
Name: BP TEST
Abbreviation:
Print Name: BP TEST
Type: TITLE
IFN: 981
National
Standard: NO
Status: ACTIVE
Owner: TIUPROVIDER,ONE
In Use: YES
Additional
Signers: * ALLOWED
Items
+ ? Help +, - Next, Previous Screen
Basics Technical Fields Find
Items:Seq Mnem MenuTxt Upload Quit
Boilerplate Text Try
Select Action: Next Screen// B Boilplt Txt
2. Select the Boilerplate Text action. Your preferred screen editor appears and the boilerplate text
already created for this Title.
==[ WRAP ]==[ INSERT ]============< BP TEST >========[ <PF1>H=Help ]====
NAME: |PATIENT NAME|
SEX: |PATIENT SEX|
DOB: |PATIENT DATE OF BIRTH|
ALLERGIES: |ALLERGIES/ADR|
LIPIDS: |BASELINE LIPIDS|
3. Just type in new text (including Objects) or edit existing text, according to the methods of the
text editor you normally use in your work (in this case FileMan Screen Editor).
HT: |PATIENT HEIGHT|
WT: |PATIENT WEIGHT|
<====T=======T======T=======T=======T=======T=======T=======T=======T=>===

Rev. March 2017 Text Integration Utilities V. 1.0 85
Implementation Guide
Creating Objects
The Create Objects option may be assigned to any TIU manager, coordinator, or IRMS
specialist, but only programmers can create Objects.
The Create Objects option lets you review current Objects and then perform various actions,
such as Create, Copy, and Delete, depending on yours and the Object’s status. Only Inactive
objects can be edited (and only by an owner). Only an owner can activate or inactivate an
object. Active objects are assumed to be ready for use in any boilerplate text.
See the next section for an example of creating an Object.
--- Manager Document Definition Menu ---
1 Edit Document Definitions
2 Sort Document Definitions
3 Create Document Definitions
4 Create Objects
You have PENDING ALERTS
Enter "VA VIEW ALERTS to review alerts
Select Document Definitions (Manager) Option: 4 Create Objects
START WITH OBJECT: FIRST// <Enter>.......................................... ...................
Objects Feb 28, 1997 09:52:16 Page: 1 of 3
Objects
Status
1 ACTIVE MEDICATIONS A
2 ALLERGIES/ADR A
3 BASELINE LIPIDS A
4 BLOOD PRESSURE A
5 CURRENT ADMISSION A
6 NOW
A
7 PATIENT AGE
A
8 PATIENT DATE OF BIRTH
A
+ ?Help >ScrollRight PS/PL PrintScrn/List +/- >>>
Find Detailed Display Copy
Change View Try Quit
Create Owner
Select Action: Next Screen//

86 Text Integration Utilities V. 1.0 Rev. March 2017
Implementation Guide
Creating an Object Example
To create an object, you must be familiar with M code at least well enough to read and copy it.
In this example, we create a very simple object, test it, make it more realistic, and then re-test
it. After that, we’ll present further issues to consider.
A. Create a very simple Object.
We’ll create an object called PATIENT RELIGION that inserts the patient’s religion into the text
of a document.
1. Go into the option Create Objects and select the action Create:
Select TIU Maintenance Menu Option: 2 Document Definitions (Manager)
--- Manager Document Definition Menu ---
1 Edit Document Definitions
2 Sort Document Definitions
3 Create Document Definitions
4 Create Objects
Select Document Definitions (Manager) Option: 4 Create Objects
START WITH OBJECT: FIRST// <Enter>.........................................
Objects Mar 09, 1997 16:10:12 Page: 1 of 3
Objects
+ Status
1 ACTIVE MEDICATIONS A
2 ALLERGIES/ADR A
3 BASELINE LIPIDS A
4 BLOOD PRESSURE A
5 CURRENT ADMISSION A
6 FASTING BLOOD GLUCOSE A
7 HEMOGLOBIN A1C A
8 INR VALUE A
9 LABS ADMISSION ABNORMAL A
10 LABS ADMISSION ALL A
11 NOW A
12 PATIENT AGE A
13 PATIENT DATE OF BIRTH A
14 PATIENT DATE OF DEATH A
+ ?Help >ScrollRight PS/PL PrintScrn/List +/- >>>
Find Detailed Display Copy
Change View Try Quit
Create Owner
Select Action: Next Screen// <Enter>
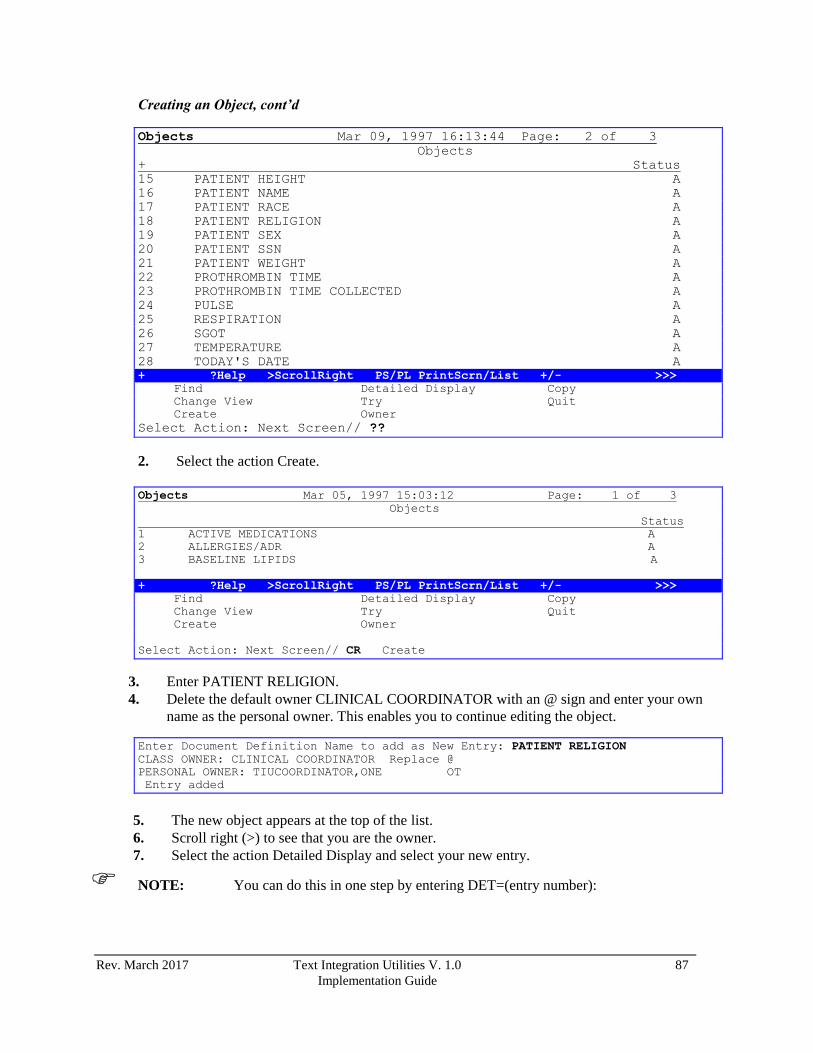
Rev. March 2017 Text Integration Utilities V. 1.0 87
Implementation Guide
Creating an Object, cont’d
Objects Mar 09, 1997 16:13:44 Page: 2 of 3
Objects
+ Status
15 PATIENT HEIGHT A
16 PATIENT NAME A
17 PATIENT RACE A
18 PATIENT RELIGION A
19 PATIENT SEX A
20 PATIENT SSN A
21 PATIENT WEIGHT A
22 PROTHROMBIN TIME A
23 PROTHROMBIN TIME COLLECTED A
24 PULSE A
25 RESPIRATION A
26 SGOT A
27 TEMPERATURE A
28 TODAY'S DATE A
+ ?Help >ScrollRight PS/PL PrintScrn/List +/- >>>
Find Detailed Display Copy
Change View Try Quit
Create Owner
Select Action: Next Screen// ??
2. Select the action Create.
Objects Mar 05, 1997 15:03:12 Page: 1 of 3
Objects
Status
1 ACTIVE MEDICATIONS A
2 ALLERGIES/ADR A
3 BASELINE LIPIDS A
+ ?Help >ScrollRight PS/PL PrintScrn/List +/- >>>
Find Detailed Display Copy
Change View Try Quit
Create Owner
Select Action: Next Screen// CR Create
3. Enter PATIENT RELIGION.
4. Delete the default owner CLINICAL COORDINATOR with an @ sign and enter your own
name as the personal owner. This enables you to continue editing the object.
Enter Document Definition Name to add as New Entry: PATIENT RELIGION
CLASS OWNER: CLINICAL COORDINATOR Replace @
PERSONAL OWNER: TIUCOORDINATOR,ONE OT
Entry added
5. The new object appears at the top of the list.
6. Scroll right (>) to see that you are the owner.
7. Select the action Detailed Display and select your new entry.
NOTE: You can do this in one step by entering DET=(entry number):

88 Text Integration Utilities V. 1.0 Rev. March 2017
Implementation Guide
8. The Detailed Display screen appears, showing your entry.
9. Select the action Technical Fields.
10. Enter the object method: S X=”TESTING123”
OBJECT METHOD: S X=”TESTING123”
Objects Mar 05, 1997 15:03:12 Page: 2 of 3
Objects
Status
18 PATIENT RELIGION I
19 PATIENT SEX A
20 PATIENT SSN A
+ ?Help >ScrollRight PS/PL PrintScrn/List +/- >>>
Find Detailed Display Copy
Change View Try Quit
Create Owner
Select Action: Next Screen// DET=18 Detailed Display
Detailed Display Mar 05, 1997 15:03:58 Page: 1 of 1
Object PATIENT RELIGION
Basics
Name: PATIENT RELIGION
Abbreviation:
Print Name: PATIENT RELIGION
Type: OBJECT
IFN: 599
National
Standard: NO
Status: INACTIVE
Owner: TIUCOORDINATOR,ONE
Technical Fields
Object Method:
+ ?Help >ScrollRight PS/PL PrintScrn/List +/- >>>
Find Detailed Display Delete
Basics Technical Fields Find
(Items: Seq Mnem MenuTxt) (Upload) Quit
(Boilerplate Text) Try
Select Action: Quit// TE TECHNICAL FIELDS
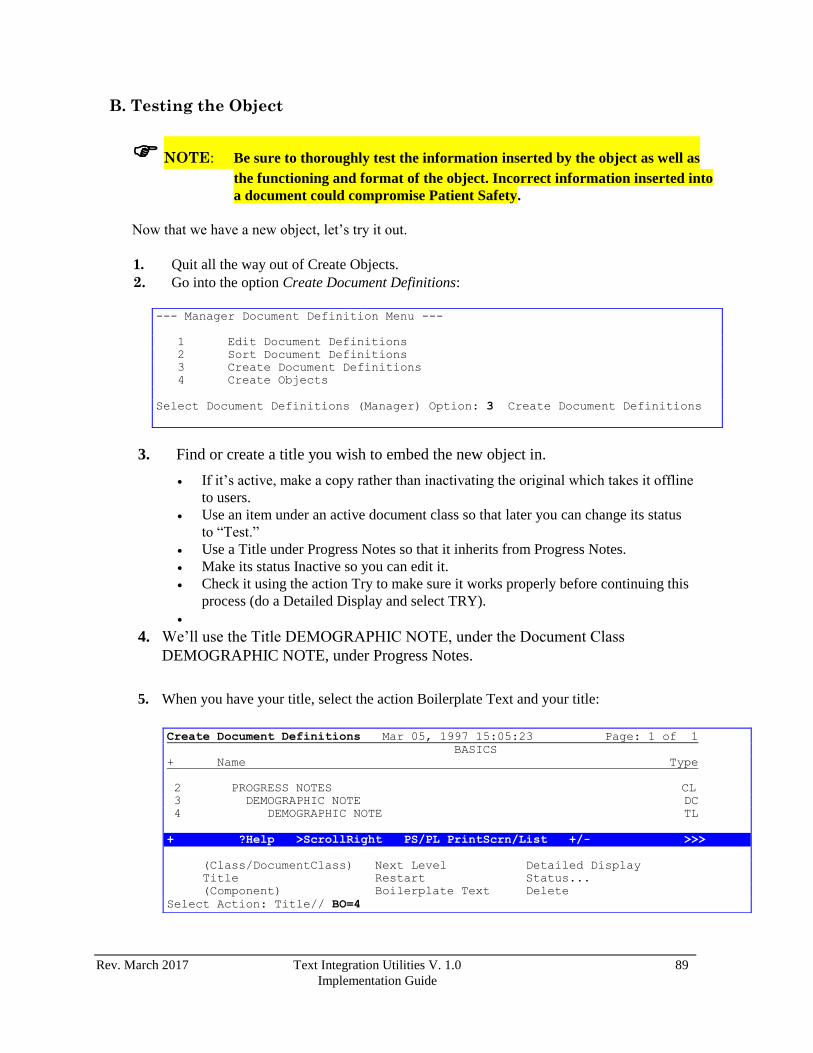
Rev. March 2017 Text Integration Utilities V. 1.0 89
Implementation Guide
B. Testing the Object
NOTE: Be sure to thoroughly test the information inserted by the object as well as
the functioning and format of the object. Incorrect information inserted into
a document could compromise Patient Safety.
Now that we have a new object, let’s try it out.
1. Quit all the way out of Create Objects.
2. Go into the option Create Document Definitions:
3. Find or create a title you wish to embed the new object in.
If it’s active, make a copy rather than inactivating the original which takes it offline
to users.
Use an item under an active document class so that later you can change its status
to “Test.”
Use a Title under Progress Notes so that it inherits from Progress Notes.
Make its status Inactive so you can edit it.
Check it using the action Try to make sure it works properly before continuing this
process (do a Detailed Display and select TRY).
4. We’ll use the Title DEMOGRAPHIC NOTE, under the Document Class
DEMOGRAPHIC NOTE, under Progress Notes.
5. When you have your title, select the action Boilerplate Text and your title:
--- Manager Document Definition Menu ---
1 Edit Document Definitions
2 Sort Document Definitions
3 Create Document Definitions
4 Create Objects
Select Document Definitions (Manager) Option: 3 Create Document Definitions
Create Document Definitions Mar 05, 1997 15:05:23 Page: 1 of 1
BASICS
+ Name Type
2 PROGRESS NOTES CL
3 DEMOGRAPHIC NOTE DC
4 DEMOGRAPHIC NOTE TL
+ ?Help >ScrollRight PS/PL PrintScrn/List +/- >>>
(Class/DocumentClass) Next Level Detailed Display
Title Restart Status...
(Component) Boilerplate Text Delete
Select Action: Title// BO=4

90 Text Integration Utilities V. 1.0 Rev. March 2017
Implementation Guide
Testing the Object, cont’d
6. The Boilerplate Text screen is displayed. At present, there is no text.
7. Select Boilerplate Text again, this time to edit it (rather than display it):
Boilerplate Text Mar 05, 1997 15:05:37 Page: 1 of 1
Title DEMOGRAPHIC NOTE
______________________________________________________________________________
+ ?Help >ScrollRight PS/PL PrintScrn/List +/- >>>
Boilerplate Text Try Quit
Status Find
Select Action: Quit// B Boilerplate Text
8. Your preferred editor appears. Type in the following:
NOTE: Be sure to spell the object name correctly; use upper case, and enclose it in
vertical bars:
9. Exit out of the editor. The screen displays our new boilerplate text.
10. Select the action TRY:
======[WRAP]==[INSERT]=<DEMOGRAPHIC NOTE>===[<PF1>H=HELP]=========
Patient’s religious preference: |PATIENT RELIGION|. Patient’s home address: ……
=====T=====T=====T=====T=====T=====T=====T=====T=====T=====T
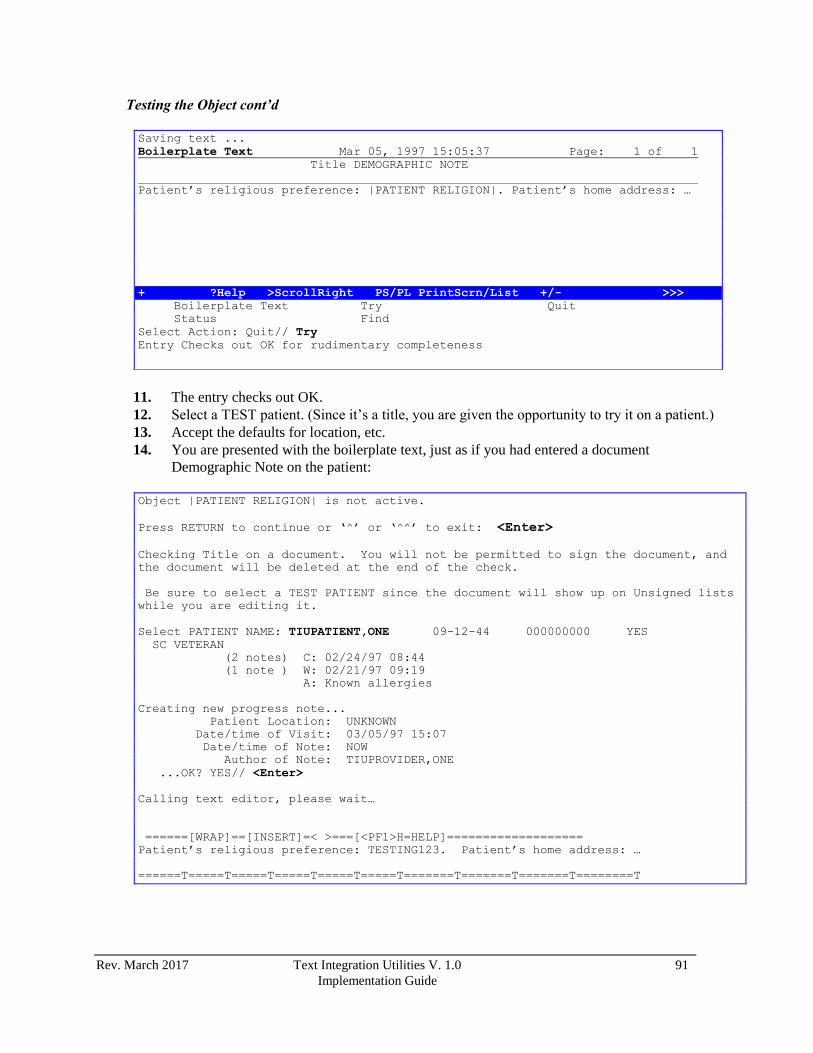
Rev. March 2017 Text Integration Utilities V. 1.0 91
Implementation Guide
11. The entry checks out OK.
12. Select a TEST patient. (Since it’s a title, you are given the opportunity to try it on a patient.)
13. Accept the defaults for location, etc.
14. You are presented with the boilerplate text, just as if you had entered a document
Demographic Note on the patient:
Object |PATIENT RELIGION| is not active.
Press RETURN to continue or ‘^’ or ‘^^’ to exit: <Enter>
Checking Title on a document. You will not be permitted to sign the document, and
the document will be deleted at the end of the check.
Be sure to select a TEST PATIENT since the document will show up on Unsigned lists
while you are editing it.
Select PATIENT NAME: TIUPATIENT,ONE 09-12-44 000000000 YES
SC VETERAN
(2 notes) C: 02/24/97 08:44
(1 note ) W: 02/21/97 09:19
A: Known allergies
Creating new progress note...
Patient Location: UNKNOWN
Date/time of Visit: 03/05/97 15:07
Date/time of Note: NOW
Author of Note: TIUPROVIDER,ONE
...OK? YES// <Enter>
Calling text editor, please wait…
======[WRAP]==[INSERT]=< >===[<PF1>H=HELP]===================
Patient’s religious preference: TESTING123. Patient’s home address: …
======T=====T=====T=====T=====T=====T=======T=======T=======T========T
Testing the Object cont’d
Saving text ...
Boilerplate Text Mar 05, 1997 15:05:37 Page: 1 of 1
Title DEMOGRAPHIC NOTE
______________________________________________________________________________
Patient’s religious preference: |PATIENT RELIGION|. Patient’s home address: …
+ ?Help >ScrollRight PS/PL PrintScrn/List +/- >>>
Boilerplate Text Try Quit
Status Find
Select Action: Quit// Try
Entry Checks out OK for rudimentary completeness

92 Text Integration Utilities V. 1.0 Rev. March 2017
Implementation Guide
Testing the Object cont’d
15. The trial document looks all right. The data we set X to is inserted in the text.
NOTE: If there are errors in the object other than the status, you may receive any of
the following messages:
Object |PATIENT RELIGION| cannot be found. User uppercase and use
object’s exact name, print name, or abbreviation. Objects’ name/print
name/abbreviation may have changed since this was embedded.
Object |PATIENT RELIGION| is not active.
Object |PATIENT RELIGION| lacks an object method.
Object |PATIENT RELIGION| is ambiguous. Can’t tell which object is
intended.
Object split between lines, rest of line not checked.
The split line message refers to lines such as:
This is a test of Object |PATIENT
RELIGION|. Patient’s Home address: . . .
But none of these messages apply to us.
16. Exit the editor. The document is deleted:
C. Making the Object More Realistic
Now that we have the basic idea, we’ll write an object method that actually gets the patient’s
religion. We’ll imitate the PATIENT AGE object, which has the object method:
S X=$$AGE^TIULO(DFN)
Note that, again, the object method sets the variable X. This time the object depends on the
patient. The variable DFN is the internal entry number in the Patient File ^DPT. Its value is
known to the system at the time a document is entered on a particular patient.
Saving text ...
<NOTHING ENTERED. DEMOGRAPHIC NOTE DELETED>

Rev. March 2017 Text Integration Utilities V. 1.0 93
Implementation Guide
Making the Object More Realistic, cont’d
This object method calls the TIULO routine, exported with the TIU package, and sets X equal to
the value of the function $$AGE^TIULO. That code looks like this:
TIULO ; SLC/JER - Embedded Objects ;9/28/95 16 :26
;;1.0;TEXT INTEGRATION UTILITIES;;Mar 05, 1997
AGE(DFN) ; Patient AGE
I '$D(VADM(4)) D DEM^TIULO(DFN,.VADM)
Q $S(VADM(4)]"":VADM(4),1:"AGE UNKNOWN")
;
DEM(DFN,VADM) ; Calls DEM^VADPT
D DEM^VADPT
Q
If the VADM array hasn’t been defined for subscript 4, the age subscript, the code calls module
DEM, passing array VADM by reference. DEM calls the VADPT patient demographics utility,
and passes patient demographics back. We can copy this and only need to understand that it puts
demographic information for patient DFN in the VADM array as described in the VADPT utility.
Note that AGE is a function and quits with the value VADM(4) if VADM(4) has a value.
Otherwise, it quits with the value “AGE UNKNOWN.”
We’ll write similar code for religion.
1. Quit out of the Manager Menu and get into programmer mode.
2. Write a similar function for religion. Looking up the VADPT utility, we find that patient
religion is returned in VADM(9), so we have:
MYROUTIN ; HERE/ME - Embedded Objects ; 9/28/96 16:26
;
RELIG (DFN) ; Patient RELIGION
I '$D(VADM(9)) D DEM^TIULO(DFN,.VADM)
Q $S(VADM(9)]"":VADM(9),1:"Religious Preference UNKNOWN")
3. To test the code, set DFN to a known patient. (To find the DFN of a patient, do a Fileman
Inquiry to the PATIENT file, enter the name of a patient, and enter R at the Include
COMPUTED fields prompt to get the record number. Set DFN to this record number.).
4. Set X= $$RELIG^MYROUTIN(DFN).
5. WRITE !,X:
W !,X
OTHER
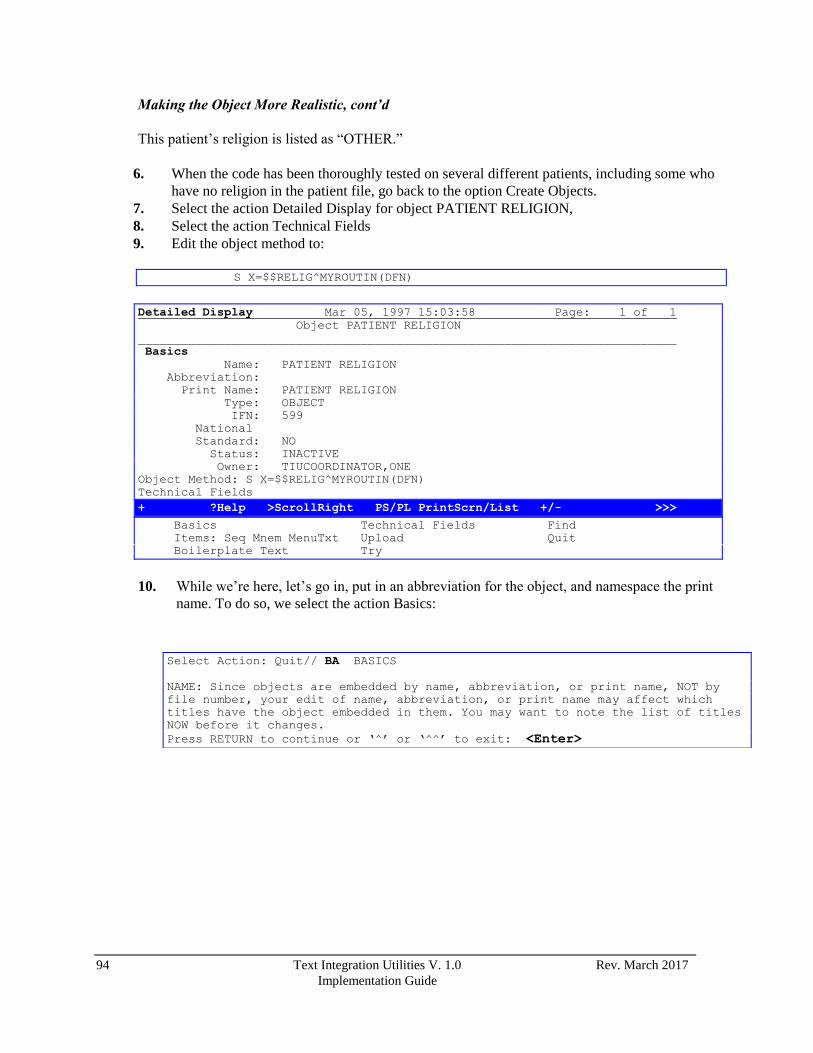
94 Text Integration Utilities V. 1.0 Rev. March 2017
Implementation Guide
Making the Object More Realistic, cont’d
This patient’s religion is listed as “OTHER.”
6. When the code has been thoroughly tested on several different patients, including some who
have no religion in the patient file, go back to the option Create Objects.
7. Select the action Detailed Display for object PATIENT RELIGION,
8. Select the action Technical Fields
9. Edit the object method to:
S X=$$RELIG^MYROUTIN(DFN)
Boilerplate Text Try
10. While we’re here, let’s go in, put in an abbreviation for the object, and namespace the print
name. To do so, we select the action Basics:
Detailed Display Mar 05, 1997 15:03:58 Page: 1 of 1
Object PATIENT RELIGION
___________________________________________________________________________
Basics
Name: PATIENT RELIGION
Abbreviation:
Print Name: PATIENT RELIGION
Type: OBJECT
IFN: 599
National
Standard: NO
Status: INACTIVE
Owner: TIUCOORDINATOR,ONE
Object Method: S X=$$RELIG^MYROUTIN(DFN)
Technical Fields
+ ?Help >ScrollRight PS/PL PrintScrn/List +/- >>>
Basics Technical Fields Find
Items: Seq Mnem MenuTxt Upload Quit
Select Action: Quit// BA BASICS
NAME: Since objects are embedded by name, abbreviation, or print name, NOT by
file number, your edit of name, abbreviation, or print name may affect which
titles have the object embedded in them. You may want to note the list of titles
NOW before it changes.
Press RETURN to continue or ‘^’ or ‘^^’ to exit: <Enter>
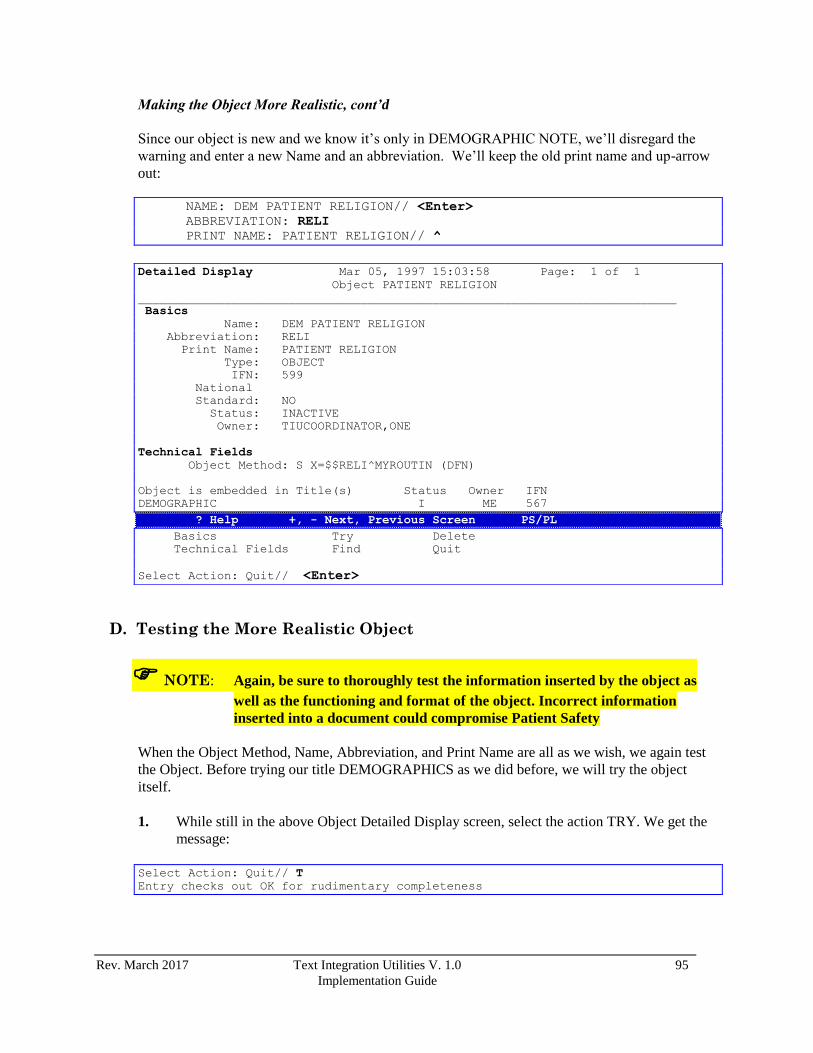
Rev. March 2017 Text Integration Utilities V. 1.0 95
Implementation Guide
Making the Object More Realistic, cont’d
Since our object is new and we know it’s only in DEMOGRAPHIC NOTE, we’ll disregard the
warning and enter a new Name and an abbreviation. We’ll keep the old print name and up-arrow
out:
NAME: DEM PATIENT RELIGION// <Enter>
ABBREVIATION: RELI
PRINT NAME: PATIENT RELIGION// ^
D. Testing the More Realistic Object
NOTE: Again, be sure to thoroughly test the information inserted by the object as
well as the functioning and format of the object. Incorrect information
inserted into a document could compromise Patient Safety
When the Object Method, Name, Abbreviation, and Print Name are all as we wish, we again test
the Object. Before trying our title DEMOGRAPHICS as we did before, we will try the object
itself.
1. While still in the above Object Detailed Display screen, select the action TRY. We get the
message:
Detailed Display Mar 05, 1997 15:03:58 Page: 1 of 1
Object PATIENT RELIGION
___________________________________________________________________________
Basics
Name: DEM PATIENT RELIGION
Abbreviation: RELI
Print Name: PATIENT RELIGION
Type: OBJECT
IFN: 599
National
Standard: NO
Status: INACTIVE
Owner: TIUCOORDINATOR,ONE
Technical Fields
Object Method: S X=$$RELI^MYROUTIN (DFN)
Object is embedded in Title(s) Status Owner IFN
DEMOGRAPHIC I ME 567
? Help +, - Next, Previous Screen PS/PL
Basics Try Delete
Technical Fields Find Quit
Select Action: Quit// <Enter>
Select Action: Quit// T
Entry checks out OK for rudimentary completeness

96 Text Integration Utilities V. 1.0 Rev. March 2017
Implementation Guide
Testing the More Realistic Object, cont’d
This is an important step. If there were problems, we might have gotten any or all of the following
messages:
Faulty Entry: No Object Method
Faulty Entry: Object Name finds multiple/wrong object(s)
Faulty Entry: Object Abbreviation finds multiple/wrong object(s)
Faulty Entry: Object Print Name finds multiple/wrong object(s)
The first message appears if the object has no Object Method. Unfortunately, this doesn’t tell us
whether the Object Method functions correctly. It only tells us the entry has or doesn’t have an
Object Method. We know it functions correctly because we tested the code.
We get one or more of the other messages if our object has a duplicate Name, Abbreviation, or
Print Name with some other object. This would cause our object not to be found when that Name,
Abbreviation, or Print Name is used in boilerplate text. We also get such a message if, for
example, our object Abbreviation is the same as the Name of another object. In that case we
would get the message:
Faulty entry: Object Abbreviation finds multiple/wrong object(s).
If this happens, our object might find and insert the WRONG object into boilerplate text. We must
change the abbreviation so it doesn’t match the name, abbreviation, or print name for another
object.
Once we have thoroughly tested the Object Method code, put in Name, Abbreviation, and Print
Name as desired, and gotten a clean TRY when we tried the OBJECT, we can now try our title
containing the object.
2. Quit out of Create Objects
3. Go into the option Create Document Definitions
4. Use the action Next Level to drill down to our title
5. Select the action Boilerplate Text
6. Select the title
Create Document Definitions Mar 05, 1997 15:05:23 Page: 1 of 1
BASICS
+ Name Type
2 PROGRESS NOTES CL
3 DEMOGRAPHIC NOTE DC
4 DEMOGRAPHIC NOTE TL
?Help >ScrollRight PS/PL PrintScrn/List +/- >>>
(Class/DocumentClass) Next Level Detailed Display
Title Restart Status...
(Component) Boilerplate Text Delete
Select Action: Title// BO=4

Rev. March 2017 Text Integration Utilities V. 1.0 97
Implementation Guide
Testing the More Realistic Object, cont’d
7. The Boilerplate Text that we entered previously is displayed. We changed the name of the
object, but we don’t need to make that update here since the Print Name is PATIENT
RELIGION, and the Print Name will do just as well as the name.
8. Select the action Try.
9. Enter a test patient
10. Accept the defaults
11. The following text appears:
12. This allows you to check out the formatting of the boilerplate text when the object is being
used.
13. In this case the line continues beyond 80 characterswe haven’t left enough room in the
line for the object.
14. If there isn’t enough room for the object data, or it doesn’t print out in the right format, we
change the Object Method and/or the Boilerplate text until it looks right.
15. Go into Boilerplate text and move the next sentence to the next line:
Boilerplate Text Mar 05, 1997 15:05:37 Page: 1 of
Title DEMOGRAPHIC NOTE
Patient’s religious preference: |PATIENT RELIGION|. Patient’s home address:…
? Help +, - Next, Previous Screen PS/PL
Boilerplate Text Try Quit
Status Find
Select Action: Quit// Try
Object |PATIENT RELIGION| is not active.
.
.
Calling text editor, please wait…
================[WRAP]==[INSERT]=< >===[<PF1>H=HELP]===================
Patient’s religious preference: UNITARIAN; UNIVERSALIST. Patient’s home ad
======T======T======T======T======T======T=====T======T======T=======T
==============[WRAP]==[INSERT]=< >===[<PF1>H=HELP]===================
Patient’s religious preference |PATIENT RELIGION|.
Patient’s home address:…
=======T=======T=======T=======T=====T=====T=====T=====T=====T=====T=====

98 Text Integration Utilities V. 1.0 Rev. March 2017
Implementation Guide
Testing the More Realistic Object, cont’d
16. Exit the editor.
17. In the Boilerplate screen, use the TRY action again:
This time the formatting looks fine.
We have tested the Object Method code, TRIED the object, and TRIED a title with the object in
it.
Everything looks good, so we proceed to activate the object.
E. Activating the object:
1. Quit out of the Detailed Display screen.
2. In the Objects screen, select the Status action.
3. Select A for Active status:
Select Action: Quit// BA Basics
NAME: DEM PATIENT RELIGION// <Enter>
ABBREVIATION: RELI// <Enter>
PRINT NAME: PATIENT RELIGION// <Enter>
PERSONAL OWNER: ME// <Enter>
STATUS: (a/I): INACTIVE// A ACTIVE
======[WRAP]==[INSERT]=< >===[<PF1>H=HELP]===================
Patient’s religious preference: UNITARIAN; UNIVERSALIST.
Patient’s home address: …
=====T=====T=====T=====T=====T=====T=====T=====T=====T=====T
Detailed Display Mar 05, 1997 15:03:58 Page: 1 of 1
Object PATIENT RELIGION
______________________________________________________________________________
Basics
Name: DEM PATIENT RELIGION
Abbreviation: RELI
Print Name: PATIENT RELIGION
Type: OBJECT
IFN: 599
National
Standard: NO
Status: INACTIVE
Owner: TIUCOORDINATOR,ONE
Technical Fields
Object Method: S X=$$RELI^MYROUTIN (DFN)
? Help +, - Next, Previous Screen PS/PL
Basics Try Delete
Technical Fields Find Quit

Rev. March 2017 Text Integration Utilities V. 1.0 99
Implementation Guide
Activating the object, cont’d
Activating an object communicates to users that it is ready for embedding in boilerplate text. It
also causes the object to execute its object method code rather than to write an inactive message
when documents are entered on it through the regular options (as opposed to the action Try). If
the object TRY action had not been clean, we would not have been able to activate the object.
The Active object is now ready for entering documents. One last test, and we’ll be done.
To enter documents (rather than just TRY them), the title also must have a status of Active or
Test.
4. Quit out of the option Create Objects and
5. Go into the option Create Document Definitions.
6. Edit the status of the test title to Test.
7. Check to make sure that you own it.
8. Quit out of the Document Definition menu
9. Go into the Clinician menu.
10. Select Entry of Progress Note from the Clinician’s Progress Notes Menu
--- Clinician's Progress Notes Menu ---
1 Entry of Progress Note
2 Review Progress Notes by Patient
2b Review Progress Notes
3 All MY UNSIGNED Progress Notes
4 Show Progress Notes Across Patients
5 Progress Notes Print Options ...
6 List Notes By Title
7 Search by Patient AND Title
8 Personal Preferences ...
Select Progress Notes User Menu Option: 1 Entry of Progress Note
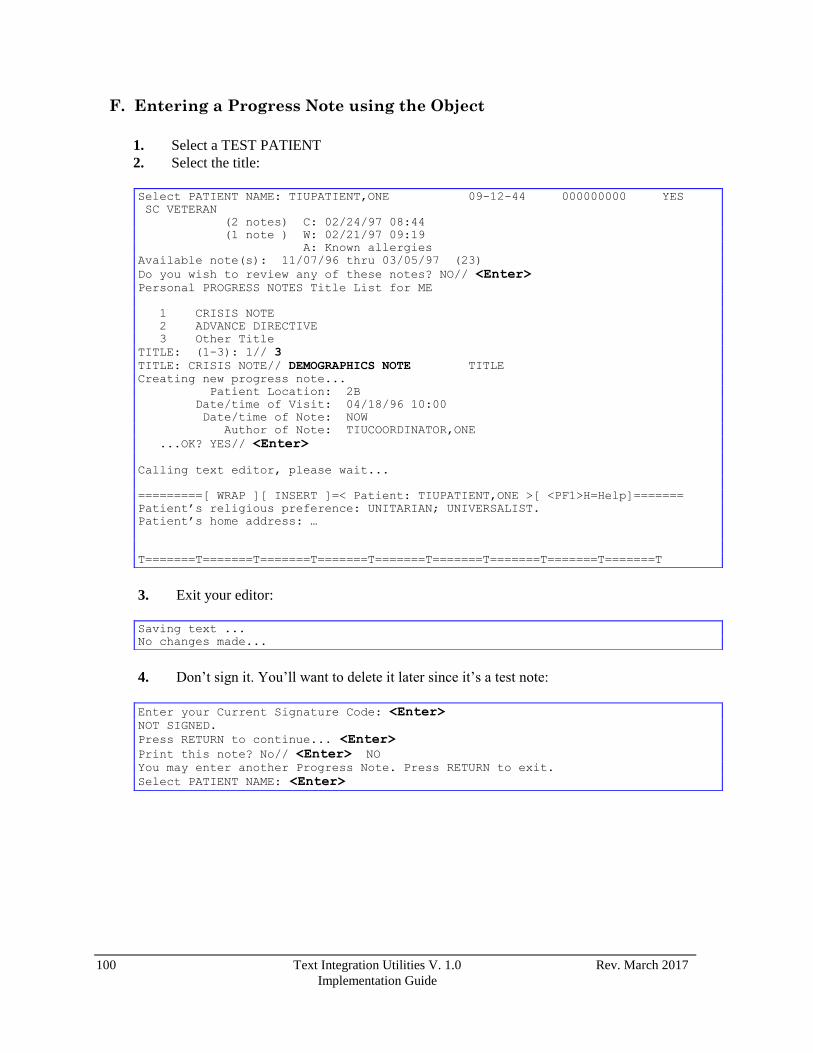
100 Text Integration Utilities V. 1.0 Rev. March 2017
Implementation Guide
F. Entering a Progress Note using the Object
1. Select a TEST PATIENT
2. Select the title:
3. Exit your editor:
4. Don’t sign it. You’ll want to delete it later since it’s a test note:
Select PATIENT NAME: TIUPATIENT,ONE 09-12-44 000000000 YES
SC VETERAN
(2 notes) C: 02/24/97 08:44
(1 note ) W: 02/21/97 09:19
A: Known allergies
Available note(s): 11/07/96 thru 03/05/97 (23)
Do you wish to review any of these notes? NO// <Enter> Personal PROGRESS NOTES Title List for ME
1 CRISIS NOTE
2 ADVANCE DIRECTIVE
3 Other Title
TITLE: (1-3): 1// 3
TITLE: CRISIS NOTE// DEMOGRAPHICS NOTE TITLE
Creating new progress note...
Patient Location: 2B
Date/time of Visit: 04/18/96 10:00
Date/time of Note: NOW
Author of Note: TIUCOORDINATOR,ONE
...OK? YES// <Enter>
Calling text editor, please wait...
=========[ WRAP ][ INSERT ]=< Patient: TIUPATIENT,ONE >[ <PF1>H=Help]=======
Patient’s religious preference: UNITARIAN; UNIVERSALIST.
Patient’s home address: …
T=======T=======T=======T=======T=======T=======T=======T=======T=======T
Saving text ...
No changes made...
Enter your Current Signature Code: <Enter> NOT SIGNED.
Press RETURN to continue... <Enter>
Print this note? No// <Enter> NO You may enter another Progress Note. Press RETURN to exit.
Select PATIENT NAME: <Enter>

Rev. March 2017 Text Integration Utilities V. 1.0 101
Implementation Guide
G. Troubleshooting:
If you have problems with this note:
Make sure its status is Active or Test.
If its status is Test, make sure you own it.
Make sure the embedded object PATIENT RELIGION has an active status.
H. Using the Object
When the note works properly, the object is finished and available for any user with a Document
Definition menu to embed it in boilerplate text. Unless you assign ownership to someone else, you
are the site-wide caretaker for this object. Any questions or requests should be addressed to you.
I. Further considerations.
Using the option Sort Document Definitions to create Objects
Once you are comfortable creating objects, it is actually easier to use the option Sort Document
Definitions than the option Create Objects. To use the Sort option, select ALL, and select a
narrow alphabetic range which includes both the object name and the name of a test title. Another
possibility is to enter yourself as the Personal Owner. This assumes you are the personal owner of
both the object and test title. Sort Document Definitions permits the object to be edited and tested
(except for the code itself) without switching options.
Activating/Inactivating/Editing Objects
Objects must be inactive before they can be edited. Before inactivating an object that has already
been used in boilerplate text, you should inactivate all Titles which use it. This takes those titles
offline for entering documents. If a title containing an inactive object is not offline and someone
enters a document on it, the object will not function and the user will see an “Object Inactive”
error message where the object data should appear.
Objects can be tested using the Try action when they are inactive, but must be activated before
they will function for the option Entry of Progress Note. So, when you have finished editing an
object, be sure to reactivate it.
Objects should not be activated until they have been thoroughly tested both by TRYing the object
and by TRYing a test title with the object embedded in its boilerplate text.
Ownership of Objects
When creating a new object, make yourself an owner, at least until you have finished testing it.
Only the owner can edit an object, even with the Manager menu.
Persons with the Manager menu are permitted to edit the owner of objects they don’t own. This
allows reassignment of object owner in those rare cases when reassignment is necessary. It should
be done only by high-level managers. In general, users are expected to respect object ownership
and edit only objects they own. If an object needs changing, contact its owner. When you own an

102 Text Integration Utilities V. 1.0 Rev. March 2017
Implementation Guide
object, you are caretaker of it for the entire site since it is available across the site for use in
boilerplate text. Consult with all users before changing it.
Naming Objects
Although TIU doesn’t enforce any rules regarding which name of the object to embed in
boilerplate text, sites may want to maintain the convention of embedding print name or
abbreviation only, leaving the .01 name to be a longer, technical, namespaced name. Then Print
Name must be long enough to be unique, but otherwise as short as possible for typing
convenience. Abbreviation is 2 to 4 letters.
Objects must always have uppercase names, abbreviations, and print names. When embedding
objects in boilerplate text, users may embed any of these three (name, abbreviation, print name) in
boilerplate text, enclosed by an “|” on both sides. Objects must always be embedded in uppercase.
As for namespacing, sites will want to share ideas among themselves as to what works best. Some
possibilities are by service or product, like the Document Definition Hierarchy, and/or by the site
where the object originated. Sites can post objects to share on SHOP,ALL
Creating more complex objects
For ideas on creating more complex, longer objects, look at the object methods of some other
exported objects. Look at the associated routines. Copy an exported object, put a break in the
copy’s object method, embed the copy in a title and try the title.

Rev. March 2017 Text Integration Utilities V. 1.0 103
Implementation Guide
Action Descriptions
Actions are not selectable when they are enclosed in parentheses.
FIND Finds text in a list of entries/information displayed. The program
searches all pages of list/information (except for unexpanded entries in
the Edit Document Definitions Option). Can be a quick way to get to the
right page. Enter F
CHANGE VIEW
Changes the view to a different list of Document Definitions.
CREATE
This action can be used to create either Objects or nonobject Document
Definitions in TIU Document Definition file 8925.1. After it is created,
a nonobject entry must be explicitly added as an Item to a parent in the
hierarchy before it can be used. (The Create Document Definitions
Option does this automatically.) File 8925.1 cannot have two entries of
the same type with the same name.
DETAILED DISPLAY
Detailed Display displays the selected entry and permits edit if
appropriate. Edit is limited if the entry is National. Shared Components
can be VIEWED via the Edit Document Definitions Option but can be EDITED
only via the Sort Option.
The DETAILED DISPLAY action lets you edit all aspects of an entry,
including Items. The Items action, in contrast, looks at the entry ONLY as
an Item under its parent and permits edit of Item characteristics ONLY.
Managers (anyone assigned the Manager menu) need not own the entry in
order to edit it. You can edit Basics, Items, Boilerplate Text, Technical
Fields and Upload Fields.
TRY
TRY examines the selected entry for basic problems.
For titles and components with boilerplate text, this includes checking any
Embedded objects to make sure the object is embedded correctly.
If the entry is a title and checks out OK (or if its only problem is an inactive
Object), you can test the boilerplate text by choosing a patient and entering
A document using the entry. TRY doesn’t require any particular status for the
Title, since documents entered during the trial function even if inactive, in
Order to permit testing of objects. (Ordinarily, object data are not retrieved
Unless the object is active, so be sure to activate the object when it’s ready
For use.) Since the trial document shows up on Unsigned lists during the time
It’s being edited, we recommend that you select test patients only.
If TRY is selected from the Boilerplate Text Screen, TRY shows which
objects are badly embedded and why. Checks include whether the object as
written exists in the file, whether it is active, whether it is split
between lines, and whether the object as written is ambiguous as to which
object is intended. If the entry is OK, you can enter a trial document.
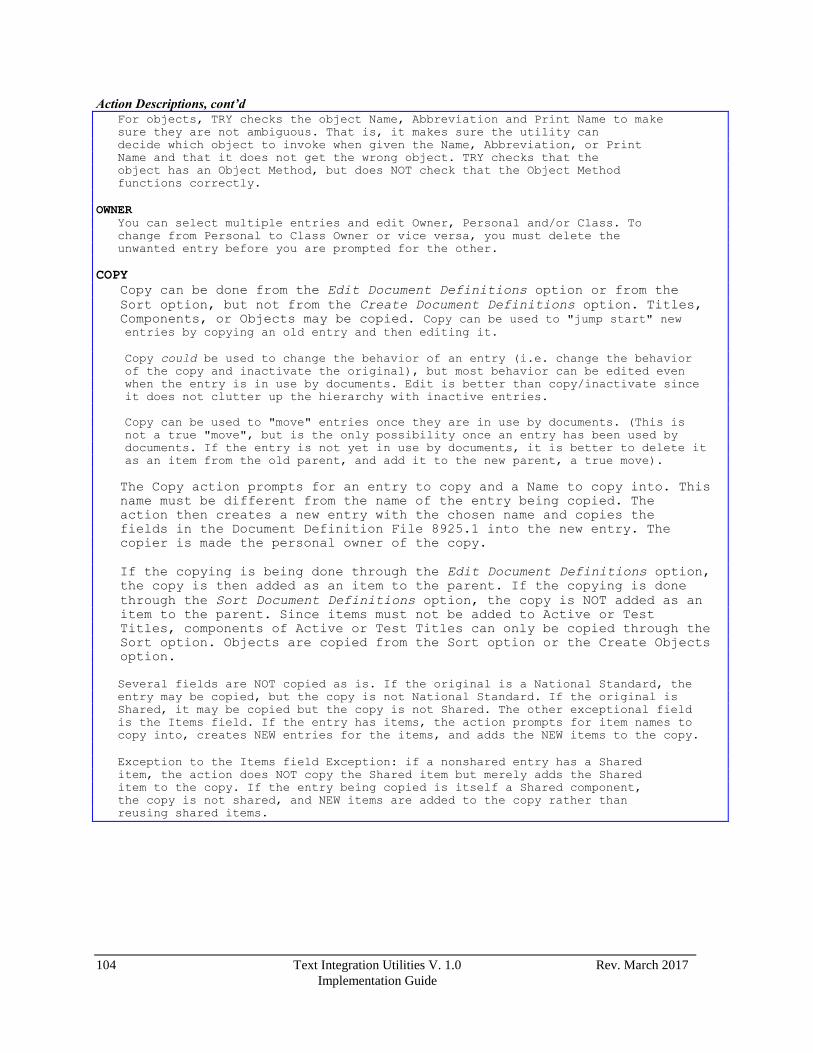
104 Text Integration Utilities V. 1.0 Rev. March 2017
Implementation Guide
Action Descriptions, cont’d For objects, TRY checks the object Name, Abbreviation and Print Name to make
sure they are not ambiguous. That is, it makes sure the utility can
decide which object to invoke when given the Name, Abbreviation, or Print
Name and that it does not get the wrong object. TRY checks that the
object has an Object Method, but does NOT check that the Object Method
functions correctly.
OWNER
You can select multiple entries and edit Owner, Personal and/or Class. To
change from Personal to Class Owner or vice versa, you must delete the
unwanted entry before you are prompted for the other.
COPY
Copy can be done from the Edit Document Definitions option or from the
Sort option, but not from the Create Document Definitions option. Titles,
Components, or Objects may be copied. Copy can be used to "jump start" new entries by copying an old entry and then editing it.
Copy could be used to change the behavior of an entry (i.e. change the behavior
of the copy and inactivate the original), but most behavior can be edited even
when the entry is in use by documents. Edit is better than copy/inactivate since
it does not clutter up the hierarchy with inactive entries.
Copy can be used to "move" entries once they are in use by documents. (This is
not a true "move", but is the only possibility once an entry has been used by
documents. If the entry is not yet in use by documents, it is better to delete it
as an item from the old parent, and add it to the new parent, a true move).
The Copy action prompts for an entry to copy and a Name to copy into. This
name must be different from the name of the entry being copied. The
action then creates a new entry with the chosen name and copies the
fields in the Document Definition File 8925.1 into the new entry. The
copier is made the personal owner of the copy.
If the copying is being done through the Edit Document Definitions option,
the copy is then added as an item to the parent. If the copying is done
through the Sort Document Definitions option, the copy is NOT added as an
item to the parent. Since items must not be added to Active or Test
Titles, components of Active or Test Titles can only be copied through the
Sort option. Objects are copied from the Sort option or the Create Objects
option.
Several fields are NOT copied as is. If the original is a National Standard, the
entry may be copied, but the copy is not National Standard. If the original is
Shared, it may be copied but the copy is not Shared. The other exceptional field
is the Items field. If the entry has items, the action prompts for item names to
copy into, creates NEW entries for the items, and adds the NEW items to the copy.
Exception to the Items field Exception: if a nonshared entry has a Shared
item, the action does NOT copy the Shared item but merely adds the Shared
item to the copy. If the entry being copied is itself a Shared component,
the copy is not shared, and NEW items are added to the copy rather than
reusing shared items.

Rev. March 2017 Text Integration Utilities V. 1.0 105
Implementation Guide
Action Descriptions, cont’d
If the copying is being done through the Edit Document Definitions option,
the user is asked which parent to add the copy to, and the copy is added
as an item to this parent. If the copy is a Title and the user has chosen
a new parent rather than the same parent, the user is asked whether to
activate the copy and inactivate the original.
If the copying is done through the Sort Document Definitions option, the
copy action does NOT add the copy to any parent. Such orphan copies can
be added to any parent using action Items for the parent.
Objects are copied from the Sort Option or the Create Objects Option.
QUIT
Allows you to quit the current menu level.

106 Text Integration Utilities V. 1.0 Rev. March 2017
Implementation Guide
Exported Objects
ACTIVE MEDICATIONS
ALLERGIES/ADR
BLOOD PRESSURE
CURRENT ADMISSION
NOW
PATIENT AGE
PATIENT DATE OF BIRTH
PATIENT DATE OF DEATH
PATIENT HEIGHT
PATIENT NAME
PATIENT RACE
PATIENT SEX
PATIENT SSN
PATIENT WEIGHT
PULSE
RESPIRATION
TEMPERATURE
TODAY'S DATE
VISIT DATE

Rev. March 2017 Text Integration Utilities V. 1.0 107
Implementation Guide
DOCUMENT TEMPLATES Document templates let you quickly add commonly used text and TIU objects when writing or
editing progress notes, completing consults, or writing discharge summaries.
The Template Editor, shown below, is used to set up personal, shared, and group templates.
These types of templates are described in the following section.
Personal templates
Any user can create his or her own templates. You can copy and paste text into a template,
type in new content, add TIU objects, or begin by copying a shared template and then
modifying it as needed. Personal template and folder icons have a folded upper right corner.
Shared templates
Only members of the Clinical Coordinator ASU class can create shared templates. Shared
templates are available to all users. Coordinators can copy and paste text into a template, type
in new content, add TIU objects, or begin by copying a personal template and then modifying
it as needed. In the tree view, shared template and folder icons do not have a folded corner.
NOTE: When you install CPRS, a copy of all your existing boilerplate titles is placed
in the inactive boilerplates folder under shared templates.
Clinical coordinators can arrange the boilerplate titles copied into the shared templates to be
used as templates, use them to create new templates, or make them available to users by
moving them out of the inactive folder. Users will not see the inactive folder or its contents
unless you choose to make the folder active.
(To see the boilerplates folder, go into the templates editor, make sure Edit Shared Templates
is checked, uncheck Hide Inactive under shared templates, and click the plus sign beside the
shared icon.)
Types of Templates
When you create templates, you can go directly into the template editor, type in text, and add
TIU objects, or if you are in a document and type in something you will use repeatedly, you
simply select that text, right-click, select Create New Template, and the editor comes up with
the selected text in the editing area.
108 Text Integration Utilities V. 1.0 Rev. March 2017
Implementation Guide
Shared templates, cont'd
You can create individual templates, group templates, or folders.
Templates contain text and TIU objects that you can place in a document.
Group templates contain text and TIU objects and can also contain other templates. If you
place a group template in a document, all text and objects in the group template and all the
templates it contains (unless they are excluded from the group template) will be placed in the
document. You can also expand the view of the group template and place the individual
templates it contains in a document one at a time.
Folders are like folders or directories in a file system. They are used to group and organize
templates. You cannot place a folder in a document. It is there to hold templates and help in
navigating the template tree view. For example, you might create a folder called "radiology"
for templates, group templates, and other folders relating to radiology.
Arranging Templates for Ease of Use
How you arrange your templates depends on your specific needs. However, it may be useful
to group similar templates together. You can also use folders to group similar templates,
making them easier to find. This organization will be similar to a good directory structure for
your workstation. For example, you may want to place all of the pulmonary templates together
rather than alphabetizing templates.
By placing those templates together that you will use, you will spend less time moving around
the tree to find the template you need.
Using Templates to Create Documents
Once you have created templates, adding them to a document is easy. When you create a new
note, a Templates button (also called a "drawer") appears. When you click the button, it opens
to show you the templates that are available. Group templates and folders have a plus next to
them. Click the plus to expand the tree view and see the templates they contain. Click a minus
sign to collapse the tree view, hiding the templates under that item.
When you find the object you want to place in a document, you can drag-and-drop it into the
document, double-click it, or right-click and choose Insert Template. The text and objects will
appear where the cursor was a few seconds later.

Rev. March 2017 Text Integration Utilities V. 1.0 109
Implementation Guide
Searching for Templates
You can search for templates by the words in the template name. To search, right-click in the
templates in the editor or in the templates "drawer" and choose Find Templates. A text field,
Find button, and two find options check boxes appear. Enter the text you want to find and
click Find.
Creating Personal Document Templates
To create a personal document template, follow these steps:
1. On the Notes, Consults, or D/C Summ tab, bring up the Template Editor by selecting
Options | Create New Template
-or-
To save specific text in a new note as a template, select the text, right-click on it, and
select Copy into New Template.
2. In the Name field under Personal Template Properties, enter a name for the new template.
Remember the template name requirements.
3. Click the template type: Template, Group Template, or Folder.
4. For Templates and Group Templates, enter the text and TIU objects (if desired) to create
the content. You can enter content in these ways:
Copy and paste from other documents
Type in text
Insert TIU objects
Copy a shared template
NOTE: After you enter the content, you can right-click in the Template Boilerplate
area to select spell check or Check Boilerplate for Errors, which looks for
invalid TIU objects.
5. Find where you want to place the template in the tree view.
a. Click the plus sign next to an item to see the objects under it.
b. Drag-and-drop the template where you want it in the tree. (Or use arrows below
the personal templates tree view.)
6. To save the template, click Apply. To save and exit the editor, click OK.

110 Text Integration Utilities V. 1.0 Rev. March 2017
Implementation Guide
Editing Document Templates
You can change your personal templates and members of the Clinical Coordinator ASU class
can change shared templates at any time.
To edit a document template, follow these steps:
1. Click the Notes, Consults, or D/C Summ tab.
2. Select Options | Edit Templates (Option | Edit Shard Templates to edit shared)
-or-
If the Templates drawer (Notes tab) is open, right-click in the drawer, and select Edit
Templates.
3. Find the template you want to edit.
a. Click the plus sign next to an item to see the objects under it.
b. Click the template you want to edit.
4. Make any desired changes, like these:
Type in more text.
Add TIU objects.
Change the template name.
Move the template to a different location.
Make the template inactive if you don't want it seen in the template drawer.
If part of a group template, exclude it to make it not copy into a document when the
group icon is dragged-and-dropped or double-clicked. Or, if excluded, you can click
the check box to include it again.
Change the template type (template, group template)
NOTE: If you change from a template or group template to a folder, you will lose the
text in the template.
5. To spell check or Check Boilerplate for Errors, right-click in the Boilerplate Template
area and select the appropriate option.
6. When finished, click Apply to save or click OK to save and exit the editor.

Rev. March 2017 Text Integration Utilities V. 1.0 111
Implementation Guide
Creating Shared Document Templates
To create shared document templates, you must be a belong to the Clinical Coordinator ASU
class. You can then create templates containing text and TIU objects that will be available to
all users.
To create shared templates, follow these steps:
1. Click the Notes, Consults, or D/C Summary tab.
2. Select Options | Create New Shared Template to bring up the Template Editor.
A template called "New Template" is created under Shared Templates..
3. In the Name field under Shared Template Properties, enter a name for the new template.
Remember the template name requirements.
4. Click the template type: Template, Group Template, or folder. If you choose Folder, skip
to step 6.
5. For templates and Group Templates, enter the text and TIU objects (if desired) to create
the content. you can enter content in these ways:
Copy and paste from other documents
Type in text
Insert TIU objects
Copy one of your personal templates
NOTE: After you enter the content, you can right-click in the Template Boilerplate
area to select spell check or Check Boilerplate for Errors, which looks for
invalid TIU objects.
6. Find where you want to place the template in the tree view.
a. Click the plus sign next to an item to see the objects under it.
b. Drag-and-drop the template where you want it in the tree. (Or use arrows below the
personal templates tree view.)
7. To save the template, click Apply. To save and exit the editor, click OK.
NOTE: You do not have to click Apply after each template, but it is recommended
because if you click Cancel, you will lose all changes you have made since
the last time you clicked Apply or OK.

112 Text Integration Utilities V. 1.0 Rev. March 2017
Implementation Guide
Copying Document Templates
Users can copy a shared template into their personal templates. Clinical Coordinators can
copy personal templates into the shared templates also. In addition, you can also copy a
template and paste it elsewhere in the same personal or shared tree (hierarchy).
Instructions for copying templates within a tree
To copy a shared template into personal, use these steps:
1. Click the Notes, Consults, or D/C Summ tab.
2. Select Options | Edit Templates
-or-
If the Templates "drawer" (Notes tab) is open, right-click in the drawer, and select Edit
Templates.
3. Expand the personal template tree to show find where you will paste the shared template.
a. Click the plus sign next to an item to see the objects under it.
b. Continue until you find the right location.
c. Click the template under which you want the shared template.
4. Find the shared template you want to copy.
a. In the shared templates, click the plus sign next to items to see the objects under them.
b. Click the template you want to copy.
5. Click the arrow button between the trees, double-click the shared template, or drag-and-
drop the shared template to the chosen location.
NOTE: At this point, the template is still a shared template. Changes to the original
shared template will appear in your version also, which may be desirable. But
if you change your version in any way, it becomes a personal template, the
icon will have a folded corner and changes to the original will not affect your
version.
6. To save the template, click Apply. To save and exit the editor, click OK.

Rev. March 2017 Text Integration Utilities V. 1.0 113
Implementation Guide
USER CLASS SETUP
Automatic population of Provider Class
The option Initialize Membership of User Classes on the IRM Conversion Menu populates the
Provider Class for operation of clinical applications, based on membership in the Provider
File. (The option starts a routine called USRPROV.) You especially need to run this routine to
implement Discharge Summary because you have to be a provider to sign a discharge
summary. Since all holders of the provider key will be added to the ASU Provider Class, you
need to review holders of the key before running the routine. It should be run only when first
implementing ASU.
Required User Classes
The following User Classes and sub-classes under Provider must be set up:
MIS Provider
Chief, MIS Physician
Medical Record Technician Nurse
Transcriptionist Resident
Intern
Medical Student
Nurse Practitioner
Physician Assistant
Other User Classes and sub-classes can be added later, as necessary. Keep it simple.
Steps to set up User Classes
1. Identify Medical Center staff who will be using Progress Notes and Discharge Summaries
through TIU.
You can either work with the various Services or Product Line ADPACs or coordinators
to provide names and roles, or you can work through VA FileMan to search the New
Person File (or a combination).
If necessary, print the New Person file and look at titles. This is the long and complicated
way to identify staff. Frequently different names are used for the same positions. We
recommend working with the Services. Maybe they already have something online that is
kept updated (especially for rotating medical students, interns, and residents) that can be
used for ASU to keep it current.
To identify the users who should be allocated to the CHIEF, MIS and MEDICAL
RECORD TECHNICIAN classes, get a list of MRTs and transcriptionists from the HIMS
office.
2. Review the list of imported User Classes.
4. Decide how to categorize your list of staff by User Classes and sub-classes.
114 Text Integration Utilities V. 1.0 Rev. March 2017
Implementation Guide
The Authorization/Subscription Utility (ASU) lets you define, populate, and retrieve
information about User Classes (which can be defined hospital-wide or more narrowly for
a specific service). It can be used across VISTA to replace and/or complement keys. You
can link User Classes with TIU Document Definitions and document actions. CPRS
actions such as ordering or signing can be linked with Document or Order type (e.g.,
Clinical Warning Note) and with User Classes (e.g., Provider Class). User Classes may be
active or inactive.
The TIU/ASU installation automatically stuffs Clinical Coordinator as the CLASS
OWNER for Progress Notes Titles.
Initialize Membership of User Classes
The option, Initialize Membership of User Classes [USR INITALIZE MEMBERSHIP]
automatically populates the User Class Membership file (USRPROV) with the Provider
User Class, based on membership in the Provider file. It should only be run when first
implementing ASU. The option excludes terminated users and users whose names begin
with “ZZ.”
Keep it Simple
We recommend that you start off by populating only the most essential User Classes (i.e.,
Provider; MRT; Chief, MIS; and Transcriptionist), and work with the exported classes
and business rules. You may need to add a few people who weren’t in classes that were
converted, or add a few classes/subclasses to match your hospital’s organization. As you
gain experience using ASU, you may want to modify the class structure some. Don’t make
it more complicated or restrictive than necessary.

Rev. March 2017 Text Integration Utilities V. 1.0 115
Implementation Guide
User Class Management Menu
Option Option Name Description
User Class Definition
USR CLASS
DEFINITION
This option allows review, addition, editing,
and removal of User Classes.
List Membership by
User
USR LIST
MEMBERSHIP BY
USER
This option allows review, addition, editing,
and removal of individual members to and from
User Classes.
List Membership by
Class
USR LIST
MEMBERSHIP BY
CLASS
This option allows review, addition, editing,
and removal of individual members to and from
User Classes.
Manage Business
Rules
USR BUSINESS
RULE MANAGE-
MENT
This option allows you to list the Business rules
defined by ASU, and to add, edit, or delete
them, as appropriate.
Process for creating user classes:
A. Populate the Provider User Class with Initialize Membership of User Classes.
B. Edit and Define User Classes.
C. Add members to User Classes.
D. Modify (add or delete) User Classes and their members, as needed.
Detailed instructions are provided on the following pages.
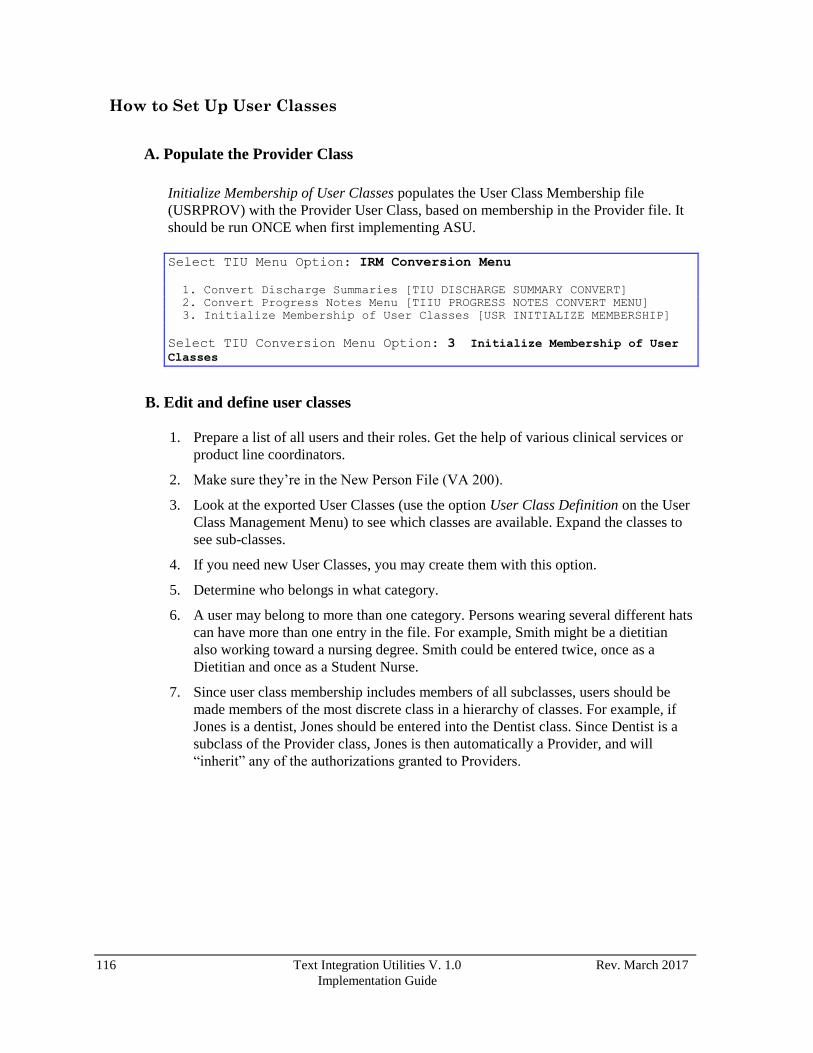
116 Text Integration Utilities V. 1.0 Rev. March 2017
Implementation Guide
How to Set Up User Classes
A. Populate the Provider Class
Initialize Membership of User Classes populates the User Class Membership file
(USRPROV) with the Provider User Class, based on membership in the Provider file. It
should be run ONCE when first implementing ASU.
Select TIU Menu Option: IRM Conversion Menu
1. Convert Discharge Summaries [TIU DISCHARGE SUMMARY CONVERT]
2. Convert Progress Notes Menu [TIIU PROGRESS NOTES CONVERT MENU]
3. Initialize Membership of User Classes [USR INITIALIZE MEMBERSHIP]
Select TIU Conversion Menu Option: 3 Initialize Membership of User Classes
B. Edit and define user classes
1. Prepare a list of all users and their roles. Get the help of various clinical services or
product line coordinators.
2. Make sure they’re in the New Person File (VA 200).
3. Look at the exported User Classes (use the option User Class Definition on the User
Class Management Menu) to see which classes are available. Expand the classes to
see sub-classes.
4. If you need new User Classes, you may create them with this option.
5. Determine who belongs in what category.
6. A user may belong to more than one category. Persons wearing several different hats
can have more than one entry in the file. For example, Smith might be a dietitian
also working toward a nursing degree. Smith could be entered twice, once as a
Dietitian and once as a Student Nurse.
7. Since user class membership includes members of all subclasses, users should be
made members of the most discrete class in a hierarchy of classes. For example, if
Jones is a dentist, Jones should be entered into the Dentist class. Since Dentist is a
subclass of the Provider class, Jones is then automatically a Provider, and will
“inherit” any of the authorizations granted to Providers.

Rev. March 2017 Text Integration Utilities V. 1.0 117
Implementation Guide
User Class Definition
This option allows you to review, add, edit, and remove User Classes. Follow the steps
below to review current User Classes and to create new ones.
1. After you select the User Class Definition option, enter the User Class Status: Active,
Inactive, or both.
User Class Definition
Select User Class Management Option: 1 User Class Definition
Select User Class Status: ACTIVE// ?
Active All User Classes
Inactive
Enter selection(s) by typing the name(s), number(s), or
abbreviation(s). Active
Start With Class: FIRST// Provider
Go To Class: LAST// Provider Searching for the User Classes....
2. To see sub-classes of the classes shown on this screen, enter a class name at the
prompt Start with Class: FIRST//. Then after the screen displays the class name,
choose the action Expand/Collapse Tree. You will then see a screen of the hierarchy
below the chosen class (e.g., physician).
User Classes Jan 31, 1997 13:41:40 Page: 1 of 1
ACTIVE USER CLASSES 1 Classes
Class Name Abbrev
1 Provider ... PROV Active
+ Next Screen - Prev Screen ?? More Actions
Find Expand/Collapse Tree Change View
Create a Class List Members Quit
Edit User Class
Select Action: Quit// EX
Expanding User Class Hierarchy.

118 Text Integration Utilities V. 1.0 Rev. March 2017
Implementation Guide
User Class Definition cont’d User Classes Jan 31, 1997 13:42:32 Page: 1 of 6
ACTIVE USER CLASSES 1 Classes
Class Name Abbrev
1 Provider PROV Active
|-Nurse
| |-Nurse Anesthetist
| |-Nurse Clinical Specialist
| |-Nurse Epidemiologist
| |-Nurse Practitioner
| |-Nursing Continuing Care
| |-Nursing Supervisor
| |-Head Nurse
| |-Vascular Nurse
| |-Research Nurse
| |-Nurse - Licensed Practical
| |_Staff Nurse
|-Physician Assistant
|-Dentist
+ + Next Screen - Prev Screen ?? More Actions
Find Expand/Collapse Tree Change View
Create a Class List Members Quit
Edit User Class
Select Action: Next Screen// C Create a Class
3. Select the action Create a Class and enter a new User Class or sub-Class name.
C. Add members to user classes
List Membership by User
This option lets you enter a user name and the program will identify what User Class
he or she is in. You can then add, edit, or remove individual members to that class.
1. Select List Membership by User from the User Class Management menu, and then
enter the name of a user.
Select User Class Management Option: 2 List Membership by
User
Select USER: TIUPROVIDER, ONE OT
Searching for the User Classes.

Rev. March 2017 Text Integration Utilities V. 1.0 119
Implementation Guide
List Membership by User, cont’d
2. A screen is displayed showing the User Class the designated user belongs to. Select
the action Add, and enter other classes to which this user may belong.
Current User Classes Jan 18, 1996 13:48:53 Page: 1 of 1
ONE PROVIDER 1 Class
User Class Effective Expires
1 Staff Physician
+ Next Screen - Prev Screen ?? More Actions
Add Remove
Edit Change View
Select Action: Quit// Add
D. Modify user classes and their members, as needed
List Membership by Class
This option lets you select a User Class to review members. You can then add, edit, or
remove individual members to and from the Class.
1. Select List Membership by Class from the User Class Management menu, and then
enter the name of a class.
Select User Class Management Option: 3 List Membership by
Class
Select CLASS: PHYSICIAN
Searching for the User Classes.

120 Text Integration Utilities V. 1.0 Rev. March 2017
Implementation Guide
List Membership by User, cont’d
2. A screen is displayed showing the User Class and current members in it. Select the
action Add, and enter other names to this class. You can also schedule changes for
rotating residents, interns, and medical students.
User Class Members Jan 18, 1996 13:51:09 Page: 1 of 1
PHYSICIANs 6 Members
Member Effective Expires
5 SEVEN DGPROVIDER
1 ELEVEN GMRCPROVIDER 06/01/95
2 FIFTY ORPROVIDER 11/02/95 01/01/99
6 FIVE SRPROVIDER
4 ONE TIUPROVIDER
3 NINE USRPROVIDER
+ Next Screen - Prev Screen ?? More Actions >>>
Add Remove Change View
Edit Schedule Changes
Select Action: Quit//
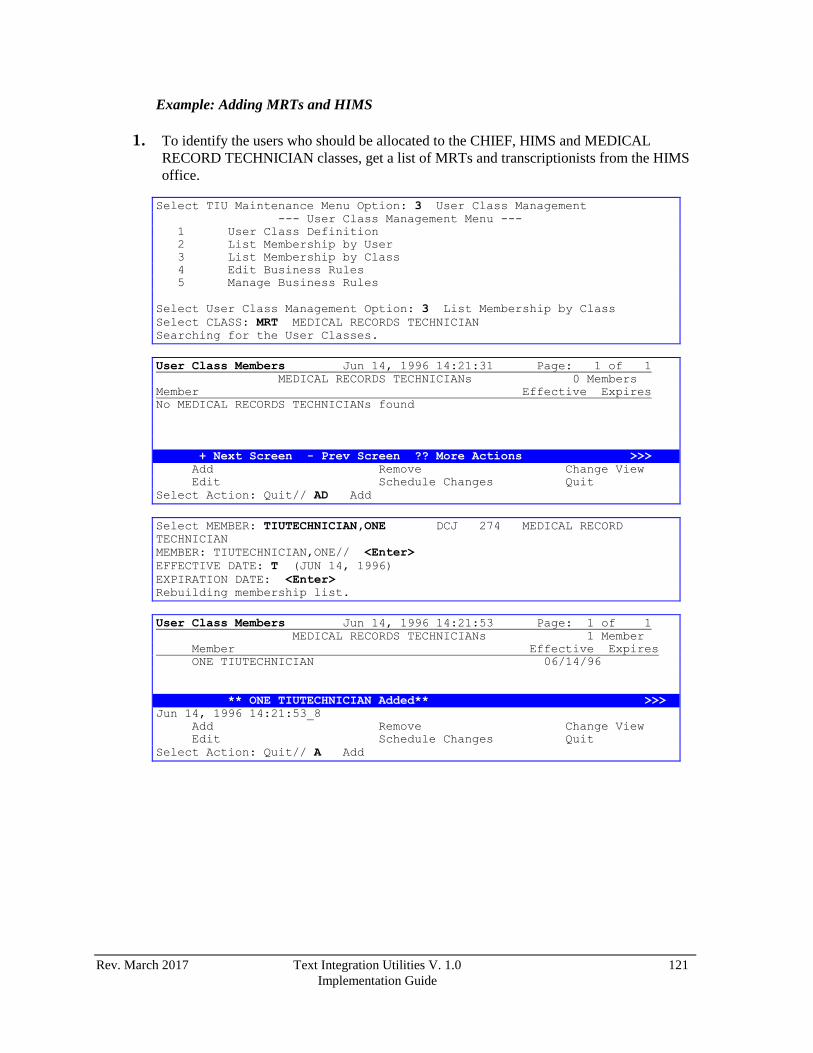
Rev. March 2017 Text Integration Utilities V. 1.0 121
Implementation Guide
Example: Adding MRTs and HIMS
1. To identify the users who should be allocated to the CHIEF, HIMS and MEDICAL
RECORD TECHNICIAN classes, get a list of MRTs and transcriptionists from the HIMS
office.
Select TIU Maintenance Menu Option: 3 User Class Management
--- User Class Management Menu ---
1 User Class Definition
2 List Membership by User
3 List Membership by Class
4 Edit Business Rules
5 Manage Business Rules
Select User Class Management Option: 3 List Membership by Class
Select CLASS: MRT MEDICAL RECORDS TECHNICIAN
Searching for the User Classes.
User Class Members Jun 14, 1996 14:21:31 Page: 1 of 1
MEDICAL RECORDS TECHNICIANs 0 Members
Member Effective Expires
No MEDICAL RECORDS TECHNICIANs found
+ Next Screen - Prev Screen ?? More Actions >>>
Add Remove Change View
Edit Schedule Changes Quit
Select Action: Quit// AD Add
Select MEMBER: TIUTECHNICIAN,ONE DCJ 274 MEDICAL RECORD
TECHNICIAN
MEMBER: TIUTECHNICIAN,ONE// <Enter>
EFFECTIVE DATE: T (JUN 14, 1996)
EXPIRATION DATE: <Enter>
Rebuilding membership list.
User Class Members Jun 14, 1996 14:21:53 Page: 1 of 1
MEDICAL RECORDS TECHNICIANs 1 Member
Member Effective Expires
ONE TIUTECHNICIAN 06/14/96
** ONE TIUTECHNICIAN Added** >>>
Jun 14, 1996 14:21:53_8
Add Remove Change View
Edit Schedule Changes Quit
Select Action: Quit// A Add

122 Text Integration Utilities V. 1.0 Rev. March 2017
Implementation Guide
Example: Adding MRTs and MIS, cont’d
Select MEMBER: TIUTECHNICIAN,TWO TT 828 MEDICAL RECORD
TECHNICIAN
MEMBER: TIUTECHNICIAN,TWO // <Enter>
EFFECTIVE DATE: T (JUN 14, 1996)
EXPIRATION DATE: <Enter>
Rebuilding membership list.
2. Add all MRTs on the list, then change view to add the Chief of MIS.
User Class Members Jun 14, 1996 14:24:11 Page: 1 of 1
MEDICAL RECORDS TECHNICIANs 7 Members
Member Effective Expires
1 ONE TIUTECHNICIAN 06/14/96
2 TWO TIUTECHNICIAN 06/14/96
3 THREE TIUTECHNICIAN 06/14/96
4 FOUR TIUTECHNICIAN 06/14/96
5 FIVE TIUTECHNICIAN . 06/14/96
6 SIX TIUTECHNICIAN 06/14/96
7 SEVEN TIUTECHNICIAN 06/14/96
** SEVEN TIUTECHNICIAN Added ** >>>
Jun 14, 1996 14:24:11_8
Add Remove Change View
Edit Schedule Changes Quit
Select Action: Quit// CH Change View
Select CLASS: CHIEF
1 CHIEF
2 CHIEF (ACTING)
3 CHIEF OF STAFF
4 CHIEF RESIDENT
5 CHIEF TECHNOLOGIST
6 CHIEF, ANESTHESIOLOGY SERVICE
7 CHIEF, MEDICAL SERVICE
8 CHIEF, HIMS
9 CHIEF, PSYCHIATRY SERVICE
TYPE '^' TO STOP, OR
CHOOSE 1-9: 8
Searching for the User Classes.

Rev. March 2017 Text Integration Utilities V. 1.0 123
Implementation Guide
Example: Adding MRTs and MIS, cont’d
User Class Members Jun 14, 1996 14:24:24 Page: 1 of 1
CHIEF, HIMS 0 Members
Member Effective Expires
No CHIEF, HIMS found
+ Next Screen - Prev Screen ?? More Actions >>>
Add Remove Change View
Edit Schedule Changes Quit
Select Action: Quit// AD Add
Select MEMBER: TIUCHIEFHIMS,ONE OT 364 CHIEF MIS
MEMBER: TIUCHIEFHIMS,ONE// <Enter>
EFFECTIVE DATE: T (JUN 14, 1996)
EXPIRATION DATE:
Rebuilding membership list.
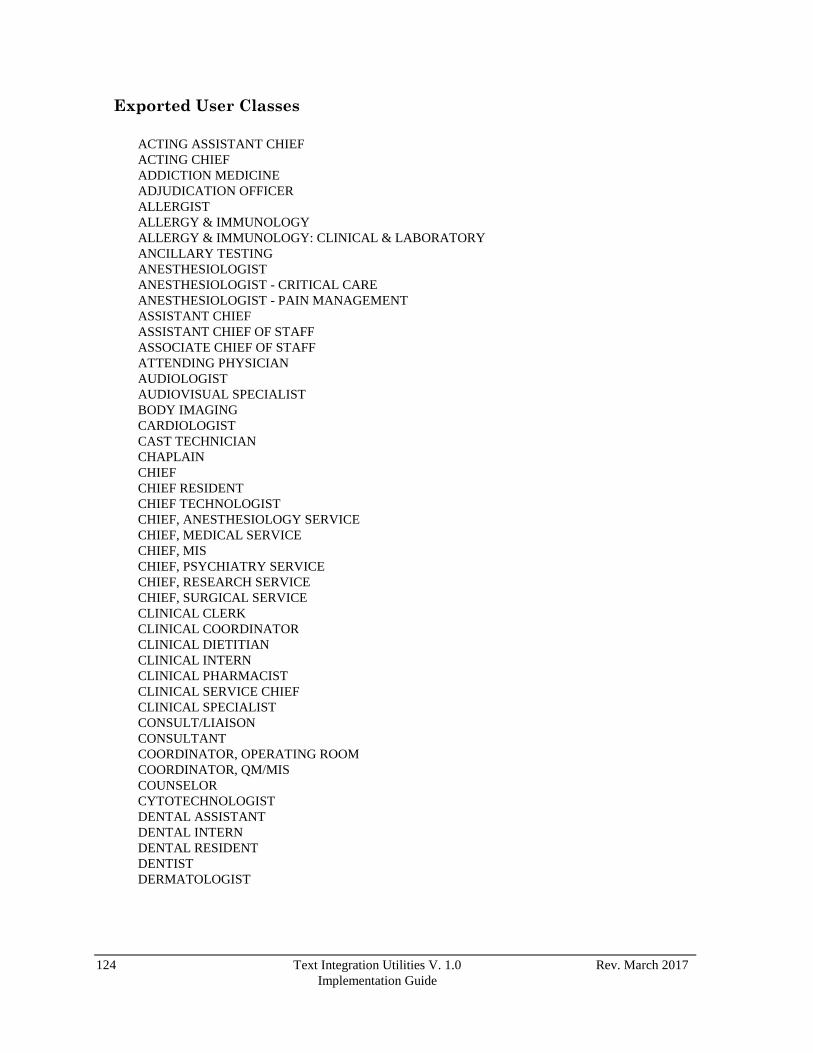
124 Text Integration Utilities V. 1.0 Rev. March 2017
Implementation Guide
Exported User Classes
ACTING ASSISTANT CHIEF
ACTING CHIEF
ADDICTION MEDICINE
ADJUDICATION OFFICER
ALLERGIST
ALLERGY & IMMUNOLOGY
ALLERGY & IMMUNOLOGY: CLINICAL & LABORATORY
ANCILLARY TESTING
ANESTHESIOLOGIST
ANESTHESIOLOGIST - CRITICAL CARE
ANESTHESIOLOGIST - PAIN MANAGEMENT
ASSISTANT CHIEF
ASSISTANT CHIEF OF STAFF
ASSOCIATE CHIEF OF STAFF
ATTENDING PHYSICIAN
AUDIOLOGIST
AUDIOVISUAL SPECIALIST
BODY IMAGING
CARDIOLOGIST
CAST TECHNICIAN
CHAPLAIN
CHIEF
CHIEF RESIDENT
CHIEF TECHNOLOGIST
CHIEF, ANESTHESIOLOGY SERVICE
CHIEF, MEDICAL SERVICE
CHIEF, MIS
CHIEF, PSYCHIATRY SERVICE
CHIEF, RESEARCH SERVICE
CHIEF, SURGICAL SERVICE
CLINICAL CLERK
CLINICAL COORDINATOR
CLINICAL DIETITIAN
CLINICAL INTERN
CLINICAL PHARMACIST
CLINICAL SERVICE CHIEF
CLINICAL SPECIALIST
CONSULT/LIAISON
CONSULTANT
COORDINATOR, OPERATING ROOM
COORDINATOR, QM/MIS
COUNSELOR
CYTOTECHNOLOGIST
DENTAL ASSISTANT
DENTAL INTERN
DENTAL RESIDENT
DENTIST
DERMATOLOGIST

Rev. March 2017 Text Integration Utilities V. 1.0 125
Implementation Guide
Exported User Classes cont’d
DERMATOLOGIST: CLINICAL & LABORATORY
DERMATOLOGY FELLOW
DERMATOPATHOLOGIST
DIABETES STUDY NURSE
DIALYSIS TECHNICIAN
DIETETIC INTERN
DIETETIC TECHNICIAN STUDENT
DIETITIAN
DIETITIAN CLINICAL SPECIALIST
DISTINGUISHED PHYSICIAN
DRG COORDINATOR
ECHO TECHNICIAN
EDUCATION STAFF SPECIALIST
ELECTRON MICROSCOPIST
EMERGENCY MEDICINE PHYSICIAN
EMERGENCY SPORTS MEDICINE
EMG TECHNICIAN
ENDOCRINOLOGIST
EPIDEMIOLOGIST
EXERCISE PHYSIOLOGIST
FAMILY GERIATRICIAN
FAMILY PRACTICE PHYSICIAN
FAMILY SPORTS MEDICINE
FEE BASIS NURSE
FELLOW
GENERAL PRACTICE PHYSICIAN
GENERIC SCREENING NURSE
GERIATRICS, GENERAL PRACTITIONER
GRADUATE NURSE TECHNICIAN
GYNECOLOGIST
HEAD NURSE
HEALTH CARE TECHNICIANS
HEMATOLOGY & ONCOLOGY
HEMODIALYSIS TECHNICIAN
HISTOPATHOLOGY TECHNICIAN
HISTOTECHNOLOGIST
HIV/AIDS COORDINATOR
HOME CARE CLINICAL COORDINATOR
HOSPITAL EPIDEMIOLOGIST
HYGIENIST
IMAGE ASSISTANT
INDUSTRIAL HYGIENIST
INFECTION CONTROL NURSE
INFECTIOUS DISEASE FELLOW
INPATIENT PSYCHOLOGIST
INTERN
INTERN PHYSICIAN
INTERN: ALLOPATHIC
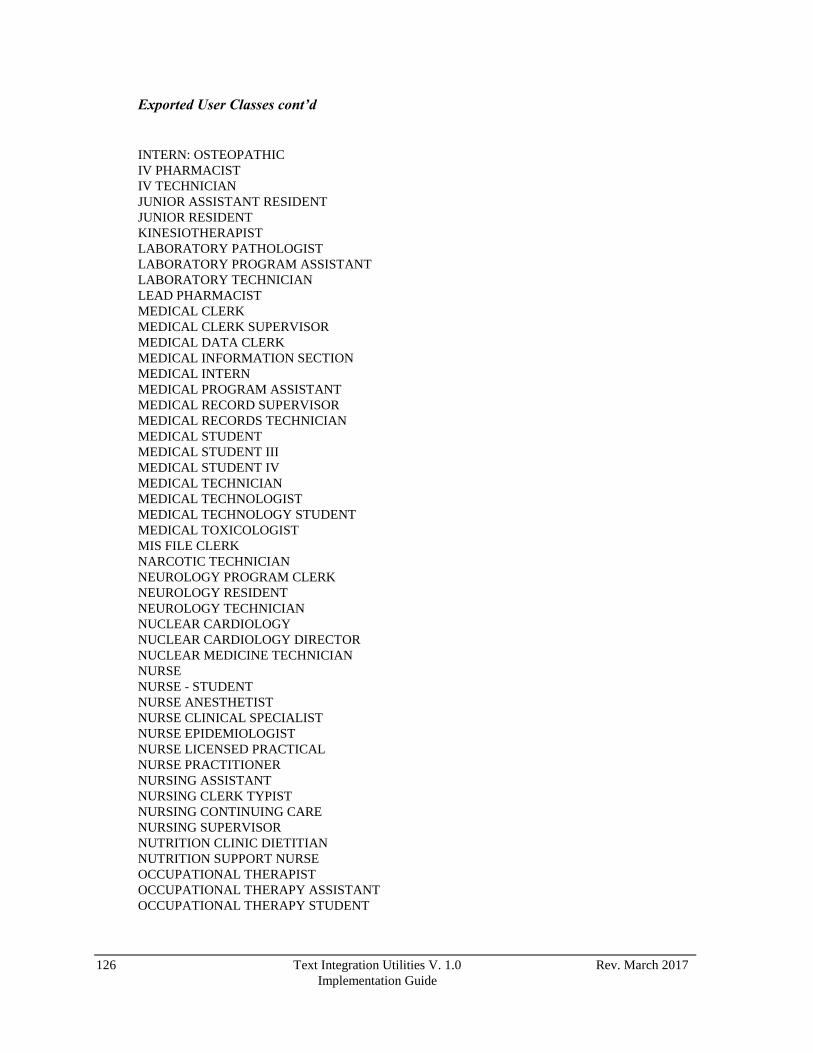
126 Text Integration Utilities V. 1.0 Rev. March 2017
Implementation Guide
Exported User Classes cont’d
INTERN: OSTEOPATHIC
IV PHARMACIST
IV TECHNICIAN
JUNIOR ASSISTANT RESIDENT
JUNIOR RESIDENT
KINESIOTHERAPIST
LABORATORY PATHOLOGIST
LABORATORY PROGRAM ASSISTANT
LABORATORY TECHNICIAN
LEAD PHARMACIST
MEDICAL CLERK
MEDICAL CLERK SUPERVISOR
MEDICAL DATA CLERK
MEDICAL INFORMATION SECTION
MEDICAL INTERN
MEDICAL PROGRAM ASSISTANT
MEDICAL RECORD SUPERVISOR
MEDICAL RECORDS TECHNICIAN
MEDICAL STUDENT
MEDICAL STUDENT III
MEDICAL STUDENT IV
MEDICAL TECHNICIAN
MEDICAL TECHNOLOGIST
MEDICAL TECHNOLOGY STUDENT
MEDICAL TOXICOLOGIST
MIS FILE CLERK
NARCOTIC TECHNICIAN
NEUROLOGY PROGRAM CLERK
NEUROLOGY RESIDENT
NEUROLOGY TECHNICIAN
NUCLEAR CARDIOLOGY
NUCLEAR CARDIOLOGY DIRECTOR
NUCLEAR MEDICINE TECHNICIAN
NURSE
NURSE - STUDENT
NURSE ANESTHETIST
NURSE CLINICAL SPECIALIST
NURSE EPIDEMIOLOGIST
NURSE LICENSED PRACTICAL
NURSE PRACTITIONER
NURSING ASSISTANT
NURSING CLERK TYPIST
NURSING CONTINUING CARE
NURSING SUPERVISOR
NUTRITION CLINIC DIETITIAN
NUTRITION SUPPORT NURSE
OCCUPATIONAL THERAPIST
OCCUPATIONAL THERAPY ASSISTANT
OCCUPATIONAL THERAPY STUDENT

Rev. March 2017 Text Integration Utilities V. 1.0 127
Implementation Guide
Exported User Classes cont’d
OCCURRENCE SCREENING
ONCOLOGY NURSE
OPC SCHEDULING SUPERVISOR
OPERATING ROOM COORDINATOR
OPERATING ROOM TECHNICIAN
OPHTHALMOLOGIST
OPTOMETRIST
ORAL SURGERY RESIDENT
ORTHOTIST/PROSTHETIST
OTOLARYNGOLOGY
OUTPATIENT CLINIC
OUTPATIENT CLINIC SUPERVISOR
OUTPATIENT PSYCHOLOGIST
OUTPATIENT RX SUPERVISOR
OUTPATIENT TECHNICIAN
PATHOLOGIST
PATHOLOGY RESIDENT
PEDIATRIC EMERGENCY PHYSICIAN
PHARMACIST
PHARMACY COORDINATOR
PHARMACY MEDICAL CLERK
PHARMACY STUDENT
PHARMACY SUPERVISOR
PHARMACY TECHNICIAN
PHARMACY TRAINEE
PHLEBOTOMIST
PHYSICAL THERAPIST
PHYSICAL THERAPY AID
PHYSICIAN
PHYSICIAN ASSISTANT
PHYSICIST
PODIATRIST
POST GRADUATE YEAR 1 RESIDENT
POST GRADUATE YEAR 2 RESIDENT
POST GRADUATE YEAR 3 RESIDENT
POST GRADUATE YEAR 4 RESIDENT
PRIVACY ACT OFFICER
PROCTOLOGIST
PROSTHETIC REPRESENTATIVE TRAINEE
PROSTHETICS
PROSTHETICS CLERK
PROSTHETICS REPRESENTATIVE
PROVIDER
PSYCHIATRIC RESEARCH ASSISTANT
PSYCHIATRIST
PSYCHIATRY CLERK
PSYCHIATRY PROGRAM ASSISTANT
PSYCHIATRY RESIDENT
PSYCHOLOGY CLINICAL ASSOCIATE

128 Text Integration Utilities V. 1.0 Rev. March 2017
Implementation Guide
Exported User Classes cont’d
PSYCHOLOGY INTERN
PSYCHOLOGY PROGRAM CLERK
PSYCHOLOGY REHABILITATION TECHNICIAN
PSYCHOLOGY RESEARCH
PSYCHOLOGY VOCATIONAL REHAB SPEC
PULMONARY CHIEF
PULMONARY CLINICAL SPECIALIST
PULMONARY FELLOW
PULMONARY FUNCTION TECH
PULMONARY LAB SUPERVISOR
PULMONARY STAFF CHIEF OF STAFF
PULMONARY TECHNICIAN
RADIATION DIAGNOSTIC TECHNOLOGIST
RADIATION ONCOLOGIST
RADIATION THERAPY TECHNOLOGIST
RADIOGRAPHER
RADIOLOGIST
RADIOLOGY DIAGNOSTIC TECH
RADIOLOGY FILE ROOM SUPERVISOR
RADIOLOGY RESIDENT
RADIOLOGY TECHNICIAN
RADIOLOGY TRANSCRIPTIONIST
RECREATION THERAPIST
RECREATIONAL THERAPY ASSISTANT
REMOTE USER
RENAL FELLOW
RESEARCH NURSE
RESEARCH TECHNICIAN
RESEARCH TECHNOLOGIST
RESIDENT PHYSICIAN
RESPIRATORY THERAPIST
SECTION CHIEF
SENIOR ASSISTANT RESIDENT
SENIOR RESIDENT
SOCIAL WORK ASSOCIATE
SOCIAL WORK INTERN
SOCIAL WORK SECRETARY
SOCIAL WORKER
SOCIAL WORKER SUPERVISOR
SOLUTIONS TECHNICIAN
SPECIAL PROCEDURES
SPEECH PATHOLOGIST
SPEECH PATHOLOGY SECTION CHIEF
STAFF DENTIST
STAFF INTERNIST
STAFF NURSE
STAFF PATHOLOGIST
STAFF PHARMACIST

Rev. March 2017 Text Integration Utilities V. 1.0 129
Implementation Guide
Exported User Classes cont’d
STAFF PHYSICIAN
STAFF PSYCHIATRIST
STAFF PSYCHOLOGIST
STAFF RADIOLOGIST
STAFF SOCIAL WORKER
STAFF SURGEON
STUDENT
STUDENT RADIOGRAPHER
SUB-INTERN
SUPERVISOR
SUPERVISOR, BLOOD BANK
SUPERVISOR, C&P UNIT
SUPERVISOR, EVENING LABS
SUPERVISOR, HEMATOLOGY LAB
SUPERVISOR, IMMUNOLOGY LAB
SUPERVISOR, MICROBIOLOGY LAB
SUPERVISOR, MIS
SUPERVISOR, PULMONARY FUNCTION LAB
SUPERVISOR, SPECIAL CHEM LAB
SUPERVISOR, STAT CHEM LAB
SUPERVISORY BIOCHEMIST
SUPERVISORY IMMUNOLOGIST
SUPERVISORY MICROBIOLOGIST
SUPERVISORY PHARMACIST
TRANSCRIPTIONIST
TUMOR REGISTRAR
UNIT COORDINATOR
UNIT NURSE
UNIT TEACHER
USER
VASCULAR NURSE
VETERINARIAN MEDICAL OFFICER
VOCATIONAL REHABILITATION SPECIALIST

130 Text Integration Utilities V. 1.0 Rev. March 2017
Implementation Guide
Define Business Rules
Business Rules in ASU authorize specific users or groups of users to perform specified
actions on documents in particular statuses.
Examples:
A completed (CLASS) Clinical Document may be viewed by a User
An unsigned (CLASS) Clinical Document may be edited by a provider who is also the
expected signer of the note
An unsigned (CLASS) Clinical Document may be deleted by Chief, MIS
A list of the Business Rules exported with TIU/ASU follows this section.
Manage Business Rules
This option allows you to display all the Business rules for a given Document Definition,
User Class, or User Role. You can then add, edit, or delete Rules, as appropriate. (This
option is also known as the ASU Rule Browser, because you can browse back and forth
among existing Business Rules, by various criteria.)

Rev. March 2017 Text Integration Utilities V. 1.0 131
Implementation Guide
Example 1: Adding a new Business Rule
1. In this example we’ll create a new Business Rule: “An UNCOSIGNED CLINICAL
DOCUMENT may be SENT BACK by a PROVIDER who is also an EXPECTED
COSIGNER.”
Select User Class Management Option: 5 Manage Business Rules
Select SEARCH CATEGORY: DOCUMENT DEFINITION// ??
Choose from:
DOCUMENT DEFINITION
USER CLASS
USER ROLE
Select SEARCH CATEGORY: DOCUMENT DEFINITION// <Enter>
Select DOCUMENT DEFINITION: ??
Choose from:
ADVANCE DIRECTIVE TITLE
ADVANCE DIRECTIVE DOCUMENT CLASS
ADVERSE REACTION/ALLERGY TITLE
ADVERSE REACTION/ALLERGY DOCUMENT CLASS
CLINICAL DOCUMENTS CLASS
CLINICAL WARNING TITLE
CLINICAL WARNING DOCUMENT CLASS
CRISIS NOTE TITLE
CRISIS NOTE DOCUMENT CLASS
DISCHARGE SUMMARIES DOCUMENT CLASS
DISCHARGE SUMMARY TITLE
DISCHARGE SUMMARY CLASS
PROGRESS NOTES CLASS
Select DOCUMENT DEFINITION: Clinical Documents (CLASS)

132 Text Integration Utilities V. 1.0 Rev. March 2017
Implementation Guide
Manage Business Rules, cont’d
2. After you specify the search category and document definition, all rules for that definition are
displayed.
ASU Rule Browser Jan 09, 1997 15:12:34 Page: 1 of 4
List Business Rules by DOCUMENT 40 Rules
for CLINICAL DOCUMENTS
_
1 An UNTRANSCRIBED CLINICAL DOCUMENT may be entered by A USER
2 An UNRELEASED CLINICAL DOCUMENT may be RELEASEED by AN TRANSCRIBER
3 An UNSIGNED CLINICAL DOCUMENT may be EDITED by AN AUTHOR/DICTATOR
4 An UNSIGNED CLINICAL DOCUMENT may be EDITED by AN EXPECTED SIGNER
5 An UNSIGNED CLINICAL DOCUMENT may be SIGNED by AN EXPECTED SIGNER
6 An UNSIGNED CLINICAL DOCUMENT may be SIGNED by A PROVIDER who is also
AN EXPECTED COSIGNER
7 A COMPLETED CLINICAL DOCUMENT may be VIEWED by A USER
8 An UNRELEASED CLINICAL DOCUMENT may be EDITED by AN TRANSCRIBER
9 An UNRELEASED CLINICAL DOCUMENT may be EDITED by A TRANSCRIPTIONIST
10 An UNCOSIGNED CLINICAL DOCUMENT may be COSIGNED by AN EXPECTED
COSIGNER
11 An UNSIGNED CLINICAL DOCUMENT may be SIGNED by A STUDENT who is also
AN EXPECTED SIGNER
12 An UNSIGNED CLINICAL DOCUMENT may be EDITED by AN EXPECTED COSIGNER
+ + Next Screen - Prev Screen ?? More Actions
Find Edit Rule Change View
Add Rule Delete Rule Quit
Select Action: Next Screen// a Add Rule

Rev. March 2017 Text Integration Utilities V. 1.0 133
Implementation Guide
Please Enter a New Business Rule:
Select DOCUMENT DEFINITION: ??
Choose from:
ADVANCE DIRECTIVE TITLE
ADVANCE DIRECTIVE DOCUMENT CLASS
ADVERSE REACTION/ALLERGY TITLE
ADVERSE REACTION/ALLERGY DOCUMENT CLASS
BOIL MARCIE MN TITLE
CLINICAL DOCUMENTS CLASS
CLINICAL WARNING TITLE
CLINICAL WARNING DOCUMENT CLASS
CRISIS NOTE TITLE
CRISIS NOTE DOCUMENT CLASS
DISCHARGE SUMMARIES DOCUMENT CLASS
DISCHARGE SUMMARY TITLE
DISCHARGE SUMMARY CLASS
MINN MARCIE DOCUMENT CLASS
PROGRESS NOTES CLASS
RNOTE DOCUMENT CLASS
Select DOCUMENT DEFINITION: CLINICAL DOCUMENTS
DOCUMENT DEFINITION: CLINICAL DOCUMENTS// <Enter>
STATUS: STATUS: ??
Choose from:
AMENDED
COMPLETED
DELETED

134 Text Integration Utilities V. 1.0 Rev. March 2017
Implementation Guide
Manage Business Rules option, cont’d PURGED
UNCOSIGNED
UNDICTATED
UNRELEASED
UNSIGNED
UNTRANSCRIBED
UNVERIFIED
STATUS: UNCOSIGNED
ACTION: ??
This is the action to be permitted for a given document definition
and status.
Choose from:
AMENDMENT
COPY RECORD
COSIGNATURE
DELETE RECORD
DICTATION
EDIT DOCUMENT DEFINITION
EDIT RECORD
ENTRY
MAKE ADDENDUM
PRINT RECORD
RELEASE FROM TRANSCRIPTION
SEND BACK
SIGNATURE
VERIFICATION
VIEW
ACTION: SEND BACK
USER CLASS: PROVIDER
AND FLAG: ??
This field allows the ADPAC to indicate whether the conditions specified by
User Class and User Role should be logically "AND'ed," or logically
"OR'ed," as they will be unless otherwise specified. i.e., if you want to
specify that an unsigned discharge summary may be signed by a user, where:
User Class = Provider AND User Role = Author,
then you'll want to set this field to AND.
Choose from:
& AND
! OR
AND FLAG: & AND
USER ROLE: ??
This identifies the role of the user with respect to the document in
question (e.g., Author/Dictator, Expected Signer, Expected Cosigner,
Attending Physician, etc.).
Choose from:
ADDITIONAL SIGNER
ATTENDING PHYSICIAN
AUTHOR/DICTATOR
EXPECTED COSIGNER
EXPECTED SIGNER
SURROGATE
TRANSCRIBER

Rev. March 2017 Text Integration Utilities V. 1.0 135
Implementation Guide
Manage Business Rules option cont’d
USER ROLE: EXPECTED COSIGNER
DESCRIPTION:
1> <Enter>
ASU Rule Browser Jan 09, 1997 17:35:52 Page: 1 of 1
List Business Rules by DOCUMENT 2 Rules
for CLINICAL DOCUMENTS
1 An UNTRANSCRIBED CLINICAL DOCUMENT may be ENTERED by A NURSE
2 An UNCOSIGNED CLINICAL DOCUMENT may be SENT BACK by a PROVIDER
who is also an EXPECTED COSIGNER
** Item 2 Added **
Find Edit Rule Change View
Add Rule Delete Rule Quit Select Action: Quit//
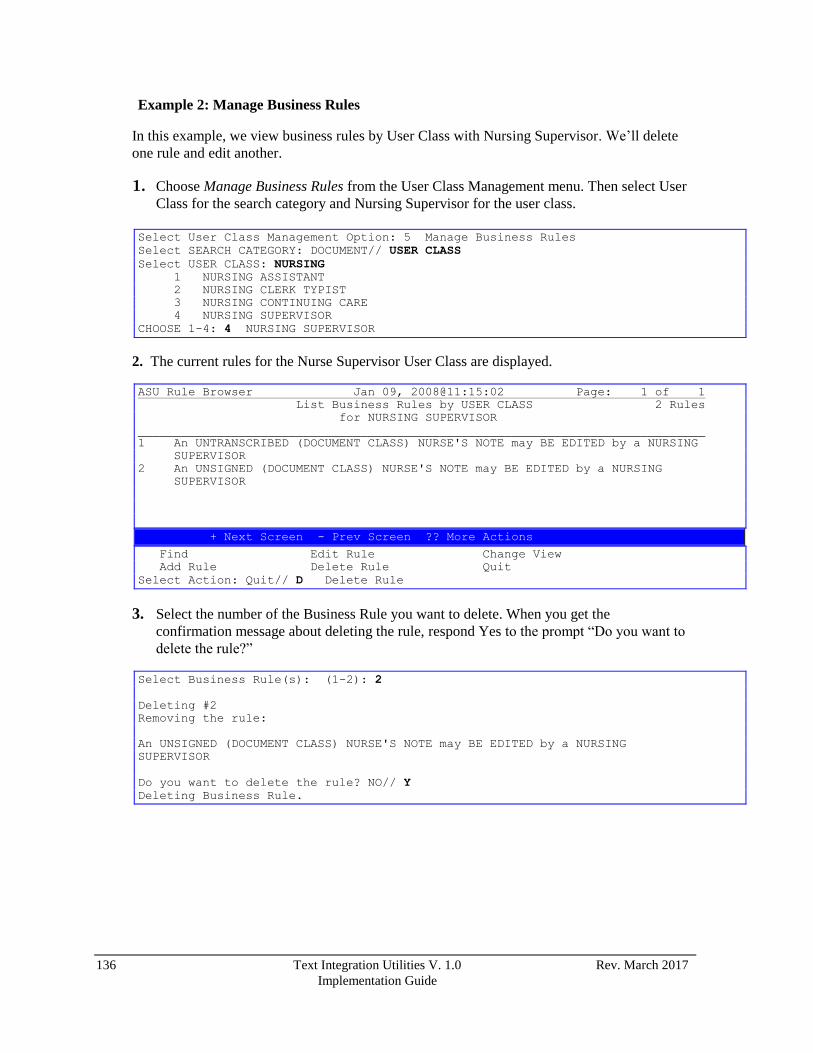
136 Text Integration Utilities V. 1.0 Rev. March 2017
Implementation Guide
Example 2: Manage Business Rules
In this example, we view business rules by User Class with Nursing Supervisor. We’ll delete
one rule and edit another.
1. Choose Manage Business Rules from the User Class Management menu. Then select User
Class for the search category and Nursing Supervisor for the user class.
Select User Class Management Option: 5 Manage Business Rules
Select SEARCH CATEGORY: DOCUMENT// USER CLASS
Select USER CLASS: NURSING
1 NURSING ASSISTANT
2 NURSING CLERK TYPIST
3 NURSING CONTINUING CARE
4 NURSING SUPERVISOR
CHOOSE 1-4: 4 NURSING SUPERVISOR
2. The current rules for the Nurse Supervisor User Class are displayed.
ASU Rule Browser Jan 09, 2008@11:15:02 Page: 1 of 1
List Business Rules by USER CLASS 2 Rules
for NURSING SUPERVISOR
_______________________________________________________________________________
1 An UNTRANSCRIBED (DOCUMENT CLASS) NURSE'S NOTE may BE EDITED by a NURSING
SUPERVISOR
2 An UNSIGNED (DOCUMENT CLASS) NURSE'S NOTE may BE EDITED by a NURSING
SUPERVISOR
+ Next Screen - Prev Screen ?? More Actions
Find Edit Rule Change View
Add Rule Delete Rule Quit
Select Action: Quit// D Delete Rule
3. Select the number of the Business Rule you want to delete. When you get the
confirmation message about deleting the rule, respond Yes to the prompt “Do you want to
delete the rule?”
Select Business Rule(s): (1-2): 2
Deleting #2
Removing the rule:
An UNSIGNED (DOCUMENT CLASS) NURSE'S NOTE may BE EDITED by a NURSING
SUPERVISOR
Do you want to delete the rule? NO// Y
Deleting Business Rule.

Rev. March 2017 Text Integration Utilities V. 1.0 137
Implementation Guide
Manage Business Rules, cont’d
4. When the screen is displayed again, the rule is not there, and the center message bar
indicates which item was deleted.
ASU Rule Browser Jan 09, 2008@11:15:21 Page: 1 of 1
List Business Rules by USER CLASS 1 Rule
for NURSING SUPERVISOR
_______________________________________________________________________________
1 An UNTRANSCRIBED (DOCUMENT CLASS) NURSE'S NOTE may BE EDITED by a NURSING
SUPERVISOR
** Item 2 deleted **
Find Edit Rule Change View
Add Rule Delete Rule Quit
Select Action: Quit//
5. Select the Edit Rule action.
ASU Rule Browser Jan 09, 2008@11:15:21 Page: 1 of 1
List Business Rules by USER CLASS 1 Rule
for NURSING SUPERVISOR
_______________________________________________________________________________
1 An UNTRANSCRIBED (DOCUMENT CLASS) NURSE'S NOTE may BE EDITED by a NURSING
SUPERVISOR
** Item 2 deleted **
Find Edit Rule Change View
Add Rule Delete Rule Quit
Select Action: Quit// E Edit Rule
6. Then accept the defaults or enter a new rule component.
Editing #1
DOCUMENT DEFINITION: NURSE'S NOTES// <Enter>
STATUS: UNTRANSCRIBED// <Enter>
ACTION: EDIT RECORD// ENTRY
USER CLASS: NURSING SUPERVISOR// NURSE
1 NURSE
2 NURSE ANESTHETIST
3 NURSE CLINICAL SPECIALIST
4 NURSE EPIDEMIOLOGIST
5 NURSE LICENSED PRACTICAL
Press <RETURN> to see more, '^' to exit this list, OR
CHOOSE 1-5: 1 NURSE
AND FLAG: <Enter>
USER ROLE: <Enter>
DESCRIPTION:
No existing text
Edit? NO// <Enter>
Refreshing the list.

138 Text Integration Utilities V. 1.0 Rev. March 2017
Implementation Guide
Manage Business Rules, cont’d
7. The screen is redisplayed with current rules for this User Class. Note that the edited rule
isn’t displayed. That’s because the User Class was changed, so you need to Change View
to the new User Class, Nurse. ASU Rule Browser Jan 09, 2008@11:31:28 Page: 1 of 1
List Business Rules by USER CLASS 0 Rules
for NURSING SUPERVISOR
_______________________________________________________________________________
No Business Rules currently exist for USER CLASS NURSING SUPERVISOR
+ Next Screen - Prev Screen ?? More Actions
Find Edit Rule Change View
Add Rule Delete Rule Quit
Select Action: Quit// C CHANGE VIEW
8. After you respond to prompts for User Class and enter Nurse, the screen redisplays with
current rules for this User Class.
Select SEARCH CATEGORY: DOCUMENT DEFINITION// user class
Select USER CLASS: nurse
1 NURSE
2 NURSE ANESTHETIST
3 NURSE CLINICAL SPECIALIST
4 NURSE EPIDEMIOLOGIST
5 NURSE LICENSED PRACTICAL
Press <RETURN> to see more, '^' to exit this list, OR
CHOOSE 1-5: 1 NURSE
ASU Rule Browser Jan 09, 2008@11:16:05 Page: 1 of 1
List Business Rules by USER CLASS 2 Rules
for NURSE
_______________________________________________________________________________
1 A COMPLETED (DOCUMENT CLASS) NURSE'S NOTE may BE VIEWED by a NURSE
2 An UNTRANSCRIBED (DOCUMENT CLASS) NURSE'S NOTE may BE ENTERED by a NURSE
+ Next Screen - Prev Screen ?? More Actions
Find Edit Rule Change View
Add Rule Delete Rule Quit
Select Action: Quit//
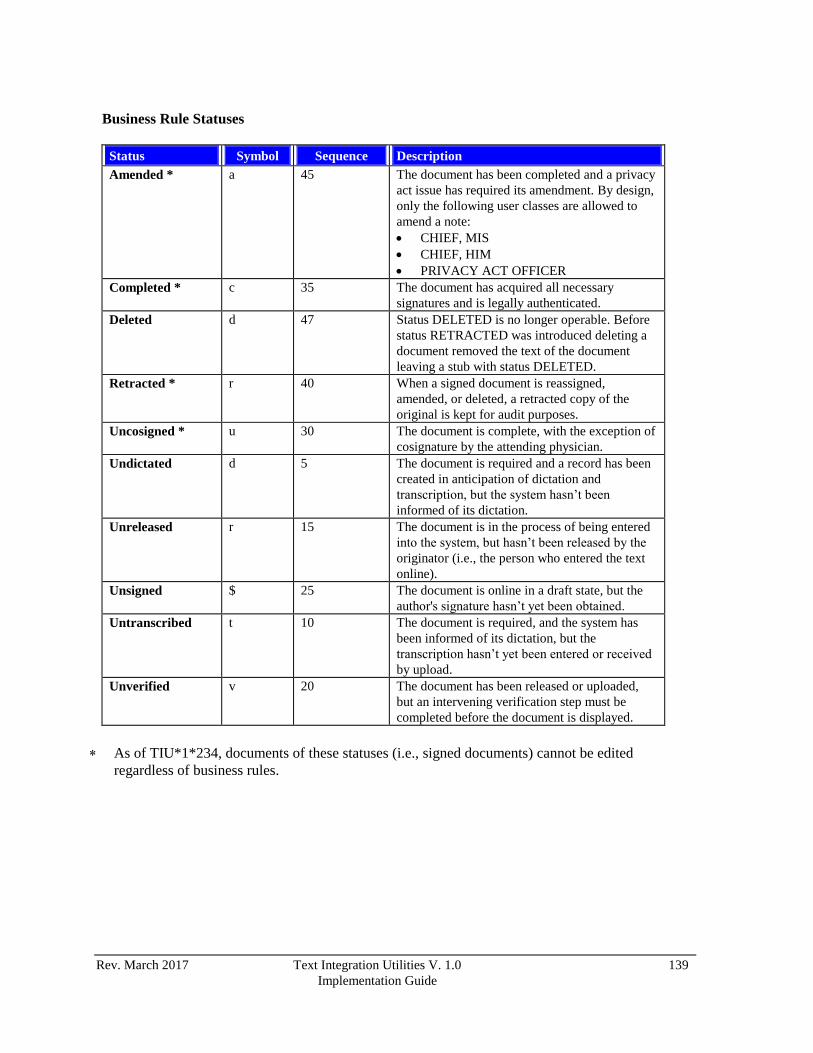
Rev. March 2017 Text Integration Utilities V. 1.0 139
Implementation Guide
Business Rule Statuses
Status Symbol Sequence Description
Amended * a 45 The document has been completed and a privacy
act issue has required its amendment. By design,
only the following user classes are allowed to
amend a note:
CHIEF, MIS
CHIEF, HIM
PRIVACY ACT OFFICER
Completed * c 35 The document has acquired all necessary
signatures and is legally authenticated.
Deleted d 47 Status DELETED is no longer operable. Before
status RETRACTED was introduced deleting a
document removed the text of the document
leaving a stub with status DELETED.
Retracted * r 40 When a signed document is reassigned,
amended, or deleted, a retracted copy of the
original is kept for audit purposes.
Uncosigned * u 30 The document is complete, with the exception of
cosignature by the attending physician.
Undictated d 5 The document is required and a record has been
created in anticipation of dictation and
transcription, but the system hasn’t been
informed of its dictation.
Unreleased r 15 The document is in the process of being entered
into the system, but hasn’t been released by the
originator (i.e., the person who entered the text
online).
Unsigned $ 25 The document is online in a draft state, but the
author's signature hasn’t yet been obtained.
Untranscribed t 10 The document is required, and the system has
been informed of its dictation, but the
transcription hasn’t yet been entered or received
by upload.
Unverified v 20 The document has been released or uploaded,
but an intervening verification step must be
completed before the document is displayed.
As of TIU*1*234, documents of these statuses (i.e., signed documents) cannot be edited
regardless of business rules.

140 Text Integration Utilities V. 1.0 Rev. March 2017
Implementation Guide
Inheritance for Business Rules
Business Rules may have one or both of the following hierarchical attributes:
Document Definition
User Class
Sometimes a rule contains a User role but no User Class, and, therefore, only has one
hierarchical attribute.
Business Rules are inherited along both of these attribute lines.
Inheritance along the Document Definition line
Rules defined for a given Document Definition are inherited by all Document Definitions
below the given one. For example, the following rule is inherited by all Titles since all Titles
descend from CLINICAL DOCUMENTS:
A COMPLETED (CLASS) CLINICAL DOCUMENT may be VIEWED by a USER
In other words, all completed Titles may be viewed by a User.
Overriding Business Rule inheritance:
This Document Definition inheritance can be overridden by setting rules at lower levels of the
Document Definition hierarchy.
Example 1:
Rule #1 below is overridden by rule #2, because Document Class NURSE NOTE is under
Class CLINICAL DOCUMENTS in the Document Definition hierarchy and both rules have
the same Status and Action.
1. An UNTRANSCRIBED (CLASS) CLINICAL DOCUMENT may be ENTERED by a
USER
2. An UNTRANSCRIBED (DOCUMENT CLASS) NURSE NOTE may be ENTERED by a NURSE

Rev. March 2017 Text Integration Utilities V. 1.0 141
Implementation Guide
Example 2:
Rule #1 below is overridden by rule #2 because Document Class NURSE NOTE is under
Class CLINICAL DOCUMENTS and both rules have the same Status and Action.
1. An UNSIGNED (CLASS) CLINICAL DOCUMENT may be VIEWED by an
AUTHOR/DICTATOR
2. An UNSIGNED (DOCUMENT CLASS) NURSE NOTE may be VIEWED by a CHIEF, MIS
If both of these rules exist, and an Author/Dictator should be able to view an Unsigned
(Document Class) NURSE NOTE, then the following rule must be added:
An UNSIGNED (DOCUMENT CLASS) NURSE NOTE may be VIEWED by an AUTHOR/DICTATOR
NOTE: Document Definition override permits Clinical Coordinators to modify the
behavior of documents for which they are responsible (e.g., NURSE NOTE),
without affecting the behavior of other documents.

142 Text Integration Utilities V. 1.0 Rev. March 2017
Implementation Guide
Inheritance along the User Class line
Rules defined for a given User Class are inherited by all User Classes below the given one. For
example, the following rule applies to all users since all User Classes descend from the User
Class USER.
A COMPLETED (CLASS) CLINICAL DOCUMENT may be VIEWED by a USER
Putting the two lines of inheritance together, this rule (if it has not been overridden) means that
all completed Titles may be viewed by all users.
Although rules are INHERITED through User Class as well as through the Document Definition
hierarchy, inheritance is not overridden by the User Class hierarchy.
In fact, if two rules have the same status, the same action, and the same Document Definition, but
one rule has a User Class that descends from the User Class of the other rule, then the rule for the
more explicit User Class is redundant. It does NOT override the more general rule.
For example, rule #1 below is not overridden by rule #2.
1. An UNSIGNED (DOCUMENT CLASS) NURSE NOTE may be VIEWED by a MEDICAL
INFORMATION SECTION
2. An UNSIGNED (DOCUMENT CLASS) NURSE NOTE may be VIEWED by a CHIEF, MIS
Instead, the second rule is redundant in the presence of the first rule. It could be eliminated with
no effect.
If a site has only rule #2 and wishes to expand those that can view NURSE NOTE from Chief,
MIS to the Medical Information Section, they could simply add rule #1. However, it would be
more efficient (fewer rules) to simply change the class CHIEF, MIS to MEDICAL
INFORMATION SECTION in the second rule.
NOTE: The reason there is no inheritance override for User Classes is that the
responsibility for User Classes is not divided up the way it is for Document
Definitions. For example, the Nursing Clinical Coordinator is responsible for
Nursing Note behavior for ALL User Classes, but is not responsible for all
TIU documents, only for Nurse Notes.
Inheritance and Addenda
Business Rules cannot be set for Addenda, since Addenda inherit their behavior from their
parents.
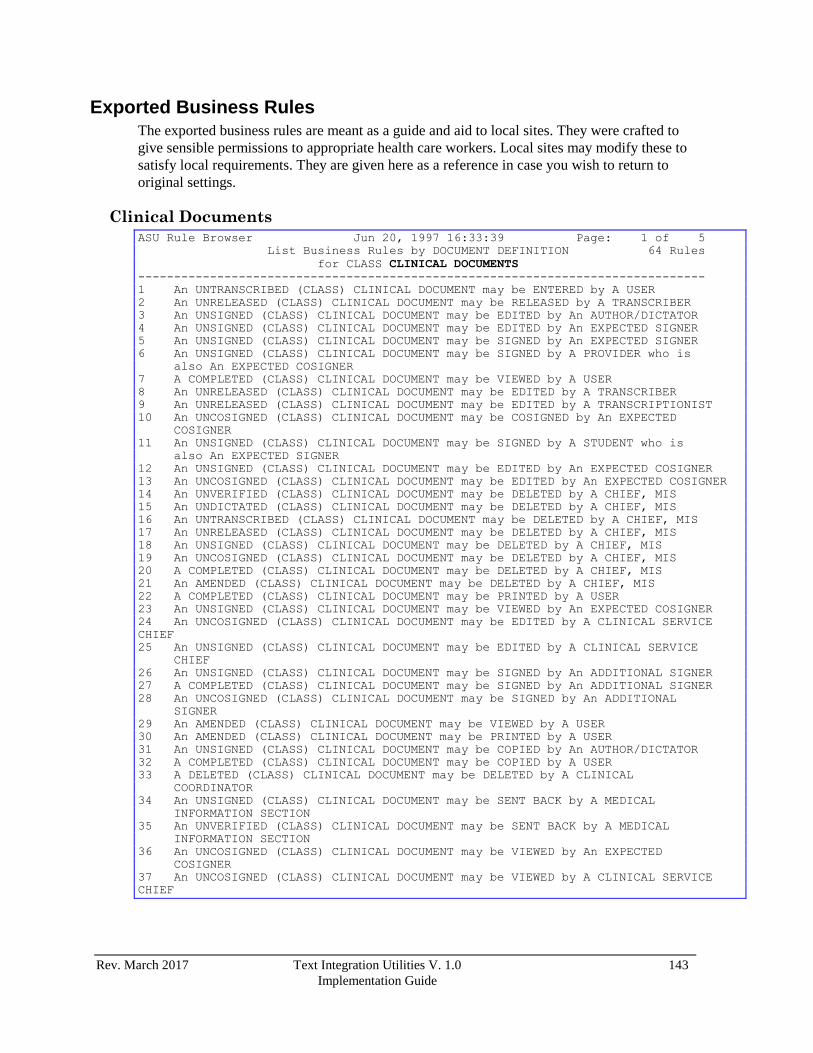
Rev. March 2017 Text Integration Utilities V. 1.0 143
Implementation Guide
Exported Business Rules The exported business rules are meant as a guide and aid to local sites. They were crafted to
give sensible permissions to appropriate health care workers. Local sites may modify these to
satisfy local requirements. They are given here as a reference in case you wish to return to
original settings.
Clinical Documents
ASU Rule Browser Jun 20, 1997 16:33:39 Page: 1 of 5
List Business Rules by DOCUMENT DEFINITION 64 Rules
for CLASS CLINICAL DOCUMENTS
-------------------------------------------------------------------------------
1 An UNTRANSCRIBED (CLASS) CLINICAL DOCUMENT may be ENTERED by A USER
2 An UNRELEASED (CLASS) CLINICAL DOCUMENT may be RELEASED by A TRANSCRIBER
3 An UNSIGNED (CLASS) CLINICAL DOCUMENT may be EDITED by An AUTHOR/DICTATOR
4 An UNSIGNED (CLASS) CLINICAL DOCUMENT may be EDITED by An EXPECTED SIGNER
5 An UNSIGNED (CLASS) CLINICAL DOCUMENT may be SIGNED by An EXPECTED SIGNER
6 An UNSIGNED (CLASS) CLINICAL DOCUMENT may be SIGNED by A PROVIDER who is
also An EXPECTED COSIGNER
7 A COMPLETED (CLASS) CLINICAL DOCUMENT may be VIEWED by A USER
8 An UNRELEASED (CLASS) CLINICAL DOCUMENT may be EDITED by A TRANSCRIBER
9 An UNRELEASED (CLASS) CLINICAL DOCUMENT may be EDITED by A TRANSCRIPTIONIST
10 An UNCOSIGNED (CLASS) CLINICAL DOCUMENT may be COSIGNED by An EXPECTED
COSIGNER
11 An UNSIGNED (CLASS) CLINICAL DOCUMENT may be SIGNED by A STUDENT who is
also An EXPECTED SIGNER
12 An UNSIGNED (CLASS) CLINICAL DOCUMENT may be EDITED by An EXPECTED COSIGNER
13 An UNCOSIGNED (CLASS) CLINICAL DOCUMENT may be EDITED by An EXPECTED COSIGNER
14 An UNVERIFIED (CLASS) CLINICAL DOCUMENT may be DELETED by A CHIEF, MIS
15 An UNDICTATED (CLASS) CLINICAL DOCUMENT may be DELETED by A CHIEF, MIS
16 An UNTRANSCRIBED (CLASS) CLINICAL DOCUMENT may be DELETED by A CHIEF, MIS
17 An UNRELEASED (CLASS) CLINICAL DOCUMENT may be DELETED by A CHIEF, MIS
18 An UNSIGNED (CLASS) CLINICAL DOCUMENT may be DELETED by A CHIEF, MIS
19 An UNCOSIGNED (CLASS) CLINICAL DOCUMENT may be DELETED by A CHIEF, MIS
20 A COMPLETED (CLASS) CLINICAL DOCUMENT may be DELETED by A CHIEF, MIS
21 An AMENDED (CLASS) CLINICAL DOCUMENT may be DELETED by A CHIEF, MIS
22 A COMPLETED (CLASS) CLINICAL DOCUMENT may be PRINTED by A USER
23 An UNSIGNED (CLASS) CLINICAL DOCUMENT may be VIEWED by An EXPECTED COSIGNER
24 An UNCOSIGNED (CLASS) CLINICAL DOCUMENT may be EDITED by A CLINICAL SERVICE
CHIEF
25 An UNSIGNED (CLASS) CLINICAL DOCUMENT may be EDITED by A CLINICAL SERVICE
CHIEF
26 An UNSIGNED (CLASS) CLINICAL DOCUMENT may be SIGNED by An ADDITIONAL SIGNER
27 A COMPLETED (CLASS) CLINICAL DOCUMENT may be SIGNED by An ADDITIONAL SIGNER
28 An UNCOSIGNED (CLASS) CLINICAL DOCUMENT may be SIGNED by An ADDITIONAL
SIGNER
29 An AMENDED (CLASS) CLINICAL DOCUMENT may be VIEWED by A USER
30 An AMENDED (CLASS) CLINICAL DOCUMENT may be PRINTED by A USER
31 An UNSIGNED (CLASS) CLINICAL DOCUMENT may be COPIED by An AUTHOR/DICTATOR
32 A COMPLETED (CLASS) CLINICAL DOCUMENT may be COPIED by A USER
33 A DELETED (CLASS) CLINICAL DOCUMENT may be DELETED by A CLINICAL
COORDINATOR
34 An UNSIGNED (CLASS) CLINICAL DOCUMENT may be SENT BACK by A MEDICAL
INFORMATION SECTION
35 An UNVERIFIED (CLASS) CLINICAL DOCUMENT may be SENT BACK by A MEDICAL
INFORMATION SECTION
36 An UNCOSIGNED (CLASS) CLINICAL DOCUMENT may be VIEWED by An EXPECTED
COSIGNER
37 An UNCOSIGNED (CLASS) CLINICAL DOCUMENT may be VIEWED by A CLINICAL SERVICE
CHIEF

144 Text Integration Utilities V. 1.0 Rev. March 2017
Implementation Guide
Exported Business Rules, cont’d
38 A COMPLETED (CLASS) CLINICAL DOCUMENT may be AMENDED by A CHIEF, MIS
39 A COMPLETED (CLASS) CLINICAL DOCUMENT may be ADDENDED by A USER
40 An AMENDED (CLASS) CLINICAL DOCUMENT may be ADDENDED by A USER
41 A DELETED (CLASS) CLINICAL DOCUMENT may be VIEWED by A USER
42 A DELETED (CLASS) CLINICAL DOCUMENT may be DELETED by A CHIEF, MIS
43 A PURGED (CLASS) CLINICAL DOCUMENT may be DELETED by A CHIEF, MIS
44 A PURGED (CLASS) CLINICAL DOCUMENT may be VIEWED by A USER
45 An UNTRANSCRIBED (CLASS) CLINICAL DOCUMENT may be VIEWED by A CHIEF, MIS
46 An UNRELEASED (CLASS) CLINICAL DOCUMENT may be VIEWED by A CHIEF, MIS
47 An UNDICTATED (CLASS) CLINICAL DOCUMENT may be VIEWED by A USER
48 A COMPLETED (CLASS) CLINICAL DOCUMENT may HAVE SIGNERS IDENTIFIED by An
AUTHOR/DICTATOR
49 An UNCOSIGNED (CLASS) CLINICAL DOCUMENT may HAVE SIGNERS IDENTIFIED by
An AUTHOR/DICTATOR
50 An UNCOSIGNED (CLASS) CLINICAL DOCUMENT may HAVE SIGNERS IDENTIFIED by An
EXPECTED COSIGNER
51 A COMPLETED (CLASS) CLINICAL DOCUMENT may HAVE SIGNERS IDENTIFIED by An
EXPECTED COSIGNER
52 An UNSIGNED (CLASS) CLINICAL DOCUMENT may be REASSIGNED by A MEDICAL
INFORMATION SECTION
53 An UNSIGNED (CLASS) CLINICAL DOCUMENT may be REASSIGNED by An
AUTHOR/DICTATOR
54 An UNSIGNED (CLASS) CLINICAL DOCUMENT may be HAVE ITS TITLE CHANGED by An
AUTHOR/DICTATOR
55 A COMPLETED (CLASS) CLINICAL DOCUMENT may be HAVE ITS TITLE CHANGED by A
CHIEF, MIS
56 An UNCOSIGNED (CLASS) CLINICAL DOCUMENT may be HAVE ITS TITLE CHANGED by An
EXPECTED COSIGNER
57 An UNCOSIGNED (CLASS) CLINICAL DOCUMENT may be HAVE ITS TITLE CHANGED by A
CLINICAL SERVICE CHIEF
58 A COMPLETED (CLASS) CLINICAL DOCUMENT may be REASSIGNED by A CHIEF, MIS
59 An UNVERIFIED (CLASS) CLINICAL DOCUMENT may be VIEWED by A MEDICAL
INFORMATION SECTION
60 An UNVERIFIED (CLASS) CLINICAL DOCUMENT may be VERIFIED by A MEDICAL
INFORMATION SECTION
61 An UNVERIFIED (CLASS) CLINICAL DOCUMENT may be EDITED by A MEDICAL
INFORMATION SECTION
62 An UNVERIFIED (CLASS) CLINICAL DOCUMENT may be PRINTED by A MEDICAL
INFORMATION SECTION
63 An UNRELEASED (CLASS) CLINICAL DOCUMENT may be VIEWED by A TRANSCRIBER
64 An UNRELEASED (CLASS) CLINICAL DOCUMENT may be VIEWED by A TRANSCRIPTIONIST
65 An UNSIGNED (CLASS) CLINICAL DOCUMENT may BE LINKED with a request by an
AUTHOR/DICTATOR
66 An UNCOSIGNED (CLASS) CLINICAL DOCUMENT may BE LINKED with a request by an
EXPECTED COSIGNER
67 A COMPLETED (CLASS) CLINICAL DOCUMENT may BE LINKED with a request by a
CHIEF, MIS
68 An UNSIGNED (CLASS) CLINICAL DOCUMENT may BE LINKED with a request by a
MEDICAL RECORDS TECHNICIAN
69 An UNSIGNED (CLASS) CLINICAL DOCUMENT may BE VIEWED by an AUTHOR/DICTATOR

Rev. March 2017 Text Integration Utilities V. 1.0 145
Implementation Guide
Exported Business Rules, cont’d
Progress Notes
List Business Rules by DOCUMENT DEFINITION 23 Rules
for CLASS PROGRESS NOTES
-------------------------------------------------------------------------------
1 A COMPLETED (CLASS) PROGRESS NOTE may be VIEWED by A USER
2 An UNSIGNED (CLASS) PROGRESS NOTE may be EDITED by A STUDENT who is also An
AUTHOR/DICTATOR
3 An UNSIGNED (CLASS) PROGRESS NOTE may be DELETED by An AUTHOR/DICTATOR
4 An UNSIGNED (CLASS) PROGRESS NOTE may be VIEWED by An AUTHOR/DICTATOR
5 An UNCOSIGNED (CLASS) PROGRESS NOTE may be VIEWED by An AUTHOR/DICTATOR
6 An UNCOSIGNED (CLASS) PROGRESS NOTE may be VIEWED by An EXPECTED COSIGNER
7 An UNSIGNED (CLASS) PROGRESS NOTE may be PRINTED by An AUTHOR/DICTATOR
8 An UNCOSIGNED (CLASS) PROGRESS NOTE may be PRINTED by An AUTHOR/DICTATOR
9 An UNCOSIGNED (CLASS) PROGRESS NOTE may be EDITED by An EXPECTED COSIGNER
10 An UNSIGNED (CLASS) PROGRESS NOTE may be EDITED by An AUTHOR/DICTATOR
11 An UNCOSIGNED (CLASS) PROGRESS NOTE may be PRINTED by An EXPECTED COSIGNER
12 An UNSIGNED (CLASS) PROGRESS NOTE may be SIGNED by An AUTHOR/DICTATOR
13 An UNCOSIGNED (CLASS) PROGRESS NOTE may be COSIGNED by An EXPECTED COSIGNER
14 An UNSIGNED (CLASS) PROGRESS NOTE may be VIEWED by A CHIEF, MIS
15 An UNSIGNED (CLASS) PROGRESS NOTE may be DELETED by A CHIEF, MIS
16 An UNCOSIGNED (CLASS) PROGRESS NOTE may be VIEWED by A CHIEF, MIS
17 An UNCOSIGNED (CLASS) PROGRESS NOTE may be DELETED by A CHIEF, MIS
18 An UNSIGNED (CLASS) PROGRESS NOTE may be EDITED by An EXPECTED COSIGNER
19 An UNSIGNED (CLASS) PROGRESS NOTE may be VIEWED by An EXPECTED COSIGNER
20 An UNSIGNED (CLASS) PROGRESS NOTE may be EDITED by A CLINICAL SERVICE CHIEF
21 An UNSIGNED (CLASS) PROGRESS NOTE may be VIEWED by A CLINICAL SERVICE CHIEF
22 An UNSIGNED (CLASS) PROGRESS NOTE may be SIGNED by A CLINICAL SERVICE CHIEF
23 An UNSIGNED (CLASS) PROGRESS NOTE may be SIGNED by An EXPECTED COSIGNER

146 Text Integration Utilities V. 1.0 Rev. March 2017
Implementation Guide
Discharge Summary
List Business Rules by DOCUMENT DEFINITION 17 Rules
for CLASS DISCHARGE SUMMARY
-------------------------------------------------------------------------------
1 An UNSIGNED (CLASS) DISCHARGE SUMMARY may be EDITED by A PROVIDER who is
also An EXPECTED COSIGNER
2 An UNSIGNED (CLASS) DISCHARGE SUMMARY may be SIGNED by A PROVIDER who is
also An ATTENDING PHYSICIAN
3 An UNCOSIGNED (CLASS) DISCHARGE SUMMARY may be COSIGNED by A PROVIDER who
is also An EXPECTED COSIGNER
4 An UNVERIFIED (CLASS) DISCHARGE SUMMARY may be VIEWED by A MEDICAL
INFORMATION SECTION
5 An UNCOSIGNED (CLASS) DISCHARGE SUMMARY may be EDITED by A PROVIDER who is
also An EXPECTED COSIGNER
6 An UNSIGNED (CLASS) DISCHARGE SUMMARY may be SIGNED by A CLINICAL SERVICE
CHIEF
7 An UNVERIFIED (CLASS) DISCHARGE SUMMARY may be VERIFIED by A MEDICAL
INFORMATION SECTION
8 An UNVERIFIED (CLASS) DISCHARGE SUMMARY may be EDITED by A MEDICAL
INFORMATION SECTION
9 An UNVERIFIED (CLASS) DISCHARGE SUMMARY may be PRINTED by A MEDICAL
INFORMATION SECTION
10 An UNSIGNED (CLASS) DISCHARGE SUMMARY may be VIEWED by A USER
11 An UNSIGNED (CLASS) DISCHARGE SUMMARY may be PRINTED by A USER
12 An UNSIGNED (CLASS) DISCHARGE SUMMARY may be ADDENDED by A USER
13 An UNCOSIGNED (CLASS) DISCHARGE SUMMARY may be ADDENDED by A USER
14 An UNCOSIGNED (CLASS) DISCHARGE SUMMARY may be VIEWED by A USER
15 An UNCOSIGNED (CLASS) DISCHARGE SUMMARY may be COSIGNED by A CLINICAL
SERVICE CHIEF
16 An UNCOSIGNED (CLASS) DISCHARGE SUMMARY may be EDITED by A CLINICAL SERVICE
CHIEF
17 An UNSIGNED (CLASS) DISCHARGE SUMMARY may be SIGNED by An EXPECTED SIGNER
Patient Record Flag Cat I
List Business Rules by DOCUMENT DEFINITION 1 Rule
for DOCUMENT CLASS PATIENT RECORD FLAG CAT I
-------------------------------------------------------------------------------
1 An UNTRANSCRIBED (DOCUMENT CLASS) PATIENT RECORD FLAG CAT I may BE ENTERED
by a DGPF PATIENT RECORD FLAGS MGR
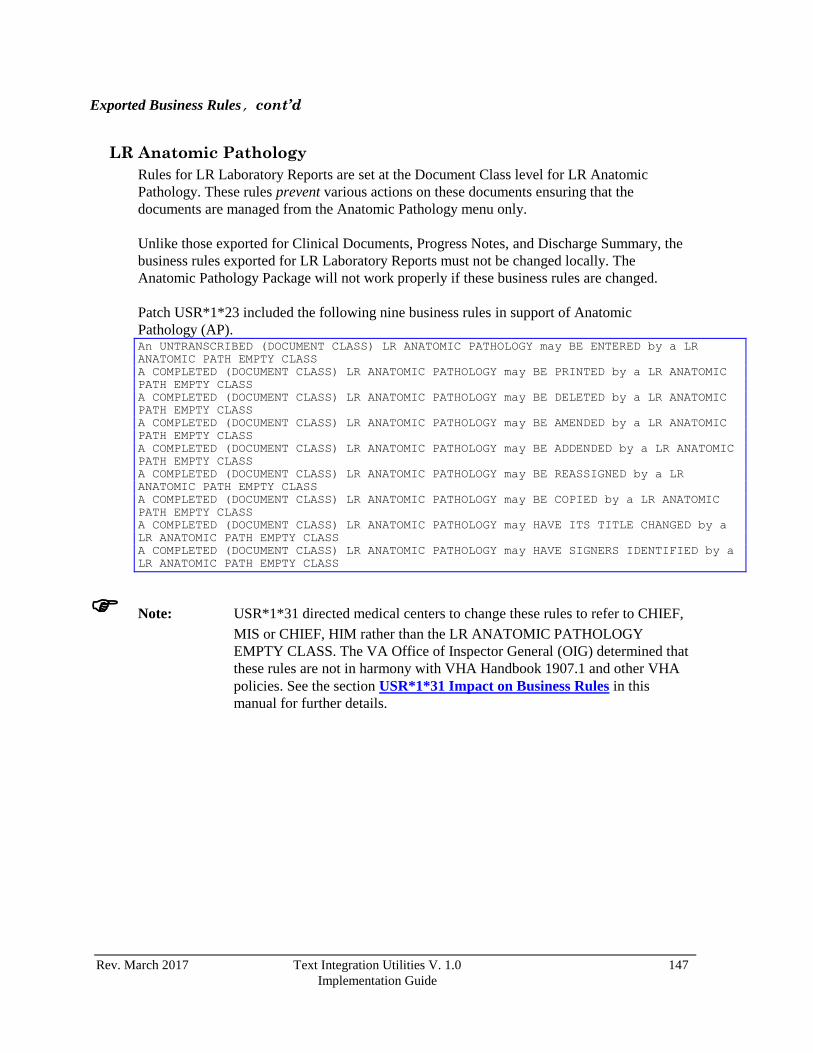
Rev. March 2017 Text Integration Utilities V. 1.0 147
Implementation Guide
Exported Business Rules, cont’d
LR Anatomic Pathology
Rules for LR Laboratory Reports are set at the Document Class level for LR Anatomic
Pathology. These rules prevent various actions on these documents ensuring that the
documents are managed from the Anatomic Pathology menu only.
Unlike those exported for Clinical Documents, Progress Notes, and Discharge Summary, the
business rules exported for LR Laboratory Reports must not be changed locally. The
Anatomic Pathology Package will not work properly if these business rules are changed.
Patch USR*1*23 included the following nine business rules in support of Anatomic
Pathology (AP). An UNTRANSCRIBED (DOCUMENT CLASS) LR ANATOMIC PATHOLOGY may BE ENTERED by a LR
ANATOMIC PATH EMPTY CLASS
A COMPLETED (DOCUMENT CLASS) LR ANATOMIC PATHOLOGY may BE PRINTED by a LR ANATOMIC
PATH EMPTY CLASS
A COMPLETED (DOCUMENT CLASS) LR ANATOMIC PATHOLOGY may BE DELETED by a LR ANATOMIC
PATH EMPTY CLASS
A COMPLETED (DOCUMENT CLASS) LR ANATOMIC PATHOLOGY may BE AMENDED by a LR ANATOMIC
PATH EMPTY CLASS
A COMPLETED (DOCUMENT CLASS) LR ANATOMIC PATHOLOGY may BE ADDENDED by a LR ANATOMIC
PATH EMPTY CLASS
A COMPLETED (DOCUMENT CLASS) LR ANATOMIC PATHOLOGY may BE REASSIGNED by a LR
ANATOMIC PATH EMPTY CLASS
A COMPLETED (DOCUMENT CLASS) LR ANATOMIC PATHOLOGY may BE COPIED by a LR ANATOMIC
PATH EMPTY CLASS
A COMPLETED (DOCUMENT CLASS) LR ANATOMIC PATHOLOGY may HAVE ITS TITLE CHANGED by a
LR ANATOMIC PATH EMPTY CLASS
A COMPLETED (DOCUMENT CLASS) LR ANATOMIC PATHOLOGY may HAVE SIGNERS IDENTIFIED by a
LR ANATOMIC PATH EMPTY CLASS
Note: USR*1*31 directed medical centers to change these rules to refer to CHIEF,
MIS or CHIEF, HIM rather than the LR ANATOMIC PATHOLOGY
EMPTY CLASS. The VA Office of Inspector General (OIG) determined that
these rules are not in harmony with VHA Handbook 1907.1 and other VHA
policies. See the section USR*1*31 Impact on Business Rules in this
manual for further details.

148 Text Integration Utilities V. 1.0 Rev. March 2017
Implementation Guide
USR*1*31 Impact on Business Rules
The ASU patch USR*1*31 directed medical centers to do the following three measures with
respect to the business rules:
1. Change LR ANATOMIC PATHOLOGY EMPTY CLASS references in business
rules to either CHIEF, MIS or CHIEF, HIM.
2. Remove references to the PURGED status in business rules.
3. Limit privileges to delete status DELETED documents in business rules.
All of these modifications can be accomplished with the TIU MAINTENANCE MENU, User
Class Management option.
The persistence of these rules is not in harmony with current VHA directives such as VHA
Handbook 1907.1 and was commented on during an Office of Inspector General (OIG)
inspection. While removal of business rules referring to the PURGED status may seem
cosmetic because the PURGED status has never been supported by VistA, OIG feels that it is
still improper to leave these rules in place. Similarly, the use of the LR ANATOMIC
PATHOLOGY EMPTY CLASS in rules about the modification of LR Anatomic Pathology
documents also goes against a directive of VHA Handbook 1907.1 in that only the Privacy
Officer or the Chief HIM may modify a signed document; hence any business rule stating
otherwise is contrary to directives (even if the USR class involved is an empty class).
Complete directions for accomplishing these three tasks are given in the patch. An abridged
version of these directions is given here:
EMPTY CLASS and the LR Anatomic Pathology Rules
Rules were created when the following option, exported by TIU*1*137, was run after patch
installation: Create DDEFS, Rules for Anat Path [TIU137 DDEFS & RULES, ANATPATH]
The rules concern documents completed in the Lab Anatomic Pathology package and
automatically entered into the TIU DOCUMENT FILE. Any necessary changes to these
documents must be made through Lab, not TIU.
Although these rules may look like they PERMITTED actions, they actually prohibited
actions since the User Class LR ANATOMIC PATH EMPTY CLASS does not have any
members (unless someone has been entered by mistake into that class). However, someone
COULD be entered by mistake into that class, and the OIG has stated that these rules must be
changed.
The rules as installed by TIU*1*137 are: A COMPLETED (DOCUMENT CLASS) LR ANATOMIC PATHOLOGY may BE AMENDED by
a LR ANATOMIC PATH EMPTY CLASS
A COMPLETED (DOCUMENT CLASS) LR ANATOMIC PATHOLOGY may HAVE ITS
TITLE CHANGED by a LR ANATOMIC PATH EMPTY CLASS
A COMPLETED (DOCUMENT CLASS) LR ANATOMIC PATHOLOGY may BE COPIED by
a LR ANATOMIC PATH EMPTY CLASS
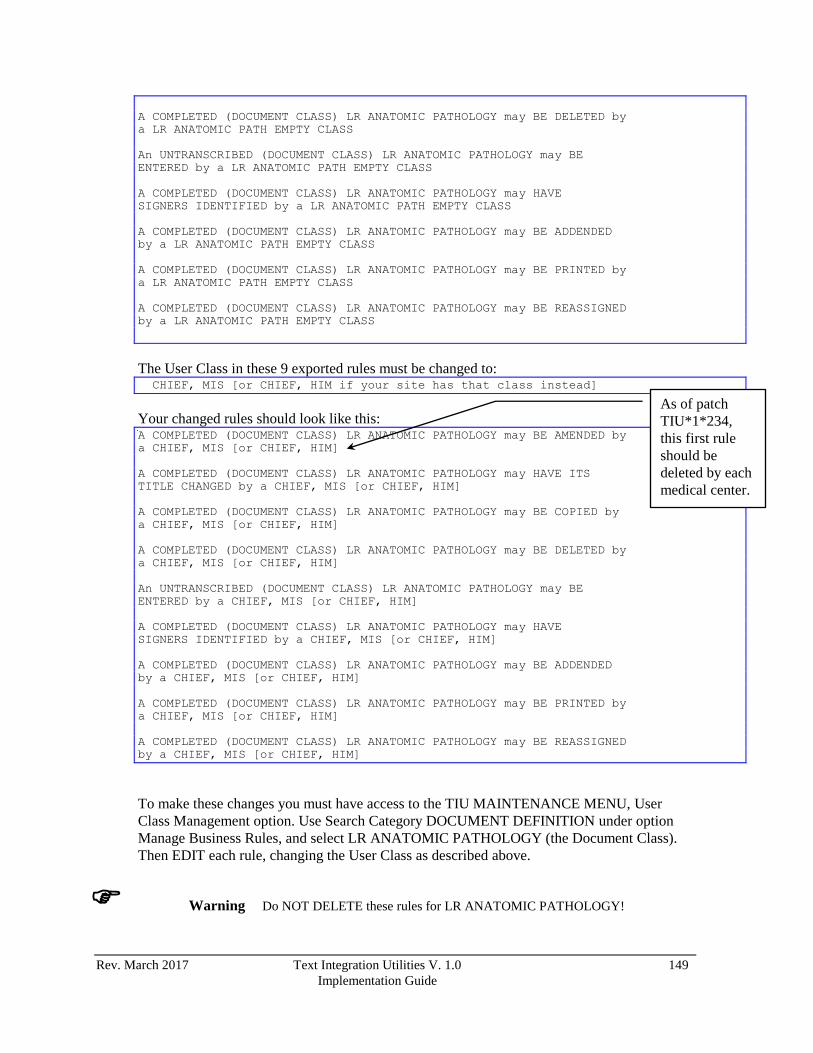
Rev. March 2017 Text Integration Utilities V. 1.0 149
Implementation Guide
A COMPLETED (DOCUMENT CLASS) LR ANATOMIC PATHOLOGY may BE DELETED by
a LR ANATOMIC PATH EMPTY CLASS
An UNTRANSCRIBED (DOCUMENT CLASS) LR ANATOMIC PATHOLOGY may BE
ENTERED by a LR ANATOMIC PATH EMPTY CLASS
A COMPLETED (DOCUMENT CLASS) LR ANATOMIC PATHOLOGY may HAVE
SIGNERS IDENTIFIED by a LR ANATOMIC PATH EMPTY CLASS
A COMPLETED (DOCUMENT CLASS) LR ANATOMIC PATHOLOGY may BE ADDENDED
by a LR ANATOMIC PATH EMPTY CLASS
A COMPLETED (DOCUMENT CLASS) LR ANATOMIC PATHOLOGY may BE PRINTED by
a LR ANATOMIC PATH EMPTY CLASS
A COMPLETED (DOCUMENT CLASS) LR ANATOMIC PATHOLOGY may BE REASSIGNED
by a LR ANATOMIC PATH EMPTY CLASS
The User Class in these 9 exported rules must be changed to: CHIEF, MIS [or CHIEF, HIM if your site has that class instead]
Your changed rules should look like this: A COMPLETED (DOCUMENT CLASS) LR ANATOMIC PATHOLOGY may BE AMENDED by
a CHIEF, MIS [or CHIEF, HIM]
A COMPLETED (DOCUMENT CLASS) LR ANATOMIC PATHOLOGY may HAVE ITS
TITLE CHANGED by a CHIEF, MIS [or CHIEF, HIM]
A COMPLETED (DOCUMENT CLASS) LR ANATOMIC PATHOLOGY may BE COPIED by
a CHIEF, MIS [or CHIEF, HIM]
A COMPLETED (DOCUMENT CLASS) LR ANATOMIC PATHOLOGY may BE DELETED by
a CHIEF, MIS [or CHIEF, HIM]
An UNTRANSCRIBED (DOCUMENT CLASS) LR ANATOMIC PATHOLOGY may BE
ENTERED by a CHIEF, MIS [or CHIEF, HIM]
A COMPLETED (DOCUMENT CLASS) LR ANATOMIC PATHOLOGY may HAVE
SIGNERS IDENTIFIED by a CHIEF, MIS [or CHIEF, HIM]
A COMPLETED (DOCUMENT CLASS) LR ANATOMIC PATHOLOGY may BE ADDENDED
by a CHIEF, MIS [or CHIEF, HIM]
A COMPLETED (DOCUMENT CLASS) LR ANATOMIC PATHOLOGY may BE PRINTED by
a CHIEF, MIS [or CHIEF, HIM]
A COMPLETED (DOCUMENT CLASS) LR ANATOMIC PATHOLOGY may BE REASSIGNED
by a CHIEF, MIS [or CHIEF, HIM]
To make these changes you must have access to the TIU MAINTENANCE MENU, User
Class Management option. Use Search Category DOCUMENT DEFINITION under option
Manage Business Rules, and select LR ANATOMIC PATHOLOGY (the Document Class).
Then EDIT each rule, changing the User Class as described above.
Warning Do NOT DELETE these rules for LR ANATOMIC PATHOLOGY!
As of patch
TIU*1*234,
this first rule
should be
deleted by each
medical center.

150 Text Integration Utilities V. 1.0 Rev. March 2017
Implementation Guide
Why LR ANATOMIC PATH rules MUST NOT BE DELETED These rules prohibit permissions regarding these actions from being inherited from TIU
Document Class CLINICAL DOCUMENTS. If these rules were deleted, incorrect
permissions would be inherited from CLASS CLINICAL DOCUMENTS. These rules (with a
changed User Class) MUST CONTINUE TO EXIST as Business Rules to avoid this
unwanted inheritance.
Obsolete PURGED Status
Sites must DELETE Rules Referencing Obsolete Status PURGED.
We are aware of the following rules referencing Status PURGED: A PURGED (CLASS) CLINICAL DOCUMENT may BE DELETED by a CHIEF, MIS
A PURGED (CLASS) CLINICAL DOCUMENT may BE VIEWED by a USER
To delete these rules referencing Status PURGED you must have access to the TIU
MAINTENANCE MENU, User Class Management option. Use Search Category
DOCUMENT DEFINITION, select Document Definition CLINICAL DOCUMENT, select
action FIND, and find 'PURGED'. Then delete each rule referencing Status PURGED.
Although these rules are not in effect since no document has status PURGED, please clean
them up to avoid misunderstanding.
Documents of Status DELETED
There should only be one business rule in your system that allows deletion of DELETED
notes. That is: A DELETED (CLASS) CLINICAL DOCUMENT may BE DELETED by a CHIEF, MIS [or CHIEF, HIM]
Some medical centers may have other rules such as:
A DELETED (CLASS) CLINICAL DOCUMENT may BE DELETED by a Clinical Coordinator
This allows too much access to this function. You must delete all except the first rule listed
here.
The DELETE action performs differently in different situations:
1. In the case of an unsigned document, the document is removed from the filing system.
2. In early versions of TIU, deleting a signed note would remove the text and mark the note
as DELETED. This was unsatisfactory and has since been changed. Today, in the case of
a signed document, DELETE only removes the document from the general view. It is still
in the filing system with the status of RETRACTED. This status allows examination of
the document in cases where a patient’s record needs to be closely scrutinized, such as in
a court proceeding.
3. In the case of a document already marked with the status of DELETED, the DELETE
action changes the status to RETRACTED.

Rev. March 2017 Text Integration Utilities V. 1.0 151
Implementation Guide
The only reason to delete a signed document is to correct some sort of error, such as one
introduced by the test version of some software. VHA regulations such as VHA Handbook
1907.1 require that the privilege of determining when an error has occurred and the right to
correct such an error be limited to a high level position such as the Chief of MIS or the Chief
of HIM.
TIU*1*234 Impact on Business Rules
First, patch 234 prevents the text of signed documents from being edited. This change
overrides business rules for editing signed documents. In the past some sites had business
rules permitting edit by expected cosigners of uncosigned documents. This practice is
forbidden by current policy.
Second, it prohibits all users except PRIVACY ACT OFFICER, CHIEF, MIS, CHIEF HIM
from AMENDING documents. (Note that alternates to these positions may be designated with
these roles for computer purposes.) The amending process is an important feature of TIU to
keep the medical record accurate. It keeps an audit trail and allows a paper trail of everything
that has been done.
Note: These two changes are required by the Office of the Inspector General and by
HIMS. The prohibitions function regardless of business rules and apply in
both VISTA and the CPRS GUI.
Because of these first two changes all sites should delete the following categories of rules.
This will avoid confusion over what actions are allowed:
1. All rules that refer to the action AMEND.
2. All rules allowing edit of signed documents.
Third, this patch adds Clinical Procedures (CP) to the types of documents
whose Expected Cosigners can be changed using VISTA option EDIT COSIGNER
(EC), which was sent out in TIU*1*220.

152 Text Integration Utilities V. 1.0 Rev. March 2017
Implementation Guide
GLOSSARY
ASU Authorization/Subscription Utility, a utility that allows sites
to associate users with user classes, allowing them to specify
the level of authorization needed to sign, order, or perform
other actions on specific document definitions and
orderables.
Action A functional process that a clinician or clerk uses in the TIU
computer program. “Edit,” “Create,” and “Find” are
examples of actions. Actions used in List Manager
applications are also known as protocols.
Boilerplate Text A pre-defined Progress Notes or Discharge Summary
template containing standard text, with blanks to fill in for
specific data about a patient.
Business Rule Business Rules in ASU authorize specific users or groups of
users to perform specified actions on documents in
particular statuses. A set of business rules is exported with
TIU/ASU; sites can edit or add to these.
Class Classes are groups of groups which hold documents.
For example, Progress Notes is a Class with many Document
Classes (kinds of progress notes) under it.
Classes may themselves be subdivided into Classes and/or may go
straight to Document Class if no further subdivisions are desired.
Besides grouping documents, Classes also store behavior which is
then inherited by lower level entries.
Clinician A doctor or other provider in the medical center who is
authorized to provide patient care.
Component Components are “sections” or “pieces” of documents, such
as Subjective, Objective, Assessment, and Plan in a SOAP
Progress

Rev. March 2017 Text Integration Utilities V. 1.0 153
Implementation Guide
Glossary cont’d
Discharge Summary A discharge summary is a formal synopsis of a patient’s
medical care during a single hospitalization. It includes
the pertinent diagnostic and therapeutic tests and
procedures as well as the conclusions generated by those
tests. A discharge summary is prepared for all discharges
and transfers from a VA medical center or domiciliary or
from nursing home care. The automated Discharge
Summary module of TIU provides an efficient and
immediate mechanism for clinicians to capture
transcribed patient discharge summaries online, where
they’re available for review, signing, adding addendum,
etc.
Document Class Document Classes group documents. Document Class is the
lowest level of class, and has Titles as items under it.
Document Definition The Document Definition utility provides the building
blocks for TIU, by organizing types of documents into a
hierarchy structure. This structure allows documents (Titles)
to inherit characteristics (such as signature requirements and
print characteristics) of the higher levels, Class and
Document Class.
HIMS A common abbreviation/synonym used at VA facilities for
Health Information Management Section of Medical
Administration Service. May also be called MIS for the
Medical Information Section.
IRT Incomplete Record Tracking, a VISTA application that can
interface with TIU to track incomplete discharge summaries
and progress notes.

154 Text Integration Utilities V. 1.0 Rev. March 2017
Implementation Guide
Glossary cont’d
MIS Common abbreviation/synonym used at VA site facilities for
the Medical Information Section of Medical Administration
Service. May be called HIMS (Health Information
Management Section).
MIS Manager Manager of the Medical Information Section of Medical
Administration Service at the site facility who has ultimate
responsibility to see that MRTs complete their duties.
MRT Medical Record Technician in the Medical Information
Section or HIMS of Medical Administration Service who
completes the tasks of assuring that all discharge summaries
placed in a patient’s medical record have been verified for
accuracy and completion and that a permanent chart copy
has been placed in a patient’s medical record for each
separate admission to the hospital.
Object Objects are placeholders which may be embedded in the predefined
boilerplate text of Titles. An example of an “Object” is “PATIENT
AGE.” Objects are typed into the boilerplate text of a Title, enclosed
by '|'s. If a Title has the boilerplate text: Patient is a healthy |PATIENT AGE| year old male
then a user who enters such a note for a 56 year old patient would be
presented with the text: Patient is a healthy 56 year old male
Progress Notes The Progress Notes module of TIU is used by health care
givers to enter and sign online patient progress notes and by
transcriptionists to enter notes to be signed by caregivers at
a later date. Caregivers may review progress notes online or
print progress notes in chart format for filing in the patient’s
record.
TIU Text Integration Utilities, a VISTA product for handling text
applications.

Rev. March 2017 Text Integration Utilities V. 1.0 155
Implementation Guide
Glossary cont’d
Title Titles are definitions for documents. They store the behavior
of the documents that use them.
User Class User Classes are the basic component of ASU
(Authorization/ Subscription Utility). The User Class file
contains the different categories of users within a hospital.
ASU allows sites to designate who is authorized to do what.
156 Text Integration Utilities V. 1.0 Rev. March 2017
Implementation Guide
APPENDIX A: USER CLASS MEMBERSHIP EXPIRATION DATE
FOR USERS REQUIRING CO-SIGNATURE (PATCH TIU*1.0*95)
WARNING: In some cases, users may gain inappropriate privileges when their user class
membership expires. In particular, users who require co-signature may be
able to complete documents without co-signature when their membership in
that user class expires.
This is how it happens:
TIU/ASU software automatically regards all users as members of the exported root
class USER. Sites often assign users to additional classes. Generally this provides the
user with additional privileges. However, some user class assignments impose
RESTRICTIONS.
This is the case with classes entered for the TIU DOCUMENT DEFINITION
parameter USERS REQUIRING COSIGNATURE. Here, user classes such as
STUDENT impose a co-signature requirement on class members: When a student
signs a document, the student is required to enter an expected cosigner, and the
document is not complete until it is cosigned.
The problem occurs when such a membership expires, while the user remains a
student, requiring co-signature. When the membership expires, the user’s
restrictions are removed, and if the student still has an account and menu access,
they can enter and complete notes without requiring a co-signature.
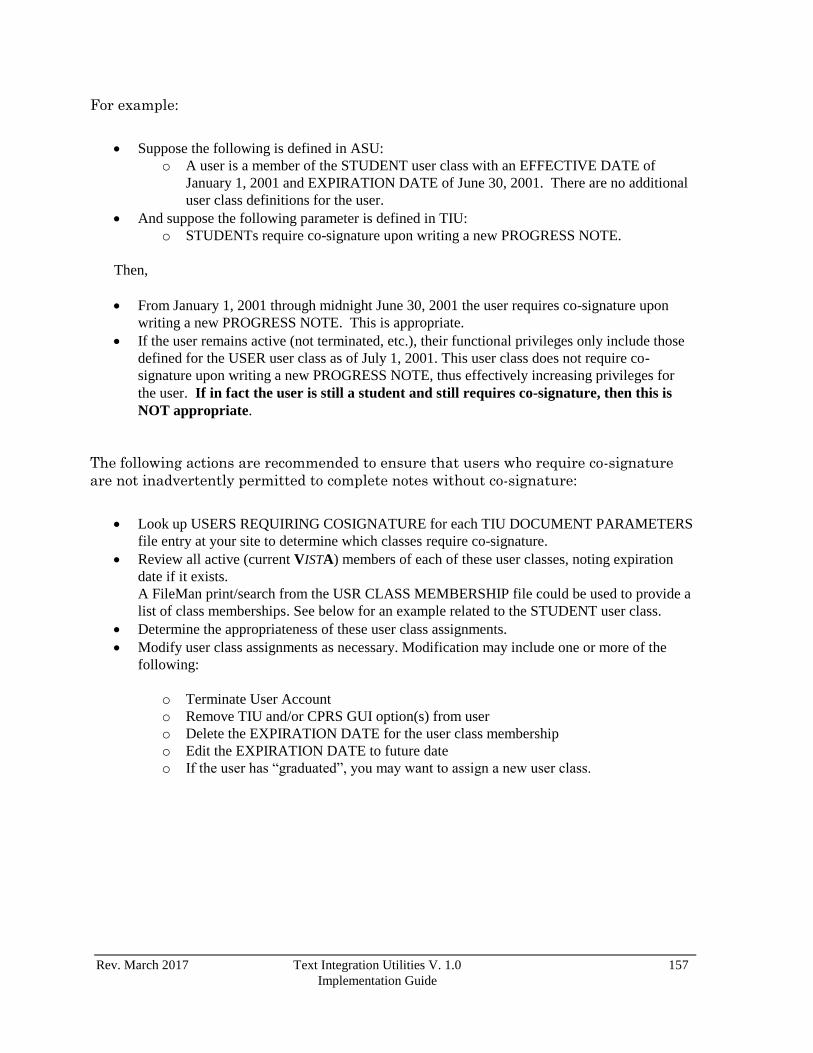
Rev. March 2017 Text Integration Utilities V. 1.0 157
Implementation Guide
For example:
Suppose the following is defined in ASU:
o A user is a member of the STUDENT user class with an EFFECTIVE DATE of
January 1, 2001 and EXPIRATION DATE of June 30, 2001. There are no additional
user class definitions for the user.
And suppose the following parameter is defined in TIU:
o STUDENTs require co-signature upon writing a new PROGRESS NOTE.
Then,
From January 1, 2001 through midnight June 30, 2001 the user requires co-signature upon
writing a new PROGRESS NOTE. This is appropriate.
If the user remains active (not terminated, etc.), their functional privileges only include those
defined for the USER user class as of July 1, 2001. This user class does not require co-
signature upon writing a new PROGRESS NOTE, thus effectively increasing privileges for
the user. If in fact the user is still a student and still requires co-signature, then this is
NOT appropriate.
The following actions are recommended to ensure that users who require co-signature
are not inadvertently permitted to complete notes without co-signature:
Look up USERS REQUIRING COSIGNATURE for each TIU DOCUMENT PARAMETERS
file entry at your site to determine which classes require co-signature.
Review all active (current VISTA) members of each of these user classes, noting expiration
date if it exists.
A FileMan print/search from the USR CLASS MEMBERSHIP file could be used to provide a
list of class memberships. See below for an example related to the STUDENT user class.
Determine the appropriateness of these user class assignments.
Modify user class assignments as necessary. Modification may include one or more of the
following:
o Terminate User Account
o Remove TIU and/or CPRS GUI option(s) from user
o Delete the EXPIRATION DATE for the user class membership
o Edit the EXPIRATION DATE to future date
o If the user has “graduated”, you may want to assign a new user class.

158 Text Integration Utilities V. 1.0 Rev. March 2017
Implementation Guide
Example of FileMan print:
Select VA FileMan Option: Print File Entries
OUTPUT FROM WHAT FILE: USR CLASS MEMBERSHIP// <Enter>
SORT BY: NUMBER// '@EXPIRATION DATE
START WITH EXPIRATION DATE: FIRST// 1/1/80
GO TO EXPIRATION DATE: LAST// T-1
WITHIN EXPIRATION DATE, SORT BY: '@USER CLASS
START WITH USER CLASS: FIRST// STUDENT
GO TO USER CLASS: LAST// STUDENT
WITHIN USER CLASS, SORT BY: MEMBER:
NEW PERSON FIELD: '@LAST SIGN-ON DATE/TIME
START WITH LAST SIGN-ON DATE/TIME: FIRST// T-30
GO TO LAST SIGN-ON DATE/TIME: LAST// <Enter>
WITHIN LAST SIGN-ON DATE/TIME, SORT BY: MEMBER
START WITH MEMBER: FIRST//<Enter>
WITHIN MEMBER, SORT BY: <Enter>
STORE IN 'SORT' TEMPLATE: <Enter>
FIRST PRINT FIELD: MEMBER
THEN PRINT FIELD: EXPIRATION DATE
THEN PRINT FIELD: MEMBER:
THEN PRINT NEW PERSON FIELD: LAST SIGN-ON DATE/TIME
THEN PRINT NEW PERSON FIELD: <Enter>
THEN PRINT FIELD: <Enter>
Heading (S/C): USR CLASS MEMBERSHIP LIST Replace USR With STUDENT USR
Replace
STUDENT USR CLASS MEMBERSHIP LIST
STORE PRINT LOGIC IN TEMPLATE: <Enter>
START AT PAGE: 1// <Enter>
DEVICE: <Enter>
STUDENT USR CLASS MEMBERSHIP LIST FEB 13,2001 (Today) PAGE 1
EXPIRATION LAST SIGN-ON
MEMBER DATE DATE/TIME
--------------------------------------------------------------------------
USERA,A JAN 20,2001 JAN 18,2001 11:11
USERB,B JUN 1,2000 FEB 6,2001 12:38
USERC,C FEB 28,2001 FEB 13,2001 09:05
USERD,D FEB 12,2001 FEB 13,2001 08:55
Or earliest
date known.
Or choose another
date range to
determine current
active users.
You could also
print the NEW
PERSON field
TERMINATION
DATE.

Rev. March 2017 Text Integration Utilities V. 1.0 159
Implementation Guide
Comments:
USERA: This user last signed into VISTA on Jan 18,2001 and today is Feb 13,2001. It appears
this user is no longer working at the site. Take the necessary steps to verify this, and if so,
ensure their account is terminated. If not, see below.
USERB & USERD: These users have recently signed into VISTA, and their STUDENT class
assignment expired – for one user, months ago; for the other, a day ago.
If they are still STUDENTs, they now have the ability to complete notes without
co-signature, which is not appropriate. You should either delete the EXPIRATION
DATE or edit it to a more accurate date in the future.
If they are no longer STUDENTs, but have become, say, RESIDENTS, and no longer
require co-signature, then the student expiration date does not pose a problem. You
may want to verify they have the appropriate new class membership so that they enjoy
all privileges of their new class.
USERC: This user has recently signed into VISTA, and their STUDENT user class
membership will expire in several weeks.
o If the student will no longer be working at the site as of that date, plan to terminate
their access.
o If the user may still be working at the site as of that date, and will still be a student,
you should either delete the EXPIRATION DATE or edit it to a more accurate date in
the future.
o If the user will still be working at the site as of that date, but will no longer be a
student, and will no longer require co-signature, the expiration date does not pose a
problem. However, you may want to set up the appropriate new class membership to
begin upon expiration of the student membership, so that they enjoy all privileges of
their new class.

160 Text Integration Utilities V. 1.0 Rev. March 2017
Implementation Guide
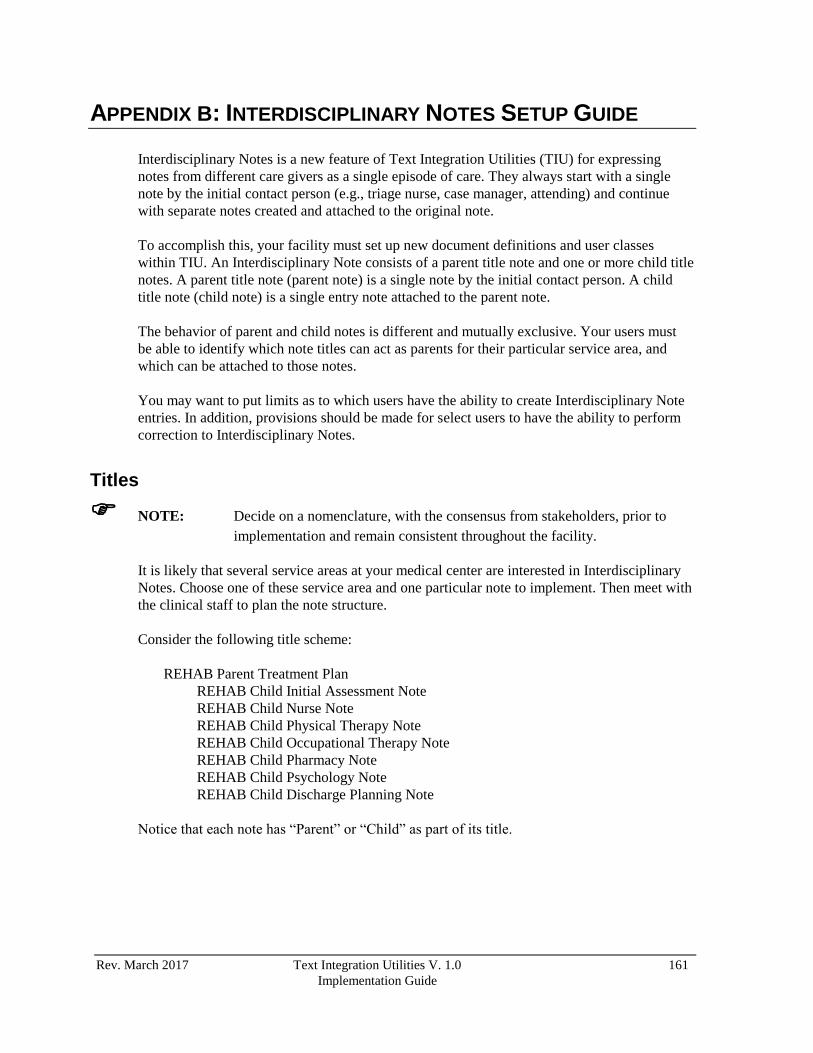
Rev. March 2017 Text Integration Utilities V. 1.0 161
Implementation Guide
APPENDIX B: INTERDISCIPLINARY NOTES SETUP GUIDE
Interdisciplinary Notes is a new feature of Text Integration Utilities (TIU) for expressing
notes from different care givers as a single episode of care. They always start with a single
note by the initial contact person (e.g., triage nurse, case manager, attending) and continue
with separate notes created and attached to the original note.
To accomplish this, your facility must set up new document definitions and user classes
within TIU. An Interdisciplinary Note consists of a parent title note and one or more child title
notes. A parent title note (parent note) is a single note by the initial contact person. A child
title note (child note) is a single entry note attached to the parent note.
The behavior of parent and child notes is different and mutually exclusive. Your users must
be able to identify which note titles can act as parents for their particular service area, and
which can be attached to those notes.
You may want to put limits as to which users have the ability to create Interdisciplinary Note
entries. In addition, provisions should be made for select users to have the ability to perform
correction to Interdisciplinary Notes.
Titles
NOTE: Decide on a nomenclature, with the consensus from stakeholders, prior to
implementation and remain consistent throughout the facility.
It is likely that several service areas at your medical center are interested in Interdisciplinary
Notes. Choose one of these service area and one particular note to implement. Then meet with
the clinical staff to plan the note structure.
Consider the following title scheme:
REHAB Parent Treatment Plan
REHAB Child Initial Assessment Note
REHAB Child Nurse Note
REHAB Child Physical Therapy Note
REHAB Child Occupational Therapy Note
REHAB Child Pharmacy Note
REHAB Child Psychology Note
REHAB Child Discharge Planning Note
Notice that each note has “Parent” or “Child” as part of its title.

162 Text Integration Utilities V. 1.0 Rev. March 2017
Implementation Guide
Consider the following list of parent titles:
ER Cover Note
ER ID Parent Note
Rehab IDP Note
Rehab Routing Note
Same-day Surgery Team Note
End-of-Life Team Note
Pain Clinic IN Parent Note
Mental Health Team Note
Discharge Planning Cover Note
In each case, the underlined word or phrase would be reserved for only parent note titles.
Clinicians responsible for starting an Interdisciplinary Note should be aware of which note
titles are potential parent note titles.
Similarly, you should use an indicator to differentiate child note titles. Clinicians responsible
for adding to Interdisciplinary notes should be aware of which note titles are potential child
note titles.
Next, plan a note structure for the service area you have selected to initially implement
Interdisciplinary Notes. Write the planned titles down and discuss them with stakeholders.
Once you have a consensus, enter the titles into the TIU document definition hierarchy.
1. Create a parent title under an existing document class.
2. Create a document class for the child titles.
3. Enter the child titles under the child titles document class.

Rev. March 2017 Text Integration Utilities V. 1.0 163
Implementation Guide
In our example the parent title looks like this:
Create Document Definitions Apr 12, 2001@10:27:55 Page: 1 of 1
BASICS
+ Name Type
2 PROGRESS NOTES CL
3 REHAB SERVICE DC
4 REHAB PARENT TREATMENT PLAN TL
?Help >ScrollRight PS/PL PrintScrn/List +/- >>>
(Class/DocumentClass) Next Level Detailed Display/Edit
Title Restart Status...
(Component) Boilerplate Text Delete
Select Action: Title//
There are seven (7) child titles in the Interdisciplinary Note we are implementing. The child
Document Class and its members look like this:
Create Document Definitions Apr 12, 2001@10:27:55 Page: 1 of 1
BASICS
+ Name Type
2 PROGRESS NOTES CL
3 INTERDISC CHILD DOCUMENT DC
4 REHAB CHILD DISCHARGE PLANNING NOTE TL
5 REHAB CHILD INITIAL ASSESSMENT NOTE TL
6 REHAB CHILD NURSE NOTE TL
7 REHAB CHILD OCCUPATIONAL THERAPY NOTE TL
8 REHAB CHILD PHARMACY NOTE TL
9 REHAB CHILD PHYSICAL THERAPY NOTE TL
10 REHAB CHILD PSYCHOLOGY NOTE TL
?Help >ScrollRight PS/PL PrintScrn/List +/- >>>
(Class/DocumentClass) Next Level Detailed Display/Edit
Title Restart Status...
(Component) Boilerplate Text Delete
Select Action: Title//
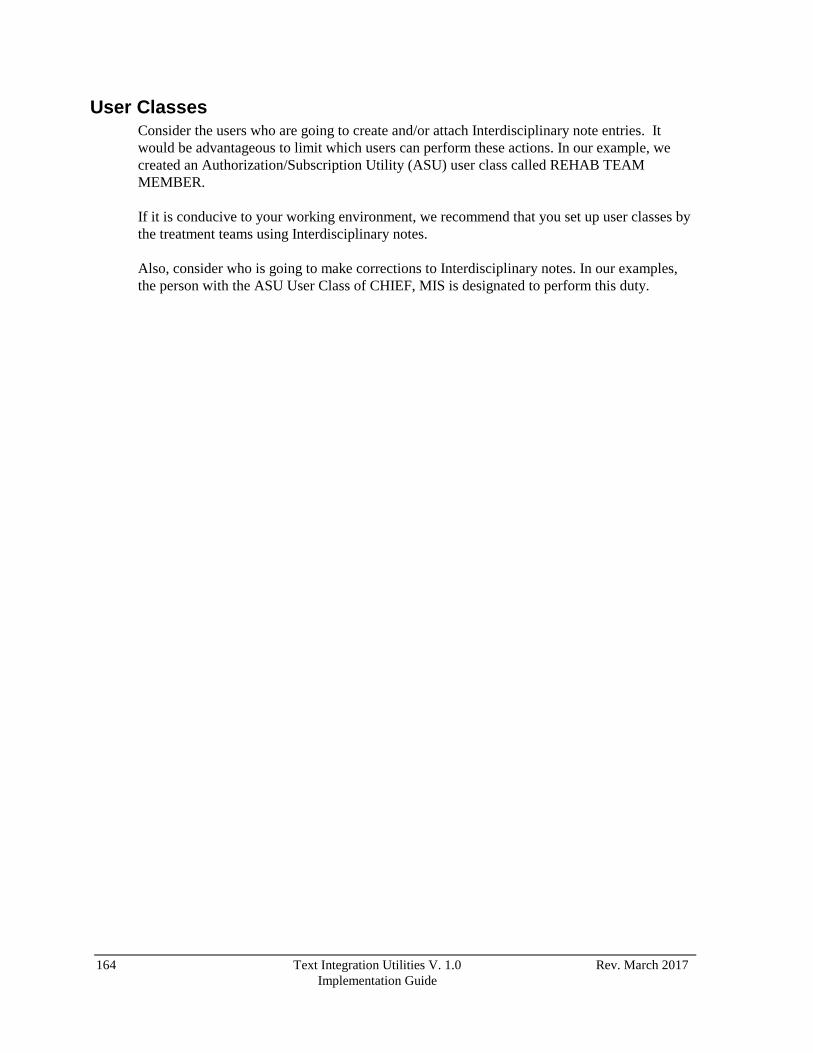
164 Text Integration Utilities V. 1.0 Rev. March 2017
Implementation Guide
User Classes Consider the users who are going to create and/or attach Interdisciplinary note entries. It
would be advantageous to limit which users can perform these actions. In our example, we
created an Authorization/Subscription Utility (ASU) user class called REHAB TEAM
MEMBER.
If it is conducive to your working environment, we recommend that you set up user classes by
the treatment teams using Interdisciplinary notes.
Also, consider who is going to make corrections to Interdisciplinary notes. In our examples,
the person with the ASU User Class of CHIEF, MIS is designated to perform this duty.

Rev. March 2017 Text Integration Utilities V. 1.0 165
Implementation Guide
Parent Business Rules
BE GIVEN AN ID ATTACHMENT (entered as ATTACH ID ENTRY) is a new ASU action
that permits the designated title note entry to receive child notes, thus creating an
Interdisciplinary Note entry.
A COMPLETED (TITLE) REHAB PARENT TREATMENT PLAN may BE GIVEN AN ID ATTACHMENT by a
REHAB TEAM MEMBER
This is the minimum rule necessary for establishing REHAB Parent Treatment Plan title as an
interdisciplinary parent title.
If you are not able to establish a user class of REHAB TEAM MEMBER, then the rule should
be stated as follows:
A COMPLETED (TITLE) REHAB PARENT TREATMENT PLAN may BE GIVEN AN ID ATTACHMENT by a
USER
You may also want to add the following rule:
An UNCOSIGNED (TITLE) REHAB PARENT TREATMENT PLAN may BE GIVEN AN ID ATTACHMENT by a
REHAB TEAM MEMBER
Uncosigned is the lowest status that can act as a parent note. The software will not allow a
child note to be attached to a parent note unless the parent note is at least in the uncosigned
status.
All these rules are symmetrical—they apply equally to attaching and detaching child notes.
(In list manager, the Interdisciplinary Notes (IN) action is also symmetrical—it will either
attach or detach a note depending on the circumstances.) Any user who is authorized (via
ASU business rules) to attach a note, is also authorized to detach that note.

166 Text Integration Utilities V. 1.0 Rev. March 2017
Implementation Guide
Parent Business Rules for Managers
You should echo each of these rules for the user class CHIEF, MIS, thus allowing the Chief of
MIS (or designee) to perform corrective actions on Interdisciplinary Note entries.
The business rules for the user class CHIEF, MIS should look like this:
A COMPLETED (TITLE) REHAB PARENT TREATMENT PLAN may BE GIVEN AN ID ATTACHMENT by a
CHIEF, MIS
An AMENDED (TITLE) REHAB PARENT TREATMENT PLAN may BE GIVEN AN ID ATTACHMENT by a
CHIEF, MIS
An UNCOSIGNED (TITLE) REHAB PARENT TREATMENT PLAN may BE GIVEN AN ID ATTACHMENT by a
CHIEF, MIS
In addition to the CHIEF, MIS user class having the ability to correct Interdisciplinary Note
entries, consideration should be given to creating a user class for the management on
Interdisciplinary Notes entries. You might call this class IN MANAGEMENT TEAM. This
user class would consist of users who are intimately involved in the planning, implementation,
and maintenance of Interdisciplinary notes. If you do set up such a user class, then add the
following rules:
A COMPLETED (TITLE) REHAB PARENT TREATMENT PLAN may BE GIVEN AN ID ATTACHMENT by an
IN MANAGEMENT TEAM
An AMENDED (TITLE) REHAB PARENT TREATMENT PLAN may BE GIVEN AN ID ATTACHMENT by an
IN MANAGEMENT TEAM
An UNCOSIGNED (TITLE) REHAB PARENT TREATMENT PLAN may BE GIVEN AN ID ATTACHMENT by
an IN MANAGEMENT TEAM

Rev. March 2017 Text Integration Utilities V. 1.0 167
Implementation Guide
Child Business Rules
BE ATTACHED is a new ASU action (entered as ATTACH TO ID NOTE) that permits a
child note entry to be attached to a parent entry.
For this user class, we initially created one business rule:
A COMPLETED (TITLE) INTERDISC CHILD DOCUMENT may BE ATTACHED to an ID note by a
COMPLETER
COMPLETER is a user role exported with USR*1*15 to support the creation of an
Interdisciplinary Note. It indicates the user, either signer or cosigner, who is responsible for
changing the status of the note to COMPLETED.
This rule is mandatory for all child note titles. Upon selecting a designated parent entry, a user
may directly create a child note entry. However, if the above business rule does not exist, the
user will not see the complete list of available titles designated as child entry titles.
In addition to the mandatory rule shown above, you should also include the following rules:
An UNCOSIGNED (TITLE) INTERDISC CHILD DOCUMENT may BE ATTACHED to an ID note by a
EXPECTED COSIGNER
A UNCOSIGNED (TITLE) INTERDISC CHILD DOCUMENT may BE ATTACHED to an ID note by a
AUTHOR/DICTATOR
An COMPLETED (TITLE) INTERDISC CHILD DOCUMENT may BE ATTACHED to an ID note by an
AUTHOR/DICTATOR
NOTE: The appropriate business rules must be created for each combination of note
status and user role.

168 Text Integration Utilities V. 1.0 Rev. March 2017
Implementation Guide
Unsigned Child Notes
In general, if users are going to attach a pre-existing note, you probably want them to sign it
first. However, circumstances may exist in your medical center where you want to permit
users to attach pre-existing notes without signature.
If an Interdisciplinary Note entry contains an unsigned child entry, then the Interdisciplinary
entry (parent title) displays as an unsigned entry in the tree view, although the individual
unsigned note contents are not visible to the user.
Even without an ASU business rule permitting unsigned documents to be attached to an
Interdisciplinary note, it is possible to have an unsigned child attached to an Interdisciplinary
Note. This happens as follows:
1. In the CPRS GUI Notes tab, select a parent title.
2. Select the menu action Add New Entry to ID Note.
3. Select a title and start writing the note.
4. The process is interrupted and the note is saved without a signature.
A similar scenario is possible in TIU List Manager (LM).
The unsigned child note is visible in the tree structure display, but whether clinicians other
than the author can view the contents of this note is dependent on your local business rules.
The software allows an unsigned note to stay attached to its parent entry, thus facilitating
retrieval of the note entry. Upon returning to complete the note entry, the author (or as
designee) finds the entry within its designated Interdisciplinary Note entry. Furthermore, if a
member of the Interdisciplinary Notes Management Team has a need to retrieve unsigned
child notes, it is clear what episode of care the note references.

Rev. March 2017 Text Integration Utilities V. 1.0 169
Implementation Guide
Child Business Rules for Managers
All the business rules for children document titles should be echoed with the CHIEF, MIS as
the user class:
A COMPLETED (TITLE) INTERDISC CHILD DOCUMENT may BE ATTACHED to an ID note by a
CHIEF, MIS
An AMENDED (TITLE) INTERDISC CHILD DOCUMENT may BE ATTACHED to an ID note by a
CHIEF, MIS
An UNCOSIGNED (TITLE) INTERDISC CHILD DOCUMENT may BE ATTACHED to an ID note by a
CHIEF, MIS
An UNSIGNED (TITLE) INTERDISC CHILD DOCUMENT may BE ATTACHED to an ID note by a
CHIEF, MIS
In our example, we have created a user class of highly involved stakeholders to monitor
Interdisciplinary Notes. This class is called the IN MANAGEMENT TEAM. We have
included the following rules for the team:
A COMPLETED (TITLE) INTERDISC CHILD DOCUMENT may BE ATTACHED to an ID note by an IN
MANAGEMENT TEAM
An AMENDED (TITLE) INTERDISC CHILD DOCUMENT may BE ATTACHED to an ID note by an IN
MANAGEMENT TEAM
An UNCOSIGNED (TITLE) INTERDISC CHILD DOCUMENT may BE ATTACHED to an ID note by an
IN MANAGEMENT TEAM
An UNSIGNED (TITLE) INTERDISC CHILD DOCUMENT may BE ATTACHED to an ID note by an IN
MANAGEMENT TEAM

170 Text Integration Utilities V. 1.0 Rev. March 2017
Implementation Guide
TIU Parameters
There are two new document parameters for parent note titles:
ORDER ID ENTRIES BY TITLE
SEND ALERTS ON NEW ID ENTRY
The ORDER ID ENTRIES BY TITLE parameter manages the order in which child notes are
listed (and printed) within the Interdisciplinary note. If set to YES, instead of listing the child
notes in date order (the default), CPRS and TIU will list child notes in alphabetical order by
note title. In effect, child notes are then grouped by title.
The SEND ALERTS ON NEW ID ENTRY parameter provides a mechanism to alert the
originator of a parent note whenever a child note is attached to the parent note. If set to YES,
then an alert is sent every time a new child note is attached to the parent note. This allows the
originator to review additions to the interdisciplinary note.
NO is the default setting for both parameters.
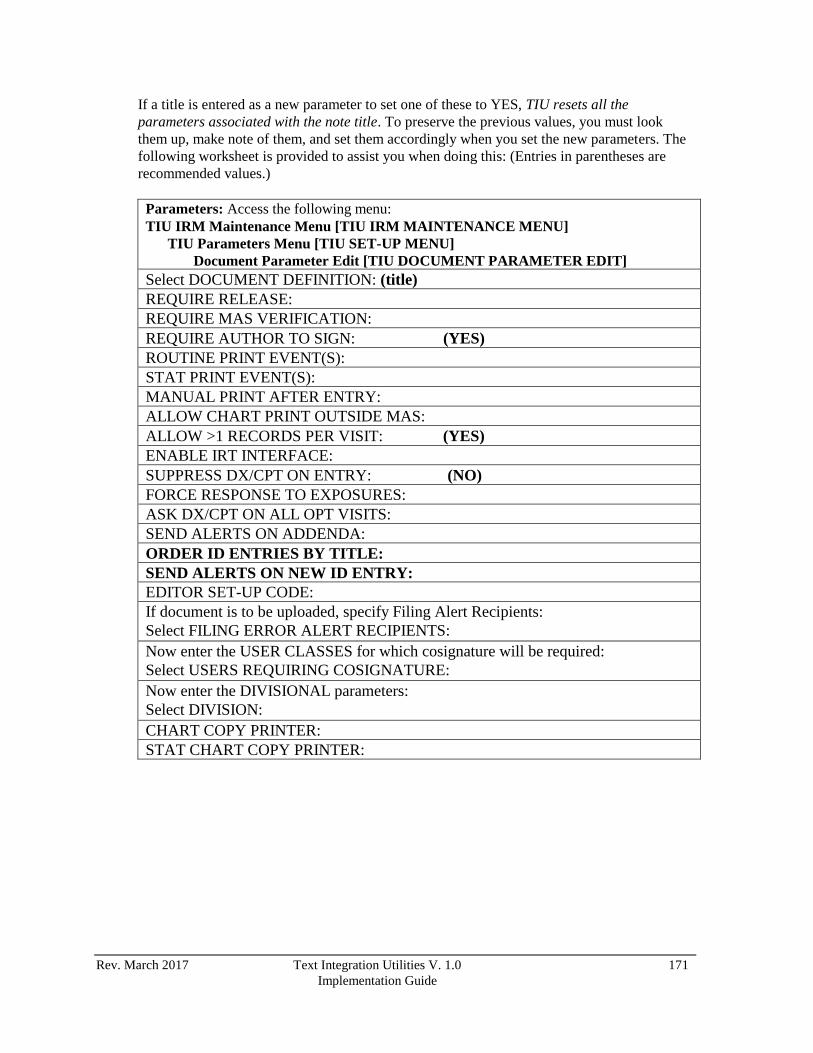
Rev. March 2017 Text Integration Utilities V. 1.0 171
Implementation Guide
If a title is entered as a new parameter to set one of these to YES, TIU resets all the
parameters associated with the note title. To preserve the previous values, you must look
them up, make note of them, and set them accordingly when you set the new parameters. The
following worksheet is provided to assist you when doing this: (Entries in parentheses are
recommended values.)
Parameters: Access the following menu:
TIU IRM Maintenance Menu [TIU IRM MAINTENANCE MENU]
TIU Parameters Menu [TIU SET-UP MENU]
Document Parameter Edit [TIU DOCUMENT PARAMETER EDIT]
Select DOCUMENT DEFINITION: (title)
REQUIRE RELEASE:
REQUIRE MAS VERIFICATION:
REQUIRE AUTHOR TO SIGN: (YES)
ROUTINE PRINT EVENT(S):
STAT PRINT EVENT(S):
MANUAL PRINT AFTER ENTRY:
ALLOW CHART PRINT OUTSIDE MAS:
ALLOW >1 RECORDS PER VISIT: (YES)
ENABLE IRT INTERFACE:
SUPPRESS DX/CPT ON ENTRY: (NO)
FORCE RESPONSE TO EXPOSURES:
ASK DX/CPT ON ALL OPT VISITS:
SEND ALERTS ON ADDENDA:
ORDER ID ENTRIES BY TITLE:
SEND ALERTS ON NEW ID ENTRY:
EDITOR SET-UP CODE:
If document is to be uploaded, specify Filing Alert Recipients:
Select FILING ERROR ALERT RECIPIENTS:
Now enter the USER CLASSES for which cosignature will be required:
Select USERS REQUIRING COSIGNATURE:
Now enter the DIVISIONAL parameters:
Select DIVISION:
CHART COPY PRINTER:
STAT CHART COPY PRINTER:
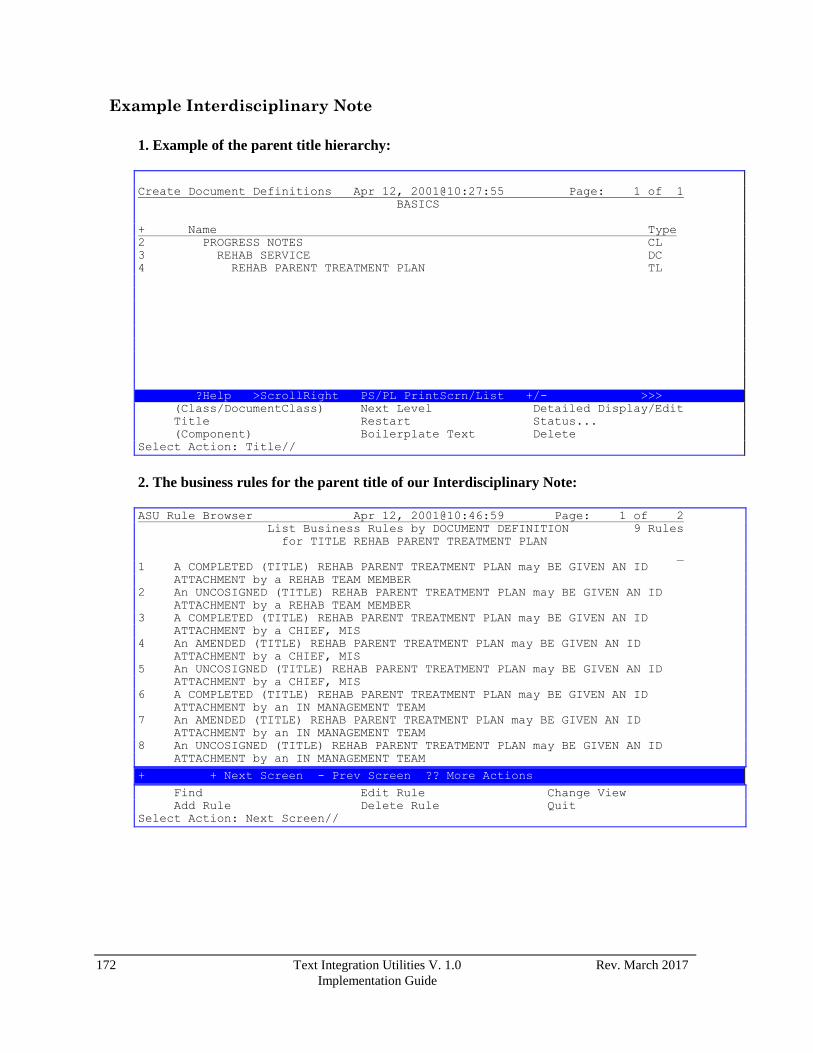
172 Text Integration Utilities V. 1.0 Rev. March 2017
Implementation Guide
Example Interdisciplinary Note
1. Example of the parent title hierarchy:
Create Document Definitions Apr 12, 2001@10:27:55 Page: 1 of 1
BASICS
+ Name Type
2 PROGRESS NOTES CL
3 REHAB SERVICE DC
4 REHAB PARENT TREATMENT PLAN TL
?Help >ScrollRight PS/PL PrintScrn/List +/- >>>
(Class/DocumentClass) Next Level Detailed Display/Edit
Title Restart Status...
(Component) Boilerplate Text Delete
Select Action: Title//
2. The business rules for the parent title of our Interdisciplinary Note:
ASU Rule Browser Apr 12, 2001@10:46:59 Page: 1 of 2
List Business Rules by DOCUMENT DEFINITION 9 Rules
for TITLE REHAB PARENT TREATMENT PLAN
_
1 A COMPLETED (TITLE) REHAB PARENT TREATMENT PLAN may BE GIVEN AN ID
ATTACHMENT by a REHAB TEAM MEMBER
2 An UNCOSIGNED (TITLE) REHAB PARENT TREATMENT PLAN may BE GIVEN AN ID
ATTACHMENT by a REHAB TEAM MEMBER
3 A COMPLETED (TITLE) REHAB PARENT TREATMENT PLAN may BE GIVEN AN ID
ATTACHMENT by a CHIEF, MIS
4 An AMENDED (TITLE) REHAB PARENT TREATMENT PLAN may BE GIVEN AN ID
ATTACHMENT by a CHIEF, MIS
5 An UNCOSIGNED (TITLE) REHAB PARENT TREATMENT PLAN may BE GIVEN AN ID
ATTACHMENT by a CHIEF, MIS
6 A COMPLETED (TITLE) REHAB PARENT TREATMENT PLAN may BE GIVEN AN ID
ATTACHMENT by an IN MANAGEMENT TEAM
7 An AMENDED (TITLE) REHAB PARENT TREATMENT PLAN may BE GIVEN AN ID
ATTACHMENT by an IN MANAGEMENT TEAM
8 An UNCOSIGNED (TITLE) REHAB PARENT TREATMENT PLAN may BE GIVEN AN ID
ATTACHMENT by an IN MANAGEMENT TEAM
+ + Next Screen - Prev Screen ?? More Actions
Find Edit Rule Change View
Add Rule Delete Rule Quit
Select Action: Next Screen//
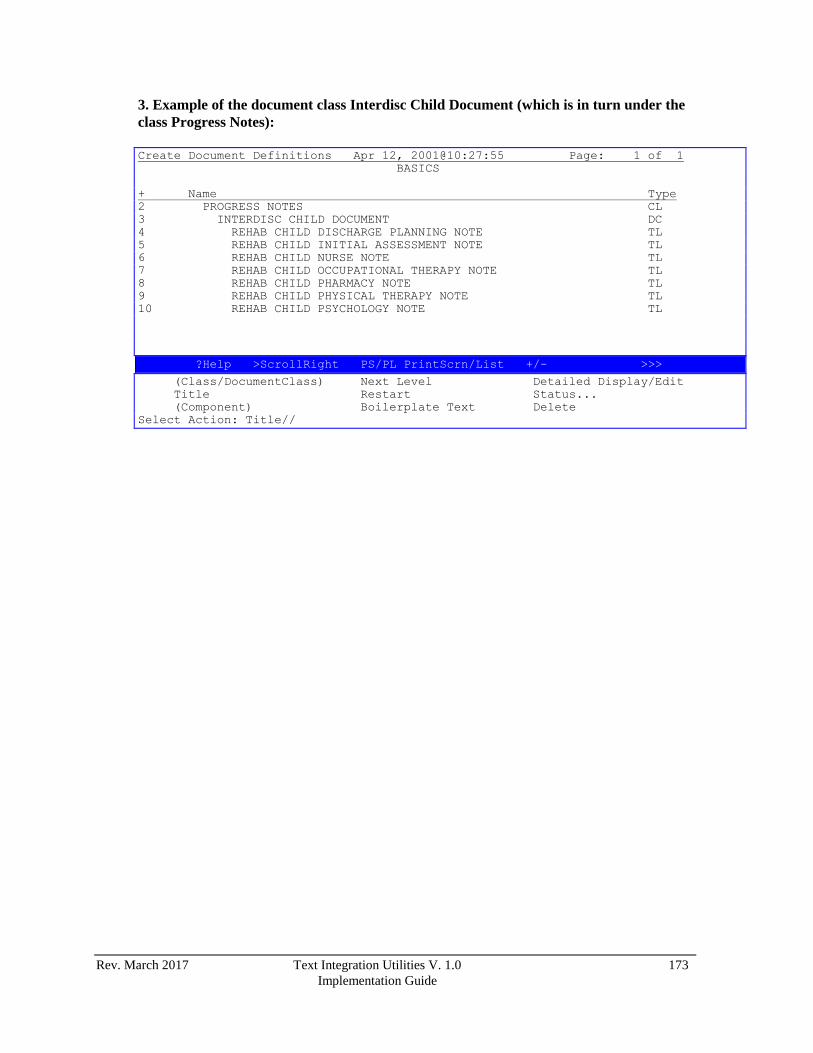
Rev. March 2017 Text Integration Utilities V. 1.0 173
Implementation Guide
3. Example of the document class Interdisc Child Document (which is in turn under the
class Progress Notes):
Create Document Definitions Apr 12, 2001@10:27:55 Page: 1 of 1
BASICS
+ Name Type
2 PROGRESS NOTES CL
3 INTERDISC CHILD DOCUMENT DC
4 REHAB CHILD DISCHARGE PLANNING NOTE TL
5 REHAB CHILD INITIAL ASSESSMENT NOTE TL
6 REHAB CHILD NURSE NOTE TL
7 REHAB CHILD OCCUPATIONAL THERAPY NOTE TL
8 REHAB CHILD PHARMACY NOTE TL
9 REHAB CHILD PHYSICAL THERAPY NOTE TL
10 REHAB CHILD PSYCHOLOGY NOTE TL
?Help >ScrollRight PS/PL PrintScrn/List +/- >>>
(Class/DocumentClass) Next Level Detailed Display/Edit
Title Restart Status...
(Component) Boilerplate Text Delete
Select Action: Title//

174 Text Integration Utilities V. 1.0 Rev. March 2017
Implementation Guide
4. The list of business rules to support the example child titles within the Document
Class of Interdisc Child:
ASU Rule Browser Apr 12, 2001@12:48:02 Page: 1 of 2
List Business Rules by DOCUMENT DEFINITION 13 Rules
for DOCUMENT CLASS INTERDISC CHILD DOCUMENT
_
1 A COMPLETED (DOCUMENT CLASS) INTERDISC CHILD DOCUMENT may BE ATTACHED
to an ID note by a COMPLETER
2 An UNCOSIGNED (DOCUMENT CLASS) INTERDISC CHILD DOCUMENT may BE ATTACHED
to an ID note by a AUTHOR/DICTATOR
3 An UNCOSIGNED (DOCUMENT CLASS) INTERDISC CHILD DOCUMENT may BE ATTACHED
to an ID note by an EXPECTED COSIGNER
4 A COMPLETED (DOCUMENT CLASS) INTERDISC CHILD DOCUMENT may BE ATTACHED
to an ID note by an AUTHOR/DICTATOR
5 A COMPLETED (DOCUMENT CLASS) INTERDISC CHILD DOCUMENT may BE ATTACHED
to an ID note by a CHIEF, MIS
6 An AMENDED (DOCUMENT CLASS) INTERDISC CHILD DOCUMENT may BE ATTACHED to
an ID note by a CHIEF, MIS
7 An UNCOSIGNED (DOCUMENT CLASS) INTERDISC CHILD DOCUMENT may BE ATTACHED
to an ID note by a CHIEF, MIS
8 An UNSIGNED (DOCUMENT CLASS) INTERDISC CHILD DOCUMENT may BE ATTACHED
to an ID note by a CHIEF, MIS
9 A COMPLETED (DOCUMENT CLASS) INTERDISC CHILD DOCUMENT may BE ATTACHED
to an ID note by an IN MANAGEMENT TEAM
10 An AMENDED (DOCUMENT CLASS) INTERDISC CHILD DOCUMENT may BE ATTACHED to
an ID note by an IN MANAGEMENT TEAM
11 An UNCOSIGNED (DOCUMENT CLASS) INTERDISC CHILD DOCUMENT may BE ATTACHED
to an ID note by an IN MANAGEMENT TEAM
12 An UNSIGNED (DOCUMENT CLASS) INTERDISC CHILD DOCUMENT may BE ATTACHED
to an ID note by an IN MANAGEMENT TEAM
+ + Next Screen - Prev Screen ?? More Actions
Find Edit Rule Change View
Add Rule Delete Rule Quit
Select Action: Next Screen//

Rev. March 2017 Text Integration Utilities V. 1.0 175
Implementation Guide
5. Parameter settings:
In our example, we decided to send alerts to the signer (and cosigner) when a user attaches a
child note to our parent note. In the display below we enter the parameter settings for our
Document Definition:
Select TIU Parameters Menu Option: ?
1 Basic TIU Parameters
2 Modify Upload Parameters
3 Document Parameter Edit
4 Progress Notes Batch Print Locations
5 Division - Progress Notes Print Params
Enter ?? for more options, ??? for brief descriptions, ?OPTION for help text.
Select TIU Parameters Menu Option: 3 Document Parameter Edit
First edit Institution-wide parameters:
Select DOCUMENT DEFINITION: REHAB PARENT TREATMENT PLAN TITLE
Are you adding 'REHAB PARENT TREATMENT PLAN' as
a new TIU DOCUMENT PARAMETERS (the 34TH)? No// Y (Yes)
DOCUMENT DEFINITION: REHAB PARENT TREATMENT PLAN// <Enter>
REQUIRE RELEASE: <Enter>
REQUIRE MAS VERIFICATION: <Enter>
REQUIRE AUTHOR TO SIGN: Y YES
ROUTINE PRINT EVENT(S): <Enter>
STAT PRINT EVENT(S): <Enter>
MANUAL PRINT AFTER ENTRY: <Enter>
ALLOW CHART PRINT OUTSIDE MAS: <Enter>
ALLOW >1 RECORDS PER VISIT: Y YES
ENABLE IRT INTERFACE: <Enter>
SUPPRESS DX/CPT ON ENTRY: n NO
FORCE RESPONSE TO EXPOSURES: <Enter>
ASK DX/CPT ON ALL OPT VISITS: <Enter>
SEND ALERTS ON ADDENDA: <Enter>
ORDER ID ENTRIES BY TITLE: <Enter>
SEND ALERTS ON NEW ID ENTRY: Y YES
EDITOR SET-UP CODE: <Enter>
If document is to be uploaded, specify Filing Alert Recipients:
Select FILING ERROR ALERT RECIPIENTS: <Enter>
Now enter the USER CLASSES for which cosignature will be required:
Select USERS REQUIRING COSIGNATURE: <Enter>
Now enter the DIVISIONAL parameters:
Select DIVISION: <Enter>
Select TIU Parameters Menu Option:
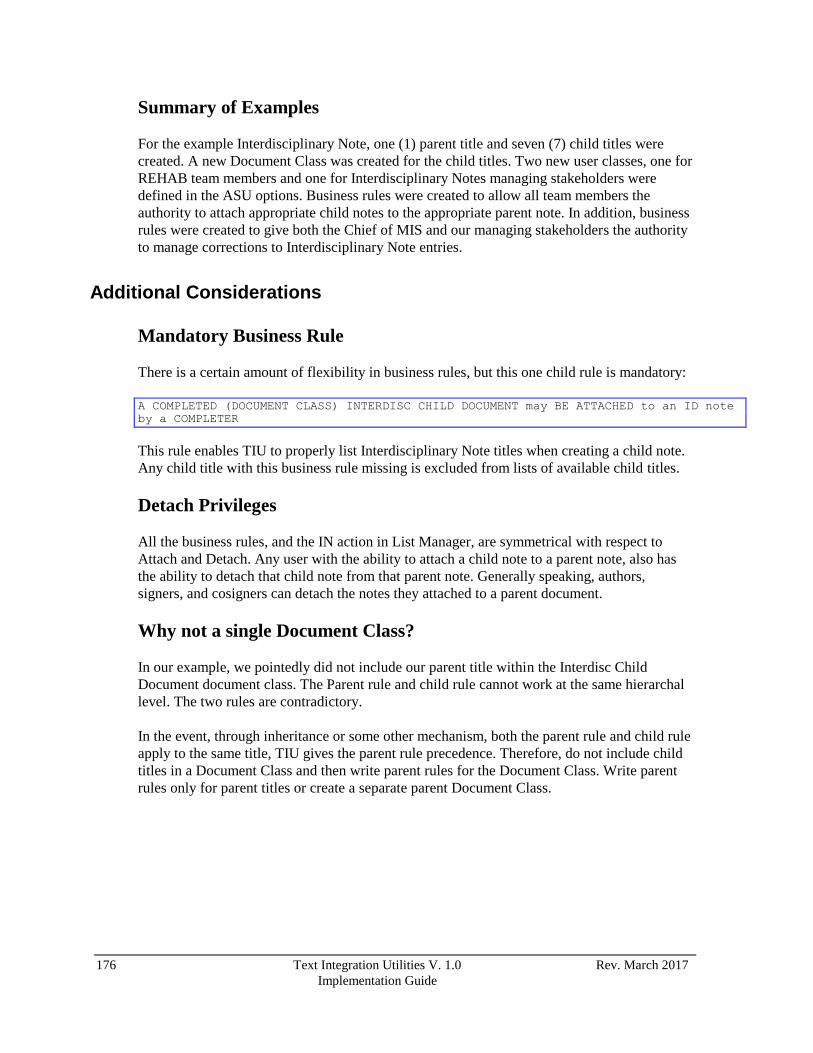
176 Text Integration Utilities V. 1.0 Rev. March 2017
Implementation Guide
Summary of Examples
For the example Interdisciplinary Note, one (1) parent title and seven (7) child titles were
created. A new Document Class was created for the child titles. Two new user classes, one for
REHAB team members and one for Interdisciplinary Notes managing stakeholders were
defined in the ASU options. Business rules were created to allow all team members the
authority to attach appropriate child notes to the appropriate parent note. In addition, business
rules were created to give both the Chief of MIS and our managing stakeholders the authority
to manage corrections to Interdisciplinary Note entries.
Additional Considerations
Mandatory Business Rule
There is a certain amount of flexibility in business rules, but this one child rule is mandatory:
A COMPLETED (DOCUMENT CLASS) INTERDISC CHILD DOCUMENT may BE ATTACHED to an ID note
by a COMPLETER
This rule enables TIU to properly list Interdisciplinary Note titles when creating a child note.
Any child title with this business rule missing is excluded from lists of available child titles.
Detach Privileges
All the business rules, and the IN action in List Manager, are symmetrical with respect to
Attach and Detach. Any user with the ability to attach a child note to a parent note, also has
the ability to detach that child note from that parent note. Generally speaking, authors,
signers, and cosigners can detach the notes they attached to a parent document.
Why not a single Document Class?
In our example, we pointedly did not include our parent title within the Interdisc Child
Document document class. The Parent rule and child rule cannot work at the same hierarchal
level. The two rules are contradictory.
In the event, through inheritance or some other mechanism, both the parent rule and child rule
apply to the same title, TIU gives the parent rule precedence. Therefore, do not include child
titles in a Document Class and then write parent rules for the Document Class. Write parent
rules only for parent titles or create a separate parent Document Class.

Rev. March 2017 Text Integration Utilities V. 1.0 177
Implementation Guide
Why not use USER?
In this guide, Interdisciplinary Notes are restricted to a well-defined group of users. If the user
class USER was substituted in the business rules for every instance of the REHAB Team
Member user class, there would be less business rules for the Clinical Application
Coordinator (or designee) to create for the implementation of Interdisciplinary Notes.
However, it is not recommended to create Interdisciplinary Note business rules for the user
class USER. This approach would greatly increase the possible occurrences of attaching a
child note to the incorrect parent entry. Once a note is attached to a parent, it disappears from
the All Notes list and is represented by the parent title. Retrieval of a misdirected child entry
would have to be accomplished via the search options available in TIU. Business rules for a
specific user class, such as REHAB Team Member user class, enhance the ability to attach
child notes to a specific parent title entry.
Child Rules for Class Progress Notes
Writing the child rules for class Progress Notes is a tempting idea. You would never have to
type the child rule again. Plus, you would not have to differentiate child titles with some
reserved word, because every title, except the parent titles, would be a child title.
This approach is not recommended, as it would allow any title to be attached as an
Interdisciplinary child entry. In addition, it would be difficult to find unattached
Interdisciplinary children because there is no way of knowing if a particular note should be
attached to an Interdisciplinary Note entry, or designated as an individual progress note.
If you do write child rules for class Progress Notes, consider making a Document Class for
each related group of Interdisciplinary children. Then if it turns out that your titles should
behave the same as most Progress Notes, you can rewrite rules for that particular Document
Class as needed.
This will not prevent other Progress Notes from being attached, but it will make it simpler to
search for unattached notes. Simply pull up a list of notes for the specific Document Class.

178 Text Integration Utilities V. 1.0 Rev. March 2017
Implementation Guide
Use of Existing Titles (Not Recommended)
Prior to the Interdisciplinary Note functionality released with patch TIU*1*100, often existing
titles would be coupled with multiple addendum to mimic an Interdisciplinary Note entry. It
is recommended these titles not be used as Interdisciplinary Note titles.
The use of these titles for Interdisciplinary notes would be accomplished in the following two
ways:
Changing an existing title. If an existing title has its name changed to reflect a new
Interdisciplinary title, then every previous incident where that the title was used will
now reflect the new title name. In this case a note that was written 5 years ago will
have its title changed to the current title name.
Creating Interdisciplinary Note rules for existing titles. Use of existing titles in
this way is not recommended. You will have titles that did not have Interdisciplinary
note capability in the past and now will be able to receive a note entry or be attached
to a note entry. A reviewer might ask, “You linked this title this year, why did you
not do it last year?” Possibly concluding that the entry from a year ago was
incomplete.
We recommend inactivating existing titles for which a similar Interdisciplinary Title is being
created. This requires the creation and activation of new Interdisciplinary Note titles.

Rev. March 2017 Text Integration Utilities V. 1.0 179
Implementation Guide
APPENDIX C: CLINICAL PROCEDURES SETUP GUIDE
The setup information in this Appendix is dependent upon the site having Clinical Procedures
Version 1.0 already installed on the VistA system.
Clinical Procedures (CP) primarily functions as a conduit for passing patient results, using
HL7 messaging, between vendors of clinical information systems (CIS) and the VistA
hospital information system. A Clinical Procedures document in TIU is the reporting
mechanism for clinicians to use when documenting clinical findings and impressions for
Clinical Procedure reports generated by a vendor device.
For example, a physician orders a clinical procedure using the Consults tab of the CPRS GUI.
After the procedure is performed the technician, using the CPUser GUI, creates a new CP
Transaction. This CP Transaction is the link between the TIU document, the Procedure
ordered, the instrument results, and any applicable images. The transaction is then submitted
to VistA for the interpreting provider to provide the interpretation and electronically sign. The
instrument report and any additional images are stored in the Imaging server and linked to the TIU Document.
A new User Role called INTERPRETER is created by USR*1.0*19. The interpreter is
usually the “IST” provider, (Cardiologist, Pulmonologist, etc). Only a user identified as an
INTERPRETER is allowed to complete Clinical Procedures. When a clinical procedure is
ready for interpretation, a notification is sent to the users defined as UPDATE USERS for the
consult service associated with the procedure ordered. The interpreting provider selects the
clinical procedure request, which now contains partial results. At this point the interpreting
provider may also view any attached images. Using the Consult action Complete/Update, the
interpreter completes the procedure by editing and signing the note.
During the completion process, the clinician is prompted to enter the new fields
PROCEDURE SUMMARY CODE and PROCEDURE DATE/TIME in addition to any
encounter information usually entered. Upon signature, an alert is sent to the ordering
provider notifying him or her that the clinical procedure is complete.
180 Text Integration Utilities V. 1.0 Rev. March 2017
Implementation Guide
Related Manuals
This manual covers information needed to implement Clinical Procedures on the TIU
package. Information covering other aspects of the Clinical Procedures package may be found
in the most recent edition of the following manuals:
Clinical Procedures Implementation Guide
Clinical Procedures Installation Guide
Clinical Procedures Technical Manual
Clinical Procedures User Manual
CPRS User Manual
Consult/Request Tracking User Manual
Text Integration Utilities (TIU) User Manual
Relation of TIU, Consults and Clinical Procedures
To implement Clinical Procedures, your facility must set up new document definitions for the
new Clinical Procedures Class within TIU. You also must map CP Definitions (procedures) to
the Consults Procedures File (#123.3) using the Setup Procedures [GMRC PROCEDURE
SETUP] option of the Consults Management Menu.
As before, Procedures are ordered on the Consults tab of CPRS. However, instead of picking
a consult document title when the consult procedure is completed, a note title from the
Clinical Procedures Class is assigned by the CPUser GUI application. When the consulting
provider (INTERPRETER) takes the action to complete the consults from the Consults tab of
CPRS, an empty note already exists and is associated with the consult.
This appendix provides information on how to set up note titles of the class Clinical
Procedures. The Consult/Request Tracking Technical Manual provides information on
mapping CP Definition file (702.01) with the Consults Procedures File (#123.3).
TIU/Clinical Procedures Setup This appendix takes you through the following steps to set up the new Clinical Procedures
Class in TIU after you have installed the TIU Enhancement for Clinical Procedures patch,
TIU*1*109 and Clinical Procedures V. 1.0:
1. Verify the upload header is appropriately defined for Clinical Procedures.
2. Construct a new document definition sub-tree for Clinical Procedures.
3. Define a set of document parameters for the new Clinical Procedures Class.
4. Define business rules for the new Clinical Procedures Class and discuss role of
Interpreter.
The Clinical Procedures Class in TIU can be set up but will not be fully utilized until after
you have installed patches OR*3*131, GMRC*3*17, and Clinical Procedures V1.0. You
should also have CPRS GUI V. 1.0.18.8 (or higher) running.
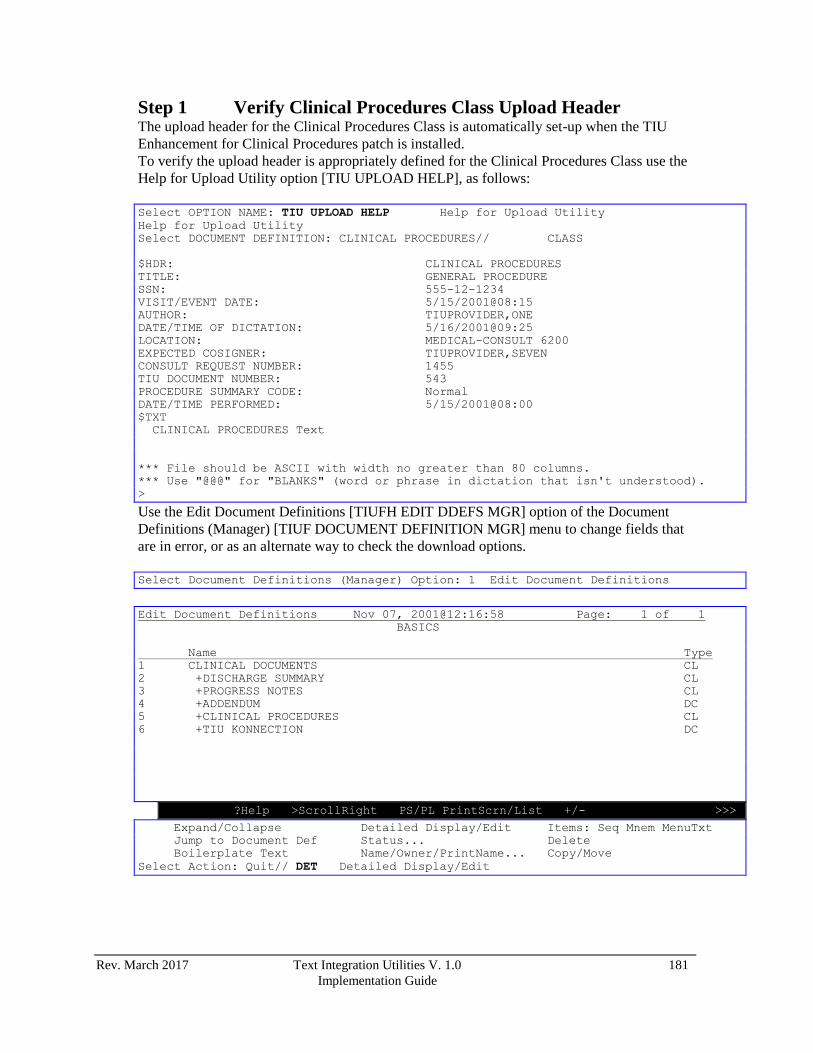
Rev. March 2017 Text Integration Utilities V. 1.0 181
Implementation Guide
Step 1 Verify Clinical Procedures Class Upload Header The upload header for the Clinical Procedures Class is automatically set-up when the TIU
Enhancement for Clinical Procedures patch is installed.
To verify the upload header is appropriately defined for the Clinical Procedures Class use the
Help for Upload Utility option [TIU UPLOAD HELP], as follows:
Select OPTION NAME: TIU UPLOAD HELP Help for Upload Utility
Help for Upload Utility
Select DOCUMENT DEFINITION: CLINICAL PROCEDURES// CLASS
$HDR: CLINICAL PROCEDURES
TITLE: GENERAL PROCEDURE
SSN: 555-12-1234
VISIT/EVENT DATE: 5/15/2001@08:15
AUTHOR: TIUPROVIDER,ONE
DATE/TIME OF DICTATION: 5/16/2001@09:25
LOCATION: MEDICAL-CONSULT 6200
EXPECTED COSIGNER: TIUPROVIDER,SEVEN
CONSULT REQUEST NUMBER: 1455
TIU DOCUMENT NUMBER: 543
PROCEDURE SUMMARY CODE: Normal
DATE/TIME PERFORMED: 5/15/2001@08:00
$TXT
CLINICAL PROCEDURES Text
*** File should be ASCII with width no greater than 80 columns.
*** Use "@@@" for "BLANKS" (word or phrase in dictation that isn't understood).
>
Use the Edit Document Definitions [TIUFH EDIT DDEFS MGR] option of the Document
Definitions (Manager) [TIUF DOCUMENT DEFINITION MGR] menu to change fields that
are in error, or as an alternate way to check the download options.
Select Document Definitions (Manager) Option: 1 Edit Document Definitions
Edit Document Definitions Nov 07, 2001@12:16:58 Page: 1 of 1
BASICS
Name Type
1 CLINICAL DOCUMENTS CL
2 +DISCHARGE SUMMARY CL
3 +PROGRESS NOTES CL
4 +ADDENDUM DC
5 +CLINICAL PROCEDURES CL
6 +TIU KONNECTION DC
?Help >ScrollRight PS/PL PrintScrn/List +/- >>>
Expand/Collapse Detailed Display/Edit Items: Seq Mnem MenuTxt
Jump to Document Def Status... Delete
Boilerplate Text Name/Owner/PrintName... Copy/Move
Select Action: Quit// DET Detailed Display/Edit

182 Text Integration Utilities V. 1.0 Rev. March 2017
Implementation Guide
From the Detailed Display/Edit screen most properties of the Clinical Procedures Class may
be changed, including Edit Upload values:
Detailed Display Nov 07, 2001@14:50:49 Page: 1 of 11
Class CLINICAL PROCEDURES
Basics Note: Values preceded by * have been inherited .
Name: CLINICAL PROCEDURES
Abbreviation: CP
Print Name: Clinical Procedures
Type: CLASS
IFN: 142
National
Standard: YES
Status: ACTIVE
Owner: CLINICAL COORDINATOR
In Use: YES
Suppress Visit
Selection: NO
Items (By Sequence if they have it, otherwise alphabetically by Menu Text)
+ ? Help +, - Next, Previous Screen PS/PL
(Basics) (Technical Fields) Find
Items: Seq Mnem MenuTxt Edit Upload Quit
(Boilerplate Text) Try
Select Action: Next Screen// ED Edit Upload
UPLOAD TARGET FILE: TIU DOCUMENT//<Enter>
LAYGO ALLOWED: YES//<Enter>
Select TARGET TEXT FIELD: REPORT TEXT//<Enter>
Editing Captioned ASCII Record Header
Select CAPTION: DATE/TIME PERFORMED//<Enter>
CAPTION: DATE/TIME PERFORMED//<Enter>
ITEM NAME: DATE/TIME PERFORMED//<Enter>
FIELD NUMBER: 70202//<Enter>
LOOKUP LOCAL VARIABLE NAME: TIUDTP//<Enter>
EXAMPLE ENTRY: 5/15/2001@08:00//<Enter>
CLINICIAN MUST DICTATE: YES//<Enter>
REQUIRED FIELD?: NO//<Enter>
Select CAPTION: <Enter>

Rev. March 2017 Text Integration Utilities V. 1.0 183
Implementation Guide
Step 2 Construct Clinical Procedures Class Document Sub-Tree Use the Create Document Definitions option [TIUFC CREATE DDEFS MGR], under the
IRM Maintenance Menu option [TIU IRM MAINTENANCE MENU], to construct a new
document definition sub-tree for Clinical Procedures that looks something like this:
Edit Document Definitions Nov 07, 2001@15:36:06 Page: 1 of 2
BASICS
Name Type
1 CLINICAL DOCUMENTS CL
2 +DISCHARGE SUMMARY CL
3 +PROGRESS NOTES CL
4 +ADDENDUM DC
5 CLINICAL PROCEDURES CL
6 +GENERAL PROCEDURES DC
7 CARDIOLOGY DC
8 PULMONARY FUNCTION TEST TL
9 EKG TL
10 GASTROENTEROLOGY DC
11 ENDOSCOPY TL
12 COLONOSCOPY TL
13 +PODIATRY DC
14 +ONCOLOGY DC
+ ?Help >ScrollRight PS/PL PrintScrn/List +/- >>>
Expand/Collapse Detailed Display/Edit Items: Seq Mnem MenuTxt
Jump to Document Def Status... Delete
Boilerplate Text Name/Owner/PrintName... Copy/Move
Select Action: Next Screen//
The above example suggests a Service oriented set of Document Classes with one or more
titles under each. Just like Progress Notes, these can include boilerplate text, with embedded
objects. It will probably take some time, with substantial cooperation between your Clinical
Coordinator, IRMS, and the Consulting Services, to develop a complete set of Document
Definitions for Clinical Procedures at your site.
NOTE: There may be titles already created under the Consults Class/Document Class
that are used for Medicine. These titles cannot be moved. We recommend that
the Clinical Coordinators name new titles under the Clinical Procedures Class
differently so that there is not confusion between old and new titles. (Hint:
Begin each new title with the initials CP).

184 Text Integration Utilities V. 1.0 Rev. March 2017
Implementation Guide
Step 3 Define Clinical Procedures Class Document Parameters To define a set of document parameters for the new Clinical Procedures Class use the
Document Parameter Edit option [TIU DOCUMENT PARAMETER EDIT]. In the table that
follows, entries in parentheses are the recommended values:
Parameters: Access the following menu:
TIU IRM Maintenance Menu [TIU IRM MAINTENANCE MENU]
TIU Parameters Menu [TIU SET-UP MENU]
Document Parameter Edit [TIU DOCUMENT PARAMETER EDIT]
Select DOCUMENT DEFINITION: CLINICAL PROCEDURES CLASS
REQUIRE RELEASE: (NO)
REQUIRE MAS VERIFICATION: (NO)
*REQUIRE AUTHOR TO SIGN: (YES)
ROUTINE PRINT EVENT(S):
STAT PRINT EVENT(S):
MANUAL PRINT AFTER ENTRY: (NO)
ALLOW CHART PRINT OUTSIDE MAS: (YES)
*ALLOW >1 RECORDS PER VISIT: (YES)
ENABLE IRT INTERFACE:
*SUPPRESS DX/CPT ON ENTRY: (NO)
FORCE RESPONSE TO EXPOSURES:
*ASK DX/CPT ON ALL OPT VISITS: (YES)
SEND ALERTS ON ADDENDA:
ORDER ID ENTRIES BY TITLE:
SEND ALERTS ON NEW ID ENTRY:
EDITOR SET-UP CODE:
If document is to be uploaded, specify Filing Alert Recipients:
Select FILING ERROR ALERT RECIPIENTS: <identify local recipients as appropriate>
Now enter the USER CLASSES for which cosignature will be required:
Select USERS REQUIRING COSIGNATURE: <identify local recipients as appropriate>
Now enter the DIVISIONAL parameters:
Select DIVISION:
CHART COPY PRINTER:
STAT CHART COPY PRINTER:
Note: At a minimum parameters marked with an asterisk ‘*’ must be set. If a response is not
entered for a particular parameter the default value is ‘No’.
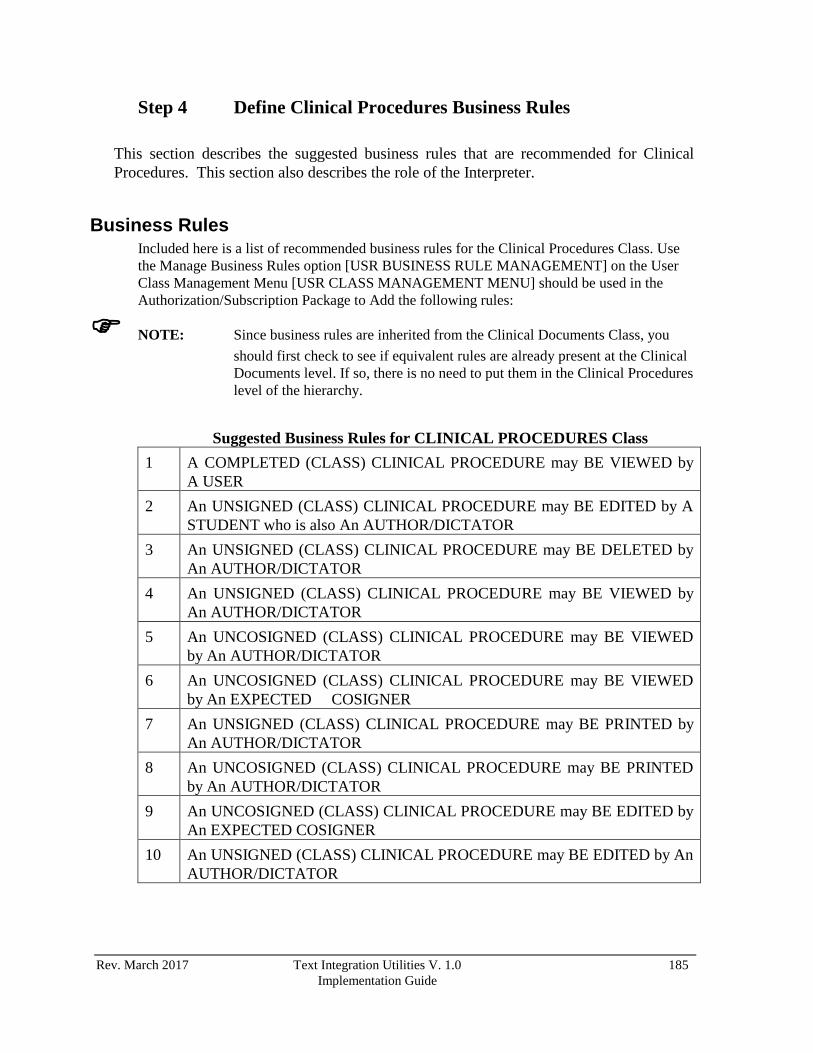
Rev. March 2017 Text Integration Utilities V. 1.0 185
Implementation Guide
Step 4 Define Clinical Procedures Business Rules
This section describes the suggested business rules that are recommended for Clinical
Procedures. This section also describes the role of the Interpreter.
Business Rules Included here is a list of recommended business rules for the Clinical Procedures Class. Use
the Manage Business Rules option [USR BUSINESS RULE MANAGEMENT] on the User
Class Management Menu [USR CLASS MANAGEMENT MENU] should be used in the
Authorization/Subscription Package to Add the following rules:
NOTE: Since business rules are inherited from the Clinical Documents Class, you
should first check to see if equivalent rules are already present at the Clinical
Documents level. If so, there is no need to put them in the Clinical Procedures
level of the hierarchy.
Suggested Business Rules for CLINICAL PROCEDURES Class
1 A COMPLETED (CLASS) CLINICAL PROCEDURE may BE VIEWED by
A USER
2 An UNSIGNED (CLASS) CLINICAL PROCEDURE may BE EDITED by A
STUDENT who is also An AUTHOR/DICTATOR
3 An UNSIGNED (CLASS) CLINICAL PROCEDURE may BE DELETED by
An AUTHOR/DICTATOR
4 An UNSIGNED (CLASS) CLINICAL PROCEDURE may BE VIEWED by
An AUTHOR/DICTATOR
5 An UNCOSIGNED (CLASS) CLINICAL PROCEDURE may BE VIEWED
by An AUTHOR/DICTATOR
6 An UNCOSIGNED (CLASS) CLINICAL PROCEDURE may BE VIEWED
by An EXPECTED COSIGNER
7 An UNSIGNED (CLASS) CLINICAL PROCEDURE may BE PRINTED by
An AUTHOR/DICTATOR
8 An UNCOSIGNED (CLASS) CLINICAL PROCEDURE may BE PRINTED
by An AUTHOR/DICTATOR
9 An UNCOSIGNED (CLASS) CLINICAL PROCEDURE may BE EDITED by
An EXPECTED COSIGNER
10 An UNSIGNED (CLASS) CLINICAL PROCEDURE may BE EDITED by An
AUTHOR/DICTATOR
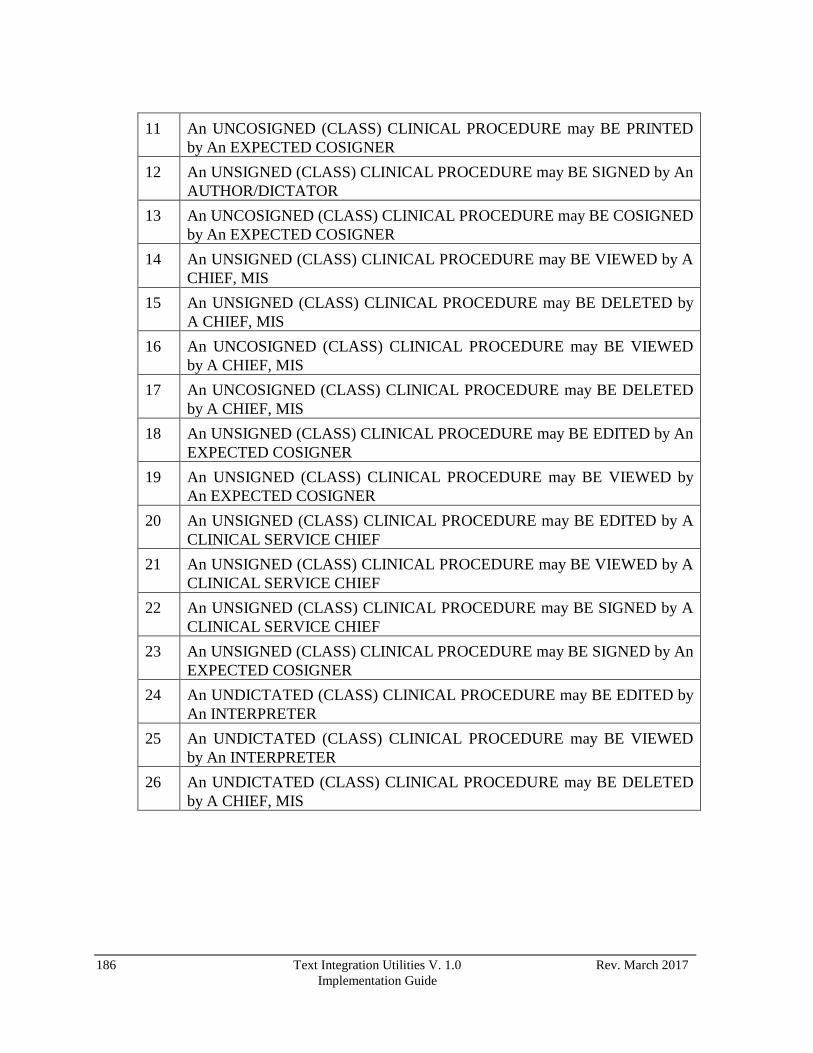
186 Text Integration Utilities V. 1.0 Rev. March 2017
Implementation Guide
11 An UNCOSIGNED (CLASS) CLINICAL PROCEDURE may BE PRINTED
by An EXPECTED COSIGNER
12 An UNSIGNED (CLASS) CLINICAL PROCEDURE may BE SIGNED by An
AUTHOR/DICTATOR
13 An UNCOSIGNED (CLASS) CLINICAL PROCEDURE may BE COSIGNED
by An EXPECTED COSIGNER
14 An UNSIGNED (CLASS) CLINICAL PROCEDURE may BE VIEWED by A
CHIEF, MIS
15 An UNSIGNED (CLASS) CLINICAL PROCEDURE may BE DELETED by
A CHIEF, MIS
16 An UNCOSIGNED (CLASS) CLINICAL PROCEDURE may BE VIEWED
by A CHIEF, MIS
17 An UNCOSIGNED (CLASS) CLINICAL PROCEDURE may BE DELETED
by A CHIEF, MIS
18 An UNSIGNED (CLASS) CLINICAL PROCEDURE may BE EDITED by An
EXPECTED COSIGNER
19 An UNSIGNED (CLASS) CLINICAL PROCEDURE may BE VIEWED by
An EXPECTED COSIGNER
20 An UNSIGNED (CLASS) CLINICAL PROCEDURE may BE EDITED by A
CLINICAL SERVICE CHIEF
21 An UNSIGNED (CLASS) CLINICAL PROCEDURE may BE VIEWED by A
CLINICAL SERVICE CHIEF
22 An UNSIGNED (CLASS) CLINICAL PROCEDURE may BE SIGNED by A
CLINICAL SERVICE CHIEF
23 An UNSIGNED (CLASS) CLINICAL PROCEDURE may BE SIGNED by An
EXPECTED COSIGNER
24 An UNDICTATED (CLASS) CLINICAL PROCEDURE may BE EDITED by
An INTERPRETER
25 An UNDICTATED (CLASS) CLINICAL PROCEDURE may BE VIEWED
by An INTERPRETER
26 An UNDICTATED (CLASS) CLINICAL PROCEDURE may BE DELETED
by A CHIEF, MIS
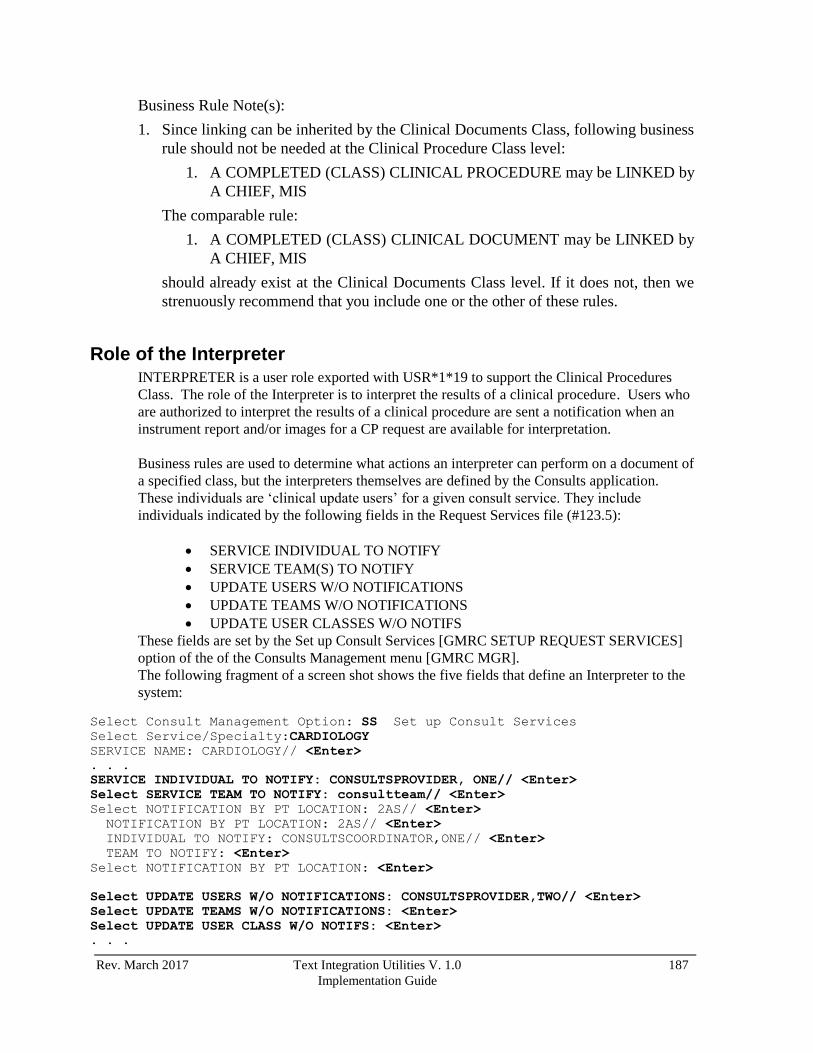
Rev. March 2017 Text Integration Utilities V. 1.0 187
Implementation Guide
Business Rule Note(s):
1. Since linking can be inherited by the Clinical Documents Class, following business
rule should not be needed at the Clinical Procedure Class level:
1. A COMPLETED (CLASS) CLINICAL PROCEDURE may be LINKED by
A CHIEF, MIS
The comparable rule:
1. A COMPLETED (CLASS) CLINICAL DOCUMENT may be LINKED by
A CHIEF, MIS
should already exist at the Clinical Documents Class level. If it does not, then we
strenuously recommend that you include one or the other of these rules.
Role of the Interpreter INTERPRETER is a user role exported with USR*1*19 to support the Clinical Procedures
Class. The role of the Interpreter is to interpret the results of a clinical procedure. Users who
are authorized to interpret the results of a clinical procedure are sent a notification when an
instrument report and/or images for a CP request are available for interpretation.
Business rules are used to determine what actions an interpreter can perform on a document of
a specified class, but the interpreters themselves are defined by the Consults application.
These individuals are ‘clinical update users’ for a given consult service. They include
individuals indicated by the following fields in the Request Services file (#123.5):
SERVICE INDIVIDUAL TO NOTIFY
SERVICE TEAM(S) TO NOTIFY
UPDATE USERS W/O NOTIFICATIONS
UPDATE TEAMS W/O NOTIFICATIONS
UPDATE USER CLASSES W/O NOTIFS
These fields are set by the Set up Consult Services [GMRC SETUP REQUEST SERVICES]
option of the of the Consults Management menu [GMRC MGR].
The following fragment of a screen shot shows the five fields that define an Interpreter to the
system:
Select Consult Management Option: SS Set up Consult Services
Select Service/Specialty:CARDIOLOGY
SERVICE NAME: CARDIOLOGY// <Enter>
. . .
SERVICE INDIVIDUAL TO NOTIFY: CONSULTSPROVIDER, ONE// <Enter>
Select SERVICE TEAM TO NOTIFY: consultteam// <Enter>
Select NOTIFICATION BY PT LOCATION: 2AS// <Enter>
NOTIFICATION BY PT LOCATION: 2AS// <Enter>
INDIVIDUAL TO NOTIFY: CONSULTSCOORDINATOR,ONE// <Enter>
TEAM TO NOTIFY: <Enter>
Select NOTIFICATION BY PT LOCATION: <Enter>
Select UPDATE USERS W/O NOTIFICATIONS: CONSULTSPROVIDER,TWO// <Enter>
Select UPDATE TEAMS W/O NOTIFICATIONS: <Enter>
Select UPDATE USER CLASS W/O NOTIFS: <Enter>
. . .
188 Text Integration Utilities V. 1.0 Rev. March 2017
Implementation Guide
The software finds the interpreter by following the RELATED SERVICES in the Consults
Procedure file. This field is set by the Setup Procedures [GMRC PROCEDURE SETUP]
option of the Consults Management menu [GMRC MGR].

Rev. March 2017 Text Integration Utilities V. 1.0 189
Implementation Guide
APPENDIX D: PATIENT RECORD FLAGS Patches TIU*1*165 TIU*1*265 and USR*1*24 support the Patient Record Flags (PRF)
project. Additional information on the PRF program is available in VHA Directive 2003-048,
dated August 28, 2003 AND VHA Directive 2010-053, titled: National Patient Record Flags
and on the PRF training web page at http://vaww.vistau.med.va.gov/vistau/prf/. Also see
National Patient Record Flag High Risk for Suicide Memorandum, dated October 17, 2012.
Patient Record Flags are warnings placed on a patient’s chart to improve employee safety and
the efficient delivery of health care. Each advisory or flag includes a narrative that describes
the reason for the flag and may include suggested actions for users to take when they
encounter the patient. It is this narrative which is displayed as a warning when users look up a
flagged patient.
Flags are placed by a select group of authorized individuals using the new PRF software. In
addition to placing the flag, authorized users must write a Progress Note for each flag that
clinically justifies placing the flag on a patient’s record.
National and Local Flags
Patient Record Flags are divided into types: the most critical flags—called Category I Patient
Record Flags—are national and transmitted to all facilities, ensuring that these flags are
universally available during patient look up.
The Office of Information creates and distributes definitions for Category I PRF through
national patches. Currently, the only Category I Patient Record Flags are a Behavioral flag
regarding violent or potentially violent patients and the High Risk for Suicide Category 1flag.
A Wandering Patient Flag is in national development.
Category II flags are local. Each site creates and maintains its own set of local flags that are
not transmitted to other sites. However, the purpose of Category II flags is similar to Category
I—to provide important patient information that may affect the safety of staff or other patients
or patient treatment. For example, a site could create a Category II Research Flag or a
Category II Infectious Disease Flag. Like Category I flags, Category II flags require a Progress
Note to document the reason for placing a flag on the patient’s record.
Documenting PRF
Each Patient Record Flag must have an associated Progress Note that clinically justifies
putting the flag on a patient’s record. It might also contain references to supporting
documentation. The PRF Best Practices document, available on the PRF Training Materials
web page (http://vaww.vistau.med.va.gov/vistau/prf/TrainingMaterials.htm), contains an
example note.
Currently, the only Category I Patient Record Flags are a Behavioral flag regarding violent or
potentially violent patients and the High Risk for Suicide Category 1flag. The Progress Note
title for documenting the Behavioral flag is Patient Record Flag Category I. This title must be
reserved for documenting the initial assignment or the continuation or discontinuation after
review of Category I flags. With the High Risk for Suicide Category 1 flag, a new title was
distributed, PATIENT RECORD FLAG CATEGORY I – HIGH RISK FOR SUICIDE. These
titles should not be used for other purposes. To write a note for this title, the user must belong

190 Text Integration Utilities V. 1.0 Rev. March 2017
Implementation Guide
to the DGPF PATIENT RECORD FLAG MGR user class. Each site is responsible for
populating this user class.
To help sites that will be creating local Category II flags, four partially customizable Progress
Note titles have been created:
PATIENT RECORD FLAG CATEGORY II – RISK, FALL
PATIENT RECORD FLAG CATEGORY II – RISK, WANDERING
PATIENT RECORD FLAG CATEGORY II – RESEARCH STUDY
PATIENT RECORD FLAG CATEGORY II – INFECTIOUS DISEASE
These titles must be reserved for documenting the assignment and/or review of their
respective Category II flags. They should not be used for other purposes.
Category I Implementation
After patches TIU*1*165 and TI*1*265 ARE installed and option TIU165 DDEFS &
RULES, PRF is run, there is still additional work to do. To implement Category I Patient
Record Flags the following additional steps need to be taken:
1. Evaluate Business Rules
2. Populate User Class DGPF PATIENT RECORD FLAGS MGR
3. Convert Existing Risk of Violence Flags
Then you need to consider Category II flags.
Evaluate Business Rules This patch exports one Business Rule for Category I flag notes, limiting the ENTRY of notes
documenting Category I flags. These notes inherit other Business Rules from class Progress
Notes and class Clinical Documents. Review the Business Rules that these notes inherit for
appropriateness and completeness. Add new Business Rules for document class PATIENT
RECORD FLAG CAT I if needed. If necessary, add new Business Rules for the title in that
document class, as well.
Do not, however, override the exported rule which limits ENTRY of Category I Patient
Record Flag notes. You should also be cautious about adding rules that limit viewing because
this will shut down Remote Data View for these notes.
Populate the New User Class After appropriate Business Rules are in place, and after those who will be assigning Category
I flags and documenting them in the Patient Record have been fully trained, populate User
Class DGPF PATIENT RECORD FLAGS MGR. Users in user class DGPF PATIENT
RECORD FLAGS MGR should then be able to enter notes entitled PATIENT RECORD
FLAG CATEGORY I to document Category I flags. The user class is what protects this
document class from unauthorized note writing, so only include people who are high-level
enough to write Category I notes.

Rev. March 2017 Text Integration Utilities V. 1.0 191
Implementation Guide
Convert Existing Risk of Violence Flags The Category I Behavioral Patient Record Flag is intended to replace all existing warnings on
the risk of violence. Therefore, all existing violence warnings including any that may exist in
CWAD notes, must be evaluated for entry as Category I Patient Record Flags. All employees
at your site who are involved in the conversion process should be familiar with the contents of
the PRF Conversion Document available on the PRF Training Materials web page
(http://vaww.vistau.med.va.gov/vistau/PRF/TrainingMaterials.htm).
As a flag is entered into the new system, it must be documented for the patient record by
writing a note of title PATIENT RECORD FLAG CATEGORY I.
Convert High Risk for Suicide Flag This flag was distributed with the High Risk Mental Health Patient – Reminder and Flag in
May 2013. Sites were informed that they shouldn’t run the conversion until notified by the
Office of Mental Health Services to run the Convert Local HRMHP PRF to National option -
Process mode. Sites were instructed to add names to a mailgroup and to link a progress note
title to the national flag. The title is named PATIENT RECORD FLAG CATEGORY I –
HIGH RISK FOR SUICIDE.
When the Convert Local HRMHP PRF to National option is run in the processing mode, the
actual processing and auto-creation of the national PRFs from the local PRFs will take place
and messages will be sent out to summarize the process results. The local PRF for the patient
will be inactivated. Note: Category I PRFs that are auto-created from this option will not have
a Progress Note related to them.
The Process Mode can be re-run as needed if a patient had an error that is resolved. Each time
the process mode is run the active local PRFs that are found will be processed.
Select OPTION NAME: DGPF LOCAL TO NATIONAL CONVERT Convert Local HRMH PRF
to National action
This option can be run in a report only mode which will provide a report
of what actions the local-to-national processing will perform. Enter 'R'
to run the Report Only mode, or 'P' to begin the local-to-national PRF
processing.
Select one of the following:
R Report Only
P Process Local-to-National
Select which mode to run: R// P Process Local-to-National
...SORRY, JUST A MOMENT PLEASE...
>> Results have been sent to the 'DGPF CLINICAL HR FLAG' mail group
The process to generate the new national (category I) PRFs from the local (category II) PRFs
consists of determining whether a national PRF can be created from existing, active, local
PRFs for suicide prevention.

192 Text Integration Utilities V. 1.0 Rev. March 2017
Implementation Guide
Consider Category II flags
All existing patient warning systems, including COTS products and class III software (but not
including CWAD), are intended to be replaced by the new PRF system. Therefore, all non-
violence flags in systems other than CWAD must be evaluated for entry as Category II Patient
Record Flags (or CWAD). If a flag is entered as a Category II PRF, then a note of the
appropriate title must be entered.
If a site has existing flags to convert to Category II flags, or if a site simply wishes to use
Category II flags to create new kinds of warnings, the site will need to set up Category II
flags. Refer to VHA Directive 2003-048, dated August 28, 2003, titled National Patient
Record Flags on the importance of limiting flags so they do not loose their salience.
After determining what flags a site wants or needs and creating flag definitions, the site needs
to consider what titles to use to document those flags. The site should begin by evaluating the
titles exported for this purpose. The exported titles are:
PATIENT RECORD FLAG CATEGORY II – RISK, FALL
PATIENT RECORD FLAG CATEGORY II – RISK, WANDERING
PATIENT RECORD FLAG CATEGORY II – RESEARCH STUDY
PATIENT RECORD FLAG CATEGORY II – INFECTIOUS DISEASE
If a site wishes, the site may alter the last part (the part following "PATIENT RECORD
FLAG CATEGORY II - ") of the exported Category II titles. In view of future plans to
standardize TIU titles, changing these is not recommended unless there is a compelling reason
for the change. If exported titles are not adequate for new Category II flags which the site has
created, new titles may be created, following the existing pattern. They must begin,
"PATIENT RECORD FLAG CATEGORY II - ".
Any new Category II titles must be created under document class PATIENT RECORD
FLAGS CAT II. Initially, give these title the status of TEST. This permits you to write
business rules while preventing users from writing notes. (The four exported titles are also
initially set to TEST by the option that creates them.)
Review Existing Business Rules for Category II Flags
Before activating Category II titles, review existing Business Rules which these Category II
titles inherit from Progress Notes and Clinical Documents. Add new Business Rules for
document class PATIENT RECORD FLAG CAT II or for individual Category II titles, if
needed. If necessary, new User Classes may be created for Category II titles.
Update from TEST to ACTIVE
After the Category II titles have been tested, Business Rules have been reviewed, and staff
have been trained in the use of Category II flags, the status of those exported and new
Category II titles which are to be used should be updated from TEST to ACTIVE. This will
enable people besides owners of the titles to enter notes on them.
Note: If you do not plan to use certain of the exported titles, then do not update the
status to ACTIVE. This will prevent the entry of notes to these unused titles.

Rev. March 2017 Text Integration Utilities V. 1.0 193
Implementation Guide
Convert Existing Warnings to Category II Flags The existing warnings that must be converted include all warnings in:
1. COTS products.
2. Class III warning software.
You are not required to convert CWAD warnings (except for the violence warnings that are
covered under Category I). However, if you prefer Category II warnings over CWAD, then
you may convert CWADs as well.
If a flag is entered as a Category II PRF, then a note of the appropriate title must be entered.
See PRF Conversion Document available on the PRF Training Materials web page
(http://vaww.vistau.med.va.gov/vistau/PRF/TrainingMaterials.htm) for a more detailed
discussion on the clinical aspects of converting Category II flags.
Reviewing Flags
Flags must be reviewed at regular intervals. When a flag is reviewed and continued, a note of
the corresponding title must be entered to justify the continuation. If a flag is discontinued, a
note of the corresponding title must be entered to justify the discontinuation.
Since flags are generated by the Patient Record Flags software, not by the presence of notes of
a certain title, it is not necessary to change the title or status of the original note when a flag is
discontinued. Instead, the flag is inactivated in the PRF software and the discontinuation is
documented in a note of the corresponding title.
194 Text Integration Utilities V. 1.0 Rev. March 2017
Implementation Guide
INDEX Action, 152
Actions, 77
Adding a new Business Rule, 131
AMEND, 151
Amended, 139
Anatomic Pathology
business rules, 147
Appendix E: Exported User Classes, 124
ASU, 114
ASU Rule Browser, 132
Attending Physicians, 17
Authorization/Subscription Utility, 114
Basic TIU Parameters, 6, 7
Boilerplate, 47, 79, 152
BoilerplateText, 78
Browser, 132
business rules
exported, 143
business rules
Interdisciplinary Notes, 165
business rules
Clinical Procedures, 185
Business Rules, 130, 152
Captioned, 7
CHIEF, HIM, 139, 148
CHIEF, MIS, 139, 148
Child Business Rules, 167
Class, 47
class assignment expired, 159
class memberships, 157
Clinical Document, 56
Clinical Documents
business rules, 143
Clinical Procedures
business rules, 185
Clinical Procedures, 179
Clinical Procedures, 189
Clinician, 152
Completed, 139
Computerized Patient Record System, 4
Consults and Clinical Procedures, 180
CPRS, 4
Create Document Definitions, 51
Create new Document Classes and Titles, 52
Create Objects, 51
Create Objects option, 85
Creating an Object, 86
Creating boilerplate, 80
Creating or Editing Titles, 51
Creating user classes, 115
Define Business Rules, 130
Define user classes, 116
Deleted, 139
Deleting and Editing Business Rules, 136
Detach Privileges, 176
Detailed Display/Edit, 80
Dischare Summary
business rules, 146
Discharge Summary Parameter Set-Up, 7
Division - Progress Notes Print Parameters, 6
Document Class, 47
Document Classes, 56
Document Parameter Edit, 6, 7
Documents of Status DELETED, 150
Edit Boilerplate Text, 81
Edit Boilplt Txt action, 84
Edit Document Definitions, 51, 63, 65
Editing boilerplate, 84
Editing Objects, 101
EMPTY CLASS, 148
Example Interdisciplinary Note, 172
EXPECTED SIGNER, 130
Expiration Date, 156
exported business rules
Anatomic Pathology, 147
Clinical Documents, 143
Discharge Summary, 146
LR Laboratory Reports, 147
Progress Notes, 145
exported business rules, 143
Exported Objects, 106
Exported User Classes, 124
FileMan Text Editor, 81
Filing error code, 46
Fine-tuning your initial Document Definition Hierarchy,
49
Flag
see also Patient Record Flag/t, 189
form headers, 60
Glossary, 152
GMR REPORT TYPE, 7
GMRD SITE PARAMETERS, 7
Hidden Action Descriptions, 76
Inactivating a Title, 49
inherit, 47
Inspector Genera, 151
Interdisciplinary Note
Example, 172
Interdisciplinary Note
Summary of Examples, 176
Interdisciplinary Notes, 161
Child Business Rules, 167
Parent Business Rules, 165
Titles, 161
Interdisciplinary Notes Parameters, 170
Interpreter, 186, 187
Intranet WWW Documentation, 4
keys, 114
List Membership by Class, 119
List Membership by User, 118, 119, 120
Lookup Method, 46
LR Anatomic Pathology Rules, 148
LR Laboratory Reports
business rules, 147
Matrix of Actions, 77
membership expires, 156

Rev. March 2017 Text Integration Utilities V. 1.0 195
Implementation Guide
MIS, 154
MIS Manager, 154
Modify (add or delete) user classes, 119
Modify Upload Parameters, 6, 7
MRT, 154
Next Level, 54
Object, 47, 86
Object Inactive, 101
Obsolete PURGED Status, 150
Office of Inspector General, 147
OIG, 147
ORDER ID ENTRIES BY TITLE, 170
Overview, 4
Owner, 77
Ownership, 77
Parameter Set-up Examples, 7
Parameters, 170
parent business rules, 165
Patient Record Flags, 189
associated Progress Notes, 189
Category I and II, 189
national and local, 189
print methods, 60
PRIVACY ACT OFFICER, 139
Progress Notes, 189
business rules, 145
Progress Notes Batch Print Locations, 6
PURGED Status, 150
require co-signature, 157
Retracted, 139
Role of the Interpreter, 187
Rule Browser, 132
screen editor, 81
SEND ALERTS ON NEW ID ENTRY, 170
Sort Document Definitions, 51
Status, 77
Summary of Examples, 176
Terminology, 47
Title, 47
Titles, 47
TIU BASIC PARAMETER EDIT, 6
TIU DOCUMENT PARAMETER EDIT, 6
TIU PRINT PN DIV PARAM, 6
TIU PRINT PN LOC PARAMS, 6
TIU UPLOAD PARAMETER EDIT, 6
Uncosigned, 139
Undicatated, 139
Unreleased, 139
Unsigned, 139
UNSIGNED PROGRESS NOTE, 130
Untranscribed, 139
Unverified, 139
Upload header, 180, 181
Upload Process, 46
User, 77
USER, 177
User Class Definition Option, 117
User Class Management Menu, 115, 121
user class membership, 159
User Class Membership, 156
User Class Set-up, 113
USERS REQUIRING COSIGNATURE, 156
USR*1*31, 148
VA FileMan, 7
VA Office of Inspector General, 147
View Object, 51