toolkit4cc english
DESCRIPTION
Thanks to funding from International Development Research Centre's (IDRC) Canada Africa Research Exchange Grant (CAREG), Drs. Susan Crichton and Lilian Vikiru have been able to design and field test this professional development approach to help teachers modify their classroom practices.TRANSCRIPT

Toolkit for Challenging Contexts:
Taking Making into Schools

Taking Making into Schools 2
Taking Making Into Schools: A Toolkit for Innovation and Change in Teaching and Learning
by Dr. Susan Crichton and Dr. Lilian Vikiru
1
Acknowledgements 2015 Canadian African Research Exchange Grant (CAREG) – International Development Research Centre (IDRC) Innovative Learning Centre – Faculty of Education | UBC Okanagan Aga Khan University – Institution of Educational Development, East Africa (AKU-‐IEO, EA)
2
Taking Making Into Schools: A Toolkit for Innovation and Change in Teaching and Learning by Dr. Susan Crichton and Dr. Lilian Vikiru is licensed under a Creative Commons Attribution-‐NonCommercial 4.0 International License. CC licensing information: http://creativecommons.org/licenses/by-‐nc-‐sa/4.0/deed.en_CA
Attributed to: Maker Day Toolkit by Dr. Susan Crichton and Deb Carter, PhD (c) is licensed under a Creative Commons Attribution-‐NonCommercial-‐ShareAlike 4.0 International License. CC licensing information: http://creativecommons.org/licenses/by-‐nc-‐sa/4.0/deed.en_CA Based on a work at http://innovativelearningcentre.ca/our-‐space/maker-‐days/ and http://innovativelearningcentre.ca/careg-‐project-‐page/
Dr. Susan Crichton Dr. Lilian Vikiru

Taking Making into Schools 3
Welcome
1
All too often educators struggle to change even the most basic aspects of their classroom practice. This is especially true for those in challenging contexts where many educators teach in the ways they were taught – often using the “mind numbing” practices of teacher-‐centred, rote instruction. We use the term challenging contexts, rather than developing world or 3rd world settings, as a way to describe settings in which individuals have limited, unreliable or no access to modern day conveniences such as electricity, running water, health care, mobile computing, broadband and related emerging technologies due to a variety of circumstances, conditions or environmental constraints. We recognize that contextual challenges occur globally, varying only in their scope, cause, duration, geography, and potential permanence. Teachers in challenging contexts have a daunting task. The challenges they face include among others, large class sizes, diverse learner abilities in a class, low literacy levels, lack of resources, serious underfunding and lack of professional learning opportunities.
Aenean eget urna
2
In 1916, the famous educator John Dewey said, “If we teach today’s students as we taught yesterday’s students, we rob our children of tomorrow.” Globally, countries struggle to make lasting, substantial reform. Initiatives such as the United Nations Millennium Goals (http://www.un.org/millenniumgoals/) have encouraged universal primary education and classroom changes that are student centred, evidence based, and encourage active and participatory learning. For instance, currently in Tanzania, teachers are called upon to show BIG RESULTS NOW, which is central to that country’s education reform initiatives. However, teachers have not been given adequate professional development opportunities to turn the initiative objectives into actual classroom practice. Our work suggests teachers need recursive, immersive professional learning to enable them to experience first hand what these reforms might look like and how they might adopt them for their classrooms. Thanks to funding from the International Development Research Centre’s (IDRC) Canada Africa Research Exchange Grant (CAREG), we have been able to design and field test a professional development approach to help teachers modify their practices. Taking Making Into Schools: A Toolkit for Innovation and Change in Teaching and Learning is an outcome of our CAREG funded work. We are grateful to the following institutions and people who helped us along our way: • Department of Education – Mvomero District,
Morogoro Region • Teachers in the Turiani Region for attending our
Workshop, especially Veronica Mdapo and Fatuma Jumbe.
• Mussa Mohamed and Veronica Sarungi for their collaborative spirits and flexibility
• Institute of Educational Development, Aga Khan University, East Africa (IED – AKU, EA)
• Innovative Learning Centre (ILC) – Faculty of Education -‐ University of British Columbia (UBC), Okanagan Campus
We offer two formats (PDF and MS Word) and two official languages (Kiswahili and English) in the hope it will help you take making into your contexts and make meaningful change with your learners.
Taking Making into Schools 4
Toolkit Contents
1
1. Academic Underpinnings 1.1. Background 1.2. The Maker Movement – A Global Perspective 1.3. The Maker Movement – A Contextual Perspective for Making in Challenging Contexts 1.4. Making and Development 1.5. Making the Connection
1.5.1. Making and Active Learning 1.5.2. Making and Constructionism
1.5.3. Making and Big Results Now 1.5.4. Making and Thinking Visibly 1.6. Design Thinking
1.6.1. Introduction 1.6.2. Tie to Education
1.7. Assessment 1.8. Indigenous Ways of Knowing 1.9. Professional Learning – Making a Case for Immersive, Recursive Experiences
2. Facilitating a Taking Making into Schools Workshop
2.1. Sample Agenda
3. Tips and Suggestions for Facilitating Your Workshop
3.1. Formation of Groups 3.2. Simple Sketching Tips 3.3. Tips for Making Sample Resources 3.4. Suggested Makerspace Components -‐ Tools and Materials Required for Your Workshop
Aenean eget urna
2
4. Sample Descriptions – Resources from Previous Workshops
4.1. Three Dimensional (3D) Globes 4.2. Tangrams 4.3. Duck 4.4. House 4.5. Letter Blocks
5. Appendices
5.1. Design Thinking Process – Facilitator Guide 5.2. Design Thinking Process – Participant Worksheet
6. Suggested Web-‐based Resources to Explore
Making is a meaningful way to introduce Science,
Technology, Engineering, Mathematics and Design – User Experience (STEMx)
Taking Making into Schools 5
1. Academic Underpinnings
1
The Maker Movement and classrooms seem perfect partners. Inquiry based learning, problem based learning, constructionism, experiential learning, Reggio Inspired learning all cry out for hands-‐on approaches to making thinking and learning visible. Once thinking is visible and tangible, there is evidence that learning has occurred. Making is a pedagogical orientation (Crichton & Carter, 2015) and a mind set (Dougherty, 2013) that integrates imagination and creativity with design thinking, problem solving, and even more importantly, problem finding. Making and makerspaces cannot be simply added to school spaces and integrated into an already overcrowded curriculum. Bringing Making into the schools is NOT about adding another course or discipline. Rather, it is an authentic way to implement active, participatory learning in the classroom. Making is a meaningful way to integrate STEMx (Science, Technology, Engineering, Mathematics and Design – User Experience) and to support personalized, constructionist learning across the curriculum.
1.1. Background Currently, fifty per cent of the content we access is located on the Internet – in the “digital cloud”. Globally, access to information is changing: there are over 1 billion smart phones, and the sum of human knowledge, in the form of Wikipedia, is available offline in a downloadable format (http://www.labnol.org/software/download-‐wikipedia-‐offline/20012/). Because we have fewer problems accessing information or finding opportunities to connect with others, we basically can make anything we can imagine and find plans, tips and people to help us online. This is called the Internet of Things – things are connected by both form and function. We are in a time in human development where digital literacy (how to use technologies like mobile phones and tablets) is not enough; digital fluency (why and when to use them) is essential. We have the potential to learn, both formally and informally, at any time,
2
place or in any format we need. Learning opportunities have probably never been more flexible. We can upgrade our calculus skills, learn to build a sustainable and inexpensive water filter (www.cawst.org), or design a solar water heater using information we can get using a range of devices (i.e. mobile phones, tablets, computers), platforms (i.e. Android, Apple, Windows), and media (i.e. wikis, websites, videos). Educators are challenged by their governments and business sectors to help students develop the skills necessary to our current times. They are told that these skills must be situated in accessible, flexible learning environments, but rarely are educators given glimpses of what these learning environments might look like or given practical suggestions of how they might create them in their contexts. The Organisation for Economic Co-‐operation and Development (OECD) describes high quality learning environments as being:
• Learner-‐centred with significant, yet different, roles for teachers
• Structured and well-‐designed, requiring a high degree of professionalism to support the student inquiry and autonomous learning
• Profoundly personalized and acutely sensitive to individual and group differences and offering tailored, timely teacher feedback for learners
• Inclusive so as to be empathetic and sensitive to individual and group differences
• Social so learners can work collaboratively in group settings and connect to their larger community (OECD, 2011).
The high quality learning environments described by the OECD and others are consistent with what Pink (2005) calls the Conceptual Age – a time where logical and linear thinking is valued, especially when it is coupled with creativity and innovation. Exploration, visual aesthetics, problem finding and problem solving have been identified as essential skills in the Conceptual Age.

Taking Making into Schools 6
3
Hatch (2014), author of the book Maker Manifesto, suggests that as part of this Conceptual Age, we are actually entering a new industrial revolution. If the first revolution was fuelled by factories powered by steam and the second by electricity, the Conceptual Age is powered by unlimited access to information; the development of increasingly reasonably price, powerful tools; and the ability to obtain a range globally sourced materials and resources with which to make things. Hatch suggests the Maker Movement is actually an Internet of Things (see representation below). He claims it is actually bigger than the online version because it consists of physical objects connected via sensors to the Internet.
1.2. The Maker Movement – A Global Perspective We all have a need to make. It stems from our curiosity with the world and our basic desire to make things and then make those things better. Our earliest ancestors led the way in making when they crafted the first hand tools in East Africa and experimented with fire. They continued to make things and make those things better as they adapted to new locations and migrated around the world. Currently, there is a new interest in learning how to make things – it is called the Do-‐It-‐Yourself (DIY) movement. People are growing tired of cheaply made, disposal goods that cannot be repaired or modified. Increasingly, people are turning to traditional ways of doing things. Many are turning away from pre-‐packaged food items with little nutritional value or poorly made items that are expensive, complicated, and have
Internet of Things
4
proprietary parts that are not interchangeable and cannot be reused. Globally, we are reclaiming our need to make, and we are formalizing it into a movement. We are creating shareable workshops (makerspaces), providing hours of online instructional videos (e.g. You Tube, Instructables -‐ www.Instructables.com), and offering workshops (professional development activities), reclaiming our individuality and modifying the world around us. What is different this time is we are using a human-‐centered design thinking approach to actually design things that are worth making and that address a real need. Educators have a role to play in this return to making by introducing design thinking and active learning to the development of resources and school activities – we call this Taking Making Into Our Schools. 1.3. The Maker Movement – A Contextual Perspective for Teaching and Learning in Challenging Contexts While education has been touted as a key to positive transformation of the individual and the community, it can only attain this function if it is delivered in the right way. As observed earlier, the mind numbing repetitive actions of teacher-‐centered delivery do not necessarily result in learning. Teaching and listening do not automatically result in learning. Transformative learning requires active learning where the learners modify their meaning schemes by critically reflecting on their experiences. A first step is to create a conducive learning environment that allows the learners to experience, critically reflect, and make meaning of their experience. Teaching and making should lead to active learning that would be transformative. Making in the school context presents a great opportunity for transformative learning where the learners can critically contemplate issues in their context. They engage in inquiry and articulate what they perceive as issues worth addressing. Through dialogue, they empathetically negotiate solutions and design and create solutions. Throughout this process, the learner takes a lead in the activity while the teacher facilitates and offers guidance through informally assessing progress. Both the teacher and the learners learn from the process, articulate their understanding by co-‐designing and co-‐creating solutions. This learning can be well documented through the steps carried out and also evidenced in the solutions created.

Taking Making into Schools 7
5
Context is an important parameter in determining what constitutes quality education. While some parameters are global, the details are context-‐dependent. As such, ideas about achieving quality education have to be contextualized so as to be successful. Challenging contexts are everywhere – it could be an urban slum area, remote rural village, harsh geographically complicated area, socially disadvantaged location or an economically disadvantaged area. The context could have a combination of issues that makes it difficult for teachers and learners to experience quality education. Some of these issues include high population, diverse learner abilities in a class, low literacy levels, lack of resources, serious underfunding, lack of professional learning opportunities, and many other related things. Such contexts render the educational reform described above less smooth but not impossible. In fact they provide an opportunity to actualize transformative learning where education responds to the needs of the individual and society in the absence of or instead of external solutions that may be ill suited to the context.
The Maker Movement has been successfully experienced in various contexts, including challenging contexts (i.e., aboriginal reserves in Canada, rural villages in Tanzania). In these contexts, the general process remains the same -‐ emphasizing the design thinking process and making. The purpose of establishing a space to make in the teachers’ resource centre is to enable educators to imagine the future of education by reflectively engaging in design thinking and innovatively creating solutions to respond to pedagogical challenges in their context. This approach is consistent with current educational reform such as Big Results Now (BRN) in Tanzania. The key concerns associated with these reforms are ensuring that learners are not just attending school but are actually learning; teachers are motivated to spend more time in the classroom teaching; and that there should be evidence based results. The maker movement builds the teachers’ capacity to imagine and implement education under such initiatives. Our current knowledge age employs different forms of literacy. Apart from traditional linguistic literacy – there is a need to embrace multi-‐literacies that represent different ways of knowing and expressing learning. New forms of literacy including media, digital, spatial,
6
scientific, mathematical literacies which are crucial in accessing and utilizing the proliferation of knowledge that is at the disposal of the learner. Multi-‐literacies tie in well with Gardner’s Multiple Intelligences. The recognition and development of multiple literacies in this way ensures that multiple intelligences among learners are addressed. It also encourages collaboration and complementary working among learners. This in turn fosters creativity and innovation as learners stretch their imagination and utilize their skills. The contextual realities in which learners and teachers operate may either inform and support their creativity or constrain innovation and their creativity. The ability to leapfrog existing practice is a response to contextual realities. The term leapfrog is borrowed from the deployment of technology. One example of leapfrogging is contexts where mobile telephony gained currency much faster than landline telephones allowing those users to quickly adapt newer technologies. Specifically, exchanging multi-‐media messages and conducting financial transactions by phone are examples of technological applications that were leapfrogged because of the widespread use of mobile phones. Similarly, knowledge, information, skills and practices drawn from indigenous ways of knowing may inform innovation and creativity in similar ways resulting in leapfrogging of educational practices. Indigenous forms of knowledge include folklore; artifacts (i.e., tools, art, crafts); environmental resources (i.e., plants, animals); learning systems; taxonomies; laws; and forms of
New forms of literacy are introduced when Making

Taking Making into Schools 8
7
communication and organization. These indigenous ways of knowing are the sources of background contextual knowledge and skills that the learner brings to class. Indigenous knowledge also provides a base and source of linguistic, mathematical and scientific content for developing learners’ competences in early years. This
8
knowledge forms the base upon which the learner constructs new learning. Some of this knowledge could be well advanced as the learner may have been engaged as an apprentice in a particular trade. Further, indigenous knowledge takes cognizance of sustainable and locally available resources. The use of such resources (including human resource) is important in developing sustainable solutions. In determining creativity, relevance and sustainability of solutions and applications, careful considerations have to be made of the context. Understanding indigenous sense of aesthetics, needs and feasibility of proposed solutions is vital. Proposed solutions have to be owned,
Education is both a goal and a catalyst for development

Taking Making into Schools 9
9
appreciated and sustained by the users. They have to be acceptable not imposed solutions. 1.4. Making and Development Education is both a goal and a catalyst for development. The importance of education is reflected in its inclusion in the Millennium Development Goals (MDGs). One of the MDGs is to achieve Universal Primary Education by ensuring “that by 2015, children everywhere, boys and girls alike will be able to complete a full course of primary education" (UN, 2015). Further, the MDGs confirm that education is instrumental to the achievement of the other Millennium Development Goals, recognizing that "educating children gives the next generation the tools to fight poverty and prevent disease, including malaria and AIDS" (UN, 2015). Sadly, an assessment of the UN MDGs’ gains made so far indicates that the world has not achieved the 2015 goal of universal primary education. Admittedly, there have been significant gains in access, but it has become evident that learning outcomes and relevance of the education are even more crucial in order for education to contribute to development. The ideas shared in this toolkit directly relate to ways in which we can work to make education more relevant and productive for children. The next stage of the UN Millennial Goal targets is the Sustainable Development Goals (SDGs). The SDGs recognize the need for each country to focus on the specific challenges it needs to overcome so as to attain
10
contextually relevant and sustainable development (UN, 2014). We see the pedagogy of Making as a natural fit for schools as it links innovation, creativity, problem finding and problem solving in relation to the needs of particular contexts.

Taking Making into Schools 10
11
1.5. Making the Connection Making can be adapted as an effective pedagogical orientation. It starts by using a Design Thinking Approach. Making highlights a new culture in learning that is not confined to traditional classrooms.
1.5.1. Making and Active Learning This new culture of active learning draws on play, questioning and imagination (Thomas & Brown, 2011). As a pedagogical orientation, making:
12
• Emphasizes collaboration, innovation, creativity and critical thinking
• Is a process of problem finding and problem solving • Naturally leads to active learning – learners discuss,
design and make things • Leads to learner engagement (intellectual,
emotional, behavioral, social and cultural) – high levels of student engagement are evident when learners are inquisitive, interested and therefore motivated to pursue more learning
• Is goal oriented hence very motivating • Renders both process and product important • Ensures that the learning is in the process
1.5.2. Making And Constructionism
The key to quality education is establishing conducive learning environments (OECD, 2011). These environments lead to active learning where learners can collaboratively co-‐construct knowledge in ways that are contextually relevant and appropriate. Learning entails the acquisition of new knowledge or the modification and reinforcement of existing knowledge. According to constructionists, learning requires the individual to engage in a process of constructing (making) meaning of their world. The learners do not imbibe knowledge already constructed for them (from teachers) but they are presented with opportunities to construct knowledge individually and collaboratively. In order to do this, constructionist educators embrace the following beliefs: • Learning should be an active process -‐ the learner
uses sensory data to construct knowledge (this recognizes multiple intelligences as sources of sensory data)
• Learners learn to learn through constructing meanings and systems of meaning – creating some order – patterns, classes, groups, chronologies
• Construction of meaning has to be both a physical and cognitive engagement – involve some physical representation of one’s meaning together with explanations of the choices we make and why
• Language is a crucial aspect of learning – we make meaning in the language that we are most comfortable with hence the importance of choosing, for instance, a local language for instruction or expressing learning
• Learning is a social activity -‐ traditional education tended to isolate the learner, progressive education
We see making as a natural fit in schools
Making links innovation, creativity, problem finding and problem solving

Taking Making into Schools 11
13
recognizes learning as a social endeavor (social constructivism) where learners work collaboratively to co-‐construct knowledge which is meaningful in a given context
• Learning does not occur in a vacuum – it is contextual-‐ hence the need for contextually relevant and appropriate knowledge. Imported ‘knowledge’ may not be relevant or appropriate thus losing the ‘value’ of being regarded as knowledge in the target context.
• Learning requires knowledge -‐ there is need for the facilitators and learners to draw from prior knowledge. For instance, indigenous knowledge is a great source of prior knowledge that informs new knowledge construction because it is contextually relevant and appropriate
• Learning takes time – it is not instantaneous. It requires planning, practice, reflection and revisiting-‐ new insights and understanding occur during these phases.
• Learning requires motivation -‐ learners need a reason to want to learn. The learning process and the product (the new construction) provides motivation to learn.
Constructionism therefore presents learning as a process of experiencing things and reflecting on those experiences. It fosters deeper and longer lasting understanding.
1.5.3. Making And Big Results Now Tanzania, like other developing economies aspires to transit from a low income to a middle-‐income economy. In order to achieve this, it has adapted the Malaysian Development Model (Big Fast Results) and launched the Big Results Now (BRN) initiative. This initiative targets four key areas and education is one of them. Education is considered a strategic agent to providing impetus for development. However, in order for education to deliver on its agency mandate, some reforms are necessary. It is important to note that while Tanzania has recorded remarkable achievements in providing access to basic education over the past 10 years, there has been a steady slide in the quality of education, begging the question of whether are the children learning or simply attending school (World Bank report July 2014; UWEZO reports 2011-‐2014). Under the BRN initiative, the World Bank and other development partners in Tanzania target
14
to improve learning outcomes by addressing specific concerns found to contribute to the poor learning outcomes. Specifically with regard to learning, they propose to ensure: • Teachers are motivated to spend more time in class
teaching • Data are gathered and results monitored regularly
so that education is managed more efficiently • More students learn to read, write and do basic
math by the end of grade 2 (World Bank, 2014)
While steps have been taken to isolate what needs to be done, the actual process of motivating teachers, engaging learners and gathering data is a pedagogical issue. The proposed pedagogical orientation, Making, would offer some practical solutions to how these noble targets could be met (see Section 2.5). Through Making, the teachers can have reason to stay longer in class and the students will be well engaged; there are many opportunities for gathering data that evidences the learning process and provides authentic data for both formative and summative assessment. That data informs school management and other stakeholders on both achievements and areas that require attention and provide a process that develops both literacy (the broader understanding of literacy see Kalantzis and Cope, 2012) and numeracy in practical and evident ways. Ultimately, the process of making delivers meaningful learning for both the teacher and the learner that is contextually relevant and will empower education to
Learning is a social activity

Taking Making into Schools 12
15
play the agency role in driving development.
1.5.4. Making and Thinking Visibly Rooted in constructionist theory and practice, making is an excellent way of providing evidence of the cognitive processes that occur during learning. At various stages of the design thinking process, there is an overt representation of the thinking process. From the outset, participants share their views about particular issues and through dialogue envision the concern shared by a partner. Then through a process of gaining empathy they can seek to develop some solutions. Dialogue reveals the partners thinking, the summaries articulate the thinking and the suggested solutions (in sketch and annotations) represent the problem solving process – a response to the articulated need. Further on, more negotiations provide evidence of mental assessments of the suggested solutions and the final sketch is evidence of collaborative thought. The prototype is the tangible evidence of the process of thinking. Final self and peer assessments articulated in the reflections provide evidence of the congruence between the initial concern shared and the solution presented. (See Section 2.5.)
1.6. Design Thinking “Design thinking is generally considered the ability to combine empathy for the context of a problem, creativity in the generation of insights and solutions, and rationality to analyze and fit solutions to the context” (Wikipedia, n.d.). It is human centered design process that considers the user rather than solely the problem or potential product or outcome. Design thinking is a significant part of the intentional process we use in our Taking Making Into the Schools workshops. We have observed that often if people are given a problem to solve, they tend to rush to a solution without considering all the confounding variables and potential solutions.
1.6.1. Introduction Design Thinking is a process by which designers can thinker (think and tinker — play purposefully) and talk collaboratively within their groups while considering, discussing, researching, and exploring options. This is often called lateral thinking, or the kind of thinking that tends to foster creativity and innovation. Design thinking aligns nicely with Making by helping makers consider what they would like to create and what might be needed. It allows makers to “creatively attack the
16
world’s greatest problems and meet people’s most urgent needs” (Hatch, 2014, p. 10). As Walt Disney, the inventor of Mickey Mouse once said, “It is kind of fun to do the impossible!” The process of design thinking involves a series of decisions and activities that inform the designer. “Design doesn’t just make things beautiful, it makes them work” (Dadich, 2013). Good design can be described with ten principles (Vitsoe, 2013). They include • Good design is innovative • Good design makes a product useful • Good design is aesthetic • Good design makes a product understandable • Good design is unobtrusive • Good design is honest • Good design is long-‐lasting • Good design is thorough down to the last detail • Good design is environmentally friendly • Good design is as little design as possible. Design thinking is a process for solving problems, and it typically consists of seven steps: define, research, ideate, prototype, choose, implement, and learn. Define • Decide what issue you are trying to resolve • Agree on who the audience is • Determine what will make the project successful Research • Review the history of the issue; try to determine
why is it a problem • Collect / share examples of other attempts to solve
the same issue • Talk with people who share or who have
encountered this problem
Ideation • Identify the needs and motivations of your users • Generate as many ideas as possible to serve these
identified needs • Sketch as many ideas as possible • Do not judge or debate ideas • During brainstorming, have one conversation /
interview at a time

Taking Making into Schools 13
17
Prototype • Combine, expand, and refine ideas. • Create multiple drafts • Seek feedback from a diverse group of people,
include your users • Share your prototype with others • Reserve judgment and maintain neutrality • Create and present actual working prototype(s)
18
Choose • Review the objective • Set aside emotion and ownership of ideas • Avoid consensus thinking • Remember: the most practical solution isn't always
the best • Select the powerful ideas
Implement • Make sample descriptions • Execute • Test your idea with your users
Learn • Gather feedback from the user(s) • Determine if the solution met its goals • Discuss what could be improved • Measure success; collect data • Document
Increasingly, educators are being called upon to be designers of learning experiences

Taking Making into Schools 14
19
Although design is always subject to personal taste, design thinkers share a common set of values that drive innovation: these values are mainly creativity, ambidextrous thinking, teamwork, end-‐user focus, curiosity (Wikipedia, n.d.).
Stanford’s d.School offers a great series of resources on design thinking. Please explore http://dschool.stanford.edu/dgift/
20
1.6.2. Tie to Education Increasingly educators are called upon to be designers of learning experiences as suggested in the OECD report shared in Section 1.2. The Maker Movement – A Global Perspective. This is a shift from their previous roles as implementers or interpreters of curriculum. A good way to incorporate design thinking in the classroom is to use it to help students intentionally find linkages between authentic learning experiences and curricular problems. Because of its emphasis on empathy, design thinking invites teachers and students to focus on human centered design and think about things worth considering. It aligns nicely with STEMx projects grounded in improving the human experience. Globally, many educators and researchers suggest teachers should incorporate the process of creative thinking – imagine, create, play, share, reflect (Resnick, 2007) in their practices as it “reflects the natural way that young children learn and play” (Martinez & Stager, 2013). Design thinking and making align quite nicely! One caution though, as with any process, honor the steps. Trust The Process. There are no shortcuts to innovation! 1.7. Assessment Assessment is an integral part of the curriculum. Essentially, assessment should co-‐occur with teaching and learning in the course of instruction. In the process of making, assessment serves as a driving force that keeps the making on track and ensures that there is evidence of learning (or lack of it). Formative assessment, also referred to as assessment for learning, is what moves the process from one step to the next. Whether conducted by self, peers or facilitators, formative assessment contributes to the completion of the product. Formative assessment is carried out when the learners share their thoughts, sketches and engage in the process of developing the prototype. During this period, the teacher can monitor and scaffold learners to ensure that they get good results. Formative assessment contributes to the production of the prototype that is then summatively evaluated by self, peers and facilitator during the gallery tour. The physical product, sample description record can be availed for further assessment and as evidence of the learner’s competence.
Design thinking and Making align quite nicely!
Prototype: Combine, expand and refine ideas

Taking Making into Schools 15
21
1.8. Indigenous Ways of Knowing Constructionist practice encourages the construction of knowledge from prior knowledge (see Section 1.5.2.). Indigenous ways of knowing (or indigenous funds of knowledge) are an excellent source of prior knowledge. Learners come to school with a bank of indigenous ways of knowing that represents their community’s way of life. The knowledge includes: folklore, artifacts (tools, art, crafts), environmental resources (plants and animals), learning systems, taxonomy, laws, equipment, forms of communication and organization. The folklore for instance, would provide a good starting point for various linguistic literacy competences while artifacts and equipment would inspire relevant creativity and aesthetics for new or modified designs. Taxonomies and environmental resources would be a good starting point for mathematical and scientific literacies. In addition, the prior knowledge would be key in determining what is contextually relevant and appropriate, an important consideration for sustainable innovations and interventions. 1.9. Professional Learning – Making a Case for Immersive, Recursive Experiences Research into quality teaching and educational change theory is clear – teachers need continuous learning opportunities if they are to adopt new approaches, adapt to Ministry of Education initiatives, and remain relevant and vibrant in their work. Teachers must engage in career long, professional learning for the same reasons that other professionals such as physicians and nurses do – to remain current, to learn new approaches, and to form professional communities of practice and support. Access to professional development is difficult due to travel costs and availability for many teachers in challenging contexts. Also, all too often, professional development is offered in a “sit and get” passive learning format. This toolkit, Taking Making Into Schools: A Toolkit for Innovation and Change in Teaching and Learning, offers a different approach. It is designed to help you facilitate recursive, immersive professional learning for practicing teachers. It also can be used with other educators to introduce them to Design Thinking and Making.
22

Taking Making into Schools 16
23
Section 2.1. provides a sample agenda for a one-‐day immersive professional development event. The immersive aspect of the day requires participants to thoughtfully and fully engage in design thinking and creative problem finding. At the heart of the day is the Maker ethos which "values learning through direct experience and the intellectual and social benefits that accrue from creating something shareable" (Martinez & Stager, 2013). It also links Design Thinking and Making to the curriculum competencies currently required for East Africa. Immersive professional learning recognizes that it is hard to share meaningfully things that we have not experienced deeply. If teachers are going to Take Making into their schools, we believe educators need to participate actively in a full day experience to help them feel confident and own the ideas of design thinking, problem finding, collaborative making, collegial and convivial critique, and reflection. References Crichton, S. & Carter, D. (2015). Taking Making Into the: An Immersive Professional Development Approach. In M. Niess & H. Gillow-‐Wiles (Eds.). Handbook of Research on Teacher Education in the Digital Age. IGI Global. Dadich, S. (August, 2013). The age of invisible design has arrived. Retrieved from http://www.wired.com/design/2013/08/the-‐age-‐of-‐invisible-‐design/ Dougherty, D. (2013). The maker mindset. In M. Honey & D. Kanter (Eds.), Design, Make, Play: Growing the Next Generation of STEM Innovators (pp. 7-‐11). New York, NY: Routledge. Hatch, M. (2014). The Maker Schools Movement Manifesto: Rules for Innovation in the New World of Crafters, Hackers, and Tinkerers. NY: McGraw-‐Hill. Kalantzis, M., and Cope, B. (2012) Literacies. Cambridge University Press.
24
Martinez, S. & Stager, G. (2013). Invent to learn: Making, tinkering, and engineering in the classroom. Torrance, CA: Constructing Modern Knowledge Press. Organization for economic co-‐operation and development (OECD). (May 2011). Innovative learning environments – A leading OECD/CERI project. Retrieved from http://www.innovations.sa.edu.au/files/links/ILEMay.pdf Resnick, M. (2007). All I really need to know (about creative thinking) I learned (by studying how children learn) in kindergarten. Paper presented at the Proceedings of the 6th ACM SIGCHI conference on Creativity & Cognition. Thomas, D and Seely Brown, J.S. (2011) . A New Culture of Learning: Cultivating the Imagination for a World of Constant Change. Seattle, WA: Createspace. Vitsoe. (2013). Dieter Rams: ten principles for good design. Retrieved from https://www.vitsoe.com/us/about/good-‐design United Nations, 2015 http://www.un.org/millenniumgoals/ United Nations, 2014 https://sustainabledevelopment.un.org/topics/sustainabledevelopmentgoals/ Wikipedia. (n.d.). Design thinking. Retrieved from http://en.wikipedia.org/wiki/Design_thinking
Taking Making into Schools 17
2. Facilitating a Taking Making into the Schools Workshop
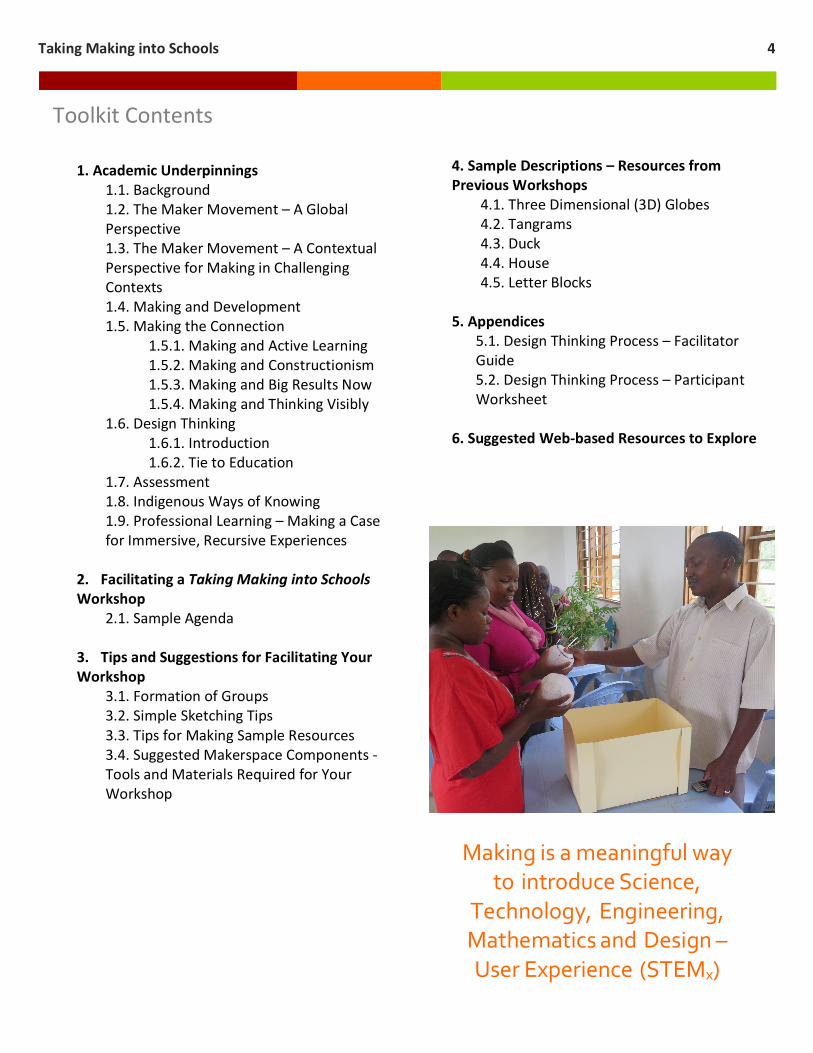
Sample Design Challenge This Sample Design Challenge was used during our field testing with teachers in the Turiani, Morogoro Region. Bakground Teachers in rural and remote schools often struggle to find appropriate resources to support learner-‐centered, participatory learning. They often forget that many of the most valuable resources are sitting right in front of them or right outside their classroom doors. Design Rationale Teachers in Tanzania are expected to get Big Results Now in their classrooms. Many are struggling to understand what results based education looks like and how to develop participatory learning activities for their students. Your Task Your group has been given the task of creating a sample learning resource that helps students learn essential competencies that lead to Big Results Now. Your sample resource must encourage and enable learner-‐centered, participatory learning. Success of Your Sample Resource Will be Determine By: • Can the sample be made using the materials
available? • Can the sample be made using found or local
materials? • Does the sample support the essential learning of the
competency your group selected during the Design Thinking Activity?
• Can other teachers made sense of your sample and see benefit for it in their classrooms?
Parameters • You must use items from the shared Maker Tool
collection • You must use items you can find locally • You must complete the Sample Description sheet • You must have a working sample for the Gallery Tour
1
The goal of the workshop is to encourage participants to experience making through design thinking and hands-‐on activities. The recursive aspect of the immersive approach is made possible by offering the Taking Making Into Schools workshop over 2 -‐ 3 consecutive days. If you can manage that, we suggest you use the same agenda each day. This allows participants to gain a deeper understanding of the process. We discovered their work improving with each of the iterations in the design process, making, and reflection steps. Taking Making Into Schools introduces participants to Making and resource development by focusing on five distinct yet related elements: • Design challenge • Design thinking process • Design solution through collaborative making • Gallery tour • Reflection
2.1. A Sample Agenda
At the end of this section (p. 21), a Sample Agenda with suggested times, pre-‐readings and materials required has been provided.
2.2. Workshop Elements
2.2.1. Design Challenge
Design thinking and making are fun processes and activities. But, teachers need something to think about and to make when they are creating education resources. This is where a Design Challenge can be used. A design challenge focuses each group of teachers on a task, allowing the facilitator to engage the group in the design process. In the task of teaching and learning, we know that simply covering the curriculum using a teacher directed approach does little to improve learning and even less to foster curiosity. It is suggested that less than 10% of what is taught is retained two years later (Lambert, 2012). Teaching more using the same rote learning approaches isn’t the answer. Countries such as Singapore have already radically changed their national policies and embraced

Taking Making into Schools 18
2
movements such as Teach Less Learn More. This movement began in 2006 as a way to help “teachers and schools to focus on the fundamentals of effective teaching, so that … students are engaged, learn with understanding, and are developed holistically, beyond preparing for tests and examinations. … [It has required schools to change in terms of] curriculum (what to teach), pedagogy (how to teach) and assessment (how much have learners learnt)” (Singapore Ministry of Education, 2015). While we’re not huge fans of high stakes exams, the 2012 PISA results, which was the first year to assess creative problem solving, ranked Singapore #1 … Canada was 5th followed by Finland 7th and the USA 13th (http://www.oecd.org/pisa/singapore-‐and-‐korea-‐top-‐first-‐oecd-‐pisa-‐problem-‐solving-‐test.htm). Samples of the types of questions asked can be found at http://www.oecd.org/pisa/test/. We see Taking Making Into Our Schools as a purposeful way to intentionally link the process of Making (designing, making, testing, reflecting) with a thoughtfully crafted Design Challenge that requires participants to gain empathy and consider new ideas. The Design Challenge provides the curricular content. Creating A Design Challenge Our experience suggests there are three primary ways to structure a design challenge: • As an inquiry question • As a problem to be solved • As a scenario to play out 1. Inquiry allows curriculum to be explored through
authentic learning experiences (Alberta Learning, 2004) – a key contribution of MAKING to teaching and learning activities. Authentic learning encourages learners to inquire into things that are real and of interest to them. It positions the learning activities as problems to be solved. Edutopia has a site sharing tools, tips and ideas about problem-‐based learning (PBL) (http://links.edutopia.mkt5094.com/ctt?kn=17&ms=NzE3NDM0OAS2&r=MjcyODg5NjI0MjMS1&b=0&j=OTMyNDg3NjYS1&mt=1&rt=0)
2. Problem solving is “cognitive processing directed at
achieving a goal when no solution method is obvious to the problem solver” (Mayer & Wittrock, 2006, p.
3
287). They explain learners need five kinds of knowledge to be successful problem solvers: • Facts: knowledge about characteristics of
elements or events, such as there are 100 cents in a Canadian dollar;
• Concepts: knowledge of a categories, principles, or models, such as knowing what place value means in arithmetic or how hot air rises in science;
• Strategies: knowledge of general methods, such as how to break a problem into parts or how to find a related problem;
• Procedures: knowledge of specific procedures, such as how to carry out long division or how to change words from singular to plural form; and
• Beliefs: cognitions about one's problem-‐solving competence (such as “I am not good in math”) or about the nature of problem solving (e.g., “If someone can't solve a problem right away, the person never will be able to solve it”).
3. Scenarios are a form of story or narrative. They can be used to introduce learners to a project. The purpose of a scenario is to set a scene for a project and to create a common starting point. A scenario can also get the parameters for the project, outlining any limiting factor, special conditions and time / context constraints. Scenarios are creative ways of imagining a “different future” or an alternative way of doing something. They help the learners visualize the context for the task as they usually cover environmental, social, technical, political and economic concerns.
Why We Prefer Design Challenge Scenarios We briefly shared three ways to craft a Design Challenge. There are many other ways, and we are sure you will find the one that fits your teaching style the best. We prefer casting our Design Challenges as scenarios as our Maker Day professional development activities are completed in small groups of four individuals. A scenario supports a group approach. Typically, we try to make groups heterogeneous and attempt to make learning as interdisciplinary as possible. Our scenarios consist off the following components: • Overview Statement which provides the background
for the challenge

Taking Making into Schools 19
4
• Design Rationale which provides the authentic context for why the challenge is important
• Problem Scenario which situates the challenge within the group that has been tasked to solve it
• Success Determinants which provide the criteria for how the design solutions will be assessed / or peer evaluated during the Gallery Tour
• Parameters or the rules and limitations to which groups have to follow or adhere
2.2.2. Design Thinking Process -‐-‐ Participant Worksheet
Once you have organized your participants into small groups, you can start the Design Thinking Activity. For tips on how to organize your groups, see Section 3.1 Formation of Groups. A sample worksheet is included in Section 5.2. If your budget allows, please print one copy of this worksheet for each participant. The worksheet is to be printed double sided on A3 paper. If you do not have access to a photocopier or cannot afford to make copies, participants can make their own version of the worksheet using blank A3 paper. Section 5.1. provides a facilitator’s guide to help you time the steps of the process and provide instruction to the participants. Please review the guide before you facilitate your workshop,
5
2.2.3. Design Thinking Process -‐-‐ Facilitator Guide
Design Thinking is a facilitated, timed process. It requires workshop participants to work in small groups to consider solutions for a Design challenge (Section 2.5.2). The design thinking process was developed at Stanford University near Silicon Valley – the heart of innovative design and computer development. Prior to starting the Design Thinking activity, you may want to introduce simple sketching tips to your participants (Section 3.2). Many adults are reluctant to draw, so this is a good time to help them remember the fun they had as children drawing their world. Also, because participants are going to make prototypes (scaled models actual objects) sketches are more helpful than abstract concepts expressed only in words. Tell participants of all the parts of the process so you don’t take shortcuts: • Design challenge • Design Thinking process • Sample Description • Gallery Tour • Reflection
Make sure you have read through the following instructions before you facilitate your first workshop. You will need to have a timing device with you (a mobile phone works well, especially if it has a digital timer).
2.2.4. Sample Description The Sample Description sheet provides reflection for the participants. Reflection is an important aspect of professional learning and growth. Educators need opportunities to learn to be a reflective practitioner – someone who thinks about what they have done and attempts to align their actions to specific outcomes or competencies. The Sample Description activity invites workshop participants to consider the Design challenge they were given and then reflect on their Design Thinking and Making activities. It is also a tool for sharing quality resource ideas. The Teacher Resource Centre (TRC) coordinator who is hosting the workshop may want to collect the Sample Descriptions and create a resource bank of excellent ideas and examples for teachers visiting the TRC to use.
Sample Description
Title:
Curricular Competence:
Description of Sample:
Description of Use in Classroom:
Steps to Make this Sample:
Suggested Assessment:
Taking Making into Schools 20
6
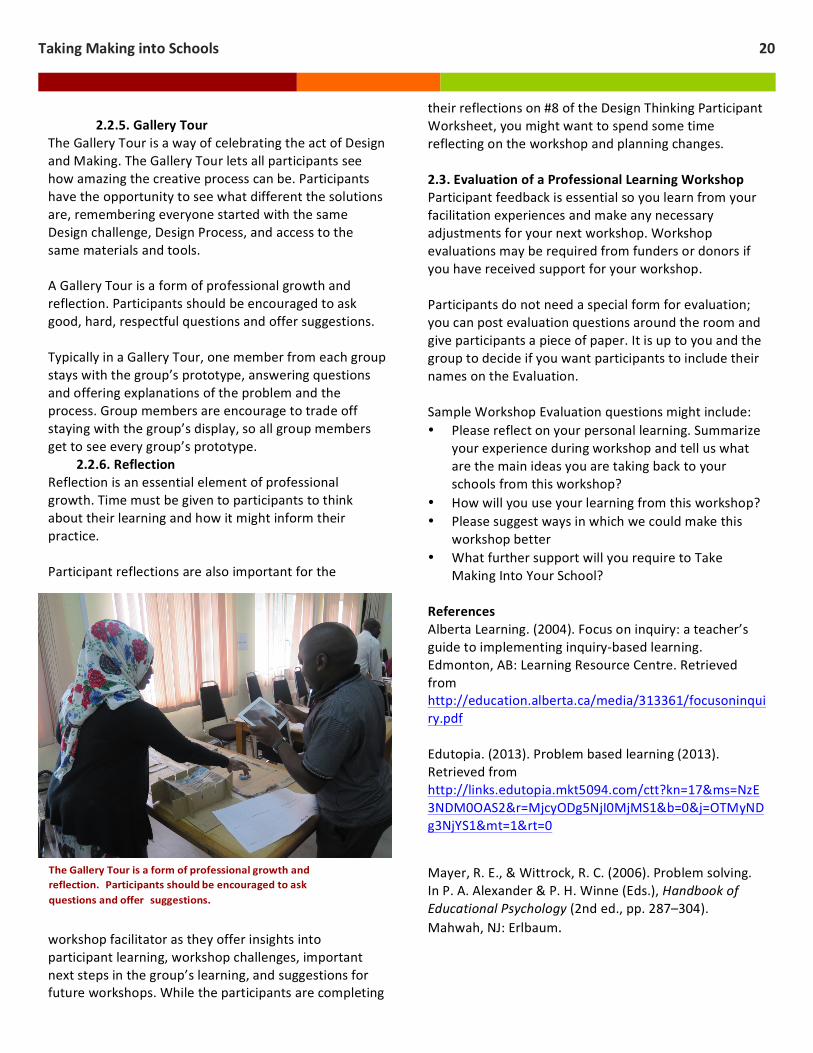
2.2.5. Gallery Tour The Gallery Tour is a way of celebrating the act of Design and Making. The Gallery Tour lets all participants see how amazing the creative process can be. Participants have the opportunity to see what different the solutions are, remembering everyone started with the same Design challenge, Design Process, and access to the same materials and tools. A Gallery Tour is a form of professional growth and reflection. Participants should be encouraged to ask good, hard, respectful questions and offer suggestions. Typically in a Gallery Tour, one member from each group stays with the group’s prototype, answering questions and offering explanations of the problem and the process. Group members are encourage to trade off staying with the group’s display, so all group members get to see every group’s prototype.
2.2.6. Reflection Reflection is an essential element of professional growth. Time must be given to participants to think about their learning and how it might inform their practice. Participant reflections are also important for the
workshop facilitator as they offer insights into participant learning, workshop challenges, important next steps in the group’s learning, and suggestions for future workshops. While the participants are completing
7
their reflections on #8 of the Design Thinking Participant Worksheet, you might want to spend some time reflecting on the workshop and planning changes. 2.3. Evaluation of a Professional Learning Workshop Participant feedback is essential so you learn from your facilitation experiences and make any necessary adjustments for your next workshop. Workshop evaluations may be required from funders or donors if you have received support for your workshop. Participants do not need a special form for evaluation; you can post evaluation questions around the room and give participants a piece of paper. It is up to you and the group to decide if you want participants to include their names on the Evaluation. Sample Workshop Evaluation questions might include: • Please reflect on your personal learning. Summarize
your experience during workshop and tell us what are the main ideas you are taking back to your schools from this workshop?
• How will you use your learning from this workshop? • Please suggest ways in which we could make this
workshop better • What further support will you require to Take
Making Into Your School? References Alberta Learning. (2004). Focus on inquiry: a teacher’s guide to implementing inquiry-‐based learning. Edmonton, AB: Learning Resource Centre. Retrieved from http://education.alberta.ca/media/313361/focusoninquiry.pdf Edutopia. (2013). Problem based learning (2013). Retrieved from http://links.edutopia.mkt5094.com/ctt?kn=17&ms=NzE3NDM0OAS2&r=MjcyODg5NjI0MjMS1&b=0&j=OTMyNDg3NjYS1&mt=1&rt=0
Mayer, R. E., & Wittrock, R. C. (2006). Problem solving. In P. A. Alexander & P. H. Winne (Eds.), Handbook of Educational Psychology (2nd ed., pp. 287–304). Mahwah, NJ: Erlbaum.

Taking Making into Schools 21
Agenda Topic
Suggested
Time Toolkit Reference for Suggested
Pre-‐reading for Facilitators
Materials Needed 1. Welcome
• Introduction of guests & hosts
• Registration • Climate setting
10 minutes Section 1.9. Professional Learning – Making a Case for Immersive, Recursive Experiences Section 3.4. Suggested Makerspace Components
Registration sheets
2. Introduction to Making Movement
10 minutes Section 1.2. The Maker Movement – A Global Perspective
Chart paper & pens Paper & pencils for participants
3. Connecting Making to Changes in Teaching and Learning
15 minutes Section 1.3. The Maker Movement – A Contextual Perspective, Especially In Challenging Contexts Section 1.5.1. Making and Active Learning
Chart paper & pens Paper & pencils for participants
4. Forming Groups 5 – 10 minutes Section 3.1. Formation of Groups Small slips of paper & pencils
5. Introduction to Design Thinking
10 minutes Section 1.9. Design Thinking Paper & pencils for participants
6. Design Thinking Activity
60 minutes Section 2.2.1. Design Challenge Section 5.2. Design Thinking Process -‐ Participant Worksheet Section 5.1. Design Thinking Process -‐ Facilitator Guide
Timing device (mobile phone) Copies of Section 2.2.1 per table Copies of Section 2.2.2 per participant Copy of Section 2.2.3 per facilitator
7. Making Activity 120 minutes Section 3.3. Tips for Making Sample Resources Section 2.2.4. Sample Description Section 3.4. Suggested Makerspace Components
• Copies of Section 2.2.4 per participant
• Makerspace • Consumable materials
8. Gallery Tour 20 minutes Section 2.2.5. Gallery Tour • Completed prototypes • Completed Sample Descriptions
9. Reflection 15 minutes Section 2.2.6. Reflection Participants’ Design Thinking Worksheet
10. Conclusion • Debrief of the
day • Clean up & tool
collection • Discussion of
next steps
15 minutes Section 2.3. Evaluation of a Professional Learning Workshop
Paper & pencils for participants

Taking Making into Schools 22
3. Tips and Suggestions for Facilitating Your Workshop
1
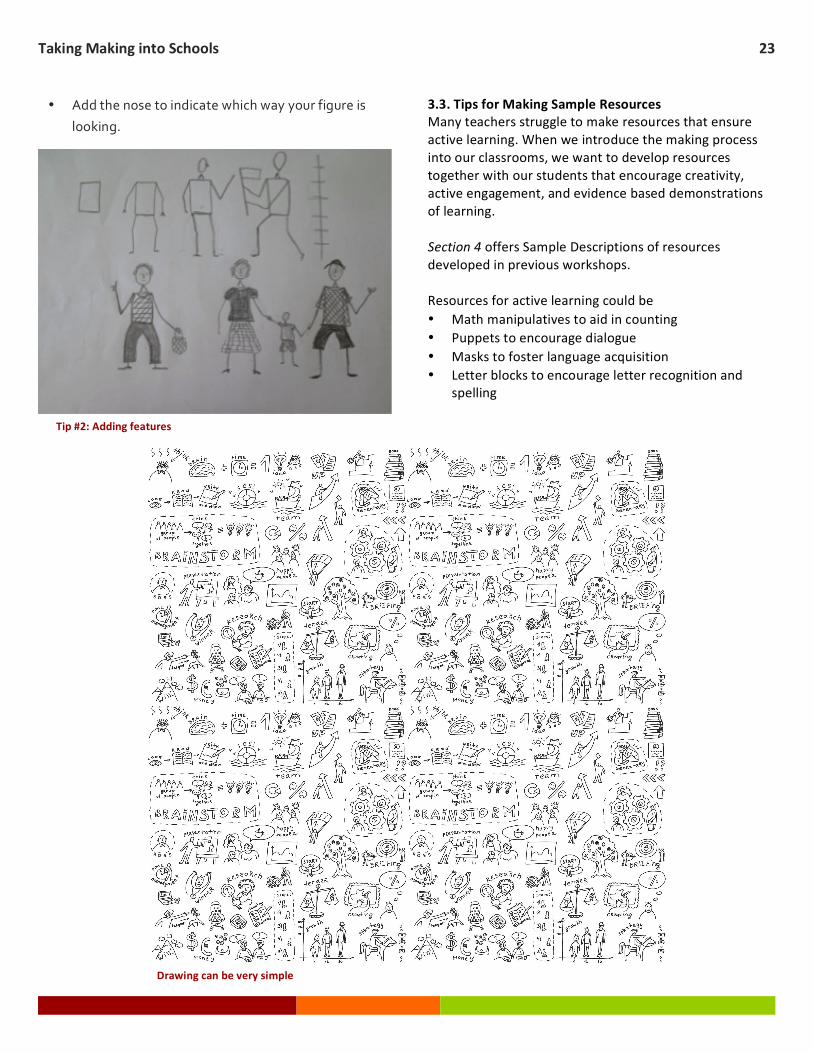
Over the years we have learned some tips that might help you facilitate your workshop. One thing we have learned through our Taking Making Into Schools workshops is that careful planning is essential. The following tips are offered as suggestions only as each group and location will be different. 3.1. Formation of Groups This workshop is designed to support active learning in small groups. As participants arrive, they can sit in table groups of four anywhere in the room. Just before the Design Thinking activity start, the facilitator should poll the group to see which subject areas are represented. Initial groupings should be by subject area rather than school or grade level. Try to make the groups as heterogeneous much as possible (e.g. gender, age, years of teaching, etc.). Unless problems surface, we suggest keeping the groups together throughout the workshop. 3.2. Simple Sketching Tips Many adults are reluctant to draw. Some never learned tips and tricks to making simple sketches. Not only is it important for teachers to encourage their students to draw, it is important that they model and teach many of these tips for their students to encourage creativity and visual thinking. When we draw, we use another part of our brain and this allows us to think more fully and come of up divergent and innovative ideas. Drawings can be very simple. They merely need to suggest shapes and ideas … our eyes will fill in the missing details and parts. Drawing people and showing actions that they might be doing can be a tad trickier. However, there are a few basic tips you might consider. Tip #1 -‐ recognize that the human body is proportional. We use the ratio of 1: 8 for adults and 1:5 for children. This means that the size of a person’s body and legs is equal to approximately 7 of their heads! (http://www.drawinghowtodraw.com/drawing-‐
lessons/drawing-‐faces-‐lessons/proportions-‐human-‐
figures-‐bodies.html
2
Tip #2 – in the examples below, notice several features: • All the drawings start with a simple rectangle. The
rectangle can be narrow to indicate thin people or wider to indicate thicker people.
• Arms must be attached to the top of the rectangle; legs to the bottom. The top and bottom corners of the rectangle form the shoulder and hip joints.
• Arms need to bend slightly at the elbows or bend more radically at the elbow to indicate action.
• Legs need to bend slightly at the knees or bend more radically to indicate running or jumping or other movements.
• After the figures are proportionately drawn using the steps above, you can dress them or add details like hats or things the figures might be holding or throwing.
Tip #1: Recognize the human body is proportional
Taking Making into Schools 23
3
• Add the nose to indicate which way your figure is
looking.
Tip #2: Adding features
4
3.3. Tips for Making Sample Resources Many teachers struggle to make resources that ensure active learning. When we introduce the making process into our classrooms, we want to develop resources together with our students that encourage creativity, active engagement, and evidence based demonstrations of learning. Section 4 offers Sample Descriptions of resources developed in previous workshops. Resources for active learning could be • Math manipulatives to aid in counting • Puppets to encourage dialogue • Masks to foster language acquisition • Letter blocks to encourage letter recognition and
spelling
Drawing can be very simple

Taking Making into Schools 24
5
• Counting blocks to encourage numeracy • Building blocks to foster spatial literacy • Tangrams for spatial knowledge and shapes • Insect habitats for observations • Globes for geography • And many, many more ideas
3.4. Suggestions for Makerspace Components -‐-‐ Tools and Materials Required for your Workshop Hand tools • small drywall saw • 3 pairs of pliers with wire cutters included • 2 small clamps • protractor • 10 small steel rulers (12”) • 10 utility knives with replaceable blades • 1 pair of scissor Consumable Items • tie wire • tongue depressors • bamboo skewers • Velcro if available • Glue sticks
6
• Liquid glue • Flour for papier mache • 3 liter plastic bowl for papier mache • small sticks / wood scraps • cardboard • newspaper • plastic bottles of various sizes • bottle caps • recycled Styrofoam • found objects that can be used • chart and manila paper • masking tape • brad fasteners Workshop materials (see Section 5. Appendices) • Photocopy Design Thinking worksheet for
participants • A3 paper for participants • Chart paper • Felt pens • Pencils for participants • Pencil sharpeners

Taking Making into Schools 25
4. Sample Descriptions – Resources from Previous Workshops
1
4.1. Three Dimensional (3D) Globes Title: Making a 3d Globe (http://www.progonos.com/furuti/MapProj/Normal/ProjPoly/Foldout/Dodecahedron/Files/Res3/gnDod-‐s500_pof-‐bw.pdf) Curricular Competence in Tanzania Schools: Social Studies Goals: • Appreciate the interdependence between human being and the environment • Consolidate the spirit of national unit and cooperation between Tanzanian societies and those of other parts of the
world • Be able to identify and relate events in Tanzania and those taking place in other nations Standard Three • Our School – Pictures and maps; Main cardinal points; 4 points of the compass Standard Four • Our District – Map reading skills; Relief, climate and vegetation; Physical feature, climate conditions and vegetation;
natural resources Standard Five • Map reading skills; 8 points of the compass; Map symbols; Locate Tanzania; Physical features; Climate; Vegetation;
Agents of colonialisms; Our economy; Tourism; Trade Standard Six • Map reading skills; The Earth; Location and physical features of East Africa; Climate; Commerce and Trade; Location
of Southern African countries; Colonial invasion; African continent; Refugees in Africa; Africa and International Organizations
Standard Seven • Our world – physical features; Climate; Communications and transport Description of Sample: A map of the world with political boundaries outlined and labeled. The map can be cut and glued to form a 3 dimensional, dodecahedron (12 sided http://mathworld.wolfram.com/Dodecahedron.html) globe with a gnomonic projection (http://en.wikipedia.org/wiki/Gnomonic_projection). A gnomonic projection is the oldest map shape. Suggestions for Use in the Classroom: • To understand Tanzanian’s place in the world • To understand the Earth is round • To show relationships between northern and southern hemispheres • To show trade routes and distances – regionally, nationally, continentally, globally • To visualize abstract ideas (boundaries, compass points, latitude, longitude, etc.) • To compare flat maps to 3d globes – what is lost and gained in both formats? • Talk about different map projections and orientations. Generate questions (e.g. why is north usually at the top of
most maps when Tanzania and many other countries are in the southern hemisphere?

Taking Making into Schools 26
2
Steps To Make This Sample • Download the map
(http://www.progonos.com/furuti/MapProj/Normal/ProjPoly/Foldout/Dodecahedron/Files/Res3/gnDod-‐s500_pof-‐bw.pdf) or copy the map provided on page 28.
• Depending on your intended use, make a copy of the map for each student. Suggested size = A3 paper • Use a pencil to darken the lines on the printed copy • Use coloured pencils or watercolours to illustrate specific regions, countries, or whatever subject for which you are
using the map • Cut the map carefully. Make sure you do not cut off the tabs that will be used later to glue the globe together • Carefully fold the map, forming the 12-‐sided globe • Glue the globe partially together and gently begin to stuff it with discarded paper scraps. This will add weight and
substance to the finished globe. • Finish gluing the globe. Suggestions for Assessment Standard Three • Locate Tanzania on the map and then on the globe • Locate main cardinal points and 4 points of the compass on the map and globe Standard Four • Locate places on the map and globe • Identify different climate zones and vegetation regions on the map and globe • Locate significant physical feature (e.g. Zanzibar, Mt Kilimanjaro, Dodoma) • Identify most likely location of various natural resources Standard Five • Find various locations on the map and globe • Locate 8 points of the compass • Use various map symbols to locate places on the map and globe • Locate Tanzania and its prominent physical features • Explain how location impacts climate • Show the original location of colonialist and map how they came to East Africa • Agents of colonialisms • Explain how location impacts our economy • Identify areas for tourism • Explain how location impacts trade Standard Six • Find various locations on the map and globe • Locate physical features of East Africa • Explain impact of location on climate • Explain impact of location on commerce and trade • Locate Southern African countries • Demonstrate routes for colonial invasion – indicating original locations and the colonies • Locate the African continent • Demonstrate the original location of refugees and indicate their pathways in Africa • Explain the impact of location on Africa’s relationships and involvement with international Organizations

Taking Making into Schools 27
3
Standard Seven • Find various locations on the map and globe • Explain impact of location on climate • Explain the impact of location on communications and transport (e.g. Eastern Africa Submarine Cable System
(EASSy) is an undersea fibre optic cable system connecting countries in Eastern Africa to the rest of the world (http://en.wikipedia.org/wiki/EASSy)
The map can be coloured, cut and glued to form a three dimensional (3D), dodecahedron (12 sided) globe.

Taking Making into Schools 28

Taking Making into Schools 29
4
4.2. Tangrams
Title: Tangrams and Geometric Shapes http://www.activityvillage.co.uk/tangrams Curricular Competence in Tanzanian Schools: • Spatial knowledge of shapes and sizes • Identifying and solving by measuring and constructing • Identification of rectangles and squares Description of Sample: Tangrams are a square that has been cut into 7 pieces. The challenge is using the 7 pieces to reform the square and other more complicated shapes. Suggestions for Use in the Classroom: • Introduce tangrams to the class as a way to understand geometric shapes • Have learners make their own Tangram sets using cardboard or flat plastic they can easily cut • Provide different Tangram shapes for the learners to work out • Remind learners they have to ALWAYS use the 7 pieces • Use Tangrams as a play activity to encourage active learning • Use Tangrams as a puzzle for problem solving Steps To Make This Sample • Print copies of the Tangram shape • Have the learners cut the shapes out
Suggestions for Assessment • Informal assessment – observe learners’ problem solving approaches • Formative assessment – ask learners to make basic shapes and record the number of steps they take to complete
the tasks. Increase the complexity of the shapes
Tangram Pattern NOTE: before photocopying for the learners, enlarge this square to the size you want but make sure, it remains a square. NOTE: Tangrams can be made using paper, cardboard, plastic, wood or any other flat, sturdy material.

Taking Making into Schools 30

Taking Making into Schools 31
5
4.3. Duck
Title: Duck Curricular Competence: English Standard 1 and 2 1. Make statements, ask and answer simple questions about the immediate environment (home and school
o Identifying and naming things o Describing things o Identifying parts of the body
Standard 3 and 4 1. Understand and use frequently used expressions in the family, school and local environment settings and situations 2. Communicate in simple routine tasks requiring simple exchange of information using all the four language skills
o Expressing similarity o Expressing location o Expressing quality in terms of size
Kiswahili Standard 1 and 2 1. Understand and use simple sentences for everyday communicative needs 2. To communicate simply about issues in the immediate environment
o Identifying and naming things in the immediate environment
o Identifying different colors o Describing things in terms of quality
Standard 3 and 4 1. Listening and speaking to meet one’s needs 2. Communicating effectively in Kiswahili about everyday issues in different contexts Science Standard 1 and 2 1. Appreciating and using scientific principles and technology in everyday life
o Naming, listing, explain characteristics of living things, draw and make models of living things
o Identifying and imitating sounds of various animals o Mentioning sources of food o Describing the habitat of different animals
Standard 3 and 4
o Explaining the natural habitat of living things o Explaining locomotion among living things

Taking Making into Schools 32
6
Mathematics Standard 1 and 2
1. Recognizing numbers 2. Counting 3. Writing number 1, 2
Description of Sample: A model of a duck made from old socks, pieces of fabric or sponge, sticks, card box, buttons, paper, glue and thread. The model is painted black/grey and white to make it look like a real duck. Ducks are one of the domestic animals kept in central Tanzania and are easily recognizable by children from this context. They are also non-‐taboo animals – hence the children can freely touch and talk about the duck. Suggestions for Use in the Classroom: • To generate communication about things in the environment • To provide a basis for discussion on personal preferences • To generate discussion on characteristics of living things and parts of their bodies • To prompt learners to identify, name, classify things in their immediate environment • To teach simple numbers 1 and 2 • To generate discussion on sounds made by different animals • To generate discussion on uses of various domestic animals • To count up to 4 • To relate the shape of the duck with number 2 Steps To Make This Sample The materials needed to make this model can be sourced from cast offs and recycled materials. • First collect all the materials needed • Cut up the pieces of cloth and sponge • Stuff the cut up pieces in the sock – shaping it accordingly. • Use straps of clothe to shape narrow and wide sections of the body of the duck • Make two holes in the bottom part of the body • Use card box to make wings-‐ insert these into the sides of the body • Use two pieces of wood to make the beak and use a knife to shape it appropriately • Take two sticks and attach card box shaped like the webbed feet of a duck • Insert the two sticks in the two holes • Attach the beak to the head • Attach two buttons for the eyes • Glue up the attachments • Paint the model with appropriate colors (white, black or grey) Suggestions for Assessment • Make statements about the model • State the color of the model • Identify/ name/describe the model • State the habitat of the model • Name and identify (by touching or pointing) the different parts of the body of the model • Count the number of legs, eyes on the model
Taking Making into Schools 33
7
• Explain the uses of the animal • Explain what the animal feeds on • Explain the similarities and differences between the modeled animal and other animals in your environment • Draw a picture of a duck • Make your own simple model of a duck

Taking Making into Schools 34
8
4.4. House Title: House Curricular Competence: English Standard 1 and 2 1. Make statements, ask and answer simple questions about the immediate environment (home and school 2. Take part in a simple conversation
o Identifying and naming things o Describing things o Counting o Grouping things with similar characteristics e.g. shape or color
Standard 3, 4 and 5 1. Understand and use frequently used expressions in the family, school and local environment settings and situations 2. Communicate in simple routine tasks requiring simple exchange of information using all the four language skills
o Expressing similarity o Expressing location o Expressing quality in terms of size o Counting
Standard 5 1. Understand information communicated by others in their immediate environment 2. Communicate accurately and appropriately with other people in her/his immediate environment using simple
expressions in all the four language skills Asking for and giving reasons Expressing comparison Using adjectives of appearance
Kiswahili Standard 1 and 2 1. Understand and use simple sentences for everyday communicative needs 2. To communicate simply about issues in the immediate environment
o Identifying and naming things in the immediate environment
o Identifying different colors o Describing things in terms of quality o Counting things o Distinguishing singular and plural
Standard 3 and 4 1. Listening and speaking to meet one’s needs 2. Communicating effectively in Kiswahili about everyday issues in different contexts
o Describing things in terms of size o Comparing and contrasting things
o Differentiating things Science Standard 1 and 2 1. Appreciating and using scientific principles and technology in everyday life
Taking Resources (House) into Classroom

Taking Making into Schools 35
9
o Naming, listing, explain characteristics of things, draw and make models of things o Describing the habitat of people o Keeping the environment clean and safe
Standard 3 and 4
o Explaining the natural habitat of living things o Keeping the environment clean and safe Mathematics
Standard 1 and 2 1. Recognizing numbers 2. Counting 3. Writing numbers 4. Recognizing, plane figures quadrilaterals, triangles, circles
Standard 3 and 4
o Drawing and cutting plane figures quadrilaterals, triangles, circles o Measuring length of figures and objects o Explaining properties of rectangles, squares and triangles o Finding perimeter and area of squares and rectangles o Recognizing types of angles – acute, right
Vocational Skills Standard 1-‐4
o Understanding and applying skills of pictorial art, decoration and modeling o Drawing shapes and things using templates o Matching shapes and templates o Modeling with clay o Decorating models o Drawing pictures of real objects o Painting using water colors
History 1. Understanding families 2. Understanding progress made in their communities
o Basic needs of the family o Activities and duties in the family and community o Understanding customs, norms and traditions related to housing
Geography
o Recognizing actions that affect the environment, their effects and take appropriate measures for conserving and protecting it
o Understanding the interdependence between human beings and the environment, and applying the knowledge for social and economic development
o Describing the environment o Identifying objects at home and school environments
Description of Sample: A model of a house made from recycled card box, sticks, reeds, ash, paint and glue. The model is representative of current types of houses found in the context (rural Tanzania). It is also representative of what is considered modern

Taking Making into Schools 36
10
housing especially in rural areas where some traditional types of housing like the manyatta (made from clay, cow dung and sticks) or round mud houses may still be seen. Suggestions for Use in the Classroom: • To develop vocabulary in both English and Kiswahili • To practice counting • To practice recognition of shapes • To practice recognition of colors • To practice measurement of length, width, perimeter and area • To generate discussion on the environment, conservation and care • To generate discussion on habitats • To generate discussion on development • To generate discussion on modeling • To practice the use of descriptive words • To generate discussion on interdependence of human beings and the other things in the environment Steps To Make This Sample Some of the materials needed to make this model can be sourced from the environment at no cost or low cost for instance, recycled card box, sticks, reeds and ash. Paint and glue may be purchased. • First collect all the materials needed. • Draw a sketch of the intended model (to take care of the detail required). • Cut out rectangular pieces of card box for the front and back parts of the house • On these pieces, draw the designated positions of windows and doors • Cut three sides of the outlined windows and doors, leaving the side that would be connected to the ‘wall’ so that the
‘doors’ and ‘windows’ can be ‘opened’ and ‘closed’. This is helpful as it provides opportunities for more activities and learning of vocabulary.
• Using the reeds, make a skeletal frame of the house. • Cut out another piece of card box for the roof. • Peel off the paper on one side to have a corrugated surface • Use glue and sticks to attach the card box pieces on the frame • Mix some ash with water and paint the house model-‐ this hardens the card box and also preserves it from termites • Let the model dry • Choose the paint for the house and paint the model • Cut a piece of the card box to act as the base (and floor) of the house. • Paint this with ash as well and let it dry • Attach the base to the rest of the model Suggestions for Assessment • Make statements about the model • State the colors on the model • Identify/ name/describe the model • Name and identify (by touching or pointing) the different parts of the model • Count the number of windows, sides, angles, shapes, etc. on the model • Explain the uses of the house • Explain what real houses are made of • Explain the similarities and differences between the modeled house and other houses in your environment • Draw a picture of a house • Make your own simple model of a house

Taking Making into Schools 37
11
4.5. Letter Blocks
Title: Letter blocks Curricular Competence: English Standard 1 and 2
o Identifying and naming things in the immediate environment o Describing things o Counting o Identifying letters of the English alphabet o Distinguishing capital and small letters o Using letters of the alphabet to spell and write short words
Standard 3, 4 and 5
1. Understand and use frequently used expressions in the family, school and local environment settings and situations
2. Communicate in simple routine tasks requiring simple exchange of information using all the four language skills o Spelling, reading and writing short words and sentences o Expressing location o Expressing quality in terms of size o Counting
Kiswahili Standard 1 and 2 1. Understand and use simple sentences for everyday communicative needs 2. To communicate simply about issues in the immediate environment
o Identifying letters of the alphabet o Distinguishing capital and small letters o Forming, reading and writing syllables and short
words and sentences o Identifying and naming things in the immediate
environment o Identifying different colors o Describing things in terms of quality o Reading
Standard 3 and 4 1. Listening and speaking to meet one’s needs 2. Communicating effectively in Kiswahili about everyday issues in different contexts
o Describing things in terms of size
Letter Blocks made from recycled water bottles

Taking Making into Schools 38
12
o Comparing and contrasting things o Differentiating things o Reading verse o Reading for comprehension and pleasure o Writing brief accounts of happenings o Mathematics (letter blocks could be replaced with number blocks)
Standard 1 and 2 1. Recognizing and reading numbers 2. Reading number names 3. Counting 4. Writing numbers 5. Arranging numbers Description of Sample: Letter blocks (can also be number blocks) are made from recycled plastic water bottles and strips of paper on which the letter or number is written. The use of recycled plastic bottles for challenging contexts has the double benefit of keeping the environment clean and reducing the cost of producing instructional material that is low cost or cost free but fairly durable. It is important that the bottle is transparent (colorless) or a light enough hue so that the letters are easily seen. Additionally, any decorations should not interfere with the visibility of what is to be read. Suggestions for Use in the Classroom: • To develop learners ability to recognize letters • To develop the ability to distinguish capital and
small letters • To develop learners ability to read letters, words
and sentences • To develop vocabulary in both English and Kiswahili • To practice spelling, word formation and sentence
construction • To learn through play e.g. engaging word search,
spelling competitions, simple crosswords • To practice recognition of colors – the papers or
letters can have different colors for this purpose • To practice the use of descriptive words Steps To Make This Sample Some of the materials needed to make this model can be sourced from the environment at no cost or low cost for instance, recycled plastic water bottles. Pen and paper may be purchased as well as a knife for cutting the blocks. • First collect all the materials needed – one may enlist the help of the learners in collecting empty plastic water
bottles • Cut bottom parts of the bottles (about 6cm or 2.5in) • Ensure the cutting is smoothly done – avoid sharp jagged edges • Cut strips of plain paper or manila paper (about 4cm by 4cm)
Blocks may include letters, numbers, syllables, or words

Taking Making into Schools 39
13
• Write letters of the alphabet on the strips of paper. One letter or number per block. • Have multiple letters especially of vowels and popularly used consonants (for making words, multiple letters are
needed) • Insert the strips of paper in one cut off part of the bottle • Cover the piece with another cut off piece making a block with the strip of paper inside
Suggestions for Assessment • Identify letters by picking the specific letter from the pile • State the name of the letter displayed • Form simple words by arranging blocks of letters • Form syllables by arranging blocks of letters • Form simple sentences, rhymes and poems • Match capital and respective small letters • Complete simple crosswords using blocks • Make words starting with the same letter • Read letters, syllables, words and sentences displayed on the sets of blocks • State/ identify the color of the different letters presented • Copy letters, words from the blocks In groups build word banks from the blocks of letters according to guidelines e.g. words starting or ending in a specific letter; words associated with an object(s)

Taking Making into Schools 40
5. Appendices
1
5.1. Design Thinking Process -‐-‐ Facilitator Guide Design Thinking is a facilitated, timed process. It requires workshop participants to work in small groups to consider solutions for a Design challenge (Section 2.5.2). The design thinking process was developed at Stanford University near Silicon Valley – the heart of innovative design and computer development. Prior to starting the Design Thinking activity, you may want to introduce simple sketching tips to your participants (Section 3.2). Many adults are reluctant to draw, so this is a good time to help them remember the fun they had as children drawing their world. Also, because participants are going to make prototypes (scaled models actual objects) sketches are more helpful than abstract concepts expressed only in words.
2
Tell participants of all the parts of the process so you don’t take shortcuts: • Design challenge • Design Thinking process • Sample Description • Gallery Tour • Reflection
Make sure you have read through the following instructions before you facilitate your first workshop. You will need to have a timing device with you (a mobile phone works well, especially if it has a digital timer).

Taking Making into Schools 41
Step Instruction
With All / Group of 4 / Partner /
Individually
Time 1. Tell participants this activity takes 60 minutes and there can
be more interruptions once the process starts. All 5 mins.
2. Organize participants into small groups – 4 participants per group is perfect.
All 10 mins.
3. Give each group a copy of your Design challenge (Section 2.2.1.) Ask someone in each group to read it aloud to the others. Ask if there are any questions about the sketch.
All 10 mins.
4. Hand out copies of the Design Thinking Participant Worksheet (Section 5.2). Make sure everyone has a pencil.
All 5 mins.
5. • Ask participants to find #1 Interview Notes (Empathy) on their worksheets.
• Tell them to pick a partner within their group and to stay with that partner throughout the Design Thinking activity.
• Ask them to interview their partner to find out what topic does their learners find most challenging? Ask lots of questions trying to gain empathy for why the learners are struggling with that topic.
• Tell them to record their interview notes on #1 of their worksheet.
• Monitor the groups to make sure one person is doing the interviewing and recording.
Set your timer for 4 minutes for this step.
Partner 4 mins.
6. • When the timer goes off, ask the partners to switch roles and to begin the interview / note taking process again.
Set your timer for 4 minutes for this step.
Partner 4 mins.
7. • Ask partners to review their notes and ask their partners for more details, stories, examples about the problems learners are having with the topics. Ask them what they have tried – what worked and what didn’t work.
• Start the interview process again, starting with the first interviewers from Step 5. Tell them to record their notes on #2 Detailed Interview (Empathy).
• Set your timer for 3 minutes for this step.
Partner 3 mins.

Taking Making into Schools 42
1
Step Instruction
With All / Group of 4 / Partner /
Individually
Time 8. • When the timer goes off, ask the partners to switch roles
and to begin the interview / note taking process again. • Set your timer for 3 minutes for this step.
Partner 3 mins.
9. • Ask participants to locate #3 Defining the Issue on their worksheets.
• Working individually, they need to determine what their partner’s Goal and Wishes are. GOAL = what is their partner trying to do to help his / her learners?
• Also, record any Insight they have gained. Insights = did they learn something new about the problem or the learners’ challenges?
• Set your timer for 3 minutes for this step.
Individually 3 mins.
10. • Ask participants to sketch 5 ideas to help their partner with their challenge. Use #4 Sketch 5 Ideas on their worksheets. Encourage participants to sketch rather than use words to illustrate the ideas.
• Set your timer for 10 minutes for this step.
Individually 10 mins.
11. • Ask participants to share their 5 sketches with their partners.
• Tell them to record their partner’s feedback and suggestions on #5 Gain Feedback From Your Partner.
• Set your timer for 5 minutes for this step.
Partner 5 mins.
12. • When the timer goes off, ask the partners to switch roles and do the process again.
• Set your timer for 5 minutes for this step
Partner 5 mins.
13. • Based on the feedback from their partners, ask the participants to use #6 Redesign Your Idea Based on Feedback to redesign their ideas. It can be combination of all the ideas, a new idea, or a modified idea based on their partner’s feedback.
• Again, stress the need to sketch their ideas. • Set your timer for 5 minutes for this step
Partner 5 mins.
14. • Ask partners to share their #6 Sketches within their small groups.
• Remember groups of the Design challenge parameters. • Ask each small group to select one sketch to prototype. • Set your timer for 15 minutes for this step
Group of 4 15 mins.
15. • Once each group has selected the design will prototype, ask them to design it on #7 Sketch Your Group’s Idea.
• Once this is sketch is completed, the group can explore the Makerspace and use the tools and materials that are available to make their prototypes.
Group of 4 Time will vary by group
2

Taking Making into Schools 43
Step Instruction
With All / Group of 4 / Partner /
Individually
Time 16. • Help groups to use the Makerspace tools and materials.
• Encourage them to push for details and to test out their prototypes.
Group of 4 2 hours or time available
17. • Once groups have begun to finish their prototypes, encourage them to begin to clean up their areas and return the tools to the Makerspace.
• Encourage recycling and reuse of the materials. • Make sure you count all the tools and make sure
everything has been returned.
Group of 4
18. • Give a copy of the Sample Description (Section 2.2.4) sheet to all participants and explain the sections.
• Ask them to complete this sheet prior to the Gallery Tour. • Clear of the tables and prepare prototypes and Sample
Descriptions for the Gallery Tour.
Individually & Group of 4
15 mins.
19. Gallery Tour • Ask 1 member of each group to stay at their table and
explain their work to the other groups. • Other group members can wander the room talking with
the representative from each group. • Remind groups to trade turns of staying at the table. • Remind participants to ask good and respectful questions
of each group’s representatives. This is an opportunity for idea sharing, iteration, and professional learning.
All 30 mins. Time depends on degree of interest
20. Reflection • Ask participants to return to their groups and share what
they have learned. Ask them to complete #8 Reflection on their worksheets.
Individually 10 mins.

Taking Making into Schools 44
1
5.2. Design Thinking Process -‐-‐ Participant Worksheet Once you have organized your participants into small groups, you can start the Design Thinking Activity. For tips on how to organize your groups, see Section 3.1. Formation of Groups. If your budget allows, please print 1 copy of this worksheet for each participant. The worksheet is to be printed double sided on A3 paper. If you do not have access to a photocopier or cannot afford to make copies, participants can make their own version of the worksheet using blank A3 paper.
2
Section 5.1. offers you a facilitator’s guide to help you time the steps of the process and provide instruction to the participants. Please review the guide before you facilitate this process. You also need a timing device to manage the Design Thinking activity (e.g. your mobile phone).

Taking Making into Schools 45

Taking Making into Schools 46

Taking Making into Schools 47
1
Free Software to Explore Autodesk 123D (http://www.123dapp.com/) Free 3D modeling software that is integrated with content and fabrication services. It also has links to projects, patterns, models.
Scratch (http://scratch.mit.edu/) With Scratch, you can program your own interactive stories, games, and animations — and share your creations with others in the online community. Scratch helps young people learn to think creatively, reason systematically, and work collaboratively — essential skills for life in the 21st century. Scratch is a project of the Lifelong Kindergarten Group at the MIT Media Lab. It is provided free of charge.
Hardware to Explore Arduino (http://www.arduino.cc/) Arduino is an open-‐source electronics prototyping platform based on flexible, easy-‐to-‐use hardware and software. It's intended for artists, designers, hobbyists and anyone interested in creating interactive objects or environments. Sites to Check Out Adafruit (http://www.adafruit.com/) Site for Adruino hardware and project ideas.
Instructable (www.Instructables.com) A site to share what you make with others. Instructables has directions for a range of projects. Invent to Learn Resources (http://www.inventtolearn.com/resources/) lists a range of resources mentioned in the book. Periodically, they offer free downloads of their book. Khan Academy (https://www.khanacademy.org/) A site to learn – just for free. The library of content covers math, science topics such as biology, chemistry, physics, and the humanities with playlists on finance and history. Things to Read Invent to Learn -‐ Making, Tinkering, and Engineering in the Classroom (http://www.inventtolearn.com/) Sylvia Libow Martinez & Gary Stager Using technology to make, repair, or customize the things we need brings engineering, design, and computer science to the masses. Fortunately for educators, this maker movement overlaps with the natural inclinations of children and the power of learning by doing. Make Magazine (http://makezine.com/) Designed after Popular Mechanics, Make Magazine is the go to site for all things Maker – from ideas to tools.
Sites to Visit MIT Center for Bits to Atoms (http://cba.mit.edu/about/) MIT's Center for Bits and Atoms is an interdisciplinary initiative exploring the boundary between computer science and physical science. CBA studies how to turn data into things, and things into data.
6. Suggested Web-‐based Resources to Explore NOTE: Unfortunately, all these resources need good access to a stable Internet connection.

Taking Making into Schools 48
2
MIT Media Lab – Lifelong Kindergarten (http://llk.media.mit.edu/) The home of Scratch – Mitch Resnick and his team design tools and software to support design, creation and learning. Stanford’s Hasso Plattner Institute of Design – d.school (http://dschool.stanford.edu/) Home of design thinking … The school was founded by Stanford mechanical engineering professor David Kelley in 2004. It is a joint project between the university and the Hasso Plattner Institute of University of Potsdam in Germany.
Like some other design schools, it integrates business and management training into more traditional engineering and product design education.
Innovative Learning Centre (ILC)– Faculty of Education, University of British Columbia Originators of Taking Making Into Our Schools – an immersive professional learning approach (www.innovativelearningcentre.ca)