touch pos – open ticket tables rectrac 10.2g/10
TRANSCRIPT

Touch POS – Open Ticket Tables RecTrac 10.2g/10.1q
TOUCH POS – OPEN TICKET TABLES ........................................................................................................1
SUMMARY ..........................................................................................................................................................1 License – Maintenance Agreement ...................................................................................................1 Set up Summary ................................................................................................................................1 Before You Begin...............................................................................................................................2
OPEN TICKET TABLES FILE MAINTENANCE SET UP................................................................................3
TABLE MAINTENANCE ..........................................................................................................................................3 TOUCH SCREEN MAINTENANCE ............................................................................................................................4
Touch Screen Set Up Considerations................................................................................................4 Adding a Touch Screen Menu Group ................................................................................................5 Control Open Ticket Buttons..............................................................................................................5 Creating a Control Open Tickets Menu Group and Adding Buttons...................................................7 Creating a Main Menu........................................................................................................................8 Creating Seating Areas....................................................................................................................11
TOUCH DEVICE MAINTENANCE ...........................................................................................................................14 CREATING A DESKTOP ICON FOR DIRECT ENTRY TO THE OPEN TICKET TABLES.......................................................15 OPEN TICKET TABLES DAILY PROCESSING ...........................................................................................17
Vermont Systems, Inc. 03/22/10 i
RecTrac 10.2g/10.1q Touch POS – Open Ticket Tables
ii 03/22/10 Vermont Systems, Inc.
© 2009 by Vermont Systems, Inc.
This document is the property of Vermont Systems, Inc. and is provided in conjunction with software by means of a licensed contract agreement between the customer and VSI. The document(s) and software referred to in this publication may not be copied, distributed, electronically transmitted, posted on the web or altered in any way without the express written consent of Vermont Systems, Incorporated. The information contained in this document is subject to change without notice.
Vermont Systems, Inc.
12 Market Place
Essex Junction, VT 05452
www.vermontsystems.com

Touch POS Open Ticket Tables RecTrac 10.2g/10.1q
Vermont Systems, Inc. 03/22/10 1
Touch POS – Open Ticket Tables
Note: This document addresses Touch POS Open Ticket Tables in RecTrac versions 10.1q (and earlier) and 10.2g (and earlier) only. For Touch POS Open Ticket Tables set up and operation information for versions 10.1r (and later) and 10.2h (and later), refer to Topic Doc – Open Ticket Tables 10.2h-w.pdf.
Summary RecTrac Touch POS Open Ticket Tables is a complete solution to restaurant table management in touch screen processing. It allows you to create multiple seating charts (such as dining room, bar, patio, etc…) using .bmp images and lets you control which buttons (rooms and/or tables) are visible on screen to which users. Open Ticket Tables processing also allows for standard restaurant ticket/check functionality (opening tickets, closing tickets, splitting tickets, combining tickets, etc…) and can be configured to use RecTrac end of shift cash out or “standard” end of day close out procedures. With numerous set up and daily operation options available, Touch Open Ticket Tables can be customized to fit any restaurant scenario.
License – Maintenance Agreement
The use of this interface requires a VSI license and annual maintenance agreement for the Touch POS modules. Prior to implementing any process outlined in this document, please contact the Vermont Systems Sales department at 1-877-883-8757 to verify that you are authorized to use this interface and if not, to obtain a quote and/or approval.
Set up Summary
You must be running RecTrac 10.1j-10.1q OR RecTrac 10.2a-10.2g to use Open Ticket Tables as discussed in this document. Initial set up must be performed in multiple areas, which are listed below.
Note: Depending on the size and complexity of your restaurant layout and daily operation, these steps could require a great deal of time and attention to complete. VSI advises you to read completely through the Open Ticket Tables File Maintenance Set Up portion of this document prior to beginning in order to better understand the scope of work that will be required.
• Table Maintenance – A unique identifier for each table in your restaurant (including bar space, if applicable) must be created.

RecTrac 10.2g/10.1q Touch POS Open Ticket Tables
2 03/22/10 Vermont Systems, Inc.
• Touch Screen Maintenance – You will create your restaurant floor plan in Touch Screen Maintenance. Menu Groups and Buttons must be created to represent your different seating areas and covers (tables, booths, barstools, etc…). Additionally, Ticket Control Buttons (open, close, combine, etc…) must be created and placed on screen as well.
• Touch Device – Touch device(s) with Open Ticket Tables dwell option must be created. The Touch device also controls default settings for table and section views. Multiple Touch devices may be required.
Before You Begin
This document is written with the following assumptions. If any of the items listed below is NOT true, contact Vermont Systems Support prior to continuing.
• Your organization is running RecTrac 10.1j-10.1q OR RecTrac 10.2a-10.2g.
• You (or the individual(s) setting up Open Ticket Tables) have a full understanding of the dining area(s) at your organization, to include but not limited to: the floor plan, the number of tables you have, maximum covers per table, restaurant policy on how tickets are opened, closed, combined, split, etc…
• The User ID with which you sign into RecTrac has the requisite permissions and ability to access all modules and functions pertaining to Open Ticket Tables to include but not limited to: POS File Maintenance and device maintenance.
• You understand POS/Touch Screen Processing and Touch Screen File Maintenance and have created Menu Groups and Buttons for food and drink items that you sell.
• You are able to create buttons (.bmp images), either using RecTrac Image Editor or other third party imaging software, such as PhotoShop, PaintPro, etc…
• You understand RecTrac permissions codes and Level 2 Manager Override Permissions.
• You understand RecTrac Device Maintenance and hierarchy.
Understanding that restaurants are set up differently and that ticket policy and procedure varies from organization to organization, this document is not designed to walk you through every conceivable set up and/or processing scenario for Open Ticket Tables. It will however, walk you through the basic file maintenance steps required to create a restaurant layout (rooms and tables) and add Open Ticket Control Buttons for the more common “every day functions” (i.e. creating tickets, closing tickets, combining tickets, etc…). This document will also walk you through the steps required to perform these types or processes in Touch POS.
For more detailed assistance with set up and operation, contact Vermont Systems, Inc. at 877-883-8757 to discuss support and/or training options.

Touch POS Open Ticket Tables RecTrac 10.2g/10.1q
Vermont Systems Inc. 03/22/10 3
Open Ticket Tables File Maintenance Set Up
You must be running RecTrac 10.1j-10.1q OR RecTrac 10.2a-10.2g to use Open Ticket Tables as discussed in this document. Initial set up must be performed in multiple areas, which are listed below.
• Table Maintenance – A unique identifier for each table in your restaurant (including bar space, if applicable) must be created.
• Touch Screen Maintenance – You will create your restaurant floor plan in Touch Screen Maintenance. Menu Groups and Buttons must be created to represent your different seating areas and covers (tables, booths, barstools, etc…). Additionally, Ticket Control Buttons (open, close, combine, etc…) must be created and placed on screen as well.
• Touch Device – Touch device(s) with Open Ticket Tables dwell option must be created. The Touch device also controls default settings for table and section views. Multiple Touch devices may be required.
Table Maintenance The Table Maintenance program is used to create tables for use with Touch POS Open Ticket Tables dwell options. Once a table is created here, it can be used in your Touch Table layout (aka your restaurant seating chart). In this document, the term “tables” refers to any type of patron seating in your restaurant (tables, booths, barstools, etc…).
You will want to add a record here for every table, booth, barstool, etc… in your restaurant. When creating your floor plan in Touch Screen Maintenance, you link these records to .bmp images. Clicking on the .bmp will allow you to open, close and edit tickets (checks) for the table.
1 Go to Files POS Table Maintenance.
2 Click Add. You will proceed to the Core Information screen.
3 Enter a Table Code in the applicable field. Table Codes may be up to eight (8) alpha-numeric characters in length.
Note: When creating Table Records, consider using an alpha-numeric scheme to give yourself clues as to where the table is in your restaurant For Example: MD01 may represent Main Dining Room Table 1 or Bar01 for Barstool 1, etc… . Remember: You have to create a record for each table, booth, barstool, etc… in your restaurant.
4 Enter a Description for the record in the applicable field.
5 Enter the number of Default Covers in the applicable field. Default Covers refers to the number of people you normally seat at this table without adding more chairs. For Example: 4.
6 Click Done. You will return to the Table Maintenance browser.
7 Repeat steps 2-6 for each table, booth, barstool, etc… in your restaurant.
8 Click Exit when done to return to the main RecTrac menu.

RecTrac 10.2g/10.1q Touch POS Open Ticket Tables
4 03/22/10 Vermont Systems, Inc.
Note: Use the Clone button to create copies of your tables quickly and easily. To create multiple clones, comma-delimit your list of Table Codes and do NOT add spaces. For Example: MD02,MD03,MD04, etc… Do NOT choose the Sequence Clone option.
Touch Screen Maintenance Touch Screen Maintenance is where you make and place the Menu Groups and Buttons that represent the rooms and tables in your restaurant as well as the buttons that allow you to control tickets. The majority of your setup will be concentrated here. The work and effort required to complete this portion of the set up will vary depending on the size and complexity of your restaurant operation as well as the amount of detail you wish to include.
At a minimum, you will need to create a button Menu Group for Open Ticket Control Buttons (the buttons that allow you to manipulate tickets and tables) and at least one button Menu Group to represent your tables. Optimally, each table should consist of two (2) buttons: one (1) for the table, itself, and one that allows you to view open ticket information for that table. These concepts (control open ticket buttons and table buttons) will be explained in greater detail below.
Understanding that restaurants are set up differently and that policy and procedure varies from organization to organization, this document will NOT walk you through every conceivable set up and/or processing scenario for Open Ticket Tables. It will however, walk you through the basic file maintenance steps required to create a restaurant layout (multiple rooms, each with multiple tables) and add Open Ticket Control Buttons for the more common “every day functions” (i.e. creating tickets, closing tickets, combining tickets, etc…). For more detailed assistance with set up and operation, contact Vermont Systems, Inc. at 877-883-8757 to discuss support and/or training options.
Touch Screen Set Up Considerations
The real first step in setting up Touch POS Open Ticket Tables is determining what you want your clerks to see and how you want to present the information. The manner in which you choose to layout your screen is completely subjective, and there is no “right” (or “wrong”) way to do it.
To get you started, this document contains a number of images (screen shots) that represent one possible solution only. Regardless of the layout upon which you decide, VSI strongly recommends you consider the following points when creating one:
• Create a Menu Group for the Open Ticket Control buttons you use and have it on screen at all times. You can accomplish this by linking a Control Button menu group in your Touch device.
• Create separate Menu Groups for the different rooms/seating areas in your restaurant.
• Since bar service is typically limited to one person per ticket, create a separate Menu Group for the bar and create a separate “table” for each potential bar stool or place where a patrons are served, if applicable.
• If you have multiple rooms/seating areas and/or if you staff a position for Host/Maitre d’, create a “Main Menu” consisting of Menu Group buttons for each room.
• If you have multiple rooms, place Menu Group buttons within the “room” to allow your clerks to go back to the Main Menu or jump to another “room” as necessary.

Touch POS Open Ticket Tables RecTrac 10.2g/10.1q
Vermont Systems Inc. 03/22/10 5
• When creating a room, use a Label button to identify it to your clerks.
• When creating images for your tables, identify/label them clearly on the .bmp image for your clerks.
• Place “back” buttons on your existing main Touch POS keypad and/or main Touch POS Menu Group, so your clerks can return to Open Ticket Tables.
• Make your buttons big enough and space them far enough apart so your clerks don’t multi-select every time they touch the screen.
• Don’t over-crowd a screen. If you can’t fit an entire room onto one screen, make two (or more) Menu Groups out of it.
• Create multiple layouts for any room(s) in your restaurant that can be reset to multiple (but standard) configurations (i.e. your Private Dining Room can be set up with 8’ rounds for a reception or with banquet tables for presentations, etc…) and link them as Menu Group buttons within the room, itself.
Adding a Touch Screen Menu Group
1 Go to Files POS Touch Screen Maintenance
2 Click Add. You will continue to the POS Touch Screen Group Update box.
3 Enter a Menu Group Code. Menu Group Codes may be up to eight (8) alpha-numeric characters in length. Then enter a Description.
4 Leave the Permissions field at the default “EVRY1,” or right-click or press F9 in the Permissions field to set Permissions for this Button Group.
5 Right-click or press F9 within the Background Image field to add a picture display to this Menu Group, if desired. Any image selected here will display as a background for the Touch Screen for this Menu Group and you will be able to place buttons over it.
6 Click OK. You will return to the POS Touch Screen Setup browser.
7 Repeat steps 2-6 to create additional Menu Groups as needed.
Control Open Ticket Buttons
Control Open Ticket buttons allow you to manipulate tickets and tables in Touch POS Open Ticket Tables daily processing. When setting up Open Ticket Tables, you should determine which of these features your clerks will use and create buttons for them.
Control Open Ticket buttons can reside on any Menu Group, and you do not need to create a separate Menu Group exclusively for their purpose. However, VSI strongly recommends you consider this option for two (2) reasons:
• An Open Ticket Control Button Group must be specified on the Touch device linked to anyone using Open Ticket Tables.
• Creating a separate Menu Group (and linking it to the Touch device) allows you to display these buttons at all times when logged into Touch Screen Processing, Open Ticket Tables.
What the Buttons Do
The following list outlines the available Control Open Tickets Buttons from which you may choose. You do not have to put all of these buttons on a single menu group, but you should consider creating a menu group populated with the ones used most often.
• Clerk – Logs the clerk out and brings up the POS Touch Screen Sign on screen.
• Closeout – Closes out the tickets on the table selected.
• Combine Ticket – Allows the clerk to combine multiple tickets from the same table into one consolidated ticket for that table.
• Covers – Allows the clerk to enter/edit the number of customers (or covers) at a table.
RecTrac 10.2g/10.1q Touch POS Open Ticket Tables
6 03/22/10 Vermont Systems, Inc.
• End of Shift – Allows the clerk to run the End-of-Shift cash out process.
• Exit – Exits the clerk from Touch POS.
• Kitchen – Displays the Kitchen Monitor.
• New Ticket – Creates a new ticket for the table selected.
• Open Table – Resets a table to ‘open’ once a party has left and the table has been bussed and reset.
Note: You can remove the need for this Control Open Tickets button by enabling the Clear Table after Ticket Closeout option on the Touch device.
• Open Ticket – Allows the user to add additional line items to a ticket(s) for the table selected.
• Order Prt – Queues the order to the default printer.
• Prt Sub-Tot – Prints the running sub-total for the ticket selected.
• Quick Tab – Allows clerks to add an open ticket ‘on the fly.’
• Reassign Ticket – Assigns the open ticket selected from one clerk to another.
• Split Ticket – Allows the clerk to split a ticket.
Note: A single ticket can be split up to 12 times.
• Table – Allows you to add a table to your menu group. When using this control button, select the table you wish to insert from the Code 2 listing. Typically this control button is used in conjunction with the Table Info button described below.
Note: Tables must be created using the Table Maintenance program. See Open Ticket Tables Table Maintenance.
• Table Combine – Allows a clerk to combine multiple tables (and their tickets).
• Table Info – Provides information on a table, including number of covers, time the ticket was opened, items that have been ordered etc… When using this control button, select the table for which you wish to show information from the Code 2 listing. Typically this control button is used in conjunction with the Table button described above.
Note: Tables must be created using the Table Maintenance program. See Open Ticket Tables Table Maintenance.
• Table Order Print – Queues all tickets assigned to a single table to the various dupe printers, such as the kitchen/kitchen monitor, simultaneously.
• Table Sub-Total – Individually subtotals all tickets assigned to a table.
Note: Sub-total receipts will be emailed to the ZZZ-Internal Household when using this button, if a valid email address exists on the ZZZ-Internal Household record.
• Ticket Listing – Lists the tickets for the clerk.
• Void Ticket – Removes all items from the ticker tape transaction listing.
Note: When you create these buttons, you will need to create a button image as well.

Touch POS Open Ticket Tables RecTrac 10.2g/10.1q
Vermont Systems Inc. 03/22/10 7
Creating a Control Open Tickets Menu Group and Adding Buttons
1 Using the steps presented in Adding a Touch Screen Menu Group, create a new Menu Group (i.e. O-CNTRL) for your Control Open Tickets buttons.
2 When done, remain on the POS Touch Screen Setup browser and insure your screen resolution is set to 1024 x 768.
3 Click Buttons. You will continue to the Touch Screen POS Button Update screen. In the top right browser box, select/highlight the Menu Group you created in step 1. (You may select the same menu group on the lower browser as well, if desired).
4 Click Add to continue to the POS Touch Screen Button Update screen.
5 The group to which you are adding a button will be displayed in the Group field at the top of the screen (i.e. O-CNTRL).
6 Select the Control Open Tickets Button Type from the radio set selections on the left-hand side of the screen. The Code field will default to Clerk.
7 Click the drop-down arrow next to the Code field and select the appropriate Control Open Tickets code from the pick list.
8 Select a Code 2 table, if necessary. This will depend on your Code.
9 All other fields will fill in automatically.
10 Adjust the size of your button by overwriting the values in the Height and Width fields as necessary.
11 Use the image editor (and Title field) as necessary to add color and text to your button. Optionally, you can use third party imaging software to create buttons and link them using the Button Image and Button Image 2 fields when creating the buttons.
Note: Image files are stored in the directory chosen as your BMP Location on your Touch device. To increase performance speed, VSI strongly recommends you store all Touch POS images locally on the POS workstations. To store all Open Ticket Tables images locally on each POS workstation, you will have to create the same directory in the same location on each POS workstation. (For example: C:\vsi\rectrac\opentablesbmps\.)
12 Click OK. You will return to the Touch Point-of-Sale Button Update screen. The button you created will appear on screen. Click and drag the image to the desired location.
RecTrac 10.2g/10.1q Touch POS Open Ticket Tables
8 03/22/10 Vermont Systems, Inc.
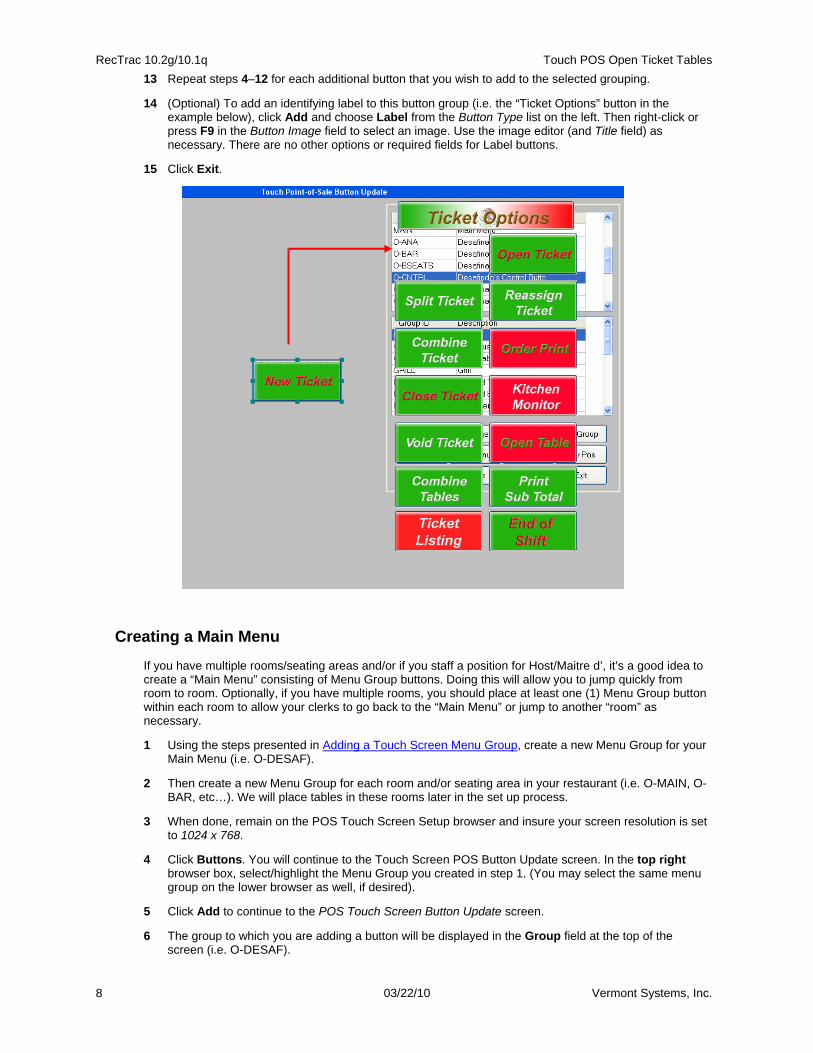
13 Repeat steps 4–12 for each additional button that you wish to add to the selected grouping.
14 (Optional) To add an identifying label to this button group (i.e. the “Ticket Options” button in the example below), click Add and choose Label from the Button Type list on the left. Then right-click or press F9 in the Button Image field to select an image. Use the image editor (and Title field) as necessary. There are no other options or required fields for Label buttons.
15 Click Exit.
Creating a Main Menu
If you have multiple rooms/seating areas and/or if you staff a position for Host/Maitre d’, it’s a good idea to create a “Main Menu” consisting of Menu Group buttons. Doing this will allow you to jump quickly from room to room. Optionally, if you have multiple rooms, you should place at least one (1) Menu Group button within each room to allow your clerks to go back to the “Main Menu” or jump to another “room” as necessary.
1 Using the steps presented in Adding a Touch Screen Menu Group, create a new Menu Group for your Main Menu (i.e. O-DESAF).
2 Then create a new Menu Group for each room and/or seating area in your restaurant (i.e. O-MAIN, O-BAR, etc…). We will place tables in these rooms later in the set up process.
3 When done, remain on the POS Touch Screen Setup browser and insure your screen resolution is set to 1024 x 768.
4 Click Buttons. You will continue to the Touch Screen POS Button Update screen. In the top right browser box, select/highlight the Menu Group you created in step 1. (You may select the same menu group on the lower browser as well, if desired).
5 Click Add to continue to the POS Touch Screen Button Update screen.
6 The group to which you are adding a button will be displayed in the Group field at the top of the screen (i.e. O-DESAF).

Touch POS Open Ticket Tables RecTrac 10.2g/10.1q
Vermont Systems Inc. 03/22/10 9
7 Select the Group Button Type from the radio set selections on the left-hand side of the screen.
8 Right-click or press F9 in the Code field and select/highlight the first Menu Group you created in step 2 above and click OK.
9 All other fields will fill in automatically.
10 Adjust the size of your button by overwriting the values in the Height and Width fields as necessary
11 Use the image editor (and Title field) as necessary to add color and text to your button. Optionally, you can use third party imaging software to create buttons and link them using the Button Image and Button Image 2 fields when creating the buttons.
Note: Image files are stored in the directory chosen as your BMP Location on your Touch device. To increase performance speed, VSI strongly recommends you store all Touch POS images locally on the POS workstations. To store all Open Ticket Tables images locally on each POS workstation, you will have to create the same directory in the same location on each POS workstation. (For example: C:\vsi\rectrac\opentablesbmps\.)
12 Click OK. You will return to the Touch Point-of-Sale Button Update screen. The button you created will appear on screen. Click and drag the image to the desired location.
13 Repeat steps 5–12 for each additional Group button that you wish to add to your main menu.
14 (Optional) To add an identifying label to this button group (i.e. the “Desafinado's Mexican Cuisine” button in the example below), click Add and choose Label from the Button Type list on the left. Then right-click or press F9 in the Button Image field to select an image. Use the image editor (and Title field) as necessary. There are no other options or required fields for Label buttons.
15 (Optional) If space allows, consider adding additional Control Open Ticket buttons to your Main Menu screen, as shown in the example below. Adding buttons such as these allows for basic functionality from the Main Menu, if needed.
• To Go = Ticket Listing, Clerk =Clerk and Exit =Exit
16 Click Exit when done.

RecTrac 10.2g/10.1q Touch POS Open Ticket Tables
10 03/22/10 Vermont Systems, Inc.
The screen appears like this in Touch POS.
Note: The Ticket Options menu appears as well, because it is linked as the Open Ticket Control Button Group menu on the Touch device for this user.

Touch POS Open Ticket Tables RecTrac 10.2g/10.1q
Vermont Systems Inc. 03/22/10 11
Creating Seating Areas
Seating areas, or rooms, are the touch button Menu Groups that contain your tables. In this document, the term “tables” refers to any type of patron seating in your restaurant (tables, booths, barstools, etc…). Optimally, each table should consist of two (2) Control Open Ticket buttons (Table and Table Info) and three (3) .bmp images (Table open, Table occupied and Table Info).
The following steps will walk you through the process of creating and placing tables. When following these steps, keep in mind that the images you create should be well marked and big enough for your employees to use.
1 From Touch Screen Maintenance, insure your screen resolution is set to 1024 x 768 and click Buttons. You will continue to the Touch Screen POS Button Update screen.
2 In the top right browser box, select/Highlight one of the seating area Menu Groups you created above. (You may select the same menu group on the lower browser box as well, if desired).
Note: If have not created seating area Menu Groups yet, refer to the steps presented in Adding a Touch Screen Menu Group and create new Menu Groups for your seating areas at this time.
3 Click Add to continue to the POS Touch Screen Button Update screen.
4 The group to which you are adding a button will be displayed in the Group field at the top of the screen (i.e. O-MAIN).
5 Select the Control Open Tickets button type from the radio set selections on the left-hand side of the screen. Clerk will default into the Code field.
6 Expand the Code field by clicking on the down-arrow and select Table.
7 Right-click or press F9 in the Code2 field and select the Table you wish to add from the Group Pick list box. The tables which populate this browser are the tables you created in Table Maintenance.
8 Overwrite whatever is in the Title field with the name of your table. Whatever you write in this field will appear as text on your .bmp images, so be as specific as possible within the space allotted.
9 All other fields will fill in automatically.
10 Two buttons are required for each table: Button Image and Button Image 2.
• Button Image is the .bmp that displays onscreen when the table is open

RecTrac 10.2g/10.1q Touch POS Open Ticket Tables
12 03/22/10 Vermont Systems, Inc.
• Button Image 2 is the .bmp that will display when the table is occupied. For obvious reasons, it is a good idea to make these buttons different colors.
11 Overwrite the Button Image and Button Image 2 fields with new file names for your table images. (For example: MD01 for Main Dining Room table 1 and O-MD01-u for Main Dining Room table 1, unavailable.)
Do NOT give each image the same name else the image will not change when the table is selected.
12 Use the image editor as necessary to add color and text to your buttons. Optionally, you can use third party imaging software to create buttons and link them using the Button Image and Button Image 2 fields when creating the buttons.
Note: Image files are stored in the directory chosen as your BMP Location on your Touch device. To increase performance speed, VSI strongly recommends you store all Touch POS images locally on the POS workstations. To store all Open Ticket Tables images locally on each POS workstation, you will have to create the same directory in the same location on each POS workstation. (For example: C:\vsi\rectrac\opentablesbmps\.)
13 Click OK. You will return to the Touch Point-of-Sale Button Update screen. The button you created will appear on screen. Click and drag the image to the desired location.
14 After you’ve placed the image, click Add again. You will return to the POS Touch Screen Button Update screen.
15 Select the Control Open Tickets button type from the radio set selections on the left-hand side of the screen. Clerk will default into the Code field.
16 Expand the Code field by clicking on the down-arrow and select Table Info.
Note: The Table Info button is not mandatory to Open Ticket Tables set up. However, it is an excellent feature and should be considered.
17 Right-click or press F9 in the Code2 field and select the very same Table you selected in step 7 above.
18 All other fields will fill in automatically.
19 Adjust the size of your button by overwriting the values in the Height and Width fields as necessary
20 Use the image editor as necessary to add color and text to your button. Optionally, you can use third party imaging software to create buttons and link them using the Button Image and Button Image 2 fields when creating the buttons.

Touch POS Open Ticket Tables RecTrac 10.2g/10.1q
Vermont Systems Inc. 03/22/10 13
Note: You can reuse the same Table Info.bmp for EACH table in your restaurant, if desired. Separate .bmp images are required for each Table (i.e. O-md01.bmp, O-md1-u.bmp, O-md02.bmp, O-md02-u.bmp, etc…), but you need only one (1) Table Info.bmp image (i.e. O-tableinfo.bmp).
21 Click OK. You will return to the Touch Point-of-Sale Button Update screen where you can click and drag the image to the desired location. Optimally, you will place the Table Info image close to the Table Image you positioned in step 13.
22 Repeat steps 3–21 for each additional table that you wish to add to this room.
23 (Optional) To add an identifying label to this button group (i.e. the “Main Dining Room” button in the example below), click Add and choose Label from the Button Type list on the left. Then right-click or press F9 in the Button Image field to select an image. Use the image editor as necessary. There are no other options or required fields for Label buttons.
24 (Optional) If space allows, consider adding additional Control Open Ticket and/or Group buttons to your room screen, as shown in the example below. Adding buttons such as these allows for basic functionality from the Main Menu, if needed.
• The buttons which run across the bottom of the screen in the example below (Main Map, Baja Bar, Riverwalk, etc…) are Group buttons that allow the clerk to jump from room to room or to the Main Menu as needed.
25 Repeat steps 1-24 for every table in every room in your restaurant.
26 Click Exit when done.
Note: Newly created tables may appear in their Button Image 2 color when you view them for the first time in Daily Processing, suggesting the table is occupied and/or not ready. In this event, you simply need to Open the table. Refer to the instructions provided under Open Ticket Tables Daily Processing, which appear below.
RecTrac 10.2g/10.1q Touch POS Open Ticket Tables
14 03/22/10 Vermont Systems, Inc.
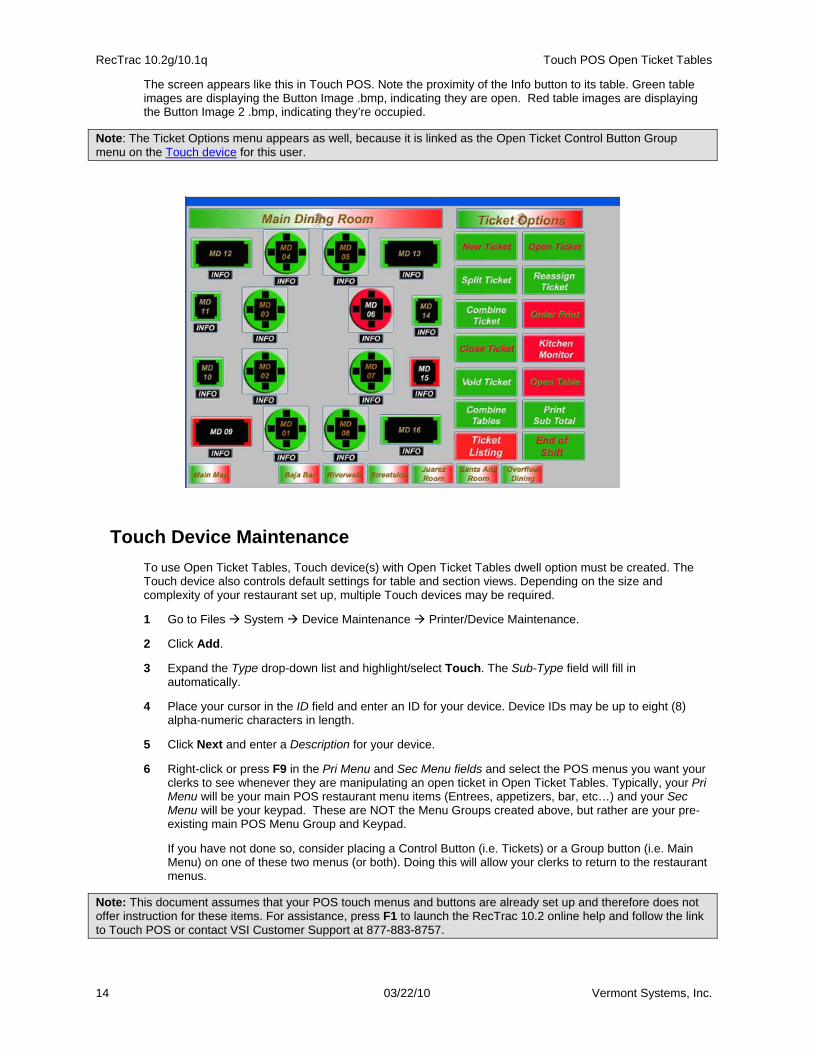
The screen appears like this in Touch POS. Note the proximity of the Info button to its table. Green table images are displaying the Button Image .bmp, indicating they are open. Red table images are displaying the Button Image 2 .bmp, indicating they’re occupied.
Note: The Ticket Options menu appears as well, because it is linked as the Open Ticket Control Button Group menu on the Touch device for this user.
Touch Device Maintenance To use Open Ticket Tables, Touch device(s) with Open Ticket Tables dwell option must be created. The Touch device also controls default settings for table and section views. Depending on the size and complexity of your restaurant set up, multiple Touch devices may be required.
1 Go to Files System Device Maintenance Printer/Device Maintenance.
2 Click Add.
3 Expand the Type drop-down list and highlight/select Touch. The Sub-Type field will fill in automatically.
4 Place your cursor in the ID field and enter an ID for your device. Device IDs may be up to eight (8) alpha-numeric characters in length.
5 Click Next and enter a Description for your device.
6 Right-click or press F9 in the Pri Menu and Sec Menu fields and select the POS menus you want your clerks to see whenever they are manipulating an open ticket in Open Ticket Tables. Typically, your Pri Menu will be your main POS restaurant menu items (Entrees, appetizers, bar, etc…) and your Sec Menu will be your keypad. These are NOT the Menu Groups created above, but rather are your pre-existing main POS Menu Group and Keypad.
If you have not done so, consider placing a Control Button (i.e. Tickets) or a Group button (i.e. Main Menu) on one of these two menus (or both). Doing this will allow your clerks to return to the restaurant menus.
Note: This document assumes that your POS touch menus and buttons are already set up and therefore does not offer instruction for these items. For assistance, press F1 to launch the RecTrac 10.2 online help and follow the link to Touch POS or contact VSI Customer Support at 877-883-8757.
Touch POS Open Ticket Tables RecTrac 10.2g/10.1q
Vermont Systems Inc. 03/22/10 15
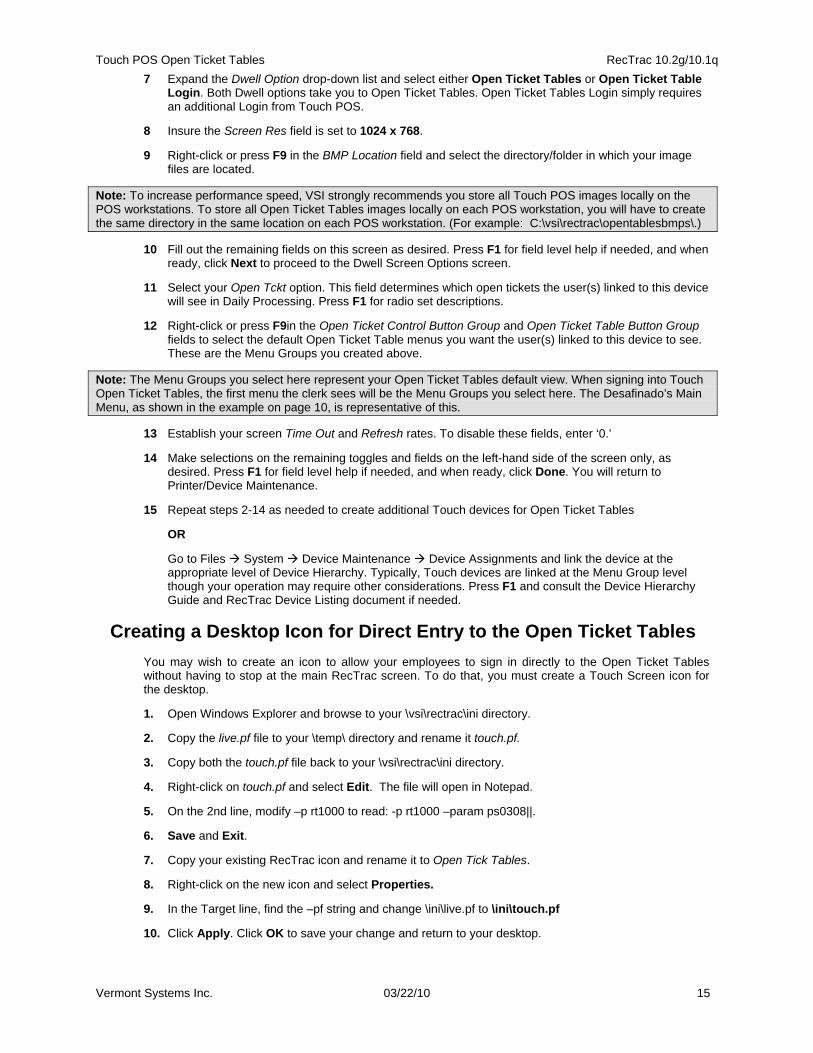
7 Expand the Dwell Option drop-down list and select either Open Ticket Tables or Open Ticket Table Login. Both Dwell options take you to Open Ticket Tables. Open Ticket Tables Login simply requires an additional Login from Touch POS.
8 Insure the Screen Res field is set to 1024 x 768.
9 Right-click or press F9 in the BMP Location field and select the directory/folder in which your image files are located.
Note: To increase performance speed, VSI strongly recommends you store all Touch POS images locally on the POS workstations. To store all Open Ticket Tables images locally on each POS workstation, you will have to create the same directory in the same location on each POS workstation. (For example: C:\vsi\rectrac\opentablesbmps\.)
10 Fill out the remaining fields on this screen as desired. Press F1 for field level help if needed, and when ready, click Next to proceed to the Dwell Screen Options screen.
11 Select your Open Tckt option. This field determines which open tickets the user(s) linked to this device will see in Daily Processing. Press F1 for radio set descriptions.
12 Right-click or press F9in the Open Ticket Control Button Group and Open Ticket Table Button Group fields to select the default Open Ticket Table menus you want the user(s) linked to this device to see. These are the Menu Groups you created above.
Note: The Menu Groups you select here represent your Open Ticket Tables default view. When signing into Touch Open Ticket Tables, the first menu the clerk sees will be the Menu Groups you select here. The Desafinado’s Main Menu, as shown in the example on page 10, is representative of this.
13 Establish your screen Time Out and Refresh rates. To disable these fields, enter ‘0.’
14 Make selections on the remaining toggles and fields on the left-hand side of the screen only, as desired. Press F1 for field level help if needed, and when ready, click Done. You will return to Printer/Device Maintenance.
15 Repeat steps 2-14 as needed to create additional Touch devices for Open Ticket Tables
OR
Go to Files System Device Maintenance Device Assignments and link the device at the appropriate level of Device Hierarchy. Typically, Touch devices are linked at the Menu Group level though your operation may require other considerations. Press F1 and consult the Device Hierarchy Guide and RecTrac Device Listing document if needed.
Creating a Desktop Icon for Direct Entry to the Open Ticket Tables You may wish to create an icon to allow your employees to sign in directly to the Open Ticket Tables without having to stop at the main RecTrac screen. To do that, you must create a Touch Screen icon for the desktop.
1. Open Windows Explorer and browse to your \vsi\rectrac\ini directory.
2. Copy the live.pf file to your \temp\ directory and rename it touch.pf.
3. Copy both the touch.pf file back to your \vsi\rectrac\ini directory.
4. Right-click on touch.pf and select Edit. The file will open in Notepad.
5. On the 2nd line, modify –p rt1000 to read: -p rt1000 –param ps0308||.
6. Save and Exit.
7. Copy your existing RecTrac icon and rename it to Open Tick Tables.
8. Right-click on the new icon and select Properties.
9. In the Target line, find the –pf string and change \ini\live.pf to \ini\touch.pf
10. Click Apply. Click OK to save your change and return to your desktop.
RecTrac 10.2g/10.1q Touch POS Open Ticket Tables
16 03/22/10 Vermont Systems, Inc.
Notes about this setup
• You should link a Touch device either at the Workstation level (preferred) or the Default level. Contact VSI if you DO NOT want to link a Touch device at the Workstation or Default level.
• You must enable the Initial Login? toggle on that Touch device.
• The Touch device must be set to your Open Ticket Tables option: Open Ticket Tables or Open Ticket Tables Login.
This concludes the Set Up portion of the document.
Note: At this point, you should consider copying your RecTrac Live database to Demo and performing test transactions, and other Touch POS Open Ticket Tables processing based on the information provided in the following pages to insure you get the desired results PRIOR to attempting these same processes in your Live database.
Touch POS Open Ticket Tables RecTrac 10.2g/10.1q
Vermont Systems Inc. 03/22/10 17
Open Ticket Tables Daily Processing
The following pages provide basic steps for manipulating tickets and tables in Open Ticket Tables daily processing using the some of the Control Open Ticket buttons created above. For most features, you will click on the Table image first and then click the Control Open Ticket button for the action you want to perform.
Toggle settings on your Touch device will impact various screens and fields you may (or may not) visit. The steps presented here do NOT account for every possible toggle setting scenario, though certain settings are mentioned where appropriate.
Note: This document assumes that your POS touch menus and buttons are already set up and therefore does not offer instruction for these items. For assistance, press F1 to launch the RecTrac online help and follow the link to Touch POS or contact VSI Customer Support at 877-883-8757.
1 Go to Daily POS Touch Screen Processing. Depending on your Open Ticket Tables Dwell option (as defined by the Dwell Option setting on your Touch device), you will proceed to:
• a POS Touch Screen Signon screen (Open Ticket Table Login) where you will enter your User ID and password before proceeding
• directly to your default Open Ticket Tables Button Group (and Open Ticket Control Button Group) as defined on the Dwell Screen Options screen of your Touch device.
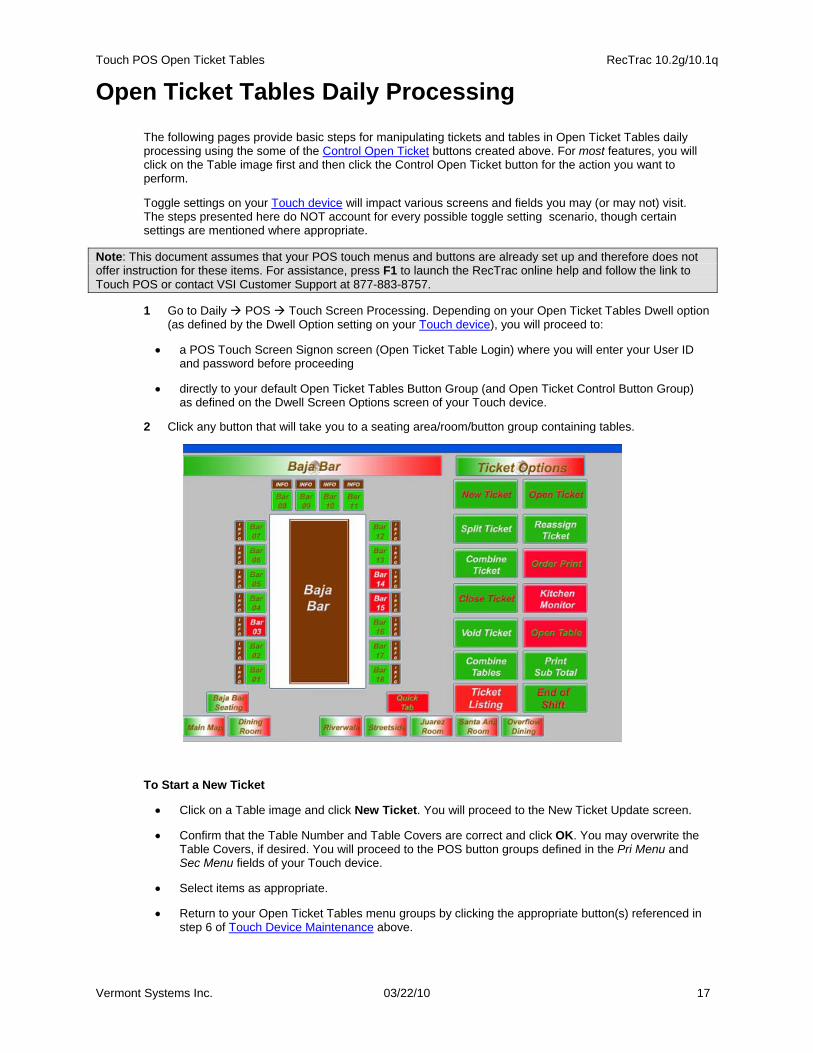
2 Click any button that will take you to a seating area/room/button group containing tables.
To Start a New Ticket
• Click on a Table image and click New Ticket. You will proceed to the New Ticket Update screen.
• Confirm that the Table Number and Table Covers are correct and click OK. You may overwrite the Table Covers, if desired. You will proceed to the POS button groups defined in the Pri Menu and Sec Menu fields of your Touch device.
• Select items as appropriate.
• Return to your Open Ticket Tables menu groups by clicking the appropriate button(s) referenced in step 6 of Touch Device Maintenance above.
RecTrac 10.2g/10.1q Touch POS Open Ticket Tables
18 03/22/10 Vermont Systems, Inc.
To Add Additional Items to an Open Ticket
• Click on an open table (the .bmp image should be displaying in its Button Image 2 setting) and then click Open Ticket. You will proceed to the POS button groups defined in the Pri Menu and Sec Menu fields of your Touch device.
• Select items as appropriate.
• Return to your Open Ticket Tables menu groups by clicking the appropriate button(s) referenced in step 6 of Touch Device Maintenance above.
To View Information about a Table
• Determine the table whose information you want to view and click the Info button located next to it. All items currently on the ticket will display.
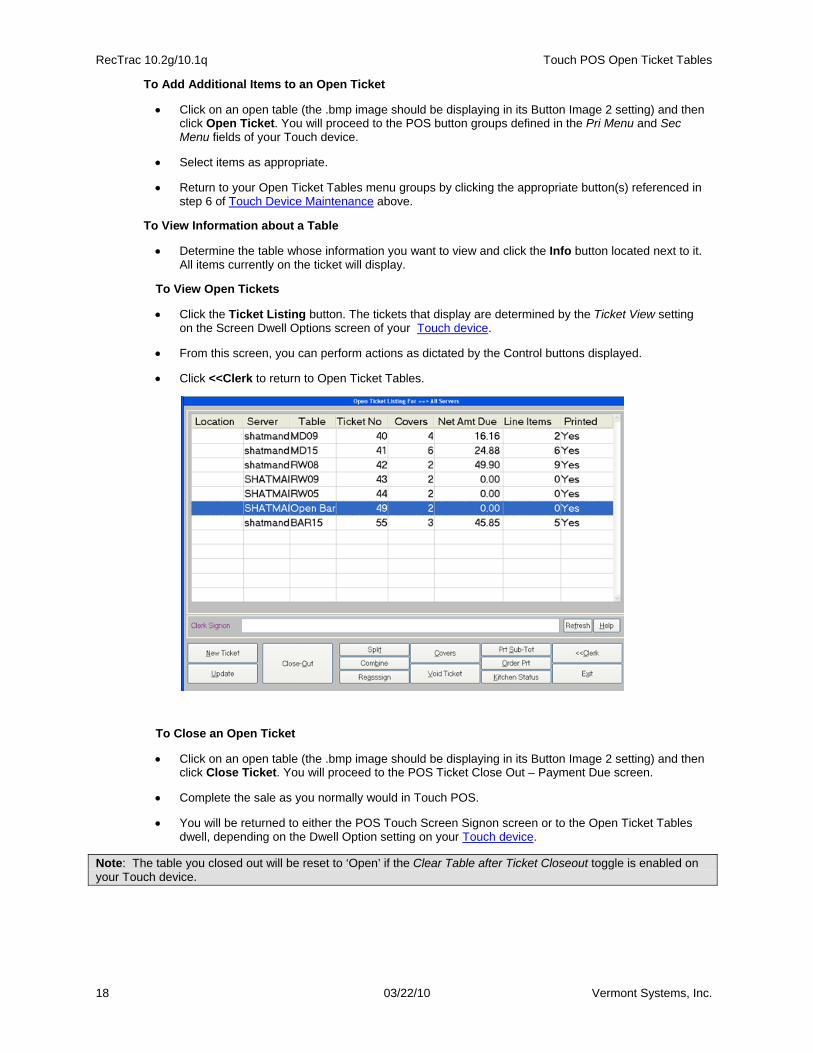
To View Open Tickets
• Click the Ticket Listing button. The tickets that display are determined by the Ticket View setting on the Screen Dwell Options screen of your Touch device.
• From this screen, you can perform actions as dictated by the Control buttons displayed.
• Click <<Clerk to return to Open Ticket Tables.
To Close an Open Ticket
• Click on an open table (the .bmp image should be displaying in its Button Image 2 setting) and then click Close Ticket. You will proceed to the POS Ticket Close Out – Payment Due screen.
• Complete the sale as you normally would in Touch POS.
• You will be returned to either the POS Touch Screen Signon screen or to the Open Ticket Tables dwell, depending on the Dwell Option setting on your Touch device.
Note: The table you closed out will be reset to ‘Open’ if the Clear Table after Ticket Closeout toggle is enabled on your Touch device.
Touch POS Open Ticket Tables RecTrac 10.2g/10.1q
Vermont Systems Inc. 03/22/10 19
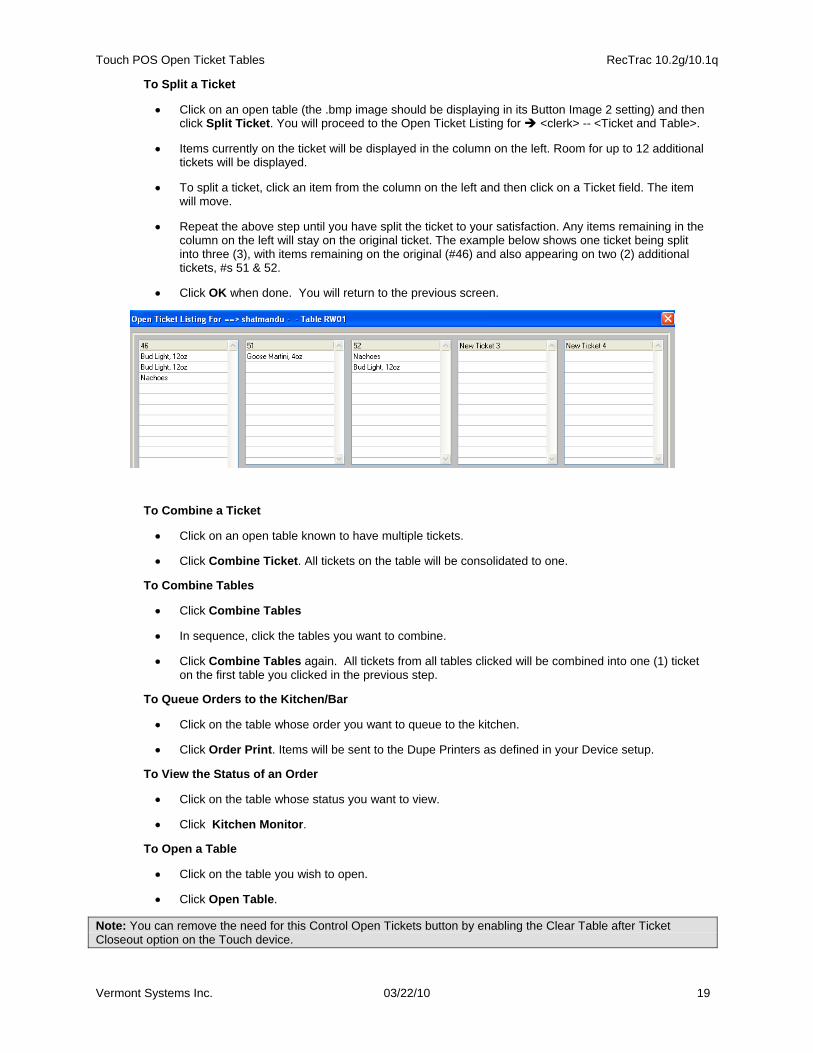
To Split a Ticket
• Click on an open table (the .bmp image should be displaying in its Button Image 2 setting) and then click Split Ticket. You will proceed to the Open Ticket Listing for <clerk> -- <Ticket and Table>.
• Items currently on the ticket will be displayed in the column on the left. Room for up to 12 additional tickets will be displayed.
• To split a ticket, click an item from the column on the left and then click on a Ticket field. The item will move.
• Repeat the above step until you have split the ticket to your satisfaction. Any items remaining in the column on the left will stay on the original ticket. The example below shows one ticket being split into three (3), with items remaining on the original (#46) and also appearing on two (2) additional tickets, #s 51 & 52.
• Click OK when done. You will return to the previous screen.
To Combine a Ticket
• Click on an open table known to have multiple tickets.
• Click Combine Ticket. All tickets on the table will be consolidated to one.
To Combine Tables
• Click Combine Tables
• In sequence, click the tables you want to combine.
• Click Combine Tables again. All tickets from all tables clicked will be combined into one (1) ticket on the first table you clicked in the previous step.
To Queue Orders to the Kitchen/Bar
• Click on the table whose order you want to queue to the kitchen.
• Click Order Print. Items will be sent to the Dupe Printers as defined in your Device setup.
To View the Status of an Order
• Click on the table whose status you want to view.
• Click Kitchen Monitor.
To Open a Table
• Click on the table you wish to open.
• Click Open Table.
Note: You can remove the need for this Control Open Tickets button by enabling the Clear Table after Ticket Closeout option on the Touch device.

RecTrac 10.2g/10.1q Touch POS Open Ticket Tables
20 03/22/10 Vermont Systems, Inc.
PAGE LEFT BLANK FOR DOUBLE-SIDED PRINTING