touchless touch manual - turn any surface into a touch screen
TRANSCRIPT
http://www.touchlesstouch.com
Touchless Touch
Manual
V1.8

Page 2 or 17
Contents
Contents .......................................................................................................................................................................................... 2 Introduction ..................................................................................................................................................................................... 3 What’s New? ................................................................................................................................................................................... 4 System Requirements ...................................................................................................................................................................... 5 Software Installation........................................................................................................................................................................ 6 Hardware Installation ...................................................................................................................................................................... 7 Sensor Mounting ............................................................................................................................................................................. 8 Configuration ................................................................................................................................................................................ 10 Calibration ..................................................................................................................................................................................... 11 Calibration with Reflective Surfaces (Whiteboards, Glass etc) ..................................................................................................... 14 Licensing ....................................................................................................................................................................................... 15 Troubleshooting ............................................................................................................................................................................ 16
Page 3 or 17
Introduction
Touchless Touch allows you to turn any suitable surface into a multi-touch surface by harnessing the
power of the cameras on the Kinect or Primesense (OpenNI) sensors.
You can connect a maximum of 4 sensors* to extend the size of the touchable area and increase
accuracy when many people are using the surface.
Possible usages include adding touch screen support for a front/rear projected screen, making a
projected white board touch-enabled, or for a cheaper way to enable touch support on large format
displays.
For most applications only a single sensor is required. For larger multi-user and multi-touch
application you may find the need for more than one sensor.
One sensor can theoretically detect all 128 touch points although in practice this is probably physically
impossible, thus the support for up to 4 sensors. The software does not mind which sensors are
installed, so you can have a combination of different compatible hardware.
* Currently you can only connect one Kinect V2 sensor to a computer at a time.

Page 4 or 17
What’s New?
V1.8
Added support for Windows 10
Added new "Reduce Lag" option for improved smoothing with faster response
Disabled Windows 8 lockdowns for operating systems other than Windows 8.0
Added automatic check for updates
Fixed a bug with the about screen not displaying correctly
Improved detection of multi-touch points with better rejecting of false data
Increased responsiveness of the KinectV2/Xbox One sensor
Overhauled the calibration routine to be more accurate
Improved the calibration routine for the more precise nature of the Kinect V2/Xbox One
Sensor
V1.7
Support for the Kinect for Windows V2 and Xbox One Sensor
V1.6
New touch algorithm meaning the software is now much more accurate.
Added new options to restrict the detection area during calibration.
Fixed a bug where the Max Touch Points option wasn’t being saved.
Improved multi-monitor support for Windows 8
V1.5
Fixed bugs with multi-monitor on Windows 8 where primary display was right of another
monitor
V1.4
Fixed major bug with some OpenNI devices not being detected
V1.3.1
Improved support for OpenNI compatible devices
V1.3
Massively improved touch detection algorithm.
Much more accurate and more sensitive.
Touches are not lost during dragging operations so easily now.
V1.2
Windows 7 (32 and 64bit) support
Improved accuracy when using multiple sensors
Slight speed increase of touch detection
Improved documentation
Fixed bug with manual licensing dialog
Improved Windows 8 compatibility
Page 5 or 17
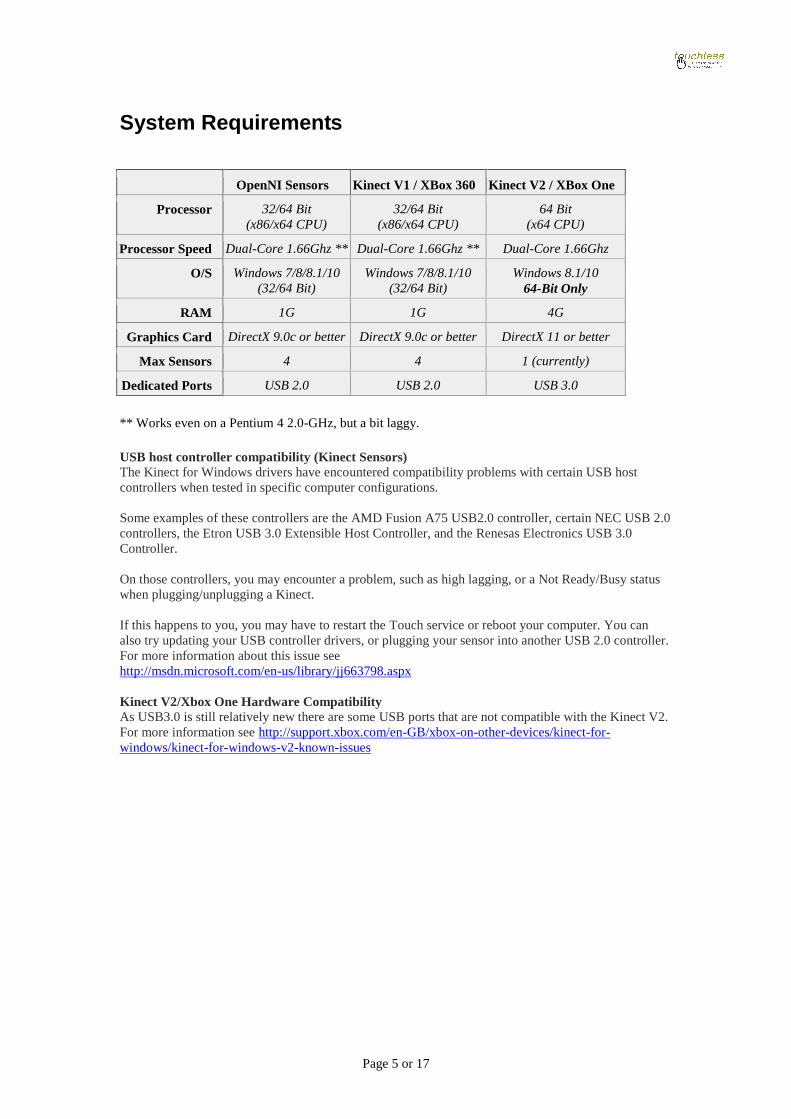
System Requirements
OpenNI Sensors Kinect V1 / XBox 360 Kinect V2 / XBox One
Processor 32/64 Bit
(x86/x64 CPU)
32/64 Bit
(x86/x64 CPU)
64 Bit
(x64 CPU)
Processor Speed Dual-Core 1.66Ghz ** Dual-Core 1.66Ghz ** Dual-Core 1.66Ghz
O/S Windows 7/8/8.1/10
(32/64 Bit)
Windows 7/8/8.1/10
(32/64 Bit)
Windows 8.1/10
64-Bit Only
RAM 1G 1G 4G
Graphics Card DirectX 9.0c or better DirectX 9.0c or better DirectX 11 or better
Max Sensors 4 4 1 (currently)
Dedicated Ports USB 2.0 USB 2.0 USB 3.0
** Works even on a Pentium 4 2.0-GHz, but a bit laggy.
USB host controller compatibility (Kinect Sensors)
The Kinect for Windows drivers have encountered compatibility problems with certain USB host
controllers when tested in specific computer configurations.
Some examples of these controllers are the AMD Fusion A75 USB2.0 controller, certain NEC USB 2.0
controllers, the Etron USB 3.0 Extensible Host Controller, and the Renesas Electronics USB 3.0
Controller.
On those controllers, you may encounter a problem, such as high lagging, or a Not Ready/Busy status
when plugging/unplugging a Kinect.
If this happens to you, you may have to restart the Touch service or reboot your computer. You can
also try updating your USB controller drivers, or plugging your sensor into another USB 2.0 controller.
For more information about this issue see
http://msdn.microsoft.com/en-us/library/jj663798.aspx
Kinect V2/Xbox One Hardware Compatibility
As USB3.0 is still relatively new there are some USB ports that are not compatible with the Kinect V2.
For more information see http://support.xbox.com/en-GB/xbox-on-other-devices/kinect-for-
windows/kinect-for-windows-v2-known-issues
Page 6 or 17
Software Installation
Installation is straightforward. Do not connect any sensors until the installation process completes.
1. Find and run the setup.exe
2. Follow the on-screen prompts
3. During the installation the Kinect for Windows Runtime will appear. You must complete this
process for the installation to work.
4. If you are on Windows 7 you may be asked if you wish to proceed installing an unsigned
driver. You must accept this dialog or the software will not work.
5. If you are using a 64-Bit version of Windows 8/8.1/10 you will be prompted with a second
Kinect for Windows installer. You must also complete this process for the installation to
work.
6. After the installation, connect the sensor(s) to the computer. Drivers will automatically be
detected and installed correctly. After about a minute the sensors will become active and will
be ready for calibration. If they are not detected restart your computer and try again.
Page 7 or 17
Hardware Installation
Hardware installation is straightforward but there are a few important things you need to know.
Kinect Sensor
This software is designed to work with the Kinect for Windows V1, V2 and Xbox One sensors *.
The Kinect for Xbox 360 sensor will only work if you download the full Kinect SDK from Microsoft
(http://www.microsoft.com/en-us/download/details.aspx?id=40278).
You can find out more information on where to purchase one of these sensors on our website.
Primesense OpenNI Sensor
This software is designed to also work with the Primesense OpenNI sensors. You can find out more
information on where to purchase one of these sensors on our website. From our experiments the
Kinect sensor has proven to be slightly more accurate but your tests may vary.
Drivers
Kinect for Windows drivers are included in the installer with this product. Drivers for Primesense
devices will accompany those products and may need to be copied into the OpenNI folders within this
software installation.
Multiple Sensors **
If you are using multiple sensors then each one must be connected to its own dedicated USB controller
on the computer.
If you receive errors relating to low USB bandwidth then you are sharing a USB controller with more
than one sensor, or have too many other devices connected.
This is a hardware limitation but can easily be bypassed by trying different USB ports or purchasing
separate USB controller cards.
* To use the Xbox One sensor you require the Windows adapter from Microsoft.
** Currently Microsoft restricts the use of the KinectV2/Xbox One sensor to one per machine.
Page 8 or 17
Sensor Mounting
The software allows a level of flexibility with the way the sensor is mounted; there are a few
exceptions to this and checking the following will greatly increase accuracy.
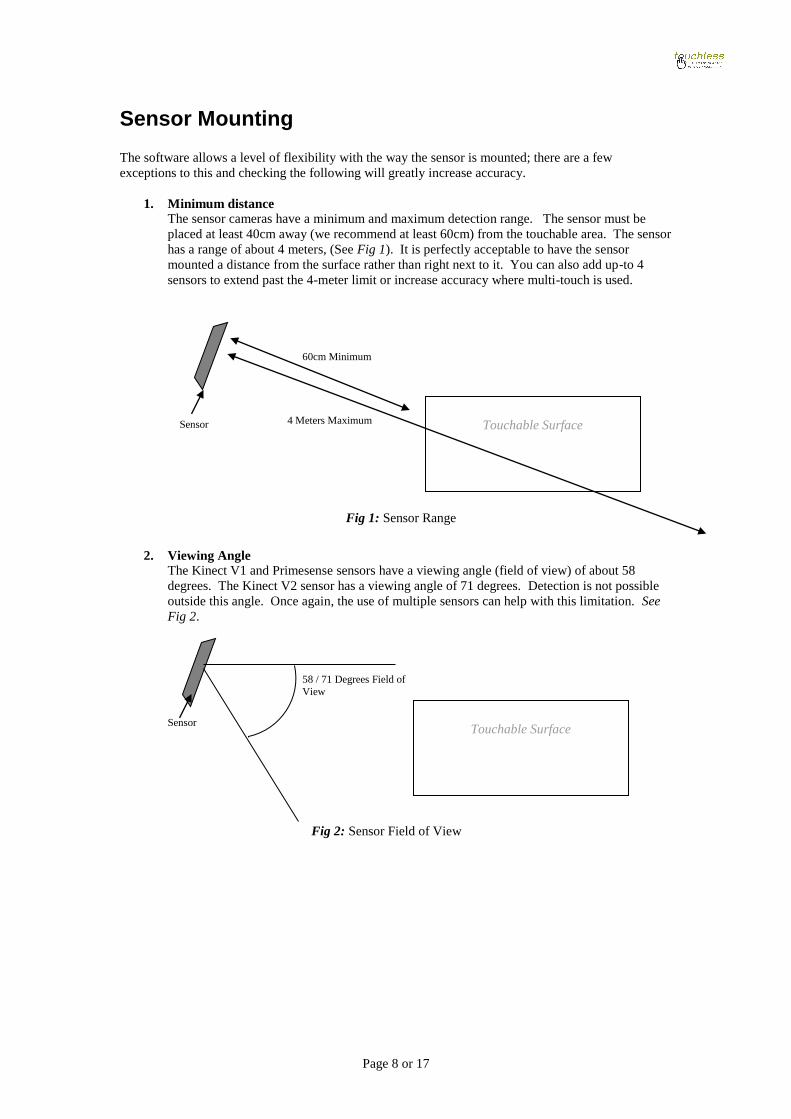
1. Minimum distance
The sensor cameras have a minimum and maximum detection range. The sensor must be
placed at least 40cm away (we recommend at least 60cm) from the touchable area. The sensor
has a range of about 4 meters, (See Fig 1). It is perfectly acceptable to have the sensor
mounted a distance from the surface rather than right next to it. You can also add up-to 4
sensors to extend past the 4-meter limit or increase accuracy where multi-touch is used.
2. Viewing Angle
The Kinect V1 and Primesense sensors have a viewing angle (field of view) of about 58
degrees. The Kinect V2 sensor has a viewing angle of 71 degrees. Detection is not possible
outside this angle. Once again, the use of multiple sensors can help with this limitation. See
Fig 2.
Touchable Surface
60cm Minimum
Fig 1: Sensor Range
Sensor 4 Meters Maximum
Touchable Surface
Fig 2: Sensor Field of View
Sensor
58 / 71 Degrees Field of
View
Page 9 or 17
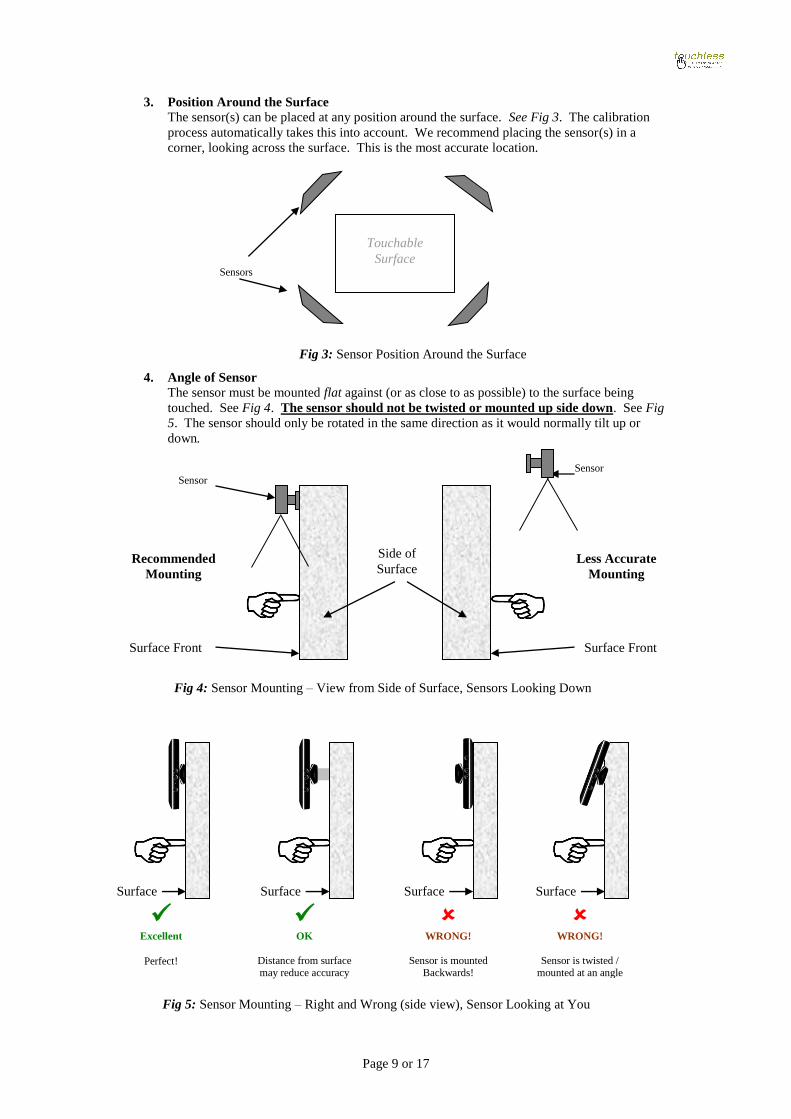
3. Position Around the Surface
The sensor(s) can be placed at any position around the surface. See Fig 3. The calibration
process automatically takes this into account. We recommend placing the sensor(s) in a
corner, looking across the surface. This is the most accurate location.
4. Angle of Sensor
The sensor must be mounted flat against (or as close to as possible) to the surface being
touched. See Fig 4. The sensor should not be twisted or mounted up side down. See Fig
5. The sensor should only be rotated in the same direction as it would normally tilt up or
down.
Touchable
Surface
Fig 3: Sensor Position Around the Surface
Sensors
Fig 5: Sensor Mounting – Right and Wrong (side view), Sensor Looking at You
Surface
Fr
ont
Surface
Fr
ont
Surface
Fr
ont
Surface
Fr
ont Excellent
Perfect!
OK
Distance from surface may reduce accuracy
WRONG!
Sensor is mounted Backwards!
WRONG!
Sensor is twisted / mounted at an angle
Fig 4: Sensor Mounting – View from Side of Surface, Sensors Looking Down
Side of
Surface
Surface Front Surface Front
Sensor Sensor
Recommended
Mounting
Less Accurate
Mounting
Page 10 or 17
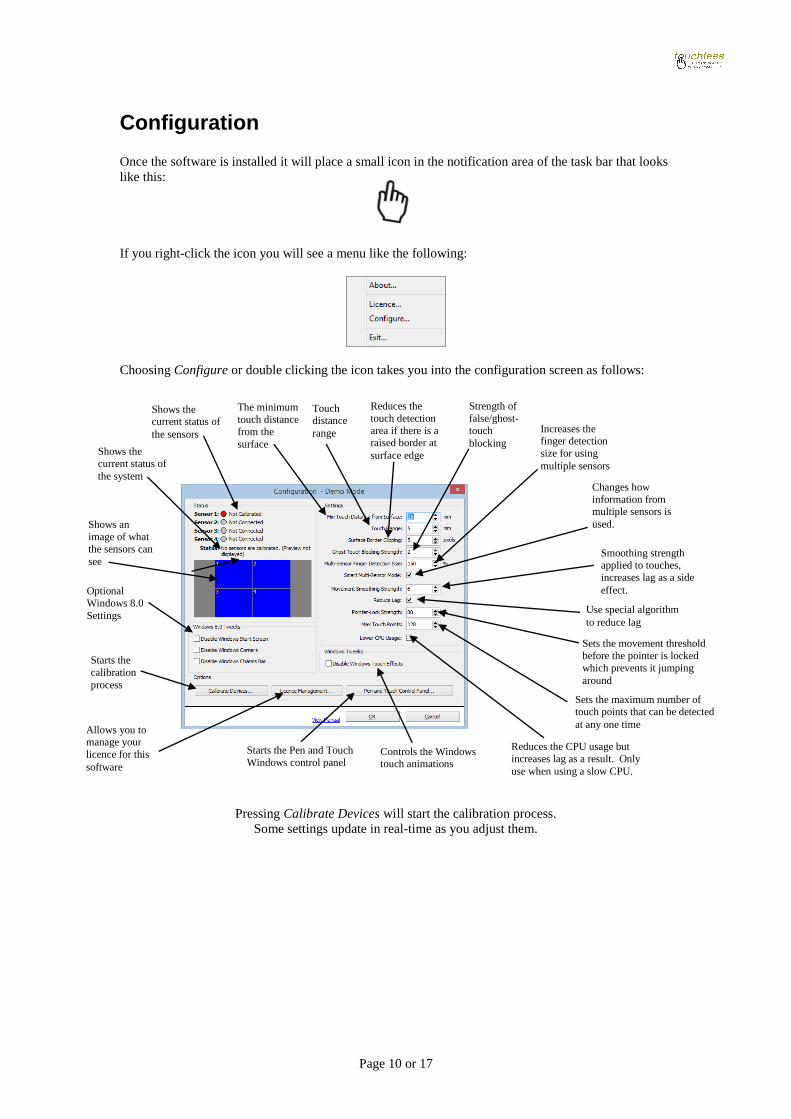
Configuration
Once the software is installed it will place a small icon in the notification area of the task bar that looks
like this:
If you right-click the icon you will see a menu like the following:
Choosing Configure or double clicking the icon takes you into the configuration screen as follows:
Pressing Calibrate Devices will start the calibration process.
Some settings update in real-time as you adjust them.
Shows the current status of
the sensors
Shows an
image of what
the sensors can
see
Shows the
current status of
the system
Optional
Windows 8.0
Settings
The minimum
touch distance
from the
surface
Touch distance
range
Sets the maximum number of touch points that can be detected
at any one time
Reduces the
touch detection
area if there is a raised border at
surface edge
Increases the finger detection
size for using
multiple sensors
Starts the
calibration
process
Reduces the CPU usage but
increases lag as a result. Only
use when using a slow CPU.
Starts the Pen and Touch
Windows control panel Controls the Windows touch animations
Strength of
false/ghost-
touch
blocking
Smoothing strength applied to touches,
increases lag as a side
effect.
Sets the movement threshold
before the pointer is locked
which prevents it jumping
around
Allows you to manage your
licence for this
software
Changes how
information from multiple sensors is
used.
Use special algorithm
to reduce lag
Page 11 or 17
Calibration
The calibration process is very important, and if performed correctly will yield very accurate results. If
you find that your results are poor then repeat the process taking time to make sure each point is
recorded correctly. Do not rush this step.
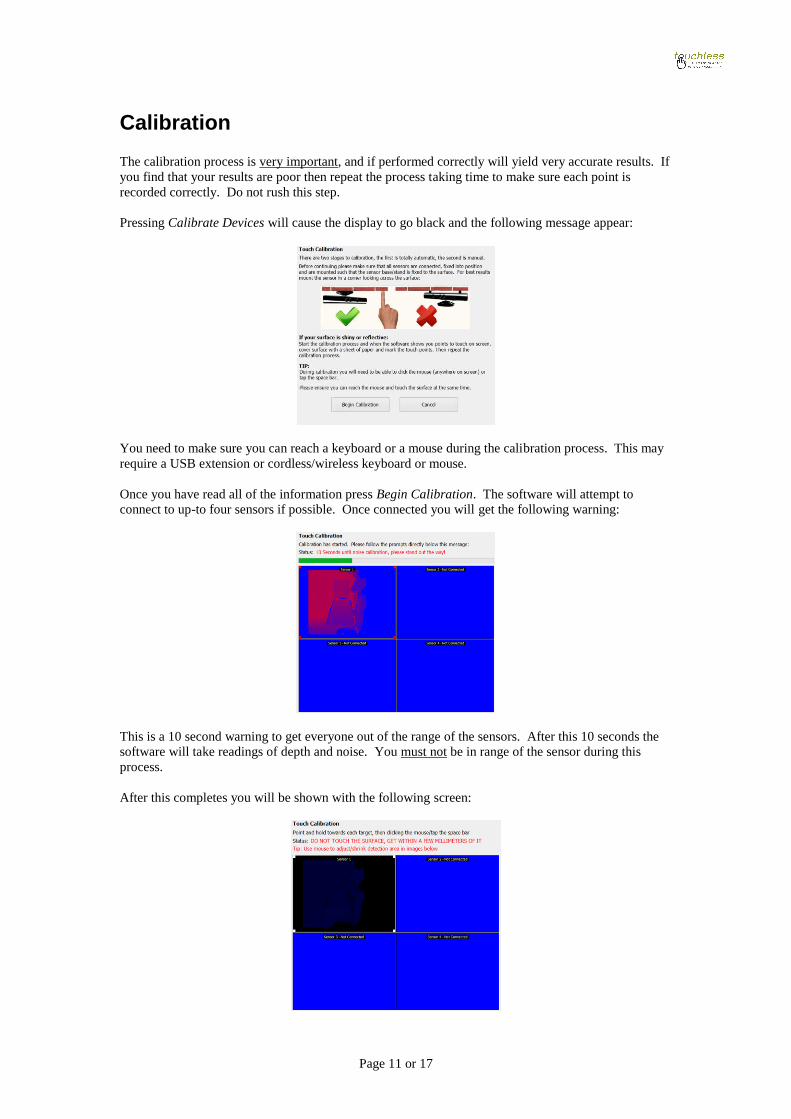
Pressing Calibrate Devices will cause the display to go black and the following message appear:
You need to make sure you can reach a keyboard or a mouse during the calibration process. This may
require a USB extension or cordless/wireless keyboard or mouse.
Once you have read all of the information press Begin Calibration. The software will attempt to
connect to up-to four sensors if possible. Once connected you will get the following warning:
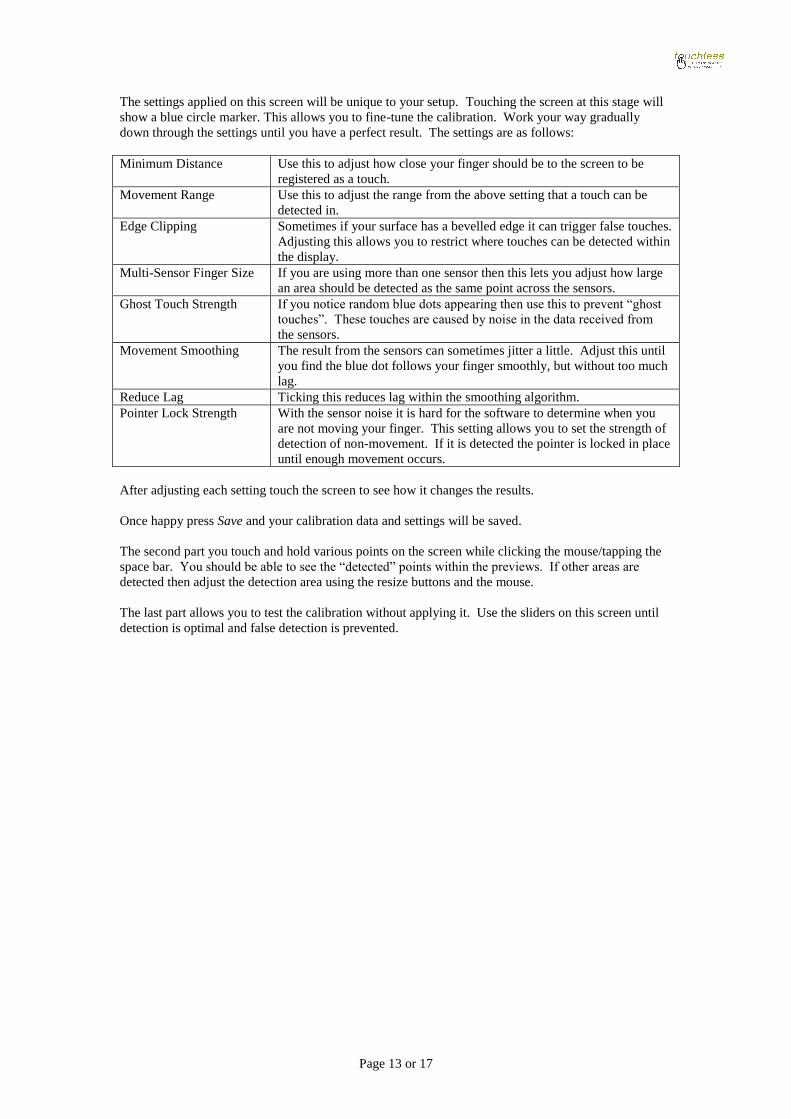
This is a 10 second warning to get everyone out of the range of the sensors. After this 10 seconds the
software will take readings of depth and noise. You must not be in range of the sensor during this
process.
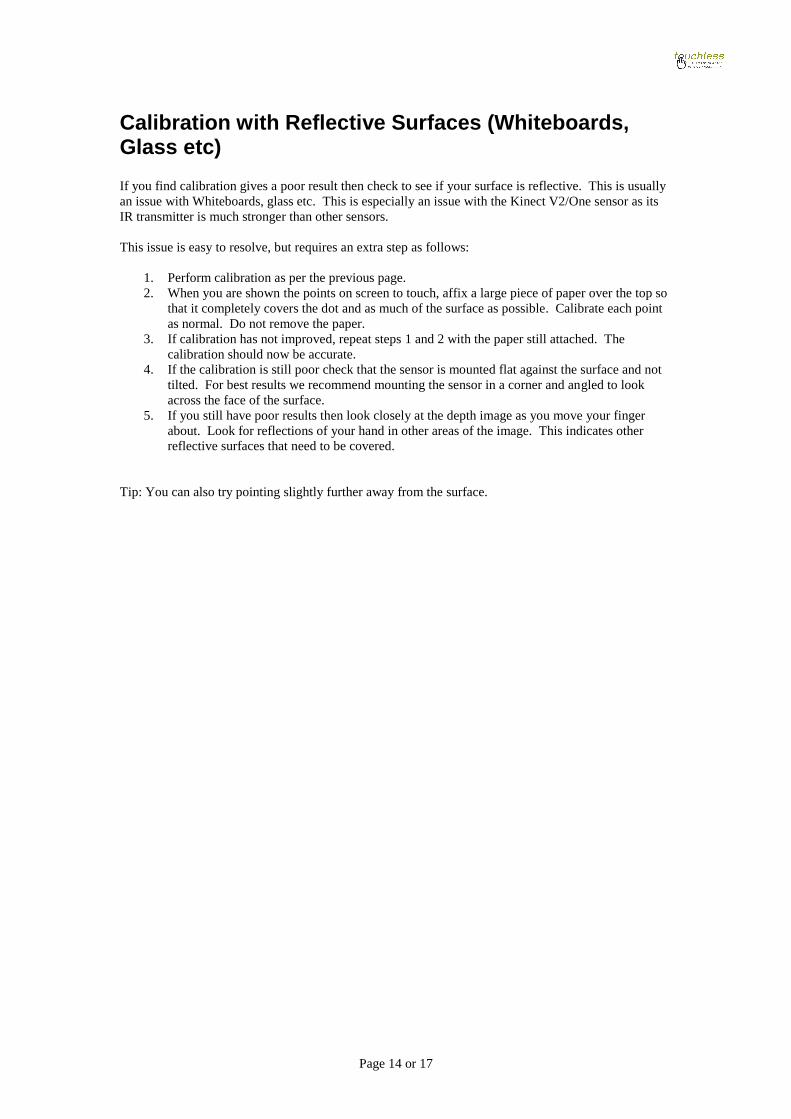
After this completes you will be shown with the following screen:

Page 12 or 17
On screen you should also see a flashing target looking like this:
The background of the image of each sensor should be blue/black. If not, press ESC and start again.
To continue, point to this target with your finger, getting as close as you can without actually touching
the surface. Your arm and hand will be highlighted in a green/yellow colour.
If you find that areas of the screen are being detected incorrectly then use the mouse and crop the
image by dragging the four flashing squares in the corners of the image.
The tip of your finger will be shown by a red square. It is important not to continue until you are happy
that the red square represents your finger tip as best as possible. Below shows being too near, too far
away and perfect positioning of the finger:
Too Far Away
Perfect Too Near
Once you are happy, press and hold the space bar, or press and hold the left mouse button. The
software will read information about where your finger is and then the next target will be shown.
Repeat this process as many times as the software asks (usually four times in total) until the following
appears:
Page 13 or 17
The settings applied on this screen will be unique to your setup. Touching the screen at this stage will
show a blue circle marker. This allows you to fine-tune the calibration. Work your way gradually
down through the settings until you have a perfect result. The settings are as follows:
Minimum Distance Use this to adjust how close your finger should be to the screen to be
registered as a touch.
Movement Range Use this to adjust the range from the above setting that a touch can be
detected in.
Edge Clipping Sometimes if your surface has a bevelled edge it can trigger false touches.
Adjusting this allows you to restrict where touches can be detected within
the display.
Multi-Sensor Finger Size If you are using more than one sensor then this lets you adjust how large
an area should be detected as the same point across the sensors.
Ghost Touch Strength If you notice random blue dots appearing then use this to prevent “ghost
touches”. These touches are caused by noise in the data received from
the sensors.
Movement Smoothing The result from the sensors can sometimes jitter a little. Adjust this until
you find the blue dot follows your finger smoothly, but without too much
lag.
Reduce Lag Ticking this reduces lag within the smoothing algorithm.
Pointer Lock Strength With the sensor noise it is hard for the software to determine when you
are not moving your finger. This setting allows you to set the strength of
detection of non-movement. If it is detected the pointer is locked in place
until enough movement occurs.
After adjusting each setting touch the screen to see how it changes the results.
Once happy press Save and your calibration data and settings will be saved.
The second part you touch and hold various points on the screen while clicking the mouse/tapping the
space bar. You should be able to see the “detected” points within the previews. If other areas are
detected then adjust the detection area using the resize buttons and the mouse.
The last part allows you to test the calibration without applying it. Use the sliders on this screen until
detection is optimal and false detection is prevented.
Page 14 or 17
Calibration with Reflective Surfaces (Whiteboards, Glass etc)
If you find calibration gives a poor result then check to see if your surface is reflective. This is usually
an issue with Whiteboards, glass etc. This is especially an issue with the Kinect V2/One sensor as its
IR transmitter is much stronger than other sensors.
This issue is easy to resolve, but requires an extra step as follows:
1. Perform calibration as per the previous page.
2. When you are shown the points on screen to touch, affix a large piece of paper over the top so
that it completely covers the dot and as much of the surface as possible. Calibrate each point
as normal. Do not remove the paper.
3. If calibration has not improved, repeat steps 1 and 2 with the paper still attached. The
calibration should now be accurate.
4. If the calibration is still poor check that the sensor is mounted flat against the surface and not
tilted. For best results we recommend mounting the sensor in a corner and angled to look
across the face of the surface.
5. If you still have poor results then look closely at the depth image as you move your finger
about. Look for reflections of your hand in other areas of the image. This indicates other
reflective surfaces that need to be covered.
Tip: You can also try pointing slightly further away from the surface.
Page 15 or 17
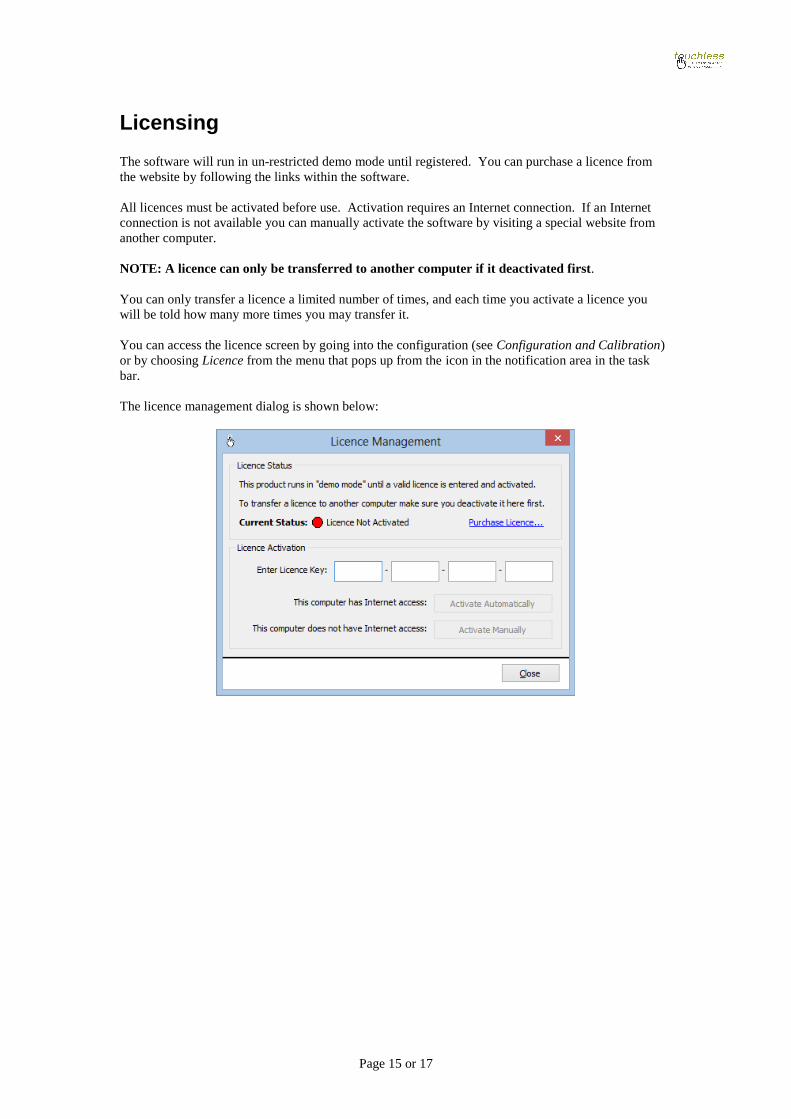
Licensing
The software will run in un-restricted demo mode until registered. You can purchase a licence from
the website by following the links within the software.
All licences must be activated before use. Activation requires an Internet connection. If an Internet
connection is not available you can manually activate the software by visiting a special website from
another computer.
NOTE: A licence can only be transferred to another computer if it deactivated first.
You can only transfer a licence a limited number of times, and each time you activate a licence you
will be told how many more times you may transfer it.
You can access the licence screen by going into the configuration (see Configuration and Calibration)
or by choosing Licence from the menu that pops up from the icon in the notification area in the task
bar.
The licence management dialog is shown below:

Page 16 or 17
Troubleshooting
The following table identifies possible issues and resolutions:
Problem Solution
Sensor status says “Not Connected” The software did not detect this sensor. If it is
connected check that it is working.
Sensor status says “Busy” The software attempted to connect to the sensor
while it was starting up. This error should clear
after a while.
Sensor status says “In Use” The software attempted to use this sensor but it is
in use by another application.
Sensor status says “Not Enough USB Bandwidth” The software attempted to start this sensor but
there was insufficient USB bandwidth to start it.
This means there are too many other USB devices
connected to the same USB controller. Or you
have another sensor connected to the same USB
controller.
Sensor status says “Not Powered” The sensor was found but it requires an external
power supply that has not been connected/not
working.
Sensor status says “Not Calibrated” The sensor was detected but it hasn’t been
calibrated yet
I connected the sensors to different USB ports and
the calibration is wrong
The software uses the USB port to identify the
each sensor. If you swap two sensors USB ports
the software cannot detect this and re-calibration
is required.
Configuration dialog says service is not
responding
The software is unable to communicate with the
Touch service. Check that it is installed correctly
and running
Touches are being detected while I am no where
near the surface
Re-calibrate the sensors and carefully adjust the
sliders at the end of the process. If you are unable
to get to the calibration options because of the
false touches simply cover the sensor cameras.
Touch detection is really lagging A small amount of lag is expected due to the
image processing. If this detection is very slow
check the CPU resources being used by the
application.
I am seeing more than one touch point when I
touch the surface
If you are using more than one sensor try re-
calibration. If this does not resolve the problem
then increase the finger detection size until the
problem stops
If you are only using one sensor then increase the
distance from screen values and decrease the
detection range.
Touches are detected at the edge of the surface
but no one is touching it.
The surface probably has raised edges. Adjust the
border/edge clipping until this problem stops
Kinect drivers could not be found The Kinect for Windows section of the
installation did not complete successfully. Re-
install this application and ensure this section is
completed.
Primesense drivers could not be found Please consult the documentation that came with
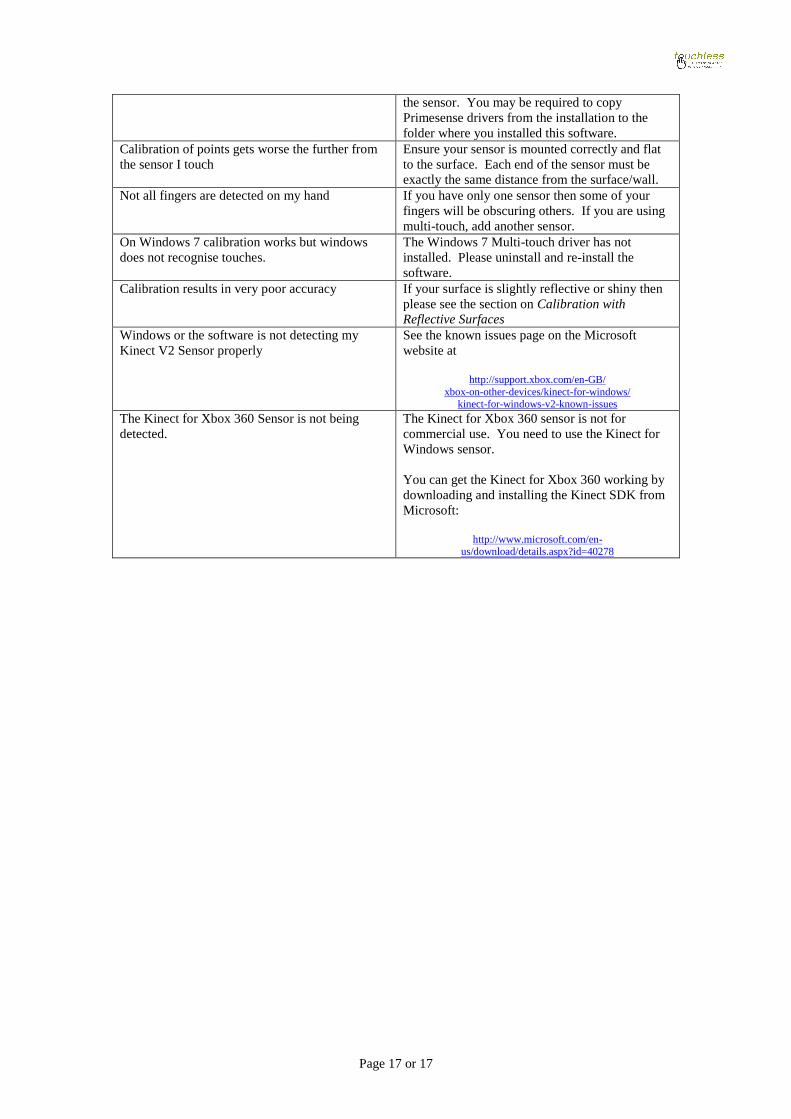
Page 17 or 17
the sensor. You may be required to copy
Primesense drivers from the installation to the
folder where you installed this software.
Calibration of points gets worse the further from
the sensor I touch
Ensure your sensor is mounted correctly and flat
to the surface. Each end of the sensor must be
exactly the same distance from the surface/wall.
Not all fingers are detected on my hand If you have only one sensor then some of your
fingers will be obscuring others. If you are using
multi-touch, add another sensor.
On Windows 7 calibration works but windows
does not recognise touches.
The Windows 7 Multi-touch driver has not
installed. Please uninstall and re-install the
software.
Calibration results in very poor accuracy If your surface is slightly reflective or shiny then
please see the section on Calibration with
Reflective Surfaces
Windows or the software is not detecting my
Kinect V2 Sensor properly
See the known issues page on the Microsoft
website at
http://support.xbox.com/en-GB/
xbox-on-other-devices/kinect-for-windows/ kinect-for-windows-v2-known-issues
The Kinect for Xbox 360 Sensor is not being
detected.
The Kinect for Xbox 360 sensor is not for
commercial use. You need to use the Kinect for
Windows sensor.
You can get the Kinect for Xbox 360 working by
downloading and installing the Kinect SDK from
Microsoft:
http://www.microsoft.com/en-
us/download/details.aspx?id=40278