tower speaker box-1 - bierbowerbierbower.net/diytower/pdfs/fiberglassspeakerbox.pdf · skewed to...
TRANSCRIPT

Tower Speaker Enclosure Instructions Recommended Tools: Table Saw Jig Saw Router Staple Gun – Pneumatic is optional Nail Gun - Optional Drill Air compressor / Spray Gun Orbital Sander Belt Sander Recommended Materials: 5/8” Thick MDF Plywood 3M Spray Adhesive Wood glue, small nails and wood screws for assembly 5/16 Carriage bolts, nuts and washers – optional for adjusting mount lugs 8-32 “T-Nuts” for speaker installation – optional, wood screws could be substituted 2 1/4 yards of Fleece cloth material Closed cell foam pad or sanding pad for finish sanding 1/4” Thick Plywood or similar for ribs and logo if applicable 1 Gallon Fiberglass Resin and activator 1 Qt. Polyester Filler Sanding Primer and activator 1 Pkg. Fiberglass Cloth Misc. Disposable paintbrushes, mixing containers, mixing sticks Acetone
Summary of Enclosure Construction The concept to build the tower speaker enclosure as shown in the photos is to construct a wood frame used as a skeleton. Once the wood frame is constructed, then fleeced is stretched over the skeleton forming an enclosed space. The front face where the speakers are mounted is the location where the fleece is temporarily glued, then stapled. Once the enclosure is wrapped, then the fleece is saturated with polyester fiberglass resin to create a hard shell. The inside of the enclosure is also reinforced with some fiberglass cloth and resin in the corners after the saturated cloth has hardened. Once the shell has hardened, then rough sanding is done to take the lumps, bumps and runs off. Any areas or holes created can be filled with Bondo as well as the wrinkles on the front face. After rough sanding the enclosure with any filling or shaping needed, then it is time to apply sanding filler primer. The sanding of the primed surface is all done by elbow grease and a power sander is not recommended. The grit of paper used starts with 180 and graduating to 600 wet/dry paper. Once the surface is smooth as a glass and pits are gone, it is time for the finish coats of paint. Step-by-Step Instructions: First read the summary and look over the tools and materials to make sure you have, can borrow, or improvise as needed to complete the tasks that will be outlined. Print the PDF file full scale to generate paper patterns for the main skeleton pieces. Cut out the paper patterns to be traced onto the 5/8 MDF.

Below an example is shown of a file that will be full scale to be used as a pattern for cutting the wood. It will be in a PDF format, which can be taken to a local Kinko’s or similar to be plotted. The actual size for the paper for the one shown below is 24” x 60”.
Here is a picture of the pieces cut out from the pattern:
Once the main skeleton pieces are cut, then use a router to radius one side of the front face where the speakers mount and the ellipse. The main rear spine needs to have a radius on both top and bottom edges where the fleece will wrap to prevent sharp corners. After finishing with the edges of the skeleton pieces, it is time to assemble as

shown in an assembly drawing included as a PDF file. If you have a Dado blade, set it up for a 5/8” wide by 1/8-3/16 deep groove. Groove the backside of the front speaker face on the centerline for fitting the rear spline. Run a Dado groove on the backside of the ellipse to fit it on the backside of the rear spline. Below are pictures of the assembled skeleton frame:
The pattern sheet shows the location of the miter cut line where each side of the cut is a 7 ½ degree cut so when it is assembled, it forms a 15 degree angle for each outer speaker. The picture above has the N setting on the ellipse for reference, but is not permanently attached at this time. I had originally planned on using the 5/8” thick N, as shown in the picture of pieces, but I changed it to a ¼” thick. This picture also shows the radius edges on the ellipse and top and bottom of the rear spline. The hole locations for the speakers were drilled and “T Nuts, 8-32” were installed for the screws mounting the speakers. This is an easy time to install the “T-Nuts” but they are also tough to keep resin and filler out of the holes. I suggest that the “T-Nuts” be installed when the priming step is completed, no worries about getting resin or Bondo in the threads. This picture also shows the 5/16” carriage bolts installed with the head flush on the mounting lug and double nutted through the main spline.
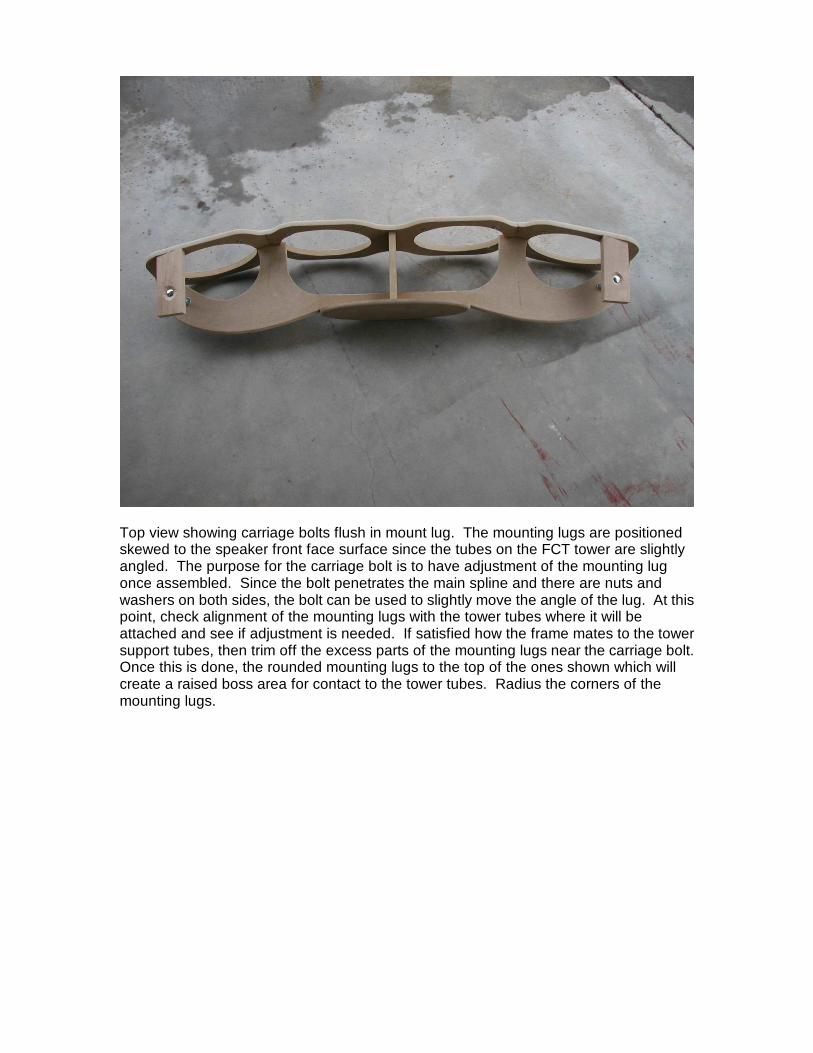
Top view showing carriage bolts flush in mount lug. The mounting lugs are positioned skewed to the speaker front face surface since the tubes on the FCT tower are slightly angled. The purpose for the carriage bolt is to have adjustment of the mounting lug once assembled. Since the bolt penetrates the main spline and there are nuts and washers on both sides, the bolt can be used to slightly move the angle of the lug. At this point, check alignment of the mounting lugs with the tower tubes where it will be attached and see if adjustment is needed. If satisfied how the frame mates to the tower support tubes, then trim off the excess parts of the mounting lugs near the carriage bolt. Once this is done, the rounded mounting lugs to the top of the ones shown which will create a raised boss area for contact to the tower tubes. Radius the corners of the mounting lugs.

This picture illustrates the radius corners on the front face for the speakers and also shows the skewed angles for the mounting lugs. Now it is time to add ribs to the frame to create lines for the surface of the enclosure. The addition of the ribs is more personal preference and I did not include patterns for these since each individual will probably have their own look they would like to achieve. The picture below shows how the fleece looks with just one rib on each side on the bottom of the box. The ribs are made of ¼” thick plywood or paneling. You can attach the ribs with a nail gun and glue or use caulking to hold them in place while you wrap the frame. You could also leave the ribs off and it will change the look. To check how it looks, just take the fleece and wrap it tight around the frame and see how it looks. If you don’t like the shape, change the shape of the rib or just don’t use them. The nice thing is that it is not permanent until it is coated with resin. The wrapping process is awkward and is best if two people are present to help wrestle with the fleece. Purchase the fleece at a fabric store and you will notice it stretches more in one direction compared to the other direction. You will also notice that one side of the fleece material is a little smoother than the other, so it is helpful to have the smooth side out when it comes to the sanding. You will need to cut the fleece into a size that is large enough to have extra material both in the length direction and wrapped around the frame. Wrap the skeleton with the fleece oriented so it is more stretchy from front of frame around to back. Once you determine a design that is appealing to you, then it is time to complete the wrapping process. To start, use the 3M spray adhesive along one edge of the speaker face plate and start at the middle section. Glue the bottom edge of the cloth then stretch the material tight around the box and glue the top edge. When stretching the cloth look at the weave direction of the threads and make sure it is even and straight. If it needs adjusting, just pull the cloth from the glue and re-stretch until it looks even. Once you have covered about 6-8” of the middle section and glued it in place, then staple around

the edges. Keep working your way to the ends about 4-6” at a time, don’t worry too much about wrinkles on the front face, just try to get the edges as smooth as possible.

Below a different design is shown wrapped and stapled before the cloth is trimmed. This design is more of a Bat box and has more ribs. I am showing you this so you can see the effect of more ribs and how it changes the surface. Once it is wrapped to your satisfaction, then trim the excess material.
Now that the frame is wrapped it is time to check it on the tower again, and adjust the bolts and mount lugs if necessary. If you are pleased with the fit on the tower, then you are ready for the resin. The resin coating step is the point of no return and now you are going to be creating a solid shell enclosure. If you are not familiar with using fiberglass resin, be sure to read how to mix the activator or catalyst. If it is mixed too strong or weak, it could harden too quick, or not harden at all. Another variable is the ambient temperature you are working in. If it is a really hot day, then it will set up faster than expected and a lot can go to waste. It is better to make small batches and use it up rather than make too big of batch and have it go to waste. I made 32 oz batches and poured the resin onto the fleece and used a brush to move it around to try to get complete soaking of the material. It is helpful to use a drop cloth and rubber gloves in this step to help manage the mess and keep it easier on your skin. If there is patches of white or light colored areas, the resin is not soaking through and you can also paint the inside of the enclosure to help soak the fleece. The areas that may not have full penetration of resin are not too critical as you can repair them with Bondo. Be sure to also soak the corners around the face and area where the staples are located. A couple of pictures are shown below after coating the fleece with resin.


As you can see from the pictures above, there are some spots that did not have full penetration of the resin. Once the outer surface was hardened, then I painted the inner surface with resin. When the inner surface was hard, I then lined the inside corners of the enclosure with the fiberglass cloth to add strength around the edges. To use fiberglass cloth it is easiest to cut strips about 2” wide by about 8-10” long. Lay them out on the area you are working and get all the pieces ready before you begin mixing the resin. Once you have cut enough strips to line the inside around the front face corners and back area of the spline, then mix another batch of resin. To apply the cloth, first lay the fiberglass cloth on the drop cloth covered work area and saturate the strip of cloth with resin until it become transparent. Then peel the strip from the table and place it into the desired location after painting it with resin. Once the strip is in place, then use the paintbrush to apply more resin to the fiberglass cloth strip and also flatten the strip to the surface and work the air bubbles out under the edges. Repeat this operation in the corners until you have covered the inside perimeter and areas along the rear main spline. The use of fiberglass reinforcing is possibly not necessary, but it will add strength and also help if an area is sanded through and needs to be patched. Once the inside fiberglass has hardened you are now ready to start the finishing process. You will notice that there are bumps, runs and dimples all over the outer surface of the enclosure. Use a small orbital sander with 40 grit paper to smooth most of the bumps. The front face where the speakers mount will have the staples and wrinkles. It is easiest to use a belt sander on this surface to knock it down so it is fairly smooth. Be careful not to sand though the fleece especially on the corners. Once the face is knocked down fairly smooth apply Bondo to build it up flat as shown below.
Keep sanding and building up the front face with Bondo until you achieve a flat surface. More pictures are shown below illustrating the surface finish after rough sanding. I started with 40 grit, then 120, 180 and 220 grit. The majority of the surface was done with the orbital sander, and a foam pad and paper in the tighter area.


This picture shows some areas where there were some small pits and pin holes and I coated them with resin to fill it in.
Once you have the enclosure sanded with a minimum of 180 grit and shaped to your taste, then it is time to coat it with the filler primer. From this point on, you will be sanding by hand and not using the orbital sander. The filler primer is a polyester based primer similar to the fiberglass resin. It also has an activator or catalyst to cause it to dry. I purchased the primer at an auto paint store and it is about $15/qt. Be very careful when mixing the primer especially since it will be applied using a spray gun. If it hardens in the gun, it will be a mess and could possibly damage the spray gun. A cheap spray gun can be purchased at Harbor Freight and Salvage usually for less than $20. This may be a good alternative to using an expensive gun. The idea of the filler primer is to coat the enclosure as thick as possible then block sand with the foam pad to fill in the low spots and even out the surface. Do not be concerned about runs, since you can just sand them off, right now quantity, not quality is the main concern.

Below are a couple pictures showing a thick coating of primer on the Bat box design.
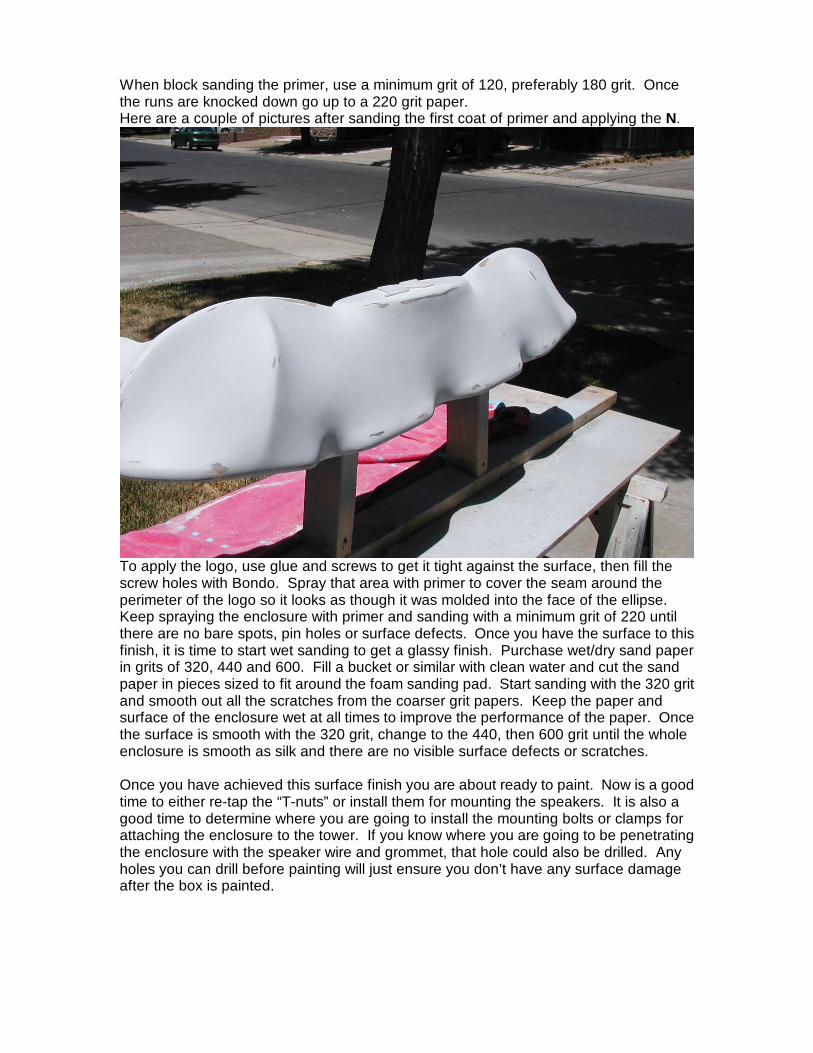
When block sanding the primer, use a minimum grit of 120, preferably 180 grit. Once the runs are knocked down go up to a 220 grit paper. Here are a couple of pictures after sanding the first coat of primer and applying the N.
To apply the logo, use glue and screws to get it tight against the surface, then fill the screw holes with Bondo. Spray that area with primer to cover the seam around the perimeter of the logo so it looks as though it was molded into the face of the ellipse. Keep spraying the enclosure with primer and sanding with a minimum grit of 220 until there are no bare spots, pin holes or surface defects. Once you have the surface to this finish, it is time to start wet sanding to get a glassy finish. Purchase wet/dry sand paper in grits of 320, 440 and 600. Fill a bucket or similar with clean water and cut the sand paper in pieces sized to fit around the foam sanding pad. Start sanding with the 320 grit and smooth out all the scratches from the coarser grit papers. Keep the paper and surface of the enclosure wet at all times to improve the performance of the paper. Once the surface is smooth with the 320 grit, change to the 440, then 600 grit until the whole enclosure is smooth as silk and there are no visible surface defects or scratches. Once you have achieved this surface finish you are about ready to paint. Now is a good time to either re-tap the “T-nuts” or install them for mounting the speakers. It is also a good time to determine where you are going to install the mounting bolts or clamps for attaching the enclosure to the tower. If you know where you are going to be penetrating the enclosure with the speaker wire and grommet, that hole could also be drilled. Any holes you can drill before painting will just ensure you don’t have any surface damage after the box is painted.

Smooth sanded and ready for mounting holes and speaker wire holes.

Painted box back from the paint booth, holes drilled in the mounting lugs, but not really visible since it is so shiny.
Now that the construction of the enclosure is complete, you need to mount it to your tower by one of two methods that I know of. One method is to simply bolt it directly through the tower tubing through the mounting lug and have the nut inside the enclosure and hidden when the speaker is installed. The other method is to purchase an aftermarket clamp that fits the tower tubes and attach the clamp to the mounting lugs and clamp it to the tower. Once you determine the method to mount the enclosure, run the speaker wire, install the speakers, use Loc-tite on screws and bolts during the final assembly and enjoy. The method I used to mount the enclosure is an “L” shaped bolt that I had fabricated and it only requires one side of the tower tube to be drilled and is totally hidden once installed. Install a thin piece of rubber or neoprene between the mounting surface of the enclosure and tower tube to protect both surfaces. A simple drawing of the bolt is shown below.

The installed finished tower speaker enclosure is shown below. I am very please with the appearance and performance and I hope you will be as pleased with your completed custom enclosure. I little trick I learned while towing is to wrap the front of the enclosure with saran wrap to keep the bugs off. It is cheap, easy and you just throw it away each trip.
