toyota hilux mk8 - truckman · toyota hilux mk8 19. run the other section of the harness forward to...
TRANSCRIPT
1ST E
DIT
ION
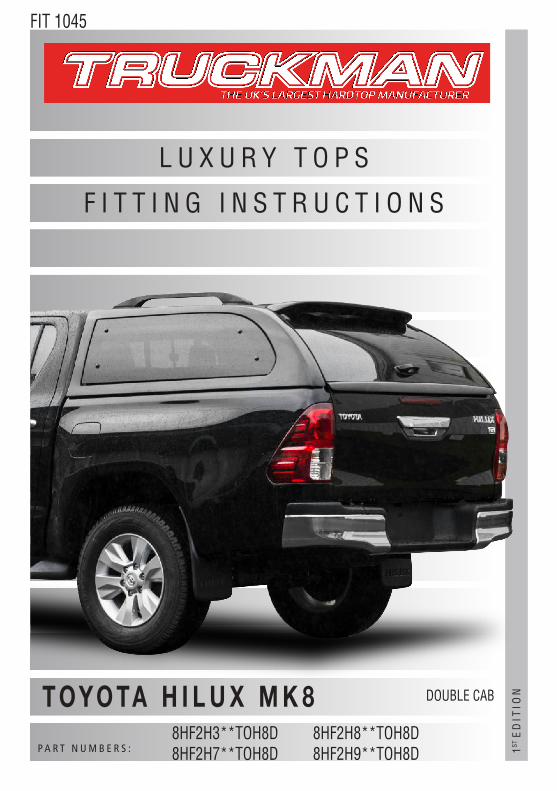
L U X U R Y T O P S
F I T T I N G I N S T R U C T I O N S
T O Y O TA H I L U X M K 8P A R T N U M B E R S :
FIT 1045
DOUBLE CAB
8HF2H3**TOH8D 8HF2H7**TOH8D
8HF2H8**TOH8D 8HF2H9**TOH8D
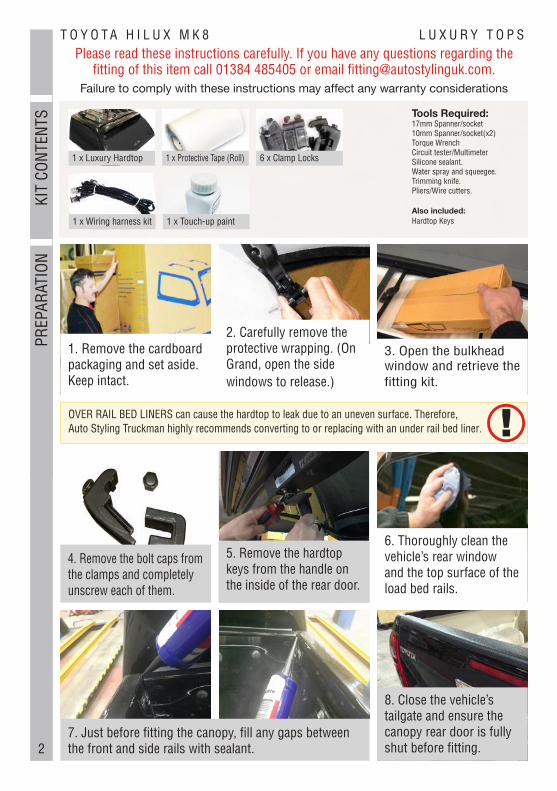
T O Y O T A H I L U X M K 8 L U X U R Y T O P SPlease read these instructions carefully. If you have any questions regarding the
fitting of this item call 01384 485405 or email [email protected] to comply with these instructions may affect any warranty considerations
Also included:Hardtop Keys
1 x Luxury Hardtop 6 x Clamp Locks1 x Protective Tape (Roll)
3. Open the bulkhead window and retrieve the fitting kit.
1. Remove the cardboard packaging and set aside. Keep intact.
PREP
ARAT
ION
KIT
CONT
ENTS
4. Remove the bolt caps from the clamps and completely unscrew each of them.
1 x Wiring harness kit 1 x Touch-up paint
2. Carefully remove the protective wrapping. (On Grand, open the side windows to release.)
OVER RAIL BED LINERS can cause the hardtop to leak due to an uneven surface. Therefore, Auto Styling Truckman highly recommends converting to or replacing with an under rail bed liner.
6. Thoroughly clean the vehicle’s rear window and the top surface of the load bed rails.
Tools Required:17mm Spanner/socket10mm Spanner/socket(x2)Torque WrenchCircuit tester/MultimeterSilicone sealant.Water spray and squeegee.Trimming knife.Pliers/Wire cutters.
5. Remove the hardtop keys from the handle on the inside of the rear door.
7. Just before fitting the canopy, fill any gaps between the front and side rails with sealant.
8. Close the vehicle’s tailgate and ensure the canopy rear door is fully shut before fitting. 2
PREP
ARAT
ION
KIT
CONT
ENTS
3
T O Y O T A H L I U X M K 8
HEAVY LIFTINGWe recommend the use of 4 people to lift the hard top.
9. Lift the canopy carefully on to the vehicle.
12. Line up the front of the canopy with the front of the vehicle’s load bed.
18. Small adjustments to the door can be made by adjusting the strikes.
15. Open the rear door. Assemble the clamps in position on the side rails. There are gaps in the rubber trim for each position.
16. Tighten the clamps to 8Nm (start with the rear ones). Re-check the torque after 30 mins.
10. Check that the canopy is central on the vehicle body.
13. The rubber seal on the bottom of the door should just be in contact with the tailgate.
14. The rear door of the canopy should be centralised.
17. Check the seal under the rear door. It should now be partially compressed.
11. There is a small lip on the edge of the canopy which should not touch the vehicle body.
19. Re-check the position again and repeat steps 10-16 if necessary.
FITT
ING
4
ELEC
TRIC
SEL
ECTR
ICAL
INST
ALLA
TION
T O Y O T A H I L U X M K 8 L U X U R Y T O P S
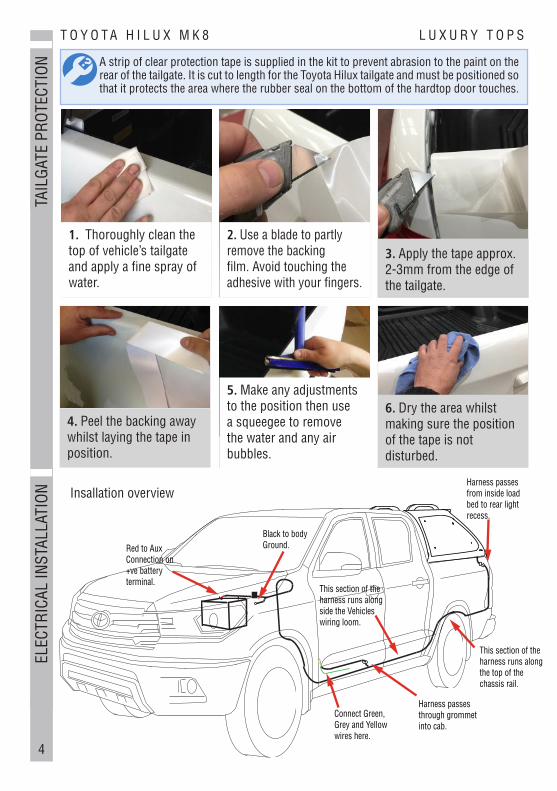
Harness passes from inside load bed to rear light recess.
Connect Green, Grey and Yellow wires here.
This section of the harness runs along the top of the chassis rail.
This section of the harness runs along side the Vehicles wiring loom.
Harness passes through grommet into cab.
Black to body Ground.Red to Aux
Connection on +ve battery terminal.
1. Thoroughly clean the top of vehicle’s tailgate and apply a fine spray of water.
2. Use a blade to partly remove the backing film. Avoid touching the adhesive with your fingers.
4. Peel the backing away whilst laying the tape in position.
3. Apply the tape approx. 2-3mm from the edge of the tailgate.
A strip of clear protection tape is supplied in the kit to prevent abrasion to the paint on the rear of the tailgate. It is cut to length for the Toyota Hilux tailgate and must be positioned so that it protects the area where the rubber seal on the bottom of the hardtop door touches.
6. Dry the area whilst making sure the position of the tape is not disturbed.
5. Make any adjustments to the position then use a squeegee to remove the water and any air bubbles.
TAIL
GATE
PRO
TECT
ION
Insallation overview
5
T O Y O T A H I L U X M K 8
ELEC
TRIC
SEL
ECTR
ICAL
INST
ALLA
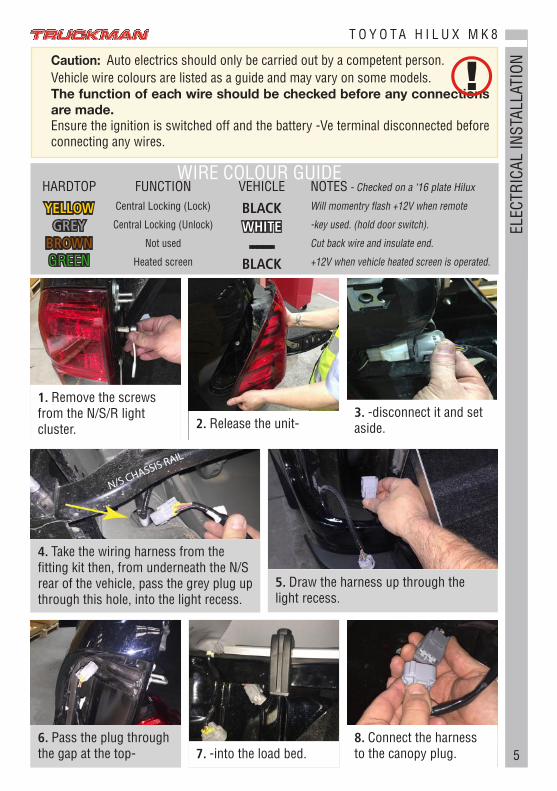
TIONCaution: Auto electrics should only be carried out by a competent person.
Vehicle wire colours are listed as a guide and may vary on some models. The function of each wire should be checked before any connections are made.Ensure the ignition is switched off and the battery -Ve terminal disconnected before connecting any wires.
WIRE COLOUR GUIDEHARDTOP FUNCTION VEHICLE NOTES - Checked on a ‘16 plate Hilux
YELLOWGREY
BROWNGREEN
Central Locking (Lock)
Central Locking (Unlock)
Not used
Heated screen
BLACKWHITE
-------
BLACK
Will momentry flash +12V when remote
-key used. (hold door switch).
Cut back wire and insulate end.
+12V when vehicle heated screen is operated.
1. Remove the screws from the N/S/R light cluster. 2. Release the unit-
3. -disconnect it and set aside.
4. Take the wiring harness from the fitting kit then, from underneath the N/S rear of the vehicle, pass the grey plug up through this hole, into the light recess.
5. Draw the harness up through the light recess.
6. Pass the plug through the gap at the top- 7. -into the load bed.
8. Connect the harness to the canopy plug.
6
T O Y O T A H I L U X M K 8 L U X U R Y T O P SEL
ECTR
ICAL
INST
ALLA
TION
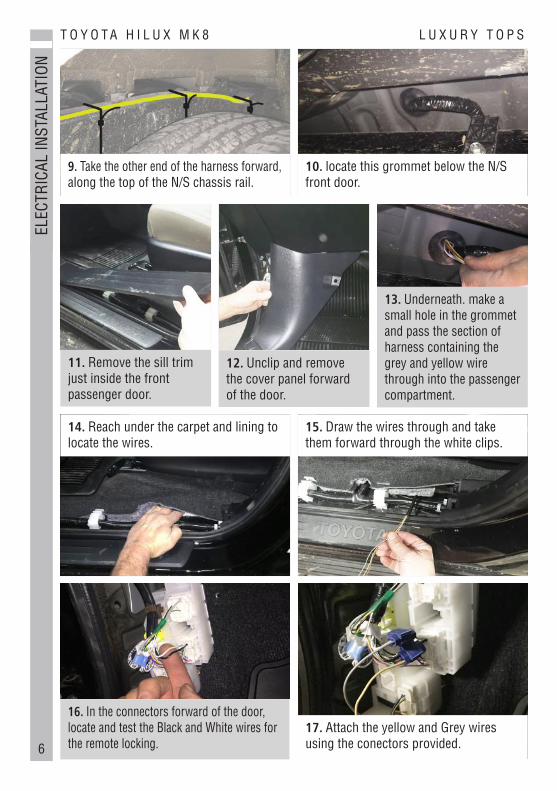
14. Reach under the carpet and lining to locate the wires.
15. Draw the wires through and take them forward through the white clips.
16. In the connectors forward of the door, locate and test the Black and White wires for the remote locking.
17. Attach the yellow and Grey wires using the conectors provided.
9. Take the other end of the harness forward, along the top of the N/S chassis rail.
10. locate this grommet below the N/S front door.
11. Remove the sill trim just inside the front passenger door.
12. Unclip and remove the cover panel forward of the door.
13. Underneath. make a small hole in the grommet and pass the section of harness containing the grey and yellow wire through into the passenger compartment.

7
T O Y O T A H I L U X M K 8
19. Run the other section of the harness forward to the front wheel arch.
From chassis rail Connect to -Ve bond
Connect to +Vebattery terminal
Cable tie to vehicle wiring loom
FUSE
20. Take the harness up into the engine bay. Use the cable ties provided to route it as shown left.
21. Connect the Red wire to the battery auxilliary terminal and the Black wire to the body grounding bond. Do not connect to the battery -Ve terminal.
22. Battery +Ve connection. 23. -Ve connection.
24. Ensure the relay and any excess wire is secured and the harness is cable tied away from heat sources or moving parts.
25. Re-connect the battery before testing.
TEST
ING
1. Switch the interior light to ‘Door’. Check it goes out when the rear door is shut.
2. Push the small button on the left of the handle to open the key cover. Insert the key, ensure it is turned fully clockwise then remove it. This operation engages the keyless remote locking.
ELEC
TRIC
AL IN
STAL
LATI
ON
18. Connect the green wire to the heated screen wire in the sill. Refer to the colour guide and check the functionality carefully before connection as there may be several wires of the same colour.
Auto Styling UK Limited, Unit 14 Narrowboat Way,Brierley Hill, DY2 0EZ, United Kingdom
Tel: 01384 485 405 Fax: 01384 485453 Email: [email protected]: www.autostylinguk.com
NoticeIt is important that safety warnings in the instructions are adhered to.
Do not attempt to fit this product if you are not competent to do so. Improper fitting may affect your warranty considerations.
Due to tolerances of the vehicle fitting of this product may differ from the exact fitting specifications described in the instructions. It is the responsibility of the fitter that the product is installed correctly.
Fitting instruction revisions may be found at www.autostylinguk.com
CONT
ACT
T O Y O T A H I L U X M K 8 IN
FORM
ATIO
N
MODELS COVERED:Truckman Luxury tops (Grand, GLS, S and L Series) for Toyota Hilux Mk8 (2016-date) Double cab.
These instructions are correct at time of publication only and may be amended without notice. For the latest version contact [email protected] or call us on 01384 485405
IMPORTANT NOTESEnsure the tailgate and side windows (if applicable) are closed when driving.Do not place animals in the load area without adequate ventilation.Do not exceed vehicle manufacturer’s load limit when using roof rails.Do not use a pressure-washer near the seals.
MAINTENANCEAFTER THE INITIAL 300 MILES AND THEN EVERY 3000 MILES Check the tightness of the fixing clamp bolts( 8Nm Torque)3 MONTHLY Use a light oil to lubricate the lock and hinges.
CLEANINGUse ordinary non-ammonia based car cleaning products and a soft or microfibre cloth.
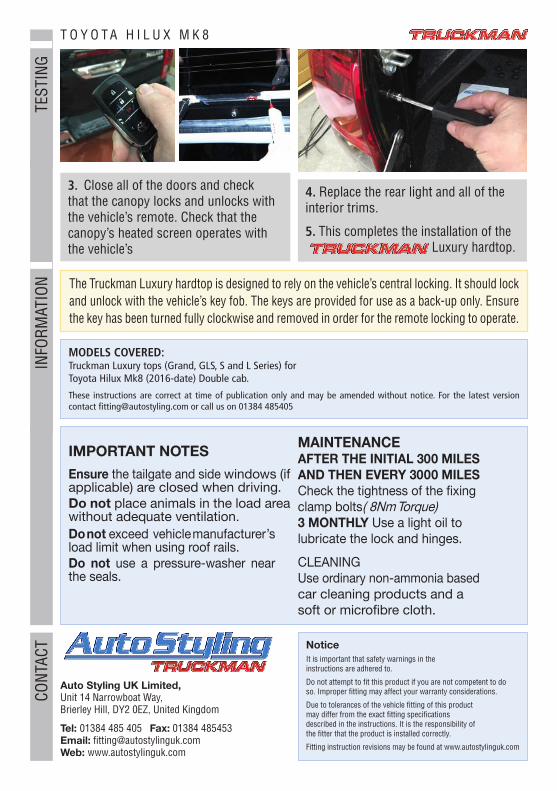
The Truckman Luxury hardtop is designed to rely on the vehicle’s central locking. It should lock and unlock with the vehicle’s key fob. The keys are provided for use as a back-up only. Ensure the key has been turned fully clockwise and removed in order for the remote locking to operate.
3. Close all of the doors and check that the canopy locks and unlocks with the vehicle’s remote. Check that the canopy’s heated screen operates with the vehicle’s
4. Replace the rear light and all of the interior trims.
5. This completes the installation of the Luxury hardtop.
TEST
ING