tr4a – rebuilding the seatstr4a.weebly.com/uploads/2/1/9/8/21980360/tr4a_seat_rebuild.pdf · tr4a...
TRANSCRIPT

TR4A – Rebuilding the Seats
In January 2013 I finally got round to the seats, the last item in the total rebuild of my 1966 TR4A.
The car is now painted in Royal Blue, code 56 or close to it and the trim colours were chosen by my wife, who's favourite handbag is light grey leather. I'd seen this combination on a Jaguar XK and knew it would work.
I did the door-cards and wheel-arches in Vinyl, but my son persuaded my to do the seats in leather.The trim was supplied by John Skinner and his leather and Vinyl are an extremely close colour match.
I had no previous experience of upholstery work on car seats and so this article has a certain amount of “dont do it this way” about it. If you are a beginner like me you may find this quite helpful!
I am a precision engineer by trade. I like to work to drawings and a tolerance of 0.1mm or 10 thou if I'm not bothered much.
With this soft seat stuff you don't have any drawings and 1/8in is about as close as you get most times. However there are a few places where quite a small size alteration makes a big difference to the end result.
Anyone doing this needs to know that the 4A seats are, like many things you find on a TR, quirky and anachronistic and actually must have been quite hard to make in the first place.
To me this is a sufficient reason to rebuild them rather than switch to some mass-produced item from a automatic factory in the far-east. I just can't see the point in bothering with a classic Brtish car if you do this. Just buy a Japanese car if thats the kind of seat you want to sit on.
There is no symmetry about these seats. The side nearest the the doors is cut back, probably to allow the seat-belts, a new thing at the time, to pass over.
They don't use traditional, vintage style, upholstery techniques like the side-screen cars do. There are no springs, no listings, hog-rings or traditional webbing.
They used Pirelli-webbing, borrowed from the Ercol furniture current at the time. The seat-bases were Vitafoam and the seat-backs expanded styrene. Under the seat-base is a rubber diaphragm. None of these materials will be serviceable after 50 years.
Both of the foams were made by filling into a mould and the back particularly is an awkward and critical shape. If you can get reproduction moulded foam you will save a lot of work and get a better result. I didn't and had to build up the backs from standard flat parts. The seat-base foam is not so critical and worked OK more or less as bought.
The seat-covers, leather in my case, are not just covers that slip over the foam. Both the base and back have them bonded into the foam. This joint gets put under a lot of tension and must be done accurately and very strongly or the whole job will look awful and come to bits.
I know someone who moans bitterly that a professional upholstery shop charged him £600 to fit his seat covers even though he supplied the covers. He didn't like the fit they got either.When I told him that I had spent £60 just on glue for these seats, he began to see the other side.

Just in case you are feeling a bit put off here is a bit of encouragement:
At this stage I still have not worked out how to secure the bottom corners of the cover for the seat-back. Leather is not compatible with the round clips used for Vinyl at this position, its too thick.
So this is still a work in progress and a few flaws are visbible to an experienced eye.

Stripping Down
You will need an old blunt screwdriver, a yard of thick strong string and if the rubber feet that they sit on are badly rusted up, a blowlamp!
I told myself to strip down one and leave the other alone so I could see how it needed to go back. Of course I didn't do this. Actually, I don't think it would help much. It would help a bit, but I like to see progress.
Begin by removing the seat-backs which have three fixings down each side and three across the top.
The ones down the side are similar to the kind of fittings that hold on the door-cards. They go in a round hole in the metal seat-frame. You lever the seat-back away from the seat-frame and they pop out, hopefully.
The top three are different. They are an ususual S-shaped clip and are removed by sliding the seat-back downwards, after of course you have released the side-fixings.
Break the side-fixings and you can find a replacement fairly easily, replacing the top fixings will be harder.
The covers are held to the frame with small U-clips and these can be levered carefully off and most of them can be re-used. Some will break or be bent so you will need at least some new ones. Not hard to get.
There are two big round clips that hold the two bottom flaps. These go round the frame-tubes. Again, these are unusual so keep them for reuse. Actually they didn't work out for me so I have some spares left.
There is a big strong spring that holds the base of the cover for the seat-back. Its hooked into the frame-tubes. It will take all your strength to get these out. Put a loop of string under one of the hooked ends. I pulled upwards with the seat on its side.
The seat-foam may be glued to the frame in several places but the glue will be weak by now and easy to free off.
Unscrew the rubber feet and the covers will lift off complete with the foam inside.Note the position of the packing-washers because these have been chosen so that the seat sits equally on both feet.
There should be funny spring clips which engage the end of the runner. The retention provided by these is minimal and I planned to use a better method.
I had to cut the cover on one seat because the feet were rusted solid, but otherwise I got the covers and foams off without damaging them. They do contain a lot of clues that you will need when you refit the new ones so DONT discard them.
I pulled the covers out of the foam so that I could see how they were bonded together.Doing this was OK on the seat-base because the foam was completely beyond any further use.
The foam for the seat-back was just about reusable. Thinking I had new foam, I separated the cover from the foam without much care. Subsequently I had a lot of trouble with the new foam for the seat-back not fitting properly and had I taken more care, may have chosen to reuse it.
Assess the foam for re-use carefully and cut the cover free, rather than just pulling it apart like I did, if you think you may need it.
I hope you have got over removing the big spring because now you do the same string trick on the diaphragm. Except there are eight hooks to do. Only the first few will put up a fight. Note how the rear two are upside-down.
More work with the string-pulling will release the hooks on the Pirelli straps. These will be time expired and won't put up much of a fight.
The rubber feet should be held with counter-sunk screws. Mine had a mixture of counter-sunk and round-head and I couldn't undo two of them.
I ground off the end that was sticking out of the captive nut and applied a bit of heat. Then quench with cold water and do this a few times. Try not to cook the rubber foot. This is better than other methods that might spoil the captive nut.
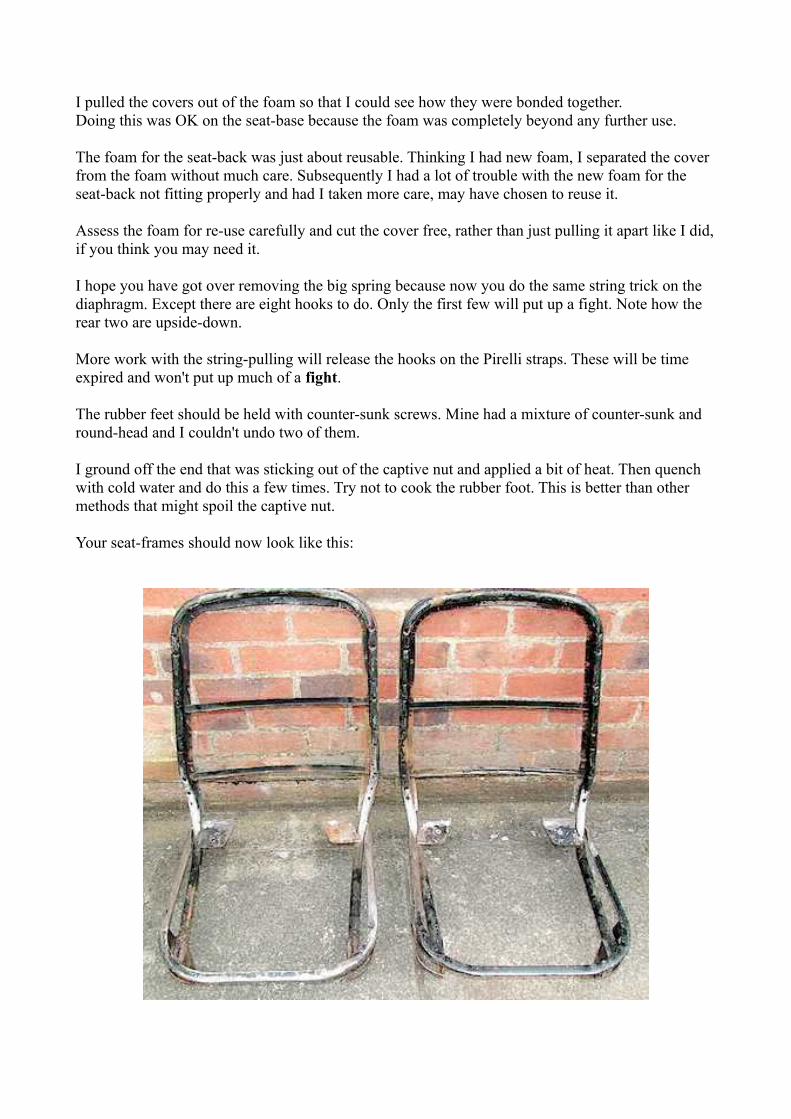
Your seat-frames should now look like this:
Fixing the Frames
The frames were blast-cleaned. There's a local chap does this cheaply. If you do this, scrape away any adhesive and grind off any really rusty bits. This ensures they will come back really clean. I did mine in February, sprayed with oil and wrapped them in cling-film until I felt like welding them.
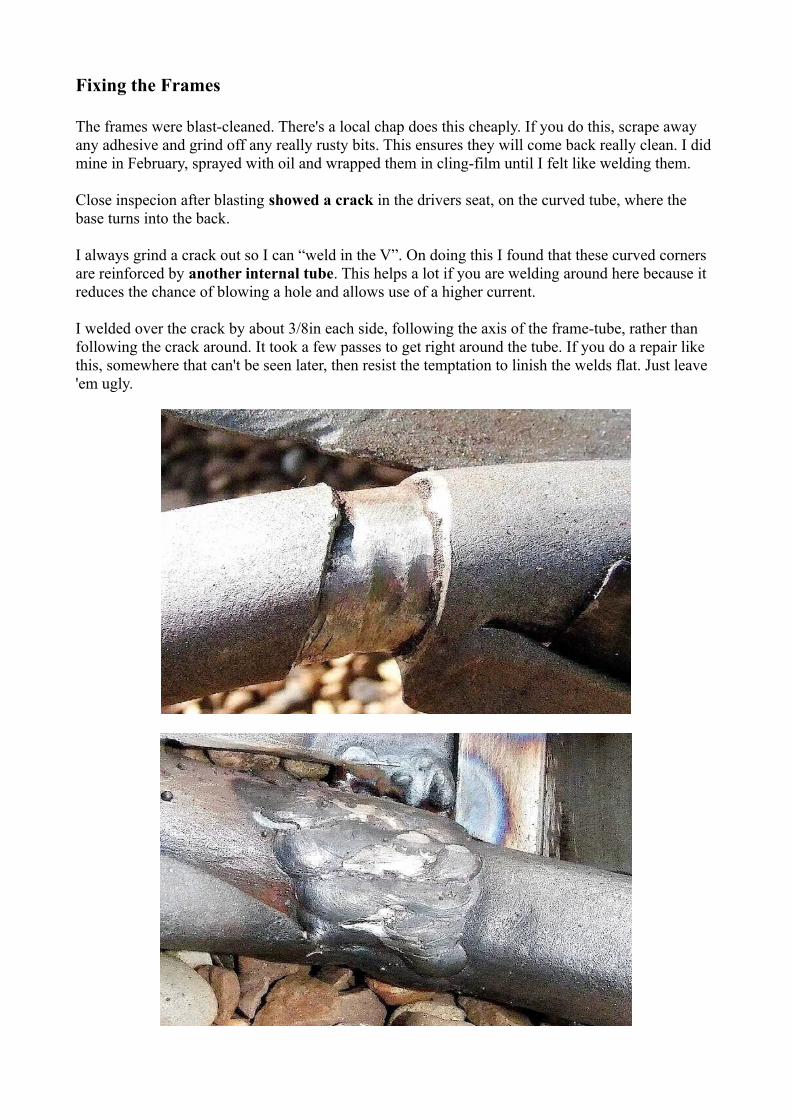
Close inspecion after blasting showed a crack in the drivers seat, on the curved tube, where the base turns into the back.
I always grind a crack out so I can “weld in the V”. On doing this I found that these curved corners are reinforced by another internal tube. This helps a lot if you are welding around here because it reduces the chance of blowing a hole and allows use of a higher current.
I welded over the crack by about 3/8in each side, following the axis of the frame-tube, rather than following the crack around. It took a few passes to get right around the tube. If you do a repair like this, somewhere that can't be seen later, then resist the temptation to linish the welds flat. Just leave 'em ugly.

Whenever I weld a crack, in a place subjected to cyclic loading, I always add something to try to stop another crack forming. Remember that a weld upsets the carbon/iron balance in the steel and this means harder areas meet with soft areas along the weld line. This makes welded repairs likely to fail again.
I added triangular reinforcing plates to both sides of the round tubes. Four plates on each seat. Later on I filled the gap with closed-cell polyethylene foam to make a soft edge for the seat-base foam to sit on. I also added two braces from the seat-back to the plates where the rubber feet fit.
Working out how to squeeze all this extra structure in without spoiling the fit of the foams took a while. However it transformed the way the seats feel when you sit in them.
Before, although you may not have noticed, the seat back flexes backwards when you put your weight against it. Afterwards they feel rigid and I found this extra support reassuring and comfortable.
Note the quarter-circle cut-back on the corner of the plate. This is to allow the hook on the diaphragm to reach the rail and the diaphragm to move down when you sit on the seat.
The plates have Dutch-bends on the top edge to make this smooth and round. You just do this by making an ordinary bend first, take it a bit past 90 degrees and the crush it flat in a vice.

These frames have the gap, between the lower rail and the rail that holds the seat-base foam, just bridged with Hessian, except for straps in a couple of places. This is a recipe for a lumpy finish around there and I chose to fill this in using 0.8mm sheet steel.
This needed two pieces running for the existing bridge piece on the sides of the frames and ending at the rear where the tubes and rails all come together. These need to curve around to follow the curve of the front corners.
And a flat, well almost flat, piece in the front that meets the side pieces. This is the most important piece from an appearance point of view. The joint is on the bracket that holds the seat to the runners.
I ran these through my wheel joddling-machine to stiffen them a bit an get a nice fit to the rails.This isn't vital, you could leave them flat.
Make a patterns for these first using card. My favourite material is a breakfast-cereal packet.Note that the two side are not quite the same shape at the thin end.
Note the cut-out that goes around the old strap that joines the two rails together. I retained this strap just to keep the whole thing in its original alignment.
If you decide to do this too, be aware that you will need to be able to weld very thin sheet to the much thicker rail. I did this by running a short bead on the thin stuff to build it up a bit. This allows use of enough current to get into the thick rails.

I also had to fit a new lower rails and rebuild the corners because these had rusted thin. Actually they were pretty thin to start with because the factory cut away too much metal.
With leather you need to put in a fair bit of tension to get a smooth finish and these rails need to be in good order.
I used 10mm angle from my local hardware store on the front and sides. At the corners I made round repair pieces using 1.2 mm sheet folded and gusseted so it would form round a curve. I left the original corners pieces in situ and welded the repair pieces to them.
The hooks for the diaphragm had worn the rails of the drivers seat almost through to the edge of the rail! These required welding up and re-drilling. If I were doing this again I'd drill them outer bigger because I found filling a 1/8in slot with weld to be quite tricky.
I was searching the web for images of TR seats and found a picture of an early TR6 frame. I noticed that it had five Pirelli-webbing straps instead of the four I had on my frames. The webbing on mine had “expired” and I had reached the conclusion that these had been put in with a lot of tension.
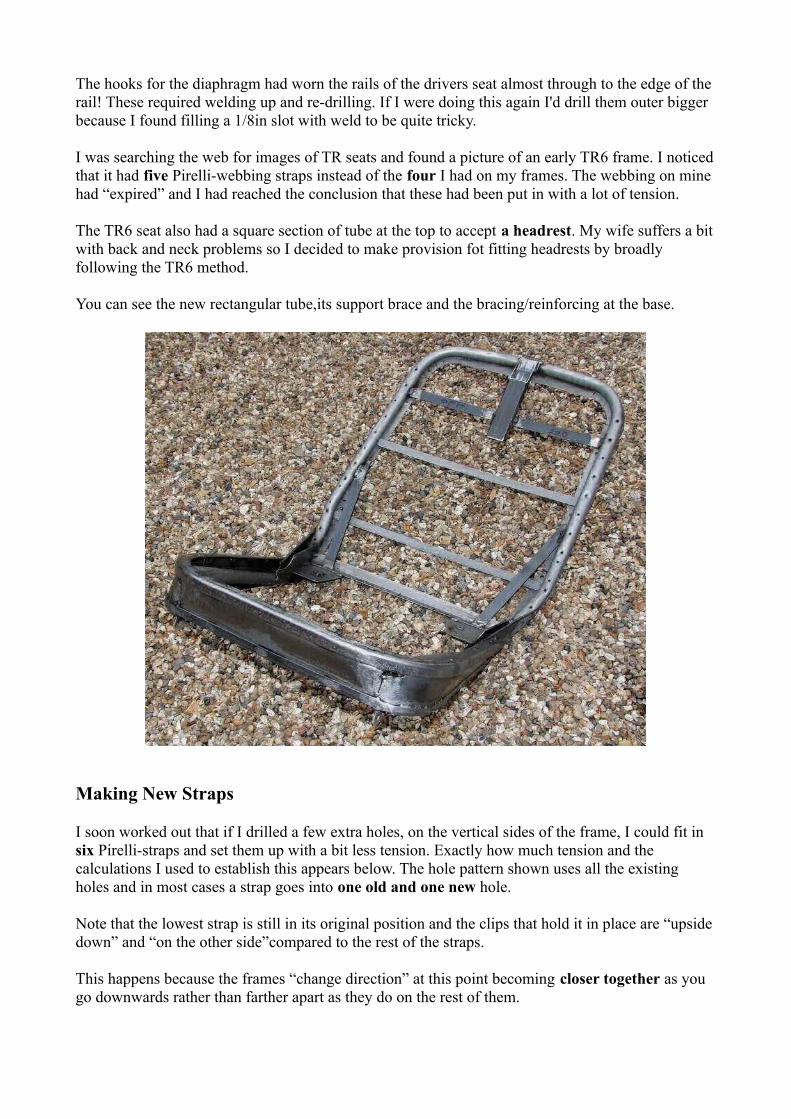
The TR6 seat also had a square section of tube at the top to accept a headrest. My wife suffers a bit with back and neck problems so I decided to make provision fot fitting headrests by broadly following the TR6 method.
You can see the new rectangular tube,its support brace and the bracing/reinforcing at the base.
Making New Straps
I soon worked out that if I drilled a few extra holes, on the vertical sides of the frame, I could fit in six Pirelli-straps and set them up with a bit less tension. Exactly how much tension and the calculations I used to establish this appears below. The hole pattern shown uses all the existing holes and in most cases a strap goes into one old and one new hole.
Note that the lowest strap is still in its original position and the clips that hold it in place are “upside down” and “on the other side”compared to the rest of the straps.
This happens because the frames “change direction” at this point becoming closer together as you go downwards rather than farther apart as they do on the rest of them.

These clips differ in shape on the sloping side of the seat compared the more vertical side. So that there are three different types of clips. Having decided to add straps I had to make extra clips of course.
The top three clips, one of each type, are the originals the lower three are my “copies”. They should be spring steel really but mine are just “coat-hanger” wire which compensates for not being springy by being a bit thicker. They work just fine. The exact shape is not that critical.
These clips were originally held into the ends of the straps by rivets passing through two oblong fish-plates. The modern replacement for this is a “staple” and these are easily available from suppliers of the Pirelli-webbing.
However when you use a staple all the tension in the strap is concentrated at the point where the staple passes through the strap. The fish-plates tightly grip the strap, when correctly rivetted and this spreads the load.

Its not hard to drill out the rivets and recover the fish-plates. I was fortunate that a “Model Engineering” supplier nearby stocked the right kind of rivet. And I had the rivet-snap to set them.
All I had to do was to work out an efficient means of making the fish-plates required for my extra straps. Normally I would cut the plates out clamp them together and drill through so as to make the holes line up. But these plates are too small to work this way.
So a piece of plate was drilled by hand using a mini-drill with a 1mm drill. I had a piece of 0.1in matrix board, used to build electronic prototypes and used this as a drilling guide.
The fish-plates were then “liberated” from the sheet with shears. This produced a nice crop of little plates most of which would pass a pair of rivets without much trouble.

The rivets used were 3/16in long, dome-headed and made from soft iron. The tool needed to “set” them, called a rivet-snap, has an indentation to fit the dome-heads. The rivet-head must sit in the snap so that there is a tiny bit left above the face of the tool. This is vital or the rivets will set loose.
Hold the snap in a vice using soft jaws. Put a rivet through a fish-plate, two layers of strap and the other plate. Hold everything together with a small tool-makers clamp and peen over the exposed rivet-end, whilst supporting the dome-head in the indentation in the snap.
Its not just a matter of smacking the rivet hard. I used the smallest hammer I have and coaxed the rivet to flatten out and tighten up evenly.
Done right the dome-head will look like this:
Note that this is the matching photo to one above, which shows the other side.

So now the tricky business of cutting the Pirelli-webbing to the required lengths.
There were no clues to be had by measuring the old straps. Some of these were so stretched that they were longer than the width of the seat. Those at the extreme top and bottom were still offering some resistance and had to be stretched to remove them. But not by much.
I set up a test with some new webbing by trapping a 1m length under my kitchen door and making marks on the floor to show how much I could stretch it. I could easily pull a 5% increase but to get 10% took a determined show of strength.
I measured the widths of the seat-frames, at the places where the fixings go and set up a spread-sheet to allow for the length of the clips and the 30mm folded over for the rivetting operation.
I decided on using a stretch ratio of 6-8%. Lower at the bottom, that does not take much load, and higher at the top. I was worried that the tube I had added, for the head-rests, might give a feeling of having a “lump in your back”. Trust me this will not happen, straps or not. I know this now. The foam provides plenty of resistance to avoid this.
If you used four straps as original, you would want to cut the following lengths of Pirelli-webbing, starting from the top and working down, lengths in mm:
378 394 415 415
I based this on 8% for the top two and 7% stretch for the lower two.
But I added straps and moved them about. The spread-sheet had the power to allow for this and I actually cut them:
378 392 407 418 426 418
Note I have assumed that you fold flaps 30mm long over the clips!!
I got my webbing from John Skinner with the seat-covers. The roll had nearly enough for four seats! But it was 1.5in wide and the original, and therefore the clips, was 1.25in. Having a bit of extra width means that I get the same resistance with less tension. One of the reasons I did not cut for a 10% stretch.

I just trimmed the ends on a slope to suit the clips, marked the lengths and the position of the folds.
Note the trial fit being carried out on newly-blasted frames, wrapped in cling-film!

Those Tricky Foams
I said this in the introduction but I'll repeat it here. Get fully moulded foams that are close to the original if at all possible.
This will save a lot of work and quite possibly money. I reckon that it cost 40 GBP in glue and perhaps 30 GBP for extra foam and other upholstery materials, to bring the reproduction foams I bought, up to the proper size.
To be fair, the foams for the seat-bases did not really want much attention. They came made from two pieces of the stiff, white coloured, kind of upholstery foam and were cut close to the size and shape of the moulded Vitafoam originals. They were just a bit to “flat” being made from ordinary sheet.
Originally the Vitafoam was covered with an extra layer of thin foam and I did this also. I used 3/8in thickness and glued it around the inner-face of the “horse-shoe”. The extra layer of foam helps to make a “pocket” to bond the cover into. But it was still too flat.
You can easily alter the shape of foam using rough trimming with a scalpel or electric carving-knife. You finish smooth with an angle-grinder with and ordinary steel grinding-disc, yes really!
I used another method because I did not want to reduce the thickness of the foam, it being already barely as thick as the original, which had seen many years of being squashed.
I cut a horse-shoe shape from 1/2in upholstery wadding, making this a little smaller than the raised area of the seat-foam. This “softens” the flatness and makes a good profile on the finished job. It was tucked in underneath the layer of 3/8in foam of foam.

No wadding, a bit too flat for my taste.
Wadding adds the curvature required and is cheap and obliging stuff to work with.

If only the foams for the seat back were as simple. These were originally moulded in yellow foam, styrene I would think. This ages somewhat better than the grey Vitafoam and were almost reusable.
The replacements were made a bit like the base-foam, but from a softer grade of dark grey upholstery foam. Its really important that softer grade is used, or you will need some fancy tackle to get the top-covers to pull down.
They were actually a three part sandwich, there being a triangular wedge piece running down both vertical sides. The cross-section of this wedge was the same for the whole run. But the moulded original is much thicker at the bottom than the top. It was wedge shaped in two directions.
I have borrowed the following two images from a post on the BritishCarForum site and they show the exact same kind of foams that I started with. So these must be a commonly available items.
The end result is actually pretty good. But this is Vinyl not leather and it's a bit more forgiving.

My guess is that wedges tapering in two directions are too tricky for the ordinary foam-cutting machines to do.
I bought an additional wedge piece and cut it transversely with a scalpel, so as to make two wedges that tapered in the same way as the moulded original. One bought-in wedge served for both sides of one seat.
The new foams were split on the glue line and I spliced in the additional wedge pieces. I used the white grade because of its greater resilience. I intended to increase the stffness if the side pieces. I don't really know why, except my daily-driver seems to be like this.
I added a tapered layer of the kind of thin foam with a fabric layer, called “scrim” I think. This supports tension. I glued it so as to set the edge to make the side-profile a match to the shape of the original foam. Quite tricky this, you need three hands.
The foam seems to lean “the wrong way” but it won't do this when the cover pulls it. The white wedges are about 1in thick at this point.
Note how the 3/8in foam layer is floating free on one edge. It stays this way. It you glue both edges then the tension of the cover would cause it to “balloon up”. This way its pulled into place by the cover and lays in place behind the stitched seam.
The back-foam was about 2 in “taller” than the back of the frame. I very nearly cut this off. DONT!This extra foam generates a lot of tension as you pull the cover down but this is vital to get the right profile in the top rolled edge of the seat-back.

The original seat had a loop of foam that followed the outside of the seat-foam. One piece all the way around. I did this too using 1/2in thick grey foam.
This proved tricky to keep in place when fitting the covers so I glued it, but only in a strip about 3/8in wide, around the pointed edge of the main foam. This is another example of leaving it un-glued over most its area, so the cover brings it into place as it compresses the foam.
You can choose to use brush-on high-temperature impact-adhesive or the quick and easy spray-can stuff. Do not expect the can to generate anything like the joint strength of the brush-on kind.
Mostly so far, you have seen joints that I made with the strong stuff. But bear in mind that this makes quite a hard layer when it is fully set. I can feel this in places, through the cover. So with hindsight a bit more use of the spray-stuff in non-stressed joints would have been good.
The long tapering wedges for example would stay in place without a really strong adhesive. After I glued these with the strong-stuff I found that that this had made the joint stiffer than I really wanted.
Maybe you are having trouble visualising the shape of the wedges that I “let in” to the sides. I should have taken a photograph but missed the opportunity. The next picture will help though.

Bonding the Covers into the Foam
If you search for pictures or videos of seat-covers being fitted, you will see the usual arrangements, where the cover has wires or sewn-in tabs. These get pulled into place by a wire-loop called a “hog-ring”, they pass through the foam and attach to a metal part of the frame.
The 4A seats aren't anything like that. The centre-panels of the covers are sewn into the outer “horseshoe-shaped” piece and this leaves a thick seam about 1/2in wide.
This seam is then glued into the foam. Study the old foam to see how the factory did this.
I prepared the new foam to accept the seam, by making a cut into it, about 1/4in deep. The cut went at an angle of about 5-10° below the glue layer, rather than following it or going straight down into the base layer. I had also added a layer of foam and this also helped to form a pocket to bond into. The leather seams are stiffer than Vinyl and this angle conforms with their “natural” lay.
The method was more or less the same for the seat-bases and the seat-backs.
The foam left over from making the “horse-shoe pieces”, went under the central fluted panels. It must be trimmed back a bit, so as to lay flat inside the bonded area, of course.
If you compare the finish of these centre-panels on my seats, with the black Vinyl one above, you can see that mine are more “perky”. This is a matter of taste and you could let them stay flat if you wish. But you probably have to put this in before you do the bonding, so make your mind up!
I prepared the seam by gluing the layers together with the strong impact adhesive brushed into the gaps. The aim here was to make sure I got both layers bonded into the pocket.
A trial fit or two, without glue, showed the technique needed to push the seam into the pocket. I found it would stay there with no glue. A few marks were made on the foam and the cover to show the correct position.

I could not imagine myself getting the seam into the pocket, in exactly the right place ,if obstructed by impact adhesive which “catches” as soon as it touches.
I have a lot of experience using Polyurethane-Sealant, my favourite brand is called Tiger-Seal. This is very sticky but takes about half an hour to cure. It does not grab on first meeting.
White-coloured sealant was squeezed into the pocket using quite a big hole in the end of the nozzle. It took three passes, four in some places, to fill the pocket. After each pass I closed up the pocket and pinched it together to drive the sealant into the pores of the foam.
Judging the quantity, so that a little will exude when you insert the seam, is pretty tricky guess-work. Maybe it will help to know that I consumed almost a whole tube to do each seat. The base and the back both took about half the tube.
To keep the cover in place while the sealant cured, I cut a piece of cardboard to protect the leather and got four house-bricks handy.
It was simple to push the cover-seam into the sealant. It slid in easily and I could move it to line up my marks. As I piled on the bricks I was careful to ensure that the corners stayed put. Similarly the ends where the seam left the pocket.
At this stage I had no idea if this would stick or simply pull out once it had set. This seam bonding comes under a lot of tension, particularly at the top of the seat-back.
Its impossible to do all this and photograph doing it at the same time if you are working alone, so you will have to make do with a shot of the end-section, taken after the sealant had cured.
Note the bevel, cut with scissors, on the edge of the foam in the centre-panel. The white sealant is easily visible below the cover, but there is actually also some just visible on the top side.
Now for the Wadding
There was no wadding in the original seats. But when I pulled the covers over the foam for the first time, it was obvious that these seats were designed for Vinyl and not leather. No amount of pulling, this way or that way, would remove all the ripples and puckers.
The corners of the horseshoe shaped outer where they meet the centre-panel, were a particular problem. There just isn't enough “push” being generated by the foam to smooth out the leather.
Much the same happens on the outside faces. The seat-bases as usual were less of a problem than the seat-backs.
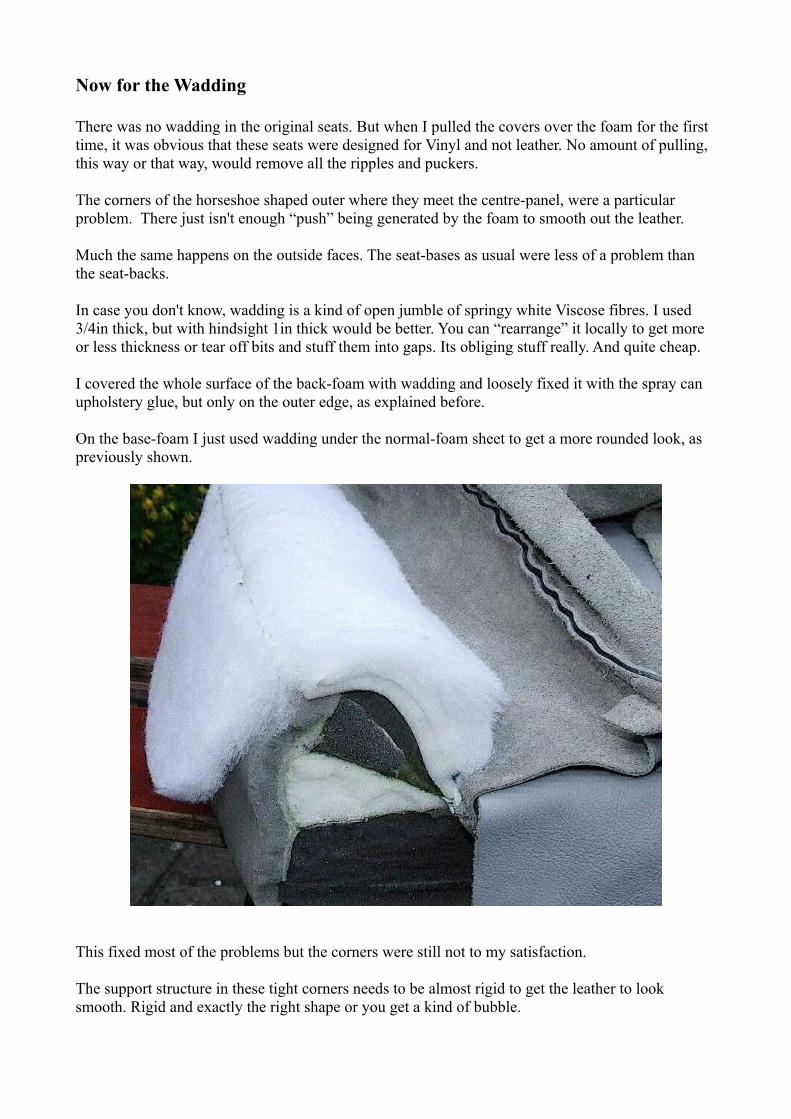
In case you don't know, wadding is a kind of open jumble of springy white Viscose fibres. I used 3/4in thick, but with hindsight 1in thick would be better. You can “rearrange” it locally to get more or less thickness or tear off bits and stuff them into gaps. Its obliging stuff really. And quite cheap.
I covered the whole surface of the back-foam with wadding and loosely fixed it with the spray can upholstery glue, but only on the outer edge, as explained before.
On the base-foam I just used wadding under the normal-foam sheet to get a more rounded look, as previously shown.
This fixed most of the problems but the corners were still not to my satisfaction.
The support structure in these tight corners needs to be almost rigid to get the leather to look smooth. Rigid and exactly the right shape or you get a kind of bubble.

I never give up on a thing like this. There is always a way out.
and the result is!
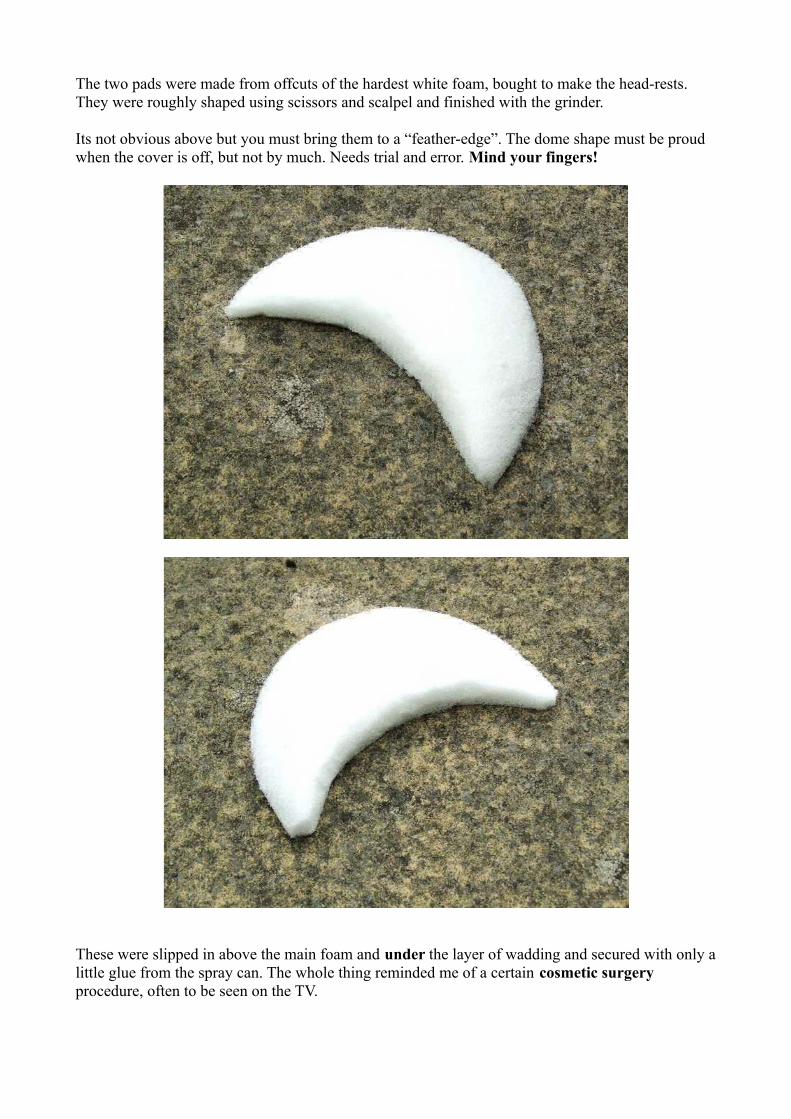
The two pads were made from offcuts of the hardest white foam, bought to make the head-rests.They were roughly shaped using scissors and scalpel and finished with the grinder.
Its not obvious above but you must bring them to a “feather-edge”. The dome shape must be proud when the cover is off, but not by much. Needs trial and error. Mind your fingers!
These were slipped in above the main foam and under the layer of wadding and secured with only a little glue from the spray can. The whole thing reminded me of a certain cosmetic surgery procedure, often to be seen on the TV.

Building onto the Frames
So now we come to the operations needed to secure the foams in place and get the final fit on the covers. Start with the bases because these are so much simpler to get right.
The first job of course is to install new diaphragms. You pull the hooks into place with string. Dont fit the two rear-hooks until later and make sure they don't fall out and get lost!
You can see that I have filled the gap between the two re-inforcing plates with white foam.Its actually closed-cell polyethythene foam recovered from packaging.
I prepared the base-foams following the method found on the original factory foam. This is Hessian glued on the back of the foam and folded over onto the frame. This gives fore-aft restraint on the base-foam.

By this stage I had made quite a few trial-fits with the foam in place on the frame. While doing this I kept the cover in place with a selection of clips and pegs.
You cannot gauge if you have the right amount of wadding and foam until you actually get the cover restrained in more or less the final position. The foams alone are too floppy to do this.
Getting the cover over the edge of foam is quite easy. You just kind of roll it and eventually it will jump from being inside-out on the top of the foam to being the rightway-out and enclosing the foam.
The trouble is then there won't be any room for the frame and no free material to fold over the frame. The whole cover will be full of foam. I knew this would happen of course, and had already put together the means to force the frame into the foam.
Here its about half-way into the final position. At this point check that the foam is correctly positioned both fore-and-aft and side-to-side, glue the Hessian flap to the front of the frame and clip the other flap around the rear cross-bar.
Loosely fix a layer of the thin foam, with the spray-can glue, to give a padded feel to the skirt.

The frame can now be squashed down to its final position and the leather-cover drawn over the skirt and clipped temporarily in place.
You need to decide if you want the leather seam to sit on the top surface or on the skirt side of the corner. Whichever side you choose will have a slightly “lumpy” line by the piping bead.
I chose to have the seam on the top. Feel down inside the gap between the foam and cover and set the seam as you want it.
Make sure the cover sits in the right place and you are happy with the look of it.
You may notice two long screws poking up where the rubber feet normally go. This is so I can set the seat down the right way up without spoiling the paint on the frame rail.
I used Hessian on the top edge of the back-foam also, even though the factory did not. This is because, as mentioned earlier, the new foams were much “taller” than the original moulded foam. About 2 in actually, which is a lot and I needed some help to get them into the right place.

I added a loop of self-adhesive foam tape, 1/4in thick, to the frame and this can just be seen above. It runs under the Hessian and right down both sides.
It may look as if I have omitted wadding on the top of these.
The cover will be pulled so tight in this area that the grey foam will be collapsed virtually right up to the frame. This will get the piping to match the profile on the original cover.
Because the seam in the top of the back-cover takes so much tension and because I wanted to make it “point backwards”, which it tries not to do, I decided to glue it.
Glueing seams like this makes them a bit more obvious because the cover then shows a line at the edge of the seam. Its not normally the done thing. I didn't go right the way down the sides.
I recut the slits in the cover around the corners, widening them to a true V-shape before gluing them down. These corners want to bunch up because there is really too much material once its folded over the frame. Anybody who has ever covered anything will know this effect.
Quite a bit of trimming and fiddling was needed to get this part to sit smoothly on the corners.

A bit of extra wadding was stuffed in here to get the right finish. Remember that these seats are not symmetrical in this area, so what works on one side does not necessarily work on the other.
Pulling the back-covers over the foam is easier than the base. No extreme clamping is needed.Just squeezing by hand and temporary clipping in place. Gradually the correct profile for the piping can be achieved by comparing with the old cover.
Now you have the strenuous task of installing the long spring that holds the bottom of the back- cover. This threads through the tube sewn into the cover and hooks into the lowest holes in the frame.
These are tough to fit on an original frame. But I have added reinforcements in this area and they don't make it any easier!
String alone would not quite get these into the right position to engage with the frame. They needed a tweak, from narrow-jawed Mole-grips, as well as stretching with string.
Those screws sticking up were found to have a second use. The string was looped around the frame and secured on the screw. This kept the spring stretched and allowed final positioning with the grips.
I did this job on my dining-room carpet while my wife was out at work. This meant I could give them a good wrestling match, without scuffing up the paint or the leather.
The long leather flap then passes around the “cross-bar” but the finished side goes against the bar.Careful where you put the U-clips because the diaphragms and the clips thathold the real panel all argue for space on this bar.

Finishing Off
Once you are happy with the fit of the covers secure them to the rails with the U-clips. I used a mixture of old and new ones. If you push these on and then change your mind you can get them off without wrecking the leather covers, almost! So try to get them right first time.
The small rubber feet were added so that I could put the seat down after the big rubber feet were fitted in place of the long screws. The big feet dont touch the ground!
This picture also gives an idea of how tricky it was to engage the hook of the spring into the frame.
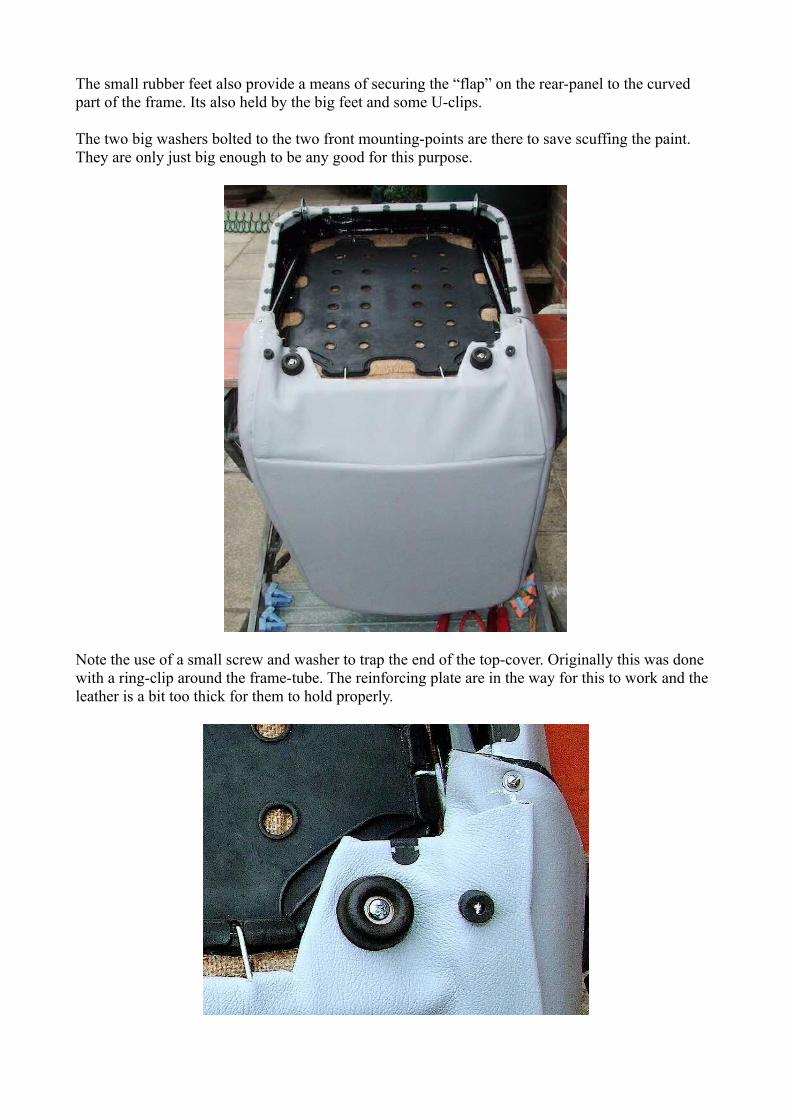
The small rubber feet also provide a means of securing the “flap” on the rear-panel to the curved part of the frame. Its also held by the big feet and some U-clips.
The two big washers bolted to the two front mounting-points are there to save scuffing the paint. They are only just big enough to be any good for this purpose.
Note the use of a small screw and washer to trap the end of the top-cover. Originally this was done with a ring-clip around the frame-tube. The reinforcing plate are in the way for this to work and the leather is a bit too thick for them to hold properly.

Alan J Turner
England
July 2013