trach care guide-2.15 - ohsu.edu · 3 breathing with a tracheostomy tube a tracheostomy is an...
TRANSCRIPT

O H S U H E A LT H C A R E
Trach care guideFor patients and families
THIS IS A PRO
F THIS IS A
PROOF THIS IS
R OF
THIS IS A PRO
IS IS A
PROOF THIS
ROOF
THIS IS A P
HIS IS A
PROOF T
F
THIS IS A
PROOF T
THIS I
PROTH
PRO
THIS I
PROOF T
THIS IS A PRO
PROOF THIS IS A PRO
Trach care guide
This guide will tell you about your airway and how to care for it at home. Your nurses, doctors and therapists will help you understand the information and skills described here.
Airway basics 2 Tracheostomy basics 4
Trach types .................................................................... 4 Parts of the trach tube ...................................... 6
Caring for your trach 8 Stoma site assessment ........................................... 8 How to clean around your trach ................... 8 How to change/clean inner cannula ........ 10 How to change your trach ties ...................... 12 Suctioning ................................................................... 13 Humidification ................................................... 15 Speaking valves ................................................. 16 Trach capping ........................................................... 18
Living with a tracheostomy 20 Bathing and showering ....................................... 20 Rest and sleep .................................................... 20 Communication ................................................. 21 Swallowing .................................................................. 22 Emotions ...................................................................... 23 Physical activity and exercise ...................... 23 Safety ..................................................................... 24 Intimacy ........................................................................ 24 Traveling ...................................................................... 25
Troubleshooting and when to call for help 26 Vomiting ....................................................................... 26 Thick secretions ................................................ 26 Difficulty breathing ......................................... 26 If your trach comes out ...................................... 27 When to call your doctor .................................. 27
Trach supply checklist 28 Trach skills checklist 29

2
Airway basics
Breathing
You’ll better understand your tracheostomy if you know more about how you breathe.
Breathing normally starts at the nose and mouth — you inhale air in through your nose and mouth and it flows down your throat. Next, the air passes through your windpipe (trachea) into your lungs. This path allows the air to be warmed, cleansed and moistened. Oxygen from the inhaled air passes from the lungs into the bloodstream so it can be used by the rest of your body. When you exhale the air then is passed back up through the trachea and out through your mouth and nose to clear the carbon dioxide from the lungs.
Copyright: <a href='https://www.123rf.com/profile_hfsimaging'>hfsimaging / 123RF Stock Photo</a>
Epiglottis
Vocal cords
Esophagus
Stoma
3
Breathing with a tracheostomy tube A tracheostomy is an opening made through the skin of your neck into your trachea to help you breathe. (The surgical procedure is called a tracheotomy.) This opening is called a stoma, and a tube called a tracheostomy tube is placed in the opening to keep the hole open. You may hear your healthcare providers refer to this as a “trach.” Trach and tracheostomy mean the same thing. The tracheostomy allows you to breathe air directly into your lungs instead of through your mouth and nose. There are many different reasons why a person needs a tracheostomy. You may already know the reason you have a tracheostomy tube. If you are unsure, ask your healthcare team to explain the medical condition or diagnosis with you. When you breathe through a tracheostomy tube air goes directly into your windpipe. This means your nose is unable to warm, clean or moisten the air. Your stoma is located below the vocal cords, so you may only be able to talk when covering your trach. You may also find you need to be very careful when you swallow food and water, so the food and water don’t get into your lungs (aspiration). We will discuss more about these things later in this manual.
4
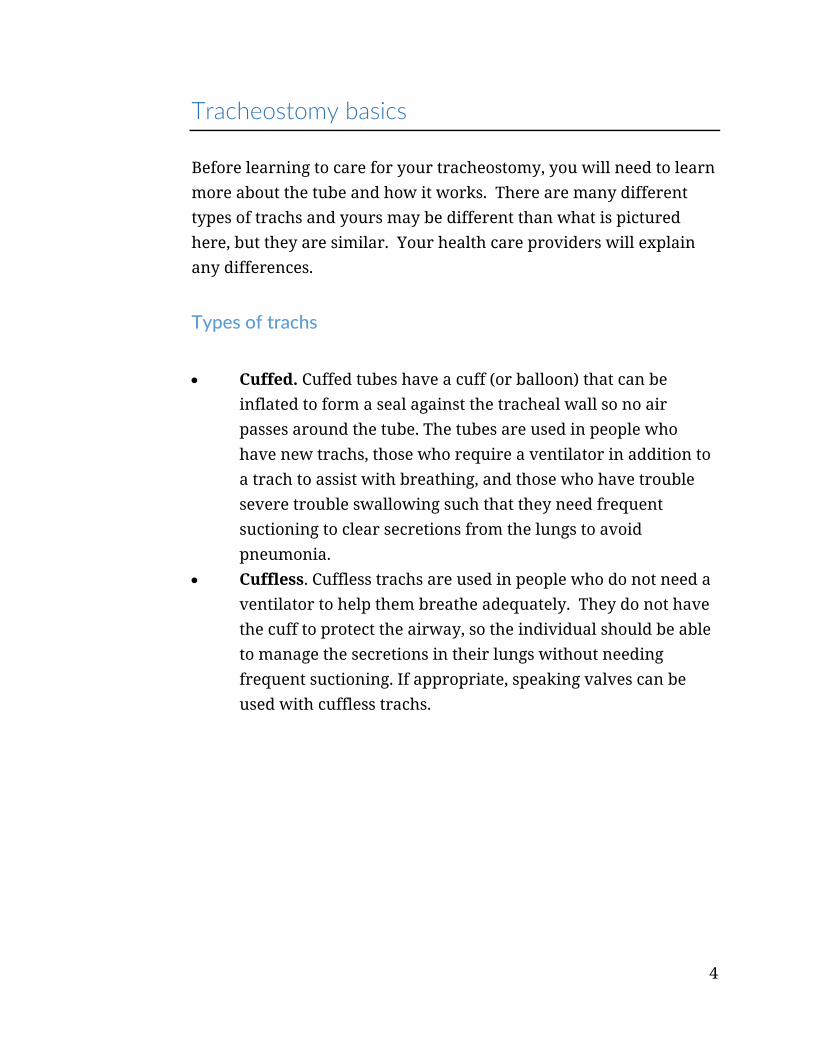
Tracheostomy basics Before learning to care for your tracheostomy, you will need to learn more about the tube and how it works. There are many different types of trachs and yours may be different than what is pictured here, but they are similar. Your health care providers will explain any differences.
Types of trachs
Cuffed. Cuffed tubes have a cuff (or balloon) that can be inflated to form a seal against the tracheal wall so no air passes around the tube. The tubes are used in people who have new trachs, those who require a ventilator in addition to a trach to assist with breathing, and those who have trouble severe trouble swallowing such that they need frequent suctioning to clear secretions from the lungs to avoid pneumonia.
Cuffless. Cuffless trachs are used in people who do not need a ventilator to help them breathe adequately. They do not have the cuff to protect the airway, so the individual should be able to manage the secretions in their lungs without needing frequent suctioning. If appropriate, speaking valves can be used with cuffless trachs.
5
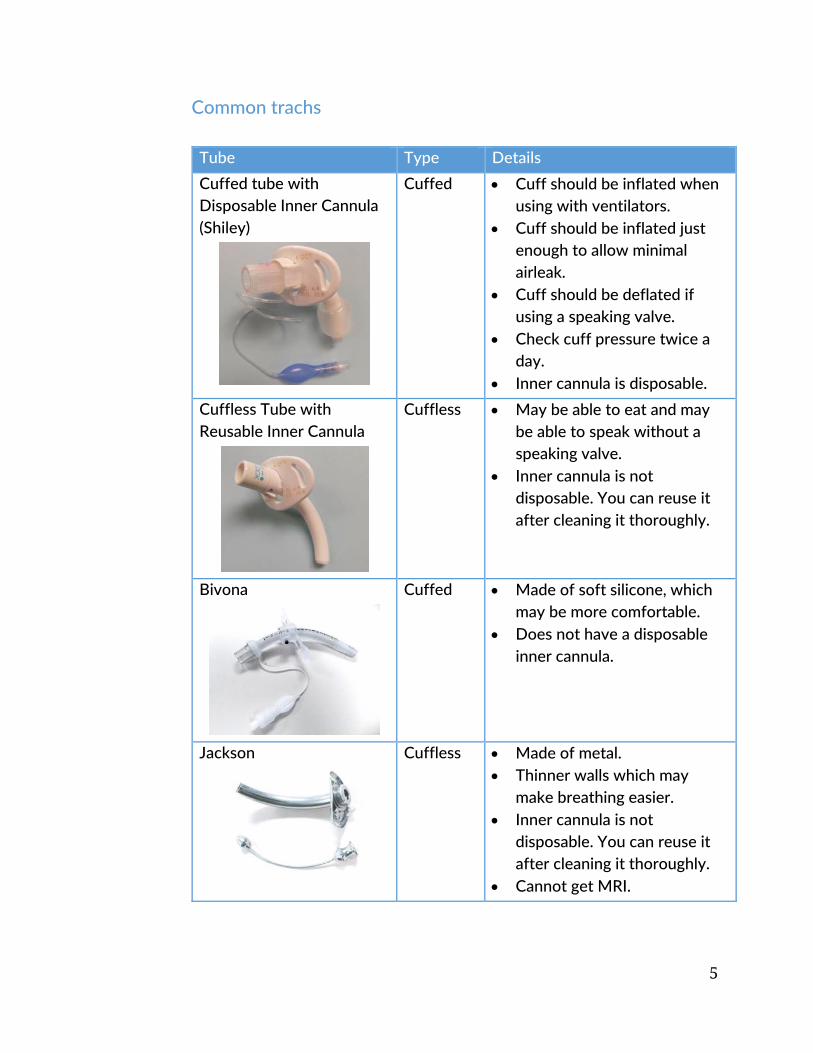
Common trachs Tube Type Details
Cuffed tube with Disposable Inner Cannula (Shiley)
Cuffed Cuff should be inflated when using with ventilators.
Cuff should be inflated just enough to allow minimal airleak.
Cuff should be deflated if using a speaking valve.
Check cuff pressure twice a day.
Inner cannula is disposable.
Cuffless Tube with Reusable Inner Cannula
Cuffless May be able to eat and may be able to speak without a speaking valve.
Inner cannula is not disposable. You can reuse it after cleaning it thoroughly.
Bivona
Cuffed Made of soft silicone, which may be more comfortable.
Does not have a disposable inner cannula.
Jackson
Cuffless Made of metal. Thinner walls which may
make breathing easier. Inner cannula is not
disposable. You can reuse it after cleaning it thoroughly.
Cannot get MRI.
6
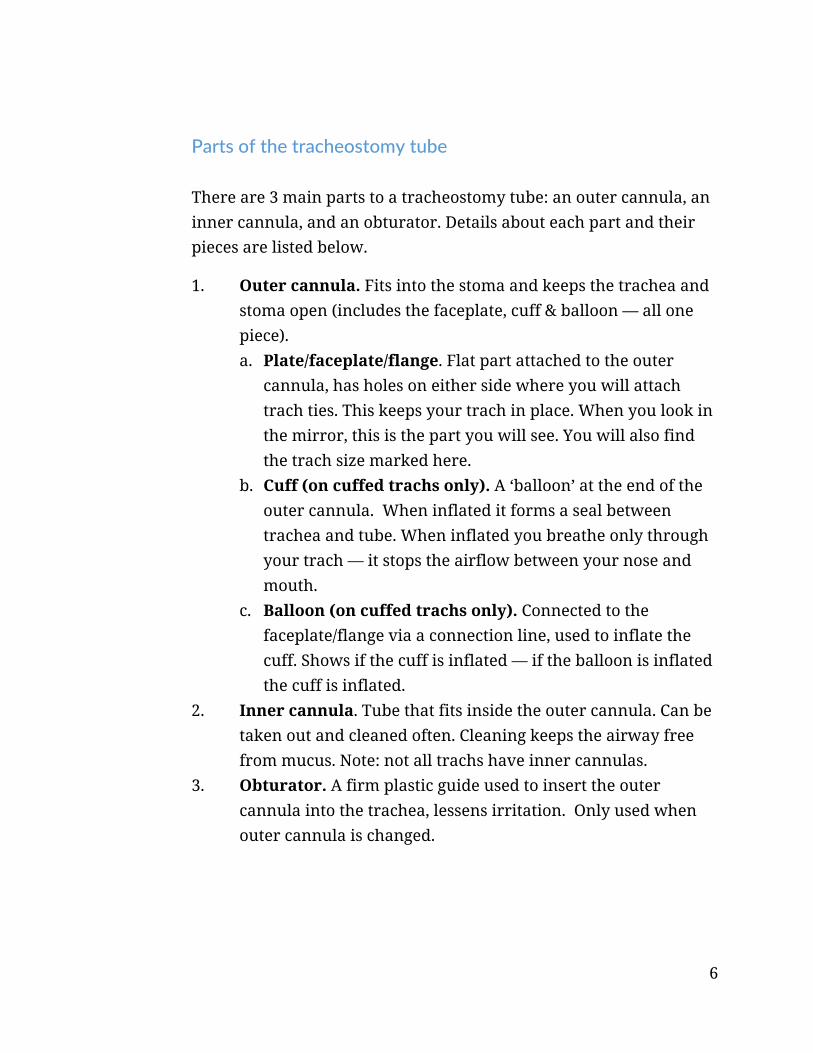
Parts of the tracheostomy tube There are 3 main parts to a tracheostomy tube: an outer cannula, an inner cannula, and an obturator. Details about each part and their pieces are listed below.
1. Outer cannula. Fits into the stoma and keeps the trachea and stoma open (includes the faceplate, cuff & balloon — all one piece). a. Plate/faceplate/flange. Flat part attached to the outer
cannula, has holes on either side where you will attach trach ties. This keeps your trach in place. When you look in the mirror, this is the part you will see. You will also find the trach size marked here.
b. Cuff (on cuffed trachs only). A ‘balloon’ at the end of the outer cannula. When inflated it forms a seal between trachea and tube. When inflated you breathe only through your trach — it stops the airflow between your nose and mouth.
c. Balloon (on cuffed trachs only). Connected to the faceplate/flange via a connection line, used to inflate the cuff. Shows if the cuff is inflated — if the balloon is inflated the cuff is inflated.
2. Inner cannula. Tube that fits inside the outer cannula. Can be taken out and cleaned often. Cleaning keeps the airway free from mucus. Note: not all trachs have inner cannulas.
3. Obturator. A firm plastic guide used to insert the outer cannula into the trachea, lessens irritation. Only used when outer cannula is changed.
7
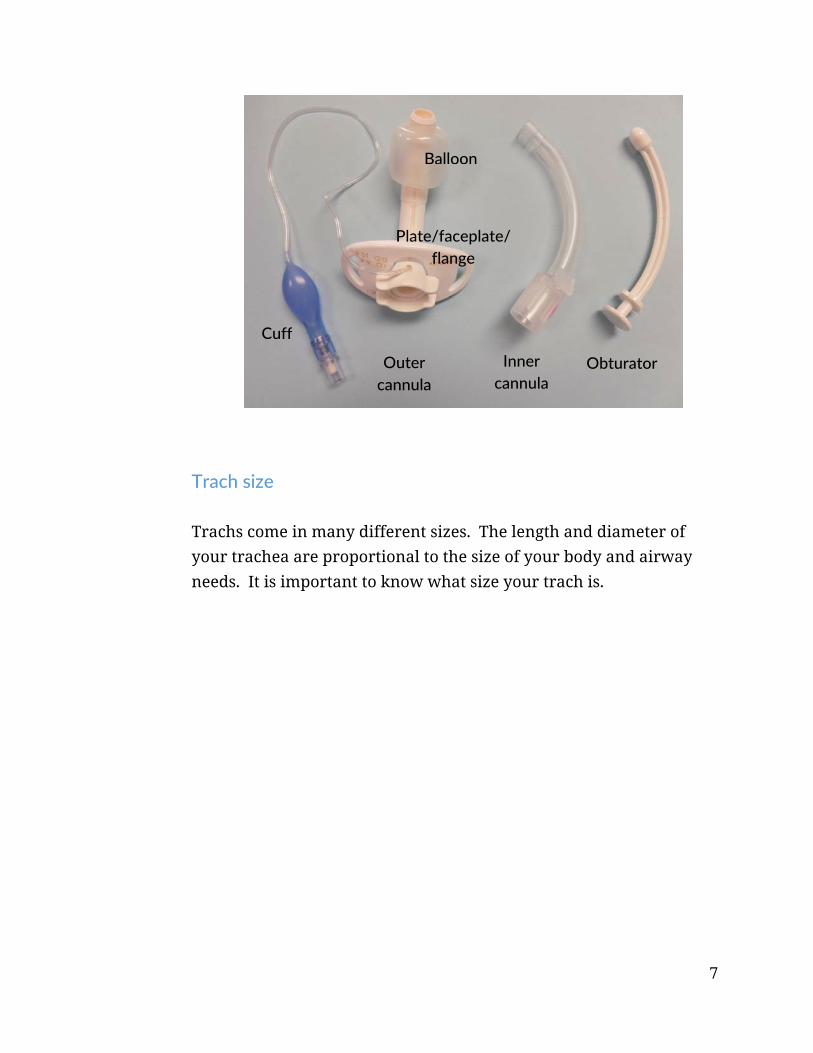
Trach size Trachs come in many different sizes. The length and diameter of your trachea are proportional to the size of your body and airway needs. It is important to know what size your trach is.
Outer cannula
Inner cannula
Obturator
Cuff
Balloon
Plate/faceplate/ flange

8
Caring for your trach
Stoma site assessment Taking good care of your tracheostomy is very important. It can prevent infections and help keep you breathing easily. Always wash your hands thoroughly before touching your trach or performing any trach cares. Look closely at your skin for signs of infection when you clean around your tracheostomy.
How to clean around your tracheostomy
1. Clean the area around the trach at least once daily. 2. Choose a comfortable position in front of a mirror. 3. Do not let crust form on the skin. Keep the skin around the
trach clean and dry. 4. Remove the old dressing (if there is one) from under the
flange.
9
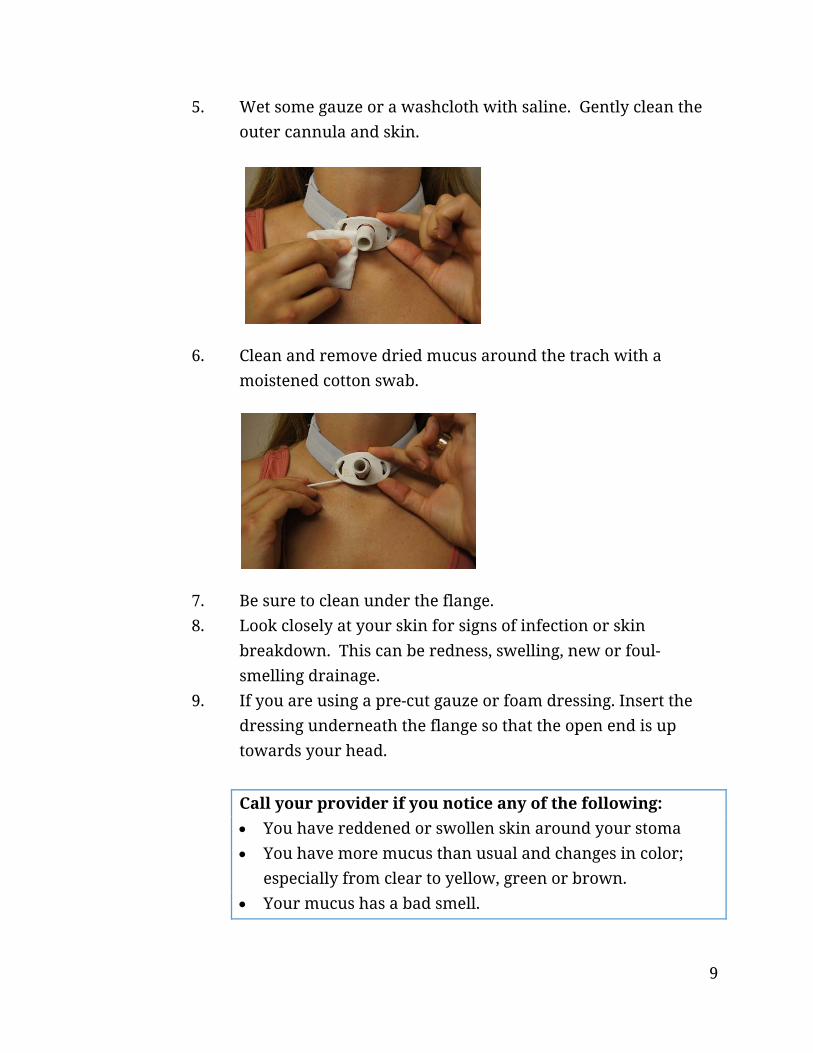
5. Wet some gauze or a washcloth with saline. Gently clean the outer cannula and skin.
6. Clean and remove dried mucus around the trach with a moistened cotton swab.
7. Be sure to clean under the flange. 8. Look closely at your skin for signs of infection or skin
breakdown. This can be redness, swelling, new or foul-smelling drainage.
9. If you are using a pre-cut gauze or foam dressing. Insert the dressing underneath the flange so that the open end is up towards your head.
Call your provider if you notice any of the following: You have reddened or swollen skin around your stoma You have more mucus than usual and changes in color;
especially from clear to yellow, green or brown. Your mucus has a bad smell.
10
How to change/clean inner cannula
Once tracheostomy care is complete, the inner cannula should be changed or cleaned.
Depending on what type of trach you have, the inner cannula will be either disposable or non-disposable.
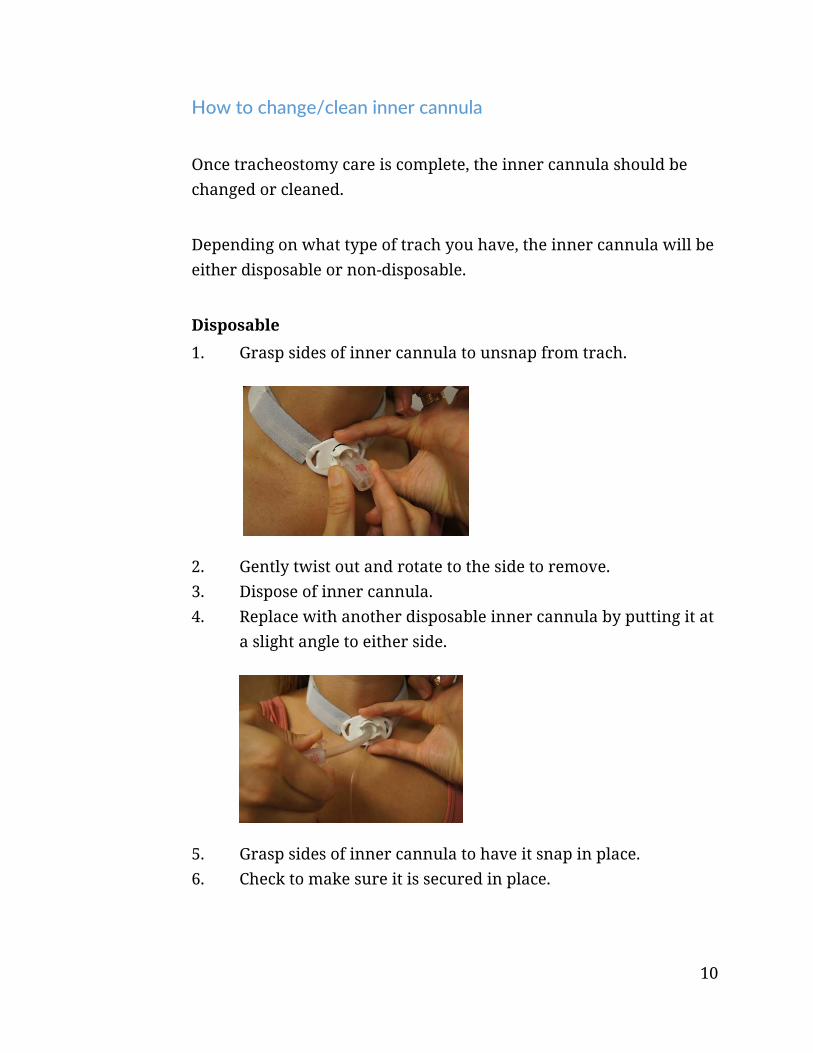
Disposable
1. Grasp sides of inner cannula to unsnap from trach.
2. Gently twist out and rotate to the side to remove. 3. Dispose of inner cannula. 4. Replace with another disposable inner cannula by putting it at
a slight angle to either side.
5. Grasp sides of inner cannula to have it snap in place. 6. Check to make sure it is secured in place.

11
Non-disposable
1. Twist inner cannula to your right to unsnap the inner cannula.
2. Gently twist out and rotate to the side to remove.
3. Clean with brush.
4. Tap remaining water or saline off.

12
5. Replace inner cannula by putting it at a slight angle to either side.
6. Twist inner cannula to the left to have it snap in place.
How to change your tracheostomy ties It is good to learn how to change your trach ties yourself. However, have someone help if needed.
1. Set up new trach tie and any other supplies you need. 2. Remove your tracheostomy dressing, if you have one. 3. Hold trach with one hand by gently holding the bottom of the
flange against your neck. (It is possible to cough out the tracheostomy tube, which is why we use trach ties.)
4. Remove the Velcro tracheostomy ties. 5. Thread the “hook” end of the tie through the opening on one
side of the flange.
13
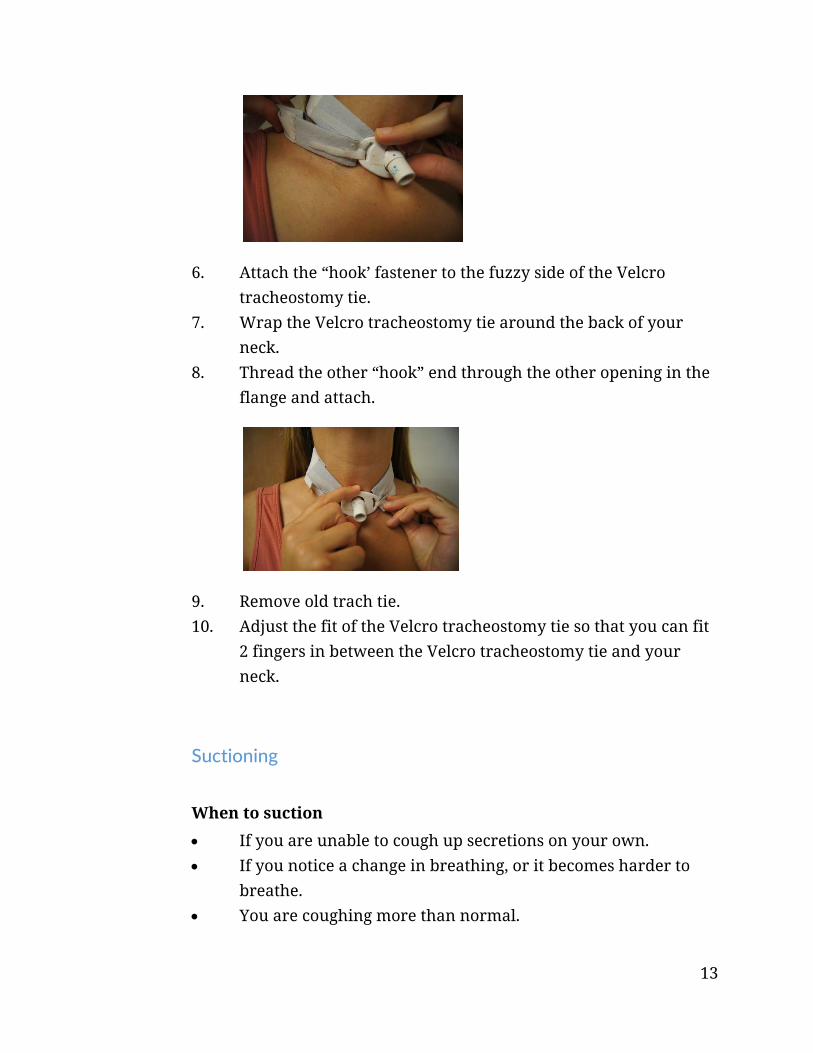
6. Attach the “hook’ fastener to the fuzzy side of the Velcro tracheostomy tie.
7. Wrap the Velcro tracheostomy tie around the back of your neck.
8. Thread the other “hook” end through the other opening in the flange and attach.
9. Remove old trach tie. 10. Adjust the fit of the Velcro tracheostomy tie so that you can fit
2 fingers in between the Velcro tracheostomy tie and your neck.
Suctioning
When to suction
If you are unable to cough up secretions on your own. If you notice a change in breathing, or it becomes harder to
breathe. You are coughing more than normal.

14
How to suction
1. Hook up your suction catheter to the suction tubing.
2. Flush suction catheter with saline. To do this, place your finger over the suction port and suck up a little bit of saline. (This cleans out the tube and lets you know that the suction is working.)
3. Insert suction catheter into trach, with NO suction.
Troubleshooting tip: If you are unable to insert the suction catheter, remove and clean/replace the inner cannula.
4. Insert at least the length of the cannula, stop if you hit
something solid or feel resistance. 5. Put your finger over the suction port (creating vacuum) as you
remove the catheter, to suction out secretions. 6. Flush/clear line with saline. 7. Allow time to catch your breath. 8. Make another pass if needed. (Go back to Step 3.)
15
9. If you are having trouble, go to page 27 for more troubleshooting tips.
Humidification
Humidity is helpful and may be especially important the first month or so after your surgery. Normally, your mouth and nose heats, moisturizes and filters the air that you breathe. Since your tracheostomy means air doesn’t go through your mouth and nose, additional moisture and filtering are now needed. If you don’t have enough humidity, you may have thick and crusty secretions which may cause trouble breathing. The amount of fluids you drink, the air in your home and the weather outside all change the amount of humidity.
There are several ways to increase the amount of humidity.
Trach Humidification. This system was most likely used during your hospital stay (the machine at your beside, with a trach mask that we placed near your trach). Your provider may want you to keep using one at home.
Use the humidifier at home to help keep your secretions thin and easy to cough or suction out.
Keep it running beside you or use the hose with the trach mask attached.
Follow the instructions that come with the personal humidifier machine for operating and cleaning.
Use distilled water for operating, not water straight from the tap. You can buy distilled water at the grocery store.
Clean the mask and hose with mild soap and water and rinse well with boiled, cooled water and let air dry.
16
Room Home Humidifiers. Heating your home in the winter and air conditioning in the summer can dry out the air. Room humidifiers may be helpful.
Wash, rinse and refill every day to prevent bacteria growth. Follow the manufacturer’s guidelines for cleaning your
humidifier. Place a humidifier by your bedside at night. Air humidity
should be around 40-50%.
Fluid Intake. It is important that you get enough fluids to stay hydrated as long as there are no restrictions imposed by your doctor.
If you have been cleared to take liquids by mouth, aim for 6 to 8 glasses of liquid per day to help keep the mucus thin.
If you have a feeding tube, make sure to flush the tube with water in addition to your tube-feedings, as directed.
Make especially sure you get enough liquids when you are sick with any infection, or have vomiting, diarrhea or other fever-type illnesses.
Troubleshooting tip: If you are still having mucus plugs after increasing the humidity level, ask your respiratory therapist or home care nurse about solutions to the problem. This may include putting a small amount of sterile normal saline into your tracheostomy tube before suctioning (called ‘instilling’). They can help guide this process.
Speaking valves
A speaking valve, sometimes referred to as a Passy-Muir valve, may be used to help you speak more easily. This one-way valve attaches to the outside opening of the tracheostomy tube and allows air to

17
pass into the tracheostomy. When you breathe out, the valve closes and air flows up through the vocal cords allowing sounds to be made. You breathe out through the mouth and nose instead of the tracheostomy. Your Respiratory Therapist or Speech Pathologist will help you determine if you can use a Passy-Muir valve. It is not suitable for all kinds of trachs.
How to use a speaking valve
Clean your inner cannula as needed before placing the valve. It may not be possible to use the valve if you have a lot of secretions or very thick secretions.
Increase the amount of time you wear the speaking valve as you are able.
Special considerations
Humidity can be used with the valve in place. Oxygen can be given with the valve in place. Remove the valve during aerosol treatments. If it is left on,
remove it and rinse it to remove any medications that could cause the valve to stick or not work well.
Care of the valve
Do NOT throw the speaking valve away. It is not disposable. Clean the valve daily with mild soapy water.
Passy‐Muir speaking valve
18
Rinse thoroughly with warm water. Do not use hot water as it may damage the valve.
Let the valve air dry completely before using it again. Do NOT use a brush, vinegar, peroxide, bleach or alcohol on
the valve.
Safety precautions
Do NOT use the valve while sleeping, unless directed by your doctor to do so.
Remove the valve immediately if you have difficulty breathing. Clean and/or change the inner cannula if needed.
NEVER use on tracheostomies that have the cuff inflated. This will cause an airway obstruction that could be fatal!
Only use on a cuffed trach tube with the cuff down if you are specifically instructed to do so.
Tracheostomy capping
Your doctor will talk with you about when you no longer need a tracheostomy (trach) tube in place and when it can be removed. The procedure to remove a trach tube is called “decannulation.”
Before the tube can be removed, you may need to do “trach capping trials” first. Sometimes this is done for the first time in the doctor’s office, hospital, or clinic. Doing these trials will let you test your ability to swallow and how well you breathe through your nose and mouth. Typically, your doctor will advise you to begin capping your trach for short periods throughout the day and gradually increase the duration, if you are able to.
Do NOT cap your trach tube unless your provider tells you to do so.
19
How to cap your tracheostomy tube
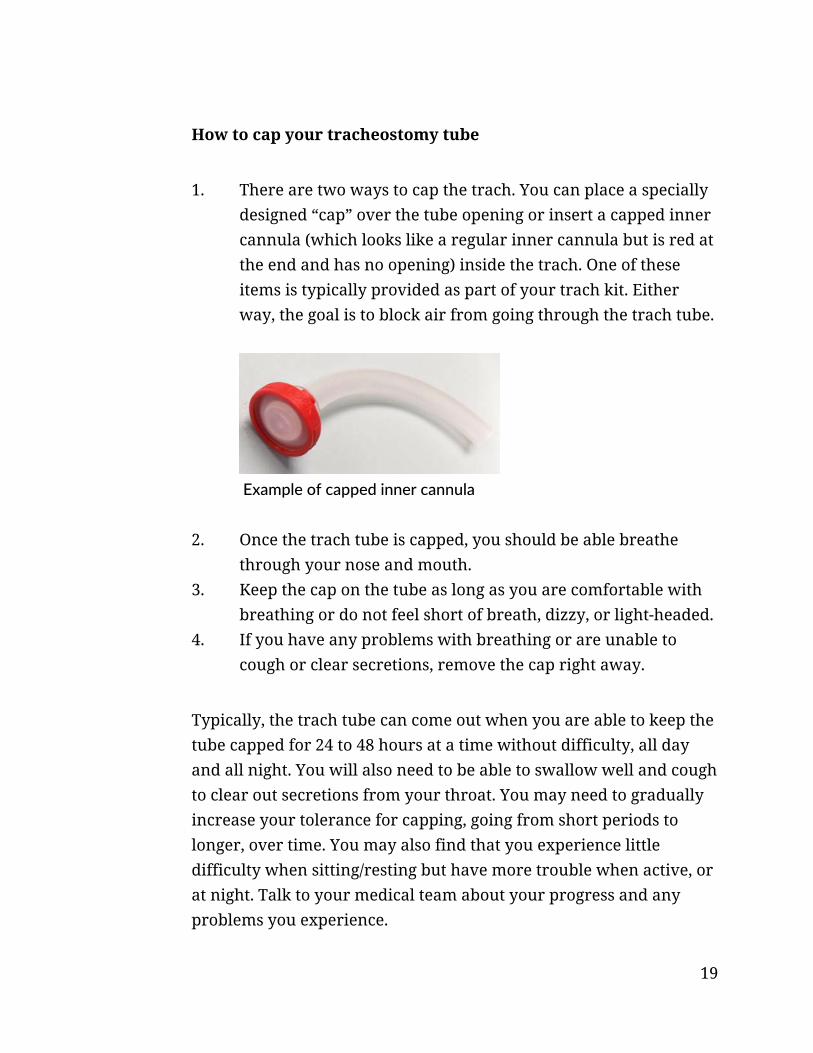
1. There are two ways to cap the trach. You can place a specially designed “cap” over the tube opening or insert a capped inner cannula (which looks like a regular inner cannula but is red at the end and has no opening) inside the trach. One of these items is typically provided as part of your trach kit. Either way, the goal is to block air from going through the trach tube.
2. Once the trach tube is capped, you should be able breathe through your nose and mouth.
3. Keep the cap on the tube as long as you are comfortable with breathing or do not feel short of breath, dizzy, or light-headed.
4. If you have any problems with breathing or are unable to cough or clear secretions, remove the cap right away.
Typically, the trach tube can come out when you are able to keep the tube capped for 24 to 48 hours at a time without difficulty, all day and all night. You will also need to be able to swallow well and cough to clear out secretions from your throat. You may need to gradually increase your tolerance for capping, going from short periods to longer, over time. You may also find that you experience little difficulty when sitting/resting but have more trouble when active, or at night. Talk to your medical team about your progress and any problems you experience.
Example of capped inner cannula

20
Living with a tracheostomy
Living with a tracheostomy can affect how you go about doing simple daily living activities. The following gives you tips on how to approach daily living so that you can continue to live your life safely with your tracheostomy.
Bathing and showering
People with a tracheostomy can still shower, but you should be careful to keep water from getting into the tracheostomy tube and stoma. You may prefer to take a bath instead of a shower. If you do take a shower:
Point shower head to lower chest and stand with your back to the water. You can also buy a “shower shield” from a medical supply store or online.
For men, take care to cover your tracheostomy tube when shaving.
Rest and sleep
Recovery from surgery can take several weeks. However, everyone recovers at their own rate. When you get home, you may be surprised how tired you are. This is normal. Rest is important to your recovery. Try to get at least 8 hours of sleep each night. It may take you a couple of nights to adjust to sleeping with the tracheostomy. At first you may be instructed to use a humidifier at night which can be

21
noisy and interfere with sleep. As time goes by, however, this may not be necessary. Ask your medical team about this.
Communication
Being able to communicate clearly is very important. Normally our voice is produced by putting the vocal cords into vibration as we breathe out. The voice is the “noise” of speech and the muscles of the mouth then shape that noise into speech. Your tracheostomy is below your vocal cords, so most of the air that you breathe out goes through your trach tube. Some air may pass by your tube and through your vocal cords. The amount of speech that you are able to make depends on how much air passes through your vocal cords. There are many ways for people who have tracheostomies to get back their ability to speak and a speech pathologist can help you learn to communicate effectively.
Some examples are:
Speaking around the tube (you must be taught how to do this safely). When the tube does not have a cuff, when the cuff is deflated, or when the tube is fenestrated, you can take a deep breath in, cover the end of the tube with your finger, and try to speak while breathing out.
Using a one-way speaking valve (Passy-Muir Valve). The valve is placed on the end of your tracheostomy tube, allowing air in through the trach and out through your mouth and nose. This shouldn’t be used with a cuffed tracheostomy tube, unless you are instructed otherwise. A speech pathologist can help to determine if you are a good candidate for this type of valve and train you in its use.

22
A number of other things can interfere with communication, including pain, swelling, scar tissue, or any weakness in your respiratory or speaking muscles. Some people may find it easier to communicate with written or other nonverbal forms of communication. It is also useful to think about ways of getting attention or summoning help, if needed. Again, your medical team should help you to plan for meeting these needs when you leave the hospital. Some ideas include:
Carry a pen and paper or a dry-erase board or pocket notebook.
Create a list of common things that you typically need that you can point to, rather than having to write them out every time.
Develop some simple gestures and agree on what they mean with friends and family.
Get someone to help record a simple message on a voice recorder that you can keep by the phone in case of an emergency that you can use if calling 911, explaining that you have a trach and can’t talk and giving your home address in case you need an ambulance.
Swallowing
Swallowing food and liquid may be difficult to do with a tracheostomy. Only eat food and drink fluids by mouth if cleared to do so by your provider and/or speech therapist. This includes taking medicines by mouth. Some tips to reduce problems with swallowing are:
Sit upright to eat. Eat slowly, chewing your food well, and taking one bite or sip
at a time. Avoid hard/tough foods and things that are difficult to chew.
23
If you wear a one-way speaking valve (“Passy-Muir” valve) make sure that you are wearing it while eating & drinking.
If you are having problems with choking or if you notice food or liquids in your secretions coming from your trach, let your medical team know right away.
Emotions
Many people have a variety of emotions before surgery, while in the hospital, or when returning home. At times you may feel worried, nervous, sad, stressed, or angry. These are very normal reactions. Sometimes it is helpful to speak with another person who has a tracheostomy or with a similar condition, or someone who is trained to help. Ask what support resources are available in your area.
Physical activity and exercise
For the first few days at home, do the same amount of activity you were doing in the hospital. Gradually increase your daily activities. Remember to continue to do any exercises you were given each day. If possible, take short walks each day and try to gradually increase how far you walk. Cold air, dust, or dirt can irritate your windpipe and lungs. The air you breathe in will not be warmed or filtered by your nose or mouth. If it is cold or windy outside, wear a scarf or handkerchief loosely over your tracheostomy tube. You can also use an “artificial nose,” also called a Heat and Moisture Exchanger (HME), which is a filter that fits over the end of your trach that helps to filter the air you breathe in and also keep the warmth and moisture in your lungs when you breathe out. Once you start to feel better and have more
24
energy, try taking short trips to a friend’s or family member’s home or to the store.
Safety
Do NOT go swimming, and avoid going out on boats unless you take special precautions. If you fall into the water, you will not be able to prevent water from entering your airway. In some cases, specialized equipment can be obtained that prevents water from going into the stoma. In addition, there are specially designed life-jackets that can keep your neck above water, if you were to fall in. If you have recently had a trach and it has been removed, you should avoid swimming until the trach site is completely healed.
Intimacy
With a tracheostomy, sometimes people are afraid they will become unattractive or unlovable. It helps to remember that people are loved for their entire self, not for the way the lower neck looks. Try not to place too much importance on one small part of you, but accept that you may have to work through some feelings. It sometimes takes a while to adjust to physical change. Be patient with yourself and your loved ones. Often when people go through a difficult experience like this, it helps to talk about your feelings and encourage your partner or family to do the same.
25
Traveling
If you are going to be away from home for any amount of time, make yourself a travel kit. Include all of the supplies that you usually need on a daily basis as well as any emergency supplies in case you need to change your tube. If you are flying, notify the airline in advance and check what is allowed for carry on. You may also want to bring a letter from your doctor indicating the medical need for these supplies.
Travel kit checklist
Gloves Sterile saline in 3cc or 5 cc vials Tissues or gauze pads Extra inner cannulas (at least 1 the same size and 1 smaller, if
possible) Tracheostomy ties Portable humidifier or suction machine (if you use them) and
a suction catheter Obturator (in case your trach comes out) Syringe (if tube is cuffed) Water-soluble lubricant Oxygen (if needed) Breathing or other medications
26
Troubleshooting and when to call for help Vomiting
If you throw up, make sure to cover the tracheostomy tube with a towel or shower shield. This will prevent vomit from being inhaled into your airway. Suction yourself right away if you think any vomit may have entered your airway.
Thick secretions
If your secretions become very thick and difficult to cough up or suction, try increasing the humidity level (see page 15), drink more liquids, and follow the steps below under “Difficulty breathing.”
Difficulty breathing
A plugged or partially plugged trach will make it difficult to breathe. This is usually caused by a build-up of secretions. If this happens, try to stay calm and follow these steps to unplug the trach:
1. Cough really hard. 2. Try suctioning. 3. If unable to insert the suction catheter, remove and
clean/replace the inner cannula. 4. If you have normal saline instillation, squirt some into your
trach. Cough and try to loosen up the plug. 5. Suction again if needed.
If you continue to have difficulty breathing, call 911
27
If your trach comes out
By the time you have been discharged from the hospital, your trach stoma is well-formed and will not suddenly close. You can breathe through the stoma itself and have time to try to replace the trach if it falls out. If your trach does come out, stay calm and follow these steps to replace it:
1. Tilt your head back slightly to make stoma hole larger 2. Cut or undo trach ties 3. Place obturator inside of trach tube 4. Apply a small amount lubricant (if available). Guide the
tracheostomy tube back inside the stoma, using the same motion that you use to insert the inner cannula.
5. Hold the tube in place 6. Pull out the obturator, replace inner cannula 7. Attach new trach ties
If trach will not go back in, try a smaller size trach (if one is available). Call 911 right away if you cannot get the tube back into place or if you are still having difficulty breathing.
When to call your doctor
Call your provider if you have any of the following:
Fever with chills Fever of 101° F or higher Reddened or swollen skin around your stoma More mucus than usual and changes in color; especially from
clear to yellow, green or brown Mucus has a bad smell
28
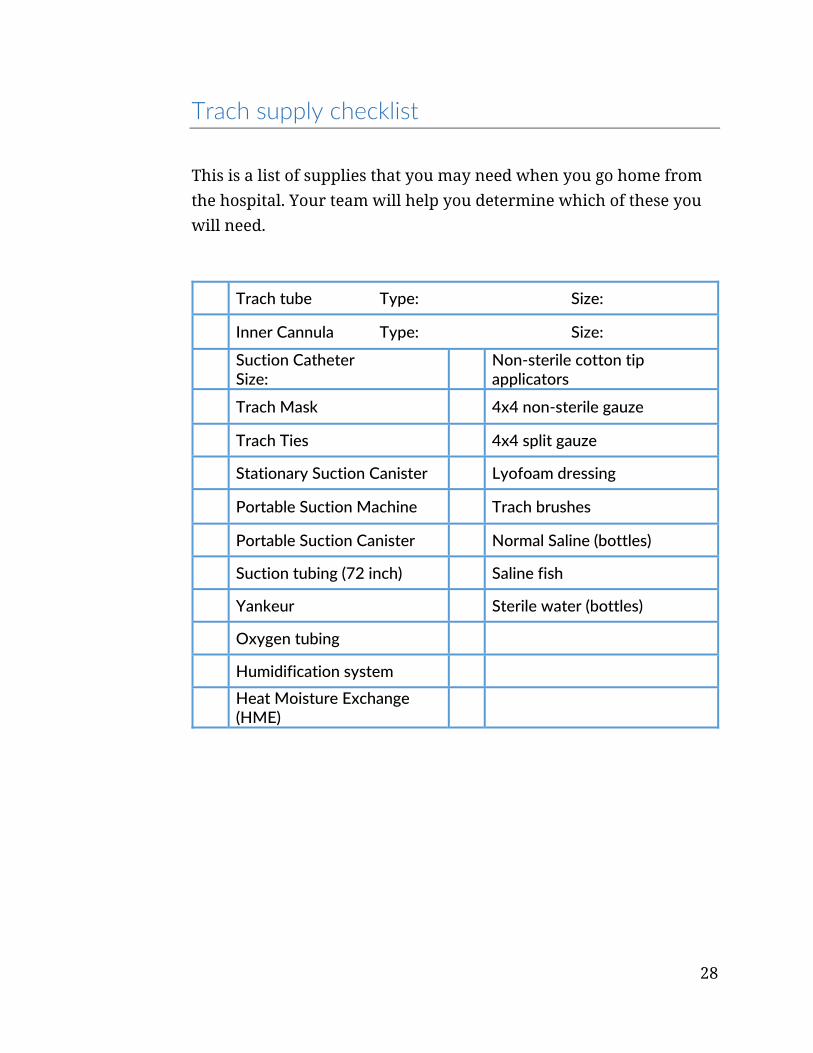
Trach supply checklist
This is a list of supplies that you may need when you go home from the hospital. Your team will help you determine which of these you will need.
Trach tube Type: Size:
Inner Cannula Type: Size:
Suction Catheter Size: Non‐sterile cotton tip
applicators Trach Mask 4x4 non‐sterile gauze
Trach Ties 4x4 split gauze
Stationary Suction Canister Lyofoam dressing
Portable Suction Machine Trach brushes
Portable Suction Canister Normal Saline (bottles)
Suction tubing (72 inch) Saline fish
Yankeur Sterile water (bottles)
Oxygen tubing
Humidification system
Heat Moisture Exchange (HME)

29
Trach skills checklist
RN teaching
Return demon‐stration
Return demon‐stration Skill
Teaching complete
Describe the type and parts of tracheostomy tube
Demonstrate ability to set up for trach care
Perform stoma site care
Describe potential problems, signs/symptoms
Clean/change inner cannula
Suctioning
Instill NS (if appropriate)
Change trach ties
Use of PMV or trach cap (if appropriate)
Humidification delivery, equipment care
Knows how to reinsert dislodged trach
When to call provider/when to call 911

3181 S.W. Sam Jackson Park Rd.
Portland, OR 97239-3098
Tel 503-494-8311
www.ohsu.edu