track & field - msolain.esmartweb.comlain_lesson_plans...shot put indoor (beanbags) outdoor ......
TRANSCRIPT

- 1 - E. O’Lain 2004
TRACK & FIELD
Junior High School
Track Unit

- 23 - E. O’Lain 2004
THROW FORTIUS

- 24 - E. O’Lain 2004
DISCUS THROW – Technical Drills
Equipment: Safety
� Bean Bags � Hula Hoops � Large Tall Pylons � Small cones � Rings � Discus (outdoor)
Goals: 1. Order of muscle firing from the lower to the upper body 2. The block and pull 3. The three keys of a throw are height of release, angle of
release and speed of release.
� Throw and retrieve commands � Throw from a U shaped, or circle formation
where everyone throws from the inside out. � Appropriate weights for students
Shot Put Indoor (beanbags) Outdoor (bean bags then discus)
Lead up activity –
Gross motor
movements
� Students warm-up and for stretching do forward and backwards arm circle, alternate direction arm circles, and hug and clap
� Students swing arm from side to side as if their arms are sleeping and they have no control over the muscles. This is how the arm should feel in discus. The throw comes for the movement of the body rather than the movement of the arm.
The Grip and arm motion
1
� Outdoor & indoor on Mats – Bowling Drill - Allows the athlete to practice the release of the discus. The discus is bowled forward out of the hand onto the ground in a "clockwise" manner.
� In a Semi Circle or against a wall indoors. Students in pair are given a beanbag. The beanbag should be held in the palm of the hand with fingers curled around the edges. The palm should be facing down.
� Students swing their arm back at shoulder height and fling their arm forward releasing the beanbag. This motion should be initiated and propelled by the movements of the core.
Upper body Motion
2 +1
� Student stand tall, feet parallel facing a wall with a beanbag in the starting position. Their blocking arm is held up so that the back of their hand is at forehead level in front of the blocking arm shoulder.
� Students fling the beanbag into the wall or field squeezing their core so that the blocking arm and core do not move. The blocking side of the body acts as an anchor they use to pull the throwing arm thru with speed.
Incorporate lower body
in One direction 3 + 2 + 1
� The throwing foot is rotated perpendicular to the direction of the throw (the one on the same side as the hand holding the implement). The Students weight is transferred to the throwing (back) leg, which is bent at the knee.
� Students rotate the throwing leg knee in the direction of the throw, transfer the weight from throwing to blocking leg pushing hips forward, then bringing the blocking shoulder around, keeping the head back and then finally throwing the disc. A queue is that energy is running up from the throwing foot to the throwing arm, it activates each muscle to fire upwards in reaction as it travels up the body, leg, hip, chest and arm.
Standing Throw
4 + 3 + 2 + 1
� The throwing foot is rotated perpendicular to the direction of the throw and the shoulders are rotated facing the opposite direction of the throw in a smooth swinging action. The throwing arm needs to be kept at shoulder height.
� The motion of the throw should be the foot fires it begins to rotate towards the direction of throw (like squishing a bug), as the leg fires it begins to lift up, as the hip fires it rotates in the direction of the throw and the hip point upward, as the shoulders fire the blocking arm opens up and towards the front of the circle (shoulder blades together head still back), as the arm fires it pulls the chest forward to the direction of the throw and the arm action is completed.

- 25 - E. O’Lain 2004
Discus Form
- 26 - E. O’Lain 2004
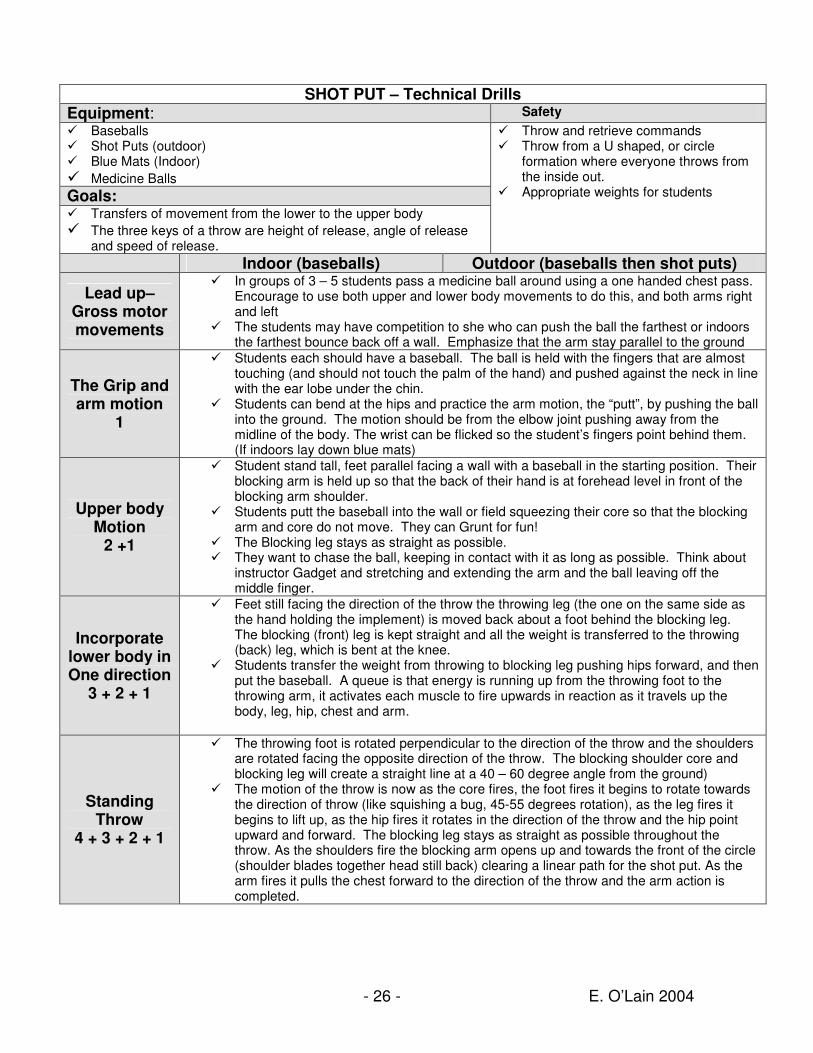
SHOT PUT – Technical Drills
Equipment: Safety
� Baseballs � Shot Puts (outdoor) � Blue Mats (Indoor)
� Medicine Balls Goals: � Transfers of movement from the lower to the upper body
� The three keys of a throw are height of release, angle of release and speed of release.
� Throw and retrieve commands � Throw from a U shaped, or circle
formation where everyone throws from the inside out.
� Appropriate weights for students
Indoor (baseballs) Outdoor (baseballs then shot puts)
Lead up– Gross motor movements
� In groups of 3 – 5 students pass a medicine ball around using a one handed chest pass. Encourage to use both upper and lower body movements to do this, and both arms right and left
� The students may have competition to she who can push the ball the farthest or indoors the farthest bounce back off a wall. Emphasize that the arm stay parallel to the ground
The Grip and arm motion
1
� Students each should have a baseball. The ball is held with the fingers that are almost touching (and should not touch the palm of the hand) and pushed against the neck in line with the ear lobe under the chin.
� Students can bend at the hips and practice the arm motion, the “putt”, by pushing the ball into the ground. The motion should be from the elbow joint pushing away from the midline of the body. The wrist can be flicked so the student’s fingers point behind them. (If indoors lay down blue mats)
Upper body Motion
2 +1
� Student stand tall, feet parallel facing a wall with a baseball in the starting position. Their blocking arm is held up so that the back of their hand is at forehead level in front of the blocking arm shoulder.
� Students putt the baseball into the wall or field squeezing their core so that the blocking arm and core do not move. They can Grunt for fun!
� The Blocking leg stays as straight as possible. � They want to chase the ball, keeping in contact with it as long as possible. Think about
instructor Gadget and stretching and extending the arm and the ball leaving off the middle finger.
Incorporate lower body in One direction
3 + 2 + 1
� Feet still facing the direction of the throw the throwing leg (the one on the same side as the hand holding the implement) is moved back about a foot behind the blocking leg. The blocking (front) leg is kept straight and all the weight is transferred to the throwing (back) leg, which is bent at the knee.
� Students transfer the weight from throwing to blocking leg pushing hips forward, and then put the baseball. A queue is that energy is running up from the throwing foot to the throwing arm, it activates each muscle to fire upwards in reaction as it travels up the body, leg, hip, chest and arm.
Standing Throw
4 + 3 + 2 + 1
� The throwing foot is rotated perpendicular to the direction of the throw and the shoulders are rotated facing the opposite direction of the throw. The blocking shoulder core and blocking leg will create a straight line at a 40 – 60 degree angle from the ground)
� The motion of the throw is now as the core fires, the foot fires it begins to rotate towards the direction of throw (like squishing a bug, 45-55 degrees rotation), as the leg fires it begins to lift up, as the hip fires it rotates in the direction of the throw and the hip point upward and forward. The blocking leg stays as straight as possible throughout the throw. As the shoulders fire the blocking arm opens up and towards the front of the circle (shoulder blades together head still back) clearing a linear path for the shot put. As the arm fires it pulls the chest forward to the direction of the throw and the arm action is completed.

- 27 - E. O’Lain 2004
Shot Put Glide Form