training manual - medrx-usa.com...the reason to perform real ear measurements for hearing instrument...
TRANSCRIPT

TRAINING MANUAL

ARP-I-MREMPT-5 MedRx AVANT REM Speech Plus Training Manual Effective Date: 4/07/2014
2
Contents
Introduction ……………………………………………………………………………………...... 3
AVANT™ REM Speech+ Software Overview…………………………………………….…… 4
AVANT™ REM Speech+ Software Options ………………………………………………..….. 5
Preparing for Testing …………………………………………………………………………….. 8
Live Speech Mapping …………………………………………………………………………..… 12
Real Ear Measurements …………………………………………………………………………. 17
Additional Tests and Features ………………………………………………………………….. 20
Printing ……………………………………………………………………………………………… 26
Rainbow Passage………………………………………………………………………………… 27
Limited Warranty …………………………………………………………………………………. 28
#0086
www.medrx-usa.com
1200 Starkey Rd., #105, Largo FL 33771 U.S.A.
Toll Free: (888) 392-1234 • (727) 584-9600
Fax: (727) 584-9602 • Email: [email protected]
MedRx's Authorized Representative in Europe (Regulatory affairs only)
Emergo Europe, Molenstraat 15 2513 BH The Hague, The Netherlands

ARP-I-MREMPT-5 MedRx AVANT REM Speech Plus Training Manual Effective Date: 4/07/2014
3
Introduction
The AVANT REM Speech+ represents a new era of precision in-situ verification for your office. Compact yet rugged, this PC-Based system is USB powered and supports all ANSI and IEC Real Ear tests. The software includes targets for DSL i/o 5.0 and NAL-NL2. A unique feature of the REM Speech+
is
simultaneous, binaural Live Speech Mapping, MedRx’s in-situ method for getting the fitting right the first time, every time. The Avant REM Speech+ device performs Real Ear Measurements where measurements are performed directly on the client's ear. These measurements can be done with or without a hearing instrument being in place. The reason to perform Real Ear Measurements for hearing instrument fittings is because shape and size of an ear canal significantly influence a hearing instrument's performance. Knowing the sound intensity outside and inside the ear enables the practitioner to determine the actual amplification and output that the test person receives through the hearing aid and make the appropriate adjustments. This manual assumes that the system hardware, software and drivers are installed and working properly. Please refer to the MedRx AVANT REM Speech+
Installation Manual for assistance.
The scope of this manual is to get you “up and running” with the Avant REM Speech+ System. Please consult the interactive Help System within the software for more detailed information of features and functionality. To access this tool, press the F1 key at any time, or click the Help icon or menu item with your mouse. Measurement uncertainty is +/- 1 dB. Refer to the Help files for test options and descriptions. Access these by clicking on the “Help” tab at the top of the screen, and select “Help Topics”. Select an item from the list in the Index tab, and click “Display”. Also refer to the Help files for test signal characteristics, analysis, equalization methods and the effect of analyzer setting on accuracy.
This device and transducers are intended for use at test frequencies between 125 Hz and 8000 Hz. This unit meets the requirements of both ANSI S3.46-1997 and IEC 61669:2001. Those standards specify the required precision that the Avant REM Speech+ does achieve.

ARP-I-MREMPT-5 MedRx AVANT REM Speech Plus Training Manual Effective Date: 4/07/2014
4
The AVANT REM Speech+
Software
General Overview The AVANT REM Speech+ software will either run as a part of the AVANT Software Suite (figure 1), or as
a stand-alone module (figure 2). The AVANT Software Suite can run stand-alone or from NOAH System or the TIMS NOAH-Compatible Office System. The software includes a context-sensitive interactive Help System. To access this tool, press the F1 key at any time, or click the Help menu with your mouse. This will display additional information and instructions for the specific section of the software you are working in.
Figure 1 The AVANT Software Suite Main Screen
Figure 2 The AVANT REM Speech+
Main Screen
Launching the REM+ Software
Stand Alone NOAH
Double click the AVANT REM+ shortcut on your Windows Desktop.
Launch NOAH
Launch Avant REM+ module following NOAH procedures.

ARP-I-MREMPT-5 MedRx AVANT REM Speech Plus Training Manual Effective Date: 4/07/2014
5
Software Options Basic Options Several options are available which allow the user to customize the AVANT REM Speech+ Software to meet their needs. Access these options from the File Menu on the Avant REM Speech+ Main Screen as shown below.
The Options may also be accessed from within the Avant REM Speech+ main program by clicking on the Options text menu as shown below.
The software allows you to set several default options as described below.
The View tab allows you to set the default appearance of the REM test environment. Values can be changed by using the check boxes and pull-down menus shown above.
The Live Speech tab sets the look and behavior of the Live Speech Mapping function. Use the Show Targets pull-down to underlay DSL 5.0 or NAL- NL2 targets below your speech maps.
The REM tab sets the default look and behavior of conventional Real Ear Measurements.

ARP-I-MREMPT-5 MedRx AVANT REM Speech Plus Training Manual Effective Date: 4/07/2014
6
The MHA/ HLS tab sets the default look and behavior of the Master Hearing Aid and Hearing Loss Simulator.
If your system has a Tympanometer connected, this tab will assist in configuring the look of the display.
NOTE: Remember, that more information is always available in the Interactive Help System by clicking the Help Icon or pressing the F1 key.
Advanced Options
The Advanced Options screen allows you to configure your system to meet your individual clinical needs. It also provides MedRx Technical Support with tools for helping you troubleshoot problems. Access this screen from the File Menu on the Avant Main Screen as shown to the right.
The key features of each tab are described below. For more in-depth information, consult the interactive Help system within the software.
The General Tab configures the overall Avant REM Speech+ behavior with respect to other Windows programs, specifically NOAH.
Use the Audio-A Tab to select the proper audio device for your Avant REM+. This tab also provides access to the Windows Audio controls.

ARP-I-MREMPT-5 MedRx AVANT REM Speech Plus Training Manual Effective Date: 4/07/2014
7
Use the Audio-B Tab to select the proper audio device for your AVANT REM+. This tab also provides access to the Windows Audio controls.
If your system has a Video Otoscope, the Video Tab allows you to select the appropriate input device.
If your system has a Tympanometer connected, use this tab to configure the equipment according to the manufacturer’s instructions.

ARP-I-MREMPT-5 MedRx AVANT REM Speech Plus Training Manual Effective Date: 4/07/2014
8
Preparing for Testing Connecting the Probes
-
2. Connect the probe microphones to the AVANT REM Speech+ main unit as shown above. DO NOT force the connector into the jacks. Align correctly before insertion. A cable from the “Speaker” jack on the REM Speech+ will connect to the input jack in the powered speaker supplied with your unit.
1. Locate the Probe Microphone case.
Use the accessories provided with your device. Headphones for use with REM devices should have 32 ohms impedance and the speaker power should be at least 5 watts. The speaker voltage should match the local mains voltage where the device is used.
The connection of a portable speaker is described below. Desk top powered speakers are connected in a similar fashion, but use only mains power.

ARP-I-MREMPT-5 MedRx AVANT REM Speech Plus Training Manual Effective Date: 4/07/2014
9
The front side of the speaker is placed at a distance of about 1 meter (19”-39”) from the patient, for normal use.
It is preferred to plug the speaker into the power supply but it may be powered by the internal battery.
The Bluetooth option is not used.
The speaker’s power cable is a USB “male A to micro-B type”, connected to the power adapter.
Powering the speaker via a computer USB port is not recommended.
Plug power cord in
as shown.
Speaker front side is shown.
Plug cable into speaker jack and connect to your REM Speech+ as indicated.
The green battery light will illuminate when charging.
Reset the volume to maximum every time the speaker is turned on. Press the + button until beeping is heard.
Connecting the Speaker Preparing for Testing
Optional Plugs
Slide white switch to the middle position to turn speaker on.

ARP-I-MREMPT-5 MedRx AVANT REM Speech Plus Training Manual Effective Date: 4/07/2014
10
Speaker Calibration: open the Speaker Calibration screen from REM/LSM screen menu Tools-
>Calibrate Speakers.
The speaker should be positioned in such a way that nothing blocks the path of the emanated sound in front and on the sides of the speaker. For example positioning a speaker behind a monitor is incorrect and can severely affect its response at the measurement location. The speaker diaphragm should be at about the same level as the patient's ear and the reference microphone.
Place the reference microphone at the location where the patient normally sits, or about 1 meter from the speakers.
Click on Start to begin the calibration and wait until it ends. Observe the response curve to flatten itself out. The darker curve is showing the response used by the equalization algorithm, the lighter curve is showing the current microphone input. Use of the powered speaker supplied with this device is recommended.
Calibrating the Probe Tube
For reasons of infection control and reliability of results, MedRx recommends that a new probe tube be used with each patient. To ensure accurate measurements, it is necessary to calibrate the probe tube each time it is replaced.
1. Place a new probe tube on the probe microphone port as shown.
2. Place the probe tube between the calibration nibs as shown. Be sure that the opening of the probe tube is centered on the opening of the reference microphone.
In the Avant REM Speech+ software, do one of the following:
Click the Probe Tube Calibration Icon.
or
Click Tools.
Click Calibrate Probe Tube.

ARP-I-MREMPT-5 MedRx AVANT REM Speech Plus Training Manual Effective Date: 4/07/2014
11
Position probe microphone between 19 and 39 inches from the loudspeaker and click Start. The signal must be at least 70 dB to complete a valid calibration. If the screen prompt indicates the signal is too low, increase the volume on the loudspeaker or move the probe microphone assembly closer and re-start the calibration.
Repeat for the other probe. Valid calibrations have the same approximate shape as the gray target curve. If the measured calibration curve differs greatly in shape or amplitude from the gray target curve, replace the probe tube and re-calibrate. If this does not correct the problem, contact MedRx technical support at (888) 392-1234.
The calibration date is available under the Function > Calibrate > Calibration Information tabs. Return Probe Microphones to MedRx for annual re-calibration. Annual re-calibration of the Avant REM Speech+
Probe Microphones is recommended. There are no user repairable components of this device.
Positioning the Speakers
Proper positioning of the loudspeakers relative to the patient’s hearing aids is critical for making accurate and repeatable measurements. Seat the patient so their ear is between 19 and 39 inches from the loudspeaker.
Make sure the grill of the loudspeaker is level with and directly in front of the patient’s head.
When using Live Speech inputs, position the patient so the mouth of the person speaking is in the same position as the loudspeaker shown here.
ARP-I-MREMPT-5 MedRx AVANT REM Speech Plus Training Manual Effective Date: 4/07/2014
12
Live Speech Mapping
Step-by-Step Guide to Live Speech Mapping
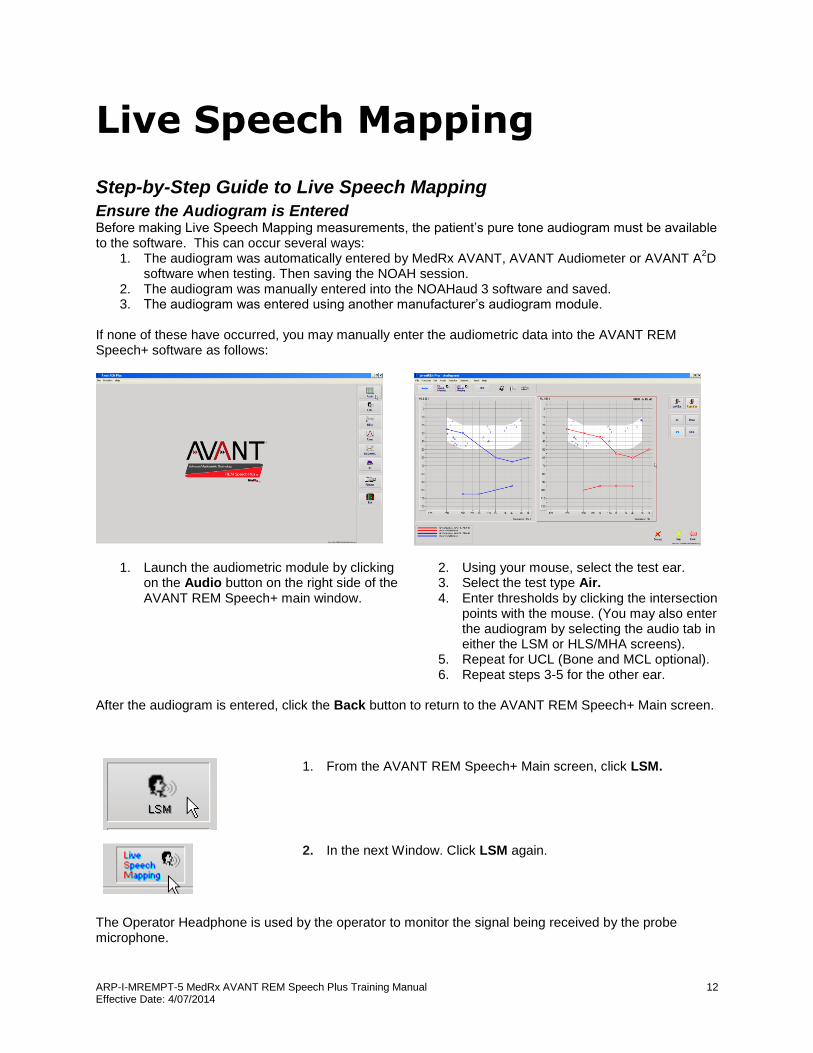
Ensure the Audiogram is Entered Before making Live Speech Mapping measurements, the patient’s pure tone audiogram must be available to the software. This can occur several ways:
1. The audiogram was automatically entered by MedRx AVANT, AVANT Audiometer or AVANT A2D
software when testing. Then saving the NOAH session. 2. The audiogram was manually entered into the NOAHaud 3 software and saved. 3. The audiogram was entered using another manufacturer’s audiogram module.
If none of these have occurred, you may manually enter the audiometric data into the AVANT REM Speech+ software as follows:
1. Launch the audiometric module by clicking on the Audio button on the right side of the AVANT REM Speech+ main window.
2. Using your mouse, select the test ear. 3. Select the test type Air. 4. Enter thresholds by clicking the intersection
points with the mouse. (You may also enter the audiogram by selecting the audio tab in either the LSM or HLS/MHA screens).
5. Repeat for UCL (Bone and MCL optional). 6. Repeat steps 3-5 for the other ear.
After the audiogram is entered, click the Back button to return to the AVANT REM Speech+ Main screen.
1. From the AVANT REM Speech+ Main screen, click LSM.
2. In the next Window. Click LSM again.
The Operator Headphone is used by the operator to monitor the signal being received by the probe microphone.

ARP-I-MREMPT-5 MedRx AVANT REM Speech Plus Training Manual Effective Date: 4/07/2014
13
Speech Mapping with Live Voice Inputs
The screenshot on the left shows the Live Speech Mapping (LSM) window. The system was designed to capture and display the human voice in the ear canal, so we recommend using the microphone input and the peaks measurement. Using the microphone allows measurement of both the professional’s voice and that of the patient’s significant others. To improve repeatability of measurements, it is recommended that the speaker read a standard passage such as the “Rainbow Passage” which is provided on pg. 29.
NOTE: The screen shot above shows the MedRx Modified Speech Spectrum (Canoe). It is also possible to underlay DSL i/0 or NAL-NL2 targets on this screen. Click Options in the text menu bar on the top of the screen to select and configure these underlays to meet the needs of your practice.
Speech Mapping with Recorded Inputs
For those who prefer a recorded, repeatable stimulus for Speech Mapping, the software provides several digital audio files. These are accessed by clicking the File button on the right and then selecting the desired track from the pull-down menu in the audio player. Peak measurements is recommended. Once the desired track is selected, click the Start button to begin measuring. A pure tone or white noise will be presented and once it reaches the selected input level with the slide bar, the chosen track will play. When enough data is collected, click the Stop button to stop the recording and capture calibration measurement.
It is also possible to use an audio CD, such as the patient’s favorite music to perform Speech Mapping. Simply click the CD button and then select a track as above. Use the sound level meter on screen to check the proper level. Adjust the output of the speaker to desired level using the sound level meter. (Remember conversational speech is 65 dB at 1 meter). NOTE: The screen shot above shows the MedRx Modified Speech Spectrum (Canoe). It is also possible to underlay DSL i/0 or NAL-NL2 targets on this screen. Click Options + Show Targets in the text menu bar on the top of the screen to select and configure these underlays to meet the needs of your practice.

ARP-I-MREMPT-5 MedRx AVANT REM Speech Plus Training Manual Effective Date: 4/07/2014
14
The screen shot below provides an overview of all the tools and controls on the Live Speech Mapping screen. For more information on these features, please consult the Interactive Help system by pressing the F1 key or clicking the Help icon.
1. Sound level meter 2. Ear selection 3. Measurement type
a. Peaks b. LTAS
4. Input Selector
5. Open Fit Function 6. Reset Button 7. Test Interrupter 8. Discard, Help and Back buttons 9. Legend 10. Target area – can be any of the following:
MedRx Modified Speech Spectrum
DSL i/o
NAL-NL2

ARP-I-MREMPT-5 MedRx AVANT REM Speech Plus Training Manual Effective Date: 4/07/2014
15
Running Speech Mapping “On-Top” within NOAH It is well established that verifying the output of hearing instruments in the patient’s ear will improve the accuracy of the fitting. In the past, it has been difficult to verify these fittings since many real ear systems have been disconnected from the fitting system. The AVANT REM Speech+ system is tightly integrated with NOAH, the industry standard for audiometric and fitting data storage and retrieval. The “on-top” mode of the REM Speech+ software allows you to effortlessly alternate between measurement and fitting adjustments.
From the Avant REM Speech+ main screen, click the NOAH LSM button. The REM Speech Plus window will reduce in size and “float” on top of the NOAH screen. Open the fitting module from the NOAH Module Selection Screen.
Use the text menus and green (start) and red (stop) buttons in the floating LSM window to make Speech Mapping measurements. Make necessary changes to the instrument based on these measurements. To make adjustments to the hearing instrument, click on the fitting module window and modify the settings according to the manufacturer’s instructions, being sure to activate, apply or save the settings to the instrument. Repeat this measure/adjust/measure cycle until the fitting is optimized.
Completing the On-Top Mode Process
Close the REM module by clicking the X button or go up to the File menu and down to
Exit. Save the NOAH session when prompted.

ARP-I-MREMPT-5 MedRx AVANT REM Speech Plus Training Manual Effective Date: 4/07/2014
16
MedRx Live Speech Mapping Protocol Unlike other products, the AVANT REM Speech+ system places full control over the measurement environment firmly in the hands of the hearing care professional. The system is powerful, yet extremely flexible, allowing each provider to use Live Speech Mapping in a way that compliments their practice style rather than compromising it. In order to get you “up and running” with the AVANT REM Speech+ system, MedRx has developed the following protocol. This simple procedure has been found to be effective with both audiologists and hearing instrument specialists. After mastering the basic operation of the system utilized in this protocol, you are encouraged to further expand your use of Live Speech Mapping in your practice. Feature-specific help is available by simply pressing the F1 key or clicking on the Help icon or text menu.
1. Complete a careful otoscopic examination as instructed by the manufacturer of your otoscope.
a. For MedRx Video Otoscopes, refer to the Help system within the software by pressing the F1 key or clicking the Help icon or text menu.
2. Basic Diagnostics. a. Using your audiometer and NOAH, measure and
record the following values: b. Pure Tone Air and Bone conduction thresholds. c. Narrow Band Noise or Pure Tone UCL at 500, 1000,
2000 and 4000 Hz. d. Other tests if needed in your practice or jurisdiction.
3. Position patient as described earlier in this manual.
4. Calibrate Probe Tube as described earlier in this manual. 5. Measure and place the probe tube in the ear canal. (Use
guide to the right). 6. Complete a Live Speech Mapping measurement UNAIDED.
a. Microphone input. b. Peak Measures. c. 1/3 Octave resolution.
7. Carefully place the hearing instrument in the ear without
disturbing the probe tube.
8. Complete a Live Speech Mapping measurement AIDED.
9. Using the On Top Mode, make any adjustments needed to the hearing instrument so that:
a. The LSM curve for Quiet Speech (50 dB) is at the bottom of the white modified speech spectrum (canoe).
b. The LSM curve for Conversational Speech (65 dB) should be within the white modified speech spectrum.
c. The LSM curve for loud sounds (85 dB) (very loud speech, clapping hands, etc.) is approximately 10 dB below the UCL curve.
Probe Tube Insertion Guide for Live Speech Mapping and Conventional REM
(re: Pomford, J & Sinclair, S. Real-Ear Measurement: Basic Terminology and Procedures. Audiology OnLine.com)
(Adult)
(Adult)
1. Perform Otoscopic Examination
2. Align end of Probe Tube with the
left end of the appropriate guide
3. Align tube marker with the red
marker above 4. Place Probe Tube in ear canal
5. Confirm placement with Otoscope
6. Perform Live Speech Mapping & REM

ARP-I-MREMPT-5 MedRx AVANT REM Speech Plus Training Manual Effective Date: 4/07/2014
17
Real Ear Measurements
In addition to Live Speech Mapping, the Avant REM+ supports all conventional Real Ear Measurements (REM). All these tests are accessed from the main REM screen.
To begin, click the
button on the right of the Avant REM+ main screen.
In general, REM tasks are performed as follows:
1. Select the REM test you wish to perform from the top row of buttons.
2. Select the test ear. 3. Select the test
stimulus.
4. Click Start. The test will stop itself after sufficient data has been collected and averaged.
5. If you wish to delete a curve, simply select it with your mouse (left click) and then click the Discard icon or press the Delete key.
6. When all measurements are complete, click the Back arrow to return to the AVANT REM Speech+ Main Screen.
Descriptions of the various “Stimulus” options are presented in the Help files under the topic “Signal Types”. Access these by clicking on the “Help” tab at the top of the screen, and selection “Help Topics”. Select an item from the list in the Index tab, and click “Display”.
ARP-I-MREMPT-5 MedRx AVANT REM Speech Plus Training Manual Effective Date: 4/07/2014
18
Stimulus Signal Types Pure Tone A pure sine wave. Crest Factor = 1.41 (3.0dB) Broadband Noise (BBN) Uniform random noise with normal (Gaussian) amplitude distribution. Can be weighted to White, Pink, Speech ANSI, and Speech Byrne (see below.) Pseudo Random Noise (PRN) A "synthetic" broadband random noise. It is less uniform than BBN, has lower spectral density and random volleys. Can be weigted to White, Pink, Speech ANSI, and Speech Byrne (see below.) ICRA Noise This stimulus was developed for measuring characteristics of non-linear instruments. The noise is weighted to Byrne LTASS. ISTS (International Speech Test Signal) Initiated by European Hearing Instrument Manufacturing Association (EHIMA.) This signal is based on natural recordings of 21 female speakers in six different languages - American English, Arabic, Chinese, French, German and Spanish. The signal is largely non-intelligible because of segmentation and remixing. The speech material was filtered to Byrne LTASS. Crest Factor: 9.23 (19.3dB) Rainbow Passage Natural recordings of several voices reciting the rainbow passage. Shaped to Byrne LTASS. Broadband Noise Weighting White This is essentially no weighting or filtering. The White Noise has flat power spectral density. Power at every frequency is equal. Because the density of frequencies (individual cycles) raises with frequency, there is more energy in high octaves. White-weighted noise can be used mostly for testing of equipment. It is not recommended to use it for hearing aid fitting, unless specified by the manufacturer. Crest Factor: BBN = 1.73 (4.8dB), PRN = 7.86 (17.9dB) Pink The noise is filtered so its energy per frequency (power spectral density) is inversely proportional to the frequency. Each octave carries the same amount of energy. Comparing to White Noise, the Pink Noise energy drops approximately 3dB per octave. Pink-weighted noise can be used mostly for testing of equipment. It is not recommended to use it for hearing aid fitting, unless specified by the manufacturer. Crest Factor: BBN = 3.67 (11.3dB), PRN = 6.55 (16.3dB)
Speech - Byrne The noise is approximately weighted to International Long Terms Average Speech Spectrum (ILTASS) as described in Byrne et. al., 1994. The noise with this weighting is preferred for hearing aid fitting because its spectrum is the best approximation of the spectrum of real human speech. Crest Factor: BBN = 4.22 (12.5dB), PRN = 3.47 (10.8dB)
Speech - ANSI The noise is approximately weighted to ANSI S3.42 Speech Noise. The noise with this weighting can be used for fitting hearing aids. The slope of ANSI-weighted noise is not as steep as Byrne-weighted, so there is more power in higher octaves. This will result in less gain required by the hearing aid to reach targets, but may result in under-fitting at high frequencies. Crest Factor: BBN = 4.46 (13.0dB), PRN = 5.17 (14.3dB)

ARP-I-MREMPT-5 MedRx AVANT REM Speech Plus Training Manual Effective Date: 4/07/2014
19
To activate specific REM tests, click the buttons as follows:
Opens the audiometry data entry screen. Use this if audiometry has not been previously measured and entered into NOAH.
Allows the selection of fitting rules to generate targets. The following rules are supported: ½ Gain, POGO I, POGO II, Berger, 1/3 Gain, NAL-RP, FIG6, DSL, NAL-NL1.
Real Ear Unaided Response - Measures the additive effect of the ear canal’s resonance to a stimulus. Reported as dB SPL of output.
Real Ear Unaided Gain - Measures the additive effect of the ear canal’s resonance to a stimulus. Reported as dB SPL of gain. If a real ear unaided response (REUR) curve has been measured, the corresponding real ear unaided gain curve is automatically plotted to the REUG screen.
The difference between the REUG and the REAG is called the Real Ear Insertion Gain (REIG). This Insertion Gain information is used to compare to the target gain curve selected for the client.
The Real Ear Aided Response (REAR) is the sound pressure level in the ear canal measured with the probe microphone close to the eardrum and the operating hearing instrument inserted in the ear and turned on. ANSI defines REAR as the SPL, as a function of frequency, at a specified measurement point in the ear canal for a specified sound field, with the hearing aid in place and turned on.
The REAG is simply the REAR expressed as gain rather than SPL. Selecting REAG allows you to see the gain at each frequency for each of the REAR curves measured.
REOR measures the effect on the natural external ear effects resulting from inserting an ear mold or a hearing instrument, before it is turned on, into the ear canal. The REOR is also referred to as Insertion Loss. REOR is also useful for validating the effectiveness of venting or canal length changes to the mold.
The Real Ear Occluded Gain (REOG) is the difference in decibels, as a function of frequency, between SPL in the ear canal and SPL at the reference microphone at the entrance of the ear canal with the hearing aid in the ear and turned off. For each REOR measurement curve, the corresponding REOG curve is calculated and automatically plotted to the REOG screen. The REOG function is useful in determining the acoustic seal of a hearing aid, relative to a sound field outside the ear.
Some clients report they seem like they are “speaking in a barrel” or “feel blocked up”. These are signs of a build up of self generated low frequency energy in the ear canal. This excessive occlusion can be measured objectively in the Occlusion Effect task.
The Real Ear to Coupler Difference (RECD) is used to simulate real ear measurements by coupler measurements and is useful when fitting children or “difficult” to fit patients. See the section on RECD later in this manual for more detail.

ARP-I-MREMPT-5 MedRx AVANT REM Speech Plus Training Manual Effective Date: 4/07/2014
20
Additional Tests & Features Real Ear to Coupler Difference (RECD)
The Real Ear to Coupler Difference (RECD) is used to simulate real ear measurements by coupler measurements and is useful when fitting children or “difficult” to fit patients. RECD measurements can be conducted outside of a Hearing Instrument Test Box when using the optional MedRx RECD Coupler.
The RECD values are used as a correction to coupler measures for that client’s hearing instruments. By performing all subsequent measures in the coupler and applying the RECD corrections to the coupler measures, the “real ear” factors are incorporated into the results. The resulting simulated measurements provide information to select and make adjustments to the hearing instrument and verify adjustments in the MedRx coupler rather than in the uncooperative client’s ear. This is particularly important in the case of children, whose small volume ear canals enhance high frequency amplification more so than in average adults. This is an essential consideration in determining the maximum output of the hearing instrument.
If RECD data is present, the software will display an option to choose between Ear or Coupler
measurement on all Real Ear screens where measurements in a coupler are appropriate.
There are two ways to measure the REAR response with optional RECD coupler: using an insert headphone or a hearing instrument.
If a hearing instrument is used, its volume control setting and other parameters should remain the same for both REAR and coupler measurements. Set the volume control to moderate, and turn the compression and noise reduction circuits off.
Using open-fit hearing aids for RECD measurements may result in invalid low and mid-frequency measurements because of insufficient gain at those frequencies. Please contact your hearing aid manufacturer for recommendations.

ARP-I-MREMPT-5 MedRx AVANT REM Speech Plus Training Manual Effective Date: 4/07/2014
21
How to perform the RECD task
First, perform the REAR task to obtain a REAR curve. This can be measured with a hearing instrument or an insert earphone.
REAR with a hearing instrument
Adjust volume of the hearing instrument to comfortable listening level. Turn the compression and noise reduction circuits off.
Position the client less than one meter from the speaker and facing the speaker.
Place the hearing instrument and the probe microphone tube as for all REM measurements.
Select START to open the measurement type selection screen.
Choose the REAR with a Hearing Aid option.
Select OK to begin the test and wait until it concludes.
REAR with an insert headphone
Place the probe microphone tube as for all REM measurements but use the insert headphone instead of a hearing instrument.
Select START to open the measurement type selection screen.
Choose the REAR with an Insert Headphone option.
Select OK to begin the test and wait until it concludes.

ARP-I-MREMPT-5 MedRx AVANT REM Speech Plus Training Manual Effective Date: 4/07/2014
22
Coupler response
When the REAR is complete, you are prompted to perform a coupler response.
Attach the hearing instrument or the insert headphone (must be the same as in the REAR test) to the appropriate coupler and place the probe tube inside the coupler.
If a hearing instrument is used, be sure to perform this measurement at the same volume control setting as the first measurement.
Select START to open the measurement type selection screen.
Choose the Coupler Response option or Use Stored to skip the measurement (see note below.)
Select OK and wait until the test completes.
The calculated RECD curve is automatically displayed on the screen and is stored in memory for correction of subsequent coupler measurements made from the RECD function.
Note: If the REAR and the coupler response were measured with the insert headphone, the program saves the coupler response curve for later use. In this case to obtain another RECD, only REAR with insert headphone measurement is necessary. This is possible because the coupler response does not change provided that neither the coupler nor the insert earphone has changed.
Note: After measuring RECD, it is possible to perform Live Speech Mapping in the coupler as well. Look for the “Measuring in” option on the LSM screen.

ARP-I-MREMPT-5 MedRx AVANT REM Speech Plus Training Manual Effective Date: 4/07/2014
23
Measuring Acoustic Feedback
Feedback (whistling, howling) is one of the most common complaints of hearing instrument users. Even though many modern hearing instruments have sophisticated feedback management systems, knowing exactly where the feedback is occurring can greatly reduce the time required to resolve the problem. The AVANT REM+ system does an excellent job measuring and displaying acoustic feedback.
1. Place the calibrated probe tube in the ear canal as instructed previously.
2. Place the hearing instrument in the ear without disturbing the probe tube.
3. Begin a Live Speech Mapping session as instructed previously.
4. When feedback is present, click the Start button. 5. Acoustic feedback appears as a large spike in the LSM
response.
If a more specific frequency analysis of the feedback is desired, change the resolution of the system to 1/24 octave by clicking the Options menu item and changing the Analyzer selection using the pull-down menu. This image shows the same feedback as above at 1/24 octave. Using this information, make any necessary adjustments to the hearing instrument to reduce or remove the feedback.

ARP-I-MREMPT-5 MedRx AVANT REM Speech Plus Training Manual Effective Date: 4/07/2014
24
Hearing Loss Simulator The Hearing Loss Simulator demonstrates the effect of the client’s hearing loss for the significant third party. The program attenuates an input signal to simulate the audiogram. The third party listens to the free field speakers. The third party can hear how their own voice is distorted by the hearing loss when the Record input option is used.
The Hearing Loss Simulator requires the client’s Audiogram data. This data can be manually entered in the Audio screen of this or any other task.
How to perform the Hearing Loss Simulator task
1. Select the Hearing Loss Simulator tab on the toolbar.
2. Enter the Audiogram values manually if the data is not automatically imported to this screen.
3. Select the input signal type: Mic, File or Record. Select the track and the Play button on the control panel. See below for instructions on how to use the Record option. The HLS output is directed to the free field loudspeakers.
4. Select Normal to play the input signal as a person with normal hearing would perceive it. Select Simulated to turn on the simulation of the client's hearing loss. Toggle between these selections as necessary.
5. The Reset option restores the audiogram to the original state. Use this option if you have modified the audiogram while in the simulate mode but want to undo the changes. The changes to the Audiogram that are made on the HLS screen are temporary and will not affect the client's original audiometry record.
6. A volume control adjustment bar allows modifying the audio for manual adjustment of the output level of the free field speakers. This allows the practitioner to demonstrate improvements to hearing loss with amplification or what happens when further hearing loss occurs.
7. To stop the playback, select the Stop button on the player.
Note: It is recommended you use a variety of tracks from the list to demonstrate the hearing loss.
Record Input Option
This option allows recording and playing back of the voice of the third party.
Note: The LSM option appears on the bottom half of the display. This is so the unaided and aided results can be displayed simultaneously for the patient and significant third party.

ARP-I-MREMPT-5 MedRx AVANT REM Speech Plus Training Manual Effective Date: 4/07/2014
25
Note: The Operator Headphone is used by the operator to monitor the signal being received by the probe microphone. The Patient Headphone is used by the patient during the Master Hearing Aid function, where a simulated hearing aid activity is presented to the patient.
Master Hearing Aid Master Hearing Aid is an alternative to using a stock hearing aid to demonstrate the benefits of amplification to an inexperienced user. The system applies the fitting rules by default to the patient's audiogram and simulates a hearing aid. The patient listens to this signal through the headphones. Options for editing the gain applied to the audiogram are provided.
About the Master Hearing Aid Display
The Master Hearing Aid screen displays a graph with dB Gain on the vertical axis and Frequency in Hz on the horizontal axis. The plot on the graph represents the gain applied to the patient’s Audiogram. The NAL-RP is applied by default. A new rule can be selected from the list on the right side of the display. A volume adjustment bar allows for manual adjustment of the output level. The control panel on the right of the display provides options for input signal source and the task icons for Normal and Simulate.
The Master Hearing Aid applies gain separately for each ear. If audiogram values are entered for the left and right ear, the selected fitting rules will be applied to each ear separately. Different rules may be entered for different ears (i.e. NAL-RP for left ear and BERGER for right ear). If an audiogram is entered only for one ear, the gain will not be adjusted for the opposite ear and the sound for that ear will be normal.
If Binaural mode is selected, the sound will be heard from both channels (left and right). If Monaural mode is selected, the sound will be heard only from the channel corresponding to the active ear when the channel for the opposite ear will be muted.
Input signal
Live voice (microphone) allows you to use the right probe mic for live speech input to the headphones. The clinician or significant third party can speak into the microphone for this activity. Note: there is a processing delay between the input and playback. Make sure that the client cannot hear the voice directly but only through the headset. If this is not possible, use the Recorder (describer below) to simulate speech input.
File allows the user to play sound files. The program supports MP3 and WAV files and comes with a preset MedRx Sounds Sensations set of files. After the option is activated, use the player panel to control the playback.
CD allows the user to play music CDs. After the option is activated, use the player panel to control the playback.
Record input mode allows the clinician or third party to record a sample of their speech which can then be replayed for repeat comparisons under different amplification conditions for the patient. Refer to the interactive Help system by pressing F1 or clicking the Help icon to learn more about the recorder.

ARP-I-MREMPT-5 MedRx AVANT REM Speech Plus Training Manual Effective Date: 4/07/2014
26
How to use the Master Hearing Aid:
1. Select the Master Hearing Aid (MHA) icon from the main screen.
2. Enter the Audiogram values manually if the data is not automatically imported to this screen.
3. Select the input signal type: File, CD, Mic, or Record.
4. Select Monaural or Binaural
5. Select the Normal icon, which will send the input signal through to the inserts without modification. The patient is listening to the signal without any amplification benefit. Select the Simulate icon to modify the input signal according to the selected rule. This selection allows the patient to hear the benefits of amplification. Toggle between these two selections as necessary.
6. If the simulated frequency response needs to be adjusted, based on feedback from the patient, manually edit the response by clicking on the gain curve at the desired frequency and new gain level. The gain curve of the selected test ear on the control panel can be edited. To edit the other ear, click the appropriate test ear icon on the control panel first.
Hint: Use the track return icon on the player control panel to replay one track continuously.
The Reset option restores the rule to the original state. Use this option if you have modified the rule but want to undo the changes.
Printing Printing within the Avant REM+ software is very simple.
From the File menu, click one of the following options:
Print Setup – selects the printer you want the report to be sent to. Avant REM Speech+ prints to any installed Windows printer. Page Setup – Allows you to set margin sizes and the default text header for your reports.
Print Preview – Shows you what your report will look like before you print it.
Print – Sends the report to the printer.

ARP-I-MREMPT-5 MedRx AVANT REM Speech Plus Training Manual Effective Date: 4/07/2014
27
Rainbow Passage
When the sunlight strikes raindrops in the air,
they act like a prism and form a rainbow. The
rainbow is a division of white light into many
beautiful colors. These take the shape of a long
round arch, with its path high above and its two
ends apparently beyond the horizon. There is,
according to legend, a boiling pot of gold at one
end. People look, but no one ever finds it. When
a man looks for something beyond his reach, his
friends say he is looking for the pot of gold at the
end of the rainbow.

ARP-I-MREMPT-5 MedRx AVANT REM Speech Plus Training Manual Effective Date: 4/07/2014
28
Limited Warranty MedRx, Inc warrants this product to be free from defects in material and workmanship for one year from the time of purchase. If this system fails to perform as specified during this period, the purchaser is responsible for calling MedRx at (888) 392-1234 or (727) 584-9600. The company's representative will advise the owner to either return specific components or the entire system to:
MedRx, Inc.
1200 Starkey Road #105
Largo, FL 33771 USA
MedRx will repair or replace any defective devices, fully test the system and/or
components and ship the system promptly back to the owner. There is no cost for the
repair or return shipping, provided the system is one year old or less and has not
been misused, abused or damaged. Such damage includes, but is not limited to,
dropping, exposure to excessive heat greater than 100ºF and water/liquid damage.
Repair or replacement of the system as provided under this warranty is the sole and
exclusive remedy of the purchaser. MedRx shall not be liable for any consequential
or incidental damages or for breach of any express or implied warranty. Except to the
extent of applicable law, any implied warranty, merchantability or fitness of this
product is limited to the duration of this warranty.
MedRx will, at its discretion, service and repair out of warranty products at the
purchaser's request, charging for parts and labor as necessary.
The limited warranty is deemed void if software or hardware is installed on this
product which is not pre-approved by MedRx, Inc. Approved software includes
NOAH™
and HIMSA approved hearing aid manufacturer programming modules for
fitting hearing aids.
MedRx, Inc is not responsible for problems resulting from installation of unapproved
software or hardware. In the event of unapproved software or hardware installed on
the system causing a conflict, MedRx will service the product for a fee to be
determined at the time of service.
Any extension of this warranty past the initial one-year warranty is subject to the following (where applicable). 1. A $300 deductible per repair. 2. Extended warranty does not include cables, connectors or peripherals. 3. Extended warranty of the Video Otoscope covers optics only.