training manual system admin...
TRANSCRIPT

Department of Finance
Government of Bihar
CFMS
Training Manual
System Admin Module
Government Industry Solution Unit (ISU)
November, 2018

Notice
© 2018 Tata Consultancy Services Limited
This is a controlled document. Unauthorisedaccess, copying, replication or usagefor a
purposeother than for which it is intended, are prohibited.
All trademarks that appearin the documenthave been used foridentification purposes
onlyandbelongto their respective companies.
1
DOCUMENT RELEASE NOTE Document Details:
Name Version No. Description
User Manual Version 1.0 Original Document
Revision Details:
Reference No
Action taken
(Add / Del / Change / Replace)
Preceding Page No.
New Page No.
Revision Description
Ver 1.0 Add New document created.
Actors for System AdminModule:- Super Admin: Super admin will have the following privileges –create users, create office, modify office, and add admin user of all treasury and Level 1 office.
Level 1 Office Admin: Level 1 office admin will create office, modify office under its hierarchy, create users and perform the own office configuration of its own office.
Office Admin: Office admin will create users and perform the own office configuration of its own office.

2
TABLE OF CONTENTS
1. INTRODUCTION ......................................................................................................... 4
1.1 Login to CFMS Portal ..................................................................................................... 4
1.2 Setting Security Question on First Time Login ................................................................. 5
1.3 Setting New Passwordon First Time Login/Change Password .......................................... 6
1.4 Updating User Profile: ................................................................................................... 7
1.5 Office Creation .............................................................................................................. 9
1.6 Office Modification ..................................................................................................... 10
1.7 Own Office .................................................................................................................. 12 1.7.1 Own Office->Office Details ............................................................................................................. 12 1.7.2 Own Office->Office HoA tagging ..................................................................................................... 14 1.7.3 Own Office->Office User tagging .................................................................................................... 15 1.7.4 Own Office->User Activity Mapping ............................................................................................... 16 1.7.5 Own Office->Office Workflow HoA Mapping.................................................................................. 17 1.7.6 Own Office->Preview ...................................................................................................................... 19
1.8 User Administration .................................................................................................... 20 1.8.1 User Creation .................................................................................................................................. 20 1.8.2 User Search ..................................................................................................................................... 22 1.8.3 User Modification ........................................................................................................................... 22 1.8.4 Reset password ............................................................................................................................... 24
1.9 Report Module ............................................................................................................ 25
1.10 GLOSSARY ................................................................................................................... 26
TotalNumber of pages: 30

3
LIST OF FIGURES Figure 1: Bihar CFMS Login Page ............................................................................................................. 4 Figure 2: Bihar CFMS Security Question Set Page................................................................................... 5 Figure 3: Setting New Password on First Time Login .............................................................................. 6 Figure 4: Master Admin Module on CFMS home page ........................................................................... 7 Figure 5: Master Admin Menu ................................................................................................................ 7 Figure 6: Change User details ................................................................................................................. 8 Figure 7: Updating User Profile ............................................................................................................... 8 Figure 8: Office Creation Screen ............................................................................................................. 9 Figure 9: Office Search Screen .............................................................................................................. 11 Figure 10: Office Administration Modify Screen .................................................................................. 11 Figure 11: Own Office Details Screen ................................................................................................... 13 Figure 12: Office HoA Tagging Screen ................................................................................................... 14 Figure 13: Office User Tagging Screen .................................................................................................. 15 Figure 14: User Activity Mapping Screen .............................................................................................. 16 Figure 15: Workflow HoA Mapping Screen ........................................................................................... 17 Figure 16: Workflow HoA Mapping Screen ........................................................................................... 17 Figure 17: Workflow HoA Mapping Screen ........................................................................................... 18 Figure 18: Workflow HoA Mapping Screen ........................................................................................... 18 Figure 19: User Creation Screen ........................................................................................................... 21 Figure 20: User Search Screen .............................................................................................................. 22 Figure 21: User Update Screen ............................................................................................................. 23 Figure 22: User Update Form ................................................................................................................ 23 Figure 23: Reset Password .................................................................................................................... 24 Figure 24: Reset Password .................................................................................................................... 25 Figure 25: Report generation screen .................................................................................................... 25 Figure 26: Select the report type format .............................................................................................. 25

4
1. INTRODUCTION
• Admin module will deal with User Authentication and Authorization for the CFMS system.
• System will have the following users Internal Users - Users of Govt. of Bihar
• This module will have the following functionalities: I. User and Access management
II. Other Office creation and modification. III. Own Office configuration.
• Admin users will support the following factors for authentication: - Knowledge factor (Password) - Possession factor (Mobile based OTP).
• System will be able to identify the users based on the stakeholder code of the user provided in the system.
1.1 Login to CFMS Portal
• Enter the Bihar CFMS URL in the browser and Bihar CFMS login page will open.
• Enter the username (Provided by Finance Dept.) and password (First Time Password Received on SMS on mobile no. registered with user in CFMS system) and click on Login.
Figure 1: Bihar CFMS Login Page
• On successful login into the CFMS system for the first time we will be re-directed to set the security question page.

5
1.2 Setting Security Question on First Time Login
Figure 2: Bihar CFMS Security Question Set Page
• Set the security question from dropdown menu and provide the secret answer
• Confirm the secret answer.
• Secret answer and confirmed secret answer (casesensitive) must be same for the user to proceed further, otherwise system will throw an exception.

6
1.3 Setting New Passwordon First Time Login/Change Password
• Navigate to: Master Admin-> My Profile->Change Password
Figure 3: Setting New Password on First Time Login
• After setting the security question first time login user will be redirected to setting new password screen.
• Enter the old password received via SMS on registered mobile number and click on submit.
• An OTP will be sent to user’s registered mobile number. Enter the OTP received and click on ok.
• Enter a new password and confirm the password.Password policiesmentioned must be kept in mind while changing the password.
• User will be re-directed to the CFMS home page.
• On homepage click on Master Admin icon to access the admin module.
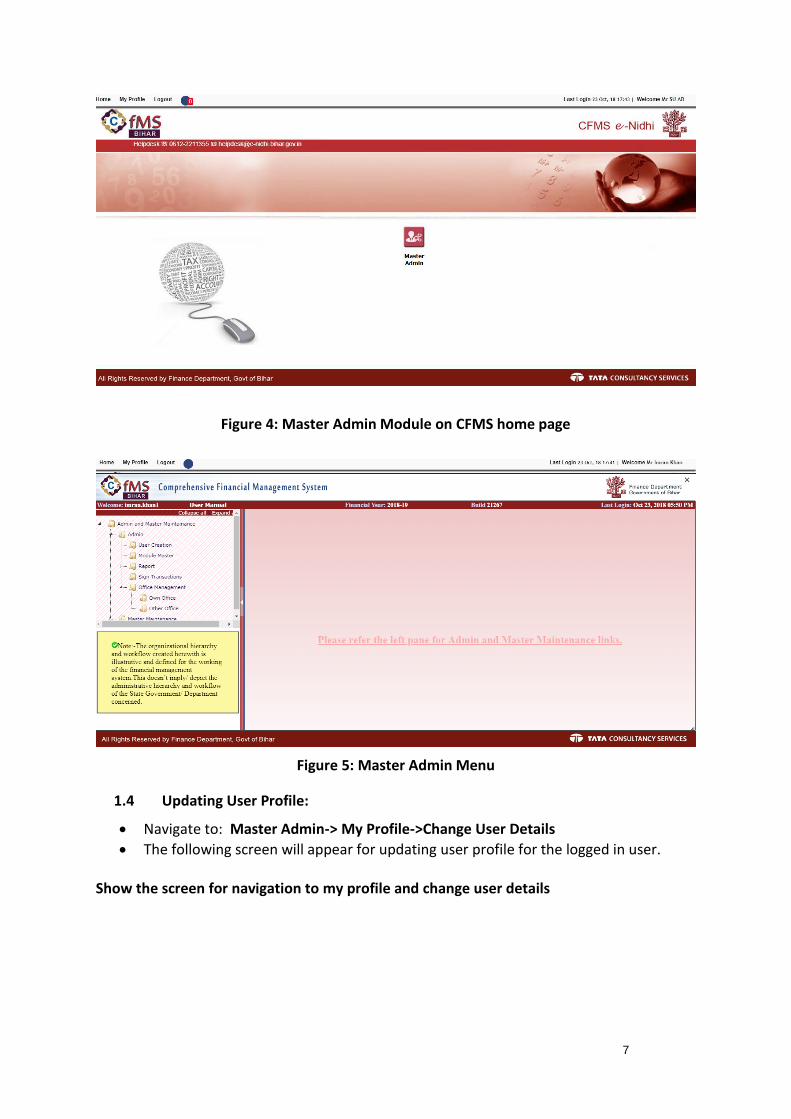
7
Figure 4: Master Admin Module on CFMS home page
Figure 5: Master Admin Menu
1.4 Updating User Profile:
• Navigate to: Master Admin-> My Profile->Change User Details
• The following screen will appear for updating user profile for the logged in user.
Show the screen for navigation to my profile and change user details

8
Figure 6: Change User details
Figure 7: Updating User Profile
• User will be able to update the following fields. ✓ Personal Email ID ✓ Office Land-Line No ✓ Address Line1 ✓ Address Line2 ✓ Pan No.
• Click on the Update button to save the modified data.
• Click on the Back button togo back to the previous screen.

9
1.5 Office Creation
• Navigate to: Master Admin->Office Management->Other Office
• Click on ‘Create New Office’ Button in the Other Office menu of Administrative module of CFMS
• The Office Creation Screen Form gets opened.
Figure 8: Office Creation Screen
• User will be able to enter the details and save them by clicking on Save button as mentioned in the figure above.
• Below are the details of the fields: • Office Details Section containing below fields:
o Office Type: Selection from dropdown, Mandatory. For Super Admin login, the Dropdown will contain “Office” and “Treasury”. For Level 1 Office Admin login, the dropdown will contain only “Office”.
o Level: For Super Admin login, if “Office Type” is selected as “Office”, this dropdown will contain only “Level-1”. For Super Admin login, if “Office Type” is selected as “Treasury” the dropdown will get disabled. For Level-1 Office Admin login, if “Office Type” is selected “Office”, this dropdown will contain “Level-2”, “Level-3” and “Level-4”.
o Office Name: User Input, Mandatory o Office Name in Hindi: User Input, Mandatory o Reporting Office:For Super Admin login, for creation of “Office Type” as
“Office”, it will be disabled. For Super Admin login, for creation of “Office Type” as “Treasury”, it will be auto populated as Finance Department. For Office Admin login, it will be Mandatory and Selection from LOV.
o Treasury:For Super Admin login, if “Office Type” is selected as “Office”, this field will be Mandatory and Selection from dropdown. For Super Admin login, if “Office Type” is selected as “Treasury”, it will be disabled. For Level 1 Office Admin login, it will be Mandatory and Selection from dropdown.

10
o Office Code:For Super Admin login, it will be Mandatory and User Input. For Level 1 Office Admin, it will be disabled.
• Address Details Section containing below fields: Address will be filled in the order Division, District, Sub Division, Block.
o Address Line 1: User Input, Mandatory, Free Text o State:Auto Populated (Bihar).Option to select 'New Delhi' from LoVfor Delhi
Bihar Bhawan Treasury, Mandatory o Division:User Input, Suggestive List.Populated from Division Master,
Mandatory o District: User Input, Suggestive List.Populated from District Master filtered
on the basis of Division, Mandatory o Sub Division: User Input, Suggestive List.Populated from Sub-Division
Master filtered on the basis of District, Non-Mandatory o Block: User Input, Suggestive List.Populated from Block Master filtered on
the basis of Sub Division, Non-Mandatory o PIN: User Input, Non Mandatory o Office Phone Number: User Input, Non Mandatory o Mobile : User Input, Non Mandatory o Email ID: User Input, Non Mandatory
• Operational Details Section containing below: o E Billing Approver: Selection from LoV, Mandatory o Head of Account: Selection from LoV,Mandatory
• Admin User Details Section containing below: o Add Office Admin: Selection from LoV and Mandatory
• Following buttons will be available on office creations screen:- • Save button-To save the details in form
• Refresh button-To clear the entered data in the form
• Back button- To navigate to previous screen
1.6 Office Modification
• Navigate to: Master Admin->Office Management->Other Office
• The following screen will appear to search/view/modify office details already created.
• Click on Other Office link in the menu of Administrative module of CFMS.
• Search a particular office by entering its name in searchbox.

11
Figure 9: Office Search Screen
• After clicking on ‘Search’ button, basic details of the office will be displayed. User can click on ‘View/Update’ button as shown in the figure above.
• On clicking ‘View/Update’ button details of office will be displayed in editable mode. Here user can modify the required details of office and save by clicking on ‘Save’button.
Figure 10: Office Administration Modify Screen
• User will be able to modify the details and save them by clicking on Save button as mentioned in the figure above.
• Below are the details of the fields: o Office Type: Auto Populated as per the details provided during Office
Creation, Cannot be modified. o Level: Auto Populated as per the details provided during Office Creation,
Cannot be modified.
12
o Office Name: Can be modified o Office Name in Hindi:Can be modified o Reporting Office: Auto Populated as per the details provided during Office
Creation, Cannot be modified. o Treasury: Auto Populated as per the details provided during Office Creation,
Cannot be modified. o Office Code: Auto Populated as per the details provided during Office
Creation, Cannot be modified. o Delete Office: Checkbox
• Address Details Section containing below fields: Address can be modified in the order Division, District, Sub Division, Block.
o Address Line 1:Can be modified o State:Can be modified o Division:Can be modified o District: Can be modified o Sub Division:Can be modified o Block:Can be modified o PIN: Can be modified o Office Phone Number:Can be modified o Mobile : Can be modified o Email ID: Can be modified
• Operational Details Section containing below: o E Billing Approver: Can be modified o Head of Account: Can be modified
o Admin User Details Section containing below:
o Add Office Admin: Can be modified
• Following buttons will be available on office creations screen:- • Update button-To save the modified details in form
• Back button- To navigate to previous screen
1.7 Own Office
1.7.1 Own Office->Office Details
• Navigate to:Master Admin->Office Management->Own Office->Office Details
• The following screen is used to modify Own office details
13
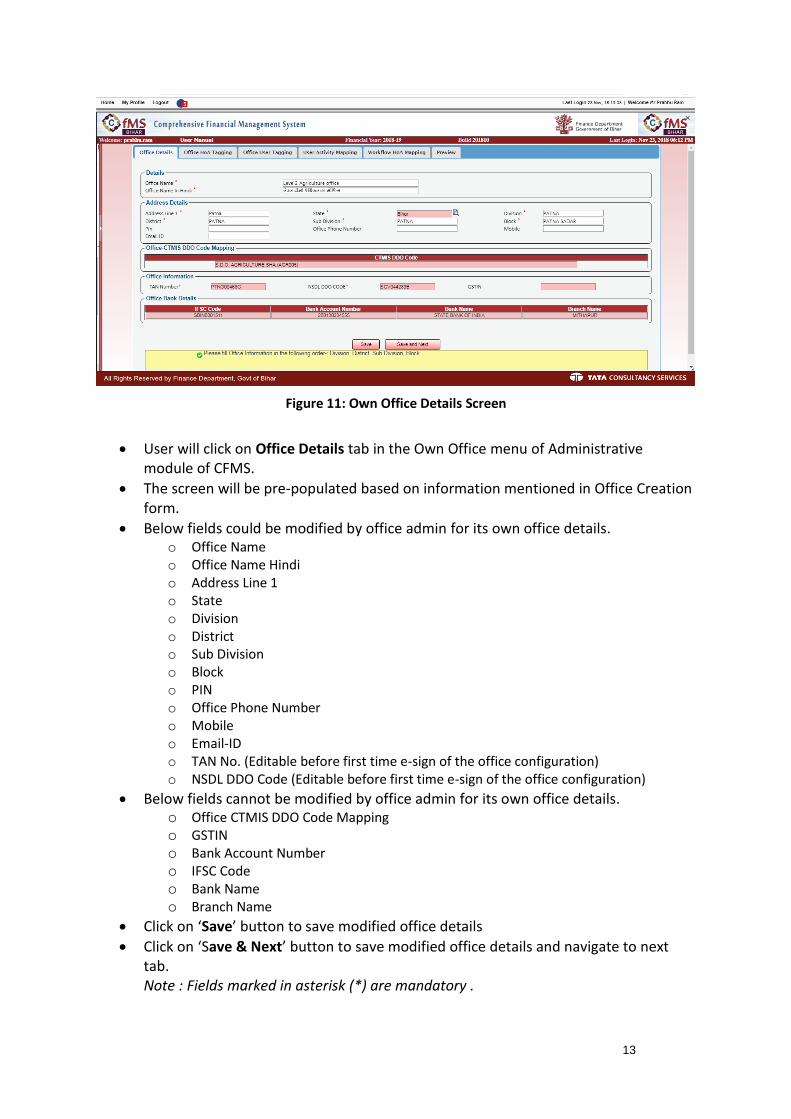
Figure 11: Own Office Details Screen
• User will click on Office Details tab in the Own Office menu of Administrative module of CFMS.
• The screen will be pre-populated based on information mentioned in Office Creation form.
• Below fields could be modified by office admin for its own office details. o Office Name o Office Name Hindi o Address Line 1 o State o Division o District o Sub Division o Block o PIN o Office Phone Number o Mobile o Email-ID o TAN No. (Editable before first time e-sign of the office configuration) o NSDL DDO Code (Editable before first time e-sign of the office configuration)
• Below fields cannot be modified by office admin for its own office details. o Office CTMIS DDO Code Mapping o GSTIN o Bank Account Number o IFSC Code o Bank Name o Branch Name
• Click on ‘Save’ button to save modified office details
• Click on ‘Save & Next’ button to save modified office details and navigate to next tab. Note : Fields marked in asterisk (*) are mandatory .

14
1.7.2 Own Office->Office HoA tagging
• Navigate to: Master Admin->Office Management->Own Office->Office HoA Tagging
• The following screen is used to map Head of Account (13 digits excluding demand number) with its Office. The Head of Accounts will then get tagged to that Office.
Figure 12: Office HoA Tagging Screen
• Office Admin will search the Head of Accounts (using required criteria), the Head of Accounts along with its descriptions will get displayed in the table (based on the search criteria). The Office Admin can search the Head of Accounts by providing any one or more combinations of Demand Number, Major Head, Sub Major Head, Minor Head and Subhead.
• Office Admin will select “Received Allotment from Office“from its LoV, select “Activity on HoA” from Dropdown and then select checkbox corresponding to single/multiple Head of Accounts. The Office Admin will then click on "Add HOA to Office" button. These selected Head of Accounts will get added and displayed in the "Office HoA" table along with its details.
• Once the HOAs are added in the Office HoA table, “Delete” icon gets displayed corresponding to those entries. The Actor can click on Delete icon and hence can select for deletion the added HoAs to Office
• If the added HoAs are fine, then the User will click on “Save” button after which the details will be saved and Head of Account/s will get tagged to the Office.
• Click on ‘Save’ button to save Office-HOA tagging details
• Click on ‘Save & Next’ button to save modified office details and navigate to next tab.

15
1.7.3 Own Office->Office User tagging
• Navigate to:Master Admin->Office Management->Own Office->Office User Mapping
• Through this screen Office Admin will be able to tag e-Signed Users who will be working for his office. The office admin will have option to search users created by him/her or by any other admin.
Figure 13: Office User Tagging Screen
• The user will be able to search e-signed users created by him/her or by any other admin. Office admin will be able to search the Users by entering in textbox for "User Details" and clicking on Search button. In order to search Users created by him as well as other Admin, Actor will select checkbox for "Include All" and then click on Search button.
• The search Result will contain the User Details like Name, User ID, Phone Number, Designation, Present Tagged Activity etc. Office designation needs to be added from the LoV against the selected user from search result to be added into the user grid.
• In order to add a searched User to that office, Actor will click on Select checkbox against the user to be added and click on "Add User to Office" button.
• Once the selected User is added to that Office, it will get displayed in the "Office Users" table.
• In order to remove an already added User from Office, Actor will select Row under ‘Untag’ column corresponding to that entry in the "Office Users" table and click on "Save" button.
• On clicking on Save button added user details to office will be saved
• Click on ‘Save’ button to save office user tagging details
• Click on ‘Save & Next’ button to save office user tagging details and navigate to next tab i;e User Activity Mapping.

16
1.7.4 Own Office->User Activity Mapping
• Navigate to:Master Admin->Office Management->Own Office-> User Activity Mapping
• Through this screen the Office Admin will be able to map Users with activities of that Office.
• Same User cannot be mapped as Maker as well as Approver for an Activity. Similarly same user cannot be mapped as Checker and Approver for an Activity.
Figure 14: User Activity Mapping Screen
• The Office Admin will select the Users from Users LoV to be mapped with Activity. This LoV will contain only those Users which have already been tagged with that Office. Office Admin can select multiple users from Users LoV using multi select option.
• The Office Admin will then selects activity from the Activity LoV and enter suffix manually. Suffix will accept alphabets as well as numerical values. Office Admin can select multiple activities from activity LoV using multi select option.
• Activity Name will get auto populated by clubbing Activity and suffix.
• On clicking Add button User Activity mapping details will be added to Activity Mapping Details table.
• In Activity Mapping Details grid User Name and Mapped activity name against that user will be displayed.
• User can delete an already added User activity mapping from Office, Actor will select Row under ‘Delete’ column corresponding to that entry in the "Activity mapping" table and click on "Save" button.
• Click on ‘Save’ button to save user activity mapping details
• Click on ‘Save & Next’ button to save user activity mapping and navigate to next tab i;e workflow-HoA mapping.

17
1.7.5 Own Office->Office Workflow HoA Mapping
• Navigate to:Master Admin->Office Management->Own Office-> Workflow HoA Mapping
• Through this functionality, Office Admin will be able to perform mapping of Maker, Checker and Approver Users with tagged Head of Account/s for the Office. This mapping will be done Module wise and Activity wise.
Figure 15: Workflow HoA Mapping Screen
Figure 16: Workflow HoA Mapping Screen

18
Figure 17: Workflow HoA Mapping Screen
Figure 18: Workflow HoA Mapping Screen
• Office Admin will select a Module of CFMS (through Radio button) and then select either "13 Digit HoA" or "17 Digit HoA" through Radio button. Based on the Radio button selection, the table will display either all the 13 Digit or 17 Digit Head of Accounts tagged to that Office. For "Payee Management" and "Deposit Account Management", Module selection, the HoA table will not be displayed and the Office Admin will directly goto the Activity Selection Section.
• Now the Office Admin will select single/multiple Head of Account from the HoA table and then select single/multiple Activity (for which Maker, Checker and Approver Users has to be mapped) from the Activity selection table. Office Admin will then click on "Get Makers" button after which the Users which are mapped as Maker for the selected Activity will get displayed in the table.

19
• Office Admin will select the Checkbox against required single/multiple User/s for Maker List. Now the Office Admin will click on "Get Checkers & Approvers" button after which the Users which are mapped as Checkers and Approvers for the selected Activity will get displayed in the table.
• From the Checker List, Office Admin will select the Checkbox against required single/multiple User/s for Checker List.
• From the Approver List table, Office Admin will select the Checkbox against required single User for Approver List. Only Single Approver can be selected from the Approver List.
• After selecting the required user/s from the Maker, Checker and Approver List, Office Admin will click on Add button.
• After clicking on Add button, the selected Head of Accounts along with its corresponding Maker, Checker and Approver Users will get added and will be displayed in the Final Section.
• Office Admin will then select Checkbox for single/multiple rows and then click on “Save” or "save & Next" button. If the Office Admin clicks on Save button then the Workflow HoA Mapping Details will get saved.
• User can delete an already added Workflow-HoA mapping from Office, Actor will select Row under ‘Delete’ column corresponding to that entry in the "Final" table and click on "Save" button.
• Click on ‘Save’ button to save Workflow-HoA mapping details
• Click on ‘Save & Next’ button to save office user activity mapping and navigate to next tab.
1.7.6 Own Office->Preview
• Navigate to:Master Admin->Office Management->Own Office-> Preview
• Through this functionality, the Office Admin will e-sign the configurations made for an Office. It will provide a Preview for the Office Configuration before e-signing of the same
20
• Through the above table, Office Admin can view the configurations of the Office which will include different Module Names, its tagged Head of Accounts, corresponding Maker, Checker and Approver User List. Hence it will enable the Office Admin to have a preview of the office configurations before e-signing the same.
• On clicking the ‘Sign’ button office admin can e-sign its own office configuration.
• On clicking ‘Print’ button office admin can print its own office configuration.
• Once the Office Configuration details as displayed in this Preview screen are e-signed, it will reflect in the Office Configuration details for the Office.
1.8 User Administration
• Navigate to : Master Admin->User Creation
• This functionality can be used to search, add and modify users in CFMS system. It can also be used for resetting password of an existing user.
1.8.1 User Creation
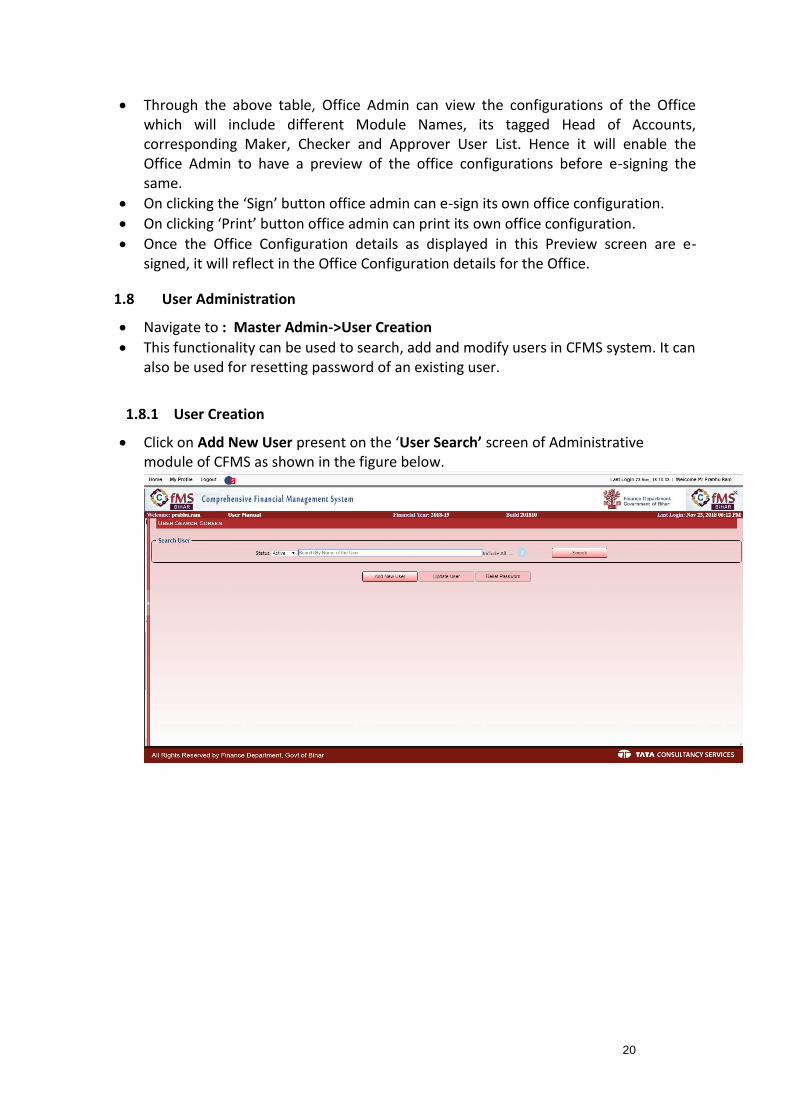
• Click on Add New User present on the ‘User Search’ screen of Administrative module of CFMS as shown in the figure below.

21
• On clicking Add New User present on the ‘User Search’ screen of Administrative module user creation screen gets open in which office admin can fill details of user that needs to be created
Figure 19: User Creation Screen
• Following are the details of the fields to be entered for the user creation: ✓ Salutation(Selected from dropdown, Mandatory) ✓ First Name(Free Text, Mandatory) ✓ Middle Name (Free Text) ✓ Last Name (Free Text, Mandatory) ✓ Gender (Selected from dropdown, Mandatory) ✓ PAN No.(Alphanumeric, Mandatory) ✓ Date of Birth(Date, Mandatory) ✓ Aadhaar Card Number(Numeric, Mandatory) ✓ Mobile Number(Numeric, Mandatory) ✓ Effective from date (Date, Mandatory) ✓ Personal Email Id (Text) ✓ Effective Till Date (Date) ✓ Official Landline Number (Numeric) ✓ Official Email Id (Free Text, Mandatory) ✓ Active (Checkbox) ✓ Address Line 1 (Free Text, Mandatory) ✓ Address Line 2 (Free Text) ✓ Link to Employee (List Of Values) ✓ User Designation (List of Values)
Following buttons will be available in user creation screen:- ✓ Back-Back button will redirect to search screen. ✓ Save-Save button will save the user details. ✓ Reset-Reset button will reset all the fields to blank.

22
1.8.2 User Search
• Admin User can search users created in CFMS on basis of ‘Status’ and text characters (User name) entered in ‘Search’ Textbox.
• User can select ‘Include All’checkbox to search user created by other admin users.
• Click on ‘Search’ and search results will be displayed on basis of search criteria selected in first step as shown in the figure below
Figure 20: User Search Screen
• User can select the no. of rows to be displayed in the search result by clicking on ‘Show’ dropdown and selecting on required value.
• User can also filter the search results using the ‘Search’ textbox.
• Navigational buttons can be used to navigate through search result.
1.8.3 User Modification
• Admin user can search the user that needs to be modified by entering his/her name in ‘Search’ text box.
• Admin user will select the user to be modified from the search result and click on Update User.

23
Figure 21: User Update Screen
• On clicking Update User admin user will be redirected to modification screen for the selected user.
Figure 22: User Update Form
• Following fields will be available for update on the user update form. ✓ PAN No.(Text) ✓ Mobile Number(Numeric, Mandatory) ✓ Personal Email Id (Text) ✓ Effective Till Date (Date) ✓ Official Landline Number (Numeric) ✓ Active (Checkbox) ✓ Address Line 1 (Free Text, Mandatory) ✓ Address Line 2 (Free Text)
24
✓ Link to Employee ✓ User Designation
• Following buttons will be available in user creation screen:- ✓ Back-Back button will redirect to search screen. ✓ Save-Save button will save the user details. ✓ Reset-Reset button will reset all editable fields to blank.
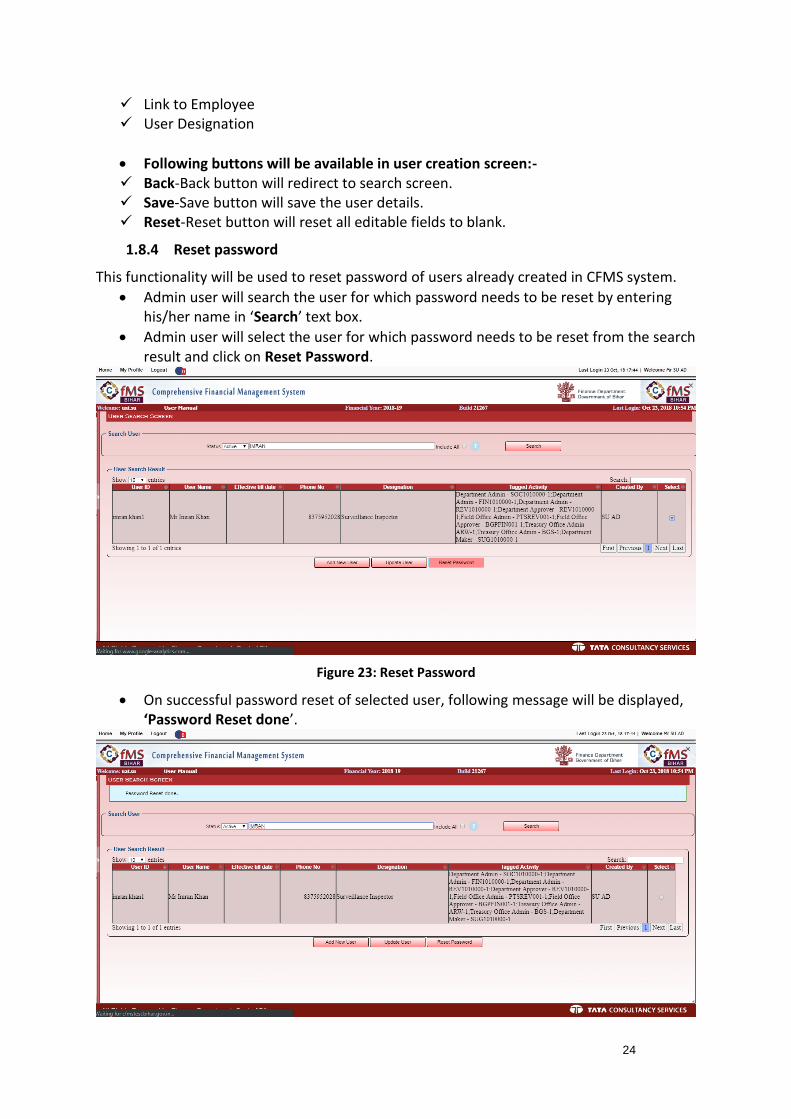
1.8.4 Reset password
This functionality will be used to reset password of users already created in CFMS system.
• Admin user will search the user for which password needs to be reset by entering his/her name in ‘Search’ text box.
• Admin user will select the user for which password needs to be reset from the search result and click on Reset Password.
Figure 23: Reset Password
• On successful password reset of selected user, following message will be displayed, ‘Password Reset done’.
25
Figure 24: Reset Password
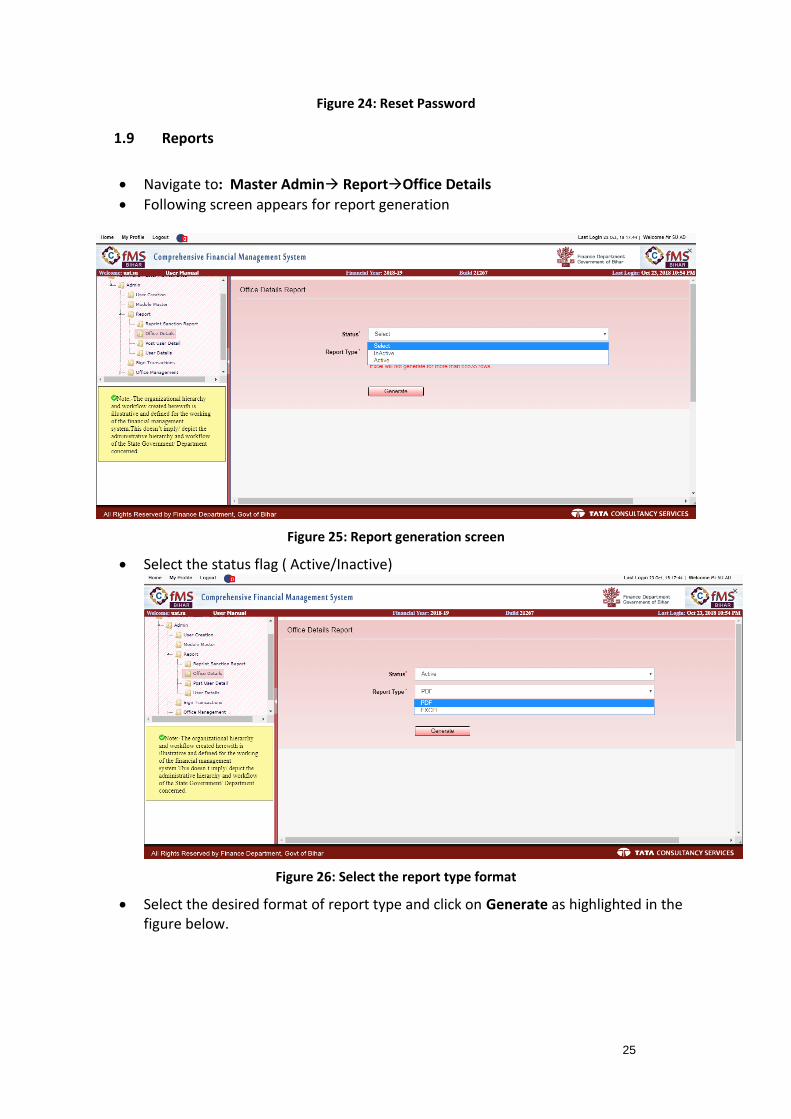
1.9 Reports
• Navigate to: Master Admin→ Report→Office Details
• Following screen appears for report generation
Figure 25: Report generation screen
• Select the status flag ( Active/Inactive)
Figure 26: Select the report type format
• Select the desired format of report type and click on Generate as highlighted in the figure below.
26
1.10 GLOSSARY
Term Description
LoV List Of Values
Mandatory Fields for which value must be entered by user.
Save ‘Save’ Button will be used to save the details entered in the form
Insert ‘Insert’ Button will be used to insert new details
Show ‘Show’ dropdown will be used to select number of rows to be shown.
Search ‘Search’ Button will be used to search the details.
Privilege Rights available with users.
OTP One Time Password
CFMS Comprehensive Financial Management System.
SMS Short Message Service
Govt. Government
Reset Reset button will clear the values already present in the entry form.
*Fields Fields marked with asterisk (*) are mandatory fields.
Fetch Fetch Button will be used to retrieve the office details.
Modify Modify Button will be used to modify the details.
Back Back button will be used to move back to previous screen.
Search Box Search Box will be used to filter the search result.
Navigational Buttons Navigational buttons will be used to navigate through the search result.