transaction management system
TRANSCRIPT

Rajasthan Government Health Scheme
Nodal Office: Project Director, Rajasthan Government Health Scheme, Second Floor, D Block, Vitta Bhawan, Janpath, Jaipur
Email: [email protected]
Rajasthan Government Health Scheme
Project Director, Rajasthan Government Health Scheme, Second Floor, D Block, Vitta Bhawan, Janpath, Jaipur
[email protected] Helpline No. 181
Rajasthan Government
Project Director, Rajasthan Government Health Scheme, Second Floor, D Block, Vitta Bhawan, Janpath, Jaipur
Helpline No. 181

Transaction Management System
(Software Application User Guide)
To enter into software application of TMS, SwasthyaMargdarshak will first login on https://sso.rajasthan.gov.in using any web browser.
Following screen will be displayed. Enter user ID and password.
a) User Name : Enter the SSOID on the displayed web address. b) Password : Enter your password. c) Captcha : Fill the captcha as shown on the screen.
Following screen will be displayed on successful login.

Click on the RGHS icon. Homepage screen of TMS will be displayed.
Click on the TMS icon. Following screen will be displayed in which below the RGHS logo on the left side are given Modules for further use. Entry has to be made in each module.

Beneficiary Identification System
First click on the Beneficiary Identification System. Following screen will be displayed.
Choose from the two options of dropdown menu of "Admission Type"
a) Normal : If the condition of the patient is normal and is not serious then choose the normal option.
b) Emergency: If the patient is brought under serious condition and requires immediate treatment and attention then choose emergency option.

You have to now identify the beneficiary family and the patient. For this follow the directions as given below:
Under ‘Normal’ Admission: For RGHS beneficiary or patient beneficiary family identification enter Janaadhar ID/Janaadhar Enrollment Number or RGHS Card Number and click on “Search” button.
On clicking “Search” button all the details of RGHS family along with e-Card will be displayed. Using Select button choose the patient from the displayed RGHS Card details and select the Treatment Type (IPD/ Day care) from the drop down menu.
Note- 1) In case of Daycare option also select “Applicable Disease for Day Care”. 2) When IPD is chosen, the Hospital can choose the Type of Treatment here as
Conservative/Surgical. New Screenshot
For both the options a Unique TID (Transaction ID) will be generated which will be displayed in a Pop Up Window as shown below.

New Screenshot
Under ‘Emergency’ Admission
On opting for emergency option the screen will be displayed as shown below and following steps have to be undertaken for TID generation.
ii. Fill the patient details and for MLC (Medico Legal Case) choose Yes or NO from the drop down and if there is MLC then choose the type (Accident/Poisoning)details of the person who has identbe generated. Note the TID for Further use in “Emergency Case Conversion Form”
Under ‘Emergency’ Admission:
On opting for emergency option the screen will be displayed as shown below and following steps have to be undertaken for TID generation.
the patient details and for MLC (Medico Legal Case) choose Yes or NO from the re is MLC then choose the type (Accident/Poisoning). Then fill the
details of the person who has identified the patient and click on “Submit” button. TID wile the TID for Further use in “Emergency Case Conversion Form”
On opting for emergency option the screen will be displayed as shown below and
the patient details and for MLC (Medico Legal Case) choose Yes or NO from the . Then fill the
button. TID will e the TID for Further use in “Emergency Case Conversion Form”.

Pre-Authorization
Note : This process of Pre-Authorization is not applicable for Government Hospital Units and have to fill the Authorization Request Form directly. Complete filled details of Authorization Request Form will be only submitted to TPA and TPA approval information is not required. The detail steps of filling Authorization Request Form is similar to the Pre-Authorization Module.
Pre-Authorization is essential for all Empanelled Hospitals. And for this click on the second module of Quick Link i.e. "Pre-Authorization". Following screen will be displayed.
Now from the options in drop down menu of "Search By" choose options:
A) Mobile Number –In case of the availability of Registered Mobile Number in RGHS choose Mobile Number option.
B) Transaction ID (TID) – For normal procedure where TID of the patient is available then choose TID of the patient.
On selection as above the RGHS Card details of the beneficiary will be auto populated and will be displayed on the screen.
Conservative Treatment Type
If the hospital has chosen conservative treatment for the patient, then details such as Doctor Consultation, Ward Selection and ICU requirements must be mentioned before selecting packages.

New Screenshot
Now click on Search Package for selection of package code as written by the doctor and
select package name and package code from the drop down option.For conservative treatment, all investigations have been included. Only selected procedures applicable will be shown here. <New Screenshot>

Surgical Treatment Type
If the hospital has chosen surgical treatment for the patient, then details of treatment are to be filled in by the hospital.
1) If the treatment is for Oncology, details of Surgery grade along with Anasthesia and Room Category should be provided.
2) If the treatment is not for Oncology, only the specialty type is to be selected. Only the
packages applicable to the selected specialty will be displayed in the search.

Package Selection The package details will be displayed in pop up window as shown in the screen below. To
include the correct package details, click on 'Add Package'
If any package is to be added or changed then click on Add/Change PACKAGE in the quick link and repeat the complete procedure. If any package is wrongly selected, then select the package and go to “Delete Record” and click on the mark so as to remove the package.
Ensure once again that the packages entered are as per the Doctor’s prescription and the total cost of the selected package is less than the available balance in RGHS card.
Post package details selection all the mandatory documents are required to be uploaded in PDF of size not more than 300 KB for Pre Authorization. The list of mandatory and non- mandatory documents is given below.

1- Doctor's Prescription2- Admission Note 3- Investigation Report4- ID Documents 5- Consent Form signed by Patient
1- Patient History 2- OPD Consultation Paper3- Referral from Physician4- Family History of
<New Screenshots>
Mandatory Documents
Doctor's Prescription
Investigation Report
Consent Form signed by Patient
Non-Mandatory Documents
OPD Consultation Paper Referral from Physician Family History of Diseases
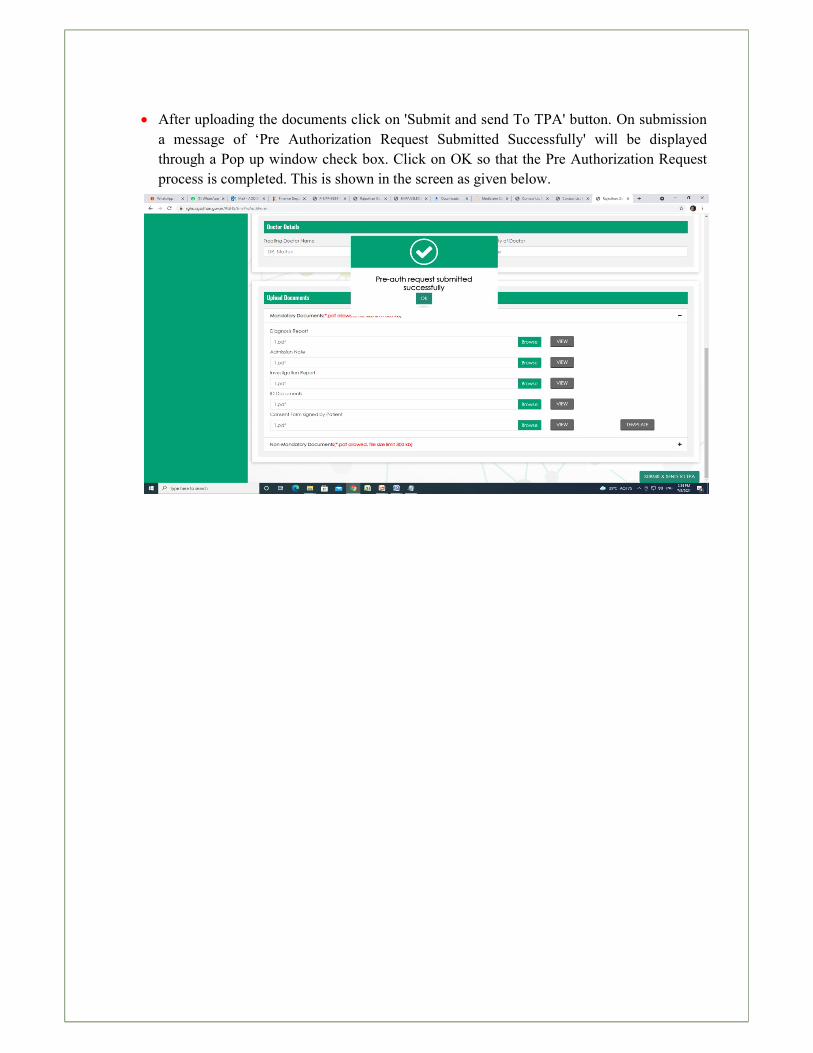
After uploading the documents click on 'Submit and send To TPA' button. On submission a message of ‘Pre Authorization Request Submitted Successfully' will be displayed through a Pop up window check box. Click on OK so that the Pre Authorization Request process is completed. This is shown in the screen as given below.

Patient Admission Form
Patient Admission form can be only filled when the generated TID gets the "Pre Authorization Approval" status. Click on the "Patient Admission Form" link on the left side. Enter the TID/ mobile number or paste the same if copied and then click on search button. The following screen will be displayed.
If the TIDCase Status is "Pre Authorization Approved" then the details of patient will be displayed automatically like Name, Age, Gender, Blood group. Fill the rest of required fields of ‘Blood Pressure’ and ‘Drug Allergy, If Any’
Now fill in the date and time of patient admission Now click 'Submit To TPA' button . A pop window will appear on the screen displaying the Admission number. Save or note this number for future reference.

Add or Change Packages
Using the above submenu facility to add or change package will be available for the treatment of beneficiary patient. For this use TID no. or mobile no. for the verification of the patient and can opt for package add or change option. Complete details will be displayed on the following screen.

Patient Discharge
Patient Discharge is to be filled post treatment of the patient. Ensure the following before filling this form %&
i- The TID status for which the claim is to be submitted should be Pre-Authorization
Approved. ii- Patient Admission Form is completely filled. iii- All the investigation reports and necessary documents of the patients are
scanned and kept in a folder on the system.
Now click on the Quick link option ‘Patient Discharge’ and select Admission number from the drop down and then submit. Following screen will appear;
Select Admission Number and click on Search button. The details of the patient like name, Date of admission and time will be displayed automated. Now fill in the Date and time of Discharge.

In the displayed screen select the option in patient discharge status. There are five options given: 1- Normal 2- Referred 3- Death 4- LAMA/DAMAand 5- Absconding, Select one option from these.
Authorization Package and Final Package will also be displayed automated. Fill in the remarks column for the add or change in package if any.
For Claim submission upload the documents in the system as given below
Mandatory Documents for Discharge
1- Patient Discharge Summary
2- Patient Feedback Form
3- Treatment Note
4- Final Bill duly signed by Beneficiaries Bifurcation of Final Bill
5- Copy of the Detailed Bill paid by Beneficiary Investigations Report
6- Copy of the Non-Admissible Bills collected from Beneficiaries
7- OT note whenever Surgery done 10- Implant Invoices and Implant Stickers
Non-Mandatory Documents for Discharge
1- Histopathology report where ever required
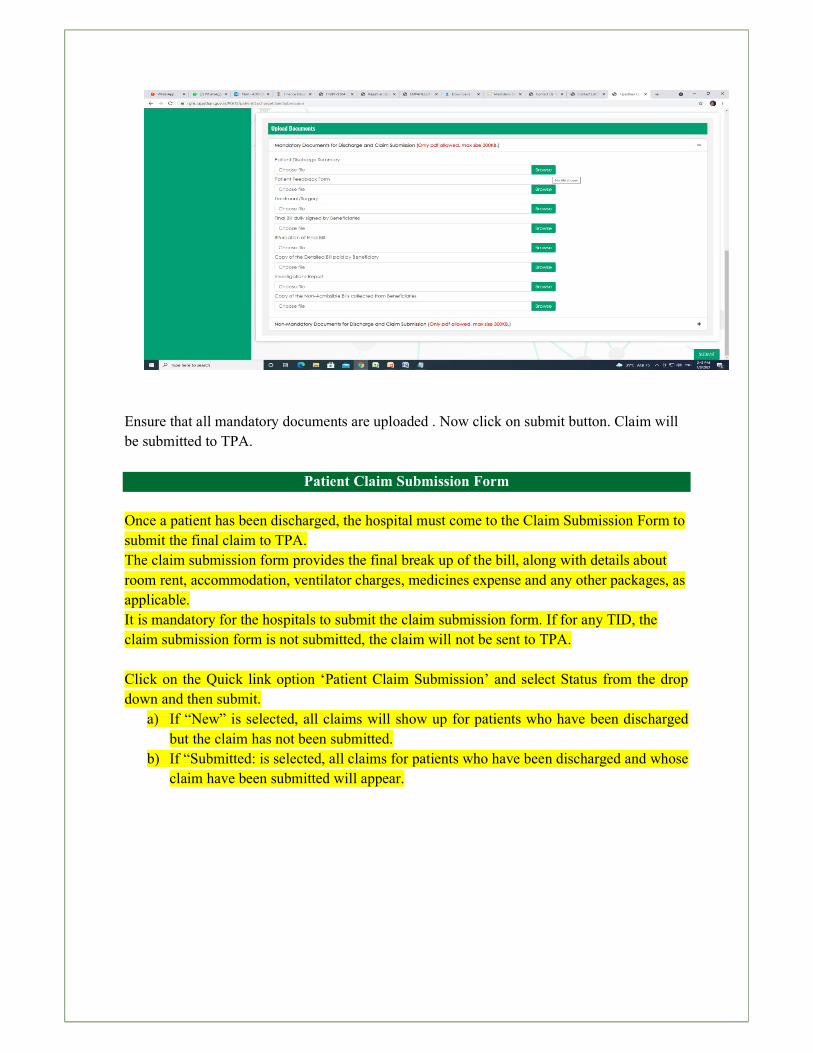
Ensure that all mandatory documents are uploaded . Now click on submit button. Claim will be submitted to TPA.
Patient Claim Submission Form Once a patient has been discharged, the hospital must come to the Claim Submission Form to submit the final claim to TPA. The claim submission form provides the final break up of the bill, along with details about room rent, accommodation, ventilator charges, medicines expense and any other packages, as applicable. It is mandatory for the hospitals to submit the claim submission form. If for any TID, the claim submission form is not submitted, the claim will not be sent to TPA. Click on the Quick link option ‘Patient Claim Submission’ and select Status from the drop down and then submit.
a) If “New” is selected, all claims will show up for patients who have been discharged but the claim has not been submitted.
b) If “Submitted: is selected, all claims for patients who have been discharged and whose claim have been submitted will appear.

The following screen will appear when you click on Search.
Select the Transaction ID and the detailed final bill breakup will be shown. Hospital should update all the values and click on Submit to send the claim form to TPA.

Feed Back Form Patient is required to give feedback on discharge by filling in feed back form.

FeedBack Form will be displayed on clicking the view button in which the details of the patient will be auto populated and will be displayed on the feedback form. Click on the print button to get a print out of the same and get it filled by the patient . It is necessary to upload the feedback form.
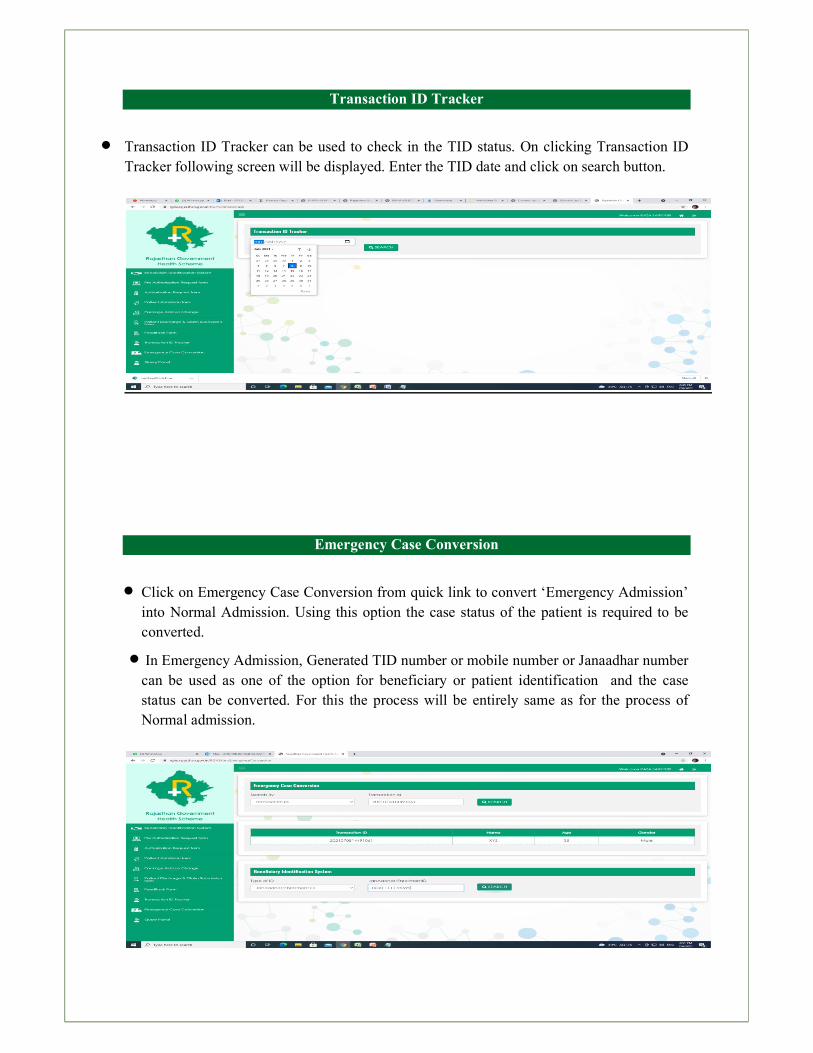
Transaction ID Tracker
Transaction ID Tracker can be used to check in the TID status. On clicking Transaction ID Tracker following screen will be displayed. Enter the TID date and click on search button.
Emergency Case Conversion
Click on Emergency Case Conversion from quick link to convert ‘Emergency Admission’ into Normal Admission. Using this option the case status of the patient is required to be converted.
In Emergency Admission, Generated TID number or mobile number or Janaadhar number can be used as one of the option for beneficiary or patient identification and the case status can be converted. For this the process will be entirely same as for the process of Normal admission.

Query Panel
To know about any Query related to your hospital click on the Query panel on the left side. Following screen will be displayed:
From the Drop Down Menu select either status or TID option. The details of the query will be displayed on the screen.
Target Turn-Around-Time
Pre-authorization approval 24 hours
If Pre-authorization is not approved within 24 hours
Auto Approval(Online Mode)
Day Care auto approval 4 hrs Claim Submission by Hospital 3 days Claim Adjudication and payment for portability cases
30 days
Request reconsideration after request for reconsideration
7 days
Claim reconsideration after request for reconsideration
7 days
Pre-authorization approval in Emergency Cases Auto Approval