transformations - buffalo state collegemath.buffalostate.edu/~it/projects/filbertrussell.pdf · key...
TRANSCRIPT
TRANSFORMATIONS
10TH GRADE GEOMETRY
10-DAY UNIT PLAN
USING:MIRAS
“TESSELMANIA” COMPUTER APPLICATION
NATIONAL LIBRARY OF VIRTUAL MANIPULAITVES
TRIANGLES
TI-83 GRAPHING CALCULATOR
BY: JANELLE FILBERT
&JENNIFER RUSSELL
UNIT OBJECTIVES:
At the completion of the unit, students will:• Be able to describe what geometric transformations are• Be able to perform geometric transformations• Know the different types of transformations• Be able to identify a figure with a line of reflection symmetry• Be able to describe and create a tessellation• Be able to identify the pre-image and image of a geometric transformation• Be able to recognize and identify the line of reflection• Be able to identify a figure with rotational symmetry
NCTM STANDARDS FOR GRADES 9-12
Geometry StandardCommunication StandardConnections StandardRepresentation Standard
NEW YORK STATE STANDARDS FOR MATH A
Key Idea 3- OperationsKey Idea 4- Modeling/Multiple Representation
RESOURCES
Textbook-Geometry by Glencoe, McGraw-Hill, 2001 edition
Computer Applications-TesselmaniaGeometer’s Sketchpad
Web Sites-National Library of Virtual Manipulatives,http://matti.usu.edu/nlvm/nav/index.html
MATERIALS NEEDED
• Miras• Computers with Internet access• Graph paper• Pencils• Graphing calculators (TI-83 preferably)• “Tesselmania” computer program• Triangles• Rulers• Flashlights• Tape measures• “Geometer’s Sketchpad” application• Tracing Paper
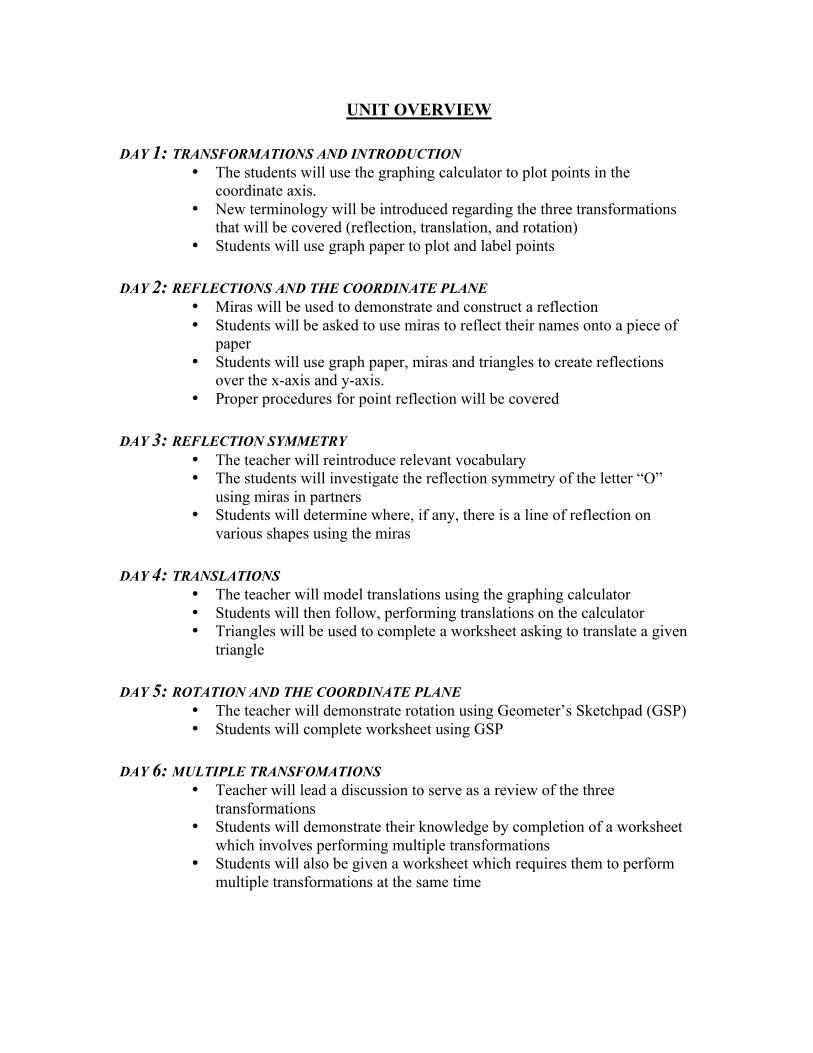
UNIT OVERVIEW
DAY 1: TRANSFORMATIONS AND INTRODUCTION• The students will use the graphing calculator to plot points in the
coordinate axis.• New terminology will be introduced regarding the three transformations
that will be covered (reflection, translation, and rotation)• Students will use graph paper to plot and label points
DAY 2: REFLECTIONS AND THE COORDINATE PLANE• Miras will be used to demonstrate and construct a reflection• Students will be asked to use miras to reflect their names onto a piece of
paper• Students will use graph paper, miras and triangles to create reflections
over the x-axis and y-axis.• Proper procedures for point reflection will be covered
DAY 3: REFLECTION SYMMETRY• The teacher will reintroduce relevant vocabulary• The students will investigate the reflection symmetry of the letter “O”
using miras in partners• Students will determine where, if any, there is a line of reflection on
various shapes using the miras
DAY 4: TRANSLATIONS• The teacher will model translations using the graphing calculator• Students will then follow, performing translations on the calculator• Triangles will be used to complete a worksheet asking to translate a given
triangle
DAY 5: ROTATION AND THE COORDINATE PLANE• The teacher will demonstrate rotation using Geometer’s Sketchpad (GSP)• Students will complete worksheet using GSP
DAY 6: MULTIPLE TRANSFOMATIONS• Teacher will lead a discussion to serve as a review of the three
transformations• Students will demonstrate their knowledge by completion of a worksheet
which involves performing multiple transformations• Students will also be given a worksheet which requires them to perform
multiple transformations at the same time
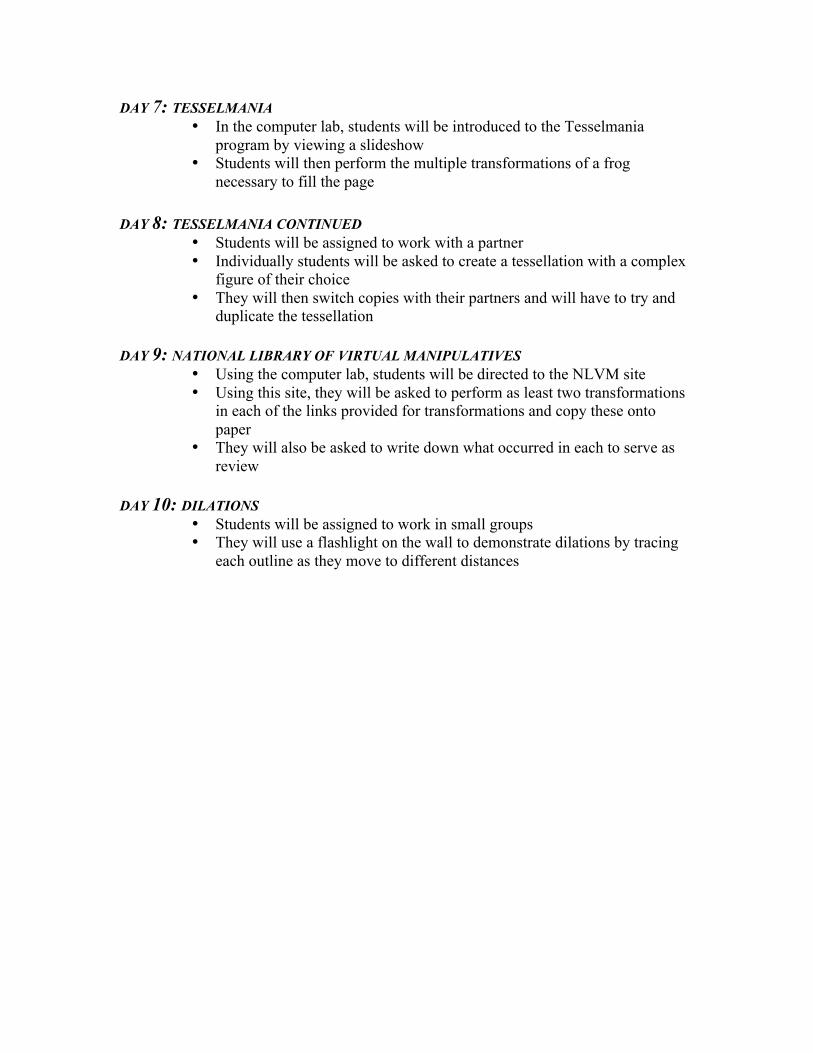
DAY 7: TESSELMANIA• In the computer lab, students will be introduced to the Tesselmania
program by viewing a slideshow• Students will then perform the multiple transformations of a frog
necessary to fill the page
DAY 8: TESSELMANIA CONTINUED• Students will be assigned to work with a partner• Individually students will be asked to create a tessellation with a complex
figure of their choice• They will then switch copies with their partners and will have to try and
duplicate the tessellation
DAY 9: NATIONAL LIBRARY OF VIRTUAL MANIPULATIVES• Using the computer lab, students will be directed to the NLVM site• Using this site, they will be asked to perform as least two transformations
in each of the links provided for transformations and copy these ontopaper
• They will also be asked to write down what occurred in each to serve asreview
DAY 10: DILATIONS• Students will be assigned to work in small groups• They will use a flashlight on the wall to demonstrate dilations by tracing
each outline as they move to different distances

DAY 1- TRANSFORMATIONS AND INTRODUCTION
Objectives:
Students will be able to:• Identify coordinates of given points on graph paper• Properly plot points when given the coordinates• Be able to define the vocabulary required• Know how to use the calculator to plot points
Materials:• Graphing calculator• Graph paper• Pencil
Opening Activity:
The students will be given a chart (see attached) with the required definitions forthe unit. They will be asked to copy these definitions from the overhead, with adiscussion of each term following its definition. They will also be asked to draw apicture of each term which will help them to remember its meaning.
Developmental Activity:
Each student will be given graph paper, one of which will have previously plottedpoints. The students must then label each of these points according to their coordinates.They will also be given a list of coordinate points, which they will have to properly ploton graph paper. After each student has finished, they will be called on randomly to theoverhead to either label or plot a solution. This will then assure that each student has thecorrect labeling.
Closing Activity:
Using the same worksheet of points, the teacher will demonstrate how one couldplot these points using the graphing calculator. The students will then be asked tocomplete one example to demonstrate understanding.
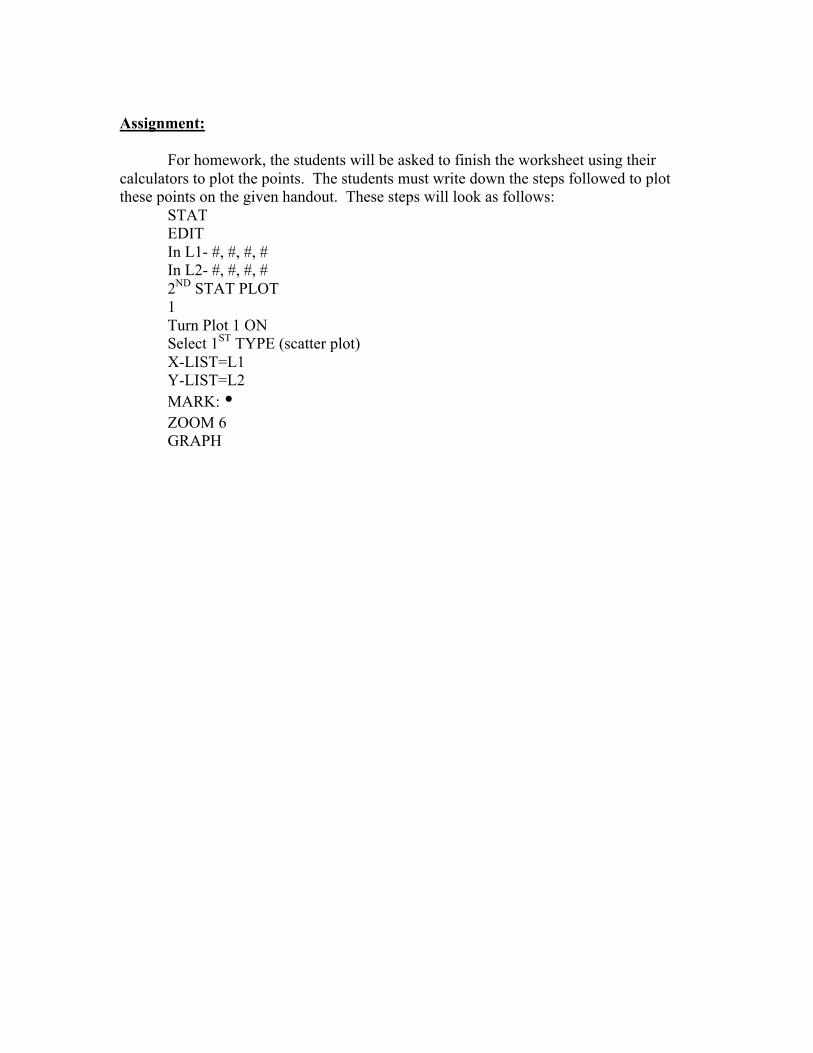
Assignment:
For homework, the students will be asked to finish the worksheet using theircalculators to plot the points. The students must write down the steps followed to plotthese points on the given handout. These steps will look as follows:
STATEDITIn L1- #, #, #, #In L2- #, #, #, #2ND STAT PLOT1Turn Plot 1 ONSelect 1ST TYPE (scatter plot)X-LIST=L1Y-LIST=L2MARK: •ZOOM 6GRAPH
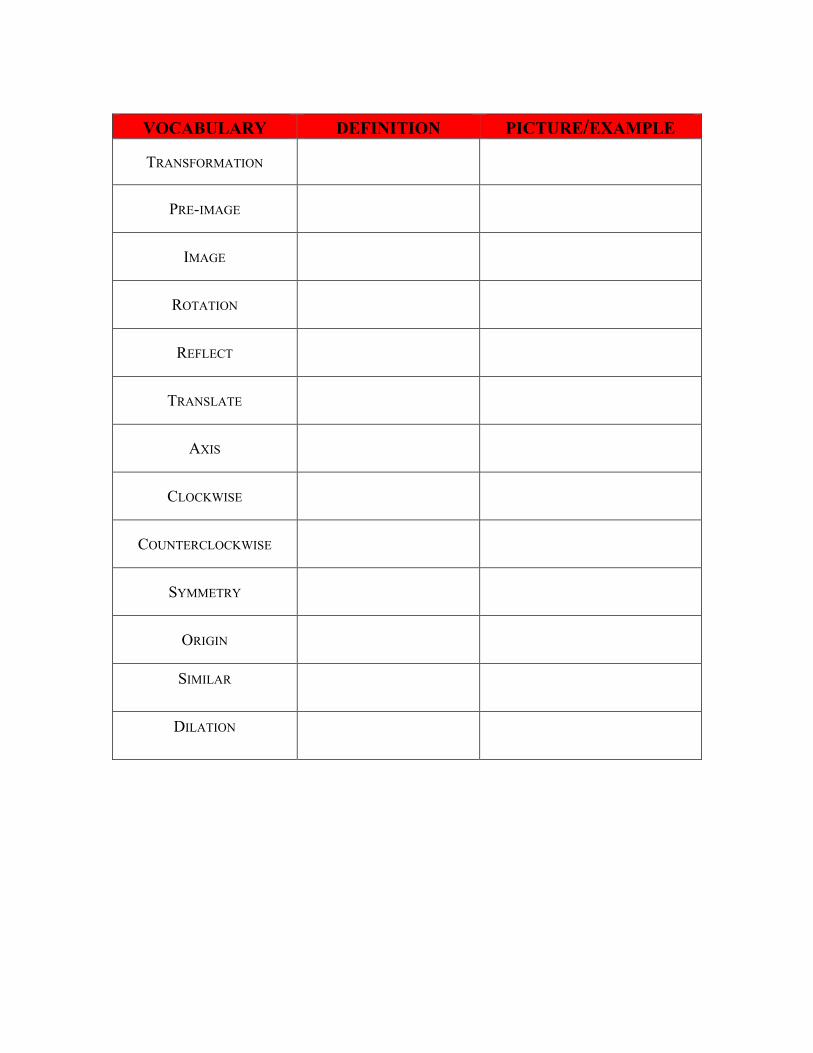
VOCABULARY DEFINITION PICTURE/EXAMPLE
TRANSFORMATION
PRE-IMAGE
IMAGE
ROTATION
REFLECT
TRANSLATE
AXIS
CLOCKWISE
COUNTERCLOCKWISE
SYMMETRY
ORIGIN
SIMILAR
DILATION

DAY 2- REFLECTIONS AND THE COORDINATE PLANE
Objectives:
Students will be able to:• Perform reflections using miras• Recognize reflections on the x and y axis• Know how to perform reflections over the x-axis and y-axis
Materials:• Miras• Several sheets of graph paper• Triangles• Pencils• Black Marker• Ruler
Opening Activity:
To begin the class, the teacher will put a picture or other simple shape on theoverhead. Modeling how to use a mira, this image will then be reflected over any givenline to first demonstrate exactly how the mira works. After the students have seen howthe mira is used, they will each be asked to write their name onto a piece of paper using ablack marker. Each student will then use their ruler to draw a line on their piece of paperwhich will serve as the line of reflection. This line must be drawn so that it does not passthrough the name. Using their miras, each student will be asked to reflect their nameonto the paper about the line.
Developmental Activity:
Students will now be given several sheets of graph paper (see attached) on whichthere are several sets of axis labeled. Here the students will be using the triangles insmall groups to reflect over both the y-axis and the x-axis on their graph paper. As theyfirst place a triangle on the graph paper, they will record each coordinate by marking thepoint and determining the coordinates. They will then be asked to reflect the triangleover the x-axis, the y-axis and other random lines (i.e. x=-4 and y=7), both marking thepoints on the graphs and recording the coordinates of the new triangle. This will leadinto a discussion on what happens to the original coordinates when reflected over each ofthe pre-determined lines.
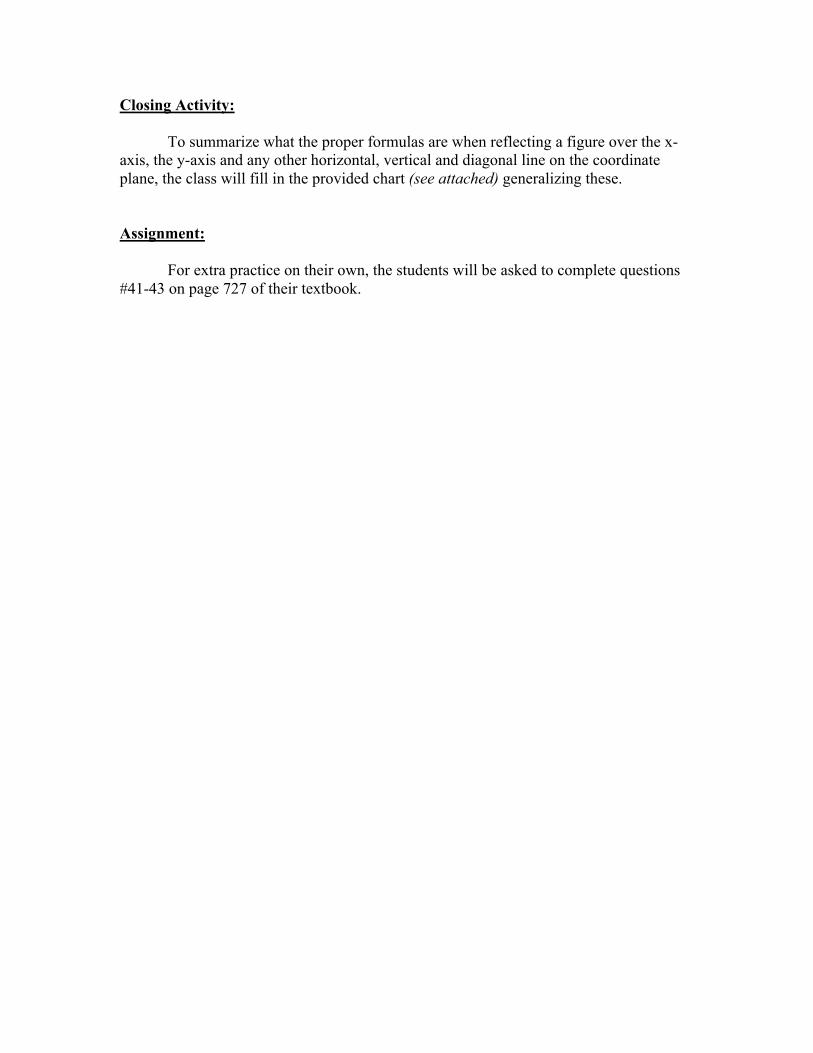
Closing Activity:
To summarize what the proper formulas are when reflecting a figure over the x-axis, the y-axis and any other horizontal, vertical and diagonal line on the coordinateplane, the class will fill in the provided chart (see attached) generalizing these.
Assignment:
For extra practice on their own, the students will be asked to complete questions#41-43 on page 727 of their textbook.
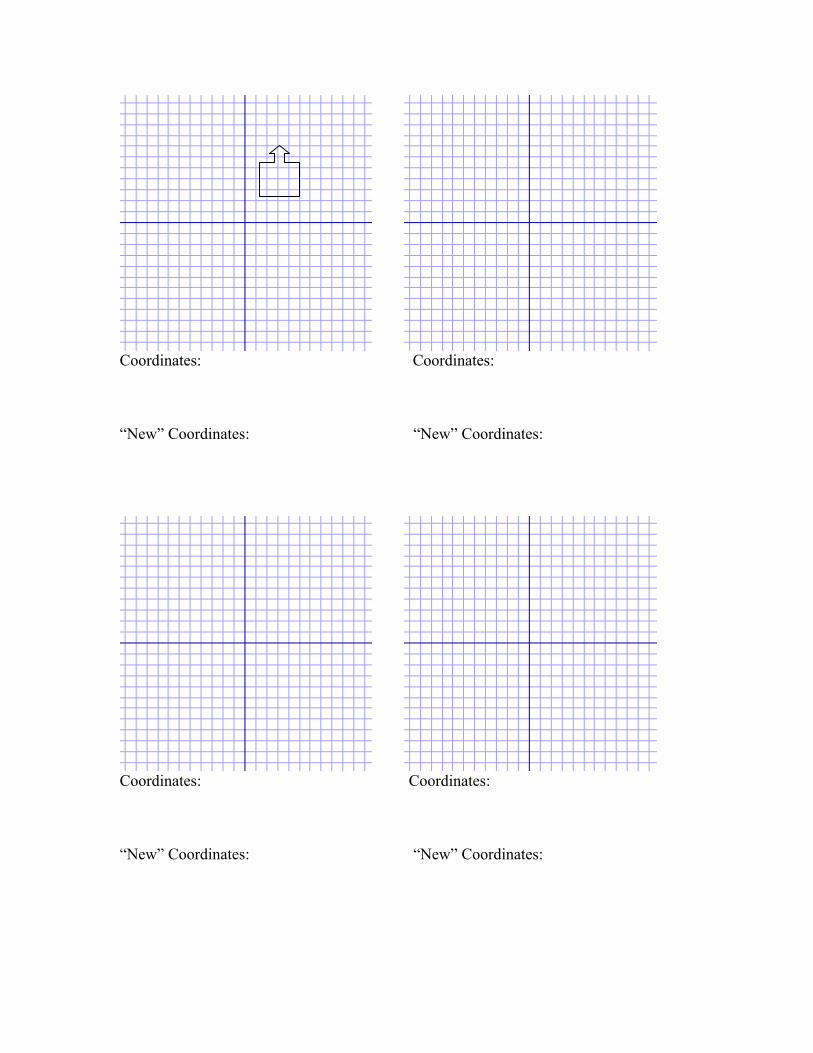
Coordinates: Coordinates:
“New” Coordinates: “New” Coordinates:
Coordinates: Coordinates:
“New” Coordinates: “New” Coordinates:
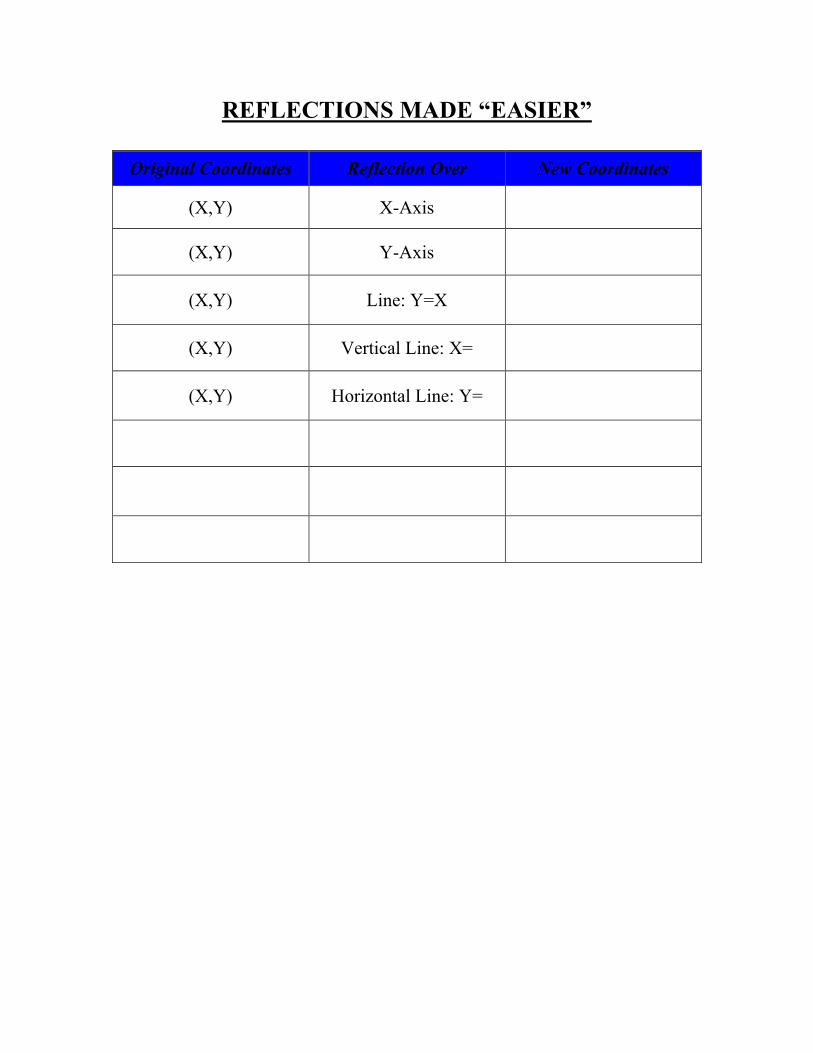
REFLECTIONS MADE “EASIER”
Original Coordinates Reflection Over New Coordinates
(X,Y) X-Axis
(X,Y) Y-Axis
(X,Y) Line: Y=X
(X,Y) Vertical Line: X=
(X,Y) Horizontal Line: Y=
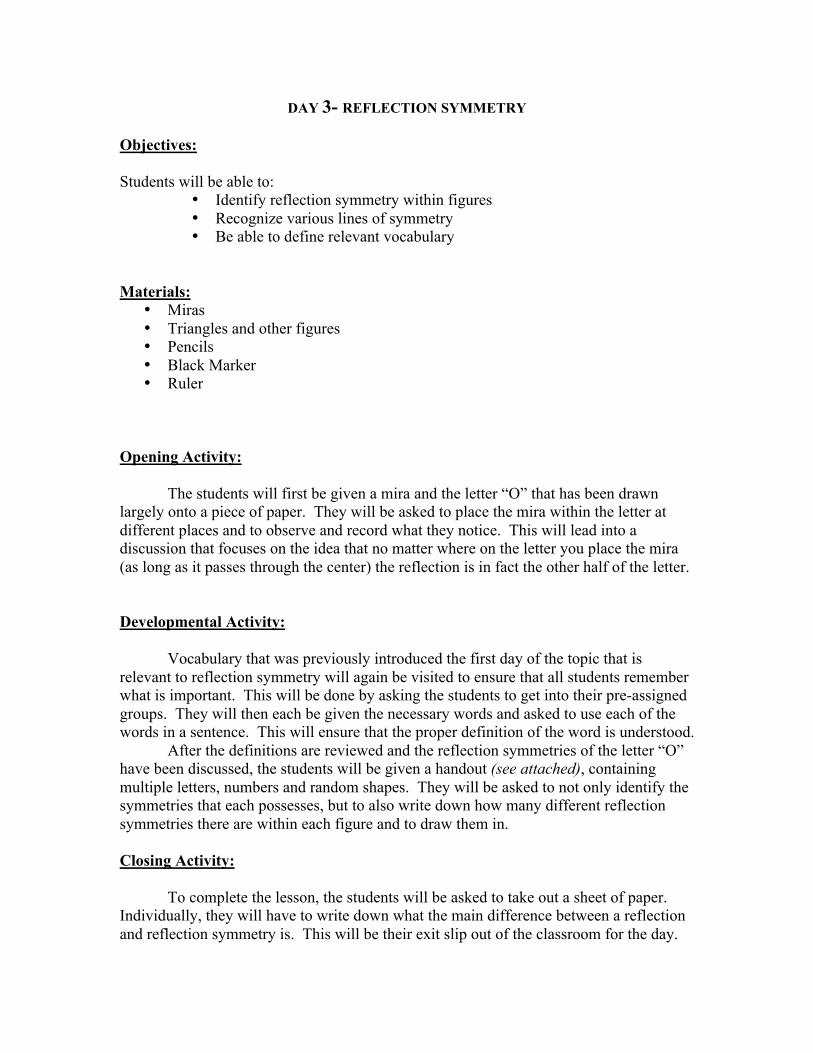
DAY 3- REFLECTION SYMMETRY
Objectives:
Students will be able to:• Identify reflection symmetry within figures• Recognize various lines of symmetry• Be able to define relevant vocabulary
Materials:• Miras• Triangles and other figures• Pencils• Black Marker• Ruler
Opening Activity:
The students will first be given a mira and the letter “O” that has been drawnlargely onto a piece of paper. They will be asked to place the mira within the letter atdifferent places and to observe and record what they notice. This will lead into adiscussion that focuses on the idea that no matter where on the letter you place the mira(as long as it passes through the center) the reflection is in fact the other half of the letter.
Developmental Activity:
Vocabulary that was previously introduced the first day of the topic that isrelevant to reflection symmetry will again be visited to ensure that all students rememberwhat is important. This will be done by asking the students to get into their pre-assignedgroups. They will then each be given the necessary words and asked to use each of thewords in a sentence. This will ensure that the proper definition of the word is understood.
After the definitions are reviewed and the reflection symmetries of the letter “O”have been discussed, the students will be given a handout (see attached), containingmultiple letters, numbers and random shapes. They will be asked to not only identify thesymmetries that each possesses, but to also write down how many different reflectionsymmetries there are within each figure and to draw them in.
Closing Activity:
To complete the lesson, the students will be asked to take out a sheet of paper.Individually, they will have to write down what the main difference between a reflectionand reflection symmetry is. This will be their exit slip out of the classroom for the day.

Assignment:
For homework, the students will have to complete the handout from class(whatever they were not able to complete in the period).
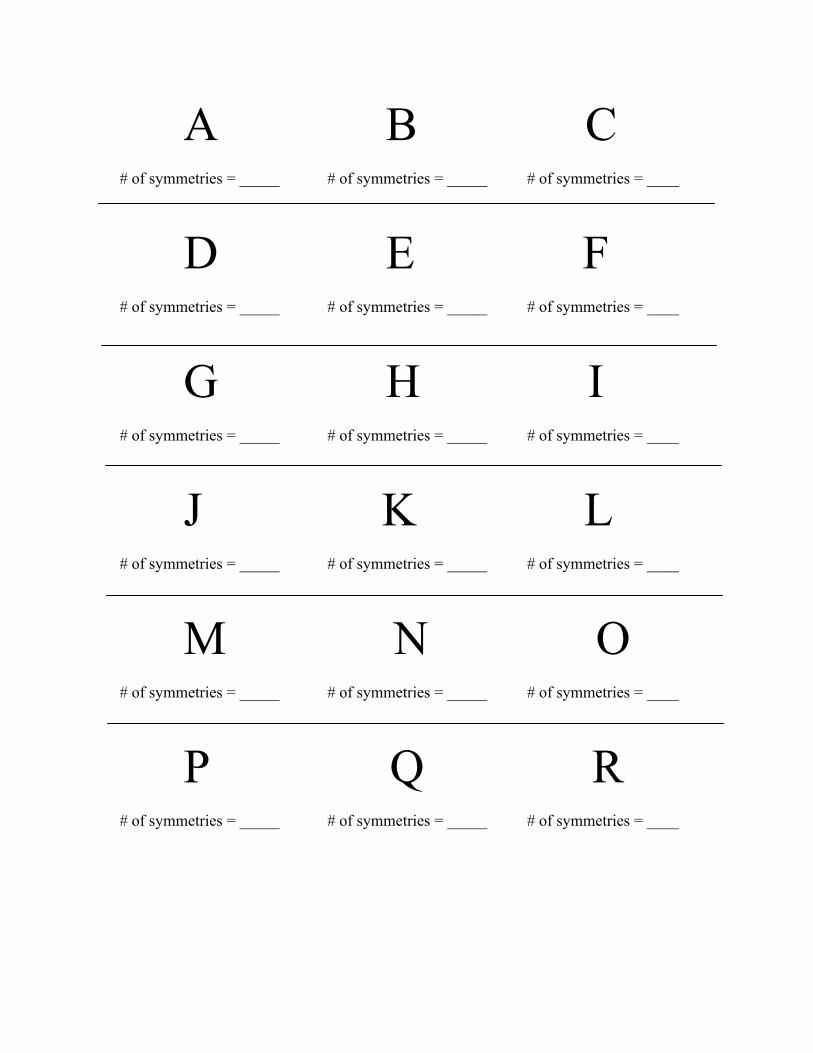
A B C# of symmetries = _____ # of symmetries = _____ # of symmetries = ____
D E F# of symmetries = _____ # of symmetries = _____ # of symmetries = ____
G H I# of symmetries = _____ # of symmetries = _____ # of symmetries = ____
J K L# of symmetries = _____ # of symmetries = _____ # of symmetries = ____
M N O# of symmetries = _____ # of symmetries = _____ # of symmetries = ____
P Q R# of symmetries = _____ # of symmetries = _____ # of symmetries = ____
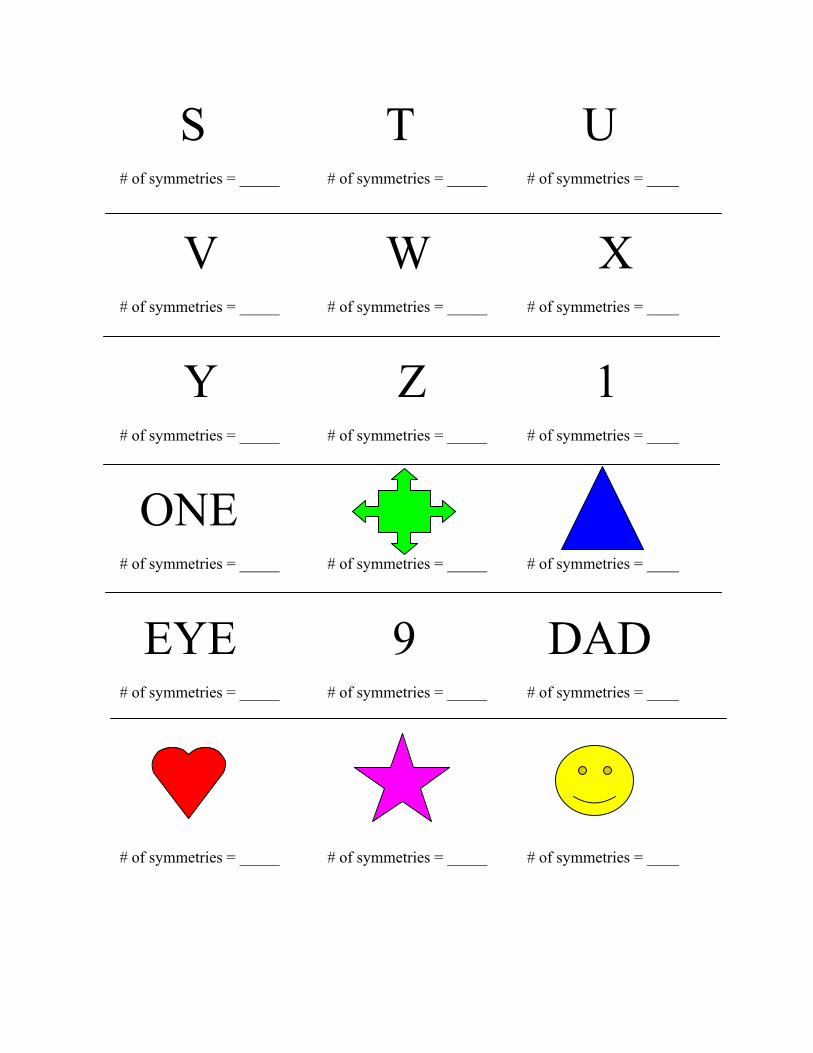
S T U# of symmetries = _____ # of symmetries = _____ # of symmetries = ____
V W X# of symmetries = _____ # of symmetries = _____ # of symmetries = ____
Y Z 1# of symmetries = _____ # of symmetries = _____ # of symmetries = ____
ONE# of symmetries = _____ # of symmetries = _____ # of symmetries = ____
EYE 9 DAD# of symmetries = _____ # of symmetries = _____ # of symmetries = ____
# of symmetries = _____ # of symmetries = _____ # of symmetries = ____
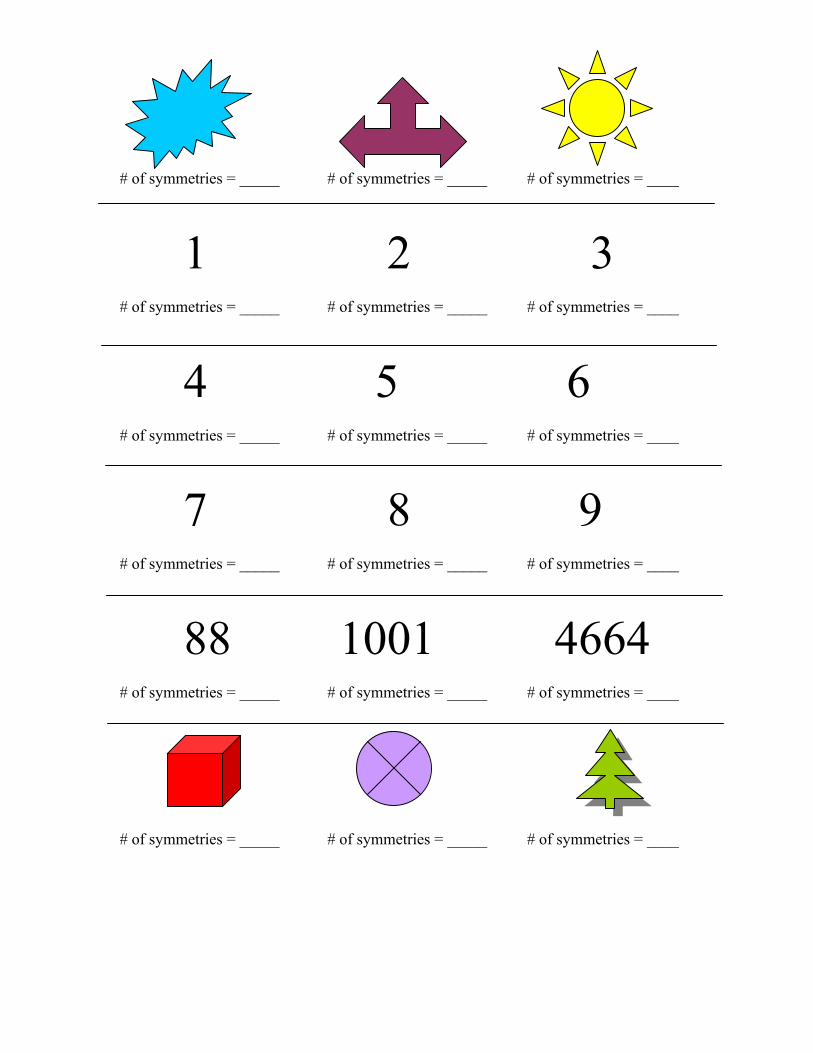
# of symmetries = _____ # of symmetries = _____ # of symmetries = ____
1 2 3# of symmetries = _____ # of symmetries = _____ # of symmetries = ____
4 5 6# of symmetries = _____ # of symmetries = _____ # of symmetries = ____
7 8 9# of symmetries = _____ # of symmetries = _____ # of symmetries = ____
88 1001 4664# of symmetries = _____ # of symmetries = _____ # of symmetries = ____
# of symmetries = _____ # of symmetries = _____ # of symmetries = ____

DAY4- TRANSLATIONS
Objectives:
Students will be able to:• Recognize and understand translations• Perform translations on the coordinate plane• Perform translations on the graphing calculator
Materials:• Several sheets of graph paper• Triangles• Pencils• Ruler• TI-83 Graphing Calculator
Opening Activity:
To start the day, the students will each be given a sheet of graph paper with asimple figure already plotted and drawn in. They will be asked to perform two simpletransformations of the figures using only their pencils.
Developmental Activity:
All students will be given their assigned calculators to use for the duration of theclass. They will also be asked to take out the homework that was previously assignedseveral days ago that asked them to use the graphing calculator to translate points. As awhole class, we will discuss what happens to the points when asked to perform thetranslations. From this the students will see the relationship between the original pointand the simple addition or subtraction that is needed to “slide” that point for the requiredtranslation. After noticing what happened to all of the points when they were translatedby hand, the students will then be given a handout (see attached) which asked them toperform several translations both by hand, on the calculator and also to write down thecoordinates of the new points.
Closing Activity:
Each student will be given a new sheet of graph paper, which contains the outlineof an original figure (each student will have a different copy) and the outline of atranslation of that same figure. They will then be asked to write down what thecoordinates of all of the points are and identify what translation was performed. This willensure that all students are able to identify a given translation, since they will get practiceperforming these translations (requires them to work both ways).
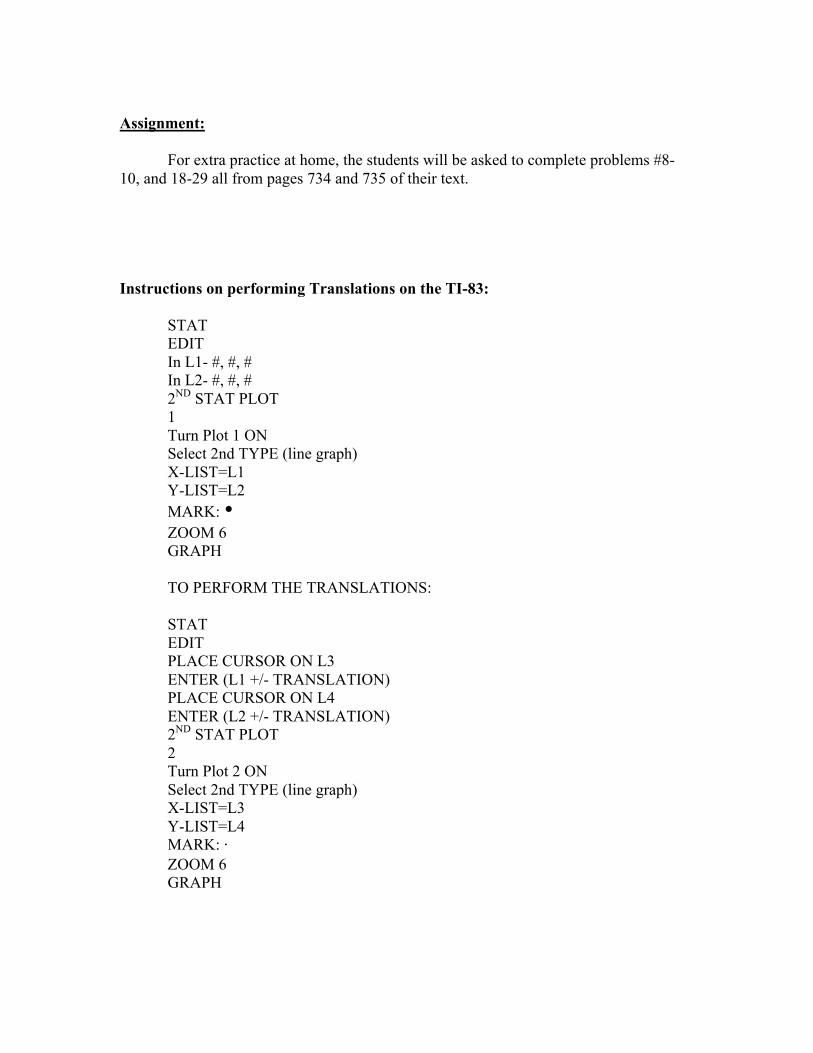
Assignment:
For extra practice at home, the students will be asked to complete problems #8-10, and 18-29 all from pages 734 and 735 of their text.
Instructions on performing Translations on the TI-83:
STATEDITIn L1- #, #, #In L2- #, #, #2ND STAT PLOT1Turn Plot 1 ONSelect 2nd TYPE (line graph)X-LIST=L1Y-LIST=L2MARK: •ZOOM 6GRAPH
TO PERFORM THE TRANSLATIONS:
STATEDITPLACE CURSOR ON L3ENTER (L1 +/- TRANSLATION)PLACE CURSOR ON L4ENTER (L2 +/- TRANSLATION)2ND STAT PLOT2Turn Plot 2 ONSelect 2nd TYPE (line graph)X-LIST=L3Y-LIST=L4MARK: ⋅ZOOM 6GRAPH

• PLOT THESE POINTS ON YOUR GRAPH PAPER• PERFORM THE GIVEN TRANSLATION ON THE GRAPHING
CALCULATOR• COPY THIS NEW IMAGE ONTO THE GRAPH PAPER• RECORD THE COORDINATES OF THE NEW POINTS
1. (3,4), (-7, 2), (9, 13) Translation of (2, -3)
New Points:_____________________________
2. (-2,0), (5, -3), (2, 1) Translation of (6, 3)
New Points:_____________________________
3. (-3,-4), (0, 2), (6, 1) Translation of (5, -9)
New Points:_____________________________
4. (5,7), (7, -2), (0, 0) Translation of (-5, -5)
New Points:_____________________________
5. (0,4), (-10, -4), (1, 1) Translation of (2, -2)
New Points:_____________________________
6. (3,9), (-1, 5), (-6, 11) Translation of (-2, -8)
New Points:_____________________________
7. (1.5, 3.5), (0, 1), (3, -3) Translation of (0, 0)
New Points:_____________________________

8. (-5,1.5), (-2, 3.5), (11, 1) Translation of (7, 7)
New Points:_____________________________
9. (8,-8), (-2, 1), (-6, 1) Translation of (0, -9)
New Points:_____________________________
10. (-6,9), (-8, 5), (-7, 3) Translation of (2, -5)
New Points:_____________________________
11. (-5,4), (12, 2), (2, -3) Translation of (4, -3)
New Points:_____________________________
12. (-8,8), (9, 5), (-7, 1) Translation of (-2, 3)
New Points:_____________________________
13. (1,1), (5, 5), (7, 13) Translation of (-8, -3)
New Points:_____________________________
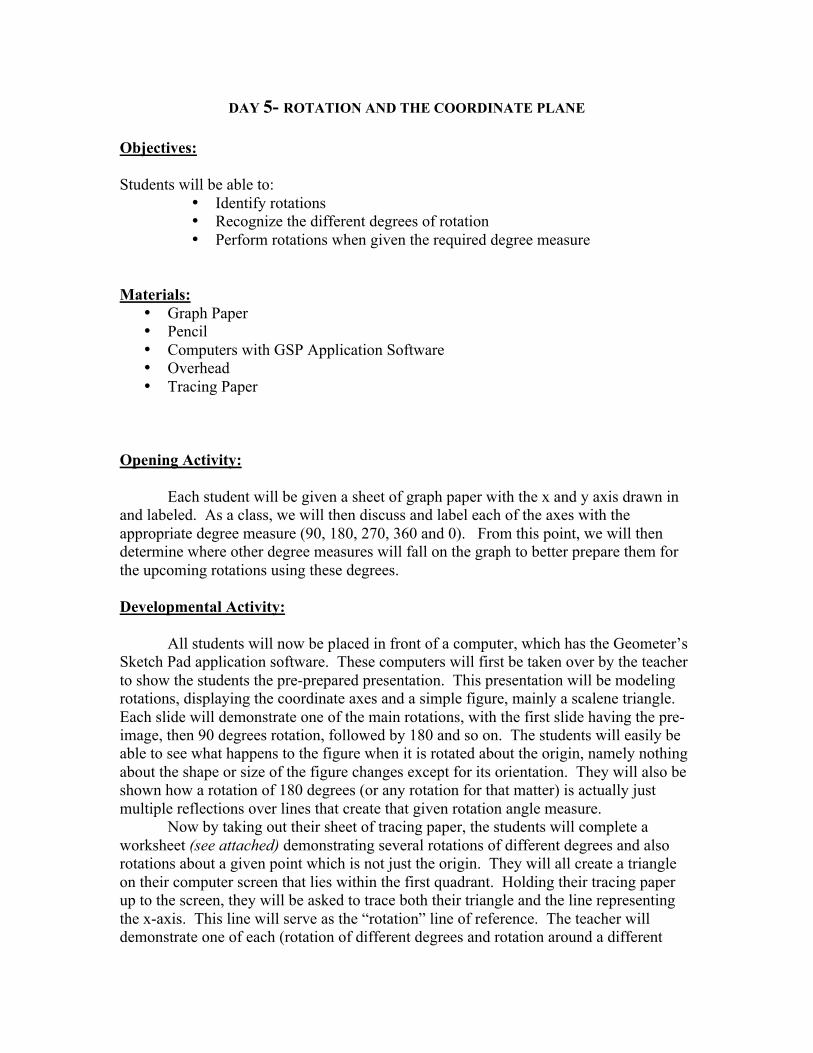
DAY 5- ROTATION AND THE COORDINATE PLANE
Objectives:
Students will be able to:• Identify rotations• Recognize the different degrees of rotation• Perform rotations when given the required degree measure
Materials:• Graph Paper• Pencil• Computers with GSP Application Software• Overhead• Tracing Paper
Opening Activity:
Each student will be given a sheet of graph paper with the x and y axis drawn inand labeled. As a class, we will then discuss and label each of the axes with theappropriate degree measure (90, 180, 270, 360 and 0). From this point, we will thendetermine where other degree measures will fall on the graph to better prepare them forthe upcoming rotations using these degrees.
Developmental Activity:
All students will now be placed in front of a computer, which has the Geometer’sSketch Pad application software. These computers will first be taken over by the teacherto show the students the pre-prepared presentation. This presentation will be modelingrotations, displaying the coordinate axes and a simple figure, mainly a scalene triangle.Each slide will demonstrate one of the main rotations, with the first slide having the pre-image, then 90 degrees rotation, followed by 180 and so on. The students will easily beable to see what happens to the figure when it is rotated about the origin, namely nothingabout the shape or size of the figure changes except for its orientation. They will also beshown how a rotation of 180 degrees (or any rotation for that matter) is actually justmultiple reflections over lines that create that given rotation angle measure.
Now by taking out their sheet of tracing paper, the students will complete aworksheet (see attached) demonstrating several rotations of different degrees and alsorotations about a given point which is not just the origin. They will all create a triangleon their computer screen that lies within the first quadrant. Holding their tracing paperup to the screen, they will be asked to trace both their triangle and the line representingthe x-axis. This line will serve as the “rotation” line of reference. The teacher willdemonstrate one of each (rotation of different degrees and rotation around a different
point) of the problems from the worksheet, and then the students will be asked tocomplete this sheet.
Closing Activity:
To complete the lesson, each student will once again be asked to take out a sheetof paper. They will all be reminded of the transformations that we have worked on so farin the lesson (reflection, rotation, and translation). They will then be asked to write downwhat the similarity among the three is, mainly how do they all affect or not affect thefigure.
Assignment:
For extra practice at home, the students will be asked to complete the worksheetand to also determine what the possible reflection lines could also have produced thatrotation.
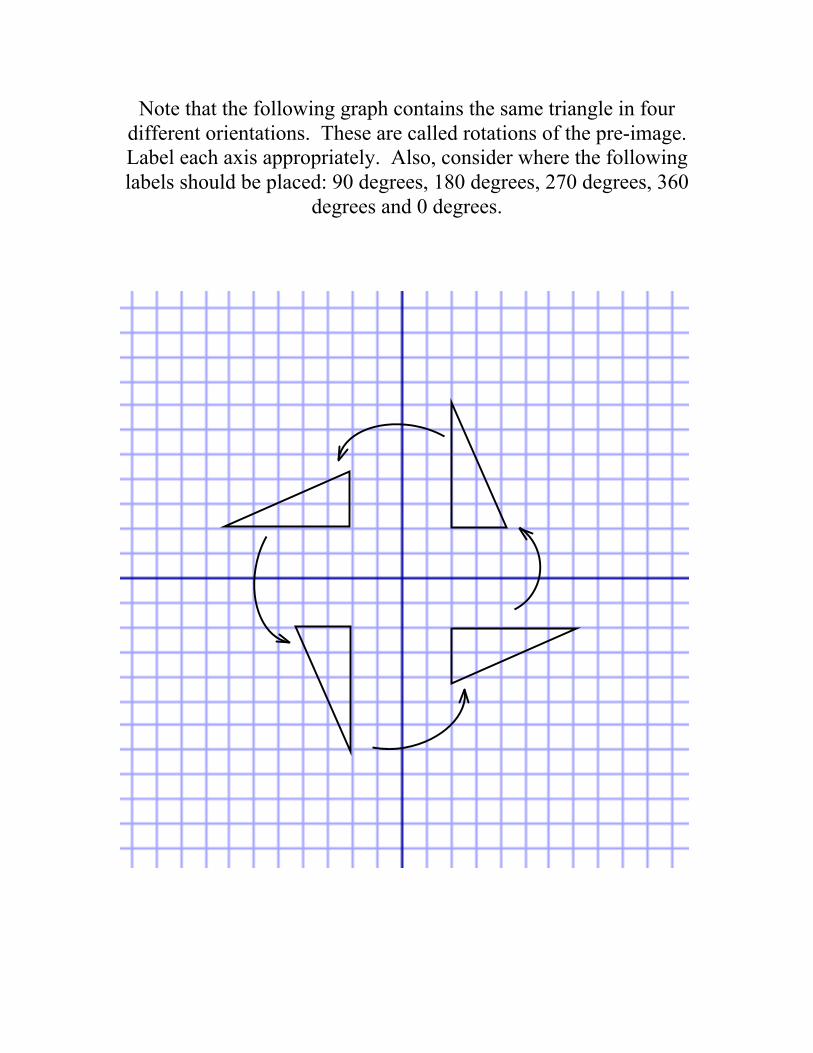
Note that the following graph contains the same triangle in fourdifferent orientations. These are called rotations of the pre-image.Label each axis appropriately. Also, consider where the followinglabels should be placed: 90 degrees, 180 degrees, 270 degrees, 360
degrees and 0 degrees.

DAY 6- MULTIPLE TRANSFORMATIONS
Objectives:
Students will be able to:• Identify when two or more transformations were performed• Perform rotation, reflection and translation individually• Perform the three listed transformations simultaneously
Materials:• Pencils• Calculators• Triangles• Miras• Graph Paper
Opening Activity:
All students will be asked to get into their already pre-assigned groups. Studentswill first be given a handout (see first attached) that contains several graphs. Thesegraphs will ask students to perform the different types of transformations at random usingmiras to perform the transformation. This will ensure that the students are able toperform the many transformations without being in the context of that lesson.
Developmental Activity:
Next the students will be given the second handout (see attached) which also asksthe students to perform the transformations. This sheet, however asks the students toperform more than one of the transformations on the same graph and at the same time.They will also then be instructed to perform the 2 requested transformations again, butthis time reversing the order in which they do them (this time do the 2nd one first). Thiswill once again ensure that the students are able to perform the transformations asked andwill allow them to see what happens when more than one transformation is done at thesame time. Both of the given handouts will be discussed within their groups and onestudent from each group will be asked to come to the overhead and show the class whatthe new image looks like.
Closing Activity:
The students will be asked to take out a sheet of paper and answer the followingquestion as their exit slip out of the classroom:
1. When you are asked to perform more than one transformation at the same time,does the order in which you do the transformations affect the result?

Assignment:
Students will be reminded that we are to be meeting in the computer lab thefollowing day. They will also be asked to bring all previous materials and handouts ontransformations to use as a reference tomorrow.

Transformations
Draw the triangle after the transformations.
1. Translate the triangle left 1 unit, then 6 units down.
2. Reflect the triangle over the y-axis.
3. Reflect the triangle over the y-axis.
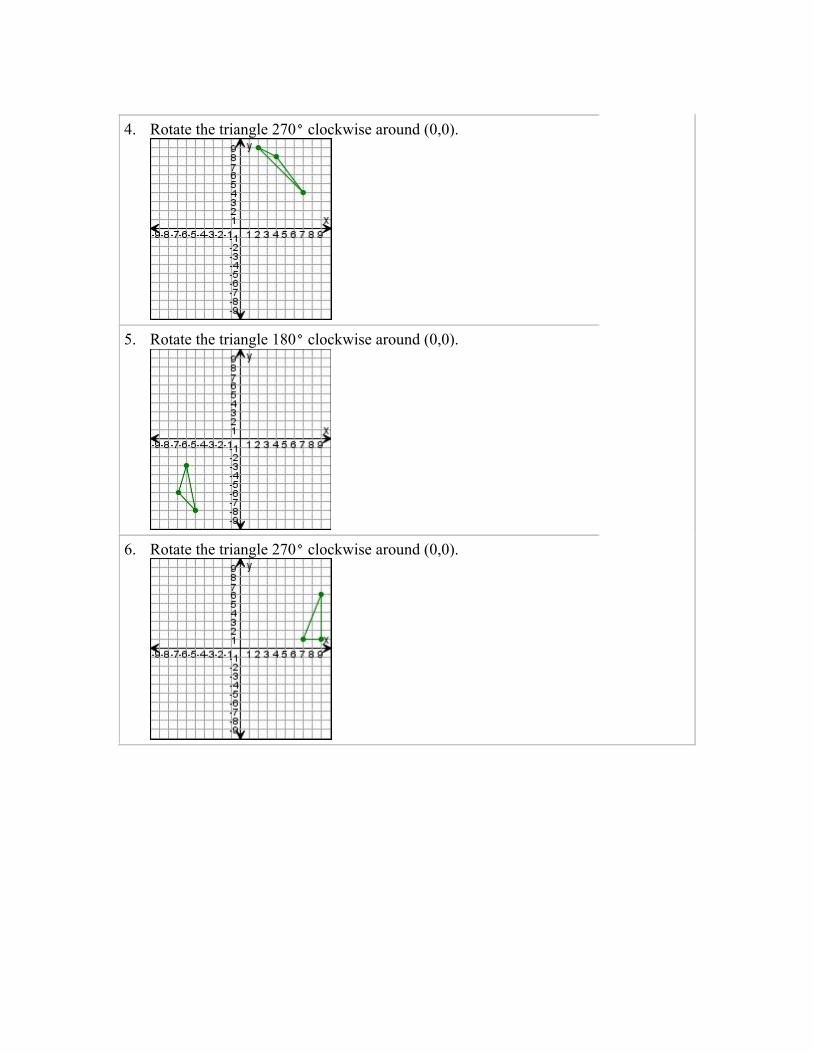
4. Rotate the triangle 270 clockwise around (0,0).
5. Rotate the triangle 180 clockwise around (0,0).
6. Rotate the triangle 270 clockwise around (0,0).
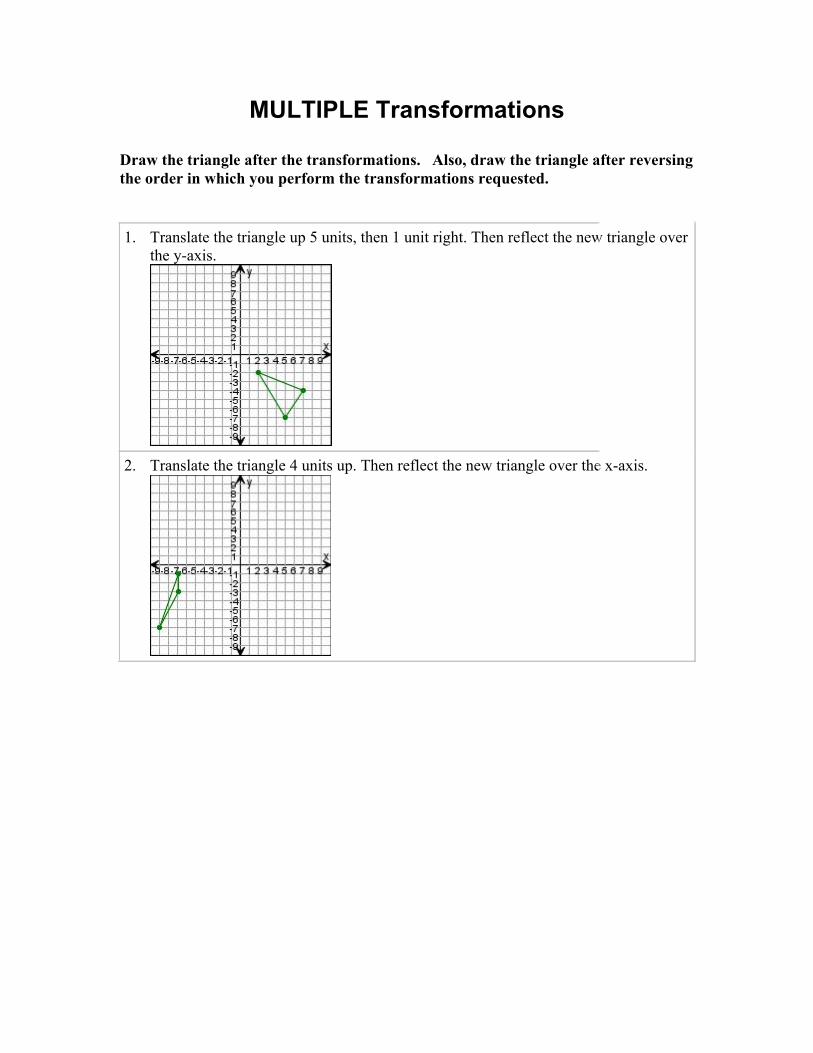
MULTIPLE Transformations
Draw the triangle after the transformations. Also, draw the triangle after reversingthe order in which you perform the transformations requested.
1. Translate the triangle up 5 units, then 1 unit right. Then reflect the new triangle overthe y-axis.
2. Translate the triangle 4 units up. Then reflect the new triangle over the x-axis.
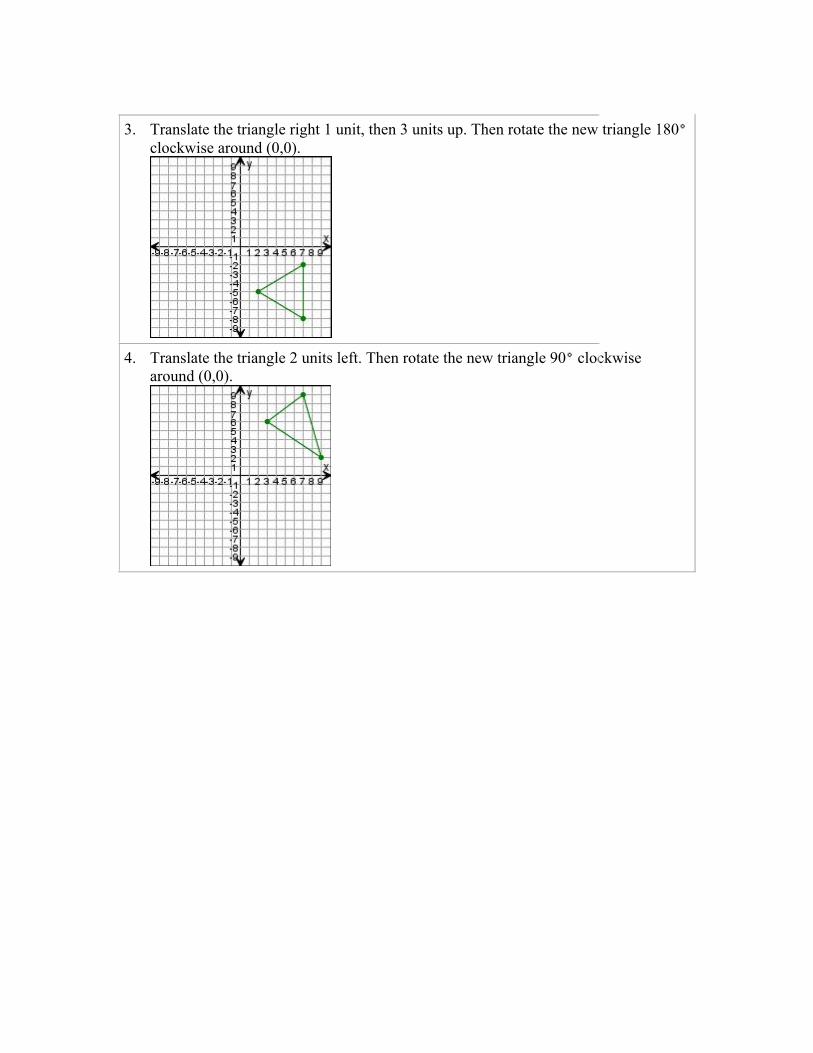
3. Translate the triangle right 1 unit, then 3 units up. Then rotate the new triangle 180clockwise around (0,0).
4. Translate the triangle 2 units left. Then rotate the new triangle 90 clockwisearound (0,0).
DAY 7- TESSELMANIA
Objectives:
Students will be able to:• Describe what a tessellation is• Identify the transformations needed in order to make the given tessellation
“fit”
Materials:• “Tesselmania” computer software• Computers
Opening Activity:
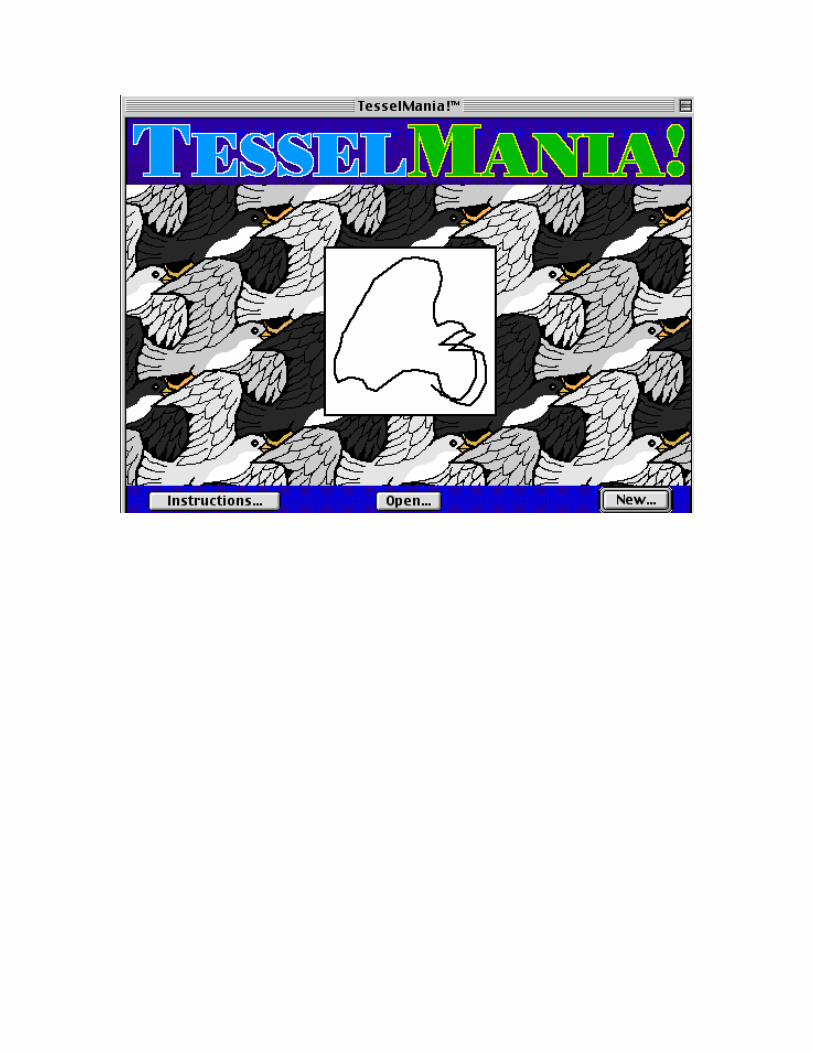
The teacher will begin in the computer lab by showing the students how to openup the computer application. Then once everyone has “Tesselmania” opened, the teacherwill ask them for their attention and show them a slideshow of how the applicationsoftware works. As the slideshow is being presented, the teacher will ask variousquestions as the transformations are occurring.
Developmental Activity:
After the slideshow, the teacher will show the students how to open up the pre-made tessellation example of a frog and show them how to move the figure around bydoing various transformations just to give the students some guidance on how to work theapplication software. The teacher will then have the students open up the example andask them to perform the multiple transformations needed to fill up a page of a createdfigure.
Closing Activity:
For the end of class, the students will be asked to print out a copy of their finalone page tessellation of a frog to be handed in. They will also be asked to write downwhat transformations they used to create their final copy. They must label thesetransformations on their picture which corresponds to their transformations that theywrote down. This shows the teacher how well the students understood the task at handand if the students knew what transformations were being used where and when.
Assignment:
For homework, the students will be asked to think of a complex figure that theywould like to tessellate for class tomorrow. They will also be reminded that they will bemeeting in the computer lab again tomorrow.
DAY 8- TESSELMANIA CONTINUED
Objectives:
Students will be able to:• Create a tessellation• Tessellate their figure using various transformations• Duplicate a tessellation just given the figure and a picture of the final copy• Identify what transformations occur when tessellating a figure
Materials:• “Tesselmania” computer software• Computers
Opening Activity:
The teacher will first begin class by partnering up students. This will be done bythe teacher randomly. Once the students have a partner they will be instructed to findtwo computers next to each other and open up the computer application. Once everyoneis seated the teacher will show them how to create a figure using the computer software.Once the teacher is done showing them the how to create a figure, the teacher willexplain the task for the day.
Developmental Activity:
This task is that everyone must first create the complex figure that they weresupposed to think of for homework. Second, after creating their figures they musttessellate it using various transformations to make it fill up a page. Thirdly, they will beasked to print out their final copy, undo the tessellation so it only shows their complexfigure on the computer, and then exchange computers with their partner. Lastly, oncethey switched computers they must create to final copy of their partners figure just giventhe figure and the final printed out copy of the tessellations.
Closing Activity:
After the students duplicate their partners’ tessellation, they will be instructed toexplain and write down the necessary transformations needed to duplicate their partnersfigure. This task will be written down on the final copies of the partners’ papers to behanded-in with both of their names on each of the papers.
Assignment:
The only homework for tonight will be the closing activity if they didn’t completeit in class. They will also be told to meet once again in the computer lab tomorrow.
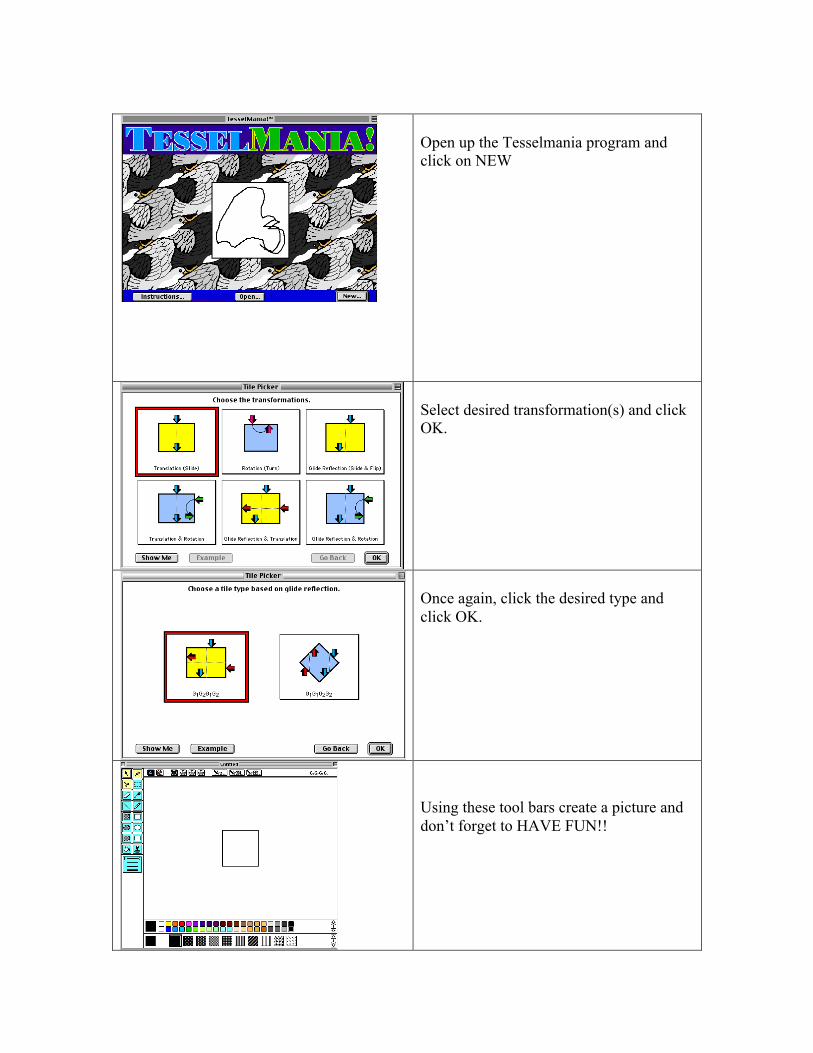
Open up the Tesselmania program andclick on NEW
Select desired transformation(s) and clickOK.
Once again, click the desired type andclick OK.
Using these tool bars create a picture anddon’t forget to HAVE FUN!!
DAY 9- NATIONAL LIBRARY OF VIRTUAL MANIPULATIVES
Objectives:
Students will be able to:• Recognize the transformations being used when playing on NLVM• Describe what transformation occurred in detail
Materials:• Computers• On-line service for NLVM• Colored pencils• Blank white paper
Opening Activity:
Students will be directed to the NLVM website. They will be instructed to, onceon the website, click on virtual library, and then click under 9-12 geometry. Once theyare this far the will be instructed to use the last three links titled Transformations-Reflections, Rotations, and Translations. They will be allowed to explore these threelinks for approximately five minutes.
Developmental Activity:
After they are done exploring, they will be asked to create two objects on each ofthe links using the key with figures in it. Using colored pencils and blank white paperthey will be instructed to copy their object from their computer onto their paper using theexact colors from the computer. They will only have to copy one object from each linkbut they must create two when doing it on the computer. They will also be asked to copydown the line of symmetry or degree measure that they used.
Closing Activity:
Once the students have created and copied down their objects they will be askedto label the original object created and the line of symmetry or degree measurement.They will also be asked to write down three things that the noticed happening. Example,when making an object using reflection I observed that if I grabbed the line of reflectionand moved it the original object stayed still while the reflection moved according to theline of reflection.
Assignment:
There is no assignment but students will be reminded that tomorrow’s class willbe back in their regular classroom.
DAY 10- DILATIONS
Objectives:
Students will be able to:• Recognize dilations when they see it• Demonstrate a dilation using a flashlight• Explain the dilation that occurred
Materials:• Flashlight• Pencil• Measuring Tape• Big piece of white paper• Tape
Opening Activity:
Students will be put into small groups of two to three students. They will beasked to pick up the required materials for the day, which consists of a flashlight, pencil,and worksheet. There will be pre-made stations already set up for them to work at. Eachgroup will be asked to report to one of the stations.
Developmental Activity:
Each group will perform the task at hand that is described on the worksheet. Theymust have one person holding the flashlight at a certain measured out distance (getmeasurement from measuring tape on the floor) so the other can trace it’s outline on thepaper taped to the wall while the other student copies down the measurement being usedon the table on the worksheet. Each student must take turns doing these tasks. They willhave to complete at least three measurements for the worksheet.
Closing Activity:
Once the drawings of the dilations are done and recorded at the appropriatemeasurements, the students will return to their desks to answer the questions listed at theend of the worksheet. Before they leave they must turn in the copy of the paper from thewall that they drew their outlines on and one worksheet with their combined answers andnames on it.
Assignment:
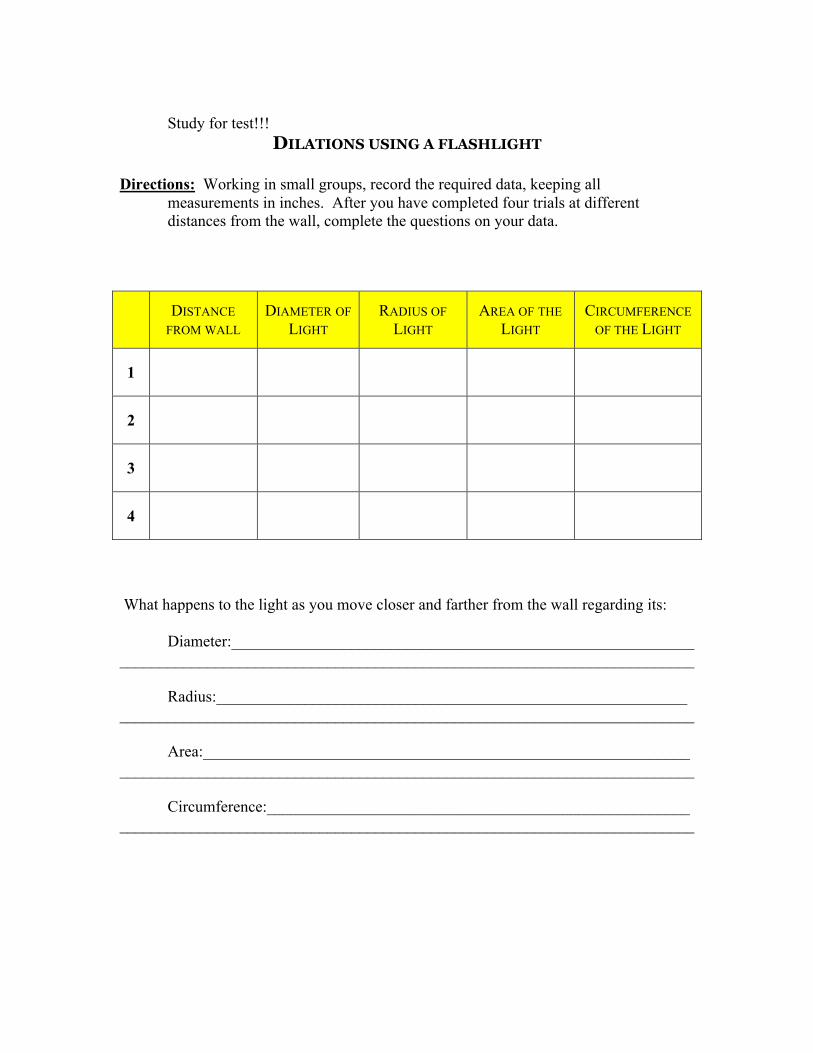
Study for test!!!DILATIONS USING A FLASHLIGHT
Directions: Working in small groups, record the required data, keeping allmeasurements in inches. After you have completed four trials at differentdistances from the wall, complete the questions on your data.
DISTANCE
FROM WALL
DIAMETER OF
LIGHT
RADIUS OF
LIGHT
AREA OF THE
LIGHT
CIRCUMFERENCE
OF THE LIGHT
1
2
3
4
What happens to the light as you move closer and farther from the wall regarding its:
Diameter:__________________________________________________________________________________________________________________________________
Radius:___________________________________________________________________________________________________________________________________
Area:_____________________________________________________________________________________________________________________________________
Circumference:_____________________________________________________________________________________________________________________________
