transkription von maptask-aufnahmen mit...
TRANSCRIPT

FOLKER Transcription Editor
for the “Forschungs- und Lehrkorpus Gesprochenes Deutsch” (“Corpus of Spoken German for Research and Teaching”, FOLK)
Transcription Manual Thomas Schmidt / Wilfried Schütte, current status: 4.8.2011
Translation: Claudia O’Donovan-Schramm / Kristina Euler
Outline:
1. What is FOLKER? ............................................................................................................................................................ 2 2. FOLKER quick start tutorial ............................................................................................................................................. 4 3. Transcription Tutorial ....................................................................................................................................................... 6
3.1 Initial entry in the segment view .............................................................................................................................. 6 3.2 Correcting in the segment view ............................................................................................................................. 10 3.3 Further correction and specification of overlaps in the score view ........................................................................ 12 3.4 Final correction in the contribution view ............................................................................................................... 17 3.5 Special functions for multi-part transcripts ............................................................................................................ 17 3.6 Mouse and keyboard commands ............................................................................................................................ 20
3.6.1 Operations with the mouse in the waveform view ....................................................................................... 20 3.6.2 Keyboard commands for the waveform view (“Selection”) ........................................................................ 20 3.6.3 Keyboard commands for the Player ............................................................................................................ 20 3.6.4 Keyboard commands for operations in the segment view ........................................................................... 21 3.6.5 Keyboard commands for operations in the score-view ................................................................................ 21
3.7 Saving .................................................................................................................................................................... 21 3.8 Output .................................................................................................................................................................... 22
3.8.1 Segments list ............................................................................................................................................... 23 3.8.2 Score .......................................................................................................................................................... 24 3.8.3 Contributions list ......................................................................................................................................... 26 3.8.4 Quantification .............................................................................................................................................. 26 3.8.5 Copying ....................................................................................................................................................... 27
4. cGAT Minimal transcripts .............................................................................................................................................. 32 4.1 Transcription symbols ............................................................................................................................................ 32 4.2 Differences between GAT-2 and cGAT minimal transcripts ................................................................................. 34 4.2 Syntax examples .................................................................................................................................................... 35
5. Reference: FOLKER’s user interface .............................................................................................................................. 37 5.1 Menus .................................................................................................................................................................... 39
5.1.1 File Menu .................................................................................................................................................... 39 5.1.2 Edit Menu .................................................................................................................................................... 43 5.1.3 View Menu .................................................................................................................................................. 48 5.1.4 Transcription Menu ..................................................................................................................................... 49 5.1.5 Help Menu ................................................................................................................................................... 50
5.2 Other parts of FOLKER’s main screen .................................................................................................................. 52 5.2.1 Toolbar ........................................................................................................................................................ 52 5.2.2 Time designation and zoom level bar .......................................................................................................... 53 5.2.3 Waveform view (oscillogram) ..................................................................................................................... 55 5.2.4 Navigation toolbar ....................................................................................................................................... 58 5.2.5 Virtual keyboard .......................................................................................................................................... 59 5.2.6 Status bar ..................................................................................................................................................... 61
5.3 Views ..................................................................................................................................................................... 61 5.3.1 „Segments“ .................................................................................................................................................. 61 5.3.2 „Score“ ........................................................................................................................................................ 63 5.3.3 „Contributions“ ........................................................................................................................................... 67
6. Appendix ......................................................................................................................................................................... 69 6.1 FAQs: Questions and answers to frequent problems ............................................................................................. 69
6.1.1 Editor .......................................................................................................................................................... 69 6.1.2 Initial input .................................................................................................................................................. 69 6.1.3 Correction .................................................................................................................................................... 70 6.1.4 Basic Tips .................................................................................................................................................... 72
6.2 Download and Installation ..................................................................................................................................... 72 6.3 Literature on „Transcription” ................................................................................................................................. 77

2
1. What is FOLKER? The FOLKER editor is used to create transcripts in a specific XML-format for the project “Forschungs- und Lehrkorpus gesprochenes Deutsch” (FOLK1) at the Institute for German Language in Mannheim (IDS). FOLKER was developed by Thomas Schmidt (University of Hamburg) in cooperation with the department for Pragmatics of the IDS.
FOLKER has been designed to fit and efficiently support the FOLK project scenario:
• Restriction to audio-files • Control of the syntax of minimal transcripts according to GAT-2 (Selting/Auer et al. 2009,
2010) • precise notation of pauses and overlapping speech sequences • Interoperability with the database “Gesprochenes Deutsch” (“Spoken German”), release
2.0.
In contrast to this, other transcription programs which are prevalent in conversation analysis such as the multi-purpose editors EXMARaLDA-Partition-Editor2, ELAN3 and Praat4 have the aim to support as many user scenarios as possible in one application.
The FOLKER Editor includes an audio-player as well as an oscillogram (waveform view) for displaying the speech signal. This way it is easy to choose segments for transcription; time stamps for these segments are positioned automatically.
This user guide is structured as follows:
The quick-start-tutorial for FOLKER (section 2) gives a broad guideline on how to con-struct a transcription. This short tutorial can also be accessed in the FOLK start menu.
Section 3 contains a tutorial as an instruction on how to transcribe. When working with FOLKER we recommend starting this section with an exercise transcript of one’s own choice. Firstly the tutorial describes making the initial entry and correcting cycles. In the editor the transcript can optionally be displayed as sequence of segments, as score5 or as sequence of speaker contributions, in which temporally contiguous sequences of segments belonging to the same speaker are summarized. These possibilities of display suit a suggestive sequence of workflow when transcribing: Initial entries, without considering the exact extension of over-laps, are advisably done in the segment view (see section 3.1) which also allows for a first correction (see section 3.2). In the score view one can correct the details of self-overlaps within the revision cycle (see section 3.3). The contribution view serves as a final possibility of correcting (see section 3.4). A special function for segmentation can help with long re-cordings and the corresponding larger transcripts (see section 3.5). Furthermore the tutorial describes separate commands for mouse and keyboard operation (see section 3.6) and gives tips regarding saving and output format: The transcript can be output, as a whole, for all views in HTML-format, as well as in a word processing program such as Microsoft Word (see sec-
1 „Corpus of Spoken German for Research and Teaching“, cf. http://agd.ids-
mannheim.de/html/folk.shtml. 2 Cf. http://www.exmaralda.org/partitureditor.html. 3 Cf. http://www.lat-mpi.eu/tools/elan/. 4 Cf. http://www.praat.org. 5 Following the visualization in the EXMARaLDA editor, cf. http://www.exmaralda.org/
partitureditor.html.

3
tion 3.8). Additionally it is possible to copy all three views, partially or as a whole, into the clipboard and from there into a word processing program (see section 3.8.5). These views are different visualizations of the same transcription model. Therefore, when transcribing, you need not make a decision ex ante and irreversibly for one type of line or score display. In-stead, you can flexibly work with different visualizations of the same transcription file.
Section 4 explains the cGAT conventions, after which FOLKER creates minimal transcripts with syntax control. FOLKER works on the basis of a data model6 for GAT-2 minimal tran-scripts (cGAT, see section 4.1) and checks for each segment during input, whether the cGAT-conventions are abided by and if there are any inconsistencies in the time assignment (see section 5.3.1). For example, segments which are overlapping and have been assigned to the same speaker are impermissible (“self-overlapping”). Therefore FOLKER is optimized for cGAT-minimal transcripts. However it is also possible to work with other transcription con-ventions, e.g. to construct basic or fine transcripts according to the GAT-2-conventions (cf. Selting/Auer et al. 2009).
The reference (section 5) with a description of the FOLKER interface can be used for fur-ther consultation.
The appendix (section 6) contains “FAQs” – frequently asked questions and answers when using FOLKER, advice on how to download and install FOLKER in either the Windows or the MAC OS X-version, as well as a short list of literature on transcribing.
In the descriptions in this manual characteristics and deviant keyboard commands for Mac OS X are depicted in italics.
6 Cf. Thomas Schmidt: „FOLKER‐Datenmodell“, 15. Dezember 2008. Changes: 05th February 2009,
06th March 2009. On the Internet at http://agd.ids-mannheim.de/html/FOLKER-Datenmodell.pdf (in German).

4
2. FOLKER quick start tutorial 1. Creating a new file
File > New… / select a WAV audio file the audio file opens and will be displayed in the wave-form view Note: You can zoom the wave-form with Ctrl + scroll wheel
2. Editing speakers Transcription > Edit speak-
ers… / Add a speaker with New speaker / Change the speaker ID in the field ID: / Specify a name in the field Name: (op-tional) all speakers are now available for speaker assignment in segments
Note: Further speakers can be added throughout the work process
3. Creating and transcribing segments First option: Attaching a segment to the end (in monologues and disciplined turn-taking) A) Button Append new segment (second button from the top in the right bar of the
segment view)
a new two second long section will be selected in the waveform view
a corresponding segment will be created in the segment view
the selection will be played once
B) Adjust the right border of the selection (red bar) in the waveform using the mouse. Use the button Play selection (F3) to listen to the selection.
By changing the border of the extract in the waveform the time values in the segment view will also automatically change
C) Input the transcribed text and complete by pressing <ENTER>
the syntax is checked during input
in the Syntax column either a checkmark or an X will indicate whether the syntax is correct.
D) Assign a speaker from the drop-down list
after this step the Time column will indicate, with either a checkmark or an X, whether there are any ‚self-overlaps‘.

5
E) Next segment: continue with A)
Second option: Adding a segment at an arbitrary position A) Make an appropriate selection in the waveform by pressing and dragging the mouse
B) Button New Segment (first button from the top in the right bar of the segment view)
a new segment will appear in the segment view
C) continue as above from C)
Note: A speaker’s contribution can be transcribed in many separate segments. These need not coincide with prosodic entities. Segments should not be longer than 5 seconds. Alternatively in option 2 the button Insert Pause can be applied. This is advisable if the selection made in the oscillogram only contains a pause.
4. Score and contribution view By clicking on the tabs Score or Contributions one can change from the segment view into the score (partition) or contribution view. The score view is especially useful for working with simultaneous passages. The contribution view summarizes contiguous segments into contributions. This can be helpful during proofreading.
These functions and further functions (output of transcriptions, operating the player, editing, deleting segments, searching and replacing etc.) are described in the following sections of the FOLKER manual.

6
3. Transcription Tutorial
3.1 Initial entry in the segment view The following steps concerning the creation of a transcription are shown using the example of the Monty Python sketch „My Theory“ (length of the transcribed part: 03:07 min).7
A new transcript can be created with File > New…. This command attaches a new WAV audio file.8 The audio file will be opened and shown in the waveform view. FOLKER only displays uncompressed WAV files up to approx. 2.5 GB in the oscillogram as visualized waves, but not e.g. compressed files in mp3 format. 9
You can add one or more speakers with Transcription > Edit speaker and then by pressing the button New speaker. The speaker ID may be changed in the field ID. The speci-fication of a name in the field Name is optional; instead of this or additionally you can insert the speaker’s function (as here “presenter”). In this manner, all speakers are defined through abbreviations, names and/or their function in the conversation. All speakers are now available to be assigned to segments and further speakers can be added later. NOTE: When anonymity is necessary, the code names should be used from the beginning, as given in the context of the transcription.
7 Cf. EXMARaLDA Demo Corpus: Monty Python: My Theory - An English transcription of Miss Elk
presenting her theory on the brontosaurus (http://www.exmaralda.org/corpora/en_demokorpus.html). 8 FOLKER accepts any absolute path for audio files, even paths on network drives. However, if it is fore-
seeable that the transcript file will be transferred along with the audio file to a different storage location on the same or another PC, both files should be kept in the same folder, i.e. you should copy or move the audio file to the folder in which the transcript in flk format will be saved. This prevents you from re-assigning the audio file if the absolute path is no longer correct after it has been moved. For more de-tails cf. section 5.1.1.
9 There are some audio files with a “.wav” extension which are compressed ones, i.e. files in ADPCM format („Adaptive Differential Pulse Code Modulation“). It might seem to be possible to assign such files to a new transcript, the oscillogram however will show only one or two horizontal zero lines de-pending on the number of channels. Such files can’t be played properly, don’t allow making a selection, thus can’t reasonably be used for transcribing. Whether such a file is on hand can be checked either in Windows Explorer in the context menu (right mouse key) with Properties > File info (???) or in the VLC-player with Window > Media information… > Codec details > Stream0 > Codec. If necessary the compressed file can be turned into an uncompressed WAV file (16bit PCM) with an audio editor, e.g. the freely available Audacity (http://audacity.sourceforge.net/).

7
The waveform view (oscillogram) can be adjusted to a suitable zoom factor with the button Zoom in / out or <Ctrl + mouse wheel>. An appropriate zoom factors facili-
tates an exact determination of the segment boundaries, but keeps segments up to 5 seconds as fully visible. Therefore about 7 sec. of the speech signal should be visible.
The raw version of the transcript can be best done in the segment view.
For the first segment one marks a suitable sample in the waveform – e.g. a sequence which is evidently marked by two pauses – by going over this sequence with pressed left mouse key and then defines this as New Segment (or with the key combination <Ctrl + EN-
TER>. If necessary one can correct the segment boundaries after checking opti-cally and acoustically (button Play selection or the <F3> key) by
• adjusting with the mouse, • using the key combinations or • with the scroll wheel (cf. section 5.2.3). In the speakers column one assigns a speaker in the drop-down menu (Combo-box) and then
adds the transcription text in the next column for the first segment. For this, one can either play the segment once (Play selection, <F3>) or in a loop function re-
peatedly (Repeat selection, <Alt + F3>), until stopping the play-back with Stop (<F6>).
The entry must be confirmed with <ENTER>.10
The same sequence of actions is mostly repeated for further transcriptions (as long as only one speaker is speaking or the speakers take turns in a disciplined fashion):
0) where appropriate, choose the last transcribed segment in the segments list
10 Later on when you have created several segments you can confirm the entry by switching into another
segment as well.
As for the following as well as for all further screenshots of the FOLKER editor the virtual keyboard (cf. section 5.2.5) is hidden. It will be shown in this manual only if its function shall be described.

8
1) move on the selection in the waveform view (oscillogram)
2) appropriately moving the right boundary of the selection in the waveform view; to save time, one can only listen to the last second of the selection by pressing the button Play last second of selection (<Shift + F3>)
3) either adding a new segment or inserting a pause
4) transcribing the newly added segment (for this repeatedly replaying the selection)
5) where necessary, assigning the speakers in the new segment
6) back to 1)
The steps 0) to 1) assure that the transcript is without gaps, i.e. that in the end every part of the recording has a description. At the same time the systematic moving on should possibly avoid self-overlapping segments.
If a segment boundary goes together with the boundary of a word (which is mostly the case), then the segment must be completed with blank space. If this is not done, words which do not belong together may be written together in the contribution view and the search for words, later on in the process, could be hampered. The only exception: The segment boundary goes straight through the middle of a word; this is especially the case if the beginning and the end of simultaneous passages of all participating speakers should be displayed by segment boun-daries.11 Cross checking (i.e. is there a blank space at the end of every segment which ends with a full word?) is easier in the score or contribution view because here one can see the gap on the right between the last word and the segment boundary. In the contribution view the boundaries are displayed on the bottom of the screen by buttons (cf. section 5.3.3). In the segment view one must click into the right end of the segment’s transcription text to see whether there is a whitespace or not, this is rather tedious and also prone to more mistakes. With the command Normalise Whitespace in the Transcription menu, respectively by automatically replacing double whitespaces with single ones before saving (after pre-adjustment in the Edit menu), redundant whitespaces can however be globally and automati-cally eliminated.
The segments in the FOLKER transcript should be directly following up on one another. These can be established, depending on their content, by different working methods:
• For speech utterances (of the same or of different speakers) with the button Ap-pend new segment; with this command a 2 sec. long selection will be set up, fol-lowing the already transcribed part, a new segment for this selection will be created in re-turn and the selection will be played, all in one procedure. After this step, the schemati-cally set right boundary usually has to be corrected.
• For pauses in speech with the button Shift selection. The length of the selection will be taken over from the preceding selection – this is why the boundary of the selection has to be corrected in most cases. The pause can be inserted with the button Insert pause (or with the shortcut <Alt + ENTER>) and will be measured down to a hundredth of a second. This way you can use FOLKER to deliberately measure pauses under 1 second in separate segments, instead of noting them with the GAT-2 character for estimated pauses (-), (--) or (---) as part of a speech segment.
11 FOLKER doesn’t show blanks as special characters, in the way one can show or hide them in e.g. MS
Word by clicking on the „paragraph mark“ icon on the toolbar by which a blank is shown as a small dot at half height.

9
This has several advantages: Besides the larger exactness, it is possible to automatically have the pause lengths, after re-adjusting the segments boundaries, corrected with Tran-scription > Update pause segments (see section 5.1.4) and the pauses will be listed sepa-rately in the quantification output (see section 3.8.4).
• In simultaneous sections / overlaps / concurrent speaking one subsequently marks a suit-able selection for every speaker involved, defines it with the button New segment as a segment and transcribes.12 Important: In simultaneous passages the segments must be assigned to different speakers, otherwise an error in time will appear!
12 Recordings with a clear channel separation such as recordings for which both of the two speakers have
used a headset are particularly suitable for identifying utterances in simultaneous passages, thus for be-coming familiar with FOLKER.

10
3.2 Correcting in the segment view By clicking in the accordant line a segment will be marked and the related selection displayed in the waveform with a green boundary on the left and a red boundary on the right:
Segment boundaries can also be re-adjusted by keeping the left mouse-key pressed while dragging the mouse (the mouse cursor turns into a double arrow) – however, segment bounda-ries can only be moved to a point close to preceeding or following segment boundaries. These boundaries are marked in the waveform view (oscillogram) by vertically dotted lines outside the selection: It is not possible to drag the selection outside this point as long as it is con-

11
nected to a segment. This should avoid this operation accidentally leading to inconsistent structures in time. At segment boundaries the mouse cursor becomes a double arrow.13
Pause segments can be corrected in length by adjusting one or both boundaries of the selec-tion. Then all pause segments of the transcript should be updated. This can be done either with the function Transcript > Update pause segments. FOLKER will then recalculate all pauses for the whole transcript. Their length can also be automatically recalculated before saving. For this you must activate the option Update pause segments before saving under Edit > Preferences… > Transcript level. This option is only available if the transcript level Level 2 - cGAT minimal transcript has been chosen.
For assumend pauses in speech you should make sure that absolutely nothing has been said or if the pause is “filled” with e.g. breathing in, which is transcribed with °h / °hh / °hhh or with very quiet particles of delay or hesitation, such as äh. Aberrantly constructed segments can be erased with the button Remove segment(s); a confirmation prompt will appear:
13 The following screenshot does not show this.
12
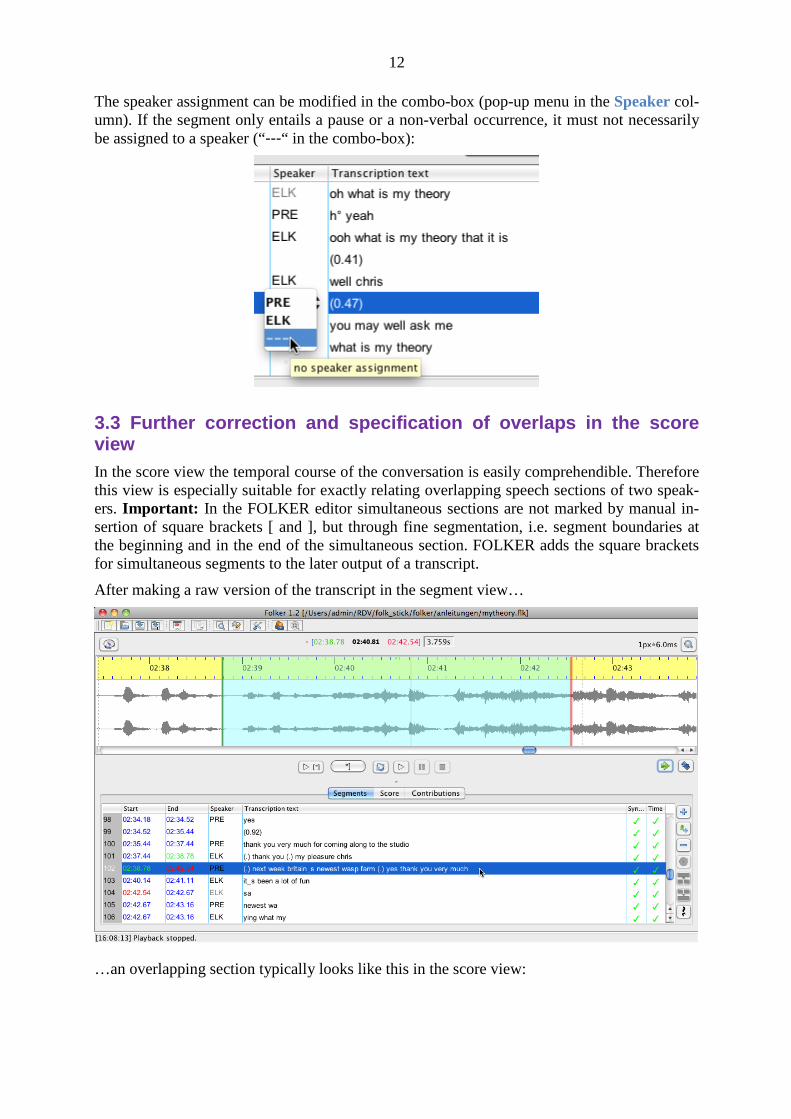
The speaker assignment can be modified in the combo-box (pop-up menu in the Speaker col-umn). If the segment only entails a pause or a non-verbal occurrence, it must not necessarily be assigned to a speaker (“---“ in the combo-box):
3.3 Further correction and specification of overlaps in the score view In the score view the temporal course of the conversation is easily comprehendible. Therefore this view is especially suitable for exactly relating overlapping speech sections of two speak-ers. Important: In the FOLKER editor simultaneous sections are not marked by manual in-sertion of square brackets [ and ], but through fine segmentation, i.e. segment boundaries at the beginning and in the end of the simultaneous section. FOLKER adds the square brackets for simultaneous segments to the later output of a transcript.
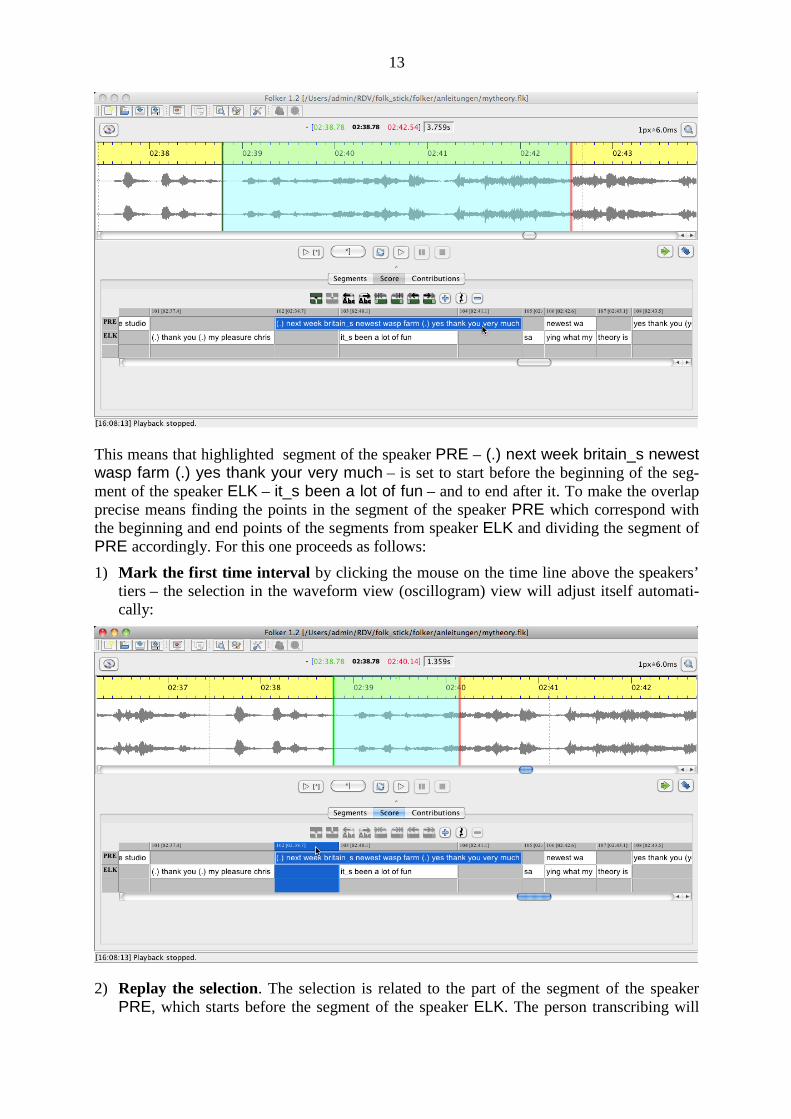
After making a raw version of the transcript in the segment view…
…an overlapping section typically looks like this in the score view:
13
This means that highlighted segment of the speaker PRE – (.) next week britain_s newest wasp farm (.) yes thank your very much – is set to start before the beginning of the seg-ment of the speaker ELK – it_s been a lot of fun – and to end after it. To make the overlap precise means finding the points in the segment of the speaker PRE which correspond with the beginning and end points of the segments from speaker ELK and dividing the segment of PRE accordingly. For this one proceeds as follows: 1) Mark the first time interval by clicking the mouse on the time line above the speakers’
tiers – the selection in the waveform view (oscillogram) view will adjust itself automati-cally:
2) Replay the selection. The selection is related to the part of the segment of the speaker PRE, which starts before the segment of the speaker ELK. The person transcribing will

14
then come to the conclusion that the speaker PRE had uttered the words (.) next week britain_s and ne of the word newest.
3) Split the segment at the determined place in the text. To do so, place the cursor behind the corresponding place in the segment description and press the button Split segment (or <Ctrl + 2>). You will be offered two timeline items to choose from, whereas in this case the first (TLI 103) will be selected, since this is the beginning of the simultaneous pas-sage14:
4) Mark the third time interval and the selection in the waveform will adjust accordingly.
14 If several simultaneous passages occur during a contribution more than two timeline items are offered in
this window.

15
5) Play the segment repeatedly. The selection is related to the part of the segment from speaker PRE, which comes after the end of the segment from speaker ELK. The person transcribing will then come to the conclusion that the speaker PRE says yes (.) thank you very much in this time interval.
6) Split the segment at the determined point in the text. To do so, move the cursor to the corresponding point in the segment description and press the button Split Segment (or <CTRL + 2>): in this case no timeline items can be chosen from, since only one (TLI 104) comes into question:
With this the overlap has been completely specified. In the segment view, these steps have led to one segment from speaker PRE turning into three – 102: (.) next week britain_s ne, 103: west wasp farm and 105: (.) yes thank you very much. Here the segment 103 has got the same points in time for start and end as ELK’s simultaneous utterance it_s been a lot of fun in segment 10415:
15 This example shows that the numbering of segments does not accord with the numbering of time line
items in the score view. Therefore, neither these numberings nor those from contributions in the contri-bution view should be used as a reference for transcript extracts in an analytical text, but only points in time (cf. section 3.8 too).

16
Errors in the determination of the exact points in the transcription text marking the beginning or ending of the simultaneous section can be corrected in the score-view with the buttons Shift characters to the left and Shift characters to the right. For this, you place the cursor e.g. in the segment after the overlap in the transcription text where the overlap
actually ends and move the characters between the segment boundary and the position of the cursor into the overlapping segment by pressing Shift characters to the left. For exam-ple you could detect that PRE’s minimal pause and the following ye of the word yes
can actually be located within the simultaneous passage:
If you split segments for the exact determination of overlaps you should place the cursor • in front of the second word when splitting words (i.e. after the whitespace, e.g. thank
|you) and • before the underscore when splitting words with marked slurring (e.g. it|_s).
A more accurate segmentation than exact phonemes is neither possible nor sensible. If a si-multaneous section either starts or ends during a phoneme (e.g. a vowel, a fricative or a na-sal), this phoneme must be placed either inside or outside the simultaneous section – it should
17
not be doubled artificially, e.g. with a slurring notation, such as a_a, since this would not rep-resent the actual way of speaking.
Complex transcription signs, such as longer periods of breathing in °hhh must not be seg-mented, i.e. split and spread over two segments. The same goes for descriptions of non-verbal behaviour or non-verbal events – e.g. ((laughs)).
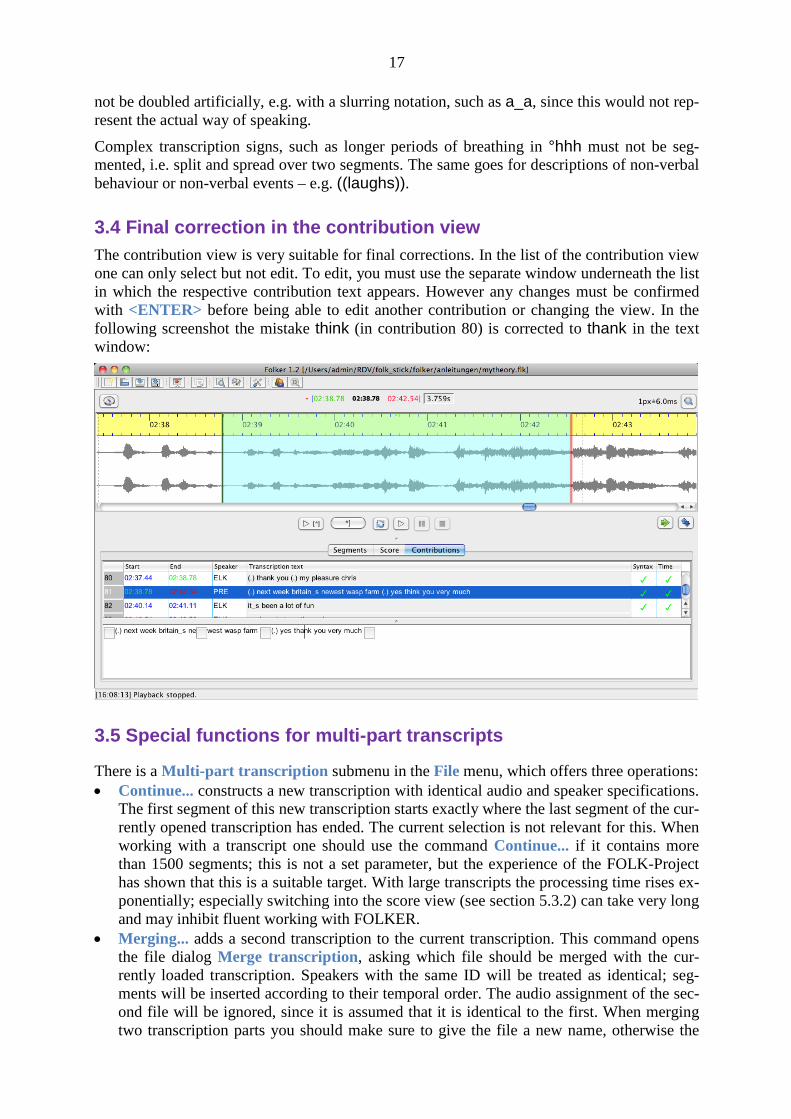
3.4 Final correction in the contribution view The contribution view is very suitable for final corrections. In the list of the contribution view one can only select but not edit. To edit, you must use the separate window underneath the list in which the respective contribution text appears. However any changes must be confirmed with <ENTER> before being able to edit another contribution or changing the view. In the following screenshot the mistake think (in contribution 80) is corrected to thank in the text window:
3.5 Special functions for multi-part transcripts
There is a Multi-part transcription submenu in the File menu, which offers three operations: • Continue... constructs a new transcription with identical audio and speaker specifications.
The first segment of this new transcription starts exactly where the last segment of the cur-rently opened transcription has ended. The current selection is not relevant for this. When working with a transcript one should use the command Continue... if it contains more than 1500 segments; this is not a set parameter, but the experience of the FOLK-Project has shown that this is a suitable target. With large transcripts the processing time rises ex-ponentially; especially switching into the score view (see section 5.3.2) can take very long and may inhibit fluent working with FOLKER.
• Merging... adds a second transcription to the current transcription. This command opens the file dialog Merge transcription, asking which file should be merged with the cur-rently loaded transcription. Speakers with the same ID will be treated as identical; seg-ments will be inserted according to their temporal order. The audio assignment of the sec-ond file will be ignored, since it is assumed that it is identical to the first. When merging two transcription parts you should make sure to give the file a new name, otherwise the

18
file name of the first part will be used for the complete file. Even if you do not add any changes to the transcription, a confirmation prompt will appear upon trying to close the program – this way you won’t forget to save the merging operation. When merging tran-scripts which partially overlap or are even identical, FOLKER duplicates the segments ex-isting twice. This however is not problematic, since the now false segments existing twice in the time control bar and can easily be erased.
• Split... splits the current transcription at the point in time at which the current marked segment ends.
For this purpose the file name of the second part will be requested in a file dialog Split tran-scription: Save second part:

19
This procedure can be carried out in all three views (see section 5.3) but always entails a change into the segment view. The part of the transcription including the currently marked segment will be kept in the editor; the part following the currently marked seg-ment will be written into a new file. Should the marked segment be a part of a simultane-ous section, then FOLKER will only split the transcript after the parallel segments. If you choose an already existing file name for the second part, especially when its name has al-ready been given to the unsplit transcript, a confirmation prompt will appear in order to avoid overwriting:
A click on No will bring you back to the window Split transcription: Save second part. Here one can either allocate a new file name or cancel the procedure. A file name for the second part of the transcript should be established after the following sample “<file-name>_part2.flk”. If one has split a transcript, saved the second part under a different name and wants to close the rest of the transcript, a confirmation will also appear.
What applies to Continue... also applies for Split...: One should split a large existing tran-script after (each) 1500 segments. Important: Before splitting a copy should be made in Windows Explorer or Mac OS X Finder so that data will not be lost due to wrong handling!
20
3.6 Mouse and keyboard commands Keyboard commands can be ergonomic if one works with the program regularly and is famil-iar with these keyboard commands, meaning that one does not have to look them up con-stantly. If one uses the keyboard commands instead of pulling the mouse one does not need to take the hands from the keyboard.
The mouse and keyboard commands are denoted under Windows XP and Mac OS X. The button <Ctrl> may be designated as “Ctrl” on some keyboards, the button <ENTER> as “Re-turn”. <Shift> stands for the shift key16.
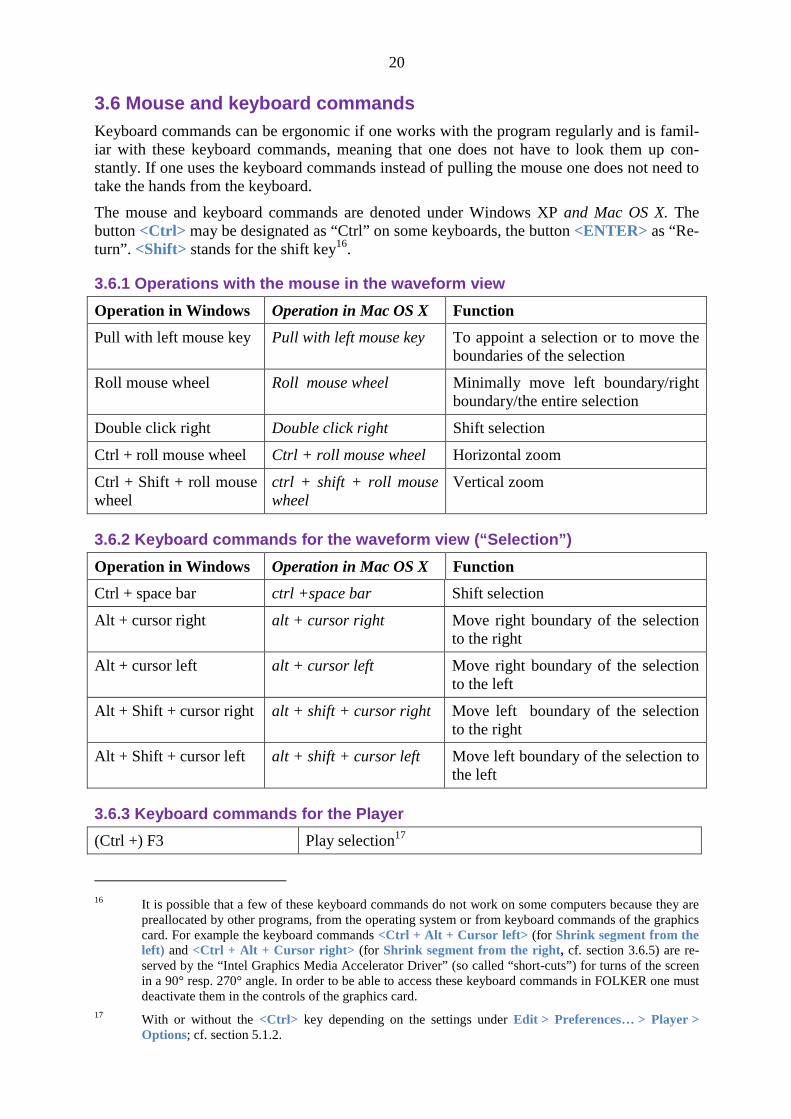
3.6.1 Operations with the mouse in the waveform view Operation in Windows Operation in Mac OS X Function
Pull with left mouse key Pull with left mouse key To appoint a selection or to move the boundaries of the selection
Roll mouse wheel Roll mouse wheel Minimally move left boundary/right boundary/the entire selection
Double click right Double click right Shift selection
Ctrl + roll mouse wheel Ctrl + roll mouse wheel Horizontal zoom
Ctrl + Shift + roll mouse wheel
ctrl + shift + roll mouse wheel
Vertical zoom
3.6.2 Keyboard commands for the waveform view (“Selection”) Operation in Windows Operation in Mac OS X Function
Ctrl + space bar ctrl +space bar Shift selection
Alt + cursor right alt + cursor right Move right boundary of the selection to the right
Alt + cursor left alt + cursor left Move right boundary of the selection to the left
Alt + Shift + cursor right alt + shift + cursor right Move left boundary of the selection to the right
Alt + Shift + cursor left alt + shift + cursor left Move left boundary of the selection to the left
3.6.3 Keyboard commands for the Player (Ctrl +) F3 Play selection17
16 It is possible that a few of these keyboard commands do not work on some computers because they are
preallocated by other programs, from the operating system or from keyboard commands of the graphics card. For example the keyboard commands <Ctrl + Alt + Cursor left> (for Shrink segment from the left) and <Ctrl + Alt + Cursor right> (for Shrink segment from the right, cf. section 3.6.5) are re-served by the “Intel Graphics Media Accelerator Driver” (so called “short-cuts”) for turns of the screen in a 90° resp. 270° angle. In order to be able to access these keyboard commands in FOLKER one must deactivate them in the controls of the graphics card.
17 With or without the <Ctrl> key depending on the settings under Edit > Preferences… > Player > Options; cf. section 5.1.2.

21
Shift + F3 Play last second of selection
(Ctrl + ) F4 Play from cursor position
(Ctrl + ) F5 Pause
(Ctrl + ) F6 Stop
3.6.4 Keyboard commands for operations in the segment view Operation in Windows Operation in Mac OS X Function
Ctrl + ENTER ctrl + ENTER New segment for selection
Alt + ENTER alt + ENTER Pause the selection
Shift + ENTER Shift + ENTER Append new segment
Alt + delete button Alt + delete Remove segment(s)
Ctrl + 1 ctrl + 1 Merge segments
Ctrl + 2 ctrl + 2 Split segment
3.6.5 Keyboard commands for operations in the score-view Operation in Windows Operation in Mac OS X Function
Ctrl + 1 ctrl + 1 Merge segments
Ctrl + 2 ctrl + 2 Split segment
Ctrl + 3 ctrl + 3 Split segment twice
Ctrl + Shift + R ctrl + shift + R Shift characters to the right
Ctrl + Shift + L ctrl + shift + L Shift characters to the left
Ctrl + Shift + cursor right
ctrl + shift + cursor right Extend segment to the right
Ctrl + Shift + cursor left ctrl + shift + cursor right Extend segment to the left
Ctrl + alt + cursor right ctrl + shift + cursor right Shrink segment from the right
Ctrl + alt + cursor left ctrl + shift + cursor right Shrink segment from the left
Ctrl + cursor right alt + cursor right Jump to the right word by word
Ctrl + cursor left alt + cursor left Jump to the left word by word
3.7 Saving The segment which has been entered last must be taken over with <ENTER> otherwise it will not be integrated in the saving process.
FOLKER saves in the background – during this process work in the editor can be continued. The function File > Exit, as well as the functions Save and Save as…, are deactivated during the saving process. In order to signalize the process to the user, a progress bar will appear in the status bar. If the application is closed via the red cross on the top of the window, FOLKER will wait for the (possible) saving process to finish, before closing.

22
Expediently the transcript should be saved under the same file name as the WAV audio file, e.g for the audio file “MyTheory.wav” as “MyTheory”. The extension “.flk” will be added automatically. FOLKER transcripts have the extension “.flk” but are xml-files in their struc-ture.
The command Save as… can be used to save the transcript under a different name and/or in a different folder. A different name is advisable when wanting to preserve variants of the tran-script or to distinguish varying results from working sessions. For this one can add the date to the file name (e.g. “MyTheory_20101201.flk”). One can also copy the file onto a portable storage medium (e.g. USB flash drive) and can then edit it on any PC. Thereby one should not forget to also copy the audio-file, at best into the same folder as the transcript file. Then a reassignment of the audio-file is not necessary when opening the file on a different PC. Im-portant: When working with multiple transcript files one should make sure not to mistakably continue working on an older version.
Working on a transcript can be continued by opening the flk-file. In doing so, the WAV file, which was assigned to the transcript when creating it, will be loaded automatically. Should the audio file have been displaced in the meantime or the header of the shortcut from the flk-file was accidentally erased because, e.g. the flk-file had been opened with an extern XML-Editor during processing, FOLKER will ask for a new location for the reassignment. Atten-tion: One should not newly link a FOLKER transcript with an audio file which has a different extension in time as the initially linked, e.g. which only contains an extract; otherwise all temporal assignments related to the segments are wrong!
3.8 Output In the File > Output… menu FOLKER transcripts can be issued as HTMLfiles, which can then e.g. be revised and printed out in a word processing software such as Microsoft Word. FOLKER works with fixed preferences when formatting. This output is possible for all three views (segments, score, contributions), additionally there is a function for quantification. For the choice of an output format one must select either “Segment list (*.html)”, “Score (*.html)”, “Contributions list (*.html)” or “Quantification (*.html)” in the pop-up Output transcription under File format:. For all outputs an equidistant font which suits the GAT-2 conventions (Selting/Auer 2009:358) will be used, not depending on the set font in the editor (see chapter 5.1.2); this is, in the segments and contributions list Courier New, with the type size 12, in the score list Courier New with the type size 10. Under File Name: a name should be assigned which makes the allocation with the flk-file easier, e.g. to the transcript “MyThe-ory.flk, “MyTheory_segmentlist.html” for the segment list. The output in FOLKER (in com-parison to EXMARaLDA and ELAN) cannot be parameterised, which means the value for, among others, font and size as well as type area are predefined and can not be adjusted indi-vidually by the user. This is done to enable a standardized output.

23
The following examples display the beginning of the Monty Python sketch „My Theory“, which has been retranscribed in FOLKER as cGAT-minimal transcript. In the segments list, in the score and in the contributions list the overlaps are marked, according to the GAT-conventions, with square brackets [ and ]; furthermore, the score view displays simultane-ously uttered parts of contributions on top of each other. In addition the segments resp. the contributions in the segment and contributions list, as well as the score area in the score view, are numbered consecutively. The numbering in the segment and contributions list (in the sec-ond column from the left) is equivalent to the respective numbering in the editor view, this means it can be used for correction submittals. The numbering of the score areas only emerges through a word-wrap during the output of the score; it is not available in the editor’s score view.
Since the numbering of the FOLKER output can differ depending on the chosen view and may change automatically after (several) corrections, all variants of numbering (segments, contributions, interval numbering in the score view, as well as numbers for the score “staves”) should not be used as reference when drawing back on transcription quotations in the ana-lysed text. Instead it is advisable to use a time value, as it is given in the output of the segment and contributions list in the left column in the format {mm:ss} and in the score in a timeline above the annotation tiers in the format [mm:ss].
3.8.1 Segments list […] {02:35} 0100 PRE thank you very much for coming along to the
studio {02:37} 0101 ELK (.) thank you (.) my pleasure chris {02:39} 0102 PRE next week britain_s ne {02:40} 0103 [west wasp farm]

24
{02:40} 0104 ELK [it_s been a lot of fun ] {02:41} 0105 PRE (.) yes thank you very much {02:43} 0106 ELK sa {02:43} 0107 [ying what my ] {02:43} 0108 PRE [newest wa ] {02:43} 0109 ELK theory is {02:44} 0110 PRE yes thank you (your applause) {02:45} 0111 ELK and whose it is {02:46} 0112 PRE yes (.) thank you (.) that_s all (.) thank you {02:48} 0113 [opens next week ] {02:48} 0114 ELK [i have another theory i ] {02:49} 0115 (0.44) {02:49} 0116 PRE ye {02:50} 0117 [s ] {02:50} 0118 ELK [call] {02:50} 0119 ed my second theory {02:51} 0120 PRE (well) thank you {02:51} 0121 ELK or my theory {02:52} 0122 [number two ] {02:52} 0123 PRE [britai] {02:52} 0124 n_s newest {02:53} 0125 [wasp farm ] {02:53} 0126 ELK [which i could ex] {02:54} 0127 pand (without doubt) {02:55} 0128 (0.7) {02:56} 0129 ELK this second theory {02:56} 0130 PRE yeah {02:57} 0131 ELK which {02:57} 0132 (.) with the one that {02:57} 0133 [i have ] {02:57} 0134 PRE [yeah ] {02:58} 0135 ELK said {02:58} 0136 (0.25) {02:58} 0137 ELK [forms ] {02:58} 0138 PRE [no ] […]
3.8.2 Score A HTML-score is mainly meant to be displayed in an internet browser. It can also be opened in Word, this however is not advisable. The score must, as shown on the following page, be opened in a landscape format in Word, because of the wide predefined type area of the wrapped score. Overlaps within a tier will be distributed to several tiers for output, as in the interface. Tiers without a speaker will be placed outside the score frame and furnished with a grey background so that the extension is clearly visible.

25 […] [18] .. [02:32] [02:33] [02:34] [02:34] [02:35] PRE the head yes thank you very much for coming along to the studio ELK and it_s mine (0.85) (0.92) [19] [02:37] [02:38] [02:40] [02:41] PRE next week britain_s ne [west wasp farm] (.) yes ELK (.) thank you (.) my pleasure chris [it_s been a lot of fun ] [20] .. [02:42] [02:42] [02:43] [02:43] [02:44] PRE thank you very much [newest wa ] yes thank you (your applause) ELK sa [ying what my ] theory is and whose it [21] .. [02:45] [02:47] [02:48] [02:49] [02:49] PRE yes (.) thank you (.) that_s all (.) thank you [opens next week ] ye [s ] ELK is [i have another theory i ] [call] (0.44) [22] [02:49] [02:50] [02:51] [02:51] [02:52] [02:53] PRE (well) thank you [britai] n_s newest [wasp farm ] ELK ed my second theory or my theory [number two ] [which i could ex] [23] [02:53] [02:54] [02:55] [02:56] [02:56] [02:56] [02:57] [02:57] PRE yeah [yeah ] ELK pand (without doubt) this second theory which (.) with the one that [i have ] said (0.7) [24] [02:58] [02:58] [02:58] [03:00] [03:01] PRE [no ] ELK [forms ] the brace of theories that i own which are mine and which belong to me the only (0.25) [...]

26
3.8.3 Contributions list […] {02:35} 078 PRE thank you very much for coming along to the studio {02:37} 079 ELK (.) thank you (.) my pleasure chris {02:39} 080 PRE next week britain_s ne[west wasp farm](.) yes
thank you very much {02:40} 081 ELK [it_s been a lot of fun ] {02:43} 082 ELK sa[ying what my ]theory is {02:43} 083 PRE [newest wa ] {02:44} 084 PRE yes thank you (your applause) {02:45} 085 ELK and whose it is {02:46} 086 PRE yes (.) thank you (.) that_s all (.) thank you
[opens next week ] {02:48} 087 ELK [i have another theory i ] {02:49} 088 (0.44) {02:49} 089 PRE ye[s ] {02:50} 090 ELK [call]ed my second theory {02:51} 091 PRE (well) thank you {02:51} 092 ELK or my theory [number two ] {02:52} 093 PRE [britai]n_s newest [wasp farm ] {02:53} 094 ELK [which i could ex]pand (without doubt) {02:55} 095 (0.7) {02:56} 096 ELK this second theory {02:56} 097 PRE yeah {02:57} 098 ELK which (.) with the one that [i have ]said {02:57} 099 PRE [yeah ] {02:58} 100 (0.25) {02:58} 101 ELK [forms ]the brace of theories that i own which are
mine and which belong to me the only only one that i know ++++++ at this time goes like this ((clears throat))
{02:58} 102 PRE [no ] […]
3.8.4 Quantification PRE ELK Without Total
Contributions (number) 24 43 36 103 Contributions (length) 54.65 79.82 52.34 186.8
Words (tokens) 120 267 0 387 Words (types) 66 107 140 Micro pauses 11 19 0 30
Non-phonological 1 8 0 9 Breathing 1 0 0 1
Measured pauses (number) 2 4 36 42 Measured pauses (length) 21.34 8.97 52.35 0.83
27
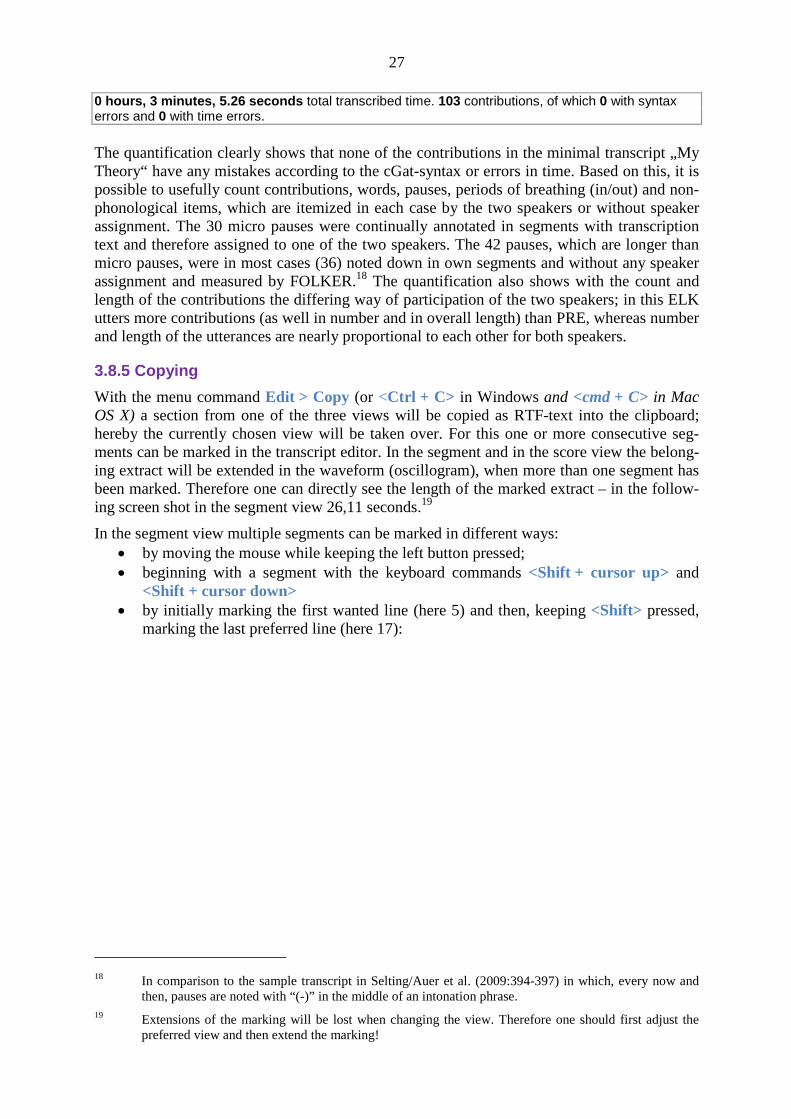
0 hours, 3 minutes, 5.26 seconds total transcribed time. 103 contributions, of which 0 with syntax errors and 0 with time errors.
The quantification clearly shows that none of the contributions in the minimal transcript „My Theory“ have any mistakes according to the cGat-syntax or errors in time. Based on this, it is possible to usefully count contributions, words, pauses, periods of breathing (in/out) and non-phonological items, which are itemized in each case by the two speakers or without speaker assignment. The 30 micro pauses were continually annotated in segments with transcription text and therefore assigned to one of the two speakers. The 42 pauses, which are longer than micro pauses, were in most cases (36) noted down in own segments and without any speaker assignment and measured by FOLKER.18 The quantification also shows with the count and length of the contributions the differing way of participation of the two speakers; in this ELK utters more contributions (as well in number and in overall length) than PRE, whereas number and length of the utterances are nearly proportional to each other for both speakers.
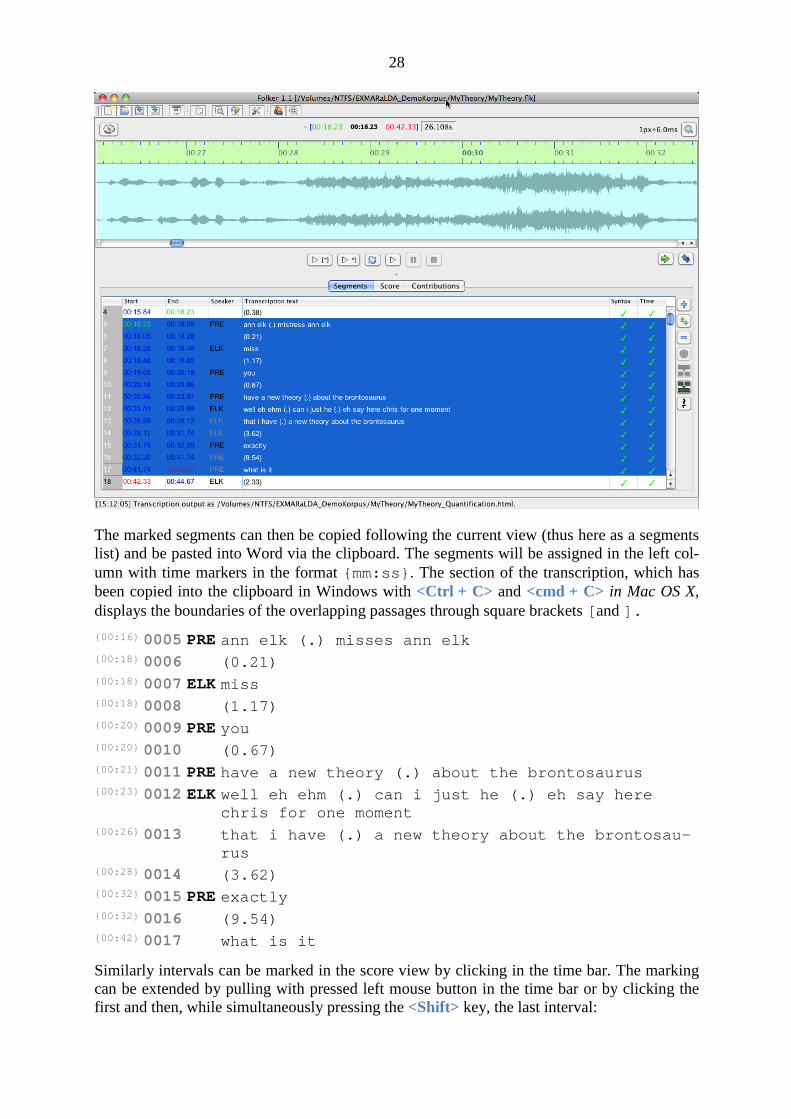
3.8.5 Copying With the menu command Edit > Copy (or <Ctrl + C> in Windows and <cmd + C> in Mac OS X) a section from one of the three views will be copied as RTF-text into the clipboard; hereby the currently chosen view will be taken over. For this one or more consecutive seg-ments can be marked in the transcript editor. In the segment and in the score view the belong-ing extract will be extended in the waveform (oscillogram), when more than one segment has been marked. Therefore one can directly see the length of the marked extract – in the follow-ing screen shot in the segment view 26,11 seconds.19
In the segment view multiple segments can be marked in different ways: • by moving the mouse while keeping the left button pressed; • beginning with a segment with the keyboard commands <Shift + cursor up> and
<Shift + cursor down> • by initially marking the first wanted line (here 5) and then, keeping <Shift> pressed,
marking the last preferred line (here 17):
18 In comparison to the sample transcript in Selting/Auer et al. (2009:394-397) in which, every now and
then, pauses are noted with “(-)” in the middle of an intonation phrase. 19 Extensions of the marking will be lost when changing the view. Therefore one should first adjust the
preferred view and then extend the marking!
28
The marked segments can then be copied following the current view (thus here as a segments list) and be pasted into Word via the clipboard. The segments will be assigned in the left col-umn with time markers in the format {mm:ss}. The section of the transcription, which has been copied into the clipboard in Windows with <Ctrl + C> and <cmd + C> in Mac OS X, displays the boundaries of the overlapping passages through square brackets [and ]. {00:16} 0005 PRE ann elk (.) misses ann elk {00:18} 0006 (0.21) {00:18} 0007 ELK miss {00:18} 0008 (1.17) {00:20} 0009 PRE you {00:20} 0010 (0.67) {00:21} 0011 PRE have a new theory (.) about the brontosaurus {00:23} 0012 ELK well eh ehm (.) can i just he (.) eh say here
chris for one moment {00:26} 0013 that i have (.) a new theory about the brontosau-
rus {00:28} 0014 (3.62) {00:32} 0015 PRE exactly {00:32} 0016 (9.54) {00:42} 0017 what is it
Similarly intervals can be marked in the score view by clicking in the time bar. The marking can be extended by pulling with pressed left mouse button in the time bar or by clicking the first and then, while simultaneously pressing the <Shift> key, the last interval:

29
The red marked interval after the last TLI can not be selected:
The marked transcript selection can then be copied and pasted into a Word document as a score. The score will be wrapped in by the predefined Word type area into “staves” (here into 2), these will be numbered consecutively in square brackets, the boundaries of the overlapping passages are displayed through square brackets [and ]: [1] 101 [02:38.7] 102 [02:40.1] 103 [02:41.1] PRE next week britain_s ne [west wasp farm ] (.) yes thank you very much ELK [it_s been a lot of fun ] sa [2] . . 105 [02:42.6] 106 [02:43.1] 107 [02:43.5] 108 [02:44.7] PRE [newest wa ] yes thank you (your applause) ELK [ying what my ] theory is and whose it is

30
The score copied and pasted via the clipboard differs from the HTML output of the score in several points. The score out of the clipboard
• displays the time bar in a shaded grey (with consecutively numbered TLIs); • issues the time value for every TLI in the [mm:ss.z] format; • formats the transcription text and the speaker IDs in the font chosen in the editor and
not as in the HTML output in the font Courier New; • fits the DIN-A4 page format (portrait with a type area of 16 cm); • places normal whitespaces between the words of the transcription text. Occasionally,
in order to avoid line breaking in such text cells, the spacing of the characters in a segment will be scaled. Instead of this, non-breaking space will be put between the words in the HTML file.
In the contribution view an extended marking of the contributions will be taken over as a copy, but not in the waveform view (oscillogram) and not in the text window below the list. In the following example contributions 10 through to 15 are marked, the selection in the waveform and the text edit window however refer to contribution 10 only:
In the contribution view the contributions of the transcript extract, which has been copied into the clipboard in Windows with <Ctrl + C> and <cmd + C> in Mac OS X, will also indicate

31
the time format in the left column as {mm:ss} after being pasted into Word. The boundaries of the overlapping passages will also be marked in the transcription text with square brackets [ and ]. {00:23} 010 ELK well eh ehm (.) can i just he (.) eh say here
chris for one moment that i have (.) a new theory about the brontosaurus (3.62)
{00:32} 011 PRE exactly (9.54) what is it {00:42} 012 ELK (2.33) ehem (2.15) {00:47} 013 PRE i mean your (.) your new theory {00:49} 014 ELK (0.87) oh what is my theory {00:51} 015 PRE h° yeah

32
4. cGAT Minimal transcripts
4.1 Transcription symbols In principle, minimal transcripts in the FOLK project are created according to cGAT conven-tions, as the syntax control in FOLKER is designed for this. “cGAT” is a slight modification of the GAT-2-minimal transcripts (cf. Selting/Auer et al. 2009). This modification is neces-sary for a consistent notation and computer-based processing, in particular the parsing in terms of the FOLK data model. These cGAT transcripts include:
• Words: the spoken text as a chain of small letters, which are disrupted by whitespaces at word boundaries. This means e.g. the following is permitted:
the house during
An orthographic transcription, a “literarische Umschrift” or an eye dialect in the sense of Gail Jefferson are thereby possible (cf. Selting/ Auer et al. 2009:30). Spell out numbers, do not use abbreviations, punctuation, hyphens within words; no full stops in abbrevia-tions, no apostrophes (use an underscore for cliticizations instead).20 A hyphen must not be used, as it could be mistaken with the sign for level pitch movement at the end of into-nation phrases used in GAT-2 basic transcripts (Selting/Auer et al. 2009: 373).
• Hesitation signals (so-called “filled pauses”), e.g. uh um er
The spelling “eh” should be avoided when transcribing signals of hesitation in German, since a mix up with the German modal particle “eh” can not always be excluded.
• Laughing is noted either as a description of the laugh ((laughs))
or for shorter and syllabic laughing, depending on the amount of the pulses or the laugh-ing syllables, e.g.
hahaha hehe hihi
Crying can also be described: ((cries))
• Continuer: in terms of monosyllabic signals such as e.g. hm yes no nay
or in terms of disyllabic signals such as e.g. hm_hm ye_es no_o nay_ay
20 In the English adaptation of the GAT-2 transcription conventions using apostrophes as in the standard
English orthography is recommended: „ We consider the apostrophe a part of standard English orthog-raphy and have retained it in this representation of cliticization. For GAT transcribers who wish to use a transcription editor such as FOLKER, the use of an underscore instead of an apostrophe is recom-mended“ (Selting/Auer et al. 2010:190).

33
• Pauses: simple round brackets with a dot, 1-3 dashes or decimals with a dot as decimal separator, following the English custom (1 or 2 digits at a time either before and after the dot instead of the comma):
(.) (micro pause, estimated, up to ca. 0.2 sec duration)
(-) (short estimated pause of ca. 0.2-0.5 sec duration)
(--) (middle estimated pause of ca. 0.5-0.8 sec. duration)
(---) (longer estimated pause of ca. 0.8-1.0 sec. duration)
(1.23) (measured pause of 1.23 sec. duration)
Preferably pauses in FOLKER should be transcribed in the segment and score view into separate segments and not be assigned to a speaker. They should be noted automatically with the button Insert pause and thereby measured exactly (within a precision of hun-dredths of seconds) by the program. The same goes for pauses of a duration of less than 1 sec., which can either be measured or estimated according to GAT-2-conventions, pro-vided they are no micro pauses. Since one can always measure with the waveform view (oscillogram), the notation for “estimated pauses” should rather be used seldom.
• Non-verbal vocal actions and events: doubled round brackets containing optional char-acters, which do not start with dashes, full stops, numbers or opening round brackets. Permitted is e.g.
((coughs)) ((incomprehensible, 2.5s.))
This, e.g. is not permitted: ((2 seconds of coughing)) ((coughs)
• (Periods of) breathing in/out: one to three repetitions of the letter h, for breathing in with preceding, and for breathing out with subsequent degree sign °. The following is permitted:
°h h° (audible inhaling or exhaling of ca. 0.2-0.5 length)
°hh hh° (audible inhaling or exhaling of ca. 0.5-0.8 length)
°hhh hhh° (audible inhaling or exhaling of ca. 0.8-1.0 length)
The following is not permitted: °hhhh °°hh
• Unintelligible passage: optional repetition of the character string +++. One of these strings +++ is equivalent to one syllable. Appropriate whitespaces can be inserted, as far as the boundaries between words can be conjectured. The following is permitted, e.g.:
+++ +++++++++ +++ ++++++
The following is not permitted, e.g.: ++ +++++
• Assumed wording / possible alternatives: Simple brackets around one or more words, separated by whitespaces. One or more alternative sounds can be added with a slash /. The following is permitted, e.g.:
(what) (what is) (hat/that) (wet is/that his) (wet/that/cat)

34
• Boundary markers for “normal” words are whitespaces, underscores are used for no-ticeable slurring. The following is permitted, e.g.:
that is that_s
The character (sequences) referred to as ‘not permitted’ will be criticized by FOLKER – by displaying the transcription text of the entire segment in red and the appearance of a red cross in the syntax column in the segments and contribution view. However it is possible that the display of the syntax mistakes may differ in the segment and in the contribution view. For example, a mistake such as (that)(is) (no whitespace between closing and opening brackets) will only be displayed in the contribution view.
4.2 Differences between GAT-2 and cGAT minimal transcripts 1. No intonation phrases: When transcribing in FOLKER following cGAT conventions you should preferably segment for practical reasons – you should not follow the GAT-2 concept of intonation phrases. Practicable segments are in particular sequences of speech which are separated by pauses clearly visible in the oscillogram or selections with a length of approx. 3-5 seconds thus allowing an efficient initial entry without urging you to replay. Of course you could follow the GAT-2 concept of intonation phrases (cf. Selting/Auer et al. 2009: 370) for the segmentation of your first entries. However, during the refined notation of overlaps and simultaneous sequences (cf. section 3.3) you will produce additional segment boundaries which do not coincide with the boundaries of intonation phrases
2. Measuring pauses: We recommend to note pauses of less than 1 second, except for micro pauses, in distinct segments so that they can be measured by FOLKER with an accuracy of hundredths of a second. This has several advantages: Besides the larger exactness, it is possi-ble to automatically have the pause lengths, after re-adjusting the segments boundaries, cor-rected with Transcription > Update pause segments (see section 5.1.4) and the pauses will be listed separately in the quantification output (see section 3.8.4). The GAT-2 notation for short estimated pauses (cf. Selting/Auer et al. 2009: 365) by (-), (--) or (---) is as well possible in FOLKER and will be accepted by the syntax control.
3. No notation with angle brackets: The GAT-2 notation for speaking interspersed with laughter, „smile voice“ and for non-verbal vocal actions and events with double angle brack-ets (e.g. <<laughing> so>, <<:-> so>, <<soughing> soo> is not possible in cGAT.
4. No notation of the glottal closure: In cGAT no glottal closure is noted, e.g. with redupli-cated continuers auch as ˀhmˀhm.
5. Intelligibility: Unintelligible passages are noted by sequences of +++ without round brackets in cGAT, not by ( ) or (xxx xxx xxx) as in the GAT-2 minimal transcript. The cGAT notations for assumed wording – e.g. (may i) –, for uncertain sounds, or syllables, at word level, with possible alternatives – e.g. (may i say/let us say) – and for unintelligible passages with an indication of its duration – e.g. ((unintelligible, appr. 3 sec)) – are the same as in the GAT-2 minimal transcript.
As for these differences, if you want to follow the GAT-2 (Selting/Auer et al. 2009) instead of the cGAT conventions, you should disable the FOLKER syntax control with Edit > Prefer-ences… > Transcript level (cf. section 5.1.2).

35
4.2 Syntax examples As a didactic help we offer FOLKER beginners a demo transcript “syntax_examples.flk” on the FOLKER download website; to open this FOLKER transcript, it must be linked to a ran-dom, but at least one hour long WAV audio file – not necessarily a speech recording.” To do so, it is easiest to create an identically named WAV file “syntax_examples.wav”, with a length of 60 minutes containing only “brown noise”21, with an audio editor such as Audac-ity.22
Whether the segment has been transcribed correctly or not will be noted in the Speakers col-umn of “syntax_examples.flk”. For this, two “pseudo speakers” RIGHT and WRONG were inserted into the speakers table. These were chosen in the Speakers column considering the consciously formulated right or wrong transcription text. The transcript input will be con-trolled twice in the Syntax and Time columns – according to the cGAT syntax (cf. segments 2-14 and 22) and depending on the constancy of the segments in time (cf. segments 18-19). However the transcription text does not contain any scripting of the audio file. Instead, tran-
21 For this one should use the space-saving parameters 22.050 kHz sampling rate, mono. Brown noise has
a lower frequency and is therefore more pleasant to listen to than white and pink noise. Furthermore the amplitude in the Audacity window “noise generator” should be adjusted to a low value (e.g. 0.2).
22 Freely available under http://audacity.sourceforge.net/?lang=en.

36
scription rules will be displayed as metalinguistic quotations or descriptions, which respec-tively will also be compliant with the syntax or wrongly formulated.
A few examples for “RIGHT” are: • a segment which consists exclusively of words • a (.) segment (-) with (--) distinct (---) pauses (1.2) of different types • a ((coughs)) segment with °h inbreath hhh° exbreath and ((sneezes)) non-
phonological descriptions • kind_a assimilated word n_another assimilated word • a (passage/massage) which the transcriber didn_t understand (accurately/a
cure lately) (or) perhapt (did not) understand • a segment in which a word is inter|rupted in the midd|le. This disruption is im-
portant for the finishing touch in the score view, in which segments may start and end at the beginning and end parts of overlaps and with this in the middle of words to the phoneme. As a result word fragments develop (cf. section 3.3).23
A few examples for “WRONG” are: • a segment for which Capital Letters were used. Capitals are not designated in
cGAT, only on the transcript level of the GAT-2 basic transcript and in this only to emphasize. This means the so called “focus accents” (Selting/Auer 2010: 200) for the stressed syllable in an intonation phrase, but not according to the conventions of writ-ten language for the initial letters of nouns and proper names.
• a segment in which signs were used which do not belong to the english al-phabète. These are, for example, diacritical signs such as the accents in French. This means that accents can be exclusively reserved for the GAT-2 fine transcription; the German umlauts ä, ö and ü are permissible.
• a segment in which ((clears throat) a non-phonological item was not described properly. The closing double brackets are missing in this example of the non-phonological description; single brackets are used for assumed wording.
23 The segment boundary in FOLKER is visualized here with a vertical line – this sign is not entered
manually in the editor. Incidentally the disruption of words through segment boundaries has nothing to do with the phenomena of cut-off phrases, which can, at best, be noted in GAT in connection with a glottal closure (cf. section 5.2.5).

37
5. Reference: FOLKER’s user interface The following description refers to the Macintosh version of FOLKER and the screenshots display FOLKER as shown under Mac OS X. Many objects of the user interface are explained through “tooltips” which are displayed in small deposited textboxes. They appear for some seconds if the mouse cursor rests over the object for more than 1 sec.; these objects are • the toolbar underneath the menu bar, e.g.
• the buttons, e.g.
and • the index cards or tabs for the three views, e.g.
Here a screenshot of FOLKER’s entire user interface in the segment view:

38
menus
toolbar time stamps
waveform
navigation
virtual keyboard
status bar
zoom
view tabs
segments
segmentation buttons
syntax control time control
timeline
selection buttons

39
5.1 Menus
5.1.1 File Menu
Menu subitem Function
New...
Setting up a new transcript
Keyboard command under Windows: <Ctrl + N> / under Mac OS X: <ctrl + N>24
Open...
Opening an existing transcript by selecting an flk file25
Keyboard commands under Windows: <Ctrl + O> / under Mac OS X: <ctrl + O>
Save
Saving the currently opened transcript under its current name
Keyboard commands under Windows: <Ctrl + S> / under Mac OS X: <ctrl + S>
Save as... Saving the currently opened transcript under a new name by speci-fying an flk file
24 <ctrl> is displayed in the references of the program menus’ of the Mac OS X-Version as ^; therefore
File>New “^N”) will appear as keyboard command in the respective menu command. 25 The extension „flk“ is connected to the program in Windows and Mac OS X after installing FOLKER;
by double clicking on an flk file the program will be started and this transcript will be loaded. When opening files on external drives (e.g. hard discs or USB flash drives) in Mac OS X in java-based pro-grams such as FOLKER you can’t choose from the “devices” list in the left Finder column as normal; instead you will get this “devices” via „Macintosh HD > Volumes“.

40
Menu subitem Function M
ulti-
part
tr
ansc
ript
ions
Continue… Creating a new transcript with identical audio and speaker data, which starts a new segment exactly where the last segment of the currently opened transcription ends
Merge… Adding a second transcript to the current transcript; speakers with the same ID will be treated as identical, segments will be added according to their temporal order
Split… Splitting the current transcript after the currently marked segment
Import... Importing an EXMARaLDA basic transcript
Export... Exporting an EXMARaLDA basic transcript or an ELAN annota-tion file
Output… Issuing a transcript as HTML file in form of a segments list, score, contributions list or quantification (i.e. as a count of the transcrip-tion)
Exit Ending the program; if the transcription is opened and something has been changed a confirmation prompt will appear
A new transcript can be created with the menu item New…. Obligatory first step is to choose a WAV file. FOLKER only accepts uncompressed WAV files up to approx. 2.5 GB, no mp3 files26. The audio file will be opened and displayed as an waveform (oscillogram) .
With the button Open… an existing transcript will be opened by choosing an flk file. If FOLKER discovers that the associated WAV audio file can not be found under the given path and filename, an error message will appear:
The access to the audio file can be restored with the button Reassign recording:
26 There are some audio files with a “.wav” extension which are compressed ones, i.e. files in ADPCM
format („Adaptive Differential Pulse Code Modulation“). It might seem to be possible to assign such files to a new transcript, the oscillogram however will show only one or two horizontal zero lines de-pending on the number of channels. Such files can’t be played properly, don’t allow making a selection, thus can’t reasonably be used for transcribing. Whether such a file is on hand can be checked either in Windows Explorer in the context menu (right mouse key) with Properties > File info (???) or in the VLC-player with Window > Media information… > Codec details > Stream0 > Codec. If necessary the compressed file can be turned into an uncompressed WAV file (16bit PCM) with an audio editor, e.g. the freely available Audacity (http://audacity.sourceforge.net/).

41
The button Cancel stops the transcript from opening, thus it is not possible in FOLKER to open a transcript without a belonging audio file.
It is advisable to save the audio file and the FOLKER transcript in the same folder. This way, the FOLKER XML transcript file (with the extension *.flk) will register only the name of the audio file instead of its total path. When relocating on the same computer or when exchanging files with another computer this folder should be relocated or copied – this usually makes it unnecessary to reassign the audio file when opening the transcript.
Only one transcript at a time can be opened in FOLKER.27 Before opening a further transcript or setting up a new one a confirmation prompt will appear asking whether the currently openend transcript should be saved:
27 The FOLKER program can be started more than once, however this is not advisable.

42
This confirmation prompt will only appear if changes in the transcript have been made after the last saving. The current transcript can be saved with Yes, all changes will be ignored if you chose No; with Cancel you return to the program. The Multi-part transcription submenu in the File menu offers access to three operations: Continue…, Merge… and Split…. These functions simplify the transcription of long con-versations (i.e. more than 30 minutes) and dealing with large transcripts (i.e. more than 1500 segments). These functions are described in detail in section 3.5.
The menu items Import… and Export… condern the interface to the transcript editors EX-MARaLDA28 (import and export) and ELAN29 (export only). You can, for example, export a FOLKER transcript to EXMARaLDA and create a parameterized output in RTF text format, print in this format, or transfer the transcript via EXMARaLDA into a Praat TextGrid. Export-ing it to ELAN e.g. can be used to transcribe the spoken text based on the audio file in FOLKER first, and then to additionally connect the transcript with a parallel video file in ELAN and to annotate it multimodally. In this type of export the connection to the audio file including the MIME type “audio/x-wav” stays intact.
The menu point Output… produces a HTML file of the transcript which can also be opened in a word processing program (e.g. Microsoft Word). In the drop-down menu you can choose whether you want a segments list, a score, a contributions list or a quantification (output func-tion for a transcript count). In the segments and contributions list and in the score view over-laps in the output are marked by pairs of square brackets [ and ] as long as they start or end at the same interval boundary. The also emitted numbering refers to the segments (segments list) or the contributions (contributions list) noted in a table row, or the score areas in the score view. In the segments and contributions list the transcribed text will be displayed in a table cell, in which word-wraps are possible if the text is longer. These continuation lines will not be numerated.
28 Cf. http://www.exmaralda.org. 29 Cf. http://www.lat-mpi.eu/tools/elan/.

43
For further information see section 3.8. Underneath the Output… menu item the 4 tran-scripts, which had been opened locally in the previous session, will be displayed for rapid access.
5.1.2 Edit Menu The Edit menu entails the four menu items Copy, Search…, Replace… and Preferences…:
With Copy (or the shortcut <Ctrl+C> in Windows and <cmd+C> in Mac OS X) you can copy a transcript section from one of the three views into the clipboard. For this the presently chosen view will be used. The section can then be inserted into Word (for further information see section 3.8.5).
The command Search… (or the shortcut <Ctrl+F> in Windows and <cmd+F> in Mac OS X) opens a search dialogue. You can enter the character you are looking for into the field Search for:. Two search options are offered: Regular expression and a filter for the use of small and capital initial letters (Match case). When you search for regular expressions, the latter can not be used. In order to find complex formulations in the currently opened transcript you can use regular expressions as search keys. A regular expression is a text pattern consisting of normal
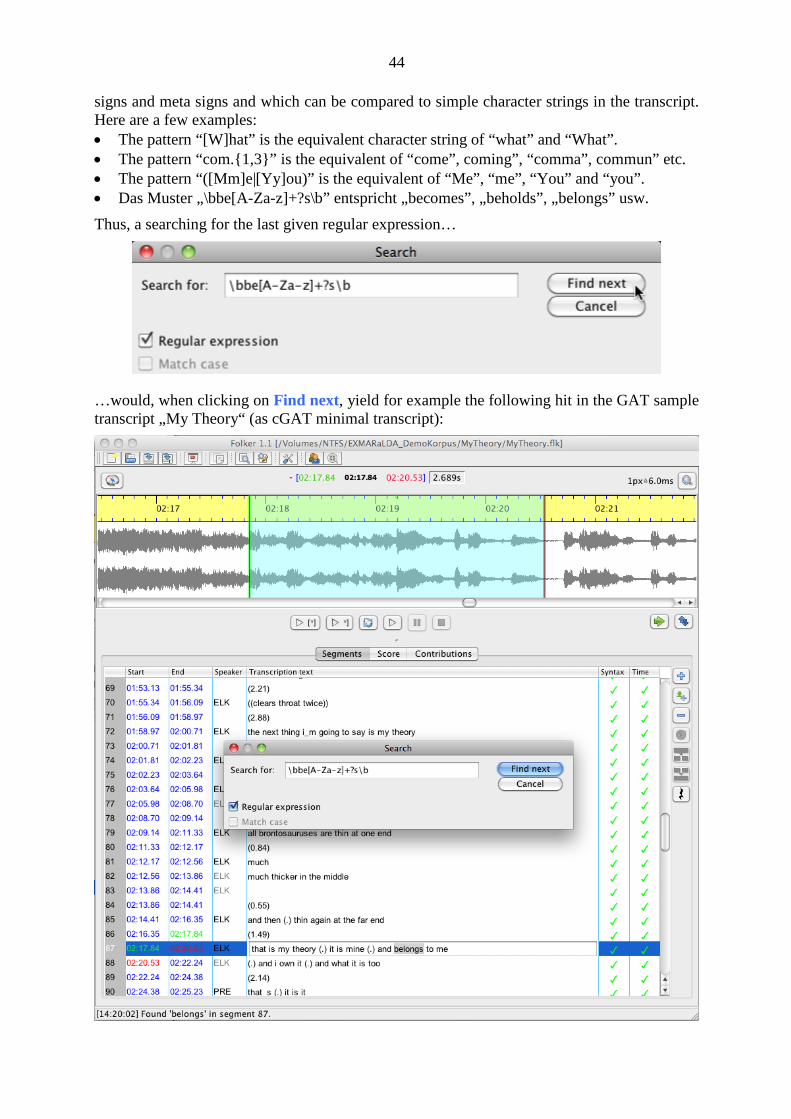
44
signs and meta signs and which can be compared to simple character strings in the transcript. Here are a few examples: • The pattern “[W]hat” is the equivalent character string of “what” and “What”. • The pattern “com.{1,3}” is the equivalent of “come”, coming”, “comma”, commun” etc. • The pattern “([Mm]e|[Yy]ou)” is the equivalent of “Me”, “me”, “You” and “you”. • Das Muster „\bbe[A-Za-z]+?s\b” entspricht „becomes”, „beholds”, „belongs” usw. Thus, a searching for the last given regular expression…
…would, when clicking on Find next, yield for example the following hit in the GAT sample transcript „My Theory“ (as cGAT minimal transcript):

45
By combining regular expressions in different ways very complex search inquiries can be formulated.30
With the command Replace… (or the shortcut <Ctrl+H> in Windows; in Mac OS X there is no shortcut available) character strings can be replaced – either for single cases (button Re-place) or in the entire transcript (button Replace all). This function is typically used to correct systematic spelling mistakes and to replace plaintext names with aliases when masking the transcript. In the following example the at first unmasked speaker name elk shall be replaced by crow in order to mask it:
In the contribution view the function Replace all is disabled, because the effects of replacing items can be rather unforeseeable if the sought for item within a contribution crosses a seg-ment boundary.
The command Preferences… opens a window with four tabs. Under Transcript level you can chose which controls FOLKER should conduct: no controls (Level 0), time control only (Level 1) or time and syntax controls for the cGAT minimal transcript (Level 2). Level 2, in which self-overlaps and the cGAT syntax are checked, is preset:
30 For users with prior knowledge in formal languages the syntax and the use of regular expressions are
explained under http://java.sun.com/javase/6/docs/api/java/util/regex/Pattern.html. A more practical in-troduction is available via http://www.regular-expressions.info/.

46
When transcribing according to other conventions, e.g. for a GAT-2 basic transcript instead of a cGAT minimal transcript, Level 2 should be disabled, otherwise several incorrect error mes-sages will appear in the syntax check.
Both check-box options are available only if “Level 2 - cGAT minimal transcript” has been chosen. With Normalise whitespace multiple whitespaces will automatically be replaced by single ones before saving. It is advisable to activate this option if you want to be sure that falsely set whitespaces, at the end of a segment or between words, will be eliminated; such chains of whitespaces cannot be identified easily, especially in the segment view. The func-tion Update pause segments before saving can be used to recalculate pauses before saving. This option is advisable if the length of a pause segment has been corrected subsequently by mov-ing the segment boundaries after the pause segment was inserted with the Insert pause function (see section 5.3.1). These options determine whether both functions should be executed automati-cally before saving; during the transcription process they can be activated manually in the Tran-scription menu at any time (see section 5.1.4).
The tab Player allows you to choose which audio player you want to use:

47
The “Direct-Show”-Player (Windows only), with which audio segments can be played on most computers without interference, is preset and advisable.31 For Macintosh, the QuickTime-Player is predefined and advisable and should not be mistaken with the alternatively offered QTJ (“Quick-Time for Java”)-Player! In this case “Direct Show” is not on offer. Changes made in the player preferences will only be effective when FOLKER is restarted. An option which can be chosen for all player versions is whether the function keys should be <F3> (Play selection), <F4> (Play), <F5> (Pause) and <F6> (Stop) or if these function keys should be in connection with the <Ctrl> key; keyboard commands are predefined without the <Ctrl> key.32 For the Loop selection (but-ton or keyboard command <Alt + F3>, see section 5.2.4.), a short pause (latency) is required be-tween the performances; a waiting time of 500 ms is predefined and can be changed on the scale at the bottom of the Preferences > Player window to a figure between 200 and 1000 ms. You can decide yourself which length you’ll find comfortable. However, it is not possible to stop the loop playing by pressing Stop or <F6> during the latency phase. This is only possible during playback, so do not choose an overly long latency time. If you active the checkbox Impose font: in the tab Font you can choose the typeface in all three views. In particular, this function can be used to choose a typeface which displays the GAT-2 special characters properly – e.g. the typeface Arial Unicode MS, which is entailed in most distri-butions of MS Office. The thumbnail Test is meant for this purpose:
By clicking on OK the chosen typeface will be taken over in all three transcript views. The cho-sen typeface will also be used for the display of all special characters entailed in the virtual key-board (see section 5.2.5). With the Language tab FOLKER’s interface (including menus, dialogue windows, status mes-sages and warning notices) can be changed into German, English or French. Changes will only take effect when restarting FOLKER:
31 Alternatives are QTJ („Quicktime for Java“) and JMF („Java Media Framework“)-Player. However on
some Windows and Macintosh Computers the latter works insufficiently. 32 On some keyboards, e.g. the iMac keyboard under Windows (with BootCamp), the function keys can’t
be assigned to program-specific commands without modifier; thus key combinations with the <Ctrl> key are obligatory. Under Mac OS X these key commands however won’t work with the option “Use keyboard shortcuts with Ctrl”; depending on the Mac OS X (10.6) System preferences option “Key-board > Keyboard > Use all F1, F2, etc. keys as standard function keys” the <fn> modifier key may or may not be used in combination with the function keys.

48
This is an example of the user interface in French:
5.1.3 View Menu In the View menu item the bar with the virtual keyboard for the GAT-2 special characters (see section 5.2.5) can be blended in or hidden. Furthermore a small range of Little helpers
will be offered. These buttons are a selection from the buttons between the waveform view (oscil-logram) and the transcription section (Shift selection and Play selection) or on the right beside
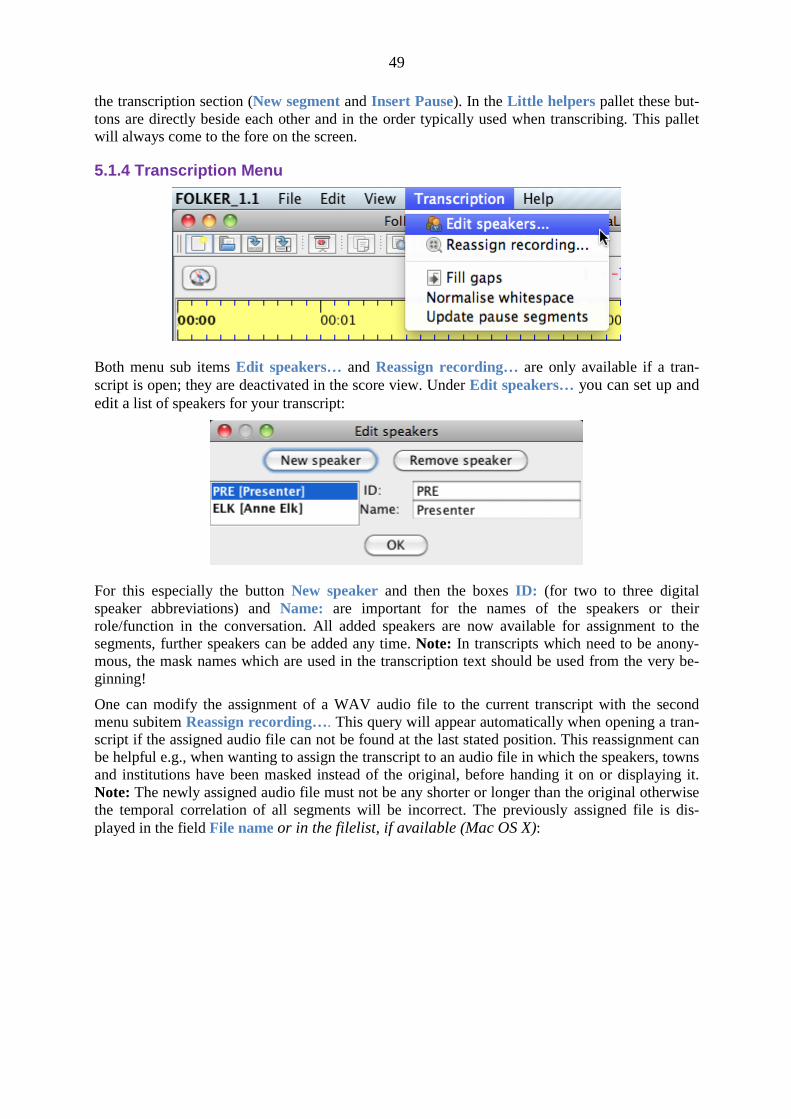
49
the transcription section (New segment and Insert Pause). In the Little helpers pallet these but-tons are directly beside each other and in the order typically used when transcribing. This pallet will always come to the fore on the screen.
5.1.4 Transcription Menu
Both menu sub items Edit speakers… and Reassign recording… are only available if a tran-script is open; they are deactivated in the score view. Under Edit speakers… you can set up and edit a list of speakers for your transcript:
For this especially the button New speaker and then the boxes ID: (for two to three digital speaker abbreviations) and Name: are important for the names of the speakers or their role/function in the conversation. All added speakers are now available for assignment to the segments, further speakers can be added any time. Note: In transcripts which need to be anony-mous, the mask names which are used in the transcription text should be used from the very be-ginning! One can modify the assignment of a WAV audio file to the current transcript with the second menu subitem Reassign recording…. This query will appear automatically when opening a tran-script if the assigned audio file can not be found at the last stated position. This reassignment can be helpful e.g., when wanting to assign the transcript to an audio file in which the speakers, towns and institutions have been masked instead of the original, before handing it on or displaying it. Note: The newly assigned audio file must not be any shorter or longer than the original otherwise the temporal correlation of all segments will be incorrect. The previously assigned file is dis-played in the field File name or in the filelist, if available (Mac OS X):

50
The next three menu items below the horizontal line are related to commands for the total current transcript: The command Fill gaps will add an empty segment without assigning a speaker to every time period which entails no transcription text. Normalise whitespace globally replaces multiple whitespaces by single ones. Update pause segments updates the length of pauses ac-cording to the length of the segments. This command is advisable if the pause boundaries of a selection have been changed. Both functions Normalise whitespace and Update pause seg-ments can be adjusted in the menu item Edit > Preferences…. > Transcript level so that they are executed automatically before saving (see section 5.1.2).
5.1.5 Help Menu The menu does not contain any context sensitive help. The subitem FOLKER on the web… is a link to the FOLKER webpage http://agd.ids-mannheim.de/html/folker.shtml on the AGD website where this manual can be downloaded. The imprint About… gives information on the program:

51
A dialogue will appear in the bottom part of this window containing information on the sys-tem configuration used. Clicking on the button Copy debug information copies the contents of a log file into the clipboard. This can then be inserted into a text file and sent to the devel-oper Thomas Schmidt ([email protected]) for detecting errors and bugs.
The Help menu also contains a window with all abbreviated keyboard commands (see section 3.6.2-3.6.5).33
33 It is possible that individual keyboard commands do not work on some PCs because they are preallo-
cated either by other programs, by the operating system or by keyboard commands from the graphics card. In the score view, e.g. the keyboard commands <Ctrl + Alt + left Cursor> (stands for Shrink from the left in FOLKER) and <Ctrl + Alt + right Cursor> (Shrink from the right) are reserved by the “Intel Graphics Media Accelerator Driver” for turns of the screen of 90° or 270° (Windows only). In order to access these key combinations in FOLKER one must disable them in the graphics driver con-trol.

52
The keyboard commands for the player are illustrated here as adjusted under Edit > Prefer-ences… > Player in the checkbox Use keyboard shortcuts with Ctrl – in the above screen-shot e.g. for Selections with the function key <F3>, not with the key combination <Ctrl+F3>.
5.2 Other parts of FOLKER’s main screen
5.2.1 Toolbar
The toolbar beneath the menu bar contains buttons with the most frequently used commands New…, Open…, Save, Save as…, Output…, Copy, Search…, Replace…, Preferences…, Edit speakers and Reassign recording….

53
5.2.2 Time designation and zoom level bar Above the waveform view (oscillogram), you can see a bar including two buttons and the time designation:
• The button Waveform navigation (with a compass symbol) on the left opens a Naviga-tion window. In this window, you can read off the value for the beginning and end of the current selection in the waveform view (oscillogram) as well as the cursor position. You can modify these values by adding other numeric values in the format mm:ss:th (t = tenth of a second, h = hundredth of a second). This function is very useful when working with larger audio files and when wanting to skip to a distant or an exactly defined position:
• In the middle from left to right − position of the current mark (red) in the format mm:ss:th (t = tenth of a second,
h = hundredth of a second; see section 5.2.2) − Start position for the selection (green) in the format mm:ss:th − Cursor position (black) in the format mm:ss:th − Stop position for the selection (red) in the format mm:ss:th − Length of the selection (black) in the format s.thms (m = milliseconds)
• On the right a button Zoom in/out with a loupe symbol to change the zoom level (zoom in/out) in the waveform view (oscillogram). Left of the button you can see the currently selected value for the horizontal zoom level in milliseconds per pixel (here 7.0 ms). The zoom dialogue contains two slide controls, one with a scale for the horizontal, the other for the vertical zoom:
By clicking on the button Zoom in/out once more, the zoom dialogue with both slide con-trols can be hidden.

54
You can also zoom horizontally by placing the cursor on the waveform view (oscillogram) and scrolling the mouse wheel, while, in Windows, keeping the <Ctrl> key pressed (in Mac OS X the keys <ctrl+alt>). You can also zoom vertically by placing the cursor on the waveform view (oscillogram) and scrolling the mouse wheel, while keeping the <Shift+Ctrl> keys pressed pressed. These zoom values will be saved in a configuration file for all following sessions:
With the Windows key combination <Shift+Ctrl> (Key combination <ctrl+Shift> in Mac OS X) and by scrolling the mouse wheel upwards one can spread the display over its maximal value of the slide controls. A vertical spread of the waveform view (oscillogram) is advisable for very quiet passages in the recording, in which it would be very difficult to recognize the beginning or the end of a speaker’s turn.34
34 If the recording uses the entire dynamic range meaning that the loudest parts display a full scale, the
oscillogram should be spread vertically for a better display of quiet passages. If the recording is under-steered it should be normalized with an audio editor such as e.g. Audacity (http://audacity.sourceforge.net/?lang=en) before being edited in FOLKER.
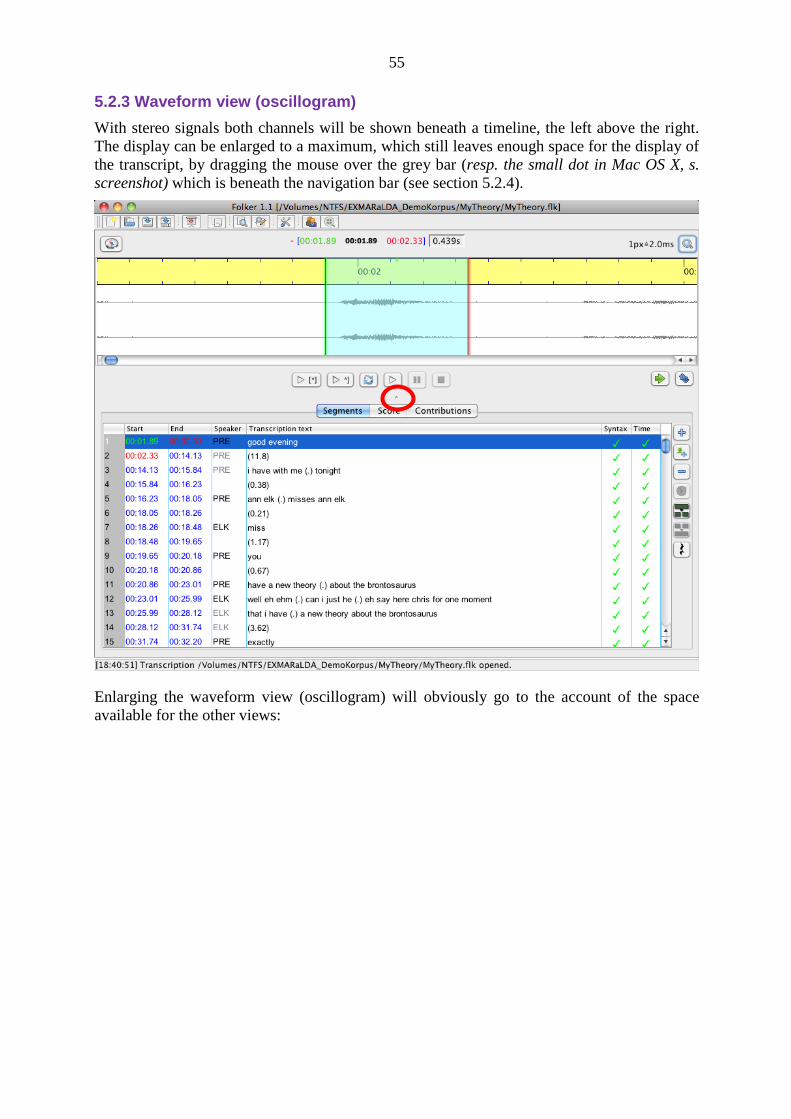
55
5.2.3 Waveform view (oscillogram) With stereo signals both channels will be shown beneath a timeline, the left above the right. The display can be enlarged to a maximum, which still leaves enough space for the display of the transcript, by dragging the mouse over the grey bar (resp. the small dot in Mac OS X, s. screenshot) which is beneath the navigation bar (see section 5.2.4).
Enlarging the waveform view (oscillogram) will obviously go to the account of the space available for the other views:
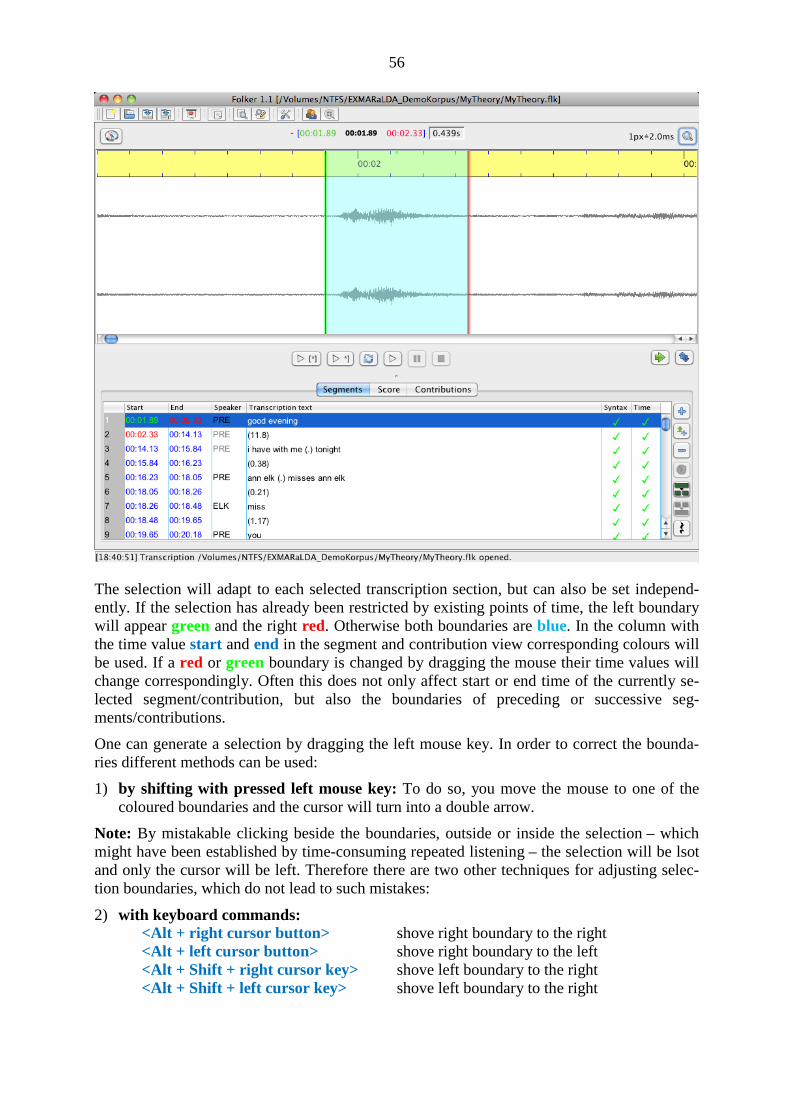
56
The selection will adapt to each selected transcription section, but can also be set independ-ently. If the selection has already been restricted by existing points of time, the left boundary will appear green and the right red. Otherwise both boundaries are blue. In the column with the time value start and end in the segment and contribution view corresponding colours will be used. If a red or green boundary is changed by dragging the mouse their time values will change correspondingly. Often this does not only affect start or end time of the currently se-lected segment/contribution, but also the boundaries of preceding or successive seg-ments/contributions.
One can generate a selection by dragging the left mouse key. In order to correct the bounda-ries different methods can be used:
1) by shifting with pressed left mouse key: To do so, you move the mouse to one of the coloured boundaries and the cursor will turn into a double arrow.
Note: By mistakable clicking beside the boundaries, outside or inside the selection – which might have been established by time-consuming repeated listening – the selection will be lsot and only the cursor will be left. Therefore there are two other techniques for adjusting selec-tion boundaries, which do not lead to such mistakes:
2) with keyboard commands: <Alt + right cursor button> shove right boundary to the right <Alt + left cursor button> shove right boundary to the left <Alt + Shift + right cursor key> shove left boundary to the right <Alt + Shift + left cursor key> shove left boundary to the right

57
3) with mouse commands: If you place the mouse in the middle third of a selection, the cursor will change into a hand. Then one can shift the selection with the mouse wheel: down = to the right, up = to the left:
If you place the mouse in the left third of a selection or on the left, outside the selection (here the cursor is an arrow), you can change the left boundary of the selection with the mouse wheel: down = to the right, up = to the left:
If you place the mouse in the right third of the selection or on the right, outside the selec-tion (here the mouse is also an arrow), you can respectively change the right boundary of the selection with the mouse wheel: down = to the right, up = to the left:
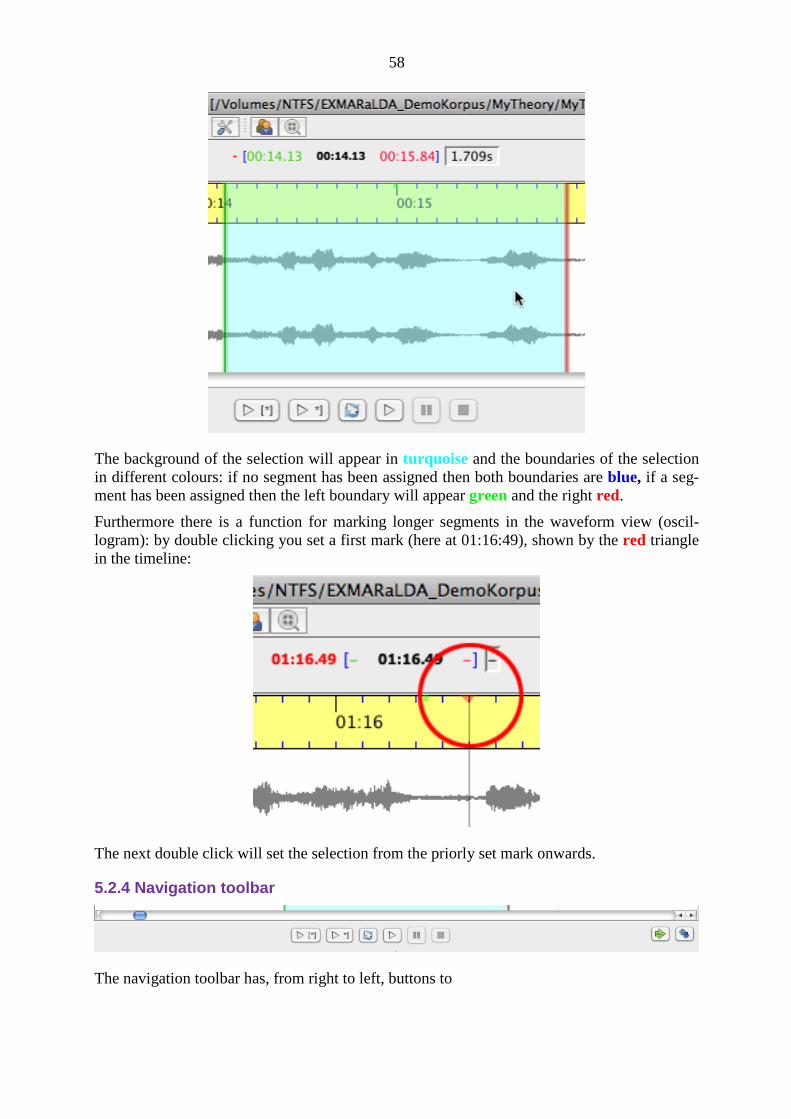
58
The background of the selection will appear in turquoise and the boundaries of the selection in different colours: if no segment has been assigned then both boundaries are blue, if a seg-ment has been assigned then the left boundary will appear green and the right red.
Furthermore there is a function for marking longer segments in the waveform view (oscil-logram): by double clicking you set a first mark (here at 01:16:49), shown by the red triangle in the timeline:
The next double click will set the selection from the priorly set mark onwards.
5.2.4 Navigation toolbar
The navigation toolbar has, from right to left, buttons to

59
Play selection (or keyboard shortcut <F3>35);
Play last second of selection (or keyboard shortcut <Shift + F3>). This function can be helpful to finely adjust the right selection boundary. If the selection is shorter than one second then a one second long extract from the audio file will be played which ends with the right boundary. This function can be helpful for a very short selection which is difficult to understand.
Loop selection (or keyboard shortcut <Alt + F3>) as loop function: The selection will be replayed until Stop is clicked or the keyboard command <F6>36 is pressed;
Play from cursor position (or keyboard shortcut <F4>);
Pause (or keyboard shortcut <F5>) and
Stop (or keyboard shortcut <F6>). Both buttons Pause and Stop can be seen in grey in the top screenshot and are therefore not available because playback has been stopped. Play selection, Play last second of selection and Repeat selection refer to the current selection.
Two further buttons for Shift selection and Detach selection are positioned on the right.
Shift selection (or keyboard command <Ctrl + Whitespace> or double clicking the right mouse button) has the effect that the current right boundary is changed into the new left boundary of a new selection. This new selection will be of the same length as the preceeding selection. This command can also be made by double clicking the right mouse button on any place in the waveform view (oscillogram).
With Detach selection the current selection will be kept but its connection to the previously set start and end points will be detached. Therefore following changes of the boundaries will not result in a change in existing points in time.
5.2.5 Virtual keyboard The virtual keyboard underneath the navigation bar (see section 5.2.4) and the grey bar (a mere dot in Mac OS X) which you can use to change the height of the waveform view (oscil-logram, see section 5.2.3), simplifies the entry of special characters according to the conven-tions of the GAT-2 basic and fine transcript (see Selting/Auer et al. 2009):
35 As for Windows, instead of the preset function keys <F3> – <F6> one can also choose key combina-
tions with the <Ctrl>-button by going to Edit > Preferences… > Player. A change in these settings will only become effective after FOLKER has been restarted.
36 You can only end a selected loop while it is being played, not during the short intervals between the replays (cf. section 5.1.2).

60
One requirement is that a font has been chosen under Edit > Preferences… > Font which entails the respective symbols (see section 5.1.2). This is given e.g. for the font Arial Unicode MS which is included in most distributions of MS Office.
This virtual keyboard can be either displayed or hidden under the menu item View > Key-board (see section 5.1.3). When writing cGAT minimal transcripts it should not be visible: special characters are not required and are directly available on English keyboards; further-more you habe more space for the waveform view (oscillogram) or the display of the tran-script in the chosen view.
The following table – divided into the three configuration levels minimal-, basic- and fine transcript – shows the buttons corresponding with the GAT 2 special characters and which hexadecimal Unicode digit conforms to these characters:
Minimal transcript
° Breathe in/out 00B0
ʔ Glottal stop37 0294
| Segment separator 007C
Basic transcript
– level tone movement 2013
Fine transcript
↑ small upwards tone jump 2191
↑↑ big upwards tone jump 2191
↓ small downwards tone jump 2193
↓↓ big downwards tone jump 2193
` falling accent tone movement 0060
´ rising accent tone movement 00B4
¯ level accent tone movement 00AF
ˆ rising-falling accent tone movement 02C6
ˇ falling-rising accent tone movement 02C7
The FOLKER syntax control should be disabled (with Edit > Preferences… > Transcript level, see section 5.1.2) when using these special characters.
37 The glottal stop is not noted in the FOLK cGAT transcripts.

61
When using the GAT-2 special characters only on occasion they can easily be inserted with the virtual keyboard. We recommend all GAT-2 users who regularly set up basic or fine tran-scripts with FOLKER or any other word processing program to install the “Keyboard layout for transcribing following GAT-2 transcription conventions”, which can be downloaded on the AGD-FOLKER download site http://agd.ids-mannheim.de/html/folker_en.shtml after registration. Stating one’s name and e-mail address is obligatory for this. The keyboard lay-outs are provided for in a PC and a Macintosh version together with an installation manual and a documentation and can be used in all Unicode apt programs, so especially in FOLKER and MS Word. A condition for this is that a font has been preset in these programs, which entails the according symbols. This is given e.g. for the font Arial Unicode MS which is in-cluded in most distributions of MS Office.
5.2.6 Status bar The last or current action will be shown with an indication of the time in the format [hh:mm:ss] at the bottom left of the main screen in the status bar, e.g. just after starting the program “Application started – transcript level: 2 / Player:ELAN-Quicktime-Player”, “Play-back started” or “Playback stopped”:
Additionally, a bar displaying the saving process will appear during longer saving processes:
5.3 Views
5.3.1 „Segments“
In the segment view single segments are listed according to their chronological order. Seg-ments are sections of the transcript which are connected to the audio file. A table will be

62
shown in which the lines comply with the segments. The columns from left to right contain the ongoing number of the line and therefore the segment number, the Start and End time of the segment, the Speaker ID (with a drop-down box), the Transcription text as well as two control columns: the entered transcript will be double checked in the columns Syntax and Time – according to the cGAT syntax for minimal transcripts and the consistence in time of the segments (integrity of temporal structures, meaning that e.g. self-overlaps and segments below a defined threshold are not permitted). Correctly transcribed and chronologically as-signed segments will be marked with a green tick, mistakes in syntax or time with a red cross. Furthermore the colour of the text will change from black to red if any mistakes have been made while entering the transcription text. The correctness of the syntax will only be indicated if the transcript level “Level 2 - cGAT minimal transcript” has been chosen in the Preferences in the Edit menu; when transcribing according to other GAT transcription levels or other conventions this level should not be chosen.
Navigation: By pressing <Cursor up> / >Cursor down> one can jump to the previous/next segment line by line. With <Ctrl + Pos1> (only in Windows) one jumps to the first segment, with <Ctrl + End> (only in Windows) to the end of the transcript. With <Shift + Cursor up> and <Shift + Cursor down> the selection will be extended to more than one segment.
To the right of the segment table the following 7 button are positioned from top to bottom:
The button New segment adds a new segment according to the current selection in the waveform view.
The button Append new segment chooses a two second long section in the waveform view which starts at the end point of the latest currently defined segment (i.e. not necessarily the segment currently selected), adds a new segment for this section and automatically plays the selection. With its combinable function this button assures a timesaving and gapless first input of the transcript.
The button Remove segment(s) removes the currently selected segment or all selected segments (in both cases after a security query).
The button Reassign time assigns the currently set start and end time in the waveform view (oscillogram) to the selected segment (if the selection has been detached before from the selected time with Detach selection, see section 5.2.4).
The button Split segment splits the currently selected segment at the chosen cursor po-sition. For this the newly created point in time will be set according to the allotment ratio of the segments text, i.e. if the text of the segment is split by the cursor in a ratio 1:3 the new timeline item will be set at the end of the first quarter of the original time interval. This time-line item mostly has to be readjusted by shifting the new segments boundaries. If the segment does not entail any text, this button will split it up into two equally long segments.
The button Merge segments merges the currently selected segments into one single segment. This new segment will take over starting point and speaker of the earliest selected segment, the end point of the latest selected segment and the combined text of all succeeding segments.

63
The button Insert pause inserts a segment with a measured pause according to the cur-rent selection in the waveform view (oscillogram).
If certain commands are not available in the current editing mode, these buttons are grey. In the screenshot above this goes for Merge segment (because currently only one segment is marked) and Reassign time (because the selection for this segment has not been detached with Detach selection before).
5.3.2 „Score“ When changing to the score view, which takes a little longer with bigger transcripts, an hour-glass, signalling that FOLKER is working, will be displayed.
The score view is shown here as an extract of the screenshot without the menu bar, the bar for time references, the zoom level and the waveform view (oscillogram) – these parts of the user interface remain the same for all views. The score view corresponds to that of the EXMAR-aLDA score editor – a table with speaker based lines and columns, which build cells for each segment. The score has a selection, which can be recognized on the blue marking and a focus, as one can see in the screenshot on the light blue (Mac OS X; in Windows black) frame around the cell. In the grey time line above the speakers’ tiers the points of time (“timeline items”, TLI) used for the segmentation are numbered consecutively and displayed with their starting time in square brackets and down to one tenth of a second exact. Buttons are placed (from left to right) above the score for the following functions:
The button Split segment – see above in section 3.3.
The button Merge segments merges the currently selected segments of one tier together.
The buttons Shift characters to the left / right shift characters which are either left or right of the cursor position into the previous/following segment.
The buttons Shrink segment from the left / right shift the start or the end point of the currently selected segment to the left or the right until the next TLI point.
The buttons Extend segment to the left / right shift shift the start or the end point of the currently chosen segment to the left or the right until the next TLI point.
The button New segment establishes a new segment (see section 3.3.). When using this button a selection dialogue will appear listing all tiers of the current selection in the waveform view (oscillogram) which do not yet entail a segment. When choosing one of the tiers a new segment is set up. If, however, one chooses Cancel, two new points in time will be inserted:

64
The buttons are grey for commands which are not available in the current editing mode; therefore the command Merge segments is not available in the screenshot above, because only one segment is marked; the commands Shrink segment from the left / right is also not available because start and endpoint of the currently selected segment can not be shifted to either the left or right.
The button Remove segment(s) removes the currently selected segment. In contrast to the segment view (see section 5.3.1) this operation can only be used for one segment.
There are several possibilities for navigation in the score view:
• In Windows you can either move character by character in the transcription text of a segment with <left cursor> / <right cursor> or word by word either left or right with <Ctrl + left cursor> / <Ctrl + right cursor>; in MAC OS X <alt +left cursor> / <alt+ right cursor>. With <Pos 1> / <End> you can jump to either the beginning or the end of the transcribed text within a segment.
• with the horizontal scrollbar. You can navigate through the score rather quickly by dragging the bar with the mouse. The transcribed text in the accessed segment of the cur-rently chosen tier (here PRE) will be highlighted in yellow:
By clicking either left or right in the scrollbar beside the bar or on the [<]- / [>]-buttons on each side of the scrollbar you move through the score in little steps. If you keep the mouse button pressed while holding into the scrollbar, you will move through the score faster. During this, the transcription text, highlighted in yellow, will run through quickly, whereas the score itself will remain unchanged and jump to the selected spot once you re-lease the mouse button. If you keep hold of either the [<]- / [>]-button the score view will scroll either to the left or the right.
• Jumping segment wise: If the text cursor is blinking within the transcribed text of a seg-ment you can either jump into the next segment in this line with <Tab> or into the previ-ous segment with <Shift + Tab>. You can scroll through the score faster by keeping ei-ther <Tab> or <Shift + Tab> held. With <Cursor up> or <Cursor down> you can jump into the segment above or below. The chosen segment will be focused, i.e. marked like a cell with a fat black (Mac OS X: blue) frame:

65
• If a segment is marked in this way you can reach all segments in every direction with the cursor buttons.
The score view is especially convenient for a precise visualisation of overlapping passages: It is clearly shown where the contributions overlap and where a contribution of one speaker is embedded into the contribution of another speaker (e.g. with continuers such as yes and hm). After the initial input in the segment view, simultaneous passages can be specified in the score view, e.g. by splitting a segment to mark the phonemically exact insertion points of an utterance within other involved contributions (further information see section 3.3).
The boundaries of the columns in the score table can be adjusted by keeping the left mouse button pressed – with the mouse cursor being a double arrow. It can be useful to move the column boundaries for cells with with short transcription text in order to be able to read the entire TLI time value (TLI 48 in the above screenshot). However it is not advisable to make further use of this function: When moving the boundary to the left a part of the transcribed text will be hidden (not erased) and when moving the boundary to the right a gap will occur which could be mistakably seen as a pause. The regular position of the boundaries can be re-stored e.g. by confirmation or by briefly changing into another view and then returning back into the score view.
Different context menus are available in the score view, depending on the position of the cur-sor and the marking:
If the cursor is in a segment the context menu entails the following commands: • Characters to the right (equals the button Shift characters to the right, which means
<Ctrl + Shift + R> in Windows and <crtl + Shift + R> in Mac OS X), • Characters to the left (equals the button Shift characters to the left, which means
<Ctrl + Shift + L> in Windows and <ctrl + Shift + L> in Mac OS X), • Split (equals the button Split segment, in Windows the key combination <Ctrl + 2> and
in Mac OS X <ctrl + 2>), • Double split (equals the key combination <Ctrl + 3> in Windows and <ctrl + 3> in Mac
OS X; no applicable button), • Copy (equals the key combination <Ctrl + C> in Windows and <cmd + C> in Mac OS
X), • Paste (equals the key combination <Ctrl + V> in Windows and <cmd + V> in Mac OS
X), • Cut (equals the key combination <Ctrl + X> in Windows and <cmd + X> in Mac OS X).

66
If a character string (e.g. a word) is marked Double split (in Windows <Ctrl + 3>, in Mac OS X <ctrl + 3>), this command will insert a segment boundary before and after the marked se-quence:
If one or more segments are marked, as well as when the interval between two TLIs is marked blue, the context menu will only permit to Copy.
If a line is marked by clicking on the speaker ID on the left, all contributions of this speaker will be copied with Copy:

67
5.3.3 „Contributions“
The contribution view is similar to the segment view, however, the units displayed are contri-butions, not segments. Contributions are chains of segments from the same speaker which are linked in time with no gaps. This view is also a table in which consecutive segments are summarized to a contribution. The lines contain the contribution, the columns from left to right the ongoing contributions number, the Start and End time of the contributions, the Speaker assignment, the Transcription text and again, columns for checking Syntax and Time. In the list itself, you can only select but not edit anything. Contributions containing longer transcription text will be displayed as wrapped; the belonging information in the other columns will be aligned horizontally.
For editing, the text of the selected contribution will appear in a separate window beneath the list. Optionally text may be added or changed in this window, as long as the temporal struc-ture is correct, meaning that there are no self-overlaps. The changes can be validated with <ENTER>, i.e. the list will be adjusted accordingly. Internal temporal assignments within the contributions if existent will be embedded as buttons in the ongoing text. Pressing one of these buttons means that the recording will be played from here on. If the mouse cursor re-mains over the button for more than 1 second, the corresponding time value will appear (simi-lar to a tooltip).
The buttons for managing segments as on the right side in the segment view (New segment, Append new segment, Remove segment(s), Reassign time, Split segment, Merge seg-ments and Insert pause) are not available in the contribution view. This is intended – the

68
contribution view would not be a good place to, e.g. add another segment, since the temporal sequence of segments is intuitively not ascertainable here.

69
6. Appendix
6.1 FAQs: Questions and answers to frequent problems
6.1.1 Editor IF THEN
…the oscillogram (waveform view) remains empty when starting a new transcript or only one or two horizontal zero lines are displayed
…you have probably allocated an audio file with a WAV extension, which has been accepted by FOLKER, but which was either larger than 2.5 GB and must be split with an audio editor such as, e.g. the freely available Au-dacity (http://audacity.sourceforge.net/?lang=en), or which has been compressed using e.g. the ADPCM method. This can be checked, e.g. in Windows Explorer in the context menu (right mouse button) under Fea-tures > File info or in the VLC player under Extras > Codec information and then the compressed file can be changed into an uncompressed WAV file (16 bit PCM) with an editor such aus Audacity.
…the cursor shoots over the right boundary when playing a selection or a segment
…first of all you should check under Edit > Prefer-ences… > Player if the “Direct-Show-Player” (in Win-dows) or the “Quicktime-Player “ (in Mac OS X) has been chosen
…FOLKER opens but only ap-pears in the taskbar
…you click on the minimized window of FOLKER and there on the command Restore (or the commands Maxi-mize or Change size)
6.1.2 Initial input IF THEN
…one comes across an English or French word while transcrib-ing Examples: I’m or en passant
...if you want to use FOLKER’s syntax control, you should leave out the apostrophe and replace it by an un-derscore as a symbol for cliticization. If you prefer to use the familiar English orthography, you should switch off FOLKER’s syntax control (Edit > Preferences… > Transcript level > Level 1 – time control only); cf. “We consider the apostrophe a part of standard English orthog-raphy and have retained it in this representation of clitici-zation. For GAT transcribers who wish to use a transcrip-tion editor such as FOLKER, the use of an underscore instead of an apostrophe is recommended.”, quoted from A system for transcribing talk-in-interaction: GAT 2, translated and adapted for English by Elizabeth Couper-Kuhlen and Dagmar Barth-Weingarten. Otherwise the typical English or French way of writing should be maintained Examples: i_m or en passant

70
...one comes across abbrevia-tions Examples:
OK or UN
Example: FOLKER
…one should spell these in full Examples:
Okay or yu en Syllabled acronyms should also be spelled in full. Exam-ple: folker
…words are pronounced pro-longed or emphasized
…these are transcribed normally. Lengthening or accen-tuation are not noted in the GAT 2 minimal transcript
…something is said e.g. laugh-ingly …
…this is not noted since the mode of speaking is not an-notated in minimal transcripts
…you don’t understand some-thing
…this should be made visible by +++. If possible the amount of syllables (e.g. trisyllabic +++++++++) and the amount of words (e.g. two words +++ ++++++) should be displayed
…you are not sure if what you hear had really been said
…you make this visible with round brackets which en-close the presumed utterance (the double round brackets are for non lexical utterances). Example: (what)
…you have two assumptions what might have been said but can’t decide on one Example: fat or that
…such alternatives should also be put in brackets with a slash in between. Example: (fat/that)
…breath in- and outtakes, non verbal utterances or incompre-hensible speech take longer than one second
…you should note the description with the actual dura-tion. Example: ((breathes 1,5 sec. in))
…you want to create minimal transcripts following the GAT-2 conventions instead of cGAT minimal transcripts (for which FOLKER was optimized)
…you should switch off FOLKER’s syntax control with Edit > Preferences… > Transcript level, as FOLKER checks the transcription text during input, whether the cGAT conventions are being observed, thus marking some seg-ments as erroneous, e.g. when using angle brackets (cf. sec-tion 4.2).
… you want to create basic tran-scripts following the GAT-2 conventions instead of cGAT minimal transcripts (for which FOLKER was optimized)
… you should switch off FOLKER’s syntax control with Edit > Preferences… > Transcript level, as FOLKER checks the transcription text during input, whether the cGAT conventions are being observed, thus marking some seg-ments as erroneous, e.g. when using capital letters for focal accents.
6.1.3 Correction IF THEN
…while correcting in the score view, you notice that a word, a
…you put the cursor behind the word, the syllable, the letter etc and press the button Shift characters to the left

71
syllable, a letter etc can still be heard in the previous segment ……while correcting in the score view, you notice that a word, a syllable, a letter etc can only be heard in the following segment
…you put the cursor in front of the word, the syllable, the letter etc and press the button Shift characters to the right
...while listening to the audio file in the score view you notice that a pause has been noted as a micro pause (.) but is longer than 0,2 sec.
...you split the segment before and after the micro pause, then go into the speakerless line underneath the now “ex-posed” micro pause and have the value of the pause measured and entered with the button Insert pause
...you notice while listening in to the score view that a noted longer pause is actually a micro pause
...you erase the segment with the pause, expand the seg-ment of the previous or following speaker and add a micro pause (.) to the expanded segment
...a pause has been noted par-allel to a segment
…you erase the pause which has been noted parallel to a segment
...one notices while correcting that a person has spoken or an extralinguistic action etc. has taken place in the beginning of the pause 1. Case: Speaker = Speaker of the previous segment 2.Case: Speaker ≠ Speaker of the previous segment
…you expand the previous segment, shorten the pause and have FOLKER recalculate the new value of the pause …you split the segment where the respective speaker stops talking or the extralinguistic actions etc. ends, and note what has been said/the extralinguistic action in the respective speaker’s line underneath the first part of the pause segment. Then you erase the first part of the pause segment and have FOLKER recalculate the shortened pause
… a person is heard talking or an extralinguistic action etc. is taking place before the end of a pause 1. Case: Speaker = Speaker of the previous segment 2.Case: Speaker ≠ Speaker of the previous segment
…you expand the following segment, shorten the pause and have FOLKER recalculate the new value of the pause …you split the pause segment where the speaker stops talking, the extralinguistic action etc. ends, and note what has been said/the extralinguistic action in the respective speaker’s line underneath the second part of the pause segment. Then you erase the second part of the pause seg-ment and have FOLKER recalculate the remaining part
…a person speaks or an ex-tralinguistic action takes place
…you split the segment into three parts, transcribe what has been said or the extralinguistic action etc. and have

72
within a pause FOLKER recalculate the pause before and after the seg-ment
6.1.4 Basic Tips • If the transcription of a conversation takes longer than one day you should make a daily
copy of the file under Save as… and add the date to the file name since you do not have the possibility of a “Cancel / Ctrl+Z” command in FOLKER and erased segments can not be recovered.
• Segments should not be any longer than 5 sec., since this would complicate the initial input as well as the correction.
• You should always put a whitespace at the end of the segment, except if the boundary of a segment goes through a word, since separate words will otherwise be treated and written as one word in the contribution view.
• Background noise should not be assigned to a speaker. • A micro pause can not be put at the beginning or the end of a segment within an
overlapping passage. • Pauses should not overlap with speakers’ contributions or the descriptions of extral-
inguistic actions. • Underscores are used if phonemes are excluded and the word therefore differs from the
standard pronunciation, e.g. don_t instead of “do not”.
6.2 Download and Installation FOLKER is available for Windows and Macintosh.38 After registration the latest versions of FOLKER can be downloaded from http://agd.ids-mannheim.de/html/folker.shtml after regis-tering. Stating name and e-mail address is obligatory. A password will be sent to the given e-mail address which gives you access to the download site. The current FOLKER version is 1.1. The previous beta versions of FOLKER have been tested at the IDS intensively in the last few months. Nevertheless a reliable performance of the program or all included functions can not be guaranteed for all conceivable work surroundings.
A requirement in Windows is the installation of a Java runtime environment, version 1.6 or higher. If this does not exist a window with the following error message will appear:
A click on the OK button will lead you to the download under http://www.java.com/en.39
38 The version for Mac OS X is functionally equivalent to the Windows version. Nevertheless a few key-
board shortcuts are not available for Mac OS X (see section 3.6). The “Direct-Show”-Player is preset under Windows, in Mac OS X it is the “Quicktime”-Player (see section 5.1.2).
39 This error message will also appear if after a FOLKER installation Java was uninstalled. When install-ing Java you should switch off the checkbox for a Yahoo toolbar.

73
You can choose the setup language before installing; the language of the system software is preset. In the following screenshot FOLKER is about to be installed on to a German Windows XP version. You can choose between German, English, French and Dutch:
After clicking OK a window Setup - FOLKER will appear with a welcome message and the request to close all other applications during the setup:
After this you must accept the following license agreement FOLKER (FOLK Editor) ======================== [Scroll down for ENGLISH] ======================== FOLKER wird im Auftrag der Abteilung 'Pragmatik' des Institut für Deutsche Sprache in Mannheim von Thomas Schmidt in Zusammenarbeit mit Arnulf Deppermann, Joachim Gasch, Martin Hartung, Rudolf Schmidt und Wilfried Schütte entwi-ckelt. FOLKER basiert auf EXMARaLDA-Code (www.exmaralda.org) und benutzt Teile des ELAN-Codes (www.lat-mpi.eu/tools/elan/). FOLKER ist Freeware, Download und Nutzung der Software sind nach Registrierung beim IDS kostenlos. Bitte geben Sie FOLKER selbst nicht weiter, sondern verweisen Sie interessierte Personen auf die FOLKER-Website des IDS: http://agd.ids-mannheim.de/html/folker.shtml Rückmeldungen zur Software (an diese Adresse) sind stets willkommen.

74
==================================== FOLKER is being developed for the department 'Pragmatik' of the Institut für Deutsche Sprache in Mannheim by Thomas Schmidt in cooperation with Arnulf Deppermann, Joachim Gasch, Martin Hartung, Rudolf Schmidt and Wilfried Schütte. FOLKER is based on EXMARaLDA code (www.exmaralda.org) and uses parts of the ELAN code (www.lat-mpi.eu/tools/elan/). FOLKER is freeware, download and use of the software are free after registration with the IDS. Please do not redistribute FOLKER. Refer interested users the FOLKER website at the IDS: http://agd.ids-mannheim.de/html/folker.shtml Feedback (to this address) is much appreciated.
and choose a target folder; C:\Programs\FOLKER is preset; the available storage space should be considered when making this choice:
Next the Start Menu Folder, in which the program’s shortcuts are created, has to be chosen:
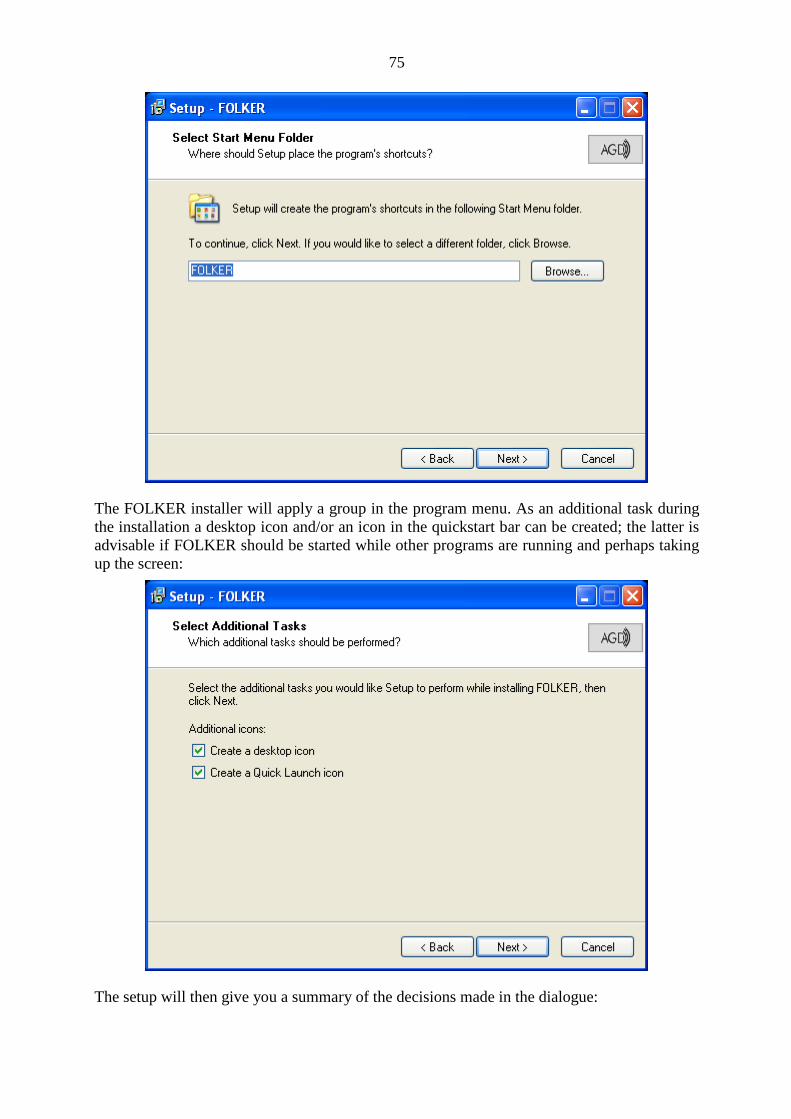
75
The FOLKER installer will apply a group in the program menu. As an additional task during the installation a desktop icon and/or an icon in the quickstart bar can be created; the latter is advisable if FOLKER should be started while other programs are running and perhaps taking up the screen:
The setup will then give you a summary of the decisions made in the dialogue:

76
The installation will be implemented after clicking on Install. If an older version of FOLKER is installed already all auxiliary files if any and the program itself must be closed; it is not necessary to uninstall the program. After the installation an English report on FOLKER changes will appear:
After clicking on Next the installation will be stated as finished. The option to launch FOLKER immediately is preset:

77
When making a single installation, e.g. on a private PC, FOLKER should be installed into the local program folder as suggested by the installation routine; administrator rights are neces-sary for this installation.
An Intel-Mac with MAC OS 10.4 is required for installing FOLKER on a Macintosh. In this case a suitable Java runtime environment is preinstalled. You open the installation file folker.dmg with a double click, then a virtual drive will appear on the desktop which contains the program folker.app. You then move this program file into the program folder. It will be copied automatically. When this is done, you can move the virtual drive into the trash bin. The file folker.dmg can be put into a folder containing installation files. This way, you have a backup of the program to hand when needed.
6.3 Literature on „Transcription” Deppermann, Arnulf / Schütte, Wilfried (2008): Data and transcription. In: Antos, Gerd /
Ventola, Eija / Weber, Tilo (Hrsg.): Handbook of Applied Linguistics. Band 2: Inter-personal Communication. Berlin/New York: De Gruyter, p. 179-213.
Selting, Margret et al. (1998): Gesprächsanalytisches Transkriptionssystem (GAT). In: Lingu-istische Berichte 173, p. 91-122 (Online available: http://www.mediensprache.net/de/medienanalyse/transcription/gat/gat.pdf).
Selting, Margret / Auer, Peter et al. (2009): Gesprächsanalytisches Transkriptionssystem 2 (GAT 2). In: Gesprächsforschung – Online-Zeitschrift zur verbalen Interaktion, Vo-lume 10 (2009), p. 353-402 (http://www.gespraechsforschung-ozs.de).
Selting, Margret / Auer, Peter et. al. (2010): A system for transcribing talk-in-interaction: GAT 2, translated and adapted for English by Elizabeth Couper-Kuhlen and Dagmar Barth-Weingarten. In: Gesprächsforschung – Online-Zeitschrift zur verbalen Interakti-on, Volume 11 (2010), p. 183-230 (www.gespraechsforschung-ozs.de).