travel photo graphy - photo reviephotography.pdf · choosing the best places and angles to record...
TRANSCRIPT
TRAVELPHOTO GRAPHYBy Margaret Brown
Travel Photography 2nd edition
AUTHOR Margaret Brown [email protected]
COnTRibUTORs [Tamron Ambassadors] Glynn Lavender, Alex Cearns, Rachel Devine
sUb EDiTOR Alison Batley
CREATiVE DiRECTOR Melissa Kallas [email protected]
PUbLisHER David O’Sullivan [email protected]
PUbLiCATiOn MAnAGER Pauline Shuttleworth [email protected]
ISBN 978-1-922156-06-8
Order print and ebook editions online at www.talubooks.com
All content in Travel Photography is protected under copyright and cannot be reproduced in any form without written consent from the publisher.
Published October 2015. All rights reserved.
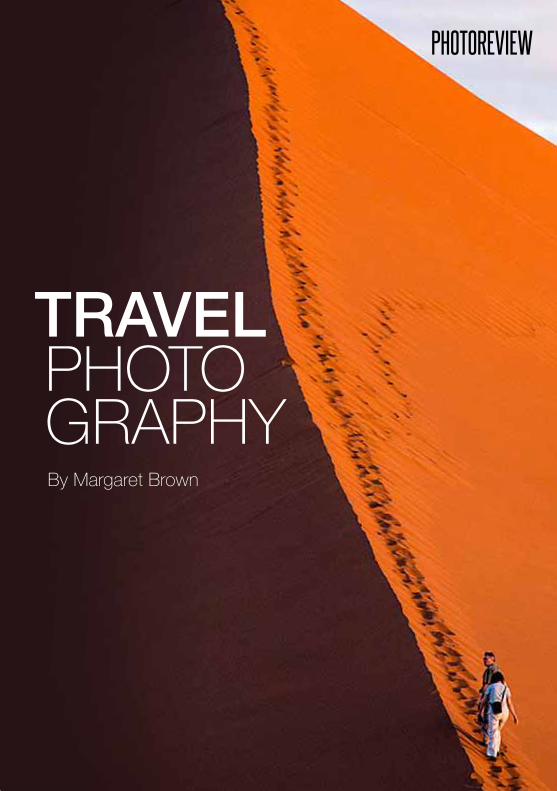
Cover image by Margaret Brown: Travellers make a late afternoon attempt to scale Dune 7, one of the most accessible dunes in Namibia’s picturesque Sossus Dune region.
Media Publishing Pty Limited ABN 86 099 172 577 PO Box 4097 Balgowlah Heights NSW 2093 Australia Phone: (02) 9948 8600 Email: [email protected] Website: www.mediapublishing.com.au
The Photo Review Pocket Guides series includes Lenses Guide, Action Photography, Printing Digital Photos, Digital SLR, and Compact System Camera Guide. www.photoreview.com.au
sPOnsORs
Co
nte
nts
2
20
34
41
48
55
62
74
80
90
Chapter 1: Choosing the right equipment how to choose the cameras, lenses and other equipment that can make your trip a success.
Chapter 2: telling your story tips on how to bring back pictures that tell the story of your trip.
Chapter 3: shooting in transit how to capture interesting pictures while you’re on the move.
Chapter 4: photographing sCenery tips and tricks for the most interesting angles when photographing landscapes.
Chapter 5: shooting in Cities Choosing the best places and angles to record the heart and soul of urban environments.
Chapter 6: people piCtures encounters with people are an important part of any trip; here are some tips for recording them.
Chapter 7: Fireworks and light shows equipment and techniques you will need to make the most of special events after dark.
Chapter 8: Close-ups While often neglected, close-up shots can add interest and variety to any trip’s portfolio.
Chapter 9: photographing wildliFe how to obtain the best possible results when you’re photographing birds and animals in both natural and captive environments.
Chapter 10: managing images as you travel Get the facts on memory cards and storage devices and tips on posting images and movies to the cloud and social networks while you’re on the move.
2 Travel Photography 2nd Edition www.photoreview.com.au
Choosing the right equipment
Chapter 1
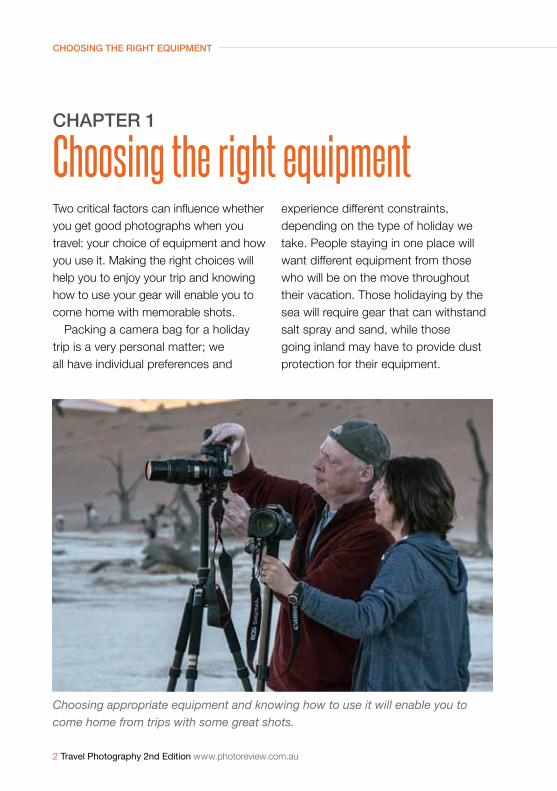
Choosing the right equipmentTwo critical factors can influence whether you get good photographs when you travel: your choice of equipment and how you use it. Making the right choices will help you to enjoy your trip and knowing how to use your gear will enable you to come home with memorable shots.
packing a camera bag for a holiday trip is a very personal matter; we all have individual preferences and
Choosing appropriate equipment and knowing how to use it will enable you to come home from trips with some great shots.
experience different constraints, depending on the type of holiday we take. people staying in one place will want different equipment from those who will be on the move throughout their vacation. those holidaying by the sea will require gear that can withstand salt spray and sand, while those going inland may have to provide dust protection for their equipment.
www.photoreview.com.au Travel Photography 2nd Edition 3
Choosing the right equipment
equipment careIf you’re travelling by air, expensive photographic and computer equipment should always be carried in your hand luggage; not put in checked-in baggage. the restrictions airlines place upon carry-on baggage will probably limit the amount of equipment you can take. When you take your own car these restrictions won’t apply. train travellers and people on cruises will also be less restricted.
Make a list of all your equipment, complete with serial numbers, well before you set off and leave a copy of it with a trusted friend or relative. take pictures of your items and bag at home prior to leaving. then, if anything goes missing while you’re out and about, you have evidence to back up reports to police and insurance claims.
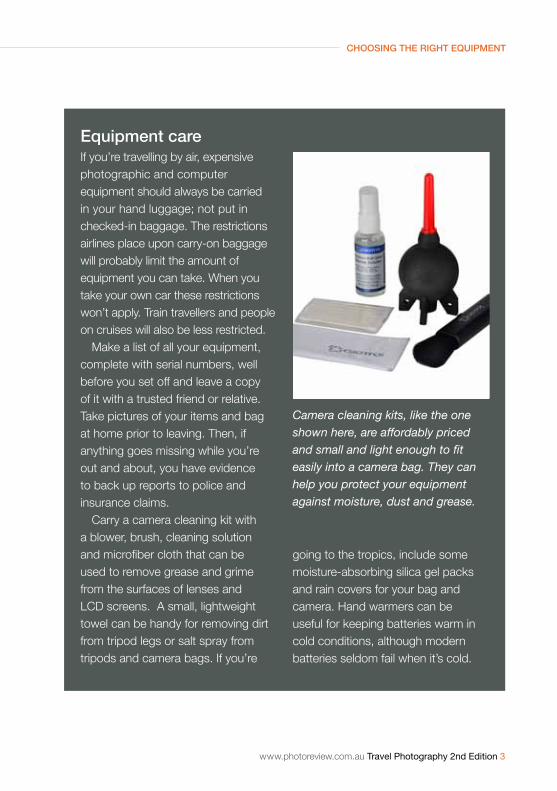
Carry a camera cleaning kit with a blower, brush, cleaning solution and microfiber cloth that can be used to remove grease and grime from the surfaces of lenses and LCD screens. a small, lightweight towel can be handy for removing dirt from tripod legs or salt spray from tripods and camera bags. If you’re
Camera cleaning kits, like the one shown here, are affordably priced and small and light enough to fit easily into a camera bag. They can help you protect your equipment against moisture, dust and grease.
going to the tropics, include some moisture-absorbing silica gel packs and rain covers for your bag and camera. hand warmers can be useful for keeping batteries warm in cold conditions, although modern batteries seldom fail when it’s cold.

4 Travel Photography 2nd Edition www.photoreview.com.au
Choosing the right equipment
Choosing a camera travelling photographers can choose from many different equipment types of equipment these days, depending on their requirements. the table below outlines the main advantages and disadvantages of various camera types.
While it would be nice to have a compact, affordably-priced camera with
Camera type
sensor size Main advantages Main disadvantages
DsLR
36 x 24 mm Superior low light performance
relatively large, heavy equipment
apS-C Good low light performance in a more compact body, increases telephoto range
reduced wide-angle coverage
CsC
36 x 24 mm as for DSLr in a more compact body Limited range of lenses
apS-C
M4/3 high performance in compact body with smaller, lighter lenses; wide choice of lenses
resolution lower than DSLrs
1-inch type Small and light, fast autofocusing
Lower resolution, limited lenses
Fixed lens camera
36 x 24 mm high performance in a compact body
Little or no zoom range
apS-C
restricted zoom rangeM4/3 Good performance and ‘serious’ controls in a compact body1-inch type
6.2 x 4.55 mm or smaller
extreme zooms available, small, light and affordably-priced cameras
reduced resolution, susceptible to noise, relatively slow lenses
a fast lens that covers a wide zoom range and a 36 x 24 mm sensor, this camera doesn’t exist – yet. however, we are seeing a definite transition from DSLR cameras to cameras with larger sensors in ever-smaller bodies, and all-in-one cameras that can claim to ‘do it all’.
these developments are taking place against the emergence of smartphones
www.photoreview.com.au Travel Photography 2nd Edition 5
Choosing the right equipment
with higher resolution, better lenses and movie capabilities that have largely replaced entry- and mid-level digicams. the latest smart-phones have larger main camera sensors and they can be used to post images and movies directly to social networks as well as making and receiving phone calls. Small wonder so many travellers use them as their main image-recording device.
If your smartphone doesn’t meet your needs, you need to balance size, weight and capabilities when searching for your ‘ideal’ travel camera. Current trends indicate that among the smaller and lighter cameras there are three popular categories:
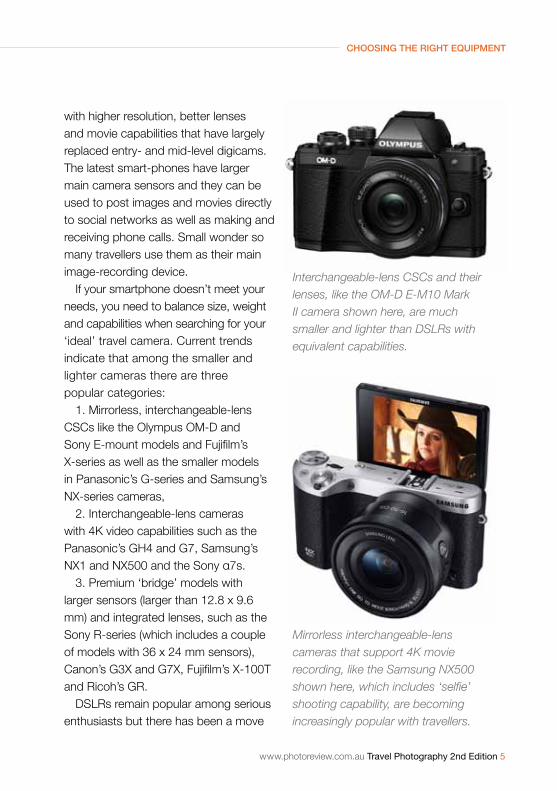
1. Mirrorless, interchangeable-lens CSCs like the Olympus OM-D and Sony E-mount models and Fujifilm’s X-series as well as the smaller models in panasonic’s G-series and Samsung’s NX-series cameras,
2. Interchangeable-lens cameras with 4K video capabilities such as the panasonic’s Gh4 and G7, Samsung’s NX1 and NX500 and the Sony α7s.
3. premium ‘bridge’ models with larger sensors (larger than 12.8 x 9.6 mm) and integrated lenses, such as the Sony r-series (which includes a couple of models with 36 x 24 mm sensors), Canon’s G3X and G7X, Fujifilm’s X-100T and ricoh’s Gr.
DSLrs remain popular among serious enthusiasts but there has been a move
Interchangeable-lens CSCs and their lenses, like the OM-D E-M10 Mark II camera shown here, are much smaller and lighter than DSLRs with equivalent capabilities.
Mirrorless interchangeable-lens cameras that support 4K movie recording, like the Samsung NX500 shown here, which includes ‘selfie’ shooting capability, are becoming increasingly popular with travellers.

6 Travel Photography 2nd Edition www.photoreview.com.au
Choosing the right equipment
Sony’s RX10 Mark II camera features a 12.8 x 9.6 mm stacked Exmor RS CMOS sensor with fast signal processing and an attached DRAM memory chip that enables it to support 4K and HD super slow motion video capture. Its 8.3x zoom lens has a constant f/2.8 maximum aperture.
towards smaller and lighter cameras and lenses and cameras with apS-C sized sensors can be a better choice than larger and heavier ‘full-frame’ cameras. third-party lens manufacturers have long contributed to the huge choice of compatible lenses for DSLrs. Most are also increasingly catering for users of mirrorless, interchangeable-lens cameras.
should you buy a new camera?Chances are you already have a digital camera but are thinking of replacing it for a special trip – particularly if you’re going overseas. having a month prior to your trip to learn the ins and outs of new gear will set you up to take much better pictures than you could while learning how to use a new camera purchased at the airport on your way out.
however, you may not need a new camera at all. If the equipment you already have does the job it doesn’t make sense to replace it – unless it provides new and improved features you know you will definitely enjoy using.
Features that can make investing in a new camera worthwhile and the benefits they can provide include:• a larger sensor in the camera will
provide a wider ISO range and be capable of recording more detail in shadows and highlights.
• a longer lens will allow you to magnify distant subjects and is a real advantage
www.photoreview.com.au Travel Photography 2nd Edition 7
Choosing the right equipment
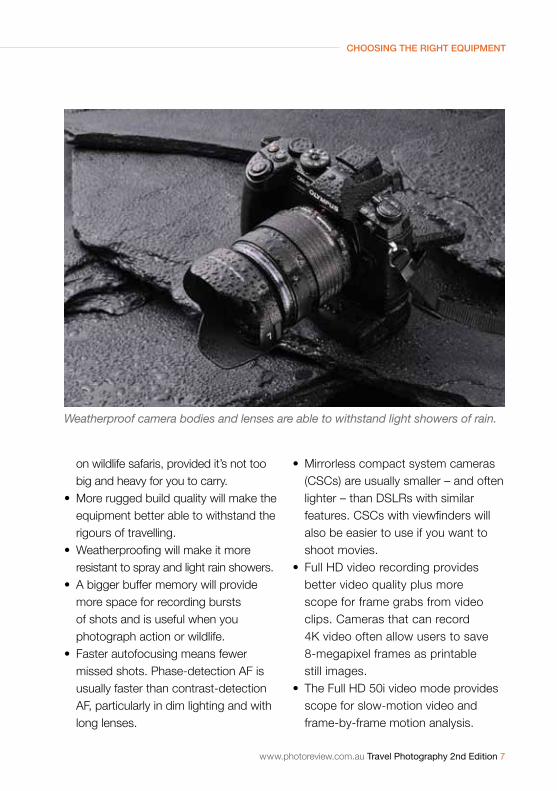
Weatherproof camera bodies and lenses are able to withstand light showers of rain.
on wildlife safaris, provided it’s not too big and heavy for you to carry.
• More rugged build quality will make the equipment better able to withstand the rigours of travelling.
• Weatherproofing will make it more resistant to spray and light rain showers.
• A bigger buffer memory will provide more space for recording bursts of shots and is useful when you photograph action or wildlife.
• Faster autofocusing means fewer missed shots. phase-detection aF is usually faster than contrast-detection aF, particularly in dim lighting and with long lenses.
• Mirrorless compact system cameras (CSCs) are usually smaller – and often lighter – than DSLrs with similar features. CSCs with viewfinders will also be easier to use if you want to shoot movies.
• Full hD video recording provides better video quality plus more scope for frame grabs from video clips. Cameras that can record 4K video often allow users to save 8-megapixel frames as printable still images.
• the Full hD 50i video mode provides scope for slow-motion video and frame-by-frame motion analysis.
8 Travel Photography 2nd Edition www.photoreview.com.au
Choosing the right equipment
lens choicesIf you travel with an interchangeable-lens camera, you will need to decide which lenses to take. When recording the highlights of a trip, most travellers will want to include pictures of scenery (landscapes and cityscapes), people (locals and fellow travellers) and, often, wildlife in either natural environments or in places established by humans for their protection. Close-ups showing details of subjects are also popular.
to cover all these options, you need lenses that can span from a wide angle of view to a narrow one. Most manufacturers offer kit lenses that cover a large percentage of the focal lengths you will need, usually with two lenses: a wide-angle-to-short telephoto and a short-to-long telephoto.
Kit lenses are usually relatively small, light and cheap. But they’re not fast, which means you will probably need to use high ISO settings when shooting in low light levels. If you’re constrained by size, weight and price, kit lenses will definitely provide the greatest versatility and performance for the buck.
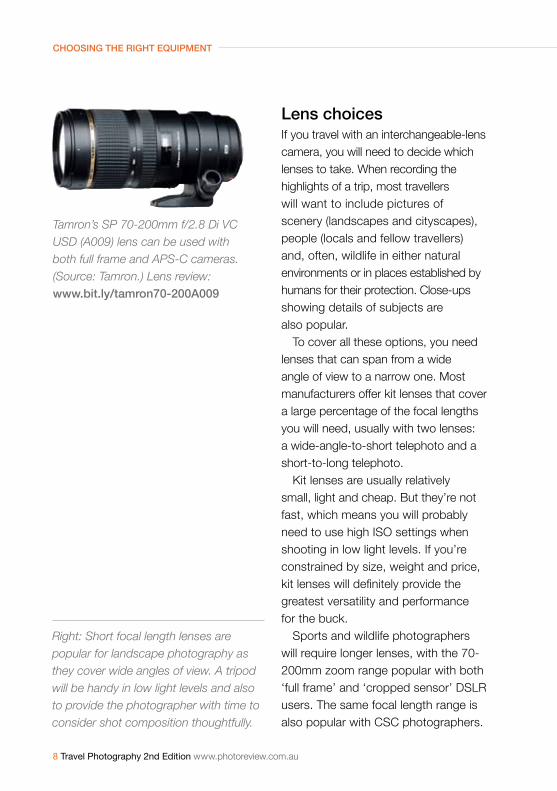
Sports and wildlife photographers will require longer lenses, with the 70-200mm zoom range popular with both ‘full frame’ and ‘cropped sensor’ DSLr users. the same focal length range is also popular with CSC photographers.
Tamron’s SP 70-200mm f/2.8 Di VC USD (A009) lens can be used with both full frame and APS-C cameras. (Source: Tamron.) Lens review: www.bit.ly/tamron70-200a009
Right: Short focal length lenses are popular for landscape photography as they cover wide angles of view. A tripod will be handy in low light levels and also to provide the photographer with time to consider shot composition thoughtfully.
www.photoreview.com.au Travel Photography 2nd Edition 9
Choosing the right equipment
10 Travel Photography 2nd Edition www.photoreview.com.au
Choosing the right equipment
plenty of options are available from both camera manufacturers and third-party suppliers, the latter often providing excellent performance at very competitive prices.
photographers mainly focused upon shooting scenery may be able to get away with using just one lens, provided its range includes a decent wide-angle (24mm equivalent in 35mm format) and adequate telephoto extension (105mm or 135mm equivalent in 35mm format). this range will cover scenery and people but will probably fall short for shooting wildlife.
Be wary of so-called ‘super-zooms’ unless you are prepared to accept their limitations. they are certainly convenient and they’re likely to cover most, if not all of the angles of view you will require when travelling.
however, to keep longer lenses portable, manufacturers must use smaller and lighter elements, which means less light is captured. You will require effective stabilisation plus a camera that performs well with high ISO settings.
Smaller maximum apertures also reduce depth-of-field control, making it more difficult to reduce ‘busy’ backgrounds to a smooth and attractive blur. You will probably notice edge softening in shots, particularly at wider aperture settings, along with distortions, particularly with wide angles of view.
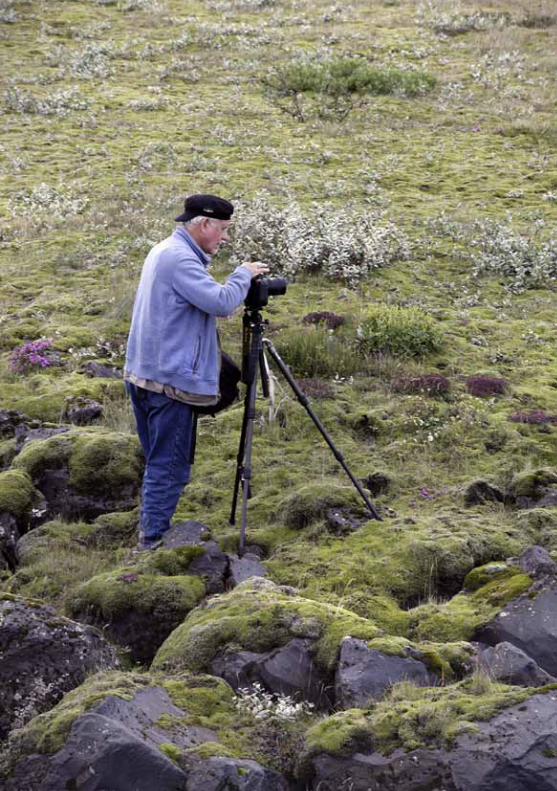
Specialist wildlife photographers who shoot from vehicles or hides usually favour fast telephoto prime lenses which are large and, often, heavy. This photograph of birders was taken in the Kgalagadi National Park in South Africa, where it is too dangerous to leave the vehicle.
other equipmenta lightweight tripod is one of the most useful accessories for travellers, even though most cameras and lenses come with some kind of stabilisation. travel tripods can be small enough to fit easily into a camera bag or airline carry-on and robust enough to pack into your checked-in baggage.
the ideal travel tripod should have a folded length of less than 55 cm and a maximum weight of less than 110 grams – including the head. It should be capable of extending to 125 cm without extending the centre column more than three quarters of its total vertical length. Most compact travel
www.photoreview.com.au Travel Photography 2nd Edition 11
Choosing the right equipment
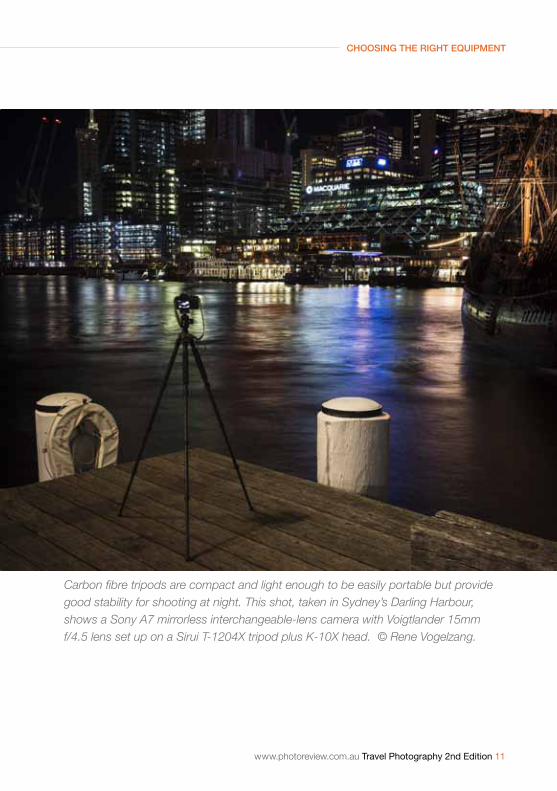
Carbon fibre tripods are compact and light enough to be easily portable but provide good stability for shooting at night. This shot, taken in Sydney’s Darling Harbour, shows a Sony A7 mirrorless interchangeable-lens camera with Voigtlander 15mm f/4.5 lens set up on a Sirui T-1204X tripod plus K-10X head. © Rene Vogelzang.
12 Travel Photography 2nd Edition www.photoreview.com.au
Choosing the right equipment
tripods have simple lift-and-set centre columns rather than geared ones, which are heavier and bulkier.
aluminium tripods are the cheapest but carbon fibre tripods are lighter in weight and usually stronger as well as being easy to grip in freezing temperatures without losing skin. tripods made with magnesium and titanium are also available but at higher prices. Most travel tripods have twist-lock legs, which are self-adjusting and fold up compactly; some have flip-locks that are quicker to
set up and fold. adjustable leg tips with spikes or points for use outdoors and rubber cushions for indoor use are a plus, as is a reversible two-piece centre column for low-level shooting.
Many travel tripods come with heads included; with others, the head is a separate accessory. Ball heads are more compact and easier to pack as well as lighter in weight than comparable three-way heads with a panning handle. the latter are more suitable for shooting video or panning to follow action.
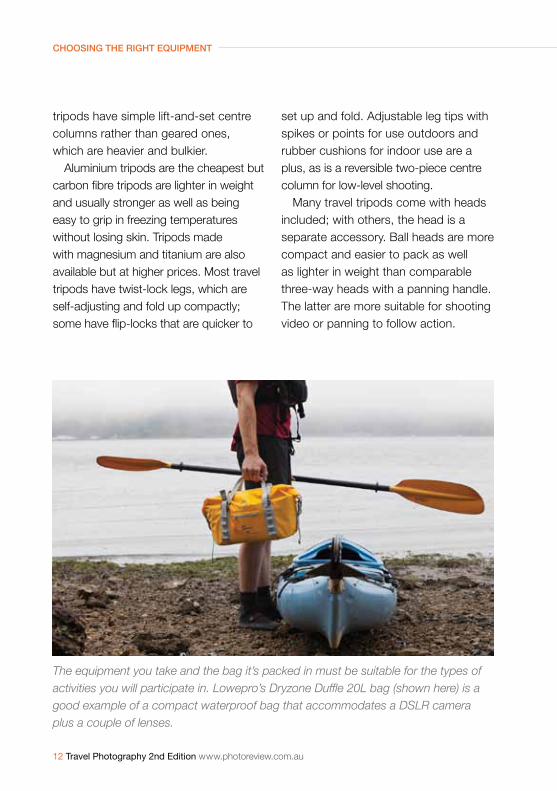
The equipment you take and the bag it’s packed in must be suitable for the types of activities you will participate in. Lowepro’s Dryzone Duffle 20L bag (shown here) is a good example of a compact waterproof bag that accommodates a DSLR camera plus a couple of lenses.
www.photoreview.com.au Travel Photography 2nd Edition 13
Choosing the right equipment
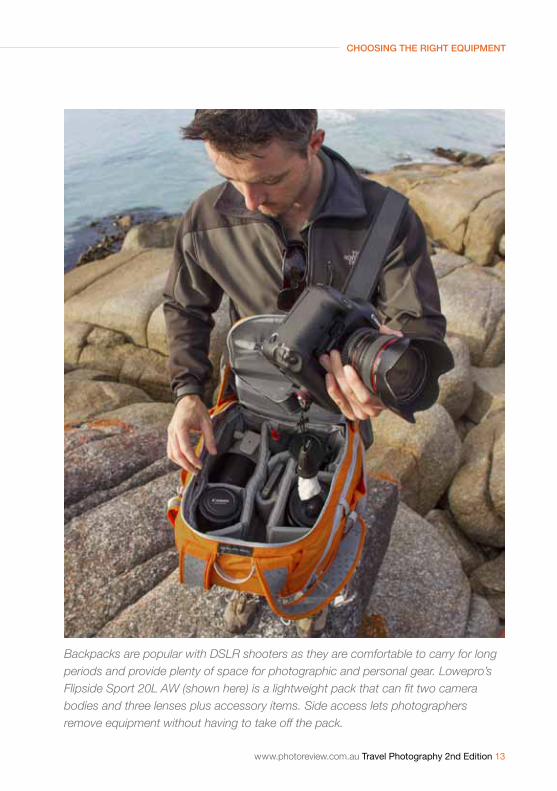
Backpacks are popular with DSLR shooters as they are comfortable to carry for long periods and provide plenty of space for photographic and personal gear. Lowepro’s Flipside Sport 20L AW (shown here) is a lightweight pack that can fit two camera bodies and three lenses plus accessory items. Side access lets photographers remove equipment without having to take off the pack.
14 Travel Photography 2nd Edition www.photoreview.com.au
Choosing the right equipment
a tripod with a hook below the centre post lets you hang a weight (camera bag, etc.) to improve stability. pressing down lightly but firmly on the yoke at the top of the legs at the point of exposure can also help minimise shaking.
Camera bags come in many different styles and sizes and you need to match your choice with the equipment you plan to use and the environments in which you will be shooting. Make sure you can carry your bag comfortably over the distances and terrain you plan to cross.
Backpacks are favoured by many outdoor photographers as they can hold a lot of gear and are usually comfortable to carry. Sling-type bags that can be easily rotated to the front of your body makes equipment easy to access.
Satchels can be useful in urban environments since they provide a high degree of security and don’t look obviously as if they contain expensive gear. Waterproof bags and cases are available for photographers working in aquatic environments.
useful linksHow many megapixels do you need? www.bit.ly/howmanympWhat gear to take on your holiday? www.bit.ly/travelphotogear CSC accessories www.bit.ly/cscaccessories Big trip planning www.bit.ly/bigtripplanning DSLR video accessories www.bit.ly/dslrtravelvideo
Choosing the right equipment
www.photoreview.com.au Travel Photography 2nd Edition 15
equipment choicesBy tamron ambassador Glynn Lavender
the gear I travel with often depends on the purpose of the journey. If the trip’s focus is just to shoot then I load up with two camera bodies, usually one with a 35mm sensor and one with an APS-C sensor. This effectively gives me two sets of lenses as each body gives different viewpoints with each lens.
as I walk around a location I have both cameras ‘out and ready’ usually with a 70-200mm lens on the 35mm body and a 10-24mm lens on the
apS-C body. this gives me a good, versatile range to walk around with and will cover most of the ‘reaction’ shots – the ones where you walk into a scene that grabs your attention and you need to shoot straight away so you don’t miss the moment.
If I am just heading out for a short trip with family, then I drop back to a single body and a lens that covers a wide variety of shooting options such as the tamron 16-300mm lens. this is a great
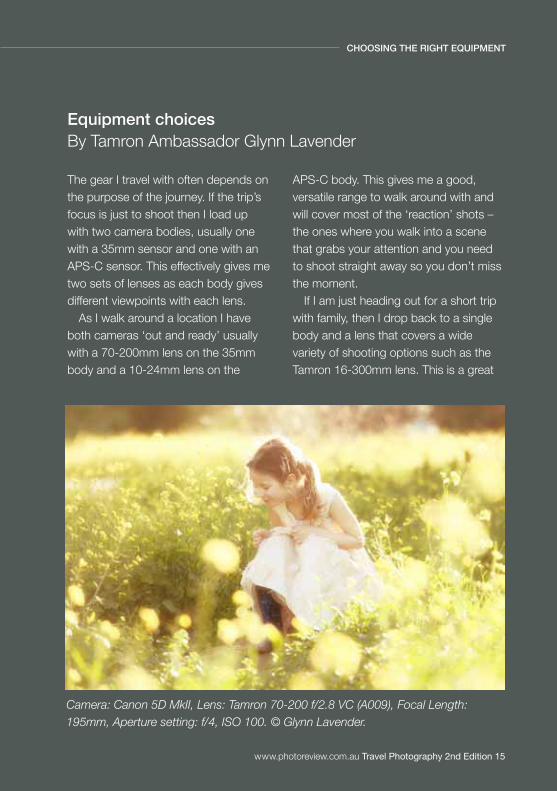
Camera: Canon 5D MkII, Lens: Tamron 70-200 f/2.8 VC (A009), Focal Length: 195mm, Aperture setting: f/4, ISO 100. © Glynn Lavender.
Choosing the right equipment
16 PG24 Travel Photography 2nd Edition www.photoreview.com.au
Choosing the right equipment
www.photoreview.com.au Travel Photography 2nd Edition 17
Left: Camera: Canon 6D, Lens: Tamron 70-200 f/2.8 VC (A009), Aperture setting: f/4.0, ISO 400. © Glynn Lavender.
versatile lens that covers most situations you are likely to encounter with family. as a father of two young girls it’s a fabulous range as I can capture them easily whether they are close or some distance away all without having to chase them around!
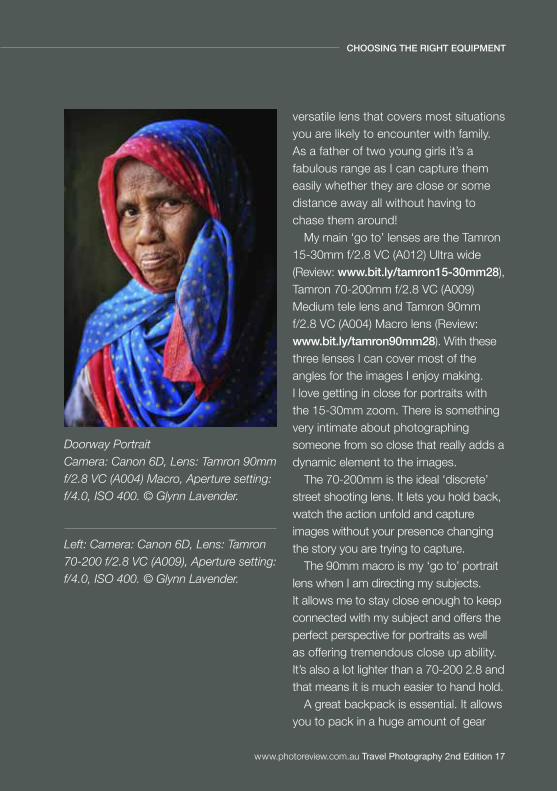
My main ‘go to’ lenses are the tamron 15-30mm f/2.8 VC (a012) Ultra wide (review: www.bit.ly/tamron15-30mm28), tamron 70-200mm f/2.8 VC (a009) Medium tele lens and tamron 90mm f/2.8 VC (a004) Macro lens (review: www.bit.ly/tamron90mm28). With these three lenses I can cover most of the angles for the images I enjoy making. I love getting in close for portraits with the 15-30mm zoom. there is something very intimate about photographing someone from so close that really adds a dynamic element to the images.
the 70-200mm is the ideal ‘discrete’ street shooting lens. It lets you hold back, watch the action unfold and capture images without your presence changing the story you are trying to capture.
the 90mm macro is my ‘go to’ portrait lens when I am directing my subjects. It allows me to stay close enough to keep connected with my subject and offers the perfect perspective for portraits as well as offering tremendous close up ability. It’s also a lot lighter than a 70-200 2.8 and that means it is much easier to hand hold.
a great backpack is essential. It allows you to pack in a huge amount of gear
Doorway Portrait Camera: Canon 6D, Lens: Tamron 90mm f/2.8 VC (A004) Macro, Aperture setting: f/4.0, ISO 400. © Glynn Lavender.
Choosing the right equipment
Choosing the right equipment
18 Travel Photography 2nd Edition www.photoreview.com.au
and helps you keep that gear safe by not having to put it down to shoot. I usually have both my cameras out and ready to shoot with my 15-30mm, or 10-24mm and 70-200mm lenses on the cameras so the bag just needs to keep my other lenses, batteries, memory cards and snacks and drinks.
My current back pack, the Lowepro Flipside Sport 20L aW is well-known for its body-side access. It is perfect as it doesn’t allow access to my gear from behind. this ensures great peace of mind when travelling.
probably the one item outside of my camera gear that has ‘saved’ me on many occasions is my hoodman Loupe. a simple device that allows me to see my
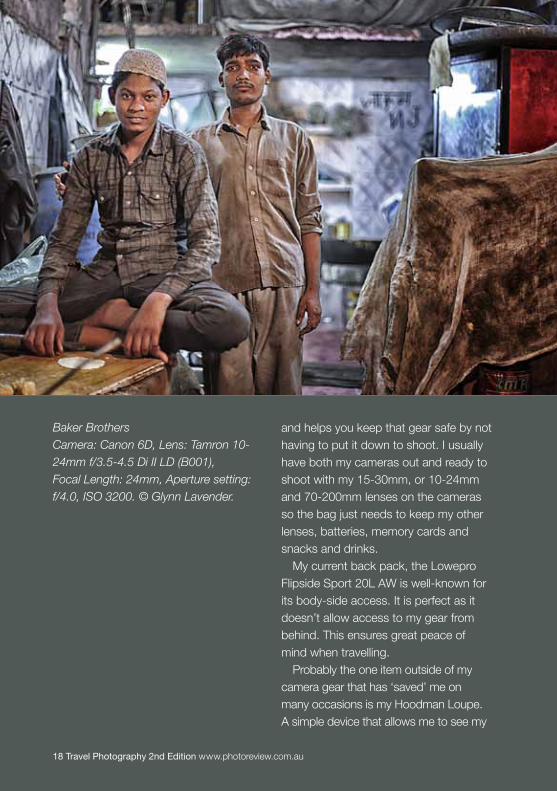
Baker Brothers Camera: Canon 6D, Lens: Tamron 10-24mm f/3.5-4.5 Di II LD (B001), Focal Length: 24mm, Aperture setting: f/4.0, ISO 3200. © Glynn Lavender.
Choosing the right equipment
www.photoreview.com.au Travel Photography 2nd Edition 19
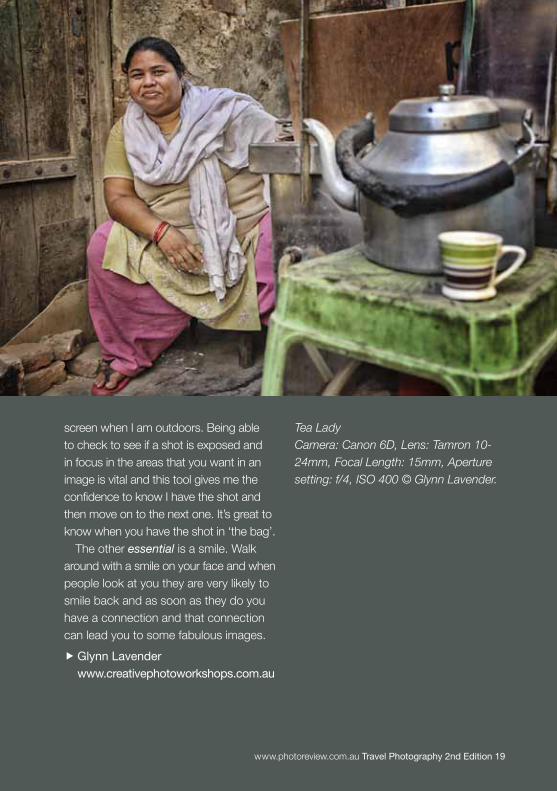
Tea Lady Camera: Canon 6D, Lens: Tamron 10-24mm, Focal Length: 15mm, Aperture setting: f/4, ISO 400 © Glynn Lavender.
screen when I am outdoors. Being able to check to see if a shot is exposed and in focus in the areas that you want in an image is vital and this tool gives me the confidence to know I have the shot and then move on to the next one. It’s great to know when you have the shot in ‘the bag’.
the other essential is a smile. Walk around with a smile on your face and when people look at you they are very likely to smile back and as soon as they do you have a connection and that connection can lead you to some fabulous images.�Glynn Lavender
www.creativephotoworkshops.com.au
20 Travel Photography 2nd Edition www.photoreview.com.au
Telling your sTory
Chapter 2
Telling your storyevery trip contains a story and it’s the travel photographer’s job to tell that story in pictures. So, before you leave home you should have some idea of what types of pictures you want to record and how you will record them and manage them while you’re on the go.
If you’re returning to a place that’s familiar this will be easier than if you’re going somewhere new. But most trips take you to particular destinations and involve specific activities so you should
be able to predict most of the situations you’re likely to encounter.
techniques for story-tellingthere are lots of ways to tell a story with pictures. Simply taking a photo of a person in a particular context can be enough to tell a story. Well-chosen portraits can also tell a powerful story.
Sometimes you need a sequence of shots to capture a period of time during which something interesting occurs.
www.photoreview.com.au Travel Photography 2nd Edition 21
Telling your sTory
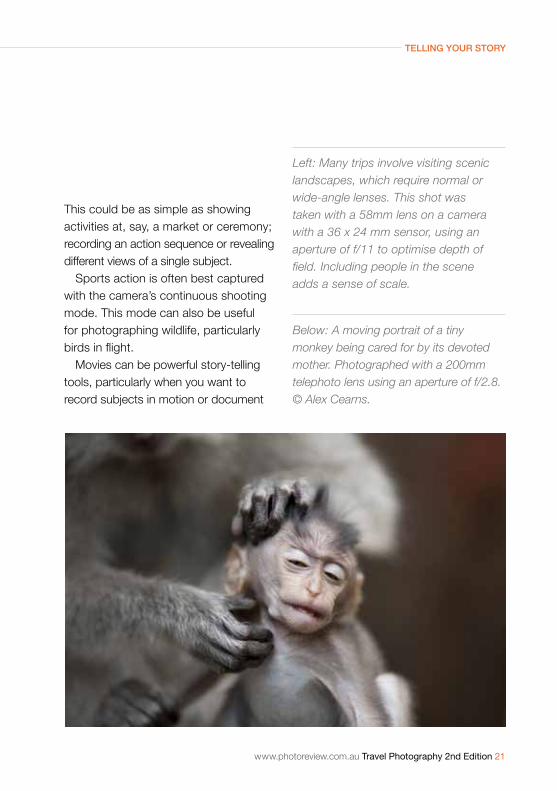
Left: Many trips involve visiting scenic landscapes, which require normal or wide-angle lenses. This shot was taken with a 58mm lens on a camera with a 36 x 24 mm sensor, using an aperture of f/11 to optimise depth of field. Including people in the scene adds a sense of scale.
this could be as simple as showing activities at, say, a market or ceremony; recording an action sequence or revealing different views of a single subject.
Sports action is often best captured with the camera’s continuous shooting mode. this mode can also be useful for photographing wildlife, particularly birds in flight.
Movies can be powerful story-telling tools, particularly when you want to record subjects in motion or document
Below: A moving portrait of a tiny monkey being cared for by its devoted mother. Photographed with a 200mm telephoto lens using an aperture of f/2.8. © Alex Cearns.
22 Travel Photography 2nd Edition www.photoreview.com.au
Telling your sTory
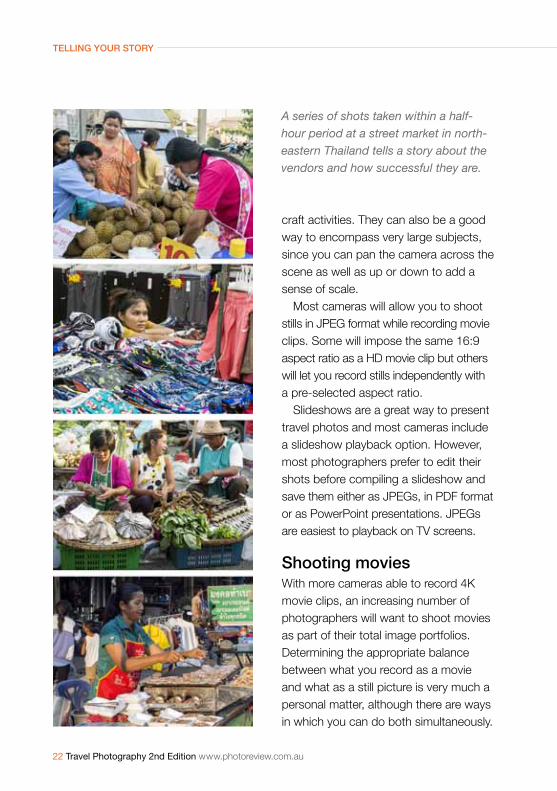
A series of shots taken within a half-hour period at a street market in north-eastern Thailand tells a story about the vendors and how successful they are.
craft activities. they can also be a good way to encompass very large subjects, since you can pan the camera across the scene as well as up or down to add a sense of scale.
Most cameras will allow you to shoot stills in JpeG format while recording movie clips. Some will impose the same 16:9 aspect ratio as a hD movie clip but others will let you record stills independently with a pre-selected aspect ratio.
Slideshows are a great way to present travel photos and most cameras include a slideshow playback option. however, most photographers prefer to edit their shots before compiling a slideshow and save them either as JpeGs, in pDF format or as powerpoint presentations. JpeGs are easiest to playback on tV screens.
shooting moviesWith more cameras able to record 4K movie clips, an increasing number of photographers will want to shoot movies as part of their total image portfolios. Determining the appropriate balance between what you record as a movie and what as a still picture is very much a personal matter, although there are ways in which you can do both simultaneously.
www.photoreview.com.au Travel Photography 2nd Edition 23
Telling your sTory
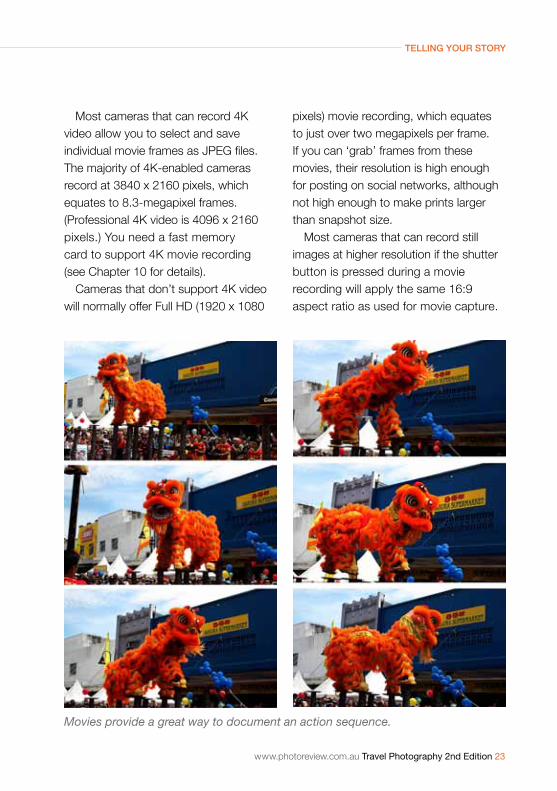
Movies provide a great way to document an action sequence.
Most cameras that can record 4K video allow you to select and save individual movie frames as JPEG files. the majority of 4K-enabled cameras record at 3840 x 2160 pixels, which equates to 8.3-megapixel frames. (professional 4K video is 4096 x 2160 pixels.) You need a fast memory card to support 4K movie recording (see Chapter 10 for details).
Cameras that don’t support 4K video will normally offer Full HD (1920 x 1080
pixels) movie recording, which equates to just over two megapixels per frame. If you can ‘grab’ frames from these movies, their resolution is high enough for posting on social networks, although not high enough to make prints larger than snapshot size.
Most cameras that can record still images at higher resolution if the shutter button is pressed during a movie recording will apply the same 16:9 aspect ratio as used for movie capture.
24 Travel Photography 2nd Edition www.photoreview.com.au
Telling your sTory
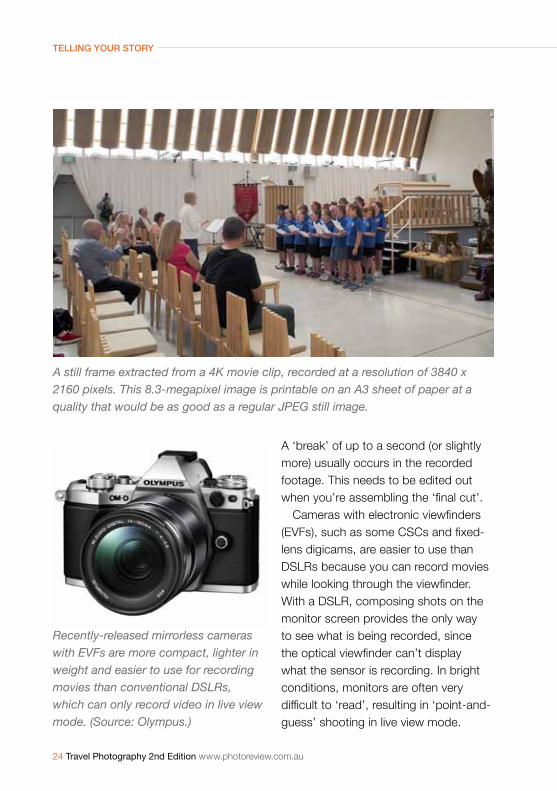
A still frame extracted from a 4K movie clip, recorded at a resolution of 3840 x 2160 pixels. This 8.3-megapixel image is printable on an A3 sheet of paper at a quality that would be as good as a regular JPEG still image.
a ‘break’ of up to a second (or slightly more) usually occurs in the recorded footage. this needs to be edited out when you’re assembling the ‘final cut’.
Cameras with electronic viewfinders (EVFs), such as some CSCs and fixed-lens digicams, are easier to use than DSLrs because you can record movies while looking through the viewfinder. With a DSLr, composing shots on the monitor screen provides the only way to see what is being recorded, since the optical viewfinder can’t display what the sensor is recording. In bright conditions, monitors are often very difficult to ‘read’, resulting in ‘point-and-guess’ shooting in live view mode.
Recently-released mirrorless cameras with EVFs are more compact, lighter in weight and easier to use for recording movies than conventional DSLRs, which can only record video in live view mode. (Source: Olympus.)
www.photoreview.com.au Travel Photography 2nd Edition 25
Telling your sTory
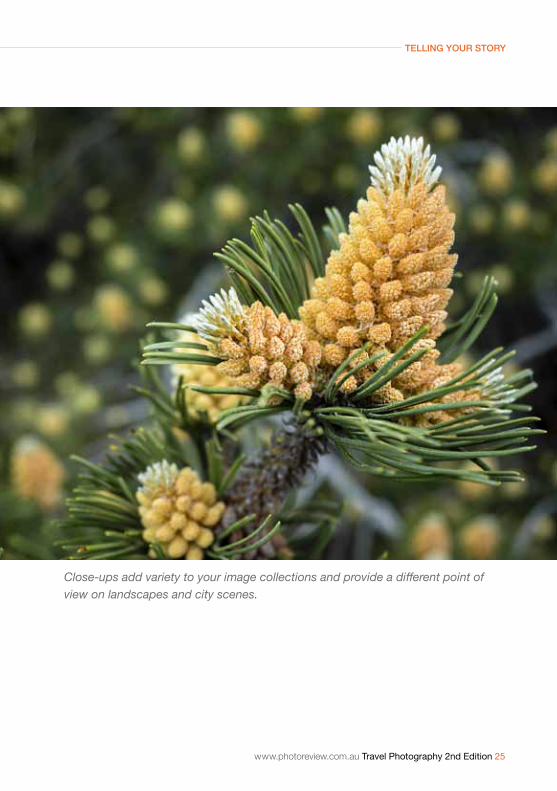
Close-ups add variety to your image collections and provide a different point of view on landscapes and city scenes.
26 Travel Photography 2nd Edition www.photoreview.com.au
Telling your sTory
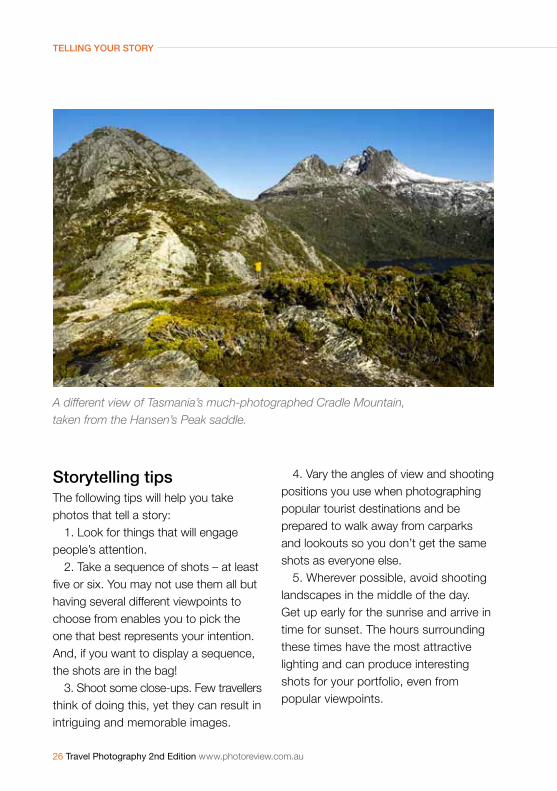
storytelling tipsthe following tips will help you take photos that tell a story:
1. Look for things that will engage people’s attention.
2. take a sequence of shots – at least five or six. You may not use them all but having several different viewpoints to choose from enables you to pick the one that best represents your intention. and, if you want to display a sequence, the shots are in the bag!
3. Shoot some close-ups. Few travellers think of doing this, yet they can result in intriguing and memorable images.
A different view of Tasmania’s much-photographed Cradle Mountain, taken from the Hansen’s Peak saddle.
4. Vary the angles of view and shooting positions you use when photographing popular tourist destinations and be prepared to walk away from carparks and lookouts so you don’t get the same shots as everyone else.
5. Wherever possible, avoid shooting landscapes in the middle of the day. Get up early for the sunrise and arrive in time for sunset. the hours surrounding these times have the most attractive lighting and can produce interesting shots for your portfolio, even from popular viewpoints.
www.photoreview.com.au Travel Photography 2nd Edition 27
Telling your sTory
useful linksEvent shooting www.bit.ly/eventshooting how to take great holiday shots www.bit.ly/greatholidatshots Award-winning travel images www.bit.ly/awardwinningtravelpics How to tell a story www.bit.ly/tellastorywithpicsn Shoot a movie on DSLR www.bit.ly/shootamovieondslr
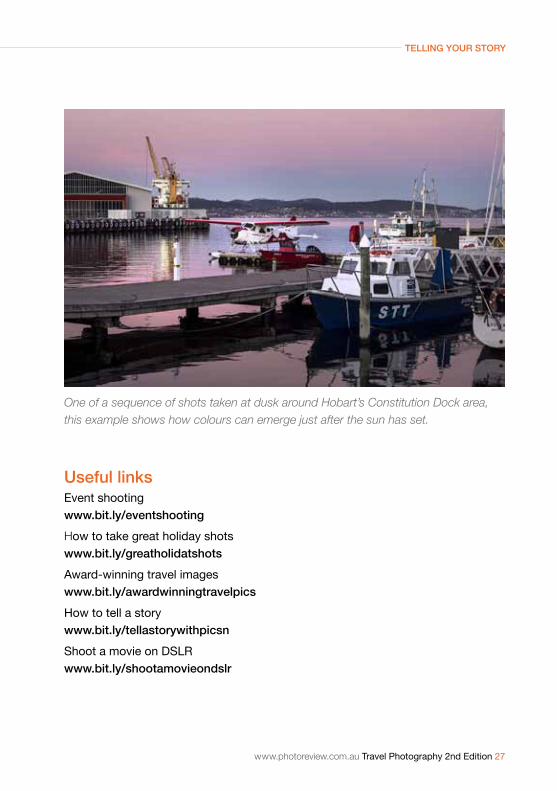
One of a sequence of shots taken at dusk around Hobart’s Constitution Dock area, this example shows how colours can emerge just after the sun has set.
Choosing the right equipment
travel story tips By tamron ambassador alex Cearns
28 Travel Photography 2nd Edition www.photoreview.com.au
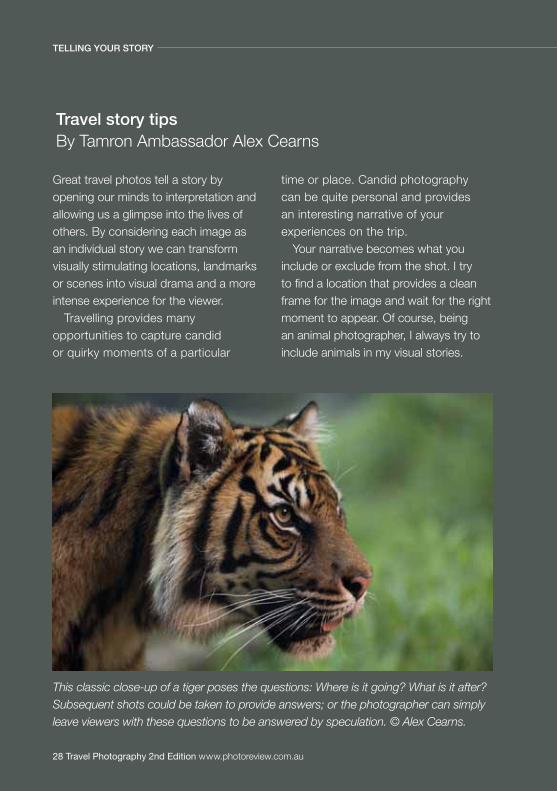
This classic close-up of a tiger poses the questions: Where is it going? What is it after? Subsequent shots could be taken to provide answers; or the photographer can simply leave viewers with these questions to be answered by speculation. © Alex Cearns.
Great travel photos tell a story by opening our minds to interpretation and allowing us a glimpse into the lives of others. By considering each image as an individual story we can transform visually stimulating locations, landmarks or scenes into visual drama and a more intense experience for the viewer.
travelling provides many opportunities to capture candid or quirky moments of a particular
time or place. Candid photography can be quite personal and provides an interesting narrative of your experiences on the trip.
Your narrative becomes what you include or exclude from the shot. I try to find a location that provides a clean frame for the image and wait for the right moment to appear. Of course, being an animal photographer, I always try to include animals in my visual stories.
telling your story
Choosing the right equipment
www.photoreview.com.au Travel Photography 2nd Edition 29
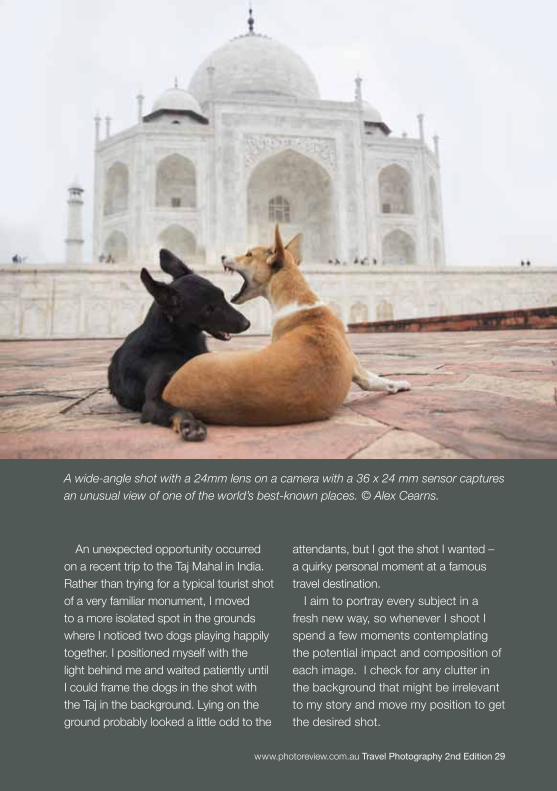
an unexpected opportunity occurred on a recent trip to the taj Mahal in India. rather than trying for a typical tourist shot of a very familiar monument, I moved to a more isolated spot in the grounds where I noticed two dogs playing happily together. I positioned myself with the light behind me and waited patiently until I could frame the dogs in the shot with the taj in the background. Lying on the ground probably looked a little odd to the
A wide-angle shot with a 24mm lens on a camera with a 36 x 24 mm sensor captures an unusual view of one of the world’s best-known places. © Alex Cearns.
attendants, but I got the shot I wanted – a quirky personal moment at a famous travel destination.
I aim to portray every subject in a fresh new way, so whenever I shoot I spend a few moments contemplating the potential impact and composition of each image. I check for any clutter in the background that might be irrelevant to my story and move my position to get the desired shot.
Choosing the right equipment
30 Travel Photography 2nd Edition www.photoreview.com.au
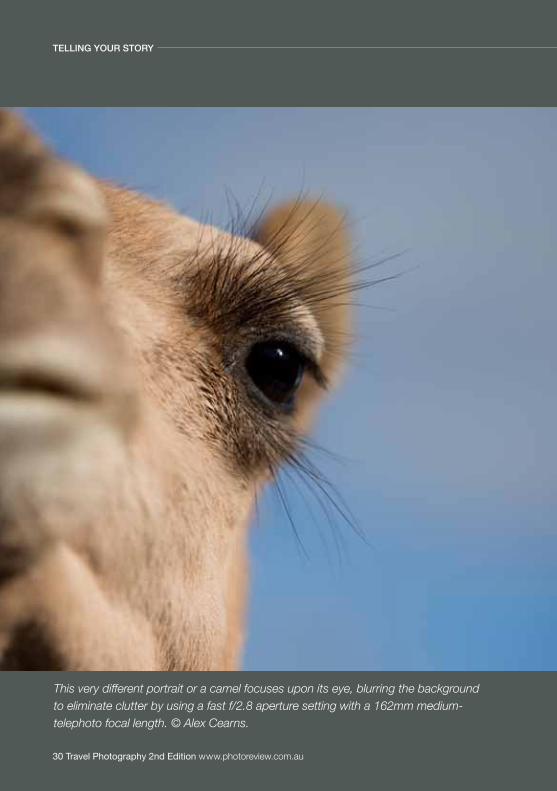
This very different portrait or a camel focuses upon its eye, blurring the background to eliminate clutter by using a fast f/2.8 aperture setting with a 162mm medium-telephoto focal length. © Alex Cearns.
telling your story

Choosing the right equipment
www.photoreview.com.au Travel Photography 2nd Edition 31
One way I like to heighten the dramatic impact of an image is to allow my eyes to rest on a particularly beautiful texture, pattern, aspect or angle. I focus my lens on that distinctive feature and depending on the result I want, I blur out the background or allow it to completely fill the frame. This allows the subject to become the focus and the viewer’s eye to fall naturally onto the specific subject.
I appreciate the art of black and white photography, but I find the full colour spectrum in nature endlessly inspiring
This extreme close-up with a very shallow depth of field presents an unconventional view of a common crab, creating an intriguing pattern and leaving viewers to wonder what the rest of the animal looks like. © Alex Cearns.
and a magical source of kaleidoscopic colours, patterns and textural stories.
all creatures are fascinating to me and no matter where I am in the world my favourite subjects are local animals or wildlife. I LOVe photographing animals in full, glorious colour. Birds are magnificent subjects for colour photography and almost any species can be the perfect subject against a simple background. their vibrant red pigments, lustrous greens, iridescent blues, and harmonious contrasts make for unique patterns and textures that are simply amazing.
telling your story
Choosing the right equipment
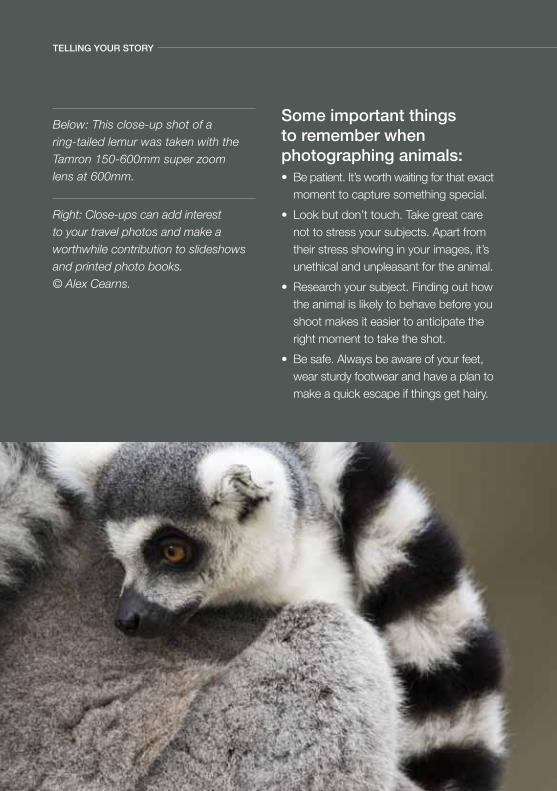
some important things to remember when photographing animals:• Be patient. It’s worth waiting for that exact
moment to capture something special. • Look but don’t touch. take great care
not to stress your subjects. apart from their stress showing in your images, it’s unethical and unpleasant for the animal.
• research your subject. Finding out how the animal is likely to behave before you shoot makes it easier to anticipate the right moment to take the shot.
• Be safe. always be aware of your feet, wear sturdy footwear and have a plan to make a quick escape if things get hairy.
Below: This close-up shot of a ring-tailed lemur was taken with the Tamron 150-600mm super zoom lens at 600mm.
Right: Close-ups can add interest to your travel photos and make a worthwhile contribution to slideshows and printed photo books. © Alex Cearns.
telling your story
Choosing the right equipment
blurred backgrounds and is fast in full sun and low light. this lens exceeds my expectations.
My number one cross-check tip is to ensure you are using the correct camera settings for the scene. Incorrect settings can lead to extreme under or over image exposure that sadly, not even the best editing software can fix.
there’s nothing more disheartening than taking a series of images in nature, which you may never see again, only to discover that you forgot to change your camera settings from your last indoor shoot. �Alex Cearns
www.houndstoothstudio.com.au
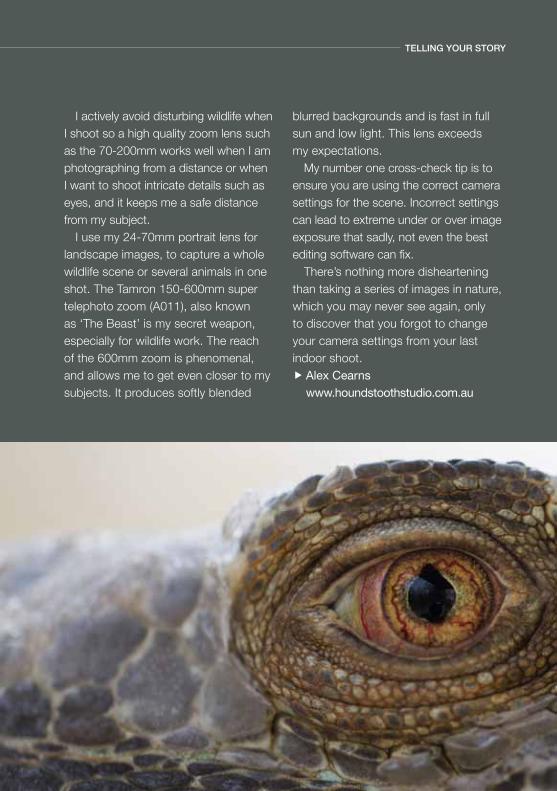
I actively avoid disturbing wildlife when I shoot so a high quality zoom lens such as the 70-200mm works well when I am photographing from a distance or when I want to shoot intricate details such as eyes, and it keeps me a safe distance from my subject.
I use my 24-70mm portrait lens for landscape images, to capture a whole wildlife scene or several animals in one shot. the tamron 150-600mm super telephoto zoom (a011), also known as ‘the Beast’ is my secret weapon, especially for wildlife work. the reach of the 600mm zoom is phenomenal, and allows me to get even closer to my subjects. It produces softly blended
telling your story
34 Travel Photography 2nd Edition www.photoreview.com.au
Shooting in tranSit
A significant part of any trip involves getting to your destination and most photographers like to take at least a few shots while they are on the way there – as well as while returning home. With a large percentage of trips involving flights, we’ll start with a few tips on shooting from commercial aircraft.
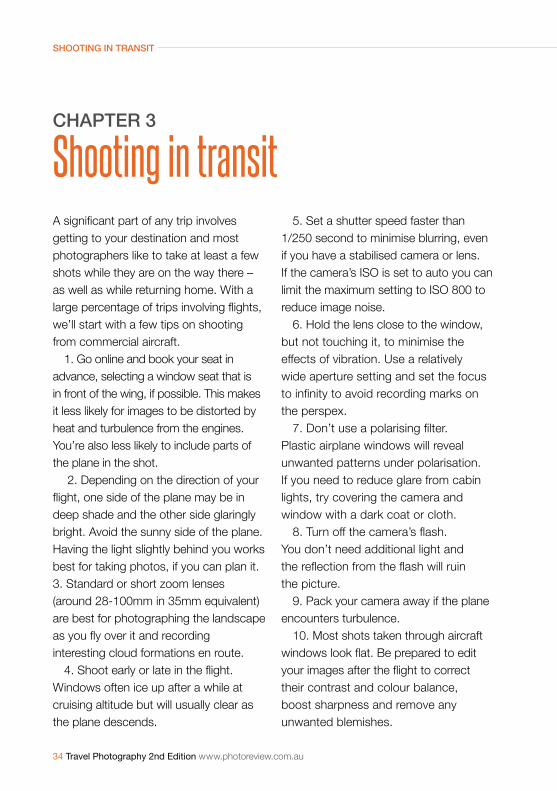
1. Go online and book your seat in advance, selecting a window seat that is in front of the wing, if possible. this makes it less likely for images to be distorted by heat and turbulence from the engines. You’re also less likely to include parts of the plane in the shot.
2. Depending on the direction of your flight, one side of the plane may be in deep shade and the other side glaringly bright. avoid the sunny side of the plane. having the light slightly behind you works best for taking photos, if you can plan it. 3. Standard or short zoom lenses (around 28-100mm in 35mm equivalent) are best for photographing the landscape as you fly over it and recording interesting cloud formations en route.
4. Shoot early or late in the flight. Windows often ice up after a while at cruising altitude but will usually clear as the plane descends.
Chapter 3
Shooting in transit5. Set a shutter speed faster than
1/250 second to minimise blurring, even if you have a stabilised camera or lens. If the camera’s ISO is set to auto you can limit the maximum setting to ISO 800 to reduce image noise.
6. hold the lens close to the window, but not touching it, to minimise the effects of vibration. Use a relatively wide aperture setting and set the focus to infinity to avoid recording marks on the perspex.
7. Don’t use a polarising filter. plastic airplane windows will reveal unwanted patterns under polarisation. If you need to reduce glare from cabin lights, try covering the camera and window with a dark coat or cloth.
8. Turn off the camera’s flash. You don’t need additional light and the reflection from the flash will ruin the picture.
9. pack your camera away if the plane encounters turbulence.
10. Most shots taken through aircraft windows look flat. Be prepared to edit your images after the flight to correct their contrast and colour balance, boost sharpness and remove any unwanted blemishes.
www.photoreview.com.au Travel Photography 2nd Edition 35
Shooting in tranSit
These illustrations show the differences between sitting in front of the aircraft’s wing (top) and behind it (lower). Although both shots were taken with the camera facing away from the sun, marks on the perspex window can be seen in the upper part of the lower shot due to as relatively small aperture setting (f/7.1 on a digicam with a minimum aperture of f/8).
36 Travel Photography 2nd Edition www.photoreview.com.au
Shooting in tranSit
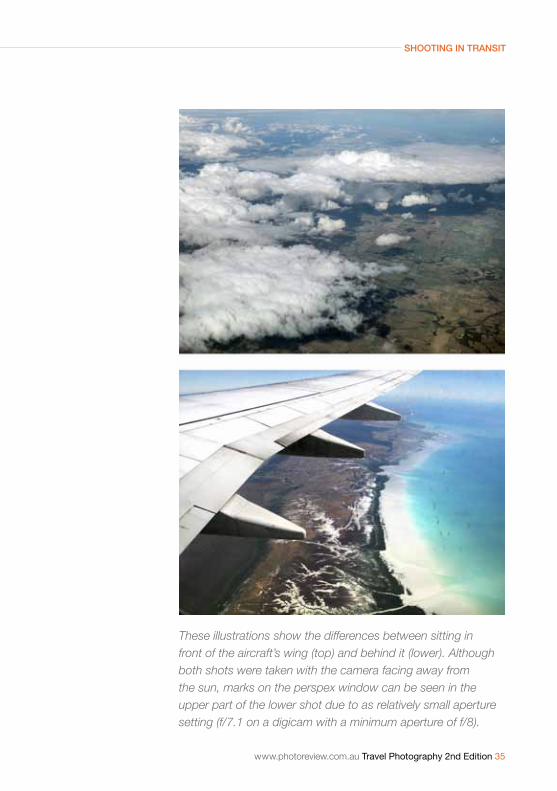
This picture was taken with a very basic compact digicam on the descent into the Ushuaia airport in Tierra del Fuego. The ISO was set at 100 with a lens aperture of f/5 and a shutter speed of 1/500 second, plus -0.3EV of exposure compensation. (The image has been edited; see Tip 10.)
www.photoreview.com.au Travel Photography 2nd Edition 37
Shooting in tranSit
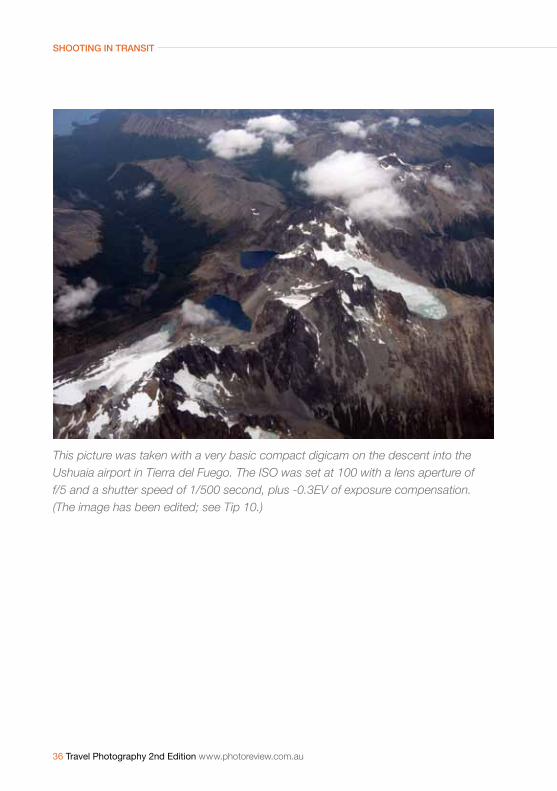
These images show the importance of editing shots taken from a plane. The top picture is the image as it came from the camera. The lower one shows this image after levels adjustment (each channel adjusted separately to correct colour rendition) and slight unsharp masking.

38 Travel Photography 2nd Edition www.photoreview.com.au
Shooting in tranSit
www.photoreview.com.au Travel Photography 2nd Edition 39
Shooting in tranSit
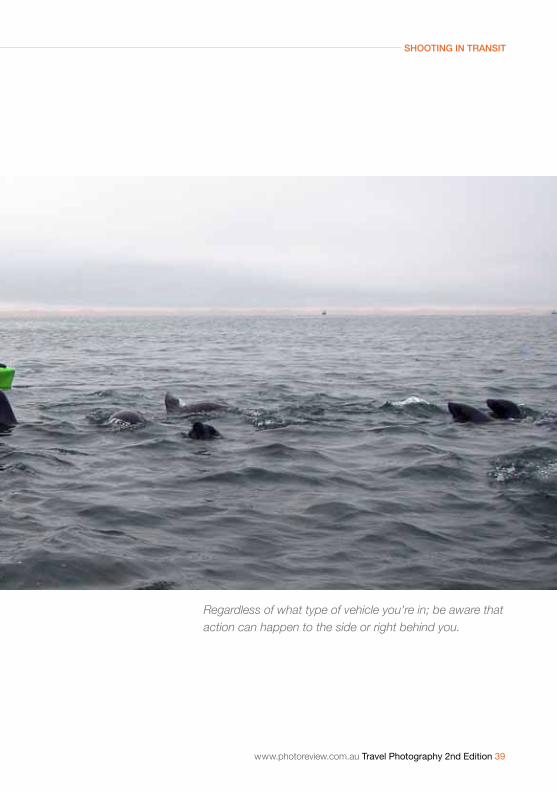
Regardless of what type of vehicle you’re in; be aware that action can happen to the side or right behind you.
40 Travel Photography 2nd Edition www.photoreview.com.au
Shooting in tranSit
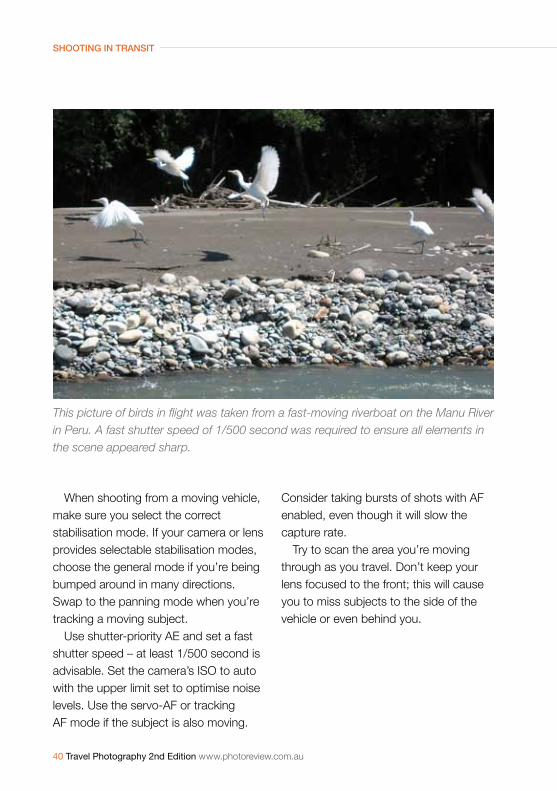
This picture of birds in flight was taken from a fast-moving riverboat on the Manu River in Peru. A fast shutter speed of 1/500 second was required to ensure all elements in the scene appeared sharp.
When shooting from a moving vehicle, make sure you select the correct stabilisation mode. If your camera or lens provides selectable stabilisation modes, choose the general mode if you’re being bumped around in many directions. Swap to the panning mode when you’re tracking a moving subject.
Use shutter-priority ae and set a fast shutter speed – at least 1/500 second is advisable. Set the camera’s ISO to auto with the upper limit set to optimise noise levels. Use the servo-aF or tracking aF mode if the subject is also moving.
Consider taking bursts of shots with aF enabled, even though it will slow the capture rate.
try to scan the area you’re moving through as you travel. Don’t keep your lens focused to the front; this will cause you to miss subjects to the side of the vehicle or even behind you.
www.photoreview.com.au Travel Photography 2nd Edition 41
photographing sCenery
although almost any lens can be used for photographing landscapes, most photographers prefer wide-angle lenses because they better encompass scenic panoramas. Your choice of focal length will vary with the type of scene, how much of it you wish to record and the presence (or absence) of objects in the foreground.
Chapter 4
Photographing scenery
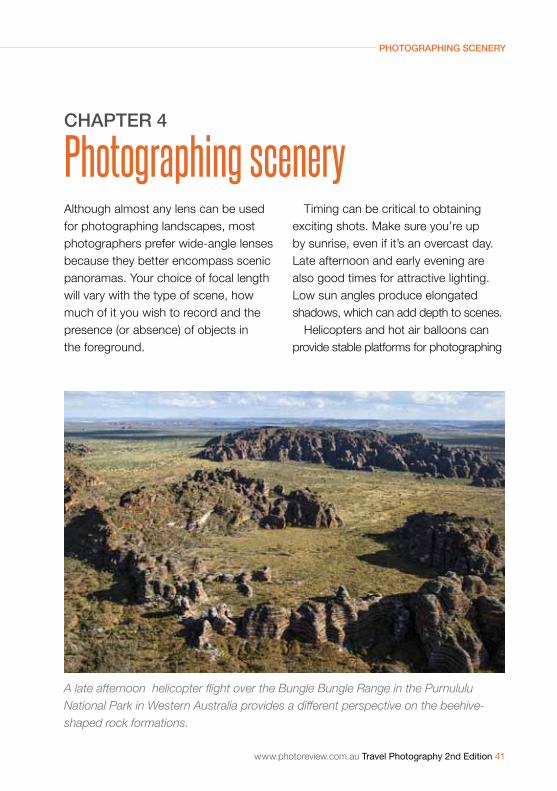
A late afternoon helicopter flight over the Bungle Bungle Range in the Purnululu National Park in Western Australia provides a different perspective on the beehive-shaped rock formations.
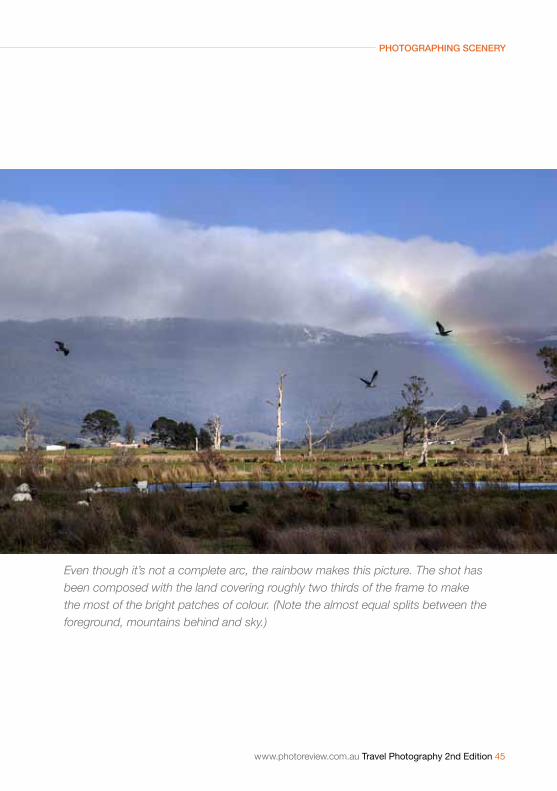
timing can be critical to obtaining exciting shots. Make sure you’re up by sunrise, even if it’s an overcast day. Late afternoon and early evening are also good times for attractive lighting. Low sun angles produce elongated shadows, which can add depth to scenes.
helicopters and hot air balloons can provide stable platforms for photographing
42 Travel Photography 2nd Edition www.photoreview.com.au
PhotograPhing scenery
www.photoreview.com.au Travel Photography 2nd Edition 43
PhotograPhing scenery
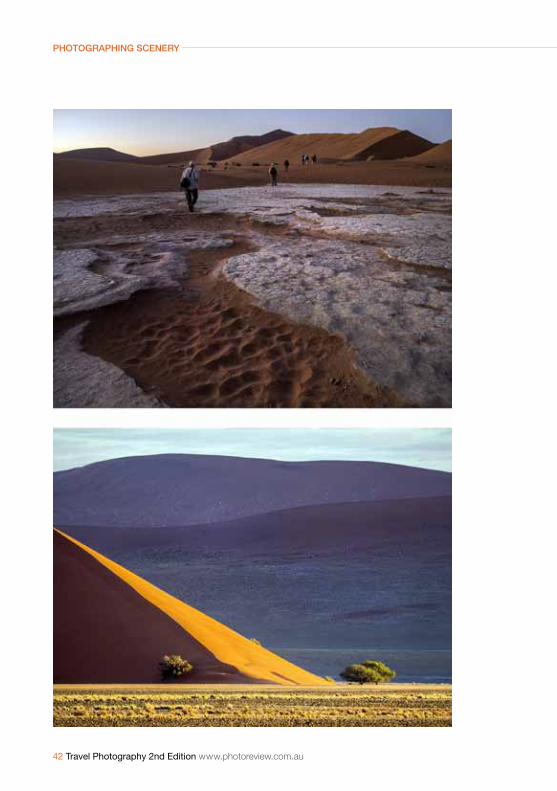
Left: The two pictures above illustrate the influence of lens focal length on the way landscapes are covered. The top picture, which was taken with a wide angle lens (24mm equivalent in 35mm format), shows the emphasis on the foreground and its separation from the background. The receding figures emphasise this separation and add a sense of depth to the scene. The lower picture was taken with an extreme telephoto lens (600mm equivalent in 35mm format) and illustrates the compression of perspective produced by longer lenses. The hills in the background appear much closer to the dune and trees in the foreground than they actually are and the end result appears to have been ‘flattened’.
landscapes and they provide a radically different angle from shots taken on the ground. Many destinations with dramatic landscapes have companies that offer rides around sunrise. If you can afford it, this is a great way to get dramatic shots.
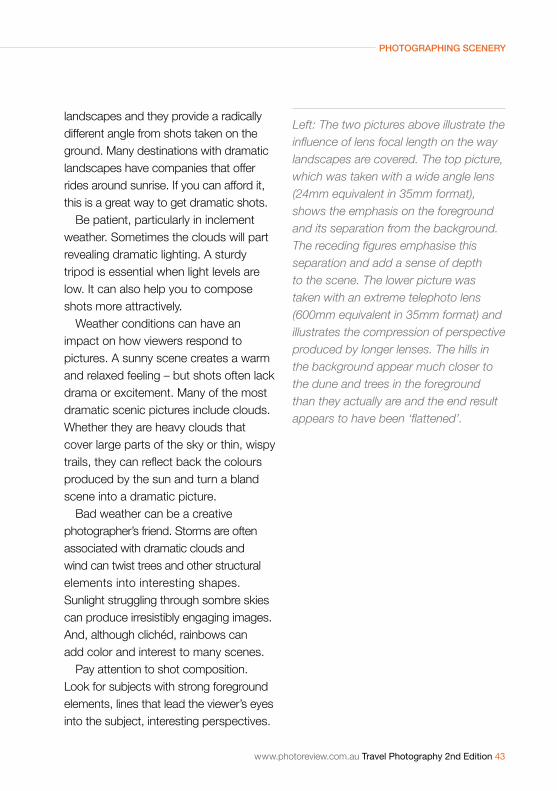
Be patient, particularly in inclement weather. Sometimes the clouds will part revealing dramatic lighting. a sturdy tripod is essential when light levels are low. It can also help you to compose shots more attractively.
Weather conditions can have an impact on how viewers respond to pictures. a sunny scene creates a warm and relaxed feeling – but shots often lack drama or excitement. Many of the most dramatic scenic pictures include clouds. Whether they are heavy clouds that cover large parts of the sky or thin, wispy trails, they can reflect back the colours produced by the sun and turn a bland scene into a dramatic picture.
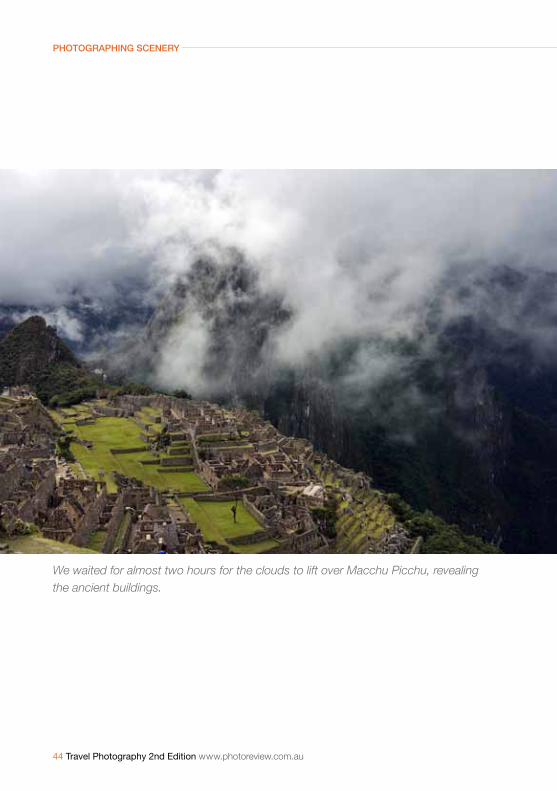
Bad weather can be a creative photographer’s friend. Storms are often associated with dramatic clouds and wind can twist trees and other structural elements into interesting shapes. Sunlight struggling through sombre skies can produce irresistibly engaging images. and, although clichéd, rainbows can add color and interest to many scenes.
pay attention to shot composition. Look for subjects with strong foreground elements, lines that lead the viewer’s eyes into the subject, interesting perspectives.
44 Travel Photography 2nd Edition www.photoreview.com.au
PhotograPhing scenery
We waited for almost two hours for the clouds to lift over Macchu Picchu, revealing the ancient buildings.
www.photoreview.com.au Travel Photography 2nd Edition 45
PhotograPhing scenery
Even though it’s not a complete arc, the rainbow makes this picture. The shot has been composed with the land covering roughly two thirds of the frame to make the most of the bright patches of colour. (Note the almost equal splits between the foreground, mountains behind and sky.)
46 Travel Photography 2nd Edition www.photoreview.com.au
PhotograPhing scenery
Sunrise at Pugilist Hill in the lower Flinders Ranges brightens the sky, leaving foreground subjects silhouetted. Ten minutes later the conditions would have changed and this shot couldn’t have been taken.
www.photoreview.com.au Travel Photography 2nd Edition 47
PhotograPhing scenery
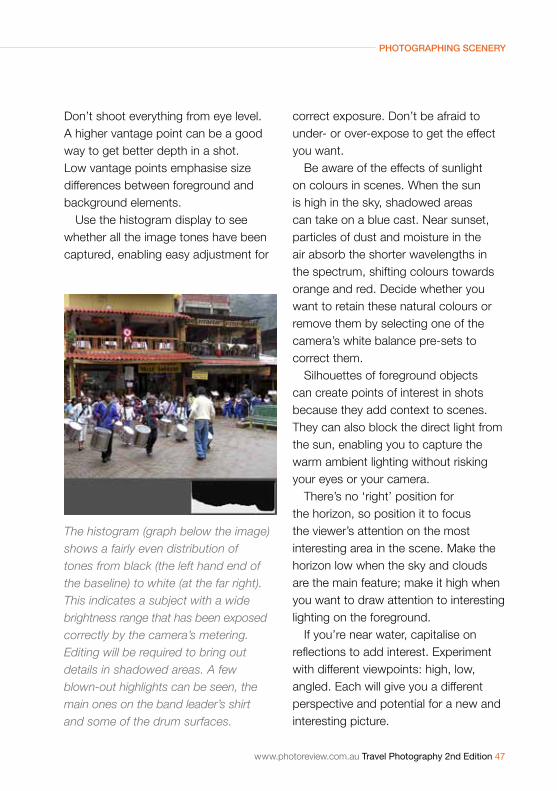
Don’t shoot everything from eye level. a higher vantage point can be a good way to get better depth in a shot. Low vantage points emphasise size differences between foreground and background elements.
Use the histogram display to see whether all the image tones have been captured, enabling easy adjustment for
The histogram (graph below the image) shows a fairly even distribution of tones from black (the left hand end of the baseline) to white (at the far right). This indicates a subject with a wide brightness range that has been exposed correctly by the camera’s metering. Editing will be required to bring out details in shadowed areas. A few blown-out highlights can be seen, the main ones on the band leader’s shirt and some of the drum surfaces.
correct exposure. Don’t be afraid to under- or over-expose to get the effect you want.
Be aware of the effects of sunlight on colours in scenes. When the sun is high in the sky, shadowed areas can take on a blue cast. Near sunset, particles of dust and moisture in the air absorb the shorter wavelengths in the spectrum, shifting colours towards orange and red. Decide whether you want to retain these natural colours or remove them by selecting one of the camera’s white balance pre-sets to correct them.
Silhouettes of foreground objects can create points of interest in shots because they add context to scenes. they can also block the direct light from the sun, enabling you to capture the warm ambient lighting without risking your eyes or your camera.
there’s no ‘right’ position for the horizon, so position it to focus the viewer’s attention on the most interesting area in the scene. Make the horizon low when the sky and clouds are the main feature; make it high when you want to draw attention to interesting lighting on the foreground.
If you’re near water, capitalise on reflections to add interest. Experiment with different viewpoints: high, low, angled. Each will give you a different perspective and potential for a new and interesting picture.

48 Travel Photography 2nd Edition www.photoreview.com.au
Shooting in citieS
Most people in the world live in cities and cities are normally the first point at which photographers see new places. all cities have landmarks that most tourists want to photograph: the Sydney Opera house, the Statue of Liberty in New York, Big Ben and the houses of parliament in London, the taj Mahal in agra, India, the acropolis in athens and places like the Eiffel Tower, Arc de triomphe and Notre Dame Cathedral in paris, to name a few.
Looking for different angles can lead to you produce more interesting pictures. So can different times of the day. Often the best pictures are obtained early in the morning before crowds arrive to get in your way.
But the most interesting places to photograph are often away from these highlights and among the regular people, documenting their daily lives and the places where they live, eat and work. Street photography – documenting people in their environments – is a popular genre among serious photographers. It’s also a great way to achieve interesting travel shots.
Try to capture some flow of energy in the city; the rush of commuters as they move towards public transport, the
Chapter 5
Shooting in citiesswirl of vehicle lights at night, people in motion against blurred backgrounds, moments of peace when they pause to chat with friends. Look for areas that display heightened contrast, whether that means light and shade, movement and tranquillity, or a variance in colour, texture or flow.
each city has a unique skyline, a panoramic view of buildings in the city’s central business district that can make a great opening image for albums or slide shows. Look for vantage points on nearby hills or in public spaces along rivers or around harbours. Use a map to determine the direction of the sun to determine the best times to shoot.
Cities located by the sea or along a river can offer attractive vantage points from or overlooking bridges and piers. Buildings and statues usually depict the city’s history and aspirations and make good subjects for photography. alleyways and narrow lanes often make good photographic subjects, particularly if the architecture is characteristic of the area.
Be aware of the influence of perspective; try to avoid converging verticals or linear distortion – unless you want to use such forms for creative effect.
www.photoreview.com.au Travel Photography 2nd Edition 49
Shooting in citieS
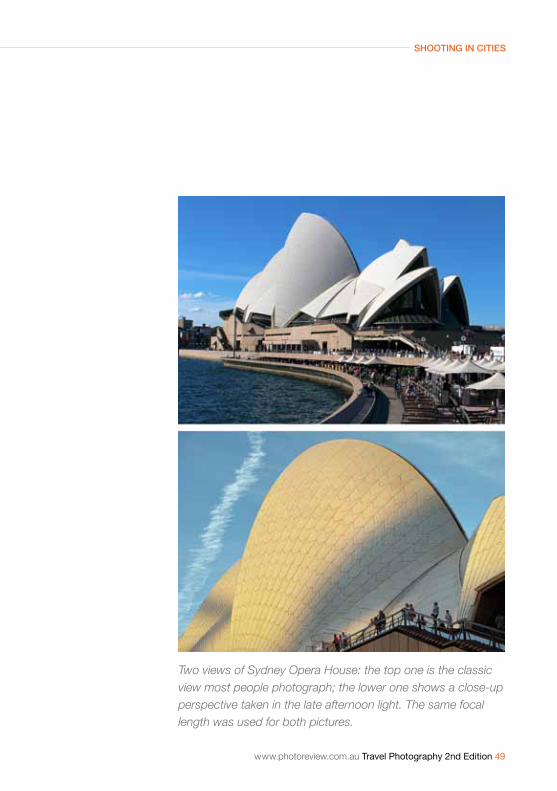
Two views of Sydney Opera House: the top one is the classic view most people photograph; the lower one shows a close-up perspective taken in the late afternoon light. The same focal length was used for both pictures.
50 Travel Photography 2nd Edition www.photoreview.com.au
Shooting in citieS
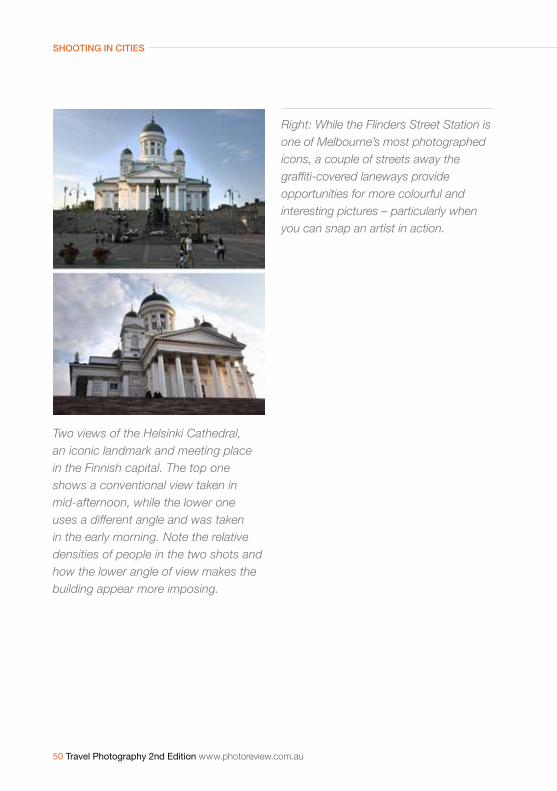
Two views of the Helsinki Cathedral, an iconic landmark and meeting place in the Finnish capital. The top one shows a conventional view taken in mid-afternoon, while the lower one uses a different angle and was taken in the early morning. Note the relative densities of people in the two shots and how the lower angle of view makes the building appear more imposing.
Right: While the Flinders Street Station is one of Melbourne’s most photographed icons, a couple of streets away the graffiti-covered laneways provide opportunities for more colourful and interesting pictures – particularly when you can snap an artist in action.

www.photoreview.com.au Travel Photography 2nd Edition 51
Shooting in citieS
52 Travel Photography 2nd Edition www.photoreview.com.au
Shooting in citieS
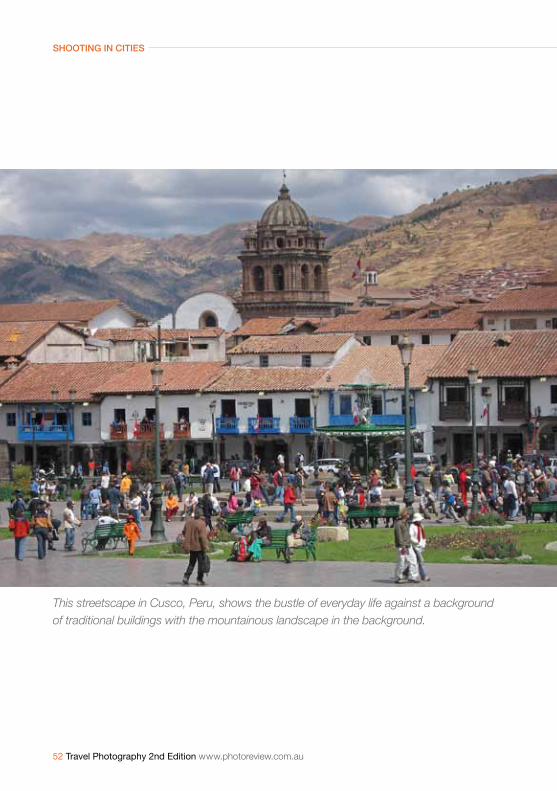
This streetscape in Cusco, Peru, shows the bustle of everyday life against a background of traditional buildings with the mountainous landscape in the background.
www.photoreview.com.au Travel Photography 2nd Edition 53
Shooting in citieS
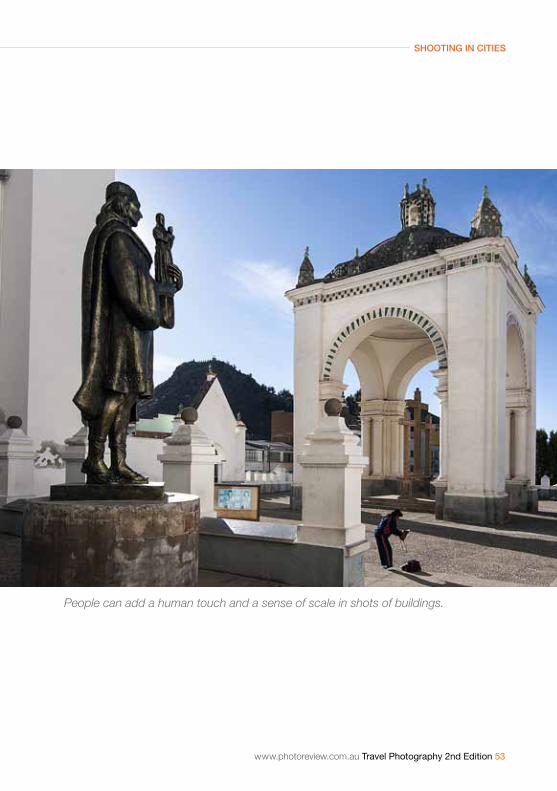
People can add a human touch and a sense of scale in shots of buildings.

54 Travel Photography 2nd Edition www.photoreview.com.au
Shooting in citieS
City lights convert a prosaic subject (the waterfront near Sydney’s Star Casino) into a more exciting and glamorous photographic subject.
Looking up at skyscrapers can emphasise their height, while looking down will make buildings appear smaller and less important. try to include people in architectural pictures to add scale, colour, movement and interest.
time of day can have a strong influence on the ‘feeling’ of photographs. Shooting in harsh midday light will heighten the impression of an unattractive environment and clearly show any pollution. Shooting in the warm light of early evening, when the rear lights of vehicles are on, can make crowded roads seem more attractive.
Cities and buildings take on a completely different look and feel after dark. the best time to photograph is between 10 and 30 minutes after sunset, when streetlights and lights in buildings will be the dominant light source, but there will still be some light and colour in the sky.
Night photography requires a tripod since exposures are generally long. to record detail, overexpose by one and two stops – otherwise the only thing that comes out will be the lights themselves. As with all difficult lighting conditions, bracketing is recommended.
www.photoreview.com.au Travel Photography 2nd Edition 55
people piCtures
In most countries, it is legal to photograph people for either editorial or fine art purposes as long as you are in a public place. however, if you intend to use any of those images for stock photography (or any other commercial purpose), you need a signed model release for each recognisable person in the picture.
Sensitivity is required when taking photos at handicraft markets where there are signs asking people not to take photos. always check with the artist before taking pictures. even without such signs, photographers should be respectful of an artist’s right to their intellectual property and always ask permission of the artist before taking photos.
Street photography is easiest to practice alone, although sometimes you can be less conspicuous if you are with other people. It’s easiest to shoot in a busy public place such as a street market or an outdoor event. Street performers can make excellent subjects and will usually co-operate. Buskers perform to make money, so be generous with what you toss in their hat or music case after you’ve taken their photos!
Chapter 6
People pictures
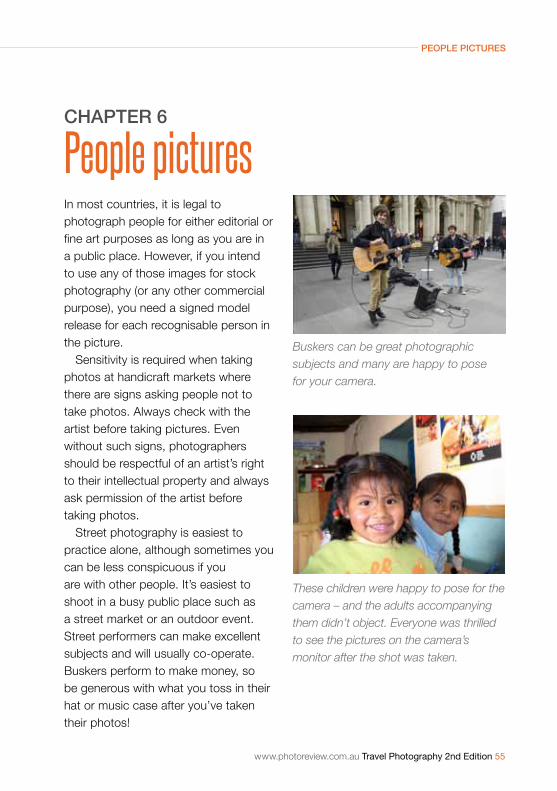
Buskers can be great photographic subjects and many are happy to pose for your camera.
These children were happy to pose for the camera – and the adults accompanying them didn’t object. Everyone was thrilled to see the pictures on the camera’s monitor after the shot was taken.

56 Travel Photography 2nd Edition www.photoreview.com.au
PeoPle Pictures
www.photoreview.com.au Travel Photography 2nd Edition 57
PeoPle Pictures
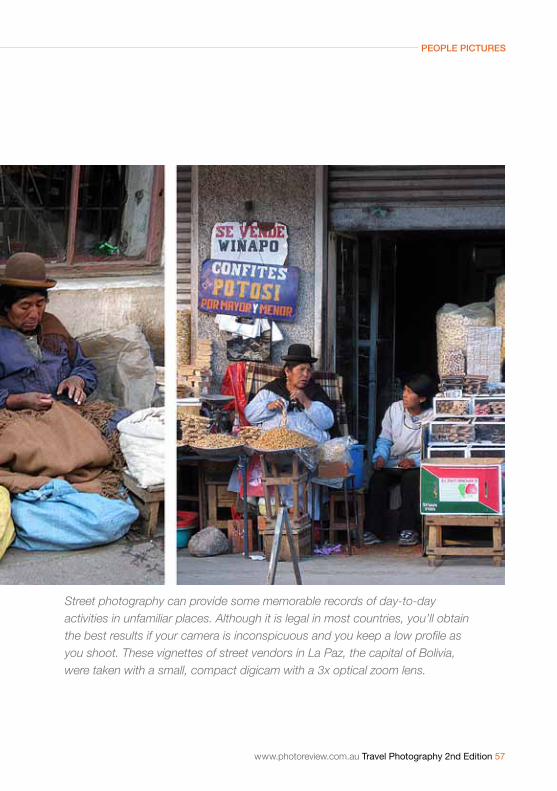
Street photography can provide some memorable records of day-to-day activities in unfamiliar places. Although it is legal in most countries, you’ll obtain the best results if your camera is inconspicuous and you keep a low profile as you shoot. These vignettes of street vendors in La Paz, the capital of Bolivia, were taken with a small, compact digicam with a 3x optical zoom lens.

58 Travel Photography 2nd Edition www.photoreview.com.au
PeoPle Pictures
Take advantage of opportunities to photograph people in their native costumes performing for tourists.
www.photoreview.com.au Travel Photography 2nd Edition 59
PeoPle Pictures
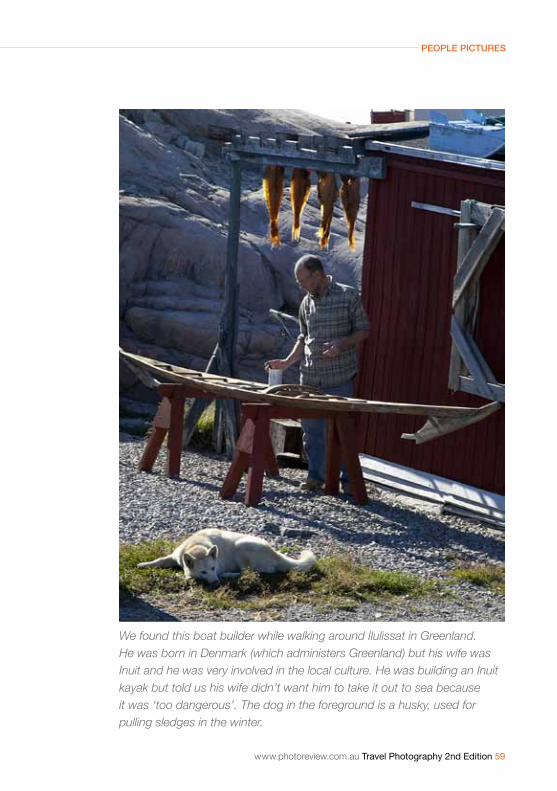
We found this boat builder while walking around Ilulissat in Greenland. He was born in Denmark (which administers Greenland) but his wife was Inuit and he was very involved in the local culture. He was building an Inuit kayak but told us his wife didn’t want him to take it out to sea because it was ‘too dangerous’. The dog in the foreground is a husky, used for pulling sledges in the winter.
60 Travel Photography 2nd Edition www.photoreview.com.au
PeoPle Pictures
Many people are happy to be photographed if you engage them in conversation first and ask permission. Show them the result on the camera’s monitor screen and explain why they caught your attention. Most people enjoy being the centre of attention.
there’s no reason why you shouldn’t photograph children in the street – or in cafes or shops. But it’s wise to get the approval of any adult accompanying them first. Simply nod towards them, indicate the camera and wait for their nod back. If someone objects to having their picture taken, don’t shoot! It’s not worth an argument.
Street photography is all about telling a story and communicating an emotion. Your camera is an extension of your own vision. Be patient. trust your instincts and enjoy the experience.
In many third-world countries, adults and children supplement their meagre incomes by posing for tourists. Most of these people rely on the additional money so it’s worthwhile being generous. Many villages will present their local dances, songs and artefacts when tourists are visiting, making it easy to obtain interesting photographs without needing to ask for permission to take pictures.
however, if you see a child soliciting to be photographed on a weekday when they should be at school, don’t be
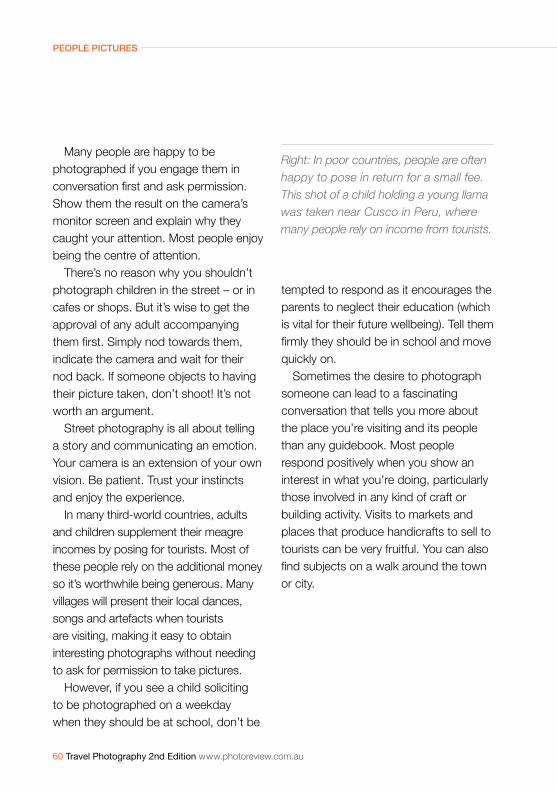
Right: In poor countries, people are often happy to pose in return for a small fee. This shot of a child holding a young llama was taken near Cusco in Peru, where many people rely on income from tourists.
tempted to respond as it encourages the parents to neglect their education (which is vital for their future wellbeing). tell them firmly they should be in school and move quickly on.
Sometimes the desire to photograph someone can lead to a fascinating conversation that tells you more about the place you’re visiting and its people than any guidebook. Most people respond positively when you show an interest in what you’re doing, particularly those involved in any kind of craft or building activity. Visits to markets and places that produce handicrafts to sell to tourists can be very fruitful. You can also find subjects on a walk around the town or city.
www.photoreview.com.au Travel Photography 2nd Edition 61
PeoPle Pictures
62 Travel Photography 2nd Edition www.photoreview.com.au
Shooting fireworkS and light ShowS
Most people enjoy a fireworks display and photographers usually flock to venues where light shows like Sydney’s Vivid Festival have been scheduled. It’s not difficult for rank amateurs to take pictures at these events; even point-and-shoot cameras include ‘Low Light’ and ‘Fireworks’ modes to make it easy to obtain shots that can be shared via social media.
Better results will be obtained when photographing light displays with more sophisticated cameras, particularly interchangeable-lens models with a full range of user-adjustable controls. Because you will be shooting at night, some specific conditions apply and you’ll need the right equipment to obtain optimal results.
Light installations often involve projections of moving images that change rapidly. Because their intensity is lower, high ISO settings are essential to provide short enough exposures to minimise blurring. however, it’s often easier to take a sequence of shots to fine-tune exposure levels since most displays are cyclical and repeat after 10 to 15 minutes.
Fireworks can be more challenging to capture since there is often a huge difference in brightness between the
Chapter 7
Shooting fireworks and light showsbright lights from the fireworks exploding and the surrounding scene. Shorter exposure times will capture more colours in the fireworks but the sky – and often the surrounding scenery – usually becomes almost black. Longer exposures will reveal more of the environment but the bright fireworks may blow out to appear as stark white.
You can get the best of both worlds if the camera is mounted on a tripod by taking two exposures, one balanced to record the fireworks and the other for the ambient scene. provided the frame area covered is identical, these exposures can be combined in editing software to provide a compromise between both exposures.
the following tips will give you the best chances of capturing successful fireworks photographs.
1. essential equipmentYou will need a tripod to keep your camera steady during long exposures. While it is possible to take shots of fireworks with the camera hand-held (particularly if it has good stabilisation and/or a suitable low-light mode), the best results will come from having the camera tripod mounted.
www.photoreview.com.au Travel Photography 2nd Edition 63
Shooting fireworkS and light ShowS
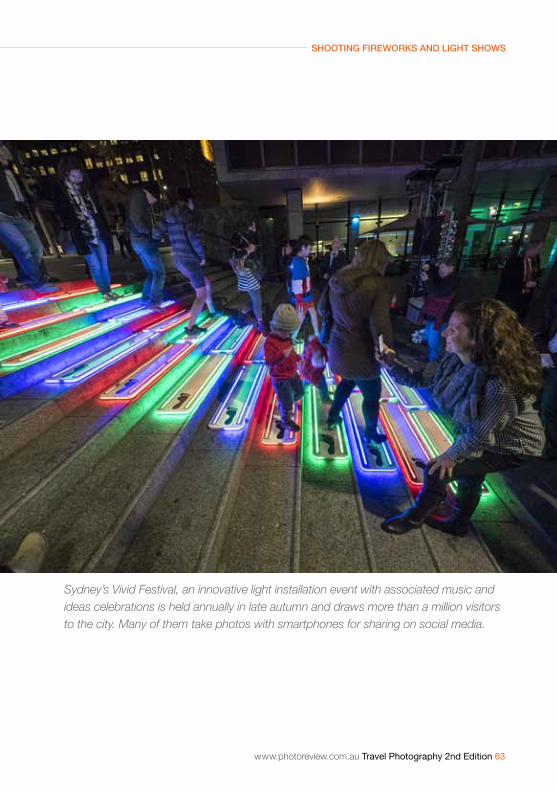
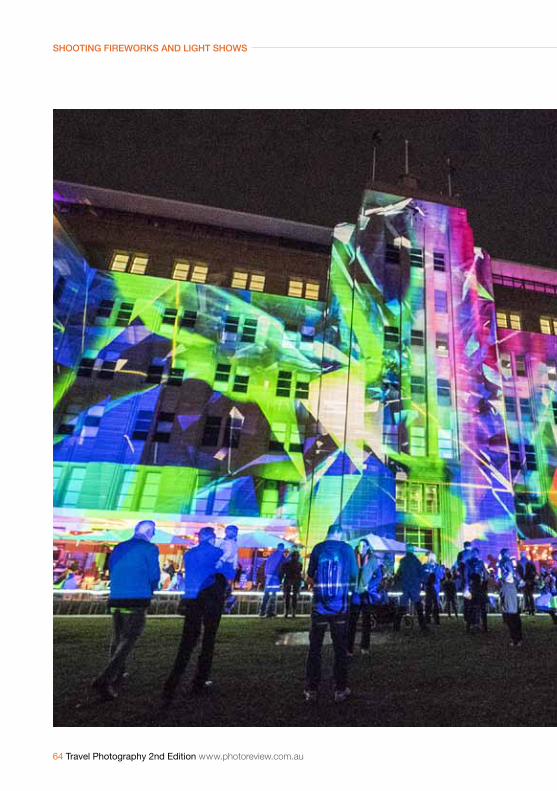
Sydney’s Vivid Festival, an innovative light installation event with associated music and ideas celebrations is held annually in late autumn and draws more than a million visitors to the city. Many of them take photos with smartphones for sharing on social media.
64 Travel Photography 2nd Edition www.photoreview.com.au
Shooting fireworkS and light ShowS
www.photoreview.com.au Travel Photography 2nd Edition 65
Shooting fireworkS and light ShowS
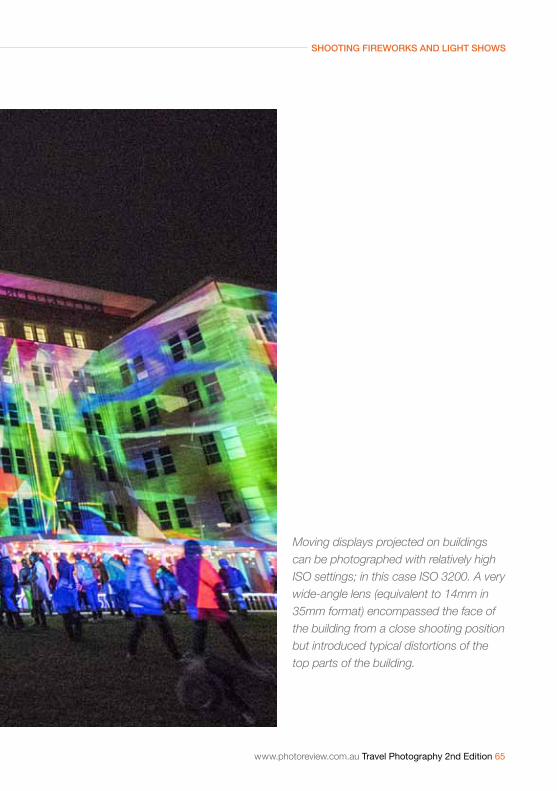
Moving displays projected on buildings can be photographed with relatively high ISO settings; in this case ISO 3200. A very wide-angle lens (equivalent to 14mm in 35mm format) encompassed the face of the building from a close shooting position but introduced typical distortions of the top parts of the building.
66 Travel Photography 2nd Edition www.photoreview.com.au
Shooting fireworkS and light ShowS
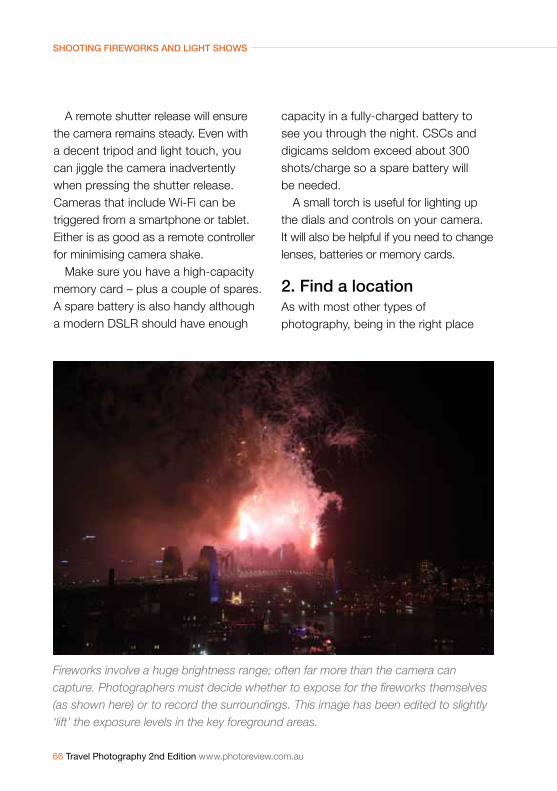
Fireworks involve a huge brightness range; often far more than the camera can capture. Photographers must decide whether to expose for the fireworks themselves (as shown here) or to record the surroundings. This image has been edited to slightly ‘lift’ the exposure levels in the key foreground areas.
a remote shutter release will ensure the camera remains steady. even with a decent tripod and light touch, you can jiggle the camera inadvertently when pressing the shutter release. Cameras that include Wi-Fi can be triggered from a smartphone or tablet. either is as good as a remote controller for minimising camera shake.
Make sure you have a high-capacity memory card – plus a couple of spares. a spare battery is also handy although a modern DSLr should have enough
capacity in a fully-charged battery to see you through the night. CSCs and digicams seldom exceed about 300 shots/charge so a spare battery will be needed.
a small torch is useful for lighting up the dials and controls on your camera. It will also be helpful if you need to change lenses, batteries or memory cards.
2. Find a locationas with most other types of photography, being in the right place
www.photoreview.com.au Travel Photography 2nd Edition 67
Shooting fireworkS and light ShowS
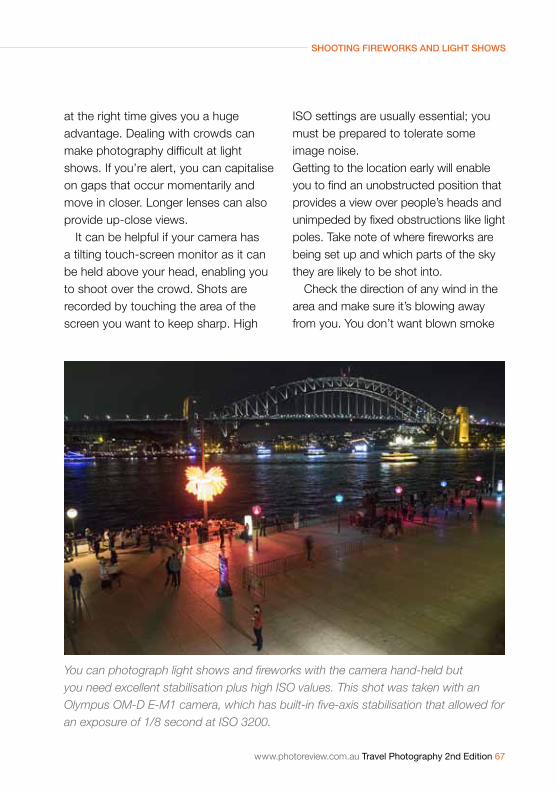
You can photograph light shows and fireworks with the camera hand-held but you need excellent stabilisation plus high ISO values. This shot was taken with an Olympus OM-D E-M1 camera, which has built-in five-axis stabilisation that allowed for an exposure of 1/8 second at ISO 3200.
at the right time gives you a huge advantage. Dealing with crowds can make photography difficult at light shows. If you’re alert, you can capitalise on gaps that occur momentarily and move in closer. Longer lenses can also provide up-close views.
It can be helpful if your camera has a tilting touch-screen monitor as it can be held above your head, enabling you to shoot over the crowd. Shots are recorded by touching the area of the screen you want to keep sharp. high
ISO settings are usually essential; you must be prepared to tolerate some image noise. Getting to the location early will enable you to find an unobstructed position that provides a view over people’s heads and unimpeded by fixed obstructions like light poles. Take note of where fireworks are being set up and which parts of the sky they are likely to be shot into.
Check the direction of any wind in the area and make sure it’s blowing away from you. You don’t want blown smoke
68 Travel Photography 2nd Edition www.photoreview.com.au
Shooting fireworkS and light ShowS
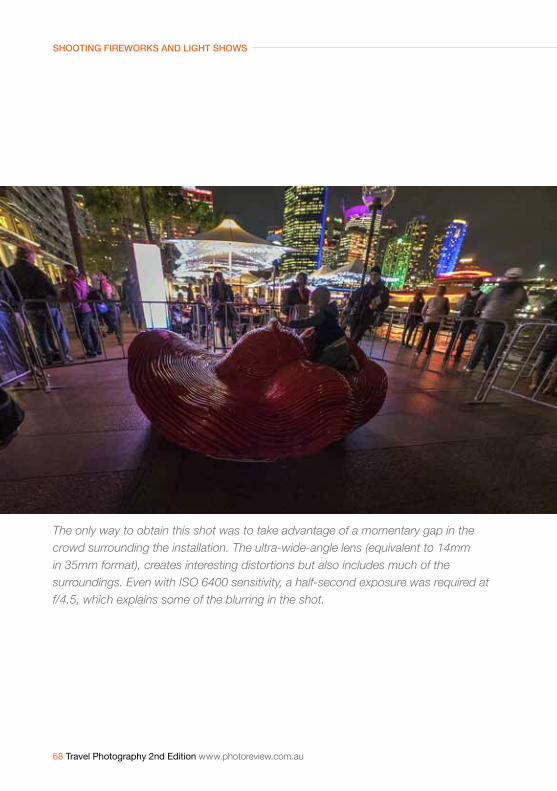
The only way to obtain this shot was to take advantage of a momentary gap in the crowd surrounding the installation. The ultra-wide-angle lens (equivalent to 14mm in 35mm format), creates interesting distortions but also includes much of the surroundings. Even with ISO 6400 sensitivity, a half-second exposure was required at f/4.5, which explains some of the blurring in the shot.
www.photoreview.com.au Travel Photography 2nd Edition 69
Shooting fireworkS and light ShowS
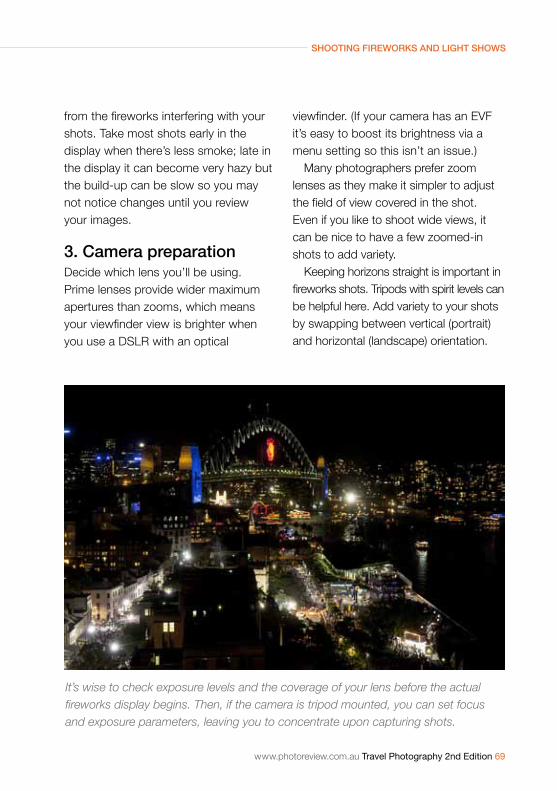
It’s wise to check exposure levels and the coverage of your lens before the actual fireworks display begins. Then, if the camera is tripod mounted, you can set focus and exposure parameters, leaving you to concentrate upon capturing shots.
from the fireworks interfering with your shots. take most shots early in the display when there’s less smoke; late in the display it can become very hazy but the build-up can be slow so you may not notice changes until you review your images.
3. Camera preparationDecide which lens you’ll be using. prime lenses provide wider maximum apertures than zooms, which means your viewfinder view is brighter when you use a DSLr with an optical
viewfinder. (If your camera has an EVF it’s easy to boost its brightness via a menu setting so this isn’t an issue.)
Many photographers prefer zoom lenses as they make it simpler to adjust the field of view covered in the shot. even if you like to shoot wide views, it can be nice to have a few zoomed-in shots to add variety.
Keeping horizons straight is important in fireworks shots. Tripods with spirit levels can be helpful here. add variety to your shots by swapping between vertical (portrait) and horizontal (landscape) orientation.

70 Travel Photography 2nd Edition www.photoreview.com.au
Shooting fireworkS and light ShowS
A very different viewpoint on a fireworks display take in buildings in the locality. The 13-second exposure duration produces attractive blurring of the waves on the shore. A 16mm wide angle lens was used at f/10 on a ‘full frame’ DSLR camera for adequate depth of field. The ISO setting was 800. © Matt Stansfield.
www.photoreview.com.au Travel Photography 2nd Edition 71
Shooting fireworkS and light ShowS
72 Travel Photography 2nd Edition www.photoreview.com.au
Shooting fireworkS and light ShowS
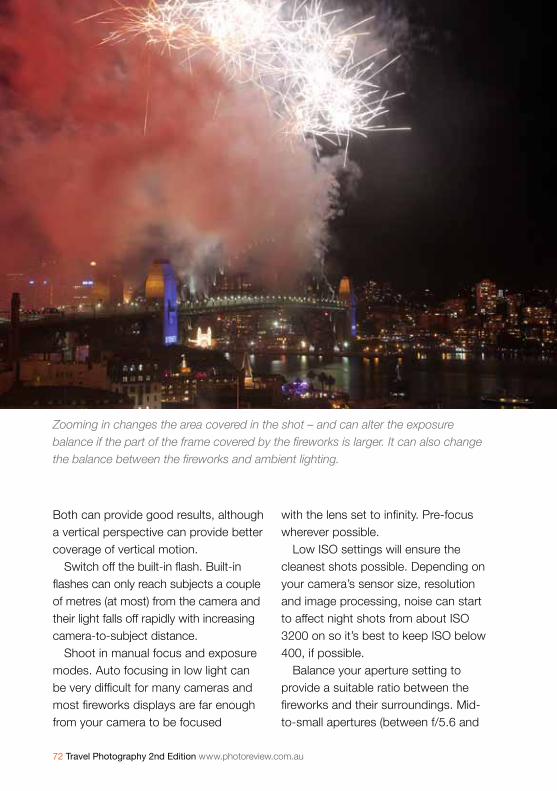
Zooming in changes the area covered in the shot – and can alter the exposure balance if the part of the frame covered by the fireworks is larger. It can also change the balance between the fireworks and ambient lighting.
Both can provide good results, although a vertical perspective can provide better coverage of vertical motion.
Switch off the built-in flash. Built-in flashes can only reach subjects a couple of metres (at most) from the camera and their light falls off rapidly with increasing camera-to-subject distance.
Shoot in manual focus and exposure modes. auto focusing in low light can be very difficult for many cameras and most fireworks displays are far enough from your camera to be focused
with the lens set to infinity. Pre-focus wherever possible.
Low ISO settings will ensure the cleanest shots possible. Depending on your camera’s sensor size, resolution and image processing, noise can start to affect night shots from about ISO 3200 on so it’s best to keep ISO below 400, if possible.
Balance your aperture setting to provide a suitable ratio between the fireworks and their surroundings. Mid-to-small apertures (between f/5.6 and
www.photoreview.com.au Travel Photography 2nd Edition 73
Shooting fireworkS and light ShowS
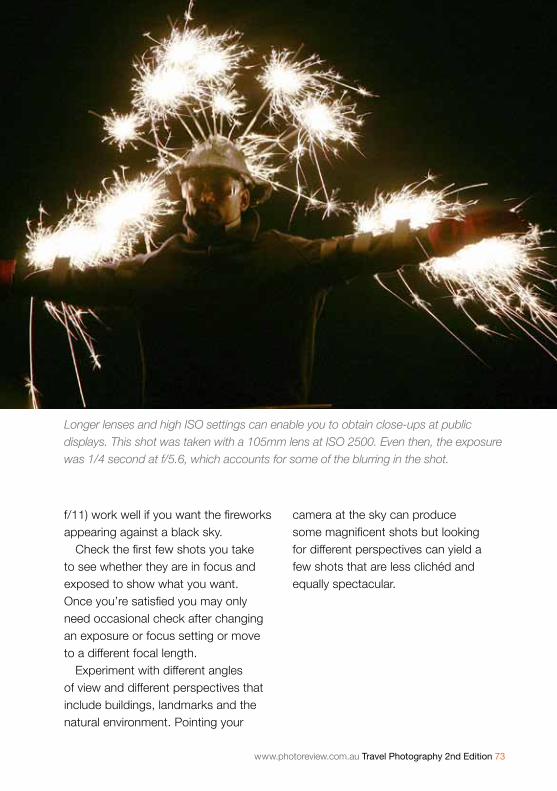
Longer lenses and high ISO settings can enable you to obtain close-ups at public displays. This shot was taken with a 105mm lens at ISO 2500. Even then, the exposure was 1/4 second at f/5.6, which accounts for some of the blurring in the shot.
f/11) work well if you want the fireworks appearing against a black sky.
Check the first few shots you take to see whether they are in focus and exposed to show what you want. Once you’re satisfied you may only need occasional check after changing an exposure or focus setting or move to a different focal length.
Experiment with different angles of view and different perspectives that include buildings, landmarks and the natural environment. pointing your
camera at the sky can produce some magnificent shots but looking for different perspectives can yield a few shots that are less clichéd and equally spectacular.
74 Travel Photography 2nd Edition www.photoreview.com.au
Close-ups
Close-up shots pull you directly into a subject and make you focus in upon details in the scene – or within individual subjects. they’re great for highlighting something most people normally overlook and revealing intimate details and interactions.
they will also add richness to your collection of images and provide a more personalised perspective that will make your shots stand out from the crowd. If you’re planning a photo book, a collection of close-ups will make a nice page layout highlighting a specific area of your trip.
We often hear the term ‘macro’ used interchangeably with close-up photography. But there is an important difference between these genres: whereas close-ups refer to images shot at close range and isolated from their surroundings, macro shots are extreme close-ups that portray the subject as life-size or greater-than-life-size.
Special macro lenses are required for macro photography and, even though these lenses can be used for other applications, few travellers can justify including a macro lens in their kits. Zoom lenses with ‘macro’ focusing positions can be great for achieving
Chapter 8
Close-upscloser-than-average focus. But few (if any) of them are capable of true macro focus.
In most cases, telephoto lenses can be used to focus in and extract details from a scene – which you may already have photographed with a wide-angle lens. extended-range zoom lenses make zooming in for close-ups easy.
popular zoom lenses that range from 55mm to 200mm or 70mm to 300mm in 35mm format will work well for most close-ups, as well as providing scope for other types of photography. even a prime 50mm lens can produce some nice close-ups, particularly if it has an f/1.8 aperture, which makes it easy to isolate subjects from their backgrounds and is well-suited to close-up shots of animals and plants.
Finding subjects for close-ups is largely a matter of having an eye for interesting details. this is developed over time although if you research your destinations beforehand you will often pick up tips on potential subjects.
Don’t be afraid to crop images to pare down to details you want to record. Sometimes it’s impossible to move in close enough to select out the details you want. either your lens may not be
www.photoreview.com.au Travel Photography 2nd Edition 75
Close-ups
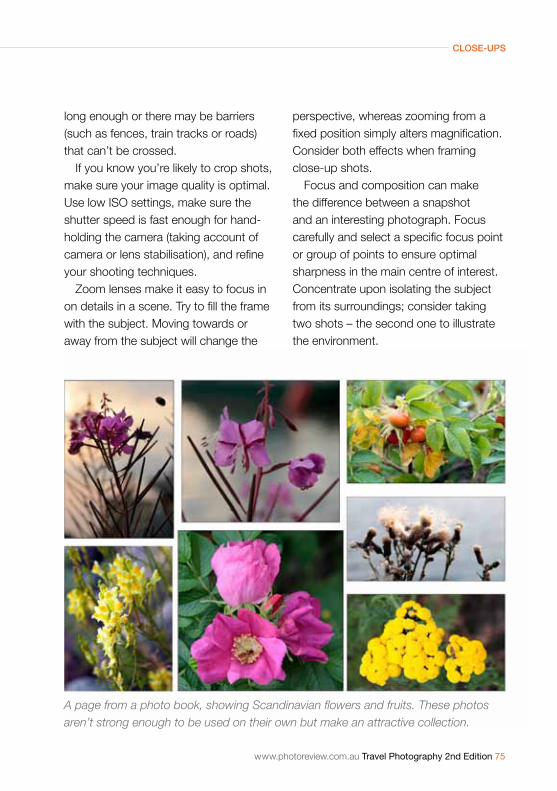
A page from a photo book, showing Scandinavian flowers and fruits. These photos aren’t strong enough to be used on their own but make an attractive collection.
long enough or there may be barriers (such as fences, train tracks or roads) that can’t be crossed.
If you know you’re likely to crop shots, make sure your image quality is optimal. Use low ISO settings, make sure the shutter speed is fast enough for hand-holding the camera (taking account of camera or lens stabilisation), and refine your shooting techniques.
Zoom lenses make it easy to focus in on details in a scene. Try to fill the frame with the subject. Moving towards or away from the subject will change the
perspective, whereas zooming from a fixed position simply alters magnification. Consider both effects when framing close-up shots.
Focus and composition can make the difference between a snapshot and an interesting photograph. Focus carefully and select a specific focus point or group of points to ensure optimal sharpness in the main centre of interest. Concentrate upon isolating the subject from its surroundings; consider taking two shots – the second one to illustrate the environment.
76 Travel Photography 2nd Edition www.photoreview.com.au
Close-ups
www.photoreview.com.au Travel Photography 2nd Edition 77
Close-ups
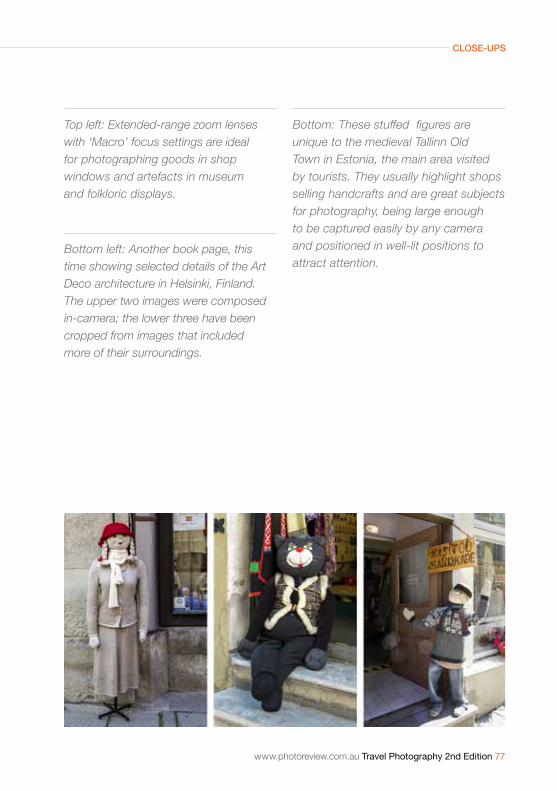
Top left: Extended-range zoom lenses with ‘Macro’ focus settings are ideal for photographing goods in shop windows and artefacts in museum and folkloric displays.
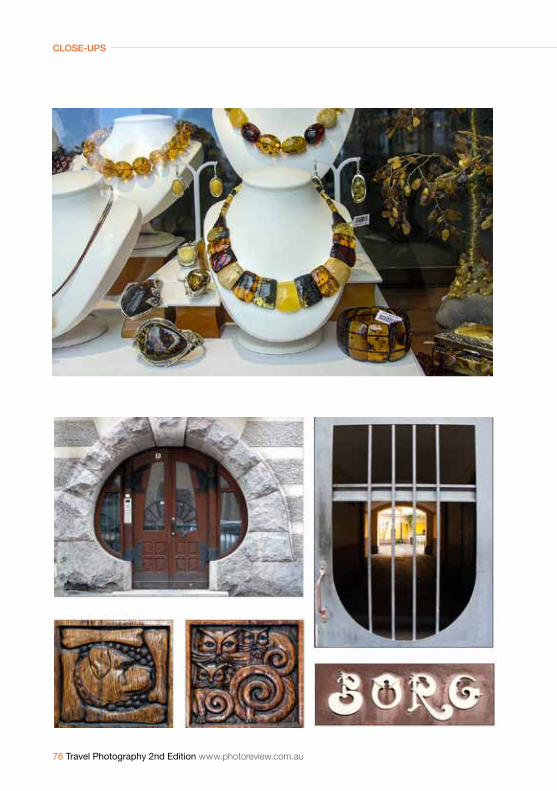
Bottom left: Another book page, this time showing selected details of the Art Deco architecture in Helsinki, Finland. The upper two images were composed in-camera; the lower three have been cropped from images that included more of their surroundings.
Bottom: These stuffed figures are unique to the medieval Tallinn Old Town in Estonia, the main area visited by tourists. They usually highlight shops selling handcrafts and are great subjects for photography, being large enough to be captured easily by any camera and positioned in well-lit positions to attract attention.
78 Travel Photography 2nd Edition www.photoreview.com.au
Close-ups
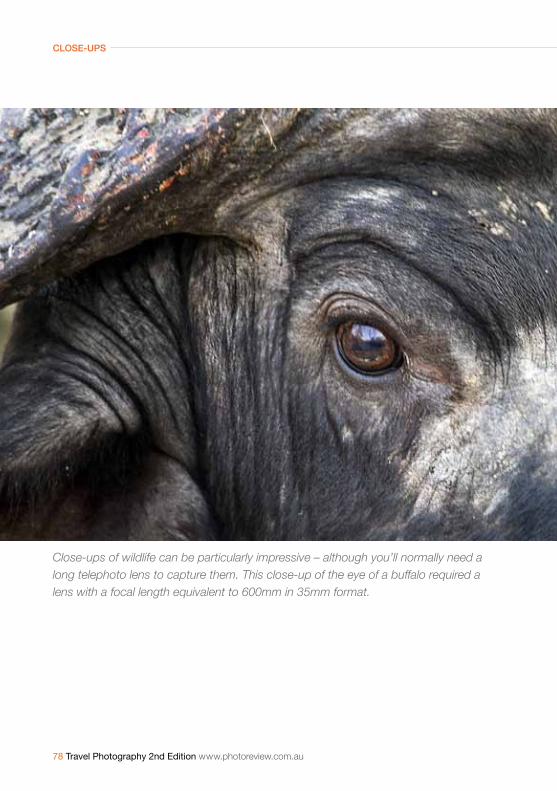
Close-ups of wildlife can be particularly impressive – although you’ll normally need a long telephoto lens to capture them. This close-up of the eye of a buffalo required a lens with a focal length equivalent to 600mm in 35mm format.
www.photoreview.com.au Travel Photography 2nd Edition 79
Close-ups
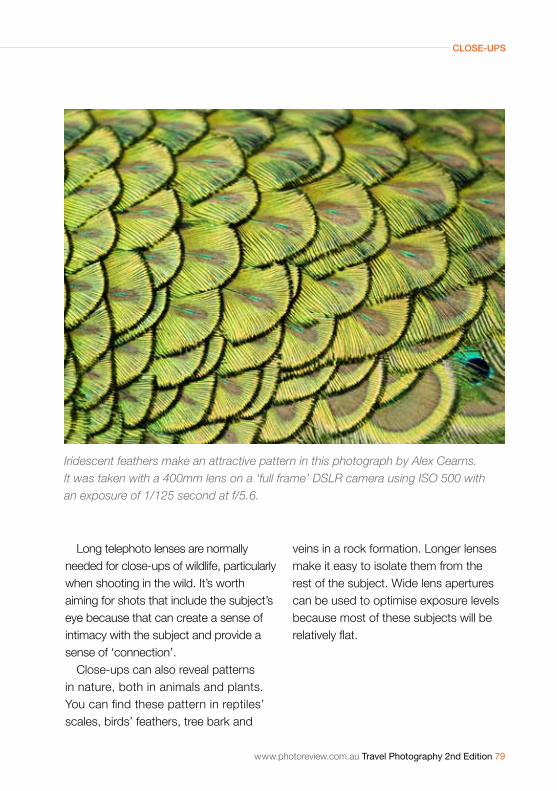
Long telephoto lenses are normally needed for close-ups of wildlife, particularly when shooting in the wild. It’s worth aiming for shots that include the subject’s eye because that can create a sense of intimacy with the subject and provide a sense of ‘connection’.
Close-ups can also reveal patterns in nature, both in animals and plants. You can find these pattern in reptiles’ scales, birds’ feathers, tree bark and
Iridescent feathers make an attractive pattern in this photograph by Alex Cearns. It was taken with a 400mm lens on a ‘full frame’ DSLR camera using ISO 500 with an exposure of 1/125 second at f/5.6.
veins in a rock formation. Longer lenses make it easy to isolate them from the rest of the subject. Wide lens apertures can be used to optimise exposure levels because most of these subjects will be relatively flat.
80 Travel Photography 2nd Edition www.photoreview.com.au
PhotograPhing wildlife
the most important criteria for success in this highly specialised genre are being in the right place at the right time with the right equipment. achieving these objectives involves research, luck and commonsense.
It can be difficult for amateurs to find the time and resources to get into prime locations where most professional shots are taken. however, there are plenty of ways to obtain memorable shots, starting with zoos and wildlife parks, which are readily accessible to the public.
research will inform you what to expect in the area(s) you plan to visit and what time of year is best for seeing the animals and birds you want to photograph. You will also need to discover how to get there (and back) and investigate the best ways to get around.
Luck is less predictable. the old saying that ‘fortune favours the well-prepared’ is perfectly true when it comes to wildlife photography so, the better your research and preparation, the more likely you will be to get lucky.
animal behaviour can be unpredictable and totally out of your control. You can’t ask them to pose for your camera – or turn to present
Chapter 9
Photographing wildlifea better angle or move into better lighting. patience is essential for good photographs, as most professional wildlife photographers will affirm.
the longer you can spend watching an animal, the more likely you will be to understand what they are doing and recognise attributes of different animals. this helps you to anticipate how they might behave at different times of the day or in different weather conditions.
Dedicated safaris and whale watching trips can provide great opportunities for keen amateur photographers. the rangers and guides who run these trips will know where the animal(s) are and when they can normally be seen at their best. they also have appropriate vehicles and other equipment for making the trip a success.
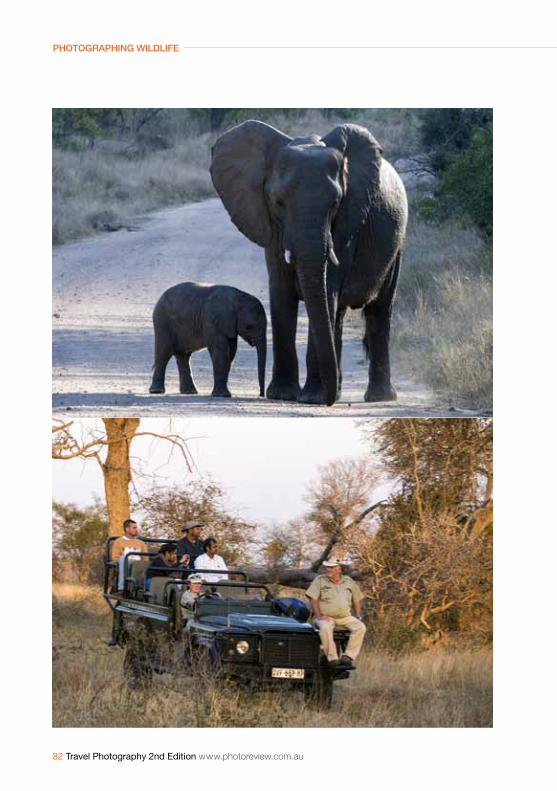
Where animals and birds are used to people (‘habituated’), you can usually get quite close to them, as long as they aren’t dangerous. Nice close-up shots can be taken with relatively short telephoto lenses (135mm to 250mm). You will need to move as quietly as possible and be prepared to back off at any signs of threatening behaviour, although this can simply be a warning; not an intention to act.
www.photoreview.com.au Travel Photography 2nd Edition 81
PhotograPhing wildlife
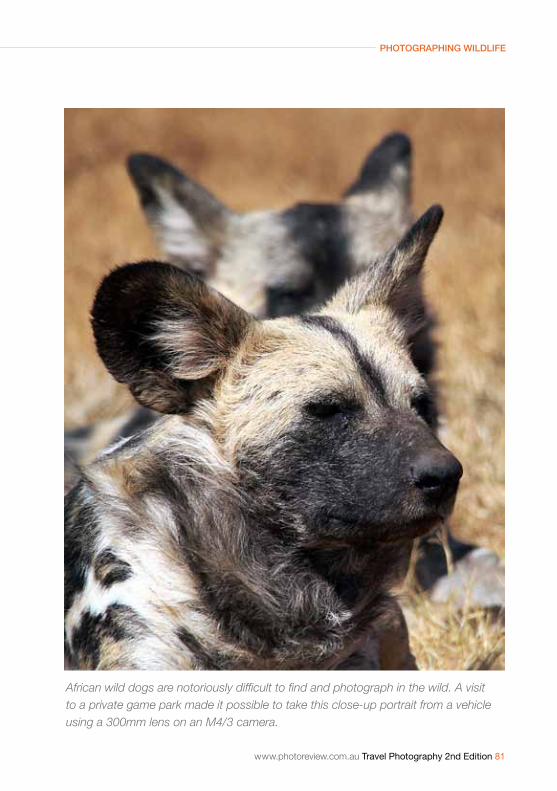
African wild dogs are notoriously difficult to find and photograph in the wild. A visit to a private game park made it possible to take this close-up portrait from a vehicle using a 300mm lens on an M4/3 camera.
82 Travel Photography 2nd Edition www.photoreview.com.au
PhotograPhing wildlife
www.photoreview.com.au Travel Photography 2nd Edition 83
PhotograPhing wildlife
Top left: You must wait for an elephant to move off the road before driving on. This mother elephant clearly indicates she sees the vehicle and has slightly flared her ears to warn against any approach. Fortunately, the backlighting makes an attractive shot in this situation.
Bottom left: Game drives in Africa make use of special vehicles, usually open-topped, which provide an all-round view of the area. Expert animal spotters are often positioned at the front of the vehicle to look for game. Safaris like this provide a great way to obtain close-up shots that couldn’t be achieved in any other way.
Be prepared to accept some constraints on where you can go and how freely you can move about. africa is a wonderful place to photograph wildlife, but safari participants are normally required to remain in vehicles – for their safety. Guides tell chilling stories about clients mauled by lions or trampled by elephants when they left the safety of vehicles.
On safari, shooting from a vehicle will provide the best chances for close-up shots as animals have become so accustomed to vehicles they ignore them. Well-run safaris will cater for keen photographers and take you into places where you can expect to see animals.
Some will concentrate on ‘bagging’ The Big Five (buffalo, elephant, leopard, lion and rhino), chosen for the difficulty in hunting them and the degree of danger involved, rather than their size or physical attractiveness. Make sure this isn’t to the detriment of photographing other animals; it would be a pity to miss out on the many ungulates (hoofed animals), which include giraffes, zebras, warthogs and lots of attractive deer species.
the most elusive animals are the smaller cats and nocturnal (or semi-nocturnal) creatures like honey badgers, bush babies, pangolins and brown hyaenas. Spotted hyaenas are relatively common and often seen during the day.
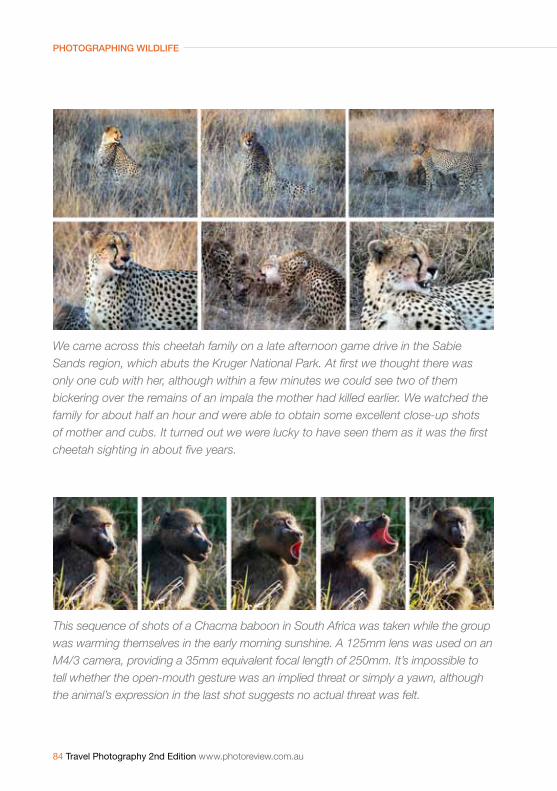
84 Travel Photography 2nd Edition www.photoreview.com.au
PhotograPhing wildlife
We came across this cheetah family on a late afternoon game drive in the Sabie Sands region, which abuts the Kruger National Park. At first we thought there was only one cub with her, although within a few minutes we could see two of them bickering over the remains of an impala the mother had killed earlier. We watched the family for about half an hour and were able to obtain some excellent close-up shots of mother and cubs. It turned out we were lucky to have seen them as it was the first cheetah sighting in about five years.
This sequence of shots of a Chacma baboon in South Africa was taken while the group was warming themselves in the early morning sunshine. A 125mm lens was used on an M4/3 camera, providing a 35mm equivalent focal length of 250mm. It’s impossible to tell whether the open-mouth gesture was an implied threat or simply a yawn, although the animal’s expression in the last shot suggests no actual threat was felt.
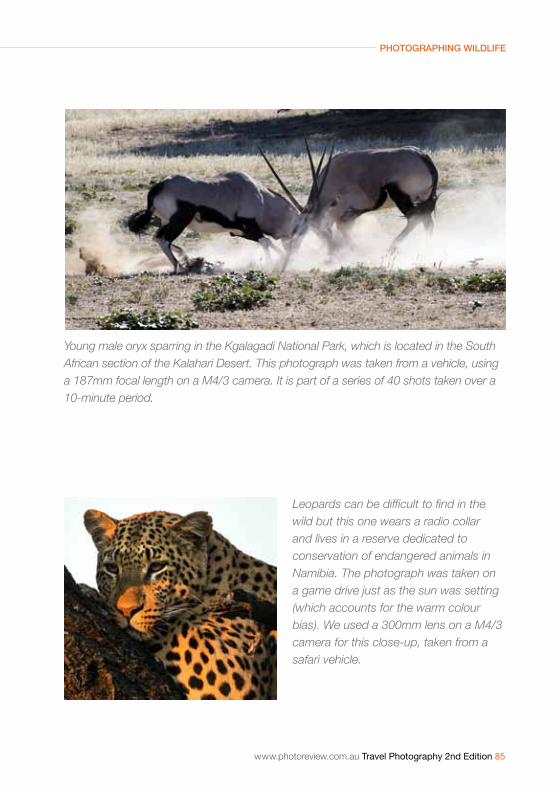
www.photoreview.com.au Travel Photography 2nd Edition 85
PhotograPhing wildlife
Young male oryx sparring in the Kgalagadi National Park, which is located in the South African section of the Kalahari Desert. This photograph was taken from a vehicle, using a 187mm focal length on a M4/3 camera. It is part of a series of 40 shots taken over a 10-minute period.
Leopards can be difficult to find in the wild but this one wears a radio collar and lives in a reserve dedicated to conservation of endangered animals in Namibia. The photograph was taken on a game drive just as the sun was setting (which accounts for the warm colour bias). We used a 300mm lens on a M4/3 camera for this close-up, taken from a safari vehicle.
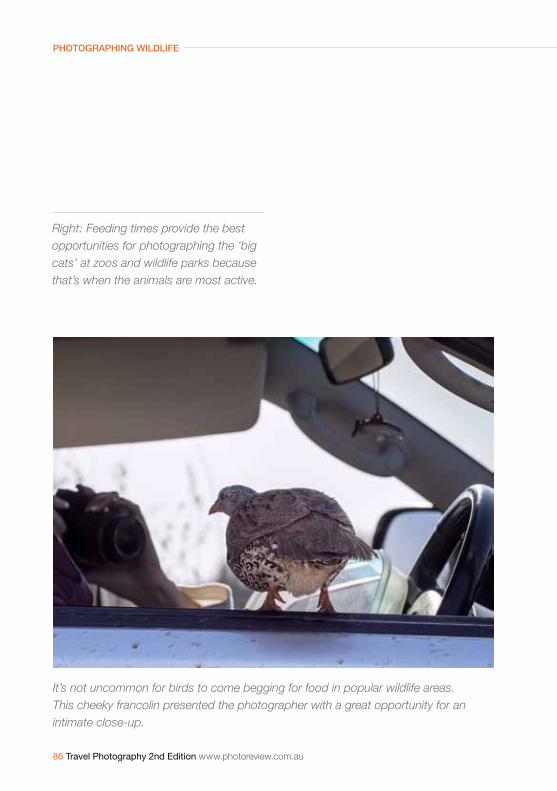
86 Travel Photography 2nd Edition www.photoreview.com.au
PhotograPhing wildlife
It’s not uncommon for birds to come begging for food in popular wildlife areas. This cheeky francolin presented the photographer with a great opportunity for an intimate close-up.
Right: Feeding times provide the best opportunities for photographing the ‘big cats’ at zoos and wildlife parks because that’s when the animals are most active.
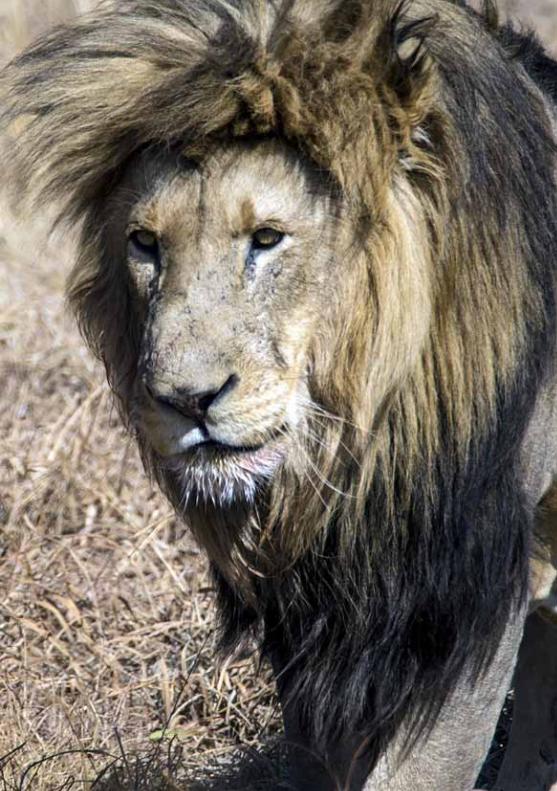
www.photoreview.com.au Travel Photography 2nd Edition 87
PhotograPhing wildlife
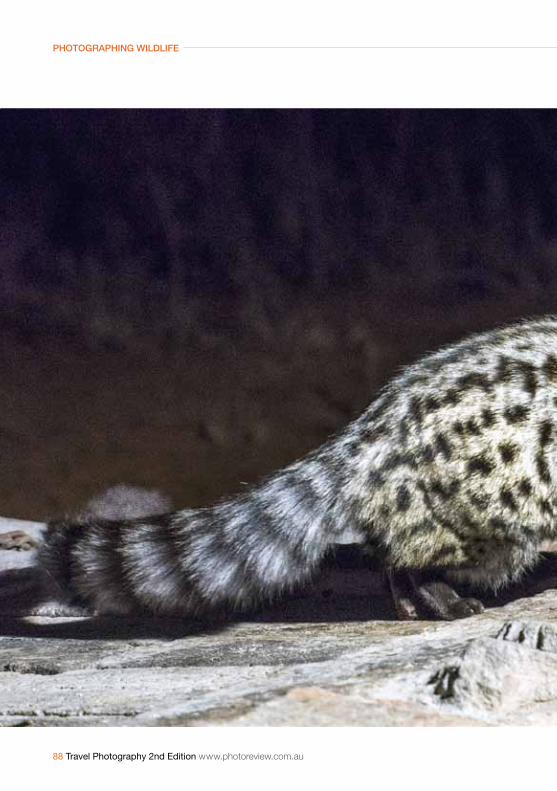
88 Travel Photography 2nd Edition www.photoreview.com.au
PhotograPhing wildlife
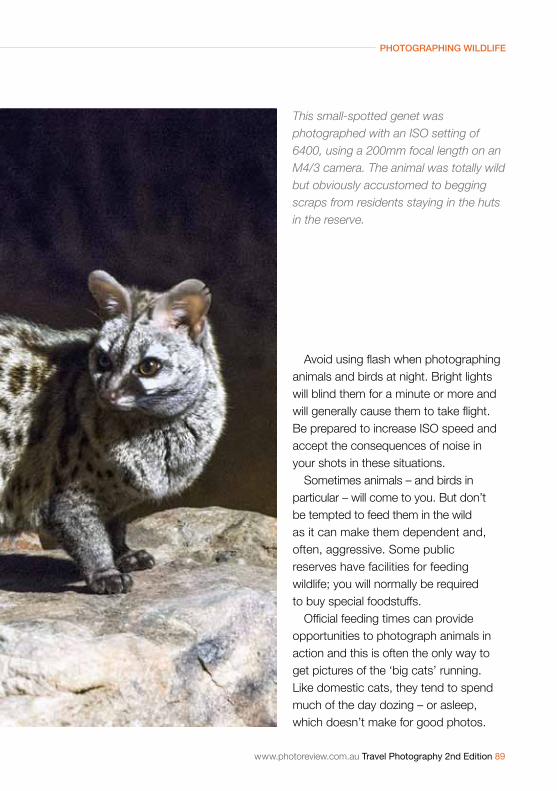
www.photoreview.com.au Travel Photography 2nd Edition 89
PhotograPhing wildlife
This small-spotted genet was photographed with an ISO setting of 6400, using a 200mm focal length on an M4/3 camera. The animal was totally wild but obviously accustomed to begging scraps from residents staying in the huts in the reserve.
Avoid using flash when photographing animals and birds at night. Bright lights will blind them for a minute or more and will generally cause them to take flight. Be prepared to increase ISO speed and accept the consequences of noise in your shots in these situations.
Sometimes animals – and birds in particular – will come to you. But don’t be tempted to feed them in the wild as it can make them dependent and, often, aggressive. Some public reserves have facilities for feeding wildlife; you will normally be required to buy special foodstuffs.
Official feeding times can provide opportunities to photograph animals in action and this is often the only way to get pictures of the ‘big cats’ running. Like domestic cats, they tend to spend much of the day dozing – or asleep, which doesn’t make for good photos.

90 Travel Photography 2nd Edition www.photoreview.com.au
Managing iMages as you travel
all travelling photographers must decide how to keep their digital photos safe and organised while on the move. One of the key decisions to make is how much and what kind of storage media you will pack with your camera equipment.
the camera will determine the type of memory card you need and its resolution, video capabilities and the extent to which you use continuous shooting will dictate the card speed required. then, allowing for the capacities of the cards you choose, you will probably need backing-up storage for images while you’re on the move.
Chapter 10
Managing images as you travelmemory card speeds Most modern cameras use Secure Digital (SD) cards, which come in three types: standard-capacity SD cards, high-capacity SDhC cards and high-speed SDXC cards. Standard-capacity SD cards have been largely phased out since their maximum capacity is only 2GB.
For all cards, data transfer speeds are currently rated in two ways: by a speed class defined by the SD Association or according to the UhS (Ultra high Speed) Speed Class rating. UhS ratings are only found on SDhC and SDXC memory cards and devices, with UhS 3 being more than twice as fast as UhS 1. recently-released cameras should be able to use UhS cards.
the ‘x’ speed rating formerly used on memory cards has been made obsolete with the introduction of speed classes. however, some card manufacturers continue to use it for read speeds. (the ‘x’ equates to approximately 0.15 Megabytes/second.)
the table below compares the different speed class ratings for SDHC and SDXC cards.
Because card prices increase with higher speeds and capacities,
Two UHS-rated SDXC cards from the same manufacturer show the speed difference between UHS 3 (left) and UHS 1 (right) cards.
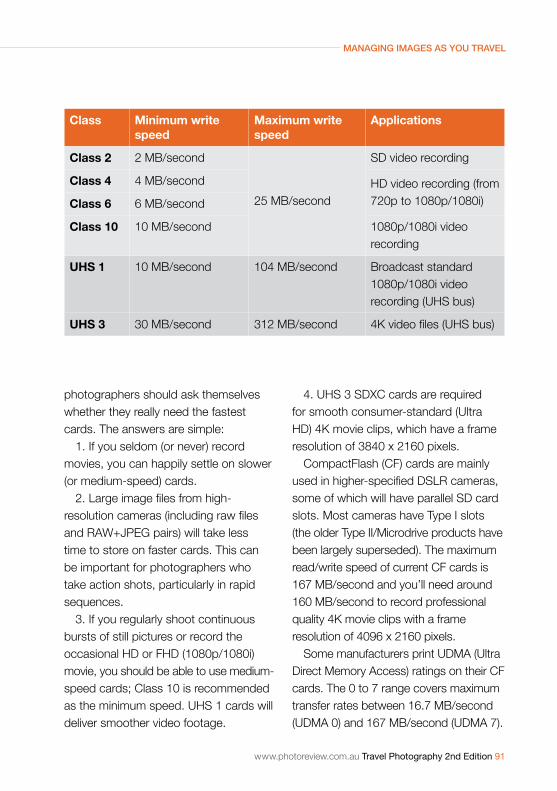
www.photoreview.com.au Travel Photography 2nd Edition 91
Managing iMages as you travel
Class Minimum write speed
Maximum write speed
Applications
Class 2 2 MB/second
25 MB/second
SD video recording
Class 4 4 MB/second hD video recording (from 720p to 1080p/1080i)Class 6 6 MB/second
Class 10 10 MB/second 1080p/1080i video recording
UHs 1 10 MB/second 104 MB/second Broadcast standard 1080p/1080i video recording (UhS bus)
UHs 3 30 MB/second 312 MB/second 4K video files (UHS bus)
photographers should ask themselves whether they really need the fastest cards. the answers are simple:
1. If you seldom (or never) record movies, you can happily settle on slower (or medium-speed) cards.
2. Large image files from high-resolution cameras (including raw files and raW+JpeG pairs) will take less time to store on faster cards. this can be important for photographers who take action shots, particularly in rapid sequences.
3. If you regularly shoot continuous bursts of still pictures or record the occasional hD or FhD (1080p/1080i) movie, you should be able to use medium-speed cards; Class 10 is recommended as the minimum speed. UhS 1 cards will deliver smoother video footage.
4. UhS 3 SDXC cards are required for smooth consumer-standard (Ultra hD) 4K movie clips, which have a frame resolution of 3840 x 2160 pixels.
CompactFlash (CF) cards are mainly used in higher-specified DSLR cameras, some of which will have parallel SD card slots. Most cameras have type I slots (the older type II/Microdrive products have been largely superseded). the maximum read/write speed of current CF cards is 167 MB/second and you’ll need around 160 MB/second to record professional quality 4K movie clips with a frame resolution of 4096 x 2160 pixels.
Some manufacturers print UDMa (Ultra Direct Memory access) ratings on their CF cards. the 0 to 7 range covers maximum transfer rates between 16.7 MB/second (UDMa 0) and 167 MB/second (UDMa 7).

92 Travel Photography 2nd Edition www.photoreview.com.au
Managing iMages as you travel
This CompactFlash card carries both the ‘x’ speed rating and the UDMA 7 designation. The 1066x rating equates to almost 164 MB/second, which is close to the UDMA 7 rating.
memory card capacitiesWhile SD cards are made in capacities up to 512GB and CompactFlash cards are available with 256GB capacity, such high capacities are very expensive and only sold by specialist shops. the original SD (Secure Digital) memory cards, which were launched in 1999, had a maximum capacity of 2MB. this was expanded to 32GB using the FAT32 file system with the introduction of SDhC (high Capacity) cards in 2006.
Both capacity and speed increased again in 2009 when SDXC (eXtended Capacity) cards were introduced. they have a theoretical maximum capacity of 2TB, achieved by using the exFAT file system. Modern UDMa-7 CompactFlash cards support data transfer rates of up to 145 Mbytes/second.
The table below shows typical file sizes for the largest images at four popular sensor resolutions. The range of file sizes reflects different compression levels and whether raw files are compressed or uncompressed.
Use these figures to estimate the shooting capacity you will need. When shooting raW+JpeG pairs, add the raw and JPEG file sizes, using data from your camera’s manual if you shoot reduced-size JPEGs or raw files.
It’s risky using a single card to store all your shots because it could be lost or mislaid and, although unlikely, any card can fail without notice through
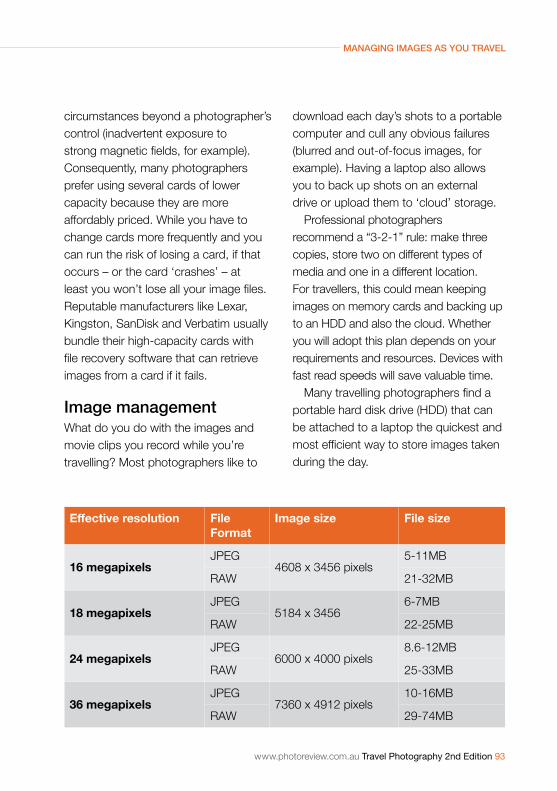
www.photoreview.com.au Travel Photography 2nd Edition 93
Managing iMages as you travel
Effective resolution File Format
Image size File size
16 megapixelsJpeG
4608 x 3456 pixels5-11MB
raW 21-32MB
18 megapixelsJpeG
5184 x 34566-7MB
raW 22-25MB
24 megapixelsJpeG
6000 x 4000 pixels8.6-12MB
raW 25-33MB
36 megapixelsJpeG
7360 x 4912 pixels10-16MB
raW 29-74MB
circumstances beyond a photographer’s control (inadvertent exposure to strong magnetic fields, for example). Consequently, many photographers prefer using several cards of lower capacity because they are more affordably priced. While you have to change cards more frequently and you can run the risk of losing a card, if that occurs – or the card ‘crashes’ – at least you won’t lose all your image files. reputable manufacturers like Lexar, Kingston, SanDisk and Verbatim usually bundle their high-capacity cards with file recovery software that can retrieve images from a card if it fails.
image managementWhat do you do with the images and movie clips you record while you’re travelling? Most photographers like to
download each day’s shots to a portable computer and cull any obvious failures (blurred and out-of-focus images, for example). having a laptop also allows you to back up shots on an external drive or upload them to ‘cloud’ storage.
professional photographers recommend a “3-2-1” rule: make three copies, store two on different types of media and one in a different location. For travellers, this could mean keeping images on memory cards and backing up to an hDD and also the cloud. Whether you will adopt this plan depends on your requirements and resources. Devices with fast read speeds will save valuable time.
Many travelling photographers find a portable hard disk drive (hDD) that can be attached to a laptop the quickest and most efficient way to store images taken during the day.

94 Travel Photography 2nd Edition www.photoreview.com.au
Managing iMages as you travel
a more recent option is a Solid State Drive (SSD), which uses flash memory (like memory cards and USB thumb drives). having no moving parts, SSDs are more robust than HDDs, offer faster transfer speeds and use less power.
Lexar Media offers solid state storage in its Professional Workflow products, which include two four-bay reader and storage drive hubs, a selection of card readers, and two storage drives. Users can select the best combination of card readers and storage drives to suit their own requirements and the
system supports thunderbolt 2 and USB 3.0 technologies for high-speed transfer and backing-up of raW images, high-resolution JpeGs and hD, 3D and 4K video footage. the hub is also backwards compatible with thunderbolt and USB 2.0 (at slower speeds), while using the same cables and connectors.
the system’s USB 3.0 storage drives provide 256GB or 512GB of capacity and they can be paired with a hub or used separately while photographers are on the move. Lexar also offers two USB 3.0 compatible card readers; one supporting 25 memory card formats and the other a dual-slot (CF and SD) professional reader with an interface speed up to 500MB/second. Both support concurrent downloads and card-to-card file transfer.
‘Cloud’ storage is something of a mixed bag with lots of players and a variety of prices, ranging from ‘free’ bundling of storage with a subscription service to $10/month for up to 1tB. Dropbox, Flickr, Bitcasa, Google Drive, Microsoft OneDrive, SmugMug, Canon Irista and amazon are among the market leaders.
the main problem with cloud storage is that you are entrusting your precious image files to a third party that also deals with a lot of other customers. Your data may be stored on a server farm, which is usually located off-shore. If the network connection is disrupted, it will become inaccessible.
Lexar Media’s four-bay Professional Workflow hub provides space for four storage drives with capacities up to 512GB. The modular design enables individual drives to be removed for use while photographers are on the move.
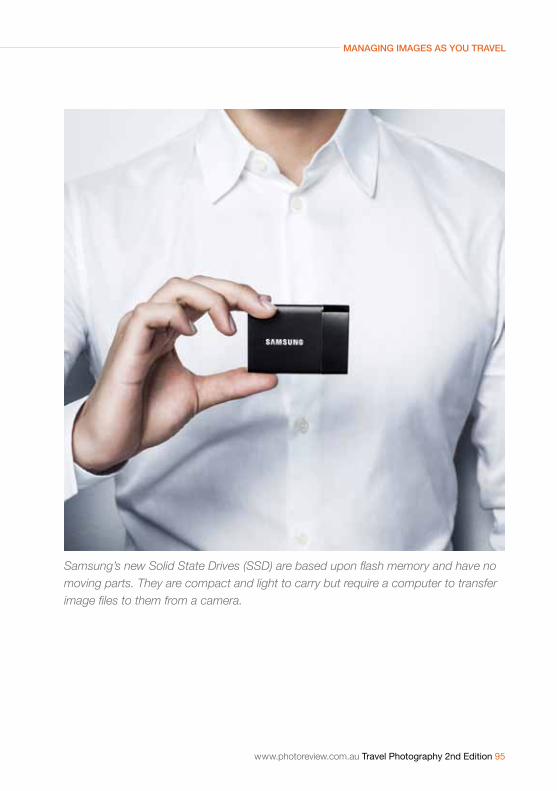
www.photoreview.com.au Travel Photography 2nd Edition 95
Managing iMages as you travel
Samsung’s new Solid State Drives (SSD) are based upon flash memory and have no moving parts. They are compact and light to carry but require a computer to transfer image files to them from a camera.

96 Travel Photography 2nd Edition www.photoreview.com.au
Managing iMages as you travel
SmugMug is one of the more popular cloud storage services among professional photographers. It offers four different plans with varying levels of customisation and e-commerce facilities.
Several hard disk drive manufacturers have developed storage devices that support ‘private’ cloud storage that you can access from your smart-phone and tablet computer. the advantage of such systems is that they are free. however, you have to set up dedicated user accounts and apply encryption to protect your data. You must also set up internet access before you can store data. Internet upload speeds are critical for your private cloud storage to be practical because you will be required to pay for both uploading and downloading when accessing files as you travel.
personal Cloud storage can be accessed from any networked computer or device, or remotely using Wi-Fi or Internet connections on your phone, tablet or laptop. You have complete control over your files; they can be password protected and encrypted, and when you delete something you know it’s gone. and after you buy the equipment, there are no annual storage fees.
photographers with Wi-Fi enabled cameras can also use their smart devices to back-up their images and movie clips to their home storage with this system – provided the Wi-Fi network is capable of handling the amount of data involved. (Capacity, system stability and transfer speeds will dictate how well the system operates.)
Making server-based cloud storage work isn’t as simple as it seems.
Most service providers place limits on how much capacity they offer before they start to charge you to store files. advertising is often a ‘given’ with plans that are free. One way to circumvent this is to have ‘personal cloud’ storage, which is a hybrid between an external drive and a cloud service. Files are stored on your local networked drive, which is usually a Network-attached Storage (NaS) device beside your home computer.
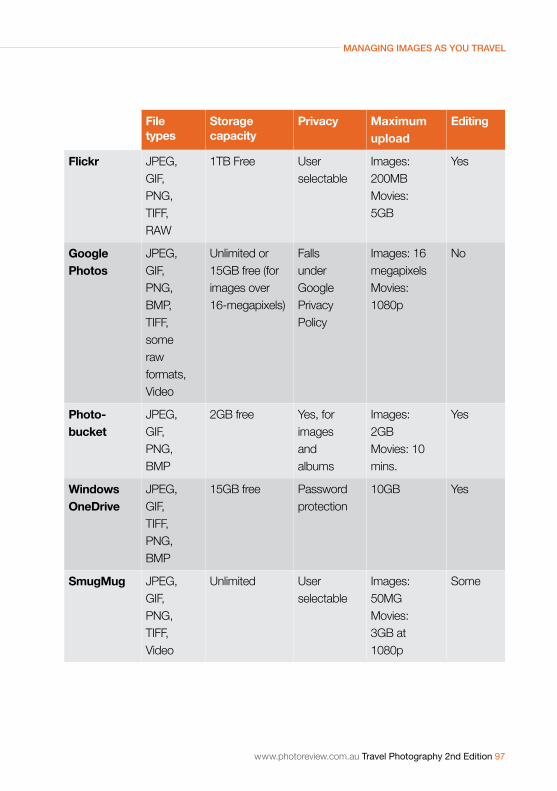
www.photoreview.com.au Travel Photography 2nd Edition 97
Managing iMages as you travel
File types
storage capacity
Privacy Maximum upload
editing
Flickr JpeG, GIF, pNG, tIFF, raW
1tB Free User selectable
Images: 200MB Movies: 5GB
Yes
Google Photos
JpeG, GIF, pNG, BMp, tIFF, some raw formats, Video
Unlimited or 15GB free (for images over 16-megapixels)
Falls under Google privacy policy
Images: 16 megapixelsMovies: 1080p
No
Photo-bucket
JpeG, GIF, pNG, BMp
2GB free Yes, for images and albums
Images: 2GBMovies: 10 mins.
Yes
Windows oneDrive
JpeG, GIF, tIFF, pNG, BMp
15GB free password protection
10GB Yes
smugMug JpeG, GIF, pNG, tIFF, Video
Unlimited User selectable
Images: 50MG Movies: 3GB at 1080p
Some
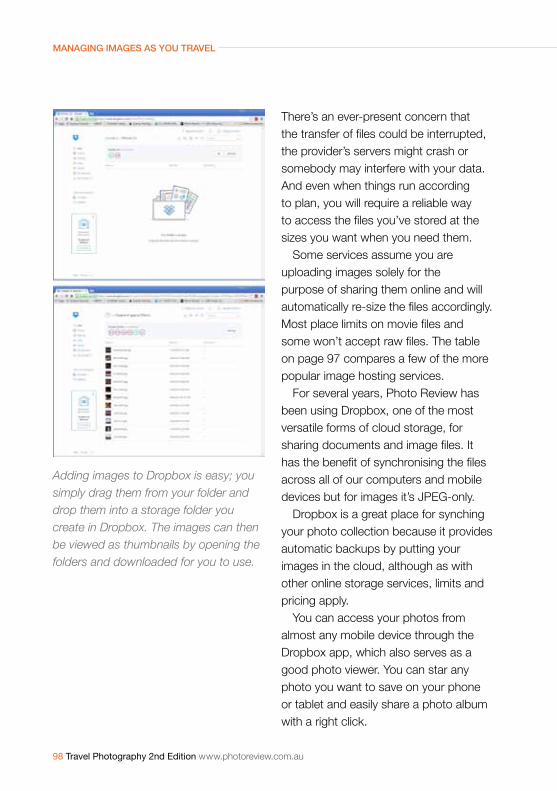
98 Travel Photography 2nd Edition www.photoreview.com.au
Managing iMages as you travel
there’s an ever-present concern that the transfer of files could be interrupted, the provider’s servers might crash or somebody may interfere with your data. and even when things run according to plan, you will require a reliable way to access the files you’ve stored at the sizes you want when you need them.
Some services assume you are uploading images solely for the purpose of sharing them online and will automatically re-size the files accordingly. Most place limits on movie files and some won’t accept raw files. The table on page 97 compares a few of the more popular image hosting services.
For several years, photo review has been using Dropbox, one of the most versatile forms of cloud storage, for sharing documents and image files. It has the benefit of synchronising the files across all of our computers and mobile devices but for images it’s JpeG-only.
Dropbox is a great place for synching your photo collection because it provides automatic backups by putting your images in the cloud, although as with other online storage services, limits and pricing apply.
You can access your photos from almost any mobile device through the Dropbox app, which also serves as a good photo viewer. You can star any photo you want to save on your phone or tablet and easily share a photo album with a right click.
Adding images to Dropbox is easy; you simply drag them from your folder and drop them into a storage folder you create in Dropbox. The images can then be viewed as thumbnails by opening the folders and downloaded for you to use.
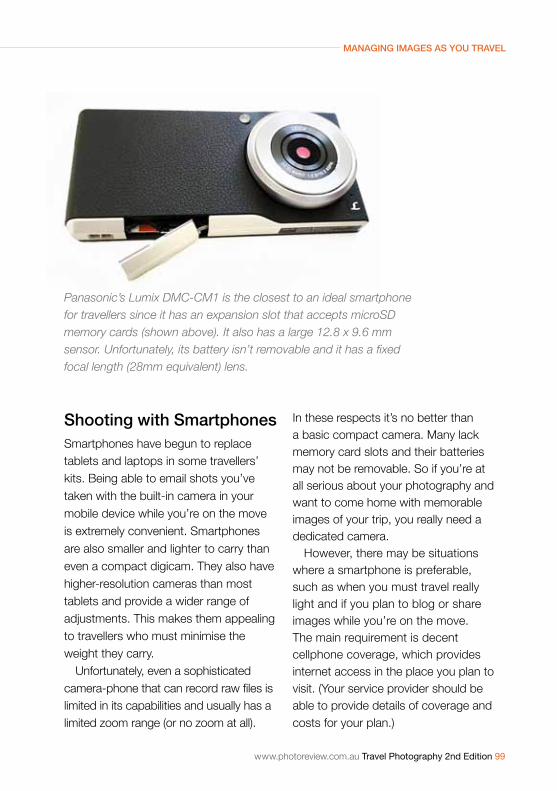
www.photoreview.com.au Travel Photography 2nd Edition 99
Managing iMages as you travel
shooting with smartphonesSmartphones have begun to replace tablets and laptops in some travellers’ kits. Being able to email shots you’ve taken with the built-in camera in your mobile device while you’re on the move is extremely convenient. Smartphones are also smaller and lighter to carry than even a compact digicam. they also have higher-resolution cameras than most tablets and provide a wider range of adjustments. this makes them appealing to travellers who must minimise the weight they carry.
Unfortunately, even a sophisticated camera-phone that can record raw files is limited in its capabilities and usually has a limited zoom range (or no zoom at all).
Panasonic’s Lumix DMC-CM1 is the closest to an ideal smartphone for travellers since it has an expansion slot that accepts microSD memory cards (shown above). It also has a large 12.8 x 9.6 mm sensor. Unfortunately, its battery isn’t removable and it has a fixed focal length (28mm equivalent) lens.
In these respects it’s no better than a basic compact camera. Many lack memory card slots and their batteries may not be removable. So if you’re at all serious about your photography and want to come home with memorable images of your trip, you really need a dedicated camera.
however, there may be situations where a smartphone is preferable, such as when you must travel really light and if you plan to blog or share images while you’re on the move. the main requirement is decent cellphone coverage, which provides internet access in the place you plan to visit. (Your service provider should be able to provide details of coverage and costs for your plan.)
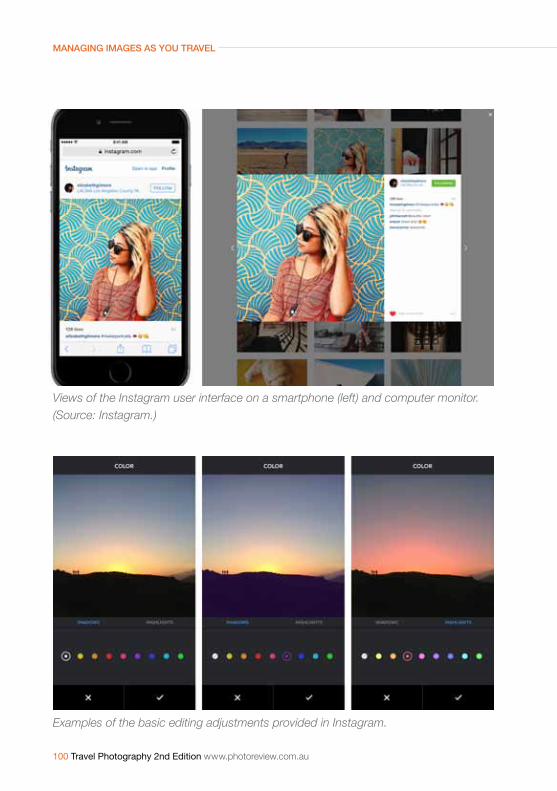
100 Travel Photography 2nd Edition www.photoreview.com.au
managing images as you travel
Views of the Instagram user interface on a smartphone (left) and computer monitor. (Source: Instagram.)
Examples of the basic editing adjustments provided in Instagram.
www.photoreview.com.au Travel Photography 2nd Edition 101
Managing iMages as you travel
Many smartphone users, particularly bloggers, sign up to Instagram and download a free app, which enables them to set up a profile page where images are posted. the app is available through the apple app Store and Google play store.
this service is primarily designed for image sharing from portable devices and accepts JPEG files and movie clips captured with the app. JPEG files may be further compressed, although the compression isn’t as aggressive as Facebook’s. Videos recorded with a recent smartphone can also be uploaded to Instagram but they’re limited to 15 seconds in length.
the current image size is 1080 x 1080 pixels at 72 pixels/inch. You can upload smaller images, but they won’t look as sharp. the header images are automatically arranged in a grid with a thin black line separating them. the images automatically rotate and there’s no way to control which image displays where.
the app provides a range of fairly basic adjustments that can be used to ‘improve’ your photos. If you want to be able to print your photos, it’s best to set Save Original photos to ON in your Instagram settings. this ensures edited photos are saved at full resolution to your device’s photo library.
all photos are public by default which means they are visible to anyone using Instagram or on the www.instagram.com website. any viewer can also download
and use them (as can Instagram) so if you don’t want your shots ‘stolen’, watermark your images before posting them to Instagram. an option exists for accounts to be made private so only people who follow you on Instagram will be able to access your photos.
the Instagram app includes links to Flickr, Facebook, and twitter and users can share individual snapshots, view shots on users’ camera rolls and access images for printing via a computer.
useful linksDigital dark age dilemma www.bit.ly/digitaldilemna SD card speeds www.bit.ly/sdcardspeeds CompactFlash www.bit.ly/compactflashinfo Storage tips www.bit.ly/photostorage
Choosing the right equipment
travel photo and back-up tips By tamron ambassador rachel Devine
The first bit of advice is get good travel insurance and make certain all of your equipment is covered. No matter what policy you have, it will not help you recover any stolen memories. While no system is fool proof, I do try to make time every evening to download the day’s images from the card and save a copy to an external hard drive that I travel with. the hard drive is small enough to store with my laptop in the hotel safe.
If I have internet access, I will also upload copies of the JpeGs to a private folder on Flickr. Wi-Fi has been a game changer for me, especially when travelling. I can share the images I take with my camera via my tablet and/or phone without ever having to open my laptop.
I shoot smarter as well so that any editing I need to do can be performed with an app on the straight-out-of-the-camera JPEG. The benefit of being able to use such great gear instead of my smartphone camera on the go is the resulting better quality images.
If I don’t post moments as they happen I am afraid they will never get shared. Instagram is the perfect space to share the immediate experience when it is fresh and exciting, while saving more images for blogging later.
102 Travel Photography 2nd Edition www.photoreview.com.au
I treat the photos from a trip as memory enhancers instead of a moment-by-moment record of what happened. When I get back home, I have only the images I really need to create an interesting and full visual story.
I tend not to want the traditional postcard images, so I get details, street portraits and environmental shots. Back home, I star my absolute favourites with a photo book in mind and edit them simply and quickly with Lightroom only.
�rachel Devine www.racheldevine.com
managing images as you travel
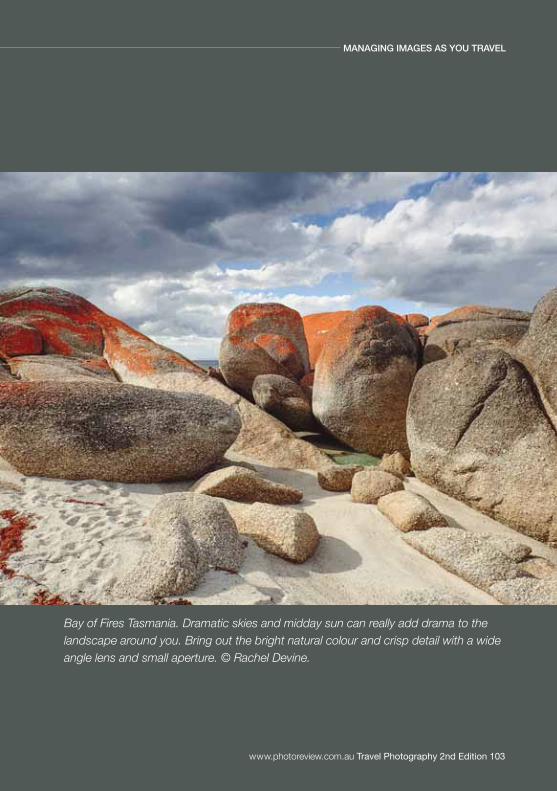
Choosing the right equipment
www.photoreview.com.au Travel Photography 2nd Edition 103
Bay of Fires Tasmania. Dramatic skies and midday sun can really add drama to the landscape around you. Bring out the bright natural colour and crisp detail with a wide angle lens and small aperture. © Rachel Devine.
managing images as you travel
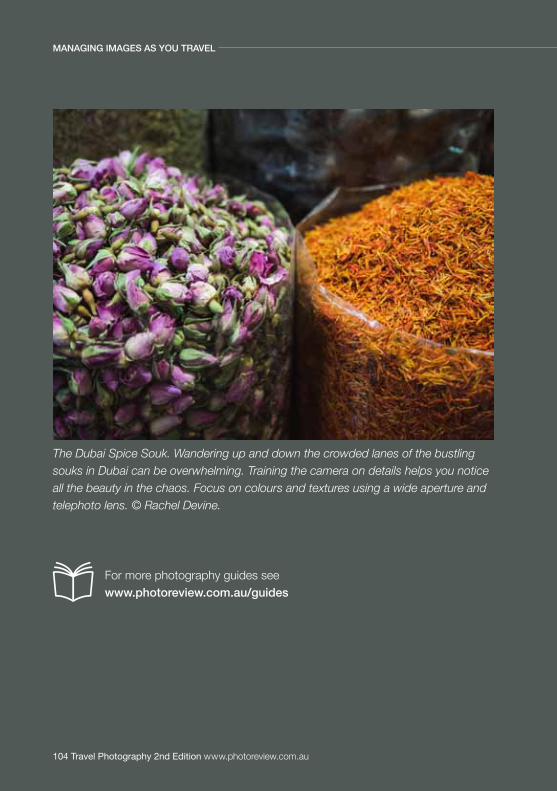
Choosing the right equipment
104 Travel Photography 2nd Edition www.photoreview.com.au
The Dubai Spice Souk. Wandering up and down the crowded lanes of the bustling souks in Dubai can be overwhelming. Training the camera on details helps you notice all the beauty in the chaos. Focus on colours and textures using a wide aperture and telephoto lens. © Rachel Devine.
managing images as you travel
For more photography guides see www.photoreview.com.au/guides

TRAVEL PHOTOGRAPHy
A few simple tips can make the world of difference to your travel shots; Travel Photography is packed with easy to follow tips and advice on how to capture superb travel images.
This handy guide shows you how to select the right gear and provides practical, step by step tips on how to improve your photos of landscapes, people, close-ups, wildlife and cities.
Travel Photography also provides advice on how to manage image files as you travel – the important facts on memory cards and storage devices – and tips on posting to the cloud and social networks while you’re on the move.
Travel Photography teaches you how to let your photos tell the story; the best places and angles, and the right settings to capture the heart and soul of urban environments and community character.
9 781922 156068 >
ISBN 978-1-922156-06-8
AbouT ThEAuTHORMargaret Brown is technical editor of Photo Review Australia and has been writing on photography for more than 30 years. She is author of the popular and extensive Photo Review Pocket Guide series and the Australian Consumer Association’s Choice Guide to Digital Photography.