treasury management - user guide - simmons bank
TRANSCRIPT

TREASURY MANAGEMENTU S E R G U I DE


TABLE OF CONTENTS
WELCOME ................................................................................................................................................2
1: FIRST-TIME LOGIN ........................................................................................................................... 3
2: ONLINE BANKING OVERVIEW .................................................................................................. 9
3: CUSTOMIZABLE DASHBOARD & WIDGETS ............................................................................ 17
4: ADMINISTRATION .........................................................................................................................23
5: POSITIVE PAY & ACH FILTERS ...............................................................................................37
6: ACH ......................................................................................................................................................45
7: WIRE TRANSFER ...........................................................................................................................55
8: REMOTE DEPOSIT NOW .............................................................................................................67
9: REMOTE DEPOSIT COMPLETE ................................................................................................75

WELCOME2
WELCOME TO THE SIMMONS BANK TREASURY MANAGEMENT TRAINING GUIDE. Simmons Bank Treasury Management Online is the online portal
that allows you to manage your accounts, treasury products and
services through an easy-to-use environment.
With Simmons Bank Treasury Management Online Banking, you can
access your depository accounts and balances, originate ACH
transactions, send wires and decision Positive Pay exceptions.
Looking for personal support? We’re here to help.
Call 1-800-551-4471
Email us at [email protected]

1: F
IRS
T-T
IME
LO
GIN
1: FIRST-TIME LOGIN
In this section, you will learn how to sign in to the system for the first time. You
will need to complete these four steps during your first login:
• Perform Initial Login
• Create Password
• Establish Security Questions
• Set Up User Authentication
You will receive access to Treasury Management Online Banking via an email
from Simmons Bank that includes two hyperlinks: one link is for your initial
login to the system and the other is for all subsequent logins.

FIRST-TIME LOGIN4

FIRST-TIME LOGIN 5
Initial Login
1. To begin, click the Initial Login
hyperlink provided in the email
from Simmons Bank. This link
is unique to the user. You will
not be able to access online
banking using a link provided
to another user.
2. The User Verification screen
appears. You will be prompted to
enter and submit your Company
ID and Login credentials. If you
are an administrator for your
company, this information will
be sent to you in a separate email
or provided during a phone call
from the bank. Otherwise, your
company administrator will send
you this information.
3. Once you enter your
Company ID and Login
credentials, click Submit.
Create Password
Once you submit your credentials,
a Change Password screen appears.
1. Follow the Password Requirements
directions to create a new
password.
2. Enter your new password in the
New Password text box and the
Confirm Password text box.
3. Click Submit.

FIRST-TIME LOGIN6
Security Questions
Once you submit your new
password, the Security Questions
screen appears. These questions
and the answers you provide will be
used for verification in the event you
forget your password or are logging
on from an unknown device.
1. Click the drop-down arrow for the
first question. You will see
a selection of pre-set questions.
2. Select one question.
3. Enter an answer to that question
in the Answer box.
4. Complete the remaining questions
and answers.
5. Click Submit.
6. The Confirm Security Questions
screen appears. Review the
questions and your answers.
7. Click Confirm.
User Authentication
For enhanced security purposes,
the online banking system includes
two options for user authentication.
Your company can be set up for
a Secure Token or Out-of-Band
Authentication phone number.
For Secure Token: You will have
to download the VIP Access mobile
app on your phone, unless you
choose to purchase a physical token.
You will also need to fill out the
Secure Token Registration screen.

FIRST-TIME LOGIN 7
For Out-of-Band Authentication
(OOBA):
1. Click Add Phone Number
in the Text Message box.
2. The Add Phone Number screen
appears. Enter the Phone Number
where you will receive your
security code.
3. You can use the same number
for both text messages and
automated phone calls by
selecting the check box.
4. Click Verify Number.
5. The Verify Phone Number screen appears showing your
phone number.
6. You will receive a text message
at the phone number you entered, with a verification code. Enter the
code received into the prompt
in Treasury Connect. Please note
that this format will be used each
time you authenticate.
7. The Verify Phone Number screen
will indicate your phone number
has been verified.
8. Click Done to continue.
9. You may also set up a phone
number for an Automated Phone
Call verification, if you wish. Click
Done when finished.

FIRST-TIME LOGIN8
10. The system Terms and Conditions
appear. Review the agreement.
11. Select the I Agree check
box at the end of the Terms
and Conditions.
12. Click Accept to complete
the process.
Once all four steps of the First-Time
Login process are complete, you
are a confirmed system user. Going
forward, use the Subsequent Login
hyperlink that was provided in your
initial email from Simmons Bank.

FIRST-TIME LOGIN 9
2: ONLINE BANKING OVERVIEW
In this section, you will learn how to use Online Banking to:
• Manage Profiles
• Set Up Notifications
• Use the Message Center
• View Cut-Off Times
• Access Payment-Related Services
• Set Up eStatements
• Use the My Accounts Widget
2:
ON
LIN
E B
AN
KIN
G
OV
ER
VIE
W

ONLINE BANKING OVERVIEW10

ONLINE BANKING OVERVIEW 11
Manage Profiles
1. To begin, click your username
in the tool bar.
2. From the drop-down box
that appears, select Profile
& Preferences.
3. The My Profile screen appears.
On this screen you can:
• View and edit your email
address, phone number and
other contact information.
• Update your security preferences,
including your password and how
an account is displayed.
• Determine your preference for
voice or text message, if you
are using the out-of-band
authentication (OOBA) method.
Notifications
1. To begin, click your username.
2. From the drop-down box that
appears, select Notification Setup.
All of the notifications available
in the system are displayed and
organized by service. You can enter
your preferred email address and
mobile phone number.
Each individual notification is turned
on by default, but you must specify
a delivery method in order to have
an alert sent to you. You can choose
to receive notifications by email,
desktop notification and/or text
message. Please note that desktop
notifications are only displayed if
you are logged in to the system.

ONLINE BANKING OVERVIEW12
3. For each notification you wish
to receive, select the desired
delivery method check box.
In order to receive a notification,
you must have both entitlement
to the service as well as access
to the account.
4. To specify a delivery method for
all alerts for this service, click the
All check box.
All bank-required alerts are
already active and settings for
these alerts cannot be edited.
5. Repeat the notification selection
process for the other services.
6. To expand each section, click the
plus sign. This will open a box
where you can filter notifications.
7. After setting up all desired
notifications, click Submit.
Going forward, the notifications
toolbar menu will display your
notifications. Please note that
regardless of delivery method,
all notifications that are turned
on are displayed in the
notification center.
A badge is displayed to let you
know how many new notifications
are available.
8. Select the Archive hyperlink to
remove the item from the menu.
9. Select View All Notifications
to access the Notification
Center where you can see all
notifications, including items
that have been archived.

ONLINE BANKING OVERVIEW 13
Message Center
The Message Center allows you to
send and receive secure messages
with the bank.
1. To begin, select Message Center
from the toolbar.
2. To send a message, click
Compose.
3. Click Select Subject and choose
a subject from the list provided.
4. Type your message in the
Message box.
5. If you want to include an
attachment, click the Attach File
box and then select your file
for uploading.
6. When your message is complete,
click Send.
Cut-Off Times
1. To view cut-off times, click
Cut-Off Times from the toolbar.
2. The cut-off times for submitting
items for various services are
displayed.

ONLINE BANKING OVERVIEW14
Payment-Related Services
The Payments menu allows you to
quickly and easily access services
such as ACH, Wire Transfer, Bill Pay
(Positive Pay) and more.
1. To access the Payments menu,
click the Payments menu from
the toolbar.
2. A drop-down menu appears.
Select the desired hyperlink
to proceed.
eStatements
1. To set up eStatements, click the
Reporting menu.
2. A drop-down menu appears.
Select Electronic Documents.
3. The enrollment screen appears.
Follow the steps described on
the screen.
4. When complete, click Enroll Now.
5. The Email Setting screen appears.
Enter or update your email and
click Save Settings.

ONLINE BANKING OVERVIEW 15
My Accounts Widget
The My Accounts widget allows you
to view accounts and their balances
in customized groups.
1. To access the My Accounts
widget, click the Dashboard
menu.
2. Click Manage Groups to create,
edit, or rename groups and
manage the accounts within
each group.
3. Click Details for a snapshot of an
account. You can view a graph of
your balances over time and your
posted transactions from the last
10 days.
4. To view a complete list of your
transaction activity, click the
account hyperlink.
5. The Account Transactions
screen appears. You can view
transactions that have posted
today for the selected account.
Options are available to change
the Transaction Date range.
6. Click View Check or View
Deposit hyperlinks to view
images of the item.
7. To search for a specific
transaction, click Advanced
Transaction Search. You can
search using a variety of criteria
including date, account, check
number and more.
For more information about the
online banking system, please
contact us at 1-800-551-4471.


3: CUSTOMIZABLE DASHBOARD & WIDGETS
In this section, you will learn how to:
• Configure Your Dashboard
• Review Preset Widgets
• Save Your Favorite Reports
3:
CU
ST
OM
IZA
BL
E
DA
SH
BO
AR
D &
WID
GE
TS

FIRST-TIME LOGIN18

CUSTOMIZABLE DASHBOARD & WIDGETS 19
Configure & Customize Your Dashboard
1. To begin, click Configure
Dashboard. The system shows
placeholders for all widgets
currently displayed on your
Dashboard.
2. To remove widgets from your
Dashboard, click the applicable
Remove Widget hyperlink.
Please note that the Information
Center and Resource widgets
cannot be removed from the
Dashboard.
3. To add widgets to your
Dashboard, click the Add Widget
button. The Add a Widget screen
appears.
4. Choose the widget you would like
displayed and click Add Widget.
Repeat this process for all widgets
you wish to add.
5. When complete, click the Add
Widgets button at the bottom of
the screen. The widgets are added
to the bottom of the Dashboard.

CUSTOMIZABLE DASHBOARD & WIDGETS20
Resize & Rearrange Widgets
1. To resize a widget, place the
mouse cursor on the side of
the widget you wish to resize.
2. Click and drag the widget box
to either enlarge or minimize
the size of the widget.
3. To rearrange the widgets on
your Dashboard, simply drag
and drop them to a new location.
For easy access, you should move
the widgets you use most often
to the top of the screen.
4. When you have the widgets
in place, click Save at the top
of the screen.
NOTE: You have customized your
Dashboard and the widgets
will be displayed in this order
going forward.
Available Widgets
• The Accounts widget provides
easy access to your balances
and transaction information.
• The Pending Payments widget
shows transactions awaiting
your approval.
• The Positive Pay widget shows
all check or ACH exceptions
and allows you to review and
decision these items.
• The Information Center widget
shows important notifications
from Simmons Bank.

CUSTOMIZABLE DASHBOARD & WIDGETS 21
• The Resources widget provides
quick access to useful information
about the Treasury Management
online system and mobile banking.
• Other widgets are available to
view Stop Payment instructions
that require approval, to enter
Loan Payments and Transfer
Funds between your accounts.
• The Favorite Reports widget
allows you to quickly access
various reports in the system.
Initially, all reports are displayed.
Set Up Favorite Reports
1. To begin, click the Reporting
menu.
2. Next, click All Reports.
3. Click the star icon to mark the
report as a favorite. Repeat this
process for all applicable reports.
4. Return to the Dashboard to see
your favorite reports displayed.
For more information about
customizing your dashboard
and your widgets, please contact
us at 1-800-551-4471.


4: ADMINISTRATION
In this section, you will learn about the different administration functions
you can perform. These functions include how to:
• Add a New User
• Manage Existing Users
• Create Account Nicknames4
: A
DM
INIS
TR
AT
ION

FIRST-TIME LOGIN24

ADMINISTRATION 25
How to Add a New User
1. To begin, click the Admin menu.
You can Copy an existing user or
Create a User to create a new user.
Please note that If you would like
to copy an existing user, versus
creating a new user, select the
Copy User button and select the
user you wish to copy.
2. Click Create a User to bring
up the New User screen
3. Enter the User Information.
The new user will be added to the
list and will appear as enrolled.
4. Next, determine the type of user.
If the user will be a Super User
(having access to all accounts and
product features that are available
to the company now and in the
future) or an Admin User (can
create and manage other users),
click the toggles accordingly.
Otherwise, do not activate those
toggles for General Users. Please
note that a user can be both a Super
User and an Admin or neither. A
General User does not manage other
users and has their entitlements set
up manually.
5. Click Save Changes.
6. If you are set up for token
authentication, you will be prompted
to enter the token plus your PIN
with no spaces. If you are set up for
out-of-band authentication (OOBA)
via a mobile device, you will receive
a text message with a verification
code. You will need to enter the
code received into the prompt in
Treasury Connect.
7. If you make any further edits,
you must select Save Changes.
Please note that the user will not be
enrolled for Treasury Management
until later in this process.

ADMINISTRATION26
Assign Accounts to a User
1. Click Account Access from the
left-hand menu.
2. Select individual accounts
or select all accounts.
3. Click Save Changes.
4. You have successfully assigned
accounts to a user.
Restrict IP Address Access
1. Click the IP Access tab from the
left-hand menu.
2. Click the toggle to restrict
access to a specific IP address.
3. Enter the applicable IP address
and click Save Changes.
NOTE: The left-hand menu will
only include services in which
your company has enrolled.

ADMINISTRATION 27
Restrict When a User Can Access the System
1. Click the Time Access tab from
the left-hand menu.
2. Click the toggle to restrict
the time a user can access the
system. You may restrict access
to certain days of the week and
times per day.
3. Click Save Changes.
Designate & Assign ACH Entitlement
1. Click Entitlements under the ACH
tab from the left-hand menu.
2. Click the Manage ACH Company
Access button. Your available
ACH companies are displayed.
3. You must assign at least one ACH
company for the user to be able
to use the ACH service.
4. Click Save.
5. Select Restrict Batch to allow
the user to view payments and/
or templates that have been
marked as Restricted.

ADMINISTRATION28
6. You can assign ACH entitlement
by selecting the individual check
box or use the Toggle row
hyperlink to select the entire
row. Please note that some
entitlements apply to templates
and some apply to individual
payments/transactions.
7. Next, determine how the user
can manage recipients.
8. When complete, click Save
Changes. You have entitled the
user to use the ACH service.
Designate ACH User Limits
1. Click the ACH User Limits tab
from the left-hand menu.
2. Enter the ACH Daily Initiation
and Approval Limits for the user.
3. Next, enter limits for each ACH
company assigned to the user.
The Daily Initiation Limit and the
Daily Limit must match, and the
Transaction Limit must be less
than or equal to the Daily Limit.
4. Click Save Changes. You have set
the user limits for ACH.
NOTE: The only entitlements that
will appear will be those in which
your company has enrolled.

ADMINISTRATION 29
Positive Pay Entitlements
1. Select Entitlements under the
Positive Pay tab from the left-
hand menu.
2. You can then assign an entitlement
to all accounts enrolled in the
Positive Pay service by choosing
the Select All check box. You can
also assign entitlements
individually to those listed.
3. Select Toggle row hyperlink to
assign all functions to an account.
4. Click Save Changes. You have
entitled the user to Positive Pay.
Designate Reporting Entitlement
1. Click Entitlements under the
Reporting tab from the left-
hand menu.
2. You may select Current Day
Reporting (CDR), Prior Day
Reporting (PDR) and other
types of reports.
3. You can select the Toggle row
hyperlink to select all options.
4. Click Save Changes.

ADMINISTRATION30
Designate Transfer & Loans Entitlement
1. Click Entitlements under the
Transfer/Loan Payment tab
from the left-hand menu.
2. Assign entitlements for
your accounts.
3. Click Save Changes.
4. Next, you will set transfer and loan
payment limits.
5. Click the User Limits tab from the
left-hand menu. These user limits
operate the same as the ACH
user limits described earlier in this
section.
6. Enter the Daily Initiation Limit
and Approval Limit.
7. Click Save Changes.
Designate Stop Payment Entitlement
1. Click Entitlements under the Stop
Payments tab from the
left-hand menu.
2. Check the boxes to entitle the
user to Add, Approve or Cancel
a stop payment. Selecting the
Toggle row hyperlink will select
all options for that account.
3. Click Save Changes.

ADMINISTRATION 31
Designate Wire Entitlement & User Limits
1. Click Entitlements under the Wire
tab from the left-hand menu.
2. Check the boxes to entitle the
user to Create, Edit, Approve
or Delete a beneficiary. Selecting
the Toggle row hyperlink will
select all options in the row.
3. Check the boxes to entitle the
user to Create, Edit, Delete or
Approve wire payments and
templates. Selecting the Toggle
row hyperlink will select all
options in the row.
4. Click Save Changes.
5. Click the User Limits tab from the
left-hand menu.
6. Enter the Total Daily Limit
and Approval Limit.
7. Click Save Changes.
NOTE: The only entitlements that
will appear will be those in which
your company has enrolled.

ADMINISTRATION32
Designate Receivables Entitlement
1. Click Entitlements under the
Receivables tab from the left-
hand menu to set up the user
for Remote Deposit Capture.
2. Select the User Has Access check
box to entitle the user.
3. Enter the username that is set up
on the Remote Deposit Capture
system for the user. If this user is
an Administrator for your company
on the system, the username
would have been provided by the
bank. All other user information
will be provided by the Remote
Deposit Capture Administrator.
4. When complete, click
Save Changes.
For more information, please refer
to the Remote Deposit training
materials or contact us at
1-800-551-4471 with any questions.
Designate Integrated Services Entitlement
1. Click Entitlements under the
Integrated Services tab from
the left-hand menu.
2. If your company has signed up
for the Electronic Statements or
Bill Payments services, you can
entitle the user by selecting the
User Has Access check boxes.
3. Click Save Changes.
NOTE: The only entitlements that
will appear will be those in which
your company has enrolled.

ADMINISTRATION 33
4. Click the Submit for Enrollment
button at the top of the screen
to continue and click Submit
User to confirm your submission.
5. The user will receive an email with
instructions for the initial login.
Please note that you must provide
the user with their User ID and
the Company ID. If your company
requires dual approval, another
Admin must approve this user.
Manage Users
1. Click the Back to User List
hyperlink at the top of the screen.
2. From the User List, click Actions
to view more ways to manage a
user, including view user details,
edit the user and copy the user’s
entitlements to another user.

ADMINISTRATION34
Reset a User Password
1. From the User List, click Actions
and select the Reset Password
option.
2. The Auto Generate Password
option defaults to selected.
a. You can keep this selection
and click Send Password.
The system will then send
an email to the user.
b. Or, you can select the
Manually Set Password
option. Enter a temporary
password and click Save
Password. Please note that
you will have to contact the
user with the temporary
password. They will not
receive an email.
Deactivate & Reactivate a User
1. From the User List, click the
Status toggle of an enrolled user.
2. You may optionally add
a comment or just click
Deactivate User.
3. To reactive a user, click the Status
toggle next to the deactivated
user’s name.
4. Click Activate User to complete
the process.
NOTE: When you deactivate a user,
they will be prevented from accessing
the system, but all audit information
will be retained.

ADMINISTRATION 35
Delete a User
1. From the User List, click the
Action List drop-down arrow.
2. Select either View User or
Edit User.
3. Click Delete User and click
the Delete button. Please note
that if you delete a user from the
system, all user audit information
will be deleted.
Unlock a User
1. From the User List, look for the
lock icon next to the user ID.
This signifies that user is locked
out of the system.
2. To unlock, click the Action List
drop-down arrow.
3. Select either View User or
Edit User.
4. Click Unlock User.
5. Click the Unlock User button.

ADMINISTRATION36
1. To begin, click the Admin menu.
2. Click Account Nicknames.
3. Select Bulk Edit Nicknames to
edit all accounts at the same time.
Otherwise, click the Edit icon.
4. Enter the new name for
the account.
5. Click the check mark.
Please note that the new
nickname will be visible to all
users accessing the system.
For more information about
administrative services, please
contact us at 1-800-551-4471.
Create Account Nicknames

5: POSITIVE PAY & ACH FILTERS
In this section, you will learn how to:
• Use The Positive Pay Widget
• Manually Create Check Issues
• Upload Check Issue Files
• Make Decisions on Exceptions
• Compose Positive Pay Messages
• View ACH Filters
5:
PO
SIT
IVE
PA
Y
& A
CH
FIL
TE
RS

FIRST-TIME LOGIN38

POSITIVE PAY & ACH FILTERS 39
Positive Pay Widget
The Positive Pay widget allows you
to quickly review check exception
items and ACH exception items.
Check Positive Pay
1. To begin, click the View Check
hyperlink to review the presented
check image. You can make a Pay
or Return decision by selecting
the appropriate check box for the
item and clicking Review.

POSITIVE PAY & ACH FILTERS40
Manually Enter Issued Check
1. In order for Positive Pay to
be effective, you should enter
check issue information into
the system prior to actually
disbursing the checks.
2. To manually enter a check issue,
click the Payments menu.
3. Click Create/Import Check Issues.
4. Select the Enter Checks radio
button. The Enter Positive Pay
Issued Checks screen displays.
5. Select the Account search icon.
6. Choose the desired account and
click Select.
7. Select Add Row and enter the
information for the issued check.
All fields are required except
Payee. You can enter an unlimited
number of checks by clicking
Add Row.
8. When complete, click
Review. Verify the issued
check information.
9. If the information is correct,
click Confirm.

POSITIVE PAY & ACH FILTERS 41
Upload a File of Issued Checks
1. To begin, click Upload/Enter
Additional Positive Pay Checks.
2. Select the Account search icon.
Please note that this account
is tied to the issued checks you
are uploading.
3. Choose the desired account and
click Select.
4. Next, select the file format that
you set up with your Treasury
Management representative.
5. Select the file you want
to upload.
6. Browse to locate your file.
7. When complete, click Open.
8. Next, click Upload. The issued
checks from the file are displayed.
You have the option to edit the
check data. Click Add Row to
manually enter another check.
9. When complete, click Review.
Verify the issued check
information.
10. If the information is correct,
click Confirm.

POSITIVE PAY & ACH FILTERS42
Make Decisions on Check Exceptions
1. To begin, click the
Payments menu.
2. Select Check Exceptions. Checks
that have been identified as
exceptions are displayed. Review
the reason an item is potentially
fraudulent. Please note that you
can search for exceptions by
clicking on the fly-away on the left
side to get to the search criteria.
3. Click the Check Image hyperlink.
You can view the front of the
check, the back of the check or
both images at the same time.
4. Compare the presented check
with the check issue data, then
click Close.
5. To pay an item, click the Pay
radio button for the item you
want to pay and click the Check
Image hyperlink to review
the presented check. When
complete, click Close.
6. To return an item, click the
Return radio button for the
item you want to return and click
the Check Image hyperlink to
review the presented check.
When complete, click Close.
7. You may also select the Pay All or
Return All icons to pay or return
all items.
8. After making your decisions,
click Review.
9. Verify your decisions and
click Save.
10. Please see the Cut-Off Times from
the menu on the toolbar. Any
corrections, such as an incorrect
check number, need to be made
through the Message Center.

POSITIVE PAY & ACH FILTERS 43
Compose Positive Pay Messages
1. To begin, select Message Center
from the toolbar.
2. Click Compose.
3. Choose Positive Pay for
the subject.
4. Enter the message you wish
to send to the bank.
5. When complete, click Send.
Make Decisions on ACH Exception Items
1. To begin, select Payments from
the toolbar.
2. Select ACH Exceptions. The ACH
Exceptions screen is displayed.
You can search for specific ACH
exceptions in the list by clicking
on the fly-away on the left side.
Several search criteria options
are available.
3. Make Pay or Return decisions
for each item. Please note that if
you do not make a decision prior
to the cut-off time listed on the
toolbar, at the top of the page,
the item will be returned.
4. After making your decisions,
click Review and verify your
decisions. Please note that once
these decisions are made, you will
not be able to change them.
5. When complete, click Save.

POSITIVE PAY & ACH FILTERS44
ACH Filters
1. To begin, click Payments.
2. Select ACH Filters. The ACH
Filters that were set up by the
bank, per your instructions,
are displayed.
3. To add a new ACH Filter, select
Message Center from the toolbar.
4. Click Compose.
5. Choose Positive Pay for the
subject line and enter your
instructions for the filter.
6. When complete, click Send.
A Simmons Bank Treasury
Management representative
will contact you regarding any
further questions in order to
set up the ACH Filter per your
instructions.
For more information about
Positive Pay service, please
contact us at 1-800-551-4471.

6: ACH
In this section, you will learn about the ACH process, including how to:
• Create an ACH Payment
• Save an ACH Payment as Template
• Upload a NACHA File
• Approve Another User’s Payment
• View ACH Activity
• Manage Recipients6
: A
CH


ACH 47
Create an ACH Payment & Save It as a Template
1. To begin, click the Payments
menu then click Create ACH
Payment. You can create ACH
payments three ways: manually,
initiation from a template or by
uploading a NACHA file. Following
are directions for creating an ACH
payment manually.
2. Enter the Payment Name.
3. Determine and select the
ACH Company Name.
4. If you selected an ACH company
that is configured as unbalanced,
you must specify the company
account that will offset these
transactions.
5. Choose the Account.
6. Click the Frequency drop-down
arrow to determine the frequency
for this payment.
7. Click Effective Date to choose the
effective date. Please note that if
you set up this payment
as recurring, a future effective
date may fall on a bank holiday.
In this case, the payment would
be processed on the next
business day.
8. Choose a date from the calendar.
a. If your company is set up
for same-day ACH, you can
choose today. Please contact
a Treasury Management
representative to enroll
in same-day ACH.
b. Same-day ACH Payments
must be originated prior to
the same-day ACH cut-off
time. The cut-off-time menu
is available for reference.

ACH48
9. Next, add recipients (payees) to
the ACH Payment. You can add
recipients to an ACH Payment
in three ways: entering recipient
information manually, by importing
recipient information from a file
or selecting a recipient from a
saved list.
Select From Recipient List to Add Recipients
1. To select from a recipient list,
click the Select From Recipient
List button to display the ACH
Recipients screen.
2. Click the Search Recipients arrow
to find a recipient(s). You can select
multiple recipients.
3. Click Create Payment From Selected
button to add the recipient(s) to the
payment. Their information will be
populated in the fields.
a. If a recipient does not have
a default amount tied to their
profile, you must enter an
amount for the recipient.
b. You can optionally indicate
whether Prenote transactions
should be created or if the
recipient should be placed
on Hold.
4. Use the Addenda hyperlink to enter
additional information about the
recipient. Check the Prenote check
box to make the item a prenote.
Check the Hold check box to hold
the item and not process in this
payment.

ACH 49
Manually Add Recipients
1. To manually add a recipient, from the Create ACH Payment screen,
select Add Recipient or the plus
icon.
2. Enter the recipient’s name and
account information.
3. Search for or enter the bank
routing information and select
the recipient’s bank.
4. Enter the amount you are paying
the recipient, then click Review.
5. If the information is correct,
click Confirm. The system will
authenticate your identity.
a. If you are set up for token
authentication, you will be
prompted to enter the token.
b. If you are set up for out-of-
band authentication via a
mobile device, the system
will send a text message
with a verification code to
the phone number you have
set up. You will need to enter
the code received into the
prompt in Treasury Connect.
6. Click Save to add the new
recipient to the Recipients List for
future use. You can now create
another payment, save the current
payment as a template or view
your ACH activity.

ACH50
Save an ACH Payment as a Template
1. Follow the prior steps to manually
create an ACH payment.
2. Click the Save as Template
button. The Confirm Save as
Template dialog box appears.
3. Click Save as Template to
complete the process. Please
note that you can change the
name or configure this template
to reset the amounts to zero
after processing.
4. The new template is added
to the list and is ready to use.
Upload a NACHA File
1. From the Dashboard, click
the Payments menu.
2. Click Create ACH Payment.
3. Click the Upload NACHA File
radio button.
4. Click Select File and locate the
NACHA file you wish to upload.
5. Click Open.
6. Click Upload. The Payment
Details screen displays the
transactions from the NACHA file.
7. Click the Offset Accounts search
icon. Please note that this option
is only available if the offset
account was not included in
the NACHA file and the ACH
Company is Unbalanced.
8. Choose the offset account for
this payment.
9. Determine the Frequency and
Effective Date for the payment.
10. Click Review.

ACH 51
11. If the information is correct,
click Confirm. The system will
authenticate your identity.
a. If you are set up for token
authentication, you will be
prompted to enter the token.
b. If you are set up for out-of-
band authentication via a
mobile device, the system
will send a text message
with a verification code to
the phone number you have
set up. You will need to enter
the code received into the
prompt in Treasury Connect.
Please note that when you upload
a NACHA file the payment is
automatically initiated. If approval
is required, another user will
have to approve the payment
to complete the process.
12. Click Close to access your ACH
Payment Activity. ACH payments
that you have initiated or that
you are entitled to approve
are displayed.
Approve Individual ACH Payments
1. On the ACH Payment Activity
screen, hover the cursor over the
Pending Approval icon to see if
you are an eligible approver for
that payment. Please note that you
cannot approve a payment that
you have initiated or modified.
2. You can approve individual
payments by using the Payments
Pending Approval widget on the
Dashboard or approve multiple

ACH52
payments by selecting the
check box by the payment and
clicking the Approve button.
3. Select the Transaction ID hyperlink.
4. Review the payment and click
Approve. You may optionally add
comments about this payment.
5. Click Approve. The system will
authenticate your identity.
a. If you are set up for token
authentication, you will be
prompted to enter the token.
b. If you are set up for out-of-
band authentication via a
mobile device, the system
will send a text message with
a verification code to the
phone number you have set
up. You will need to enter
the code received into the
prompt in Treasury Connect.
6. You can edit ACH payments
that have a status of scheduled
or expired by clicking the
Transaction ID hyperlink and
clicking the Edit Payment option.
Approve Multiple ACH Payments
1. On the ACH Payment Activity
screen, hover the cursor over the
Pending Approval icon to see if
you are an eligible approver for
that payment. Please note that you
cannot approve a payment that
you have initiated or modified.
2. You can approve multiple
payments at one time by selecting
the check box by the payment.

ACH 53
3. Click Approve. The system will
authenticate your identity.
a. If you are set up for token
authentication, you will be
prompted to enter the token.
b. If you are set up for out-of-
band authentication via a
mobile device, the system
will send a text message
with a verification code to
the phone number you have
set up. You will need to
enter the code received
into the prompt in
Treasury Connect.
4. You can edit ACH payments
that have a status of scheduled
or expired by clicking the
Transaction ID hyperlink and
clicking the Edit Payment option.
Manage ACH Recipients
1. Click the Payments menu.
2. Click ACH Recipients. The
ACH Recipients screen displays.
3. To view a recipient, click the
hyperlink for the recipient’s name.
4. Click the Actions hyperlink to
edit or delete the recipient.
5. Click the Search Recipients
arrow to find a particular
recipient. The Search Recipients
panel is displayed and you can
search via recipient name,
amount and/or status.
For more information about the
ACH service, please contact us
at 1-800-551-4471.


7: WIRE TRANSFER
In this section, you will learn about the wire transfer process, including how to:
• Create a Domestic Wire and
Save It as a Template
• Create an International Wire
• Approve Wires
• View Wire Activity
• Manage Beneficiaries7
: W
IRE
TR
AN
SF
ER

FIRST-TIME LOGIN56

WIRE TRANSFER 57
Create a Domestic Wire
1. To begin, from the Dashboard
click the Payments menu then
click Create USD Wire. You can
create a single wire or multiple
wires. Following are directions for
creating a single wire.
2. Select the company that is
initiating the transaction from
the Wire Company Name list.
3. Specify a debit account for
the wire in the Debit Account
field. Clicking the Search icon
allows you to search and view
available accounts.
4. Choose the appropriate account
from the list and click Select.
5. Specify the Beneficiary for
the payment.
a. You can enter the beneficiary
information manually or
search for a predefined
beneficiary.
6. The Beneficiary Information
will display.
7. Enter the amount of the wire
in the Wire Amount box.
8. Enter the frequency of the wire.
a. You can choose from several
recurring options.
9. To enter the effective date of
the wire, click the Effective Date
calendar icon.
10. A calendar will display. Select a
date from the calendar.
Please note that if you set up a
payment as recurring, a future
effective date may fall on a bank
holiday. In this case, the payment
would be processed on the next
business day.

WIRE TRANSFER58
11. Enter the purpose for the wire
transfer in the Purpose box. Each
wire is required to have a clear
and specific description of the
purpose of the funds.
12. Next, enter information about this
payment that you would like to
communicate to the beneficiary
in the Additional Information
box. You can add up to three
lines by selecting the plus icon.
a. Anything entered in the
Additional Information field
will be displayed on your
wire confirmation email.
13. Use the Reference Beneficiary
field to enter information that
enables the beneficiary to identify
the transfer.
14. When complete, click Review.
15. Review the details of the wire.
Please ensure that all data
entered is correct. Incorrect or
inaccurate information will cause
unnecessary delays. You may
be contacted by an associate in
Treasury Management to verify
some information regarding your
wire transaction.
16. If the information is correct,
click Confirm.
17. The system authenticates
your identity.
a. If you are set up for token
authentication, you will be
prompted to enter the token.

WIRE TRANSFER 59
b. If you are set up for out-of-
band authentication via a
mobile device, the system
will send a text message with
a veri ication code to the
phone number you have set
up. You will need to enter
the code received into the
prompt in Treasury Connect.
18. If additional approvals are
required, the approvals must
be obtained prior to cut-off in
order for the wire to be sent.
19. You can now create another
payment, save the current
payment as a template or
view your Wire Activity.
Save a Wire Transfer as a Template
1. From the Confirmation Screen,
click the Save as Template
button.
2. Enter the template name in the
Template Name box.
3. Click the Create Template button.
4. The new template is added to
the Wire Template list and is
ready for use. Please note that
if you wish to use the same
information for the Notes and
Reference Beneficiary fields when
saving or creating Wire Templates,
you can save that information as
part of the template. Otherwise,
leave the fields blank.

WIRE TRANSFER60
Create an International Wire Transfer
1. From the Dashboard, click
the Payments tab and then
Create FX Wire.
2. The Create FX Wire screen
displays.
3. To select the currency for this
wire, click the arrow in the
Destination Currency box.
A drop-down list will appear.
4. Click the currency type. It will
then display in the Destination
Currency box.
5. Next, enter the amount
you want to transfer in the
Wire Amount box.
6. Determine if the amount is in U.S.
dollars or other currency by using
the toggle.
7. Click the Get Quote button.
8. The current foreign exchange
rate for the selected currency
is displayed.
9. Choose the company that is
initiating the transaction from
the Wire Company Name drop-
down list.
10. Specify a debit account for
the wire in the Debit Account
field. Clicking the Search icon
allows you to search and view
available accounts.
11. Choose the appropriate account
from the list and click Select.
12. Specify the beneficiary by
clicking the Search icon. A list
of beneficiaries is displayed.
13. Choose the beneficiary and
click Select.
14. The beneficiary information
is displayed.

WIRE TRANSFER 61
15. The Effective Date for the wire
will show the current date and
cannot be changed.
16. Enter the purpose for the wire
transfer in the Purpose box.
Each wire is required to have a
clear and specific description of
the purpose of the funds.
17. Next, enter information about this
payment that you would like to
communicate to the beneficiary in
the Additional Information box.
You can add up to three lines by
selecting the plus icon.
a. Anything entered in the
Additional Information field
will be displayed on your
wire confirmation email.
18. When complete, click Review.
19. Review the details of the wire
and click Confirm.
20. An agreement screen displays.
You must agree and accept that
you are entering into a contract
to transfer funds at the quoted
exchange rate.
21. Click the I Agree check box.
22. Click the Accept button.
a. Review the cut-off time and
exchange rate information
for this payment. Please
ensure that all data entered
is correct. Incorrect or
inaccurate information will
cause unnecessary delays.
You may be contacted by
an associate in Treasury
Management to verify some
information regarding your
wire transaction.
23. Click Confirm to proceed.

WIRE TRANSFER62
24. A veri ication screen appears,
and the system authenticates
your identity.
a. If you are set up for token
authentication, you will be
prompted to enter the token.
b. If you are set up for out-of-
band authentication via a
mobile device, the system
will send a text message
with a veri ication code to
the phone number you have
set up. You will need to
enter the code received
into the prompt in
Treasury Connect.
Approve a Wire Transfer
1. There are multiple ways
to approve a wire transfer:
this section will outline several
different ways to approve them.
From the Dashboard, click the
Payments tab and then
Wire Activity.
2. Wire transfers that you are
entitled to see are displayed.
3. Hover the mouse cursor over the
Pending Approval icon to see if
you are an eligible approver.
4. You can use the Payments
Pending Approval widget on the
dashboard, or you can select the
check box by the wire and click
the Approve button (which allows
you to approve multiple wires at
one time).

WIRE TRANSFER 63
5. To approve a wire individually
using the Transaction ID
hyperlink, simply click the
Transaction ID hyperlink, review
the wire, and click Approve.
6. You have the option to add
comments related to this
payment.
7. Click Approve.
8. A verification screen appears,
and the system authenticates
your identity.
a. If you are set up for token
authentication, you will be
prompted to enter the
token.
b. If you are set up for out-of-
band authentication via a
mobile device, the system
will send a text message
with a veri ication code to
the phone number you have
set up. You will need to
enter the code received
into the prompt in
Treasury Connect.

WIRE TRANSFER64
View Wire Activity
1. From the Dashboard, click
the Payments tab and then
Wire Activity.
2. The Wire Activity screen
displays all wires regardless
of payment status.
3. You can print or download
the list by clicking the Print
or Download buttons.
4. You can view recurring wires
by clicking the Recurring Wires
hyperlink.
5. To find a specific wire payment,
click the Search arrow.
6. On the Search Wire Payment
sidebar, you can search for wire
payments using a variety of
search criteria.
7. Simply define the criteria and click
the Search button.
Manage Beneficiaries
1. From the Dashboard, click
the Payments tab and then
Wire Beneficiaries.
2. To view a beneficiary, click the
Name hyperlink.
3. To edit or delete the beneficiary,
click the Actions hyperlink.
4. To find a particular beneficiary,
click the Search Beneficiaries
sidebar arrow.
5. To set up another wire beneficiary,
click Create New Beneficiary
button.
WIRE TRANSFER 65
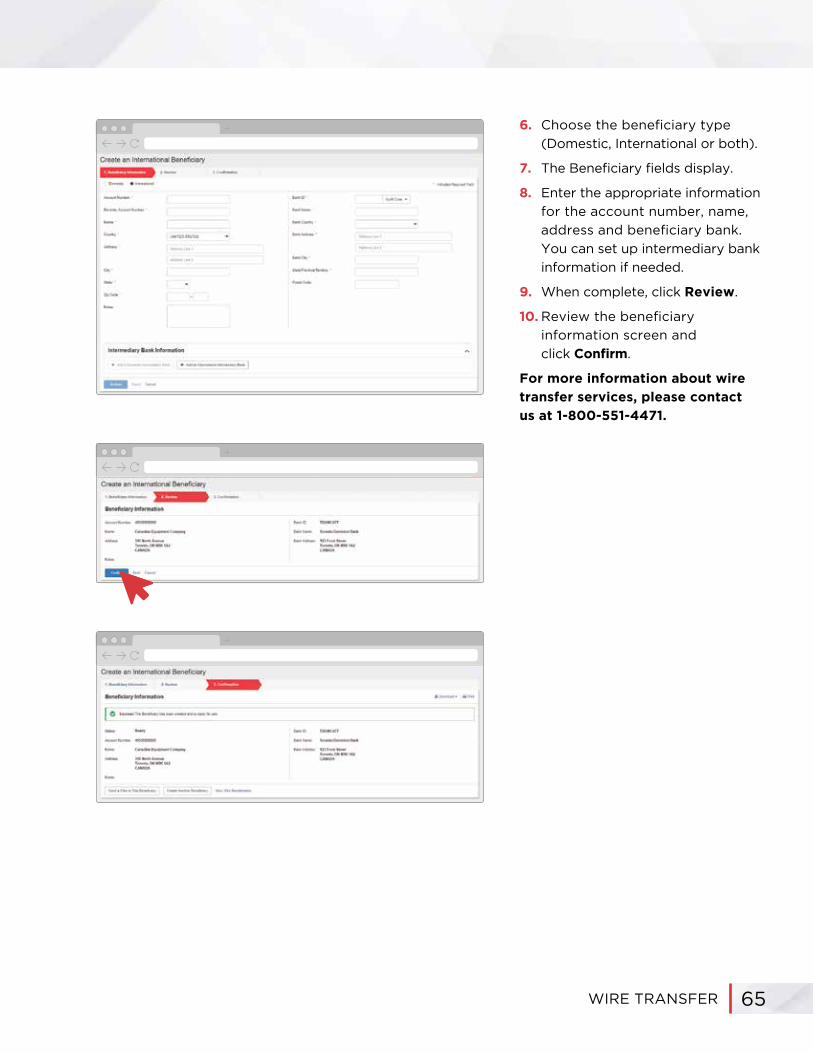
6. Choose the beneficiary type
(Domestic, International or both).
7. The Beneficiary fields display.
8. Enter the appropriate information
for the account number, name,
address and beneficiary bank.
You can set up intermediary bank
information if needed.
9. When complete, click Review.
10. Review the beneficiary
information screen and
click Confirm.
For more information about wire
transfer services, please contact
us at 1-800-551-4471.


8: REMOTE DEPOSIT NOW
In this section, you will learn about the Remote Deposit Now process,
including how to:
• Scan Checks
• Edit a Batch
• Make a Deposit
• View Reports
• Learn About Different Notifications
• Create a User
8: R
EM
OT
E D
EP
OS
IT N
OW


REMOTE DEPOSIT NOW 69
How to Scan Checks
1. To begin, from the Dashboard
click the Receivables menu
tab then click Remote Deposit
Capture.
2. The Launch screen appears.
Click the blue Launch button
to continue.
3. The Remote Deposit Dashboard
appears. Click the Transactions
menu tab to continue.
4. Click the Remote Deposit Now
hyperlink.
5. The Remote Deposit Now
Homepage appears. The Messages
section will inform you if there
was a problem with a deposit.
If there was an issue, a hyperlink
is available to take you to the
message that details what went
wrong and how to fix it.
6. Click Scan to create a deposit.
7. Next, place the checks in the
scanner with the front facing
outward and toward the right
of the scanner.
8. Click Start to proceed.
9. The Expected Total dialog box
appears. Enter the total amount
of the deposit.
10. When you click OK, the checks
will automatically start to scan.
11. The scanned items are displayed
in sequence.
12. The Codeline displays the
magnetic ink character
recognition (MICR) line from
the check. Please note that if a
Codeline includes any question
marks, it means the check was
scanned backward and will
need to be rescanned.

REMOTE DEPOSIT NOW70
13. Next, hover over the Codeline to
view an image of scanned item.
14. Review the check image. Make
sure that you can see all four
corners of the check, the MICR
line is readable and there are
no black lines. If the image
quality is not good, you must
rescan the check.
15. Repeat this review for all items.
16. If all images are of good quality,
click the Save Batch button.
17. Click the Home button to return
to the main screen. The saved
batch is available to edit. Please
note that the batch has not
been processed yet. The batch
must first be edited and then
deposited.
Edit a Batch
1. To edit a batch, click the batch
hyperlink in the Batches Ready
For Edit section or click the
Batch Edit tab.
2. If you see the Batch in Balance
and Ready for Deposit message,
there is nothing to edit and you
can move forward with making
the deposit. Otherwise, review
the check image and make sure
it lines up with the fields at the
bottom of the screen.

REMOTE DEPOSIT NOW 71
a. The Aux On Us field could
be the check number of the
account depending on how
these items are placed on
the check.
b. The On Us field is the
account number if it is
directly to the right of the
routing number and followed
by the check number.
c. You can ignore the Account
Number and the Invoice
Number fields.
3. In the example, the amount needs
to be entered to match the check.
When you enter the amount, the
Actual Total will automatically
update.
4. Click Save.
5. The next check that needs to be
reviewed appears. Compare the
check to the fields.
6. Add the amount if it is not
displayed.
7. Click Save to keep the change.
You have successfully edited
the batch.
8. Please note that you must see the
Batch is in balance and ready for deposit message to proceed.

REMOTE DEPOSIT NOW72
Make a Deposit
1. Click the Make Deposit tab. A list
of all batches that are ready for
deposit appears.
2. Select the check box for each
deposit you wish to submit.
3. Next, select the Deposit Account
drop-down. Please note that if
only one account is available, the
account will automatically display
in the window.
4. Select the account that the batch
needs to be deposited into.
5. Click Make Deposit to complete
the process.
View Reports
1. Once you click Make Deposit, the
Make Deposit dialog box appears.
2. Click the View Deposit Report
hyperlink.
3. You will see a line-item detail
report. You can view the date
of the deposit, the account name,
the batch number and the total
amount of the deposit.
4. Click Close and you will return to
the Make Deposit dialog screen.
5. Click the View Deposit Image
Report hyperlink.
6. The View Deposit Image Report
appears.
7. You can see the front of each
check image, the date of the
deposit, the account name, the
batch number and the total
amount of the deposit.

REMOTE DEPOSIT NOW 73
8. Click Close and you will return to
the Make Deposit dialog screen.
9. Click OK.
10. You can also access the reports
from the menu.
Understand System Notifications
1. If you are the Admin for the
system, you will receive a
notification each time a
deposit is submitted.
2. You will also be notified when
a user has been added to the
system.
Create a User
1. From the Remote Deposit
Dashboard, click the Admin menu.
2. From the drop-down menu,
click Users.
3. A list of all users in the system
appears.
4. You can view or edit existing
users.
5. To create a new user, click
Add User.

REMOTE DEPOSIT NOW74
6. Enter the user’s settings.
7. Please note the RDN ID,
as you will need this when
you add the Remote Deposit
Now service to the user in
Treasury Management.
8. All users need to have the
Customer Services check
box selected.
9. Click Add to proceed.
10. Select the Enable RDN check
box. The user can now use the
Remote Deposit Now system.
11. The Add User Setting screen
appears.
12. Select the Create Deposits box
to allow the user to make a
deposit.
13. You can expand the user’s roles
by clicking on the Roles Within
the Customer Services Privilege
drop-down.
14. Select the Enable check box for
each account that the user can
deposit into.
15. Click the Update button to
complete the process.
16. You will see a success message
on the Update User Settings
screen when you have
successfully created a user.
For more information about
the Remote Deposit Now
service, please contact us
at 1-800-551-4471.

9: REMOTE DEPOSIT COMPLETE
In this section, you will learn about the Remote Deposit Complete process,
including how to:
• Create a Deposit
• View a Deposit Report
• Create a User 9
: R
EM
OT
E D
EP
OS
IT
CO
MP
LE
TE


REMOTE DEPOSIT COMPLETE 77
How to Create a Deposit
1. To begin, from the Dashboard
click the Receivables menu
tab then click Remote Deposit
Capture.
2. The Remote Deposit Capture
screen appears. Click the Launch
button to continue.
3. The Remote Deposit Complete
Dashboard appears. Click the
Transactions menu tab to
continue.
4. Click the Remote Deposit
Complete hyperlink.
5. Your open deposits are displayed.
Click Create New Deposit.
6. Enter the number of checks
you will scan.
7. Enter the total amount of all
the checks you will deposit.
8. Place the check(s) in the scanner
with the front facing outward and
toward the right of the scanner.
9. When you click the Create button,
the checks will automatically start
to scan.
10. The scanned items are displayed.
11. You can click on the Front of
Check or Back of Check tabs
to display your scanned checks.
12. If you receive a Warning icon
there is something that must
be corrected. Hover over the
icon to learn what must be fixed.
For example, you might have
invalid magnetic ink character
recognition (MICR) information.
13. All of your Deposit Amounts
will initially display as zero.
Click the Refresh button to
update the dollar amounts.

REMOTE DEPOSIT COMPLETE78
14. You can determine if you want
to delete or rescan an item.
15. To rescan an item, click the
Rescan icon next to the item
you want to rescan.
16. The system will display the
original image of the check.
17. Load the check into the scanner
and click the Rescan button.
18. The system displays the new
scanned item.
19. Once you have verified the scan,
click the Rescan button to accept
the image.
20. The rescanned check displays
with the proper information.
21. Click the Refresh button
to update the amount.
22. If the Deposit Amount displays
as To Be Keyed, you may still
complete the deposit. In this case,
the proper information will be
completed by the service, prior
to the submission of your deposit.
23. You may also add additional
checks by loading them into
the scanner.
24. When you have verified that all
the checks are ready for deposit,
click Complete Deposit.
25. The deposit you created appears.
Please note that at this point you
have not submitted the deposit to
the bank.
26. You may click the Open icon
to edit the deposit.
27. If you want to add more checks,
you must create a new deposit.

REMOTE DEPOSIT COMPLETE 79
28. Click the check box by the
deposit you wish to submit
to the bank.
29. Next, click the Close Deposit(s)
button.
30. The Confirm Deposit Close
screen appears. You must
confirm that you are done with
the deposit. Please note that
when you click the Close button,
the deposit will be submitted
to the bank and can no longer
be modified.
31. Click Close to submit the deposit
to the bank.
32. The Close Deposit Results screen
appears to notify you that the
deposit has been closed and
therefore sent to the bank for
processing.
33. Click OK to continue using
the system.

REMOTE DEPOSIT COMPLETE80
Review a Deposit Report
1. Click the Reports menu option.
2. The Reports screen appears.
Select the Credits and Debits
to Your Merchant Settlement
Account hyperlink.
3. The Merchant Settlement
Account Reports Search
screen appears.
4. Select a Start Date from the
calendar icon.
5. Click Get Batches.
6. Based on your search criteria,
a list of batches appears.
Please note that deposits are
not available on this report until
the following business day.
7. Click the Report icon.
8. The Deposit report displays a
summary of the deposit, including
the number of checks deposited,
the deposit effective date and
the deposit total.
9. You can also view the front and
back of all the checks that have
been deposited.
10. You may also view each item
in the deposit individually by
selecting the Batch Details icon.
11. Next, click the Transaction
Detail icon.
12. All of the details display.
Please note that the system offers
different notifications. If you are
the Admin for the system, you will
receive a notification each time a
deposit is submitted.

REMOTE DEPOSIT COMPLETE 81
Create a User
1. Click the Admin menu option.
A drop-down menu appears.
2. Click Users.
3. A list of all users in the system
displays.
4. You can view or edit existing users.
5. To create a new user, click the
Add User button.
6. Enter the user’s settings. Please
note the Cash Mgmt ID, as you
will need this when you add
the Remote Deposit Complete
service to the user in Treasury
Management.
7. Check the Customer Services
check box for all users.
8. Select the Reports check box
to grant the user the right to
view and run reports.
9. Click Add to proceed.
10. You can expand user roles within
the Customer Services Privilege
screen. For example:
• You can select Credits and
Debits PDF Report to let the
user view this report.
• You can select Accounting
to give the user all reporting
functionality.
• You can select the RDC Admin
check box to give the user
single authority to run and
submit a deposit. And, you can
select the RDC User check box
to grant the user the ability to
run a deposit.

REMOTE DEPOSIT COMPLETE82
• You can select Reconciliation
Report to let the user view this
report. When you select the
Reconciliation Report check
box, also select the Enable
check box for each account
that the user can deposit into.
11. Click the Update button
to complete the process.
For more information about
the Remote Deposit Complete
service, please contact us at
1-800-551-4471.

