treasury solution - ach - hancock whitney services...treasury solution ach user guide updated march,...
TRANSCRIPT
Treasury Solution - ACH User Guide
Contents ACH Overview ....................................................................................................................... 3
Payments can be created using Treasury Solutions by three methods. ................................. 3
Enhanced ACH Features ............................................................................................................ 3
Payment Options ........................................................................................................................ 3
ACH Service Application ........................................................................................................ 4
Service Tools ............................................................................................................................... 5
Add an ACH Profile ...................................................................................................................... 6
ACH: Add Profile-Three Sections ................................................................................................ 8
General ............................................................................................................................... 9
Schedule Recurring Payments ........................................................................................ 10
Transactions .................................................................................................................... 11
User and Approval ........................................................................................................... 16
Modify an ACH Profile ............................................................................................................... 19
Delete an ACH Profile ............................................................................................................... 21
Create an ACH Payment ........................................................................................................... 22
Create Payment-Free Form ...................................................................................................... 24
Approve ACH Payments ............................................................................................................ 26
TREASURY SOLUTION ACH USER GUIDE
Updated March, 2020
2
View and Approve ................................................................................................................. 26
Quick Approval ...................................................................................................................... 27
ACH PassThru ....................................................................................................................... 27
Reporting ............................................................................................................................ 28
Transaction Search .................................................................................................................. 28
Add an ACH Report ................................................................................................................... 30
Report Maintenance ................................................................................................................. 32
Reference Guide – Treasury Solutions ACH Summary ......................................................... 33
Reference Guide – Common ACH Payment Type Codes ...................................................... 36
Reference Guide – File Mapping Instructions ...................................................................... 37
Additional Resources- ACH Services………… .......... …………………………………………………41
TREASURY SOLUTION ACH USER GUIDE
Updated March, 2020
3
ACH Overview
The ACH (Automated Clearing House) payments feature provides users with the tools necessary to complete a host of electronic funds transfer activities. The versatility of this module will allow users to create payment profiles, set approval limit thresholds for internal control, import payment data into profiles, utilize PassThru upload with NACHA formatted data or create a payment without a profile for use one time.
Payments can be created using Treasury Solutions by three methods.
• Creating a profile with a database that is housed on the Treasury Solution website o Profile can be shared with authorized users to create and approve payments o Ability to manually add payment information o Create tiered approval levels o Import payment information into profile from outside data source that has
been file mapped o Dual approval adds additional layer of security to protect against fraud
• PassThru Upload o Utilizing PassThru is ideal for users with NACHA formatting software o PassThru allows users to upload the payment from their computer o Maintains dual approval to protect against fraud
• Create Payment without Profile o One time payments can be made using a free form option o After payment is made, user has ability to save payment as a profile for future
use
Enhanced ACH Features (may include additional setup)
• Same Day ACH Payments (Limit of $100,000 per transaction, cut off time 12 PM CT) • Free Form - One Time Payments without a profile • Mobile/Tablet Secondary Approval • Enhanced ACH Reporting
Payment Options
• Payroll, Direct Deposit (PPD+) • Consumer Debits (PPD+) • Child Support Credits (PPD+) • Business to Business Payment (CCD+) • Corporate Cash Concentration and Cash Disbursement (CCD+) • Government Agency Taxes (TAX) • Corporate Payments with Addenda NACHA Format (CTX) • Internet Initiated (WEB) • Telephone Initiated (TEL)
TREASURY SOLUTION ACH USER GUIDE
Updated March, 2020
4
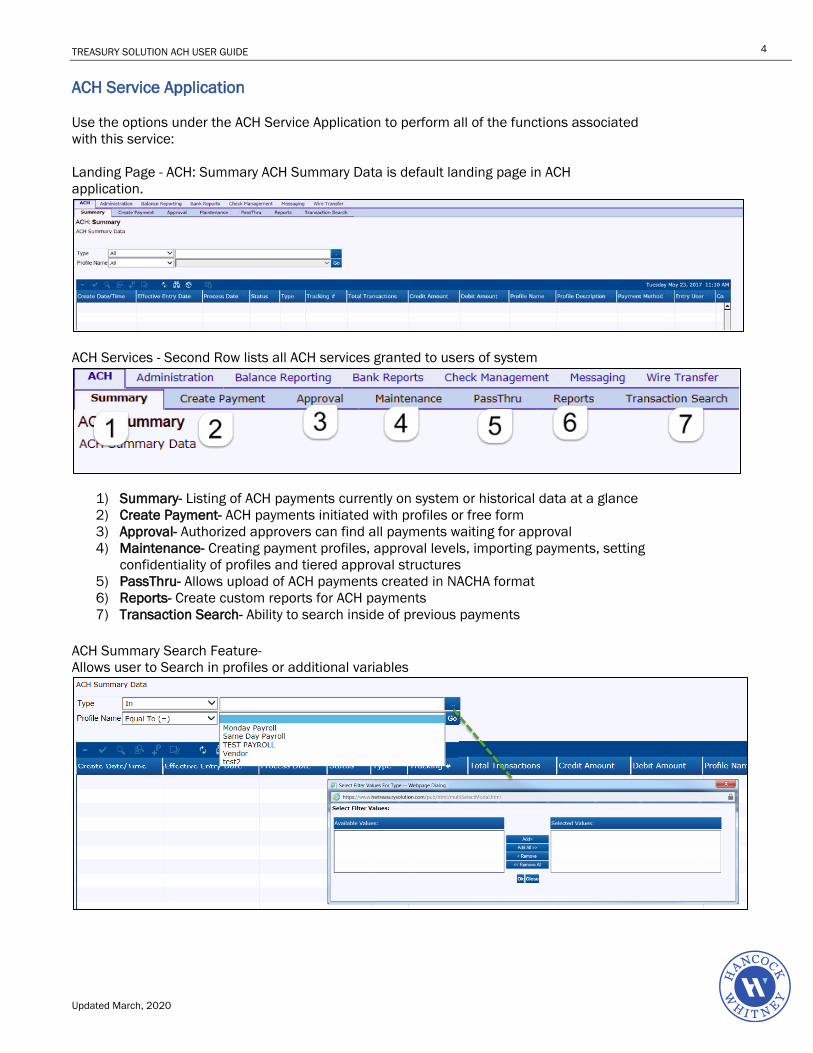
ACH Service Application Use the options under the ACH Service Application to perform all of the functions associated with this service: Landing Page - ACH: Summary ACH Summary Data is default landing page in ACH application.
ACH Services - Second Row lists all ACH services granted to users of system
1) Summary- Listing of ACH payments currently on system or historical data at a glance 2) Create Payment- ACH payments initiated with profiles or free form 3) Approval- Authorized approvers can find all payments waiting for approval 4) Maintenance- Creating payment profiles, approval levels, importing payments, setting
confidentiality of profiles and tiered approval structures 5) PassThru- Allows upload of ACH payments created in NACHA format 6) Reports- Create custom reports for ACH payments 7) Transaction Search- Ability to search inside of previous payments
ACH Summary Search Feature- Allows user to Search in profiles or additional variables
TREASURY SOLUTION ACH USER GUIDE
Updated March, 2020
5
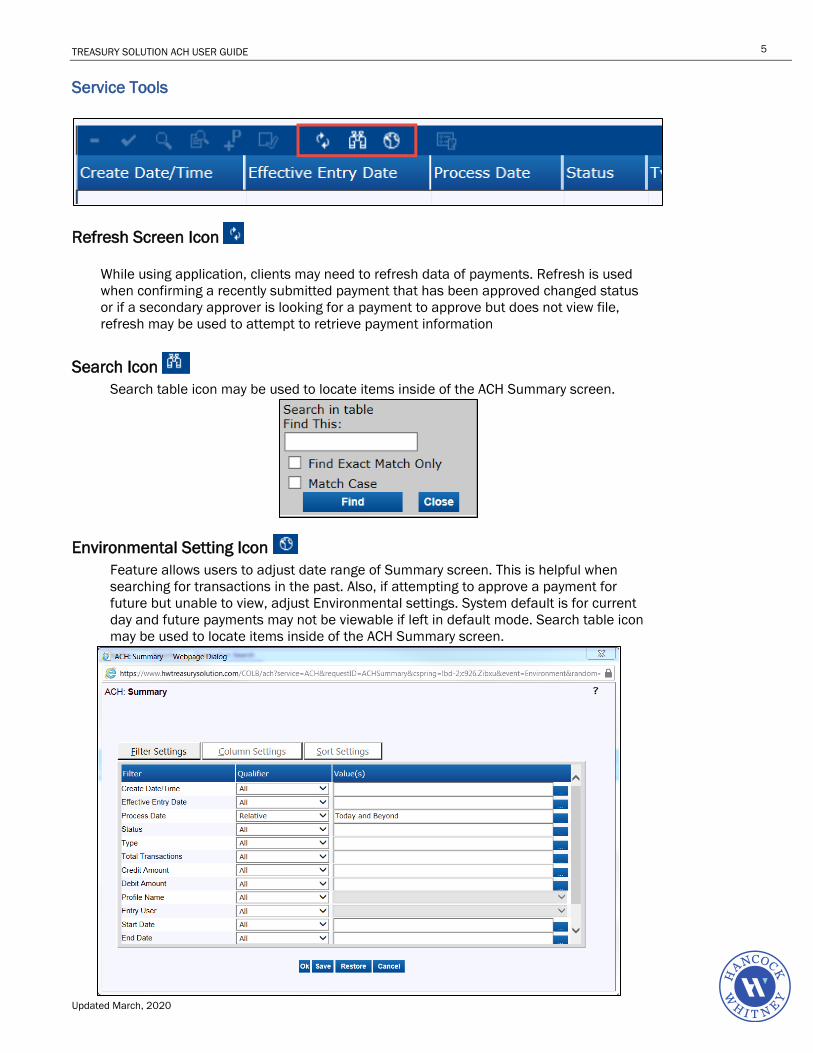
Service Tools
Refresh Screen Icon
While using application, clients may need to refresh data of payments. Refresh is used when confirming a recently submitted payment that has been approved changed status or if a secondary approver is looking for a payment to approve but does not view file, refresh may be used to attempt to retrieve payment information
Search Icon Search table icon may be used to locate items inside of the ACH Summary screen.
Environmental Setting Icon Feature allows users to adjust date range of Summary screen. This is helpful when searching for transactions in the past. Also, if attempting to approve a payment for future but unable to view, adjust Environmental settings. System default is for current day and future payments may not be viewable if left in default mode. Search table icon may be used to locate items inside of the ACH Summary screen.

TREASURY SOLUTION ACH USER GUIDE
Updated March, 2020
6
Add an ACH Profile
1. Select the ACH Tab in the navigation bar, choose Maintenance from the options presented. The ACH: Profile Summary page is displayed, containing a list of currently set up profiles.
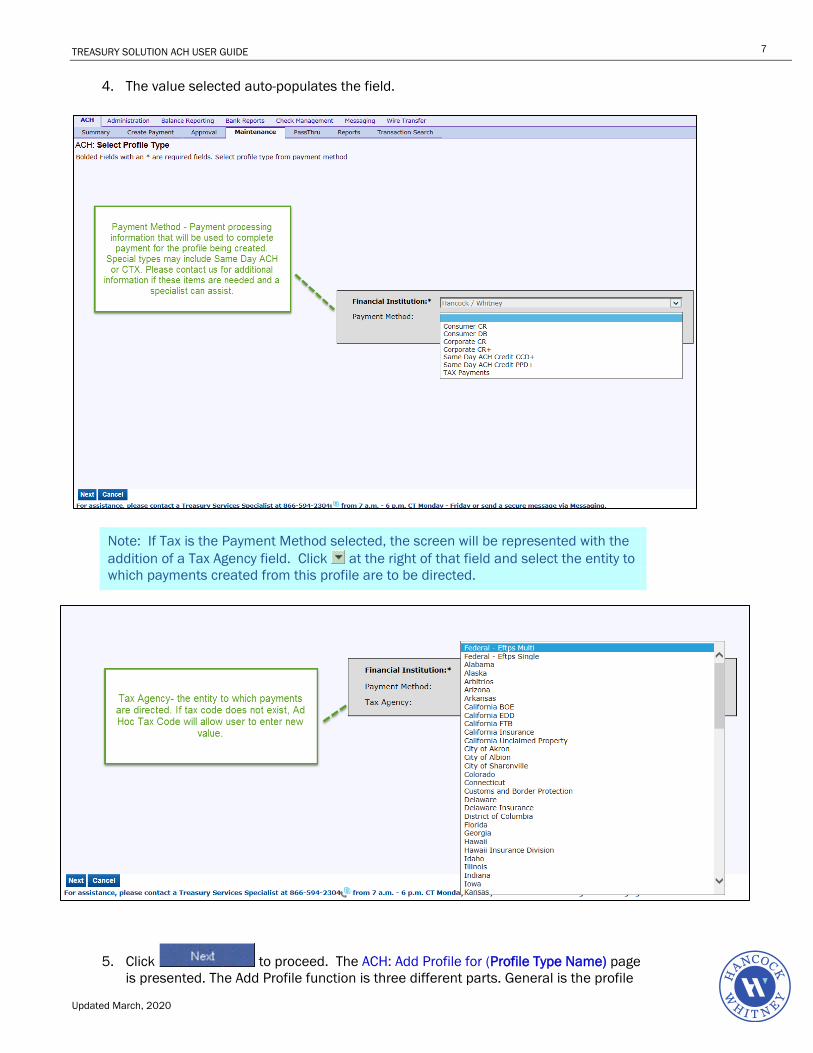
2. Click to display the Select Profile Type page. 3. Click at the right of the Payment Method field to display the list of available
payment method types Click on the type that is to be associated with the profile being added. Once Payment Method is selected, click Next to enter payment information or Cancel to start over.
TREASURY SOLUTION ACH USER GUIDE
Updated March, 2020
7
4. The value selected auto-populates the field.
Note: If Tax is the Payment Method selected, the screen will be represented with the addition of a Tax Agency field. Click at the right of that field and select the entity to which payments created from this profile are to be directed.
5. Click to proceed. The ACH: Add Profile for (Profile Type Name) page is presented. The Add Profile function is three different parts. General is the profile
TREASURY SOLUTION ACH USER GUIDE
Updated March, 2020
8
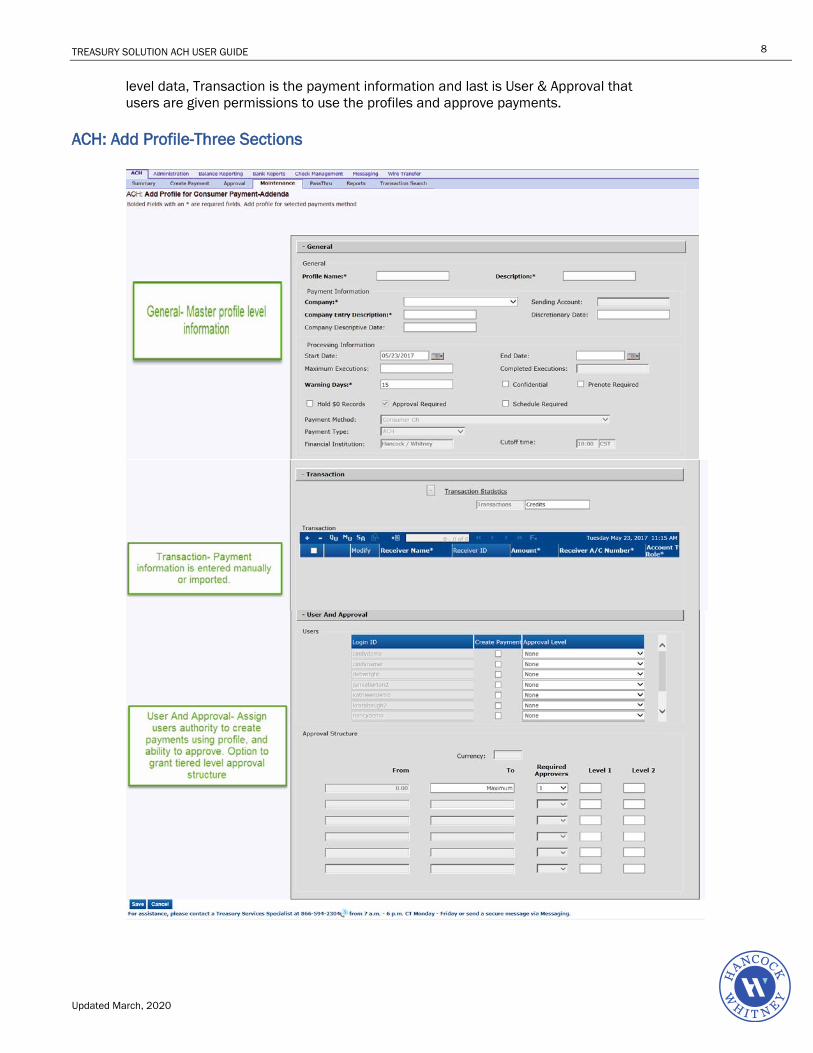
level data, Transaction is the payment information and last is User & Approval that users are given permissions to use the profiles and approve payments.
ACH: Add Profile-Three Sections
TREASURY SOLUTION ACH USER GUIDE
Updated March, 2020
9
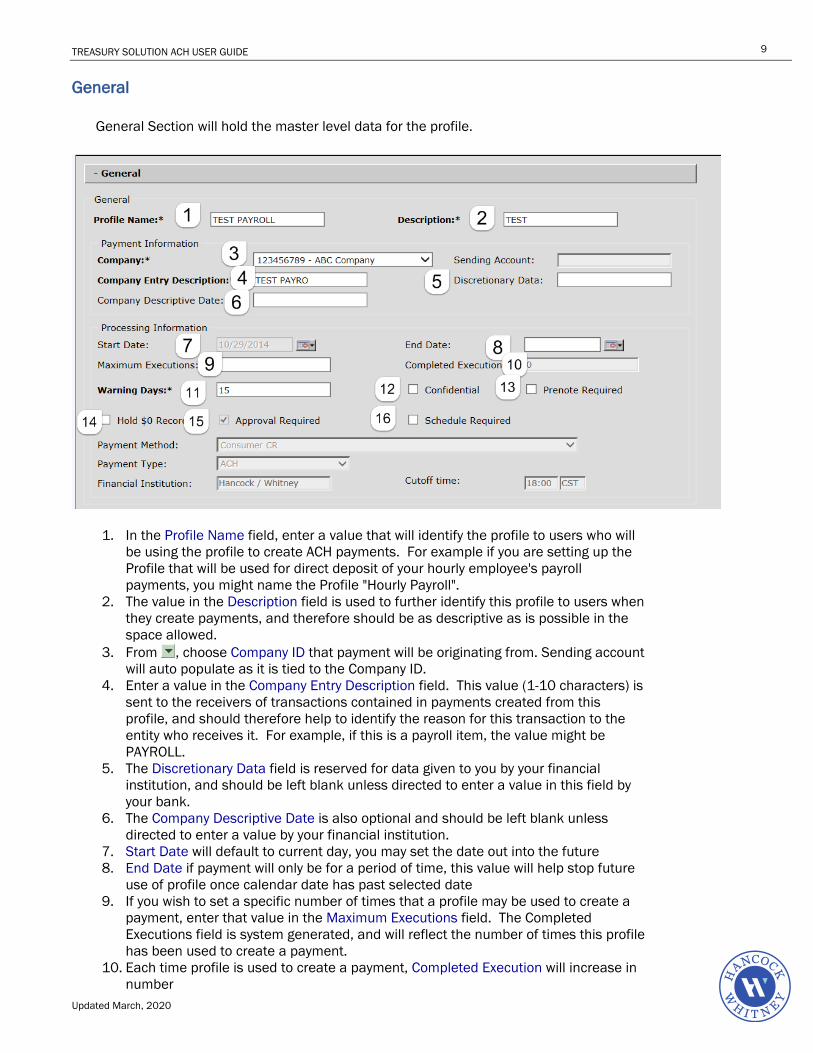
General General Section will hold the master level data for the profile.
1. In the Profile Name field, enter a value that will identify the profile to users who will be using the profile to create ACH payments. For example if you are setting up the Profile that will be used for direct deposit of your hourly employee's payroll payments, you might name the Profile "Hourly Payroll".
2. The value in the Description field is used to further identify this profile to users when they create payments, and therefore should be as descriptive as is possible in the space allowed.
3. From , choose Company ID that payment will be originating from. Sending account will auto populate as it is tied to the Company ID.
4. Enter a value in the Company Entry Description field. This value (1-10 characters) is sent to the receivers of transactions contained in payments created from this profile, and should therefore help to identify the reason for this transaction to the entity who receives it. For example, if this is a payroll item, the value might be PAYROLL.
5. The Discretionary Data field is reserved for data given to you by your financial institution, and should be left blank unless directed to enter a value in this field by your bank.
6. The Company Descriptive Date is also optional and should be left blank unless directed to enter a value by your financial institution.
7. Start Date will default to current day, you may set the date out into the future 8. End Date if payment will only be for a period of time, this value will help stop future
use of profile once calendar date has past selected date 9. If you wish to set a specific number of times that a profile may be used to create a
payment, enter that value in the Maximum Executions field. The Completed Executions field is system generated, and will reflect the number of times this profile has been used to create a payment.
10. Each time profile is used to create a payment, Completed Execution will increase in number
TREASURY SOLUTION ACH USER GUIDE
Updated March, 2020
10
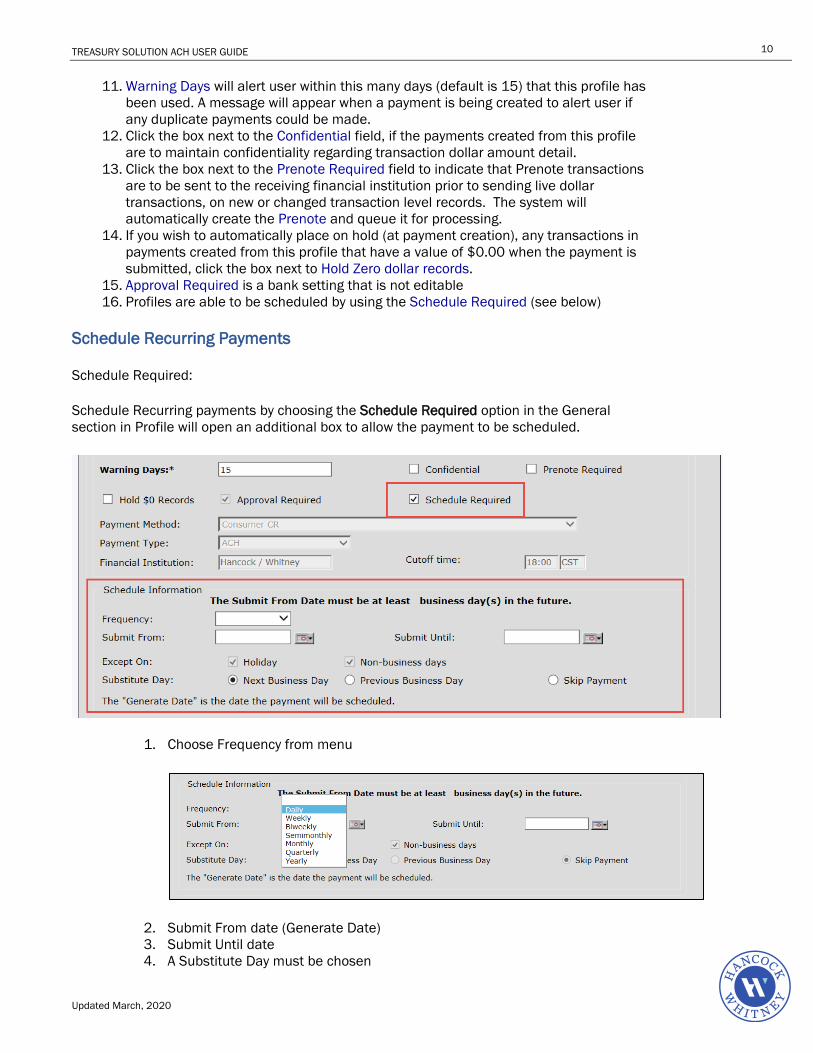
11. Warning Days will alert user within this many days (default is 15) that this profile has been used. A message will appear when a payment is being created to alert user if any duplicate payments could be made.
12. Click the box next to the Confidential field, if the payments created from this profile are to maintain confidentiality regarding transaction dollar amount detail.
13. Click the box next to the Prenote Required field to indicate that Prenote transactions are to be sent to the receiving financial institution prior to sending live dollar transactions, on new or changed transaction level records. The system will automatically create the Prenote and queue it for processing.
14. If you wish to automatically place on hold (at payment creation), any transactions in payments created from this profile that have a value of $0.00 when the payment is submitted, click the box next to Hold Zero dollar records.
15. Approval Required is a bank setting that is not editable 16. Profiles are able to be scheduled by using the Schedule Required (see below)
Schedule Recurring Payments
Schedule Required:
Schedule Recurring payments by choosing the Schedule Required option in the General section in Profile will open an additional box to allow the payment to be scheduled.
1. Choose Frequency from menu
2. Submit From date (Generate Date) 3. Submit Until date 4. A Substitute Day must be chosen
TREASURY SOLUTION ACH USER GUIDE
Updated March, 2020
11
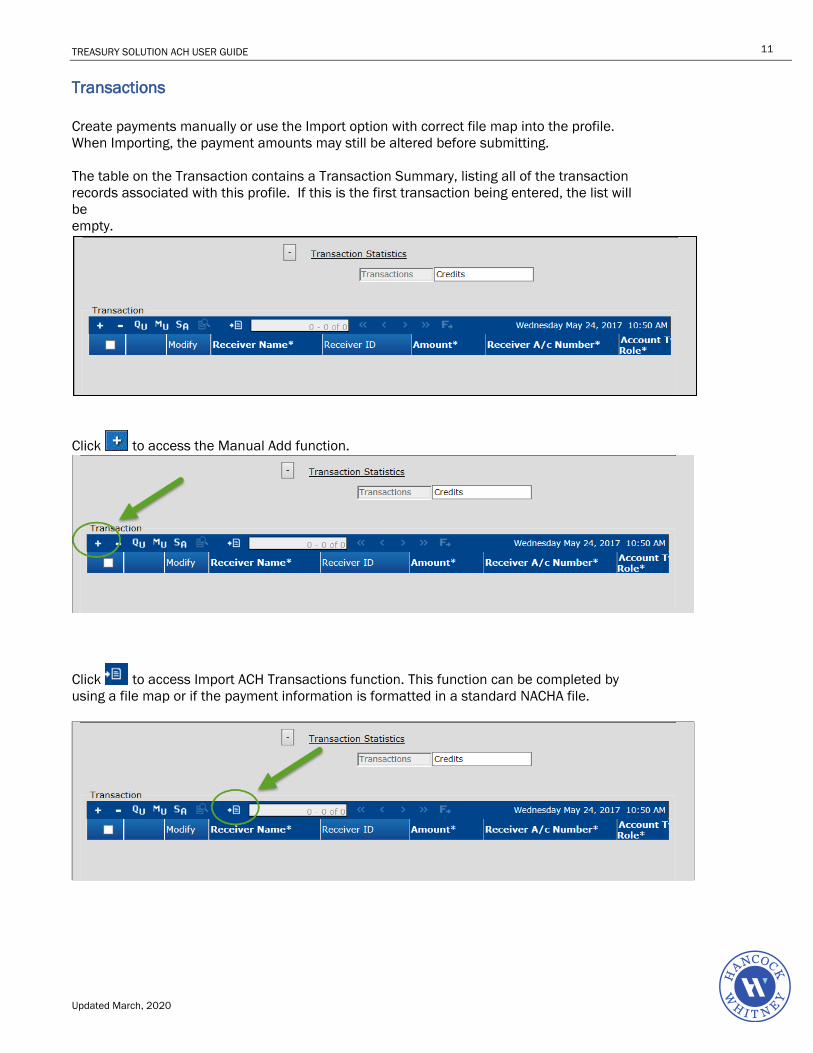
Transactions Create payments manually or use the Import option with correct file map into the profile. When Importing, the payment amounts may still be altered before submitting. The table on the Transaction contains a Transaction Summary, listing all of the transaction records associated with this profile. If this is the first transaction being entered, the list will be empty.
Click to access the Manual Add function.
Click to access Import ACH Transactions function. This function can be completed by using a file map or if the payment information is formatted in a standard NACHA file.

TREASURY SOLUTION ACH USER GUIDE
Updated March, 2020
12
Manual Add Function
1. Receiver Name – payee who will receive payment. Payee can be an individual or business name
2. Receiver ID- Enter the identification number of the entity or person associated with this payee (example, employee ID number)
3. Receiver A/C Number- Account Number field, enter the receiving account number (the account held by the entity entered in the Name field, ie. Employee checking account number, business checking account number.
4. Account Type Role- Click at the right of the Account Type field, and select the value that represents the type of account (Checking, Savings, etc.) to which this transaction will settle.
5. Bank R/T- Enter the receiving financial institution's RT (Routing Transit) number in the field.
6. Status- Click to select if payee will be Active, Hold or Prenote 7. Amount- Enter the dollar value of the transaction being added. You may enter 0.00
if the amount for the transaction being added is changed each time a payment is created from this profile. In the case of Tax payments, this field is auto-calculated, based on the dollar amount(s) assigned in the addenda associated with the transaction.
8. Hold- Click Hold if payee is to be entered or modified but kept in batch 9. Addenda- Enter any information that you would like to accompany the transaction.
This information will be transmitted to the payee, but it may not be retrievable by the receiving party unless the receiver has access to reports granted to them by their financial institution.
Note: If the payment method selected is one requiring the set up of addenda (Tax, CCD+, etc.) click the Addenda button at the far right of the transaction record to access the appropriate Addenda page.
TREASURY SOLUTION ACH USER GUIDE
Updated March, 2020
13
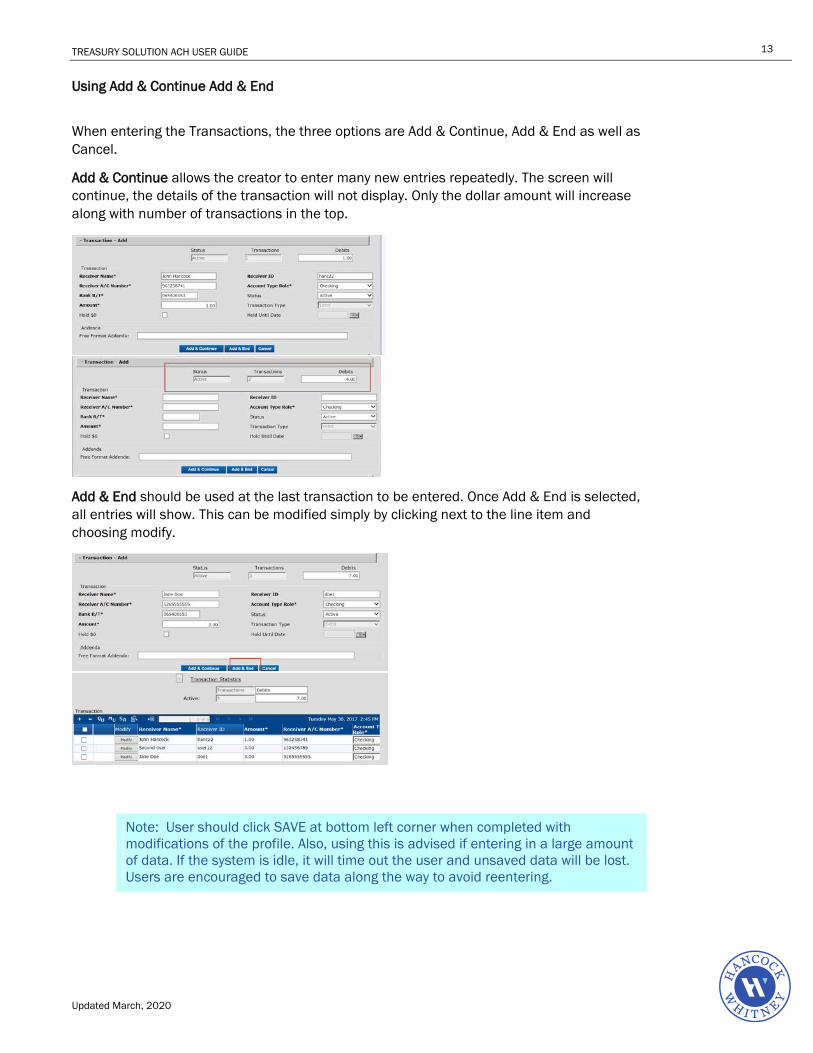
Using Add & Continue Add & End
When entering the Transactions, the three options are Add & Continue, Add & End as well as Cancel.
Add & Continue allows the creator to enter many new entries repeatedly. The screen will continue, the details of the transaction will not display. Only the dollar amount will increase along with number of transactions in the top.
Add & End should be used at the last transaction to be entered. Once Add & End is selected, all entries will show. This can be modified simply by clicking next to the line item and choosing modify.
Note: User should click SAVE at bottom left corner when completed with modifications of the profile. Also, using this is advised if entering in a large amount of data. If the system is idle, it will time out the user and unsaved data will be lost. Users are encouraged to save data along the way to avoid reentering.
TREASURY SOLUTION ACH USER GUIDE
Updated March, 2020
14
TREASURY SOLUTION ACH USER GUIDE
Updated March, 2020
15
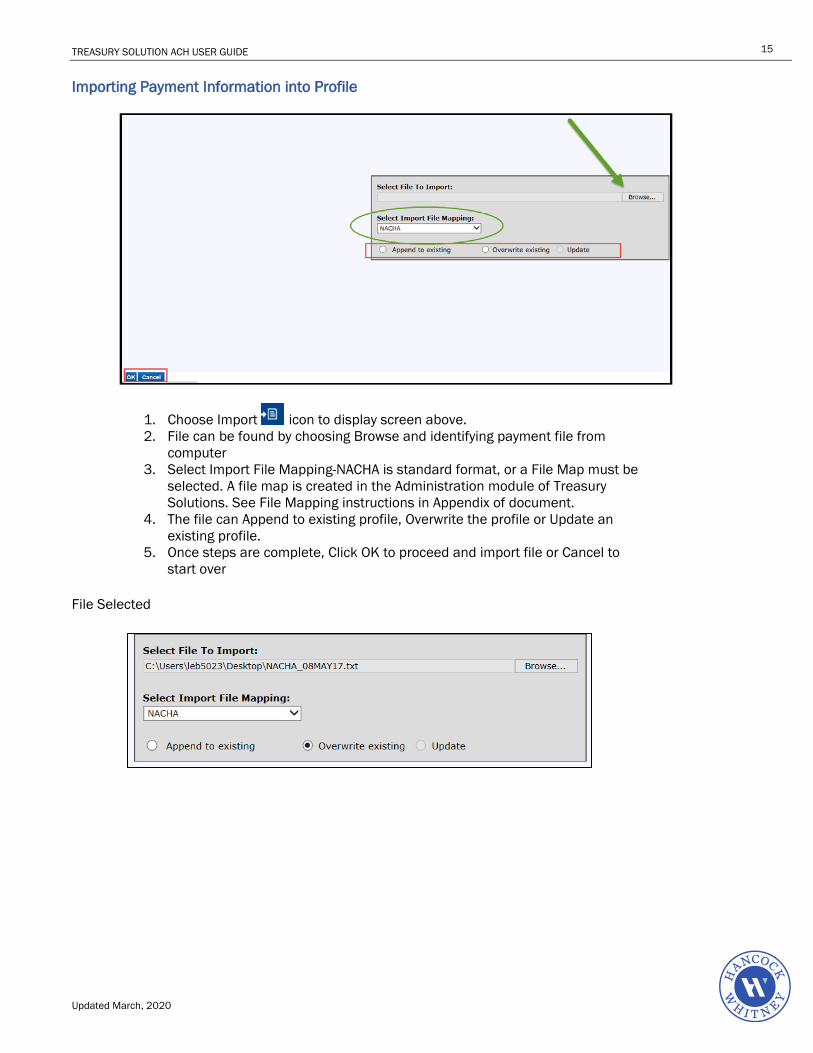
Importing Payment Information into Profile
1. Choose Import icon to display screen above. 2. File can be found by choosing Browse and identifying payment file from
computer 3. Select Import File Mapping-NACHA is standard format, or a File Map must be
selected. A file map is created in the Administration module of Treasury Solutions. See File Mapping instructions in Appendix of document.
4. The file can Append to existing profile, Overwrite the profile or Update an existing profile.
5. Once steps are complete, Click OK to proceed and import file or Cancel to start over
File Selected
TREASURY SOLUTION ACH USER GUIDE
Updated March, 2020
16
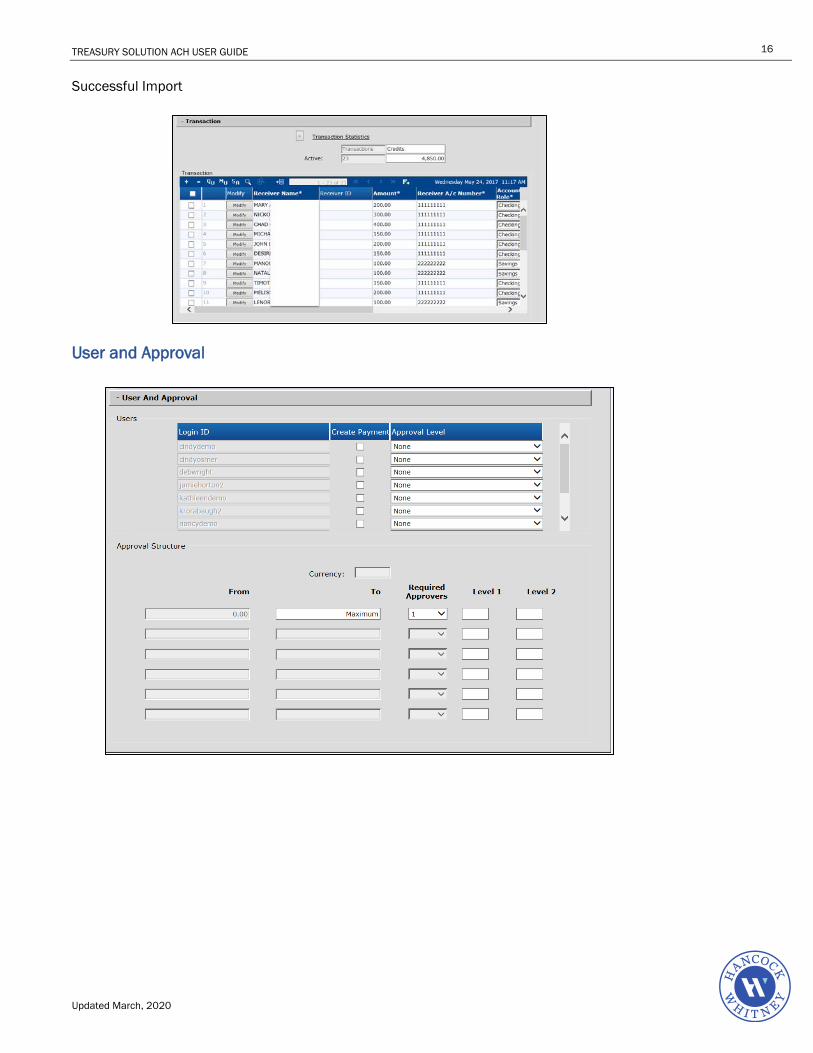
Successful Import
User and Approval

TREASURY SOLUTION ACH USER GUIDE
Updated March, 2020
17
In this section of the profile, entitle user(s) with ACH permission to the use the payment being added.
1. All users will ACH permission will be listed. Choose by clicking box Create Payment if this person will be an authorized user to make a payment using the profile created. All users can be enabled or only selected users.
Note: When adding a new user to the system, if the user will need to make ACH payments, add user to profile that will be required.
2. Each profile must have at least one approver. System Default is Level 1 (Approval Structure is covered next). Create the profile, and then choose who can create payments, and then who can approve payments from the list of authorized ACH users.
Note: When adding a new user to the system, if the user will need to Approve ACH payments, Approval Level must be granted before Payment is made.
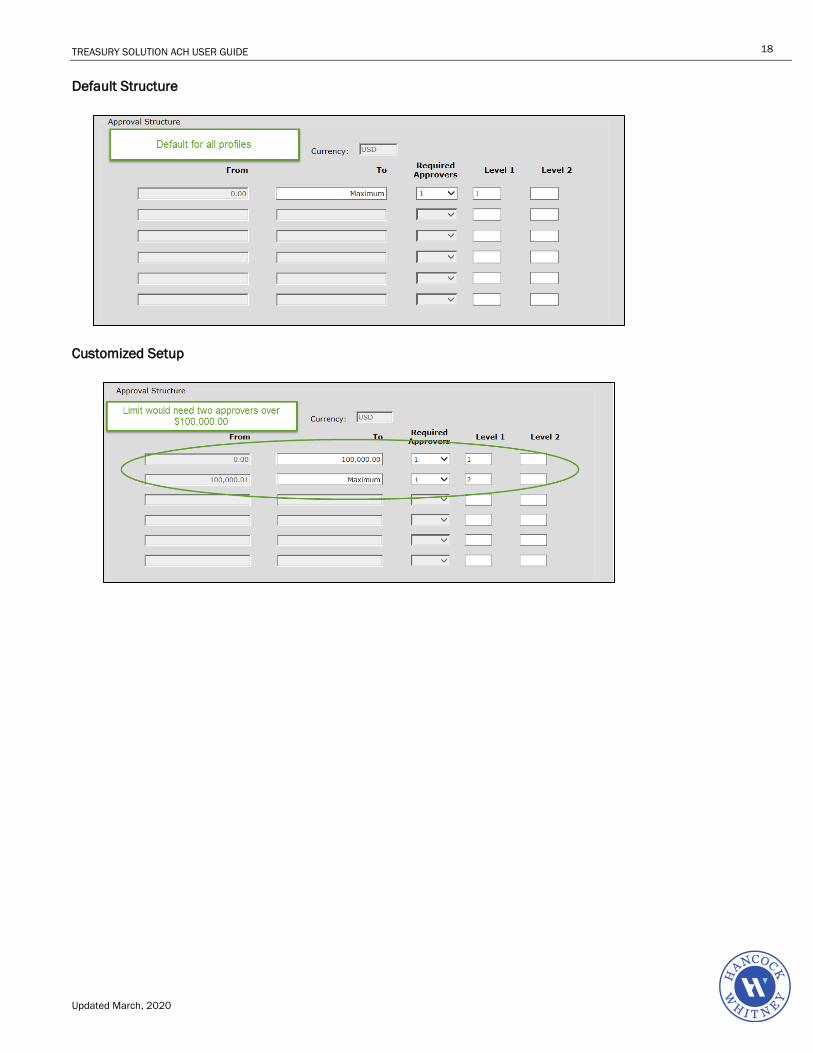
Approval Structure
Approval structure is set per ACH Profile and can be adjusted to meet the internal controls of any user.
The tiered approach allows minimum and maximum amounts and the number of approvers required for these types of payments. System default is set as a Level 1 can approve 0.00 to Unlimited. All ACH payments require a minimum of one approver, different from the original user who initiated the payment.
Below are two examples of the approval structure. The first is the system default; the second is an example of a user who placed dollar controls. The number of approvers and Level 2 designations are designed by the profile creator or administrator if warranted.
TREASURY SOLUTION ACH USER GUIDE
Updated March, 2020
18
Default Structure
Customized Setup
TREASURY SOLUTION ACH USER GUIDE
Updated March, 2020
19
History
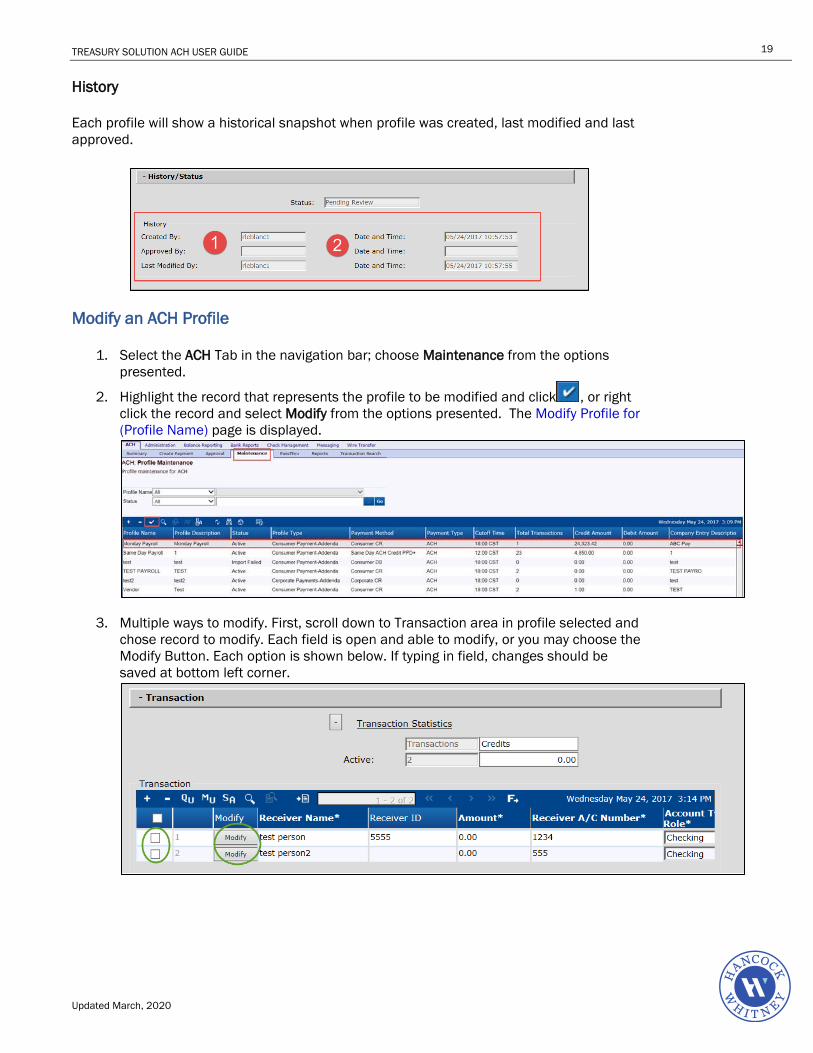
Each profile will show a historical snapshot when profile was created, last modified and last approved.
Modify an ACH Profile
1. Select the ACH Tab in the navigation bar; choose Maintenance from the options presented.
2. Highlight the record that represents the profile to be modified and click , or right click the record and select Modify from the options presented. The Modify Profile for (Profile Name) page is displayed.
3. Multiple ways to modify. First, scroll down to Transaction area in profile selected and chose record to modify. Each field is open and able to modify, or you may choose the Modify Button. Each option is shown below. If typing in field, changes should be saved at bottom left corner.
TREASURY SOLUTION ACH USER GUIDE
Updated March, 2020
20
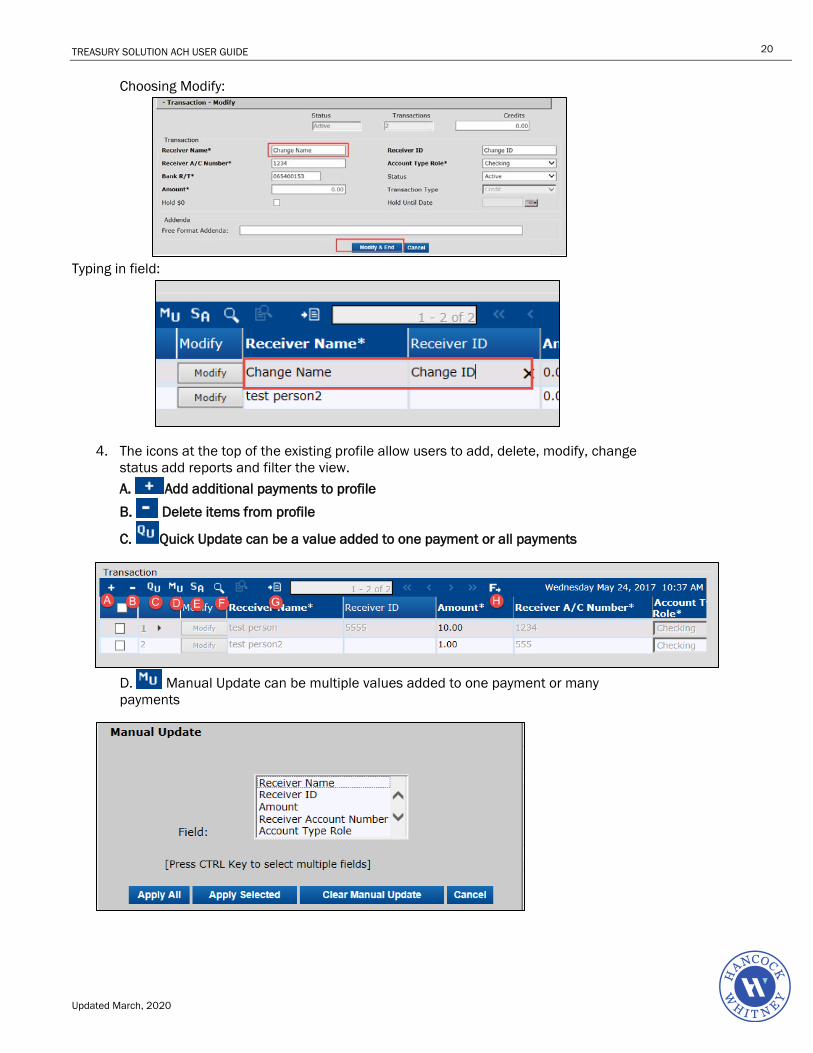
Choosing Modify:
Typing in field:
4. The icons at the top of the existing profile allow users to add, delete, modify, change status add reports and filter the view. A. Add additional payments to profile B. Delete items from profile
C. Quick Update can be a value added to one payment or all payments
D. Manual Update can be multiple values added to one payment or many payments

TREASURY SOLUTION ACH USER GUIDE
Updated March, 2020
21
E. Status All allows users to change payment status of payees in profile
F. Generates a profile report for user
G. Import icon, payments can be imported into profile using a file map built in Administration or using the standardized NACHA format H. Filter Icon allows user to sort and change order of payees listed in profile
Delete an ACH Profile
1. Select the ACH Tab in the navigation bar, choose Maintenance from the options presented. The ACH: Profile Summary page is displayed, containing a list of currently set up profiles.
2. Highlight the record that represents the profile to be deleted and click , or right
click the record and select Delete from the options presented. The Delete Profile Warning dialog is displayed.
3. Click OK to complete the deletion of the selected profile. The ACH Profile Summary is re-displayed. The record selected for deletion has been removed from the list.
4. Click Cancel to quit without deleting the selected profile
TREASURY SOLUTION ACH USER GUIDE
Updated March, 2020
22
Create an ACH Payment
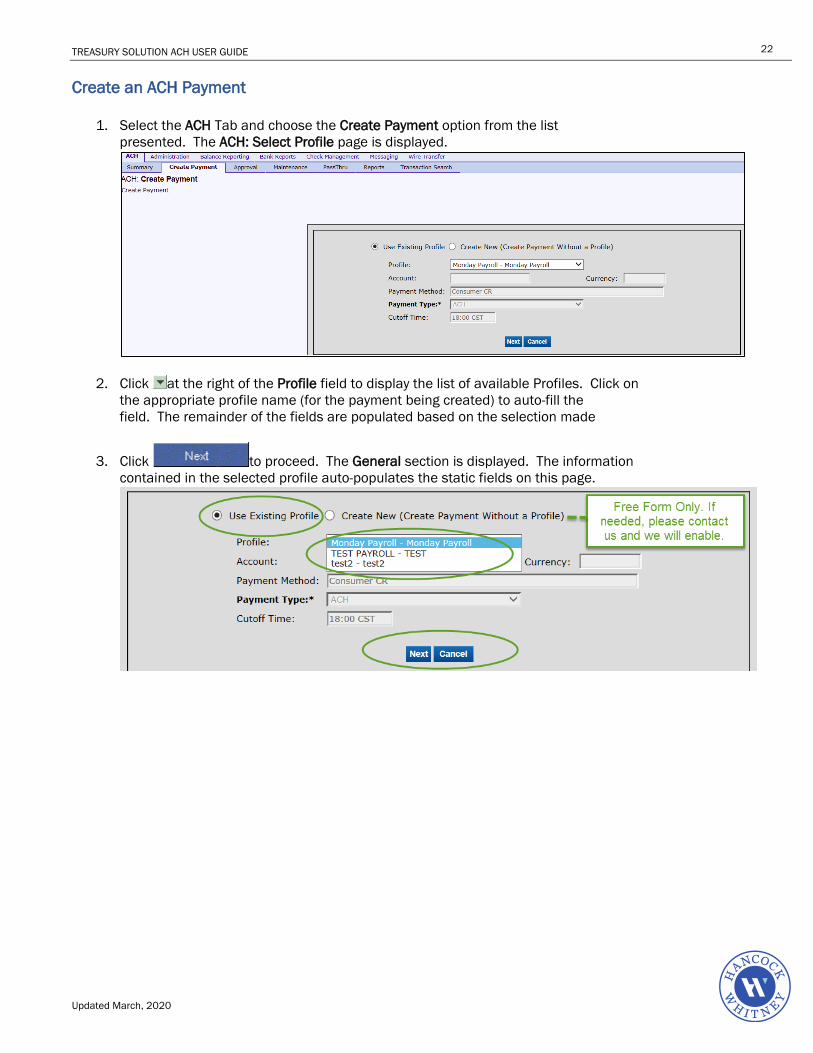
1. Select the ACH Tab and choose the Create Payment option from the list presented. The ACH: Select Profile page is displayed.
2. Click at the right of the Profile field to display the list of available Profiles. Click on the appropriate profile name (for the payment being created) to auto-fill the field. The remainder of the fields are populated based on the selection made
3. Click to proceed. The General section is displayed. The information contained in the selected profile auto-populates the static fields on this page.
TREASURY SOLUTION ACH USER GUIDE
Updated March, 2020
23
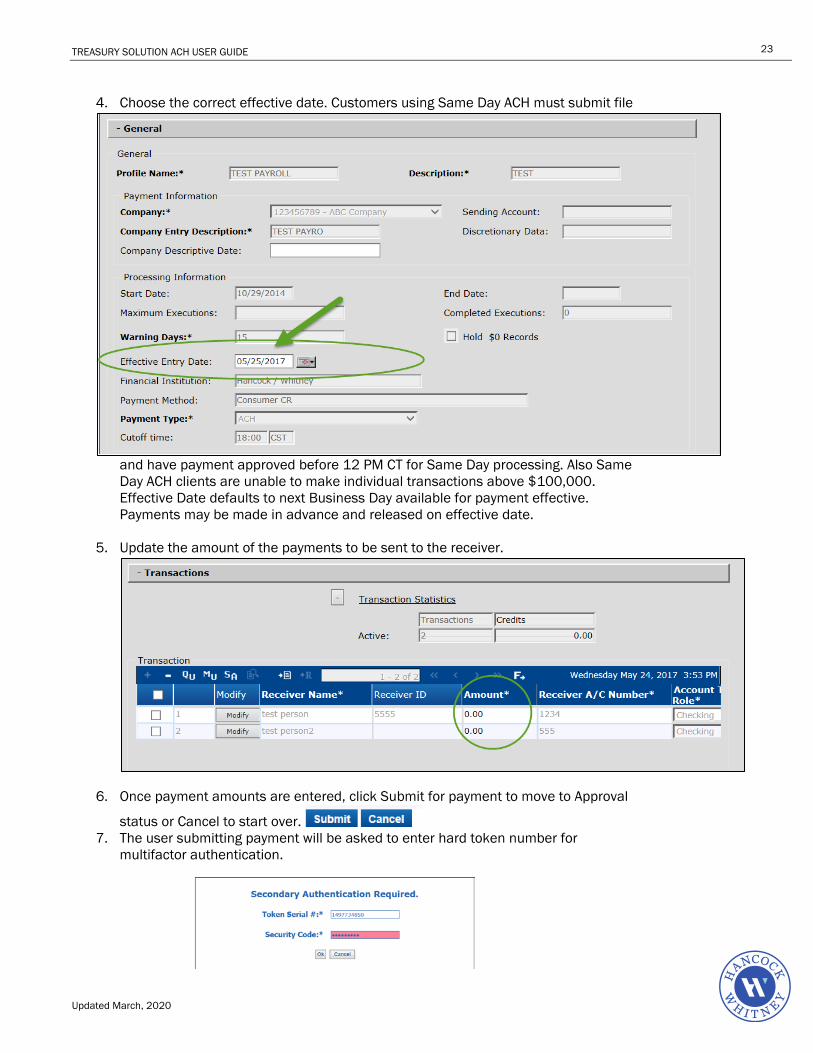
4. Choose the correct effective date. Customers using Same Day ACH must submit file
and have payment approved before 12 PM CT for Same Day processing. Also Same Day ACH clients are unable to make individual transactions above $100,000. Effective Date defaults to next Business Day available for payment effective. Payments may be made in advance and released on effective date.
5. Update the amount of the payments to be sent to the receiver.
6. Once payment amounts are entered, click Submit for payment to move to Approval
status or Cancel to start over. 7. The user submitting payment will be asked to enter hard token number for
multifactor authentication.
TREASURY SOLUTION ACH USER GUIDE
Updated March, 2020
24
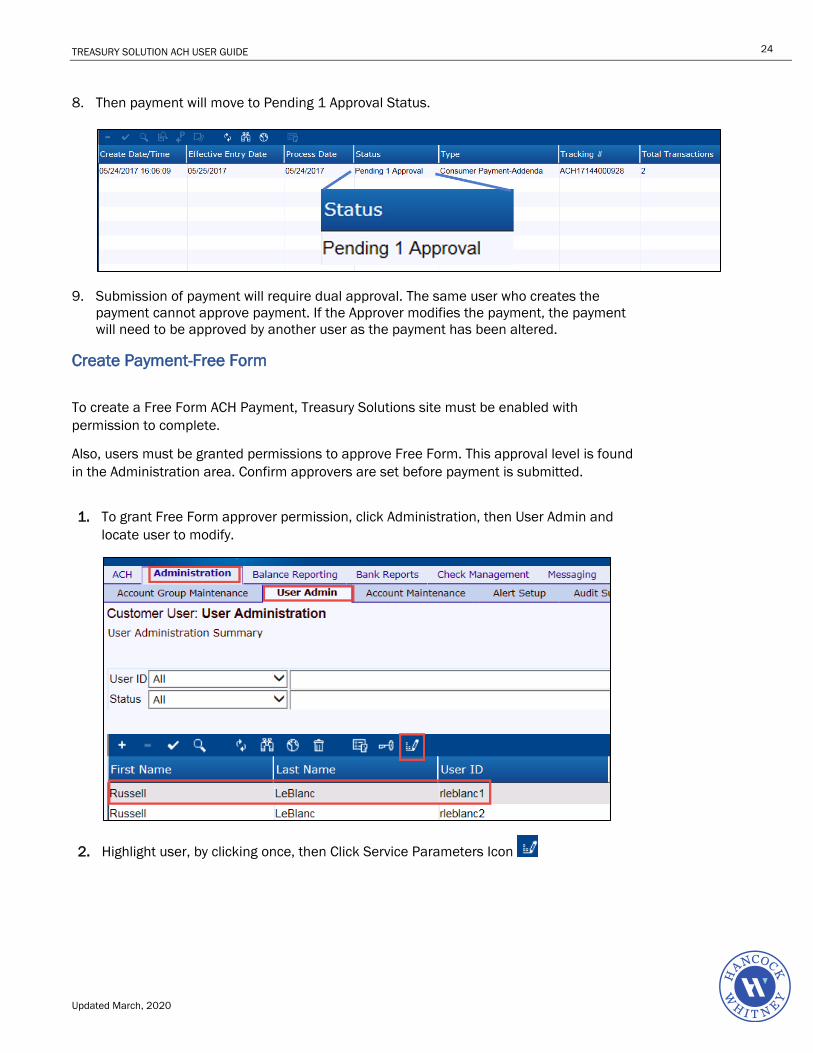
8. Then payment will move to Pending 1 Approval Status.
9. Submission of payment will require dual approval. The same user who creates the payment cannot approve payment. If the Approver modifies the payment, the payment will need to be approved by another user as the payment has been altered.
Create Payment-Free Form
To create a Free Form ACH Payment, Treasury Solutions site must be enabled with permission to complete.
Also, users must be granted permissions to approve Free Form. This approval level is found in the Administration area. Confirm approvers are set before payment is submitted.
1. To grant Free Form approver permission, click Administration, then User Admin and
locate user to modify.
2. Highlight user, by clicking once, then Click Service Parameters Icon

TREASURY SOLUTION ACH USER GUIDE
Updated March, 2020
25
3. In Services and Activities, choose ACH, then Click, Modify
4. All Service Parameters will be listed for user. Default levels are listed will all 9’s. Dollar
limit level is set by the bank and flows down to all users unless company would like to change user limits here. However, this can also be controlled on the payment profile level by setting tiered approval level. Default Approval Level 1 should be chosen for any user who can approve Free Form ACH payments. Click SAVE.
TREASURY SOLUTION ACH USER GUIDE
Updated March, 2020
26
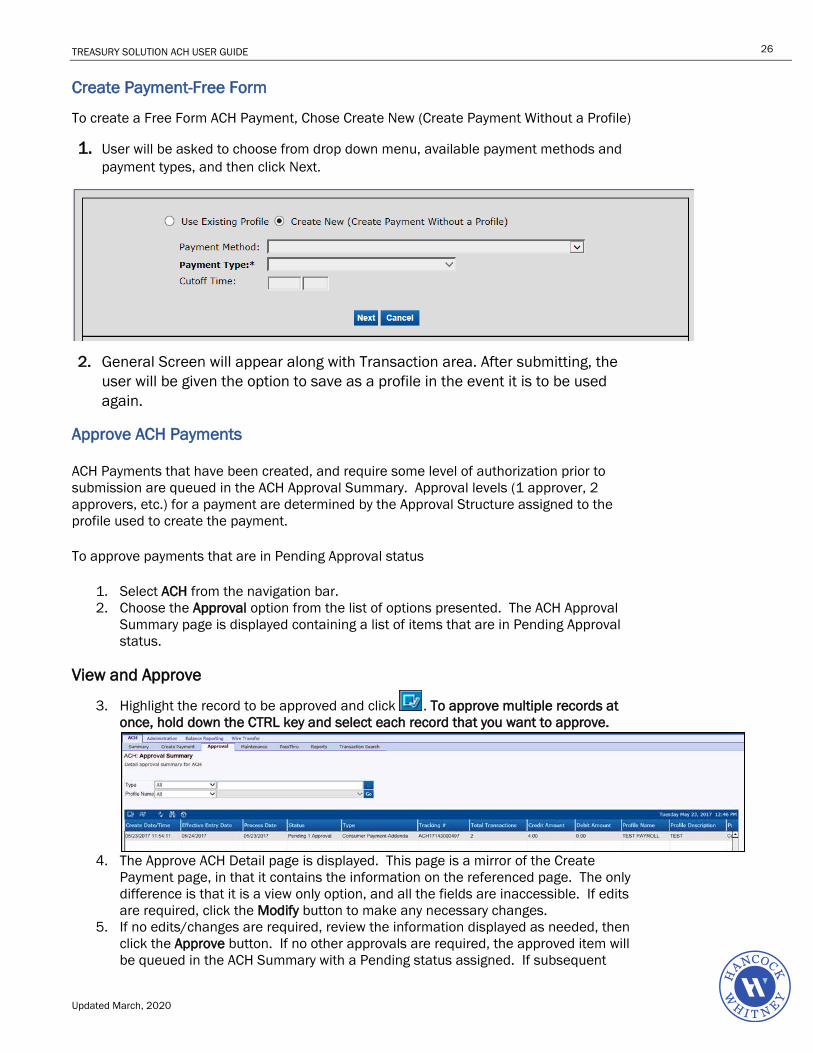
Create Payment-Free Form
To create a Free Form ACH Payment, Chose Create New (Create Payment Without a Profile)
1. User will be asked to choose from drop down menu, available payment methods and payment types, and then click Next.
2. General Screen will appear along with Transaction area. After submitting, the
user will be given the option to save as a profile in the event it is to be used again.
Approve ACH Payments
ACH Payments that have been created, and require some level of authorization prior to submission are queued in the ACH Approval Summary. Approval levels (1 approver, 2 approvers, etc.) for a payment are determined by the Approval Structure assigned to the profile used to create the payment.
To approve payments that are in Pending Approval status
1. Select ACH from the navigation bar. 2. Choose the Approval option from the list of options presented. The ACH Approval
Summary page is displayed containing a list of items that are in Pending Approval status.
View and Approve
3. Highlight the record to be approved and click . To approve multiple records at once, hold down the CTRL key and select each record that you want to approve.
4. The Approve ACH Detail page is displayed. This page is a mirror of the Create
Payment page, in that it contains the information on the referenced page. The only difference is that it is a view only option, and all the fields are inaccessible. If edits are required, click the Modify button to make any necessary changes.
5. If no edits/changes are required, review the information displayed as needed, then click the Approve button. If no other approvals are required, the approved item will be queued in the ACH Summary with a Pending status assigned. If subsequent
TREASURY SOLUTION ACH USER GUIDE
Updated March, 2020
27
approval levels are required, another authorized user is required to approve the payment before it is queued for further processing.
6. If you wish to move to the next item in the approval queue without taking any action on the payment currently displayed, click the Skip button. If no other payments are pending approval, the Approval Summary is again displayed.
7. Click Cancel to return to the summary page without saving any changes/edits made to the displayed payment.
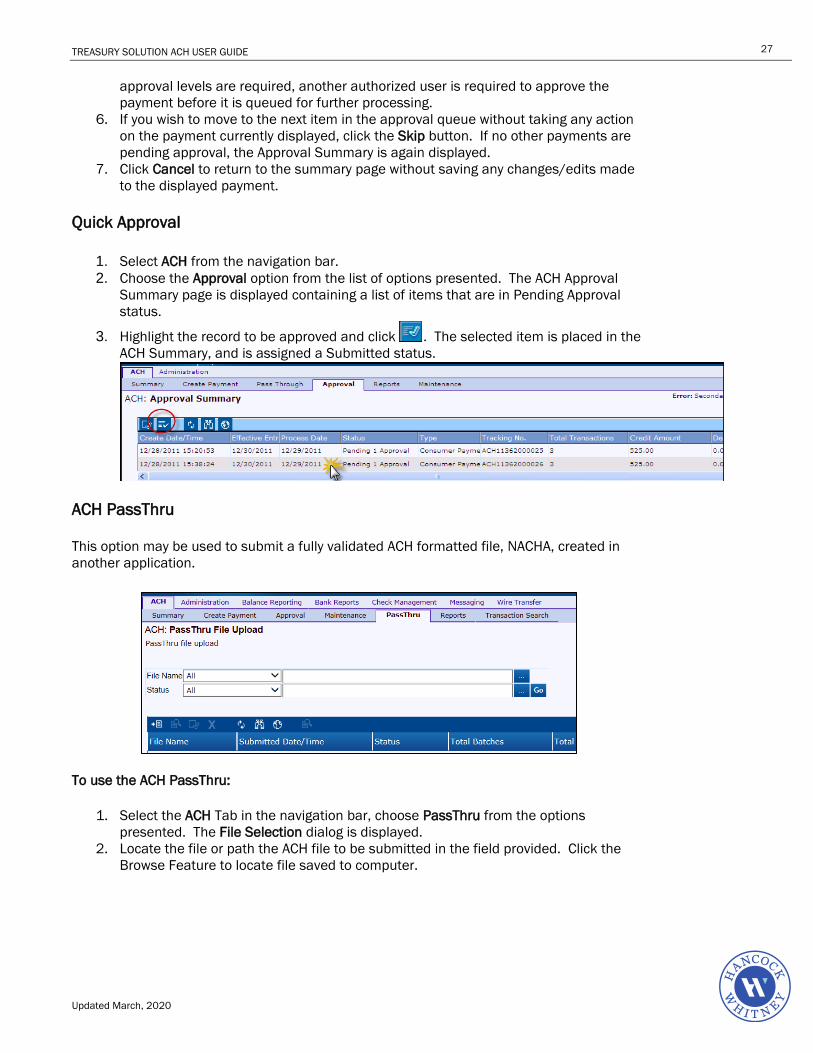
Quick Approval
1. Select ACH from the navigation bar. 2. Choose the Approval option from the list of options presented. The ACH Approval
Summary page is displayed containing a list of items that are in Pending Approval status.
3. Highlight the record to be approved and click . The selected item is placed in the ACH Summary, and is assigned a Submitted status.
ACH PassThru
This option may be used to submit a fully validated ACH formatted file, NACHA, created in another application.
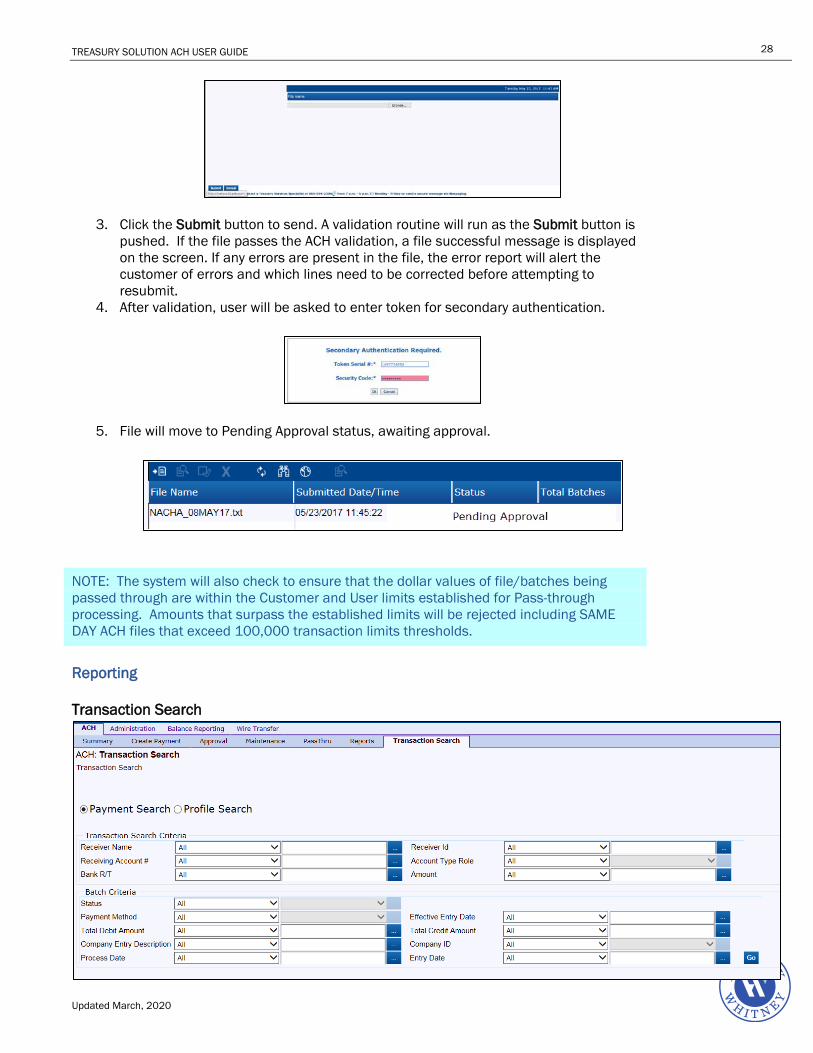
To use the ACH PassThru:
1. Select the ACH Tab in the navigation bar, choose PassThru from the options presented. The File Selection dialog is displayed.
2. Locate the file or path the ACH file to be submitted in the field provided. Click the Browse Feature to locate file saved to computer.
TREASURY SOLUTION ACH USER GUIDE
Updated March, 2020
28
3. Click the Submit button to send. A validation routine will run as the Submit button is pushed. If the file passes the ACH validation, a file successful message is displayed on the screen. If any errors are present in the file, the error report will alert the customer of errors and which lines need to be corrected before attempting to resubmit.
4. After validation, user will be asked to enter token for secondary authentication.
5. File will move to Pending Approval status, awaiting approval.
NOTE: The system will also check to ensure that the dollar values of file/batches being passed through are within the Customer and User limits established for Pass-through processing. Amounts that surpass the established limits will be rejected including SAME DAY ACH files that exceed 100,000 transaction limits thresholds.
Reporting
Transaction Search
TREASURY SOLUTION ACH USER GUIDE
Updated March, 2020
29
Authorized users have the ability to research transactions
1. From the ACH Menu, choose Transaction Search and the options will display as Payment Search or Profile Search.
2. Each field will contain a drop down menu to limit options for the search results. Once the identifier is chosen to search by, Click to enter text , then Click GO on bottom right to view results.
TREASURY SOLUTION ACH USER GUIDE
Updated March, 2020
30
Printing a Report for a Single Payment After submitting a payment, you may want to produce a report showing the transaction detail that was included in that payment.
1. From the ACH: Summary screen, double click on the payment that you want to produce a report on.
2. On the bottom right of the screen, click on for a .pdf file or for a comma delimited or fixed width file format.
Add an ACH Report
The Reports option gives you a completely flexible way to customize the reporting process that fits a user’s organizational/operational needs. Add reports to the system containing the criteria/data you wish to see. Add summary and/or detail reports that include as little or as much information as you require.
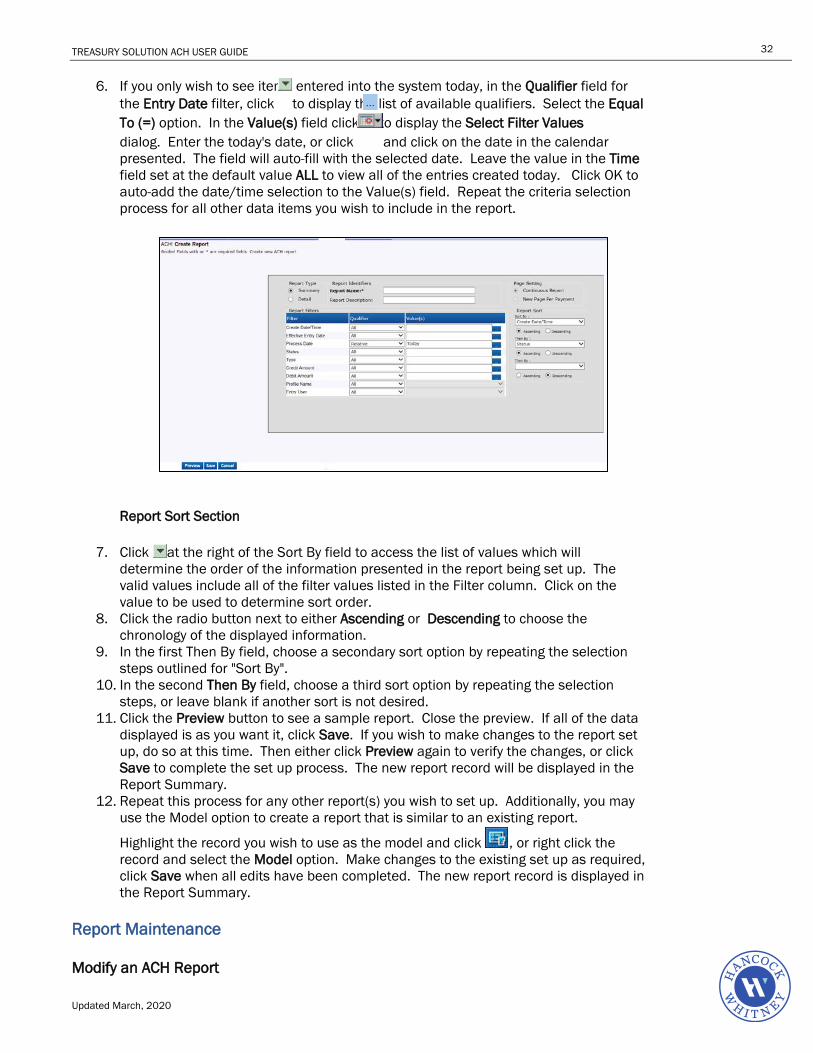
1. Select the Report option under the ACH tab. The ACH Report Summary page is presented. If this is the first time you have accessed this option, or if no reports are currently set up on the system, the Summary will be empty. If reports have already been established, the list presented contains information including Report Name, Report Type, Report Description, and the name of the user who created the report.
2. Click to access the Create Report page. Report Type Section
3. Click the radio button next to either the Summary or Detail option, depending on the level of information to be included in the report being set up. If the Summary option is selected, the report will display general information about the selected payment(s). If Detail is chosen, the report will include the transaction detail for the selected payment(s). Report Identifies Section
4. In the Report Name field, enter a value that will help identify the report when you want to access the associated report.
5. In the Report Description field, enter a short descriptive phrase that will further identify the report when accessing it from the Reports Summary list.

TREASURY SOLUTION ACH USER GUIDE
Updated March, 2020
31
Report Filters Section
In this section of the page, set up the filters that will determine what data will be included in the report being set up. Be as specific as you wish, as many additional reports may be set up to capture other available/required information. The Filter column contains the items that may be included in the report being added. The Qualifier column allows you to choose the conditions you wish to assign to the associated filter, and in the Values column, you enter the specific data for the selected filter and qualifier. For example:
TREASURY SOLUTION ACH USER GUIDE
Updated March, 2020
32
6. If you only wish to see items entered into the system today, in the Qualifier field for the Entry Date filter, click to display the list of available qualifiers. Select the Equal To (=) option. In the Value(s) field click to display the Select Filter Values dialog. Enter the today's date, or click and click on the date in the calendar presented. The field will auto-fill with the selected date. Leave the value in the Time field set at the default value ALL to view all of the entries created today. Click OK to auto-add the date/time selection to the Value(s) field. Repeat the criteria selection process for all other data items you wish to include in the report.
Report Sort Section
7. Click at the right of the Sort By field to access the list of values which will determine the order of the information presented in the report being set up. The valid values include all of the filter values listed in the Filter column. Click on the value to be used to determine sort order.
8. Click the radio button next to either Ascending or Descending to choose the chronology of the displayed information.
9. In the first Then By field, choose a secondary sort option by repeating the selection steps outlined for "Sort By".
10. In the second Then By field, choose a third sort option by repeating the selection steps, or leave blank if another sort is not desired.
11. Click the Preview button to see a sample report. Close the preview. If all of the data displayed is as you want it, click Save. If you wish to make changes to the report set up, do so at this time. Then either click Preview again to verify the changes, or click Save to complete the set up process. The new report record will be displayed in the Report Summary.
12. Repeat this process for any other report(s) you wish to set up. Additionally, you may use the Model option to create a report that is similar to an existing report.
Highlight the record you wish to use as the model and click , or right click the record and select the Model option. Make changes to the existing set up as required, click Save when all edits have been completed. The new report record is displayed in the Report Summary.
Report Maintenance Modify an ACH Report
TREASURY SOLUTION ACH USER GUIDE
Updated March, 2020
33
1. Select the Report option under the ACH tab. The ACH Report Summary page is presented. The list presented contains a record for each report definition currently set up on the system, with information that includes Report Name, Report Type, Report Description, and the name of the user who created the report.
2. Highlight the record of the report definition to be modified and click to access the Modify Report page. Alternately, you may right click the record and select the Modify option from the list presented, to access the Modify Report page.
3. Make the required changes to the definition fields. You may click to view the report setup before saving you edits. Close the report preview when finished. You are returned to the Modify Report page. If additional edits are required, complete them.
When all edits are completed, click . All edits will be saved within the report definition, and be reflected in the next call of this report. Click Cancel to return to the Summary page without saving any edits/modifications.
Delete an ACH Report
1. Select the Report option under the ACH tab. The ACH Report Summary page is presented. The list presented contains a record for each report definition currently set up on the system, with information that includes Report Name, Report Type, Report Description, and the name of the user who created the report.
2. Highlight the record of the report definition to be deleted and click , or right click the record and select Delete from the options presented. The Delete Profile Warning dialog is displayed.
3. Click OK to complete the deletion of the selected report definition. The Report Summary is re-displayed. The record selected for deletion has been removed from the list.
4. Click Cancel to quit without deleting the selected profile
View an ACH Report
1. Select the Report option under the ACH tab. The ACH Report Summary page is presented.
2. Highlight the record that represents the report you wish to view/print and click
. Alternately, right click the record and click the Preview option from the list presented. The report will be displayed on the screen. Use the print option, if you wish a hard copy of the report.
3. Once review or printing is completed, close the report and return to the Report Summary.
4. Repeat for any other report you would like to review/print.
Reference Guide – Treasury Solutions ACH Summary
The ACH Summary page contains a listing of all payments currently on the system. Information displayed on the page includes:
Status – The processing stage of an ACH Payment: • Pending 1 Approval • Pending 2 Approvals • Pending 3 Approvals

TREASURY SOLUTION ACH USER GUIDE
Updated March, 2020
34
• Pending • Processed • Submitted • Failed • Deleted
Tracking No – The system assigned tracking number/identifier assigned to a payment/record. Total Transactions - The total transaction count in an ACH payment (batch). Entry User - The identification of the user who:
• Placed the request • Created the item • Created the payment

TREASURY SOLUTION ACH USER GUIDE
Updated March, 2020
35
Icon/Button Description
Displays a warning message asking you to verify that you want to delete the selected record.
Displays the Modify Profile page for you to make changes to the selected ACH Payment.
Displays the View Payment page from which you can view detailed ACH Payment information page.
View and Approve a payment in Pending Approval status.
Refresh the table with the most current data.
Displays the Find page for you to specify search information.
Displays the Environment page for you to set environment parameters.
Displays the Add Profile page for you to create a new ACH Profile based on information from the Profile selected in the summary table.
TREASURY SOLUTION ACH USER GUIDE
Updated March, 2020
36
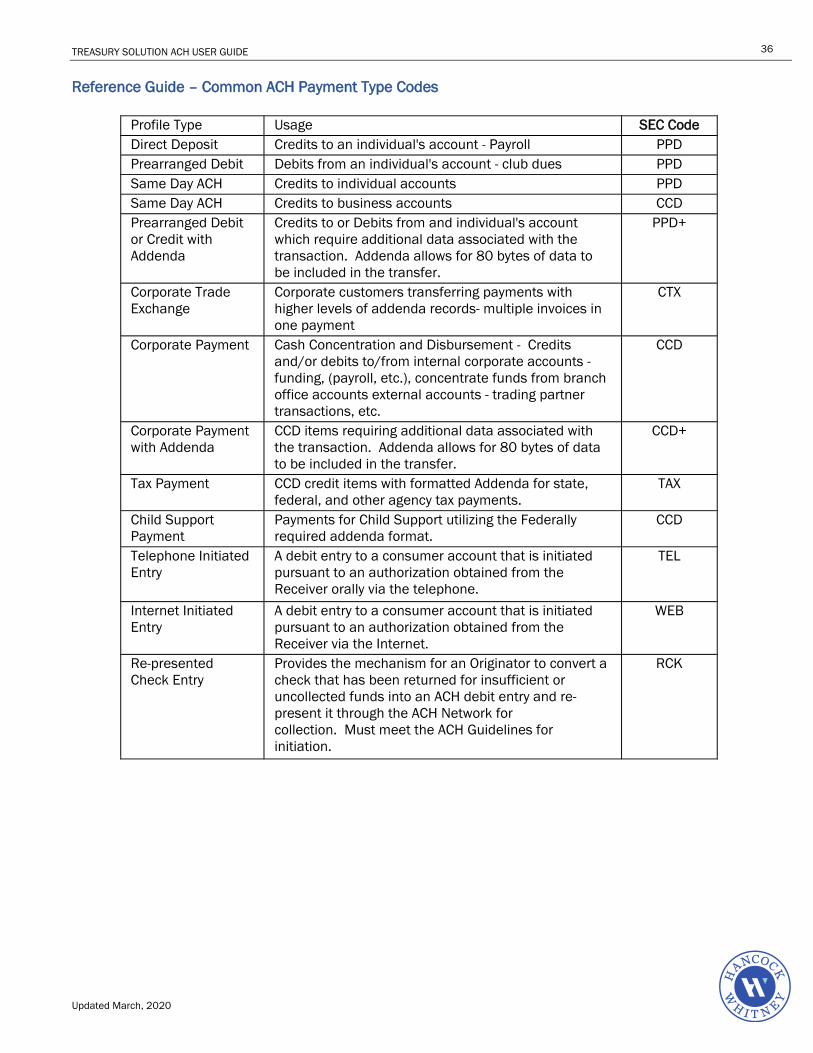
Reference Guide – Common ACH Payment Type Codes
Profile Type Usage SEC Code Direct Deposit Credits to an individual's account - Payroll PPD Prearranged Debit Debits from an individual's account - club dues PPD Same Day ACH Credits to individual accounts PPD Same Day ACH Credits to business accounts CCD Prearranged Debit or Credit with Addenda
Credits to or Debits from and individual's account which require additional data associated with the transaction. Addenda allows for 80 bytes of data to be included in the transfer.
PPD+
Corporate Trade Exchange
Corporate customers transferring payments with higher levels of addenda records- multiple invoices in one payment
CTX
Corporate Payment
Cash Concentration and Disbursement - Credits and/or debits to/from internal corporate accounts - funding, (payroll, etc.), concentrate funds from branch office accounts external accounts - trading partner transactions, etc.
CCD
Corporate Payment with Addenda
CCD items requiring additional data associated with the transaction. Addenda allows for 80 bytes of data to be included in the transfer.
CCD+
Tax Payment CCD credit items with formatted Addenda for state, federal, and other agency tax payments.
TAX
Child Support Payment
Payments for Child Support utilizing the Federally required addenda format.
CCD
Telephone Initiated Entry
A debit entry to a consumer account that is initiated pursuant to an authorization obtained from the Receiver orally via the telephone.
TEL
Internet Initiated Entry
A debit entry to a consumer account that is initiated pursuant to an authorization obtained from the Receiver via the Internet.
WEB
Re-presented Check Entry
Provides the mechanism for an Originator to convert a check that has been returned for insufficient or uncollected funds into an ACH debit entry and re-present it through the ACH Network for collection. Must meet the ACH Guidelines for initiation.
RCK
TREASURY SOLUTION ACH USER GUIDE
Updated March, 2020
37
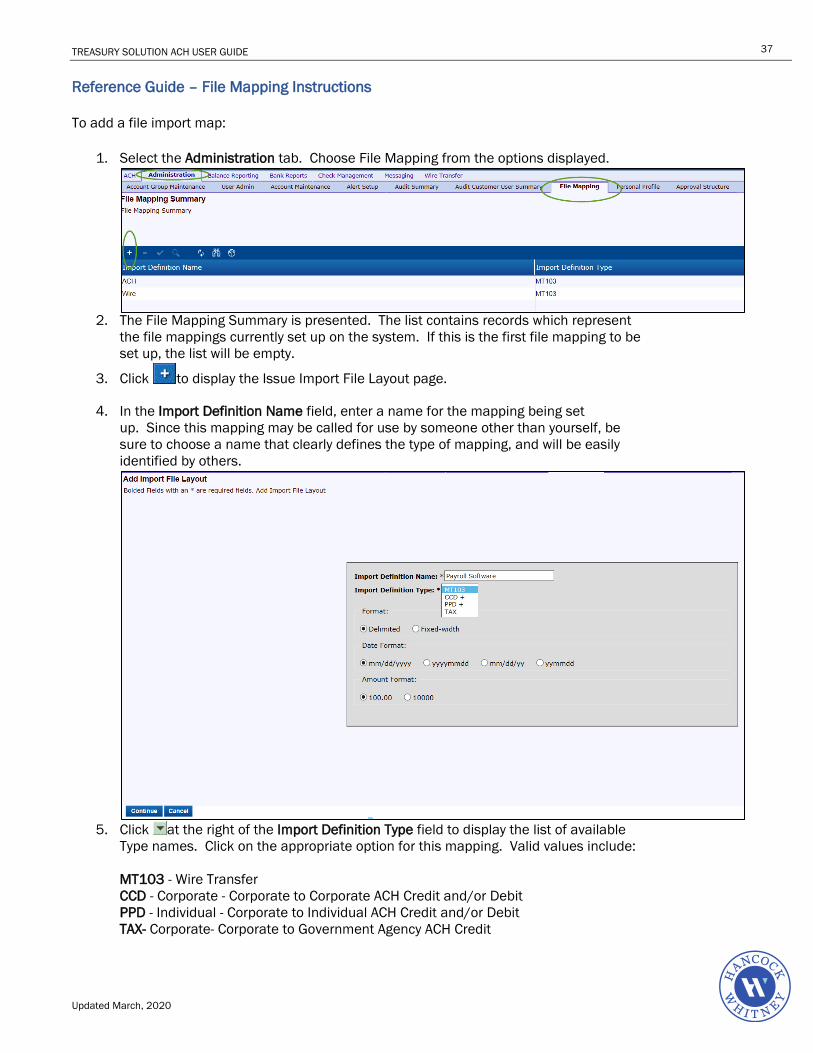
Reference Guide – File Mapping Instructions
To add a file import map:
1. Select the Administration tab. Choose File Mapping from the options displayed.
2. The File Mapping Summary is presented. The list contains records which represent
the file mappings currently set up on the system. If this is the first file mapping to be set up, the list will be empty.
3. Click to display the Issue Import File Layout page.
4. In the Import Definition Name field, enter a name for the mapping being set up. Since this mapping may be called for use by someone other than yourself, be sure to choose a name that clearly defines the type of mapping, and will be easily identified by others.
5. Click at the right of the Import Definition Type field to display the list of available
Type names. Click on the appropriate option for this mapping. Valid values include: MT103 - Wire Transfer CCD - Corporate - Corporate to Corporate ACH Credit and/or Debit PPD - Individual - Corporate to Individual ACH Credit and/or Debit TAX- Corporate- Corporate to Government Agency ACH Credit
TREASURY SOLUTION ACH USER GUIDE
Updated March, 2020
38
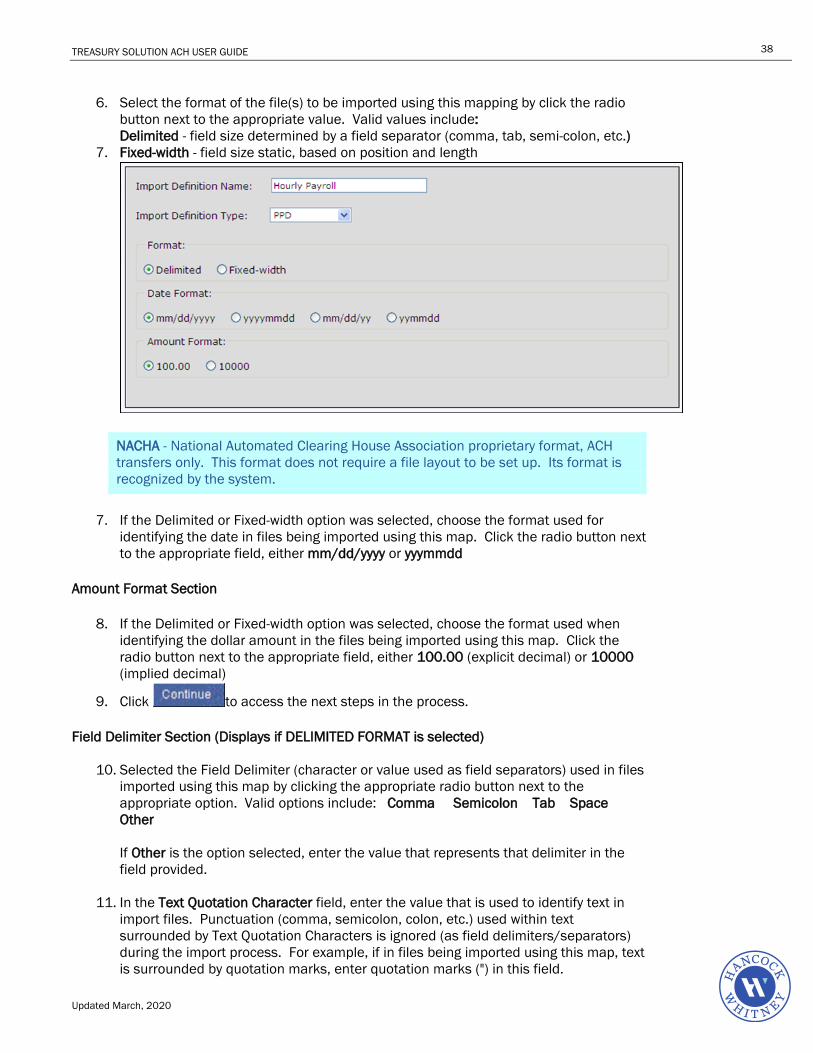
6. Select the format of the file(s) to be imported using this mapping by click the radio
button next to the appropriate value. Valid values include: Delimited - field size determined by a field separator (comma, tab, semi-colon, etc.)
7. Fixed-width - field size static, based on position and length
NACHA - National Automated Clearing House Association proprietary format, ACH transfers only. This format does not require a file layout to be set up. Its format is recognized by the system.
7. If the Delimited or Fixed-width option was selected, choose the format used for identifying the date in files being imported using this map. Click the radio button next to the appropriate field, either mm/dd/yyyy or yyymmdd
Amount Format Section
8. If the Delimited or Fixed-width option was selected, choose the format used when identifying the dollar amount in the files being imported using this map. Click the radio button next to the appropriate field, either 100.00 (explicit decimal) or 10000 (implied decimal)
9. Click to access the next steps in the process.
Field Delimiter Section (Displays if DELIMITED FORMAT is selected)
10. Selected the Field Delimiter (character or value used as field separators) used in files imported using this map by clicking the appropriate radio button next to the appropriate option. Valid options include: Comma Semicolon Tab Space Other If Other is the option selected, enter the value that represents that delimiter in the field provided.
11. In the Text Quotation Character field, enter the value that is used to identify text in import files. Punctuation (comma, semicolon, colon, etc.) used within text surrounded by Text Quotation Characters is ignored (as field delimiters/separators) during the import process. For example, if in files being imported using this map, text is surrounded by quotation marks, enter quotation marks (") in this field.
TREASURY SOLUTION ACH USER GUIDE
Updated March, 2020
39
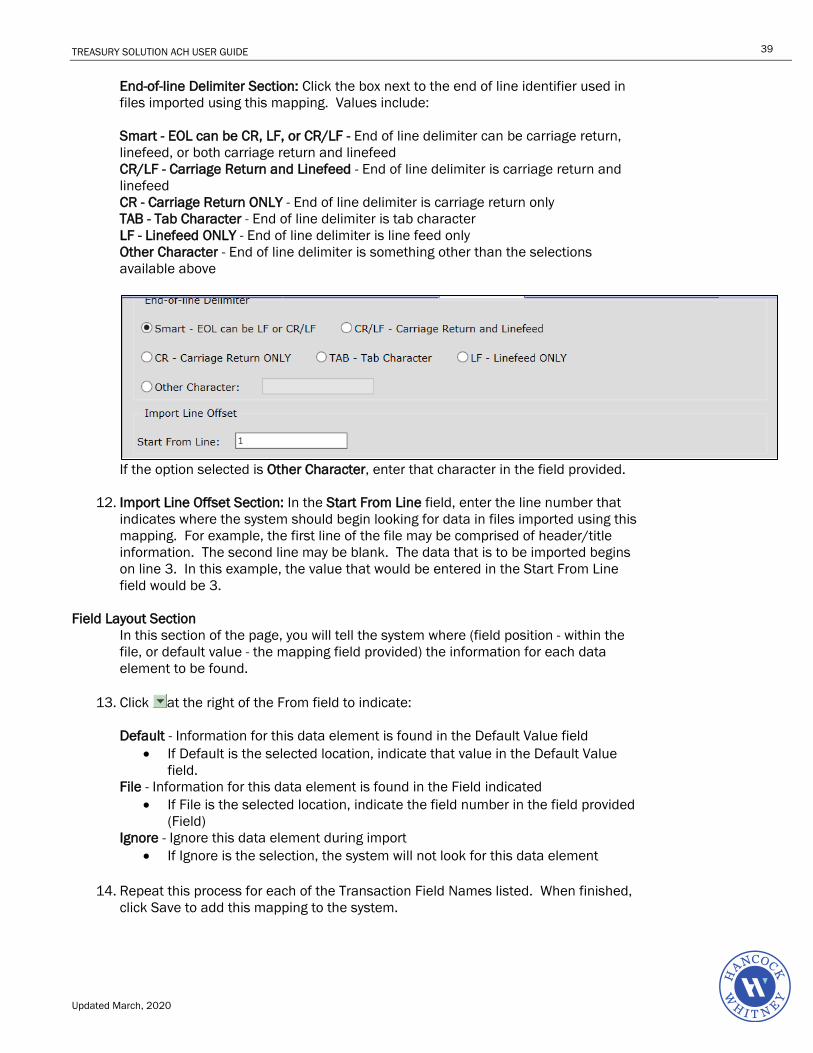
End-of-line Delimiter Section: Click the box next to the end of line identifier used in files imported using this mapping. Values include: Smart - EOL can be CR, LF, or CR/LF - End of line delimiter can be carriage return, linefeed, or both carriage return and linefeed CR/LF - Carriage Return and Linefeed - End of line delimiter is carriage return and linefeed CR - Carriage Return ONLY - End of line delimiter is carriage return only TAB - Tab Character - End of line delimiter is tab character LF - Linefeed ONLY - End of line delimiter is line feed only Other Character - End of line delimiter is something other than the selections available above
If the option selected is Other Character, enter that character in the field provided.
12. Import Line Offset Section: In the Start From Line field, enter the line number that indicates where the system should begin looking for data in files imported using this mapping. For example, the first line of the file may be comprised of header/title information. The second line may be blank. The data that is to be imported begins on line 3. In this example, the value that would be entered in the Start From Line field would be 3.
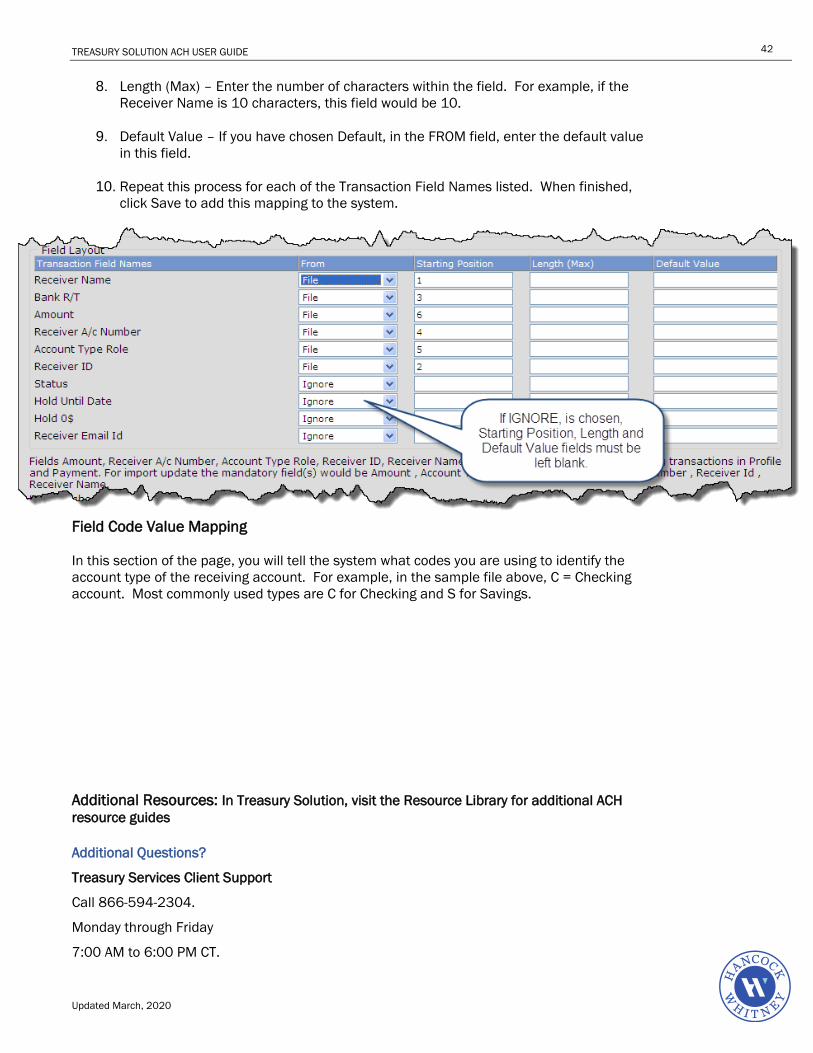
Field Layout Section In this section of the page, you will tell the system where (field position - within the file, or default value - the mapping field provided) the information for each data element to be found.
13. Click at the right of the From field to indicate: Default - Information for this data element is found in the Default Value field
• If Default is the selected location, indicate that value in the Default Value field.
File - Information for this data element is found in the Field indicated • If File is the selected location, indicate the field number in the field provided
(Field) Ignore - Ignore this data element during import
• If Ignore is the selection, the system will not look for this data element
14. Repeat this process for each of the Transaction Field Names listed. When finished, click Save to add this mapping to the system.
TREASURY SOLUTION ACH USER GUIDE
Updated March, 2020
40
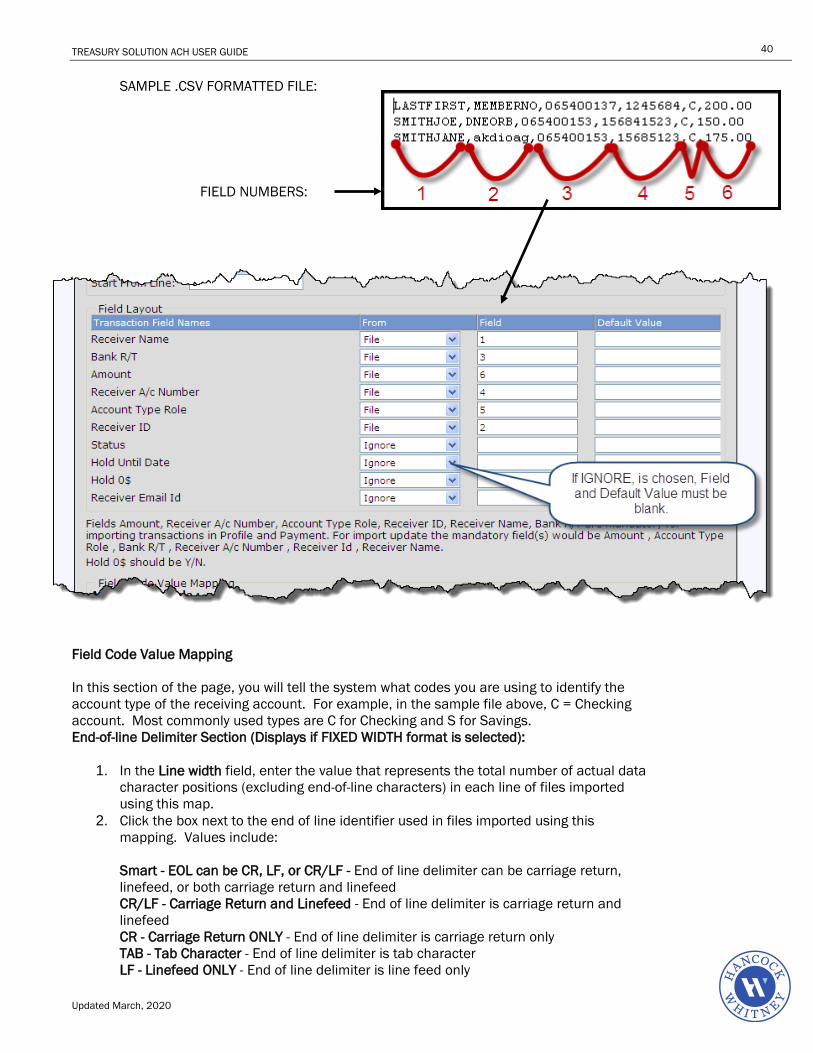
SAMPLE .CSV FORMATTED FILE:
FIELD NUMBERS:
Field Code Value Mapping In this section of the page, you will tell the system what codes you are using to identify the account type of the receiving account. For example, in the sample file above, C = Checking account. Most commonly used types are C for Checking and S for Savings. End-of-line Delimiter Section (Displays if FIXED WIDTH format is selected):
1. In the Line width field, enter the value that represents the total number of actual data character positions (excluding end-of-line characters) in each line of files imported using this map.
2. Click the box next to the end of line identifier used in files imported using this mapping. Values include: Smart - EOL can be CR, LF, or CR/LF - End of line delimiter can be carriage return, linefeed, or both carriage return and linefeed CR/LF - Carriage Return and Linefeed - End of line delimiter is carriage return and linefeed CR - Carriage Return ONLY - End of line delimiter is carriage return only TAB - Tab Character - End of line delimiter is tab character LF - Linefeed ONLY - End of line delimiter is line feed only

TREASURY SOLUTION ACH USER GUIDE
Updated March, 2020
41
Other Character - End of line delimiter is something other than the selections available above
3. If the option selected is Other Character, enter that character in the field provided.
Import Line Offset Section 4. In the Start From Line field, enter the line number that indicates where the system
should begin looking for data in files imported using this mapping. For example, the first line of the file may be comprised of header/title information. The second line may be blank. The data that is to be imported begins on line 3. In this example, the value that would be entered in the Start From Line field would be 3.
5. In the Start From Character Position field, indicate the character position at which column 1 begins. For example, if column one begins in position 1 of the start from line, enter 1 (one) in the Start From Character Position field. If column begins in character position 26, enter that number in the field.
File Layout Section In this section of the page, you will tell the system where (field position - within the file, or default value - the mapping field provided) the information for each data element to be found.
6. Click at the right of the From field to indicate:
Default - Information for this data element is found in the Default Value field
• If Default is the selected location, indicate that value in the Default Value field.
File - Information for this data element is found in the Field indicated • If File is the selected location, indicate the field number in the field provided
(Field) Ignore - Ignore this data element during import
• If Ignore is the selection, the system will not look for this data element
7. Starting Position – Enter the starting position, within the file, where this field begins. For example, if the Receiver Name begins at position 1, enter 1. If it begins at position 25, enter 25 here.
TREASURY SOLUTION ACH USER GUIDE
Updated March, 2020
42
8. Length (Max) – Enter the number of characters within the field. For example, if the Receiver Name is 10 characters, this field would be 10.
9. Default Value – If you have chosen Default, in the FROM field, enter the default value in this field.
10. Repeat this process for each of the Transaction Field Names listed. When finished, click Save to add this mapping to the system.
Field Code Value Mapping In this section of the page, you will tell the system what codes you are using to identify the account type of the receiving account. For example, in the sample file above, C = Checking account. Most commonly used types are C for Checking and S for Savings.
Additional Resources: In Treasury Solution, visit the Resource Library for additional ACH resource guides
Additional Questions?
Treasury Services Client Support
Call 866-594-2304.
Monday through Friday
7:00 AM to 6:00 PM CT.