treatment planning in avatar - sf, dph · treatment planning in avatar: cyf substance abuse clients...
TRANSCRIPT

p. 1
N. Israel, PhD, SFDPH OQM for CYF-SOC v1 01/10/2012
Treatment Planning in Avatar:
CYF Substance Abuse Clients

p. 2
N. Israel, PhD, SFDPH OQM for CYF-SOC v1 01/10/2012
Table of Contents
Page
Purpose 3
1. Opening the Treatment Plan 5
2. Completing the Face Page 8
3. Entering and Filing Objectives 11
4. Entering and Filing Interventions for an Objective 16
5. Entering the Next Objective(s) 17
6. Notification 21
7. Previewing the Treatment Plan 22

p. 3
N. Israel, PhD, SFDPH OQM for CYF-SOC v1 01/10/2012
Table of Contents (cont).
9. Editing the Plan 27
10. Submitting your Treatment Plan 31
11. Printing your Treatment Plan 32
12. Additional Help 34
p. 4
N. Israel, PhD, SFDPH OQM for CYF-SOC v1 01/10/2012
Purpose
The purpose of this manual is to walk you step-by-step through each of the screens
and mouse-clicks necessary to record a Substance Abuse Treatment Plan in the Ava-
tar Electronic Health Record system. It is meant as a beginning tool; over time you
may learn features and tips that allow you to enter this information even more
quickly. That‘s fantastic. Please share those with all of us (e-mail me at my address
below and I‘ll be happy to send out your tip and those of others). In the meantime,
here‘s a manual to get you on your way.
Best,
Nathaniel Israel

p. 5
N. Israel, PhD, SFDPH OQM for CYF-SOC v1 01/10/2012
1. Begin by logging in to the Avatar
record system.
2. Click on ‗Select Client.‘
1. Opening the Treatment Plan

p. 6
N. Israel, PhD, SFDPH OQM for CYF-SOC v1 01/10/2012
1. Type in the name of your client. If there
are multiple persons with a similar name,
choices will appear in a menu below. Click
on the appropriate client, and click ‗OK.‘
1. Opening the Treatment Plan
p. 7
N. Israel, PhD, SFDPH OQM for CYF-SOC v1 01/10/2012
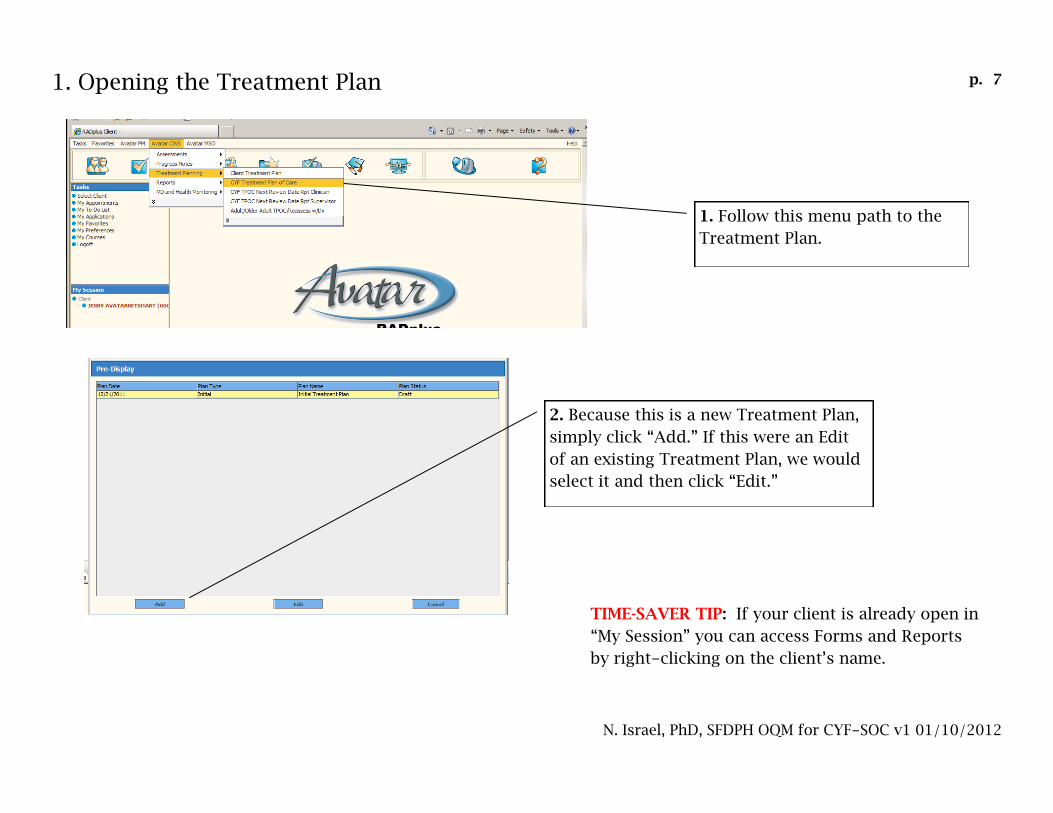
1. Follow this menu path to the
Treatment Plan.
2. Because this is a new Treatment Plan,
simply click ―Add.‖ If this were an Edit
of an existing Treatment Plan, we would
select it and then click ―Edit.‖
TIME-SAVER TIP: If your client is already open in
―My Session‖ you can access Forms and Reports
by right-clicking on the client‘s name.
1. Opening the Treatment Plan
p. 8
N. Israel, PhD, SFDPH OQM for CYF-SOC v1 01/10/2012
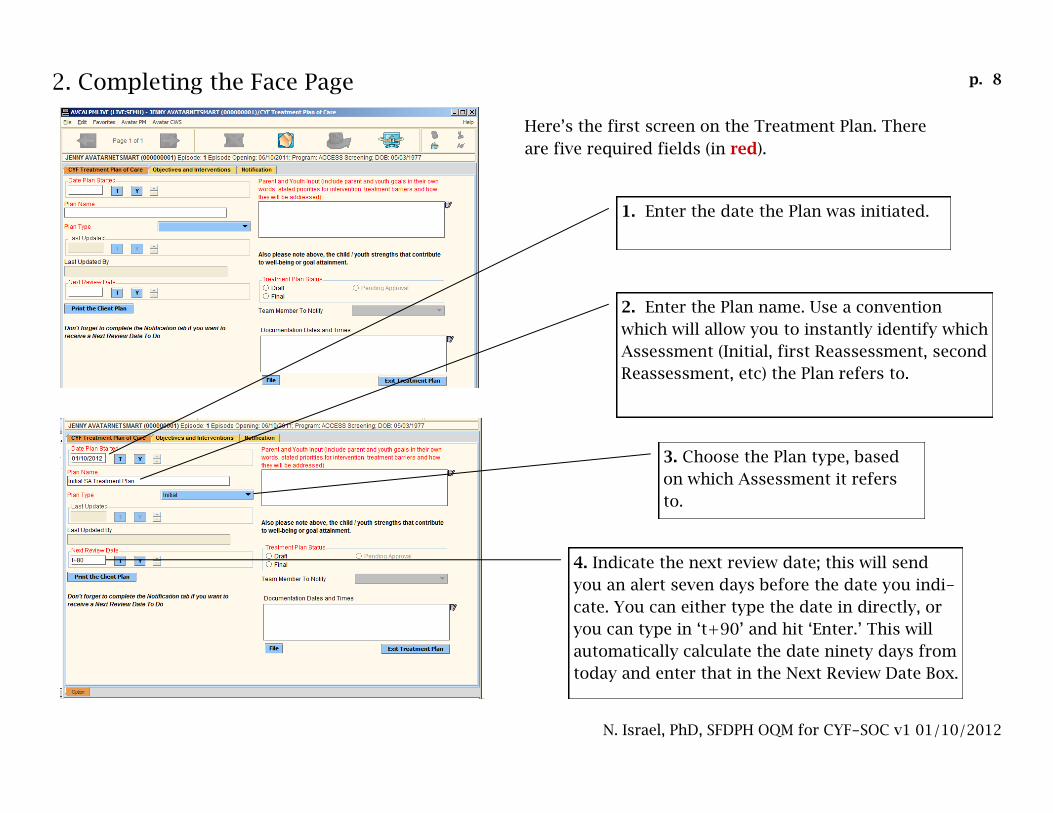
1. Enter the date the Plan was initiated.
2. Enter the Plan name. Use a convention
which will allow you to instantly identify which
Assessment (Initial, first Reassessment, second
Reassessment, etc) the Plan refers to.
3. Choose the Plan type, based
on which Assessment it refers
to.
4. Indicate the next review date; this will send
you an alert seven days before the date you indi-
cate. You can either type the date in directly, or
you can type in ‗t+90‘ and hit ‗Enter.‘ This will
automatically calculate the date ninety days from
today and enter that in the Next Review Date Box.
Here‘s the first screen on the Treatment Plan. There
are five required fields (in red).
2. Completing the Face Page
p. 9
N. Israel, PhD, SFDPH OQM for CYF-SOC v1 01/10/2012
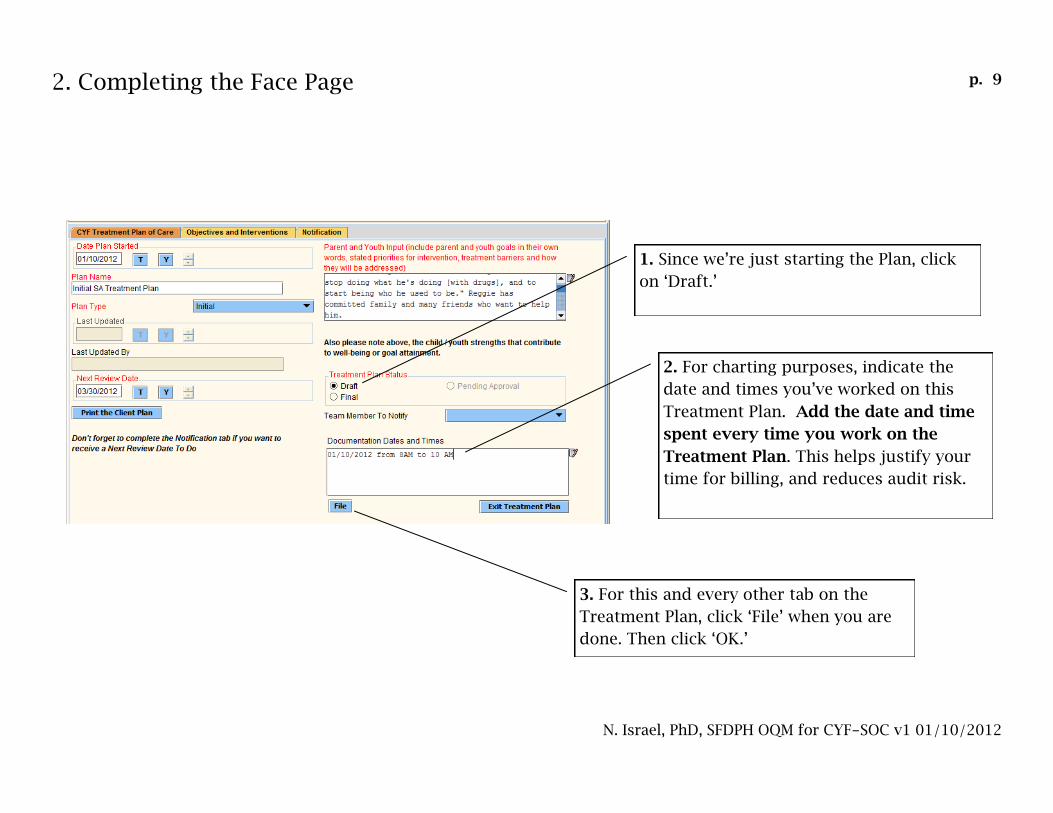
1. Since we‘re just starting the Plan, click
on ‗Draft.‘
2. For charting purposes, indicate the
date and times you‘ve worked on this
Treatment Plan. Add the date and time
spent every time you work on the
Treatment Plan. This helps justify your
time for billing, and reduces audit risk.
3. For this and every other tab on the
Treatment Plan, click ‗File‘ when you are
done. Then click ‗OK.‘
2. Completing the Face Page

p. 10
N. Israel, PhD, SFDPH OQM for CYF-SOC v1 01/10/2012
1. Avatar will ask you if you want to default a previous Treat-
ment Plan forward. For Treatment Plans based on the CANS
Reassessment, you can default the previous plan forward and
then change the Problems, Goals, Objectives and Interventions
which need to be changed. Since this is our Initial Treatment
Plan, we will click ‗No.‘
2. This alert lets us know that the Treatment Plan face
page has been filed. Now we‘ll move to the task of fill-
ing in the Treatment Plan.
2. Completing the Face Page
p. 11
N. Israel, PhD, SFDPH OQM for CYF-SOC v1 01/10/2012
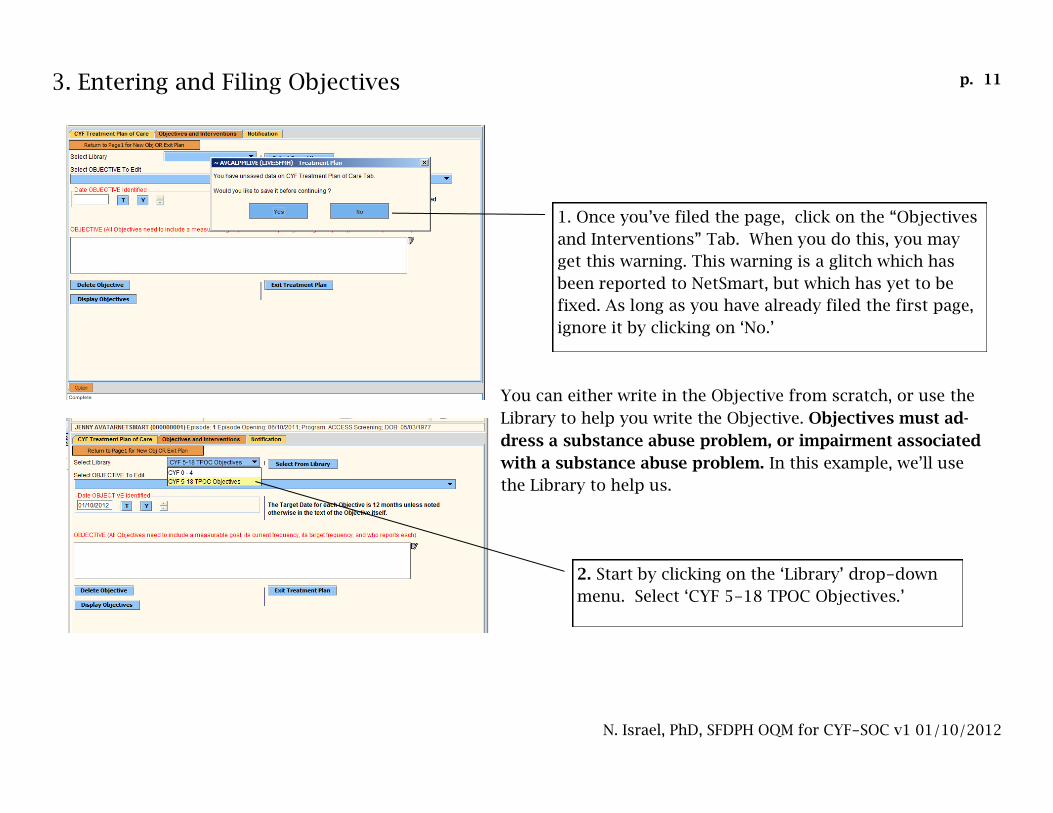
1. Once you‘ve filed the page, click on the ―Objectives
and Interventions‖ Tab. When you do this, you may
get this warning. This warning is a glitch which has
been reported to NetSmart, but which has yet to be
fixed. As long as you have already filed the first page,
ignore it by clicking on ‗No.‘
You can either write in the Objective from scratch, or use the
Library to help you write the Objective. Objectives must ad-
dress a substance abuse problem, or impairment associated
with a substance abuse problem. In this example, we‘ll use
the Library to help us.
2. Start by clicking on the ‗Library‘ drop-down
menu. Select ‗CYF 5-18 TPOC Objectives.‘
3. Entering and Filing Objectives
p. 12
N. Israel, PhD, SFDPH OQM for CYF-SOC v1 01/10/2012
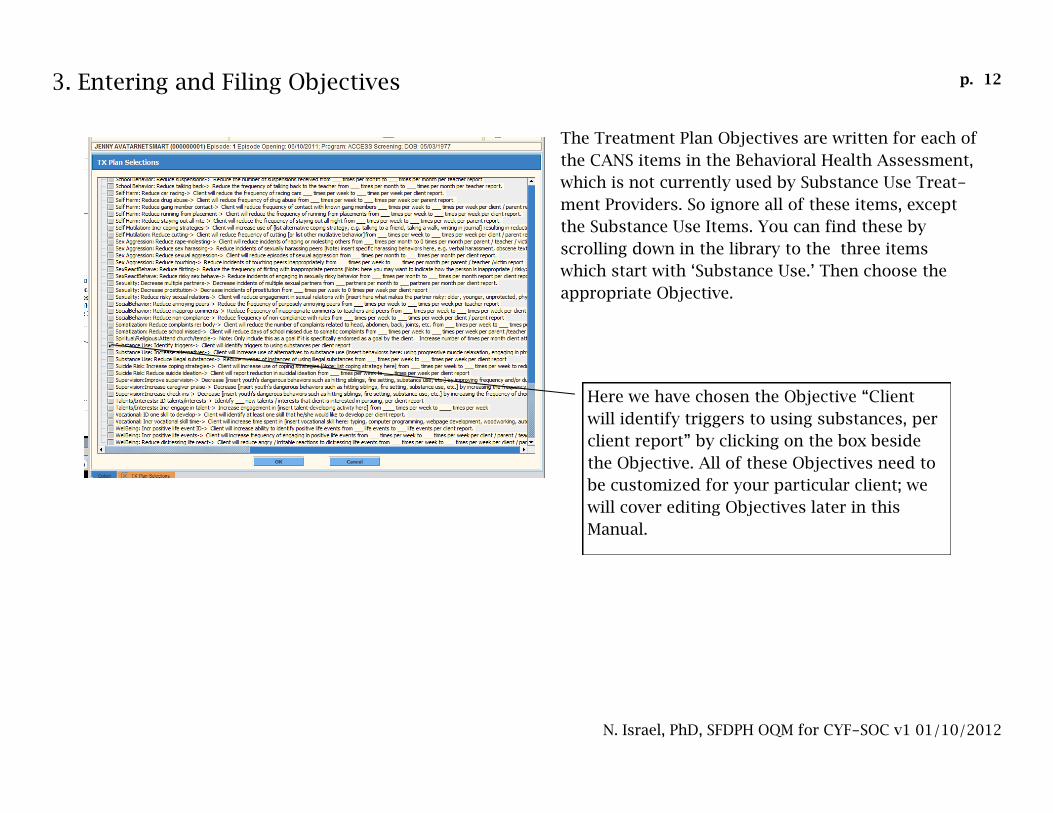
The Treatment Plan Objectives are written for each of
the CANS items in the Behavioral Health Assessment,
which is not currently used by Substance Use Treat-
ment Providers. So ignore all of these items, except
the Substance Use Items. You can find these by
scrolling down in the library to the three items
which start with ‗Substance Use.‘ Then choose the
appropriate Objective.
Here we have chosen the Objective ―Client
will identify triggers to using substances, per
client report‖ by clicking on the box beside
the Objective. All of these Objectives need to
be customized for your particular client; we
will cover editing Objectives later in this
Manual.
3. Entering and Filing Objectives

p. 13
N. Israel, PhD, SFDPH OQM for CYF-SOC v1 01/10/2012
1. Click on the Library Objective which appears
in the blue Objective menu.
When you click on it, it will appear in the text
box below. Edit the Objective to fit your client‘s
individual treatment needs.
2. When you are finished editing the Objective,
click on the Forward arrow at the top of the
screen.
3. Entering and Filing Objectives
p. 14
N. Israel, PhD, SFDPH OQM for CYF-SOC v1 01/10/2012
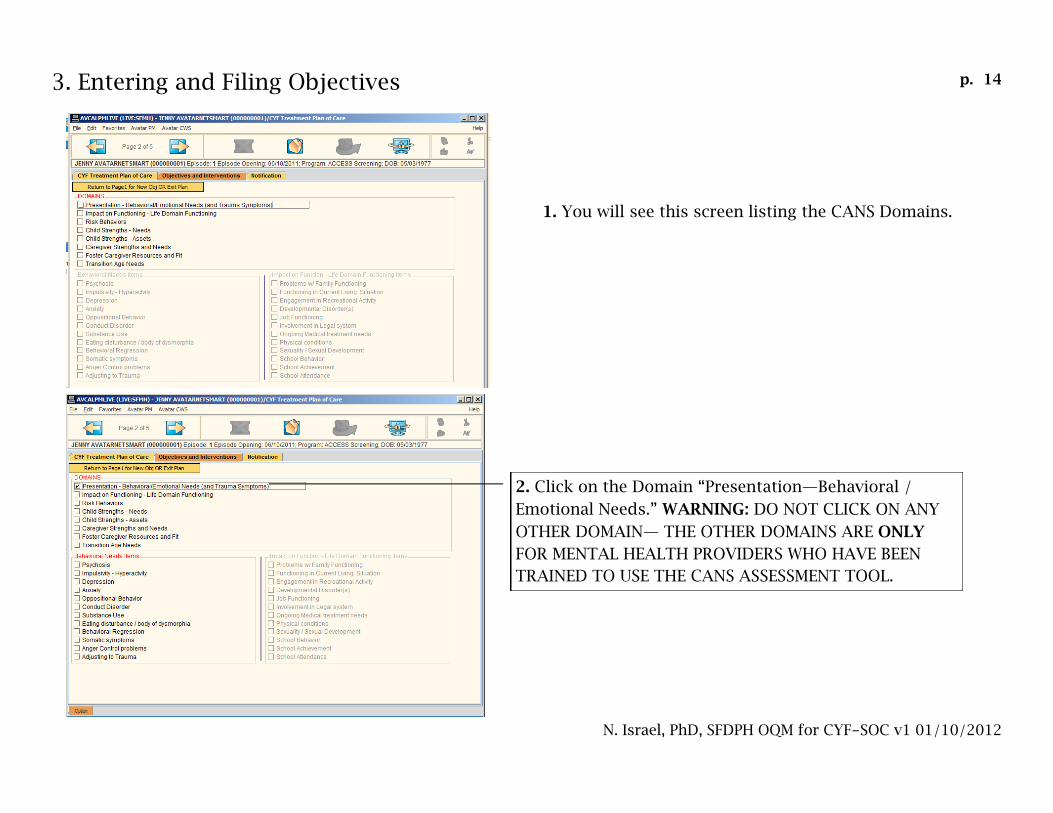
1. You will see this screen listing the CANS Domains.
2. Click on the Domain ―Presentation—Behavioral /
Emotional Needs.‖ WARNING: DO NOT CLICK ON ANY
OTHER DOMAIN— THE OTHER DOMAINS ARE ONLY
FOR MENTAL HEALTH PROVIDERS WHO HAVE BEEN
TRAINED TO USE THE CANS ASSESSMENT TOOL.
3. Entering and Filing Objectives

p. 15
N. Israel, PhD, SFDPH OQM for CYF-SOC v1 01/10/2012
1. Click on the Item ―Substance Use.‖ WARNING: DO
NOT CLICK ON ANY OTHER ITEM— THE OTHER ITEMS
ARE ONLY FOR MENTAL HEALTH PROVIDERS WHO
HAVE BEEN TRAINED TO USE THE CANS ASSESSMENT
TOOL.
2. Click the forward arrow to go to the next page.
You can skip pages 3 and 4, as they list items which
are associated with domains you will not be using.
3. Entering and Filing Objectives

p. 16
N. Israel, PhD, SFDPH OQM for CYF-SOC v1 01/10/2012
1. You should now be at the Interventions page, page
5. On this page you will describe the interventions
needed to address this specific Objective which you
have listed.
2. Type in the Intervention(s) which will achieve this
objective. This may include several interventions.
3. File the Objective and Intervention(s).
4. Entering and Filing Interventions for an Objective

p. 17
N. Israel, PhD, SFDPH OQM for CYF-SOC v1 01/10/2012
1. Once you click on ‘File,‘ this Objective and
its Intervention have been filed.
2. To enter the next Objective, simply click on
the button above the Interventions text box.
5. Entering the Next Objective(s)

p. 18
N. Israel, PhD, SFDPH OQM for CYF-SOC v1 01/10/2012
1. Select the empty space beneath the first Objective.
Click on that space, and the text in the Objective box
will clear out. You can now enter your next Objective!
2. Here we have written out our own Objective. Whether
you start with an Objective from the Library or write one
out of your own, be sure that you‘ve stated the specific,
observable behavior which will be addressed, how often it
happens, how often it will happen when treated, and who
will report on the change in the behavior.
5. Entering the Next Objective(s)

p. 19
N. Israel, PhD, SFDPH OQM for CYF-SOC v1 01/10/2012
1. Here we repeat the same process: we select
the ‗Presentation—Behavioral and Emotional
Needs‘ Domain, and then we go below to the
‗Substance Use‘ item and click on it.
2. Then we click on the forward Arrows to
go to page 5, to specify the Interventions
for this specific Objective.
5. Entering the Next Objective(s)

p. 20
N. Israel, PhD, SFDPH OQM for CYF-SOC v1 01/10/2012
1. Type in the Intervention(s) which will achieve this
objective. This may include several interventions.
2. Now file the Objective and Intervention(s).
3. For each additional Objective, use the same process that we just completed: write out the Objective, file it,
click on the ―Presentation—Behavioral / Emotional Needs‘ Domain, and then on the ―Substance Use‖ item. Then
specify the Intervention(s) for that particular Objective. Do this until you have addressed all Objectives identified
for a Client.
5. Entering the Next Objective(s)
p. 21
N. Israel, PhD, SFDPH OQM for CYF-SOC v1 01/10/2012
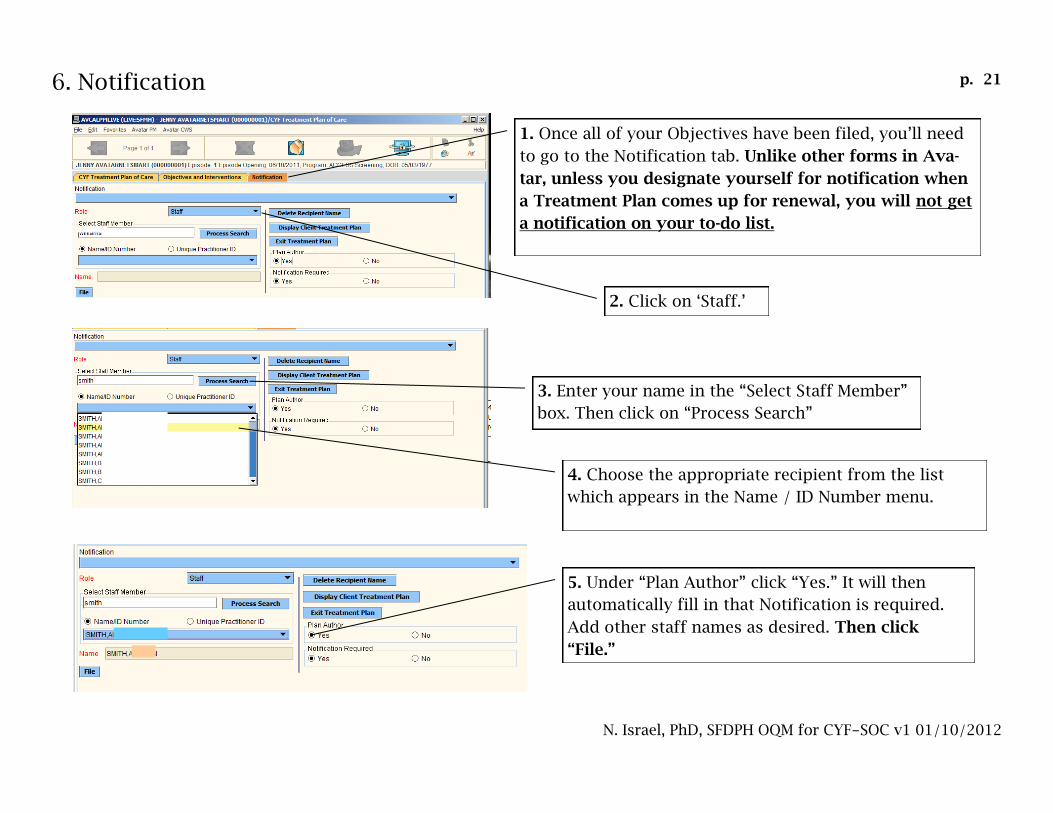
1. Once all of your Objectives have been filed, you‘ll need
to go to the Notification tab. Unlike other forms in Ava-
tar, unless you designate yourself for notification when
a Treatment Plan comes up for renewal, you will not get
a notification on your to-do list.
2. Click on ‗Staff.‘
3. Enter your name in the ―Select Staff Member‖
box. Then click on ―Process Search‖
4. Choose the appropriate recipient from the list
which appears in the Name / ID Number menu.
5. Under ―Plan Author‖ click ―Yes.‖ It will then
automatically fill in that Notification is required.
Add other staff names as desired. Then click
“File.”
6. Notification
p. 22
N. Israel, PhD, SFDPH OQM for CYF-SOC v1 01/10/2012
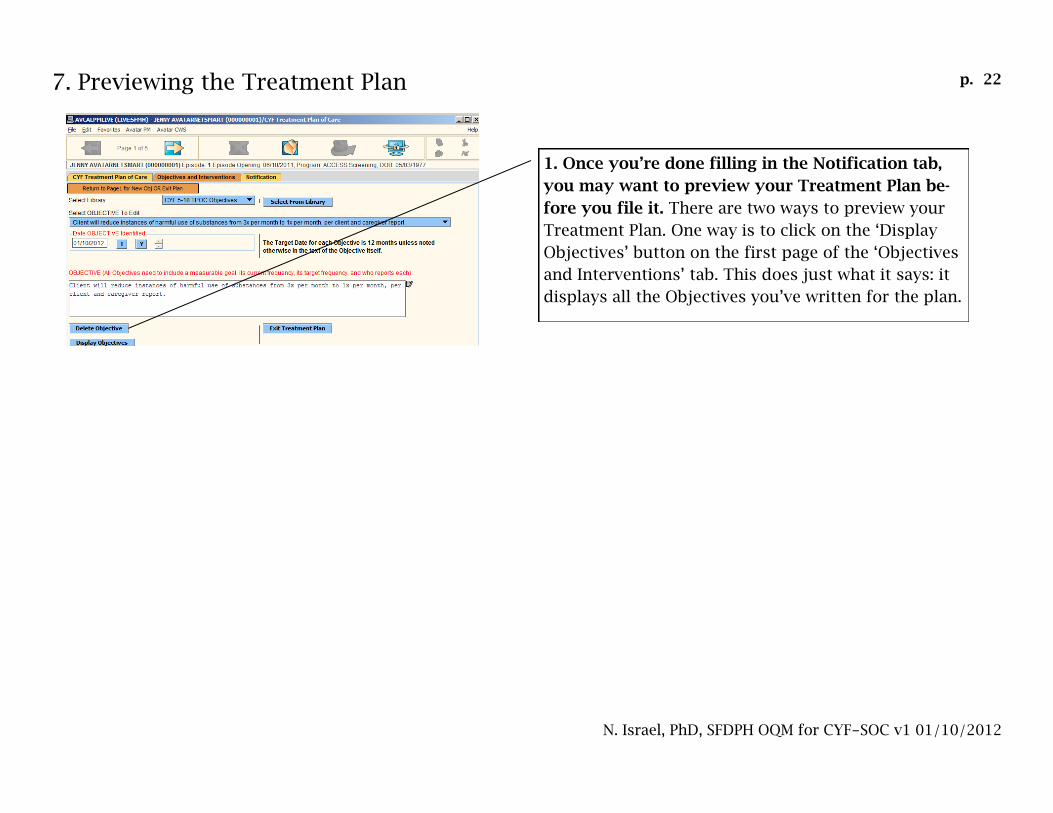
1. Once you‟re done filling in the Notification tab,
you may want to preview your Treatment Plan be-
fore you file it. There are two ways to preview your
Treatment Plan. One way is to click on the ‗Display
Objectives‘ button on the first page of the ‗Objectives
and Interventions‘ tab. This does just what it says: it
displays all the Objectives you‘ve written for the plan.
7. Previewing the Treatment Plan
p. 23
N. Israel, PhD, SFDPH OQM for CYF-SOC v1 01/10/2012
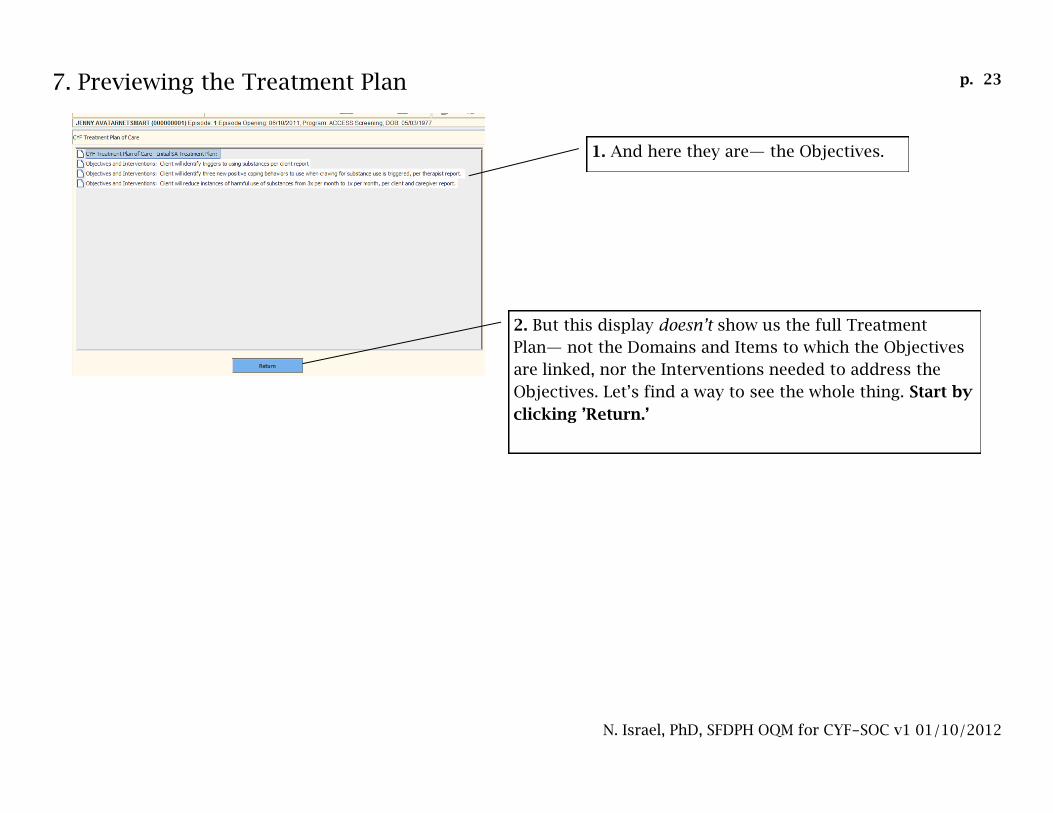
1. And here they are— the Objectives.
2. But this display doesn’t show us the full Treatment
Plan— not the Domains and Items to which the Objectives
are linked, nor the Interventions needed to address the
Objectives. Let‘s find a way to see the whole thing. Start by
clicking ‟Return.‟
7. Previewing the Treatment Plan

p. 24
N. Israel, PhD, SFDPH OQM for CYF-SOC v1 01/10/2012
1. Now click on the „CYF Treatment Plan of Care‟ tab.
The second way to preview the Treatment Plan is to click
on ‗Print the Client Plan.‘ This generates a printable re-
port of the plan. We don‘t want to print it yet, we just
want to see it to make sure we have everything we need
on our Treatment Plan.
7. Previewing the Treatment Plan

p. 25
N. Israel, PhD, SFDPH OQM for CYF-SOC v1 01/10/2012
1. Here‘s the whole Plan! It says ‗Draft‘ on the front be-
cause we have yet to finalize it. The Plan begins with the
narrative on Caregiver and Youth Input. Then it lists
each Objective, the Domains and Items addressed by the
Objective, and the Interventions to be used to address
the Objective.
7. Previewing the Treatment Plan

p. 26
N. Israel, PhD, SFDPH OQM for CYF-SOC v1 01/10/2012
1. Here‘s the second page of the Plan. It has all of the Sig-
nature Lines you‘ll need for the Treatment Plan to pass
audit. Remember that even though we have an electronic
copy of the Plan, a printed, signed copy must reside in
you physical (paper) chart at all times. Otherwise there is
a risk that payment for services will be denied or re-
couped.
7. Previewing the Treatment Plan

p. 27
N. Israel, PhD, SFDPH OQM for CYF-SOC v1 01/10/2012
1. Say we preview the Treatment Plan and we find a
mistake — say we need to delete an Objective. How do
we do that? We start by clicking on the ‗Objectives and
Interventions‘ tab.
2. Begin by selecting the Objective to delete. Then
click ‗Delete Objective.‘
3. If you are sure that you want to delete this Objec-
tive, click ‗Yes.‘ This will delete the Objective and
the Interventions that you have written which are
associated with the Objective.
9. Editing the Treatment Plan
p. 28
N. Israel, PhD, SFDPH OQM for CYF-SOC v1 01/10/2012
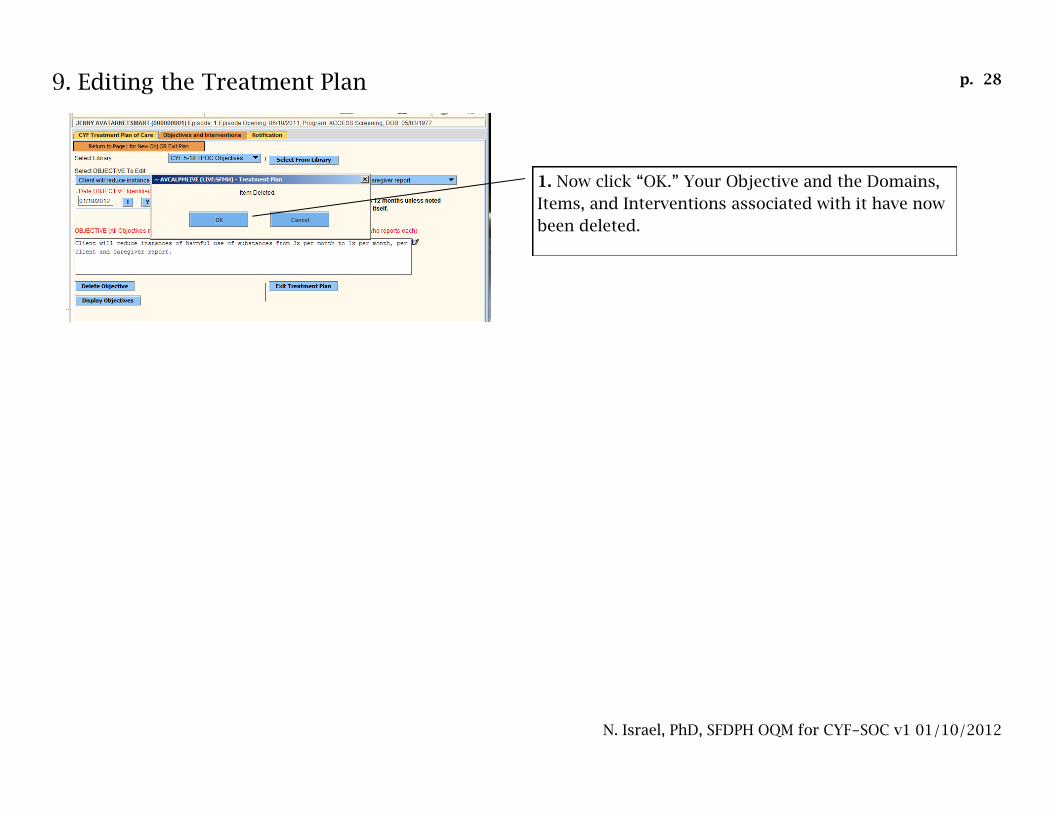
1. Now click ―OK.‖ Your Objective and the Domains,
Items, and Interventions associated with it have now
been deleted.
9. Editing the Treatment Plan
p. 29
N. Israel, PhD, SFDPH OQM for CYF-SOC v1 01/10/2012
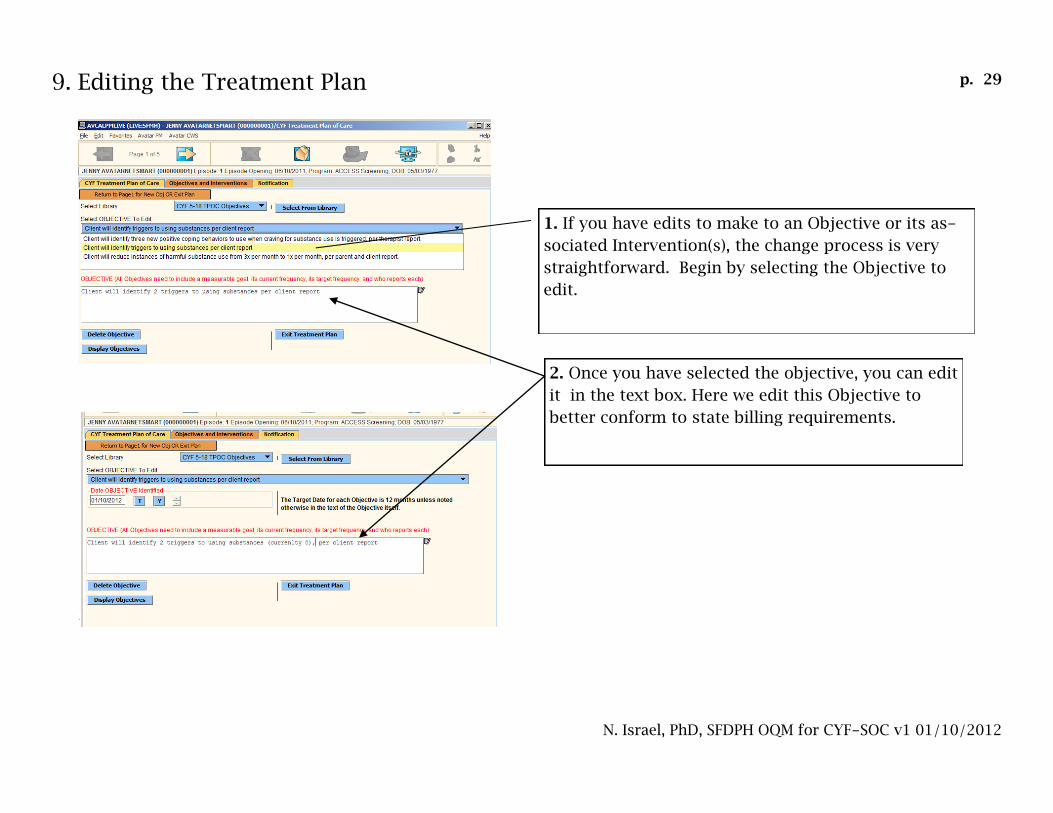
1. If you have edits to make to an Objective or its as-
sociated Intervention(s), the change process is very
straightforward. Begin by selecting the Objective to
edit.
2. Once you have selected the objective, you can edit
it in the text box. Here we edit this Objective to
better conform to state billing requirements.
9. Editing the Treatment Plan

p. 30
N. Israel, PhD, SFDPH OQM for CYF-SOC v1 01/10/2012
1. We don‘t need to edit any of these, so we simply
continue on by clicking the forward arrows.
2. When we get to the Interventions page we can
make any needed changes to the Interventions by
editing the text in the Interventions text box.
3. To save our edits in this tab (including our
edits to the Objective), we must click on the
‗File‘ button. This way all of our changes are
saved.
9. Editing the Treatment Plan

p. 31
N. Israel, PhD, SFDPH OQM for CYF-SOC v1 01/10/2012
1. When you have filed all of your Objectives and Interven-
tions, you can send it to your supervisor (if unlicensed or
non-waivered) or submit it directly (if you are licensed /
waivered). To submit, you need to select a choice other
than „Draft‟ (either Final or Pending Approval). If you are
unlicensed / non-waivered, you need to also select the
Team Member to Notify.
2. Then click on ‗File.‘
10. Submitting the Treatment Plan

p. 32
N. Israel, PhD, SFDPH OQM for CYF-SOC v1 01/10/2012
1. You can print the Client Treatment Plan at any
point by going to the Client Treatment Plan tab and
clicking on ―Print the Client Plan.‖
2. When you click on it, this dialog box will appear.
Click ‗OK.‘
11. Printing the Treatment Plan

p. 33
N. Israel, PhD, SFDPH OQM for CYF-SOC v1 01/10/2012
1. When you click ‗OK,‘ a report (the Treatment
Plan!) will pull up, which you can then print by
clicking on the printer icon.
2. If you don‘t see the report come up,
look at the bar at the bottom of your
screen. It should have a box like this. Click
on this box, and the report will show up
for printing.
11. Printing the Treatment Plan
p. 34
N. Israel, PhD, SFDPH OQM for CYF-SOC v1 01/10/2012
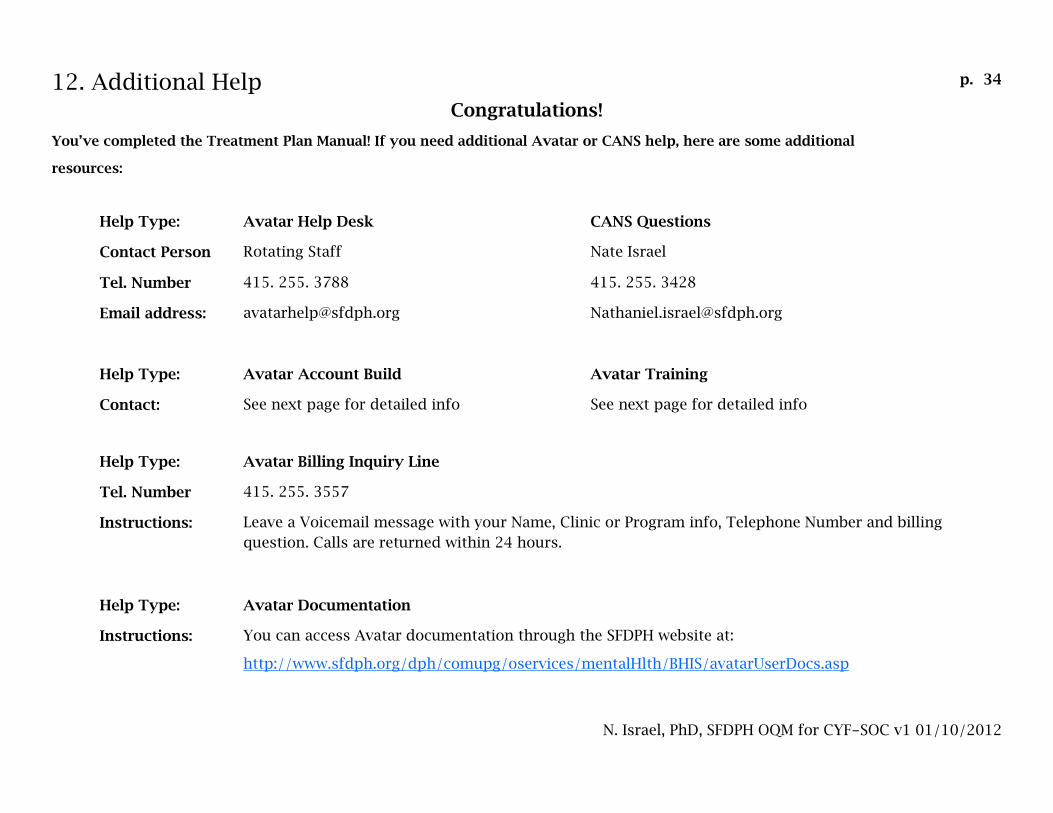
Congratulations!
You‟ve completed the Treatment Plan Manual! If you need additional Avatar or CANS help, here are some additional
resources:
Help Type: Avatar Help Desk CANS Questions
Contact Person Rotating Staff Nate Israel
Tel. Number 415. 255. 3788 415. 255. 3428
Email address: [email protected] [email protected]
Help Type: Avatar Account Build Avatar Training
Contact: See next page for detailed info See next page for detailed info
Help Type: Avatar Billing Inquiry Line
Tel. Number 415. 255. 3557
Instructions: Leave a Voicemail message with your Name, Clinic or Program info, Telephone Number and billing
question. Calls are returned within 24 hours.
Help Type: Avatar Documentation
Instructions: You can access Avatar documentation through the SFDPH website at:
http://www.sfdph.org/dph/comupg/oservices/mentalHlth/BHIS/avatarUserDocs.asp
12. Additional Help
p. 35
N. Israel, PhD, SFDPH OQM for CYF-SOC v1 01/10/2012
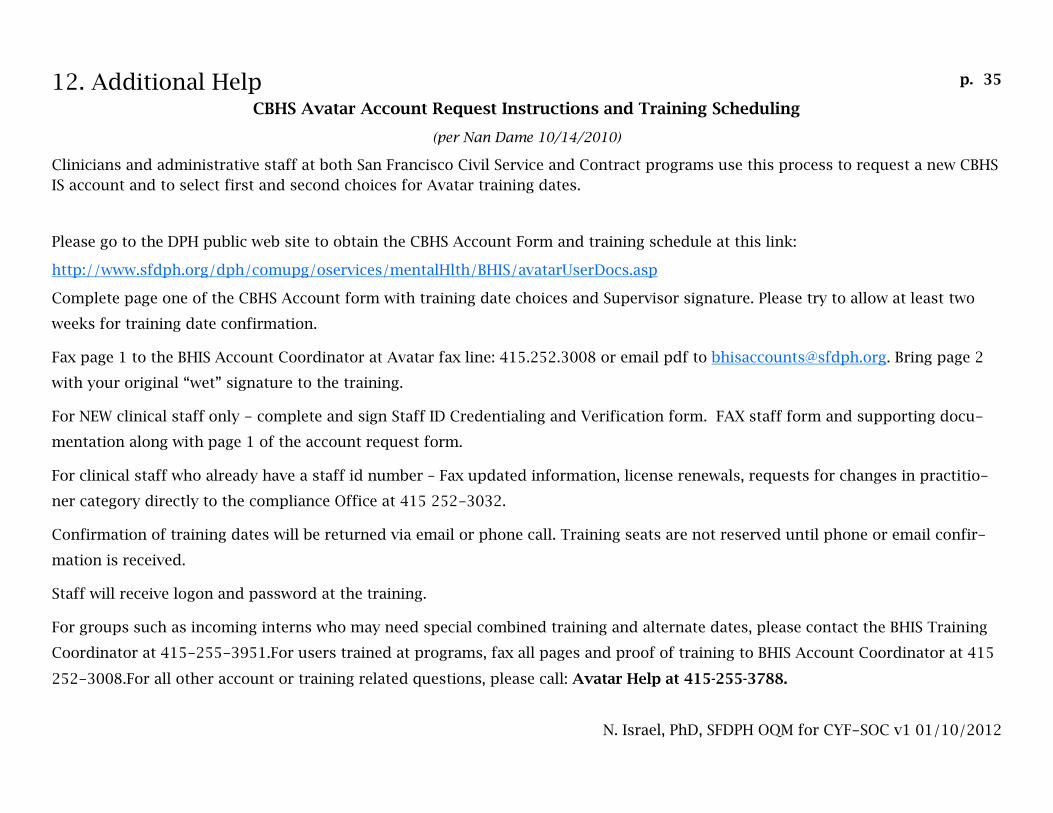
CBHS Avatar Account Request Instructions and Training Scheduling
(per Nan Dame 10/14/2010)
Clinicians and administrative staff at both San Francisco Civil Service and Contract programs use this process to request a new CBHS
IS account and to select first and second choices for Avatar training dates.
Please go to the DPH public web site to obtain the CBHS Account Form and training schedule at this link:
http://www.sfdph.org/dph/comupg/oservices/mentalHlth/BHIS/avatarUserDocs.asp
Complete page one of the CBHS Account form with training date choices and Supervisor signature. Please try to allow at least two
weeks for training date confirmation.
Fax page 1 to the BHIS Account Coordinator at Avatar fax line: 415.252.3008 or email pdf to [email protected]. Bring page 2
with your original ―wet‖ signature to the training.
For NEW clinical staff only - complete and sign Staff ID Credentialing and Verification form. FAX staff form and supporting docu-
mentation along with page 1 of the account request form.
For clinical staff who already have a staff id number – Fax updated information, license renewals, requests for changes in practitio-
ner category directly to the compliance Office at 415 252-3032.
Confirmation of training dates will be returned via email or phone call. Training seats are not reserved until phone or email confir-
mation is received.
Staff will receive logon and password at the training.
For groups such as incoming interns who may need special combined training and alternate dates, please contact the BHIS Training
Coordinator at 415-255-3951.For users trained at programs, fax all pages and proof of training to BHIS Account Coordinator at 415
252-3008.For all other account or training related questions, please call: Avatar Help at 415-255-3788.
12. Additional Help