tririga role-based applicant training guide date: december 1
TRANSCRIPT

WCAA
TRIRIGA Role-Based Applicant Training Guide
Date: December 1, 2014
Prepared By

WCAA TRIRIGA Role-Based Training Guide 2 | P a g e
Revision: 2; December 1, 2014
Revision History
Revision Date: December 1, 2014
Revision Number: 2
Revision # Date Collaborator Description
0 November 21,
2014
T. Brown, J. Williams, T.
Allen
Document Creation
1 November 26,
2014
T. Brown, T. Allen Document Updates
2 December 1, 2014 T. Brown, T. Allen Screen Capture Updates
Record of Review
Date Reviewer Purpose
November 26, 2014 Todd Allen QA
December 1, 2014 Todd Allen QA
Click here to enter a
date.
Click here to enter a
date.

WCAA TRIRIGA Role-Based Training Guide 3 | P a g e
Revision: 2; December 1, 2014
Table of Contents
1 Introduction .......................................................................................................................................... 5
1.1 Overview ....................................................................................................................................... 5
2 Navigation and Querying ...................................................................................................................... 6
2.1 Overview ....................................................................................................................................... 6
2.2 Demonstration .............................................................................................................................. 7
2.2.1 Home Page ............................................................................................................................ 7
2.2.2 Querying within an Application .......................................................................................... 10
2.2.3 Navigating within an Application ........................................................................................ 12
2.2.4 TRIRIGA Help ....................................................................................................................... 13
3 Reports ................................................................................................................................................ 14
3.1 Running and Exporting Reports .................................................................................................. 14
4 Applicant ............................................................................................................................................. 15
4.1 Overview ..................................................................................................................................... 15
4.2 Demonstration ............................................................................................................................ 16
4.2.1 Applicant Navigation ........................................................................................................... 16
4.2.2 Application Creation and Submittal .................................................................................... 21
4.2.3 Adding External Records ..................................................................................................... 32
4.2.4 Application Resubmit .......................................................................................................... 38
5 Applicant Team Member .................................................................................................................... 40
5.1 Overview ..................................................................................................................................... 40
5.2 Demonstration ............................................................................................................................ 41
5.2.1 Applicant Team Navigation ................................................................................................. 41
5.2.2 Application Creation ........................................................................................................... 46
5.2.3 Adding External Records ..................................................................................................... 56
5.2.4 Application Resubmit .......................................................................................................... 62
6 Applicant Viewer ................................................................................................................................. 64
6.1 Overview ..................................................................................................................................... 64
6.2 Demonstration ............................................................................................................................ 65
6.2.1 Applicant Viewer Navigation ............................................................................................... 65

WCAA TRIRIGA Role-Based Training Guide 4 | P a g e
Revision: 2; December 1, 2014
6.2.2 Applicant Viewer Process .................................................................................................... 68
7 Appendix A: Glossary .......................................................................................................................... 71
WCAA TRIRIGA Role-Based Training Guide 5 | P a g e
Revision: 2; December 1, 2014
1 Introduction
1.1 Overview
TRIRIGA is an Integrated Work Place Management System (IWMS). It is software that electronically
manages the Tenant Construction/Alteration (C/A) Permit Process. This process includes the tenant
application, review, permitting, work in process, and closeout procedures for construction or alteration
of any site, facility, or easement controlled by the WCAA. Automatic notifications by the system
streamline communications about such things as application acceptance, documents needed, reviews
required, or permits approved.
This training guide covers several topics. Each process represents a business practice. Further
explanations of applications are provided in the appropriate section. Finally, there are exercises directly
relevant to your role in processing business flows through the system. Terminology is defined
throughout the document and in Appendix A. The following list of topics serves as the foundation for
this training guide:
• Basic System Navigation and Querying
• System Reports
• Applicant Process
• Applicant Team Member Process
• Applicant Viewer Process
• Permit Manager Process
• Permit Coordinator Process
• Permit Reviewer Process
• Permit Inspector Process
(The training guide may have you log out at the end of one section and log in at the beginning of
another. This is because this guide is also meant to be used as a reference beyond initial training. Later
on, when referencing a section for how to perform a task, the first step will always be to log into the
system.)

WCAA TRIRIGA Role-Based Training Guide 6 | P a g e
Revision: 2; December 1, 2014
2 Navigation and Querying
2.1 Overview
Before reviewing core elements essential in the processing of work, it’s important to be comfortable in
navigating throughout TRIRIGA. At the conclusion of this section, you should be confident in your
knowledge of:
• Home Page usage and functions
• Querying within applications
• Specific functionality within applications
• TRIRIGA Help
The Home Page is the starting point when you first log in to TRIRIGA. From the Home Page, you are able
to perform various functions including the ability to quickly access or search for applications. You are
also able to check system notifications and assignments.
Within an application, you are able to search a number of fields to narrow the results you can choose
from. Also, within an application, it is necessary to understand the various functions and navigation
techniques available to you. Through menu options, tabs, and icons, you can act upon records. Let’s
begin our demonstration below.

WCAA TRIRIGA Role-Based Training Guide 7 | P a g e
Revision: 2; December 1, 2014
2.2 Demonstration
2.2.1 Home Page
Each role’s Home Page is different. For general purposes, we’ll look at the Home Page on one role. In
later sections, each role’s Home Page will be reviewed.
The first step is to sign in. The Home Page is immediately available after sign in.

WCAA TRIRIGA Role-Based Training Guide 8 | P a g e
Revision: 2; December 1, 2014
Each Home Page has a “Reminders” section to the left of the screen. This includes Notifications, such as
an application being submitted or a permit being issued. We’ll review all the different types of
notifications in each role. These same notifications also go to your email, so you do not have to be
logged into the system to get them. Wherever you normally check your email from, you’ll be able to see
these notifications.
The Reminders section also includes applications in different statuses that require your attention. It’s a
quick and easy way to see what’s open on your plate.
To the right side are open applications. Each Applicant will see only applications applying to them. Each
Reviewer will see applications needing review, Inspectors will see applications applicable to them, and
the Permit Manager and Permit Coordinator will see all open applications. From this query section, you
can open and act upon records.

WCAA TRIRIGA Role-Based Training Guide 9 | P a g e
Revision: 2; December 1, 2014
The Home Page is also where you have the ability to sign out of TRIRIGA or open the Help Menu.
If there were more applications than could fit on the Home Page, you’d click the “More” button in the
bottom right of the section. This would also give you the ability to query based on WCAA Reference #,
Purpose of Construction or Alteration, etc. Notice that you have the ability to ‘Clear Filters’, so you can
delete what you’ve typed and start over. You can also change the number of records shown by using the
dropdown on the right side of the screen.
Let’s move on to querying within an application.

WCAA TRIRIGA Role-Based Training Guide 10 | P a g e
Revision: 2; December 1, 2014
2.2.2 Querying within an Application
Within an application, there are multiple ways to populate the information you need. Whenever you see
a Lookup icon (magnifying glass) next to a field, it means there are choices for you. Click the magnifying
glass, and the query window opens.
To query, find the column you want to filter on, and in the open white box below it, type what you are
looking for. You can type a full or partial search, and hit ‘Enter’. The values you searched for are
returned.
For example, once you’ve opened an application, you’d take the steps below to search a field.
1. In the Applicant Contact section, to the right of the Applicant Contact Name field, choose the
Lookup/Picker icon (magnifying glass) and a window opens.
2. In the Name column, type “Applicant”, and hit ‘Enter’. Everyone with Applicant in their name is
returned as a possible choice.
3. To choose the right person, click the radio button next to that person, and then click OK.
4. In the Additional Contacts section, you can click “Find”, and a similar window opens.
5. In the Name field, type “Applicant”, and hit ‘Enter’. The results are filtered for those that contain
a name with “Applicant”.
Again, you can click the Lookup icon on various fields to display the corresponding query results.

WCAA TRIRIGA Role-Based Training Guide 11 | P a g e
Revision: 2; December 1, 2014
Another way to search for your record within a field is to start typing what you are looking for. For
example:
6. In the Contractor Information section, in the Primary Contractor field, type “air”. A list of results
shows up for Contractors containing “air”. You can then click on one to populate the field.
7. To clear the field, simply click the “X” to the right of the field.
8. Notice that section have a plus or minus sign next to them. This means then can be collapsed or
expanded. If you’re looking for fields and don’t see it on the screen, make sure that section is
expanded. Or, if you want to see less on the screen, collapse a section.
9. When filling out an application, only those fields with a red asterisk next to them are required. If
you do not fill out all required fields and try to submit a record, you will receive an error
message, and the necessary fields will become highlighted.
10. Finally, certain fields within the system are hyperlinks. They appear as underlined text, and
when you click on them, they open another window with additional information. For example, if
you click on “Applicant Contact Name”, additional information will appear about that the
Applicant Contact, if it’s available in the system.
11. To end this exercise, click the “X” (top right) and a message will pop up.
12. You do not need to save your work (click “OK”). The message is closed.
13. Sign out of TRIRIGA.

WCAA TRIRIGA Role-Based Training Guide 12 | P a g e
Revision: 2; December 1, 2014
2.2.3 Navigating within an Application
Within an application, and depending on your role, you will have different tabs and buttons to navigate
through the system. The tabs (top of the screen) will show different pages from which you can perform
different functions related to your role. The tab that is highlighted is the page you are on.
Note: The Applicant (and their Team and Viewers) only see one page, the Application Submittal Page.
The buttons (top right of the screen) allow you to process an application. This is where you can save
your work, save and close the application, process the record, and click the “X” button to close the
screen.
Note: Remember, each role has different button options that are applicable to their process.
It’s important to navigate within the system, not through your browser, so clicking the “X” button of the
screen is the correct action, while clicking the “X” to close the browser window, or to move forward or
backward, is not the correct action.

WCAA TRIRIGA Role-Based Training Guide 13 | P a g e
Revision: 2; December 1, 2014
2.2.4 TRIRIGA Help
From any screen in TRIRIGA, you can access the Help menu. This provides a link to the IBM TRIRIGA
Information and Support Resources. From here, you can review any number of topics.

WCAA TRIRIGA Role-Based Training Guide 14 | P a g e
Revision: 2; December 1, 2014
3 Reports
3.1 Running and Exporting Reports
The Permit Manager and Permit Coordinator have the ability to run multiple community reports. The
Report Manager is available in the “Reminders” section of the Home Page. Like other query sections,
the Report Manager is searchable for the report type you are looking for.
Your System Admin can set up different types of reports for you. All you have to do is click the “Run
Report” button.
You can export the report for viewing or saving in Excel by clicking “Export”.

WCAA TRIRIGA Role-Based Training Guide 15 | P a g e
Revision: 2; December 1, 2014
4 Applicant
4.1 Overview
The Applicant fills out the initial permit application for construction or alteration. They can designate a
Contact other than themselves to handle the application, assign a Contractor, and complete the same
application process they would have on paper. They can also upload documents.
The system will notify the Applicant/Applicant Contact if the application is returned and why, it will
delivery letters such as Project Review letters, or it will deliver the Permit. Remember, notifications are
available in the system from the Reminders section of the Home Page. These notifications are also
emailed.
Let’s do some exercises.

WCAA TRIRIGA Role-Based Training Guide 16 | P a g e
Revision: 2; December 1, 2014
4.2 Demonstration
Roles: Applicant TRIRIGA Login ID: applicant/password
Data Setup:
1. Ensure there are at least three documents available for upload on your Computer.
4.2.1 Applicant Navigation
First, let’s take an overview of some Applicant basics. Then, we’ll create an application.
1. Open the Internet Explorer web browser, and type in the WCAA TRIRIGA URL. The WCAA
TRIRIGA sign in page will be displayed.
2. Sign in as an Applicant using the login provided above. The Applicant Home Page is displayed,
and the Reminder section as well as “My Organization’s Permit Applications”, “My
Organization’s Team Members”, and “My Organization’s Additional Contacts” sections are
visible. These sections provide quick access to the most used information.
3. View the “Reminders” portal section. “Notices” and “Permit Applications” collections are
available.

WCAA TRIRIGA Role-Based Training Guide 17 | P a g e
Revision: 2; December 1, 2014
4. Click the arrow to the left of “Notices” to expand collection, if not already expanded. A numeric
value is displayed for the total number of “Action Items” and “Notifications”.
5. Click either link to open the “Action Items and Notifications” portal landing page. The “Action
Items” and “Notifications” sections are displayed with associated data.

WCAA TRIRIGA Role-Based Training Guide 18 | P a g e
Revision: 2; December 1, 2014
6. Click a Notification link, and the Notification form is opened and Notification Details are
displayed. Again, Notifications are sent by the system when your application has been accepted,
returned, is in review, approved, closed, etc.
7. Click the “X” button (top right), and then click the “Home” link on the title bar (top left). The
form is closed, and you are returned to portal Home Page.
Note that if you are in an application, and you return to the Home Page, clicking the “Home” link
will refresh the page and provide you with the latest data.

WCAA TRIRIGA Role-Based Training Guide 19 | P a g e
Revision: 2; December 1, 2014
8. Click arrow to the left of “Permit Applications” to expand collection, if not already expanded. A
numeric value is displayed for the total number of “Permit Applications Submitted for Review”
and “Permit Applications Returned for Clarification” detail queries.
9. Click the “Permit Applications Submitted for Review” link. “Permit Applications Submitted for
Review” query displays application records in any state other than Draft or Returned. It will not
show everyone’s applications; it only shows those applications associated to your organization.
10. Click the Home link on the title bar (top left), and you are returned to portal Home Page.
11. Click the “Permit Applications Returned for Clarification” link. “Permit Applications Returned
for Clarification” query displays application records associated with your organization in the
Returned state. These quick links help you easily navigate to the information you need within
the system.

WCAA TRIRIGA Role-Based Training Guide 20 | P a g e
Revision: 2; December 1, 2014
12. Click the Home link on the title bar (top left) to return to portal Home Page. View the “My
Organization’s Permit Applications” portal section. The query section displays application
records associated with your organization.
13. View the “My Organization’s Team Members” portal section. The query section displays
external contact records associated with your organization.
14. View the “My Organization’s Additional Contact” portal section. The hierarchical query section
displays application records associated with your organization.
15. Click “Sign Out”.

WCAA TRIRIGA Role-Based Training Guide 21 | P a g e
Revision: 2; December 1, 2014
4.2.2 Application Creation and Submittal
Now, let’s create an application.
1. Open the web browser, and type in the WCAA TRIRIGA URL and the WCAA TRIRIGA sign in page
is displayed.
2. Sign in as an Applicant using the login provided, and the Home Page is displayed.
3. In the “My Organization’s Permit Applications” portal section, click the Add button (top right).
The Tenant C/A Permit Application form is displayed and will contain the sections and fields for
allowing you to begin the application process.
4. In the “Authorized Party” section, section fields are automatically populated with your
information.
5. In the “Applicant Contact” section, section fields are automatically populated with your
information; however, this contact can be updated to someone else.
6. Notice the bottom of the section states, “Applicant Contact is required to submit this Permit
Application. If your Applicant Contact is not currently available for selection within the system,
you will have an option to Add New External Contact after you click the Create Draft button.”

WCAA TRIRIGA Role-Based Training Guide 22 | P a g e
Revision: 2; December 1, 2014
This means that you can leave the Applicant Contact as yourself, change it to someone else who
is already in the system, or if that person is not in the system, you can request that they be
added by adding an External Contact. This last option is only available after your click “Create
Draft”, so we’ll cover that in a later section.
7. Click the Lookup/Picker icon (magnifying glass) at the end of the “Applicant Contact Name”
field. The query window opens and displays external contact records.
8. In the Name column, type “Applicant”, and hit ‘Enter’. Click the radio button next to “Applicant
Team”, and click ‘OK’. The query window closes, and Applicant Contact section fields are
updated.

WCAA TRIRIGA Role-Based Training Guide 23 | P a g e
Revision: 2; December 1, 2014
You can update Applicant Contact information, such as a phone number, directly from the application. If
you want the updated contact information to only appear on this record, just enter it, and save the
record. For example, for this application, you may want all calls to go directly to your cell as your main
phone. Or, if you want it to permanently update the record, as in your phone number has changed, you
can enter the information, and check the box next to “Apply Updated Contact Information”. Let’s try
that now.
9. Update the Applicant Contact Phone number. Click the checkbox next to “Apply Updated
Contact Information” (note the checkmark disappears). The checkbox allows you to click it, and
the checkbox disappears.
10. In the “Contractor Information” section, click the Lookup/Picker icon (magnifying glass) to the
right of the “Primary Contractor (or other to perform work)” field. The query window opens
and displays external organization records.
11. Select the radio button to the left of an organization name, and click the “OK” link (top right).
The “Contractor Information” section is populated with the selected external organization
record data.
12. Note that if your Contractor does not exist in the system: “Primary Contactor is not required to
submit this Permit Application. However, please contact [email protected] to request approval
for a new external organization record to be created if your Primary Contactor is not currently
available for selection within the system.”

WCAA TRIRIGA Role-Based Training Guide 24 | P a g e
Revision: 2; December 1, 2014
13. For the Contractor Contact, note that if they are not in the system, you’ll have to first click
“Create Draft”, and then add them via an External Contact link, which we’ll go over later. Notice
the section states: “Contractor and Additional Contacts are not required to submit this Permit
Application. If your Contacts are not currently available for selection within the system, you will
have an option to Add New External Contact after you click the Create Draft button.”
14. In the “Contractor Contact” section, click on the Lookup/Picker icon (magnifying glass) to the
right of the “Contractor Contact Name” field. The query window opens and displays external
contact records. Or, if there is only one Contractor Contact available, it will auto-populate the
field.
15. If the field does not auto-populate, select the radio button to the left of a contact name, and
click the “OK” link (top right). The Contractor Contact information is populated.
Again, like the “Applicant Contact” section, you have the ability to update the contact information one
time or permanently.
16. Update and document the Contractor Contact Phone number. Click the checkbox next to “Apply
Updated Contact Information”.
17. In the “Additional Contacts” section, click “Find”, and a window opens.

WCAA TRIRIGA Role-Based Training Guide 25 | P a g e
Revision: 2; December 1, 2014
18. Place a checkmark next to two (2) Contacts, and click “OK”. The window closes, and the
“Additional Contacts” section is populated.
19. Place a check next to one contact, and click “Remove”, and the name is removed.
20. In the “Proposed Project Information” section, click on the Lookup/Picker icon (magnifying
glass) to the right of the “Name of Building/Site to be Altered” field. The query window opens
and displays building and property records.
Remember, you could also populate the field by starting to type your answer and choosing from
the list that appears.
21. Select the radio button to the left of a building or property, and click the “OK” action (top right).
The Building or Property name is populated. The “Airport Building #” field is also populated; it
will populate automatically based on the building or property you choose.
Note: If you do not know the building number, simply enter the airport, “DTW” or “YIP”.

WCAA TRIRIGA Role-Based Training Guide 26 | P a g e
Revision: 2; December 1, 2014
22. Use the drop down list next to “AOA Access” and “Airport” to populate the fields.
23. Enter values in the following fields:
• “Area/Space Name to be Altered”
• “Purpose of C/A”
• “Project Description”
24. Click the checkbox next to “Additional Project Description Sheet”.
If you need additional room, you can attach a document with more detail. We’ll discuss
attaching documents later on.
25. Enter values in the Estimated Cost fields:
• “Estimated Design/Engineering Cost”
• “Estimated Furnishing/Equipment Cost”
• “Estimated or Actual Construction Cost”
• “Bond Amount if Applicable”
Next, we’ll learn how to upload documents. There are three categories in which to upload documents.
They are “Insurance & Bonds”, “Construction Documents”, and “Safety Plan/Drug Policy”. In your job,
you would upload as appropriate to all three. The steps to upload are the same no matter which tab you
upload to, so we’ll take a look at the “Insurance & Bonds” tab.
26. View the “Documents” section and notice the numeric value is displayed for the total number of
documents associated with the corresponding tabs below. If you upload a document, you’ll have
to save your work in order for the numbers to refresh and update.
27. Click the “Insurance & Bonds” tab.

WCAA TRIRIGA Role-Based Training Guide 27 | P a g e
Revision: 2; December 1, 2014
28. Click the “Upload” link (top right of section) and the “Object Attachment Upload” window is
displayed.
29. Click the “Browse” link to the right of Local File field and a browser window is displayed.
30. Search for and select a document from your local computer or network. Click “Open” link near
lower right corner of the window. The “Document Name” and “Local File” path are populated.

WCAA TRIRIGA Role-Based Training Guide 28 | P a g e
Revision: 2; December 1, 2014
31. Click “Upload” (upper right) and the document is uploaded and listed under the “Insurance &
Bonds” tab.
Note that there is a box next to your document, which allows you to select the document, and
then click “Remove” (next to “Upload”). If you accidentally upload the wrong document, or
change your mind, you can remove the document from your application.
You can also upload multiple documents at once. Let’s take a look at doing that now.
32. Click “Construction Documents” tab, and then click “Upload” and the “Object Attachment
Upload” window is displayed.
33. Click the “Multiple Upload” link (upper right), then:
• Click the “Select Files” link (upper right).
• Search for your files and open them by selecting the first document, then holding ‘CTRL’ or
‘SHIFT’, and clicking the second document. The first selection will not remain highlighted as
with some other programs, but notice that the “File Name” field contains the names of
both documents.

WCAA TRIRIGA Role-Based Training Guide 29 | P a g e
Revision: 2; December 1, 2014
• Click “Open” (bottom right). All selected files are listed.
34. Click “Upload” (top right). The documents are uploaded and listed under the “Construction
Documents” tab.
Finally, we’ll need to authorize the application.
35. View the “Applicant Authorization” section. The “Applicant Name (Authorized Party)” field is
automatically populated from the “Official Name of Applicant (Authorized Party)” field.
36. Select the radio button next to the “Authorize?” field.
37. Click the “Create Draft” button (top right or bottom left). Note that the button appears at both
the top and bottom of the screen. This is for ease of use; both buttons do the same thing.
Notice that the document counts are updated to reflect all uploaded documents.

WCAA TRIRIGA Role-Based Training Guide 30 | P a g e
Revision: 2; December 1, 2014
38. Click the Save & Close button. The application form is closed, and the previous portal page is
displayed.
39. Click the “Home” link (top left). Remember, this refreshes the Home Page. View the “My
Organization’s Permit Applications” portal section to see your application. The “WCAA
Reference #” has not been assigned, and the application displays status of “Draft”. The “WCAA
Reference #” does not get assigned until the application is submitted. It is a system-generated
number that allows for tracking of the application through the process.
40. Click on the Permit Application that shows a status of “Draft” (the one you just saved). The
Tenant C/A Permit Application is opened.
41. Click the “Submit” button (top right). The Application form is closed, and the previous portal
page is displayed.

WCAA TRIRIGA Role-Based Training Guide 31 | P a g e
Revision: 2; December 1, 2014
42. Click the “Home” link (top left). View the “My Organization’s Permit Applications” portal
section. The “WCAA Reference #” was created and is displayed. The application status is
updated to “Received”.
Congratulations! You’ve just submitted your application!
43. Click “Sign Out” (top right), and you are signed out of TRIRIGA.

WCAA TRIRIGA Role-Based Training Guide 32 | P a g e
Revision: 2; December 1, 2014
4.2.3 Adding External Records
If your contacts do not exist in the system, you can request they be added using an “Add New External
Contact” link.
1. Open the web browser, and type in the WCAA TRIRIGA URL and the WCAA TRIRIGA sign in page
is displayed.
2. Sign in as an Applicant using the login provided, and the Home Page is displayed.
3. In the “My Organization’s Permit Applications” portal section, click the “Add” link (top right),
and the Tenant C/A Permit Application is displayed.
First, we’ll have to populate the required fields. These are needed in order to save a draft. Once we’ve
saved the draft, the links will appear to add new external contacts.
4. Populate the following fields:
• “Proposed Project Information” section
o “Name of Building/Site to be Altered”
o “Airport Building #” (auto-populates)
o “Purpose of C/A”
• “Applicant Authorization” section: “Authorize?” field
5. Click “Create Draft”.

WCAA TRIRIGA Role-Based Training Guide 33 | P a g e
Revision: 2; December 1, 2014
6. In the “Application Contact” section, click the “Add New External Contact” link (top right of
section). A blank External Contact record form opens. Notice that the “Primary Organization”
section is auto-populated with your company.
7. In the “General” section, type required External Contact information into form fields:
• “Last Name”
• “First Name”
Remember, you can tell which fields are required because of the red asterisk.
In the “Contact Information” section, type optional External Contact information:
• “Work Phone”
• “Email”
8. In the “Primary Address” section, type optional External Contact information:
• “Address”
• “Zip/Postal Code”
• “City”
• “State/Province”

WCAA TRIRIGA Role-Based Training Guide 34 | P a g e
Revision: 2; December 1, 2014
9. Click the “Create Draft” button (top right). TRIRIGA assigns an ID if one was not populated, and
the record has a “Draft” status. This ID is for tracking within the system. The record becomes
active following a WCAA business process for approval by Permits and then activation by the
Application Administrator.

WCAA TRIRIGA Role-Based Training Guide 35 | P a g e
Revision: 2; December 1, 2014
10. Click the “X”, and the window closes. (Notification is sent to the Applicant, Applicant Contact,
Permit Manager, Permit Coordinator and the WCAA Application Administrator. The WCAA
Application Administrator can then Activate the record in the system, and the new user will
receiving an email notification with website login information, their User ID, and their
Password.) Remember, you can check your notifications from the Home Page Reminders
section, or from your email.
Now that we’ve created our External Contact record, we have to add it to the application.
11. Click the Lookup/Picker icon (magnifying glass) at the end of the “Applicant Contact Name”
field. The query window opens and displays external contact records.
12. Select the radio button next to the External Contact you created, and click “OK” (top right). The
query window closes, and the “Applicant Contact” section is updated.
The same concept can be followed to add an External Contact to the “Contractor Contact” section.
13. First, in the “Contractor Information” section, select a “Primary Contractor”.
14. Click the “Add New External Contact” link at the end of the “Contractor Contact” section.
A blank External Contact record form opens. The “Primary Organization” section, “Organization
Path” field populates with the Contractor Company.

WCAA TRIRIGA Role-Based Training Guide 36 | P a g e
Revision: 2; December 1, 2014
15. Complete the record as needed.
16. Click the “Create Draft” button (top right). TRIRIGA assigns an ID if one was not populated, and
the record has a “Draft” status. This ID is also for tracking in the system.
17. Click the “X”. The External Contact form is closed. (Notification is sent to the Applicant, Permit
Manager, Permit Coordinator and the WCAA Application Administrator).
18. For the “Contractor Contact Name” field, click the Clear icon (circled X), and type the first name
of the newly created contact. TRIRIGA filters the result set based on the values entered.
19. Select the External Contact you created. TRIRIGA accepts the selection, and populates the
corresponding fields.
The same concept applies to create Additional Contacts.
WCAA TRIRIGA Role-Based Training Guide 37 | P a g e
Revision: 2; December 1, 2014
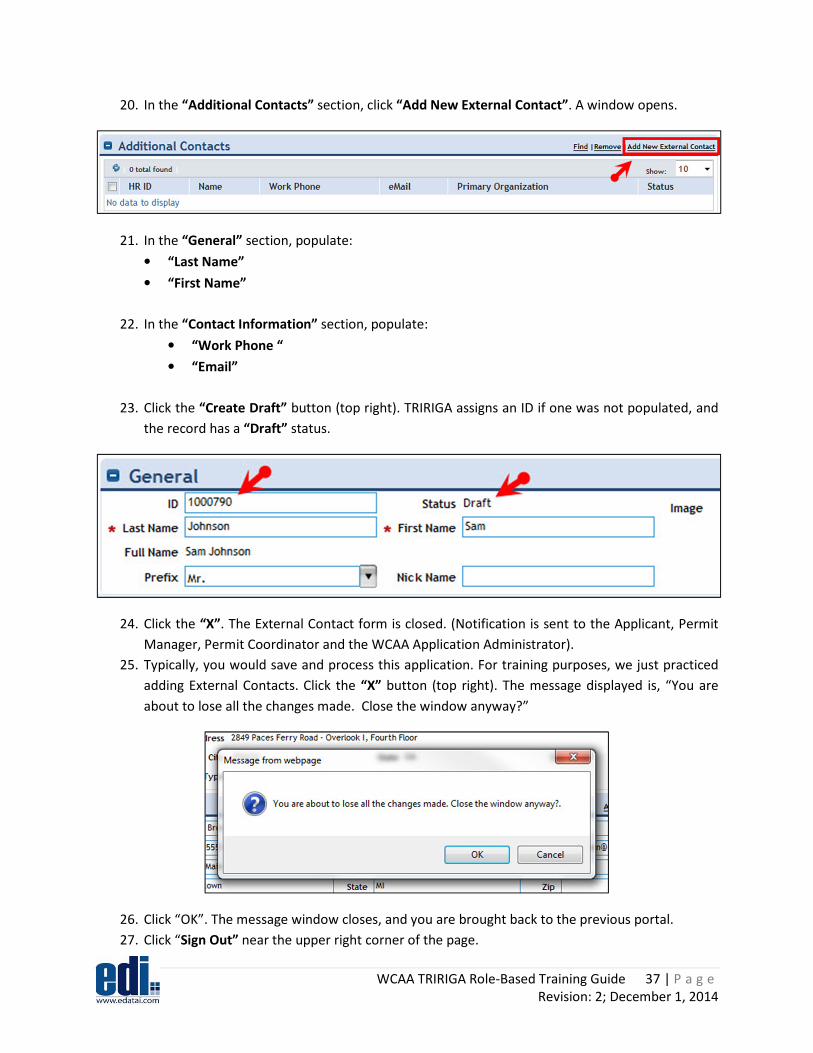
20. In the “Additional Contacts” section, click “Add New External Contact”. A window opens.
21. In the “General” section, populate:
• “Last Name”
• “First Name”
22. In the “Contact Information” section, populate:
• “Work Phone “
• “Email”
23. Click the “Create Draft” button (top right). TRIRIGA assigns an ID if one was not populated, and
the record has a “Draft” status.
24. Click the “X”. The External Contact form is closed. (Notification is sent to the Applicant, Permit
Manager, Permit Coordinator and the WCAA Application Administrator).
25. Typically, you would save and process this application. For training purposes, we just practiced
adding External Contacts. Click the “X” button (top right). The message displayed is, “You are
about to lose all the changes made. Close the window anyway?”
26. Click “OK”. The message window closes, and you are brought back to the previous portal.
27. Click “Sign Out” near the upper right corner of the page.

WCAA TRIRIGA Role-Based Training Guide 38 | P a g e
Revision: 2; December 1, 2014
4.2.4 Application Resubmit
Roles: Applicant TRIRIGA Login ID: applicant/password
Roles: Permit Manager TRIRIGA Login ID: pmanager/password
There may be a case where your application is incomplete or Permits has to return it for any other
reason. In this case, you’ll receive a notification of the returned application, the reason it was returned,
and you can log into the system to make any necessary updates.
*************************************************************************************
For this exercise, we must first take the record that you submitted and return it. This is not typically
something you would do yourself, but it is necessary to get the record in the correct status to proceed
with this demonstration.
1. Open the web browser, and type in the WCAA TRIRIGA URL. The WCAA TRIRIGA sign in page is
displayed.
2. Sign in as the Permit Manager using the login provided.
3. From the “All Tenant C/A Permit Applications”, choose your Application, and the Application is
open.
4. Click “Return” (top right). A window opens.
5. Enter a Reason, and click “Send”. The window closes.

WCAA TRIRIGA Role-Based Training Guide 39 | P a g e
Revision: 2; December 1, 2014
6. Click the “X” (top right). The window closes.
7. Click the “Home” link (top left). The application you returned has a status of “Returned”.
8. Click “Sign Out” (top right).
*************************************************************************************
We’re ready now to get back to your role as the Applicant. In your job, you’ll receive an email
notification that the application has been returned, along with a reason. You’ll then log into the system
to make any corrections, and resubmit the application. Let’s do that now.
9. Sign in as an Applicant using the login provided. The Applicant Home Page is displayed.
10. View the “My Organization’s Permit Applications” portal section, and select the Permit
Application link that shows a status of “Returned”.
11. For this training, we’ll pretend the Bond Amount was not correct. Edit the “Bond Amount” field.
(In your job, you’d add whatever information is requested in the notification.) You’ve now made
all corrections necessary and are ready to resubmit the application for review.
12. Click the “Submit” button (top right). The Application form is closed, and the portal Home Page
is displayed.
13. Click the “Home” link (top left). View the “My Organization’s Permit Applications” portal
section. The application Status is updated to “Received”.
14. Click “Sign Out” (top right).

WCAA TRIRIGA Role-Based Training Guide 40 | P a g e
Revision: 2; December 1, 2014
5 Applicant Team Member
5.1 Overview
The Applicant Team Member has the same capabilities within the system, except that they cannot
submit. This role can set up an application to then be submitted by the Applicant, or they can edit an
application as needed.
*************************************************************************************
Note: This section covers the same functions as the above Applicant, except there is no ability to submit;
there is no need to cover some processes again. However, they will remain in the guide for future
reference.
*************************************************************************************

WCAA TRIRIGA Role-Based Training Guide 41 | P a g e
Revision: 2; December 1, 2014
5.2 Demonstration
Roles: Applicant Team Member TRIRIGA Login ID: ateam/password
Data Setup:
1. Ensure there are at least three documents available for upload on your Computer.
5.2.1 Applicant Team Navigation
First, let’s take an overview of some Applicant Team Member basics. Then, we’ll create an application.
1. Open the Internet Explorer web browser, and type in the WCAA TRIRIGA URL. The WCAA
TRIRIGA sign in page will be displayed.
2. Sign in as an Applicant Team Member using the login provided above. The Applicant Team
Member Home Page is displayed, and the Reminder section as well as “My Organization’s
Permit Applications,” “My Organization’s Team Members,” and “My Organization’s Additional
Contacts” sections are visible. These sections provide quick access to the most used
information.
3. View the “Reminders” portal section. “Notices” and “Permit Applications” collections are
available.

WCAA TRIRIGA Role-Based Training Guide 42 | P a g e
Revision: 2; December 1, 2014
4. Click the arrow to the left of “Notices” to expand collection, if not already expanded. A numeric
value is displayed for the total number of “Action Items” and “Notifications”.
5. Click either link to open the “Action Items and Notifications” portal landing page. The “Action
Items” and “Notifications” sections are displayed with associated data.

WCAA TRIRIGA Role-Based Training Guide 43 | P a g e
Revision: 2; December 1, 2014
6. Click a Notification link, and the Notification form is opened and Notification Details are
displayed. Again, Notifications are sent by the system when your application has been accepted,
returned, is in review, approved, closed, etc.
7. Click the “X” button (top right), and then click the “Home” link on the title bar (top left). The
form is closed, and you are returned to portal Home Page.
Note that if you are in an application, and you return to the Home Page, clicking the Home
button will refresh the page and provide you with the latest data.

WCAA TRIRIGA Role-Based Training Guide 44 | P a g e
Revision: 2; December 1, 2014
8. Click arrow to the left of “Permit Applications” to expand collection, if not already expanded. A
numeric value is displayed for the total number of “Permit Applications Submitted for Review”
and “Permit Applications Returned for Clarification” detail queries.
9. Click the “Permit Applications Submitted for Review” link. “Permit Applications Submitted for
Review” query displays application records in any state other than “Draft” or “Returned”. It will
not show everyone’s applications; it only shows those applications associated to your
organization.
10. Click the “Home” link on the title bar (top left), and you are returned to portal Home Page.
11. Click the “Permit Applications Returned for Clarification” link. “Permit Applications Returned
for Clarification” query displays application records associated with your organization in the
Returned state. These quick links help you easily navigate to the information you need within
the system.

WCAA TRIRIGA Role-Based Training Guide 45 | P a g e
Revision: 2; December 1, 2014
12. Click the “Home” link on the title bar (top left) to return to portal Home Page. View the “My
Organization’s Permit Applications” portal section. The query section displays application
records associated with your organization.
13. View the “My Organization’s Team Members” portal section. The query section displays
external contact records associated with your organization.
14. View the “My Organization’s Additional Contact” portal section. The hierarchical query section
displays application records associated with your organization.
15. Click “Sign Out”.

WCAA TRIRIGA Role-Based Training Guide 46 | P a g e
Revision: 2; December 1, 2014
5.2.2 Application Creation
Now, let’s create an application.
1. Open the web browser, and type in the WCAA TRIRIGA URL and the WCAA TRIRIGA sign in page
is displayed.
2. Sign in as an Applicant Team Member using the login provided, and the Home Page is displayed.
3. In the “My Organization’s Permit Applications” portal section, click the “Add” button (top
right). The Tenant C/A Permit Application is displayed and will contain the sections and fields for
allowing you to begin the application process.
4. In the “Authorized Party” section, section fields are automatically populated with your
information.
5. In the “Applicant Contact” section, section fields are automatically populated with your
information; however, this contact can be updated to someone else.
6. Notice the bottom of the section states, “Applicant Contact is required to submit this Permit
Application. If your Applicant Contact is not currently available for selection within the system,
you will have an option to Add New External Contact after you click the Create Draft button.”

WCAA TRIRIGA Role-Based Training Guide 47 | P a g e
Revision: 2; December 1, 2014
This means that you can leave the Applicant Contact as yourself, change it to someone else who
is already in the system, or if that person is not in the system, you can request that they be
added by adding an External Contact. This last option is only available after your click “Create
Draft”, so we’ll cover that in a later section.
7. Click the Lookup/Picker icon (magnifying glass) at the end of the “Applicant Contact Name”
field. The query window opens and displays external contact records.
8. In the Name column, type “Applicant”, and hit ‘Enter’. Click the radio button next to “Applicant
Team” (plus the number provided to you), and click “OK”. The query window closes, and
Applicant Contact section fields are updated.

WCAA TRIRIGA Role-Based Training Guide 48 | P a g e
Revision: 2; December 1, 2014
You can update “Applicant Contact” information, such as a phone number, directly from the
application. If you want the updated contact information to only appear on this record, just enter it, and
save the record. For example, for this application, you may want all calls to go directly to your cell as
your main phone. Or, if you want it to permanently update the record, as in your phone number has
changed, you can enter the information, and check the box next to “Apply Updated Contact
Information”. Let’s try that now.
9. Update the Applicant Contact Phone number. Click the checkbox next to “Apply Updated
Contact Information” (note the checkmark disappears). The checkbox allows you to click it, and
the checkbox disappears.
10. In the “Contractor Information” section, click the Lookup/Picker icon (magnifying glass) to the
right of the “Primary Contractor (or other to perform work)” field. The query window opens
and displays external organization records.
11. Select the radio button to the left of an organization name, and click the “OK” link (top right).
The Contractor Information section is populated with the selected external organization record
data.
12. Note that if your Contractor does not exist in the system: “Primary Contactor is not required to
submit this Permit Application. However, please contact [email protected] to request approval
for a new external organization record to be created if your Primary Contactor is not currently
available for selection within the system.”

WCAA TRIRIGA Role-Based Training Guide 49 | P a g e
Revision: 2; December 1, 2014
13. For the Contractor Contact, note that if they are not in the system, you’ll have to first click
“Create Draft”, and then add them via an External Contact link, which we’ll go over later. Notice
the section states: “Contractor and Additional Contacts are not required to submit this Permit
Application. If your Contacts are not currently available for selection within the system, you will
have an option to Add New External Contact after you click the Create Draft button.”
14. In the “Contractor Contact” section, click on the Lookup/Picker icon (magnifying glass) to the
right of the “Contractor Contact Name” field. The query window opens and displays external
contact records. Or, if there is only one Contractor Contact available, it will auto-populate the
field.
15. If the field does not auto-populate, select the radio button to the left of a contact name, and
click “OK” (top right). The “Contractor Contact” information is populated.
Again, like the “Applicant Contact” section, you have the ability to update the contact information one
time or permanently.
16. Update and document Contractor Contact Phone number. Click the checkbox next to “Apply
Updated Contact Information”.
17. In the “Additional Contacts” section, click Find and a window opens.

WCAA TRIRIGA Role-Based Training Guide 50 | P a g e
Revision: 2; December 1, 2014
18. Place a checkmark next to two (2) Contacts, and click “OK”. The window closes, and the
Additional Contact section is populated.
19. Place a check next to one contact, and click “Remove”, and the name is removed.
20. In the “Proposed Project Information” section, click on the Lookup/Picker icon (magnifying
glass) to the right of the “Name of Building/Site to be Altered” field. The query window opens
and displays building and property records.
Remember, you could also populate the field by starting to type your answer and choosing from
the list that appears.
21. Select the radio button to the left of a building or property, and click “OK” (top right). The
Building or Property name is populated. The “Airport Building #” field is also populated; it will
populate automatically based on the building or property you choose.
Note: If you do not know the building number, simply enter the airport, “DTW” or “YIP”.

WCAA TRIRIGA Role-Based Training Guide 51 | P a g e
Revision: 2; December 1, 2014
22. Use the drop down list next to “AOA Access” and “Airport” to populate the fields.
23. Enter values in the following fields:
• “Area/Space Name to be Altered”
• “Purpose of C/A”
• “Project Description”
24. Click the checkbox next to “Additional Project Description Sheet”.
If you need additional room, you can attach a document with more detail. We’ll discuss
attaching documents later on.
25. Enter values in the Estimated Cost fields:
• “Estimated Design/Engineering Cost”
• “Estimated Furnishing/Equipment Cost”
• “Estimated or Actual Construction Cost”
• “Bond Amount if Applicable”
Next, we’ll learn how to upload documents. There are three categories in which to upload documents.
They are “Insurance & Bonds”, “Construction Documents”, and “Safety Plan/Drug Policy”. In your job,
you would upload as appropriate to all three. The steps to upload are the same no matter which tab you
upload to, so we’ll take a look at the “Insurance & Bonds” tab.
26. View the Documents section and notice the numeric value is displayed for the total number of
documents associated with the corresponding tabs below. If you upload a document, you’ll have
to save your work in order for the numbers to refresh and update.
27. Click the “Insurance & Bonds” tab.

WCAA TRIRIGA Role-Based Training Guide 52 | P a g e
Revision: 2; December 1, 2014
28. Click the “Upload link” (top right of section) and the Object Attachment Upload window is
displayed.
29. Click the “Browse” link to the right of “Local File” field and a browser window is displayed.
30. Search for and select a document from your local computer or network. Click “Open” link near
lower right corner of the window. The “Document Name” and “Local File” path are populated.

WCAA TRIRIGA Role-Based Training Guide 53 | P a g e
Revision: 2; December 1, 2014
31. Click “Upload” (upper right) and the document is uploaded and listed under the “Insurance &
Bonds” tab.
Note that there is a box next to your document, which allows you to select the document, and
then click “Remove” (next to “Upload”). If you accidentally upload the wrong document, or
change your mind, you can remove the document from your application.
You can also upload multiple documents at once. Let’s take a look at doing that now.
32. Click the “Construction Documents” tab, and then click “Upload”, and the Object Attachment
Upload window is displayed.
33. Click the “Multiple Upload” link (upper right), then:
• Click the “Select Files” link (upper right).
• Search for your files and open them by selecting the first document, then holding ‘CTRL’ or
‘SHIFT’, and clicking the second document. The first selection will not remain highlighted as
with some other programs, but notice that the “File Name” field contains the names of
both documents.

WCAA TRIRIGA Role-Based Training Guide 54 | P a g e
Revision: 2; December 1, 2014
• Click “Open” (bottom right). All selected files are listed.
34. Click “Upload” (top right). The documents are uploaded and listed under the “Construction
Documents” tab.
Finally, we’ll need to authorize the application.
35. View the “Applicant Authorization” section. The “Applicant Name (Authorized Party)” field is
automatically populated from the “Official Name of Applicant (Authorized Party)” field.
36. Select the radio button next to the “Authorize?” field.
37. Click the “Create Draft” button (top right or bottom left). Note that the button appears at both
the top and bottom of the screen. This is for ease of use; both buttons do the same thing.
Notice that the Document counts are updated to reflect all uploaded documents.

WCAA TRIRIGA Role-Based Training Guide 55 | P a g e
Revision: 2; December 1, 2014
38. Click the “Save & Close” button. The application form is closed, and the previous portal page is
displayed.
39. Click the “Home” link (top left). Remember, this refreshes the Home Page. View the “My
Organization’s Permit Applications” portal section to see your application. The “WCAA
Reference #” has not been assigned and Application displays status of “Draft”. The “WCAA
Reference #” does not get assigned until the application is submitted. It is a system-generated
number that allows for tracking of the application through the process.
That’s it! You’ve done your part. The Applicant will be able to edit and submit the application.
40. Click “Sign Out” (top right), and you are signed out of TRIRIGA.

WCAA TRIRIGA Role-Based Training Guide 56 | P a g e
Revision: 2; December 1, 2014
5.2.3 Adding External Records
If your contacts do not exist in the system, you can request they be added using an ‘Add New External
Contact’ link.
1. Open the web browser, and type in the WCAA TRIRIGA URL and the WCAA TRIRIGA sign in page
is displayed.
2. Sign in as an Applicant Team Member using the login provided, and the Home Page is displayed.
3. In the “My Organization’s Permit Applications” portal section, click the “Add” button (top
right), and the Tenant C/A Permit Application is displayed.
First, we’ll have to populate the required fields. These are needed in order to save a draft. Once we’ve
saved the draft, the links will appear to add new external contacts.
4. Populate the following fields:
• “Proposed Project Information” section
o “Name of Building/Site to be Altered”
o “Airport Building #” (auto-populates)
o “Purpose of C/A”
• “Applicant Authorization” section: “Authorize?” field
5. Click “Create Draft”.

WCAA TRIRIGA Role-Based Training Guide 57 | P a g e
Revision: 2; December 1, 2014
6. In the “Application Contact” section, click the “Add New External Contact” link (top right of
section). A blank External Contact record form opens. Notice that the “Primary Organization”
section is auto-populated with your company.
7. In the “General” section, type required External Contact information into form fields:
• “Last Name”
• “First Name”
Remember, you can tell which fields are required because of the red asterisk.
In the “Contact Information” section, type optional External Contact information:
• Work Phone
8. In the “Primary Address” section, type optional External Contact information:
• “Address”
• “Zip/Postal Code”
• “City”
• “State/Province”

WCAA TRIRIGA Role-Based Training Guide 58 | P a g e
Revision: 2; December 1, 2014
9. Click the “Create Draft” button (top right). TRIRIGA assigns an ID if one was not populated, and
the record has a “Draft” status.

WCAA TRIRIGA Role-Based Training Guide 59 | P a g e
Revision: 2; December 1, 2014
10. Click the “X” and the window closes. (Notification is sent to the Applicant, Applicant Contact,
Permit Manager, Permit Coordinator and the WCAA Application Administrator. The WCAA
Application Administrator can then Activate the record in the system, and the new user will
receiving an email notification with website login information, their User ID, and their
Password.) Remember, you can check your notifications from the Home Page Reminders
section, or from your email.
Now that we’ve created our External Contact record, we have to add it to the application.
11. Click the Lookup/Picker icon (magnifying glass) at the end of the “Applicant Contact Name”
field. The query window opens and displays external contact records.
12. Select the radio button next to the External Contact you created, and click “OK” (top right). The
query window closes, and the “Applicant Contact” section is updated.
The same concept can be followed to add an External Contact to the “Contractor Contact” section.
13. First, in the “Contractor Information” section, select a “Primary Contractor”.
14. Click the “Add New External Contact” link at the end of the “Contractor Contact” section.
A blank External Contact record form opens. “Primary Organization” section, “Organization
Path” field populates with associated Contractor Company.
15. Complete the record as needed.

WCAA TRIRIGA Role-Based Training Guide 60 | P a g e
Revision: 2; December 1, 2014
16. Click the “Create Draft” button (top right). TRIRIGA assigns an ID if one was not populated, and
the record has a “Draft” status.
17. Click the “X”. The External Contact form is closed. (Notification is sent to the Applicant, Permit
Manager, Permit Coordinator and the WCAA Application Administrator).
18. For the “Contractor Contact Name” field, click the Clear icon (circled X), and type the first name
of the newly created contact in the “Contractor Contact Name” field. TRIRIGA filters the result
set based on the values entered.
19. Select the External Contact you created. TRIRIGA accepts the selection, and populates the
corresponding fields.
The same concept applies to create an Additional Contact.

WCAA TRIRIGA Role-Based Training Guide 61 | P a g e
Revision: 2; December 1, 2014
20. In the “Additional Contacts” section, click “Add New External Contact”. A window opens.
21. In the “General” section, populate:
• “Last Name”
• “First Name”
22. In the “Contact Information” section, populate
• “Work Phone”
• “Email”
23. Click the “Create Draft” button (top right). TRIRIGA assigns an ID if one was not populated, and
the record has a “Draft” status.
24. Click the “X”. The External Contact form is closed. (Notification is sent to the Applicant, Permit
Manager, Permit Coordinator and the WCAA Application Administrator).
25. Typically, you would save and process this application. For training purposes, we just practiced
adding External Contacts. Click the “X” button (top right). The message displayed is, “You are
about to lose all the changes made. Close the window anyway?”
26. Click “OK”. The message window closes, and you are brought back to the previous portal.
27. Click “Sign Out” near the upper right corner of the page.

WCAA TRIRIGA Role-Based Training Guide 62 | P a g e
Revision: 2; December 1, 2014
5.2.4 Application Resubmit
There may be a case where your application is incomplete or Permits has to return it for any other
reason. In this case, you’ll receive a notification of the returned application, the reason it was returned,
and you can log into the system to make any necessary updates. Let’s do that now.
1. Open the web browser, and type in the WCAA TRIRIGA URL. The WCAA TRIRIGA sign in page is
displayed.
2. Sign in as an Applicant Team Member using the login provided. The Applicant Home Page is
displayed.
3. View the “My Organization’s Permit Applications” portal section, and select the Permit
Application link that shows a status of “Returned”.
4. For this training, we’ll pretend the Bond Amount was not correct. Edit the “Bond Amount” field.
(In your job, you’d add whatever information is requested in the notification.) You’ve now made
all corrections necessary and are ready to resubmit the application for review.
5. Click the “Submit” button (top right). The Application form is closed, and the portal Home Page
is displayed.

WCAA TRIRIGA Role-Based Training Guide 63 | P a g e
Revision: 2; December 1, 2014
6. Click the “Home” link (top left). View the “My Organization’s Permit Applications” portal
section. The application Status is updated to “Received”.
7. Click “Sign Out” (top right).

WCAA TRIRIGA Role-Based Training Guide 64 | P a g e
Revision: 2; December 1, 2014
6 Applicant Viewer
6.1 Overview
The Applicant Viewer can only view the application. They do not have edit permissions to change fields
nor create new external contacts, create drafts, or submit the application. This role is typically an
executive that wants knowledge of applications for their organization.
*************************************************************************************
Note: This section covers the same navigation as the above Applicant, except there is no ability to
edit/create/submit. However, it will remain in the guide for future reference.
*************************************************************************************

WCAA TRIRIGA Role-Based Training Guide 65 | P a g e
Revision: 2; December 1, 2014
6.2 Demonstration
Roles: Applicant Viewer TRIRIGA Login ID: aviewer/password
Data Setup:
1. Organization has existing application in an open status.
6.2.1 Applicant Viewer Navigation
First, let’s take an overview of some Applicant Viewer basics. Then, we’ll look at an application.
1. Open the web browser, and type in the WCAA TRIRIGA URL. The WCAA TRIRIGA sign in page is
displayed.
2. Sign into TRIRIGA as an Applicant Viewer using the login provided. The Applicant Viewer Portal
homepage is displayed including the “Reminders”, “My Organization’s Permit Applications”,
“My Organization’s Team Members”, and “My Organization’s Additional Contacts” sections.
3. View the “Reminders” portal section. “Notices” and “Permit Applications” collections are
available.
4. Click arrow to the left of “Notices” to expand collection, if not already expanded. A numeric
value is displayed for the total number of “Action Items” and “Notifications”.

WCAA TRIRIGA Role-Based Training Guide 66 | P a g e
Revision: 2; December 1, 2014
5. Click either link to open the “Action Items and Notifications” portal landing page. The “Action
Items” and “Notifications” sections are displayed with associated data.
6. Click a Notification link. The Notification form is opened and details are displayed. Again,
Notifications are sent by the system when your application has been accepted, returned, is in
review, approved, closed, etc.
7. Click the “X” button (top right), and then click the “Home” link on the title bar (top left). The
form is closed, and you are returned to portal Home Page.
8. Click arrow to the left of “Permit Applications” to expand the collection, if not already
expanded. A numeric value is displayed for the total number of “Permit Applications Submitted
for Review” and “Permit Applications Returned for Clarification” detail queries.
9. Click the “Permit Applications Submitted for Review” link. “Permit Applications Submitted for
Review” query displays application records associated with the logged in users primary
organization in any state other than Draft or Returned. It will not show everyone’s applications;
it only shows those applications associated to your organization.

WCAA TRIRIGA Role-Based Training Guide 67 | P a g e
Revision: 2; December 1, 2014
10. Click the “Home” link on the title bar (top left), and you are returned to portal Home Page.
11. Click the “Permits Applications Returned for Clarification” link. “Permits Applications Returned
for Clarification” query displays application records in the “Returned” status.
12. Click the “Home” link on the title bar (top left). You are returned to portal Home Page.
• View the “My Organization’s Permit Application” Portal Section. The query section displays
application records associated with your organization.
13. View the “My Organization’s Team Members” Portal Section, and note the information
available. The query section displays external contact records associated with your organization.
14. Click “Sign Out”.

WCAA TRIRIGA Role-Based Training Guide 68 | P a g e
Revision: 2; December 1, 2014
6.2.2 Applicant Viewer Process
Now, let’s look at an application.
1. Open the web browser, and type in the WCAA TRIRIGA URL and the WCAA TRIRIGA sign in page
is displayed.
2. Sign in as the Applicant Viewer with the login provided.
3. In the “My Organization’s Permit Applications” portal section, select an application by clicking
on it. The application will be opened for you to view. You will not be able to edit the record.
4. View the “Authorization Party” section. This is the official name and contact information for
the applicant.
5. View the “Applicant Contact” section. This can be the Applicant or an Applicant Team Member.
This person can edit the record and will receive notifications.

WCAA TRIRIGA Role-Based Training Guide 69 | P a g e
Revision: 2; December 1, 2014
6. The “Contractor Information” section contains the Contractor Company. The “Contractor
Contact” section contains the contact for the Contractor Company. The “Additional Contacts”
section contains any other contacts that have been associated to the application. For example, a
Designer may be entered here.
7. The “Proposed Projects Information” section contains the details of the project, such as the
Building/Site, AOA Access, Airport, Estimate dollar amounts, and Purpose of C/A, to name a few.
8. The “Documents” section shows currently uploaded documents. You can see how many
documents are on each tab by the numeric values listed. You can click a document link to view
that document. Again, you can use the tabs to view different document types.

WCAA TRIRIGA Role-Based Training Guide 70 | P a g e
Revision: 2; December 1, 2014
9. The “Applicant Authorization” section is where the application gets authorized for processing.
10. Click the “X” button (top right) and you are returned to the Home Page.
11. Sign out of TRIRIGA (top right).

WCAA TRIRIGA Role-Based Training Guide 71 | P a g e
Revision: 2; December 1, 2014
7 Appendix A: Glossary
Additional Contacts: These are any other contacts that have been associated to the application, outside
of those with their own field, such as Applicant Contact or Contractor Contact. For example, a Designer
may be added here.
Applicant: The Applicant is the tenant submitting the application / applying for a permit. They have full
edit rights to the application.
Applicant Contact: The Applicant Contact is the main contact for the application. They can be the same
as the Applicant, or they can be an Applicant Team Member. They can edit the application, they just
cannot submit it.
Applicant Team Member: The Applicant Team Member can edit the application. The only thing they
cannot do is submit it. They may be listed as the Applicant Contact to receive notifications and perform
functions against the application.
Applicant Viewer: The Applicant Viewer can only view the application. They are typically executives who
want knowledge and insight into their organization’s applications.
Application: The application is the application for construction or alteration.
Application Administrator: This is the System Administrator. They are able to activate or deactivate
users, add new data, such as buildings, and update system reports and queries, among other functions.
Application Review tab: This tab holds information for the Permit team, such as records of document
acceptance, application return log, and communication log. The Applicant or Applicant Team cannot see
this tab.
Application Submittal tab: This tab holds the actual application. Everyone has access to this tab,
although the Applicant or Applicant Team can only view applications associated to their organization.
Authorized Party: This is the official name of the applicant; it is the business or company.
Buttons: These take action on the application, such as accepting it, returning it, or amending it, to name
a few. They are located at the top right and bottom left of the screen. This is for ease of use, and
whether you choose a button from the top or the bottom, it does the same thing.
C/A: This stand for Construction or Alteration.
CA Permit #: This is the Permit number assigned to the Permit. It will be assigned until the Permit is
issues.
Close-Out tab: This allows the Permits team to check close out guidelines. The Applicant or Applicant
Team cannot see this tab.

WCAA TRIRIGA Role-Based Training Guide 72 | P a g e
Revision: 2; December 1, 2014
Contractor Contact: This is the main contact for the Contractor.
Document Review tab: This tab is where reviews take place. From this tab, comments can be added or
reviews can be marked ‘No Comment’. Reviewers can also be added or removed by the Permits team.
The Applicant or Applicant Team cannot see this tab.
External Contact: Any WCAA tenant, contractor, airline, non-airline (local and corporate), vendor, or
business partner.
Home Page: This is the main page you are brought to upon log in. You can navigate to different
applications or notifications from this page.
Home Link: This is the link in the top left of the Home Page. It refreshes the page. If it’s shown on a
different page, clicking it allows you to return to the Home Page.
Link: Term for a hyperlink that initiates a pop-up form or window used in completing a task.
Notifications: Notifications are sent by the system to both your email and your Notifications section
under Reminders in your Home Page. They contain information, such as an application being received,
accepted, or approved, to name a few.
Official Name of Applicant: The tenant organization applying for a C/A Permit. Also referred to as the
Authorized Party, this may be a corporate entity or official business name.
Primary Contractor: This is the Primary Contractor Company for the application.
Permit Coordinator: The Permit Coordinator is a member of the Permits team. They process
applications.
Permit Manager: The Permit Manager is a member of the Permits team. They process applications.
Permit Inspector: The Permit Inspector may review the application in progress or may perform an
inspection when the application is in a Work In Progress (WIP) status. They can find the application non-
compliant.
Permit Reviewer: The Permit Reviewer reviews the application and related documentation and provides
comments for acceptance.
Permits Team: General term used for workgroup of WCAA individuals involved in the overall permit
process.
Reminders section: The Reminders section is available from the Home Page. It contains Notifications as
well as quick links to the most used types of applications for the logged in role.
Report Letters: Custom reports generated from the Tenant C/A Permit Application form data, formatted
using BIRT Designer, and displayed within the application.

WCAA TRIRIGA Role-Based Training Guide 73 | P a g e
Revision: 2; December 1, 2014
Report Manager: Report Manager is available to the Permit Manager and Permit Coordinator. It allows
different types of system reports and queries to be run. These can then be exported to Excel. The WCAA
Application Administrator can set up different types of queries. These differ from the custom Report
Letters available from the Review Reports tab of an application.
Review Reports tab: The Review Reports tab allows the Permit Manager and Permit Coordinator to run
different types of reports. These can be sent by the system as email attachments.
Status: The Status is the state of the application. Examples are Returned, Under Review, or Accepted. It
tells you where the application is in the process.
Tenant: Any external contact leasing space from the WCAA.
WCAA: WCAA stands for Wayne County Airport Authority, which encompasses Detroit Metropolitan
Wayne County Airport (DTW) and Willow Run Airport (YIP).
WCAA Reference #: This is the number assigned to an application once it is submitted.
Work in Progress tab: This tab allows the Permit Inspector to add comments and perform their process
as needed. The Applicant or Applicant Team cannot see this tab.