troubleshooting in rather than cutting out the fitting and ... zoomlock_faq.pdf · each klauke tool...
TRANSCRIPT

Troubleshooting1. Do you have any troubleshooting suggestions if
a coupling leaks after crimp? A. Verify tubing for scratches, incise marks and dents
prior to tube cutting. Be careful when using a knife to cut off plastic shipping caps on copper tubes.
B. Take time to cut the tubing properly using a tubing cutter. Rushing through the cutting process may cause dents and oval tubing which can create leaks.
C. Verify proper deburring and sanding/cleaning of tube surface per steps 5 to 7.
D. Verify proper tube insertion depth using provided insertion gauge. One gauge is provided with the tool kit or can be ordered separately. Refer to the “minimum insertion depth” table in FAQ section if you do not have a gauge.
E. Verify the proper crimp diameter using the provided crimp gauge.
F. Verify correct jaw is installed for the fitting you are trying to crimp.
G. Try applying a light coating of spray lubricant such as WD-40 directly to the jaws.
H. Let jaw and tool do the work. If the fitting is in a hard to reach place, it is important to let the tool body move freely.
I. Avoid applying any sort of pulling or twisting of the tool during the crimp process.
J. If the fitting was recently crimped (15 – 20 minutes) prior to pressurization, it is possible the bubbles are a result of trapped air in the double crimp area to leak out over time. This is not a joint leak and will leak out over time. This is more likely to occur on smaller fittings.
2. If a fitting does leak, can you braze the fitting in rather than cutting out the fitting and having to make up for lost pipe? If you find a fitting that has a refrigerant leak, try re-crimping the connection first. If that does not work, the fitting must be cut out and replaced. Trying to braze the fitting will very likely melt the o-ring material and thus introduce contaminants into the system that could cause other system issues.
Installation3. What is the #1 cause of leaky fittings?
Skipping the installation instructions 4 to 8 will cause the tube to leak. It is very important to use the scouring pad and deburr tool. Refrigerant gas at the maximum rated 700 psi pressure is more likely to leak than water at a much lower pressure, therefore, following the tube preparation instructions is very important.
4. What is considered a “deep” scratch and what can be done to clean this? A deep scratch is defined as one that can be felt with your fingernail. Try using a new piece of Scotch Brite® abrasive pad or 400 grit sandpaper. Alternatively, 180 grit sandpaper/cloth can be used for 15 - 20 seconds to remove a deep scratch.
FLAME-FREE REFRIGERANT FITTINGS
TROUBLESHOOTING & FREQUENTLY ASKED QUESTIONS
Following tube preparation steps 4 to 8 is important for preventing leaks.
Page 2
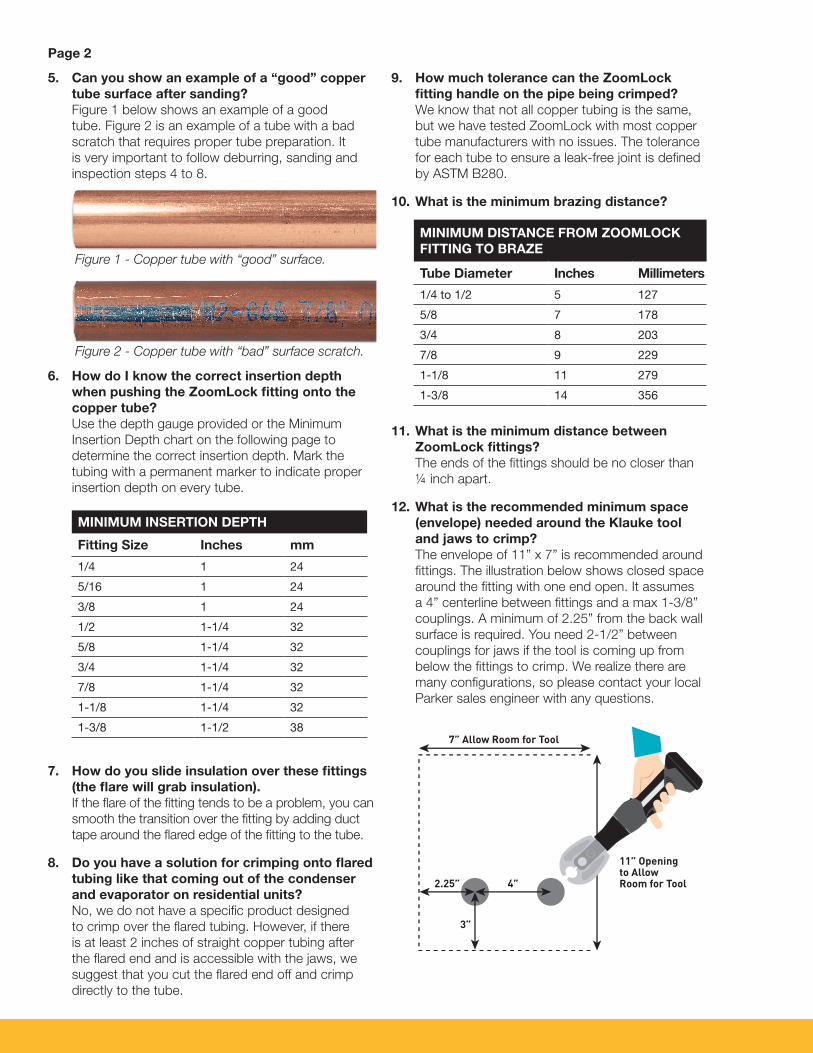
5. Can you show an example of a “good” copper tube surface after sanding? Figure 1 below shows an example of a good tube. Figure 2 is an example of a tube with a bad scratch that requires proper tube preparation. It is very important to follow deburring, sanding and inspection steps 4 to 8.
6. How do I know the correct insertion depth when pushing the ZoomLock fitting onto the copper tube? Use the depth gauge provided or the Minimum Insertion Depth chart on the following page to determine the correct insertion depth. Mark the tubing with a permanent marker to indicate proper insertion depth on every tube.
7. How do you slide insulation over these fittings (the flare will grab insulation). If the flare of the fitting tends to be a problem, you can smooth the transition over the fitting by adding duct tape around the flared edge of the fitting to the tube.
8. Do you have a solution for crimping onto flared tubing like that coming out of the condenser and evaporator on residential units? No, we do not have a specific product designed to crimp over the flared tubing. However, if there is at least 2 inches of straight copper tubing after the flared end and is accessible with the jaws, we suggest that you cut the flared end off and crimp directly to the tube.
9. How much tolerance can the ZoomLock fitting handle on the pipe being crimped? We know that not all copper tubing is the same, but we have tested ZoomLock with most copper tube manufacturers with no issues. The tolerance for each tube to ensure a leak-free joint is defined by ASTM B280.
10. What is the minimum brazing distance?
11. What is the minimum distance between ZoomLock fittings? The ends of the fittings should be no closer than ¼ inch apart.
12. What is the recommended minimum space (envelope) needed around the Klauke tool and jaws to crimp? The envelope of 11” x 7” is recommended around fittings. The illustration below shows closed space around the fitting with one end open. It assumes a 4” centerline between fittings and a max 1-3/8” couplings. A minimum of 2.25” from the back wall surface is required. You need 2-1/2” between couplings for jaws if the tool is coming up from below the fittings to crimp. We realize there are many configurations, so please contact your local Parker sales engineer with any questions.
MINIMUM DISTANCE FROM ZOOMLOCK FITTING TO BRAZE
Tube Diameter Inches Millimeters
1/4 to 1/2 5 127
5/8 7 178
3/4 8 203
7/8 9 229
1-1/8 11 279
1-3/8 14 356
MINIMUM INSERTION DEPTH
Fitting Size Inches mm
1/4 1 24
5/16 1 24
3/8 1 24
1/2 1-1/4 32
5/8 1-1/4 32
3/4 1-1/4 32
7/8 1-1/4 32
1-1/8 1-1/4 32
1-3/8 1-1/2 38
11” Opening to Allow Room for Tool
7” Allow Room for Tool
4”2.25”
3”
Figure 1 - Copper tube with “good” surface.
Figure 2 - Copper tube with “bad” surface scratch.

Crimp Tool 13. Can Zoomlock be crimped in the same location
as Viega ProPress fittings? No. The fittings will leak if you do not crimp per step 11 of the installation instructions. Proper crimping is also illustrated in the photo below.
14. How many crimps can you complete on a complete battery charge? On average you can achieve 100-150 crimps per charge depending on the size fittings being crimped. Each Klauke Tool kit comes with 2 Makita Lithium-ion 2.0 Ah 18V batteries (BL1820B) and a rapid charge charging system. To prevent any downtime, it is recommended that you have both batteries charged before going to the job site and to have one charging while the other is in use.
15. How can I increase the number of crimps and battery life? You can purchase a Makita 3.0 Ah 18 V Li-Ion battery (BL1930). Parker does not sell these, but they can be purchased at your local or online retailers wherever batteries are sold.
16. How do you know when the tool needs to be serviced? The 15 kN (MAP2L) and 19 kN MAP2L19 Klauke tools have red LED lights on the back of the tool that will blink for 20 seconds after a crimp. The 19 kN MAP219 tool has a screen on the tool which indicates the number of remaining crimps. Take the tool back to an authorized dealer to have the tool serviced.
17. What is the expected life of the jaws? Each jaw has an expected life of 10,000 to 12,000 crimps.
Page 3
18. How do you know when the jaw needs to be replaced? You will know when the jaw needs to be replaced when the contact point between the upper and lower jaw starts to open up/widen. A good indication of failure is when the crimp gauge no longer engages. Use the supplied wire brush in tool kit to periodically clean pressing jaws.
19. Where can replacement batteries and chargers be purchased?? The 2.0 Ah 18 V Makita Li-Ion battery (BL1820B) along with the 110V AC charger (DC18RC) can be purchased at your local or online retailers wherever batteries are sold.
Technical20. What material is the o-ring made of?
The o-ring is a highly engineered HNBR Parker o-ring that has been used in HVAC applications by OEMs and suppliers for many years with no issues.
21. What is the expected life of the o-ring in the system? The expected life of the o-ring that stays within the product specifications for temperature and pressure should be 30 years.
22. Does the o-ring compensate for imperfections in the piping to make a tight seal? Yes, the o-ring does compensate for small/minor scratches on the surface of the tube; however, the tubing needs to be inspected prior to use per ASTM B280 and the Copper Tube Handbook published by the Copper Development Association (CDA) specifi-cations. Imperfections in and adjacent to the crimp area could inhibit the joint integrity. These imperfec-tions may include surface scratches, incise marks, and tubing out of round.
23. Are there any shelf life concerns? No, the shelf life of the product is estimated at or above 30 years.
24. Is there a concern about ice building up and then thawing under fitting in a horizontal or vertical configuration? No, ZoomLock has been thoroughly tested in freeze/thaw applications with over 10,000 cycles completed in both vertical and horizontal configurations with no leakage concerns.
HELPING YOUR BUSINESS WIN MORE BUSINESS
P-457 / 82017© 2017 Parker Hannifin Corporation
Parker Hannifin CorporationSporlan Division206 Lange Drive • Washington, MO 63090 USAphone 636 239 1111fax 636 239 9130www.sporlanonline.com/ZoomLock
25. Are there any concerns with corrosion due to coastal applications, cleaning agents, or off-gassing of produce/vegetables? No, ZoomLock has gone through a battery of corrosion testing, completing over 2,000 hours of salt spray testing without failure, which proves the resilience of the product.
26. The product specifications state that the application temperature limits are -40°F to +300°F / -40°C to 150°C. What happens if we go beyond that limit? If the application that the fitting is being used in goes beyond the specified limits of the o-ring (-40°F to +300°F / -40°C to 150°C) then there will be an increased likelihood that a leak can occur.
27. Can I use ZoomLock in a transportation application where fitting vibration is high? Yes, ZoomLock has gone through extensive vibration testing and results are actually better than that of a braze joint. Please review the vibration testing procedure and conclusion for more information.
28. Can you use ZoomLock to crimp to aluminum, steel, or stainless steel? No, ZoomLock is specifically designed for copper to copper connections. Connecting to dissimilar metals can cause formicary corrosion issues that could cause a failure.
Other29. Is ZoomLock approved by state and city building codes?
ZoomLock has been approved by UL-207, ASHRAE 15, International Code Council – Evaluation Service (ICC-ES), International Mechanical Code (IMC), Universal Mechanical Code (UMC), and International Residential Code (IRC). These approvals are all that is needed in most areas. Please contact your local building inspector with questions prior to install.