tsr autobrake - · tsr autobrake aerosoft gmbh 2008 6 with this additional program, what will be...
TRANSCRIPT
TSR Autobrake
Aerosoft
Manual
TSR Autobrake
Aerosoft GmbH 20082
Copyright: © 2008 / Aerosoft GmbH Airport Paderborn/Lippstadt D-33142 Bueren, Germany
Tel: +49 (0) 29 55 / 76 03-10 Fax: +49 (0) 29 55 / 76 03-33
E-Mail: [email protected] Internet: www.aerosoft.de www.aerosoft.com
All trademarks and brand names are trademarks or registered trademarks of their respective owners. All rights reserved.
3
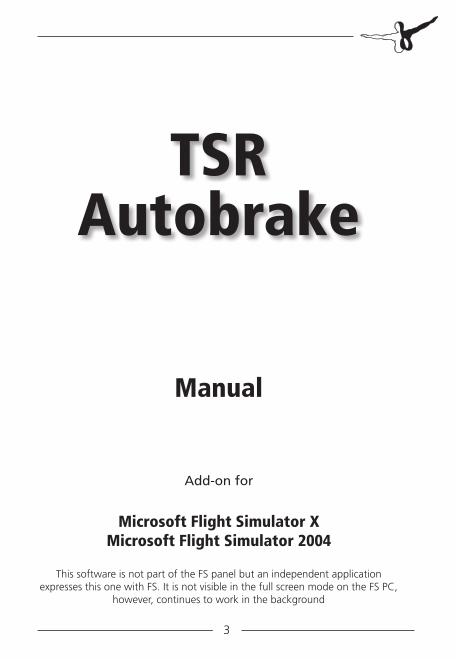
TSR Autobrake
Add-on for
Microsoft Flight Simulator XMicrosoft Flight Simulator 2004
Manual
This software is not part of the FS panel but an independent application expresses this one with FS. It is not visible in the full screen mode on the FS PC,
however, continues to work in the background
TSR Autobrake
Aerosoft GmbH 20084
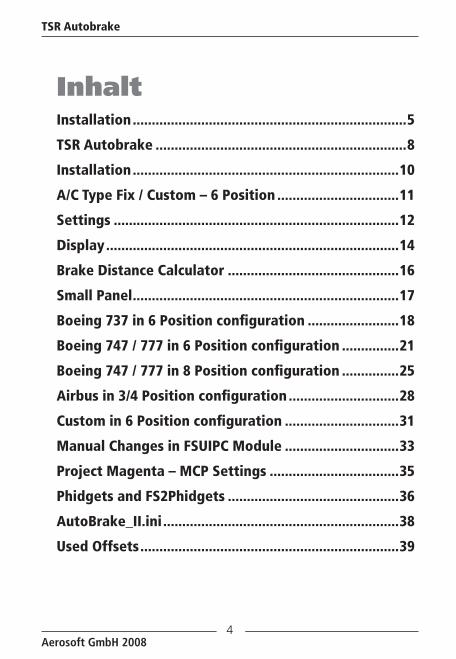
InhaltInstallation ........................................................................5
TSR Autobrake ..................................................................8
Installation ......................................................................10
A/C Type Fix / Custom – 6 Position ................................11
Settings ...........................................................................12
Display .............................................................................14
Brake Distance Calculator .............................................16
Small Panel ......................................................................17
Boeing 737 in 6 Position configuration ........................18
Boeing 747 / 777 in 6 Position configuration ...............21
Boeing 747 / 777 in 8 Position configuration ...............25
Airbus in 3/4 Position configuration .............................28
Custom in 6 Position configuration ..............................31
Manual Changes in FSUIPC Module ..............................33
Project Magenta – MCP Settings ..................................35
Phidgets and FS2Phidgets .............................................36
AutoBrake_II.ini ..............................................................38
Used Offsets ....................................................................39
5
InstallationPlease make sure after installation .Net framework 2.0 (or high-1. er) is installed on that PC.
This free Windows component (Windows update) should not be installed you will get this error message following at start of the TSR AutoBrake:
The Application failed to initialize Properly (Oxc0000135)
In this case go to Microsoft Update to update your Windows.
From program version 2.0.4.107 on wrong or incomplete INI 2. file settings are corrected by automatic or a new INI file will be prepared.
Also from this version on the needed INI files will be saved in a new subfolder Config.
An existing INI file from an earlier version in program main folder will be moved to this new subfolder and corrected if needed.
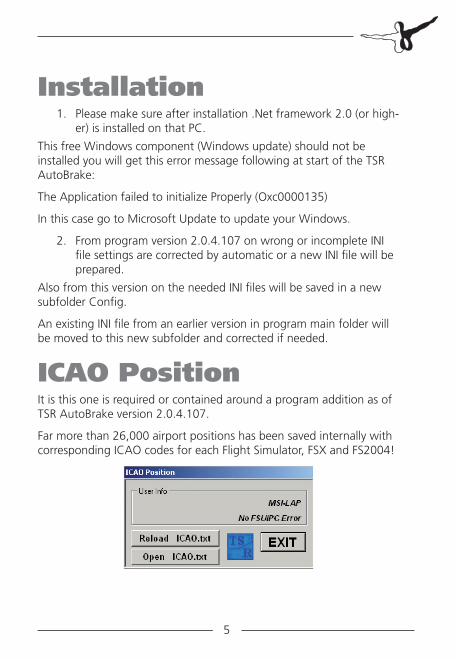
ICAO PositionIt is this one is required or contained around a program addition as of TSR AutoBrake version 2.0.4.107.
Far more than 26,000 airport positions has been saved internally with corresponding ICAO codes for each Flight Simulator, FSX and FS2004!
TSR Autobrake
Aerosoft GmbH 20086
With this additional program, what will be opened and closed by TSR AutoBrake program automatically you can for your needed airports define for its corresponding landing directions RWY conditions.
Conditions means here that the braking acceleration counted in TSR AutoBrake will be in addition increased or decreased up to 40%.
There can be e.g. RWY’s with slope or downward slope (like Lukla) or just good or bad surface simulated, they are actually not available in FS.
After opening the ICAO.txt file by clicking on Open ICAO.txt by following the exact syntax values are inserted or changed.
[ICAO],[direction],[factor]
factor 00/10=norm, 01-09=bad/sloped negative, 11-20=good/sloped
ICAO = the ICAO of airports, e.g. VNLK for Lukla. For installed Lukla Scenery from Aerosoft use also the default ICAO VNLK.
Direction = landing direction, for Lukla e.g. for runway 06 we write 06 for 60 deg. Or for landing direction 180 deg the value 18 is written.
Factor = slope / downward slope / good surface / bad surface, for Lukla e.g. for landing direction 06 what is a extreme slope we defined the value 15.
Applies to Factor:
The value of 10 or 00 is the normal value what is NOT to define because it is used automatic when nothing is defined.
Values of 01 to 09 define a downward slope or a bad surface that prolong the braking distance.
01 is staying for the worst value.
Values of 11 to 20 define a slope or a good surface that shorten the braking distance.
20 is staying for the best value.
7
Example Lukla – VNLK:
VNLK,06,15VNLK,24,04
In this case in the base file we used for landing direction 06 (60 deg) the value of 15 for factor to define a slope and for direction 24 (240 deg) the value 04 to define a downward slope.
The direction 24 (240 deg) is in this case of Lukla not a landing direction but it will be as well used for e.g. a takeoff abort to calculate the braking distance, as long the direction is defined but not needed to define.
For the definition the EXACT SYNTAX is needed to use and all directions for a airport with the same ICAO has to be in the same block.
There is no need for an alphabetical or direction order, so you can write e.g.:
EDLW,24,12EDLW,06,12EDDL,05,12EDDL,23,08EDDL,26,08EDDS,07,11EDDS,25,11
After changes has benn done and the file has been saved you can reload the file to update while FS and TSR AutoBrake is running just by clicking on Reload ICAO.txt button.
NoteOn Windows XP 32 and Vista 32 systems anything works well and loads in some seconds.
On a Vista 64 test system with AMD processor the ICAO Position program needs up to 5 minutes to read and organize the over 26,000 airport positions. May be this behavior depends on a unfavorable combination of hardware and Vista 64 on this test PC, should however mentioned here.

TSR Autobrake
Aerosoft GmbH 20088
TSR AutobrakeThe Autobrake system controls the deceleration in dependence of different conditions during the braking phase. The braking phase itself starts at touchdown of the A/C. An important factor is the weather condition and the RWY state such as rain or snow, which will extremely prolong the braking distance. But its not only the braking distance which is important for a realistic landing simulation, it´s also the “feel” of a slippery RWY which which has to come over.
Up to now this important system has not been given enough attention and hasn´t been realized anywhere near to reality. This missing system has now been the center of our attention and we´ve developed an action as realistically as possible.
“What goes up, must come down“ is not enough for our standard.
Autobrake contains:
6 Position Autobrake System for Boeing 737 •RTO / OFF / AB-1 / AB-2 / AB-3 / AB-MAX
6 Position Autobrake System for Boeing 777 / 747 •RTO / OFF / AB-1 / AB-2 / AB-3 / AB-MAX
8 Position Autobrake System for Boeing 777 / 747 •RTO / OFF / DISARM / AB-1 / AB-2 / AB-3 / AB-4 / AB-MAX
3/4 Position Autobrake System for Airbus •OFF / LOW / MED / MAX
6 Position Autobrake System for 4 Custom defined A/C’s •RTO / OFF / AB-1 / AB-2 / AB-3 / AB-MAX (RTO already at 40 kts active, therefore for every A/C type useable as a Piper J3 up to … )
Brake distance varies depending on weather factor (rain, snow •and its heaviness).
Slippery RWY (depending on weather conditions) can lead to •skidding of the A/C.
9
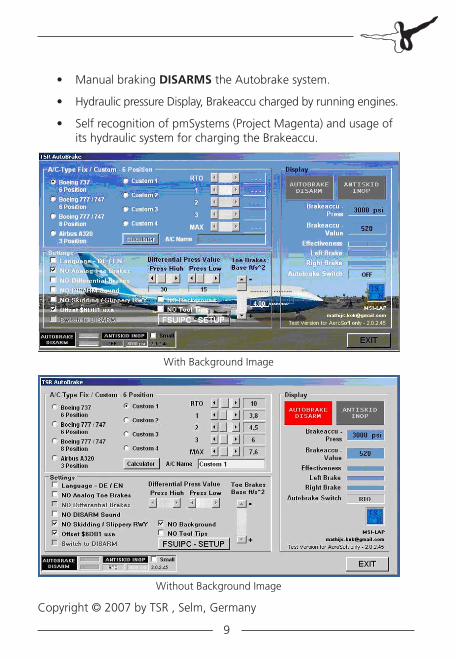
Manual braking • DISARMS the Autobrake system.
Hydraulic pressure Display, Brakeaccu charged by running engines.•
Self recognition of pmSystems (Project Magenta) and usage of •its hydraulic system for charging the Brakeaccu.
With Background Image
Without Background Image
Copyright © 2007 by TSR , Selm, Germany
TSR Autobrake
Aerosoft GmbH 200810
InstallationYou have to be logged in with administrator rights before you start the installation of “TSR Autobrake”.
After you have chosen your prefered installation language, the welcome screen appears and you will be presented with some important information and the license agreement. Please read it carefully.
You will be asked to insert your email adress and the product key. Please insert them exactlly the way there were written in the confirmation mail you received of our online shop.
The installation program will attempt to locate the correct path of Microsoft Flight Simulator. If this path cannot be successfully located, or if you wish to install to another location, then you will have to enter the correct path for installation manually. In order to do this, click on “Browse“ and navigate to the correct path. Before the installation-program starts to copy the files onto your hard disc, you will be presented with all the installation details.
The installation program will now copy all of the “TSR Autobrake” files onto your hard disc and subsequently register the tool in the tool library. A backup copy of the original Tool.cfg will also be made. The necessary adjustments for the AI Traffic in Microsoft Flight Simulator will be automatically carried out by the installation program.
Removing “TSR Autobrake“In order to fully remove “TSR Autobrake” click on the “Start” Button in the Windows task bar, choose “Settings” and then “Control Panel”. Here you will see an icon named “Add and Remove programs”. Double click on this icon to open it and you will see a list of all installed programs. Locate “aerosoft’s - TSR Autobrake“, click once with the left mouse button and then click on the “add-remove”-button.
The deinstallation program will now begin to remove the tool “TSR Autobrake“- files from your hard disc.
Entries in the FS scenery library will also be removed.
11
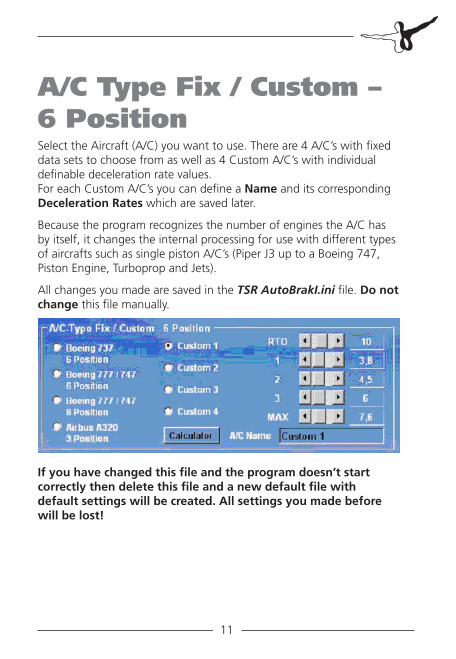
A/C Type Fix / Custom – 6 PositionSelect the Aircraft (A/C) you want to use. There are 4 A/C’s with fixed data sets to choose from as well as 4 Custom A/C’s with individual definable deceleration rate values. For each Custom A/C’s you can define a Name and its corresponding Deceleration Rates which are saved later.
Because the program recognizes the number of engines the A/C has by itself, it changes the internal processing for use with different types of aircrafts such as single piston A/C’s (Piper J3 up to a Boeing 747, Piston Engine, Turboprop and Jets).
All changes you made are saved in the TSR AutoBrakI.ini file. Do not change this file manually.
If you have changed this file and the program doesn’t start correctly then delete this file and a new default file with default settings will be created. All settings you made before will be lost!
TSR Autobrake
Aerosoft GmbH 200812
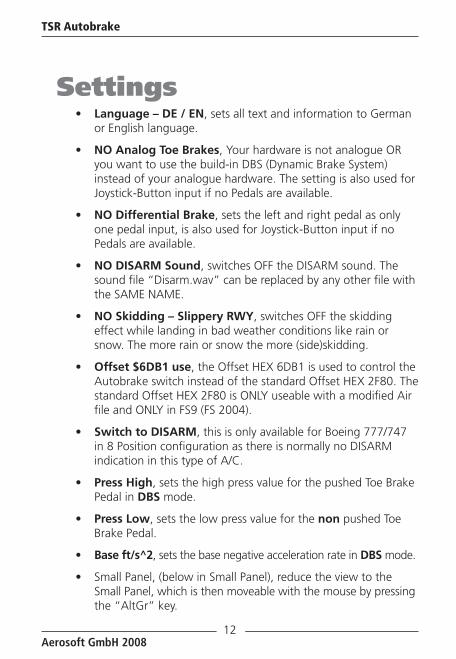
SettingsLanguage – DE / EN• , sets all text and information to German or English language.
NO Analog Toe Brakes• , Your hardware is not analogue OR you want to use the build-in DBS (Dynamic Brake System) instead of your analogue hardware. The setting is also used for Joystick-Button input if no Pedals are available.
NO Differential Brake• , sets the left and right pedal as only one pedal input, is also used for Joystick-Button input if no Pedals are available.
NO DISARM Sound• , switches OFF the DISARM sound. The sound file “Disarm.wav” can be replaced by any other file with the SAME NAME.
NO Skidding – Slippery RWY• , switches OFF the skidding effect while landing in bad weather conditions like rain or snow. The more rain or snow the more (side)skidding.
Offset $6DB1 use• , the Offset HEX 6DB1 is used to control the Autobrake switch instead of the standard Offset HEX 2F80. The standard Offset HEX 2F80 is ONLY useable with a modified Air file and ONLY in FS9 (FS 2004).
Switch to DISARM• , this is only available for Boeing 777/747 in 8 Position configuration as there is normally no DISARM indication in this type of A/C.
Press High• , sets the high press value for the pushed Toe Brake Pedal in DBS mode.
Press Low• , sets the low press value for the non pushed Toe Brake Pedal.
Base ft/s^2• , sets the base negative acceleration rate in DBS mode.
Small Panel, (below in Small Panel), reduce the view to the •Small Panel, which is then moveable with the mouse by pressing the “AltGr” key.
13
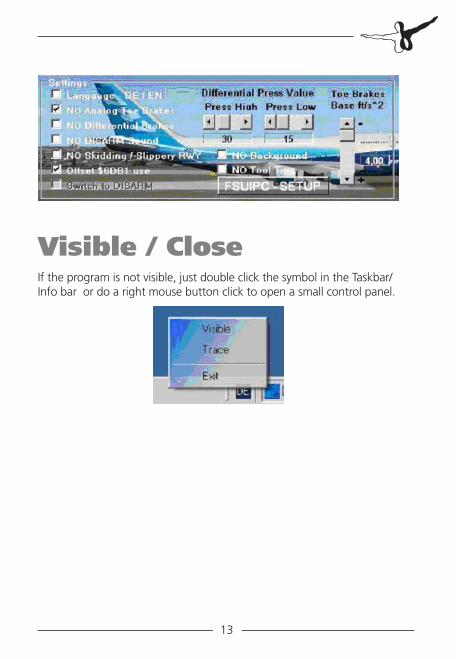
Visible / CloseIf the program is not visible, just double click the symbol in the Taskbar/Info bar or do a right mouse button click to open a small control panel.

TSR Autobrake
Aerosoft GmbH 200814
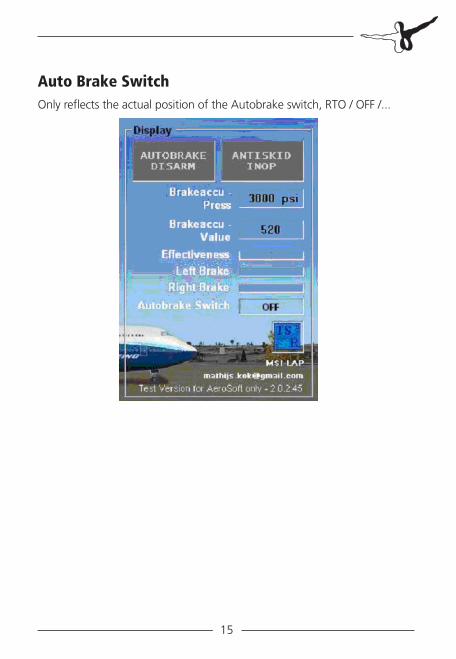
DisplayAUTOBRAKE DISARM / ANTISKID INOP
AUTOBRAKE DISARM• light > corresponding Offset is HEX 6DC0, Bit0
ANTISKID INOP• light > corresponding Offset is HEX 6DC0, Bit1
Brakeaccu Press / ValueThe Brakeaccu value 0-520 reflects the actual value of the pressure 0-3000psi. The value is readable in Offset HEX 579E, 2 Byte lengths, very useful for gauges like the Brake Press Gauge from Flight Illusion or others. The displays are NOT static because they will change on each braking phase. The charging of Brakeaccu is done by running the engine or by pmSystems by Project Magenta and its hydraulic pressure values (pmSystems is self recognized).
EffectivenessIt displays the ratio of debit and actually deceleration. The ratio is dependent of factors like RWY surface. weather...
Left Brake / Right BrakeShows the actual brake pressure.
15
Auto Brake SwitchOnly reflects the actual position of the Autobrake switch, RTO / OFF /...
TSR Autobrake
Aerosoft GmbH 200816
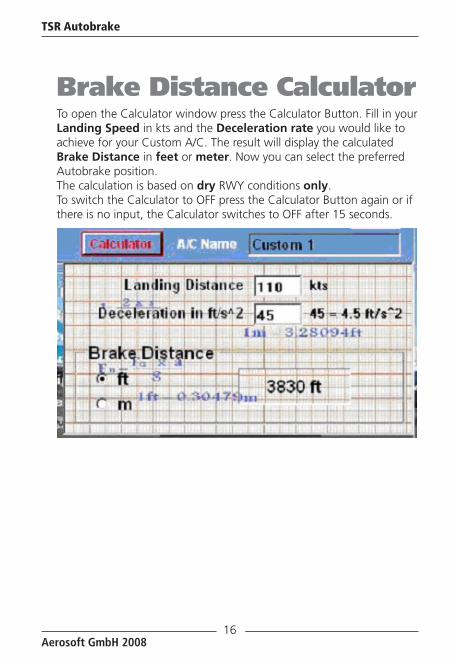
Brake Distance CalculatorTo open the Calculator window press the Calculator Button. Fill in your Landing Speed in kts and the Deceleration rate you would like to achieve for your Custom A/C. The result will display the calculated Brake Distance in feet or meter. Now you can select the preferred Autobrake position. The calculation is based on dry RWY conditions only. To switch the Calculator to OFF press the Calculator Button again or if there is no input, the Calculator switches to OFF after 15 seconds.
17
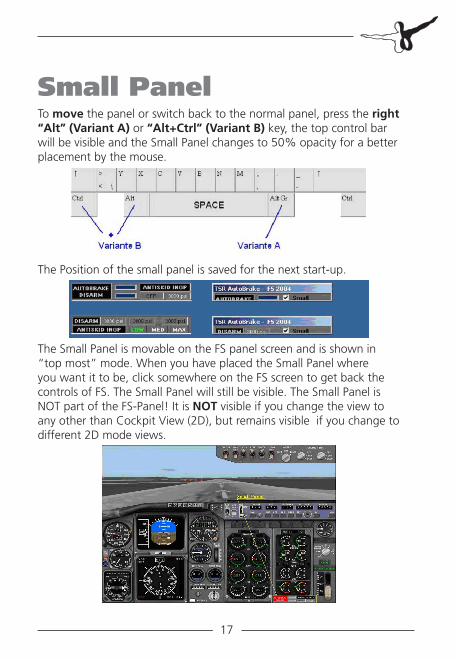
Small PanelTo move the panel or switch back to the normal panel, press the right “Alt” (Variant A) or “Alt+Ctrl” (Variant B) key, the top control bar will be visible and the Small Panel changes to 50% opacity for a better placement by the mouse.
The Position of the small panel is saved for the next start-up.
The Small Panel is movable on the FS panel screen and is shown in “top most” mode. When you have placed the Small Panel where you want it to be, click somewhere on the FS screen to get back the controls of FS. The Small Panel will still be visible. The Small Panel is NOT part of the FS-Panel! It is NOT visible if you change the view to any other than Cockpit View (2D), but remains visible if you change to different 2D mode views.
TSR Autobrake
Aerosoft GmbH 200818
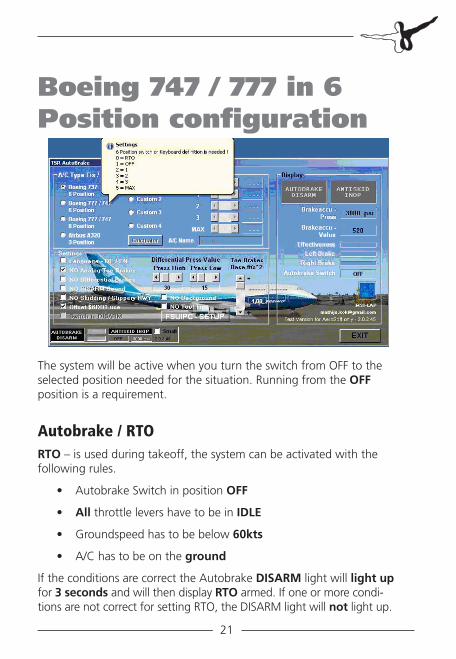
Boeing 737 in 6 Position configuration
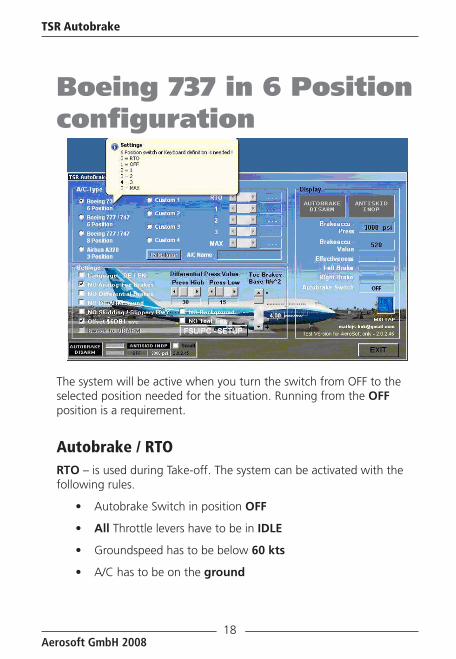
The system will be active when you turn the switch from OFF to the selected position needed for the situation. Running from the OFF position is a requirement.
Autobrake / RTORTO – is used during Take-off. The system can be activated with the following rules.
Autobrake Switch in position • OFF
All• Throttle levers have to be in IDLE
Groundspeed has to be below • 60 kts
A/C has to be on the • ground
19
If the conditions are correct the Autobrake DISARM light will light up for 3 seconds and will then display RTO armed. If one or more conditions are not correct for setting RTO, the DISARM light will not light up.
If the RTO is armed during takeoff and all throttle levers are pulled back to IDLE above 90kts, the Autobrake system will use the maximum decided negative Acceleration rate to brake the A/C. To stop the automatic braking use the manual brake (Joystick or Toe Brakes) or just move the throttle forward. The Autobrake DISARMS immediately and you will here a disarm sound (if not disabled).
If you land with Autobrake in position RTO the DISARM light will light as soon as you touch down because autobraking in this position is not possible.
Autobrake 1- MAXAutobrake 1 - MAX – is used during Landing, the system can be activated with the following rules.
Autobrake Switch in position • OFF.
The A/C has been airborne.•
Select the Autobrake position needed for your situation and •condition.
The Autobrake is active as soon as you touch down.•
The Autobrake position can be changed while the system is active and working as long as the A/C’s groundspeed is above 60kts.
The following conditions will DISARM the Autobrake system:
If you don’t move the throttle levers back to • IDLE or Retard within 3 seconds after touchdown.
The system is also disarmed if the • Speed brakes have been deployed and retracted.
The manual brake is used (Joystick or Toe Brakes)•
One or more throttle levers are moved forward.•
TSR Autobrake
Aerosoft GmbH 200820
The Brakeaccu is charged by pmSystems or by the FS-Engine 2 (setting). Each braking phase decreases the Brakeaccu so that the Hydraulic source has to charge the system up to the source pressure. The used Offset for this is 579E, 2 Byte length, were the Brakeaccu Value (0 – 520) reflects the Brakeaccu Press (0 – 3000) in psi. So it is very easy to set up e.g. the Brakeaccu Gauge from Flight Illusion to display the actual Brakeaccu Pressure.
Autobrake system with 6 Position configuration – RTO / OFF / 1 / 2 / 3 / MAX
Boeing 737- 600/ - 700/ •
Boeing 737- 800/ - 900•
The used values for Offset 2F80 (normal FS9 Offset) or for Offset 6DB1 (if selected) are:
0 = RTO•
1 = OFF•
2 = Autobrake 1•
3 = Autobrake 2•
4 = Autobrake 3•
5 = Autobrake MAX•
If you like to use the normal FS9 Offset it is necessary to change your ???.air file from the Aircraft folder you’re A/C you want to use. E.g. for the default B737-400, Your FS9 Folder\Aircraft\b737_400\boeing737-400.air. To change this file please send only this file to our Support address. You will be sent back the changed file as fast a s possible.
21
Boeing 747 / 777 in 6 Position configuration
The system will be active when you turn the switch from OFF to the selected position needed for the situation. Running from the OFF position is a requirement.
Autobrake / RTORTO – is used during takeoff, the system can be activated with the following rules.
Autobrake Switch in position • OFF
All• throttle levers have to be in IDLE
Groundspeed has to be below • 60kts
A/C has to be on the • ground
If the conditions are correct the Autobrake DISARM light will light up for 3 seconds and will then display RTO armed. If one or more condi-tions are not correct for setting RTO, the DISARM light will not light up.
TSR Autobrake
Aerosoft GmbH 200822
If the RTO is armed during takeoff and all throttle levers are pulled back to IDLE above 85kts, the Autobrake system will use the maximum decided negative Acceleration rate to brake the A/C. To stop the automatic braking use the manual brake (Joystick or Toe Brakes) or just move the throttle forward. The Autobrake DISARMS immediately and you will here a disarm sound (if not disabled).
If you land with Autobrake in position RTO the DISARM light will light as soon as you touch down because autobraking in this position is not possible.
Autobrake 1- MAXAutobrake 1 - MAX – is used while Landing, the system can be activated with the following rules.
Autobrake Switch in position • OFF
The A/C has been airborne•
Select the Autobrake position needed for your situation and •condition
The Autobrake is active as soon as you touch down•
The Autobrake position can be changed while the system is active and working as long as the A/C’s groundspeed is above 60kts.
The following conditions will DISARM the Autobrake system:
If you don’t move the throttle levers back to • IDLE or Retard within 3 seconds after touchdown
The system is also disarmed if the • Speed brakes have been deployed and retracted
The manual brake is used (Joystick or Toe Brakes)•
One or more throttle levers are moved forward•
23
The Brakeaccu is charged by pmSystems or by FS-Engine 2 (setting). Each braking phase decreases the Brakeaccu so that the Hydraulic source has to charge the system up to the source pressure. The used Offset for this is 579E, 2 Byte length, were the Brakeaccu Value (0 – 520) reflects the Brakeaccu Press (0 – 3000) in psi. So it is very easy to set up e.g. the Brakeaccu Gauge from Flight Illusion to display the actual Brakeaccu Pressure.
Autobrake system with 6 Position configuration – RTO / OFF / 1 / 2 / 3 / MAX
Boeing 747•
Boeing 767 / 777•
This is the special Autobrake system for the Boeing 747.
The used values for Offset 2F80 (normal FS9 Offset) or for Offset 6DB1 (if selected) are:
0 = RTO•
1 = OFF•
2 = Autobrake 1•
3 = Autobrake 2•
4 = Autobrake 3•
5 = Autobrake MAX•
If you want to use the normal FS9 Offset it is neccessary to change your ???.air file from the Aircraft folder of the A/C you would want to use use. E.g. for the default B747-400, Your FS9 Folder\Aircraft\b737_400\boeing747-400.air. To change this file please send only this file to our Support address. You will be sent back the changed file as soon as possible.
TSR Autobrake
Aerosoft GmbH 200824
25
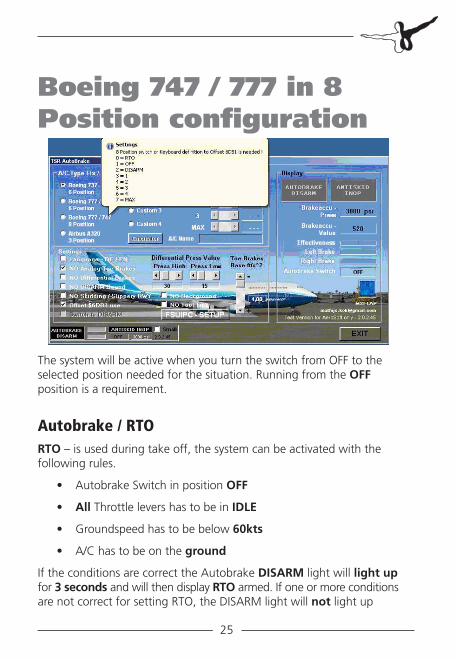
Boeing 747 / 777 in 8 Position configuration
The system will be active when you turn the switch from OFF to the selected position needed for the situation. Running from the OFF position is a requirement.
Autobrake / RTORTO – is used during take off, the system can be activated with the following rules.
Autobrake Switch in position • OFF
All• Throttle levers has to be in IDLE
Groundspeed has to be below • 60kts
A/C has to be on the • ground
If the conditions are correct the Autobrake DISARM light will light up for 3 seconds and will then display RTO armed. If one or more conditions are not correct for setting RTO, the DISARM light will not light up
TSR Autobrake
Aerosoft GmbH 200826
If the RTO is armed during takeoff and all throttle levers are pulled back to IDLE above 85kts, the Autobrake system will use the maximum decided negative Acceleration rate to brake the A/C. To stop the automatic braking use the manual brake (Joystick or Toe Brakes) or just move the throttle forward. The Autobrake DISARMS immediately and you will here a disarm sound (if not disabled).
If you land with Autobrake in position RTO the DISARM light will light as soon as you touch down because autobraking in this position is not possible.
Autobrake 1- MAXAutobrake 1 - MAX – is used during landing, the system can be activated with the following rules.
Autobrake Switch in position • OFF
The A/C has been airborne•
Select the Autobrake position needed for your situation and •condition
The Autobrake is active as soon as you touch down•
The Autobrake position can be changed while the system is active and working as long as the A/C’s groundspeed is above 60kts.
The following conditions will DISARM the Autobrake system:
If you don’t move the throttle levers back to • IDLE or Retard within 3 seconds after touchdown
The system is also disarmed if the • Speed brakes have been deployed and retracted
The manual brake is used (Joystick or Toe Brakes)•
One or more throttle levers are moved forward•
27
The Brakeaccu is charged by pmSystems or by FS-Engine 2 (setting). Each braking phase decreases the Brakeaccu so that the Hydraulic source has to charge the system up to the source pressure. The used Offset for this is 579E, 2 Byte length, were the Brakeaccu Value (0 – 520) reflects the Brakeaccu Press (0 – 3000) in psi. So it is very easy to set up e.g. the Brakeaccu Gauge from Flight Illusion to display the actual Brakeaccu Pressure.
Autobrake system with 8 Position configuration – RTO / OFF / DISARM / 1 / 2 / 3 / 4 MAX
Boeing 747•
Boeing 767 / 777•
This is the special Autobrake system for the Boeing 747. Instead of the DISARM lights the Autobrake Switch jumps to position DISARM when the Autobrake is disarmed.
This Modus works with Offset $6DB1 only!
The used values for Offset 6DB1 are:
0 = RTO•
1 = OFF•
2 = DISARM•
3 = AB1•
4 = AB2•
5 = AB3•
6 = AB4•
7 = MAX•
If you want to use the normal FS9 Offset it is neccessary to change your ???.air file from the Aircraft folder of the A/C you would want to use use. E.g. for the default B747-400, Your FS9 Folder\Aircraft\b737_400\boeing747-400.air. To change this file please send only this file to our Support address. You will be sent back the changed file as soon as possible.
TSR Autobrake
Aerosoft GmbH 200828
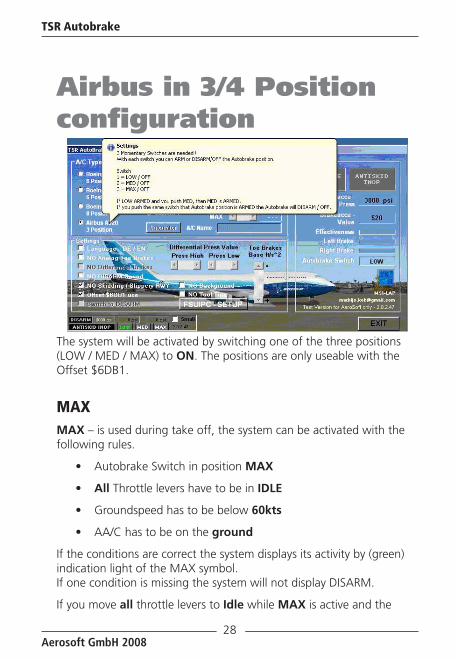
Airbus in 3/4 Position configuration
The system will be activated by switching one of the three positions (LOW / MED / MAX) to ON. The positions are only useable with the Offset $6DB1.
MAXMAX – is used during take off, the system can be activated with the following rules.
Autobrake Switch in position • MAX
All• Throttle levers have to be in IDLE
Groundspeed has to be below • 60kts
AA/C has to be on the • ground
If the conditions are correct the system displays its activity by (green) indication light of the MAX symbol. If one condition is missing the system will not display DISARM.
If you move all throttle levers to Idle while MAX is active and the
29
groundspeed is above 72 kts, the system will brake with full pressure down to zero speed. To disarm the system you need to switch OFF the system by pressing the MAX switch again or by using the manual brakes (Joystick or Pedals) to get a DISARM. If you use the manual brakes the DISARM indication will light and you will hear a disarm sound (if not set to inactive).
If MAX is active during landing you will get a DISARM indication and sound as soon as you touchdown the system is deactivated.
LOW / MEDLOW / MED – is used during landing, the system can be activated with the following rules.
Autobrake Switch in position • OFF
The A/C has been airborne•
Select the neccessary Autobrake position, • MAX or MED
The Autobrake is active as soon as you touch down•
The Autobrake position is changeable while the system is active and working as long as the A/C’s groundspeed is above 60kts.
The following conditions will DISARM the Autobrake system:
If you don’t move the throttle levers back to • IDLE or Retard within 3 seconds after touchdown
The system is also disarmed if the • Speed brakes have been deployed and retracted
The manual brake is used (Joystick or Toe Brakes)•
One or more throttle levers move forward•
TSR Autobrake
Aerosoft GmbH 200830
The Brakeaccu is charged by pmSystems or by FS-Engine 2 (setting). Each braking phase decreases the Brakeaccu so that the Hydraulic source has to charge the system up to the source pressure. The used Offset for this is 579E, 2 Byte length, were the Brakeaccu Value (0 – 520) reflects the Brakeaccu Press (0 – 3000) in psi. Actually it is very easy to set up e.g. the Brakeaccu Gauge from Flight Illusion to display the actual Brakeaccu Pressure.
This Modus works with Offset $6DB1 only!
The used values for Offset 6DB1 are:
1 = LOW•
2 = MED•
3 = MAX•
After each setting to a value > 0 (1, 2, 3) the Offset will be set back to zero (0) by the program, this is needed to ensure you can switch the function ON and OFF in different states, e.g. from ON to OFF and vice versa.
31
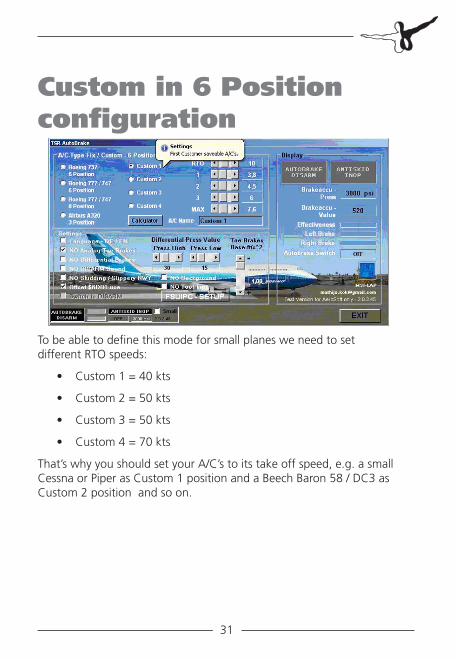
Custom in 6 Position configuration
To be able to define this mode for small planes we need to set different RTO speeds:
Custom 1 = 40 kts•
Custom 2 = 50 kts•
Custom 3 = 50 kts•
Custom 4 = 70 kts•
That’s why you should set your A/C’s to its take off speed, e.g. a small Cessna or Piper as Custom 1 position and a Beech Baron 58 / DC3 as Custom 2 position and so on.
TSR Autobrake
Aerosoft GmbH 200832
Aircraft Names for Custom 1… Custom 4The Aircraft name you like to use for Custom1… Custom 4 will be saved and shown beside the radio button.
Aircraft Deceleration Values for Custom 1… Custom 4The different deceleration values for RTO / 1 / 2 / 3 / MAX are saved separately for each aircraft so you can use for different aircraft with their own deceleration values.
Deceleration RateTo define YOUR deceleration rate you can use the Calculator (page 8) where you enter a landing speed and a landing distance to find out the needed deceleration rate. Now you can select the Autobrake Position which you want to use for this value.

33
Manual Changes in FSUIPC ModuleAutobrake Switcha) Using the FS-Panel Autobrake Switch
The FS-Panel Autobrake Switch is only usable in FS9 (FS2004), but it is neccessary to send your Aircraft .air file to Support to modify it, e.g. boeing737-400.air for the default 737-400. The FS Offset for this switch is HEX 2F80, 1 Byte length.
b) Using the Offset 6DB1
The Offset for the Autobrake Switch is HEX 6DB1, 1 Byte length. To set up this Offset for e.g. Keyboard use (CTRG+NUM keys) follow the example below. Make sure you use keys, they are NOT used in FS because FSUIPC will ignore them.
To set up all positions you need to define:
6 keys for Boeing / Custom A/C’s (values 0-5) in 6-Position mode•
8 keys for Boeing (values 0-7) in 8-Position mode•
3 keys for Airbus (values 1-3)•
It does NOT mean that you have to define all keys separately, you can of course use them for all modes!
TSR Autobrake
Aerosoft GmbH 200834
E.g. you have defined 6 keys (values 0, 1, 2, 3, 4, 5) then the values are for:
Boeing / Custom A/C’s• 0 = RTO 1 = OFF 2 = Autobrake 1 3 = Autobrake 2 4 = Autobrake 3 5 = Autobrake MAX
Boeing 747 / 777• 0 = RTO 1 = OFF 2 = DISARM 3 = Autobrake 1 4 = Autobrake 2 5 = Autobrake 3 6 = Autobrake 4 7 = Autobrake MAX
Airbus• 1 = LOW (ON / OFF) 2 = MED (ON / OFF) 3 = MAX (ON / OFF)
35
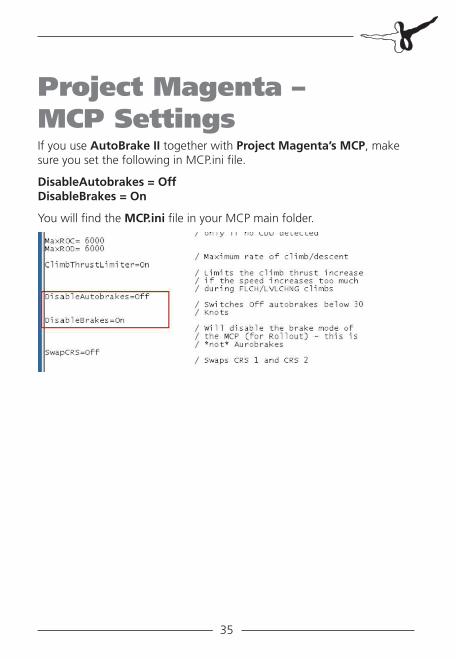
Project Magenta – MCP SettingsIf you use AutoBrake II together with Project Magenta’s MCP, make sure you set the following in MCP.ini file.
DisableAutobrakes = Off DisableBrakes = On
You will find the MCP.ini file in your MCP main folder.
TSR Autobrake
Aerosoft GmbH 200836
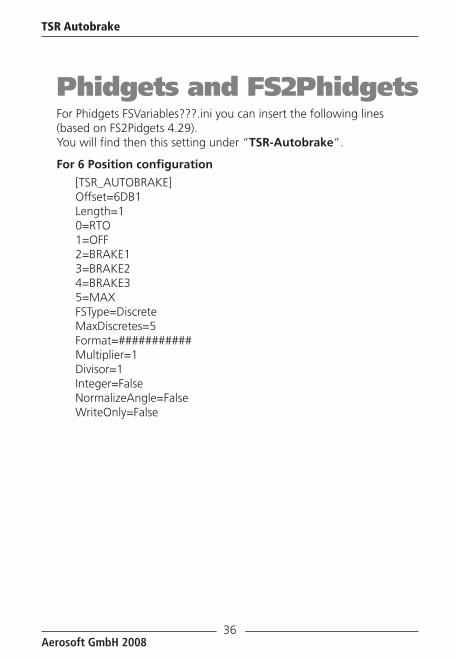
Phidgets and FS2PhidgetsFor Phidgets FSVariables???.ini you can insert the following lines (based on FS2Pidgets 4.29). You will find then this setting under “TSR-Autobrake”.
For 6 Position configuration
[TSR_AUTOBRAKE] Offset=6DB1 Length=1 0=RTO 1=OFF 2=BRAKE1 3=BRAKE2 4=BRAKE3 5=MAX FSType=Discrete MaxDiscretes=5 Format=########### Multiplier=1 Divisor=1 Integer=False NormalizeAngle=False WriteOnly=False
37
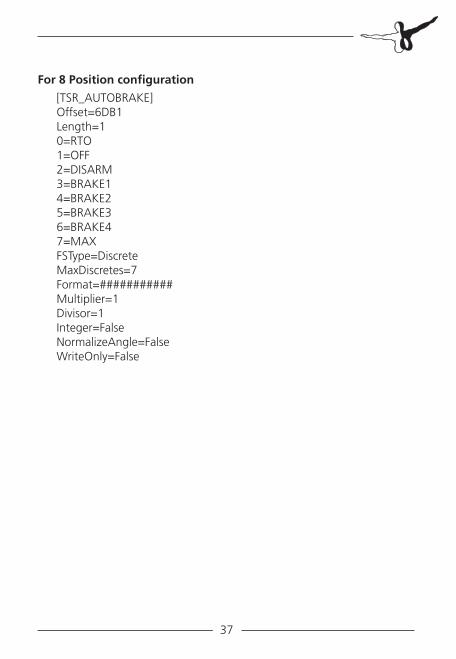
For 8 Position configuration
[TSR_AUTOBRAKE] Offset=6DB1 Length=1 0=RTO 1=OFF 2=DISARM 3=BRAKE1 4=BRAKE2 5=BRAKE3 6=BRAKE4 7=MAX FSType=Discrete MaxDiscretes=7 Format=########### Multiplier=1 Divisor=1 Integer=False NormalizeAngle=False WriteOnly=False
TSR Autobrake
Aerosoft GmbH 200838
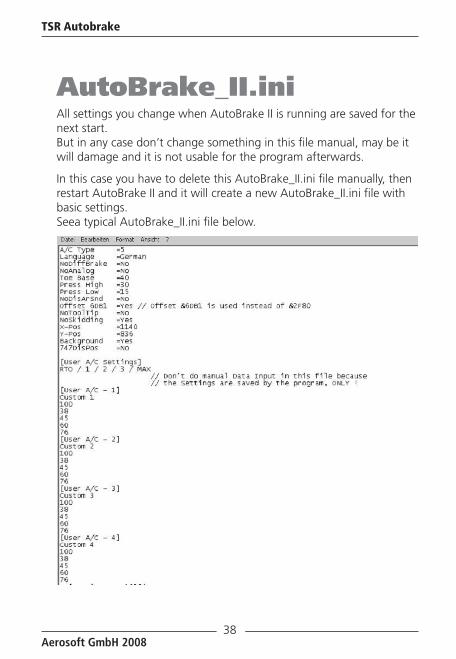
AutoBrake_II.iniAll settings you change when AutoBrake II is running are saved for the next start. But in any case don’t change something in this file manual, may be it will damage and it is not usable for the program afterwards.
In this case you have to delete this AutoBrake_II.ini file manually, then restart AutoBrake II and it will create a new AutoBrake_II.ini file with basic settings. Seea typical AutoBrake_II.ini file below.
39
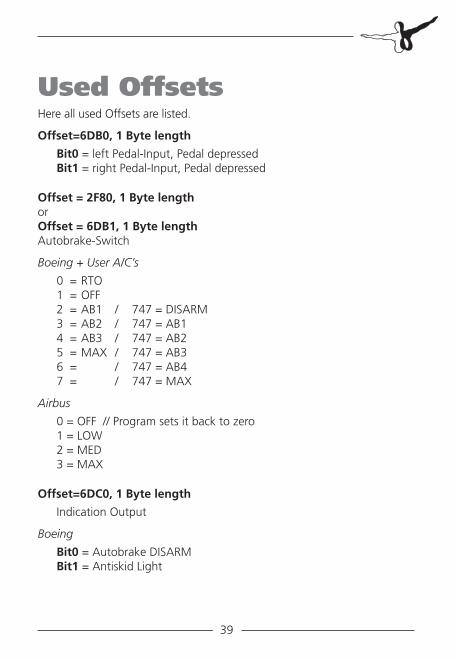
Used OffsetsHere all used Offsets are listed.
Offset=6DB0, 1 Byte length
Bit0 = left Pedal-Input, Pedal depressed Bit1 = right Pedal-Input, Pedal depressed
Offset = 2F80, 1 Byte length or Offset = 6DB1, 1 Byte length Autobrake-Switch
Boeing + User A/C’s
0 = RTO 1 = OFF 2 = AB1 / 747 = DISARM 3 = AB2 / 747 = AB1 4 = AB3 / 747 = AB2 5 = MAX / 747 = AB3 6 = / 747 = AB4 7 = / 747 = MAX
Airbus
0 = OFF // Program sets it back to zero 1 = LOW 2 = MED 3 = MAX
Offset=6DC0, 1 Byte length
Indication Output
Boeing
Bit0 = Autobrake DISARM Bit1 = Antiskid Light
TSR Autobrake
Aerosoft GmbH 200840
Airbus
Bit2 = Airbus Autobrake LOW indication Bit3 = Airbus Autobrake MED indication Bit4 = Airbus Autobrake MAX indication
Offset=579E, 2 Byte length
Brake-Accu 0 – 520 reflects 0 – 3000Psi
Offset=6DC6, 2 Byte length
Brake-Press Left 0 – 520 reflects 0 – 3000Psi
Offset=6DC8, 2 Byte length
Brake-Press Right 0 – 520 reflects 0 – 3000Psi