tunelab pro · tunelab pro version 5.1 1. what is tunelab pro? 1 - basics and definitions of terms...
TRANSCRIPT

TuneLab ProV E R S I O N 5 . 1
1. What is TuneLab Pro? 1 - basics and definitions of terms used in later chapters.
2. Normal Tuning Procedure 10- how to tune your first piano with TuneLab.
3. The Tuning Curve 16- what it is and how it is adjusted.
4. All About Offsets 21- different kinds of cents offsets used by TuneLab.
5. Over-pull (Pitch-Raise) Tuning Procedure 23- how to make a pitch raise more accurate.
6. Calibration Procedure 27- something you need to do only once when TuneLab is first installed.
7. Historical Temperaments 31- unequal temperaments for period music or for modern development.
8. Special Functions 33- split-scale mode, RPT tuning exam, alternate intervals, etc.
9. Menu and Optional Settings 39- complete list of menu items and options you can set.
© 2017 Real-Time Specialties March 2017(734) 434-2412 version 5.1www.tunelab-world.com

What is TuneLab Pro ?
TuneLab is software that helps you to tune pianos. This software comes in various forms – for a Windowslaptop, iPhone, iPad, iPod Touch, and Android phones and tablets. Although these platforms are quitedifferent, most of the features of TuneLab are implemented similarly in all versions. This manual describesTuneLab Pro for Windows laptops. There are separate manuals to describe TuneLab for these otherplatforms. See www.tunelab-world.com for details.
Visual Tuning
TuneLab is one of the class of devices or software programs called “Visual Tuning Aids” or “ElectronicTuning Devices”. These are devices or programs that provide a piano tuner with real-time guidance duringtuning. The sound of a note as it is played is picked up by a microphone and analyzed. The results of theanalysis are displayed in a visual pattern. In the case of TuneLab, there are two main visual patterns that aredisplayed - the phase display and the spectrum display. Both of these displays indicate if the pitch of a noteshould be raised or lowered, but each display has its own unique advantages. Having both displays visiblesimultaneously gives the piano tuner the best of both worlds.
Phase Display
The phase display is the horizontal band shown above. This display is used for fine tuning. The black squaresmove to the left if the note is flat and to the right if the note is sharp. The closer you get to the correct tuning,the slower the black squares will move. The goal is to make the black squares come as much to a stop aspossible. If the piano string has any false beats, the black squares may appear to move in an irregular fashion,sometimes moving back and forth. When there is no note playing, or when the note being played is far fromthe correct pitch, the black squares will disappear or move randomly.
This display is called a phase display because it displays the phase of the sound from the microphone ascompared to the phase of an internally generated reference pitch, as in a strobe tuner. The movement of thesquares can be compared to listening to beats between a tuning fork and a note on the piano. For the bass andmidrange, when a square makes one complete trip around the display, that corresponds to one complete beatthat you would hear when comparing two tones. For higher notes the display is artificially slowed down inorder to keep the speed of the display in a reasonable range.
1
Chapter
1

Spectrum Display
The spectrum display is the graph shown above zoomed-in to ±130 cents around the desired pitch. Using theEdit Options menu, you can choose to make the traces thicker (as shown) for easier visibility, at the cost of aslight loss of resolution. This display shows how the sound energy is distributed across the frequency spectrum.If TuneLab is listening to a pure tone, the spectrum graph will show a single peak. The example seen here wasmade from a A-440 tuning fork that was a little flat. The red line in the center of the display marks the correctpitch. The green lines nearest the center mark the points that are 10 cents above and below the correct pitch.The green lines far from the center mark the points that are 100 cents above and below the correct pitch, i.e.the previous note and the next note in a chromatic scale. The object in tuning with the spectrum display is totune the note until the peak of the graph is centered on the red line.
The spectrum display has several advantages over the phase display. One is that it shows where the pitch of thepiano is, even when that pitch is far from the correct pitch. The other advantage is that the spectrum displaycan show several peaks at once. This is what you would get when playing a poorly tuned unison:
Here the piano note C7 is being played with one string tuned nine cents higher than the other two strings. Bylooking at individual peaks it is possible to tune notes in the high treble without mutes! You simply tune one ofthe strings and watch which peak moves. You can move that peak to the red line and then that string will be atthe correct pitch. However, tuning this way is not as accurate as tuning by sounding one string at a time,because the multiple peaks tend to become blurred as they merge into one another.
The Spectrum Display can also be zoomed in on the center ±10 cents in the center, while still showing ±130cents or ±260 cents overall. When one of these “dual-zoom” modes is selected, the numbers at the bottomshow offsets in cents rather than frequencies in Hz. Here is one such setting of the Spectrum Display showingtwo simultaneous notes - one at A6 and the other at A#6 (+100 cents higher than the target pitch):
2

As shown in the upper right corner of the previous Spectrum display, if a tone is recognized close enough tothe target pitch, there will be a numerical display of the tuning error in cents – in this case, -0.6 cents.
One advantage of the phase display is that it generally provides more resolution than the spectrum display,except in the highest octave where the resolutions are about the same. For this reason the spectrum display isused for rough tuning and the phase display is used for fine tuning. False beats can confuse the phase displaythough. So the spectrum display is preferred even for fine tuning in the high treble. In any case, both displaysare available; so you can use whichever display seems to be giving the clearest indication.
Toolbar
TuneLab Pro uses a toolbar for many functions. Here is the toolbar from TuneLab Pro:
New Tuning File - prepares for creation of a new tuning, and may start auto measure sequence
Open Tuning File - selects and loads an existing tuning file
Save Tuning File - saves the current tuning as a file so it can be recalled later
Sound On/Off - toggles the sound generation mode on and off
Offsets - manages overall offset and custom stretch values
Lock Mode - begins locking onto the note by automatically adjusting the offset (“.” also works.)
Zoom Spectrum In/Out - zooms through 6 different zoom levels (“-” and “+” also work.)
Auto Note Switching - enables auto note switching
Auto Note Switch, One Direction - enables auto note switching in just one direction
Measure Inharmonicity - measures inharmonicity (“M” also works.)
Over-pull - enables/disables over-pull (pitch raise) mode (function key “F2” also works.)
Historical Temperaments - selects optional non-equal temperaments Tuning Curve - displays the tuning curve for adjustment or review (“T” also works.)
All these toolbar buttons have associated tooltips. To see a tooltip, merely move the mouse cursor so that itrests on one of these buttons. After a short pause a box will appear with a reminder about what that buttondoes. If there is a keyboard key that performs the same function, the tooltip will tell you about it.
Current Settings Display
In the middle of the main TuneLab display screen in large letters there is a display of the currently selected note.Above the phase display is a display of current settings. Usually most of these fields are blank; but here is anexample with all the fields active:
3
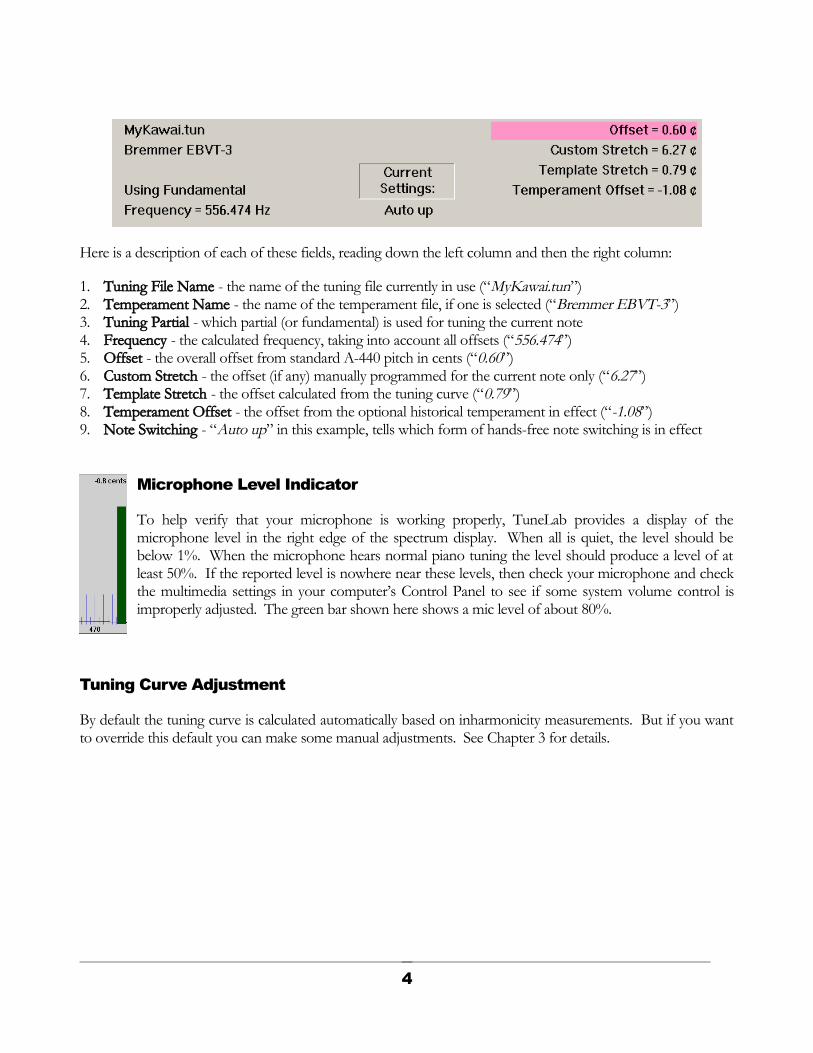
Here is a description of each of these fields, reading down the left column and then the right column:
1. Tuning File Name - the name of the tuning file currently in use (“MyKawai.tun”)2. Temperament Name - the name of the temperament file, if one is selected (“Bremmer EBVT-3”)3. Tuning Partial - which partial (or fundamental) is used for tuning the current note4. Frequency - the calculated frequency, taking into account all offsets (“556.474”)5. Offset - the overall offset from standard A-440 pitch in cents (“0.60”)6. Custom Stretch - the offset (if any) manually programmed for the current note only (“6.27”)7. Template Stretch - the offset calculated from the tuning curve (“0.79”)8. Temperament Offset - the offset from the optional historical temperament in effect (“-1.08”)9. Note Switching - “Auto up” in this example, tells which form of hands-free note switching is in effect
Microphone Level Indicator
To help verify that your microphone is working properly, TuneLab provides a display of themicrophone level in the right edge of the spectrum display. When all is quiet, the level should bebelow 1%. When the microphone hears normal piano tuning the level should produce a level of atleast 50%. If the reported level is nowhere near these levels, then check your microphone and checkthe multimedia settings in your computer’s Control Panel to see if some system volume control isimproperly adjusted. The green bar shown here shows a mic level of about 80%.
Tuning Curve Adjustment
By default the tuning curve is calculated automatically based on inharmonicity measurements. But if you wantto override this default you can make some manual adjustments. See Chapter 3 for details.
4
Partials
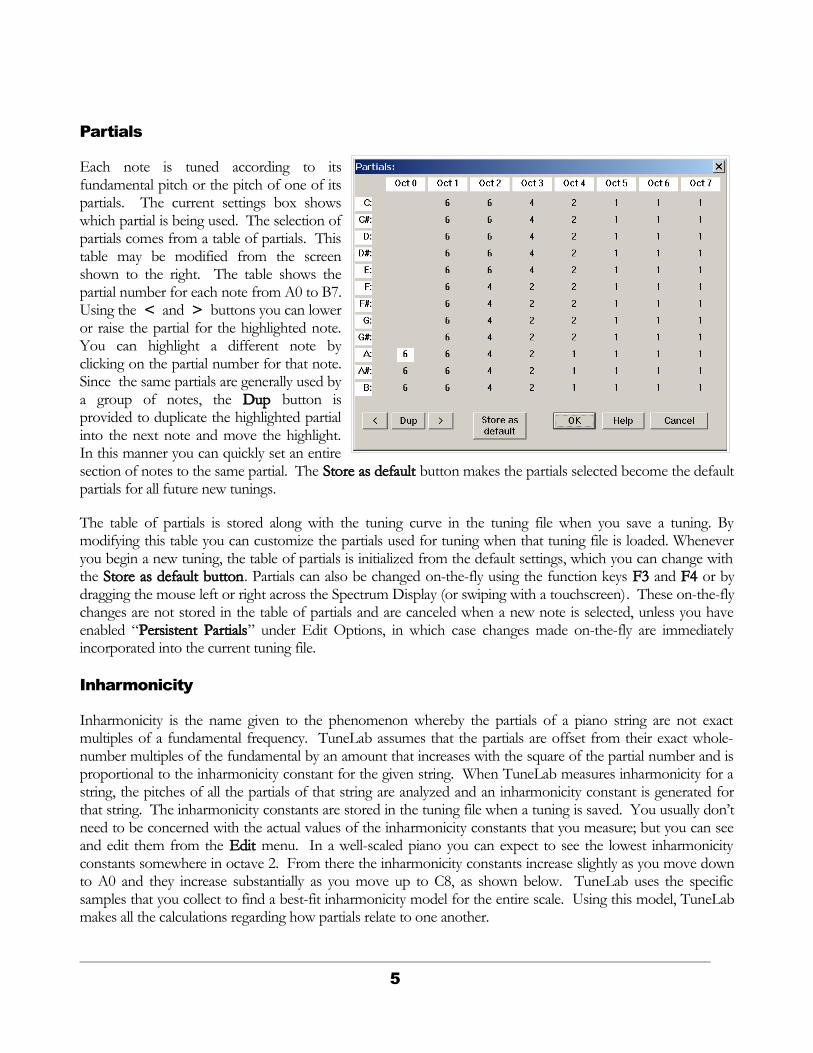
Each note is tuned according to itsfundamental pitch or the pitch of one of itspartials. The current settings box showswhich partial is being used. The selection ofpartials comes from a table of partials. Thistable may be modified from the screenshown to the right. The table shows thepartial number for each note from A0 to B7.Using the < and > buttons you can loweror raise the partial for the highlighted note.You can highlight a different note byclicking on the partial number for that note.Since the same partials are generally used bya group of notes, the Dup button isprovided to duplicate the highlighted partialinto the next note and move the highlight.In this manner you can quickly set an entiresection of notes to the same partial. The Store as default button makes the partials selected become the defaultpartials for all future new tunings.
The table of partials is stored along with the tuning curve in the tuning file when you save a tuning. Bymodifying this table you can customize the partials used for tuning when that tuning file is loaded. Wheneveryou begin a new tuning, the table of partials is initialized from the default settings, which you can change withthe Store as default button. Partials can also be changed on-the-fly using the function keys F3 and F4 or bydragging the mouse left or right across the Spectrum Display (or swiping with a touchscreen). These on-the-flychanges are not stored in the table of partials and are canceled when a new note is selected, unless you haveenabled “Persistent Partials” under Edit Options, in which case changes made on-the-fly are immediatelyincorporated into the current tuning file.
Inharmonicity
Inharmonicity is the name given to the phenomenon whereby the partials of a piano string are not exactmultiples of a fundamental frequency. TuneLab assumes that the partials are offset from their exact whole-number multiples of the fundamental by an amount that increases with the square of the partial number and isproportional to the inharmonicity constant for the given string. When TuneLab measures inharmonicity for astring, the pitches of all the partials of that string are analyzed and an inharmonicity constant is generated forthat string. The inharmonicity constants are stored in the tuning file when a tuning is saved. You usually don’tneed to be concerned with the actual values of the inharmonicity constants that you measure; but you can seeand edit them from the Edit menu. In a well-scaled piano you can expect to see the lowest inharmonicityconstants somewhere in octave 2. From there the inharmonicity constants increase slightly as you move downto A0 and they increase substantially as you move up to C8, as shown below. TuneLab uses the specificsamples that you collect to find a best-fit inharmonicity model for the entire scale. Using this model, TuneLabmakes all the calculations regarding how partials relate to one another.
5
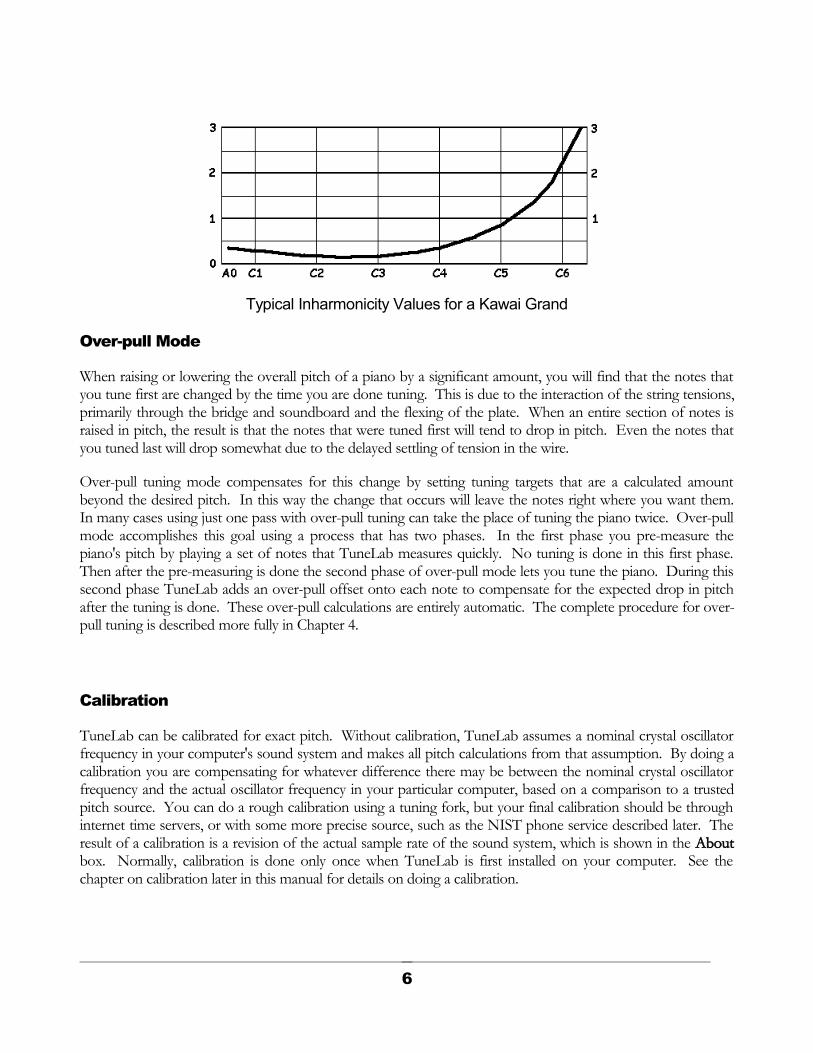
Typical Inharmonicity Values for a Kawai Grand
Over-pull Mode
When raising or lowering the overall pitch of a piano by a significant amount, you will find that the notes thatyou tune first are changed by the time you are done tuning. This is due to the interaction of the string tensions,primarily through the bridge and soundboard and the flexing of the plate. When an entire section of notes israised in pitch, the result is that the notes that were tuned first will tend to drop in pitch. Even the notes thatyou tuned last will drop somewhat due to the delayed settling of tension in the wire.
Over-pull tuning mode compensates for this change by setting tuning targets that are a calculated amountbeyond the desired pitch. In this way the change that occurs will leave the notes right where you want them.In many cases using just one pass with over-pull tuning can take the place of tuning the piano twice. Over-pullmode accomplishes this goal using a process that has two phases. In the first phase you pre-measure thepiano's pitch by playing a set of notes that TuneLab measures quickly. No tuning is done in this first phase.Then after the pre-measuring is done the second phase of over-pull mode lets you tune the piano. During thissecond phase TuneLab adds an over-pull offset onto each note to compensate for the expected drop in pitchafter the tuning is done. These over-pull calculations are entirely automatic. The complete procedure for over-pull tuning is described more fully in Chapter 4.
Calibration
TuneLab can be calibrated for exact pitch. Without calibration, TuneLab assumes a nominal crystal oscillatorfrequency in your computer's sound system and makes all pitch calculations from that assumption. By doing acalibration you are compensating for whatever difference there may be between the nominal crystal oscillatorfrequency and the actual oscillator frequency in your particular computer, based on a comparison to a trustedpitch source. You can do a rough calibration using a tuning fork, but your final calibration should be throughinternet time servers, or with some more precise source, such as the NIST phone service described later. Theresult of a calibration is a revision of the actual sample rate of the sound system, which is shown in the Aboutbox. Normally, calibration is done only once when TuneLab is first installed on your computer. See thechapter on calibration later in this manual for details on doing a calibration.
6

Automatic Note Switching
Using the menu or the keyboard or the mouse you can enable different forms of automatic note switching.There is auto up, auto down, auto both, and manual. In manual mode the note TuneLab is listening for willnot change unless you manually change it by using the arrow keys or clicking in the spectrum display. In thethree automatic modes TuneLab listens for nearby notes and switches to them when you play them. Autoboth will switch to any note within 300 cents of the current note, above or below the current note. Auto upwill only switch to a note that is within 300 cents up from the current note. Similarly auto down will onlyswitch in the downward direction. When measuring inharmonicity a special type of note switching takes overand switches through a pre-defined list of notes that you want to measure for a new tuning.
In TuneLab Pro, the different forms for automatic note switching can be enabled with the keyboard. Shift-Right-Arrow and Shift-Left-Arrow enable auto note switching in the indicated direction. Press both arrows atonce to enable both directions. However the easiest way to turn auto note switching on or off is to click anddrag from the Current Note display to the right or the left. Dragging to the left turns auto note switching offand dragging to the right turns it on. You can also cycle through the three kinds of auto note switching byclicking the Auto Note button repeatedly.
Historical Temperaments
By default, TuneLab assumes an equal tempered scale. If you would like to tune in some unequal temperament(not usual), you can select an historical temperament file to apply to your tuning. An historical temperamentfile contains a list of 12 offsets for each of the 12 notes of an octave. When an historical temperament isselected, one of these 12 offsets is used, depending on which note is selected. For any given note, the sameoffset is used in every octave. In addition, the temperament offset may be optionally normalized. This meansthat all 12 offsets will be shifted by the same amount before they are used. You can choose to have the offsetsnormalized so that the offset for A is always zero; you can choose to normalize so that the average offset is zero(to minimize the overall change from equal temperament); or you can choose to use the historicaltemperaments just as they are with no normalization. The temperament name and the temperament offset forthe selected note appear in the Current Settings box shown previously. When you save a tuning the historicaltemperament values (and temperament name) are saved in the tuning file. See the chapter on special functionsfor information on making and using temperament files.
Tuning Files
A tuning file is a file made by TuneLab and stored usually in My Documents/TuneLab. In this file are allthe factors necessary to re-create a specific tuning. You can save the current tuning to a named file, or open anexisting tuning file from the File menu. You can also save a tuning file by clicking on the diskette icon in the
7

toolbar. If you want to organize your tuning files into several folders (like “Churches” and “Homes” or“Grands” and “Verticals”) under the one home folder, you can create these other folders as you save tuningfiles. When you save a tuning file, you will see a standard Windows “Save As..” dialog box. The appearance ofthat box will depend on which version of Windows you are running. But all versions offer some way to selectdifferent folders and to create new folders. Examine all the elements of your “Save As..” dialog box and youwill find a way.
Here is what a tuning file contains:
· The inharmonicity constants for all the notes that you measured.· The adjustment settings of the tuning curve (the template).· The name of the historical temperament (if any) and all 12 offsets from that temperament.· The partial and custom offset (if any) for each of the 88 notes.· The selection of bass and treble intervals in the tuning curve adjuster.· The Over-pull selections in effect at the time the file was saved.· The overall offset in effect at the time the tuning was saved.
Sound Generation
Although the common use for TuneLab is in listening to notes and providing a visual tuning aid, you can alsouse TuneLab as a tone generator. When TuneLab is in sound generation mode, the spectrum display andphase display are disabled. The pitch of the sound generated in the speakers is the same as the pitch that wouldhave indicated correct tuning in the listening mode. The pitch is generated for whichever partial is selected -not necessarily the fundamental. Sound generation using low pitches may not be audible due to the limitationsin the frequency response of the speakers found in laptop computers.
Sound generation is generally used to aid in stringing operations where precision is not as important as innormal tuning. If you intend to use sound generation for precise tuning in TuneLab Pro, you should be awareof the fact that some laptops use two separate crystal oscillators in their sound output and sound inputoperation. Therefore a separate calibration may be needed for the sound generation mode. If this is the casewith your laptop, you should do the separate output pitch calibration as described in the chapter on calibration.Even if your laptop has only one sound crystal, it does not hurt to do a separate calibration for the tonegeneration. If you don’t plan on using TuneLab to generate precise tones, you don’t need to do this specialoutput calibration.
Note Selection
Using the mouse you can change notes by clicking in one ofthe four quadrants of the spectrum display. Clicking in theupper quadrants switches up or down an entire octave.Clicking in the lower quadrants switches up or down by asingle note. You can also select a note using the keyboardby pressing the letter and then the octave number for the
note on the keyboard. To select a sharp, use the right arrow key after selecting the natural, or use UPPER
8
CASE letter to select the sharp directly. You can also select notes by using the right and left Arrow keys tomove up and down the scale. You can change octaves with the Page Up and Page Down keys. During anormal tuning it is most convenient to switch notes automatically using auto note switching.
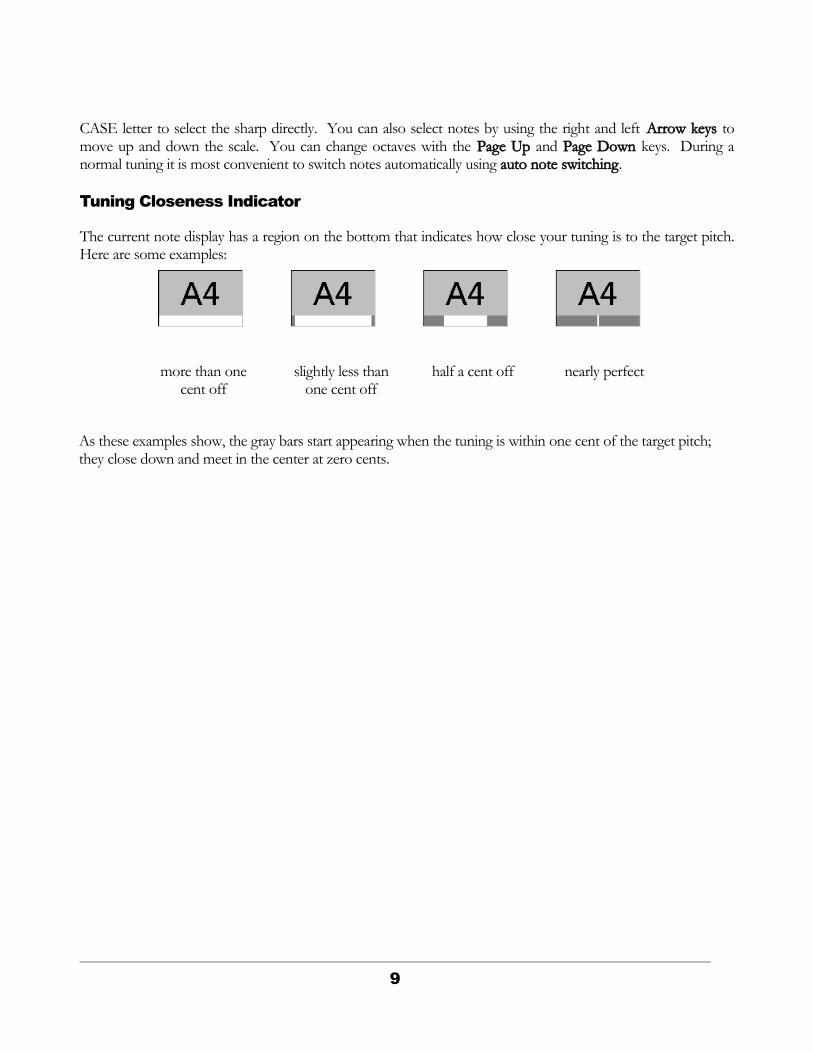
Tuning Closeness Indicator
The current note display has a region on the bottom that indicates how close your tuning is to the target pitch.Here are some examples:
more than onecent off
slightly less thanone cent off
half a cent off nearly perfect
As these examples show, the gray bars start appearing when the tuning is within one cent of the target pitch; they close down and meet in the center at zero cents.
9

Normal Tuning Procedure
This chapter takes you step-by-step through an ordinary piano tuning (not a pitch-raise). We are alsoassuming that you have not tuned this piano before and saved a tuning file, because if you had, then youcould skip the initial setup and just load that tuning file now and begin tuning.
Initial Setup
Tuning with an electronic tuning aid can be done with just two mutes. First check the condition of the existingtuning to see if there are any major problems with the piano and to see if a pitch raise is necessary. Assumingthat a pitch raise is not necessary, the next step is to measure the inharmonicity of the piano.
When TuneLab is started it will have a tuning file name such as “untitled-1”. If you have some other tuning fileloaded as the current tuning you should clear out that tuning and start a new tuning by selecting thetoolbar button shown here. This will clear out any old inharmonicity constants and reset the table of
partials to the default. You are now ready to develop a new tuning. TuneLab will now switch to the first notein your “measure sequence” and start the inharmonicity measurement. Depending on your optionsettings the measurement may start immediately or you may have to click on the measure button first.
Measuring Inharmonicity
Start by measuring the inharmonicity of at least four notes and preferably six notes. The default measuresequence is the C notes from C1 to C6. If the piano is a spinet that is known to have a large break in theinharmonicity, you may want to consider using the Split Scale mode, as described in the Special Functionschapter. For now, we will assume that the piano is a well-scaled instrument that does not require Split Scalemode. We will measure the C notes from C1 to C6. If one of these notes is hard to measure accuratelybecause of a serious false beat or lack of partials, then just measure some other nearby note instead. The graphin Chapter 1 shows typical inharmonicity measurements of a Kawai 6’8” grand. In any case, when you measurethe inharmonicity of a note you should mute all but one string of the note. Measuring the inharmonicity of twoor three strings sounding at once is not recommended.
To measure the inharmonicity of a note, select that note in TuneLab, as described in Chapter 1 under “NoteSelection”. (That selection may have been done for you if you had set up an auto measure sequence in EditOptions.) Now that TuneLab is showing the note that you want to measure, if the measurement has notalready been initiated by the auto measure sequence, begin a measurement by pressing M on the keyboard or
by clicking on the measure button: This will cause a status box to appear showing “Measuring, waitingfor trigger”. TuneLab will begin listening to the note as soon as you play it. The sudden rise in sound level is
10
Chapter
2

the trigger. If you do not play the note shortly after initiating a measurement it is quite likely that someextraneous noise may trigger the sampling period and you will get a false reading. If this happens, just wait forthe calculation to finish and then discard the reading and start over. If the “Auto Measure” option has beenenabled, then you do not need to switch notes or start each measurement because this will be doneautomatically for you.
When sampling for inharmonicity you should play the note that you want to measure and then watch the statusbox change from “waiting for trigger” to “listening”. This listening period is about six seconds for low notesand progressively shorter for higher notes. If the piano is in good condition the sustain period of the noteshould last to the end of the “listening” period. After the listening period TuneLab will calculate theinharmonicity and display a results box showing what was measured. In some notes with too-soft hammers, thepartials are so weak or ill-defined that they cannot be measured. In that case it may be useful to pluck the stringrather than strike it using the key. If you pluck the string, pluck it near the termination point to get a rich set ofpartials. This is generally needed only for very high notes.
The only value that is saved from the inharmonicity measurement is the inharmonicity constant. The graph inChapter 1 shows the typical pattern of inharmonicity constants for a Kawai 6’8” grand (model 650). Otherpianos may have more or less inharmonicity, but the pattern should be approximately the same. The graphstops at C6, but in almost every case, the actual inharmonicity continues in the same pattern of risinginharmonicity established by the lower octaves. So you can avoid measurements in the highest octaves and stillhave an accurate picture of the inharmonicity of the piano.
When a measurement is complete,TuneLab displays a box like the oneshown to the left. Here we see thatpitches were detected for thefundamental and partials 2 and 3.Some of partials 4-6 were detected,but they were too weak to be usedfor measuring inharmonicity. Theoffset column shows the offset incents for the individual partials ascompared to what they would be ifthere were no inharmonicity.Generally there is more inharmonicoffset the higher you go in thepartial series. The amplitudecolumn shows the relative strengths
of the specific partials. TuneLab analyzes the pattern of partial offsets and calculates an inharmonicity constantfor the string - in this case 0.632. If things look reasonable at this point then you would select Save, which willsave the inharmonicity constant for the note C5. You can also select Save,+ which will save the measurementand then begin another measurement of the same note so that you may average several readings of one note.This is especially useful when using the auto-measure sequencing where Save,+ will allow you to take additionalreadings of the same note without canceling the auto-measure sequence. In this box you can also view thepartial amplitudes in graphical form using the horizontal bar graph, which is explained in Chapter 6 in the
11

section on Voicing. If you measure inharmonicity again for the same note, the inharmonicity readings will beaveraged.
Adjusting the Tuning Curve
Now that the inharmonicity readings have been taken, TuneLab forms a model of the inharmonicity of all thenotes of the scale. Using that model, TuneLab can predict how various intervals will sound. In automaticadjustment mode TuneLab uses that prediction to find an adjustment of the tuning curve that is optimized forthe intervals you have selected. In manual or semi-automatic mode you can adjust the curve yourself. Thistuning curve is sometimes called the template tuning curve because it follows a four-parameter template.
Subjective value judgments can play a role in how tuning curve adjustments are to be made. Normally werecommend fully automatic adjustment mode, which you can select using the toolbar buttons at the top ofthe adjuster screen. When the fully automatic mode is selected, you can cause the automatic adjustment to bemade by pressing U on the keyboard, or clicking on any of the four Auto buttons below the tuning curve.
Refer to the picture of the tuning curve in Chapter 1. You get to this screen by pressing T on the keyboard orby clicking on the tuning curve icon in the toolbar. You are also taken to this screen automatically at the end ofa sequence of inharmonicity measurements for a new tuning. Note the buttons that select between the threedifferent ways of adjusting the tuning curve:
This button selects the totally manual method of adjusting the tuning curve. When this option is used,you must use the adjuster arrows to adjust all four aspects of the tuning curve, which are overall stretch
in the treble and in the bass, and the shape of the bass and treble portions of the curve.
This button selects the semi-automatic method. The overall stretch in the treble and the bass arecalculated automatically, but you must manually adjust the shape of the treble and the bass using the
remaining adjuster arrows.
This button selects the fully automatic method. All four aspects of the tuning curve are adjustedautomatically when you touch any of the adjuster arrows, which now will say “Auto” instead of showing
a picture of an arrow.
If you do not choose the fully automatic method, you must adjust the curve by clicking and dragging up ordown through the green bands in the graph background. The bands at the extreme left and right control theoverall stretch in the bass and the treble. The inner bands control the shape of the bass or treble portion of thetuning curve without changing the overall stretch.
Although tuning curve adjustments can be carried out by clickingand dragging the mouse, for compatibiltiy with older versions ofTuneLab you can also use the keyboard for these actions. Themappings shown to the left are in effect. This mapping shows theinner two adjustment bands are mapped to U, I, J, and K. The outertwo adjustment bands map to Y, O, H, and L (in fully manual mode
12

only). If you are using the fully automatic method of tuning curve adjustment, then you can skip theadjustment details.
In the course of doing an adjustment you may find that a portion of the tuning curve goes off the scale. If thishappens and you want to see the whole curve, press the Z key (for “Zoom”). This will toggle the graphicallimits between the original limits and the limits that exactly contain the current curve.
Now that you have become familiar with the mechanics of adjusting the tuning curve, it is time to adjust thetuning to match your tuning criteria. You may want the 6:3 octaves in the low bass to be as pure as possibleand the 4:1 double octaves in the treble to be as pure as possible. Do that by selecting these intervals in theselection boxes located around the adjuster arrows. Open these drop-down selection boxes by clicking on thelittle triangle after the interval name. Scroll through the choices and tap or click on 6:3 in the left selection boxand 4:1 in the right selection box. TuneLab will remember your preference and these intervals will always beselected for you when you start a new tuning. In addition, the interval selections for each tuning will be storedin the tuning file, so you can have different interval selections with each tuning file.
Now that you have the proper intervals selected, the deviation curve (the lower curve) shows you how yourselected intervals will sound. The goal is to adjust the tuning curve until the deviation curve is as straight aspossible at both ends. This is, in fact, what the fully automatic adjustment method does. You will notice thatthe right-hand adjuster buttons control the shape of the treble end of the tuning and hence the shape of thetreble end of the deviation curve. If the deviation curve is bowed up in the middle, press the down adjusterarrow. If the deviation curve is bowed down in the middle, press the up adjuster arrow. Unless you are usingthe totally manual method, the ends of the deviation curve will always be at zero. Your goal in adjusting theshape is to get as much of the deviation curve as possible to lie close to zero.
When you adjust the shape of the bass end of the tuning curve you will notice that the deviation curve movesin the opposite direction as the tuning curve. This behavior is a consequence of the way the deviation curve isdefined. If the bass end of the deviation curve is bowed up in the middle, press the up adjuster button. If thebass end of the deviation curve is bowed down in the middle, press the down adjuster button.
The Zoom function was mentioned earlier in relation to containing the tuning curve. The Zoom function alsoscales the graphical display of the deviation curve.
When you get the deviation curve to look something like the one shown in the picture in Chapter 1, you aredone. Notice that the deviation curve does not hold very close to zero at the transition in the middle. That isnormal and expected. As you move from the bass to the treble, your criterion for a good tuning graduallychanges from making 6:3 octaves beatless to making 4:1 double octaves beatless. Midway through thattransition the 6:3 octaves will be a little narrow and the 4:1 double octaves will be a little wide. It is impossibleto get both intervals to be beatless at once throughout the scale. You should find that in the vicinity of thetransition you have other criteria for a good tuning (such as 4:2 single octaves) and those criteria will be satisfiedquite well. The criteria for a good tuning that we suggested here are just a starting point. Some TuneLab usersreport getting better results by selecting 4:2 octaves in the treble. Feel free to experiment to find the settingsthat most closely correspond to your tuning style.
13
Saving the Tuning File
After the tuning curve has been adjusted to your satisfaction, exit from the tuning curve adjuster by pressingESC or click the X button. If you want to save this tuning file for later recall, now would be a good time to doso. Save the tuning file by clicking on the Save Tuning File button in the toolbar and entering the name of
the tuning file. Use a name that is short enough to fit in the space allotted in the current settings box but longenough to remind you which particular piano this is so that you can recognize it in a list of other tuning files. Ifyou are tuning a lot of new pianos of the same brand, you may decide to keep one tuning file that you use forall pianos of a particular model. If you have the time, it is best to measure inharmonicity and adjust a tuningcurve for each piano. However new pianos of the same model do not vary that much and for all but the mostcritical uses, a generic tuning may be acceptable. You can delete tuning files from the Open File box using theright mouse button. See Chapter 1 for information on organizing your tuning files into different folders. Aftersaving a tuning file, you can enter comments about this tuning from the View menu. The comments will beplaced into a text file with the same name as the tuning file.
Beginning to Tune
Because aural tuning always starts by setting a temperament, aural tuning sequences start in the middle of thescale and work downwards and upwards from there. When tuning to a calculated TuneLab tuning file, you cantune in any order that you want. Although you may not be considering a pitch raise at this time, remember thatyou will get less interaction between notes if you tune from the low bass to the high treble in order. That is therecommended sequence.
If tuning the bass first, select A0. Play the A0 on the piano and watch for a peak on the spectrum display. Thebass requires some special consideration. Because you are tuning to a high partial, it is quite easy for a wrongpartial to masquerade as the correct partial if the note is seriously mis-tuned. When in doubt, use aural methodsto verify that the note is at least in the ballpark before trusting the spectrum display or the phase display. If youdo not see a very prominent peak in the spectrum display, it is not necessarily a cause for concern. The phasedisplay will work even with partials that are almost too small to see in the spectrum display. Especially in thebass, feel free to select a different partial on the fly if you are having trouble getting a reasonable indication onthe current partial. You can press Function keys F3 or F4 to change the partial. If you have enabled autopartial selection in Edit Options, TuneLab will search for a stronger partial as you tune and switch to thatstronger partial automatically if one is found.
We recommend that for your very first tuning with TuneLab you leave auto note switching disabled. That wayyou will not be confused by unintentional note switches. Later on, you can enable auto note switching to speedup your tuning. For now you can manually switch notes by pressing the arrow keys.
When you finish the monochord section of the bass and come to the bichords, always mute one of the stringsbefore tuning the other string in the unison. After one string is tuned, remove the mute and tune the unisonaurally. There are times when machine tuning of the unisons is an advantage, but those instances are usually inthe high treble. In the bass there are many partials that need to be balanced. Tuning these unisons aurallyallows you to make the needed compromises to get the best-sounding unisons. Also, aural unison tuning isfaster than using the machine.
14

Proceed up through the bi-chords and into the tri-chords. Here you can mute the outside two strings and tunethe middle string. Then move the right mute over one note to expose the right-hand unison. Tune that unisonaurally and then move the left-hand mute over one note. That will expose the left-hand unison and also re-mute the right-hand string. In case your right-hand unison was off at all, it is better to tune the left-hand unisonto the middle string than to tune the left-hand unison to the combination of the middle and right-hand stringssounding at once. Also, having all three strings sound at once increases your chances of having to deal withfalse beats. So always tuning unison strings in pairs is recommended.
Continue tuning through the high treble. Here you may have some trouble with the phase display. Eventhough TuneLab has artificially slowed down the movement of the phase display in the high treble, false beatstogether with a short sustain can produce a confusing picture in the phase display. It is here that werecommend that you switch over to using the spectrum display. The resolution of the spectrum display is interm of cycles per second, not in terms of cents. Therefore the cents-wise resolution of the spectrum displaygets better and better the higher you go in frequency. You can see this by noting the jagged look of thespectrum display around A-440 in the picture in Chapter 1 as compared to the somewhat more precise look ofthe graph following that one which is based around C7 (at about 2100 Hz). Therefore, in the high treble werecommend just trying to get the peak to be centered on the central red line in the spectrum display.
Using Auto Note Switching
You can use auto note switching to make tuning easier. To enable this feature hold the Shift key and press theappropriate Arrow keys. When auto note switching is enabled, TuneLab will be constantly listening for nearbynotes; and when it hears one, it will switch to it. Auto note switching can be enabled for switching up, down,or in both directions. The range of auto note switching is up to 300 cents from the current note. If you useaural checks while tuning, be aware that auto note switching may occur while you are doing these checks. If anunintended auto note switch occurs, simply use the arrow keys to return to the correct note.
When higher treble notes are selected, auto note switching requires a “trigger”, which is a sudden rise in volume, such as you would get when playing a note after some silence. At other times, auto note switching is less demanding, and will switch when the pitch changes without a trigger event. If TuneLab doesn’t switch when you want it to, wait for some silence, and then play the note again.
15

The Tuning Curve
The tuning curve is the source of the “Template Stretch” offsets that appear on the main tuning screen. Thetuning curve determines how much stretch there is in the bass and the treble. You do not need to look at thetuning curve if you are using a saved tuning file, or if you are using automatic tuning curve adjustment. But it isadvisable to take a look at it when making a new tuning just to confirm that the automatic adjustment isreasonable. You will certainly need to look at it to make manual or semi-automatic adjustments. Also, you willneed to visit the tuning curve adjuster if you want to change which intervals are used to adjust the bass andtreble portions of the curve, as described later in this chapter.
If the tuning curve adjuster is configured for automatic adjustment, then the tuning curve will be adjustedautomatically after every inharmonicity measurement, using the bass and treble intervals you have selected.Therefore you can just start tuning after making the final inharmonicity measurement for a new tuning. Therest of this chapter will describe what aspects of the tuning curve can be adjusted and how to accomplish thoseadjustments.
Tuning Curve Variations
The tuning curve is adjustable in four different ways, as illustrated here:
Each of these graphs shows the stretch for all the notes from A0 to C8. The first graph shows three variationsof a tuning curve where the thing that is being adjusted is the overall stretch in the treble. The second graphshows three variations of a tuning curve where the thing that is being adjusted is the overall stretch in the bass.The third graph shows variations of the shape of the tuning curve in the treble. The overall stretch at C8remains the same, but the way in which it gets there is different. One graph shows a stretch that graduallyincreases as you approach C8. Another shows a stretch that goes up very little at first, and then abruptly goesup to the same value for C8 as before. And yet another variation is midway between these two extremes. Of
16
Chapter
3
over-all treble stretch over-all bass stretch treble shape bass shape

course there are infinitely many such variations, but these few have been presented to illustrate the kind ofvariation we are talking about. And finally the fourth graph shows variations in the shape of the bass portion ofthe tuning curve.
Every tuning curve generated by TuneLab is some combination of these fours kinds of variations oradjustments. So it is not surprising that in manual adjustment mode, you have four different adjustments thatyou can make. Here is what the top part of the tuning curve adjustment screen looks like in each adjustmentmode:
FULLY AUTOMATIC SEMI-AUTOMATIC MANUAL
Notice that these graphs have breaks and do not appear continuous. These breaks represent places where thetuning switches to a different partial. The jumps in the tuning curve are necessary to compensate for the factthat different partials are being used. The jumps in the curve do not represent actual jumps in the tuning,which is in fact still continuous.
In the manual mode there are four green bands in thebackground. Clicking and dragging the mouse up ordown in those bands will adjust one of the four aspectsof the tuning curve. The left-most and right-most bandsadjust the overall stretch in the bass and the treble. Themiddle two bands adjust the shape of the tuning curve inthe bass and the treble. This kind of adjustment gives the
most flexibility, but it is the most tedious, especially if you don't know what you want to do to the tuning curve.It is preserved for historical reasons, but is hardly everused. In semi-automatic mode only the inner twoadjustment bands are active. That is because the overallstretch in the bass and the treble is being adjustedautomatically, so the outside green bands that controlthose adjustments are removed. As with full manualmode, you adjust the shape of the tuning curve byclicking and dragging up or down in the appropriate
green band. In the semi-automatic mode, TuneLab will adjust the overall stretch to make the deviation curve(described below) average near to zero at A0 and C8.
The fully automatic mode shows a solid green background. In this mode, just one click anywhere in thatbackground will cause all four aspects of the tuning curve to be adjusted automatically. As with semi-automatic
17

mode, TuneLab will adjust the tuning curve overall stretch to make the deviation curve read near zero at thelow and high extremes of the scale. In addition it will adjust the shape of the tuning curve to make thedeviation curve as flat as possible in the vicinity of the ends of the scale.
You can select between fully automatic, semi-automatic, and manual adjustment modes by clicking on one ofthe mode selection buttons shown here:
Deviation Curve
In order to understand how the tuningcurve is adjusted automatically or manuallywe first have to examine the deviation curve,which is the graph shown below the tuningcurve. The deviation curve is divided into aleft and a right portion. The left portionshows the effect of the tuning on theinterval selected for the bass, and the right
portion shows the effect on the interval selected for the treble. The bass and treble intervals are selected fromthe two drop-down boxes in the upper corners of the graph. This particular display indicates that the trebleinterval is the 4:1 double octave, and the bass interval is the 6:3 single octave.
Using the intervals shown (4:1 and 6:3), the left portion of the deviation curve would show how wide or narrowthe 6:3 octaves are in the bass. A positive number of cents means wide and a negative number means narrow.In the bass portion, each interval is specified in the graph by the left-most note in that interval. So for example,the left-most portion of the deviation curve says how wide or narrow is the 6:3 octave formed by A0 and A1.
Similarly, the right portion of the deviation curve would show how wide or narrow the 4:1 double octaves arein the treble. In this case, each interval is specified by the right-most note of that interval. Therefore the right-most portion of the deviation curve says how wide or narrow is the 4:1 double octave formed by C6 and C8.
Common selections for bass and treble intervals will generally give these results:
● 6:3 in the bass = low to moderate bass stretch
● 8:4 in the bass = higher bass stretch
● 4:1 in the treble = moderate treble stretch
● 4:2 in the treble = higher treble stretch
● 2:1 in the treble = low treble stretch
The graph shown above is the deviation curve for a particular piano and tuning curve. The selected intervalswere 6:3 in the bass and 4:1 in the treble. It was adjusted in the fully automatic adjustment mode. As we saidbefore, this causes the deviation curve to be near zero at the extreme ends of the scale and to be as flat as
18

possible in the vicinity of those extremes. In this case we see that is so. Reading from that graph we can seethat for this particular tuning of this particular piano:
● The 6:3 octave A0-A1 is wide by about 0.6 cents
● The 6:3 octave C#1-C#2 is nearly perfect
● The 6:3 octave F1-F2 is narrow by about 0.2 cents
● The 6:3 octave C3-C4 is about 2.6 cents wide
● The 6:3 octave C#4-C#5 is narrow by about 0.4 cents
● The 4:1 double octave D2-D4 is about 2.5 cents wide
● The 4:1 double octave G4-G6 is nearly perfect
● The 4:1 double octave C6-C8 is about 1.3 cents wide
To read the deviation curve properly, remember that every interval is composed of two notes and thedeviation curve reports the condition of that interval on the graph. But the graph shows the condition of thatinterval for either the upper or lower note in the interval. In the treble section of the deviation curve the notechosen to represent the interval is the upper note, but in the bass section the note chosen to represent theinterval is the lower note. So for every point on the graph, imagine an interval that extends from that point tothe right or to the left depending on which half of the deviation curve you are in.
Now let's explore the deviation curvefurther. Without changing the tuning curveadjustment, we can select the 4:2 octave inthe treble in place of the 4:1 double octave.If we did that, the deviation curve wouldbecome the graph as shown here on the left.The graph zoom has been changed tocontain the very low value at C8. When the
4:1 interval is changed to the 4:2 interval the tuning does not change. The tuning is still the same, but thedeviation curve changed because it is now reporting a different interval in the treble. (Notice that the bassportion of the deviation curve remained the same, since it is still reporting the 6:3 interval.) But looking at the4:2 interval we see that its tuning has a perfect 4:2 octave at D#4-D#5. This is actually quite good because thefourth octave is normally tuned with perfect 4:2 octaves when tuning aurally. But 4:2 octaves are not used foraural tuning in the high treble because the partials involved are too weak to cause much of a beat. So weshould not be upset at seeing such narrow 4:2 octaves being reported in the high end of the deviation curve.
Now suppose we force an automatic adjustment of the tuning curve based on this new interval selection (byclicking on the tuning curve when the background is all green). Then the deviation curve would look like theone shown below. As before, when we do an auto-adjust the selected intervals are forced to come out nearlybeatless near A0 and C8. Adjusting with 4:2 in the treble generally produces more stretch than with 4:1 in thetreble. In the example that generated these graphs, C8 was stretched by 31.64 cents when the 4:1 interval wasselected for the adjustment. But C8 was stretched by 48.31 cents when the 4:2 interval was used as the basis ofthe adjustment instead.
19

Now that we have adjusted the tuning curvebased on the 4:2 intervals, let's go back andsee how the 4:1 interval would turn out withthis adjustment. The graph shown hereshows that the 4:1 interval would begenerally much wider everywhere, especiallyin the high treble. Compare this graph tothe one on the previous page to see how
well- behaved the 4:1 double octave was when it was used for the adjustment.
So what we see is that tuning is a compromise between competing intervals. Personal preference determineswhich intervals are most important at which parts of the scale. As you can see, there are many possible ways toadjust the tuning curve even if you use the fully automatic adjustment mode. And after an adjustment has beenmade, you can temporarily select a different interval just to see how that interval would work out with thecurrent tuning curve adjustment. We recommend that at first you simply select 6:3 in the bass and 4:1 in thetreble and do an adjustment in automatic mode and use it. If you prefer more stretch in the bass, use the 8:4octave instead of the 6:3. If you want more stretch in the treble, use the 4:2 octave instead of the 4:1 doubleoctave.
Displaying Beats in the Deviation Curve
The deviation curve normally shows the condition of the selected intervals in cents. But you can also showbeats. To switch to showing beats in the deviation curve, check the appropriate item in the options shown withthe OPT button.
Displaying the Tuning Curve for All Fundamentals
Normally the tuning curve is shown for whatever partials are selected for each note. But if you want to seewhat the tuning curve would look like if every note were tuned to the fundamental, there is an option for thatby using the OPT button.
20

All About Offsets
TuneLab uses various offsets. The offsets are all displayed in cents on the right side of the Current Settings boxas shown in Chapter 1. TuneLab combines them to calculate the desired pitch for each note. In normaltuning only the template tuning curve offset is present and the other offsets are all zero. The overall offset and
the custom stretch offsets can be enterednumerically using the Enter Offsets menuitem, or by pressing F6. In the windowshown here the entry in the upper left is theoverall offset which affects all notes equally.This is the offset you would use to shift theentire scale to some non-standard pitch, likeA-435. Instead of entering the offset incents you can let TuneLab calculate theoffset for you by entering what pitch youwould like for A4 (instead of 440). Just
enter the desired pitch in the next box and TuneLab will make the offset be whatever is needed to achieve thatpitch.
There are also optional custom stretch offsets for each note individually. Normally all these custom stretchvalues are zero. But for special uses you can establish a custom additional offset for any note. You can fill inthe box shown above for the “Custom Stretch for..” for whatever note is currently selected. Or you can clickon “Examine/Edit all Custom Stretch Values” and see and edit all 88 of these custom stretch values at once.
Working with the Overall Offset
In addition to entering the overall offset numerically, you can also modify the offset with either the keyboard orthe mouse. To use the mouse just click and drag right or left through the phase display. Dragging to the rightraises the offset and dragging to the left lowers it.
For compatibility with older versions of TuneLab you can also use the keyboard to adjustthe overall offset. Just observe the mapping shown to the left. You can adjust the offsetusing the keyboard keys Y, U, I, and O to raise the offset by +10, +1, +.1, and +.01.Similarly, the keyboard keys H, J, K, and L may be used to lower the offset by -10, -1,-.1, and -.01. The Z key will set this offset to zero. The overall offset can also beaffected by Locking mode, which is described later in this chapter.
21
Chapter
4
Custom Stretch
This is an optional note-by-note offset and it is stored in the tuning file. It is rarely used, except when recordingan aural tuning for the Tuning Exam. It can be used to make note-by-note corrections to the tuning curve.But if you find yourself making many such corrections, then you should consider readjusting the whole tuningcurve instead. This custom stretch can be set by a transfer from the overall offset as described above. Thisoffset is not displayed if it is zero.
Template (Tuning Curve) Stretch
For each note, this offset comes from the tuning curve. It is calculated based on the adjustment of the wholetuning curve, taking into account the partial that is selected and the inharmonicity. It is normally calculatedautomatically, but it can also be manually adjusted by adjusting the entire tuning curve.
Temperament Offset
This offset is shown only when an unequal (historical) temperament is selected. In that case, this offset showsthe temperament offset for the current note, which is the same for all other notes of the same name in differentoctaves. The 12 temperament offsets are stored in the tuning file when it is saved with an unequaltemperament selected.
Locking Mode
Locking mode is entered by clicking on the Lock button or by pressing the period (“.”) key. The leftstatus box will appear indicating the Locking mode. To cancel locking mode, click on the Lock button again orpress the ESC key. When Locking mode is active, the offset is automatically adjusted by TuneLab to make thephase display come to a complete stop. The adjustment starts by making large rapid changes in the offset,which gradually reduce to small slow changes after a few seconds. This behavior allows quick initial locking,followed by more precise offset trimming as the feedback is gradually reduced. At any time during the lockingoperation the feedback can be set to maximum by pressing the period key again. A form of Locking mode isalso used whenever you perform a calibration as described in the chapter on calibration.
22
Over-pull (Pitch Raise) Tuning Procedure
Over-pull tuning is most often used in pitch raising, although it could also be used for pitch-lowering. Whenlarge overall changes are made to the tuning of a piano, the notes that you tune tend to change pitch as youtune later notes. Over-pull tuning mode compensates for this change by setting the pitch targets a calculatedamount beyond the desired pitch. In this way the settling that occurs as later notes are tuned will leave thenotes closer to where you ultimately want them to be. In many cases using just one pass with over-pull tuningcan take the place of tuning the piano twice. And even if you do use two passes, doing the first pass in over-pull mode will leave the piano closer to the correct pitch than if you hadn't used that mode, and thus thesecond pass will be easier.
Measuring Inharmonicity Before an Over-pull
When over-pull mode is activated TuneLab will not let you measure inharmonicity. Therefore if you want tocreate a custom tuning for the piano as described in Chapter 2, you would have to measure the inharmonicitybefore enabling over-pull mode. For small pitch raises the normal inharmonicity measurements will besufficient. However for larger pitch raises, the act of pulling the string up to pitch will change the inharmonicityof the strings. For such pitch raises it is not worthwhile to measure inharmonicity first. Just load the Averagetuning file (which comes packaged with TuneLab), or a generic tuning file from a similar model piano. Thendo a pitch-raise pass using that tuning. When you do the second pass, start over with a new tuning file and takefresh inharmonicity readings. Only the final pass would need to have custom inharmonicity measurementstaken.
Enabling Over-pull Mode
Over-pull has two phases. The first phase is pre-measuring the piano. No tuning is done in this phase. Wesimply let TuneLab hear a set of notes from the piano and gather some pitch information about those notes.In the second phase we do the actual tuning which includes over-pull offsets that TuneLab calculates from thedata gathered in the first phase of over-pull. If your evaluation of the piano convinces you that the overall pitchchange is large enough to need an over-pull, you can begin the process of over-pull tuning by pre-measuringthe piano. This must be done before any tuning has been started, in order to get an accurate measure of howflat the piano was to start with. This will enable TuneLab to calculate an amount of over-pull appropriate tothe particular piano. To start, stop, or change any parameters relating to over-pull, use the Over-pullMode menu item, or click on the Over-pull toolbar button shown here, or press the F2 function key.This will display the window shown below.
23
Chapter
5

You can click on Start to startthe pre-measuring processfrom the beginning. Or youcan click on Resume to startpre-measuring at thecurrently selected note,keeping all previous pre-measurement values. Afterthe pre-measurements allhave been taken you can clickon Begin over-pull tuning tostart the actual tuning withover-pull offsets calculatedand added in for you basedon the pre-measurementsthat were taken. As a generalrule of thumb, the calculated
over-pull offsets are about one quarter of the average pre-measurement value. So if the piano was 50 cents flat,over-pull tuning will set target pitches that are about 12 cents sharper than normal. This is only anapproximation because TuneLab uses the entire set of pre-measurements in a proprietary manner to calculatethe over-pull offsets. You can choose the pattern of pre-measurements. You can select Every note (chromaticseries), Every white note, or All notes in a C-Major arpeggio. Since TuneLab interpolates between the notes thatyou do pre-measure, it is not necessary to pre-measure every note.
The rest of the window has to do with options that you can use with the over-pull process. The first over-pulloptions are the location of the break between the bass bridge and the tenor bridge and the break betweenwound strings and plain strings. Clicking on any selection will allow you to change it. TuneLab uses thisinformation in the calculation of the over-pull offset, as well as to qualify the next options - the safety limits.
The next two options are safety limits. They set an overriding upper limit on how high the over-pull offset cango. For example, if the pre-measurements showed that the piano was about 180 cents flat, the calculated over-pull would have been about 45 cents sharp. But this is above the specified safety limit of 25 cents, so the over-pull offset was limited to 25 cents. You can set these safety limits to whatever you want by clicking on thesetting. But you take all responsibility for what may happen with higher safety limits. TuneLab initially isinstalled with the most conservative limits in effect. If you want more permissive limits, then you will have tochange them. When the TuneLab over-pull offset is being limited by a safety limit, that offset will be displayedwith a pink background to let you know that you have hit a safety limit. If this is expected then just continuetuning. You will probably need to do an extra pass, but you would want to do that anyway to lessen the chanceof breaking strings. On the other hand if you think the strings can take it, raise the safety limit to a higher valueto cause this piano to be brought up to pitch more quickly.
You can optionally specify the location of one or two plate struts in the treble. If specified, this information willhelp to prevent a pitch-raise from ending up too sharp just after a strut. The over-pull factor should normallybe left at 1.00. It multiplies all the calculated over-pull amounts by this factor.
24

You will also be able to delete pre-measurements that you decide are faulty. If you delete a pre-measurement,TuneLab will simply interpolate between the neighboring pre-measurements to calculate the over-pull offset.Sampling every note sometimes gives a more accurate picture of the pre-tuned state of the piano, but it alsotakes four times longer than sampling only the notes from a C-arpeggio. If you think the piano is close to beingin tune with itself, then sampling only the C-arpeggio notes probably is sufficient, and that is in fact the default.
Sometimes something goes wrong with a pre-measurement. You might play the wrong note, or TuneLabmight get triggered by some non-piano sound and make a faulty measurement. That is why each pre-measurement is displayed as it is taken. If you suspect that a faulty pre-measurement has been made then youeither redo the set of pre-measurements from the beginning, or you can click on View/Edit pre-measurements andsee if any pre-measurements appear unreasonable. If so, you can delete the faulty measurements and thenproceed to tuning in over-pull mode. As before TuneLab will interpolate over the missing pre-measurementsusing the nearby good pre-measurements.
Pre-measuring Process
When starting the pre-measurement process it is important to have some reasonable tuning loaded first. That isbecause the pre-measurements will evaluate the pitch of the piano by comparison to whatever tuning iscurrently loaded. However it is often sufficient to load the Average tuning, or some generic tuning fromanother piano to use in a pitch-raise, since it is difficult to customize a tuning while the piano is significantly flat.So if you have a reasonable tuning loaded, start the pre-measurements by clicking on the Over-pull button asdescribed above and then on Begin pre-measuring. This willdisplay the status boxes shown here, instructing you to playC1 or A0, depending on the pre-measure pattern you have selected. When you play C1, TuneLab will do aquick one-second pitch measurement for C1 and then the right status box will change to theone shown here. This shows the results of the pre-measurement of C1 (-24 cents) and givesinstructions for the next note to play in the pre-measure sequence. So now you would play E1and then TuneLab will automatically switch to E1 and make the pre-measurement. Note that this is not thesame thing as auto note switching during ordinary tuning. During pre-measuring, TuneLab will switch to thenext note whenever a moderately loud sound is heard. So it is up to you to ensure that TuneLab hears the notethat it expects to hear. Normally you would run through all the notes in the pre-measure sequence in abouthalf a minute. But if you and TuneLab should somehow get out of sync and you play a different note from theone that TuneLab is instructing you to play, the pre-measurements obtained that way will be invalid. If thishappens there are several ways you can correct the situation. The easiest way is to start over and re-do all thepre-measurements from scratch. Or if you like, you can manually select a note and then select Resume pre-measuring from the Over-pull window. This will begin pre-measuring wherever you want. Or after the pre-measurements are done you can review the pre-measurements from the Over-pull window and manually deletethose pre-measurements that you suspect are faulty. TuneLab will smoothly interpolate across any missing pre-measurements.
25
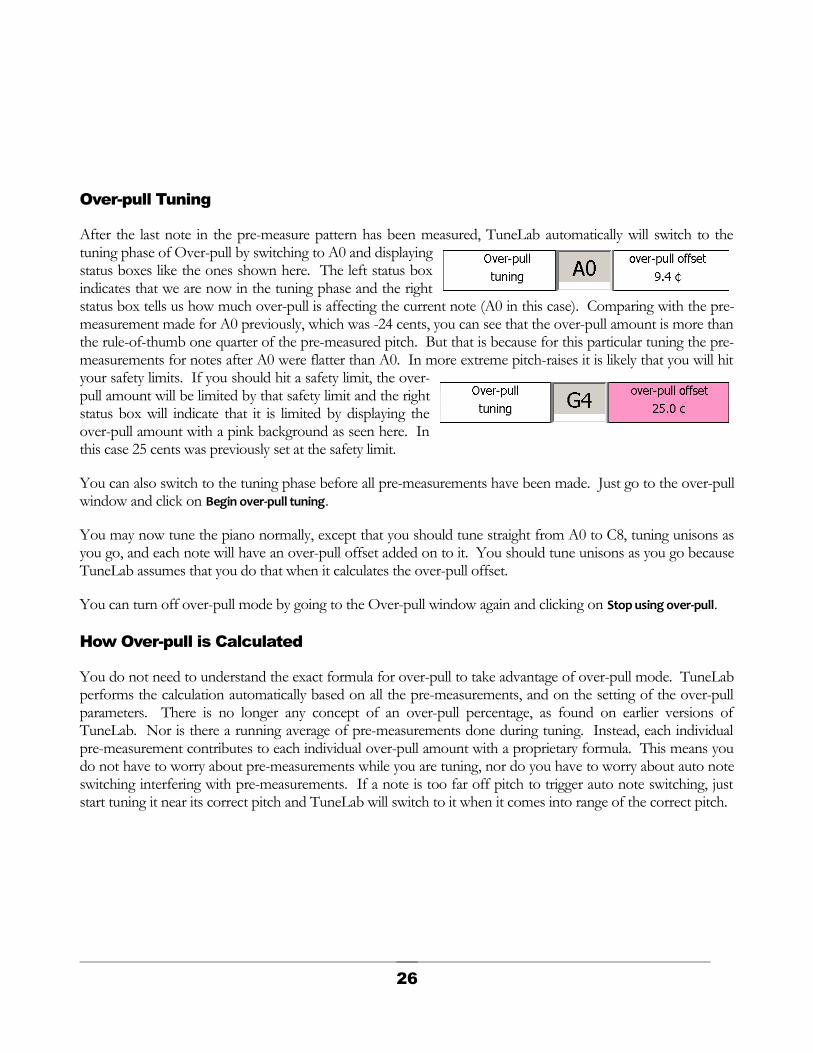
Over-pull Tuning
After the last note in the pre-measure pattern has been measured, TuneLab automatically will switch to thetuning phase of Over-pull by switching to A0 and displayingstatus boxes like the ones shown here. The left status boxindicates that we are now in the tuning phase and the rightstatus box tells us how much over-pull is affecting the current note (A0 in this case). Comparing with the pre-measurement made for A0 previously, which was -24 cents, you can see that the over-pull amount is more thanthe rule-of-thumb one quarter of the pre-measured pitch. But that is because for this particular tuning the pre-measurements for notes after A0 were flatter than A0. In more extreme pitch-raises it is likely that you will hityour safety limits. If you should hit a safety limit, the over-pull amount will be limited by that safety limit and the rightstatus box will indicate that it is limited by displaying theover-pull amount with a pink background as seen here. Inthis case 25 cents was previously set at the safety limit.
You can also switch to the tuning phase before all pre-measurements have been made. Just go to the over-pullwindow and click on Begin over-pull tuning.
You may now tune the piano normally, except that you should tune straight from A0 to C8, tuning unisons asyou go, and each note will have an over-pull offset added on to it. You should tune unisons as you go becauseTuneLab assumes that you do that when it calculates the over-pull offset.
You can turn off over-pull mode by going to the Over-pull window again and clicking on Stop using over-pull.
How Over-pull is Calculated
You do not need to understand the exact formula for over-pull to take advantage of over-pull mode. TuneLabperforms the calculation automatically based on all the pre-measurements, and on the setting of the over-pullparameters. There is no longer any concept of an over-pull percentage, as found on earlier versions ofTuneLab. Nor is there a running average of pre-measurements done during tuning. Instead, each individualpre-measurement contributes to each individual over-pull amount with a proprietary formula. This means youdo not have to worry about pre-measurements while you are tuning, nor do you have to worry about auto noteswitching interfering with pre-measurements. If a note is too far off pitch to trigger auto note switching, juststart tuning it near its correct pitch and TuneLab will switch to it when it comes into range of the correct pitch.
26

Calibration Procedure
Chapter 1 described the purpose of calibration. This chapter takes you through the process of actually doing acalibration. Normally you would only do a calibration only once when you first install TuneLab on yourcomputer. The results of the calibration are stored permanently and used every time you run TuneLab.
Internet Calibration
One of the ways to calibrate is by way of Internet Time Servers. As with any calibration method, it normallyonly needs to be done once. TuneLab stores the calibration and uses it thereafter.
The Internet Calibration first appears like this:
As the instructions say, the process takes up to six hours, but it can be performed unattended. After clicking on "Begin Calibration", TuneLab will query up to four Internet Time Servers to establish a precise time for the start of the operation. During the six hours, the software is counting audio samples from the sound system to determine the sampling rate, which is the goal of any calibration. After about one minute, the display looks like the next picture.
27
Chapter
6
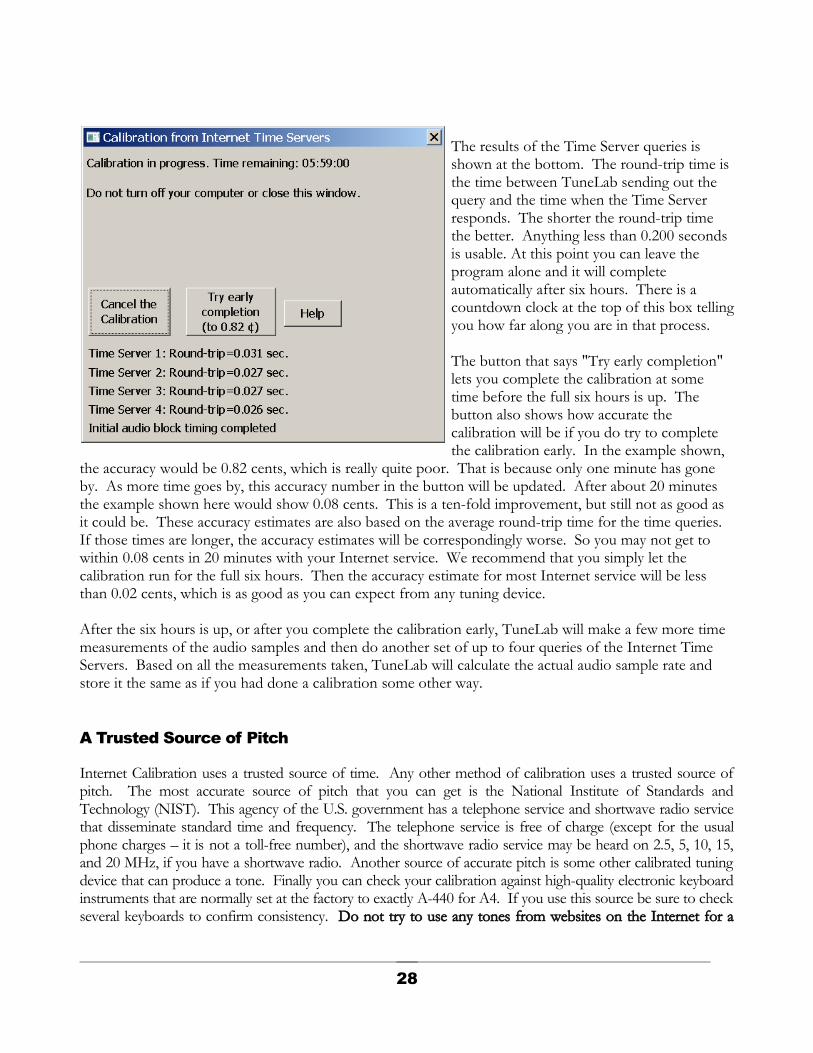
The results of the Time Server queries is shown at the bottom. The round-trip time is the time between TuneLab sending out the query and the time when the Time Server responds. The shorter the round-trip time the better. Anything less than 0.200 seconds is usable. At this point you can leave the program alone and it will complete automatically after six hours. There is a countdown clock at the top of this box tellingyou how far along you are in that process.
The button that says "Try early completion" lets you complete the calibration at some time before the full six hours is up. The button also shows how accurate the calibration will be if you do try to complete the calibration early. In the example shown,
the accuracy would be 0.82 cents, which is really quite poor. That is because only one minute has gone by. As more time goes by, this accuracy number in the button will be updated. After about 20 minutes the example shown here would show 0.08 cents. This is a ten-fold improvement, but still not as good as it could be. These accuracy estimates are also based on the average round-trip time for the time queries. If those times are longer, the accuracy estimates will be correspondingly worse. So you may not get to within 0.08 cents in 20 minutes with your Internet service. We recommend that you simply let the calibration run for the full six hours. Then the accuracy estimate for most Internet service will be less than 0.02 cents, which is as good as you can expect from any tuning device.
After the six hours is up, or after you complete the calibration early, TuneLab will make a few more time measurements of the audio samples and then do another set of up to four queries of the Internet Time Servers. Based on all the measurements taken, TuneLab will calculate the actual audio sample rate and store it the same as if you had done a calibration some other way.
A Trusted Source of Pitch
Internet Calibration uses a trusted source of time. Any other method of calibration uses a trusted source ofpitch. The most accurate source of pitch that you can get is the National Institute of Standards andTechnology (NIST). This agency of the U.S. government has a telephone service and shortwave radio servicethat disseminate standard time and frequency. The telephone service is free of charge (except for the usualphone charges – it is not a toll-free number), and the shortwave radio service may be heard on 2.5, 5, 10, 15,and 20 MHz, if you have a shortwave radio. Another source of accurate pitch is some other calibrated tuningdevice that can produce a tone. Finally you can check your calibration against high-quality electronic keyboardinstruments that are normally set at the factory to exactly A-440 for A4. If you use this source be sure to checkseveral keyboards to confirm consistency. Do not try to use any tones from websites on the Internet for a
28

calibration reference. The pitch from such sites is only as accurate as the sound card in your computer,which could be off by quite a bit.
NIST Broadcast (and Telephone) Schedule
The NIST standard frequency service is available by telephone by calling (303) 499-7111 in Colorado. This is avery popular number. What you hear when you call this number is exactly the same as what is beingtransmitted by the NIST shortwave radio stations as mentioned above. NIST reports that they get over twomillion calls per year. In order to use these services effectively, you need to know something about theschedule for this service. The following schedule is followed each hour. It shows what tones are presentduring each minute of the hour. When a tone is present, it is present for the first 45 seconds of the minute andit is silent for the last 15 seconds.
Although the 440 Hz tone in minute #2 is tempting, do not try to use it. That pitch is only present for 45seconds each hour. The difficulty in calling at just the right time and the shortness of the tone make this choiceinadvisable. Instead you can use the 500 Hz and 600 Hz tones. The telephone service will disconnect you afterthree minutes, so make sure that when you call you have everything set up and time your call so that you will beassured of at least three minutes of 500 Hz or 600 Hz tones. If you happen to be closer to Hawaii than toColorado, you can receive WWVH by shortwave radio or by calling (808) 335-4363 in Hawaii. For moreinformation on both of these sources, see the website:
www.boulder.nist.gov/timefreq/stations/iform.html
Using NIST Tones for Calibration
To use the NIST standard frequency service to do a calibration, start by selecting Calibrate to ExternalReference from the File menu. Then select 500 or 600 Hz NIST tones as the reference source. Do not try tomake the call to the NIST using Skype or any such Internet phone service. Use a landline or standardcellphone. Internet phone services can slightly distort the pitch of the sound. Position the receiver of thephone so it can be heard by your computer's microphone. Follow the on-screen instructions. TuneLab willautomatically determine which tone is currently sounding (500 or 600) and lock to it. When TuneLab hasheard enough it will display a message saying that calibration is done.
29
0: - - - 10: - - - 20: 500 30: - - - 40: 500 50: - - - 1: 600 11: 600 21: 600 31: 600 41: 600 51: - - - 2: 440 12: 500 22: 500 32: 500 42: 500 52: 500 3: - - - 13: 600 23: 600 33: 600 43: - - - 53: 600 4: - - - 14: - - - 24: 500 34: 500 44: - - - 54: 500 5: 600 15: - - - 25: 600 35: 600 45: - - - 55: 600 6: 500 16: - - - 26: 500 36: 500 46: - - - 56: 500 7: 600 17: 600 27: 600 37: 600 47: - - - 57: 600 8: - - - 18: - - - 28: 500 38: 500 48: - - - 58: 500 9: - - - 19: 600 29: - - - 39: 600 49: - - - 59: - - -
Using Other References for Calibration
Besides the 500 and 600 Hz NIST tones, TuneLab offers other choices. If you have a precise 440 or 1760 Hztone source, you can use that. 1760 Hz was chosen because it is the fourth harmonic of 440 Hz. Finally, thereis a completely general choice where you can enter whatever frequency you like. But whatever frequency youenter, it must be the true frequency of the source that you intend to use for calibration. If you have a calibratedCyberFork (from Reyburn Piano Services) then you can use it as a calibration source by entering the exact pitchin Hz. The exact pitch of a CyberFork is offset from 440 by the amount written on the CyberFork. The offseton the CyberFork is in cents, so you first need to convert that to Hz. You can use TuneLab to do that byselecting A4 (440 Hz) and then adjusting the offset, as described in the chapter “All About Offsets”. Adjust theoffset until it matches the offset written on the CyberFork, then read the frequency in Hz from the lower left ofthe current settings box. It should be near 440. For example, if the CyberFork says -0.56 cents, then thefrequency of that CyberFork is 439.858 Hz. If you want to use that CyberFork to calibrate TuneLab, that is theexact frequency you should enter.
If you want to use a high-quality electronic keyboard instrument to calibrate TuneLab and if that instrument hasselectable voices, select a flute or simple pipe organ voice without any vibrato. Play A4, assuming that theinstrument has been trimmed at the factory to exactly A-440. If you are in doubt about the reliability of thatpitch source then after calibrating, check the A4 of several other electronic keyboards. If they are all in generalagreement, you can be fairly confident that you have performed a good calibration.
Stopping Calibration
If a calibration is not completing automatically this usually means something is wrong with the setup or thesound being provided to the microphone. You can stop (abort) calibration at any time by pressing the ESC keyor by clicking in the left status box that says “Calibrating..”.
Verifying Calibration
After a calibration is complete, you may wonder if it completed properly. You can check this in several ways.From the Help menu, select About. A box will appear that shows, among other things, the actual sample rate.This is the actual end product of doing a calibration. The actual sample rate is stored in your computer to beused every time you start up TuneLab. If you are curious as to how far off TuneLab would have been withoutcalibration, compare the actual sample rate shown in the About box with the nominal sample, which is 22,050.Now that you have done a calibration, it will not matter that the actual sample rate is different from thenominal rate because TuneLab knows about the difference, and is taking it into account in all its calculations.Another way to check calibration is to go back to NIST or some other trusted source of known pitch. Selectthe note and offset that make the phase display stand still. If TuneLab is properly calibrated, the frequencydisplay in the current settings box should be absolutely accurate and it should agree with the frequency of thetrusted source.
Calibrating Sound Generation
When you calibrate the listening mode as described above, TuneLab assumes that same calibration will apply tosound-generating mode too. That assumption is generally true. But in some computers the sound generating
30

(the speaker) is based on a separate crystal oscillator from the one that runs the listening mode (themicrophone). That means it is possible for the listening mode and the sound generating mode to requiredifferent calibrations. If you would like to ensure that generated tones are just as precise as the listening mode,you should calibrate the sound generating mode as well.
The calibration of the sound generating mode is based on the calibration of the listening mode as describedabove. What we do is generate a tone and have the microphone of that same computer listen to that tone.Then TuneLab will be able to determine a precise calibration for sound generating mode.
From the File menu select Calibration / Calibrate Sound Gen from Listen Mode. After clicking on Start you will seea window like the one shown on the left. At the same time you should hear a tone in the speaker. When
the microphone hears that tone, the message will switch to “Initializing...” and then to a message like the oneon the right, showing a percentage done. This percentage will count up to 100% in about half a minute andthen the calibration will be done. If the sound is interrupted or if there is excessive noise before the calibrationcan complete, the message may go back to “Initializing..” or even “Waiting for microphone to hear tone fromspeaker.” But if the tone is heard clearly by the microphone, the calibration will complete with a messagetelling you that it is completed successfully.
31

Historical Temperaments
TuneLab normally produces an equal temperament. But historically, equal temperament was not always thenorm. Even today there is a strong interest in non-equal temperaments. With a non-equal temperament,different key signatures have different musical characteristics. It is said that the classical composers were awareof these differences and wrote their music to take advantage of these differences. A full treatment of historicaltemperaments and their musical characteristics and advantages and disadvantages is beyond the scope of thismanual. But if you are interested, there is a lot of literature on this subject.
For our purposes an historical temperament is defined by a set of 12 offsets from equal temperament. These12 offsets are repeated in every octave. TuneLab comes packaged with a set of historical temperaments thatcan be applied to any tuning file. If you know of an historical temperament that is not included with TuneLab,it is easy to add that temperament to your computer by entering the 12 offsets, as described below.
Loading Temperament Files
To add an historical temperament to the current tuning, click on Read Temperament File in the File menu, orpress the F5 function key. If you see a temperament that you want to use, just open it. If you have an historicaltemperament applied and would like to remove it from the current tuning, click on Cancel temperament in theFile menu. This will return your tuning to Equal Temperament.
When an historical temperament has been added to the current tuning, you will see the name of thattemperament just below the tuning file name on the main tuning page. Also you will see an offset for each noteshowing as Temperament Offset xx.xx. As you change notes, the temperament offset changes.
Making Temperament Files
If you want to use a temperament that was not provided with TuneLab, you can create your own newtemperament files from the File menu, New..., Unequal Temperament File. At this point you have two choices onhow to make the temperament. One is “..by manually entering offset”. This will show you 12 boxes where youcan enter the 12 offsets that define the temperament. The other choice is “..from current Custom Stretch values”.This choice is useful when you already have tuned a temperament aurally and captured that tuning by lockingTuneLab to each note and transferring the offset into the Custom Stretch values. Then TuneLab asks you todecide which note will form the basis of the 12 offsets that you wish to capture, as shown below.
31
Chapter
7

When you select a starting note the Custom Stretch valuesfor that note and the following 11 notes will fill the boxeson the left. You can still make manual changes to thosevalues. To finish, you click on Make temperament file andgive the temperament a name. This will store the 12 offsetsthat you entered into a file with the specified file name.
Applying Temperaments
In addition to merely selecting a temperament you can also specify how it is to be applied to your tuning. Youhave three choices that you can make from the Edit menu under Edit Options / Temperaments: (1) Normalizeso that the average offset is zero cents. (2) Normalize so that A is always at zero cents. (3) Leave thetemperament offsets just as they are in the temperament file. The reason for normalization #1 is to minimizethe overall impact on tuning stability when changing between equal temperament and an unequal temperament.Choice #2 may be useful if you want to ensure that the pitch of A does not change.
Finally you can rotate any temperament. From the File menu select Rotate temperament starting note. This willtake the 12 offsets and rotate them so that the offset currently associated with C will instead be associated withthe note that you select. This is useful if you want to apply an historical temperament, but you want to changewhich key signatures are “favored” by the given temperament.
32

Special Functions
Split Scale Mode (especially Spinets)
Many spinets (and some small grands, like the Yamaha GH-1) are difficult to tune because they have a largejump in their inharmonicity - usually at the point where the scale makes the transition between wound stringsand plain strings. TuneLab has a special facility just for such pianos. This facility is called the "Split Scale".
If you want to use the Split Scale, do this:
1. Take inharmonicity measurements of the two consecutive notes at the transition. (If theinharmonicity constants from these two measurements are not significantly different from eachother, discard one of the readings and do not use Split Scale mode.)
2. Measure three other notes below the transition.
3. Measure three other notes above the transition.
This pattern of inharmonicity measurements tells TuneLab to use the Split Scale tuning curve, and it also tellsTuneLab exactly where the transition is.
An alternate way to start a Split Scale tuning file is from the New menu. Select “New Split Scale Tuning File”.TuneLab will then ask you for the location of the break where you expect the inharmonicity to jump (typicallythe break between wound strings and bare wire strings). Once TuneLab knows this, it will figure out whichnotes you should measure and sequence through those measurements automatically.
After you have measured inharmonicity as described above, you can invoke the tuning curve adjuster. Thetuning curve adjuster shows when TuneLab is in Split Scale mode by placing a vertical line on the tuning curveand the deviation curve, as shown in the picture below. This vertical line shows the location of the breakbetween the two parts of the split scale. If you do not see this vertical line in the tuning curve adjuster,TuneLab is not in Split Scale mode. If you expected to see Split Scale mode, review your list of inharmonicityreadings to see if they follow the correct pattern for Split Scale.
For example, if you are tuning a piano that has a break at F#3/G3, you could invoke Split Scale mode bymeasuring inharmonicity at:
B0 G1 E2 F#3 G3 C4 A4 G5
33
Chapter
8

When TuneLab is in Split Scale mode, the tuning curve adjustments have a direct effect on the portion of thetuning curve above the transition. We recommend that you select 4:1 double octaves in the treble side of thetuning curve adjuster, and 6:3 single octaves in the bass side. As with normal tuning you can let TuneLabcalculate the tuning after inharmonicity measurements are made. But looking at the tuning curve is useful forconfirming that the calculations went well.
In Split Scale mode, the usual model for the inharmonicity of the whole piano is broken up into two separatemodels - one for the portion of the scale below the transition and one for the portion above the transition.When you adjust the tuning curve, you will be adjusting directly only the portion of the tuning curve above thetransition. The portion of the tuning curve below the transition will be adjusted automatically to give perfect6:3 single octaves, if 6:3 octaves are what you selected for the bass. If you selected something else for the bass,then TuneLab will adjust the bass for 6:3 single octaves at the top of the bass and whatever you selected at thebottom of the bass. TuneLab will blend smoothly between these two intervals as you move down the scale inthe bass. If you select 6:3 single octaves for the bass, then the deviation curve will show exactly zero cents forthe entire left half of the curve. For adjusting the tuning curve in Split Scale mode, we recommend the fullyautomatic method of adjustment as shown in the previous picture. The image shown above is what a goodtuning curve and deviation curve might look like in Split Scale mode. Note the vertical line which indicatesSplit Scale mode.
The large deviations in the middle of the deviation graph are to be expected. Pianos that need Split Scale modetend to have high inharmonicity just above the break. Although 4:1 double octaves in this region may be quitewide, 4:2 single octaves will be just about right. You can check the condition of 4:2 single octaves bytemporarily switching to 4:2 in the treble. Make sure you switch back to 4:1 double octaves before making anyfurther adjustments. After you have adjusted the tuning curve so that the deviation curve looks like the one
34

above, focus mostly on the far right end of the curve and how it sticks close to zero, then exit from the tuningcurve adjuster and tune the piano as usual.
Tuning Exam Mode
From the Modes menu you can enter or leave Tuning Exam Mode. When this mode is active, the status boxon the right side of the current note display is used to display the total offset, rounded to the nearest 0.1 cents,in keeping with the requirements of the PTG Tuning Exam. This display may be used to gather tuning offsetsmanually. Also, Tuning Exam Mode forces the use of the proper partials, as specified by the PTG TuningExam. In addition, there is a grading facility for comparing an examinee’s tuning with a master tuning. See theseparate document on using TuneLab in the Tuning Exam for details.
Measuring Voicing and Sustain Time
As a by-product of measuring inharmonicity, TuneLab creates a picture of the relative amplitudes of the variouspartials that were measured. All the partial amplitudes are rated in proportion to the strongest partial, which israted at 100. The voicing display is part of the inharmonicity result display shown in Chapter 2. In that displayyou will see two sets of horizontal bar graphs - one white and the other black. The white bars show theamplitudes for the current measurement. The black bars show the amplitudes for a previously savedmeasurement (using the “Save” pushbutton). In the case of the picture in Chapter 2, the previous measurementwas made with a forté blow, and the current measurement was made with a much softer blow. This resulted indifferent relative amplitudes, especially for the second partial. Keep in mind the limitations in the use of thisvoicing measurement. The exact pattern of amplitudes depends greatly on the quality and the placement of themicrophone, and on the strength of the hammer blow.
Another by-product of an inharmonicity measurement is the sustain time, which is described as the length oftime that a note sounds before fading so much that it cannot be heard. Although this definition is impreciseand subjective, piano rebuilders often need some measure of sustain time to evaluate the quality of the bridgeand soundboard. The calculated sustain time is shown along with the results of the inharmonicitymeasurement. To measure sustain time, follow the normal instructions for measuring inharmonicity.However, there are several precautions for measuring sustain time.
One precaution is to turn off automatic gain control on the microphone, if your laptop soundcard offers suchan option. Normally, automatic gain control would be a good thing because it brings up the level of the soundas the note decays, thus giving TuneLab more signal to work with. But automatic gain control will make thenotes appear to sustain much longer than they really do, so the calculation of sustain time will be invalid. If youdo change automatic gain control settings, you will have to switch temporarily to sound generating mode andback to listening mode for the change to take effect.
Another precaution is to be aware of the sound level as you strike the note. If the level reaches 100% for toomuch of the phase of the inharmonicity measurement, then no sustain time will be reported. You can previewthe sound level by looking at the mic level indicator on the main screen. Learn how hard you must strike thenote to achieve an initial 100% level, or thereabouts. A brief period of 100% level is OK as long as the leveldrops below 100% shortly thereafter.
35
Finally, make sure that the correct note is selected when you measure sustain time. Although the sustaincalculation is not pitch-sensitive, the total sampling time does depend on which note is selected. TuneLabassumes a shorter sustain for higher notes, as you can see by noting the differences in the inharmonicitysampling times.
Auto Partial Selection
As stated in Chapter 1, the selection of which partial to use for each note can be modified by editing the tableof partials as a whole, or by making individual on-the-fly changes. Sometimes individual bass strings are foundto be weak in the pre-selected partial, making it difficult to tune them. You could manually try different partials,or you can let TuneLab change to a different partial by enabling the option for automatic partial selection. Thisoption can be found under Edit Options. You specify a note below which automatic partial selection mayoccur, and how high a partial you will allow to be selected automatically. The default is to disable automaticpartial selection completely. If you select a higher limiting note in your Options, then the lower notes will haveautomatic partial selection enabled.
When automatic partial selection is enabled for a note, the partial selection may change during the first fewseconds after you switch to that note. TuneLab will not change partials unless it finds a qualified partial that isat least twice as strong as the currently selected partial. TuneLab will change partials only once for each noteswitch. If an automatic partial change does occur, that change is treated exactly the same as if you had madethe change on the fly manually. In particular, if the Persistent Partials option is enabled, the change isincorporated immediately into the current tuning file.
Aural Temperament Tuning Sequences
Normally TuneLab sequences from one note to the next in chromatic half-steps. But what if you want tofollow a sequence like those that are used in aural tuning, perhaps as a training aid in learning aural tuning? Forthis purpose TuneLab provides aural temperament sequence control.
First, select an aural sequence file by going to the File menu and clicking on Select Aural Tuning Sequence.An aural sequence is specified by a file that lists the notes contained in the sequence in the order that theyshould be seen. The TuneLab installation contains one such file named “4ths and 5ths.txt”, but you can makeothers. The aural sequence files are simple text files and they reside in the Aural Sequences folder under thesame folder where you keep your tuning files (usually My Documents\TuneLab Pro). Any text files that youcreate and place in this folder will be accessible as an aural sequence file. If you would like to add more auraltemperament sequence files, use Notepad or some other text processor and make a file that lists the notes youwant to include in the sequence in the same format that is used by “4ths and 5ths.txt” and place the new fileinto the same Aural Sequences folder.
After you have made a selection, the note switching mode will show “aural sequence” instead of “Auto up”, or“Manual note”, etc., and the first note in the sequence will be selected automatically. Once TuneLab is in theaural sequence mode, you can switch to the next note in the sequence by pressing the space bar. You can goto the previous note in the sequence by pressing the Backspace key. There is no automatic (hands-free) noteswitching in aural sequence mode.
36

Once an aural sequence has been selected, you can change back to some other note switching mode and returnto aural sequences again later by selecting aural sequence from the Modes menu, or by pressing Cntl-A.TuneLab remembers the last aural sequence file used so you don’t have to select it again.
Using Alternate Intervals on the Deviation Curve Display
In Edit Options there is an option that defines an additional interval that can be displayed in the deviationcurve for both the bass and the treble sections. By default, only the intervals you select in the selection boxeson the screen are displayed in black and green in the deviation curve. But if you specify an alternate interval,that interval will also be displayed with a light blue trace. The alternate intervals are not used in any automaticadjustments. They are displayed just for informational purposes.
The alternate intervals can be useful when adjusting the tuning curve if you want to ensure that two differentintervals come out the way you want them. For example, suppose the regular interval selections are 6:3 singleoctaves for the bass and 4:1 double octave for the treble. Then suppose that we also define alternate intervalsof 8:4 single octaves in the bass and 4:2 single octaves in the treble. The deviation curves might look like this:
Note how the 4:1 interval (shown in black and green) is about 1.8 cents wide at the middle of the scale andgradually becomes beatless in the high treble. However the 4:2 interval (shown in light blue) is beatless in themiddle of the scale (at D#5) and becomes about 6 cents narrow at the very top of the scale.
This actually is a very desirable outcome. The 4:2 interval is more important in the middle of the scale, and the4:1 interval generally is considered a better standard for judging the high treble. The two traces in the deviationcurve show a gradual transition from beatless 4:2 octaves in the middle and beatless 4:1 double octaves in thehigh treble.
In the bass, we see that while the 6:3 octaves (in black and green) are all fairly good, the 8:4 octaves (in blue)generally are narrow throughout the bass.
When alternate intervals are specified, the usual Zoom function (activated by the Z key) is modified slightly.Normally the Zoom function redraws the curves so that they are just contained in the display. A secondconsecutive Zoom will return to the original default zoom level. But if an alternate interval is specified, thereare three stages in setting the zoom.
37
1. The first application of the Zoom function redraws the display to just contain the primaryintervals in the deviation curve. The alternate intervals are allowed to run off the top or bottomof the graph.
2. The second application of the Zoom function redraws the display to just contain both the primaryand alternate intervals. Nothing is allowed to run off the top or bottom of the display.
3. The third application of the Zoom function redraws the display with the original zoom settings,allowing the alternate intervals again to run off the top or bottom of the screen.
38

Menu Items and Options
Here is an item-by-item list of the menus used in TuneLab Pro.
FileNew
New Tuning File - clears out any existing tuning file data and loads from DEFAULTSplit Scale Tuning File - asks for the break, then starts new tuning fileUnequal Temperament File
…by manually entering offsets - If you know the 12 offsets that define an new unequaltemperament, you can enter them here and make your own temperament file.
…from Current Custom Stretch values - If you have a piano that has been tuned aurallyin an unequal temperament and you would like to make a file that duplicates thattemperament, match at least one octave from that tuning using Custom Stretch values andthen choose this menu item to use those Custom Stretch values to make an unequaltemperament file.
Open Tuning File - lets you choose an existing tuning file to loadSave Tuning File - saves the current tuning data into the current tuning file nameSave Tuning File As… - saves the current tuning data and lets you choose a new file nameRead Temperament File - lets you choose an existing unequal temperament file, (or press F5)Rotate Temperament Starting Note - lets you transpose a temperament so that it is based on
some other note besides CCancel Temperament - returns the current tuning to equal temperamentSelect Aural Tuning Sequence - lets you pick a file that defines the tuning sequence you wantCalibration
Calibrate to External Reference - TuneLab calibrates to a reference tone, such as the NISTtones or some other trusted source of pitch.
Calibrate to Internet Time Server Reference – Six hour unattended process of calibratingby means of precise time references.
Calibrate Sound Gen from Listen Mode - Choose this item only if you need precise soundgeneration capability and have already done a basic calibration of TuneLab in the listeningmode.
Save Overpull Pre-measurements - Use this function after you are done tuning a piano in over-pull mode if you want a record of all the pre-measurements for off-line study.
Exit - Exit from TuneLab. TuneLab will prompt you if you need to save a tuning file first.Edit
39
Chapter
9
Edit Inharmonicity Constants - Review and possibly edit the inharmonicity constants that resultedfrom inharmonicity measurements, (or press Insert) (Not generally needed)
Edit Template Tuning Curve – This item switches the screen to the tuning curve adjuster. You canalso switch to the tuning curve adjuster by pressing the T key on the keyboard.
Edit Partials – This item allows you to review and possibly change the table of partials currently inuse. This table will be saved with the current tuning if you save the tuning file, (or press P)
Change Partial Lower - overrides the tuning file and changes to a lower partial, (or press F3)Change Partial Higher - overrides the tuning file and changes to a higher partial, (or press F4)Enter Offsets - Allows you to enter the Overall Offset or Custom Stretch offsets, (or press F6)Transfer Offset to Custom Stretch - If you have adjusted the offset for the current note and
would like to make that offset a permanent feature of the tuning for the current note only, use thismenu item, (or press F9)
Edit Options - allows the setting of various options, listed laterView
Zoom Spectrum DisplayWide View - shows many partials at once, (or press “-”)+/- 260 cents - shows ±260 cents around the current note and partial, (or press “+” or “-”)+/- 130 cents - shows ±130 cents around the current note and partial, (or press “+” or “-”)+/- 50 cents - shows ±50 cents around the current note and partial, (or press “+”or “-”)+/- 260 cents with Middle Zoom - shows ±260 cents with an expanded display of ±10 cents +/- 130 cents with Middle Zoom - shows ±130 cents with an expanded display of ±10 cents
Exam Scoring - If you have matched an examinee’s tuning by transferring all his/her offsets toCustom Stretch values, use this function to compare the resulting tuning with a previously savedmaster tuning which was also recorded using the Custom Stretch values.
Comments for this tuning - Lets you save comments attached to the current tuning fileModes
Generate Sound Output - switches to making tones instead of listening to them, (or press S)Listen to Sound Input - switches back to listening instead of generating tones, (or press S)Note Switching
Manual only - change notes manually (Shift down arrow)Auto up - enables auto note switching to higher notes (Shift right arrow)Auto down - enables auto note switching to lower notes (Shift left arrow)Auto both directions - enables auto switching in either direction (Shift left and right arrows)Auto Measure - enables auto sequencing through defined notes to measure for a new tuningAural Tuning Sequence - enables following an aural tuning sequence that was previously
selected from the File menu (Cntl-A)Over-pull Mode - Manage all the phases of Over-pull tuning, (or press F2)Locking Mode – This item enables the mode where TuneLab automatically adjusts the offset to
match the tone that it hears. See the chapter on “All About Offsets” for more information.Tuning Exam
Detuning - adds detuning offset for test prepCapture - displays offsets rounded to 0.1 cents and makes it easy to record them as CustomStretch values for saving into a master tuning or examinee tuning file
40
Stop - turns off detuning or capture modes and goes back to normalRecord A4 Fundamental for RPT Exam – assumes overall offset is the A4 error
HelpHelp Topics - invokes the complete help file for referenceTutorial - invokes a special help file that leads you through a step-by-step tutorialAbout this version - gives information about this version of the programEnter License Information - lets you convert the free trial version to the paid version
Options (in Edit Options box)
Spectrum DisplayUse wide traces in spectrum graph - makes traces three pixels wide instead of one pixelFont Size for tuning error display in spectrum graph – to make this number easier to read
Phase DisplaySpeed Factor - scales the speed of the phase display for all notesSwitch to Cents at… - This item specifies the note at which the speed of the phase display switches to
cents. Below this note, the speed of the phase display is based on beats. One beat of pitch error meansone complete cycle of the phase display (if Speed Factor is set to 1). Above the specified note, thephase display speed represents the pitch error in cents. The higher you put this changeover point, thefaster the phase display will be for the higher notes.
InharmonicityStart Measuring Inharmonicity Immediately – used for new tunings to avoid having to click on the
Measure button to start each measurementMeasure Sequence - allows you to redefine which notes are to be measured for inharmonicity in a
new tuning
PartialsMake partial changes persistent – This option remembers in the tuning file any changes made to the
selected partial using the F3/F4 keys. If this option is not checked, all such changes are temporary, andthe partial selections in the tuning file stay as they are.
Auto Partial Selection – This option specifies which notes, if any, should use automatic partial selection.This option is for the lowest bass notes. See Chapter 8 for details. The default is for no auto partialselection. The highest partial that may be used can also be specified.
Create sound with partials and inharmonicity – Instead of the normal operation of creating toneswith a single partial, this option causes tone generation to be a complex combination of partials.
Edit table of partials - allows you to edit the partials used in tuning, either for the current tuning or fornewly-generated tunings
TemperamentsNormalize Historical Temperaments – This option allows the selection of three types of
normalization: none (as is), normalize so that A=0, and normalize so that the average offset=0. The
41
normalization shifts all 12 offsets for tuning but does not change the original offsets in the tuning file orthe temperament file.
FilesTreating Offsets between sessions and tuning files - allows you to specify if the overall offset
will be saved and restored from tuning files or between times when the TuneLab program is startedup
Always start TuneLab with the tuning file that was last used - Normally when TuneLab isstarted up, the tuning in effect is a no-stretch “untitled” tuning. When this option is selected,TuneLab remembers the tuning file in effect when it is shut down and automatically loads thattuning file when it is started up again.
Comment Files have this extenstion - Normally TuneLab is started up, the tuning in effect is ano-stretch “untitled” tuning. When this option is selected, TuneLab remembers the tuning filein effect when it is shut down and automatically loads that tuning file when it is started upagain.
IntervalsSpecify alternate intervals for display in the deviation curve.
© 2017 Real-Time Specialties(734) 434-2412
www.tunelab-world.com
42