tutorial: bust darts in top-down knitting 1 this table for calculating and recording your results:...
TRANSCRIPT

Tutorial: Bust Darts in Top-down Knitting 1 ___________________________________________________________________________________________________________
___________________________________________________________________________________________________________ © by Christina Körber-Reith (aka strickauszeit), 2015. For any questions please contact me: www.ravelry.com/people/strickauszeit or send an email: [email protected]. This tutorial is only for personal use. Please do not reproduce or sell this tutorial.
Bust darts are a wonderful shaping technique for accentuating curves and customizing a garment to ensure proper and desired fit. To determine if they are appropriate for you, please refer to my tutorial “Measuring Yourself, Choosing a Size, and Adjusting for Proper Fit”, which contains explanations and hints to help you decide. There are two ways to work bust darts: vertically or horizontally. For vertical bust darts you will work increases above the fullest part of the bust. If desired, corresponding decreases are then worked below the fullest part of the bust. For horizontal bust darts you will work short rows below the fullest part of the bust. In top-down knitting both vertical bust darts and horizontal bust darts are worked after finishing the armhole and casting on stitches under the arm. Work your sweater until this point then, to give your sweater more stability, work two more rows/rounds of the body. Then stop. To create a perfect fit, I recommend working both sleeves before working the bust darts. The sleeves have an impact on the fit of the upper body of your sweater, pulling the shoulder section into the proper shape and widening the neck opening a little bit. As a result your sweater will fit differently (and more accurately) with sleeves than without sleeves. Thus, the correct placement of the bust darts should be determined based on the fit of the sweater with sleeves. Otherwise there is the danger of placing the bust darts in a wrong position – something which could cause more harm than good. Finally, after finishing both sleeves I recommend washing the knitted piece. Washing often affects the large item differently than the small swatch. When you wash it before starting the bust darts, you can take into account the expected changes and plan accordingly. Instructions for how to wash the knitted piece on your needles are provided in my tutorial “Measuring Yourself, Choosing a Size, and Adjusting for Proper Fit”. The information included in this tutorial appears lengthy, and includes detailed step-by-step directions for several different options. Once you get a feel for the process, however, creating bust darts should become relatively uncomplicated and even fun. Spending some time to familiarize yourself with the technique and investing some effort in a few simple calculations will surely pay off in the form of a beautiful, custom-fit garment you will be able to wear proudly.
A. Vertical bust darts Vertical bust darts add width in the front where it is needed for the bust. For vertical bust darts you will first work some increases to reach the stitch number for your full chest measurement, then you will work a straight section across the fullest part of the bust and finally you will work decreases under the bust to come back to the original stitch number or to reach the stitch number you want for your under chest measurement. The number of decreases does not necessarily have to equal the increases. It is also possible to work only increases and omit the decreases. This is a good solution when you don’t want a tight fitting sweater below your bust, but prefer more room in the front in order to hide your belly. Working only increases is also perfect for cardigans which are fitted above the bust but have looser, draping fronts. There are different ways to work the increases and decreases for the vertical bust darts. I will show you two basic versions and give hints for making modifications.
Tutorial: Bust Darts in Top-down Knitting 2 ___________________________________________________________________________________________________________
___________________________________________________________________________________________________________ © by Christina Körber-Reith (aka strickauszeit), 2015. For any questions please contact me: www.ravelry.com/people/strickauszeit or send an email: [email protected]. This tutorial is only for personal use. Please do not reproduce or sell this tutorial.
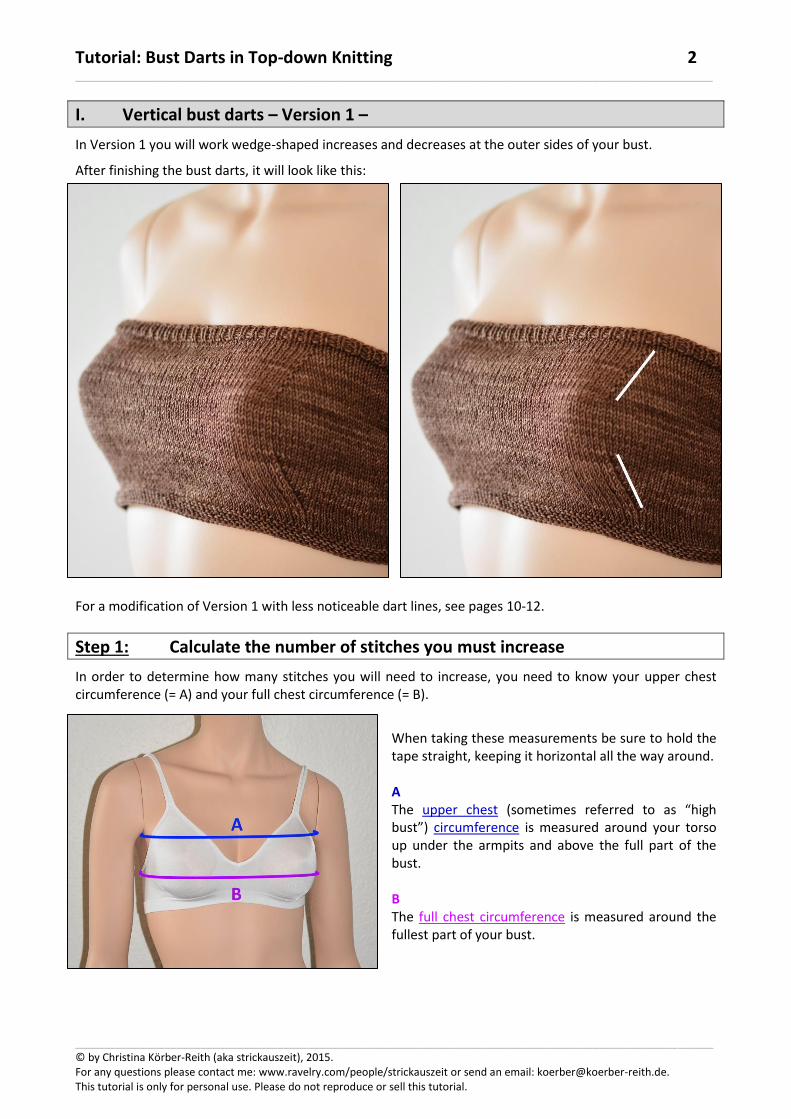
I. Vertical bust darts – Version 1 – In Version 1 you will work wedge-shaped increases and decreases at the outer sides of your bust. After finishing the bust darts, it will look like this:
For a modification of Version 1 with less noticeable dart lines, see pages 10-12.
Step 1: Calculate the number of stitches you must increase In order to determine how many stitches you will need to increase, you need to know your upper chest circumference (= A) and your full chest circumference (= B).
When taking these measurements be sure to hold the tape straight, keeping it horizontal all the way around. A The upper chest (sometimes referred to as “high bust”) circumference is measured around your torso up under the armpits and above the full part of the bust. B The full chest circumference is measured around the fullest part of your bust.

Tutorial: Bust Darts in Top-down Knitting 3 ___________________________________________________________________________________________________________
___________________________________________________________________________________________________________ © by Christina Körber-Reith (aka strickauszeit), 2015. For any questions please contact me: www.ravelry.com/people/strickauszeit or send an email: [email protected]. This tutorial is only for personal use. Please do not reproduce or sell this tutorial.
To calculate the number of stitches you must increase for each bust dart, proceed as follows: Subtract the upper chest circumference from the full chest circumference (B minus A). This difference
(= C) is the total number of cm/inches you must add in the front for your full bust.
Calculate the number of stitches you must increase (= D) by multiplying C by your stitch gauge per 1 cm/1 inch. Round D up or down to the next even number.
Because you will work two bust darts (one each at the left and right sides), divide this number D by 2. Now you know how many stitches you must increase for each bust dart (= E).
Use this table for calculating and recording your results:
Example (cm)
Example (inches)
Your notes
A Upper chest circumference 94 37
B Full chest circumference 100 39.5
C Total width to add in the front: Subtract A from B 100 - 94 = 6 39.5 - 37 = 2.5
D
Stitch gauge per 1 cm/1 inch 2.8 sts 7 sts
Stitches to increase: Multiply C by your stitch gauge 6 x 2.8 = 16.8 2.5 x 7 = 17.5
Round up or down to the next even number 18 sts 18 sts
E Increases at each bust dart: Divide D by 2 18 : 2 = 9 sts 18 : 2 = 9 sts
Step 2: Determine where to begin the increases Next you must determine where to begin the increase section for the vertical bust darts. In other words, how many rows/rounds must you work even after the underarm cast on and before beginning the bust dart increases? The increases should end approximately 1 cm/0.5” above the fullest part of the bust.
So have a look in the mirror and determine the fullest part of your bust. Using a tape measure find the vertical length from the top of the shoulder (the imaginary shoulder seam) to the fullest part of your bust, measuring straight down along the side of the bust (= F). Use the photo as a guide; do not measure down the front or on an angle. Subtract 1 cm/0.5 inch from F (= G). Note: You can also determine G directly by measuring from the top of the shoulder to the spot where you want to end your bust dart.
To calculate the number of rows/rounds you must work even between the underarm cast on and the increases, proceed as follows: Subtract the sweater’s armhole depth (see pattern schematic) from G. Now you know how many
cm/inches you have for working the increase section after the armhole (= H).

Tutorial: Bust Darts in Top-down Knitting 4 ___________________________________________________________________________________________________________
___________________________________________________________________________________________________________ © by Christina Körber-Reith (aka strickauszeit), 2015. For any questions please contact me: www.ravelry.com/people/strickauszeit or send an email: [email protected]. This tutorial is only for personal use. Please do not reproduce or sell this tutorial.
The blue line is the armhole depth. H describes the distance between the end of the armhole and the end of the increase section for the bust darts. This is the maximum length for working the increase section. Tip: To be sure about your calculated results, try on the sweater and measure straight down from the underarm cast-on stitches to see where your measurement H ends. Does it end at your preferred point above the fullest part of your bust?
Multiply H by your row/round gauge per 1 cm/1 inch to calculate the maximum number of rows/rounds in which you can work the increases. Round your result up or down to the next even number (= I).
Now calculate the actual number of rows/rounds required to complete your increase section (= J). In general, you want to work the increases only on RS-rows (when working a cardigan) or in every other round (when working a pullover), so you must multiply your number of increases (E) by 2. The result is the total number of rows/rounds you need for your increase section (J).
Subtract J from I. Now you know how many rows/rounds you have to work even after casting on stitches under the arm and before starting the increase section (= K).
Use this table for calculating and recording your results:
Example (cm)
Example (inches)
Your notes
F Vertical length from shoulder to fullest part of bust 27 10.5
G Shortened Length: Subtract 1 cm/0.5 inch from F 27 - 1 = 26 10.5 - 0.5 = 10
H Subtract the armhole depth from G 26 - 20 = 6 10 - 7.75 = 2.25
I
Row/Round gauge per 1 cm/1 inch 3.8 R/Rd 9.5 R/Rd
R/Rd available for incs: Multiply H by R/Rd gauge 6 x 3.8 = 22.8 2.25 x 9.5 = 21.25
Round up or down to the next even number 22 R/Rd 22 R/Rd
J R/Rd for actual increases: Multiply E by 2 9 x 2 = 18 R/Rd 9 x 2 = 18 R/Rd
K R/Rd to work even: Subtract J from I 22 - 18 = 4 R/Rd 22 - 18 = 4 R/Rd Special note for larger busts: If your row/round number J is bigger than your row/round number I, in other words if you need more rows/rounds for your increases than you have available according to your measurement H, you must make a modification in calculating J, which is based on increasing every other row/round. You may have to work some or all of the increases in every row/round in order to fit them all in above the fullest part of the bust. In this situation I recommend working at least two rows/rounds even after casting on the stitches under the arm (this provides some stability at the underarm) and then start the increases. For example: If your row/round number J is 26 R/Rd (E = 13 sts) and I is 22 R/Rd, then begin by working 2 R/Rd even (= new modified K). Now you have 20 R/Rd more to work the increases (= I – 2 R/Rd even). In these 20 R/Rd you can work 10 increases every second R/Rd, so you have three additional increases which must be worked evenly into the increase section. Another solution is to work the bust dart increases every second row/round, working only as many as you can fit in the allotted space, and working additional increases elsewhere (e.g. neckline shaping of a cardigan or V-neck) to make up the difference.

Tutorial: Bust Darts in Top-down Knitting 5 ___________________________________________________________________________________________________________
___________________________________________________________________________________________________________ © by Christina Körber-Reith (aka strickauszeit), 2015. For any questions please contact me: www.ravelry.com/people/strickauszeit or send an email: [email protected]. This tutorial is only for personal use. Please do not reproduce or sell this tutorial.
Step 3: Determine the sideways placement of the vertical bust darts Next you must determine how far from the side seams you should work your first increase and your last increase. To do this we will work backwards.
Step 3a: Determine the final increase stitch First determine where you want the final increase stitch. You want to avoid placing the vertical bust darts directly over the nipples – this would unwantedly highlight them. Ideally you want at least 2.5 cm/1 inch between the final increase stitch and the nipple. I think it is easier to mark this stitch on your knitted piece rather than measuring on your body. Measuring is a little bit complicated due to the roundness of the bust. But if you want to measure and calculate, do this as follows:
Measure the distance between the imaginary side seam (center underarm) and your nipple (= L). Subtract 2.5 cm/1 inch from your result to get the distance from the side seam to the desired spot of the final increase (= M). Then calculate the number of stitches by multiplying M by your stitch gauge per 1 cm/1 inch (= N). This is the number of stitches between the side seam of your sweater and the end marker for the final increase stitch. Place markers (M1) on right front and left front, N stitches in from the side seams.
Use this table for calculating and recording your results:
Example (cm)
Example (inches)
Your notes
L Distance side seam to nipple 15 6
M Subtract 2.5 cm/1 inch from L 15 - 2.5 = 12.5 6 - 1 = 5
N Stitch gauge per 1 cm/1 inch 2.8 sts 7 sts
Multiply M by your stitch gauge 12.5 x 2.8 = 35 sts 5 x 7 = 35 sts For marking the final increase stitch without measuring, proceed as follows:
Try on the sweater and take a look in the mirror. Place removable markers or paperclips on the stitches that lie directly above your nipples (think of a straight vertical line from your nipples up to the last row/ round of your sweater). Then take off the sweater. Now move each marker approximately 2.5 cm/ 1 inch outwards, towards the side seams of the sweater. These markers are the markers M1. Make sure that both markers are equidistant from the side seams (count the number of stitches between the M1 marker and the side seam marker on each side; the number of stitches must be the same on both sides).

Tutorial: Bust Darts in Top-down Knitting 6 ___________________________________________________________________________________________________________
___________________________________________________________________________________________________________ © by Christina Körber-Reith (aka strickauszeit), 2015. For any questions please contact me: www.ravelry.com/people/strickauszeit or send an email: [email protected]. This tutorial is only for personal use. Please do not reproduce or sell this tutorial.
Try on the sweater again and check the position of the markers in the mirror, making sure they are even and approximately 2.5 cm/1 inch outside the nipples. Then take the sweater off again.
Step 3b: Determine the first increase stitch This next step is easy. In Step 1 you calculated how many stitches to increase for each bust dart (E). Beginning at each M1, count E stitches toward the side seam and place an additional removable marker or paperclip (M2) before the next stitch. You have now E stitches on each side between M1 and M2. The placement of your markers M1 and M2 should look like this:
Step 4: Working the increase section Now you are ready to continue knitting, but before proceeding take a look at the knitting sequence. The order you work the darts in each row/round, depends on whether you are making a cardigan or a pullover. When working a cardigan, you will be working the following sequence on right side rows: Beginning at center front, first you will work the left front stitches including the left bust dart, then you will work the back stitches and finally you will work the right front stitches including the right bust dart.
When working a pullover, you will be working the following sequence: Assuming the beginning of the round is at the back left side, you will first work the back stitches and then the front stitches, including first the right bust dart and then the left bust dart.

Tutorial: Bust Darts in Top-down Knitting 7 ___________________________________________________________________________________________________________
___________________________________________________________________________________________________________ © by Christina Körber-Reith (aka strickauszeit), 2015. For any questions please contact me: www.ravelry.com/people/strickauszeit or send an email: [email protected]. This tutorial is only for personal use. Please do not reproduce or sell this tutorial.
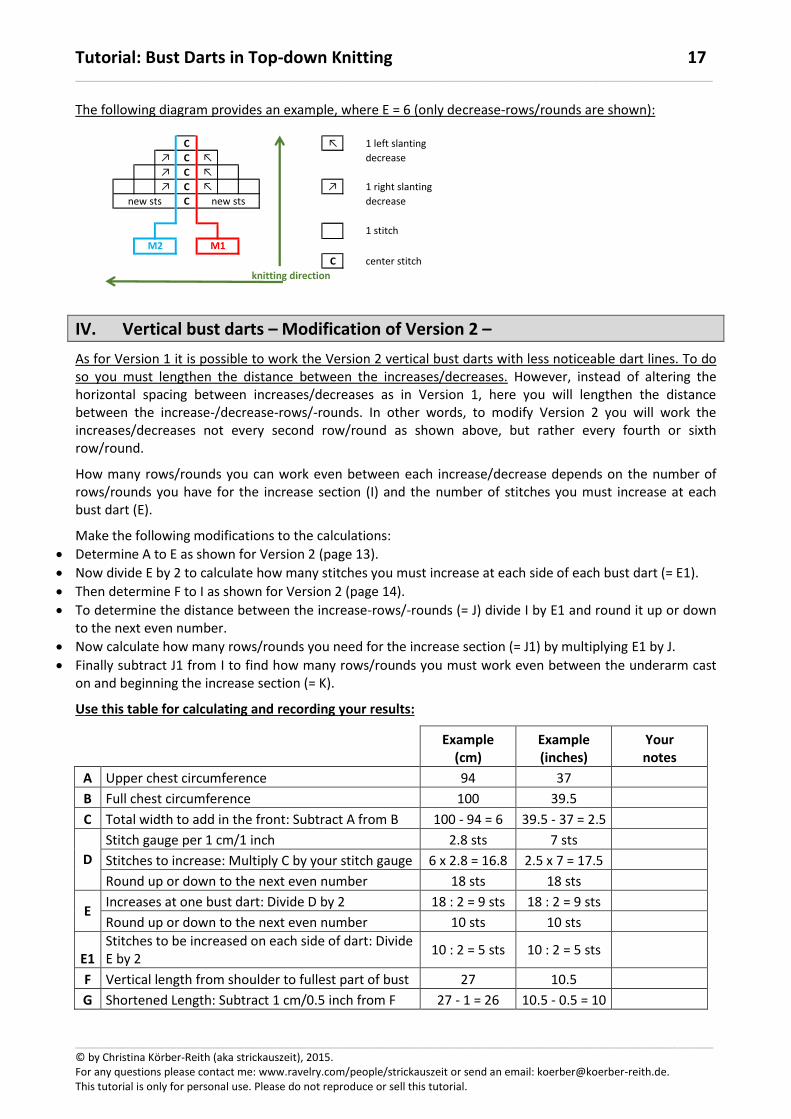
Once you have determined the proper sequence for your sweater, continue knitting as follows: Follow the general pattern instructions and at the same time work the bust darts as follows: First work even ___(K) rows/rounds (see Step 2). Then start working the increase section for the bust darts: Increase section right bust dart (worked 1st for pullover; worked 2nd for cardigan): R 1 (RS)/Rd 1: work to M2, slip M2, make a left slanting increase, work to M1, slip M1. R 2 (WS)/Rd 2 and every following WS-row/second Rd: work without any increases. R 3/Rd 3: work to M2, slip M2, work 1 st, make a left slanting increase, work to M1, slip M1. R 5/Rd 5: work to M2, slip M2, work 2 sts, make a left slanting increase, work to M1, slip M1. Continue the increases in this way, always working the increase 1 stitch to the left of the previous one, until you have increased all ___ (E) stitches. Now place a new marker (M3) after the final increased stitch. You will notice that the increases have moved the marker M1 to the left. Now the marker M3 should lie in the previous position of the marker M1 beside your nipple. The following diagram provides an example, where E = 6 (only increase-rows/rounds are shown): Increase section left bust dart (worked 1st for cardigan; worked 2nd for pullover): R 1 (RS)/Rd 1: work to M1, slip M1, work to M2, make a right slanting increase, slip M2. R 2 (WS)/Rd 2 and every following WS-row/second Rd: work without any increases. R 3/Rd 3: work to M1, slip M1, work to 1 st before M2, make a right slanting increase, work 1 st, slip M2. R 5/Rd 5: work to M1, slip M1, work to 2 sts before M2, make a right slanting increase, work 2 sts, slip M2. Continue the increases in this way, always working the increase 1 stitch before (i.e., to the right of) the previous one, until you have increased all ___ (E) stitches. Now place a new marker (M3) before the final increased stitch. You will notice that the increases have moved the marker M1 to the right. Now the marker M3 should lie in the previous position of the marker M1 beside your nipple. The following diagram provides an example, where E = 6 (only increase-rows/rounds are shown):
↖ ↖ 1 left slanting
↖ increase
↖
↖ 1 stitch
↖
↖
6 5 4 3 2 1
knitting direction
M2
M3
6 new stitches 6 original stitches
M1
↗ ↗ 1 right slanting
↗ increase
↗
↗ 1 stitch
↗
↗
1 2 3 4 5 6
knitting direction
M3
M2
6 original stitches6 new stitches
M1

Tutorial: Bust Darts in Top-down Knitting 8 ___________________________________________________________________________________________________________
___________________________________________________________________________________________________________ © by Christina Körber-Reith (aka strickauszeit), 2015. For any questions please contact me: www.ravelry.com/people/strickauszeit or send an email: [email protected]. This tutorial is only for personal use. Please do not reproduce or sell this tutorial.
Step 5: Working around the fullest part of your bust When you have finished the increase section, work even, following the general pattern instructions, until the sweater is approximately 1 cm/0.5 inch past the fullest part of your bust. Now you are ready to work the decrease section.
Step 6: Working the decrease section In this section you will decrease all the increased stitches (see next page for exceptions/modifications). Paying close attention to the sequence you are working, continue knitting your sweater as follows: Follow the general pattern instructions and at the same time work the bust darts as follows: Decrease section right bust dart (worked 1st for pullover; worked 2nd for cardigan): R 1 (RS)/Rd 1: work to M2, slip M2, work to the last 2 sts before M3, work a right slanting decrease (making 1 st from next 2 sts), slip M3, work to M1, slip M1. Note: You may now remove M1. R 2 (WS)/Rd 2 and every following WS-row/second Rd: work without any decreases. Continue the decreases as described for R 1/Rd 1 until you have decreased all previously increased stitches (E). The following diagram provides an example, where E = 6 (only decrease-rows/rounds are shown): Decrease section left bust dart (worked 1st for cardigan; worked 2nd for pullover): R 1 (RS)/Rd 1: work to M1, slip M1, work to M3, slip M3, work a left slanting decrease (making 1 st from next 2 sts), work to M2, slip M2. Note: You may now remove M1. R 2 (WS)/Rd 2 and every following WS-row/second Rd: work without any decreases. Continue the decreases as described for R 1/Rd 1 until you have decreased all previously increased stitches (E). The following diagram provides an example, where E = 6 (only decrease-rows/rounds are shown):
6 5 4 3 2 1
↗
↗ ↗ 1 right slanting
↗ decrease
↗ (e.g. k2tog)
↗
↗ 1 stitch
knitting direction
M1 M3
6 original stitches 6 new stitches
M2
1 2 3 4 5 6
↖
↖ ↖ 1 left slanting
↖ decrease
↖ (e.g. ssk)
↖
↖ 1 stitch
knitting direction
M3
6 original stitches6 new stitches
M1M2

Tutorial: Bust Darts in Top-down Knitting 9 ___________________________________________________________________________________________________________
___________________________________________________________________________________________________________ © by Christina Körber-Reith (aka strickauszeit), 2015. For any questions please contact me: www.ravelry.com/people/strickauszeit or send an email: [email protected]. This tutorial is only for personal use. Please do not reproduce or sell this tutorial.
Modifications in the decrease section As described in the introduction, you may omit the decrease section or work fewer decreases than increases. In the latter case, work as shown in Step 6 but decrease only your preferred stitch number, then stop the decrease section. For a very tight fitting sweater under the bust you could also work more decreases than increases. In this case you would need both the measurement of your full chest circumference (= B; see Step 1) and the measurement of your under chest circumference (= O).
O The under chest circumference is measured up under the bust around your torso. Be sure to hold the measuring tape straight, keeping it horizontal all the way around.
To calculate the number of stitches you must decrease for the bust darts, proceed as follows: Subtract the under chest circumference from the full chest circumference (B minus O). This is the total
cm/inches you will want to subtract in the front for your under bust measurement (= P).
Calculate the number of stitches you must decrease (= Q) by multiplying P by your stitch gauge per 1 cm/1 inch. Round Q up or down to the next even number.
Now divide this number Q by 2. This is the number of stitches you must decrease on each side in the decrease section (= R). Use this number instead of E when working your bust dart decreases.
Use this table for calculating and recording your results:
Example (cm)
Example (inches)
Your notes
B Full chest circumference 100 39.5
O Under chest circumference 90 35.5
P Width to subtract in the front: Subtract O from B 100 - 90 = 10 39.5 - 35.5 = 4
Q
Stitch gauge per 1 cm/1 inch 2.8 sts 7 sts
Stitches to decrease: Multiply P by your stitch gauge 10 x 2.8 = 28 4 x 7 = 28
Round up or down to the next even number 28 sts 28 sts
R Decreases at each bust dart: Divide Q by 2 28 : 2 = 14 sts 28 : 2 = 14 sts
Tutorial: Bust Darts in Top-down Knitting 10 ___________________________________________________________________________________________________________
___________________________________________________________________________________________________________ © by Christina Körber-Reith (aka strickauszeit), 2015. For any questions please contact me: www.ravelry.com/people/strickauszeit or send an email: [email protected]. This tutorial is only for personal use. Please do not reproduce or sell this tutorial.
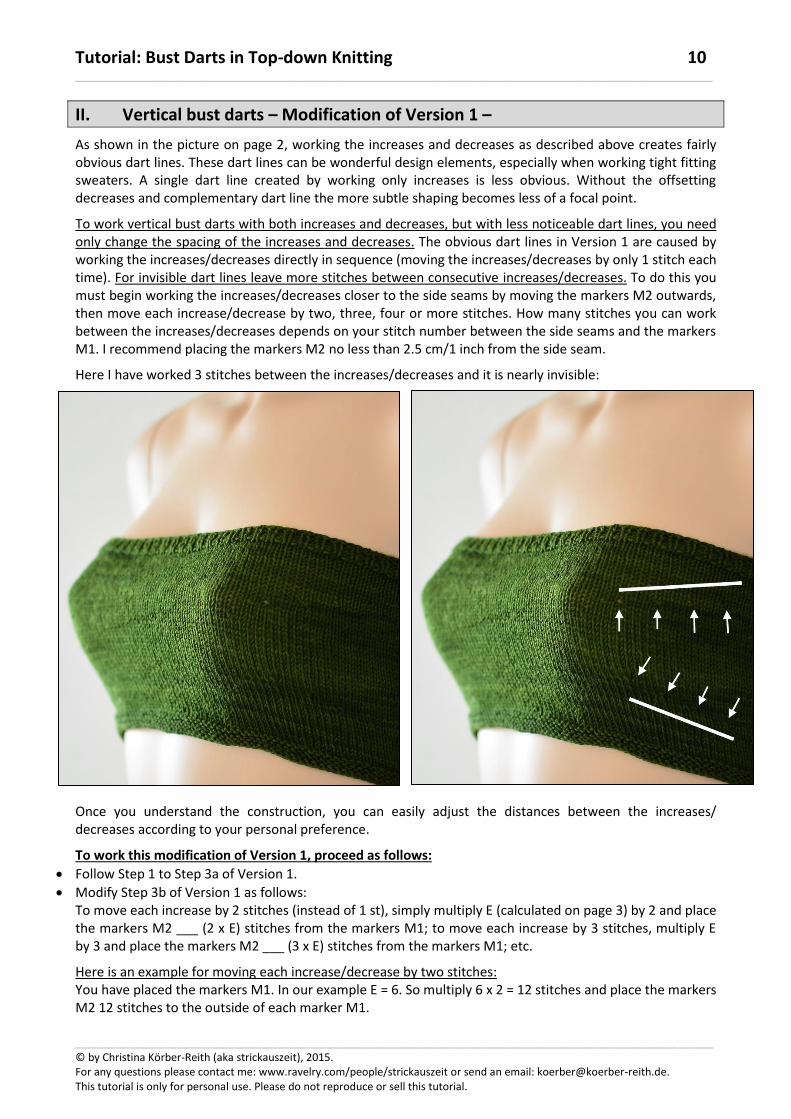
II. Vertical bust darts – Modification of Version 1 – As shown in the picture on page 2, working the increases and decreases as described above creates fairly obvious dart lines. These dart lines can be wonderful design elements, especially when working tight fitting sweaters. A single dart line created by working only increases is less obvious. Without the offsetting decreases and complementary dart line the more subtle shaping becomes less of a focal point. To work vertical bust darts with both increases and decreases, but with less noticeable dart lines, you need only change the spacing of the increases and decreases. The obvious dart lines in Version 1 are caused by working the increases/decreases directly in sequence (moving the increases/decreases by only 1 stitch each time). For invisible dart lines leave more stitches between consecutive increases/decreases. To do this you must begin working the increases/decreases closer to the side seams by moving the markers M2 outwards, then move each increase/decrease by two, three, four or more stitches. How many stitches you can work between the increases/decreases depends on your stitch number between the side seams and the markers M1. I recommend placing the markers M2 no less than 2.5 cm/1 inch from the side seam. Here I have worked 3 stitches between the increases/decreases and it is nearly invisible: Once you understand the construction, you can easily adjust the distances between the increases/ decreases according to your personal preference. To work this modification of Version 1, proceed as follows:
Follow Step 1 to Step 3a of Version 1.
Modify Step 3b of Version 1 as follows: To move each increase by 2 stitches (instead of 1 st), simply multiply E (calculated on page 3) by 2 and place the markers M2 ___ (2 x E) stitches from the markers M1; to move each increase by 3 stitches, multiply E by 3 and place the markers M2 ___ (3 x E) stitches from the markers M1; etc. Here is an example for moving each increase/decrease by two stitches: You have placed the markers M1. In our example E = 6. So multiply 6 x 2 = 12 stitches and place the markers M2 12 stitches to the outside of each marker M1.

Tutorial: Bust Darts in Top-down Knitting 11 ___________________________________________________________________________________________________________
___________________________________________________________________________________________________________ © by Christina Körber-Reith (aka strickauszeit), 2015. For any questions please contact me: www.ravelry.com/people/strickauszeit or send an email: [email protected]. This tutorial is only for personal use. Please do not reproduce or sell this tutorial.
Increase section right bust dart (worked 1st for pullover; worked 2nd for cardigan): R 1 (RS)/Rd 1: work to M2, slip M2, work 1 st, make a left slanting increase, work to M1, slip M1. R 2 (WS)/Rd 2 and every following WS-row/second Rd: work without any increases. R 3/Rd 3: work to M2, slip M2, work 3 sts, make a left slanting increase, work to M1, slip M1. R 5/Rd 5: work to M2, slip M2, work 5 sts, make a left slanting increase, work to M1, slip M1. Continue the increases in this way, always moving the increases 2 stitches to the left by working 1 stitch past the previous increased stitch then making a left slanting increase of your choice. When you have increased all ___ (E) stitches, place a new marker (M3) after the final increased stitch. The following diagram provides an example, where E = 6 and each increase is moved by 2 stitches (only increase-rows/rounds are shown):
Increase section left bust dart (worked 1st for cardigan; worked 2nd for pullover): R 1 (RS)/Rd 1: work to M1, slip M1, work to the last st before M2, make a right slanting increase, work 1 st, slip M2. R 2 (WS)/Rd 2 and every following WS-row/second Rd: work without any increases. R 3/Rd 3: work to M1, slip M1, work to 3 sts before M2, make a right slanting increase, work 3 sts, slip M2. R 5/Rd 5: work to M1, slip M1, work to 5 sts before M2, make a right slanting increase, work 5 sts, slip M2. Continue the increases in this way, always moving the increases to the right by working to the stitch before the last increased stitch, then making a right slanting increase of your choice, then working to marker M2. When you have increased all ___ (E) stitches, place a new marker (M3) before the final increased stitch. The following diagram provides an example, where E = 6 and each increase is moved by 2 stitches (only increase-rows/rounds are shown):
After finishing the increase section, follow Step 5 of Version 1 and work even around the full part of the bust.
↖ 1 left slanting
↖ increase
↖
↖ 1 stitch
↖
↖ 1 new stitch
↖
6 5 4 3 2 1 6 5 4 3 2 1
knitting direction
M3
6 original stitches 6 original stitches and 6 new stitches
M1 M2
↗ ↗ 1 right slanting
↗ increase
↗
↗ 1 stitch
↗
↗ 1 new stitch
1 2 3 4 5 6 1 2 3 4 5 6
knitting direction
6 original stitches
M1
6 original and 6 new stitches
M2
M3
Tutorial: Bust Darts in Top-down Knitting 12 ___________________________________________________________________________________________________________
___________________________________________________________________________________________________________ © by Christina Körber-Reith (aka strickauszeit), 2015. For any questions please contact me: www.ravelry.com/people/strickauszeit or send an email: [email protected]. This tutorial is only for personal use. Please do not reproduce or sell this tutorial.
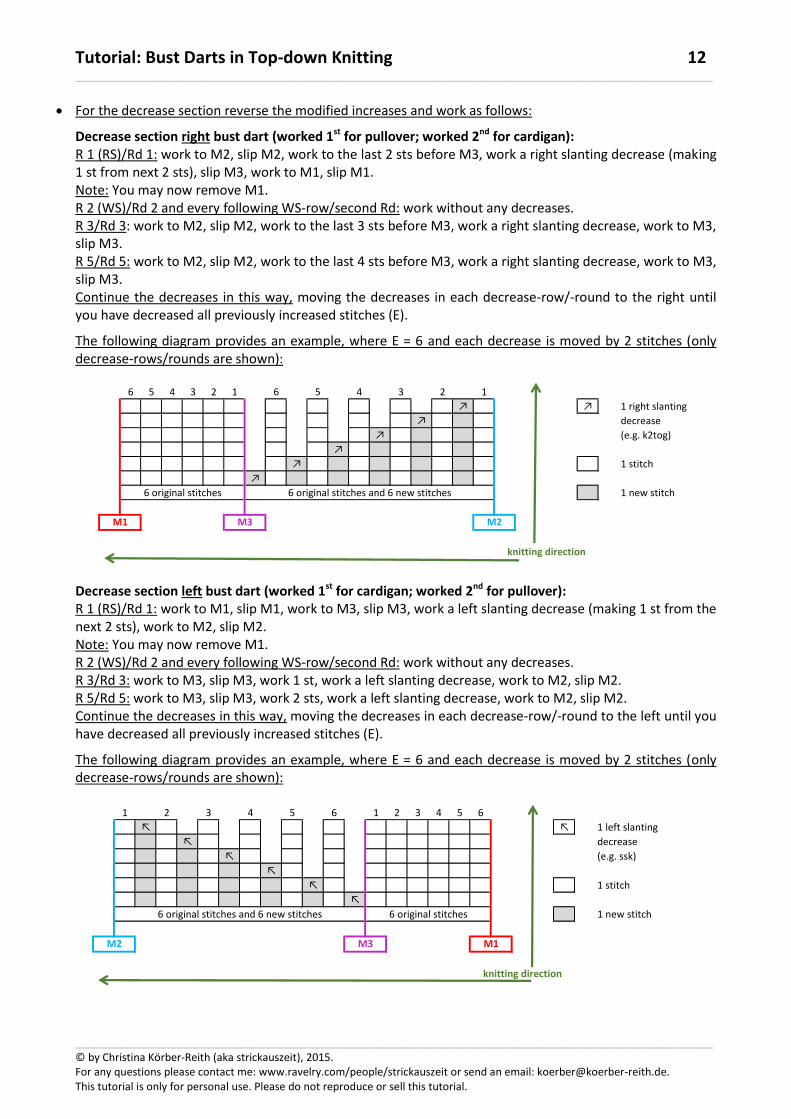
For the decrease section reverse the modified increases and work as follows: Decrease section right bust dart (worked 1st for pullover; worked 2nd for cardigan): R 1 (RS)/Rd 1: work to M2, slip M2, work to the last 2 sts before M3, work a right slanting decrease (making 1 st from next 2 sts), slip M3, work to M1, slip M1. Note: You may now remove M1. R 2 (WS)/Rd 2 and every following WS-row/second Rd: work without any decreases. R 3/Rd 3: work to M2, slip M2, work to the last 3 sts before M3, work a right slanting decrease, work to M3, slip M3. R 5/Rd 5: work to M2, slip M2, work to the last 4 sts before M3, work a right slanting decrease, work to M3, slip M3. Continue the decreases in this way, moving the decreases in each decrease-row/-round to the right until you have decreased all previously increased stitches (E). The following diagram provides an example, where E = 6 and each decrease is moved by 2 stitches (only decrease-rows/rounds are shown): Decrease section left bust dart (worked 1st for cardigan; worked 2nd for pullover): R 1 (RS)/Rd 1: work to M1, slip M1, work to M3, slip M3, work a left slanting decrease (making 1 st from the next 2 sts), work to M2, slip M2. Note: You may now remove M1. R 2 (WS)/Rd 2 and every following WS-row/second Rd: work without any decreases. R 3/Rd 3: work to M3, slip M3, work 1 st, work a left slanting decrease, work to M2, slip M2. R 5/Rd 5: work to M3, slip M3, work 2 sts, work a left slanting decrease, work to M2, slip M2. Continue the decreases in this way, moving the decreases in each decrease-row/-round to the left until you have decreased all previously increased stitches (E). The following diagram provides an example, where E = 6 and each decrease is moved by 2 stitches (only decrease-rows/rounds are shown):
6 5 4 3 2 1 6 5 4 3 2 1
↗ ↗ 1 right slanting
↗ decrease
↗ (e.g. k2tog)
↗
↗ 1 stitch
↗
1 new stitch
knitting direction
6 original stitches 6 original stitches and 6 new stitches
M3M1 M2
1 2 3 4 5 6 1 2 3 4 5 6
↖ ↖ 1 left slanting
↖ decrease
↖ (e.g. ssk)
↖
↖ 1 stitch
↖
1 new stitch
knitting direction
6 original stitches
M3 M1
6 original stitches and 6 new stitches
M2

Tutorial: Bust Darts in Top-down Knitting 13 ___________________________________________________________________________________________________________
___________________________________________________________________________________________________________ © by Christina Körber-Reith (aka strickauszeit), 2015. For any questions please contact me: www.ravelry.com/people/strickauszeit or send an email: [email protected]. This tutorial is only for personal use. Please do not reproduce or sell this tutorial.
III. Vertical bust darts – Version 2 – In Version 2 you will work diamond-shaped increases and decreases on each side of your bust. After finishing the bust darts, it will look like this: For a modification of Version 2 with less noticeable dart lines, see pages 17 and 18.
Step 1: Calculate the number of stitches you must increase Follow Step 1 of Version 1, but with one modification: The stitch number E must be an even number. So round E up or down to the next even number. Use this table for calculating and recording your results:
Example (cm)
Example (inches)
Your notes
A Upper chest circumference 94 37
B Full chest circumference 100 39.5
C Total width to add in the front: Subtract A from B 100 - 94 = 6 39.5 - 37 = 2.5
D
Stitch gauge per 1 cm/1 inch 2.8 sts 7 sts
Stitches to increase: Multiply C by your stitch gauge 6 x 2.8 = 16.8 2.5 x 7 = 17.5
Round up or down to the next even number 18 sts 18 sts
E Increases at one bust dart: Divide D by 2 18 : 2 = 9 sts 18 : 2 = 9 sts
Round up or down to the next even number 10 sts 10 sts
Tutorial: Bust Darts in Top-down Knitting 14 ___________________________________________________________________________________________________________
___________________________________________________________________________________________________________ © by Christina Körber-Reith (aka strickauszeit), 2015. For any questions please contact me: www.ravelry.com/people/strickauszeit or send an email: [email protected]. This tutorial is only for personal use. Please do not reproduce or sell this tutorial.
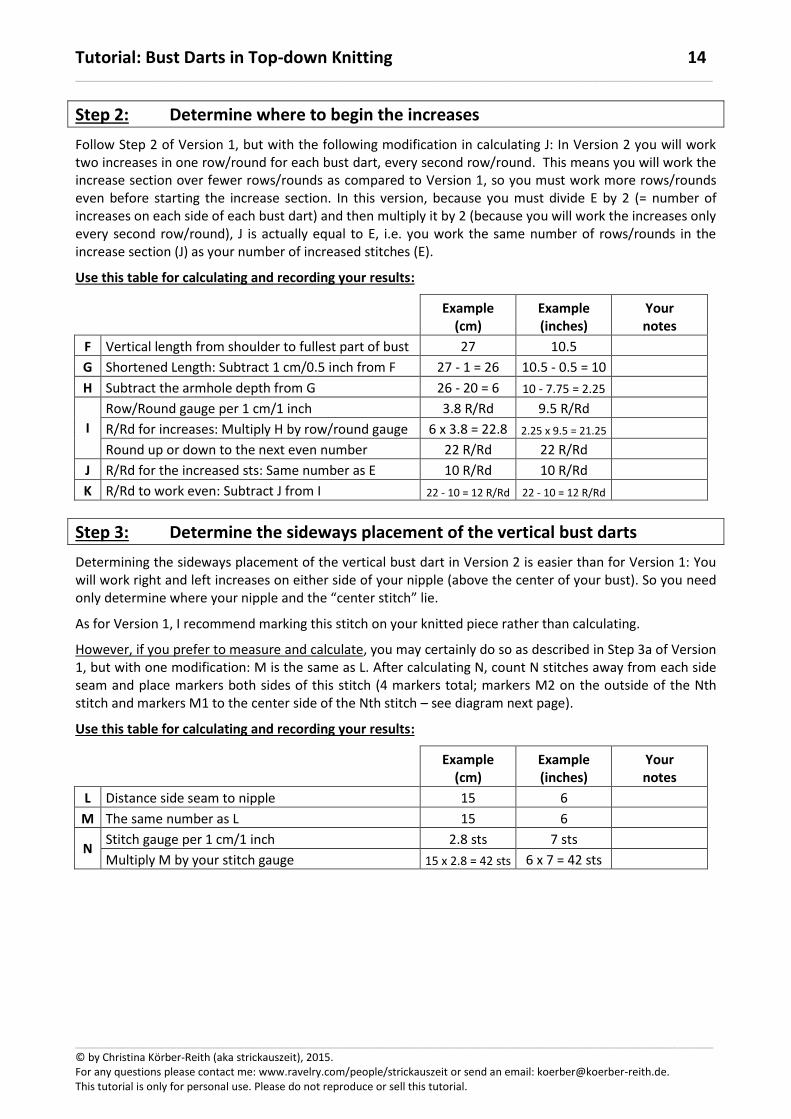
Step 2: Determine where to begin the increases Follow Step 2 of Version 1, but with the following modification in calculating J: In Version 2 you will work two increases in one row/round for each bust dart, every second row/round. This means you will work the increase section over fewer rows/rounds as compared to Version 1, so you must work more rows/rounds even before starting the increase section. In this version, because you must divide E by 2 (= number of increases on each side of each bust dart) and then multiply it by 2 (because you will work the increases only every second row/round), J is actually equal to E, i.e. you work the same number of rows/rounds in the increase section (J) as your number of increased stitches (E). Use this table for calculating and recording your results:
Example (cm)
Example (inches)
Your notes
F Vertical length from shoulder to fullest part of bust 27 10.5
G Shortened Length: Subtract 1 cm/0.5 inch from F 27 - 1 = 26 10.5 - 0.5 = 10
H Subtract the armhole depth from G 26 - 20 = 6 10 - 7.75 = 2.25
I
Row/Round gauge per 1 cm/1 inch 3.8 R/Rd 9.5 R/Rd
R/Rd for increases: Multiply H by row/round gauge 6 x 3.8 = 22.8 2.25 x 9.5 = 21.25
Round up or down to the next even number 22 R/Rd 22 R/Rd
J R/Rd for the increased sts: Same number as E 10 R/Rd 10 R/Rd
K R/Rd to work even: Subtract J from I 22 - 10 = 12 R/Rd 22 - 10 = 12 R/Rd
Step 3: Determine the sideways placement of the vertical bust darts Determining the sideways placement of the vertical bust dart in Version 2 is easier than for Version 1: You will work right and left increases on either side of your nipple (above the center of your bust). So you need only determine where your nipple and the “center stitch” lie. As for Version 1, I recommend marking this stitch on your knitted piece rather than calculating. However, if you prefer to measure and calculate, you may certainly do so as described in Step 3a of Version 1, but with one modification: M is the same as L. After calculating N, count N stitches away from each side seam and place markers both sides of this stitch (4 markers total; markers M2 on the outside of the Nth stitch and markers M1 to the center side of the Nth stitch – see diagram next page). Use this table for calculating and recording your results:
Example (cm)
Example (inches)
Your notes
L Distance side seam to nipple 15 6
M The same number as L 15 6
N Stitch gauge per 1 cm/1 inch 2.8 sts 7 sts
Multiply M by your stitch gauge 15 x 2.8 = 42 sts 6 x 7 = 42 sts

Tutorial: Bust Darts in Top-down Knitting 15 ___________________________________________________________________________________________________________
___________________________________________________________________________________________________________ © by Christina Körber-Reith (aka strickauszeit), 2015. For any questions please contact me: www.ravelry.com/people/strickauszeit or send an email: [email protected]. This tutorial is only for personal use. Please do not reproduce or sell this tutorial.
For marking the center stitch without measuring, proceed as follows: Try on the sweater and take a look in the mirror. Using removable markers or paperclips, mark the stitches that lie directly above your nipples (think of a straight vertical line from your nipples up to the last row/round of your sweater). Then take off the sweater. Now place markers on both sides of these center stitches. The markers nearer to the side seam are the markers M2, the markers closer to the center front are the markers M1. Make sure that the markers M2 are equidistant from the side seams (count the number of stitches between the marker and the side seam marker on each side; the number of stitches must be the same on both sides).
The placement of your markers M1 and M2 on both sides should like this:
Tip: It is also possible to work more than one center stitch. So feel free to place the markers farther apart and work 3 or 5 or more center stitches. How many center stitches you like to work, depends on your personal preference. The more center stitches you are working, the more separated the increases (and later the decreases) at each bust dart will be.
Step 4: Working the increase section Please refer to Version 1 Step 4 (page 6) for the difference in knitting sequence for cardigans and pullovers. Follow the general pattern instructions and at the same time work the bust darts: First work even ___(K) rows/rounds (see Step 2). Then start working the increase section for the bust darts: Increase section right bust dart (worked 1st for pullover; worked 2nd for cardigan): R 1 (RS)/Rd 1: work to M2, make a right slanting increase, slip M2, work the center stitch(es), slip M1, make a left slanting increase. R 2 (WS)/Rd 2 and every following WS-row/second Rd: work without any increases. Continue the increases as described for R 1/Rd 1 until you have increased all ___ (E) stitches. The following diagram provides an example, where E = 6 (only increase-rows/rounds are shown):
C ↖ 1 left slanting
↖ C ↗ increase
↖ C ↗
↖ C ↗ ↗ 1 right slanting
C increase
1 stitch
C center stitch
knitting direction
new sts
M2M1
new sts

Tutorial: Bust Darts in Top-down Knitting 16 ___________________________________________________________________________________________________________
___________________________________________________________________________________________________________ © by Christina Körber-Reith (aka strickauszeit), 2015. For any questions please contact me: www.ravelry.com/people/strickauszeit or send an email: [email protected]. This tutorial is only for personal use. Please do not reproduce or sell this tutorial.
Increase section left bust dart (worked 1st for cardigan; worked 2nd for pullover): R 1 (RS)/Rd 1: work to M1, make a right slanting increase, slip M1, work the center stitch(es), slip M2, make a left slanting increase. R 2 (WS)/Rd 2 and every following WS-row/second Rd: work without any increases. Continue the increases as described for R 1/Rd 1 until you have increased all ___ (E) stitches. The following diagram provides an example, where E = 6 (only increase-rows/rounds are shown):
Step 5: Working around the fullest part of your bust When you have finished the increase section, work even, following the general pattern instructions, until the sweater is approximately 1 cm/0.5 inch past the fullest part of your bust. Now you are ready to work the decrease section.
Step 6: Working the decrease section Paying close attention to the sequence you are working, continue knitting your sweater as follows: Follow the general pattern instructions and at the same time work the bust darts as follows: Decrease section right bust dart (worked 1st for pullover; worked 2nd for cardigan): R 1 (RS)/Rd 1: work to 2 sts before M2, work a left slanting decrease, slip M2, work the center stitch(es), slip M1, work a right slanting decrease. R 2 (WS)/Rd 2 and every following WS-row/second Rd: work without any decreases. Continue the decreases as described for R 1/Rd 1 until you have decreased all previously increased stitches (E). The following diagram provides an example, where E = 6 (only decrease-rows/rounds are shown): Decrease section left bust dart (worked 1st for cardigan; worked 2nd for pullover): R 1 (RS)/Rd 1: work to 2 sts before M1, work a left slanting decrease, slip M1, work the center stitch(es), slip M2, work a right slanting decrease. R 2 (WS)/Rd 2 and every following WS-row/second Rd: work without any decreases. Continue the decreases as described for R 1/Rd 1 until you have decreased all previously increased stitches (E).
C ↖ 1 left slanting
↖ C ↗ increase
↖ C ↗
↖ C ↗ ↗ 1 right slanting
C increase
1 stitch
C center stitch
knitting direction
new stsnew sts
M1M2
C ↖ 1 left slanting
↗ C ↖ decrease
↗ C ↖
↗ C ↖ ↗ 1 right slanting
C decrease
1 stitch
C center stitch
knitting direction
M2M1
new sts new sts
Tutorial: Bust Darts in Top-down Knitting 17 ___________________________________________________________________________________________________________
___________________________________________________________________________________________________________ © by Christina Körber-Reith (aka strickauszeit), 2015. For any questions please contact me: www.ravelry.com/people/strickauszeit or send an email: [email protected]. This tutorial is only for personal use. Please do not reproduce or sell this tutorial.
The following diagram provides an example, where E = 6 (only decrease-rows/rounds are shown):
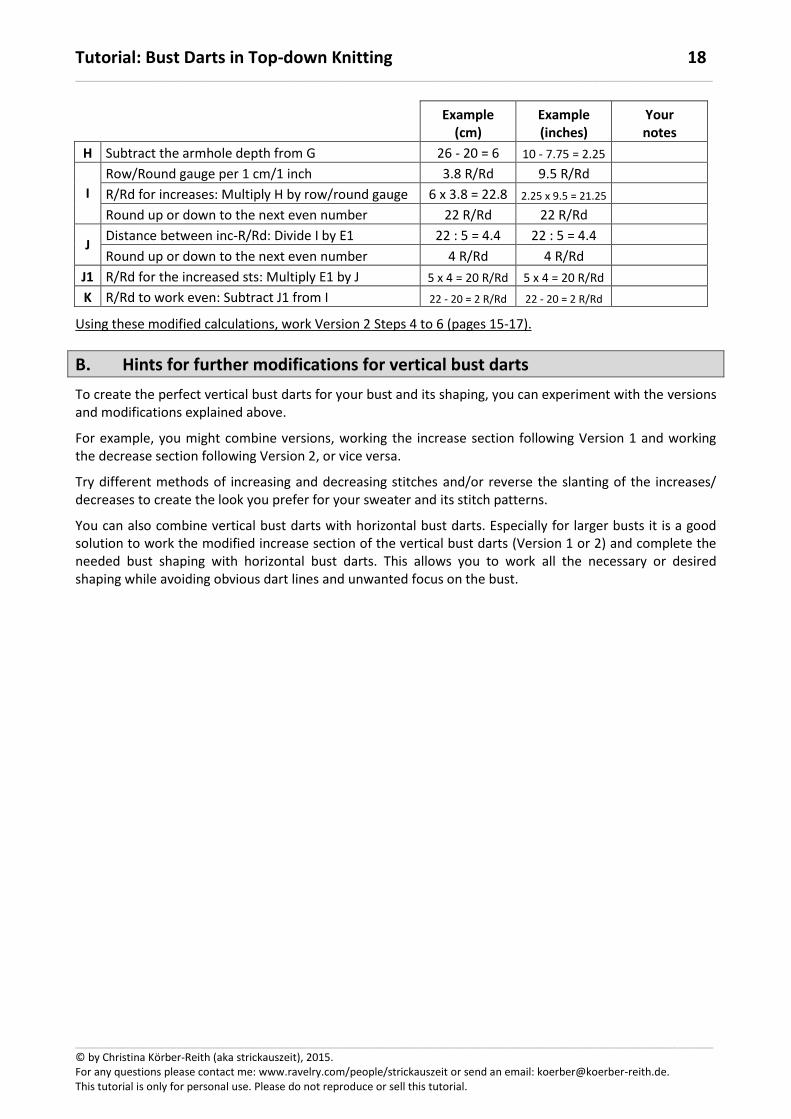
IV. Vertical bust darts – Modification of Version 2 – As for Version 1 it is possible to work the Version 2 vertical bust darts with less noticeable dart lines. To do so you must lengthen the distance between the increases/decreases. However, instead of altering the horizontal spacing between increases/decreases as in Version 1, here you will lengthen the distance between the increase-/decrease-rows/-rounds. In other words, to modify Version 2 you will work the increases/decreases not every second row/round as shown above, but rather every fourth or sixth row/round. How many rows/rounds you can work even between each increase/decrease depends on the number of rows/rounds you have for the increase section (I) and the number of stitches you must increase at each bust dart (E). Make the following modifications to the calculations:
Determine A to E as shown for Version 2 (page 13).
Now divide E by 2 to calculate how many stitches you must increase at each side of each bust dart (= E1).
Then determine F to I as shown for Version 2 (page 14).
To determine the distance between the increase-rows/-rounds (= J) divide I by E1 and round it up or down to the next even number.
Now calculate how many rows/rounds you need for the increase section (= J1) by multiplying E1 by J.
Finally subtract J1 from I to find how many rows/rounds you must work even between the underarm cast on and beginning the increase section (= K).
Use this table for calculating and recording your results:
Example (cm)
Example (inches)
Your notes
A Upper chest circumference 94 37
B Full chest circumference 100 39.5
C Total width to add in the front: Subtract A from B 100 - 94 = 6 39.5 - 37 = 2.5
D
Stitch gauge per 1 cm/1 inch 2.8 sts 7 sts
Stitches to increase: Multiply C by your stitch gauge 6 x 2.8 = 16.8 2.5 x 7 = 17.5
Round up or down to the next even number 18 sts 18 sts
E Increases at one bust dart: Divide D by 2 18 : 2 = 9 sts 18 : 2 = 9 sts
Round up or down to the next even number 10 sts 10 sts
E1 Stitches to be increased on each side of dart: Divide E by 2
10 : 2 = 5 sts 10 : 2 = 5 sts
F Vertical length from shoulder to fullest part of bust 27 10.5
G Shortened Length: Subtract 1 cm/0.5 inch from F 27 - 1 = 26 10.5 - 0.5 = 10
C ↖ 1 left slanting
↗ C ↖ decrease
↗ C ↖
↗ C ↖ ↗ 1 right slanting
C decrease
1 stitch
C center stitch
knitting direction
M1M2
new sts new sts
Tutorial: Bust Darts in Top-down Knitting 18 ___________________________________________________________________________________________________________
___________________________________________________________________________________________________________ © by Christina Körber-Reith (aka strickauszeit), 2015. For any questions please contact me: www.ravelry.com/people/strickauszeit or send an email: [email protected]. This tutorial is only for personal use. Please do not reproduce or sell this tutorial.
Example (cm)
Example (inches)
Your notes
H Subtract the armhole depth from G 26 - 20 = 6 10 - 7.75 = 2.25
I
Row/Round gauge per 1 cm/1 inch 3.8 R/Rd 9.5 R/Rd
R/Rd for increases: Multiply H by row/round gauge 6 x 3.8 = 22.8 2.25 x 9.5 = 21.25
Round up or down to the next even number 22 R/Rd 22 R/Rd
J Distance between inc-R/Rd: Divide I by E1 22 : 5 = 4.4 22 : 5 = 4.4
Round up or down to the next even number 4 R/Rd 4 R/Rd
J1 R/Rd for the increased sts: Multiply E1 by J 5 x 4 = 20 R/Rd 5 x 4 = 20 R/Rd
K R/Rd to work even: Subtract J1 from I 22 - 20 = 2 R/Rd 22 - 20 = 2 R/Rd Using these modified calculations, work Version 2 Steps 4 to 6 (pages 15-17).
B. Hints for further modifications for vertical bust darts To create the perfect vertical bust darts for your bust and its shaping, you can experiment with the versions and modifications explained above. For example, you might combine versions, working the increase section following Version 1 and working the decrease section following Version 2, or vice versa. Try different methods of increasing and decreasing stitches and/or reverse the slanting of the increases/ decreases to create the look you prefer for your sweater and its stitch patterns. You can also combine vertical bust darts with horizontal bust darts. Especially for larger busts it is a good solution to work the modified increase section of the vertical bust darts (Version 1 or 2) and complete the needed bust shaping with horizontal bust darts. This allows you to work all the necessary or desired shaping while avoiding obvious dart lines and unwanted focus on the bust.
Tutorial: Bust Darts in Top-down Knitting 19 ___________________________________________________________________________________________________________
___________________________________________________________________________________________________________ © by Christina Körber-Reith (aka strickauszeit), 2015. For any questions please contact me: www.ravelry.com/people/strickauszeit or send an email: [email protected]. This tutorial is only for personal use. Please do not reproduce or sell this tutorial.
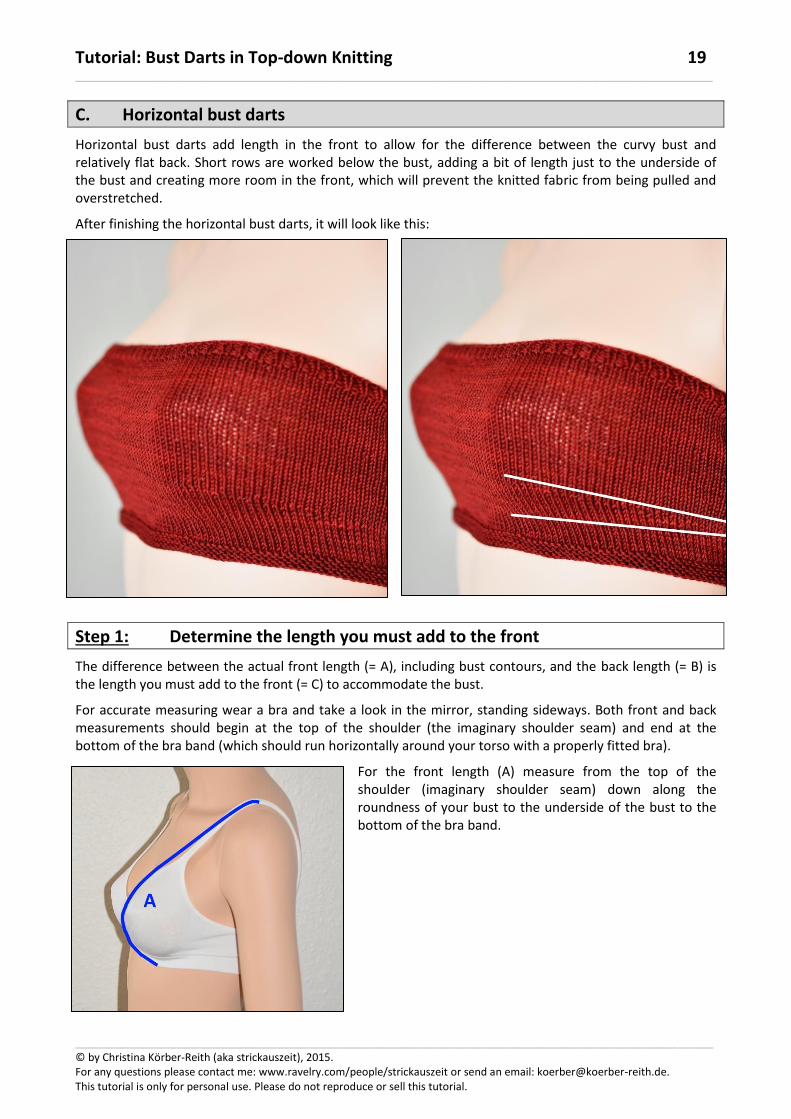
C. Horizontal bust darts Horizontal bust darts add length in the front to allow for the difference between the curvy bust and relatively flat back. Short rows are worked below the bust, adding a bit of length just to the underside of the bust and creating more room in the front, which will prevent the knitted fabric from being pulled and overstretched. After finishing the horizontal bust darts, it will look like this:
Step 1: Determine the length you must add to the front The difference between the actual front length (= A), including bust contours, and the back length (= B) is the length you must add to the front (= C) to accommodate the bust. For accurate measuring wear a bra and take a look in the mirror, standing sideways. Both front and back measurements should begin at the top of the shoulder (the imaginary shoulder seam) and end at the bottom of the bra band (which should run horizontally around your torso with a properly fitted bra).
For the front length (A) measure from the top of the shoulder (imaginary shoulder seam) down along the roundness of your bust to the underside of the bust to the bottom of the bra band.

Tutorial: Bust Darts in Top-down Knitting 20 ___________________________________________________________________________________________________________
___________________________________________________________________________________________________________ © by Christina Körber-Reith (aka strickauszeit), 2015. For any questions please contact me: www.ravelry.com/people/strickauszeit or send an email: [email protected]. This tutorial is only for personal use. Please do not reproduce or sell this tutorial.
For the back length (B) measure from the top of the shoulder (imaginary shoulder seam) straight down to the bottom of the bra band.
To determine the length you must add to the front (C), subtract B from A. You may also determine C as follows: Knit your top-down sweater until its length is just past the fullest part of your bust. Stop knitting, try on the sweater, and take a look in the mirror. Right now the front and back should appear uneven; the sweater ends lower across the back than in the front because the bust makes it “ride up”. Now consider what length needs to be added in the front to accommodate the bust and make the edge of the front(s) line up horizontally with the back. In other words, you want to measure the vertical distance between where the back bottom edge lies and where the front bottom edge lies. If necessary, enlist a friend to help with this, especially when working in Stockinette Stitch as the curling edges make this process a bit difficult. Your measured vertical distance is the measurement C = length to add to the front.
Step 2: Calculate the number of short rows required Calculate the number of short rows you must work (= D) as follows: Multiply C by your row gauge per 1 cm/1 inch. Round it up or down to the next even number.
Note: When working a pullover in rounds keep in mind that you will work the short rows flat. So check if you have a difference in your round gauge and your row gauge. In this case, calculate with the row gauge!
Because you work the short rows in right side/wrong side pairs, divide the number of rows (D) by 2. The result is the number of short rows you must work on right side and on wrong side (= E).
Use this table for calculating and recording your results:
Example (cm)
Example (inches)
Your notes
A Front length 38 14.95
B Back length 31 12.25
C Length to add at front: Subtract B from A 38 - 31 = 7 2.7
D
Row gauge per 1 cm/1 inch 3.8 R/Rd 9.5 R/Rd
Short rows to work: Multiply C by D 7 x 3.8 = 26.6 2.7 x 9.5 = 25.6
Round up or down to the next even number 26 R 26 R
E Short rows on RS/WS: Divide D by 2 26 : 2 = 13 R 26 : 2 = 13 R
Tutorial: Bust Darts in Top-down Knitting 21 ___________________________________________________________________________________________________________
___________________________________________________________________________________________________________ © by Christina Körber-Reith (aka strickauszeit), 2015. For any questions please contact me: www.ravelry.com/people/strickauszeit or send an email: [email protected]. This tutorial is only for personal use. Please do not reproduce or sell this tutorial.
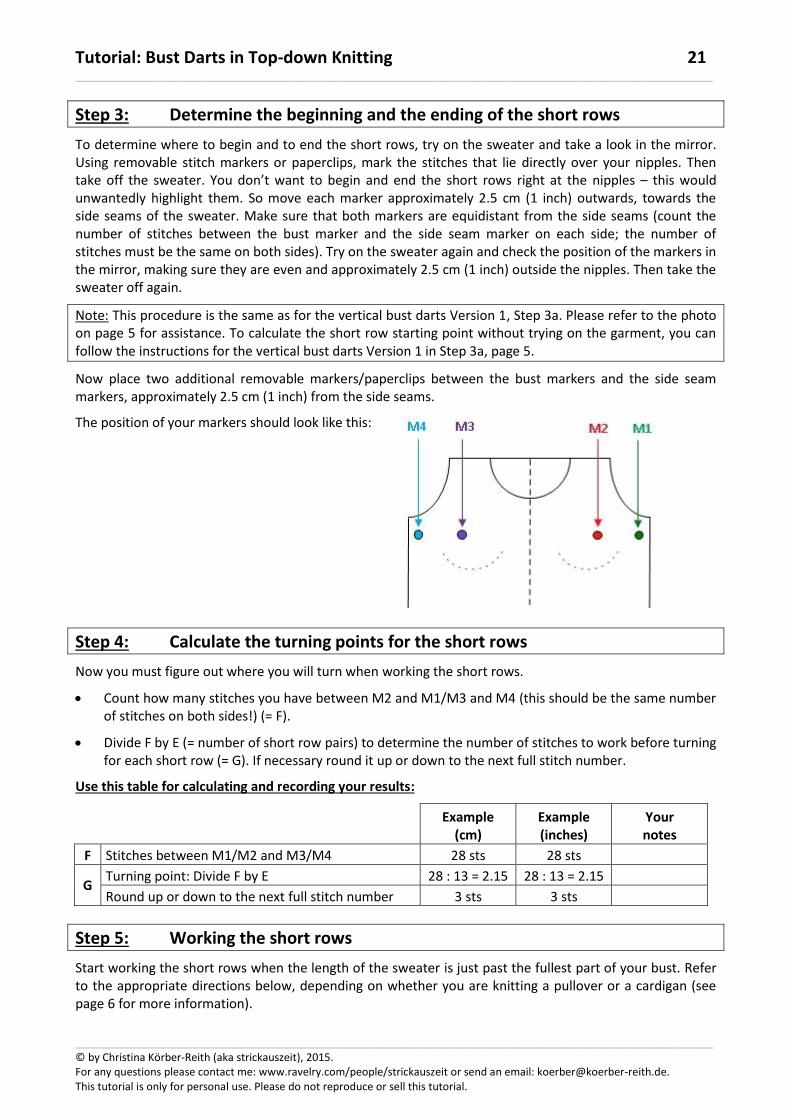
Step 3: Determine the beginning and the ending of the short rows To determine where to begin and to end the short rows, try on the sweater and take a look in the mirror. Using removable stitch markers or paperclips, mark the stitches that lie directly over your nipples. Then take off the sweater. You don’t want to begin and end the short rows right at the nipples – this would unwantedly highlight them. So move each marker approximately 2.5 cm (1 inch) outwards, towards the side seams of the sweater. Make sure that both markers are equidistant from the side seams (count the number of stitches between the bust marker and the side seam marker on each side; the number of stitches must be the same on both sides). Try on the sweater again and check the position of the markers in the mirror, making sure they are even and approximately 2.5 cm (1 inch) outside the nipples. Then take the sweater off again. Note: This procedure is the same as for the vertical bust darts Version 1, Step 3a. Please refer to the photo on page 5 for assistance. To calculate the short row starting point without trying on the garment, you can follow the instructions for the vertical bust darts Version 1 in Step 3a, page 5. Now place two additional removable markers/paperclips between the bust markers and the side seam markers, approximately 2.5 cm (1 inch) from the side seams. The position of your markers should look like this:
Step 4: Calculate the turning points for the short rows Now you must figure out where you will turn when working the short rows. Count how many stitches you have between M2 and M1/M3 and M4 (this should be the same number
of stitches on both sides!) (= F).
Divide F by E (= number of short row pairs) to determine the number of stitches to work before turning for each short row (= G). If necessary round it up or down to the next full stitch number.
Use this table for calculating and recording your results:
Example (cm)
Example (inches)
Your notes
F Stitches between M1/M2 and M3/M4 28 sts 28 sts
G Turning point: Divide F by E 28 : 13 = 2.15 28 : 13 = 2.15
Round up or down to the next full stitch number 3 sts 3 sts
Step 5: Working the short rows Start working the short rows when the length of the sweater is just past the fullest part of your bust. Refer to the appropriate directions below, depending on whether you are knitting a pullover or a cardigan (see page 6 for more information).

Tutorial: Bust Darts in Top-down Knitting 22 ___________________________________________________________________________________________________________
___________________________________________________________________________________________________________ © by Christina Körber-Reith (aka strickauszeit), 2015. For any questions please contact me: www.ravelry.com/people/strickauszeit or send an email: [email protected]. This tutorial is only for personal use. Please do not reproduce or sell this tutorial.
Detailed instructions for working “wrap and turn” short rows are given here; however, you may substitute any short row method you prefer. Working short rows in Stockinette Stitch by “wrapping and turning” Wrap and turn: RS-rows: Knit to turning point. Slip the next st purlwise (with yarn in back) from left hand needle to right hand needle. Bring the yarn between the needles to the front of work and slip the slipped st back to left hand needle. Turn work and bring the yarn to the working side between the needles (to the front to prepare for purling). The slipped st is now wrapped. WS-rows: Purl to turning point. Slip the next st purlwise (with yarn in front) from left hand needle to right hand needle. Bring the yarn between the needles to the back of work and slip the slipped st back to left hand needle. Turn work and bring the yarn to the working side between the needles (to the back to prepare for knitting). The slipped st is now wrapped. Hide wraps: RS-rows: Work to the wrapped st. Insert the right hand needle under the wrap, knitwise, then into the wrapped st and knit the wrap and the st together. WS-rows: Work to the wrapped st. Insert the right hand needle from behind into the back loop of the wrap and place it on the left hand needle. Purl it together with the wrapped st.
For a pullover, work the short rows for the horizontal bust darts as follows: R 1 (RS): work the back stitches to the beginning of the front stitches (right side seam), work the
front stitches to M2, slip M2, wrap the next stitch & turn. R 2 (WS): work to M3, slip M3, wrap the next stitch & turn. R 3 (RS): work to M2, slip M2, hide wrap, work your determined stitch number to turning point (= G
stitches), wrap & turn. R 4 (WS): work to M3, slip M3, hide wrap, work your determined stitch number to turning point (= G
stitches), wrap & turn. R 5 (RS): work to M2, slip M2, work to the wrapped stitch, hide wrap, work your determined stitch
number to turning point (= G stitches), wrap & turn. R 6 (WS): work to M3, slip M3, work to the wrapped stitch, hide wrap, work your determined stitch
number to turning point (= G stitches), wrap & turn. Repeat R 5 and R 6 until you have worked all ___ (E) short rows between M2 and M1 (RS-rows) and between M3 and M4 (WS-rows). After the final WS-row, work all the way to the beginning of round and resume working in the round.
Tutorial: Bust Darts in Top-down Knitting 23 ___________________________________________________________________________________________________________
___________________________________________________________________________________________________________ © by Christina Körber-Reith (aka strickauszeit), 2015. For any questions please contact me: www.ravelry.com/people/strickauszeit or send an email: [email protected]. This tutorial is only for personal use. Please do not reproduce or sell this tutorial.
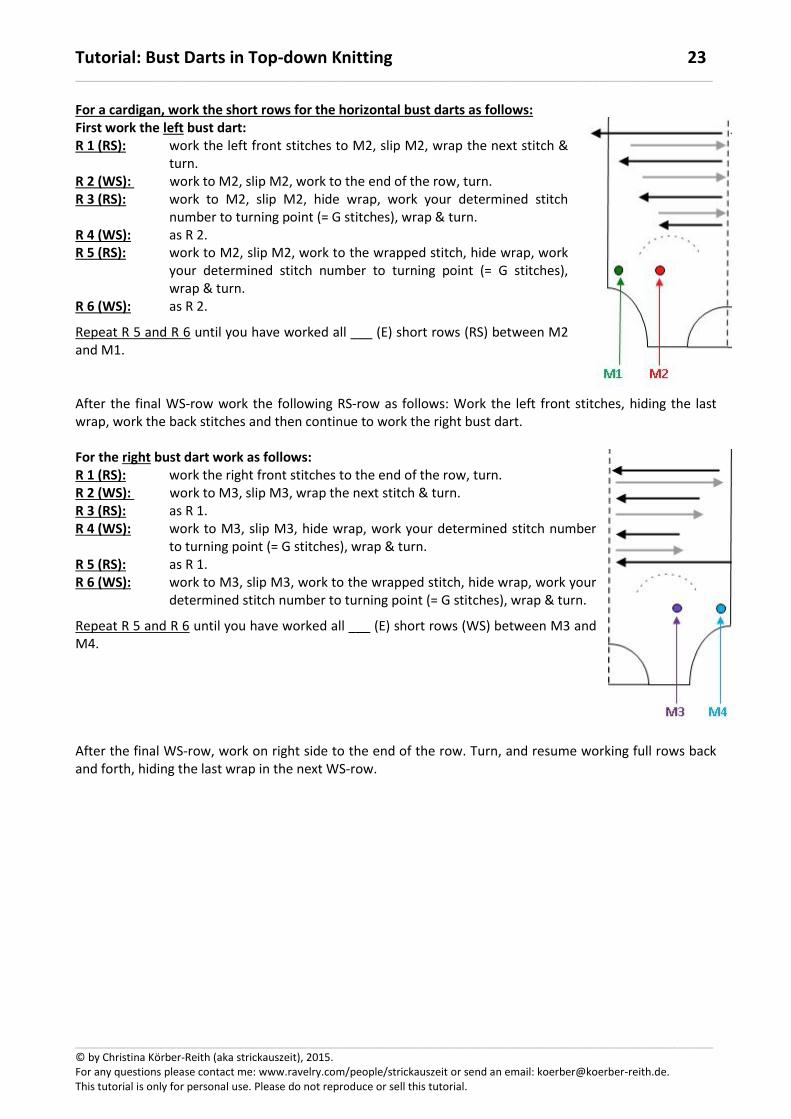
For a cardigan, work the short rows for the horizontal bust darts as follows: First work the left bust dart: R 1 (RS): work the left front stitches to M2, slip M2, wrap the next stitch &
turn. R 2 (WS): work to M2, slip M2, work to the end of the row, turn. R 3 (RS): work to M2, slip M2, hide wrap, work your determined stitch
number to turning point (= G stitches), wrap & turn. R 4 (WS): as R 2. R 5 (RS): work to M2, slip M2, work to the wrapped stitch, hide wrap, work
your determined stitch number to turning point (= G stitches), wrap & turn.
R 6 (WS): as R 2. Repeat R 5 and R 6 until you have worked all ___ (E) short rows (RS) between M2 and M1. After the final WS-row work the following RS-row as follows: Work the left front stitches, hiding the last wrap, work the back stitches and then continue to work the right bust dart. For the right bust dart work as follows: R 1 (RS): work the right front stitches to the end of the row, turn. R 2 (WS): work to M3, slip M3, wrap the next stitch & turn. R 3 (RS): as R 1. R 4 (WS): work to M3, slip M3, hide wrap, work your determined stitch number
to turning point (= G stitches), wrap & turn. R 5 (RS): as R 1. R 6 (WS): work to M3, slip M3, work to the wrapped stitch, hide wrap, work your
determined stitch number to turning point (= G stitches), wrap & turn. Repeat R 5 and R 6 until you have worked all ___ (E) short rows (WS) between M3 and M4. After the final WS-row, work on right side to the end of the row. Turn, and resume working full rows back and forth, hiding the last wrap in the next WS-row.