tutorials - your creativity store · pdf filefor hints, tips and information visit: tutorials...
TRANSCRIPT

TutorialsFor hints, tips and information visit:www.pencils.co.uk

Contents What is Manga?
Having only been in existence in its present form for
a mere fifty years, Manga can on first glance seem
like a relatively new art-form. However, the roots
of this ‘contemporary’ art form go back as far as the
nineteenth century in the form of Ukiyo-E; a Japanese
print made with carved blocks of wood. One of the
most famous names of this period was Hokusai. His
iconic images, so representative of Japanese art of
the time, showed scenes of daily life involving men,
women and animals. It was Hokusai himself who
coined the term Manga; a literal translation of which
means “irresponsible pictures.” Under the influence of
western comic styles, the Ukiyo-e art-form evolved to
become what we now regard as modern day Manga.
Names such as Hokusai were replaced by names like
Tezuka – whose early creations such as Astro boy are
often seen as the true beginnings of what we now
know as Manga.
Manga’s massive appeal today is often credited to
the sheer vastness of its content. Modern Manga
will show stories of the fantastical, the futuristic, the
romantic, and the everyday. The wealth and variety
of the stories and styles on offer mean that Manga can
provide something for everyone. Whatever your age
or interest, there is a Manga style out there for you.
Once you have completed these 3 chibi characters why
not try the Derwent Master Manga kit which contains
three different Manga characters.
What is Manga? 3
Chibi Style 4
Character Types 5
Cute Apple Dress 6-8
Purple Schoolgirl 9-11
Funky Goggles 12-14
3

Chibi Style
Chibi is a Japanese word meaning “short person” or
“small child.”
Super deformed or SD is a specific style of Japanese
caricature where characters are drawn in an
exaggerated way, typically small and chubby, with
stubby limbs and oversized heads, to make them
resemble small children.
Chibi characters are normally between two and four
‘heads tall’, meaning the size of the head is between
half and a quarter of the whole body. The characters
in these tutorials are slightly more than two heads
tall, but feel free to draw whatever size you feel most
comfortable with.
The most important thing is to make sure the body
retains a ‘chunky’ feel, which matches the rest of the
character. Joints on the body such as the shoulder and
neck should be kept narrow in order to allow for a
large amount of movement, but in general the limbs
will be thicker than normal.
Chibi hair is often equally chunky, with the hair
clumped together into large spiky strips, or simplified
to look much bolder than usual. You can still achieve
some fine detail, but the hair ought to be as bold as the
rest of the character – it’s a great opportunity to have
fun! Try out some hairstyles that would look unusual
on a regular person, and play around with colours. The
most important thing about Chibi characters is that
they are all about fun, and they’re just as fun to draw!
Character Types
Cute Apple Dress Chibi characters are often presented in a bright and
cheerful manner, and this girl is no exception! Her
golden locks surround a beaming face and her blue
dress is vibrant and colourful with a pattern of apples
around it and matching red lace frills and belt. The
socks are designed to match the dress perfectly, with
an added frill of red lace along the top. Finally, her
shoes, bag and accessories are all carefully picked out
to complement her dress.
Purple SchoolgirlThis character is excited and full of energy. Her funky
uniform is based on the traditional Japanese schoolgirl
uniform known as ‘sailor fuku’, but has been jazzed up
with some exciting pink and purple colours. She’s also
wearing ‘loose socks’, a type of oversized sock worn in
Japan that hang loosely and cover some of the shoes.
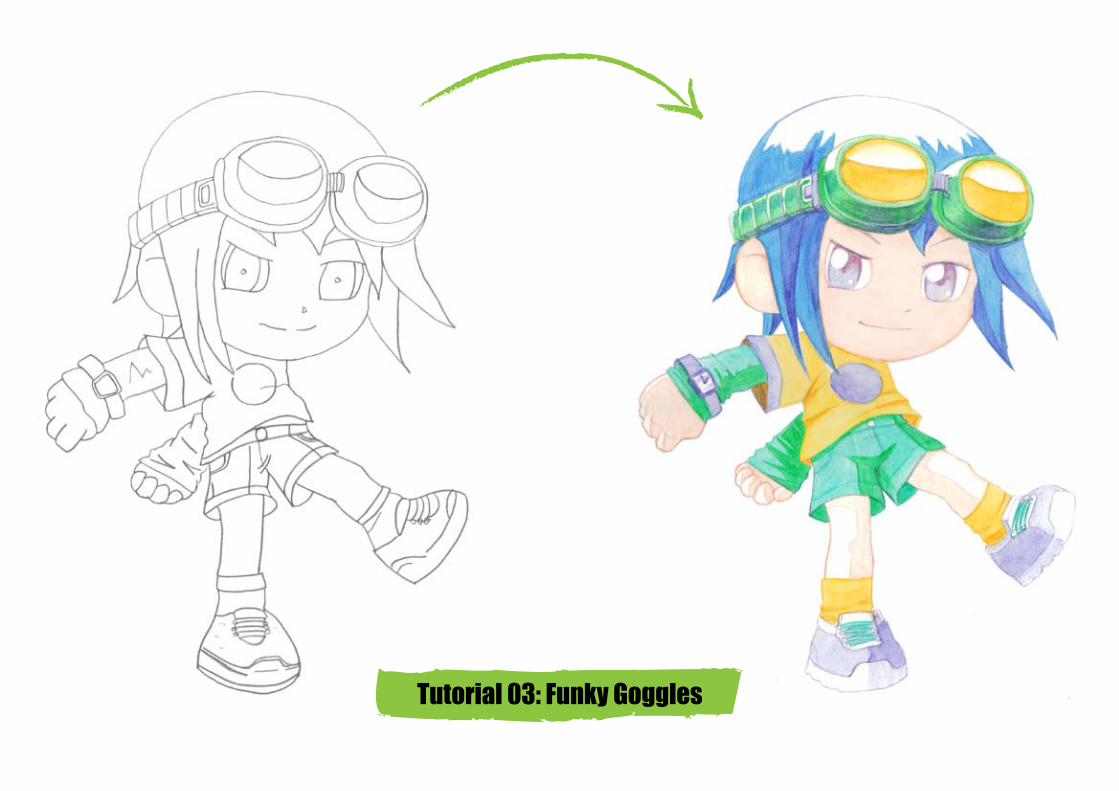
Funky GogglesWith Chibi Manga characters you can give them crazy
hair colours, the brighter the better. This character has
vivid yellow-tinted goggles that he wears on his bright
blue hair but you could experiment with any colour
combination you like. In this drawing everything is tied
together with a strong colour scheme of blue, yellow
and green even the details on the t-shirt, watch and
shoes are all designed to complement the blue hair.
4 5

Tutorial 01 – Cute Apple Dress:
Step 01: Start off by drawing the character outlines with the
‘Outliner’ pencil. It is possible to erase the lines with
a regular pencil eraser, but you have to be careful
when drawing. Try to avoid pressing too hard with this
pencil otherwise the lines will be difficult to remove.
(For an outline to copy and the completed character,
see the end of the tutorials.)
Step 02:Now that the pencils lines are in place we can start
adding colour, beginning with the socks. First of all,
draw the outline of the area with the Iris Blue pencil.
This helps to ensure the area has a crisp and solid
outline. Lightly fill in the area with Iris Blue, being
sure to apply very little pressure. Now it’s time to
paint! Simply apply a light wash to the area you have
coloured, with the paintbrush, in order to blend the
colours together into an even tone. You don’t need too
much water, but try to paint each area in full before it
dries to avoid uneven colours.
Step 03:Now apply the same technique to the skin. It’s useful
to allow each area of colour to dry before moving
on to the next, so that colours don’t spread into one
another. Using the Baked Earth pencil draw the outline
of the legs and then start to lightly fill in the skin area.
However, rather than filling in the whole of the area
with pencil, only colour the parts beneath the skirt
and below the knee leaving a patch of white around
the knee area. This area of white gives the skin a shiny
feel. Now apply a little water to the colour as before,
but keep the brush strokes to the outside of the legs,
and below the knee area ensuring to keep the patch of
white around the knee.
Step 04: Now we continue to fill in the other areas of colour
using the same technique. The dress is filled in with Iris
Blue, first defining the outlines of the areas and then
filling in with colour. The rest of the skin is coloured
using Baked Earth, just as you did for the legs. The skin
has highlights on the arms and hands, so the upwards-
facing areas of these parts of the body have been left
white.
Step 05: It’s now time to tackle those golden curls! Using the
Cadmium Orange pencil, define the outline of the hair.
You can draw extra lines for the areas where the hair
overlaps itself. The hair has a large area of highlight
at the top that is left blank, in a similar manner to
the skin. Now, apply some extra Cadmium Orange
pencil to the area of blonde hair located behind the
character’s neck, as this will make it darker. Apply a
little water to create a colour wash as before, taking
extra care to keep the brush wet to avoid the ink from
drying whilst you’re filling out the colour area.
Tutorial 01 – Cute Apple Dress:
6 7

Step 06: Using the Cherry pencil, mark out the details on the
dress such as the apples, the frills and the belt. Define
the outline and then fill in the central areas, before
applying a little water to the details you have coloured
in. This will intensify the red.
Step 07: The red colour is lovely, but we want it brighter and
richer! And this is the beauty of the Inktense pencils. If
you wait a few moments to allow the red colour to dry,
and then apply more Cherry pencil evenly over the
top and finally add a little more water, this will greatly
intensify the red, really bringing out the richness of
tone. Do the same thing to the handbag, socks and
shoes. She is now complete!
Tutorial 01 – Cute Apple Dress: Tutorial 02 - Purple Schoolgirl:
Step 01: In this tutorial each area, for example the limbs or the
clothes, are defined using the colour pencil you will
eventually colour that area in with. If you wish you
can first draw the outline of the complete character
very lightly with the outliner pencil, these lines can be
erased later.
(For an outline to copy and the completed character,
see the end of the tutorials.)
Step 02:Define the areas of skin on the girl using the Baked
Earth pencil and then lightly shade them in. Don’t
forget to include small areas such as the skin showing
around the belly, and the small area under the neck.
In a similar manner to the ‘Cute Apple Dress’ tutorial
leave an area of the paper white to create highlight
areas on the hands and legs. Apply a little water to the
area you have shaded to fill out and create an even
skin tone.
Step 03:Apply the same technique with the skirt, socks
and shoes. The skirt and shoes are drawn using the
Carmine Pink pencil, and the socks are coloured with
Violet. By drawing the lines of the folds and pleats on
the skirt it helps to define shape and volume of the
clothing, and the clothing looks interesting despite
being a single colour. If the lines become too washed
out during the painting stage you can re-draw them
with the same colour pencil after the paint has dried.
8 9

Step 04: With this step, we’re going to add shading to the
clothing to give the image a sense of depth and shape.
Apply some of the Carmine Pink pencil to the right-
hand side of the skirt, and to all the areas facing to the
right. Also apply the pencil to the underside of the
skirt. With the socks, apply more Violet pencil to the
right hand side of the sock, drawing a zip-zag line to
show the folds in the fabric.
Step 05: Now it’s time to add a little water to create a colour
wash! Carefully brush over the new areas of colour,
paying attention to keep the shadows to the right
side. Wash your brush in water, and then continue to
use the same method on the socks, keeping the brush
within the areas marked out but also defining a solid
edge to the shaded area. Wait for the colour on the
socks to dry in order to avoid the colours running
together, and then apply the same process to
the shoes.
Step 06: Use the same technique as the skirt and socks to
define the colours on the top. Use the Violet pencil
for the main area, and the Carmine Pink pencil for the
collar and cuffs. This sailor uniform has a prominent
white stripe on the cuff and around the collar, so be
sure to keep this area free of colour and paint. With
neighbouring areas like this you may wish to colour
one area at a time in order to avoid the colours
running into one another.
Tutorial 02 - Purple Schoolgirl: Tutorial 02 - Purple Schoolgirl:
Step 07: The hair is coloured using Cherry pencil. Whilst it
might have been interesting to colour the hair the
same pink as the clothes, by using a slightly different
shade this can give the effect of the hair being more
‘natural’ to the character, and helps distinguish the
difference in material between hair and fabric. Mark
out the outline, then fill in the area as evenly as
possible with the Cherry pencil and then apply a little
water to create a wash. Wait for the area to dry and
then repeat the process in order to make the colour
much brighter.
Step 08: Define the area of the mouth using the Cherry pencil.
Draw the outline, and then fill the area in lightly. With
the mouth, however, we want a gradient of colour
from strong to light from top to bottom of the area.
This is achieved by applying more pencil and pressure
at the top of the mouth, and lighter pressure towards
the bottom. When applying the water be sure to brush
downwards from the top to the bottom to get the
colours to fade.
Step 09: It’s fun to get plenty of colour into the eyes of Manga
characters. Eyes are always presented as shiny and
vibrant, and the more colour there is helps to give the
impression of the eyes reflecting the world around
them. In this case a base colour of violet is applied
first, and a little water is added to evenly spread the
colour. This is followed by a heavy application of
Carmine Pink at the top of the eye, which is then
brushed downwards with a little water in order to mix
the colours. Now she’s ready!
10 11

Tutorial 03 - Funky Goggles:
Step 01: Copy the outline of the complete image lightly using
the outliner pencil.
(For an outline to copy and the completed character,
see the end of the tutorials.)
Step 02:Let’s start this picture by filling in the hair and skin
with a base colour as before defining the area, lightly
adding colour and then a little water to create an even
tone. The Bright Blue pencil is used for the hair and
Baked Earth for the skin. A white area is left at the
top of the hair in order to represent a highlight. Wait
for the hair to dry, and then apply another layer of
Bright Blue to the hair areas. This will intensify the
colour and bring out the bright and even shade that is
required for the hair.
Step 03:The goggles have highly reflective yellow lenses, so
it’s important that they look shiny. Using the Golden
Yellow pencil, mark out the outline and then draw
a curved horizontal line to represent the reflection.
Make the pencil increasingly dense towards the
reflection line, and include a small extra bit of pencil
at the top of the lens. Apply a little water to the lenses
using the paintbrush and brush downwards to achieve
a gradient.
Tutorial 03 - Funky Goggles:
Step 04: Fill in the rest of the goggles using the Field Green
pencil. Leave large sections of white at the top of
the goggle areas in order to give the impression of a
highlight. This helps to give them a nice plasticky feel,
which suits the personality of the character.
Step 05:Fill in the t-shirt with the Golden Yellow pencil, and
a little water as before. Allow this to dry, and then
repeat the process for the sleeves and shorts using the
Teal Green pencil. Allow the image to dry and then fill
in the hem of the t-shirt sleeve and the watch with the
Lagoon pencil.
Step 06:Often you can achieve a more vibrant look to your
pictures by using a different shade of colour when
adding shading and shadows. Using the Field Green
pencil, define shaded areas to the shorts and sleeves.
Apply a little water to these areas of shading and the
colours will mix together to give a deeper and brighter
shadow than you would normally achieve. Finally,
some extra detail and lines, like cuffs and pockets are
added with the Bright Blue pencil.
12 13

Tutorial 03 - Funky Goggles:
Step 07: Now we’ll try the same process with the t-shirt. Using
the Cadmium Orange pencil, mark out some simple
folds across the front of the shirt, as well as filling in
an area of shade inside the t-shirt sleeve. Apply a little
water using the paintbrush to bring out some richly
shaded folds. This helps to give the image a sense of
motion and shows the pinching of the shirt around the
armpits or shoulders.
Step 08:Let’s add some shading to the hair as well! The Lagoon
pencil is a much deeper shade of blue than the Bright
Blue of the hair, so it will add contrast and shape to the
picture. Colour the areas you want shaded with the
Lagoon pencil, and then apply a little water with the
paintbrush to reveal a darker and stronger colour.
Step 09:Finish off the picture by adding some small details,
starting by painting in the eyes. Use the Lagoon pencil
for the base of the eyes, followed by Carmine Pink
shading at the top of the eye. Apply a little water to
the eye and define the pink section in the uppermost
portion of the eyeball. Some Lagoon is applied to
the underside of the goggles as well in order to add
richness to the shadows there, and some extra outlines
are marked with Lagoon. With eyes and goggles
complete, the boy is ready for action!
About the Artist
Hayden Scott-Baron
Hayden Scott-Baron is a professional video-games
artist, specialising in character design. He is the
author of ‘Digital Manga Techniques’ and ‘Manga Clip
Art’, and frequently participates in industry panels,
presentations and workshops on the art form of
Manga and works in a variety of different mediums.
Hayden is a founding member of UK manga publisher
Sweatdrop Studios and has produced a number of
manga-style comics.
www.deadpanda.comwww.sweatdrop.com
14 15

Tutorial 01: Cute Apple Dress

Tutorial 02: Purple Schoolgirl
Tutorial 03: Funky Goggles