twigs gardening activities...middle-sized ones and clay for the smallest. soil is made up of a...
TRANSCRIPT

TWIGSYouth Gardening and Healthy Eating Curriculum

Gardening Activity Lessons
Ongoing Garden Chores . . . . . . . . . . . . . . . . . . . . . . . . . . . . . . . . . . . . . . . . . . . 11
You are the Expert . . . . . . . . . . . . . . . . . . . . . . . . . . . . . . . . . . . . . . . . . . . . . . . . . . . . . . 12
Soil . . . . . . . . . . . . . . . . . . . . . . . . . . . . . . . . . . . . . . . . . . . . . . . . . . . . . . . . . . . . . . . . . . . . . . . . . . . . . . . . . . . 15
Design a Garden . . . . . . . . . . . . . . . . . . . . . . . . . . . . . . . . . . . . . . . . . . . . . . . . . . . . . . . . . 18
Seed Magic . . . . . . . . . . . . . . . . . . . . . . . . . . . . . . . . . . . . . . . . . . . . . . . . . . . . . . . . . . . . . . . . . . . 20
Starting with Seeds . . . . . . . . . . . . . . . . . . . . . . . . . . . . . . . . . . . . . . . . . . . . . . . . . . . . 24
Ready, Set, Grow! . . . . . . . . . . . . . . . . . . . . . . . . . . . . . . . . . . . . . . . . . . . . . . . . . . . . . . . 27
Cool Tools . . . . . . . . . . . . . . . . . . . . . . . . . . . . . . . . . . . . . . . . . . . . . . . . . . . . . . . . . . . . . . . . . . . . . . 30
Wet and Wonderful . . . . . . . . . . . . . . . . . . . . . . . . . . . . . . . . . . . . . . . . . . . . . . . . . . . 33
Edible Flowers . . . . . . . . . . . . . . . . . . . . . . . . . . . . . . . . . . . . . . . . . . . . . . . . . . . . . . . . . . . . . 36
Compost . . . . . . . . . . . . . . . . . . . . . . . . . . . . . . . . . . . . . . . . . . . . . . . . . . . . . . . . . . . . . . . . . . . . . . . . 40
Rotation . . . . . . . . . . . . . . . . . . . . . . . . . . . . . . . . . . . . . . . . . . . . . . . . . . . . . . . . . . . . . . . . . . . . . . . . . . 43
Companions . . . . . . . . . . . . . . . . . . . . . . . . . . . . . . . . . . . . . . . . . . . . . . . . . . . . . . . . . . . . . . . . . 46
Pest or Pal . . . . . . . . . . . . . . . . . . . . . . . . . . . . . . . . . . . . . . . . . . . . . . . . . . . . . . . . . . . . . . . . . . . . . 49
Worms . . . . . . . . . . . . . . . . . . . . . . . . . . . . . . . . . . . . . . . . . . . . . . . . . . . . . . . . . . . . . . . . . . . . . . . . . . . . 54
The Spice of Life . . . . . . . . . . . . . . . . . . . . . . . . . . . . . . . . . . . . . . . . . . . . . . . . . . . . . . . . . 59
Gardening Workout. . . . . . . . . . . . . . . . . . . . . . . . . . . . . . . . . . . . . . . . . . . . . . . . . . . . 63

Ongoing Garden ChoresChildren and adult volunteers should work together to establish a rotating schedule for watering and other routine garden chores. It’s a source of pride and accomplishment to all involved when continual commitment yields a beautiful and bountiful harvest.
1. Watering - use hose with nozzle (soft spray), soaker hose, or watering cans. In warm seasons, plants should be checked twice a week to make sure they are getting adequate water. If seeds have been planted, they must be kept moist (not wet) until germination, which will require frequent watering, at least once a day. Young seedlings will also need greater attention and water until they establish their roots in the bed/container.
Children and adult volunteers should check garden beds/containers weekly to perform the following necessary tasks:
1. Weeding - keep nutrients in the soil by removing weeds in the beds/containers.
2. Soil preparation - add amendments such as manure, compost, etc. to soil and mix into garden beds/ containers with appropriate tools.
3. Thinning - remove tiny seedlings so remaining plants have room to grow and use the nutrients in the soil. If there is room, transplant seedlings to another bed/container.
4. Cultivating - use hand cultivator and loosen soil around individual plants in order to aerate the soil so plants will absorb water.
5. Fertilizing - use fertilizer to feed plants.
6. Mulching - add a layer of amendments around plants but not on top of them to prevent weeds from growing, to keep moisture in the soil, and to nourish the soil when they decompose. Water well after mulching.
7. Planting - sow seeds of fast germinating plants throughout the planting season.
8. Picking - pick vegetables when ready.
9. Maintaining pathways - Keep paths mud free/dry and weed free.
10. Deadheading - snap or cut the dead flowers off stalks to prevent formation of seedpods and to promote more blossoms.
Always remember to use tools carefully, clean them properly, and store them in their proper place!
Teams With Intergenerational Support | TWIGS Copyright ©1997, 2005, 2008, 2018 UC Regents of the University of California. All rights reserved.
11

You are the Expert
Summary:Groups will pick a gardening topic to research. They will put
together a “show and tell” so the others can see what they have learned.
Some Helpful Information:Gardening comes right after TV and shopping as a favorite pastime or hobby in the United States. This means there are all sorts of books
and videos out there that teach about gardening. There are many
theories and planting schemes to follow depending on which person
or book you believe. We all develop our own gardening style with time and experience.
Used bookstores almost always have some books on gardening that are less expensive than new ones.
Nurseries can sometimes be talked into donating books (and other supplies as well) to your group. Often here are newsletters and pamphlets available for free. If there is a local gardening club (your reference librarian can probably help you find them) it can be a source to find gardening information for your garden library as well. Check with the library for videos they have to lend about gardening or one of the topic areas listed in the preparation section.
TWIGS | Teams With Intergenerational SupportCopyright ©1997, 2005, 2008, 2018 UC Regents of the University of California. All rights reserved.
13 NUTRITION ACTIVITY
12
Why Do This?It is empowering to acquire
knowledge and share it. Everyone will
be an expert on one part of gardening.
This information will be used throughout
the gardening projects. Whatever phase
or part of the garden is being worked on
there will be someone who can answer
questions or who will know where
to look for answers.
1GARDENING ACTIVITY

You are the Expert
TIME:2+ hours a week
MATERIALS:• Reference materials (books,
magazines, pamphlets, videos paper)
• Drawing materials
PREPARATION:1. Collect as many references as
possible. Look at the topics and decide which ones will provide the best information for each group.
2. Decide on how many topics and groups to assign. You can make small groups (2-3 people) and give only one topic or divide into a few groups each with a couple of topics. Groups will require an older, accomplished reader to be paired with a youngster.
Topics: Soil Compost Watering Winter Crops Summer Crops Transplanting Harvesting Starting and Transplanting Seedlings Pest control
3. Be sure no one is overly pressured. The experts know where to find answers; they don’t have to know all the answers!
STEP BY STEP:1. Explain that they are going to be experts so everyone can ask them
questions as the garden project progresses. They will learn about their topic and show-and-tell what they found out with everyone. They can do a skit-type demonstration or show pictures and talk, or use any other method they like.
2. Assign partners. Have them choose or assign topics.
3. Distribute materials.
4. Help folks determine what are the important concepts to relate to the rest of the group and determine how to share that information.
5. Have everyone do their information sharing.
EXTENSIONS:• Have groups call an expert. You can find out who they should call and
provide a number or let them search out an expert. They should share the information with the rest of the group.
• Take a field trip to a local farm or a farmer’s market and ask lots of questions!
Teams With Intergenerational Support | TWIGS Copyright ©1997, 2005, 2008, 2018 UC Regents of the University of California. All rights reserved.
13
GARDENING ACTIVITY 1

GOOD SOURCES OF INFORMATION ON GARDENINGWestern Garden Book, by the editors of Sunset. Encyclopedia-style book that covers many aspects of gardening and answers basic questions. There are editions for all parts of the country. Often available used.
The Encyclopedia Of Organic Gardening, Rodale Press. This is a comprehensive guide formatted like an encyclopedia. Just look up
whatever you are interested in, from a particular plant or insect to intensive gardening or compost. Often available at used bookstores.
Golden Gate Gardening, by Pam Pierce. This is a complete guide to year-round food gardening in the CA Bay and Coastal areas.
U.C. Ag and Natural Resources Catalog, available through the University of California Cooperative Extension office. Check the phone book for the office near you or phone within California (800) 994- 8849 or web site http://anrcatalog.ucanr.edu. This is a source to check for the following and more books on gardening.
The California Garden Web includes links to basic principles of home gardening, planning your vegetable garden, getting ready to plant, caring for, harvesting and storing your vegetables, as well as herbs. Cagardenweb.ucanr.edu/vegetables
3386 Natural Enemies Handbook - The Illustrated Guide to Biological Pest Control. $45.00.
21385 Wildlife Pest Control around Gardens & Home, 122 pp $18.00. Identification and control of pests, birds and mammals common in California.
3332 Pests of the Garden & Small Farm: A Grower’s Guide to Using Less Pesticide, 276 pp $35.00. Practical, useful techniques to help the home gardener use less toxic pesticides, more biological controls, and other approaches to reduce pests.
8037 Compost in a Hurry, free to download.
8159 Growing Tomatoes in the Home Garden, free to download.
8059 Vegetable Garden Basics, free to download.
3382 California Master Gardener Handbook, 700pp $37.00
TWIGS | Teams With Intergenerational SupportCopyright ©1997, 2005, 2008, 2018 UC Regents of the University of California. All rights reserved.
14
HANDOUTGARDENING ACTIVITY1
You are the Expert

Soil
Summary:Soil samples are explored to determine what kind of particles they are made of. Soil test kits are then used to determine the nutrient makeup of the soil.
Some Helpful Information:Half of every plant you grow is underground-roots. The roots need an optimal growing environment if they are to do all the work of gathering and transporting nutrients and water for all the plant’s growth as well as giving the plant a place to anchor itself. That’s why the nutrients in the soil and the consistency of the soil are as important to your garden as the seeds you plant. Soil is made up of minerals, organic material (such as decaying plants and microorganisms), air and water. All these things interact with plants to keep them healthy.
This activity discusses the different size particles in soil. The three size classifications that gardeners use are sand for the biggest particles, silt for middle-sized ones and clay for the smallest. Soil is made up of a mixture of sand, silt and clay. The ideal mixture for gardening is called loam and consists of 40% silt, 40% sand and 20% clay. Too much clay keeps the soil too wet, then air can’t reach plant roots. Too much sand and the soil will not hold enough water, so roots dry out.
For the first part of this activity you’ll need to gather soil samples of each particle type. When wet, sand is gritty, silt is smooth and slippery, clay is slippery and sticky. Sand is easy to find at the beach; soil near the beach is often sandy as well. For clay soil you typically have to dig a little deeper. Areas that retain wa ter probably have clay soil beneath them. Soil with organic material (broken-down plants and other living stuff) often have a mix of sand, silt and clay in them. Get soil moist, and grasp it firmly. If it sticks together it doesn’t have too much sand. If the moist clump of soil crumbles apart easily it probably doesn’t have too much clay either. If it really sticks in a clump it is probably high in clay content.
There are three main nutrients that plants need from soil. Nitrogen makes the plant a healthy green. It helps the plants to grow. Phosphorus is important for strong root growth. Potassium will help the plant grow strong and resist infections. It is simple to test for these elements with an inexpensive basic soil test kit. The results can tell if the garden soil needs something added to ensure healthy plants. There are lots of other minerals and nutrients, but these three are the most important and are easy to test for.
Teams With Intergenerational Support | TWIGS Copyright ©1997, 2005, 2008, 2018 UC Regents of the University of California. All rights reserved.
13NUTRITION ACTIVITY
15
2 GARDENING ACTIVITY
Why Do This?Food is only as good as the soil it
grew from. This activity will have
participants look at two soil qualities
and gain a deeper understanding
of what plants need from soil.

TIME:1-2 hour(s)
MATERIALS:• Samples of clay, silt and
sandy soils
• An area to get muddy/dirty
• Small cups, 3 per group
• Soil test kits, one per 5+ participants trowels
• Access to areas to dig different types of soil (or you can provide pre-dug soil samples)
PREPARATION:1. Scout out areas for folks to
dig soil samples. Be sure your garden site soil is tested.
2. Gather materials.
3. Review activity to be familiar with steps and information.
STEP BY STEP:
Part One: Soil particles
1. Break into groups of 5 or so.
2. Have each group collect one cup of each soil type.
3. Have everyone in each group look at, smell, listen to as they rub, feel each soil type. They should be comparing them and discussing if they think it is a good soil to grow plants in.
4. Demonstrate to everyone how to add a little water and clump the soil types (see helpful information). Explain that sandy soils fall apart; clay soils stick tightly; and loam soils, the best for growing in, clump and then crumble.
Part Two: Soil test
1. In groups have participants follow directions in the soil test kit. Assign tasks to everyone, such as reader, test tube holder, soil mixer...
2. Everyone discuss together what results they found. Which soils need which nutrients?
EXTENSIONS:• Put soil samples in a quart jar with 2 cups of water. Shake well then let
the soil settle (for 24 hours). The sand will settle first, next the silt and clay last. Look at the different layers. What is this soil mostly made of?
• Put 2 cups sandy soil in a container then cover with cheese cloth. Add 1 cup water, swirl, then pour water back into measuring cup. How much water came back? Try the same with clay soil and loam soil. How do they differ?
• Have someone from Cooperative Extension come talk about soil.
• Collect soils from home or local farmers and test them for particle size and nutrients.
TWIGS | Teams With Intergenerational SupportCopyright ©1997, 2005, 2008, 2018 UC Regents of the University of California. All rights reserved.
16
GARDENING ACTIVITY2
Soil

SOIL LAYERS:
Clay
Silt
Sand
Silt and Clay have many small pores so water passes through slowly. Water may move through so slowly that parts of the roots temporarily don’t get what they need.
Sand has many large pores, so water passes through readily. Little is retained for use by plant roots. Because of this, you will need to water and fertilize more often.
It is best for gardening to have soil that is a combination of silt, clay and sand-to allow nutrients, water and air to travel through a combination of large and small pores.
Teams With Intergenerational Support | TWIGS Copyright ©1997, 2005, 2008, 2018 UC Regents of the University of California. All rights reserved.
17
HANDOUT2GARDENING ACTIVITY
Soil

Design a Garden
Summary:This activity helps participants plan a garden. Everyone provides input
and the group then decides what design will best meet the groups’ needs. The plan is put on paper for all to see and review.
Some Helpful Information:Gardening is up there with TV and Shopping as one of America’s favorite pastimes. Some folks enjoy growing vegetables, some grow cactus, while others grow flowers. Some grow it all. There are all kinds of gardens. Successful ones are usually carefully
planned. For your garden to be a success it will need lots of coordinated effort. This means everyone will take part. It works best
if everyone is included in the planning. Here are some general rules for a successful garden;
1. Plant only as large a garden as can realistically be maintained. Beginners often over-plant and fail because their skill is not yet developed enough for the task. Develop an area you can patrol for weeds and pests and one you will have enough water for. If you want you can expand later!
2. Plan on paper before beginning.
3. Plant things that will fit the space you are working with. If long vinelike pumpkins are planted on the perimeter they can grow along the edge and not interfere with other plants in the center that are growing up rather than out.
4. Plant the right things at the right time of year. Peas don’t like the heat and melons won’t grow when it is cool. There are plants that are best suited to your area. They will be the most rewarding and easy to grow.
5. Sun, sun, sun! Plants need plenty of light to grow. If it is too shady you will be very limited in what you can grow. Pick a sunny location.
6. Soil, soil, soil! Without good soil it won’t matter how much sun and water you have. Prepare the soil carefully and amend it as needed.
7. Water: make sure you have access and make sure if you plant seeds that someone will keep them moist. Depending on the weather, they should be watered once a day.
TWIGS | Teams With Intergenerational SupportCopyright ©1997, 2005, 2008, 2018 UC Regents of the University of California. All rights reserved.
13 NUTRITION ACTIVITY
18
Why Do This?Grains constitute a large portion
of our diet. This activity introduces
several grains with an emphasis on
what wheat is and how it is used.
3GARDENING ACTIVITY
Why Do This?Planning together will make this
garden belong to all the participants.
When folks see their input in place they
are going to continue their support for
and involvement with their garden. When
creating the garden design, the garden
creators will learn from doing the
mapping and research.

TIME:1 hour
PREPARATION:1. Determine what sites and
materials are available. See the background information. Consider raised beds or container gardens if your site prevents an in-ground garden. More information on these types of gardens is available in the books listed on page 14.
2. Gather some seed or garden catalogs and seed packets that illustrate garden produce and the needs of the plants.
MATERIALS:• seed packets and catalogs
• rulers
• pencils and other drawing tools
• a magnetic compass
• large sheets of newsprint
• graph paper
STEP BY STEP:1. Take a walk out to the future
garden site and have a brainstorming and discussion session. Have everyone name their favorite plant, food or otherwise. Ask folks if they have ever grown things. What types of things would they like to grow?
2. Go to an area where people can draw and write in small groups. Break into groups of mixed ages, 4 or 5 persons per group. Provide drawing materials and graph paper to each group. Have everyone brainstorm the things they think the garden will need, like a faucet, sun and soil. List these things (on newsprint or a chalkboard) where everyone can see them.
3. Have each group come up with a garden plan that includes a list of 3 or 4 things they would like to grow. Each group can list and illustrate their plan on the paper you provide.
4. Have each group share their plan with the other groups. Note when there are similarities. You can keep a master list of plants and tally how many groups wanted similar plants.
5. As one big group, plan your garden. You can be sure to include the things most folks wanted and can combine the good ideas from the different groups.
6. Let everyone get in on drawing out the master plan for your garden. Older youth can mark off rows. Younger ones can draw in the plants and color the hoses and flowers!
Teams With Intergenerational Support | TWIGS Copyright ©1997, 2005, 2008, 2018 UC Regents of the University of California. All rights reserved.
19
GARDENING ACTIVITY 3
Design a Garden

Seed Magic
Summary:This is a 2-part activity. Everyone will dissect a seed in order to
observe seed parts in three seeds. Seeds will be planted with and without the conditions they need to see how they grow.
Some Helpful Information:There are two basic types of plants and seeds, dicots and monocots. “Mono” means one; these plants start life with one leaf, like a grass. “Di” means two; these plants, like beans or
radishes, start life with two leaves. Monocot and dicot seeds have three things in common: a seed coat, an embryo or baby plant,
and a food supply. Cotyledons are the initial seed leaves of the plant. Monocots have one seed leaf and dicots have two. When mature, the
leaves of monocots are long and thin (lilies and grasses like corn, wheat and rice); dicots’ leaves are broad (almost all other plants). The seed coat is a protective layer that protects it until it is time for it to grow. (There are some lotus seeds that were over one thousand years old that grew and are growing today in Kenilworth Aquatic Gardens of Washington D.C.!) The food supply gives the tiny growing embryo enough food to sprout out of its seed coat and look for soil and water that will maintain the plant for the rest of its life. A food supply and water are what sprouts grow from when we make bean sprouts.
In the first part of this activity folks will look at seeds and see all the tiny parts that help them to grow. Ev eryone will draw a picture and label it to help them remember the seed parts.
All plants have the same requirements to grow into healthy plants. They all need air, water, nutrients the right amount of light and an optimal temperature. Different plants like differing amounts of water, different types of soil and grow in different temperature ranges. Broccoli grows well in cool temperatures but melons need heat. Strawberries like acidic soil; potatoes don’t thrive in it. Too much heat and sunlight will make lettuce taste bitter and go to seed; tomato plants won’t make tomatoes if they don’t get enough light and warmth.
In the second part of this session we see how seeds will grow in varied situations. Some are started without water, others without soil and some without light. Have everyone make predictions about what will happen. Make notes and keep the notes with the plant to be amended over the next two weeks.
TWIGS | Teams With Intergenerational SupportCopyright ©1997, 2005, 2008, 2018 UC Regents of the University of California. All rights reserved.
13 NUTRITION ACTIVITY
20
4GARDENING ACTIVITY
Why Do This?The nature of seeds becomes
much clearer when you see the
parts and understand their function
first hand. The things plants need to
grow are evident when you look at
plants that try to do without.

TIME:1 hour
MATERIALS:• seeds, soaked overnight: kidney,
pinto and/or green bean
• seeds, dry: peanuts in shell, radish
• crayons
• paper
• planting containers (four per group; cut-off milk cartons are fine)
• potting soil
• shoe boxes (one per group)
PREPARATION:1. Gather materials
2. Review the activities to be clear on steps
3. Soak the seeds overnight
STEP BY STEP:
Activity One
1. Have a class discussion about seeds. Where do they come from? What do they look like? Why do they look that way? What will they become? What’s inside?
2. Break into groups of three or so.
3. Distribute the soaked bean seeds and peanuts.
4. Tell everyone to open them up and see if they can find similarities and differences. Have them draw pictures, one of each kind, and label their drawings, naming the different parts (they are to decide what to call the parts).
5. Have everyone share their drawings and labels.
6. Show them the “Seed Magic” drawings. If they like they can copy down the labeled names. Their label names are fine too.
Activity Two
1. Discuss: What do seeds need to grow? What if they didn’t have water? Soil? Light? It was very cold?
2. Explain that they are going to try growing plants with these varied conditions. Show them the directions and materials.
ALTERNATE PLAN: If you don’t have enough materials for each group to do all four growth scenarios, you can assign one scenario to each group. At a later date have everyone compare results.
EXTENSIONS:• Pack dry peas into a small container with water. Cover with a snap-on
lid or a rubber band over plastic wrap. (They will swell up and pop off the lid.)
• Go outside and collect any seeds you can find. How do they travel? Stick to socks or pet fur? Flying in the breeze? Floating on water? In animals’ or people’s tummies? Have folks design a “traveling seed” on paper.
Teams With Intergenerational Support | TWIGS Copyright ©1997, 2005, 2008, 2018 UC Regents of the University of California. All rights reserved.
21
GARDENING ACTIVITY 4
Seed Magic

MONOCOT
DlCOT
Embryonic Root
Cotyledon
Endosperm
First Leaves
Seed Coat
Embryonic Root
Cotyledon
TWIGS | Teams With Intergenerational SupportCopyright ©1997, 2005, 2008, 2018 UC Regents of the University of California. All rights reserved.
22
Seed MagicHandout #1
HANDOUT 4 GARDENING ACTIVITY

without WATER without LIGHT
without SOIL without WARMTH or LIGHT
CREDITS (ideas from) The Growing Classroom by Roberta Jaffe and Gary Appel, Addison Wesley 1990
Teams With Intergenerational Support | TWIGS Copyright ©1997, 2005, 2008, 2018 UC Regents of the University of California. All rights reserved.
23
Seed Magic – Growing SeedsHandout #2
HANDOUT4GARDENING ACTIVITY

Starting with Seeds
Summary:Groups will explore different seed types, then construct a
tiny greenhouse where they can observe several seeds germinating.
Some Helpful Information:Seeds come in many shapes and sizes. Each type has its own characteristics of growth and dispersal mechanism. A tiny seed will travel better on the wind. A seed with a tough outer coat will make it through an animal’s
intestines intact. A pointy seed may work its way into the soil deeper than a rounder one. Big seeds are tougher. They
aren’t as dependent on perfect soil moisture conditions early in life as tiny seeds are.
Seeds look different as they germinate. Some seeds grow straight up out of the ground, while some push up a curved portion of stem
that pushes through the soil before the leaves unfurl towards the sky.
TWIGS | Teams With Intergenerational SupportCopyright ©1997, 2005, 2008, 2018 UC Regents of the University of California. All rights reserved.
13 NUTRITION ACTIVITY
24
Why Do This?Grains constitute a large portion
of our diet. This activity introduces
several grains with an emphasis on
what wheat is and how it is used.
5GARDENING ACTIVITY
Why Do This?Seeds are the beginnings of most
plants. These little miracles contain
everything needed to start a new plant.
Working with a variety of seeds helps us
to understand how many seed types there
are. Watching a sampling germinate
further demonstrates the variety of
seeds as well as demonstrating
the miracle of seeds.

TIME:1 hour
MATERIALS:• Seeds - a variety such as corn,
beans, sesame, sunflower, radish, peas, wheat, carrot, lettuce. (Read package carefully.
• Sandwich size ziplock bags
• ¼ cup of potting soil per student
• ¼ cup measure (or three tablespoons)
• Popsicle sticks
• Construction paper
• Scissors
• 12" lengths of yarn or string
• Stapler
• Spray bottle of water
• Tape
PREPARATION:1. Collect materials, snip yarn
lengths.
2. Construct a ziplock greenhouse. See the illustration for directions.
3. Decide how you will distribute seeds so every group gets some of several types and one unique type that no other group has.
4. You may want to hand out everything except the soil and water. It helps with an active group to have one adult monitor the soil and one adult monitor the spray bottle(s).
5. Optional: You can cut out the construction paper greenhouse frames ahead of time. Then you will not need scissors for everyone.
STEP BY STEP:1. Break into groups of 3-4.
2. Distribute a mixture of seeds to each group.
3. Tell all the groups they are to separate their seeds and categorize them. They can use color, shape, size, type or whatever classifications they choose. Let them know that their group has one unique seed that no one else has. ·
4. Have groups tell about their categories. After everyone has shared categories, they can then show which seed was the unique one that only their group had.
5. Show them the greenhouse baggie you made and explain how to make one.
6. Distribute materials and have everyone make their own greenhouse. Plant only two or three seeds per greenhouse; otherwise, they get too crowded, roots tangle and transplanting becomes too difficult.
7. The greenhouses can be taped up on a window low enough to see or be taken home to be put on a window and observed daily. When the plants get big they can be transplanted into pots or into outside garden areas. (If grown indoors too long they won’t transplant well.) Refer to seed catalogs or pack ages for best time of year for planting outdoors.
8. Have everyone take a turn predicting what will happen. How long it will take? How will different seed look different as they grow? How might they look similar?
EXTENSIONS:• Make notes of predictions and check them out with time.
• Cut open a green pepper and note all the seeds inside. Discuss why there are so many. What would happen if every pepper seed grew? Would the world be covered with peppers?
• Make art by gluing seeds to construction paper like a mosaic.
• Have everyone take an old sock and wear it outside their shoe. Walk through a meadow or weed patch. Water the sock and see what grows!
Starting with Seeds
Teams With Intergenerational Support | TWIGS Copyright ©1997, 2005, 2008, 2018 UC Regents of the University of California. All rights reserved.
25
GARDENING ACTIVITY 5

1.dirt in
bag
3.spray bottle with water
5.construction paper “frame”
popsicle stick - bag stapled to it
yarn
2.2 or 3 seeds
4.ziplock bag with air inside
6.
frame folded
over
CONSTRUCTING A ZIPLOCK GREENHOUSE1. Put soil into ziplock bag.
2. Drop 2-3 seeds in, spaced apart.
3. Spray water into bag.
4. Close bag with air in it.
5. Create construction paper frame. Place popsicle stick and yarn at top edge; staple in place.
6. Fold paper house frame over bag.
Starting with Seeds
TWIGS | Teams With Intergenerational SupportCopyright ©1997, 2005, 2008, 2018 UC Regents of the University of California. All rights reserved.
26
HANDOUT 5 GARDENING ACTIVITY

Ready, Set, Grow!
Summary:Groups will sow seeds and plant transplants directly into garden.
Some Helpful Information:Before planting anything, you need to prepare the soil and plan where to put things. Take into consideration which plants need lots of sun (melons, cucumbers ...) and which can use some shade (spinach, lettuce...). Consider planting things that need lots of water together (cucumbers, lettuce). Things that do better when not watered a lot (tomatoes) should be planted separately. Much of this is explored in the activity "Design a Garden" on page 18. When planning, decide which plants will be transplanted as seedlings (purchase or ask for donations from a nursery) and which will be directly sown into the garden as seeds. Spacing between rows and between plants depends on the plant variety. Referring to a good reference book and the seed package will provide this information.
Some plants are very tender when young. They will not grow well out in the garden until there is no chance of drying out or getting too cold. Some plants take quite awhile to grow to maturity. If they are started in a protected place, they can grow for awhile before the weather is nice enough for them to survive well out doors. This helps them get a headstart on the weather, and crops will be available sooner.
Seeds do best when planted just deep enough, but not too deep. The tiniest seeds often need just a sprinkling of dirt over them. Others need to be an inch underground so the roots are anchored solidly. All seedlings need to stay moist at first. Often seeds are planted close together. Later when plants are up and growing they can be thinned to an appropriate density. Plants that are left too close together will stunt each other.
Transplants (small plants put into the garden) need a good initial watering. They may droop a bit at first but will perk up in 24 hours or so. Dig a hole before removing seedling from the pot or flat. Don’t let roots dry out or get hot. Remove them carefully; don’t ever pull on the stem! Tear the small pot open or push up from below, keeping roots and soil as intact as possible. Plant the same depth as they were in their pot. Don’t leave roots exposed or bury the stem. (Tomatoes are an exception. Some stem can be buried and roots will grow below the soil.) Some gardeners put a handful of fresh compost in the planting hole before putting in the plant to give extra nutrients.
Teams With Intergenerational Support | TWIGS Copyright ©1997, 2005, 2008, 2018 UC Regents of the University of California. All rights reserved.
13NUTRITION ACTIVITY
27
6 GARDENING ACTIVITY
Why Do This?The entire group participates in
the birth of a garden. They will see
which plants start better as seedlings
and how deeply particular seeds
need to be planted. Everyone will
nurture their own plants and
learn from each other.
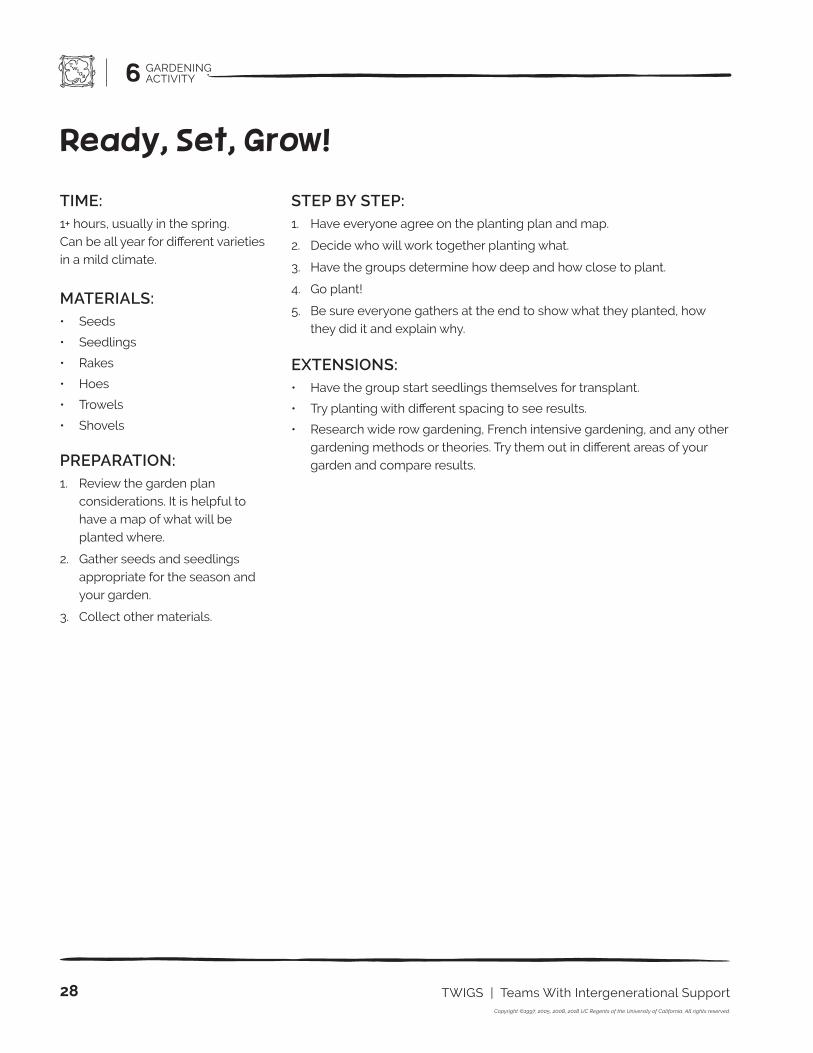
Ready, Set, Grow!
TIME:1+ hours, usually in the spring. Can be all year for different varieties in a mild climate.
MATERIALS:• Seeds
• Seedlings
• Rakes
• Hoes
• Trowels
• Shovels
PREPARATION:1. Review the garden plan
considerations. It is helpful to have a map of what will be planted where.
2. Gather seeds and seedlings appropriate for the season and your garden.
3. Collect other materials.
STEP BY STEP:1. Have everyone agree on the planting plan and map.
2. Decide who will work together planting what.
3. Have the groups determine how deep and how close to plant.
4. Go plant!
5. Be sure everyone gathers at the end to show what they planted, how they did it and explain why.
EXTENSIONS:• Have the group start seedlings themselves for transplant.
• Try planting with different spacing to see results.
• Research wide row gardening, French intensive gardening, and any other gardening methods or theories. Try them out in different areas of your garden and compare results.
TWIGS | Teams With Intergenerational SupportCopyright ©1997, 2005, 2008, 2018 UC Regents of the University of California. All rights reserved.
28
GARDENING ACTIVITY6

Ready, Set, Grow!
PLANTING:
poke a hole as deep as your seed needs
drop the seed in the hole
cover with soil and water well
TRANSPLANTING:
dig hole, then gently remove from pot
place in hole, add soil
press firmly
water well
1/2” tofirst joint
1” tosecond joint
2”whole finger
Teams With Intergenerational Support | TWIGS Copyright ©1997, 2005, 2008, 2018 UC Regents of the University of California. All rights reserved.
29
HANDOUT6GARDENING ACTIVITY

Cool Tools
Summary:Participants will review the proper use and care of tools
through skits.
Some Helpful Information:There are different tools that really help out the gardener: a shovel or spade for digging; a hoe for weeding as well as chopping at and smoothing soil. Rakes smooth a wide area and can help collect plant material or rocks. When transplanting, a trowel comes in very handy for digging
small holes; a cultivator can remove weeds and aerate the soil. A wheelbarrow is useful for moving soil, compost and
mulches from place to place. All these tools are most safely used when some basic rules are followed.
• Walk when carrying tools or using the wheelbarrow.
• Keep tools below shoulder level.
• If an area is crowded wait or move with extra care.
• Clean tools before putting them away.
• Use digging tools like a shovel or spading fork with shoes on.
• Tools on the ground should have blades and points facing down.
Many of us have seen comedies where a person steps on the tines of a rake or the blade of a shovel or hoe. The tool handle pops up and smacks the person in the head. Speaking from experience, it really hurts and isn’t funny at all! If the tool is rested upright against a fence or put away this won’t happen. If it’s necessary to lay the tool down, it should only be left blade or tines facing down into the dirt. (Lying this way they can still trip you up, so take care.)
TWIGS | Teams With Intergenerational SupportCopyright ©1997, 2005, 2008, 2018 UC Regents of the University of California. All rights reserved.
13 NUTRITION ACTIVITY
30
Why Do This?Grains constitute a large portion
of our diet. This activity introduces
several grains with an emphasis on
what wheat is and how it is used.
7GARDENING ACTIVITY
Why Do This?Tools help us do jobs efficiently. It
would be an awful lot of work to turn all
the soil in a garden with a stick or just with
hands! Tools used improperly can hurt people
and get broken. If folks have a chance to
rehearse the proper use of each tool they
will have an easier time remembering
proper use in the midst of a
gardening project.

TIME:1 hour
MATERIALS:• Several of:
» Shovels
» Spading forks
» Trowels
» Cultivators
» Rakes
» Hoes
» Wheelbarrows
» Tool cleaning brushes
• 1 tool-cleaning tub
• Copies of the handout instructions
PREPARATION:1. Make sure you have all the
needed tools.
2. Make up a tool-cleaning tub, a large plastic tub filled with sand and vegetable oil (mix 5 : 1). Make it large enough so the shovel blade can be scooped into it.
3. Review all the rules and tools so you are sure of what the groups will be doing. Some rules and tools may not be necessary for your garden.
STEP BY STEP:1. Take out the tools one by one. Name them and talk about how and
when they are used. Demonstrate briefly each of the safety rules. Show everyone the cleaning tub and brush. Show them how to brush dirt off and put the tool in and out of the oily sand to clean it further. This applies a coating of oil that protects the metal from rusting.
2. Break into groups, one group per tool.
3. Distribute the tools and rule to each group.
4. Have the group make up a skit that shows the proper use of that tool.
5. Have each of the groups demonstrate while the rest of the groups try to guess what the rule is. Remember ALL these rules are followed with ALL the tools!
6. Remind everyone that if folks forget the rules while in the garden they must remind each other (nicely) to use the tools safely and follow the rules.
EXTENSIONS:• Go to a hardware store together and look at all the tools.
• Have a race where someone tries to rake up weeds with a shovel while another person uses a rake, or fill a wheelbarrow using a hoe and a shovel. This shows the importance of using the right tool for the job.
Cool Tools
Teams With Intergenerational Support | TWIGS Copyright ©1997, 2005, 2008, 2018 UC Regents of the University of California. All rights reserved.
31
7GARDENING ACTIVITY

TOOL RULES:
Cool Tools
Wheelbarrow
Do a skit that shows how important this rule is:
Walk when carrying tools or using the wheel barrow.
Cultivator
Do a skit that shows how im portant this rule is:
If the area is crowded wait or move with extra care.
Hoe and rake
Do a skit that shows how important this rule is:
Tools on the ground should have blades and points facing down.
Shovels and digging forks
Do a skit that shows how important this rule is:
Use digging tools like a shovel or spading fork with shoes on.
Hoe
Do a skit that shows how important this rule is:
Keep them below shoulder level.
Trowel, cleaning brush, and oily sand in bucket or tub
Do a skit that shows how important this rule is:
Clean tools before putting them away.
Hose/Watering Can
Do a skit that shows how important this rule is:
Make sure the hose is off so water is not wasted. Coil hoses neatly out of the way.
TWIGS | Teams With Intergenerational SupportCopyright ©1997, 2005, 2008, 2018 UC Regents of the University of California. All rights reserved.
32
HANDOUT 7 GARDENING ACTIVITY

Wet and WonderfulSummary:Two demonstrations show that plants transport and transpire water. Three types of irrigation are then modeled for all to observe.
Some Helpful Information:All parts of garden plants need water. Leaves of plants use water to make the sugar the entire plant needs to grow. Roots gather the water likewise for the entire plant. This means the leaves have something the roots need and the roots have something the leaves need. There are lots of tiny pipes that run up and down through the plant carrying water and nutrients to the places they are needed. The thick strings in a celery plant are examples of these kinds of waterpipes. They carry water up from the base of the plant to the leaves. If you supply these pipes with colored water you can see it move up into the celery leaves over time. Cut the celery and you will see the tiny tubes filled with colored water.
Plants need just enough water to grow well. Too much water in the soil keeps a plant from getting the oxygen it needs, but not enough lets it dry up. Either way, with too much or too little water, the plant may die. Roots absorb water from the soil. Large plants have deep roots, and smaller plants have roots closer to the soil surface. Deep-rooted plants need lots of water to penetrate the soil to reach the roots deep below. These plants do not need frequent watering, because deep down the water doesn’t dry up quickly (if the soil type is loam or clay). Shallow rooted plants need watering more often to keep their roots moist and are prone to losing moisture to evaporation at the surface.
Garden plants can be watered using various methods. Furrow watering is seen often in big farms along the road. The farmer digs a long trench and mounds soil on either side of the trench. Water flows down the trench and the plants are planted in the mounds alongside. Drip irrigation supplies water very slowly in steady stream of drips in one spot. The water slowly seeps straight down. Overhead sprinkling is like rain: it wets the surface of the soil uniformly. Different plants benefit from these different types of irrigation. Sprinkling is great for seedlings that are not deep in the soil and need frequent watering. More water is lost due to evaporation if sprinklers are turned on during the day. When they get water on their leaves through overhead watering, some plants that are susceptible to mold and mildew diseases get damaged. Drip is used in mature deep-rooted plants that won’t move for a long time, like grapes. Drip only waters at the roots of the desired plant. It conserves water and decreases weeds. Furrow watering keeps water off the plant leaves, preventing molds and mildews, and it doesn’t require the expense of buying drip materials. When a large crop is only grown for a few months, then plowed under, it is too much work to set up drip equipment.
Teams With Intergenerational Support | TWIGS Copyright ©1997, 2005, 2008, 2018 UC Regents of the University of California. All rights reserved.
13NUTRITION ACTIVITY
33
Why Do This?Folks will pay much closer
attention to how much they water
and how they do it when they
understand that it makes a
difference to the plants.
8 GARDENING ACTIVITY

Wet and Wonderful
TIME:1+ hour(s)
MATERIALS:• A plastic bag and twist tie
or rubber band
• 2 cups of celery stalks with leaves and/or white carnations food coloring
• 3 groups, each with:
» glass bowl
» ½ cup fine grain soil
• 1 group with spray bottle
• 1 group with a juice can with small hole poked in bottom copies of irrigation method illustrations
PREPARATION:1. One full day ahead place red or
blue food coloring (15 drops) in a pitcher or jar of water. Under running water, cut off the bottom of the celery stalks (or carnation stems). Quickly place them in the colored water. Or, split carnation stems part way. Snip off the ends under running water and put one half in red water and the other in blue water (see illustration).
2. Make sure soil is fine grain. You can sift coarse soil through a ¼" screen or hand pick out any rocks and other large pieces.
3. Poke a tiny hole in the bottom of the juice can. (Put can over a broom handle and tap a small nail into the bottom.)
4. At the meeting site, several hours early (2 hrs on a sunny day, 4 hrs on a cloudy day): Stick a small branch with lots of leaves into the plastic bag and fasten it there with the rubber band or twist tie (see illustration). Make sure not to break the stem, and choose a stem that is low enough for all to get a close look at.
STEP BY STEP:1. Break into three groups. Distribute the celery (or flowers). Tell group the
plants didn’t grow that way, and they weren’t that way yesterday. Ask everyone to talk together to decide how they got their coloring.
2. Take everyone out to see the leaves you bagged earlier. Ask them what they see. How did the water get there? Where did it come from? (Don’t forget to take the bag off!)
3. Now that everyone has seen that plants use water and transport it, we will look at ways to water our garden plants.
4. Separate into three groups. Each group is to try an irrigation technique in their glass bowl. Give them the handout with directions and other materials.
5. Have all the groups look at the alternative methods demonstrated by the other two groups.
6. As a large group decide which method is best for deep-rooted plants? For shallow-rooted plants? Which uses least water?
EXTENSIONS:• Water three plants in different amounts and keep track of their growth
(height, number of leaves) over several weeks.
• Keep track of how many weeds there are in the drip irrigated part of a garden compared to an overhead sprinkled area.
• Have folks sprinkle an area for 1 minute, another area for 5 minutes, and another for 30 minutes. Dig down and see how deep the water has gone in the different areas.
• Try putting different soil types (clay, sand, loam) in a colander lined with cheesecloth and compare how fast water moves through each.
• Carnation stem split part way with one half in red water and the other in blue water.
TWIGS | Teams With Intergenerational SupportCopyright ©1997, 2005, 2008, 2018 UC Regents of the University of California. All rights reserved.
34
GARDENING ACTIVITY8

Wet and Wonderful
IRRIGATION METHODS:
1. Furrow Watering
Fill bowl with soil and pack down. Make furrow. Water slowly with 1/2 cup of water. Note how water moves through soil.
2. Spray Bottle Watering
Fill bowl with soil. Pack down. Using the spray can, water with 1/2 cup of water. Note how water moves through soil.
3. Drip Can Watering
Fill bowl with soil and pack down. Place can on soil near edge of bowl.Water slowly with 1/2 cup of water.Note how water moves through soil.
Carnation stem split part way with one half in red water and the other in blue water.
Small branch with leaves stuffed into a plastic bag and fas tened there with a rubber band or twist tie. This branch is still attached to the plant!
Teams With Intergenerational Support | TWIGS Copyright ©1997, 2005, 2008, 2018 UC Regents of the University of California. All rights reserved.
35
HANDOUT8GARDENING ACTIVITY

Edible Flowers
Summary:Groups will get to sample some edible flowers and learn their names
and growth habits. Everyone gets to plant a container with edible flowers to take home.
Some Helpful Information:There are lots of edible flowers. Their flavors vary from subtle (some say flavorless) to spicy hot. Some of the edible flowers are from herbs, and others are flowers we usually think of as just
ornamental. Adding flowers to salads livens up a dish for people and may make it more appetizing.
IMPORTANT:• Do not eat flowers unless you know they have not been sprayed with
dangerous pesticides or other chemicals. There are some dangerous substances used to treat plants such as roses in an ornamental garden.
• Do not eat any plants or flowers that have not been identified to you as edible and safe to eat.
TWIGS | Teams With Intergenerational SupportCopyright ©1997, 2005, 2008, 2018 UC Regents of the University of California. All rights reserved.
13 NUTRITION ACTIVITY
36
Why Do This?Folks don’t all have the
experience of eating flowers.
This activity will show them that
some flowers taste good. They will
have a planter to take home and
show their families.
9GARDENING ACTIVITY

TIME:1+ hour
MATERIALS:• Common edible plants
» Johnny-jump-ups, four seedlings per person
» Calendula, one seedling per person
» Forget-me-not, one seedling per person
» There are many different edible plants listed on the handout to choose from
• 8" pots, one per person
• Potting soil
• Mixture of edible flowers or prepared stuffed nasturtiums (see recipe on the handout)
Edible Flowers
PREPARATION:1. Collect materials. Nurseries sometimes have old pots that they can give/
donate or sell inexpensively. Larger pots are better, the plants roots will have more room and grow stronger and longer in a large pot. If you get larger pots get a few extra plants to fill them in.
2. Buy seedlings without flowers! Seedlings that are flowering already are stressed. A healthy plant for transplanting has not already out grown its container.
3. See if anyone you know has nasturtiums, roses, lemon blossoms, or other flowers you can bring in for folks to taste. Fancy grocery stores and farmer’s markets are good places to look for edible flower mixes.
STEP BY STEP:1. Serve the flowers or stuffed nasturtiums you have brought.
2. Have a discussion, has anyone ever eaten flowers before?
3. Distribute materials and have everyone make up a flower pot to take home.
EXTENSIONS:• Be sure to plant some edible flowers in the group’s garden.
• Check out the book Living With The Flowers by Denise Diamond. Prepare some of the recipes with your home grown flowers.
Teams With Intergenerational Support | TWIGS Copyright ©1997, 2005, 2008, 2018 UC Regents of the University of California. All rights reserved.
37
GARDENING ACTIVITY 9

Here is a list of flowers to eat that you can choose from to grow in your garden:
Savory Herbs:
These are strong, use in small quantities
• basil
• bee balm chamomile chives
• dill
• garlic chives lavender lemon verbena mustard (hot) nasturtium oregano
Sweetly Floral:
adds a perfume-like sweetness; let some soak in a glass of water and enjoy.
• apple blossom carnation or pink (small varieties, not hothouse ones) day lily
• geranium (pelargonium) honeysuckle
• lemon blossom lilac
• orange blossom petunia
• plum blossom rose
• violet
Mild Herbs:
More a sweet than pungent flavor, some slightly bitter
• borage
• calendula
• chicory clover
• red dandelion
• elder flower
• hibiscus
• passionflower
• salad burnet
• yarrow
Mild Floral:
subtle and delicately sweet; add for color and faint flavors
• gladiolus
• hollyhock
• johnny jump up
• pansy
• peony
• poppy (petals only)
• primrose
• sunflower
• squash blossom
• tulip
• viola
Edible Flowers
TWIGS | Teams With Intergenerational SupportCopyright ©1997, 2005, 2008, 2018 UC Regents of the University of California. All rights reserved.
38
HANDOUTGARDENING ACTIVITY9

Stuffed Nasturtiums(Serves 6-8)
Ingredients:
½ cup ricotta
¼ cup finely chopped walnuts
1 tablespoon cinnamon
Directions:
1. Mix ingredients together and roll into small balls.
2. Place balls inside nasturtium flowers, top with a Johnny-Jump-up.
Here are some alternate designs to choose from for the take-home flower pots:
• 4 Johnny Jump-ups around edges, 1 calendula and 1 Forget-Me-Not in the center
• 3 purple petunias on boarder, 3 multicolored giant pansies in-between with one scented geranium center.
• 6 apricot and yellow violas planted all around 3 Iceland Poppies.
Edible Flowers
Teams With Intergenerational Support | TWIGS Copyright ©1997, 2005, 2008, 2018 UC Regents of the University of California. All rights reserved.
39
GARDENING ACTIVITY
RECIPEHANDOUT9

Compost
Summary:Groups will work together to build a compost heap. Over subsequent
weeks the entire group will monitor the pile’s progress.
Some Helpful Information:Just think what the world would be like if plants and animals didn’t break down and decay. YUCK! We would be stepping over dead everything, all the time! A compost pile is a place where we help out the decomposition of garden and kitchen waste. With the right ingredients a compost pile can produce all the soil amendments your garden will ever need. There are lots of ways
to compost. You can just heap up anything that used to be alive and let it sit; in a year or so it’ll become rich soil full of nutrients. You
can chop up all the waste, pile it in layers, keep it watered and turned and you will have rich compost in a few weeks.
Anything that used to be alive can decompose in a compost pile. Even an old pair of cotton socks will de compose into soil. Most people choose to put things in their pile that will decompose rapidly and also things that won’t attract critters like flies or dogs. For this reason you probably won’t be throwing in any socks or meat products. Earthworms and sow bugs will help your compost and garden. They are decomposers; they eat and digest as well as burrow, aerate, and mix efficiently.
A well-nourished compost pile will supply good quality fertilizer and conditioner for the garden. Compost that is fed only a limited diet will break down very slowly and contain a limited number of nutrients. The results of your soil test (from Gardening Activity #2) can help you understand what your garden’s soil may be lacking or already have enough of. Check soil acidity before adding lots of ash. Whatever your soil type, any garden can benefit from the nutrients and conditioning gained by adding compost. Conditioning means to add “roughage” to your soil. Partially decomposed material fluffs up soil, helps aerate it and can increase drainage in clay soils and water retention in sandy soils. Sound like the garden soil cure-all? It is!
There are commercially available fertilizers that can be purchased and added to the soil. These materials are expensive, can be toxic and do not add any conditioning to the soil. Composting provides a lesson in basic biology (decomposition) and encourages folks to recycle at the same time. Compostable materials are available free for the hauling. You need to chop them up if you want them to compost quickly. If you have time to wait, just toss ‘em in whole.
TWIGS | Teams With Intergenerational SupportCopyright ©1997, 2005, 2008, 2018 UC Regents of the University of California. All rights reserved.
13 NUTRITION ACTIVITY
40
10GARDENING ACTIVITY
Why Do This?Compost is a natural way to add
nutrients and conditioners to the
garden soil. Learning about com post
teaches about how nature recycles
living things through the soil into
living things again.

TIME:1+ hour(s)
MATERIALS:• Composting materials from
homes and around the community
• Shovels and spading forks
• Water
• Soil
• Thermometer
• Wheel barrow
PREPARATION:1. Have everyone save all
non-meat and dairy kitchen scraps from the week before.
2. Select a permanent compost pile spot in the garden area. Remember you’ll want to be able to drop manure off, as well as get finished compost to garden. You’ll need access to water as well.
3. Obtain material for composting.
LOTS OF: leaves, lawn trimmings straw or hay (from the floor of a feed store) wood shavings weeds (avoid those that have gone to seed)
SOME: manure (from horse, dairy, goat, rabbit, or chicken farm) kitchen waste (fruit, veggies of all kinds, any former plant material)
A BIT OF: wood ash earth worms (optional) garden soil
Compost
4. Decide if you want to build a structure for your pile or just make a heap. If you are going to build a structure look up composting at the library or call the local Cooperative Extension office to see the various designs possible.
STEP BY STEP:1. Talk about composting with group. Ask what will become of an apple
core left in the dirt? What happens to dead leaves, animals and such in the forest? Why don’t forest plants need to be fertilized?
2. Talk about how plants have different nutritional needs like people. Show them the different things gathered to be composted.
3. Divide into four groups. One group will add lots of plant materials, the next group will layer on some manure, the next group sprinkles with topsoil. Someone sprinkles the layers with water. Repeat the layering until you use up all the ingredients. Group members take turns filling a wheelbarrow, shoveling, spreading things on the pile.
4. Everyone together covers the heap with straw or soil.
5. Place thermometer into the heap and note the temperature.
6. Be sure to take the heap’s temperature weekly at least. When it begins to cool it’s time to turn it.
EXTENSIONS:• Make a terrarium with soil in the bottom. Toss in food scraps, paper,
plastic, anything. Keep it moist and see what decomposes and what doesn’t.
• Make mini composting containers from milk cartons. Have everyone layer in composting ingredients and watch the decomposition occur on a small scale. Plant some seedlings in the resulting compost.
• Go to a weedy or forested area, dig up some soil and look at what is decomposing, look for fungus and insects that help decomposition happen. Compare an area where plants look healthy and another where they look weak.
Teams With Intergenerational Support | TWIGS Copyright ©1997, 2005, 2008, 2018 UC Regents of the University of California. All rights reserved.
41
GARDENING ACTIVITY 10

Here are the nutrients you can get from various compostable materials (Don’t forget kitchen scraps they are always good for the compost pile);
Nitrogen:
• manure (bird is best, then horse, then cow) grass clippings
• leaves (especially oak) alfalfa hay
Phosphorus:
• manure (bird is best, then horse, then cow)
• wood ashes
• wool waste
• hair (from a beauty parlor)
Potassium:
• wood ashes kelp
• alfalfa hay
Trace minerals:
• just about everything you add will provide some (food scraps – non-meat and non-dairy)
• wood ashes
• leaves
To build a classic compost heap the ingredients are layered into a pile that is then covered over with soil or straw (see illustration). An easy way to compost is to make a cylinder of wire and just toss everything in as you collect it. It’s nice to have a pile of leaves or sawdust nearby to sprinkle over the top so you don’t have to look at yesterday’s leftovers. All compost piles need water, as wet as a rung out sponge is the moisture level you try for. They will decompose quickly if you chop all the ingredients, keep them moist, stir them once a month or so, mound them back up and cover them. As time progresses deep dark rich compost soil will appear ready to be spread on the garden.
This is a brief overview of an interesting topic. Composting is a great gardening activity. There is a lot of information about composting if you check with your U.C. Cooperative Extension office-check this web site, http://anrcatalog.ucdavis.edu to download publication 8037, “Compost in a Hurry.” Check with a local garden club, nursery or look in the library. Do some research and you can learn a lot more about composting.
Compost
TWIGS | Teams With Intergenerational SupportCopyright ©1997, 2005, 2008, 2018 UC Regents of the University of California. All rights reserved.
42
HANDOUTGARDENING ACTIVITY10

Rotation
Summary:This activity simulates plants growing, using nutrients and the benefits of crop rotation.
Some Helpful Information:Some plants feed on the nutrients in soil more heavily than others. Specific nutrients are depleted from the soil if the same crop is planted in the same soil year after year. Other plants can actually help increase the fertility of the soil. If plants that contribute nutrients are planted some years they can help the soil rejuve nate itself.
It is wise to give an area of soil a break from growing crops at all. It’s even better for the soil to plant what is called a “green manure.” Examples of green manure are rye grass or leguminous plants (plants whose seeds grow in a pod with two seams like all peas and beans) like vetch, soybeans, or red clover. These plants, with the help of tiny soil bacteria, are able to collect nitrogen gas from the air for plant growth. Once grown the green manure crop is then turned into the soil. This adds a lot of soil conditioning roughage to the soil as well as nitrogen. These plants also can make phosphorus more available to whatever is planted in the area next.
A common crop rotation scheme is to plant a heavy feeding crop like corn, cabbage family vegetables or tomatoes in a spot one year then the next year plant a soil enriching crop like the legumes: fava beans, peas or beans. The enriching crop is turned into the soil after harvest. The next year light feeding plants like root vegetables, bulbs and herbs are planted. This three-year cycle is then repeated.
Rotating crops like this helps to control pests as well. Many insect larvae winter in the soil. If they hatch the next year and the plant they like to feed on is gone they will not survive as well. For similar reasons, rotation helps control plant diseases.
Teams With Intergenerational Support | TWIGS Copyright ©1997, 2005, 2008, 2018 UC Regents of the University of California. All rights reserved.
13NUTRITION ACTIVITY
43
11 GARDENING ACTIVITY
Why Do This?This will give participants a visual
understanding of crop rotation.

TIME:1 hour
MATERIALS:• 100 2" X 2" paper squares
• An open area about 10' X 10' to play “Crop Rotation” in.
PREPARATION:This game requires everyone’s attention. Review the steps so you can keep track of the game and all the players at the same time.
STEP BY STEP:1. Planting:
• Get three volunteers to be corn plants. To “plant” them in the corn patch, have them all stand in a small area about 2 feet apart.
• Now you need three people to be bean plants. Plant the beans in a spot next to the corn.
• Last to be planted in this simulated garden are potatoes. Have three members volunteer to be the potatoes. Plant them adjacent to the other two crops of corn and beans.
2. Scatter about ⅓ of the paper scraps evenly over the floor/ground around the plant/people. Explain that these represent the soil nutrients the plants need to grow and produce their vegetables. Remem ber, plants cannot move! They can bend down and use their fingers like roots, but their feet must stay stationary or they are out of the game.
3. When you signal the plants to “GO” they are to scoop up all the nutrients (paper squares) they can and then stop when you signal (by saying stop or blowing a whistle, or ringing a bell ...). Play for 15 seconds or until most of the papers squares are picked up.
4. After stopping explain that the beans actually put nutrients back into the ground. They are to drop all their paper pieces. Give each bean three more pieces that they again drop onto the ground. The potatoes are light feeders. They only need 3 pieces of paper. If they have 3, they produced a beautiful crop of spuds this year. If they have any extras they should drop them back on the ground. The corn is a heavy feeder. Each corn plant must have 7 squares of paper, or they didn’t produce very well.
5. The season is over and these plants are harvested (have the people step aside.) A new crop is planted. Get volunteers for each crop and plant them in the same places. You fertilize with a bit of compost by sprinkling more paper squares EVENLY through all the growing areas. (There will be squares building up in the bean patch, a few extras in the potato patch, and very few left in the corn patch.)
6. Repeat steps 3, 5 and 6.
7. Have a discussion. What can the gardener do to make sure the corn gets enough nutrients? How about if we plant the beans where the corn was, put corn where the potatoes were, and plant potatoes where the beans were? Next year the same rotation can be done. Nutrients will begin to even out in the garden this way.
8. Let members suggest rotations and try them out. Keep playing until it seems they can grow successive crops and maintain soil fertility enough for successful crops.
EXTENSIONS:• Apply crop rotation plans in the
group’s garden.
• Drop some specially marked paper squares in the potato patch. After the next round show that any potato that collects the marked squares had inadvertently picked up a potato disease. (If crops are rotated the disease is dispersed by corn and beans, but the soil is clean again when the potatoes get there!)
• In the garden try different legumes and green manure crops in different areas of the garden. Compare how well the next year’s crops grow.
TWIGS | Teams With Intergenerational SupportCopyright ©1997, 2005, 2008, 2018 UC Regents of the University of California. All rights reserved.
44
GARDENING ACTIVITY11
Rotation

CORN I BEAN I POTATO ROTATION:
First Year
Second Year
Third Yearetc.
Teams With Intergenerational Support | TWIGS Copyright ©1997, 2005, 2008, 2018 UC Regents of the University of California. All rights reserved.
45
HANDOUTGARDENING
ACTIVITY 11
Rotation

Companions
Summary:Groups will learn about companion planting by doing a role play. They
will try planting companions together and watch to see if these plants benefit from each other as the garden grows.
Some Helpful Information:Plants have their likes and dislikes. Some plants benefit from being planted next to each other. Natives of Mexico have practiced companion planting for centuries. Corn plants are
planted with a bean plant at their base. The bean plant adds nitrogen to the soil (if turned in to the soil), which helps the corn
grow. The corn plant gives the bean something to hold onto as it grows tall. This helps the bean. Planting squash around the beans
and corn provides a ground cover that prevents weeds from growing up, and the squash doesn’t mind a little shade from the other plants in the hot afternoon sun.
There are also plants that attract good insects that feast on garden pests. You can plant them on the edge of vegetable plots or in flower borders. The more variety you plant, the more beneficial insects you attract. Some of them are alyssum, coriander, cosmos, fennel, California Lilac and buckwheat.
Some plants don’t do well when planted with each other. The handout lists many common garden vegetables, what plants to plant near them, and which not to plant with them.
TWIGS | Teams With Intergenerational SupportCopyright ©1997, 2005, 2008, 2018 UC Regents of the University of California. All rights reserved.
13 NUTRITION ACTIVITY
46
12GARDENING ACTIVITY
Why Do This?As the group becomes familiar with
gardening they can learn some
interesting specifics that will help
produce healthy crops.

TIME:1 hour
MATERIALS:• Copies of “Companion Planting
Guide”
• Picture of Pole Bean, Corn and Squash
• Some companion plants or seeds (see preparation)
PREPARATION:1. Depending on what is in
your garden, select some seeds/seedlings to plant as companions (refer to the handout information.) You will give some seeds or seedlings to each group. They will use the handout, “The Guide To Companion Planting,” to decide where in the garden to plant the vegetable, herb or flower you provided for them.
2. Review the role play so it will be easy to narrate and direct.
STEP BY STEP:Do a role play with the group. Volunteer group members take the roles of different plants as the leader narrates the story to everyone.
1. Volunteers play three corn plants, standing tall with arms up.
• Some more volunteers (5-6) become invading weeds. Some grow up tall and some spread out across the ground, all crowding around the corn plants. These weeds take up nutrients and space.
• How do those corn plants feel? This weedy garden stands while another is created.
2. Three more corn plants stand up.
• Now three volunteers become bean plants growing at their base. Bean plants add nitrogen to the soil that the corn uses to grow. They pretend they are feeding snacks to the corn.
• There is still room for weeds though so now a couple of sprawling squash are planted at the base of the corn. They shade the ground preventing weeds from growing and languishing in the shade of the corn and beans.
• How do these corn plants feel?
3. Have a discussion of companion planting. Explain that some plants grow well next to some and not very well next to others. Companion planting is planting plants next to each other that help each other out.
4. Break into groups. Give each group a seed package or seedlings and a “Guide to Companion Planting.” Have the group decide where to plant their seeds/seedlings and then do the planting.
EXTENSIONS:• Write down the differences you notice as companioned plants grow next
to ones without companions.
• Find a book on companion planting and learn about the various herbs that are great for companion planting.
Companions
Teams With Intergenerational Support | TWIGS Copyright ©1997, 2005, 2008, 2018 UC Regents of the University of California. All rights reserved.
47
GARDENING ACTIVITY 12

THE GUIDE TO COMPANION PLANTING
Vegetable Plant with Don’t Plant with
Beans potatoes, carrots, cucumbers, cauliflower, cabbage, summer savory, most herbs and veggies
onion, garlic, gladiolas
Beans (pole) com, summer savory onions, beets, kohlrabi, sunflower
Beets onions, kohlrabi pole beans
Cabbage Family (cabbage, Cauliflower, kale, kohlrabi, broccoli)
potatoes, celery, dill beets, onions, lavender strawberries, pole beans, tomatoes
Carrots peas, leaf lettuce, chives, onions, leek tomatoes
dill
Corn potatoes, peas, beans, squash
Cucumbers beans, corn, peas, radish, sunflowers potatoes, aromatic herbs
Eggplant beans
Leek onions, carrots, celery
Lettuce carrots, radish, strawberries (mix seeds and grow all at once) cucumbers
Onion/Garlic beets, strawberries, tomato, lettuce, savory, beans
peas
Peas carrots, turnips, radishes, cucumbers, corn, beans
most herbs and veggies
onions, garlic, potatoes
Potato beans, corn, cabbage, marigold, horseradish (plant at patch corners)
squash, cucumber, sunflower, tomato, raspberry
Radish peas, nasturtium, lettuce cucumbers
Spinach strawberries
Squash (pumpkins) nasturtium, corn
Strawberry bush beans
Sunflower cucumbers
Tomatoes chives, onion, parsley, nasturtiums, carrots, limas, marigold
kohlrabi, potato, cabbage, fennel
Turnip peas
Adapted from The Growing Classroom, Addison Wesley, 1990
TWIGS | Teams With Intergenerational SupportCopyright ©1997, 2005, 2008, 2018 UC Regents of the University of California. All rights reserved.
48
HANDOUTGARDENING ACTIVITY12
Companions

Pest or Pal?
Teams With Intergenerational Support | TWIGS Copyright ©1997, 2005, 2008, 2018 UC Regents of the University of California. All rights reserved.
13NUTRITION ACTIVITY
49
13 GARDENING ACTIVITY
Why Do This?There are all sorts of critters that
take up residence in a garden.
With first hand experience looking
for them, identifying them and
learning how to deal with pests
everyone will learn a valuable
garden ing skill.
Summary:Some local insects and tiny garden creatures will be gathered. Using the material provided the critters will be identified. Pests will be moved elsewhere and pals will be returned to the garden.
Some Helpful Information:Scientists tell us that in a three foot square area of healthy soil there are as many as 2,000 insects, many too small for us to see without a microscope.
All insects, worms, spiders, lizards, frogs, birds, toads and other creatures have their own useful place in nature. Each plays a role in the delicate balance, eating others and serving as food for another. Some of the small animals that get into your garden will help control the other pests that might damage your crops. Whether we label them pests or pals, all of these critters are just trying to make a living, they really mean no harm. Most of the common garden invaders are covered in the handout notes included with this activ ity. There are lots of animals you may find in your garden that are not covered here. The gardening section and insect section at the library have many books that can help you find out what an insect is and if it is a friend or foe of your garden. Read through the critter information provided here for an interesting look at some common garden denizen.
People are finding that insects become resistant to insecticides, the sprays are costly and can be very toxic to humans and other animals. Integrated Pest Management (IPM), using cultural or biological methods as much as possible to control pests on plants, is a rapidly growing field. IPM has some advantages over using chemical sprays alone. Using these methods to control pests is much safer for the gardener and the con sumer of the treated products.

TWIGS | Teams With Intergenerational SupportCopyright ©1997, 2005, 2008, 2018 UC Regents of the University of California. All rights reserved.
50
13 GARDENING ACTIVITY
TIME:1+ hour
MATERIALS:• Small clear containers (baby
food jars work well, bug boxes are great if you can afford a lot of them)
• Hand lenses, available at nature stores
• Copies of “Pest or Pal?” handout
• Some gardening books on natural pest control (from the library)
• spray bottle
• 2 cloves of garlic
• A hot pepper newspaper or short sections of old hose jar lids and an inexpensive beer
• 1 tablespoon liquid SOAP (not detergent)
PREPARATION:1. Collect materials. If you know
people who use baby food, have them save jars for you.
2. Read the handout information on garden critters so you are familiar with the material.
3. Refer to the herbs activity (Garden Activity #15) to see what herbs are good to repel and deter insects.
4. Make some natural pest control products. (See the pest control part of the handout on page 53)
Pest or Pal?
STEP BY STEP:1. Have everyone scour the garden or any outside area and bring back a
sampling of the kinds of tiny animals that live there. They can also bring back leaves that have been munched to see if they can discover who is causing the damage. Make sure everyone knows to be gentle, for these animals are alive and deserve to be treated with respect! Replace any moved rocks or boards; we wouldn’t like it if a giant ripped the top off our house to peek in then walked off and left us roofless! Find as many different types of garden critters as possible and bring back samples in jars, remembering where they came from. Some animals need a damp environment and should not be put back in dry places, etc.
2. Set the jars out and have everyone look at what was found. If anyone knows the name and/or habits of a certain type of animal, have that information shared with everyone.
3. Divide into groups and distribute the jars evenly amongst the groups. The groups are to look at the information sheets and try to decide if the animal should be released back into the garden or taken to another location and released.
4. Show everyone the samples of pest controlling materials and talk about the other ideas provided for pest control.
5. Take all unwanted critters to an area away from the garden and the gardens of others and release them. Remember that snails need damp shade to survive. A dry dirt field would kill them!
EXTENSIONS:• Have weekly forays in the garden to see if populations rise, fall, move or
change with the seasons and the groups efforts to control them.
• Have folks devise bug catching devices that will work at night when the bugs are out. (Several are illustrated in The Organic Gardener by Catherine Osgood Foster)

Teams With Intergenerational Support | TWIGS Copyright ©1997, 2005, 2008, 2018 UC Regents of the University of California. All rights reserved.
51
HANDOUT13GARDENING ACTIVITY
SOME COMMON GARDEN VISITORS “PESKY FELLOWS”Slugs and Snails eat just about everything. They like cool damp times and often come out only in a drizzle or at night.
Earwigs eat the tiny first plant growth often leaving just a tiny green stub where a sprout once was. They eat just about any newly sprouted plant but particularly love marigolds, beans and zinnias.
Aphids and Whiteflies suck plant juices and kill the plant by eating its juices or letting infection kill a weakened plant. Ants will sometimes farm aphids like they were dairy farmers. The aphid produces a sweet nectar that the ant eats. Ants will actually carry aphids from place to place
spreading aphids on your plants! Both of these pests can be hosed off plants fairly effectively. Remove infested plants and control ants. Try some peppermint!
Cutworms chew through the stem of a plant at ground level causing it to topple over. Make a little wall or collar for the plant by setting a milk carton or plastic soda bottle with the ends cut off over the plant.
Caterpillars and hornworms (cabbage loopers) crawl on leaves munching as they go. The plants can lose all or at least a lot of their leaves! These can be picked off by hand or there are organic sprays (of a bacteria that attacks caterpillars) that can be purchased.
Leafminers are little flies that have larvae that burrow between the layers of the leaf, leaving sinuous trails. They are particu larly fond of spinach, chard, beets, and squash. The eggs are easy to see and can be rubbed off the backs of leaves. On squash they can be left. Growing the other plants in
cooler times of year makes the leaf miner less of a problem.
(continued)
Pest or Pal?

TWIGS | Teams With Intergenerational SupportCopyright ©1997, 2005, 2008, 2018 UC Regents of the University of California. All rights reserved.
52
HANDOUT 13 GARDENING ACTIVITY
Handout, continued
“VERY HELPFUL HALF-PINTS”Honeybees help pollinate plants, ensuring better crops. Plant bright flowers to attract them to your garden. Consider becoming a beekeeper and you can get some honey from them as well!
Lacewings are pretty flying insects that have clear wings with lots of vis ible veining. Their larvae eat lots of aphids and whiteflies for you.
Lady bugs and their larvae both eat voraciously on aphids and other insect pests. These pretty spotted insects can eat a lot and are always welcome in the garden.
Spiders are arachnoids (no – they are not insects, they have 8 legs, insects have 6). Spiders do a lot of insect catching for you. Black widows and brown recluse spiders can hurt you, so treat them with respect and let them be!
Toads and lizards eat insects. (Toads can eat hordes of ear wigs.) Toads like a cool dark place to spend hot dry afternoons. Placing a clay pipe in a shady place can provide a great toad home.
Birds can eat a lot of insects. Some birds peck at freshly planted seed and at fruit, so you may want to only provide nests for the kinds that eat insects like martins and swallows. You can net seeds and fruits to protect them from birds.
Herbs and decoy plants: Some herbs can help repel insects from the garden. There are weeds that insects like to munch that can keep them occupied on
something other than your garden plants.
You and I with a watchful eye: If we look closely at plants regularly we will be able to tell if there is an insect problem before it gets out of control. We can pick off unwanted pests and thank the helpful fellows when we see them at work in our garden.
continued
Pest or Pal?

Teams With Intergenerational Support | TWIGS Copyright ©1997, 2005, 2008, 2018 UC Regents of the University of California. All rights reserved.
53
HANDOUT13GARDENING ACTIVITY
Handout, continued
NATURAL PEST CONTROL, TRICKS AND TRAPS!• Hand picking insects and other pests off plants is often the easiest and
best defense. If you don’t like to touch them, a pair of rubber gloves are inexpensive at the hardware store.
• Plant a little extra for the bugs so they can share your bounty!
• A soapy water solution: 1 tablespoon of liquid dishwashing SOAP (not detergent) in 1 quart of water. Put in a spray bottle. Good for aphids and whiteflies. Rinse plant after it has set for an hour or more.
• Use a blender to prepare a mixture of 1 hot pepper, 2 cloves of garlic and 4 cups of water. This can be strained and sprayed on infested plants. It won’t hurt the plant and will rinse off food before eating.
• A jar lid, saucer or other shallow container settled into the soil then filled with beer will attract and drown many pests, especially earwigs and slugs.
• A short section of old hose or a rolled up newspaper will attract nighttime marauders like earwigs.
• These can be collected and moved well away from the garden in the morning.
• A board laid on the soil with a little bit of crawl space is good for collecting snails and slugs. In the morning they can be gathered and carried far from the vegetable garden and released.
• Birds eat a lot of insects. Providing a bird bath may attract them. A bird house or two (placed where cats can’t bother them) will encourage birds to stay and pick off insects for you.
• Lizards, frogs and toads are also great insect catchers. Make them feel welcome. If they have a favorite place in a pile of pots, on a pile of rocks, or in a water trough, let them claim it as home and don’t disturb them.
• There are flowering plants called insectaries which attract beneficial insects to your garden. Ask your group leader where you can learn about these. Plant some!
• Nurseries sell ladybugs and sometimes praying mantis egg cases. These beneficial insects can be released into the garden to help control less welcome insects. It is fun and educational to see these insects, but be warned (before spending a lot of money on them) sometimes they just leave!
Pest or Pal?

Worms
Summary:Groups will build a worm hotel and then observe how worms behave.
Some Helpful Information:Worms can devour their own weight in animal, leaf and other plant matter every day. As they chew their way through the soil they mix and aerate it as well as depositing lots of nutrients in the soil. Worms are one of nature’s important recyclers. They take old decaying matter and turn it into rich soil that can provide
nutrients for a whole new crop of plants. When you see a worm in the garden keep it out of harm’s way.
TWIGS | Teams With Intergenerational SupportCopyright ©1997, 2005, 2008, 2018 UC Regents of the University of California. All rights reserved.
13 NUTRITION ACTIVITY
54
14GARDENING ACTIVITY
Why Do This?Worms are great garden helpers.
Members will come to appreciate
how they help the garden and soil by
observing their behavior.

Worms
TIME:
1 hour
MATERIALS:• Worms, 2 per group (from soil
or bait shop)
• Potting soil
• Clean sand and garden soil
• Large opening, large clear glass jars
• Small tin cans spray bottles
• Old screening, or perforated lid to cover jar and allow air circulation.
• Rubber bands to hold screening
• Worm food: old leaves, coffee grounds, cornmeal, tiny fruit and vegetable scraps
• Black construction paper
• Tape
PREPARATION:1. Gather materials and review procedure.
2. Depending on the size jars you have you will need more or less soil. (See directions for building a worm hotel.) Try setting up a worm hotel so you can estimate if you have the right amount of soil, etc. If you use gallon jars (often available from delis and restaurants) you can use 3-4 worms per container.
3. IMPORTANT! Be sure the jars don’t dry out or get hot. This would kill the worms! Someone has to care for them over the week between meetings. A cool dark place is ideal for letting them sit. A light spray of water should keep them moist (not soggy.)
STEP BY STEP:1. Ask if anyone has seen worms. Does anyone know why they come
above ground when it rains? (They are escaping soggy tunnels where they can’t breathe.)
2. Distribute the handouts. Have everyone look them over and draw a worm.
3. Have each group make a worm hotel using the illustrated directions.
4. Distribute damp paper towels and worms. Have every one complete the handouts.
5. Place worms in their hotels.
6. Next week have everyone answer the final questions on their handouts.
7. Release the worms in the garden.
EXTENSIONS:• Time how long worms take to burrow.
• Try starting seedlings in a pot that has a worm and try one without. Is there any difference?
Teams With Intergenerational Support | TWIGS Copyright ©1997, 2005, 2008, 2018 UC Regents of the University of California. All rights reserved.
55
GARDENING ACTIVITY 14

WormsHandout #1
HOW TO BUILD A WORM HOTEL1. Place can open end down in center of jar. (The can will encourage the
worms to stay out at the edges of the jar where you can see them.)
2. Place a 1-2 inch layer of sand in the jar, keep can in the center of jar.
3. Next make a layer of garden soil deep enough so the jar is ⅔ full. Be sure can doesn’t move. LIGHTLY pack soil so it fills the container. You don’t want it packed tightly!
4. Fill jar up with potting soil, pack lightly. Leave 1-2 inches of jar empty. Draw a picture of your “hotel” on your handout showing the layers of sand, garden soil and potting soil.
5. Make a SNUG fitting black cover for the hotel. Hold it with tape.
6. Dampen the soil thoroughly. Be sure it’s not soggy.
7. Make small mounds of different worm foods on the surface around the edges.
8. Gently place the worms on the potting soil. Leave the jar covered for a week before looking in on the hotel guests.
TWIGS | Teams With Intergenerational SupportCopyright ©1997, 2005, 2008, 2018 UC Regents of the University of California. All rights reserved.
56
HANDOUTGARDENING ACTIVITY14

WormsHandout #2
DRAWING & WRITING ALL ABOUT WORMS
1. What color are your worms? _____________________________________________________________________________________________________________________________________________________________________________________________________________________________________
___________________________________________________________________________________________________________________________________________________________________________________________________________________________________________________________________________________________________________________
2. Do they look like your drawing? ____________________________________________________________________________________________________________________________________________________________________________________________________________________________
___________________________________________________________________________________________________________________________________________________________________________________________________________________________________________________________________________________________________________________
3. Make another drawing.
4. Do you see the lighter color wide band where the baby worm eggs come from? _______________________________________________________________________________________
5. Draw your worm hotel:
6. How might it look next week? _________________________________________________________________________________________________________________________________________________________________________________________________________________________________
___________________________________________________________________________________________________________________________________________________________________________________________________________________________________________________________________________________________________________________
___________________________________________________________________________________________________________________________________________________________________________________________________________________________________________________________________________________________________________________
Teams With Intergenerational Support | TWIGS Copyright ©1997, 2005, 2008, 2018 UC Regents of the University of California. All rights reserved.
57
HANDOUTGARDENING
ACTIVITY 14

7. Draw the hotel again:
8. What differences do you see? ________________________________________________________________________________________________________________________________________________________________________________________________________________________________
___________________________________________________________________________________________________________________________________________________________________________________________________________________________________________________________________________________________________________________
___________________________________________________________________________________________________________________________________________________________________________________________________________________________________________________________________________________________________________________
9. Did they eat all their food? Did they like one food better than another? __________________________________________________________________________________________________________________
___________________________________________________________________________________________________________________________________________________________________________________________________________________________________________________________________________________________________________________
___________________________________________________________________________________________________________________________________________________________________________________________________________________________________________________________________________________________________________________
10. Why do you think worms would be good to have in the garden? ___________________________________________________________________________________________________________________________________
___________________________________________________________________________________________________________________________________________________________________________________________________________________________________________________________________________________________________________________
___________________________________________________________________________________________________________________________________________________________________________________________________________________________________________________________________________________________________________________
WormsHandout, continued
TWIGS | Teams With Intergenerational SupportCopyright ©1997, 2005, 2008, 2018 UC Regents of the University of California. All rights reserved.
58
HANDOUTGARDENING ACTIVITY14

The Spice of Life
Teams With Intergenerational Support | TWIGS Copyright ©1997, 2005, 2008, 2018 UC Regents of the University of California. All rights reserved.
13NUTRITION ACTIVITY
59
15 GARDENING ACTIVITY
Why Do This?Herbs are great for cooking
with, but many work double time
helping reduce insect problems. Group
members will remember what the herb
they have worked with does because
they will have some tangible
experience working with it.
Summary:Groups will get information sheets on a specific herb. They will taste/smell, plant and read/hear about the herb, then report their findings to the rest of the groups.
Some Helpful Information:Herbs are used in many ways and have been for centuries. Although research does not always support their use as beneficial, folklore stories and legends about their powers have been passed down for generations. You may know of someone who uses herbs in special ways. Many people use herbs to flavor food and pro vide attractive garnishing.
Nosegays, bundles of aromatic herbs, make nice sweet-smelling gifts that can be used to perfume a room. Many people use simmering herbs as an air freshener, especially in winter when houses are closed up and stuffy.
Herbs in the garden serve more than one purpose. Peppermint grows well in a damp area and makes a pretty plant around the hose bib. It also helps repel ants. Coriander is a food flavorer, yet also attracts helpful insects to your garden that feast on garden pests. There are varieties of rosemary that are fine for cooking, are drought-tolerant and can be a good hearty ground cover.
With a little research you can find an herb to meet culinary, household and gardening needs.

The Spice of Life
TIME:1+ hour(s)
MATERIALS:• Fresh garlic
• Aromatic geranium seedling(s)
• Some dry catnip and catnip seeds
• A six-pack of marigold seedlings
• Some cilantro and cilantro seed (same as coriander)
• Peppermint and a peppermint seedling or rooting
• A six-pack of calendula seedlings and a calendula product (soaps, oils, balms, all available at health food stores)
• Dried basil (the herb) and a six-pack of basil seedlings planting materials
PREPARATION:1. Gather materials
2. Decide how the groups will be split and how the herbs will be assigned.
STEP BY STEP:1. Have a general discussion about herbs. Ask what people’s favorites are.
2. Distribute handouts, herb samples and planting materials.
3. Let everyone know they are to:
• Learn about their herb
• Decide where it’s best planted
• Plant it
• Share that information with the rest of the groups.
4. When all the planting is done, have the groups share what they learned.
EXTENSIONS:• Go to a nursery and see all the herbs they sell.
• Have folks look in a cookbook for their favorite food. Is an herb called for that can be grown in the garden?
TWIGS | Teams With Intergenerational SupportCopyright ©1997, 2005, 2008, 2018 UC Regents of the University of California. All rights reserved.
60
GARDENING ACTIVITY15

The Spice of Life
HERBS AND LEGENDS ABOUT THEIR USES
Garlic
This herb can repel many pests if it is interspersed throughout the garden. Garlic can also be used as an antibiotic for plants. If the cloves are put through a blender and mixed with water the liquid can be sprayed on plants suffering from many infections. Garlic is also
a favorite herb used in cooking. Everyone seems to like spaghetti with garlic sauce.
Plant by breaking apart
the cloves. Plant pointed end up, about 2 inches deep. Garlic likes rich soil and full sun.
Geranium (pelargonium)
These beautiful flowers can drive away beetles. There are many varieties of geranium. Some are large plants growing 3 feet tall. Tiny creeping scented varieties that smell just like lemons, roses or mint may only grow 5 inches tall. Perfumes are made from the leaves and American pioneers would soak some leaves in water to place on the forehead of someone with a headache. There are
also trailing ivy-type varieties. Each is planted in different spots.
This was a favorite flower of the early Americans, often grown in window boxes. Rose scented geraniums can be used to make jellies and cakes.
Geraniums can be grown from cuttings. Take a piece from another large healthy plant, remove a few of the lower leaves and any flowers. Place the broken stem in moist rich soil and in about 4 weeks a new geranium plant will grow. Most geraniums like a relatively cool location in the garden, but protect from winter frost. In hot climates a half a day of sunlight is plenty. In cooler climates they do best in full sun. For best growth, keep moist, although they are fairly drought resistant.
Catnip
This herb can be made into a tea or dried and given to cats for their pleasure. Catnip is hearty and will bear flowers all summer if it is cut back after its first bloom. It is very drought tolerant. Plant it where it won’t be watered too much.
Although cats seem to prefer the dried leaves and flowers, if planted to the side of the garden, catnip helps to keep cats out of the rest of the garden by distracting them.
Catnip can deter the flea beetle, so plant it near po tatoes, eggplants, tomatoes, cauliflower and beets. Catnip’s pretty flowers are also good for attracting bees to your garden. Bees are good to have because they help make sure
the flow ers get pollinated and make more vegetables for eating.
Cilantro
This plant has two names. When eaten as a leafy green plant it is known as cilantro, often used in Mexican or Chinese dishes. The seeds are also used as an herb, called coriander. Coriander is used in stews, sausage, gingerbread, cookies and candy. This is one of the earliest known spices. It was found in Egyptian tombs and used in Rome as a meat preservative.
The plant will produce a lot of seeds that should be harvested early, otherwise they fall to the ground and you have a lot more plants growing in no time. They like full sun, rich soil and regular watering. These plants grow well from seed.
Teams With Intergenerational Support | TWIGS Copyright ©1997, 2005, 2008, 2018 UC Regents of the University of California. All rights reserved.
61
HANDOUTGARDENING
ACTIVITY 15

The Spice of Life
Marigolds
These come in a lot of different colors. You can get red ones, orange ones, gold ones and
ones that are mixtures of these colors. Some grow tall, up to 2 feet. Others stay low-6 inches tall. They all like sun and rich soil. Many gardeners consider the scented marigolds the work horses of the garden. Marigolds de ter a lot of different garden pests. Plant them throughout the garden. Planted in large numbers they will repel nematodes (they attack potatoes) and bean beetles particularly well.
If there are a lot of earwigs in your garden, you may find it difficult to grow marigolds, because earwigs love them. The good news is that the earwigs spend all their time eating your marigolds and are less likely to munch your bean, cucumber and lettuce seedlings!
Calendulas are also in the marigold family. There are a lot of skin healing products made with calendula. The bright flowering plant can keep merry yellow and orange flowers blooming in the garden well into the cold season. Petals from the flowers sprinkled into salads add a delightful splash of color.
Mint
This plant will deter the white cabbage moth and ants. (Ants can bring aphids into your garden.) There are several varieties, even one that smells like lemon! Mint usually grows heartily anywhere that stays moist. A couple of cuttings placed in the ground near a hose bib where a lot of water drips will often grow well with little attention. Peppermint will deter the white cabbage butterfly and serves the gardener well when planted with the cabbages.
Mint can be used to make hot or iced tea. Mint tea is known to aid digestion. It adds refreshing flavor to ice water on hot summer afternoons and makes an attractive, nicely scented and tasty garnish on a scoop of ice cream!
Basil
This is a popular culinary herb. Pesto, made from basil, is used on pasta, in soups and lots of other dishes. Basil is a member of the mint family. It has the classic square stem common to this family of plants. Basil grows well from seed, or seedlings can be transplanted into the garden. The plants like full, warm sun and are not frost hardy. The leaves can be used fresh or dried.
This highly aromatic herb is supposed to repel mosquitoes and flies. Planted next to tomatoes it repels insects and helps the plants resist disease. These two vegetable plants are great when cooked together and grown together.
TWIGS | Teams With Intergenerational SupportCopyright ©1997, 2005, 2008, 2018 UC Regents of the University of California. All rights reserved.
62
HANDOUT 15 GARDENING ACTIVITY

Gardening Workout
Summary: This activity will help youth recognize that working in the garden helps them stay physically active.
So Helpful Information:The 2015-2020 Dietary Guidelines for Americans provides recommendations for physical activity guidelines for different age groups. It is important to recognize that besides eating healthy foods, regular physical activity is one of the most important things Americans can do to improve their health.
• Adults need at least 150 minutes of moderate-intensity physical activity per week, and should perform muscle-strengthening exercises on 2 or more days each week.
• Youth ages 6 to 17 years need at least 60 minutes of physical activity per day, including aerobic, muscle-strengthening, and bone-strengthening activities.
• Older adults should follow the adult guidelines if they can. If they are not able to meet the adult guidelines, they should be as physically active as their abilities and conditions allow.
Encourage children and adolescents to participate in physical activities that they find enjoyable. Most of the 60 or more minutes a day should be either moderate or vigorous-intensity aerobic physical activity. As part of the 60 minutes or more of daily physical activity, they should include muscle-strengthening physical activity on at least 3 days of the week and bone-strengthening physical activity on at least 3 days of the week.
• Aerobic physical activity increases a person’s heart rate and breathing from a moderate to a great extent. Aerobic activities increase cardiovascular fitness over time. Examples are running, hopping, skipping, jumping rope, swimming, dancing, and bicycling.
• Muscle-strengthening physical activity makes muscles do more work than usual resulting in stronger muscles. This type of activity increases skeletal muscle strength, power, endurance, and mass. Examples are climbing trees, playing tug-of-war, push-ups, pull-ups, sit-ups, lifting weights, or working with resistance bands.
• Bone-strengthening physical activity produces an impact or tension force on bones, which promotes bone growth and strength. Examples are running, jumping rope, lifting weights, basketball, volleyball, tennis, and hopscotch.
(Source: https://health.gov/paguidelines/)
Teams With Intergenerational Support | TWIGS Copyright ©1997, 2005, 2008, 2018 UC Regents of the University of California. All rights reserved.
13NUTRITION ACTIVITY
63
16 GARDENING ACTIVITY
Why Do This?Eating right is not the only thing
that helps our body stay healthy.
Being physically active is also
important for maintaining a fit
and healthy body.

Gardening Workout
TIME: 1 hour
MATERIALS:• Garden tools or pictures
• White board and markers
PREPARATION:1. Gather materials
2. Make copies of “Gardening” worksheet
STEP BY STEP:1. Growing foods in your own garden is fun. But, do you know that
gardening is a great way to be outdoors enjoying fresh air and getting some exercise at the same time?
• Why do you think it’s important for us to exercise and be physically active? (Build strong heart, muscles and bones. Help our bodies to be more flexible).
• Discuss the three different types of physical activities (aerobic, muscle-strengthening, bone-strengthening).
• How much physical activity do kids need? (at least 60 minutes a day of varying types of activities).
2. We need to take good care of our body by eating healthy foods and being physically active. Help students understand that they can be physically active working in the garden.
• Let’s make a list of activities we can do in a garden. Ask students to brainstorm ideas. Make a list on the board. (pulling weeds, hoeing weeds, raking leaves, shoveling soil, digging, planting, trimming trees, pruning shrubs, pushing a wheelbarrow, watering plants, removing rocks, spreading compost, etc.)
3. Ask the group to stand up and do warm-up stretching for a few minutes. Discuss why it’s a good idea to do warm-up stretching for 5-10 minutes before you exercise (gardening included) –A warm-up prepares the body for work by loosening the joints and gently stretching the muscles).
• Distribute the gardening workout handout. Have students do each garden activity on the list and make a note of which part of the body is working. For example, watering plants involves lifting and carrying a watering can, so the muscles in your arm (lifting) and hands (gripping) are working.
• Take a look at the list afterward and discuss how much work the body has to do to get each job done. Which activity is more or less strenuous compared to each other?
4. Remind students to protect themselves from potential sun exposure and dehydration if they are going to work out in the garden for a while.
TWIGS | Teams With Intergenerational SupportCopyright ©1997, 2005, 2008, 2018 UC Regents of the University of California. All rights reserved.
64
GARDENING ACTIVITY16

Gardening Workout
Watering Plants
Body Parts using:
_______________________________________________________
_______________________________________________________
_______________________________________________________
Hands
Arms
Trimming Plants
Body Parts using:
_______________________________________________________
_______________________________________________________
_______________________________________________________
Pushing a Wheelbarrow
Body Parts using:
_______________________________________________________
_______________________________________________________
_______________________________________________________
Shoveling
Body Parts using:
_______________________________________________________
_______________________________________________________
_______________________________________________________
Raking Leaves
Body Parts using:
_______________________________________________________
_______________________________________________________
_______________________________________________________
Teams With Intergenerational Support | TWIGS Copyright ©1997, 2005, 2008, 2018 UC Regents of the University of California. All rights reserved.
65
HANDOUTGARDENING
ACTIVITY 16