twilio elastic sip trunk provisioning · twilio elastic sip trunking freepbx configuration guide,...
TRANSCRIPT
Twilio Elastic SIP Trunking FreePBX Configuration Guide, Version 1.0.1, 6.12.2018 1
Twilio Elastic SIP Trunking – FreePBXâ Configuration Guide This configuration guide is intended to help you provision your Twilio Elastic SIP Trunk to communicate with FreePBX, an open source communication server. Please be aware, due to different versions, variations, add-ons, and options for FreePBX based plarforms, the settings you see may differ from those shown in this configuration guide. This document is intended to provide general guidelines for setting up your Twilio Elastic SIP Trunk and not as a comprehensive configuration template for FreePBX. Twilio does not provide direct support for third-party products; you should reach out to the applicable vendors support options for specific assistance configuring their products. Twilio Elastic SIP Trunk Provisioning We begin by provisioning the Twilio Elastic SIP Trunk through the Twilio Console, following the steps below. These steps assume there are no existing SIP Trunks provisioned. Our examples will use the Twilio US1 (Virginia) data center as the primary data center for call Termination and Origination and the Twilio US2 (Oregon) data center as the secondary data center for call Termination and Origination. You should modify the Termination and Origination URI’s based on the data centers that are physically closest to your location. A list of the regional termination and origination URI’s can be found on our SIP Trunking landing page: Termination: https://www.twilio.com/docs/sip-trunking#termination Origination: https://www.twilio.com/docs/sip-trunking#origination 1. Log into the Twilio Console - https://www.twilio.com/login. 2. From the main Dashboard on the left side of the screen, select (...) for All Products & Services. 3. Scroll down to Elastic SIP Trunking and click it. 4. From the Elastic SIP Trunking Dashboard, click the "Getting Started" button. 5. From the Getting Started with Elastic SIP Trunking page, Click the "Create a SIP Trunk". 6. Enter a Friendly Name. For the configuration guide, I used "FreePBX". Click Create. 7. On the "FreePBX" General Settings Screen, note the settings that impact this specific trunk. **Configuring Your Termination URI (From FreePBX > Twilio)** 8. On the left side of the screen under your "FreePBX" Trunk Name, Choose Termination. 9. Note, that in order to use a Trunk for termination (FreePBX > Twilio) it must have a Termination SIP URI and at least one authentication scheme (IP Access Control Lists and/or Credential Lists). We will provision both authentication schemes. 10. In the Termination SIP URI edit box, enter a unique termination URI (we use "twilio-freepbx" aka twilio-freepbx.pstn.twilio.com), on the far-right, you will be notified if the name is unique and available when you click outside the edit box.
Twilio Elastic SIP Trunking FreePBX Configuration Guide, Version 1.0.1, 6.12.2018 2
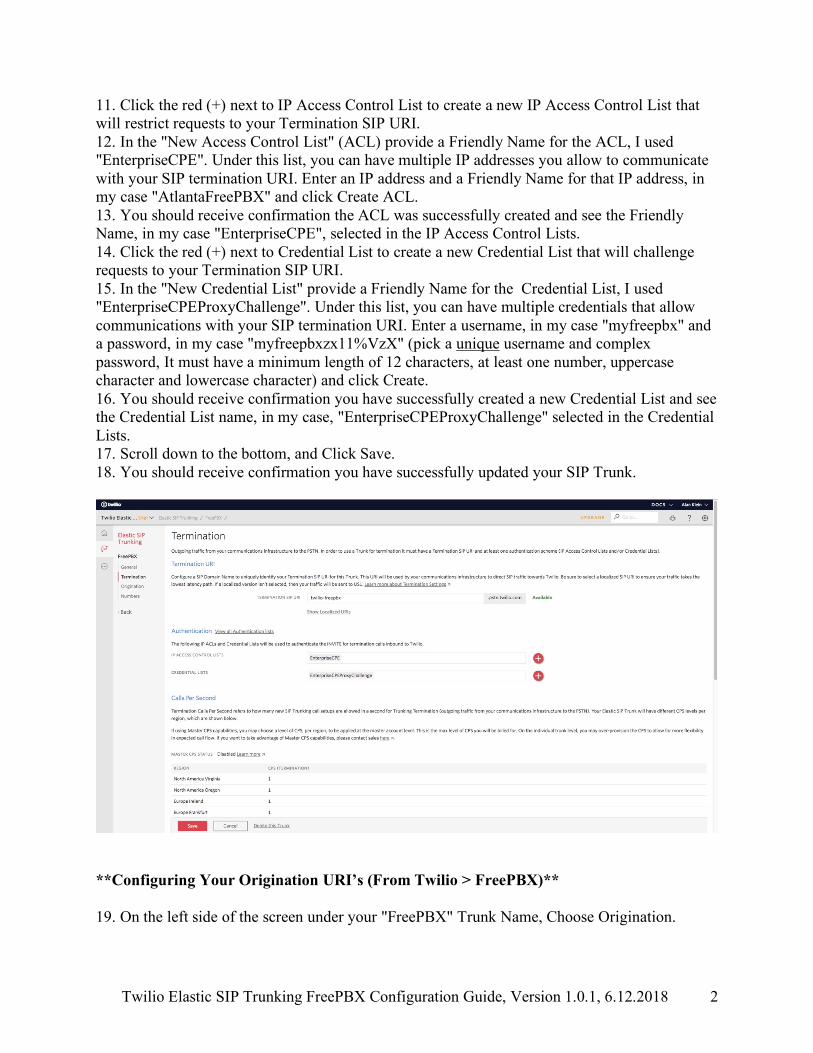
11. Click the red (+) next to IP Access Control List to create a new IP Access Control List that will restrict requests to your Termination SIP URI. 12. In the "New Access Control List" (ACL) provide a Friendly Name for the ACL, I used "EnterpriseCPE". Under this list, you can have multiple IP addresses you allow to communicate with your SIP termination URI. Enter an IP address and a Friendly Name for that IP address, in my case "AtlantaFreePBX" and click Create ACL. 13. You should receive confirmation the ACL was successfully created and see the Friendly Name, in my case "EnterpriseCPE", selected in the IP Access Control Lists. 14. Click the red (+) next to Credential List to create a new Credential List that will challenge requests to your Termination SIP URI. 15. In the "New Credential List" provide a Friendly Name for the Credential List, I used "EnterpriseCPEProxyChallenge". Under this list, you can have multiple credentials that allow communications with your SIP termination URI. Enter a username, in my case "myfreepbx" and a password, in my case "myfreepbxzx11%VzX" (pick a unique username and complex password, It must have a minimum length of 12 characters, at least one number, uppercase character and lowercase character) and click Create. 16. You should receive confirmation you have successfully created a new Credential List and see the Credential List name, in my case, "EnterpriseCPEProxyChallenge" selected in the Credential Lists. 17. Scroll down to the bottom, and Click Save. 18. You should receive confirmation you have successfully updated your SIP Trunk.
**Configuring Your Origination URI’s (From Twilio > FreePBX)** 19. On the left side of the screen under your "FreePBX" Trunk Name, Choose Origination.

Twilio Elastic SIP Trunking FreePBX Configuration Guide, Version 1.0.1, 6.12.2018 3
20. Click the "Add new Origination URI" button, where we will define how calls are sent from Twilio to your FreePBX. 21. For the Origination SIP URI edit box, enter the format (without quotes and with your unique public IP address): "sip:203.0.113.254;region=us1" with a priority of 10 and a weight of 10. This will originate all SIP Traffic from the Twilio US1 (Virginia) data center to FreePBX. Click Add. 22. Click the (+) next to Origination UR, to add a secondary Origination URI, should the primary encounter issues. 23. For the Origination SIP URI edit box, enter the format (without quotes and with your unique public IP address): "sip:203.0.113.254;region=us2" with a priority of 20 and a weight of 10. This will originate SIP Traffic from the Twilio US2 (Oregon) data center to FreePBX, only if the US1 Virginia data center is unable to deliver the call. Click Add.
**Assigning Telephone Numbers To Your Elastic SIP Trunk** 24. On the left side of the screen under your "FreePBX" Trunk Name, Choose Numbers. 25. Click the "Buy a Number" button. 26. Search for a number that meets your needs. 27. Click Buy next to the number. 28. Click Buy This Number to confirm the purchase. 29. You will receive a confirmation dialog the number was purchased, click close. 30. Your purchased number is now associated with your SIP Trunk. ** This completes all the Twilio Specific Provisioning Steps **

Twilio Elastic SIP Trunking FreePBX Configuration Guide, Version 1.0.1, 6.12.2018 4
FreePBX Provisioning This configuration guide was created using: Asterisk 15.40, FreePBX 14.0.3.6 (manual install) During the process of configuring certain FreePBX screens, for example Outbound Routes, be aware that some popular web browsers may attempt to autofill in fields with your FreePBX username and password which will cause provisioning issues if allowed to happen. FreePBX 14.x ships with pjsip listening on UDP/5060 and chan_sip listening on UDP/5160; these are separate SIP stacks with separate configuration files. All trunks and extensions in this configuration guide are created using pjsip. 1. Login to your FreePBX Web Interface. 2. From the Top Menu: Settings > Asterisk SIP Settings. General SIP Settings (Tab) --NAT Settings (Click Detect Network Settings) --Codecs (Uncheck All except ulaw) Click Submit Click Apply Config (Red Button) 3. Open a shell prompt and reload FreePBX settings (to process the NAT settings). [aklein@localhost ~]$ sudo fwconsole stop Running FreePBX shutdown... Shutting down Asterisk Gracefully. Will forcefully kill after 30 seconds. Press C to Cancel Press N to shut down NOW [============================] < 1 sec [aklein@localhost ~]$ sudo fwconsole start Running FreePBX startup... Taking too long? Customize the chown command, See http://wiki.freepbx.org/display/FOP/FreePBX+Chown+Conf Setting Permissions... Setting base permissions...Done Setting specific permissions... 883 [============================] Finished setting permissions Starting Asterisk... [============================] < 1 sec Asterisk Started [aklein@localhost ~]$ 4. From the Top Menu: Connectivity > Trunks. +Add Trunk +Add SIP (chan_pjsip) Trunk
Twilio Elastic SIP Trunking FreePBX Configuration Guide, Version 1.0.1, 6.12.2018 5
General (Tab) Trunk Name: Twilio-US1-North-America-Virginia Outbound CallerID: +13213513261 (use your own Twilio Elastic SIP Trunk Number) pjsip Settings (Tab) General Tab Username: myfreepbx (per my example) Password: myfreepbxzx11%VzX (per my example, use your own unique password) Authentication: Outbound Registration: None SIP Server: twilio-freepbx.pstn.us1.twilio.com (use your own unique regional Termination URI) SIP Server Port: 5060 Context: from-pstn-e164-us Advanced (Tab) DTMF Mode: RFC 4733 Click Submit Click Apply Config 5. From the Top Menu: Connectivity > Trunks - Add the Secondary Trunk for the Alternate US2 Data Center. +Add Trunk +Add SIP (chan_pjsip) Trunk General (Tab) Trunk Name: Twilio-US2-North-America-Oregon Outbound CallerID: +13213513261 (use your own Twilio Elastic SIP Trunk Number) pjsip Settings (Tab) General Tab Username: myfreepbx (per my example) Password: myfreepbxzx11%VzX (per my example, use your own unique password) Authentication: Outbound Registration: None SIP Server: twilio-freepbx.pstn.us2.twilio.com (use your own unique regional Termination URI) SIP Server Port: 5060 Context: from-pstn-e164-us Advanced (Tab) DTMF Mode: RFC 4733 Click Submit Click Apply Config

Twilio Elastic SIP Trunking FreePBX Configuration Guide, Version 1.0.1, 6.12.2018 6
Insure FreePBX processes the new configuration (from the CLI): [aklein@localhost ~]$ sudo fwconsole reload Reloading FreePBX Successfully reloaded [aklein@localhost ~]$ 6. From the Top Menu: Connectivity > Outbound Routes. +Add Outbound Route Route Settings (Tab) Route Name: TwilioSIPOutbound Trunk Sequence for Matched Routes: Choose (Primary and Secondary for Failover): --Twilio-US1-North-America-Virginia (First) --Twilio-US2-North-America-Oregon (Second)

Twilio Elastic SIP Trunking FreePBX Configuration Guide, Version 1.0.1, 6.12.2018 7
Dial Patterns (Tab) – We will use North America dial patterns for this example. For the First Row Enter: prepend edit box: +1 prefix edit box : blank match pattern: NXXNXXXXXX Add another row: prepend edit box: + prefix edit box : blank match pattern: 1NXXNXXXXXX Click Submit Click Apply Config
7. From the Top Menu: Applications > Extensions. + Add Extension + Add New PJSIP Extension General (Tab) User Extension: 233 Display Name: Alan Klein (use your name) Secret: choose dynamic password Click Submit
Twilio Elastic SIP Trunking FreePBX Configuration Guide, Version 1.0.1, 6.12.2018 8
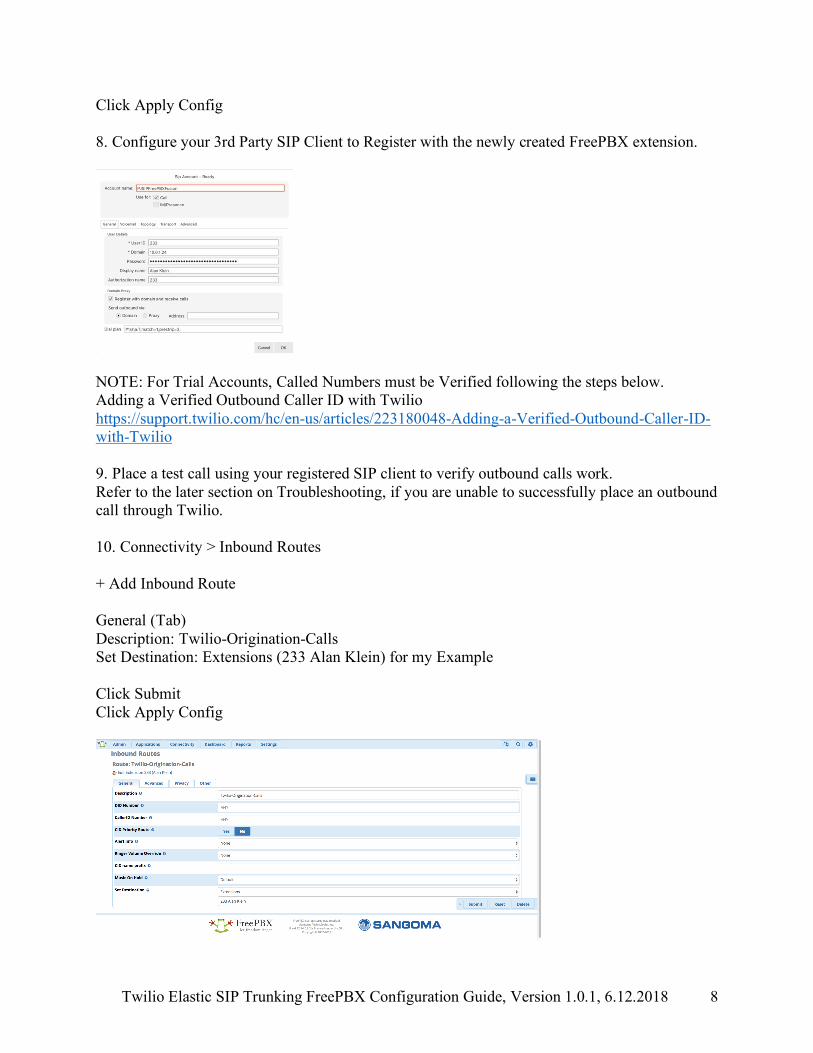
Click Apply Config 8. Configure your 3rd Party SIP Client to Register with the newly created FreePBX extension.
NOTE: For Trial Accounts, Called Numbers must be Verified following the steps below. Adding a Verified Outbound Caller ID with Twilio https://support.twilio.com/hc/en-us/articles/223180048-Adding-a-Verified-Outbound-Caller-ID-with-Twilio 9. Place a test call using your registered SIP client to verify outbound calls work. Refer to the later section on Troubleshooting, if you are unable to successfully place an outbound call through Twilio. 10. Connectivity > Inbound Routes + Add Inbound Route General (Tab) Description: Twilio-Origination-Calls Set Destination: Extensions (233 Alan Klein) for my Example Click Submit Click Apply Config
Twilio Elastic SIP Trunking FreePBX Configuration Guide, Version 1.0.1, 6.12.2018 9
11. Place a test call to your Elastic SIP Trunk phone number. Refer to Troubleshooting, if you are unable to successfully place an inbound call to your PBX.

Twilio Elastic SIP Trunking FreePBX Configuration Guide, Version 1.0.1, 6.12.2018 10
Troubleshooting Twilio Troubleshooting The most comprehensive page for Twilio specific Elastic SIP Trunk Troubleshooting is our Troubleshooting landing page, https://www.twilio.com/docs/sip-trunking/troubleshooting. You can look at the packet captures between Twilio and FreePBX by going to your Elastic SIP Trunking call logs, https://www.twilio.com/console/sip-trunking/logs/calls, clicking on a specific call date, and then on the right, clicking the download link next to SIP PCAP Log. This packet capture is in the common .pcap format. Note that for SIP/TLS .pcap files will be blank. Some of the common issues encountered: 1. The IP addresses and ports used for SIP Signaling and Media must be whitelisted so they can
pass through to FreePBX. The most up to date list of IP addresses and ports can be found on the Twilio Console Elastic SIP Trunking Networking Information - https://www.twilio.com/console/sip-trunking/your-network. The ;region parameter for the Origination URI restricts the IP addresses to those regions defined for your origination URI’s. A common symptom of a firewall issue is viewable in the .pcap file where Twilio sends SIP INVITES to your origination URI’s with no responses from FreePBX.
2. The From/To/Request-URI/P-Asserted Identity should be in E.164 Format. What is E.164? https://www.twilio.com/docs/glossary/what-e164
3. Twilio Trial accounts have limits which may impact how Elastic SIP Trunking is used.
Trial Accounts have a maximum of: • 1 unique SIP trunk • 1 origination phone number • 4 concurrent calls • 5 verified CallerID’s Trial accounts may only place calls TO and FROM verified numbers. A purchased Twilio phone number also qualifies as a verified number you can use as the caller ID.
4. Check the Twilio Debugger, https://www.twilio.com/console/runtime/debugger?quickDate=24, from the Twilio Console, to see if a specific error message appears which may be preventing the call.
Twilio Elastic SIP Trunking FreePBX Configuration Guide, Version 1.0.1, 6.12.2018 11
FreePBX Troubleshooting Add the following FreePBX Modules, to help facilitate troubleshooting. From FreePBX Daskboard: Admin > Module Admin Click the Standard and Extended Buttons (so they turn blue) Click the Check Online Button Install the Asterisk CLI Module and the Config Edit Module Once both are installed, Click the red Apply Config Button Both are now accessible under the FreePBX Admin Menu Helpful Asterisk CLI commands (which you can enter under Admin > Asterisk CLI) core show help pjsip pjsip show settings pjsip show version pjsip show identifies pjsip show endpoints pjsip show transports pjsip show auths pjsip show aors pjsip show contacts pjsip show channels FreePBX fwconsole commands: "fwconsole" is the Linux command that controls FreePBX 13+ from the Linux command prompt https://wiki.freepbx.org/pages/viewpage.action?pageId=37912685 To Restart FreePBX/Asterisk from the shell: fwconsole restart, to reload the FreePBX configuration, fwconsole reload. Asterisk PJSIP Troubleshooting (bold text enables SIP messaging in Asterisk CLI) Asterisk CLI (from Bash Shell): asterisk -vvvr Enable: • core set verbose 4 • core set debug 4 • pjsip set logger on Disable: • core set verbose 3 • core set debug 0 • pjsip set logger off From the FreePBX Dashboard: Admin > FreePBX Support https://www.freepbx.org/support-2/

Twilio Elastic SIP Trunking FreePBX Configuration Guide, Version 1.0.1, 6.12.2018 12
SIP TLS/SRTP – Addendum Caution: These changes will impact call origination and termination until the full set-up is completed and verified. **SETTING UP TWILIO SIDE** 1. Log into the Twilio Console - https://www.twilio.com/login 2. From the main Dashboard on the left side of the screen, select (...) for All Products & Services 3. Scroll down to Elastic SIP Trunking and click it 4. Select Trunks 5. Click on you SIP Trunk (my Example used: FreePBX) 6. Under Secure Trunking, Toggle the Slider to Enabled and Click Save 7. Click Origination, and modify the origination URI's to use TLS by clicking on each entry and making the following change (adjusting the IP address to match your configuration): Current: sip:203.0.113.254;region=us1 New: sip:203.0.113.254;transport=tls;region=us1 Current: sip:203.0.113.254;region=us2 New: sip:203.0.113.254;transport=tls;region=us2 **SETTING UP FREE PBX SIDE** For this configuration guide, we used the following process detailed at: https://wiki.asterisk.org/wiki/display/AST/Secure+Calling+Tutorial, to create the necessary certificate files to enable SIP/TLS Download the Twilio Root CA Certificates: Importing Twilio's Root CA Certificates https://www.twilio.com/docs/sip-trunking#rootCA Right Click Save As Link: Download Twilio's CA certificate (name: cacert.pem) Save the file to: /etc/asterisk/keys on your FreePBX server 1. Login to your FreePBX Web Interface. 2. From the Top Menu: Settings > Asterisk SIP Settings. 3. Click on the Chan PJSIP Setting Tab 4. Under TLS/SSL/SRTP Settings, next to CA Chain File, enter /etc/asterisk/keys/cacert.pem in the edit box 5. Under TLS/SSL/SRTP Settings, next to Certificate File, enter /etc/asterisk/keys/asterisk.pem in the edit box 6. Under TLS/SSL/SRTP Settings, next to Private Key File, enter /etc/asterisk/keys/asterisk.key in the edit box 7. SSL Method set to tlsv1 8. Verify Client: No
Twilio Elastic SIP Trunking FreePBX Configuration Guide, Version 1.0.1, 6.12.2018 13
9. Verify Server: No 10. Under Transports, enable tls 11. Click Submit 12. Click Apply Config 13. From the Linux prompt, execute: fwconsole stop and then fwconsole start (to being listening on TCP/5061 and process the new certificate changes) 14. From the Top Menu: Connectivity > Trunks 15. Select the first trunk, Twilio-US1-North-America-Virginia, and click the edit icon 16. Click on the pjsip Settings tab 17. Click SIP Server Port: 5061 18. Click Transport: 0.0.0.0-tls 19. Click the Advanced Tab 20. Scroll Down to Media Encryption: SRTP via in-SDP (recommended) 21 Click Submit 22. Click Apply Config 23. From the Top Menu: Connectivity > Trunks 24. Select the first trunk, Twilio-US2-North-America-Oregon, and click the edit icon 24. Click on the pjsip Settings tab 25. Click SIP Server Port: 5061 26. Click Transport: 0.0.0.0-tls 27. Click the Advanced Tab 28. Scroll Down to Media Encryption: SRTP via in-SDP (recommended) 29 Click Submit 30. Click Apply Config Notes, you will see the following entries in your log file and the Asterisk CLI. Twilio uses wild card certificates. Even though this log entry appears, it will not impact call processing if verify server is set to no. ERROR[3857]: pjproject:0 <?>: tlsc0x7f5b6033cd38 RFC 5922 (section 7.2) does not allow TLS wildcard certificates. Advise your SIP provider, please!

Twilio Elastic SIP Trunking FreePBX Configuration Guide, Version 1.0.1, 6.12.2018 14
Relevant Twilio Documentation Twilio Elastic SIP Trunking https://www.twilio.com/docs/sip-trunking SIP Trunking Configuration Guides https://www.twilio.com/docs/sip-trunking/sample-configuration Troubleshooting Your SIP Trunk https://www.twilio.com/docs/sip-trunking/troubleshooting Twilio SIP Trunking Scale and Limits https://www.twilio.com/docs/sip-trunking/scale-and-limits Elastic SIP Trunking Emergency Calling https://www.twilio.com/docs/sip-trunking/emergency-calling Calls Per Second (CPS) - Trunking Termination https://www.twilio.com/docs/sip-trunking/cps-trunk-termination Elastic SIP Trunking: Region selection for origination traffic https://www.twilio.com/blog/2017/07/sip-trunking-origination-traffic.html On-demand pcaps – Greater Visibility into Elastic SIP Trunking https://www.twilio.com/blog/2015/12/pcaps.html Announcing Secure Trunking https://www.twilio.com/blog/2015/09/secure-trunks.html
• core set verbose