twincat ads/ ams driver - hmisource.com · twincat ads/ams driver gp-pro ex device/plc connection...
TRANSCRIPT

1
Beckhoff Automation GmbH
TwinCAT ADS/AMS Driver
1 System Configuration....................................................................................................... 3
2 External Device Selection ................................................................................................ 5
3 Communication Settings .................................................................................................. 6
4 Setup Items .................................................................................................................... 16
5 Supported Devices......................................................................................................... 20
6 Device Code and Address Code.................................................................................... 50
7 Error Messages.............................................................................................................. 51

TwinCAT ADS/AMS Driver
GP-Pro EX Device/PLC Connection Manual 2
Introduction
This manual describes how to connect the Display and the External Device (target PLC).
In this manual, the connection procedure will be described in the sections identified below:
1 System Configuration
This section lists the types of External
Devices and SIO that you can connect.
"1 System Configuration" (page 3)
2 External Device Selection
Select a model (series) of the External
Device and its connection method.
"2 External Device Selection" (page 5)
Operation
3 Communication Settings
This section shows setting examples for
communicating between the Display and
the External Device.
"3 Communication Settings" (page 6)
4 Setup Items
This section describes communication
setup items on the Display. Set the
Display’s communication settings in GP
Pro-EX or in off-line mode.
"3.4 Setting Example 4" (page 12)

TwinCAT ADS/AMS Driver
GP-Pro EX Device/PLC Connection Manual 3
1 System Configuration
The system configuration in the case when the External Device and the Display are connected is shown.
Connection Configuration
• 1:1 Connection
Series CPU Link I/F SIO Type Setting Example
Bus Terminal Controller
BC9000BC9100BX9000
RJ45 on CPU unit Ethernet (TCP)"Setting Example 1" (page 6)
X900 Ethernet (TCP)"Setting Example 1" (page 6)
Embedded PC
CX1000 X01 Ethernet (TCP)"Setting Example 2" (page 8)
CX1010 X001 Ethernet (TCP)"Setting Example 2" (page 8)
CX1020 X01 or X02 Ethernet (TCP)"Setting Example 2" (page 8)
CX9000 X001 or X02 Ethernet (TCP)"Setting Example 2" (page 8)
IPC/TwinCAT2-SoftPLC
IPCPC/AT
RJ45 Ethernet (TCP)"Setting Example 3" (page 10)
IPC/TwinCAT3-Runtime
IPCPC/AT
RJ45 Ethernet (TCP)"Setting Example 4" (page 12)
CX5020 X000 or X001 Ethernet (TCP)"Setting Example 5" (page 14)

TwinCAT ADS/AMS Driver
GP-Pro EX Device/PLC Connection Manual 4
• 1:n Connection
• n:1 Connection
• n:m Connection
* The number of Displays you can connect depends on the External Device. Check the specifications of the
External Device. Adding more External Devices increases the load, which may require adjustments to the
Timeout time.

TwinCAT ADS/AMS Driver
GP-Pro EX Device/PLC Connection Manual 5
2 External Device Selection
Select the External Device to be connected to the Display.
Setup Items Setup Description
Number of Devices/PLCsUse an integer from 1 to 4 to enter the number of Devices/PLCs to connect to the display.
ManufacturerSelect the manufacturer of the External Device to be connected. Select "Beckhoff Automation GmbH".
Series
Select a model (series) of the External Device to be connected and connection method. Select "TwinCAT ADS/AMS".Check the External Device which can be connected in "TwinCAT ADS/AMS" in system configuration.
"1 System Configuration" (page 3)
PortSelect the Display port to be connected to the External Device. Select "Ethernet (TCP)".
Use System Area
Check this option to synchronize the system data area of the Display and the device (memory) of the External Device. When synchronized, you can use the External Device’s ladder program to switch the display or display the window on the Display.
Cf. GP-Pro EX Reference Manual "LS Area (Direct Access Method Area)"
This feature can also be set in GP-Pro EX or in the Display's offline mode.Cf. GP-Pro EX Reference Manual "System Settings [Display Unit] -
[System Area] Settings Guide"Cf. Maintenance/Troubleshooting Guide "Main Unit - System Area
Settings"
TwinCAT ADS/AMS Driver
GP-Pro EX Device/PLC Connection Manual 6
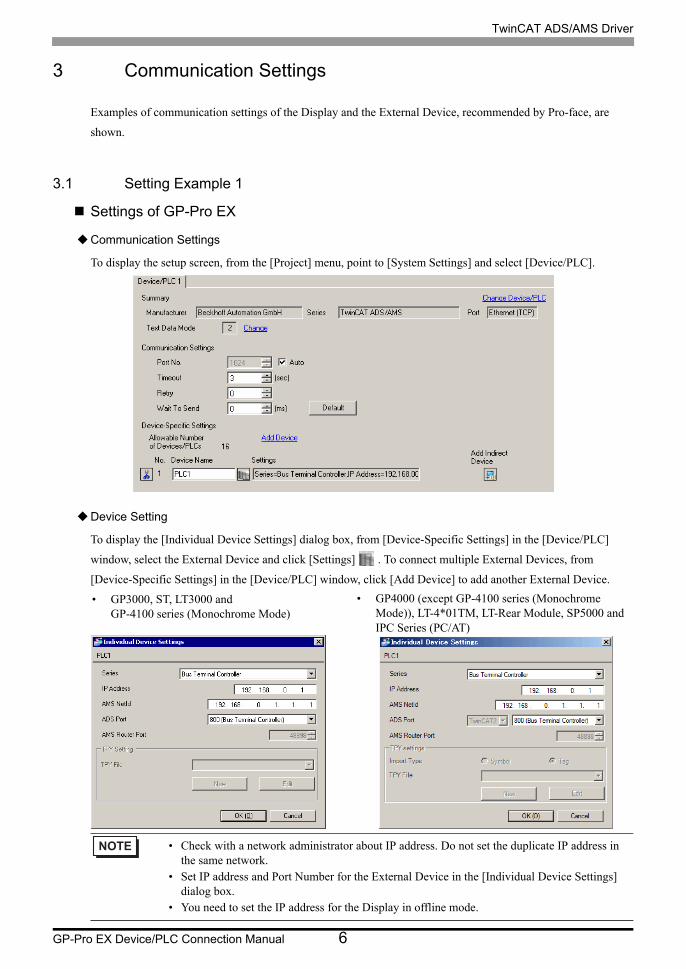
3 Communication Settings
Examples of communication settings of the Display and the External Device, recommended by Pro-face, are
shown.
3.1 Setting Example 1
Settings of GP-Pro EX
Communication Settings
To display the setup screen, from the [Project] menu, point to [System Settings] and select [Device/PLC].
Device Setting
To display the [Individual Device Settings] dialog box, from [Device-Specific Settings] in the [Device/PLC]
window, select the External Device and click [Settings] . To connect multiple External Devices, from
[Device-Specific Settings] in the [Device/PLC] window, click [Add Device] to add another External Device.
• Check with a network administrator about IP address. Do not set the duplicate IP address in the same network.
• Set IP address and Port Number for the External Device in the [Individual Device Settings] dialog box.
• You need to set the IP address for the Display in offline mode.
• GP3000, ST, LT3000 andGP-4100 series (Monochrome Mode)
• GP4000 (except GP-4100 series (Monochrome Mode)), LT-4*01TM, LT-Rear Module, SP5000 and IPC Series (PC/AT)

TwinCAT ADS/AMS Driver
GP-Pro EX Device/PLC Connection Manual 7
Settings of External Device
Use the TwinCAT for setting up communication with the External Device. Refer to your External Device manual
for details.
1 Set up the External Device as in the following table, and add to the TwinCAT system. Please refer to the manual
of the External Device for more details.
2 Add the Display's IP address and AMS NetId to the TwinCAT system.
Right click the TwinCAT icon in the Notification Area, and select [Properties].
3 In the [AMS Router] tab, click [Add].
4 Enter the following settings and click [OK].
5 Restart the TwinCAT system.
6 Create the project in TwinCAT PLC Control, and download to the External Device.
Setup Items Setting Value
Address 192.168.0.1
AMS Net Id 192.168.0.1.1.1
Setup Items Setting Value
AMS Net Id 192.168.0.2.1.1
Address 192.168.0.2
Transport TCP/IP
• In the AMS Net Id, set a value that appends 1.1 to the IP address.
• Check with a network administrator about IP address. Do not set the duplicate IP address in
the same network.
• Set the IP address and Port Number for the External Device in the [Individual Device Settings]
dialog box.
• You need to set the IP address for the Display in offline mode.

TwinCAT ADS/AMS Driver
GP-Pro EX Device/PLC Connection Manual 8
3.2 Setting Example 2
Settings of GP-Pro EX
Communication Settings
To display the setup screen, from the [Project] menu, point to [System Settings] and select [Device/PLC].
Device Setting
To display the [Individual Device Settings] dialog box, from [Device-Specific Settings] in the [Device/PLC]
window, select the External Device and click [Settings] . To connect multiple External Devices, from
[Device-Specific Settings] in the [Device/PLC] window, click [Add Device] to add another External Device.
• When using Embedded PC/IPC, in the [TPY File] field define the TPY file (tag data) output
by TwinCAT ADS/AMS.
• Check with a network administrator about IP address. Do not set the duplicate IP address in
the same network.
• Set the IP address and Port Number for the External Device in the [Individual Device Settings]
dialog box.
• You need to set the IP address for the Display in offline mode.
• GP3000, ST, LT3000 andGP-4100 series (Monochrome Mode)
• GP4000 (except GP-4100 series (Monochrome Mode)), LT-4*01TM, LT-Rear Module, SP5000 and IPC Series (PC/AT)

TwinCAT ADS/AMS Driver
GP-Pro EX Device/PLC Connection Manual 9
Settings of External Device
Use the TwinCAT for communication settings of the External Device. Refer to your External Device manual for
details.
1 Set up the External Device as in the following table. Please refer to the manual of the External Device for more
details.
2 Change the target to External Device.
From the TwinCAT System Manager's tree view, select [SYSTEM - Configuration].
3 From the [General] tab, click [Choose Target] to display a dialog box. Select the External Device. When selecting
the target, set the [Target Route] and [Remote Route] to [Static].
4 Set up the Display's IP address and AMS NetId on the External Device.
From the TwinCAT System Manager's tree view, select [SYSTEM - Configuration] and then [Route Settings] to
display a screen.
5 Select the [Static Route] tab and click [Add].
6 Enter the following settings and click [Add Route].
7 Create the project in TwinCAT PLC Control, and download to the External Device.
Setup Items Setting Value
Address 192.168.0.1
AMS Net Id 192.168.0.1.1.1
Setup Items Setting Value
AmsNetId 192.168.0.2.1.1
Transport Type TCP/IP
Address Info 192.168.0.2 (IP Address)
Target Route Static
Remote Route none
• In the AmsNetId, set a value that appends 1.1 to the IP address.
• Check with a network administrator about IP address. Do not set the duplicate IP address in
the same network.
• Set the IP address and Port Number for the External Device in the [Individual Device Settings]
dialog box.
• You need to set the IP address for the Display in offline mode.

TwinCAT ADS/AMS Driver
GP-Pro EX Device/PLC Connection Manual 10
3.3 Setting Example 3
Settings of GP-Pro EX
Communication Settings
To display the setup screen, from the [Project] menu, point to [System Settings] and select [Device/PLC].
Device Setting
To display the [Individual Device Settings] dialog box, from [Device-Specific Settings] in the [Device/PLC]
window, select the External Device and click [Settings] . To connect multiple External Devices, from
[Device-Specific Settings] in the [Device/PLC] window, click [Add Device] to add another External Device.
• When using Embedded PC/IPC, in the [TPY File] field define the TPY file (tag data) output
by TwinCAT ADS/AMS.
• Check with a network administrator about IP address. Do not set the duplicate IP address in
the same network.
• Set the IP address and Port Number for the External Device in the [Individual Device Settings]
dialog box.
• You need to set the IP address for the Display in offline mode.
• GP3000, ST, LT3000 andGP-4100 series (Monochrome Mode)
• GP4000 (except GP-4100 series (Monochrome
Mode)), LT-4*01TM, LT-Rear Module, SP5000 and
IPC Series (PC/AT)

TwinCAT ADS/AMS Driver
GP-Pro EX Device/PLC Connection Manual 11
Settings of External Device
Use the TwinCAT for communication settings of the External Device. Refer to your External Device manual for
details.
1 In the TwinCAT system, enter the following settings. Please refer to the manual of the External Device for more
details.
2 Add the Display's IP address and AMS NetId to the TwinCAT system.
Right click the TwinCAT icon in the Notification Area, and select [Properties].
3 In the [AMS Router] tab, click [Add].
4 Enter the following settings and click [OK].
5 Restart the TwinCAT system.
Setup Items Setting Value
Address 192.168.0.1
AMS Net Id 192.168.0.1.1.1
Setup Items Setting Value
AMS Net Id 192.168.0.2.1.1
Address 192.168.0.2
Transport TCP/IP
• In the AMS Net Id, set a value that appends 1.1 to the IP address.
• Check with a network administrator about IP address. Do not set the duplicate IP address in
the same network.
• Set the IP address and Port Number for the External Device in the [Individual Device Settings]
dialog box.
• You need to set the IP address for the Display in offline mode.

TwinCAT ADS/AMS Driver
GP-Pro EX Device/PLC Connection Manual 12
3.4 Setting Example 4
Settings of GP-Pro EX
Communication Settings
To display the setup screen, from the [Project] menu, point to [System Settings] and select [Device/PLC].
Device Setting
To display the [Individual Device Settings] dialog box, from [Device-Specific Settings] in the [Device/PLC]
window, select the External Device and click [Settings] . To connect multiple External Devices, from
[Device-Specific Settings] in the [Device/PLC] window, click [Add Device] to add another External Device.
• GP3000, ST, LT3000 and GP-4100 series do not support TwinCAT3.
• When using Embedded PC/IPC, in the [TPY File] field define the TPY file (tag data) output
by TwinCAT ADS/AMS.
• Check with a network administrator about IP address. Do not set the duplicate IP address in
the same network.
• Set the IP address and Port Number for the External Device in the [Individual Device Settings]
dialog box.
• You need to set the IP address for the Display in offline mode.

TwinCAT ADS/AMS Driver
GP-Pro EX Device/PLC Connection Manual 13
Settings of External Device
Use the TwinCAT for communication settings of the External Device. Refer to your External Device manual for
details.
1 Start the setting tool.
2 Select [Routes] from [SYSTEM] in [Solution Explorer].
3 Select the [Static Route] tab from display, click [Add].
4 Enter the following settings and click [Add Route]. Set the Display and the External Device.
Display
5 From [PLC] in [Solution Explorer], right click the PLC project that you want to connect, and select [Change Port]
from the displayed menu.
Enter the Port number and click [OK].
Setup Items Setting Value
Ams Net Id 192.168.0.2.1.1
Transport Type TCP/IP
Connection Timeout (s) 5
• In the AMS Net Id, set a value that appends 1.1 to the IP address.
Setup Items Setting Value
Port 851
• Check with a network administrator about IP address. Do not set the duplicate IP address in
the same network.
• Set the IP address and Port number for the External Device in the [Individual Device Settings]
dialog box.
• You need to set the IP address for the Display in offline mode.

TwinCAT ADS/AMS Driver
GP-Pro EX Device/PLC Connection Manual 14
3.5 Setting Example 5
Settings of GP-Pro EX
Communication Settings
To display the setup screen, from the [Project] menu, point to [System Settings] and select [Device/PLC].
Device Setting
To display the [Individual Device Settings] dialog box, from [Device-Specific Settings] in the [Device/PLC]
window, select the External Device and click [Settings] . To connect multiple External Devices, from
[Device-Specific Settings] in the [Device/PLC] window, click [Add Device] to add another External Device.
• GP3000, ST, LT3000 and GP-4100 series do not support TwinCAT3.
• When using Embedded PC/IPC, in the [TPY File] field define the TPY file (tag data) output
by TwinCAT ADS/AMS.
• Check with a network administrator about IP address. Do not set the duplicate IP address in
the same network.
• Set the IP address and Port Number for the External Device in the [Individual Device Settings]
dialog box.
• You need to set the IP address for the Display in offline mode.

TwinCAT ADS/AMS Driver
GP-Pro EX Device/PLC Connection Manual 15
Settings of External Device
Use the TwinCAT for communication settings of the External Device. Refer to your External Device manual for
details.
1 Start the setting tool.
2 Change the target to External Device.
From [Solution Explorer], select [SYSTEM].
3 From the [General] tab, click [Choose Target] to display a dialog box. Select the External Device. When selecting
the target, set the [Target Route] and [Remote Route] to [Static].
4 Set the Display's IP address and AMS Net Id on the External Device.
From [SYSTEM] in [Solution Explorer], select [Routes].
5 Select the [Static Route] tab and click [Add].
6 Enter the following settings and click [Add Route]. Set the Display and the External Device.
Display
7 From [PLC] in [Solution Explorer], right click the PLC project that you want to connect, and select [Change Port]
from the displayed menu.
Enter the Port number and click [OK].
Setup Items Setting Value
Ams Net Id 192.168.0.2.1.1
Transport Type TCP/IP
Connection Timeout (s) 5
• In the AMS Net Id, set a value that appends 1.1 to the IP address.
Setup Items Setting Value
Port 851
• Check with a network administrator about IP address. Do not set the duplicate IP address in
the same network.
• Set the IP address and Port number for the External Device in the [Individual Device Settings]
dialog box.
• You need to set the IP address for the Display in offline mode.

TwinCAT ADS/AMS Driver
GP-Pro EX Device/PLC Connection Manual 16
4 Setup Items
Set communication settings of the Display with GP-Pro EX or in offline mode of the Display.
The setting of each parameter must be identical to that of External Device.
"3 Example of Communication Setting" (page 9)
4.1 Setup Items in GP-Pro EX
Communication Settings
To display the setup screen, from the [Project] menu, point to [System Settings] and select [Device/PLC].
• Set the Display’s IP address in off-line mode.
Cf. Maintenance/Troubleshooting Guide "Ethernet Settings"
• To use this driver, open TCP port 48898.
Setup Items Setup Description
Port No.Enter a port number of the Display, using 1024 to 65535. Check into [Auto], and a port number is set automatically.
TimeoutUse an integer from 1 to 127 to enter the time (s) for which the Display waits for the response from the External Device.
RetryIn case of no response from the External Device, use an integer from 0 to 255 to enter how many times the Display retransmits the command.
Wait To SendUse an integer from 0 to 255 to enter standby time (ms) for the Display from receiving packets to transmitting next commands.
• Refer to the GP-Pro EX Reference Manual for Indirect Device.
Cf. GP-Pro EX Reference Manual "Changing the Device/PLC at Runtime (Indirect Device)"

TwinCAT ADS/AMS Driver
GP-Pro EX Device/PLC Connection Manual 17
Device Setting
To display the [Individual Device Settings] dialog box, from [Device-Specific Settings] in the [Device/PLC]
window, select the external device and click [Settings] .
To connect multiple External Devices, from [Device-Specific Settings] in the [Device/PLC] window, click [Add
Device] to add another External Device.
Setup Items Setup Description
Series Set series of the External Device.
IP Address
Set IP address of the External Device.
• Check with a network administrator about IP address. Do not set the duplicate IP address.
AMS NetIdEnter the External Device's AMS NetId.AMS NetId is the IP Address with 1.1 appended.
ADS Port Set up the TwinCAT version and the ADS Port.
AMS Router Port Displays the AMS Router Port. AMS Router Port is fixed to 48898.
Import Type
When the [Series] is set to [Embedded PC/IPC], select the import type for the TPY file.Tag (recommended): Import tag data.Symbol: Import symbol names only.
Import type is the same as the import type for GP3000, ST, LT3000 and GP-4100 series (monochrome model).
TPY File
When the [Series] is set to [Embedded PC/IPC], select the tag data that defines the TPY file for the External Device.When creating new tag data, click [ New].
"5.2 Embedded PC Series / IPC/TwinCAT2-SoftPLC (Tag)" (page 21)
"5.3 Embedded PC Series / IPC/TwinCAT2-SoftPLC (Symbol)" (page 27)
"5.4 Embedded PC Series / IPC/TwinCAT3-Runtime (Tag)" (page 34)
"5.5 Embedded PC Series / IPC/TwinCAT3-Runtime (Symbol)" (page 41)
• GP3000, ST, LT3000 andGP-4100 series (Monochrome Mode)
• GP4000 (except GP-4100 series (Monochrome Mode)), LT-4*01TM, LT-Rear Module, SP5000 and IPC Series (PC/AT)

TwinCAT ADS/AMS Driver
GP-Pro EX Device/PLC Connection Manual 18
4.2 Setup Items in Offline Mode
Communication Settings
To display the setting screen, touch [Device/PLC Settings] from [Peripheral Settings] in offline mode. Touch the
External Device you want to set from the displayed list.
• Please refer to Maintenance/Troubleshooting Guide for more information on how to enter
offline mode or about operation.
Cf. Maintenance/Troubleshooting Guide "Offline Mode"• The number of the setup items to be displayed for 1 page in the offline mode depends on the
Display in use. Please refer to the Reference manual for details.
Setup Items Setup Description
Port No.
Set the Port No. of the Display. Select either [Fixed] or [Auto].When you select [Fixed], use an integer from 1024 to 65535 to enter the port No. of the Display.When you select [Auto], the port No. will be automatically assigned regardless of the entered value.
TimeoutUse an integer from 1 to 127 to enter the time (s) for which the Display waits for the response from the External Device.
RetryIn case of no response from the External Device, use an integer from 0 to 255 to enter how many times the Display retransmits the command.
Wait To SendUse an integer from 0 to 255 to enter standby time (ms) for the Display from receiving packets to transmitting next commands.

TwinCAT ADS/AMS Driver
GP-Pro EX Device/PLC Connection Manual 19
Device Setting
To display the setting screen, touch [Device/PLC Settings] from [Peripheral Settings]. Touch the External Device
you want to set from the displayed list, and touch [Device].
Setup Items Setup Description
Device/PLC NameSelect the External Device for device setting. Device name is a title of External Device set with GP-Pro EX.(Initial value [PLC1])
Series Displays the External Device model.
IP Address
Set IP address of the External Device.
• Check with a network administrator about IP address. Do not set the duplicate IP address.
AMS NetId (Byte 1-4) /AMS NetId (Byte 5, 6)
Enter the External Device's AMS NetId.AMS NetId is the IP Address with 1.1 appended.
ADS Port Set up the ADS Port.
AMS Router Port Displays the AMS Router Port. AMS Router Port is fixed to 48898.
TwinCAT ADS/AMS Driver
GP-Pro EX Device/PLC Connection Manual 20
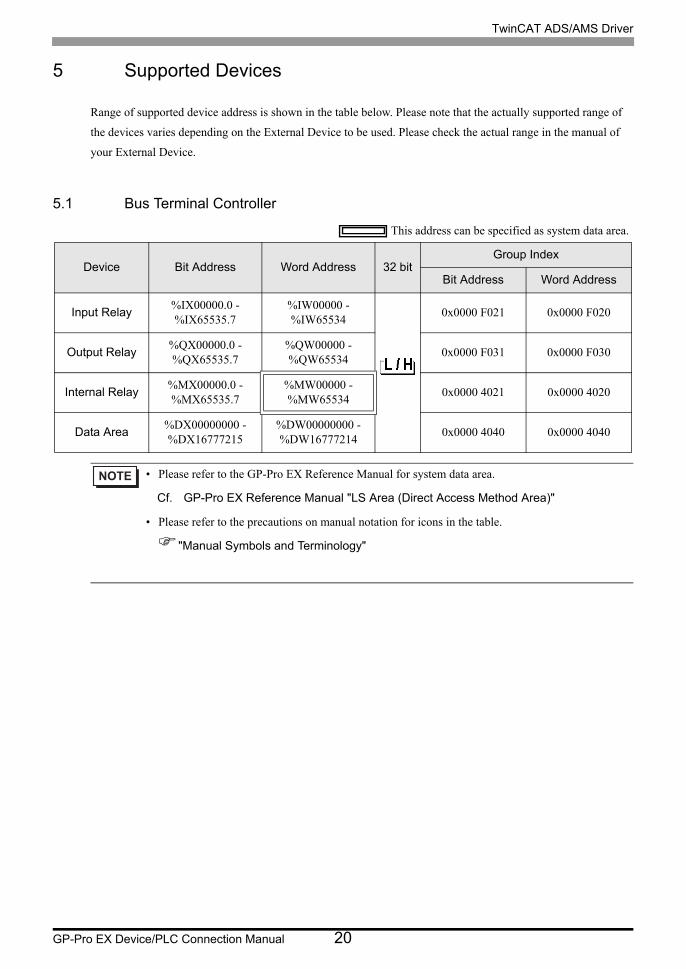
5 Supported Devices
Range of supported device address is shown in the table below. Please note that the actually supported range of
the devices varies depending on the External Device to be used. Please check the actual range in the manual of
your External Device.
5.1 Bus Terminal Controller
This address can be specified as system data area.
Device Bit Address Word Address 32 bitGroup Index
Bit Address Word Address
Input Relay%IX00000.0 - %IX65535.7
%IW00000 - %IW65534
0x0000 F021 0x0000 F020
Output Relay%QX00000.0 - %QX65535.7
%QW00000 - %QW65534
0x0000 F031 0x0000 F030
Internal Relay%MX00000.0 - %MX65535.7
%MW00000 - %MW65534
0x0000 4021 0x0000 4020
Data Area%DX00000000 - %DX16777215
%DW00000000 - %DW16777214
0x0000 4040 0x0000 4040
• Please refer to the GP-Pro EX Reference Manual for system data area.
Cf. GP-Pro EX Reference Manual "LS Area (Direct Access Method Area)"
• Please refer to the precautions on manual notation for icons in the table.
"Manual Symbols and Terminology"

TwinCAT ADS/AMS Driver
GP-Pro EX Device/PLC Connection Manual 21
5.2 Embedded PC Series / IPC/TwinCAT2-SoftPLC (Tag)
You can import tag data from projects created using TwinCAT.
This address can be specified as system data area.
Device Bit Address Word Address 32 bit Notes
BOOL
Single <TAGNAME> -
- *1
1D Array<TAGNAME>[xl] - <TAGNAME>[xh]
-
2D Array<TAGMNAME>[xl,yl] - <TAGNAME>[xh,yh]
-
3D Array<TAGNAME>[xl,yl,zl] - <TAGNAME>[xh,yh,zh]
-
BYTESINTUSINT
Single<TAGNAME>.00 - <TAGNAME>.07
<TAGNAME>
*1
1D Array<TAGNAME>[xl].00 - <TAGNAME>[xh].07
<TAGNAME>[xl] - <TAGNAME>[xh]
2D Array<TAGNAME>[xl,yl].00 - <TAGNAME>[xh,yh].07
<TAGNAME>[xl,yl] - <TAGNAME>[xh,yh]
3D Array<TAGNAME>[xl,yl,zl].00 - <TAGNAME>[xh,yh,zh].07
<TAGNAME>[xl,yl,zl] - <TAGNAME>[xh,yh,zh]
INTWORDUINT
Single<TAGNAME>.00 - <TAGNAME>.15
<TAGNAME>
*1*2
1D Array<TAGNAME>[xl].00 - <TAGNAME>[xh].15
<TAGNAME>[xl] - <TAGNAME>[xh]
2D Array<TAGNAME>[xl,yl].00 - <TAGNAME>[xh,yh].15
<TAGNAME>[xl,yl] - <TAGNAME>[xh,yh]
3D Array<TAGNAME>[xl,yl,zl].00 - <TAGNAME>[xh,yh,zh].15
<TAGNAME>[xl,yl,zl] - <TAGNAME>[xh,yh,zh]
DINTDWORDUDINT
Single<TAGNAME>.00 - <TAGNAME>.31
<TAGNAME>
*1
1D Array<TAGNAME>[xl].00 - <TAGNAME>[xh].31
<TAGNAME>[xl] - <TAGNAME>[xh]
2D Array<TAGNAME>[xl,yl].00 - <TAGNAME>[xh,yh].31
<TAGNAME>[xl,yl] - <TAGNAME>[xh,yh]
3D Array<TAGNAME>[xl,yl,zl].00 - <TAGNAME>[xh,yh,zh].31
<TAGNAME>[xl,yl,zl] - <TAGNAME>[xh,yh,zh]
DATEREAL*3
TIMETIME_OF_DAYDATE_AND_TIME*4
Single - <TAGNAME>
*1
1D Array -<TAGNAME>[xl] - <TAGNAME>[xh]
2D Array -<TAGNAME>[xl,yl] - <TAGNAME>[xh,yh]
3D Array -<TAGNAME>[xl,yl,zl] - <TAGNAME>[xh,yh,zh]

TwinCAT ADS/AMS Driver
GP-Pro EX Device/PLC Connection Manual 22
STRING
Single
-
<TAGNAME>
- *1*5
1D Array<TAGNAME>[xl] - <TAGNAME>[xh]
2D Array<TAGNAME>[xl,yl] - <TAGNAME>[xh,yh]
3D Array<TAGNAME>[xl,yl,zl] - <TAGNAME>[xh,yh,zh]
*1 <TAGNAME>: TagName including structure name in case of structure. The maximum number of characters for Symbol Name is 255 including delimiters and element number. In addition, maximum number of characters when using D-Script, limited to 54 characters. Example)
BOOL type single symbol "BOOLSYMBOL"BOOL type 1D Array "BOOL1D[10]"WORD type 2D Array "WORD2D[10,10]"UDINT type 3D Array "UDINT3D[0,1,2]"STRING in User Defined Structure [STRUCT001] "STRUCT001.STRINGSYM"
• You cannot start names with any of the following text: LS, USR, SCR, PRT
*2 The system data area is initially set up with 16 words of items. If you set up less than 16 words of items, after allocating a 16 word or larger array of tags in the system data area, select only the necessary items.
*3 32 bit type
*4 DATE_AND_TIME is a 64-bit data type in theDisplay, and a 32-bit data type on the External Device. Bit conversion is handled by the protocol.The Display supports precision to the milliseconds. The External Device supports precision to the seconds.
*5 Up to 1414 single-byte characters are supported by the STRING data type. Characters 1415 or higher are ignored.
• You can use tags on supported Displays. To check if tags are supported by your Display, in the GP-Pro EX Reference Manual's "Supported Features", see "Import Device/PLC tags".
• The tag import feature is supported in GP-Pro EX V3.01.000 or later (or in the case of GP-4*01TM, V3.10.000 or later).
• To import tags, use tag data output from TwinCAT2's TwinCAT 2.11 Version 2237 or earlier.
Device Bit Address Word Address 32 bit Notes
TwinCAT ADS/AMS Driver
GP-Pro EX Device/PLC Connection Manual 23
• You cannot use tags with nested arrays (for example, Array[x][y].Structure) in GP-Pro EX. Design
your tags using multidimensional arrays (for example, Array[x,y].Structure) so you can use them in
GP-Pro EX.
• When using this driver, if you have many parts on a screen set up with tags, changing screens and
displaying windows may take longer than expected. This is due to the time required to reference
tag values on the screen or window.
To reduce the time to change screens or display windows, consider separating the parts onto
multiple screens.
• Please refer to the GP-Pro EX Reference Manual for system data area.
Cf. GP-Pro EX Reference Manual "LS Area (Direct Access Method Area)"
• Please refer to the precautions on manual notation for icons in the table.
"Manual Symbols and Terminology"

TwinCAT ADS/AMS Driver
GP-Pro EX Device/PLC Connection Manual 24
Importing Tag File
1 In GP-Pro EX, open the [Individual Device Settings] dialog box, and from the [Series] drop-down list, select
"Embedded PC/IPC". Set [ADS Port] to [TwinCAT2], and the [Import Type] to [Tag].
2 Click [New].

TwinCAT ADS/AMS Driver
GP-Pro EX Device/PLC Connection Manual 25
3 Click [Import].
4 From the [Select File] field, click [Browse..], and then select the TPY file.

TwinCAT ADS/AMS Driver
GP-Pro EX Device/PLC Connection Manual 26
5 Check the tags to import, and click [OK].
• For details on importing tags, see "Using Device/PLC Tags" in the GP-Pro EX Reference Manual.
• GP-Pro EX does not support editing or deleting global scope symbols. To modify those symbols,
please override them by TPY file import or create a new symbol list by selecting [New].

TwinCAT ADS/AMS Driver
GP-Pro EX Device/PLC Connection Manual 27
5.3 Embedded PC Series / IPC/TwinCAT2-SoftPLC (Symbol)
You can import symbols only from projects created using TwinCAT. You cannot create symbols in GP-Pro EX.
This address can be specified as system data area.
Device Bit Address Word Address 32 bit Notes
BOOL
Single <TAGNAME> -
- *1
1D Array<TAGNAME>[xl] - <TAGNAME>[xh]
-
2D Array<TAGMNAME>[xl,yl] - <TAGNAME>[xh,yh]
-
3D Array<TAGNAME>[xl,yl,zl] - <TAGNAME>[xh,yh,zh]
-
BYTESINTUSINT
Single<TAGNAME>.00 - <TAGNAME>.07
<TAGNAME>
*1
1D Array<TAGNAME>[xl].00 - <TAGNAME>[xh].07
<TAGNAME>[xl] - <TAGNAME>[xh]
2D Array<TAGNAME>[xl,yl].00 - <TAGNAME>[xh,yh].07
<TAGNAME>[xl,yl] - <TAGNAME>[xh,yh]
3D Array<TAGNAME>[xl,yl,zl].00 - <TAGNAME>[xh,yh,zh].07
<TAGNAME>[xl,yl,zl] - <TAGNAME>[xh,yh,zh]
INTWORDUINT
Single<TAGNAME>.00 - <TAGNAME>.15
<TAGNAME>
*1*2
1D Array<TAGNAME>[xl].00 - <TAGNAME>[xh].15
<TAGNAME>[xl] - <TAGNAME>[xh]
2D Array<TAGNAME>[xl,yl].00 - <TAGNAME>[xh,yh].15
<TAGNAME>[xl,yl] - <TAGNAME>[xh,yh]
3D Array<TAGNAME>[xl,yl,zl].00 - <TAGNAME>[xh,yh,zh].15
<TAGNAME>[xl,yl,zl] - <TAGNAME>[xh,yh,zh]
DINTDWORDUDINT
Single<TAGNAME>.00 - <TAGNAME>.31
<TAGNAME>
*1
1D Array<TAGNAME>[xl].00 - <TAGNAME>[xh].31
<TAGNAME>[xl] - <TAGNAME>[xh]
2D Array<TAGNAME>[xl,yl].00 - <TAGNAME>[xh,yh].31
<TAGNAME>[xl,yl] - <TAGNAME>[xh,yh]
3D Array<TAGNAME>[xl,yl,zl].00 - <TAGNAME>[xh,yh,zh].31
<TAGNAME>[xl,yl,zl] - <TAGNAME>[xh,yh,zh]
DATEREAL*3
TIMETIME_OF_DAYDATE_AND_TIME
Single - <TAGNAME>
*1
1D Array -<TAGNAME>[xl] - <TAGNAME>[xh]
2D Array -<TAGNAME>[xl,yl] - <TAGNAME>[xh,yh]
3D Array -<TAGNAME>[xl,yl,zl] - <TAGNAME>[xh,yh,zh]

TwinCAT ADS/AMS Driver
GP-Pro EX Device/PLC Connection Manual 28
STRING
Single
-
<TAGNAME>
- *1*4
1D Array<TAGNAME>[xl] - <TAGNAME>[xh]
2D Array<TAGNAME>[xl,yl] - <TAGNAME>[xh,yh]
3D Array<TAGNAME>[xl,yl,zl] - <TAGNAME>[xh,yh,zh]
*1 <TAGNAME>: TagName including structure name in case of structure. The maximum number of characters for Symbol Name is 255 including delimiters and element number. In addition, maximum number of characters when using D-Script, limited to 54 characters. Example)
BOOL type single symbol "BOOLSYMBOL"BOOL type 1D Array "BOOL1D[10]"WORD type 2D Array "WORD2D[10,10]"UDINT type 3D Array "UDINT3D[0,1,2]"STRING in User Defined Structure [STRUCT001] "STRUCT001.STRINGSYM"
• You cannot start names with any of the following text: LS, USR, SCR, PRT
*2 The system data area is initially set up with 16 words of items. If you set up less than 16 words of items, after allocating a 16 word or larger array of tags in the system data area, select only the necessary items.
*3 32 bit type
*4 Up to 1414 single-byte characters are supported by the STRING data type. Characters 1415 or higher are ignored.
• To import symbols, use symbol data output from TwinCAT2's TwinCAT 2.11 Version 2237 or earlier.
• Imported LREAL symbols use the bottom 32 bits only.
• Imported POINTER symbols display the associated address.
• Imported DATE, TIME, TIME_OF_DAY, and DATE_AND_TIME symbols display 32-bit data.
• Please refer to the GP-Pro EX Reference Manual for system data area.
Cf. GP-Pro EX Reference Manual "LS Area (Direct Access Method Area)"
• Please refer to the precautions on manual notation for icons in the table.
"Manual Symbols and Terminology"
Device Bit Address Word Address 32 bit Notes

TwinCAT ADS/AMS Driver
GP-Pro EX Device/PLC Connection Manual 29
Symbol List Dialog Box Settings
• Symbol List
To use a symbol in GP-Pro EX, the symbol needs to be registered in the [Symbol List].
Setup Items Setup Description
Symbol List Name Enter the name of the Symbol List.
Show Filters the symbols displayed in the list.
Import Imports a TPY file into the current Symbol List.
Delete Deletes the selected symbol.

TwinCAT ADS/AMS Driver
GP-Pro EX Device/PLC Connection Manual 30
• Select Symbols
Select the TPY file to import, and the individual symbols to import into GP-Pro EX.
Setup Items Setup Description
TPY File Select the TPY file to import.
Available ItemsAmong all the symbols in the TPY file, displays only those symbols that you can import.
Selected Items Displays the symbols to import.
[>>] [>]Move to [Selected Items].Click [>] to move symbols selected with a check mark.Click [>>] to move all symbols.
[<<] [<]Remove from [Selected Items].Click [<] to remove symbols selected with a check mark.Click [<<] to remove all symbols.
Datatype Filter Option Filter the symbols displayed in the [Available Items] area.

TwinCAT ADS/AMS Driver
GP-Pro EX Device/PLC Connection Manual 31
Importing Symbols
1 In GP-Pro EX, open the [Individual Device Settings] dialog box, and from the [Series] drop-down list, select
"Embedded PC/IPC". Set [ADS Port] to [TwinCAT2], and the [Import Type] to [Symbol].
2 Click [New].

TwinCAT ADS/AMS Driver
GP-Pro EX Device/PLC Connection Manual 32
3 Click [Import].
4 From the [TPY file] field, click [Import].
5 Select the TPY file to import.
6 In the [Available Items] area, select the symbols to import and click [>]. The symbols to import are added to the
[Selected Items] area.

TwinCAT ADS/AMS Driver
GP-Pro EX Device/PLC Connection Manual 33
7 Click [OK] to import. Import results appear in the [Symbol List].
• When there are symbols that failed to import, you can save the generated error log.

TwinCAT ADS/AMS Driver
GP-Pro EX Device/PLC Connection Manual 34
5.4 Embedded PC Series / IPC/TwinCAT3-Runtime (Tag)
You can import tag data from projects created using TwinCAT.
This address can be specified as system data area.
Device Bit Address Word Address 32 bit Notes
BOOL
Single <TAGNAME> -
- *1
1D Array<TAGNAME>[xl] - <TAGNAME>[xh]
-
2D Array<TAGMNAME>[xl,yl] - <TAGNAME>[xh,yh]
-
3D Array<TAGNAME>[xl,yl,zl] - <TAGNAME>[xh,yh,zh]
-
4D Array<TAGNAME>[xl,yl,zl,wl] - <TAGNAME>[xh,yh,zh,wh]
-
5D Array
<TAGNAME>[xl,yl,zl,vl,wl] - <TAGNAME>[xh,yh,zh,vh,wh]
-
6D Array
<TAGNAME>[xl,yl,zl,ul,vl,wl] - <TAGNAME>[xh,yh,zh,uh,vh,wh]
-
BYTESINTUSINT
Single<TAGNAME>.00 - <TAGNAME>.07
<TAGNAME>
*1
1D Array<TAGNAME>[xl].00 - <TAGNAME>[xh].07
<TAGNAME>[xl] - <TAGNAME>[xh]
2D Array<TAGNAME>[xl,yl].00 - <TAGNAME>[xh,yh].07
<TAGNAME>[xl,yl] - <TAGNAME>[xh,yh]
3D Array<TAGNAME>[xl,yl,zl].00 - <TAGNAME>[xh,yh,zh].07
<TAGNAME>[xl,yl,zl] - <TAGNAME>[xh,yh,zh]
4D Array
<TAGNAME>[xl,yl,zl,wl].00 - <TAGNAME>[xh,yh,zh,wh].07
<TAGNAME>[xl,yl,zl,wl] - <TAGNAME>[xh,yh,zh,wh]
5D Array
<TAGNAME>[xl,yl,zl,vl,wl].00 - <TAGNAME>[xh,yh,zh,vh,wh].07
<TAGNAME>[xl,yl,zl,vl,wl] - <TAGNAME>[xh,yh,zh,vh,wh]
6D Array
<TAGNAME>[xl,yl,zl,ul,vl,wl].00 - <TAGNAME>[xh,yh,zh,uh,vh,wh].07
<TAGNAME>[xl,yl,zl,ul,vl,wl] - <TAGNAME>[xh,yh,zh,uh,vh,wh]

TwinCAT ADS/AMS Driver
GP-Pro EX Device/PLC Connection Manual 35
INTWORDUINT
Single<TAGNAME>.00 - <TAGNAME>.15
<TAGNAME>
*1*2
1D Array<TAGNAME>[xl].00 - <TAGNAME>[xh].15
<TAGNAME>[xl] - <TAGNAME>[xh]
2D Array<TAGNAME>[xl,yl].00 - <TAGNAME>[xh,yh].15
<TAGNAME>[xl,yl] - <TAGNAME>[xh,yh]
3D Array<TAGNAME>[xl,yl,zl].00 - <TAGNAME>[xh,yh,zh].15
<TAGNAME>[xl,yl,zl] - <TAGNAME>[xh,yh,zh]
4D Array
<TAGNAME>[xl,yl,zl,wl].00 - <TAGNAME>[xh,yh,zh,wh].15
<TAGNAME>[xl,yl,zl,wl] - <TAGNAME>[xh,yh,zh,wh]
5D Array
<TAGNAME>[xl,yl,zl,vl,wl].00 - <TAGNAME>[xh,yh,zh,vh,wh].15
<TAGNAME>[xl,yl,zl,vl,wl] - <TAGNAME>[xh,yh,zh,vh,wh]
6D Array
<TAGNAME>[xl,yl,zl,ul,vl,wl].00 - <TAGNAME>[xh,yh,zh,uh,vh,wh].15
<TAGNAME>[xl,yl,zl,ul,vl,wl] - <TAGNAME>[xh,yh,zh,uh,vh,wh]
DINTDWORDUDINT
Single<TAGNAME>.00 - <TAGNAME>.31
<TAGNAME>
*1
1D Array<TAGNAME>[xl].00 - <TAGNAME>[xh].31
<TAGNAME>[xl] - <TAGNAME>[xh]
2D Array<TAGNAME>[xl,yl].00 - <TAGNAME>[xh,yh].31
<TAGNAME>[xl,yl] - <TAGNAME>[xh,yh]
3D Array<TAGNAME>[xl,yl,zl].00 - <TAGNAME>[xh,yh,zh].31
<TAGNAME>[xl,yl,zl] - <TAGNAME>[xh,yh,zh]
4D Array
<TAGNAME>[xl,yl,zl,wl].00 - <TAGNAME>[xh,yh,zh,wh].31
<TAGNAME>[xl,yl,zl,wl] - <TAGNAME>[xh,yh,zh,wh]
5D Array
<TAGNAME>[xl,yl,zl,vl,wl].00 - <TAGNAME>[xh,yh,zh,vh,wh].31
<TAGNAME>[xl,yl,zl,vl,wl] - <TAGNAME>[xh,yh,zh,vh,wh]
6D Array
<TAGNAME>[xl,yl,zl,ul,vl,wl].00 - <TAGNAME>[xh,yh,zh,uh,vh,wh].31
<TAGNAME>[xl,yl,zl,ul,vl,wl] - <TAGNAME>[xh,yh,zh,uh,vh,wh]
Device Bit Address Word Address 32 bit Notes
TwinCAT ADS/AMS Driver
GP-Pro EX Device/PLC Connection Manual 36
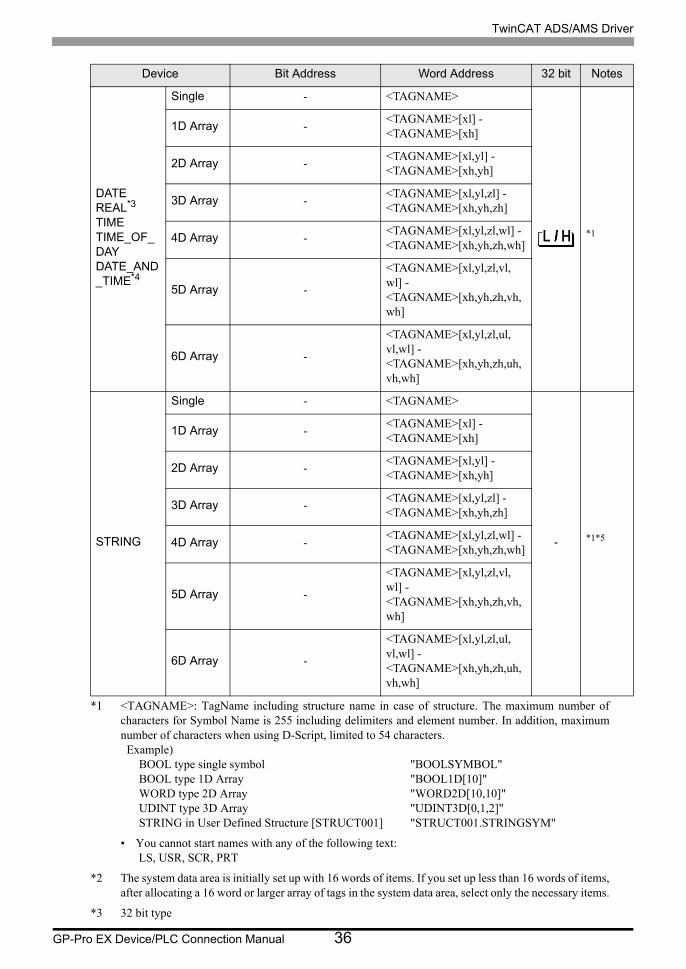
DATEREAL*3
TIMETIME_OF_DAYDATE_AND_TIME*4
Single - <TAGNAME>
*1
1D Array -<TAGNAME>[xl] - <TAGNAME>[xh]
2D Array -<TAGNAME>[xl,yl] - <TAGNAME>[xh,yh]
3D Array -<TAGNAME>[xl,yl,zl] - <TAGNAME>[xh,yh,zh]
4D Array -<TAGNAME>[xl,yl,zl,wl] - <TAGNAME>[xh,yh,zh,wh]
5D Array -
<TAGNAME>[xl,yl,zl,vl,wl] - <TAGNAME>[xh,yh,zh,vh,wh]
6D Array -
<TAGNAME>[xl,yl,zl,ul,vl,wl] - <TAGNAME>[xh,yh,zh,uh,vh,wh]
STRING
Single - <TAGNAME>
- *1*5
1D Array -<TAGNAME>[xl] - <TAGNAME>[xh]
2D Array -<TAGNAME>[xl,yl] - <TAGNAME>[xh,yh]
3D Array -<TAGNAME>[xl,yl,zl] - <TAGNAME>[xh,yh,zh]
4D Array -<TAGNAME>[xl,yl,zl,wl] - <TAGNAME>[xh,yh,zh,wh]
5D Array -
<TAGNAME>[xl,yl,zl,vl,wl] - <TAGNAME>[xh,yh,zh,vh,wh]
6D Array -
<TAGNAME>[xl,yl,zl,ul,vl,wl] - <TAGNAME>[xh,yh,zh,uh,vh,wh]
*1 <TAGNAME>: TagName including structure name in case of structure. The maximum number of characters for Symbol Name is 255 including delimiters and element number. In addition, maximum number of characters when using D-Script, limited to 54 characters. Example)
BOOL type single symbol "BOOLSYMBOL"BOOL type 1D Array "BOOL1D[10]"WORD type 2D Array "WORD2D[10,10]"UDINT type 3D Array "UDINT3D[0,1,2]"STRING in User Defined Structure [STRUCT001] "STRUCT001.STRINGSYM"
• You cannot start names with any of the following text: LS, USR, SCR, PRT
*2 The system data area is initially set up with 16 words of items. If you set up less than 16 words of items, after allocating a 16 word or larger array of tags in the system data area, select only the necessary items.
*3 32 bit type
Device Bit Address Word Address 32 bit Notes

TwinCAT ADS/AMS Driver
GP-Pro EX Device/PLC Connection Manual 37
*4 DATE_AND_TIME is a 64-bit data type in theDisplay, and a 32-bit data type on the External Device. Bit conversion is handled by the protocol.The Display supports precision to the milliseconds. The External Device supports precision to the seconds.
*5 Up to 1414 single-byte characters are supported by the STRING data type. Characters 1415 or higher are ignored.
• You can use tags on supported Displays. To check if tags are supported by your
Display, in the GP-Pro EX Reference Manual's "Supported Features", see "Import
Device/PLC tags".
• The tag import feature is supported in GP-Pro EX V3.01.000 or later (or in the case of
GP-4*01TM, V3.10.000 or later).
• To import tags, use tag data output from TwinCAT3's TwinCAT 3.1 Version 3.1.4012.0
or earlier.
• You cannot use tags with nested arrays (for example, Array[x][y].Structure) in GP-Pro EX. Design
your tags using multidimensional arrays (for example, Array[x,y].Structure) so you can use them in
GP-Pro EX.
• When using this driver, if you have many parts on a screen set up with tags, changing screens and
displaying windows may take longer than expected. This is due to the time required to reference
tag values on the screen or window.
To reduce the time to change screens or display windows, consider separating the parts onto
multiple screens.
• Please refer to the GP-Pro EX Reference Manual for system data area.
Cf. GP-Pro EX Reference Manual "LS Area (Direct Access Method Area)"
• Please refer to the precautions on manual notation for icons in the table.
"Manual Symbols and Terminology"

TwinCAT ADS/AMS Driver
GP-Pro EX Device/PLC Connection Manual 38
Importing Tag File
1 In GP-Pro EX, open the [Individual Device Settings] dialog box, and from the [Series] drop-down list, select
"Embedded PC/IPC". Set [ADS Port] to [TwinCAT3], and the [Import Type] to [Tag].
2 Click [New].

TwinCAT ADS/AMS Driver
GP-Pro EX Device/PLC Connection Manual 39
3 Click [Import].
4 From the [Select File] field, click [Browse..], and then select the TPY file.

TwinCAT ADS/AMS Driver
GP-Pro EX Device/PLC Connection Manual 40
5 Check the tags to import, and click [OK].
• For details on importing tags, see "Using Device/PLC Tags" in the GP-Pro EX Reference Manual.
• GP-Pro EX does not support editing or deleting global scope symbols. To modify those symbols,
please override them by TPY file import or create a new symbol list by selecting [New].

TwinCAT ADS/AMS Driver
GP-Pro EX Device/PLC Connection Manual 41
5.5 Embedded PC Series / IPC/TwinCAT3-Runtime (Symbol)
You can import symbols only from projects created using TwinCAT. You cannot create symbols in GP-Pro EX.
This address can be specified as system data area.
Device Bit Address Word Address 32 bit Notes
BOOL
Single <TAGNAME> -
- *1
1D Array<TAGNAME>[xl] - <TAGNAME>[xh]
-
2D Array<TAGMNAME>[xl,yl] - <TAGNAME>[xh,yh]
-
3D Array<TAGNAME>[xl,yl,zl] - <TAGNAME>[xh,yh,zh]
-
4D Array<TAGNAME>[xl,yl,zl,wl] - <TAGNAME>[xh,yh,zh,wh]
-
5D Array
<TAGNAME>[xl,yl,zl,vl,wl] - <TAGNAME>[xh,yh,zh,vh,wh]
-
6D Array
<TAGNAME>[xl,yl,zl,ul,vl,wl] - <TAGNAME>[xh,yh,zh,uh,vh,wh]
-
BYTESINTUSINT
Single<TAGNAME>.00 - <TAGNAME>.07
<TAGNAME>
*1
1D Array<TAGNAME>[xl].00 - <TAGNAME>[xh].07
<TAGNAME>[xl] - <TAGNAME>[xh]
2D Array<TAGNAME>[xl,yl].00 - <TAGNAME>[xh,yh].07
<TAGNAME>[xl,yl] - <TAGNAME>[xh,yh]
3D Array<TAGNAME>[xl,yl,zl].00 - <TAGNAME>[xh,yh,zh].07
<TAGNAME>[xl,yl,zl] - <TAGNAME>[xh,yh,zh]
4D Array
<TAGNAME>[xl,yl,zl,wl].00 - <TAGNAME>[xh,yh,zh,wh].07
<TAGNAME>[xl,yl,zl,wl] - <TAGNAME>[xh,yh,zh,wh]
5D Array
<TAGNAME>[xl,yl,zl,vl,wl].00 - <TAGNAME>[xh,yh,zh,vh,wh].07
<TAGNAME>[xl,yl,zl,vl,wl] - <TAGNAME>[xh,yh,zh,vh,wh]
6D Array
<TAGNAME>[xl,yl,zl,ul,vl,wl].00 - <TAGNAME>[xh,yh,zh,uh,vh,wh].07
<TAGNAME>[xl,yl,zl,ul,vl,wl] - <TAGNAME>[xh,yh,zh,uh,vh,wh]

TwinCAT ADS/AMS Driver
GP-Pro EX Device/PLC Connection Manual 42
INTWORDUINT
Single<TAGNAME>.00 - <TAGNAME>.15
<TAGNAME>
*1*2
1D Array<TAGNAME>[xl].00 - <TAGNAME>[xh].15
<TAGNAME>[xl] - <TAGNAME>[xh]
2D Array<TAGNAME>[xl,yl].00 - <TAGNAME>[xh,yh].15
<TAGNAME>[xl,yl] - <TAGNAME>[xh,yh]
3D Array<TAGNAME>[xl,yl,zl].00 - <TAGNAME>[xh,yh,zh].15
<TAGNAME>[xl,yl,zl] - <TAGNAME>[xh,yh,zh]
4D Array
<TAGNAME>[xl,yl,zl,wl].00 - <TAGNAME>[xh,yh,zh,wh].15
<TAGNAME>[xl,yl,zl,wl] - <TAGNAME>[xh,yh,zh,wh]
5D Array
<TAGNAME>[xl,yl,zl,vl,wl].00 - <TAGNAME>[xh,yh,zh,vh,wh].15
<TAGNAME>[xl,yl,zl,vl,wl] - <TAGNAME>[xh,yh,zh,vh,wh]
6D Array
<TAGNAME>[xl,yl,zl,ul,vl,wl].00 - <TAGNAME>[xh,yh,zh,uh,vh,wh].15
<TAGNAME>[xl,yl,zl,ul,vl,wl] - <TAGNAME>[xh,yh,zh,uh,vh,wh]
DINTDWORDUDINT
Single<TAGNAME>.00 - <TAGNAME>.31
<TAGNAME>
*1
1D Array<TAGNAME>[xl].00 - <TAGNAME>[xh].31
<TAGNAME>[xl] - <TAGNAME>[xh]
2D Array<TAGNAME>[xl,yl].00 - <TAGNAME>[xh,yh].31
<TAGNAME>[xl,yl] - <TAGNAME>[xh,yh]
3D Array<TAGNAME>[xl,yl,zl].00 - <TAGNAME>[xh,yh,zh].31
<TAGNAME>[xl,yl,zl] - <TAGNAME>[xh,yh,zh]
4D Array
<TAGNAME>[xl,yl,zl,wl].00 - <TAGNAME>[xh,yh,zh,wh].31
<TAGNAME>[xl,yl,zl,wl] - <TAGNAME>[xh,yh,zh,wh]
5D Array
<TAGNAME>[xl,yl,zl,vl,wl].00 - <TAGNAME>[xh,yh,zh,vh,wh].31
<TAGNAME>[xl,yl,zl,vl,wl] - <TAGNAME>[xh,yh,zh,vh,wh]
6D Array
<TAGNAME>[xl,yl,zl,ul,vl,wl].00 - <TAGNAME>[xh,yh,zh,uh,vh,wh].31
<TAGNAME>[xl,yl,zl,ul,vl,wl] - <TAGNAME>[xh,yh,zh,uh,vh,wh]
Device Bit Address Word Address 32 bit Notes

TwinCAT ADS/AMS Driver
GP-Pro EX Device/PLC Connection Manual 43
DATEREALTIMETIME_OF_DAYDATE_AND_TIME
Single - <TAGNAME>
*1*3
1D Array -<TAGNAME>[xl] - <TAGNAME>[xh]
2D Array -<TAGNAME>[xl,yl] - <TAGNAME>[xh,yh]
3D Array -<TAGNAME>[xl,yl,zl] - <TAGNAME>[xh,yh,zh]
4D Array -<TAGNAME>[xl,yl,zl,wl] - <TAGNAME>[xh,yh,zh,wh]
5D Array -
<TAGNAME>[xl,yl,zl,vl,wl] - <TAGNAME>[xh,yh,zh,vh,wh]
6D Array -
<TAGNAME>[xl,yl,zl,ul,vl,wl] - <TAGNAME>[xh,yh,zh,uh,vh,wh]
STRING
Single - <TAGNAME>
- *1*4
1D Array -<TAGNAME>[xl] - <TAGNAME>[xh]
2D Array -<TAGNAME>[xl,yl] - <TAGNAME>[xh,yh]
3D Array -<TAGNAME>[xl,yl,zl] - <TAGNAME>[xh,yh,zh]
4D Array -<TAGNAME>[xl,yl,zl,wl] - <TAGNAME>[xh,yh,zh,wh]
5D Array -
<TAGNAME>[xl,yl,zl,vl,wl] - <TAGNAME>[xh,yh,zh,vh,wh]
6D Array -
<TAGNAME>[xl,yl,zl,ul,vl,wl] - <TAGNAME>[xh,yh,zh,uh,vh,wh]
*1 <TAGNAME>: TagName including structure name in case of structure. The maximum number of characters for Symbol Name is 255 including delimiters and element number. In addition, maximum number of characters when using D-Script, limited to 54 characters. Example)
BOOL type single symbol "BOOLSYMBOL"BOOL type 1D Array "BOOL1D[10]"WORD type 2D Array "WORD2D[10,10]"UDINT type 3D Array "UDINT3D[0,1,2]"STRING in User Defined Structure [STRUCT001] "STRUCT001.STRINGSYM"
You cannot start names with any of the following text: LS, USR, SCR, PRT
*2 The system data area is initially set up with 16 words of items. If you set up less than 16 words of items, after allocating a 16 word or larger array of tags in the system data area, select only the necessary items.
*3 32 bit type
Device Bit Address Word Address 32 bit Notes
TwinCAT ADS/AMS Driver
GP-Pro EX Device/PLC Connection Manual 44
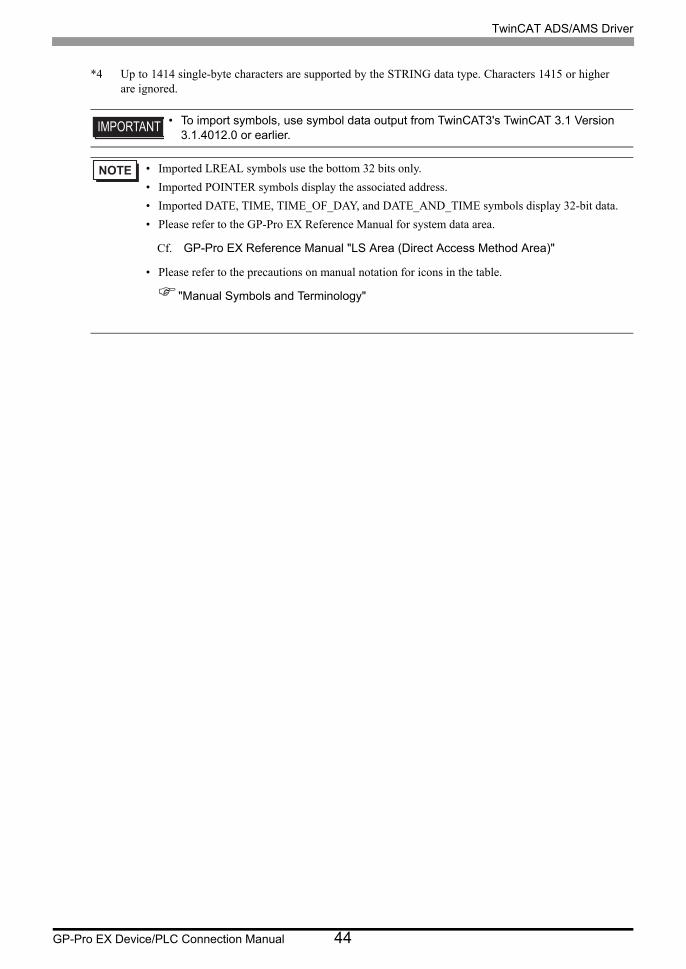
*4 Up to 1414 single-byte characters are supported by the STRING data type. Characters 1415 or higher are ignored.
• To import symbols, use symbol data output from TwinCAT3's TwinCAT 3.1 Version 3.1.4012.0 or earlier.
• Imported LREAL symbols use the bottom 32 bits only.
• Imported POINTER symbols display the associated address.
• Imported DATE, TIME, TIME_OF_DAY, and DATE_AND_TIME symbols display 32-bit data.
• Please refer to the GP-Pro EX Reference Manual for system data area.
Cf. GP-Pro EX Reference Manual "LS Area (Direct Access Method Area)"
• Please refer to the precautions on manual notation for icons in the table.
"Manual Symbols and Terminology"

TwinCAT ADS/AMS Driver
GP-Pro EX Device/PLC Connection Manual 45
Symbol List Dialog Box Settings
• Symbol List
To use a symbol in GP-Pro EX, the symbol needs to be registered in the [Symbol List].
Setup Items Setup Description
Symbol List Name Enter the name of the Symbol List.
Show Filters the symbols displayed in the list.
Import Imports a TPY file into the current Symbol List.
Delete Deletes the selected symbol.

TwinCAT ADS/AMS Driver
GP-Pro EX Device/PLC Connection Manual 46
• Select Symbols
Select the TPY file to import, and the individual symbols to import into GP-Pro EX.
Setup Items Setup Description
TPY File Select the TPY file to import.
Available ItemsAmong all the symbols in the TPY file, displays only those symbols that you can import.
Selected Items Displays the symbols to import.
[>>] [>]Move to [Selected Items].Click [>] to move symbols selected with a check mark.Click [>>] to move all symbols.
[<<] [<]Remove from [Selected Items].Click [<] to remove symbols selected with a check mark.Click [<<] to remove all symbols.
Datatype Filter Option Filter the symbols displayed in the [Available Items] area.

TwinCAT ADS/AMS Driver
GP-Pro EX Device/PLC Connection Manual 47
Importing Symbols
1 In GP-Pro EX, open the [Individual Device Settings] dialog box, and from the [Series] drop-down list, select
"Embedded PC/IPC". Set [ADS Port] to [TwinCAT3], and the [Import Type] to [Symbol].
2 Click [New].
TwinCAT ADS/AMS Driver
GP-Pro EX Device/PLC Connection Manual 48
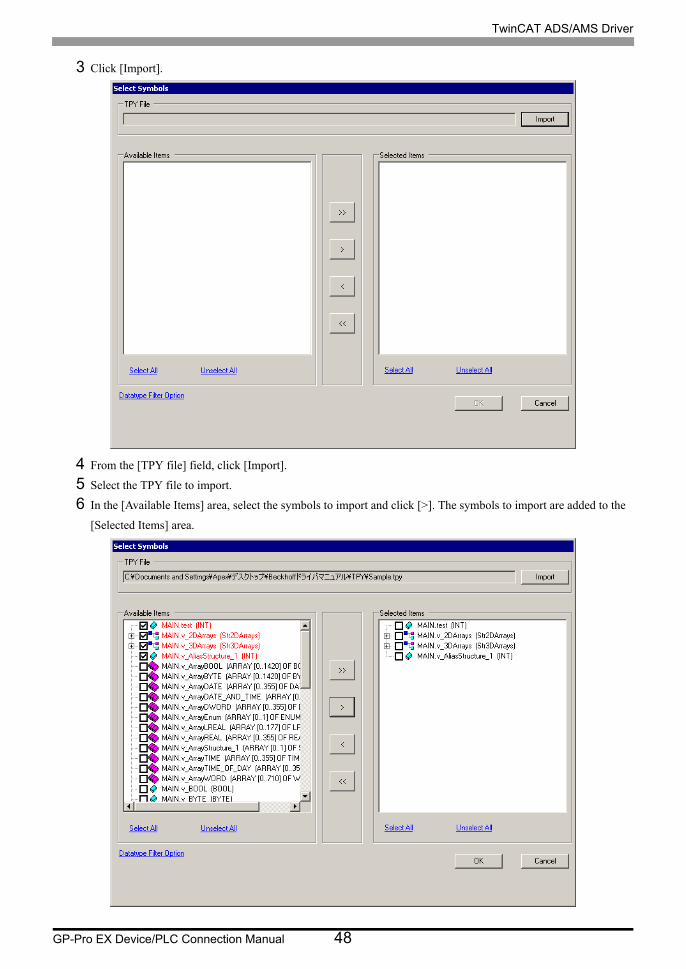
3 Click [Import].
4 From the [TPY file] field, click [Import].
5 Select the TPY file to import.
6 In the [Available Items] area, select the symbols to import and click [>]. The symbols to import are added to the
[Selected Items] area.

TwinCAT ADS/AMS Driver
GP-Pro EX Device/PLC Connection Manual 49
7 Click [OK] to import. Import results appear in the [Symbol List].
• When there are symbols that failed to import, you can save the generated error log.
TwinCAT ADS/AMS Driver
GP-Pro EX Device/PLC Connection Manual 50
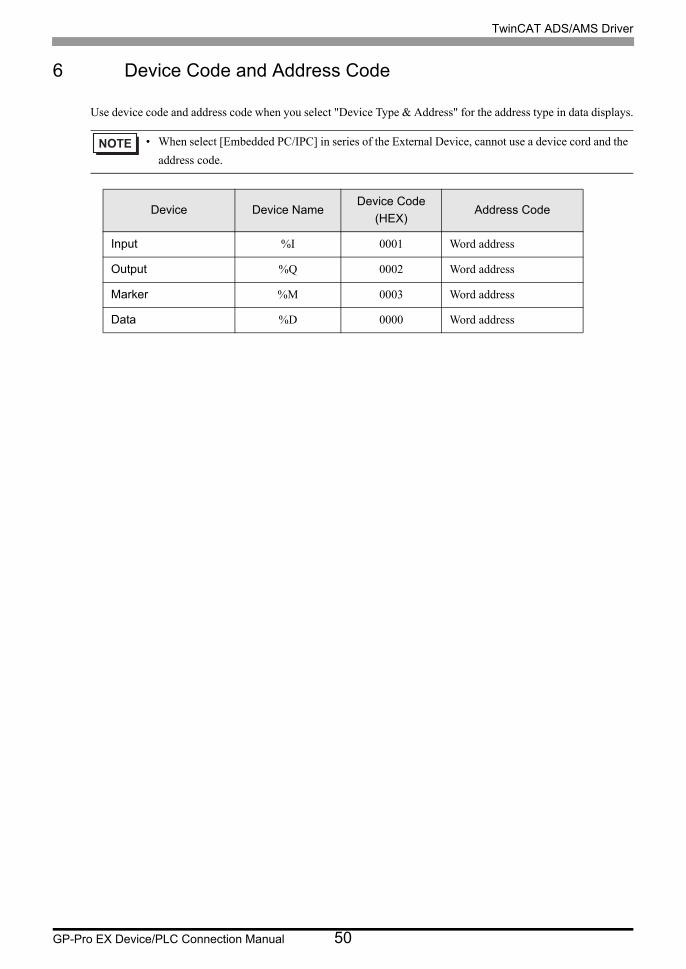
6 Device Code and Address Code
Use device code and address code when you select "Device Type & Address" for the address type in data displays.
• When select [Embedded PC/IPC] in series of the External Device, cannot use a device cord and the
address code.
Device Device NameDevice Code
(HEX)Address Code
Input %I 0001 Word address
Output %Q 0002 Word address
Marker %M 0003 Word address
Data %D 0000 Word address

TwinCAT ADS/AMS Driver
GP-Pro EX Device/PLC Connection Manual 51
7 Error Messages
Error messages are displayed on the screen of Display as follows: "No. : Device Name: Error Message (Error
Occurrence Area)". Each description is shown below.
Display Examples of Error Messages
"RHAA035: PLC1: Error has been responded for device write command (Error Code: 2 [02H])"
Error Messages Unique to External Device
Item Description
No. Error No.
Device NameName of External Device where error occurs. Device name is a title of External Device set with GP-Pro EX. (Initial value [PLC1])
Error Message Displays messages related to the error which occurs.
Error Occurrence Area
Displays IP address or device address of External Device where error occurs, or error codes received from External Device.
• IP address is displayed such as "IP address (Decimal): MAC address (Hex)".• Device address is displayed such as "Address: Device address".• Received error codes are displayed such as "Decimal [Hex]".
• Refer to your External Device manual for details on received error codes.
• Refer to "Display-related errors" in "Maintenance/Troubleshooting Guide" for details on the
error messages common to the driver.
Message ID Error Message Description
RHxx128NodeName:Out of range value in write request (Address: %s)
This message appears when writing out of range values from the Display to DATE, TOD, or DT data types on the External Device.