txconnect - enroll a new student and update … txsuite “how to” guide series texas computer...
TRANSCRIPT

The txSuite “How To” Guide Series
T E X A S C O M P U T E R C O O P E R A T I V E
D e v e l o p e d b y t h e
Web-based Access for Teachers, Parents, and Students
Business and Student Systems
How to:
Enroll a New Student Online & Update Registration Data
txCo
nn
ect

Copyright © 2016 by Texas Computer Cooperative All rights reserved
1314 Hines AvenueSan Antonio, TX 78208-1899

1
txConnect - Enroll a New Student Online & Update Registration Data
ContentsOvOvOverview .................................................................................................................................. 3
Prerequisites ....................................................................................................................................................... 3New Student Enrollment Vs. Online Student Registration ................................................................. 3Checklist Overview ........................................................................................................................................... 3Types of Forms ................................................................................................................................................... 4
Create a txConnect User Account ............................................................................................. 7
Log On to txConnect ............................................................................................................... 13
Enroll the Student.................................................................................................................. 15Step 1 - Enrollment Overview .....................................................................................................................18Step 2 - Registration Key...............................................................................................................................19Step 3 - Addresses and Contacts ...............................................................................................................22Step 4 - Student Information ......................................................................................................................27Step 5 - Final Steps ..........................................................................................................................................31Complete the Registration Process ..........................................................................................................33
Visit In Person ...........................................................................................................................................33Receive a Student Portal ID ..................................................................................................................33
Add the Student to Your txConnect Account ........................................................................ 35Confirm Your Email is Registered ...............................................................................................................37
Update Online Registration Data as Needed ...................................................................... 39Contacts Form ..................................................................................................................................................47

2
txConnect - Enroll a New Student Online & Update Registration Data

3
txConnect - Enroll a New Student Online & Update Registration Data
OvOvoverviewIn txConnect, a parent can enroll his student in the district using the New Student Enrollment page. The parent can then update the student’s online registration data as needed.
NOTE:Throughout this guide, the word “parent” is used to describe the user; however, a legal guardian may also enroll the student and update registration data online.
Prerequisites
� This guide assumes that several required steps have already been performed by the district to enable online registration at the campus.
� The parent must have an email address.
� These steps can only be performed on a personal computer. A mobile device cannot be used.
� This guide is based on txConnect 2.10.3.
New Student Enrollment Vs. Online Student Registration
New Student Enrollment refers to the one-time process of enrolling a new student in the district.
Online Student Registration refers to the maintenance of records for existing students (i.e., students already enrolled in the district), such as demographic data updates and standard form submission.
Checklist Overview
The following parent steps are covered in this guide:
� Create a user account in txConnect.
� Log on to txConnect.
4
txConnect - Enroll a New Student Online & Update Registration Data
� Enroll the new student, and submit the data to the district.
� Follow up by delivering any required forms or evidence in person to the district or campus.
� Obtain a Student Portal ID from the campus.
� Add the student to the parent’s txConnect account.
� Update the student’s online registration data as needed.
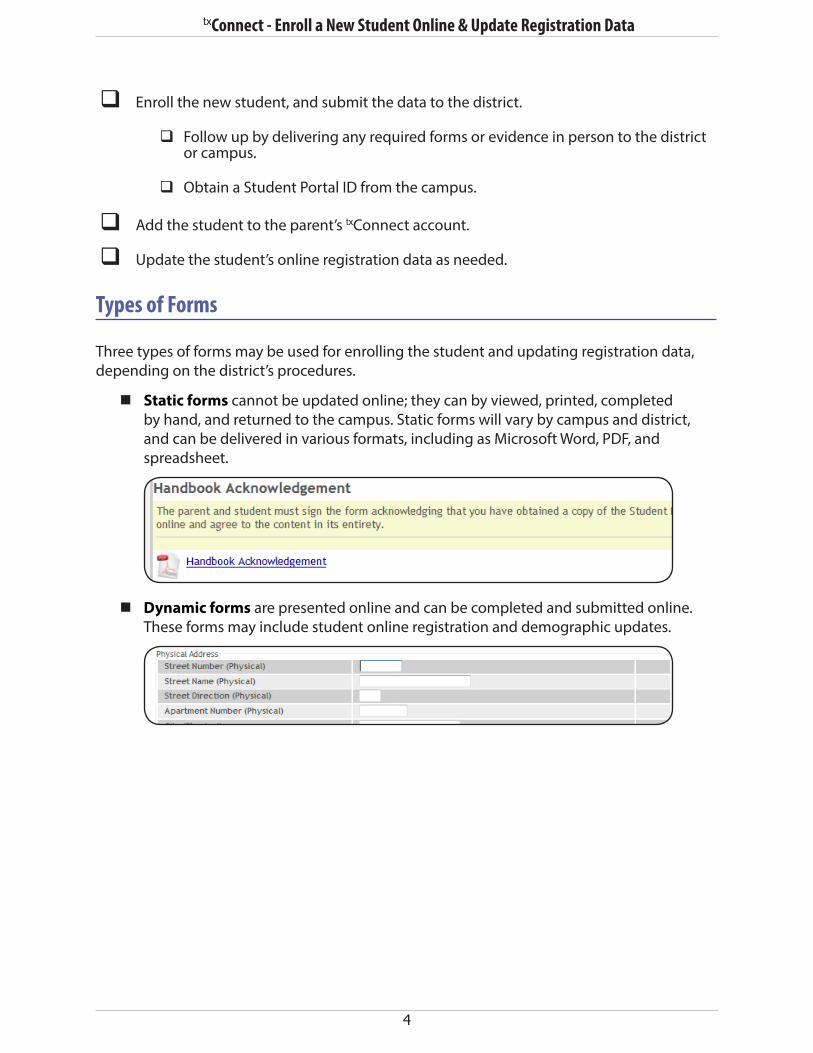
Types of Forms
Three types of forms may be used for enrolling the student and updating registration data, depending on the district’s procedures.
� Static forms cannot be updated online; they can by viewed, printed, completed by hand, and returned to the campus. Static forms will vary by campus and district, and can be delivered in various formats, including as Microsoft Word, PDF, and spreadsheet.
� Dynamic forms are presented online and can be completed and submitted online. These forms may include student online registration and demographic updates.

5
txConnect - Enroll a New Student Online & Update Registration Data
� Standard forms are predefined district-level forms that are common throughout Texas. Some forms have required data that must be entered, and some forms only require the parent to review the data and acknowledge that he has viewed and accepted the form.

6
txConnect - Enroll a New Student Online & Update Registration Data
7
txConnect - Enroll a New Student Online & Update Registration Data
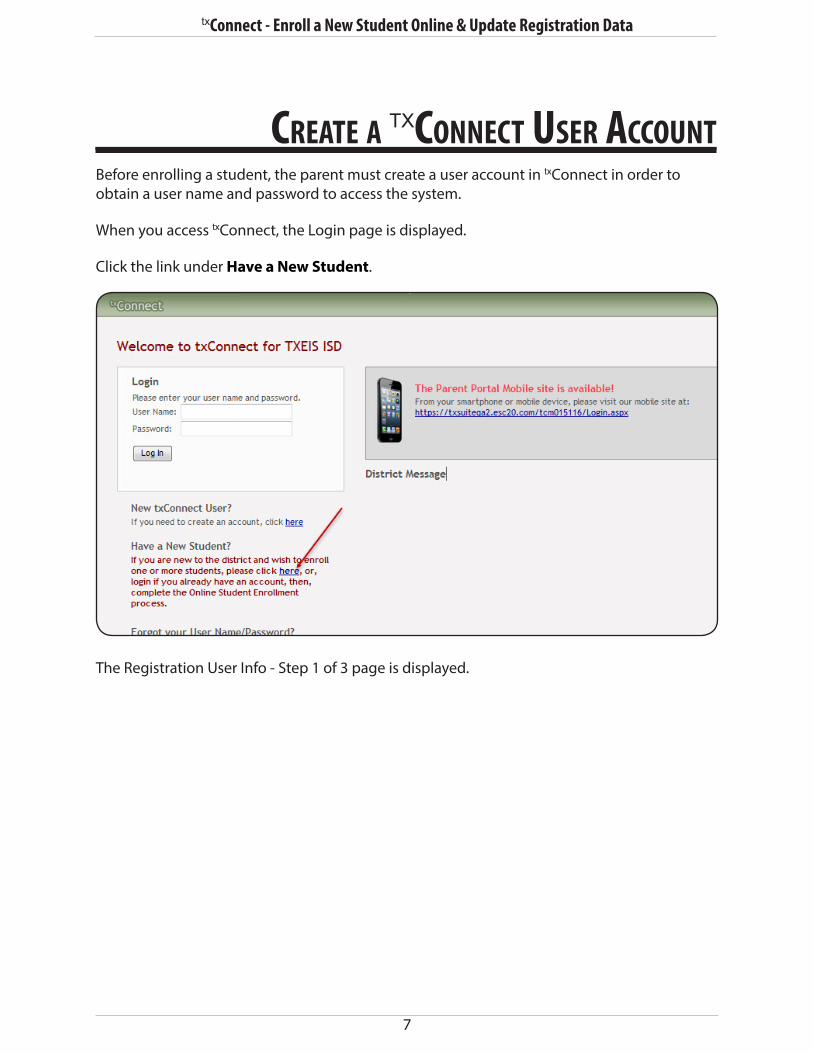
Create a txConneCt User aCCoUntBefore enrolling a student, the parent must create a user account in txConnect in order to obtain a user name and password to access the system.
When you access txConnect, the Login page is displayed.
Click the link under Have a New Student.
The Registration User Info - Step 1 of 3 page is displayed.

8
txConnect - Enroll a New Student Online & Update Registration Data
Step 1:
1. In the User Name field, type a user name that will identify you when you log on to txConnect, such as a combination of letters from your first and last names.
z The user name must be 6-25 characters and must be unique (i.e., not used by anyone else in the district).
z The user name is not case-sensitive (i.e., it does not matter if it is uppercase or lowercase letters).
z If you type a user name that is already taken, the system notifies you that the user name is taken. Another user name must be entered.
2. In the Password field, type a password that you will use when you log on to txConnect.
z The password must be 8-25 alphanumeric characters.
z It must be a combination of the following: uppercase, lowercase, numeric, and/or punctuation (e.g., aBc1234).
z The password is case-sensitive (i.e., it must always be typed exactly as it is entered here, including uppercase and lowercase letters).
3. In the Confirm Password field, retype your password exactly as it was typed above. This step confirms that you typed your password as intended.

9
txConnect - Enroll a New Student Online & Update Registration Data
4. In the E-mail field, type your current email address.
z You cannot enter an email address that is already in use.
z Your email address must be entered in a valid format (e.g., [email protected]).
Your email address is required if:
z You are new to the district and you are registering a new student.
z You are updating an existing student’s enrollment information.
z You wish to receive attendance or grade alerts.
5. In the Confirm E-mail field, re-type your email address. This step confirms that you typed your email address as you intended.
z The addresses entered in the E-mail and Confirm E-mail fields must match exactly.
z Once you complete your registration, you will receive an email message at that address containing a verification code. You must type (or copy/paste) the verification code on the My Account page in order to verify your email address.
6. Click Next.
z If all required data was not entered, a red message is displayed to the right of each field that is missing data. That information must be provided before you can continue.

10
txConnect - Enroll a New Student Online & Update Registration Data
z If the data was entered correctly, the Hint Question - Step 2 of 3 page is displayed.
Step 2:
1. In the Question field, select a question to which you will provide an answer. The question is asked in the event that you lose your password.
2. In the Answer field, type the answer to the question. You will be required to answer the question correctly in order to recover your password. You should select a question for which you will easily remember the answer. The answer is case sensitive (i.e., it must always be typed exactly as it is entered here, including uppercase and lowercase letters).
3. Click Next.
If the data was entered correctly, the Add Students - Step 3 of 3 page is displayed.
Step 3:
The Step 3 page can be skipped for now. Your student’s portal ID will be provided by the campus at a later time.

11
txConnect - Enroll a New Student Online & Update Registration Data
Click Complete to continue to the My Account page.
A pop-up window provides information about the next steps.
� To prevent the message from being displayed each time you log on, select Do not show me this again.
� Click to close the dialog box.

12
txConnect - Enroll a New Student Online & Update Registration Data

13
txConnect - Enroll a New Student Online & Update Registration Data
Log on to txConneCtIf you are continuing from the previous step and are already logged on, you can skip this step.
If you are not already logged on, you must log on to txConnect using the user name and password created in the previous step. Once you are logged on, you can access the page for enrolling a student in the district.
1. From the Login page in the User Name field, type your user ID. The user ID is not case sensitive.
2. In the Password field, type your password. The typed text is hidden. The password is case sensitive.
3. Click Log In. The My Account page is displayed.
If you entered an invalid user ID and/or password, an error message will prompt you to reenter the data. You must enter the correct information to continue.
WARNING:If you have three unsuccessful attempts to log on (invalid user ID/password combinations), the system will lock out your account for 10 minutes. Try logging on again after 10 minutes.

14
txConnect - Enroll a New Student Online & Update Registration Data
15
txConnect - Enroll a New Student Online & Update Registration Data
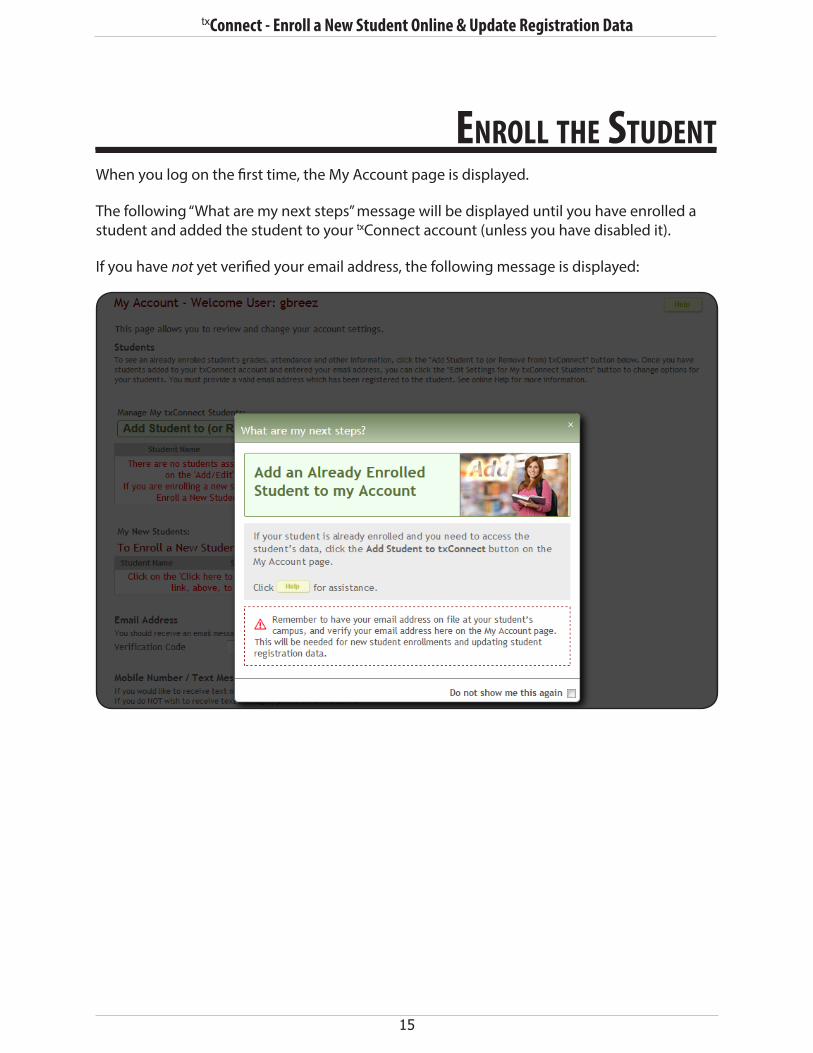
enroLL the stUdentWhen you log on the first time, the My Account page is displayed.
The following “What are my next steps” message will be displayed until you have enrolled a student and added the student to your txConnect account (unless you have disabled it).
If you have not yet verified your email address, the following message is displayed:

16
txConnect - Enroll a New Student Online & Update Registration Data
If you have already verified your email address, the following message is displayed:
� To prevent the message from being displayed each time you log on, select Do not show me this again.
� Click to close the dialog box.
Before enrolling a student, you must verify your email address using the code that was sent to your email address.

17
txConnect - Enroll a New Student Online & Update Registration Data
If you entered an email address when you registered for this txConnect account, you should have received an email message in your inbox with a code allowing you to verify your email address. You must verify your email address before you can access features that require your email address.
1. Type (or copy/paste) the verification code that was sent in the email message, and click Verify Code.
If the verification code is unsuccessful, click Resend Code to send a new code.
2. If the correct code was entered, your email address is displayed.

18
txConnect - Enroll a New Student Online & Update Registration Data
From the My Account page, click Click here to Enroll a New Student for School. The Online Student Enrollment - New Students page is displayed.
Step 1 - Enrollment Overview
Under Enrollment Overview, a brief overview of the student registration steps is provided.
19
txConnect - Enroll a New Student Online & Update Registration Data
1. Under Student Name, enter the student’s full name.
2. Click Continue. The Step 2 Registration Key page is displayed.
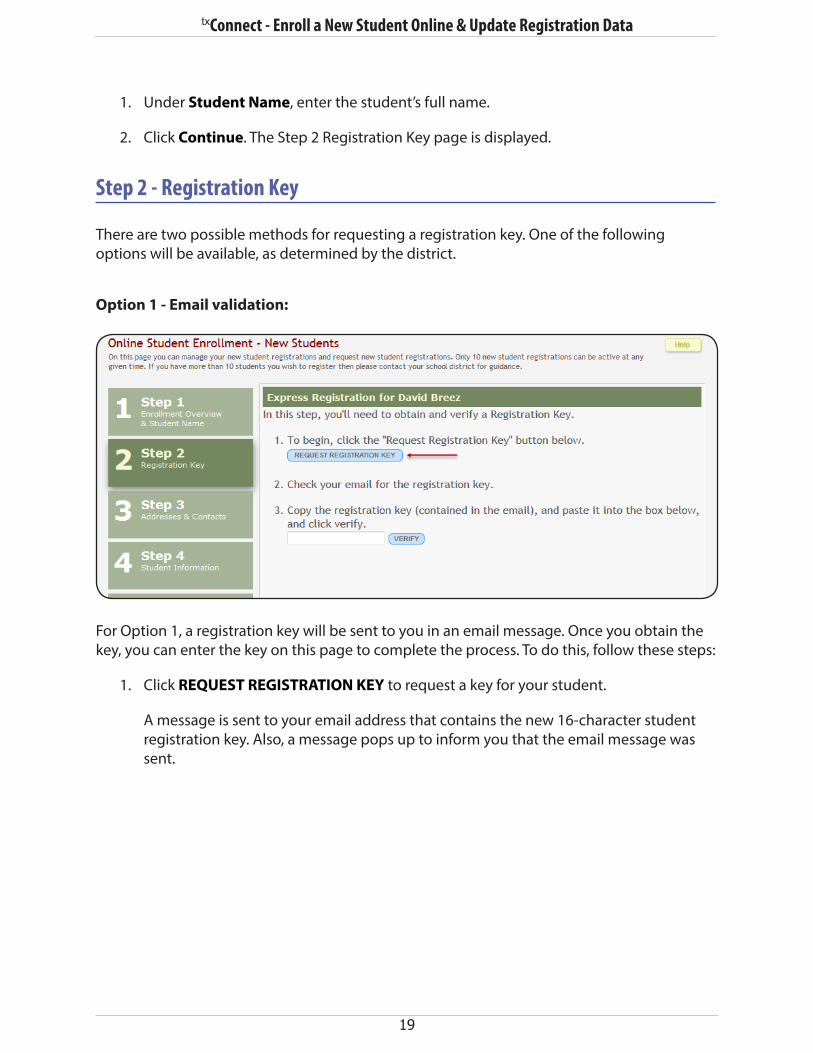
Step 2 - Registration Key
There are two possible methods for requesting a registration key. One of the following options will be available, as determined by the district.
Option 1 - Email validation:
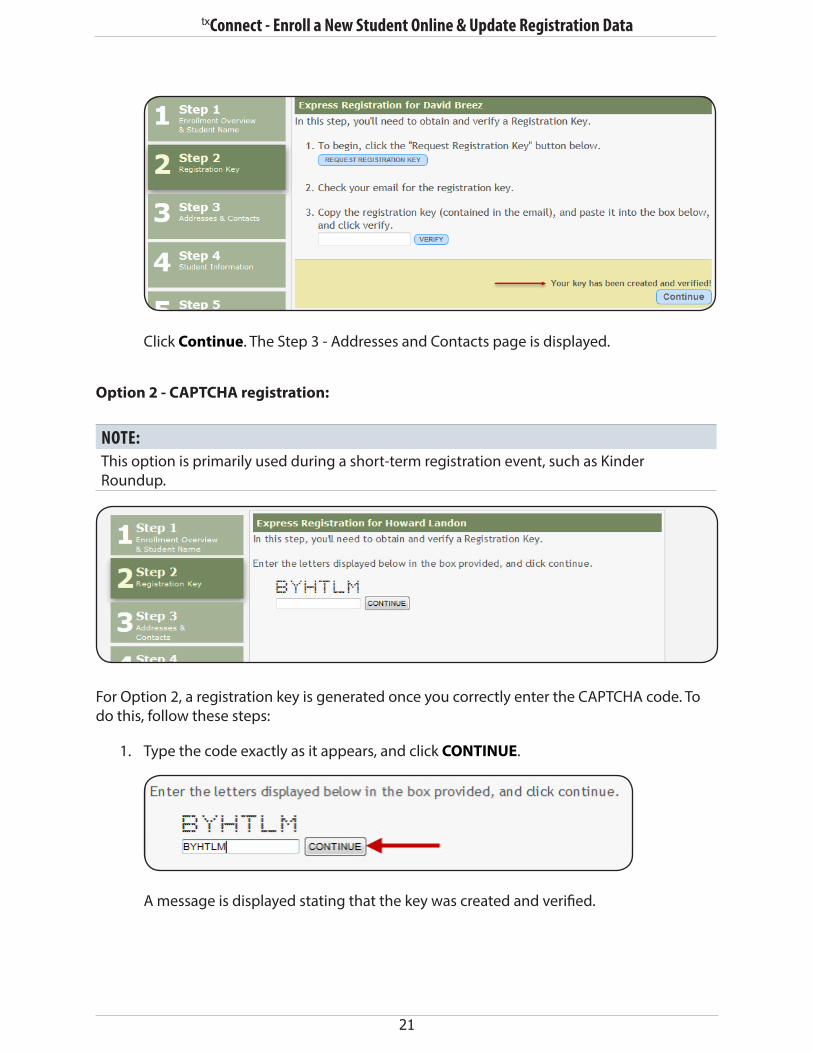
For Option 1, a registration key will be sent to you in an email message. Once you obtain the key, you can enter the key on this page to complete the process. To do this, follow these steps:
1. Click REQUEST REGISTRATION KEY to request a key for your student.
A message is sent to your email address that contains the new 16-character student registration key. Also, a message pops up to inform you that the email message was sent.

20
txConnect - Enroll a New Student Online & Update Registration Data
Click Close to close the message.
2. Check your email inbox for the message that contains the enrollment key.
3. In the Registration Key field, you must enter the exact enrollment key in order to complete the registration process. The easiest way to enter the code accurately is to copy it from the email message and paste it into the field. Then click VERIFY.
4. If you entered the code correctly, the message “Your key has been created and verified!” is displayed.
21
txConnect - Enroll a New Student Online & Update Registration Data
Click Continue. The Step 3 - Addresses and Contacts page is displayed.
Option 2 - CAPTCHA registration:
NOTE:This option is primarily used during a short-term registration event, such as Kinder Roundup.
For Option 2, a registration key is generated once you correctly enter the CAPTCHA code. To do this, follow these steps:
1. Type the code exactly as it appears, and click CONTINUE.
A message is displayed stating that the key was created and verified.

22
txConnect - Enroll a New Student Online & Update Registration Data
Also, a message is sent to the parent’s email address which includes the student’s registration key. The parent should save this information for his records.
Click Continue. The Step 3 - Addresses and Contacts page is displayed.
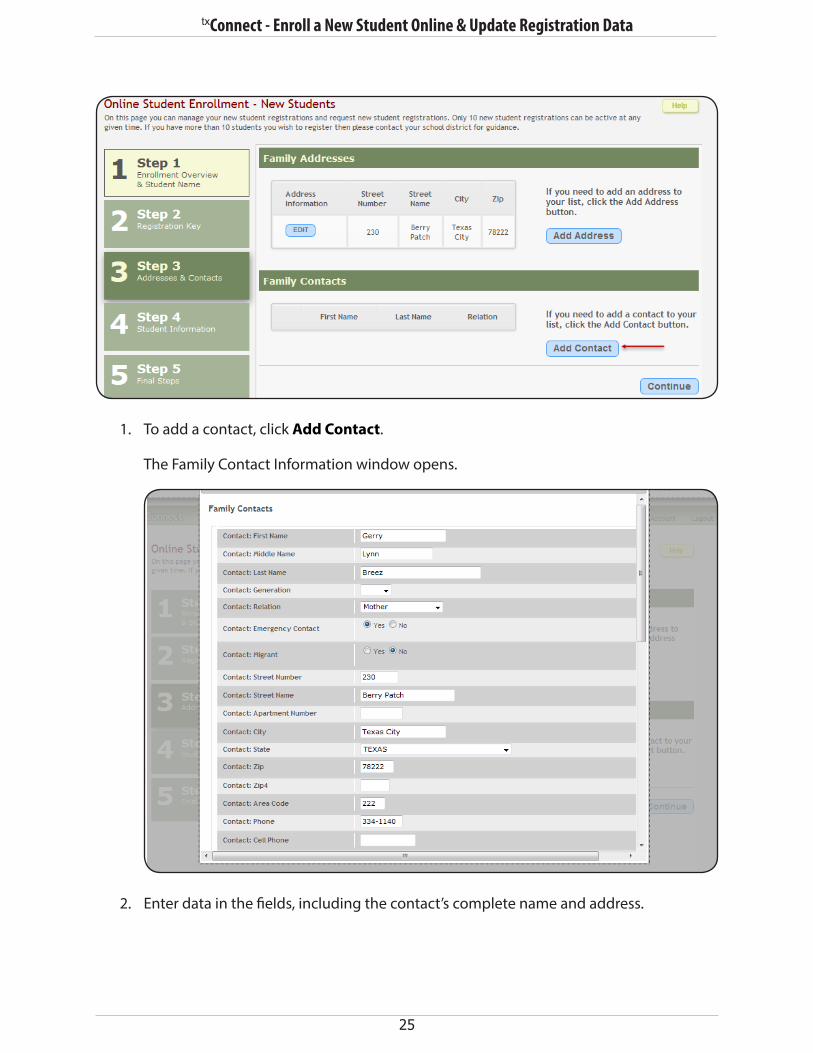
Step 3 - Addresses and Contacts
Step 3 allows you to add physical addresses and mailing addresses for the student, family members, and other contacts.

23
txConnect - Enroll a New Student Online & Update Registration Data
Under Family Addresses, any existing addresses for the student and family are listed. You can enter multiple sets of addresses if needed.
1. To add an address, click Add Address.
The Address Manager window opens.
2. Type the complete address in the fields provided. For a physical address, use the fields under Physical Address. For a mailing address, use the fields under Mailing Address.
3. Click Save Changes. The window closes, and the address is listed under Family Addresses.
Some fields are required. If you do not enter data in a required field, a message is displayed when you click Save Changes, and you must provide the data to continue.

24
txConnect - Enroll a New Student Online & Update Registration Data
Click OK to close the message, add the required data, and click Save Changes again.
4. To add another address, click Add Address again, and repeat the steps to add the next address.
5. To edit an existing address, click Edit next to the address.
The Address Manager window opens allowing you to update the fields.
z Update the fields as needed. Some fields are required. If you delete data from a required field, a message is displayed when you click Save Changes, and you must provide the data to continue.
z Click Save Changes to save your updates.
Under Family Contacts, enter contact information for all of the student’s family and emergency contacts. Any existing contacts are listed.
25
txConnect - Enroll a New Student Online & Update Registration Data
1. To add a contact, click Add Contact.
The Family Contact Information window opens.
2. Enter data in the fields, including the contact’s complete name and address.

26
txConnect - Enroll a New Student Online & Update Registration Data
Scrolling may be required in order to view all fields and to click Save Changes.
3. Click Save Changes. The window closes, and the contact is listed under Family Contacts.
Some fields are required. If you do not enter data in a required field, a message is displayed when you click Save Changes, and you must provide the data to continue.
Click OK to close the message, add the required data, and click Save Changes again.
4. To add another contact, click Add Contact again, and repeat the steps to add the data for the next contact.
5. To edit an existing contact, click Edit next to the contact.

27
txConnect - Enroll a New Student Online & Update Registration Data
The Family Contact Information window opens allowing you to update the fields.
6. Update the fields as needed.
Some fields are required. If you delete data from a required field, a message is displayed when you click Save Changes, and you must provide the data to continue.
7. Click Save Changes to save your updates.
8. Once all addresses and contacts have been added, click Continue. The Step 4 - Student Information page is displayed.
Step 4 - Student Information
Any existing students added to your account are listed.
NOTE:If you start the online enrollment process for a student but do not complete it, you will be able to access this page and continue the process from this point. To return to this page later, click the Skip to Step 4 button on the Step 1 page.
1. Click Enter Student Info for the student.

28
txConnect - Enroll a New Student Online & Update Registration Data
Fields are displayed allowing you to select the student’s address and contacts and enter additional information.
2. Under Selected Student: Student Name (where Student Name is your student’s full name), enter all required data:
z Select an address for the student from the drop-down list. These are the addresses you entered in Step 3.
If you need to add another address, you can click RETURN TO STEP 3 to add another address, and then return to Step 4.
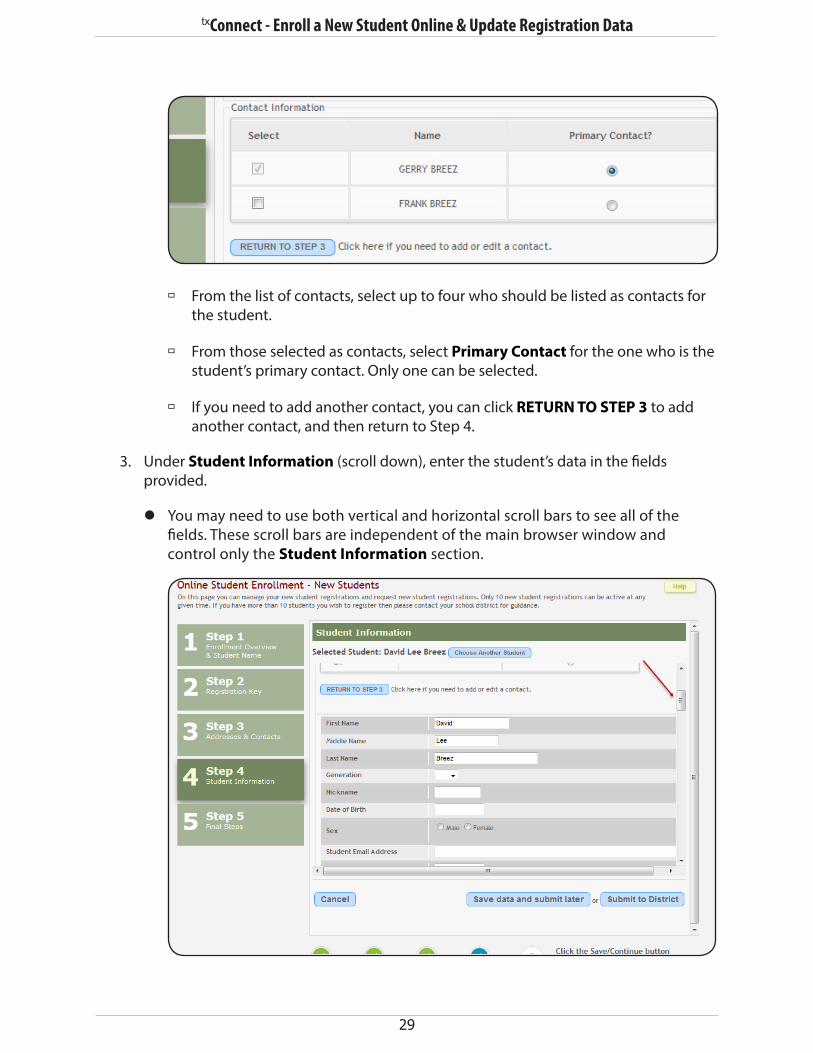
z Under Contact Information, select contacts for the student from those entered in Step 3.
29
txConnect - Enroll a New Student Online & Update Registration Data
ß From the list of contacts, select up to four who should be listed as contacts for the student.
ß From those selected as contacts, select Primary Contact for the one who is the student’s primary contact. Only one can be selected.
ß If you need to add another contact, you can click RETURN TO STEP 3 to add another contact, and then return to Step 4.
3. Under Student Information (scroll down), enter the student’s data in the fields provided.
z You may need to use both vertical and horizontal scroll bars to see all of the fields. These scroll bars are independent of the main browser window and control only the Student Information section.

30
txConnect - Enroll a New Student Online & Update Registration Data
4. In the data fields, enter the required data, and then click Submit to District. Or, click Save data and submit later if you have not completed all information and need to continue at a later time. Scroll down to find these buttons.
z If you click Save data and submit later, a message is displayed indicating that the data is saved but not submitted for district processing. You can return at a later time to complete the process.
z If you click Submit to District, a message is displayed indicating that the data is saved and submitted for district processing.
A message is sent to your email address confirming that the student was successfully registered.

31
txConnect - Enroll a New Student Online & Update Registration Data
Once you click Submit to District, the student’s registration information is submitted to the district for review and acceptance, and a check mark and date are displayed in Step Four in the Submitted to District column.
5. Click Continue to continue to Step 5 to complete the process.
Step 5 - Final Steps
Information about the final steps is displayed.

32
txConnect - Enroll a New Student Online & Update Registration Data
� To add another student, click Add Another Student and repeat the process from Step 1.
� Under Print Registration Confirmation, all students are listed whom you have successfully submitted to the district for registration, or are in the process of registering. If you have started the enrollment process for the student, his name is displayed. If his enrollment has successfully been submitted to the district, a check mark and the submission date are displayed.
Click Print Registration Confirmation for each registered student to print a confirmation message for your records that includes the student’s name, student registration key, and instructions for completing the process and adding the student to your account.
� Under Downloadable Enrollment Forms, click each form to view it. The form opens in a new window where it can be viewed and printed.
33
txConnect - Enroll a New Student Online & Update Registration Data
6. Print and complete all forms by hand, and take the completed forms to the campus or district.
Complete the Registration Process
Visit In Person
To complete the registration process, you must go to the district or campus to deliver the required downloadable forms and complete any steps that must be handled in person, as required by the district and campus.
Once you have completed in-person registration at the district or campus, the campus staff will review the student enrollment information and determine if the information is complete. The campus will complete the registration process.
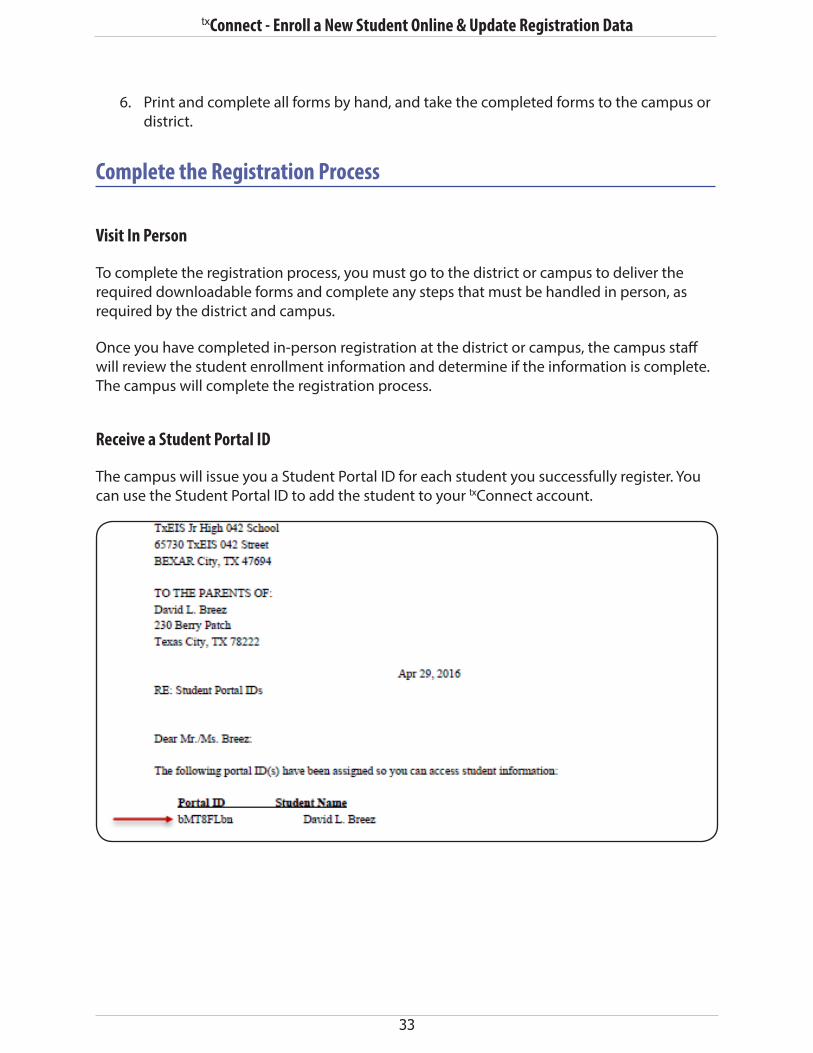
Receive a Student Portal ID
The campus will issue you a Student Portal ID for each student you successfully register. You can use the Student Portal ID to add the student to your txConnect account.

34
txConnect - Enroll a New Student Online & Update Registration Data

35
txConnect - Enroll a New Student Online & Update Registration Data
add the stUdent to YoUr txConneCt aCCoUntOnce you have a Student Portal ID issued by the student’s campus, you can add the student to your txConnect account.
1. If you are not already logged on to txConnect, log on to proceed.
2. From the main menu, select My Account.
The My Account page is displayed.
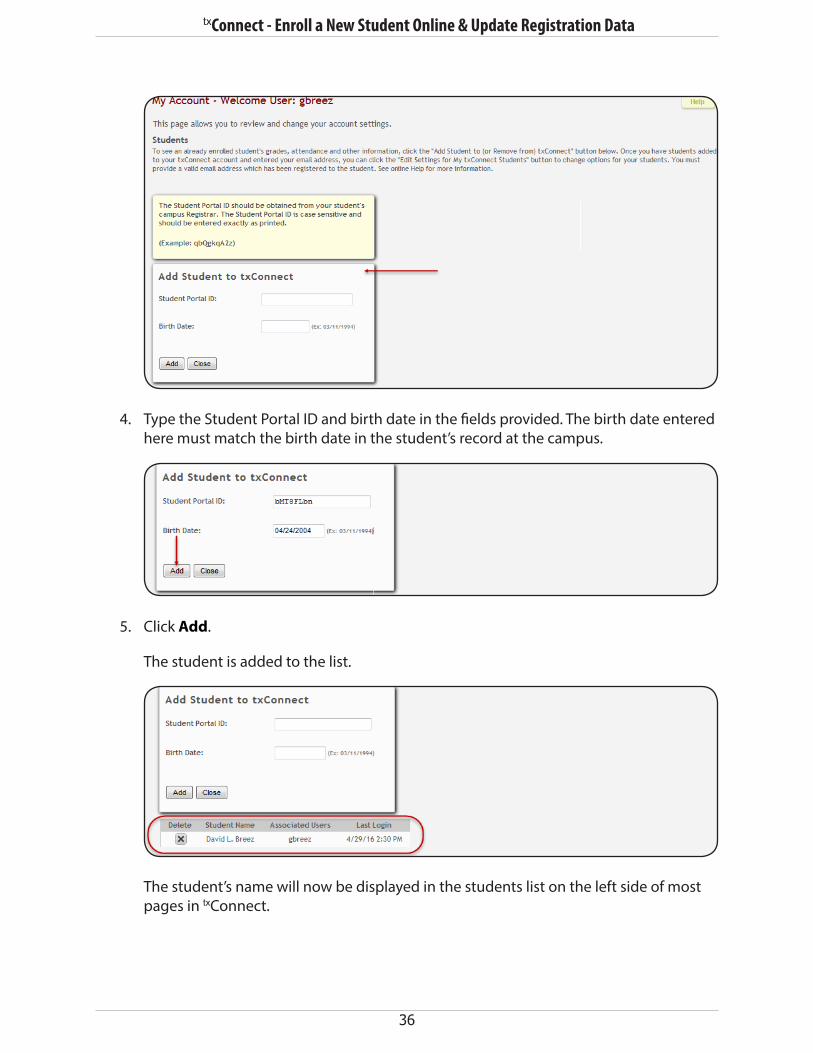
3. Under Manage My txConnect Students, click Add Student to txConnect.
The Add Student to txConnect fields are displayed.
36
txConnect - Enroll a New Student Online & Update Registration Data
4. Type the Student Portal ID and birth date in the fields provided. The birth date entered here must match the birth date in the student’s record at the campus.
5. Click Add.
The student is added to the list.
The student’s name will now be displayed in the students list on the left side of most pages in txConnect.
37
txConnect - Enroll a New Student Online & Update Registration Data
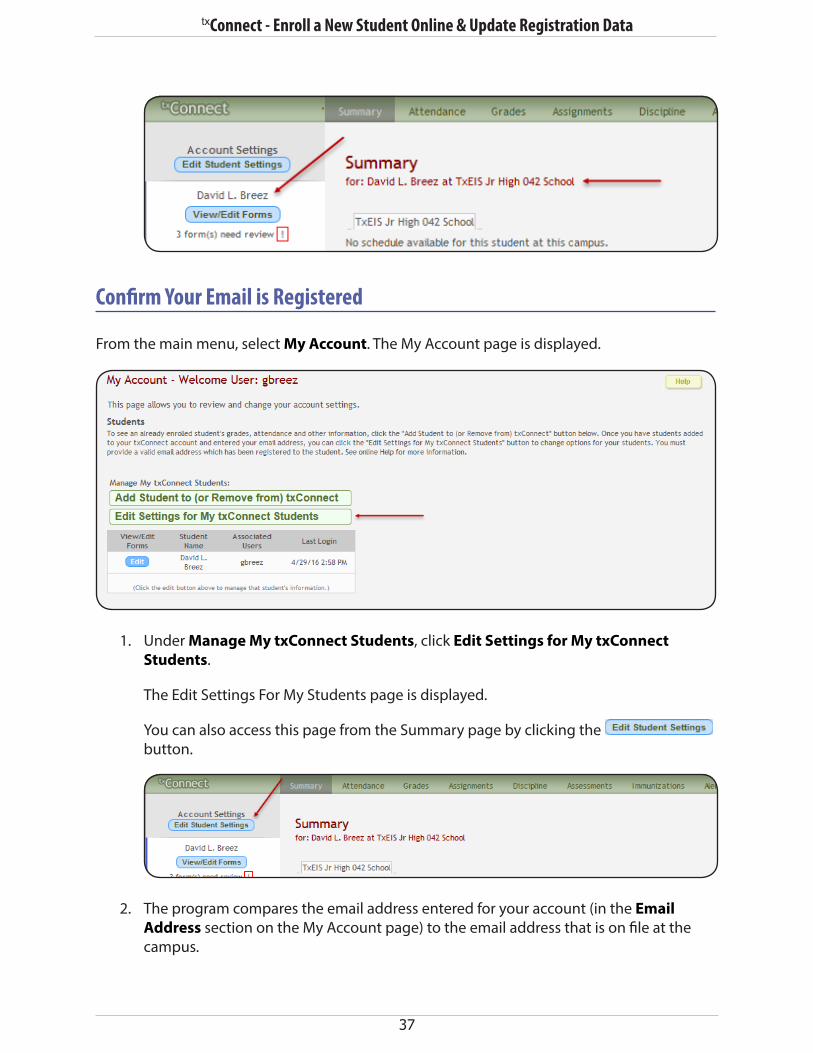
Confirm Your Email is Registered
From the main menu, select My Account. The My Account page is displayed.
1. Under Manage My txConnect Students, click Edit Settings for My txConnect Students.
The Edit Settings For My Students page is displayed.
You can also access this page from the Summary page by clicking the button.
2. The program compares the email address entered for your account (in the Email Address section on the My Account page) to the email address that is on file at the campus.

38
txConnect - Enroll a New Student Online & Update Registration Data
z If your email address does not match any email addresses associated with the student’s parent/guardian, a message is displayed indicating that your email address does not match. You cannot proceed until this is corrected.
NOTE:If an incorrect email address is entered for your txConnect account, you can change (and re-verify) it on the My Account page under Email Address. If an incorrect address is on file at the campus, you must contact the campus.
z If your email address matches the email address for one of the student’s parents/guardians, the message “Your email is registered to this student” is displayed.

39
txConnect - Enroll a New Student Online & Update Registration Data
Update onLine registration data as neededOnce the enrolled student is added to your txConnect account, and the correct email address entered and verified, you can update the student’s registration data as needed. The
button is displayed on the Summary page, and the button appears on the My Account page. You can click either button to access the Student Information page where you can update the data.
If you are not already logged on to txConnect, log on to proceed.
The following “Online Registration” message is displayed once you have enrolled a student and added the student to your txConnect account (unless you have disabled it).
� To prevent the message from being displayed each time you log on, select Do not show me this again.
� Click to close the dialog box.
From the Summary page, you can access all of your student’s registration forms.

40
txConnect - Enroll a New Student Online & Update Registration Data
The district may designate some required forms as “monitored,” which means that the district keeps track of these required forms to ensure that they are submitted for all students. If a form is monitored by the district, icons are displayed next to the forms to indicate the status of each form. The icons are only displayed for forms that are required and monitored by the district.
� A green check mark icon is displayed if the form has been submitted.
� A red exclamation mark icon is displayed if the parent has not yet submitted the form. The count of forms requiring the parent’s attention is also displayed.
The parent can click View/Edit Forms to go directly to the page where he can update the form.
1. Click .
Or, from the My Account page, click .

41
txConnect - Enroll a New Student Online & Update Registration Data
The Student Information for STUDENT NAME page is displayed, where STUDENT NAME is the name of your student. One or more headings, such as Registration, are displayed.
2. Click the heading to view the list of associated forms. The associated form(s) are displayed below the heading.
z If the form is required by the district or campus, the message “This is a required form” is displayed.
z Some forms are monitored to determine if a parent has reviewed or completed the form as required. For monitored forms, the following applies:
42
txConnect - Enroll a New Student Online & Update Registration Data
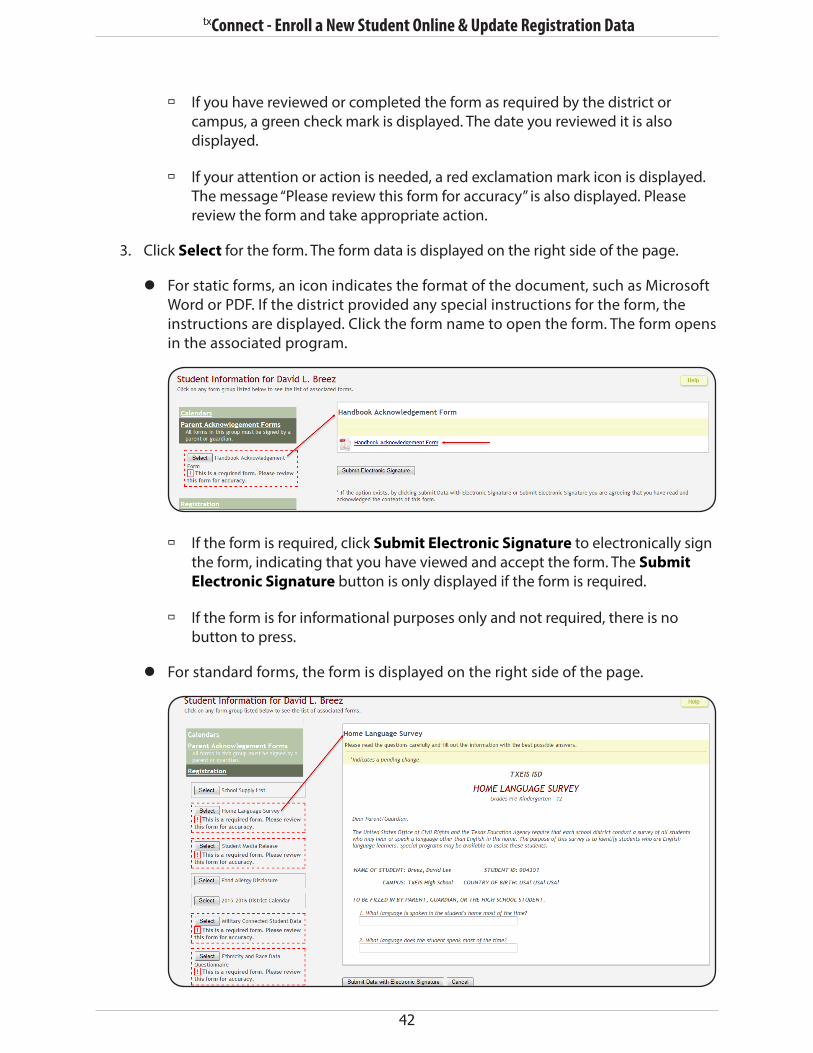
ß If you have reviewed or completed the form as required by the district or campus, a green check mark is displayed. The date you reviewed it is also displayed.
ß If your attention or action is needed, a red exclamation mark icon is displayed. The message “Please review this form for accuracy” is also displayed. Please review the form and take appropriate action.
3. Click Select for the form. The form data is displayed on the right side of the page.
z For static forms, an icon indicates the format of the document, such as Microsoft Word or PDF. If the district provided any special instructions for the form, the instructions are displayed. Click the form name to open the form. The form opens in the associated program.
ß If the form is required, click Submit Electronic Signature to electronically sign the form, indicating that you have viewed and accept the form. The Submit Electronic Signature button is only displayed if the form is required.
ß If the form is for informational purposes only and not required, there is no button to press.
z For standard forms, the form is displayed on the right side of the page.

43
txConnect - Enroll a New Student Online & Update Registration Data
In a standard form, fields are displayed in the form allowing you to enter the data. Some fields are required. You must enter the required data in a valid format to continue.
ß If the form is required and has data fields that must be entered, enter the required data and click Submit Data with Electronic Signature.
ß If the form is required but has no data fields to be entered, click Submit Electronic Signature to electronically sign the form, indicating that you have viewed and accept the form.
ß If the form is for informational purposes only and not required, there is no button to press.
ß If you have previously submitted a change in the field, but the change is still pending (i.e., not yet approved by an administrator), the original data is displayed with an asterisk next to it.
z For dynamic forms, the form opens on the right side of the page in a grid format with column headings and rows of data. Form instructions may also be displayed.
ß The left column displays all the information fields, such as name, grade, SSN, and birth date.
ß The next column displays the current data for the field, if it exists.

44
txConnect - Enroll a New Student Online & Update Registration Data
ß If the district or campus provided specific instructions for the field, the instructions are displayed below the field name.
ß Some data can be updated, and some data cannot be updated. If the data can be updated, the Edit button is displayed.
When you click Edit, an input field appears below the existing data allowing you to type the new information. A Cancel button is also displayed for the field.
The input field will display existing data if available. Type over the existing data with the new information. Otherwise, click Cancel.
4. When you click Submit Electronic Signature (if applicable):
z The message “An electronic copy of this form was accepted on M/DD/YYYY” is displayed at the bottom of the form.
z The student’s record is updated to reflect that a parent has acknowledged a required form.
5. When you click Submit Data with Electronic Signature (if applicable):
z A confirmation message opens in a separate window. Click Close Window to close the message.

45
txConnect - Enroll a New Student Online & Update Registration Data
z The message “An electronic copy of this form was accepted on M/DD/YYYY” is displayed at the bottom of the form.
z The campus staff is notified of your changes and will need to approve them before they are updated in your student’s official records. If you have submitted a change that has not yet been approved, an asterisk is displayed next to the field to indicate that the change is pending.
NOTE:If you edit a pending field, your most recent change will overwrite the former pending change. The campus staff will approve the most recent change.
z If the campus staff rejects a change, a message is displayed indicating the reason for the rejection. The message is cleared once you click Edit, type new information in the field and resubmit the change.
z Once the campus staff has approved the change, the new data is displayed.

46
txConnect - Enroll a New Student Online & Update Registration Data
z For all electronic signatures, the red exclamation mark icon is replaced with a green check box icon indicating that the form was submitted.
6. If all required forms have been submitted, the Print Registration Form Completion Confirmation link is displayed. Click the link to view the confirmation message.
47
txConnect - Enroll a New Student Online & Update Registration Data
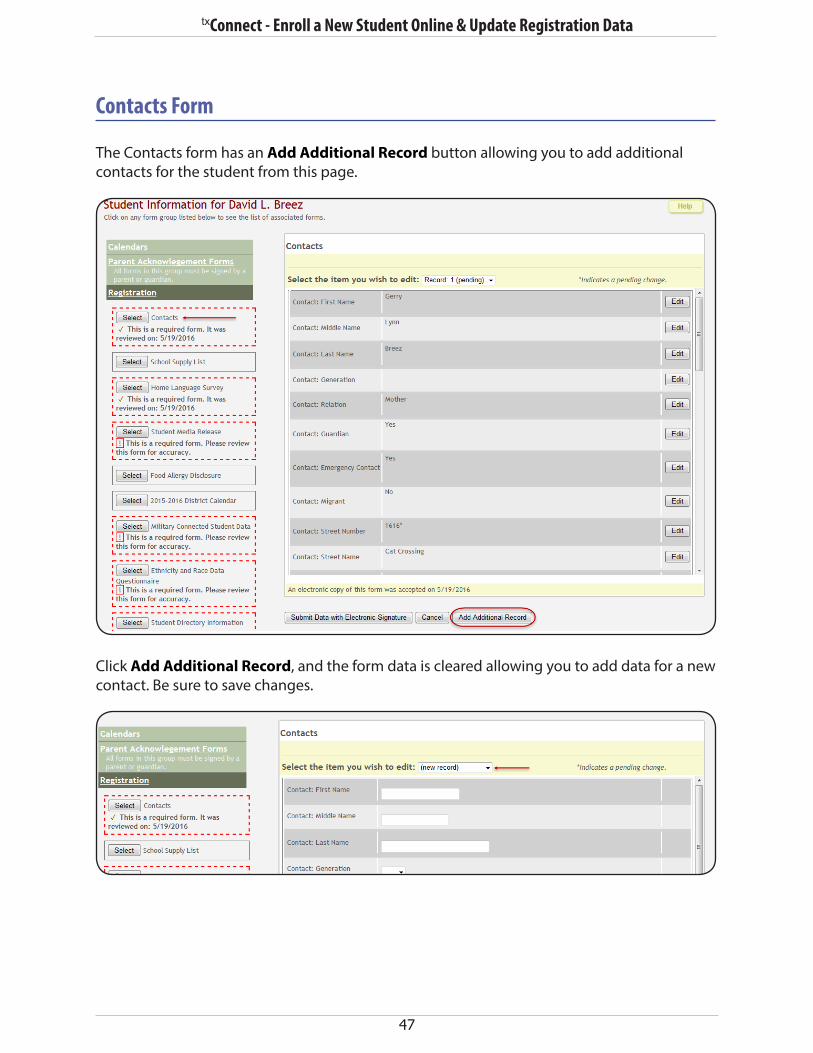
Contacts Form
The Contacts form has an Add Additional Record button allowing you to add additional contacts for the student from this page.
Click Add Additional Record, and the form data is cleared allowing you to add data for a new contact. Be sure to save changes.

48
txConnect - Enroll a New Student Online & Update Registration Data
From the Contacts form, you can also request that a contact be deleted, except for the student’s Priority 1 contact (as specified in the student’s record at the campus). Select Mark For Deletion if you want to remove the contact. Once approved by the campus, that contact will be deleted from the student’s record.
The student’s Priority 1 contact cannot be deleted; the Mark For Deletion field is not displayed for a Priority 1 contact.


Web-based Access for Teachers, Parents, and Students