u niversity checins
TRANSCRIPT
PRODUCT OVERVIEWDiscover how Check-Ins help facilitate ongoing and effective dialogues
Get ready to use Check-Ins by enabling navigation and assigning permissions
GETTING STARTED
System default and custom templates help your managers guide the topics of their meetings
TEMPLATES
Explore how your users can navigate and effectively use Check-Ins
USER EXPERIENCE
Discover how to communicate and report on Check-In activities
COMMUNICATION & REPORTS
CHECK-INS STARTER GUIDE
FAQs
WHAT’S NEW: OCTOBER '21 RELEASE
university
OVERVIEW TEMPLATESGETTING STARTED USER EXPERIENCE COMMUNICATION & REPORT FAQs OCTOBER '21
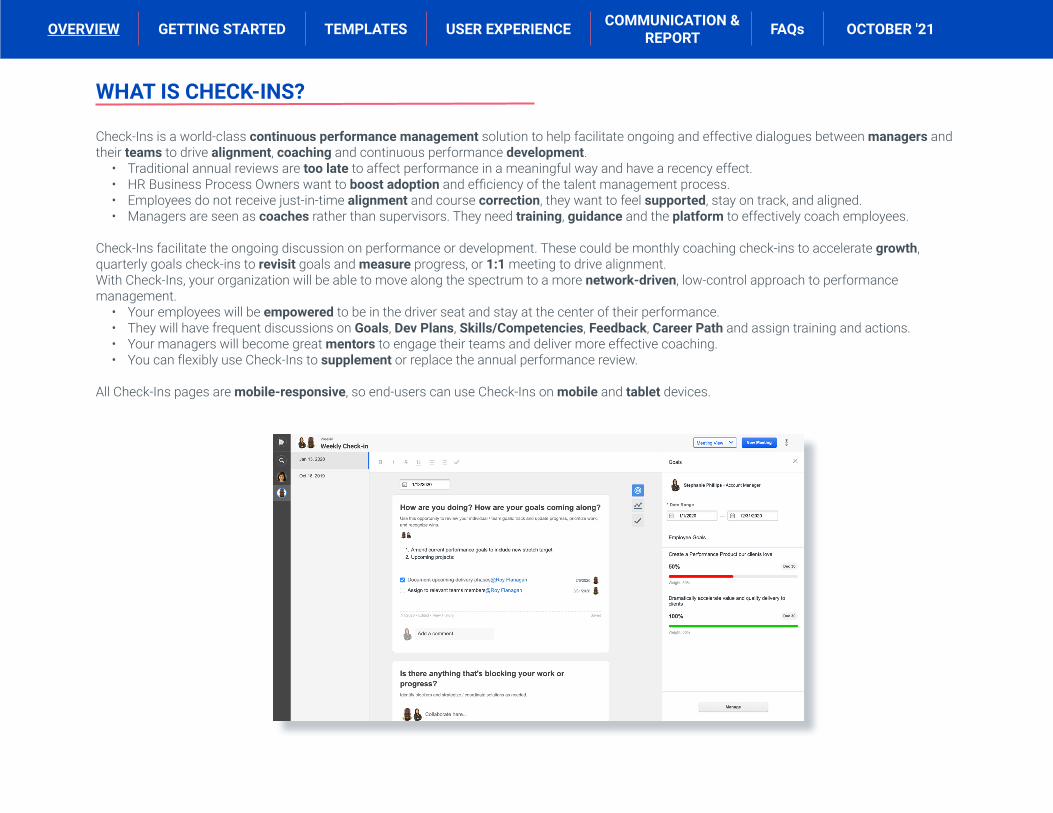
WHAT IS CHECK-INS?
Check-Ins is a world-class continuous performance management solution to help facilitate ongoing and effective dialogues between managers and their teams to drive alignment, coaching and continuous performance development.
• Traditional annual reviews are too late to affect performance in a meaningful way and have a recency effect. • HR Business Process Owners want to boost adoption and efficiency of the talent management process.• Employees do not receive just-in-time alignment and course correction, they want to feel supported, stay on track, and aligned. • Managers are seen as coaches rather than supervisors. They need training, guidance and the platform to effectively coach employees.
Check-Ins facilitate the ongoing discussion on performance or development. These could be monthly coaching check-ins to accelerate growth, quarterly goals check-ins to revisit goals and measure progress, or 1:1 meeting to drive alignment. With Check-Ins, your organization will be able to move along the spectrum to a more network-driven, low-control approach to performance management.
• Your employees will be empowered to be in the driver seat and stay at the center of their performance.• They will have frequent discussions on Goals, Dev Plans, Skills/Competencies, Feedback, Career Path and assign training and actions. • Your managers will become great mentors to engage their teams and deliver more effective coaching. • You can flexibly use Check-Ins to supplement or replace the annual performance review.
All Check-Ins pages are mobile-responsive, so end-users can use Check-Ins on mobile and tablet devices.
OVERVIEW TEMPLATESGETTING STARTED USER EXPERIENCE COMMUNICATION & REPORT FAQs OCTOBER '21
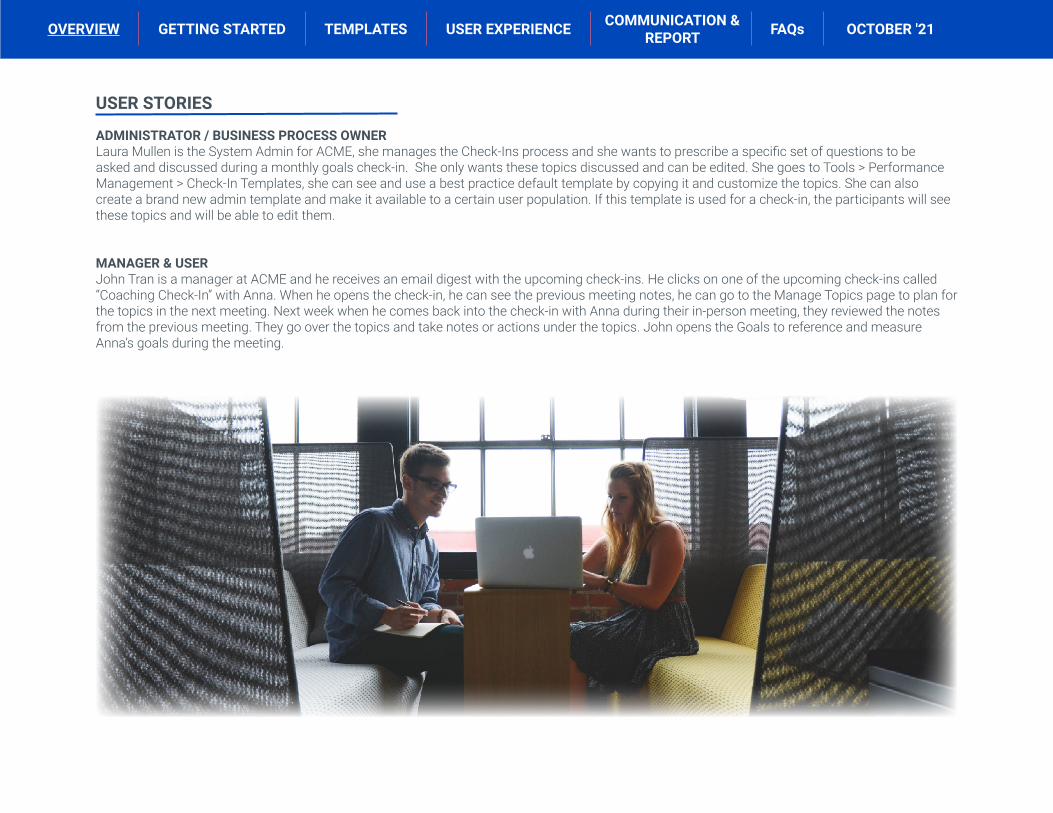
USER STORIES
ADMINISTRATOR / BUSINESS PROCESS OWNERLaura Mullen is the System Admin for ACME, she manages the Check-Ins process and she wants to prescribe a specific set of questions to be asked and discussed during a monthly goals check-in. She only wants these topics discussed and can be edited. She goes to Tools > Performance Management > Check-In Templates, she can see and use a best practice default template by copying it and customize the topics. She can also create a brand new admin template and make it available to a certain user population. If this template is used for a check-in, the participants will see these topics and will be able to edit them.
MANAGER & USERJohn Tran is a manager at ACME and he receives an email digest with the upcoming check-ins. He clicks on one of the upcoming check-ins called “Coaching Check-In” with Anna. When he opens the check-in, he can see the previous meeting notes, he can go to the Manage Topics page to plan for the topics in the next meeting. Next week when he comes back into the check-in with Anna during their in-person meeting, they reviewed the notes from the previous meeting. They go over the topics and take notes or actions under the topics. John opens the Goals to reference and measure Anna’s goals during the meeting.
OVERVIEW TEMPLATESGETTING STARTED USER EXPERIENCE COMMUNICATION & REPORT FAQs OCTOBER '21
GETTING STARTED
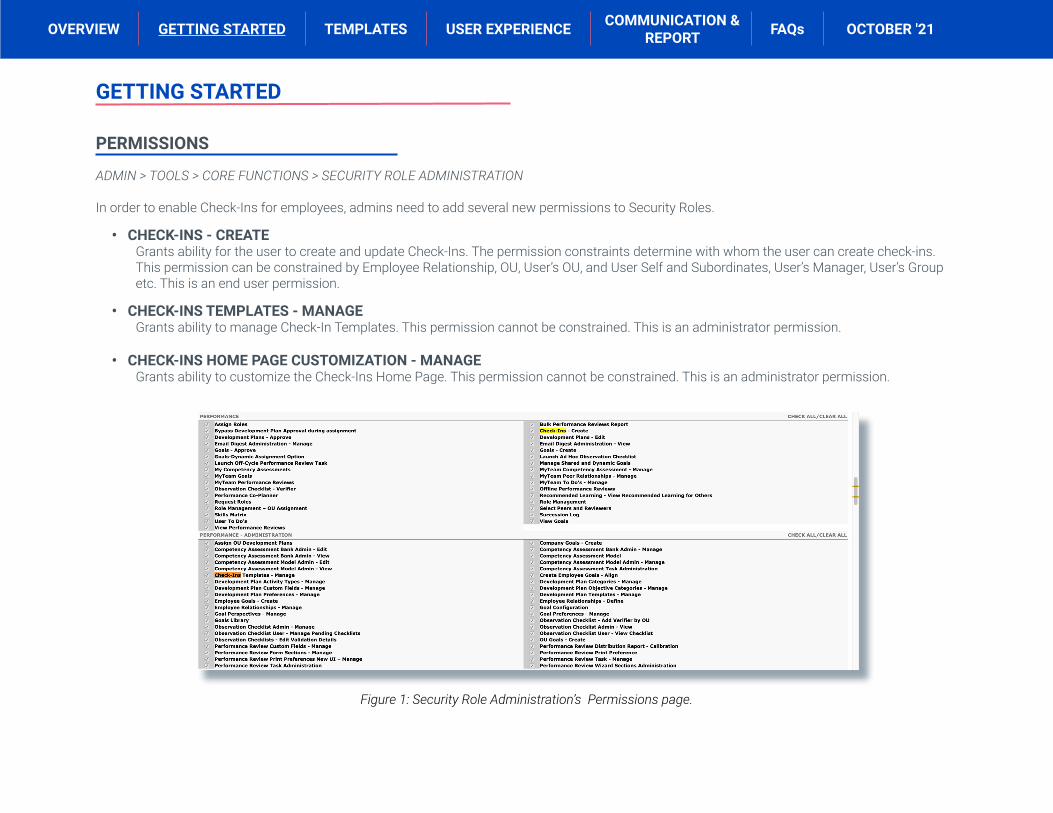
PERMISSIONS
ADMIN > TOOLS > CORE FUNCTIONS > SECURITY ROLE ADMINISTRATION
In order to enable Check-Ins for employees, admins need to add several new permissions to Security Roles.
• CHECK-INS - CREATEGrants ability for the user to create and update Check-Ins. The permission constraints determine with whom the user can create check-ins. This permission can be constrained by Employee Relationship, OU, User’s OU, and User Self and Subordinates, User’s Manager, User’s Group etc. This is an end user permission.
• CHECK-INS TEMPLATES - MANAGEGrants ability to manage Check-In Templates. This permission cannot be constrained. This is an administrator permission.
• CHECK-INS HOME PAGE CUSTOMIZATION - MANAGEGrants ability to customize the Check-Ins Home Page. This permission cannot be constrained. This is an administrator permission.
Figure 1: Security Role Administration’s Permissions page.
OVERVIEW TEMPLATESGETTING STARTED USER EXPERIENCE COMMUNICATION & REPORT FAQs OCTOBER '21
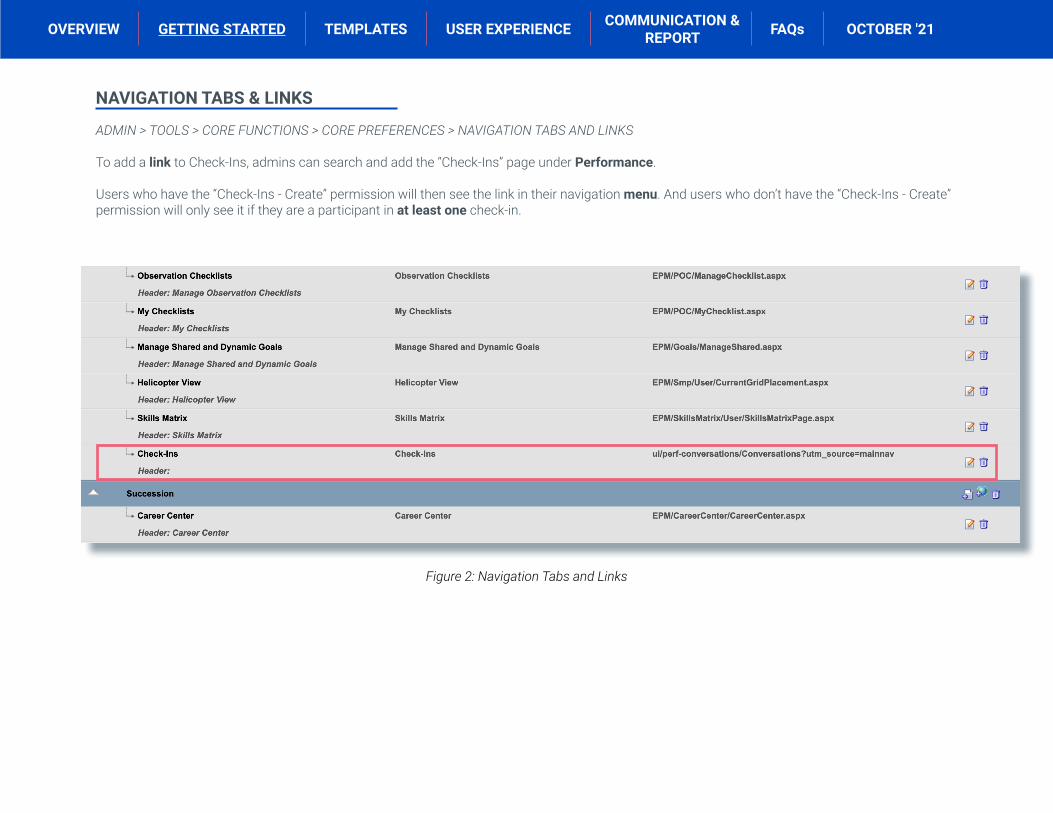
Figure 2: Navigation Tabs and Links
NAVIGATION TABS & LINKS
ADMIN > TOOLS > CORE FUNCTIONS > CORE PREFERENCES > NAVIGATION TABS AND LINKS
To add a link to Check-Ins, admins can search and add the “Check-Ins” page under Performance.
Users who have the “Check-Ins - Create” permission will then see the link in their navigation menu. And users who don’t have the “Check-Ins - Create” permission will only see it if they are a participant in at least one check-in.
OVERVIEW TEMPLATESGETTING STARTED USER EXPERIENCE COMMUNICATION & REPORT FAQs OCTOBER '21
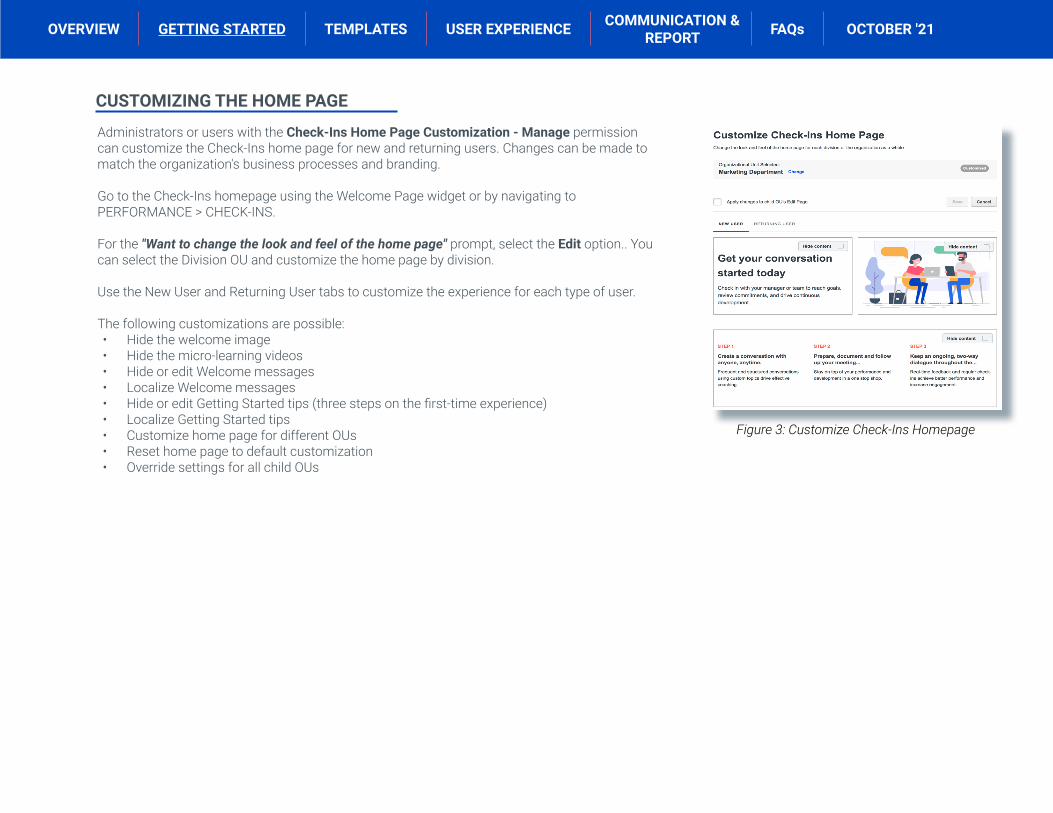
CUSTOMIZING THE HOME PAGE
Administrators or users with the Check-Ins Home Page Customization - Manage permission can customize the Check-Ins home page for new and returning users. Changes can be made to match the organization's business processes and branding.
Go to the Check-Ins homepage using the Welcome Page widget or by navigating to PERFORMANCE > CHECK-INS.
For the "Want to change the look and feel of the home page" prompt, select the Edit option.. You can select the Division OU and customize the home page by division.
Use the New User and Returning User tabs to customize the experience for each type of user.
The following customizations are possible:• Hide the welcome image• Hide the micro-learning videos• Hide or edit Welcome messages• Localize Welcome messages• Hide or edit Getting Started tips (three steps on the first-time experience)• Localize Getting Started tips• Customize home page for different OUs• Reset home page to default customization• Override settings for all child OUs
Figure 3: Customize Check-Ins Homepage
OVERVIEW TEMPLATESGETTING STARTED USER EXPERIENCE COMMUNICATION & REPORT FAQs OCTOBER '21
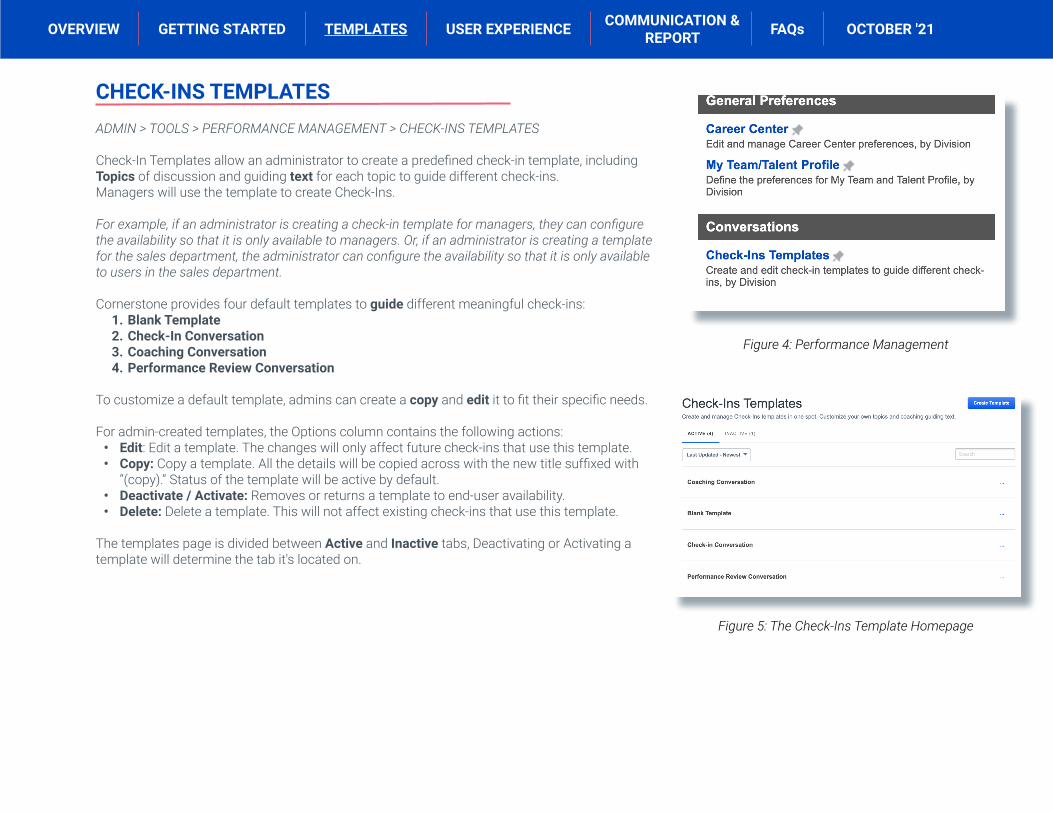
CHECK-INS TEMPLATESADMIN > TOOLS > PERFORMANCE MANAGEMENT > CHECK-INS TEMPLATES
Check-In Templates allow an administrator to create a predefined check-in template, including Topics of discussion and guiding text for each topic to guide different check-ins.Managers will use the template to create Check-Ins.
For example, if an administrator is creating a check-in template for managers, they can configure the availability so that it is only available to managers. Or, if an administrator is creating a template for the sales department, the administrator can configure the availability so that it is only available to users in the sales department.
Cornerstone provides four default templates to guide different meaningful check-ins:1. Blank Template2. Check-In Conversation3. Coaching Conversation4. Performance Review Conversation
To customize a default template, admins can create a copy and edit it to fit their specific needs.
For admin-created templates, the Options column contains the following actions:• Edit: Edit a template. The changes will only affect future check-ins that use this template.• Copy: Copy a template. All the details will be copied across with the new title suffixed with
“(copy).” Status of the template will be active by default.• Deactivate / Activate: Removes or returns a template to end-user availability. • Delete: Delete a template. This will not affect existing check-ins that use this template.
The templates page is divided between Active and Inactive tabs, Deactivating or Activating a template will determine the tab it's located on.
Figure 4: Performance Management
Figure 5: The Check-Ins Template Homepage
OVERVIEW TEMPLATESGETTING STARTED USER EXPERIENCE COMMUNICATION & REPORT FAQs OCTOBER '21
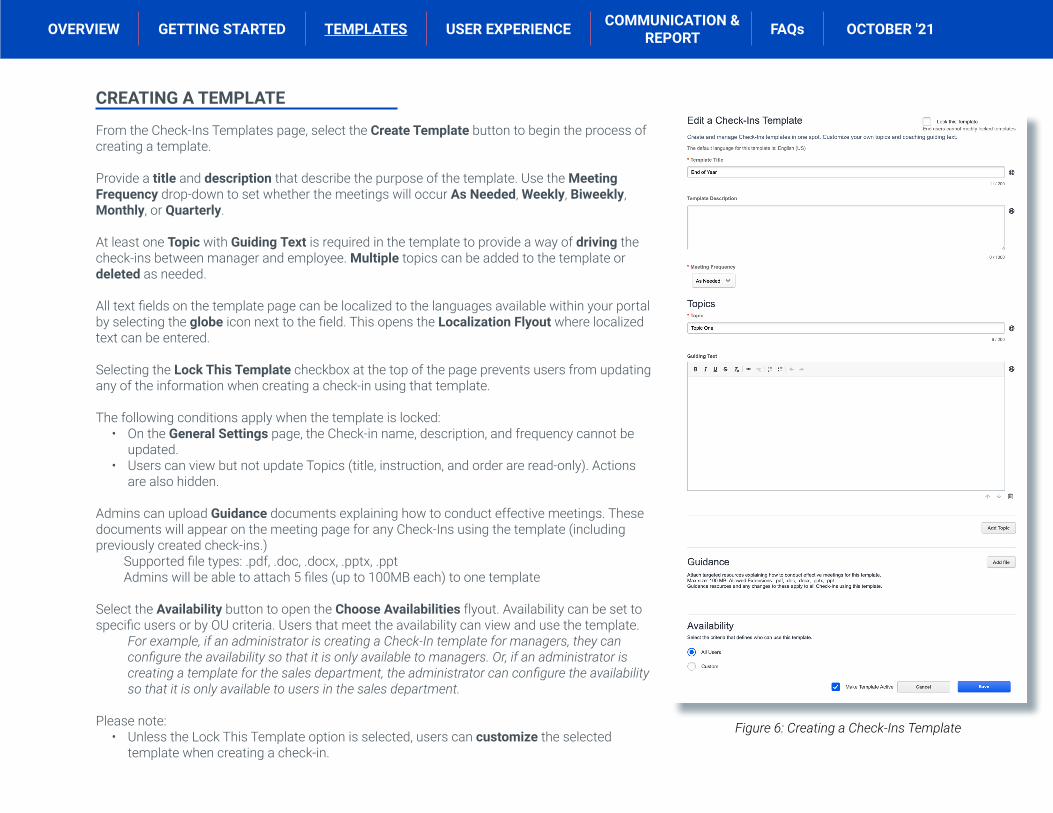
From the Check-Ins Templates page, select the Create Template button to begin the process of creating a template.
Provide a title and description that describe the purpose of the template. Use the Meeting Frequency drop-down to set whether the meetings will occur As Needed, Weekly, Biweekly, Monthly, or Quarterly.
At least one Topic with Guiding Text is required in the template to provide a way of driving the check-ins between manager and employee. Multiple topics can be added to the template or deleted as needed.
All text fields on the template page can be localized to the languages available within your portal by selecting the globe icon next to the field. This opens the Localization Flyout where localized text can be entered.
Selecting the Lock This Template checkbox at the top of the page prevents users from updating any of the information when creating a check-in using that template.
The following conditions apply when the template is locked:• On the General Settings page, the Check-in name, description, and frequency cannot be
updated.• Users can view but not update Topics (title, instruction, and order are read-only). Actions
are also hidden.
Admins can upload Guidance documents explaining how to conduct effective meetings. These documents will appear on the meeting page for any Check-Ins using the template (including previously created check-ins.)
Supported file types: .pdf, .doc, .docx, .pptx, .pptAdmins will be able to attach 5 files (up to 100MB each) to one template
Select the Availability button to open the Choose Availabilities flyout. Availability can be set to specific users or by OU criteria. Users that meet the availability can view and use the template.
For example, if an administrator is creating a Check-In template for managers, they can configure the availability so that it is only available to managers. Or, if an administrator is creating a template for the sales department, the administrator can configure the availability so that it is only available to users in the sales department.
Please note:• Unless the Lock This Template option is selected, users can customize the selected
template when creating a check-in.
Figure 6: Creating a Check-Ins Template
CREATING A TEMPLATE
OVERVIEW TEMPLATESGETTING STARTED USER EXPERIENCE COMMUNICATION & REPORT FAQs OCTOBER '21
USER EXPERIENCE
CHECK-INS HOME PAGE
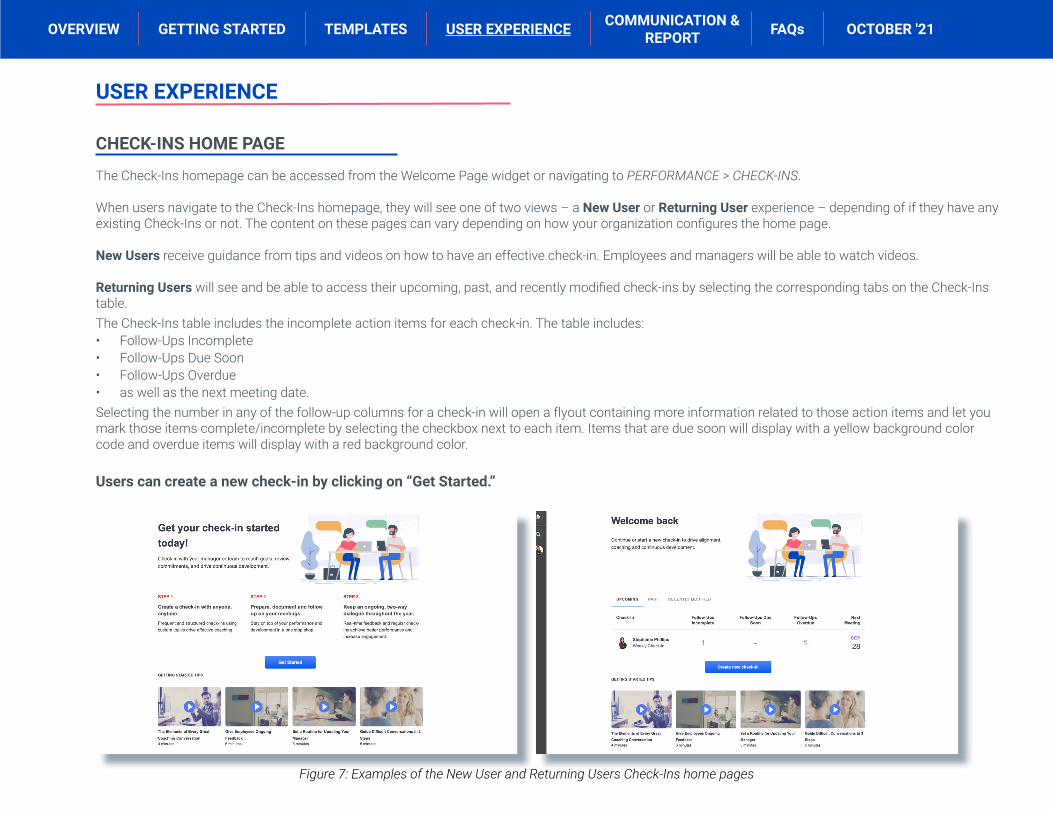
The Check-Ins homepage can be accessed from the Welcome Page widget or navigating to PERFORMANCE > CHECK-INS.
When users navigate to the Check-Ins homepage, they will see one of two views – a New User or Returning User experience – depending of if they have any existing Check-Ins or not. The content on these pages can vary depending on how your organization configures the home page.
New Users receive guidance from tips and videos on how to have an effective check-in. Employees and managers will be able to watch videos.
Returning Users will see and be able to access their upcoming, past, and recently modified check-ins by selecting the corresponding tabs on the Check-Ins table. The Check-Ins table includes the incomplete action items for each check-in. The table includes:• Follow-Ups Incomplete• Follow-Ups Due Soon• Follow-Ups Overdue• as well as the next meeting date.Selecting the number in any of the follow-up columns for a check-in will open a flyout containing more information related to those action items and let you mark those items complete/incomplete by selecting the checkbox next to each item. Items that are due soon will display with a yellow background color code and overdue items will display with a red background color.
Users can create a new check-in by clicking on “Get Started.”
Figure 7: Examples of the New User and Returning Users Check-Ins home pages
OVERVIEW TEMPLATESGETTING STARTED USER EXPERIENCE COMMUNICATION & REPORT FAQs OCTOBER '21
CREATE A CHECK-IN
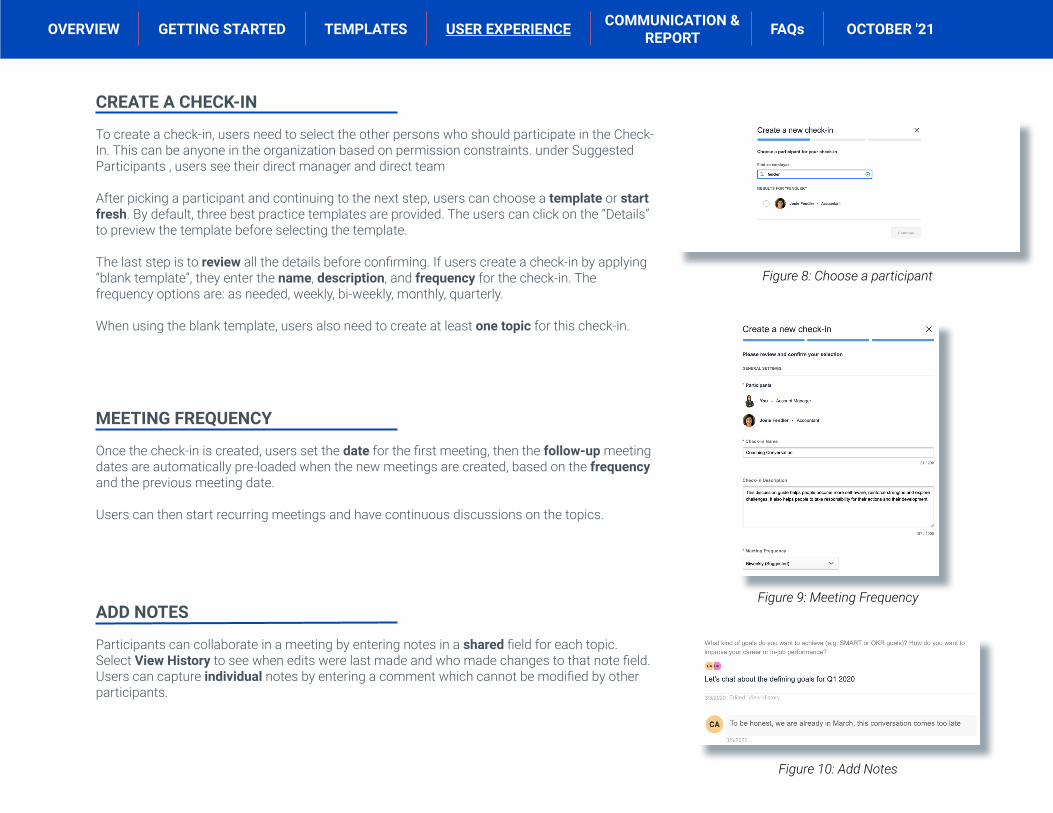
To create a check-in, users need to select the other persons who should participate in the Check-In. This can be anyone in the organization based on permission constraints. under Suggested Participants , users see their direct manager and direct team
After picking a participant and continuing to the next step, users can choose a template or start fresh. By default, three best practice templates are provided. The users can click on the “Details” to preview the template before selecting the template.
The last step is to review all the details before confirming. If users create a check-in by applying “blank template”, they enter the name, description, and frequency for the check-in. The frequency options are: as needed, weekly, bi-weekly, monthly, quarterly.
When using the blank template, users also need to create at least one topic for this check-in.
Figure 8: Choose a participant
MEETING FREQUENCY
Once the check-in is created, users set the date for the first meeting, then the follow-up meeting dates are automatically pre-loaded when the new meetings are created, based on the frequency and the previous meeting date. Users can then start recurring meetings and have continuous discussions on the topics.
ADD NOTES
Participants can collaborate in a meeting by entering notes in a shared field for each topic. Select View History to see when edits were last made and who made changes to that note field. Users can capture individual notes by entering a comment which cannot be modified by other participants.
Figure 9: Meeting Frequency
Figure 10: Add Notes
OVERVIEW TEMPLATESGETTING STARTED USER EXPERIENCE COMMUNICATION & REPORT FAQs OCTOBER '21
OPEN GOALS
If Goals are enabled, the Goals panel is available. Users can always see their own goals. If they have permissions to see another participant’s goals, they can switch to another user using the user selector.
The goals can be filtered by the goals period and the date range defaults to the current calendar year. Users can see the details of the goal including tasks and target.
They can update goals by clicking on the Manage Goals button and navigate to the Goals page.
OPEN DEVELOPMENT PLANS
If Development Plans are enabled, the Development Plans panel is available. Users can always see their own plan. If they have permissions to see another participant’s goals, they can switch to another user using the user selector.
In the panel, the user's primary plan displays, including as any objectives with title, description, learning, and actions.
Selecting the Manage Dev Plan button takes the current user to the selected user’s Development Plan page. Figure 12: Goals and Dev Plan panel buttons are
available on the right hand side of the screen
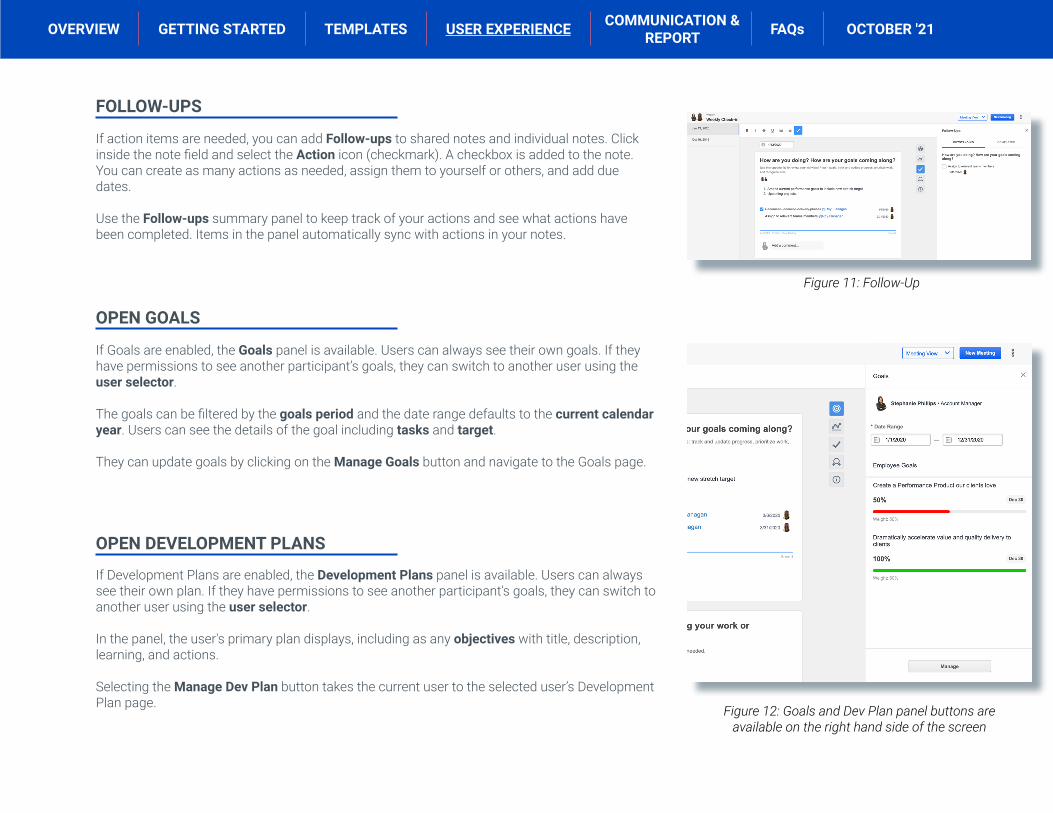
FOLLOW-UPS
If action items are needed, you can add Follow-ups to shared notes and individual notes. Click inside the note field and select the Action icon (checkmark). A checkbox is added to the note. You can create as many actions as needed, assign them to yourself or others, and add due dates.
Use the Follow-ups summary panel to keep track of your actions and see what actions have been completed. Items in the panel automatically sync with actions in your notes.
Figure 11: Follow-Up
OVERVIEW TEMPLATESGETTING STARTED USER EXPERIENCE COMMUNICATION & REPORT FAQs OCTOBER '21
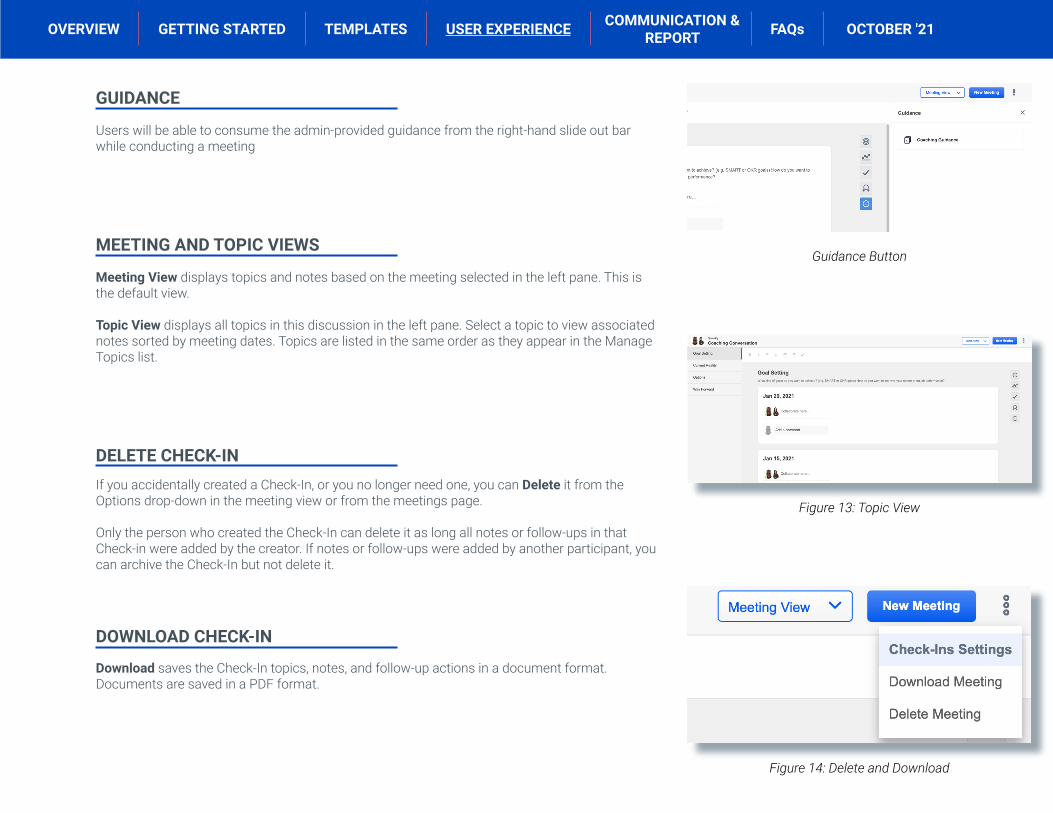
DELETE CHECK-INIf you accidentally created a Check-In, or you no longer need one, you can Delete it from the Options drop-down in the meeting view or from the meetings page.
Only the person who created the Check-In can delete it as long all notes or follow-ups in that Check-in were added by the creator. If notes or follow-ups were added by another participant, you can archive the Check-In but not delete it.
DOWNLOAD CHECK-IN
Download saves the Check-In topics, notes, and follow-up actions in a document format. Documents are saved in a PDF format.
Figure 14: Delete and Download
MEETING AND TOPIC VIEWS
Meeting View displays topics and notes based on the meeting selected in the left pane. This is the default view.
Topic View displays all topics in this discussion in the left pane. Select a topic to view associated notes sorted by meeting dates. Topics are listed in the same order as they appear in the Manage Topics list.
GUIDANCE
Users will be able to consume the admin-provided guidance from the right-hand slide out bar while conducting a meeting
Figure 13: Topic View
Guidance Button
OVERVIEW TEMPLATESGETTING STARTED USER EXPERIENCE COMMUNICATION & REPORT FAQs OCTOBER '21
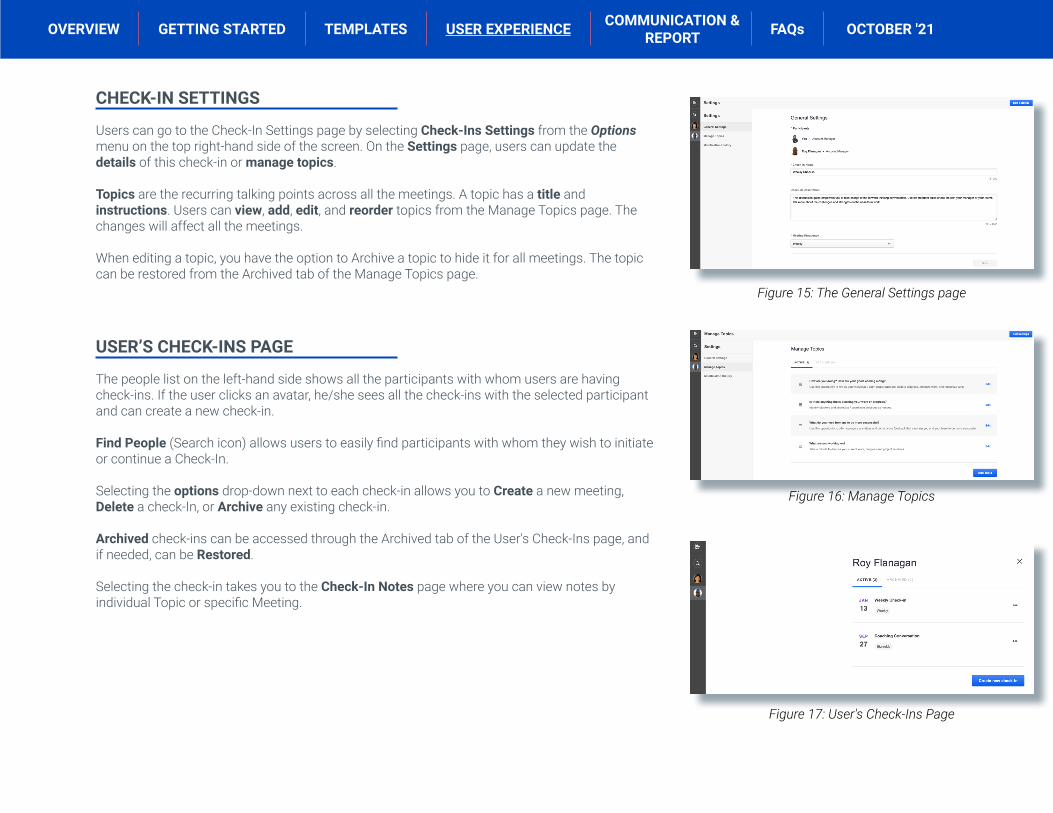
CHECK-IN SETTINGS
USER’S CHECK-INS PAGE
Users can go to the Check-In Settings page by selecting Check-Ins Settings from the Options menu on the top right-hand side of the screen. On the Settings page, users can update the details of this check-in or manage topics. Topics are the recurring talking points across all the meetings. A topic has a title and instructions. Users can view, add, edit, and reorder topics from the Manage Topics page. The changes will affect all the meetings.
When editing a topic, you have the option to Archive a topic to hide it for all meetings. The topic can be restored from the Archived tab of the Manage Topics page.
The people list on the left-hand side shows all the participants with whom users are having check-ins. If the user clicks an avatar, he/she sees all the check-ins with the selected participant and can create a new check-in.
Find People (Search icon) allows users to easily find participants with whom they wish to initiate or continue a Check-In.
Selecting the options drop-down next to each check-in allows you to Create a new meeting, Delete a check-In, or Archive any existing check-in.
Archived check-ins can be accessed through the Archived tab of the User's Check-Ins page, and if needed, can be Restored.
Selecting the check-in takes you to the Check-In Notes page where you can view notes by individual Topic or specific Meeting.
Figure 15: The General Settings page
Figure 16: Manage Topics
Figure 17: User's Check-Ins Page
OVERVIEW TEMPLATESGETTING STARTED USER EXPERIENCECOMMUNICATION &
REPORT FAQs OCTOBER '21
COMMUNICATION & REPORTS
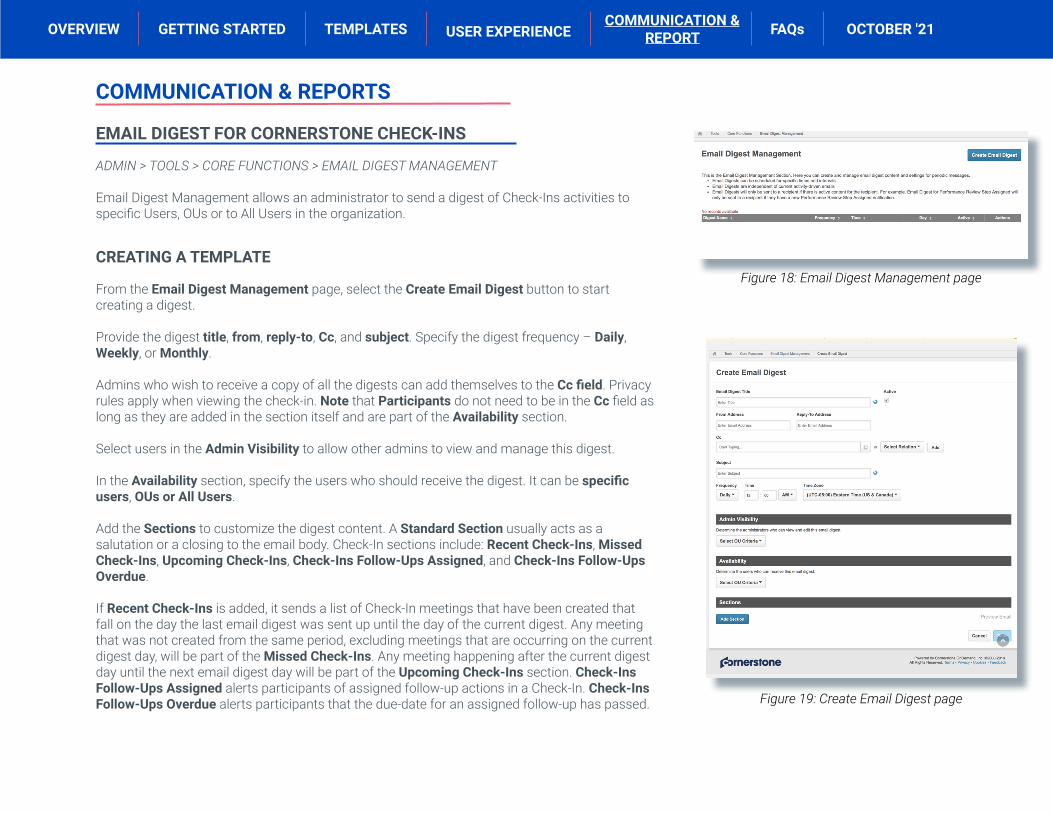
ADMIN > TOOLS > CORE FUNCTIONS > EMAIL DIGEST MANAGEMENT
Email Digest Management allows an administrator to send a digest of Check-Ins activities to specific Users, OUs or to All Users in the organization.
From the Email Digest Management page, select the Create Email Digest button to start creating a digest.
Provide the digest title, from, reply-to, Cc, and subject. Specify the digest frequency – Daily, Weekly, or Monthly.
Admins who wish to receive a copy of all the digests can add themselves to the Cc field. Privacy rules apply when viewing the check-in. Note that Participants do not need to be in the Cc field as long as they are added in the section itself and are part of the Availability section.
Select users in the Admin Visibility to allow other admins to view and manage this digest.
In the Availability section, specify the users who should receive the digest. It can be specific users, OUs or All Users.
Add the Sections to customize the digest content. A Standard Section usually acts as a salutation or a closing to the email body. Check-In sections include: Recent Check-Ins, Missed Check-Ins, Upcoming Check-Ins, Check-Ins Follow-Ups Assigned, and Check-Ins Follow-Ups Overdue.
If Recent Check-Ins is added, it sends a list of Check-In meetings that have been created that fall on the day the last email digest was sent up until the day of the current digest. Any meeting that was not created from the same period, excluding meetings that are occurring on the current digest day, will be part of the Missed Check-Ins. Any meeting happening after the current digest day until the next email digest day will be part of the Upcoming Check-Ins section. Check-Ins Follow-Ups Assigned alerts participants of assigned follow-up actions in a Check-In. Check-Ins Follow-Ups Overdue alerts participants that the due-date for an assigned follow-up has passed.
CREATING A TEMPLATE
EMAIL DIGEST FOR CORNERSTONE CHECK-INS
Figure 18: Email Digest Management page
Figure 19: Create Email Digest page

OVERVIEW TEMPLATESGETTING STARTED USER EXPERIENCECOMMUNICATION &
REPORT FAQs OCTOBER '21
EMAIL DIGEST FOR CORNERSTONE CHECK-INS (Continued)
On the Send To field, the admin can send the section to the Check-In Participant. In addition, they also have the option to send it to any user. For privacy purposes, only a participant can have access to the link and read the check-in. Non-participants will only see the details (e.g., Check-In Link) but will not be able to open the link or read the check-in itself.
Edit the Check-In Section Tags to add the Check-In details like Check-In Title, Check-In Link, Check-In Meeting Date, Participant Name, and Recipient Name.
The following is a list of tags that can be added:• {RECIPIENT.FIRST.NAME}• {RECIPIENT.LAST.NAME}• {LIST.BEGIN},• {LIST.END}• {CHECK-IN.TITLE}• {CHECK-IN.PARTICIPANT.FIRST.NAME}• {CHECK-IN.PARTICIPANT.LAST.NAME}• {CHECK-IN.MEETING.DATE}• {CHECK-IN.LINK}
Note that each check-in link in each section is unique. No more than one instance of the same check-in is displayed in each section. If meetings under the same check-in should appear more than once in a section, ONLY the most recent of the meetings is displayed.
Also note that a user in the Availability section will only receive the section if it has content. For example, if a user has not had any Recent Check-In but has a Missed Check-In, they will only receive the Missed Check-In section.
Preview the Email before sending it to check the content and wording.
Once submitted, the digest is sent on the scheduled time. Recipients and Participants can view a consolidated list of all their Check-Ins activities.
Figure 20: Select Check-In Sections
OVERVIEW TEMPLATESGETTING STARTED USER EXPERIENCECOMMUNICATION &
REPORT FAQs OCTOBER '21
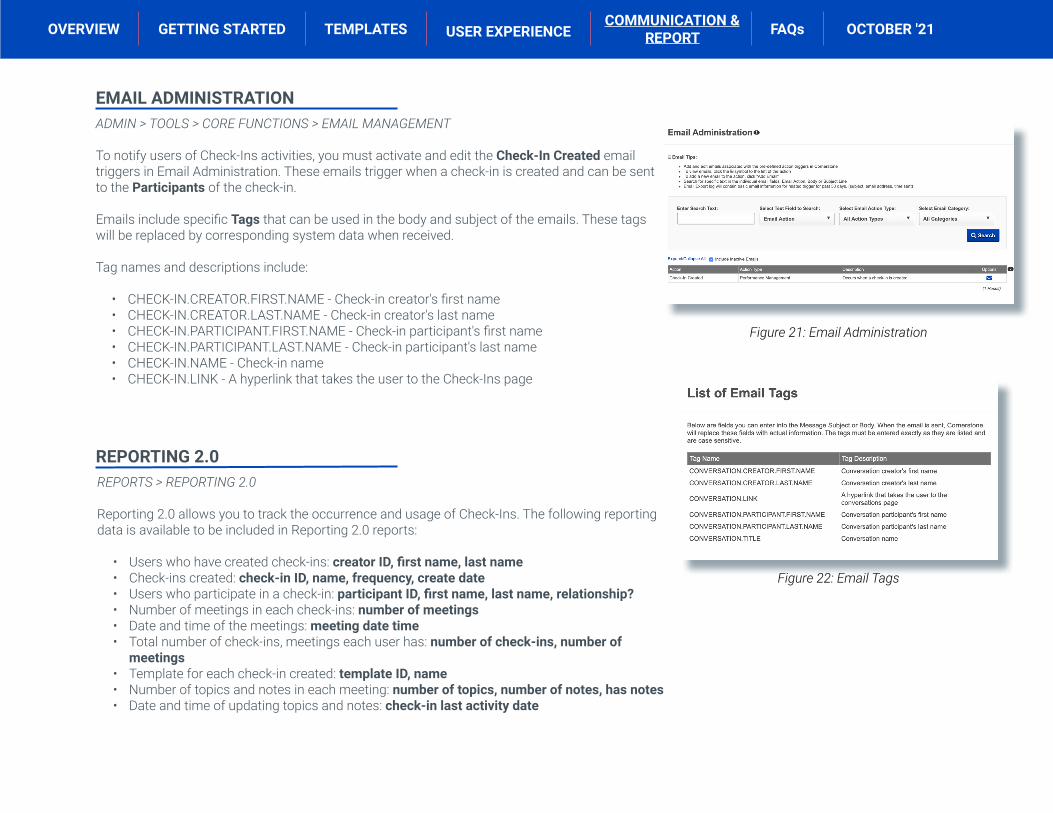
ADMIN > TOOLS > CORE FUNCTIONS > EMAIL MANAGEMENT
To notify users of Check-Ins activities, you must activate and edit the Check-In Created email triggers in Email Administration. These emails trigger when a check-in is created and can be sent to the Participants of the check-in.
Emails include specific Tags that can be used in the body and subject of the emails. These tags will be replaced by corresponding system data when received.
Tag names and descriptions include:
• CHECK-IN.CREATOR.FIRST.NAME - Check-in creator's first name• CHECK-IN.CREATOR.LAST.NAME - Check-in creator's last name• CHECK-IN.PARTICIPANT.FIRST.NAME - Check-in participant's first name• CHECK-IN.PARTICIPANT.LAST.NAME - Check-in participant's last name• CHECK-IN.NAME - Check-in name• CHECK-IN.LINK - A hyperlink that takes the user to the Check-Ins page
EMAIL ADMINISTRATION
Figure 21: Email Administration
REPORTS > REPORTING 2.0
Reporting 2.0 allows you to track the occurrence and usage of Check-Ins. The following reporting data is available to be included in Reporting 2.0 reports:
• Users who have created check-ins: creator ID, first name, last name• Check-ins created: check-in ID, name, frequency, create date• Users who participate in a check-in: participant ID, first name, last name, relationship?• Number of meetings in each check-ins: number of meetings• Date and time of the meetings: meeting date time• Total number of check-ins, meetings each user has: number of check-ins, number of
meetings• Template for each check-in created: template ID, name• Number of topics and notes in each meeting: number of topics, number of notes, has notes• Date and time of updating topics and notes: check-in last activity date
REPORTING 2.0
Figure 22: Email Tags
OVERVIEW TEMPLATESGETTING STARTED USER EXPERIENCE COMMUNICATION & REPORT FAQs OCTOBER '21
FREQUENTLY ASKED QUESTIONS
Q: If I change managers, will my new manager see the check-ins that I had with their predecessor…Will they show up in the Performance Review? A: No
Q: If I change managers, will I still be able see the check-ins that I had with my previous manager? A: Yes
Q: Will I still be able to see those check-ins if they are inactive? A: Yes
Q: Can I print out the check-ins/get a PDF of the check-ins that I have had with my employee(s) to share with HR? A: No
Q: Can I have a co-planner or other users (project team members) participate in a check-in? A: No
Q: I create a check-in between a co-worker on myself because we are working on a project that’s tied to a shared goal and have set up weekly check-ins. Can my manager see that check-in? A: No
Q: Which check-ins do I see…Is it like goals/feedback where you only see the stuff that falls within the review period? A: You see all check-ins regardless of review period
Q: Can I see check-ins for inactive users? A: Inactive users will be included in the existing search results. Only those inactive users that had a check-in before will appear in the results (as long as they have not been deleted/anonymized.)
© 2021 Cornerstone OnDemand | [email protected] | 888-365-CSOD
university
OVERVIEW TEMPLATESGETTING STARTED USER EXPERIENCE COMMUNICATION & REPORT FAQs OCTOBER '21
What’s new with the October '21 Release
Enhancement to Goal visibility in Check-InsPrior to this enhancement, the Goals Panel in Check-Ins only supported the Direct Manager - Employee relationship. An indirect manager or a functional manager could not access subordinate's goals in Check-Ins even if they had the “View Goals” permission and could view these goals elsewhere in the portal.
With this enhancement, Check-Ins participants can view other participant's goals in the Check-Ins Goal Panel if they have the “View Goals” permission and the other participant is within the permission’s constraints.
Easily access Check-Ins on mobile devicesPrior to this enhancement, when accessing the Check-in homepage in portrait mode on a mobile device, there is no way of accessing check-ins that are more than 7 days in the past or future. In order to achieve this, you have to rotate the phone to landscape mode and only then are you able to access the participant sidebar and therefore the required check-ins.
To create a more intuitive user experience, a new link will appear next to the “Create new check-in” option when the ability to access the People sidebar is not visible on a mobile device. This new link on the mobile Check-Ins Home page allows returning users to quickly select a person from the People sidebar so that they can view the required check-in.
Enhancement to Check-Ins People SearchTo reduce confusion in the user experience, the checkbox to include inactive users is removed from the search feature in the People sidebar. Instead, inactive colleagues will automatically be included in the search results if they previously had a check-in with the user running the search.