uc-8100 series linux software user's manual · uc-8100 series linux software user’s manual...
TRANSCRIPT

UC-8100 Series Linux Software User’s Manual
Edition 4.2, January 2017
www.moxa.com/product
© 2017 Moxa Inc. All rights reserved.
UC-8100 Series Linux Software User’s Manual
The software described in this manual is furnished under a license agreement and may be used only in accordance with the terms of that agreement.
Copyright Notice
© 2017 Moxa Inc. All rights reserved.
Trademarks
The MOXA logo is a registered trademark of Moxa Inc. All other trademarks or registered marks in this manual belong to their respective manufacturers.
Disclaimer
Information in this document is subject to change without notice and does not represent a commitment on the part of Moxa.
Moxa provides this document as is, without warranty of any kind, either expressed or implied, including, but not limited to, its particular purpose. Moxa reserves the right to make improvements and/or changes to this manual, or to the products and/or the programs described in this manual, at any time.
Information provided in this manual is intended to be accurate and reliable. However, Moxa assumes no responsibility for its use, or for any infringements on the rights of third parties that may result from its use.
This product might include unintentional technical or typographical errors. Changes are periodically made to the information herein to correct such errors, and these changes are incorporated into new editions of the publication.
Technical Support Contact Information
www.moxa.com/support
Moxa Americas Toll-free: 1-888-669-2872 Tel: +1-714-528-6777 Fax: +1-714-528-6778
Moxa China (Shanghai office) Toll-free: 800-820-5036 Tel: +86-21-5258-9955 Fax: +86-21-5258-5505
Moxa Europe Tel: +49-89-3 70 03 99-0 Fax: +49-89-3 70 03 99-99
Moxa Asia-Pacific Tel: +886-2-8919-1230 Fax: +886-2-8919-1231
Moxa India Tel: +91-80-4172-9088 Fax: +91-80-4132-1045

Table of Contents
1. Introduction ...................................................................................................................................... 1-1 2. Getting Started ................................................................................................................................. 2-1
22BSoftware Architecture .......................................................................................................................... 2-2 23BSoftware Packages .............................................................................................................................. 2-2 24BConnecting to the UC-8100-LX ............................................................................................................. 2-2
69BConnecting through the Serial Console ........................................................................................... 2-3 70BSSH Console ............................................................................................................................... 2-4
25BUser Account Management ................................................................................................................... 2-6 71BSwitching to the Root Account ...................................................................................................... 2-6
26BCreating and Deleting User Accounts ..................................................................................................... 2-7 27BDisabling the Default User Account ....................................................................................................... 2-7 28BNetwork Settings ................................................................................................................................ 2-7
72BConfiguring Ethernet Interfaces ..................................................................................................... 2-7 Connecting to a Cellular Network ................................................................................................... 2-9
29BSystem Administration ........................................................................................................................ 2-9 74BQuerying the Firmware Version ..................................................................................................... 2-9 75BAdjusting the Time ...................................................................................................................... 2-9 76BSetting the Time Zone ............................................................................................................... 2-10
30BDetermining Available Drive Space ..................................................................................................... 2-11 31BEnabling and Disabling Daemons ........................................................................................................ 2-11 32BPackage Management ....................................................................................................................... 2-12 33BShutting Down the UC-8100-LX .......................................................................................................... 2-13
3. Advanced Configuration of Peripherals ............................................................................................. 3-1 34BSerial Ports ........................................................................................................................................ 3-2
77BTChanging the Terminal Settings .................................................................................................... 3-2 35BUSB Port............................................................................................................................................ 3-3
78BDisabling the USB Port ................................................................................................................. 3-3 79BUSB Automount .......................................................................................................................... 3-4
36BSD and MicroSD Slot ........................................................................................................................... 3-4 80BEnabling Write Protection ............................................................................................................. 3-5
37BPreparing a Bootable SD Card (UC-8131-LX, UC-8132-LX, UC-8162-LX, UC-8112-LX models only) ............... 3-6 81BCreating a Linux System Image Using a Windows Platform ............................................................... 3-6 82BCreating a System Image in a Linux Environment ............................................................................ 3-7
38BBooting up the UC-8100-LX for the First Time ........................................................................................ 3-8 83BFile System Resizing .................................................................................................................... 3-8 84BBooting from a MicroSD Card (UC-8112 Only) ................................................................................. 3-8
Firmware Update using an SD Card (UC-8112-ME-T-LX and UC-8112-ME-T-LX-US-LTE Only) ....................... 3-9 Prepare an SD card ..................................................................................................................... 3-9 Update the Firmware ................................................................................................................. 3-11
Firmware Update using TFTP Server .................................................................................................... 3-12 Preparing the TFTP Server .......................................................................................................... 3-12 Updating the Firmware ............................................................................................................... 3-12
39BPush Button and LED Indicators .......................................................................................................... 3-13 85BDiagnosing Device and Subsystem Failures ................................................................................... 3-13
40BRestoring the Firmware to Factory Default ........................................................................................... 3-14 41BUsing Cellular Modules ...................................................................................................................... 3-14
86BCellular Signal Strength ............................................................................................................. 3-14 87BCellular Dial-Up Mode ................................................................................................................ 3-14 88BCellular GPS Port ....................................................................................................................... 3-14 89BConfiguring MC7304/MC7354 Cellular Modules .............................................................................. 3-15
42BConfiguring the Wireless LAN ............................................................................................................. 3-16 90BConfiguring WPA2 Settings ......................................................................................................... 3-17 91BConnecting to an AP Using WEP Authentication (UC-8131-LX, UC-8132-LX, UC-8162-LX, and UC-8112-LX Only) ....................................................................................................................................... 3-17 92BConnecting to an AP Using WPA/WPA2 PSK Authentication ............................................................. 3-18 93BUsing the wpa_cli Command ....................................................................................................... 3-19
4. UC-8100-LX Security ......................................................................................................................... 4-1 43BSecure Boot ....................................................................................................................................... 4-2 45BSudo Mechanism ................................................................................................................................ 4-3
5. General Debian Package Usage ......................................................................................................... 5-1 46BNTP Client .......................................................................................................................................... 5-2 47BExecuting Scheduled Commands Using Cron .......................................................................................... 5-2
99BUpdating System Time and RTC .................................................................................................... 5-2 48BRocket-Fast System for Log Processing: rsyslog ..................................................................................... 5-3
100BRsyslog’s Configuration File .......................................................................................................... 5-3 101BSyntax of the Selector ................................................................................................................. 5-4
49BOpenSSL ........................................................................................................................................... 5-4
102BCiphers ...................................................................................................................................... 5-5 103BCryptographic Hash Functions ....................................................................................................... 5-5 Public-Key Cryptography .............................................................................................................. 5-5
50BThe Apache Web Server ...................................................................................................................... 5-5 104BEditing the Server Name in the Configuration File ............................................................................ 5-6
51BSFTP ................................................................................................................................................. 5-6 52BDNS .................................................................................................................................................. 5-7
105B/etc/hosts .................................................................................................................................. 5-7 106B/etc/resolv.conf ........................................................................................................................... 5-7 107B/etc/nsswitch.conf ....................................................................................................................... 5-7
53Biptables ............................................................................................................................................. 5-8 108BObserving and Erasing Chain Rules .............................................................................................. 5-11 109BDefining a Policy for Chain Rules ................................................................................................. 5-11 110BAppend or Delete Rules .............................................................................................................. 5-12
54Brsync .............................................................................................................................................. 5-12 111BUsing rsync for External Backups ................................................................................................ 5-13 112BAutomating Rsync Backups ......................................................................................................... 5-13
55BNAT ................................................................................................................................................ 5-14 113BNAT Example ............................................................................................................................ 5-14 114BEnabling NAT at Bootup ............................................................................................................. 5-15
56BNFS (Network File System) ................................................................................................................ 5-16 115BSetting Up the UC-8100-LX as an NFS Client ................................................................................ 5-16
57BSNMP .............................................................................................................................................. 5-16 58BOpenVPN ......................................................................................................................................... 5-18
116BStatic-Key VPN.......................................................................................................................... 5-18 59BPackage Management ....................................................................................................................... 5-19
117Bapt-get .................................................................................................................................... 5-19 118Bapt-cache ................................................................................................................................. 5-19 119BList All Available Packages .......................................................................................................... 5-19 120BFind Package Name and Software Description ............................................................................... 5-19 121BCheck Package Information ........................................................................................................ 5-20 122BCheck Dependencies for Specific Packages ................................................................................... 5-20 123BCheck Cache Statistics ............................................................................................................... 5-20 124BUpdate System Packages ........................................................................................................... 5-20 125BInstall or Upgrade Specific Packages ............................................................................................ 5-20 126BUpgrade All Software Packages ................................................................................................... 5-20 127BInstall Multiple Packages ............................................................................................................ 5-20 129BInstall Packages without Upgrading ............................................................................................. 5-20 130BUpgrade Specific Packages ......................................................................................................... 5-21 131BInstall Specific Package Version .................................................................................................. 5-21 132BRemove Packages without Configuration ...................................................................................... 5-21 133BCompletely Remove Packages ..................................................................................................... 5-21 134BClean Up Disk Space .................................................................................................................. 5-21 135BDownload Only Source Code of Package ....................................................................................... 5-21 136BDownload and Unpack a Package ................................................................................................ 5-21 137BDownload, Unpack, and Compile a Package .................................................................................. 5-21 138BDownload a Package Without Installing ........................................................................................ 5-22 139BCheck the Package Change Log ................................................................................................... 5-22 140BCheck Broken Dependencies ....................................................................................................... 5-22 141BSearch and Build Dependencies ................................................................................................... 5-22 142BAuto Clean Apt-Get Cache .......................................................................................................... 5-22 143BAuto Remove Installed Packages ................................................................................................. 5-22
6. Programmer’s Guide ......................................................................................................................... 6-1 60BLinux Tool Chain Introduction ............................................................................................................... 6-2
144BNative Compilation ...................................................................................................................... 6-2 145BCross Compilation ....................................................................................................................... 6-2 146BObtaining Help ............................................................................................................................ 6-4
61BTest Program—Developing Hello.c ......................................................................................................... 6-4 147BCompiling Hello.c Using Native Compilation .................................................................................... 6-5 148BCompiling Hello.c Using Cross Compilation ..................................................................................... 6-5
62BMakefile Example ................................................................................................................................ 6-6 63BModbus ............................................................................................................................................. 6-6 64BRTC (Real Time Clock) ......................................................................................................................... 6-7 65BWDT (Watch Dog Timer) ...................................................................................................................... 6-8 66BCryptographic Hardware Accelerator ..................................................................................................... 6-9 67BDiagnostic LED ................................................................................................................................... 6-9
149BTurning on the LEDs .................................................................................................................... 6-9 150BTurning off the LEDs .................................................................................................................... 6-9 151BBlinking the LEDs ........................................................................................................................ 6-9
Using cell_mgmt ............................................................................................................................... 6-10 Main Page ................................................................................................................................ 6-11 Automatic Dial-Up ..................................................................................................................... 6-12

Cellular Module ......................................................................................................................... 6-12 cell_mgmt at ['AT_COMMAND'] ................................................................................................... 6-14 SIM Card .................................................................................................................................. 6-14 Switching Between Carrier Frequency Bands (MC-7354, MC-9090 only) ........................................... 6-15 GPS ......................................................................................................................................... 6-15 Cellular Management ................................................................................................................. 6-15
A. Extending the Lifetime of the SD Card ............................................................................................... A-1 3BOverview ........................................................................................................................................... A-2
7BSD Flash Types ........................................................................................................................... A-2 4BTips for Running GNU/Linux on an SD Card ............................................................................................ A-2
8BChoosing an SLC SD Card ............................................................................................................. A-2 9BUsing a Larger Capacity SD Card ................................................................................................... A-2 10BTweaking GNU/Linux to Write to RAM Instead of the SD card ............................................................ A-3 11BSetting the SD Card to Read-Only Mode ......................................................................................... A-3
B. Copying Images on an SD/MicroSD Card ........................................................................................... B-1 5BUsing Win32 Disk Imager .................................................................................................................... B-2 6BUsing the dd Command ....................................................................................................................... B-3

1 1. Introduction
This is the programming and software operation manual for the Linux OS models of the UC-8100 series of embedded computers.
The UC-8100 series of computers come in various models that support a range of operating systems, ARM architecture CPUs, and software enhancements. The following models are covered by this manual:
UC-8131-LX: RISC-based platform with 300 MHz CPU, 2 Ethernet ports, 1 serial port, 1 GB SD, USB port, and Debian ARM 7
UC-8132-LX: RISC-based platform with 300 MHz CPU, Mini PCIe socket for cellular, 2 Ethernet ports, 2 serial ports, 1 GB SD, USB port, and Debian ARM 7
UC-8162-LX: RISC-based platform with 600 MHz CPU, Mini PCIe socket for cellular, 2 Ethernet ports, 2 serial ports, 1 GB SD, USB port, and Debian ARM 7
UC-8112-LX: RISC-based platform with 1 GHz CPU, Mini PCIe socket for cellular, 2 Ethernet ports, 2 serial ports, 1 GB SD, USB port, Micro SD Socket, and Debian ARM 7
UC-8112-ME-T-LX: RISC-based platform with 1 GHz CPU, Mini PCIe socket for cellular, 2 Ethernet ports, 2 serial ports, 4 GB eMMC flash, USB port, and Debian ARM 7
UC-8112-ME-T-LX-US-LTE: RISC-based platform with 1 GHz CPU, built-in MC7354 cellular for North American market, 2 Ethernet ports, 2 serial ports, 4 GB eMMC flash, USB port, and Debian ARM 7
2 2. Getting Started
In this chapter, we describe how to configure the UC-8100’s basic settings.
The following topics are covered in this chapter:
22BSoftware Architecture
23BSoftware Packages
24BConnecting to the UC-8100-LX
69BConnecting through the Serial Console
70BSSH Console
25BUser Account Management
71BSwitching to the Root Account
26BCreating and Deleting User Accounts
27BDisabling the Default User Account
28BNetwork Settings
72BConfiguring Ethernet Interfaces
Connecting to a Cellular Network
29BSystem Administration
74BQuerying the Firmware Version
75BAdjusting the Time
76BSetting the Time Zone
30BDetermining Available Drive Space
31BEnabling and Disabling Daemons
32BPackage Management
33BShutting Down the UC-8100-LX

UC-8100 Series Linux Software Getting Started
2-2
22BSoftware Architecture The Linux operating system that is pre-installed in UC-8100-LX series follows standard Linux architecture, making it easy to accept programs that follow the POSIX standard. This computer uses the Debian ARM 7 distribution so that users can enjoy the full range of Debian software, and benefit from its strong community of developers and documentation. With Debian ARM, the UC-8100-LX supports both native and cross compilation, making programming on the computer easier and more straightforward.
The UC-8100-LX series image is partitioned into bootloader and Linux kernel, backup root file system and root file system. Refer to the following image partition table for reference.
Partition System Content Partition Format Partition Size
1 Bootloader and Linux kernel W95 FAT32 32 MB
2 Backup root file system EXT4 128 MB
3 Root file system EXT4 Rest of the capacity
The default file system format of the UC-8100 Series is EXT4, which is a journaling file system for Linux, developed as the successor to EXT3. The journaling file system keeps track of the changes before committing them to the main file system. In the event of a system crash or power failure, journaling file systems are quicker to bring back online and less likely to become corrupted.
NOTE Click on the following links for more information on EXT4. https://wiki.debian.org/Ext4 https://ext4.wiki.kernel.org/index.php/Ext4_Howto
23BSoftware Packages Refer to Appendix A for software packages installed by default. Most of the software packages come from the Debian community, whereas the unique features of the UC-8100-LX series, such as the diagnostic LED and wireless connection, are supported by Moxa. Refer to the Package Management section for information on how to manage the software packages installed on UC-8100-LX series computers.
24BConnecting to the UC-8100-LX You will need another computer to connect to the UC-8100-LX and log on to the command line interface. There are two ways to connect: through serial console cable or through Ethernet cable. Refer to the Hardware Manual to see how to set up the physical connections.
The default login username and password are:
Username: moxa Password: moxa
The username and password are the same for all serial console and SSH remote log in actions. Root account login is disabled until you manually create a password for the account. The user moxa is in the sudo group so you can operate system level commands with this user using the sudo command. For additional details, see
the Sudo Mechanism section in chapter 4.
ATTENTION
For security reasons, we recommend that you disable the default user account and create your own user accounts.

UC-8100 Series Linux Software Getting Started
2-3
69BConnecting through the Serial Console This method is particularly useful when using the computer for the first time. The signal is transmitted over a direct serial connection so you do not need to know either of its two IP addresses in order to connect to the UC-8100-LX. To connect through the serial console, configure your PC’s terminal software using the following settings.
Serial Console Port Settings
Baudrate 115200 bps
Parity None
Data bits 8
Stop bits 1
Flow Control None
Terminal VT100
Below we show how to use the terminal software to connect to the UC-8100-LX in a Linux environment and in a Windows environment.
152BLinux Users
NOTE These steps apply to the Linux PC you are using to connect to the UC-8100-LX. Do NOT apply these steps to the UC-8100-LX itself.
Take the following steps to connect to the UC-8100-LX from your Linux PC.
1. Install minicom from the package repository of your operating system.
For Centos and Fedora: user@PC1:~# yum -y install minicom
For Ubuntu and Debian: user@PC2:~# apt-get install minicom
2. Use the minicom –s command to enter the configuration menu and set up the serial port settings.
user@PC1:~# minicom –s
3. Select Serial port setup.
4. Select A to change the serial device. Note that you need to know which device node is connected to the UC-8100-LX.

UC-8100 Series Linux Software Getting Started
2-4
5. Select E to configure the port settings according to the Serial Console Port Settings table provided.
6. Select Save setup as dfl (from the main configuration menu) to use default values.
7. Select Exit from minicom (from the configuration menu) to leave the configuration menu.
8. Execute minicom after completing the above configurations.
user@PC1:~# minicom
153BWindows Users
NOTE These steps apply to the Windows PC you are using to connect to the UC-8100-LX. Do NOT apply these steps to the UC-8100-LX itself.
Take the following steps to connect to the UC-8100-LX from your Windows PC.
1. Download PuTTY http://www.chiark.greenend.org.uk/~sgtatham/putty/download.html to set up a serial connection with the UC-8100-LX in a Windows environment. The figure below shows a simple example of the configuration that is required.
2. Once the connection is established, the following window will open.
70BSSH Console The UC-8100-LX supports SSH connections over an Ethernet network. Use the following default IP addresses to connect to the UC-8100-LX.
Port Default IP LAN 1 192.168.3.127
LAN 2 192.168.4.127

UC-8100 Series Linux Software Getting Started
2-5
154BLinux Users
NOTE These steps apply to the Linux PC you are using to connect to the UC-8100-LX. Do NOT apply these steps to the UC-8100-LX itself.
Use the ssh command from a Linux computer to access the UC-8100-LX’s LAN1 port.
user@PC1:~ ssh [email protected]
Type yes to complete the connection.
The authenticity of host ‘192.168.3.127 (192.168.4.127)’ can’t be established.
RSA key fingerprint is 8b:ee:ff:84:41:25:fc:cd:2a:f2:92:8f:cb:1f:6b:2f.
Are you sure you want to continue connection (yes/no)? yes_
ATTENTION
Rekey SSHD regularly In order to secure your system, we suggest doing a regular SSH-rekey, as shown in the following steps.
cd /etc/ssh
sudo rm –rf
ssh_host_dsa_key ssh_host_ecdsa_key ssh_host_rsa_key
ssh_host_dsa_key.pub ssh_host_ecdsa_key.pub ssh_host_rsa_key.pub
sudo ssh-keygen -t rsa -f /etc/ssh/ssh_host_rsa_key
sudo ssh-keygen -t dsa -f /etc/ssh/ssh_host_dsa_key
sudo ssh-keygen -t ecdsa –f. /etc/ssh/ssh_host_ecdsa_key
When prompted for a passphrase, leave the passphrase empty and press enter.
Restart SSH
moxa@Moxa:~$ sudo /etc/init.d/ssh restart
For more information about SSH, refer to the following link.
https://wiki.debian.org/SSH
UC-8100 Series Linux Software Getting Started
2-6
155BWindows Users
NOTE These steps apply to the Windows PC you are using to connect to the UC-8100-LX. Do NOT apply these steps to the UC-8100-LX itself.
Take the following steps from your Windows PC.
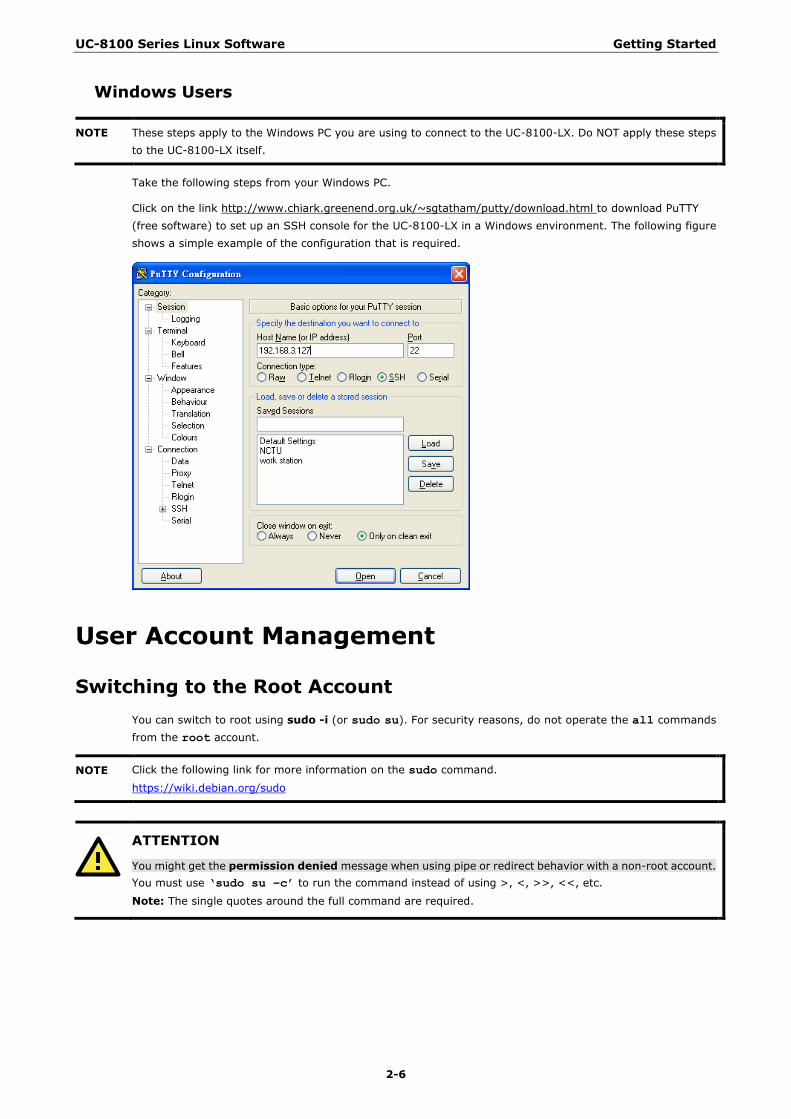
Click on the link http://www.chiark.greenend.org.uk/~sgtatham/putty/download.html to download PuTTY (free software) to set up an SSH console for the UC-8100-LX in a Windows environment. The following figure shows a simple example of the configuration that is required.
25BUser Account Management
71BSwitching to the Root Account You can switch to root using sudo -i (or sudo su). For security reasons, do not operate the all commands from the root account.
NOTE Click the following link for more information on the sudo command.
https://wiki.debian.org/sudo
ATTENTION
You might get the permission denied message when using pipe or redirect behavior with a non-root account. You must use ‘sudo su –c’ to run the command instead of using >, <, >>, <<, etc.
Note: The single quotes around the full command are required.

UC-8100 Series Linux Software Getting Started
2-7
26BCreating and Deleting User Accounts You can use the useradd and userdel commands to create and delete user accounts. Be sure to reference
the main page of these commands to set relevant access privileges for the account. Following example shows how to create a test1 user in the sudo group whose default login shell is bash and has home directory at /home/test1:
moxa@Moxa:~# sudo useradd -m -G sudo -s /bin/bash test1
To change the password for test1, use the passwd option along with the new password. Retype the password
to confirm the change.
moxa@Moxa:~# sudo passwd test1
Enter new UNIX password:
Retype new UNIX password:
passwd: password updated successfully
To delete user test1, use the userdel command.
moxa@Moxa:# sudo userdel test1
27BDisabling the Default User Account
ATTENTION
You should first create a user account before you disable the default account.
Use the passwd command to lock the default user account so the user moxa cannot log in.
root@Moxa:# passwd –l moxa
To unlock the user moxa:
root@Moxa:# passwd –u moxa
28BNetwork Settings
72BConfiguring Ethernet Interfaces After the first login, you can configure the UC-8100-LX’s network settings to better fit your application. Note that it is more convenient to manipulate the network interface settings from the serial console than from an SSH login to avoid reconnections.
156BModifying Network Settings via the Serial Console
In this section, we use the serial console to configure the UC-8100-LX’s network settings. Follow the instructions in the Connecting to the UC-8100-LX section to access the Console Utility of the target computer via the serial Console port, and then type Moxa:~# cd /etc/network to change directories.
moxa@Moxa:~$ cd /etc/network/
moxa@Moxa:/etc/network/~$
Type Moxa:~# sudo vi interfaces to edit the network configuration file in the vi editor. You can configure
the UC-8100-LX’s Ethernet ports to use either static or dynamic (DHCP) IP addresses.

UC-8100 Series Linux Software Getting Started
2-8
157BSetting a Static IP address
To set a static IP address for the UC-8100-LX, use the iface command to modify the address, network,
netmask, and broadcast parameters of the Ethernet interface.
# interfaces(5) file used by ifup(8) and ifdown(8)
auto eth0 eth1 lo
iface lo inet loopback
# embedded ethernet LAN1
#iface eth0 inet dhcp
iface eth0 inet static
address 192.168.3.127
network 192.168.3.0
netmask 255.255.255.0
broadcast 192.168.3.255
# embedded ethernet LAN2
iface eth1 inet static
address 192.168.4.127
network 192.168.4.0
netmask 255.255.255.0
broadcast 192.168.4.255~
158BSetting Dynamic IP Addresses:
To configure one or both LAN ports to request an IP address dynamically use the dhcp option in place of the static in the iface command as follows:
Default Setting for LAN1 Dynamic Setting using DHCP iface eth0 inet static address 192.168.3.127 network: 192.168.3.0 netmask 255.255.255.0 broadcast 192.168.3.255
iface eth0 inet dhcp
# embedded ethernet LAN1
iface eth0 inet dhcp

UC-8100 Series Linux Software Getting Started
2-9
Connecting to a Cellular Network You can install cellular modules on the UC-8100-LX. Refer to the Moxa website (www.moxa.com) or product data for compatible cellular modules.
The cellular connection utility is cell_mgmt. Once the cellular module is installed and the SIM card is inserted,
use this command to establish a cellular connection.
The cell_mgmt configuration file /etc/qmi-network.conf contains the APN, Username, and Password information. When you use the cell_mgmt command for the first time, you can type the following instructions directly along with the command without editing the qmi-network.conf file. The APN, username, and
password will be automatically recorded in the configuration file and retrieved when you run the command again.
moxa@Moxa:~$ sudo cell_mgmt start APN=internet USERNAME=moxa PASSWORD=moxa PIN=123
Next, use “cell_mgmt start” directly with valid configuration information.
moxa@Moxa:~$ sudo cell_mgmt start
For detailed information about cellular network settings, refer to the "Using Cellular Modules" section.
29BSystem Administration
74BQuerying the Firmware Version To check the UC-8100-LX’s firmware version, type:
moxa@Moxa:~$ kversion
UC-8112-LX version 1.0.0
Add the –a option to create a full build version:
moxa@Moxa:~$ kversion -a
UC-8112-LX version 1.0.0 Build 14050416
75BAdjusting the Time
NOTE The UC-8100 series uses a rechargeable battery that provides power for about one week. Be sure to sync with a time server every time the battery is recharged to ensure that the UC-8100 is using the correct time.
The UC-8100-LX has two time settings. One is the system time, and the other is the RTC (Real Time Clock) time kept by the UC-8100-LX hardware. Use the #date command to query the current system time or set a new system time. Use the #hwclock command to query the current RTC time or set a new RTC time.
Use the date MMDDhhmmYYYY command to set the system time:
MM = Month DD = Date hhmm = hour and minute
moxa@Moxa:~$ sudo date 071123192014
Mon Jul 11 23:19:00 UTC 2014
Use the following command to set the RTC time to system time:
moxa@Moxa:~$ sudo hwclock –w
moxa@Moxa:~$ sudo hwclock
Fri 11 Jul 2014 11:19:38 PM UTC -1.006862 seconds

UC-8100 Series Linux Software Getting Started
2-10
NOTE Click the following links for more information on date and time: https://www.debian.org/doc/manuals/system-administrator/ch-sysadmin-time.html https://wiki.debian.org/DateTime
76BSetting the Time Zone There are two ways to configure the Moxa embedded computer’s timezone. One is using the TZ variable. The other is using the /etc/localtime file.
159BUUsing the TZ Variable
The format of the TZ environment variable looks like this:
TZ=<Value>HH[:MM[:SS]][daylight[HH[:MM[:SS]]][,start date[/starttime], enddate[/endtime]]]
Here are some possible settings for the North American Eastern time zone:
1. TZ=EST5EDT
2. TZ=EST0EDT
3. TZ=EST0
In the first case, the reference time is GMT and the stored time values are correct worldwide. A simple change of the TZ variable can print the local time correctly in any time zone. In the second case, the reference time is Eastern Standard Time and the only conversion performed is for Daylight Saving Time. Therefore, there is no need to adjust the hardware clock for Daylight Saving Time twice per year. In the third case, the reference time is always the time reported. You can use this option if the hardware clock on your machine automatically adjusts for Daylight Saving Time or you would like to manually adjust the hardware time twice a year.
moxa@Moxa:~$ TZ= EST5EDT moxa@Moxa:~$ export TZ
You must include the TZ setting in the /etc/rc.d/rc.local file. The timezone setting will be activated
when you restart the computer.
The following table lists other possible values for the TZ environment variable:
Hours From Greenwich Mean Time (GMT) Value Description 0 GMT Greenwich Mean Time
+1 ECT European Central Time
+2 EET European Eastern Time
+2 ART
+3 EAT Saudi Arabia
+3.5 MET Iran
+4 NET
+5 PLT West Asia
+5.5 IST India
+6 BST Central Asia
+7 VST Bangkok
+8 CTT China
+9 JST Japan
+9.5 ACT Central Australia
+10 AET Eastern Australia
+11 SST Central Pacific
+12 NST New Zealand
-11 MIT Samoa

UC-8100 Series Linux Software Getting Started
2-11
Hours From Greenwich Mean Time (GMT) Value Description
-10 HST Hawaii
-9 AST Alaska
-8 PST Pacific Standard Time
-7 PNT Arizona
-7 MST Mountain Standard Time
-6 CST Central Standard Time
-5 EST Eastern Standard Time
-5 IET Indiana East
-4 PRT Atlantic Standard Time
-3.5 CNT Newfoundland
-3 AGT Eastern South America
-3 BET Eastern South America
-1 CAT Azores
160BUsing the Localtime File
The local timezone is stored in the /etc/localtime and is used by GNU Library for C (glibc) if no value has been set for the TZ environment variable. This file is either a copy of the /usr/share/zoneinfo/ file or a symbolic link to it. The UC-8100-LX does not provide /usr/share/zoneinfo/ files. You should find a
suitable time zone information file and write over the original local time file in the UC-8100-LX
30BDetermining Available Drive Space To determine the amount of available drive space, use the df command with the –h tag. The system will return the amount of drive space broken down by file system. Here is an example:
moxa@Moxa:~$ df -h
Filesystem Size Used Avail Use% Mounted on
rootfs 803M 238M 524M 32% /
/dev/root 803M 238M 524M 32% /
tmpfs 25M 188K 25M 1% /run
tmpfs 5.0M 0 5.0M 0% /run/lock
tmpfs 10M 0 10M 0% /dev
tmpfs 50M 0 50M 0% /run/shm
31BEnabling and Disabling Daemons By default, only the following daemons are enabled in the UC-8100-LX:
sftpd SFTP Server / Client daemon sshd Secure Shell Server daemon
You can use the insserv command to manage which services run in the background. The following example shows how to add the Apache daemon to the current run level.
moxa@Moxa:~$ sudo insserv –d apache2
The Apache daemon will not get activated in the current boot session, but will be running in the background from the next boot session.
To disable the Apache daemon, use the following command:
moxa@Moxa:~$ sudo insserv -r apache2
UC-8100 Series Linux Software Getting Started
2-12
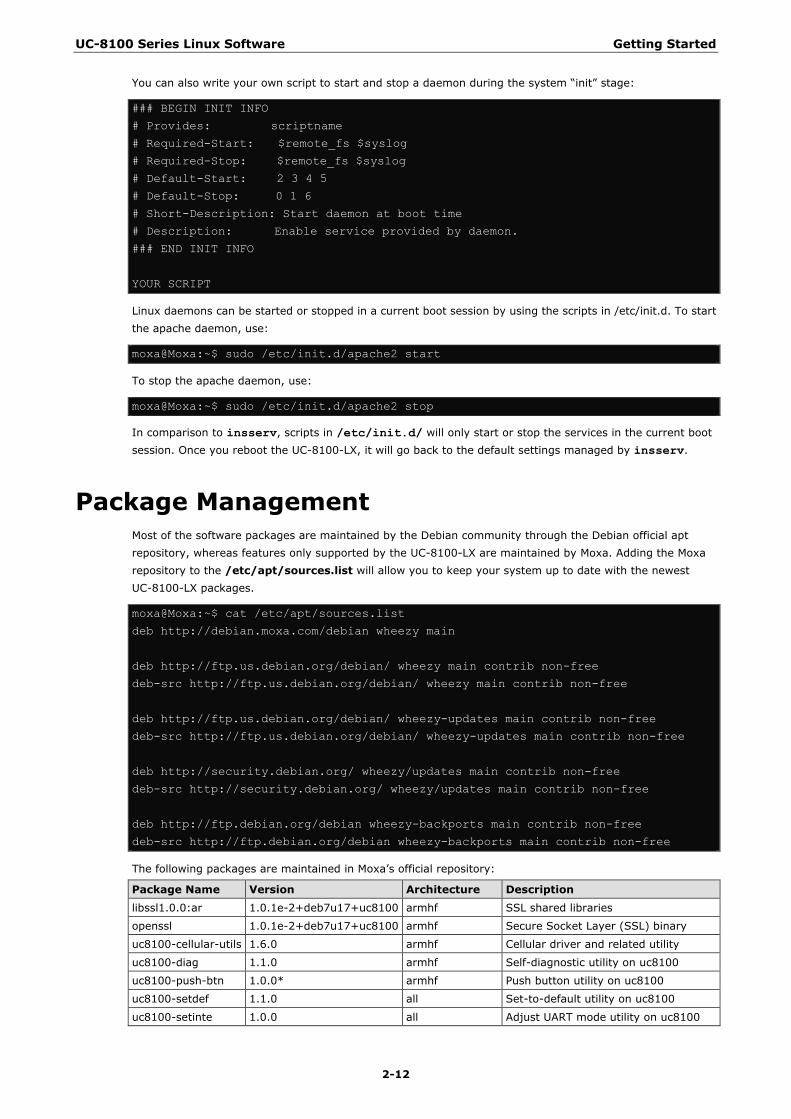
You can also write your own script to start and stop a daemon during the system “init” stage:
### BEGIN INIT INFO
# Provides: scriptname
# Required-Start: $remote_fs $syslog
# Required-Stop: $remote_fs $syslog
# Default-Start: 2 3 4 5
# Default-Stop: 0 1 6
# Short-Description: Start daemon at boot time
# Description: Enable service provided by daemon.
### END INIT INFO
YOUR SCRIPT
Linux daemons can be started or stopped in a current boot session by using the scripts in /etc/init.d. To start the apache daemon, use:
moxa@Moxa:~$ sudo /etc/init.d/apache2 start
To stop the apache daemon, use:
moxa@Moxa:~$ sudo /etc/init.d/apache2 stop
In comparison to insserv, scripts in /etc/init.d/ will only start or stop the services in the current boot session. Once you reboot the UC-8100-LX, it will go back to the default settings managed by insserv.
32BPackage Management Most of the software packages are maintained by the Debian community through the Debian official apt repository, whereas features only supported by the UC-8100-LX are maintained by Moxa. Adding the Moxa repository to the /etc/apt/sources.list will allow you to keep your system up to date with the newest UC-8100-LX packages.
moxa@Moxa:~$ cat /etc/apt/sources.list
deb http://debian.moxa.com/debian wheezy main
deb http://ftp.us.debian.org/debian/ wheezy main contrib non-free
deb-src http://ftp.us.debian.org/debian/ wheezy main contrib non-free
deb http://ftp.us.debian.org/debian/ wheezy-updates main contrib non-free
deb-src http://ftp.us.debian.org/debian/ wheezy-updates main contrib non-free
deb http://security.debian.org/ wheezy/updates main contrib non-free
deb-src http://security.debian.org/ wheezy/updates main contrib non-free
deb http://ftp.debian.org/debian wheezy-backports main contrib non-free
deb-src http://ftp.debian.org/debian wheezy-backports main contrib non-free
The following packages are maintained in Moxa’s official repository:
Package Name Version Architecture Description
libssl1.0.0:ar 1.0.1e-2+deb7u17+uc8100 armhf SSL shared libraries
openssl 1.0.1e-2+deb7u17+uc8100 armhf Secure Socket Layer (SSL) binary
uc8100-cellular-utils 1.6.0 armhf Cellular driver and related utility
uc8100-diag 1.1.0 armhf Self-diagnostic utility on uc8100
uc8100-push-btn 1.0.0* armhf Push button utility on uc8100
uc8100-setdef 1.1.0 all Set-to-default utility on uc8100
uc8100-setinte 1.0.0 all Adjust UART mode utility on uc8100

UC-8100 Series Linux Software Getting Started
2-13
Package Name Version Architecture Description
uc8100-snmpd 5.4.3~dfsg-2 armhf SNMP (Simple Network Management Protocol)
uc8100-system 1.5.0 armhf System files in uc8100
uc8100-wifi-ut 1.2.0 armhf Wi-Fi utility on uc8100 series
33BShutting Down the UC-8100-LX To shut down the UC-8100, disconnect the power source to the computer. When the computer is powered off, main components such as the CPU, RAM, and storage devices are powered off, although an internal clock may retain battery power.
You can use the Linux command shutdown to close all software running on the UC-8100 and halt the system.
However, main components such as the CPU, RAM, and storage devices will continue to be powered after you run this command.
moxa@Moxa:~$ sudo shutdown -h now
3 3. Advanced Configuration of Peripherals
In this chapter, we include more information on the UC-8100-LX’s peripherals, such as the serial interface, storage, diagnostic LEDs, and the cellular module.
The following topics are covered in this chapter:
34BSerial Ports
77BTChanging the Terminal Settings
35BUSB Port
78BDisabling the USB Port
79BUSB Automount
36BSD and MicroSD Slot
80BEnabling Write Protection
37BPreparing a Bootable SD Card (UC-8131-LX, UC-8132-LX, UC-8162-LX, UC-8112-LX models only)
81BCreating a Linux System Image Using a Windows Platform
82BCreating a System Image in a Linux Environment
38BBooting up the UC-8100-LX for the First Time
83BFile System Resizing
84BBooting from a MicroSD Card (UC-8112 Only)
Firmware Update using an SD Card (UC-8112-ME-T-LX and UC-8112-ME-T-LX-US-LTE Only)
Prepare an SD card
Update the Firmware
Firmware Update using TFTP Server
Preparing the TFTP Server
Updating the Firmware
39BPush Button and LED Indicators
85BDiagnosing Device and Subsystem Failures
40BRestoring the Firmware to Factory Default
41BUsing Cellular Modules
86BCellular Signal Strength
87BCellular Dial-Up Mode
88BCellular GPS Port
89BConfiguring MC7304/MC7354 Cellular Modules
42BConfiguring the Wireless LAN
90BConfiguring WPA2 Settings
91BConnecting to an AP Using WEP Authentication (UC-8131-LX, UC-8132-LX, UC-8162-LX, and UC-8112-LX Only)
92BConnecting to an AP Using WPA/WPA2 PSK Authentication
93BUsing the wpa_cli Command

UC-8100 Series Linux Software Advanced Configuration of Peripherals
3-2
34BSerial Ports The UC-8131-LX has 1 serial port at /dev/ttyM0, while all other UC-8100-LX models have 2 serial ports at /dec/ttyM0 and /dev/ttyM1. The serial ports support RS-232, RS-422, and RS-485 2-wire operation
modes with flexible baudrate settings.
The default operation mode is set to RS-422; use the setinterface command to change the operation mode.
Usage: setinterface device-node [interface-no] Device-node: /dev/ttyMn; n = 0,1,2,... Interface-no: As in the following table
Interface-no Operation Mode
None Display current setting
0 RS-232
1 RS-485 2-wire
2 RS-422 / RS-485 4-wire
For example, to set /dev/ttyM0 to RS-485 2-wire mode, use the following command:
moxa@Moxa:~# sudo setinterface /dev/ttyM0 1
Now setting is RS485-2W mode
moxa@Moxa:~# sudo setinterface /dev/ttyM0
UART Port#0 is in RS485-2W Mode
77BTChanging the Terminal Settings The stty command is used to manipulate the terminal settings. You can view and modify the serial terminal
settings with this command. Details are given below.
161BDisplaying All Settings
The following text shows how to display all settings.
moxa@Moxa:~$ sudo stty -a -F /dev/ttyM0
speed 9600 baud; rows 0; columns 0; line = 0;
intr = ^C; quit = ^\; erase = ^?; kill = ^U; eof = ^D; eol = <undef>;
eol2 = <undef>; swtch = <undef>; start = ^Q; stop = ^S; susp = ^Z; rprnt = ^R;
werase = ^W; lnext = ^V; flush = ^O; min = 1; time = 0;
-parenb -parodd cs8 hupcl -cstopb cread clocal -crtscts
-ignbrk -brkint -ignpar -parmrk -inpck -istrip -inlcr -igncr icrnl ixon -ixoff
-iuclc -ixany -imaxbel -iutf8
opost -olcuc -ocrnl onlcr -onocr -onlret -ofill -ofdel nl0 cr0 tab0 bs0 vt0 ff0
isig icanon iexten echo echoe echok -echonl -noflsh -xcase -tostop -echoprt
echoctl echoke

UC-8100 Series Linux Software Advanced Configuration of Peripherals
3-3
162BConfiguring Serial Settings
The following example changes the baudrate to 115200.
moxa@Moxa:~$ sudo stty 115200 -F /dev/ttyM0
After running this command, the baudrate will be changed to 115200.
moxa@Moxa:~$ sudo stty -a -F /dev/ttyM0
speed 115200 baud; rows 0; columns 0; line = 0;
intr = ^C; quit = ^\; erase = ^?; kill = ^U; eof = ^D; eol = <undef>;
eol2 = <undef>; swtch = <undef>; start = ^Q; stop = ^S; susp = ^Z; rprnt = ^R;
werase = ^W; lnext = ^V; flush = ^O; min = 1; time = 0;
-parenb -parodd cs8 hupcl -cstopb cread clocal -crtscts
-ignbrk -brkint -ignpar -parmrk -inpck -istrip -inlcr -igncr icrnl ixon -ixoff
-iuclc -ixany -imaxbel -iutf8
opost -olcuc -ocrnl onlcr -onocr -onlret -ofill -ofdel nl0 cr0 tab0 bs0 vt0 ff0
isig icanon iexten echo echoe echok -echonl -noflsh -xcase -tostop -echoprt
echoctl echoke
NOTE Detailed information on the stty utility is available at the following link:
http://www.gnu.org/software/coreutils/manual/coreutils.html
35BUSB Port The UC-8100-LX series has a USB port for storage expansion.
78BDisabling the USB Port USB ports on the UC-8100-LX can be disabled. To disable a USB port, take the following steps:
1. After powering on the UC-8100 computer, press <DEL> to enter the BIOS configuration settings.
----------------------------------------------------------------------------
Boot Loader Version 1.0.0S12 CPU TYPE: 1GHz
Build date: May 7 2014 - 15:55:07 Serial Number: MOXATESTSN01
LAN1 MAC: 00:90:E8:00:00:01 LAN2 MAC: 00:90:E8:00:00:02
----------------------------------------------------------------------------
(0) TPM Setting (1) SD Card Write Protect
(2) Extend USB Port Control (3) Go To OS
---------------------------------------------------------------------------
Command>>
2. Enter 2 to Extend USB Port Control.
Current Extend USB Port is ON.
Change to ,0 - ON, 1 - OFF (0-1,enter for abort):
3. Enter 1 to disable the USB port.
Change to ,0 - ON, 1 - OFF (0-1,enter for abort): 1
Saving Environment to EEPROM...
4. You need to reboot the UC-8100-LX computer to make the change effective. Also, during boot up, you will see the following message on the console, which indicates the successful disabling of the USB port.
[60.268951] hub 2-0:1.0: unable to enumerate USB device on port 1

UC-8100 Series Linux Software Advanced Configuration of Peripherals
3-4
ATTENTION
No USB devices can be mounted when the port is disabled This includes USB block storage devices and dongles, neither of which will be able to be mounted.
79BUSB Automount The UC-8100-LX supports hot plug function for connecting USB mass storage devices. However, by default, the automount utility (udev) only supports auto-mounting of one partition. Use the mount command to view
details about all partitions.
ATTENTION
Remember to type the #sync command before you disconnect the USB mass storage device to prevent loss of data.
Exit from the /media/usb* directory when you disconnect the storage device. If you stay in /media/usb*, the auto unmount process will fail. If that happens, type #umount /media/usb* to unmount the device manually.
36BSD and MicroSD Slot The SD slot supports the SD, SDHC, and SDXC formats, and is used as the main storage for the UC-8100-LX series. The UC-8100-LX comes with a pre-installed 1GB SD card, but allows using SD cards with up to 64 GB of storage space.
The UC-8112-LX has an internal Micro SD slot. The storage media with a valid boot code will serve as the main storage, and the other storage media will be used as expansion. Either the SD or MicroSD slot can serve as the main storage. In either case, the expansion storage will be auto-mounted to /media/sd-mmcblk1pX, where
X is the partition number.
Below we explain how to enable write protection on the SD and Micro SD slot, and how to prepare a bootable SD with different capacities.
UC-8100 Series Linux Software Advanced Configuration of Peripherals
3-5
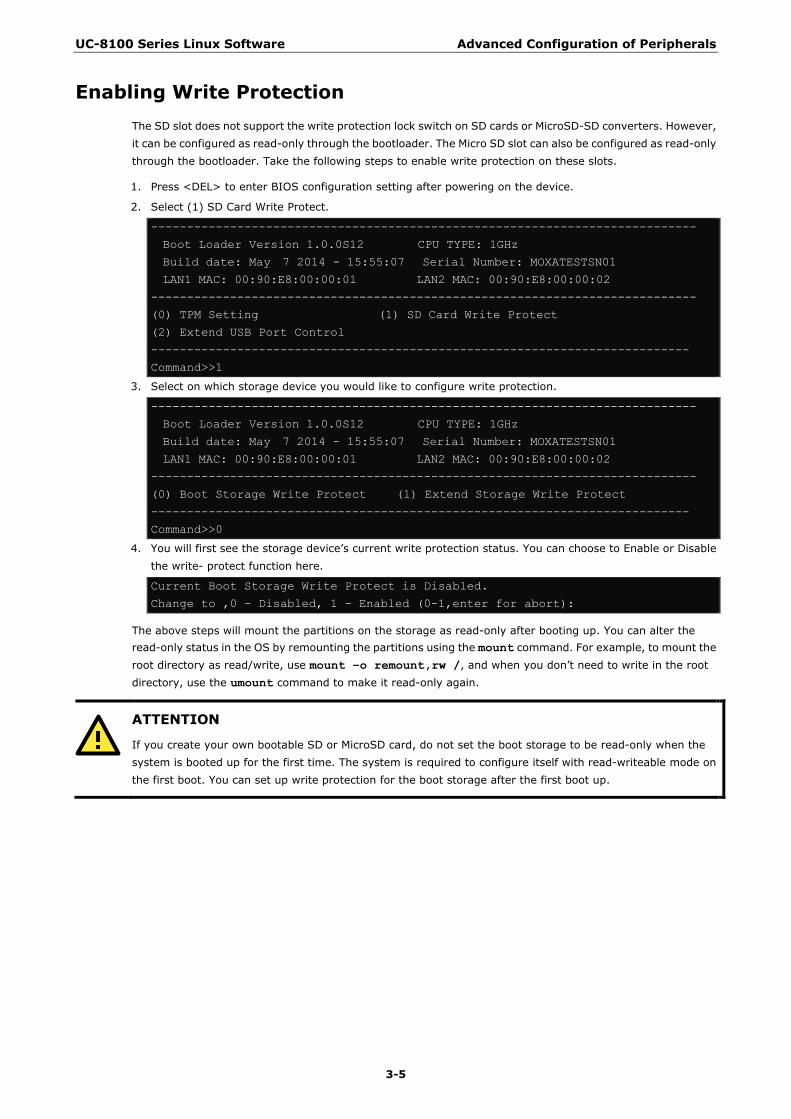
80BEnabling Write Protection The SD slot does not support the write protection lock switch on SD cards or MicroSD-SD converters. However, it can be configured as read-only through the bootloader. The Micro SD slot can also be configured as read-only through the bootloader. Take the following steps to enable write protection on these slots.
1. Press <DEL> to enter BIOS configuration setting after powering on the device.
2. Select (1) SD Card Write Protect.
----------------------------------------------------------------------------
Boot Loader Version 1.0.0S12 CPU TYPE: 1GHz
Build date: May 7 2014 - 15:55:07 Serial Number: MOXATESTSN01
LAN1 MAC: 00:90:E8:00:00:01 LAN2 MAC: 00:90:E8:00:00:02
----------------------------------------------------------------------------
(0) TPM Setting (1) SD Card Write Protect
(2) Extend USB Port Control
---------------------------------------------------------------------------
Command>>1
3. Select on which storage device you would like to configure write protection.
----------------------------------------------------------------------------
Boot Loader Version 1.0.0S12 CPU TYPE: 1GHz
Build date: May 7 2014 - 15:55:07 Serial Number: MOXATESTSN01
LAN1 MAC: 00:90:E8:00:00:01 LAN2 MAC: 00:90:E8:00:00:02
----------------------------------------------------------------------------
(0) Boot Storage Write Protect (1) Extend Storage Write Protect
---------------------------------------------------------------------------
Command>>0
4. You will first see the storage device’s current write protection status. You can choose to Enable or Disable the write- protect function here.
Current Boot Storage Write Protect is Disabled.
Change to ,0 - Disabled, 1 - Enabled (0-1,enter for abort):
The above steps will mount the partitions on the storage as read-only after booting up. You can alter the read-only status in the OS by remounting the partitions using the mount command. For example, to mount the root directory as read/write, use mount –o remount,rw /, and when you don’t need to write in the root directory, use the umount command to make it read-only again.
ATTENTION
If you create your own bootable SD or MicroSD card, do not set the boot storage to be read-only when the system is booted up for the first time. The system is required to configure itself with read-writeable mode on the first boot. You can set up write protection for the boot storage after the first boot up.

UC-8100 Series Linux Software Advanced Configuration of Peripherals
3-6
37BPreparing a Bootable SD Card (UC-8131-LX, UC-8132-LX, UC-8162-LX, UC-8112-LX models only)
If you want to use an SD card with greater capacity, or upgrade the UC-8100’s firmware, you can download the latest UC-8100-LX image from Moxa’s official website and prepare a bootable SD card by yourself.
You can download the image file to either a Windows or Linux PC, and then transfer the file to the SD card. Refer to the following tutorial for details.
81BCreating a Linux System Image Using a Windows Platform If you are using Windows, take the following steps.
1. Make sure the e SD card’s write protection switch is unlocked.
2. Insert the SD card into a Windows PC.
3. Download win32diskimager from following link.
http://sourceforge.net/projects/win32diskimager/
4. Execute the win32diskimager after installation.
5. Make sure the device name matches the USB device.
6. Select the image file.

UC-8100 Series Linux Software Advanced Configuration of Peripherals
3-7
7. Make sure you have selected the correct image file, and then click the Write button.
8. When finished, click OK.
82BCreating a System Image in a Linux Environment If you are using Linux, take the following steps.
1. Make sure the SD card’s write protection switch is unlocked.
2. Insert the SD card into a Linux PC.
UC-8100 Series Linux Software Advanced Configuration of Peripherals
3-8
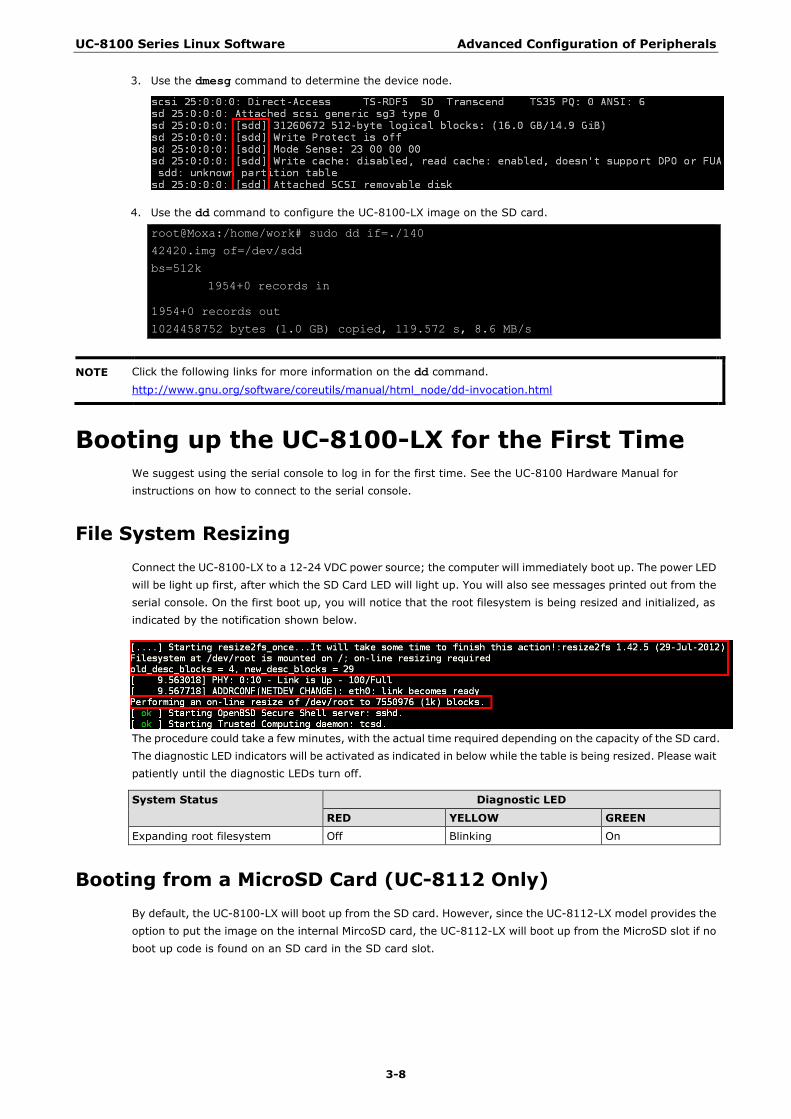
3. Use the dmesg command to determine the device node.
4. Use the dd command to configure the UC-8100-LX image on the SD card.
root@Moxa:/home/work# sudo dd if=./140
42420.img of=/dev/sdd
bs=512k
1954+0 records in
1954+0 records out
1024458752 bytes (1.0 GB) copied, 119.572 s, 8.6 MB/s
NOTE Click the following links for more information on the dd command.
http://www.gnu.org/software/coreutils/manual/html_node/dd-invocation.html
38BBooting up the UC-8100-LX for the First Time We suggest using the serial console to log in for the first time. See the UC-8100 Hardware Manual for instructions on how to connect to the serial console.
83BFile System Resizing Connect the UC-8100-LX to a 12-24 VDC power source; the computer will immediately boot up. The power LED will be light up first, after which the SD Card LED will light up. You will also see messages printed out from the serial console. On the first boot up, you will notice that the root filesystem is being resized and initialized, as indicated by the notification shown below.
The procedure could take a few minutes, with the actual time required depending on the capacity of the SD card. The diagnostic LED indicators will be activated as indicated in below while the table is being resized. Please wait patiently until the diagnostic LEDs turn off.
System Status Diagnostic LED
RED YELLOW GREEN Expanding root filesystem Off Blinking On
84BBooting from a MicroSD Card (UC-8112 Only) By default, the UC-8100-LX will boot up from the SD card. However, since the UC-8112-LX model provides the option to put the image on the internal MircoSD card, the UC-8112-LX will boot up from the MicroSD slot if no boot up code is found on an SD card in the SD card slot.
UC-8100 Series Linux Software Advanced Configuration of Peripherals
3-9
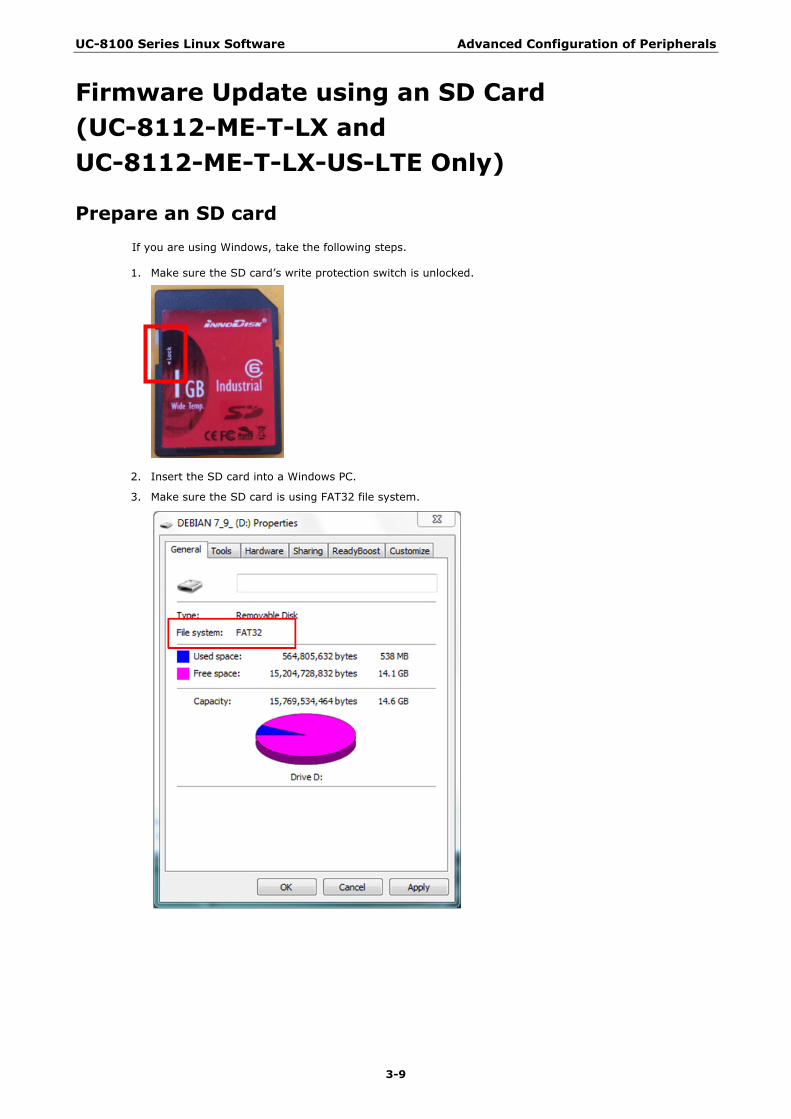
Firmware Update using an SD Card (UC-8112-ME-T-LX and UC-8112-ME-T-LX-US-LTE Only)
Prepare an SD card If you are using Windows, take the following steps.
1. Make sure the SD card’s write protection switch is unlocked.
2. Insert the SD card into a Windows PC.
3. Make sure the SD card is using FAT32 file system.

UC-8100 Series Linux Software Advanced Configuration of Peripherals
3-10
4. If the SD card is not using a FAT32 file system, you will need to format it to a FAT32 file system.
NOTE When you format the SD card, all of the files on the SD card will be deleted.
5. Copy the image file onto the SD card and then follow the steps to update the firmware.

UC-8100 Series Linux Software Advanced Configuration of Peripherals
3-11
Update the Firmware 1. To update the firmware, log in to the product through the serial console. Instructions on how to connect to
the serial console can be found in the UC-8100 Hardware Manual.
2. After powering on the UC-8112-ME computer, press <DEL> to enter the BIOS configuration settings.
If you could not enter the BIOS menu by pressing <DEL>, replace putty by Tera Term terminal console tool. (Detailed information is available on the following website: https://ttssh2.osdn.jp/index.html.en.)
----------------------------------------------------------------------------
Model: UC-8112-ME-T-LX
Boot Loader Version 1.0.0S09 CPU TYPE: 1GHz
Build date: Jan 30 2016 - 14:44:07 Serial Number: TAFBB1064329
LAN1 MAC: 00:90:E8:55:46:33 LAN2 MAC: 00:90:E8:55:46:34
----------------------------------------------------------------------------
(0) Extend USB Port Control (1) Firmware Update by SD Card
(2) Firmware Update by Tftp (3) Go To OS
---------------------------------------------------------------------------
Command>>
3. Enter 1 to choose an img file.
Command>>1
Firmware File Name (firmware.img):
4. Enter the img filename.
Firmware File Name (firmware.img): FWR_UC-8112-ME-T-LX_V1.0.0_Build_16030911.img
5. After updating the firmware, enter 3 to open the OS command line.
Firmware File Name (firmware.img): FWR_UC-8112-ME-T-LX_V1.0.0_Build_16030911.img
mmc2(part 0) is current device
MMC write: dev # 2, block # 0, count 393216 ... 393216 blocks write: OK
mmc2(part 0) is current device
MMC write: dev # 2, block # 393216, count 393216 ... 393216 blocks write: OK
mmc2(part 0) is current device
MMC write: dev # 2, block # 786432, count 237568 ... 237568 blocks write: OK
----------------------------------------------------------------------------
Model: UC-8112-ME-T-LX
Boot Loader Version 1.0.0S09 CPU TYPE: 1GHz
Build date: Jan 30 2016 - 14:44:07 Serial Number: TAFBB1064329
LAN1 MAC: 00:90:E8:55:46:33 LAN2 MAC: 00:90:E8:55:46:34
----------------------------------------------------------------------------
(0) Extend USB Port Control (1) Firmware Update by SD Card
(2) Firmware Update by Tftp (3) Go To OS
---------------------------------------------------------------------------
Command>> 3

UC-8100 Series Linux Software Advanced Configuration of Peripherals
3-12
Firmware Update using TFTP Server
Preparing the TFTP Server 1. Set up a TFTP server.
2. Make sure the image (*.img) file is in your TFTP server directory.
Updating the Firmware 1. To update the firmware, log in to the product through the serial console. Instructions on how to connect to
the serial console can be found in the UC-8100 Hardware Manual.
2. After powering on the UC-8112-ME computer, press <DEL> to enter the BIOS configuration settings.
If you could not enter the BIOS menu by pressing <DEL>, replace putty by Tera Term terminal console tool. (Detailed information is available on the following website: https://ttssh2.osdn.jp/index.html.en.)
----------------------------------------------------------------------------
Model: UC-8112-ME-T-LX
Boot Loader Version 1.0.0S09 CPU TYPE: 1GHz
Build date: Jan 30 2016 - 14:44:07 Serial Number: TAFBB1064329
LAN1 MAC: 00:90:E8:55:46:33 LAN2 MAC: 00:90:E8:55:46:34
----------------------------------------------------------------------------
(0) Extend USB Port Control (1) Firmware Update by SD Card
(2) Firmware Update by Tftp (3) Go To OS
---------------------------------------------------------------------------
Command>>
3. Enter 2 to update the firmware by Tftp server. If you want to set up the TFTP IP address, enter 1 to set up the target machine’s IP address and the Tftp server IP address and then choose an img file.
Command>> 2
Current IP Address
Local IP Address : ipaddr=192.168.31.134
Server IP Address : serverip=192.168.31.132
Do you set your ip address?
0 - No, 1 - Yes (0-1,enter for abort): 1
Local IP Address : 192.168.31.134
Server IP Address : 192.168.31.132
Saving Environment to SPI Flash...
SF: Detected MX25L6405D with page size 64 KiB, total 8 MiB
Erasing SPI flash...Writing to SPI flash...done
Firmware File Name (firmware.img): FWR_UC-8112-ME-T-LX_V1.0.0_Build_16030911.img
4. After updating the firmware, enter 3 to open the OS command line.
----------------------------------------------------------------------------
Model: UC-8112-ME-T-LX
Boot Loader Version 1.0.0S09 CPU TYPE: 1GHz
Build date: Jan 30 2016 - 14:44:07 Serial Number: TAFBB1064329
LAN1 MAC: 00:90:E8:55:46:33 LAN2 MAC: 00:90:E8:55:46:34
----------------------------------------------------------------------------
(0) Extend USB Port Control (1) Firmware Update by SD Card
(2) Firmware Update by Tftp (3) Go To OS
---------------------------------------------------------------------------
Command>> 3
UC-8100 Series Linux Software Advanced Configuration of Peripherals
3-13
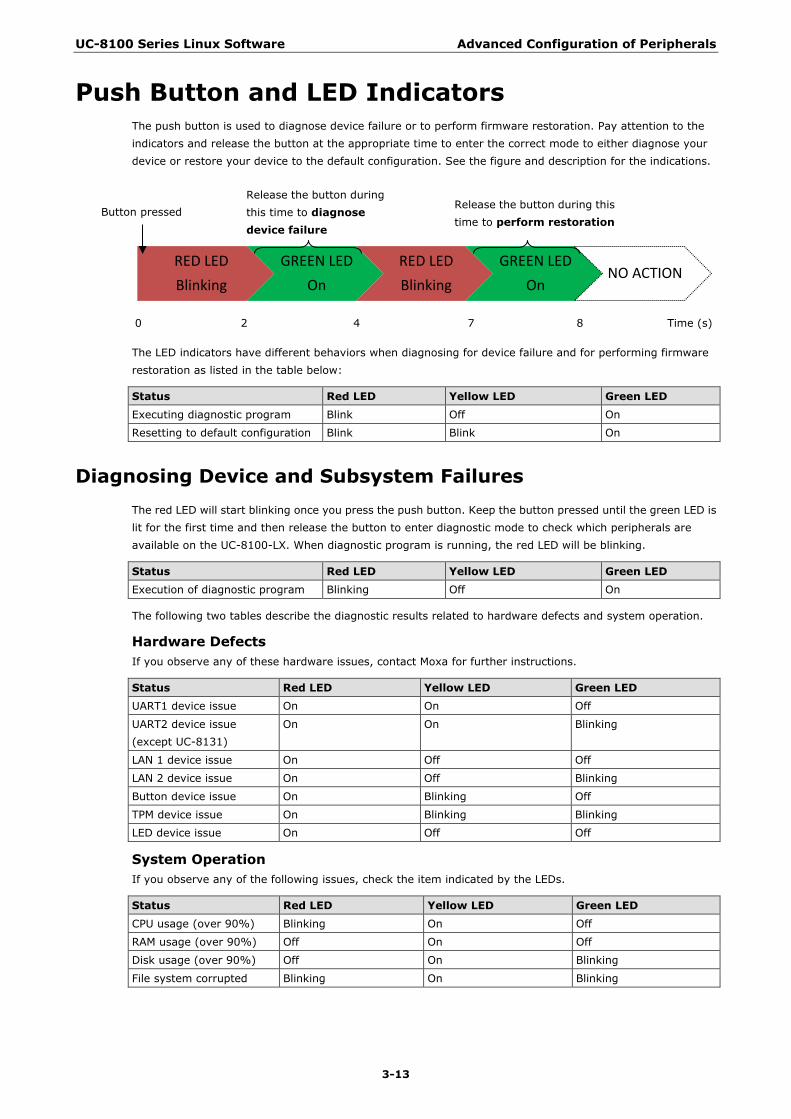
39BPush Button and LED Indicators The push button is used to diagnose device failure or to perform firmware restoration. Pay attention to the indicators and release the button at the appropriate time to enter the correct mode to either diagnose your device or restore your device to the default configuration. See the figure and description for the indications.
The LED indicators have different behaviors when diagnosing for device failure and for performing firmware restoration as listed in the table below:
Status Red LED Yellow LED Green LED
Executing diagnostic program Blink Off On
Resetting to default configuration Blink Blink On
85BDiagnosing Device and Subsystem Failures The red LED will start blinking once you press the push button. Keep the button pressed until the green LED is lit for the first time and then release the button to enter diagnostic mode to check which peripherals are available on the UC-8100-LX. When diagnostic program is running, the red LED will be blinking.
Status Red LED Yellow LED Green LED Execution of diagnostic program Blinking Off On
The following two tables describe the diagnostic results related to hardware defects and system operation.
184BHardware Defects If you observe any of these hardware issues, contact Moxa for further instructions.
Status Red LED Yellow LED Green LED UART1 device issue On On Off
UART2 device issue (except UC-8131)
On On Blinking
LAN 1 device issue On Off Off
LAN 2 device issue On Off Blinking
Button device issue On Blinking Off
TPM device issue On Blinking Blinking
LED device issue On Off Off
185BSystem Operation If you observe any of the following issues, check the item indicated by the LEDs.
Status Red LED Yellow LED Green LED
CPU usage (over 90%) Blinking On Off
RAM usage (over 90%) Off On Off
Disk usage (over 90%) Off On Blinking
File system corrupted Blinking On Blinking
RED LED Blinking
GREEN LED On
RED LED Blinking
GREEN LED On
NO ACTION
0 2 4 7 8
Release the button during this time to diagnose device failure
Time (s)
Release the button during this time to perform restoration
Button pressed

UC-8100 Series Linux Software Advanced Configuration of Peripherals
3-14
40BRestoring the Firmware to Factory Default Keep the push button pressed until the green LED lights up for the second time and then release the button. The UC-8100-LX will enter the restoration process and reset the computer to factory defaults. The green LED will light up, and the red and yellow LED indicators will blink as the root filesystem is reset to default values.
Status Red LED Yellow LED Green LED
Resetting to defaults Blinking Blinking On
You can also use the setdef command to restore the computer to factory defaults:
moxa@Moxa:~$ sudo setdef
ATTENTION
Reset-to-default will erase all the data stored on the boot storage Please back up your files before resetting the system to factory defaults. All the data stored in the UC-8100-LX‘s boot storage will be destroyed after resetting to factory defaults.
41BUsing Cellular Modules UC-8100-LX computers have a mini PCIe socket for installing a cellular module. Contact your sales representative for more information about available modules.
86BCellular Signal Strength The following table shows how cellular signal strength is indicated by the signal indicators.
Signal Indicator Value RSSI dbm Condition
3 LEDs on (red, yellow, green) 20 to 30 -73 to -53 Excellent
2 LEDs on (red, yellow) 10 to 19 -93 to -74 Good
1 LED on (red) 2 to 9 -109 to -94 Marginal
No LED on Else Else No signal
87BCellular Dial-Up Mode For the modules provided below, we suggest dialing up from QMI interface with QMI commands instead of using AT commands from the AT ports.
Module MC7304 MC7354 MC9090
Dial Up mode QMI /dev/cdc-wdm0
QMI /dev/cdc-wdm0
QMI /dev/cdc-wdm0
AT Port /dev/ttyUSB2 /dev/ttyUSB2 /dev/ttyUSB2
Default mode 7 7 8
88BCellular GPS Port Module MC7304 MC7354 MC9090 Device node /dev/ttyUSB1 /dev/ttyUSB1 /dev/ttyUSB1

UC-8100 Series Linux Software Advanced Configuration of Peripherals
3-15
89BConfiguring MC7304/MC7354 Cellular Modules The MC7304 and MC7354 cellular modules can be used with the UC-8100-LX. Refer to product datasheet for detailed specifications. You can use the UC-8100-LX’s cellular connection utility, cell_mgmt, to initiate a cellular connection.
163B164BGPS
The GPS function of the MC7304/MC7354 is disabled by default. You can get raw GPS data by just listening to the GPS port /dev/ttyUSB1.
moxa@Moxa:~# cat /dev/ttyUSB1
Verizon
Verizon users should use the following commands to switch to the corresponding Verizon profile:
moxa@Moxa:~# echo -n -e 'ATE0\r\n' | sudo tee /dev/ttyUSB1
moxa@Moxa:~# echo -n -e 'AT!entercnd="A710"\r\n' | sudo tee /dev/ttyUSB1
moxa@Moxa:~# echo -e -n
'AT!GOBISETIMAGEPREF="05.05.16.02","VZW","VZW_005.012_002"\r\n' | sudo tee
/dev/ttyUSB1
For the settings to take effect, you must run the following commands to re-initialize the cellular module:
moxa@Moxa:~$ sudo cell_mgmt power_off
moxa@Moxa:~$ sudo cell_mgmt power_on
174BAT&T AT&T users should use the following commands to switch to the corresponding AT&T profile:
moxa@Moxa:~# echo -n -e 'ATE0\r\n' | sudo tee /dev/ttyUSB1
moxa@Moxa:~# echo -n -e 'AT!entercnd="A710"\r\n' | sudo tee /dev/ttyUSB1
moxa@Moxa:~# echo -e -n
'AT!GOBISETIMAGEPREF="05.05.16.02","ATT","ATT_005.010_001"\r\n' | sudo tee
/dev/ttyUSB1
For the settings to take effect, you must run the following commands to re-initialize the cellular module:
moxa@Moxa:~$ sudo cell_mgmt power_off
moxa@Moxa:~$ sudo cell_mgmt power_on
175BSprint
Sprint users should run the following commands to switch to the corresponding Sprint profile:
moxa@Moxa:~# echo -n -e 'ATE0\r\n' | sudo tee /dev/ttyUSB1
moxa@Moxa:~# echo -n -e 'AT!entercnd="A710"\r\n' | sudo tee /dev/ttyUSB1
moxa@Moxa:~# echo -e -n 'AT!GOBISETIMAGEPREF="05.05.16.02","SPRINT","
SPRINT_005.011_000"\r\n' | sudo tee /dev/ttyUSB1
For the settings to take effect, you must run the following commands to re-initialize the cellular module:
moxa@Moxa:~$ sudo cell_mgmt power_off
moxa@Moxa:~$ sudo cell_mgmt power_on

UC-8100 Series Linux Software Advanced Configuration of Peripherals
3-16
176BGeneric General users should run the following command:
echo -n -e 'ATE0\r\n' | sudo tee /dev/ttyUSB1
moxa@Moxa:~# echo -n -e 'AT!entercnd="A710"\r\n' | sudo tee /dev/ttyUSB1
moxa@Moxa:~# echo -e -n 'AT!GOBISETIMAGEPREF="05.05.16.02"," GENNA-UMTS","
GENNA-UMTS_005.009_000"\r\n' | sudo tee /dev/ttyUSB1
For the settings to take effect, you must run the following commands to re-initialize the cellular module:
moxa@Moxa:~$ sudo cell_mgmt power_off
moxa@Moxa:~$ sudo cell_mgmt power_on
Power On/Off Module
The cell_mgmt command can be used to re-initialize the module without rebooting the UC-8100-LX. To power
off the module, run the following command:
moxa@Moxa:~# sudo cell_mgmt power_off
To re-initialize the cellular module and power on the module, use the following command:
moxa@Moxa:~# sudo cell_mgmt power_on
NOTE Additional information about qmi utilities can be found at the following link.
http://www.freedesktop.org/wiki/Software/libqmi/
42BConfiguring the Wireless LAN You can configure the Wi-Fi connection on the UC-8100 using a configuration file or the wpa_supplicant
command (recommended).
NOTE You might encounter compatibility issues if you configure Wi-Fi settings using commands other than the wpa_supplicant command.
Use the following command to list the available wireless network IDs:
#iwlist wlan0 scanning
root@Moxa:# iwlist wlan0 scanning wlan0 Scan completed : Cell 01 - Address: 50:67:F0:61:2D:7A Protocol:802.11b/g ESSID:"MIS-WAP-1" Mode:Managed Frequency:2.412 GHz (Channel 1) Quality=81/100 Signal level=-58 dBm Noise level=-92 dBm Encryption key:on Bit Rates:54 Mb/s

UC-8100 Series Linux Software Advanced Configuration of Peripherals
3-17
90BConfiguring WPA2 Settings The UC-8100 series computer supports WPA2 security using the /sbin/wpa_supplicant program. Refer to the following table for configuration options. The Key required before joining network? column describes whether an encryption and/or authentication key must be configured before associating with a network.
Infrastructure mode
Authentication mode
Encryption status
Manual Key required?
IEEE 802.1X enabled?
Key required before joining network?
ESS Open None No No No
ESS Open WEP Optional Optional Yes
ESS Shared None Yes No Yes
ESS Shared WEP Optional Optional Yes
ESS WPA WEP No Yes No
ESS WPA TKIP No Yes No
ESS WPA AES No Yes No
ESS WPA-PSK WEP Yes Yes No
ESS WPA-PSK TKIP Yes Yes No
ESS WPA-PSK AES Yes Yes No
91BConnecting to an AP Using WEP Authentication (UC-8131-LX,
UC-8132-LX, UC-8162-LX, and UC-8112-LX Only) 1. Edit the /etc/wpa_supplicant.conf file.
##### WEP ##### network={
ssid="MIS-WAP-1" bssid=50:67:F0:61:2D:7A key_mgmt=NONE wep_key0=CFEE46EED3FA94FAEB92348922
} ###############
The following table describes the related parameters.
Parameter Usage Function ssid {Access Point Name} Network name (as announced by the access point). An
ASCII or hex string enclosed in quotation marks.
bssid {MAC address of the AP} Set network bssid, (typically the MAC address of the access point).
key_mgmt {NONE,WEP,TKIP,AES} List of acceptable key management protocols;
wep_key0 {wep key} WEP key in hexadecimal format 2. Type /usr/sbin/wifi_mgmt start to enable this function.
To stop the function, type /usr/sbin/wifi_mgmt stop.
NOTE For more information about wpa_supplicant.conf, go to the following websites: • http://www.daemon-systems.org/man/wpa_supplicant.conf.5.html
• http://linux.die.net/man/5/wpa_supplicant.conf

UC-8100 Series Linux Software Advanced Configuration of Peripherals
3-18
92BConnecting to an AP Using WPA/WPA2 PSK Authentication 1. Edit the relevant parameters in the /etc/wpa_supplicant.conf file.
##### WPA/WPA2 PSK ##### network={
ssid="5566" proto=WPA WPA2 RSN key_mgmt=WPA-PSK pairwise=TKIP CCMP group=TKIP CCMP psk="01234567890"
} #######################
2. Type /usr/sbin/wifi_mgmt start to enable this function. To stop the function, type /usr/sbin/wifi_mgmt stop
The following table describes the relevant parameters.
Parameter Usage Function ssid {Access Point Name} Network name (as announced by the access point). An
ASCII or hex string enclosed in quotation marks.
proto {WPA WPA2 RSN} List of acceptable protocols; one or more of: WPA (IEEE802.11i/D3.0) and RSN (IEEE 802.11i). WPA2 is another name for RSN. The default value is “WPA RSN”.
key_mgmt {WPA-PSK or WPA-EAP} List of acceptable key management protocols; one or more of: WPA-PSK (WPA pre-shared key), WPA-EAP (WPA using EAP authentication), IEEE8021X (IEEE 802.1x using EAP authentication and, optionally, dynamically generated WEP keys). The default value is “WPA-PSK WPA-EAP”.
pairwise {TKIP CCMP, or NONE} List of acceptable pairwise (unicast) ciphers for WPA; one or more of: CCMP (AES in Counter mode with CBC-MAC, RFC 3610, IEEE802.11i/D7.0), TKIP (Temporal Key Integrity Protocol, IEEE802.11i/D7.0), NONE (deprecated). The default value is “CCMP TKIP”.
group {CCMP, TKIP, WEP104, WEP40}
List of acceptable group (multicast) ciphers for WPA; one or more of: CCMP (AES in Counter mode with CBC-MAC, RFC 3610, IEEE802.11i/D7.0), TKIP (Temporal Key Integrity Protocol, IEEE802.11i/D7.0), WEP104 (WEP with 104-bit key), EP40 (WEP with 40-bit key). The default value is “CCMP TKIP WEP104 WEP40”.
psk {preshared key} WPA preshared key used in WPA-PSK mode. The key is specified as 64 hex digits or as an 8 to 63 character ASCII passphrase.
mode # 0 = infrastructure (Managed) mode, i.e., associate with an AP (default) # 1 = IBSS (ad-hoc, peer-to-peer)
IEEE 802.11 operation mode.

UC-8100 Series Linux Software Advanced Configuration of Peripherals
3-19
93BUsing the wpa_cli Command wpa_cli is a text-based front-end program for interacting with wpa_supplicant. You can use the wpa_cli
command to query the current status, change configuration, trigger events, and request user input.
NOTE Before you use the wpa_cli command, you must run the wpa_supplicant command.
See http://linux.die.net/man/8/wpa_cli for
165BScanning APs and Viewing Scan Results
To scan for access points in the area, enter the following command:
root@Moxa:/home# wpa_cli –i wlan0 scan
To display AP scan results, enter the command shown below:
166BAdding WEP Settings to a Configuration File
The commands that you can use to the WEP configuration information in the /etc/wpa_supplicant.conf
file are shown below:
root@Moxa:/home# wpa_cli -i wlan0 add_network 0 root@Moxa:/home# wpa_cli -i wlan0 set_network 0 key_mgmt NONE OK root@Moxa:/home# wpa_cli -i wlan0 set_network 0 ssid '"MOXA-AP-1"' OK root@Moxa:/home# wpa_cli -i wlan0 set_network 0 bssid 50:67:F0:61:2D:7A OK root@Moxa:/home# wpa_cli -i wlan0 set_network 0 wep_key0 AAEE431ED3FVV4FAEB923443C4 OK root@Moxa:/home# wpa_cli -i wlan0 enable_network 0 OK root@Moxa:/home# wpa_cli -iwlan0 select_network 0 OK root@Moxa:/home# wpa_cli -i wlan0 save_config

UC-8100 Series Linux Software Advanced Configuration of Peripherals
3-20
167BAdding WPA/WPA2 Settings to a Configuration File
The relevant commands you can enter to add WPA/WPA2 configuration information to the /etc/wpa_supplicant.conf file are shown below:
root@Moxa:/home# wpa_cli -i wlan0 add_network 1 root@Moxa:/home# wpa_cli -i wlan0 set_network 1 ssid '"MOXA-AP"' OK root@Moxa:/home# wpa_cli -i wlan0 set_network 1 proto 'WPA WPA2 RSN' OK root@Moxa:/home# wpa_cli -i wlan0 set_network 1 key_mgmt 'WPA-PSK' OK root@Moxa:/home# wpa_cli -i wlan0 set_network 1 pairwise 'TKIP CCMP' OK root@Moxa:/home# wpa_cli -i wlan0 set_network 1 group 'TKIP CCMP' OK root@Moxa:/home# wpa_cli -i wlan0 set_network 1 psk '"01234567890"' 'SET_NETWORK 1 psk "01234567890"' command timed out. root@Moxa:/home# wpa_cli -i wlan0 enable_network 1 OK root@Moxa:/home# wpa_cli -iwlan0 select_network 1 OK root@Moxa:/home# wpa_cli -i wlan0 save_config OK
The following table lists the wpa_cli commands.
Command Function wpa_cli -i wlan0 status Get current WEP/WPA/EAPOL/EAP status.
wpa_cli -i wlan0 help Show this usage help.
wpa_cli -i wlan0 terminate Terminate wpa_supplicant.
wpa_cli -i wlan0 interface Show interfaces or select an interface.
wpa_cli -i wlan0 list_networks List configured networks in wpa_supplicant.conf.
wpa_cli -i wlan0 select_network Set network variables. Network id can be received from the list_networks command output.
This command uses the same variables and data formats as the configuration file.
wpa_cli -i wlan0 enable_network Enable a network. Network id can be received from the list_networks command output.
wpa_cli -i wlan0 disable_network Disable a network. Network id can be received from the LIST_NETWORKS command output. Special network id “all” can be used to disable all networks.
wpa_cli -i wlan0 remove_network Remove a network. Network id can be received from the list_networks command output.
Special network id “all” can be used to remove all networks.
wpa_cli -i wlan0 reconfigure Force wpa_supplicant to re-read its configuration file.
wpa_cli -i wlan0 save_config Save the current configuration. Replace original /etc/wpa_supplicant.conf file.
wpa_cli -i wlan0 scan wpa_cli -i wlan0 scan_results
Scan available networks. Get scanning results.
4 4. UC-8100-LX Security
The UC-8100-LX series offers better security by introducing Moxa’s innovative secure boot feature, and the integration of a Trusted Platform Module gives the user more solid protection of the platform.
The following topics are covered in this chapter:
43BSecure Boot
45BSudo Mechanism
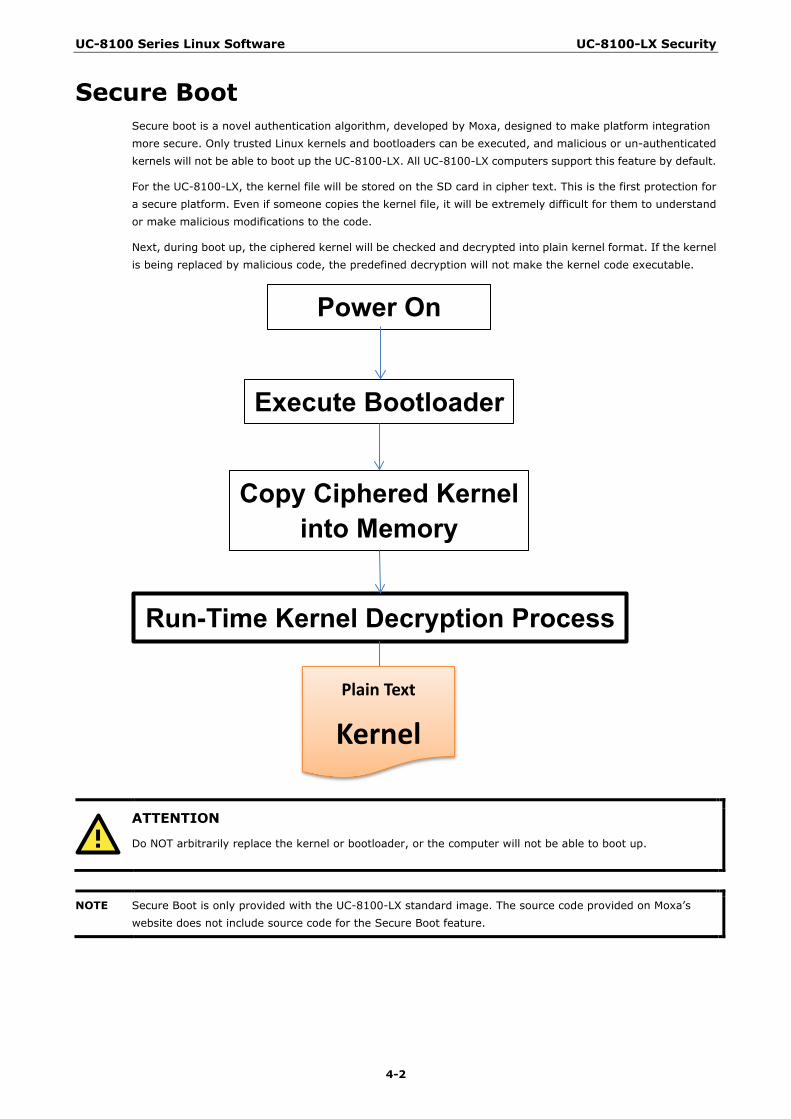
UC-8100 Series Linux Software UC-8100-LX Security
4-2
43BSecure Boot Secure boot is a novel authentication algorithm, developed by Moxa, designed to make platform integration more secure. Only trusted Linux kernels and bootloaders can be executed, and malicious or un-authenticated kernels will not be able to boot up the UC-8100-LX. All UC-8100-LX computers support this feature by default.
For the UC-8100-LX, the kernel file will be stored on the SD card in cipher text. This is the first protection for a secure platform. Even if someone copies the kernel file, it will be extremely difficult for them to understand or make malicious modifications to the code.
Next, during boot up, the ciphered kernel will be checked and decrypted into plain kernel format. If the kernel is being replaced by malicious code, the predefined decryption will not make the kernel code executable.
ATTENTION
Do NOT arbitrarily replace the kernel or bootloader, or the computer will not be able to boot up.
NOTE Secure Boot is only provided with the UC-8100-LX standard image. The source code provided on Moxa’s website does not include source code for the Secure Boot feature.
Power On
Execute Bootloader
Copy Ciphered Kernel
into Memory
Run-Time Kernel Decryption Process
Plain Text
Kernel

UC-8100 Series Linux Software UC-8100-LX Security
4-3
45BSudo Mechanism In the UC-8100-LX, the root account is disabled for better security. Sudo is a program designed to let system administrators allow some users to execute some commands as root (or another user). The basic philosophy is to give as few privileges as possible but still allow people to get their work done. Using sudo is better (safer) than opening a session as root for a number of reasons, including:
• Nobody needs to know the root password (sudo prompts for the current user's password). Extra privileges can be granted to individual users temporarily, and then taken away without the need for a password change.
• It is easy to run only the commands that require special privileges via sudo; the rest of the time, you work as an unprivileged user, which reduces the damage that mistakes can cause.
• The code below shows that some system level commands are not available to user moxa directly.
moxa@Moxa:~$ ifconfig
-bash: ifconfig: command not found
moxa@Moxa:~$ sudo ifconfig
eth0 Link encap:Ethernet HWaddr 00:90:e8:00:00:07
inet addr:192.168.3.127 Bcast:192.168.3.255 Mask:255.255.255.0
UP BROADCAST ALLMULTI MULTICAST MTU:1500 Metric:1
RX packets:0 errors:0 dropped:0 overruns:0 frame:0
TX packets:0 errors:0 dropped:0 overruns:0 carrier:0
collisions:0 txqueuelen:1000
RX bytes:0 (0.0 B) TX bytes:0 (0.0 B)
eth1 Link encap:Ethernet HWaddr 00:90:e8:00:00:08
inet addr:192.168.4.127 Bcast:192.168.4.255 Mask:255.255.255.0
UP BROADCAST ALLMULTI MULTICAST MTU:1500 Metric:1
RX packets:0 errors:0 dropped:0 overruns:0 frame:0
TX packets:0 errors:0 dropped:0 overruns:0 carrier:0
collisions:0 txqueuelen:1000
RX bytes:0 (0.0 B) TX bytes:0 (0.0 B)
lo Link encap:Local Loopback
inet addr:127.0.0.1 Mask:255.0.0.0
inet6 addr: ::1/128 Scope:Host
UP LOOPBACK RUNNING MTU:16436 Metric:1
RX packets:32 errors:0 dropped:0 overruns:0 frame:0
TX packets:32 errors:0 dropped:0 overruns:0 carrier:0
collisions:0 txqueuelen:0
RX bytes:2592 (2.5 KiB) TX bytes:2592 (2.5 KiB)

5 5. General Debian Package Usage
In this chapter, we explain how to configure the UC-8100-LX’s functions.
The following topics are covered in this chapter:
46BNTP Client
47BExecuting Scheduled Commands Using Cron
99BUpdating System Time and RTC
48BRocket-Fast System for Log Processing: rsyslog
100BRsyslog’s Configuration File
101BSyntax of the Selector
49BOpenSSL
102BCiphers
103BCryptographic Hash Functions
Public-Key Cryptography
50BThe Apache Web Server
104BEditing the Server Name in the Configuration File
51BSFTP
52BDNS
105B/etc/hosts
106B/etc/resolv.conf
107B/etc/nsswitch.conf
53Biptables
108BObserving and Erasing Chain Rules
109BDefining a Policy for Chain Rules
110BAppend or Delete Rules
54Brsync
111BUsing rsync for External Backups
112BAutomating Rsync Backups
55BNAT
113BNAT Example
114BEnabling NAT at Bootup
56BNFS (Network File System)
115BSetting Up the UC-8100-LX as an NFS Client
57BSNMP
58BOpenVPN
116BStatic-Key VPN
59BPackage Management
117Bapt-get
118Bapt-cache
119BList All Available Packages
120BFind Package Name and Software Description
121BCheck Package Information
122BCheck Dependencies for Specific Packages
123BCheck Cache Statistics
124BUpdate System Packages
125BInstall or Upgrade Specific Packages
126BUpgrade All Software Packages
127BInstall Multiple Packages
129BInstall Packages without Upgrading
130BUpgrade Specific Packages
131BInstall Specific Package Version
132BRemove Packages without Configuration
133BCompletely Remove Packages
134BClean Up Disk Space
135BDownload Only Source Code of Package
136BDownload and Unpack a Package
137BDownload, Unpack, and Compile a Package
138BDownload a Package Without Installing
139BCheck the Package Change Log
140BCheck Broken Dependencies
141BSearch and Build Dependencies
142BAuto Clean Apt-Get Cache
143BAuto Remove Installed Packages

UC-8100 Series Linux Software General Debian Package Usage
5-2
46BNTP Client The UC-8100-LX has a built-in NTP (Network Time Protocol) client that is used to initialize a time request to a remote NTP server. Use #ntpdate <this client utility> to update the system time.
ntpdate 192.168.1.97 hwclock –w
Visit http://www.ntp.org for more information about NTP and NTP server addresses.
192.168.4.127 – PuTTY
moxa@Moxa:~$ sudo ntpdate 192.168.50.33
6 May 03:55:10 ntpdate[4511]: step time server 192.168.50.33 offset 78338115.278119
sec
moxa@Moxa:~$ sudo hwclock -w
moxa@Moxa:~$ sudo hwclock
Tue 06 May 2014 03:56:14 AM UTC -0.846314 seconds
NOTE Before using the NTP client utility, check your IP and DNS settings to make sure that an Internet connection is available. Refer to Chapter 2 for instructions on how to configure the Ethernet interface, and see Chapter 4 for DNS setting information.
47BExecuting Scheduled Commands Using Cron The cron daemon reads /etc/crontab to retrieve scripts and other commands to be run at regularly
scheduled times.
The cron daemon wakes up every minute and checks each command listed in the crontab file to see if it should be run at that time. Whenever the cron daemon executes a command, a report is automatically mailed to the
owner of the crontab (or to the user named in the MAILTO environment variable in the crontab, if such a user exists).
Modify the file /etc/crontab to schedule an application. The crontab entries follow the format illustrated below:
mm h dom mon dow user command
minute hour date month week user <command>
0-59 0-23 1-31 1-12 0-6 (0 is Sunday)
For example, run the following command if you want to launch a program at 8:00 every day:
#minute hour date month dow user command
* 8 * * * root /path/to/your/program
Every column in a crontab entry must be marked with a character. The asterisk indicates “every possible unit,” so that setting an asterisk in the day-of-week column will configure cron to run the command on every day of the week. If you wish to run a command “every X minutes” or “every X hours”, then use the format */X.
99BUpdating System Time and RTC Take the following steps to use cron to update the system time and RTC:
1. Write a shell script named fixtime.sh and save it to the /home directory.
#!/bin/sh ntpdate time.stdtime.gov.tw hwclock –w exit 0

UC-8100 Series Linux Software General Debian Package Usage
5-3
2. Reset the access permissions for fixtime.sh
moxa@Moxa:~# chmod 755 fixtime.sh
3. Modify the /etc/crontab file to run fixtime.sh every 10 minutes (i.e.: */10) by adding this line:
*/10 * * * * root /home/fixtime.sh
NOTE Click the following link for more information on cron. http://www.debian-administration.org/articles/56
48BRocket-Fast System for Log Processing: rsyslog Rsyslog is an enhanced, multi-threaded log reporting utility with a focus on security and reliability. It offers support for on-demand disk buffering, log reports and alarms delivered over TCP, SSL, TLS, and RELP, writing to databases, and email alerting. It is a drop-in replacement for syslogd.
Rsyslog is installed but disabled by default.
Enable rsyslog manually /etc/init.d/rsyslog start
Disable rsyslog manually /etc/init.d/rsyslog stop
Enable rsyslog insserv -d rsyslog
Disable rsyslog insserv -r rsyslog
100BRsyslog’s Configuration File The syntax of the /etc/rsyslog.conf file is detailed in the rsyslog.conf(5) manual page, but there is also HTML documentation available in the rsyslog-doc package (/usr/share/doc/rsyslog-doc/html/index.html). The overall principle is to write “selector” and “action” pairs. The selector defines all relevant messages, and the action describes how to deal with them.
Each message is associated with an application, called a facility in rsyslog documentation: auth and authpriv for authentication
cron comes from task scheduling services, cron and atd
daemon affects a daemon without any special classification (DNS, NTP, etc.)
ftp concerns the FTP server
kern message coming from the kernel
lpr comes from the printing subsystem
mail comes from the e-mail subsystem
news Usenet subsystem message (especially from an NNTP — Network News Transfer Protocol — server that manages newsgroups)
syslog messages from the syslogd server, itself
user user messages (generic)
uucp messages from the UUCP server (Unix to Unix Copy Program, an old protocol notably used to distribute e-mail messages)
local0 to local7 reserved for local use
Each message is also associated with a priority level. Here is the list in decreasing order:
emerg Help! There's an emergency, the system is probably unusable.
alert hurry up, any delay can be dangerous, action must be taken immediately
crit conditions are critical
err error
warn warning (potential error)
notice conditions are normal, but the message is important
info informative message
debug debugging message
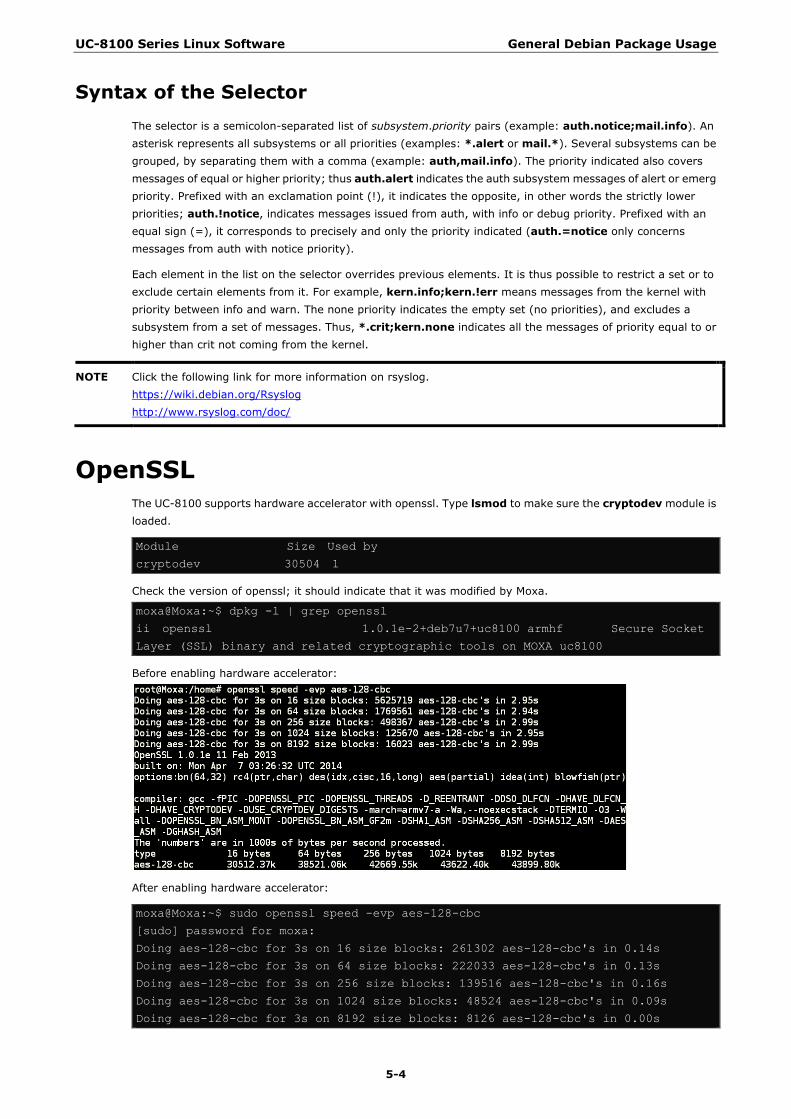
UC-8100 Series Linux Software General Debian Package Usage
5-4
101BSyntax of the Selector The selector is a semicolon-separated list of subsystem.priority pairs (example: auth.notice;mail.info). An asterisk represents all subsystems or all priorities (examples: *.alert or mail.*). Several subsystems can be grouped, by separating them with a comma (example: auth,mail.info). The priority indicated also covers messages of equal or higher priority; thus auth.alert indicates the auth subsystem messages of alert or emerg priority. Prefixed with an exclamation point (!), it indicates the opposite, in other words the strictly lower priorities; auth.!notice, indicates messages issued from auth, with info or debug priority. Prefixed with an equal sign (=), it corresponds to precisely and only the priority indicated (auth.=notice only concerns messages from auth with notice priority).
Each element in the list on the selector overrides previous elements. It is thus possible to restrict a set or to exclude certain elements from it. For example, kern.info;kern.!err means messages from the kernel with priority between info and warn. The none priority indicates the empty set (no priorities), and excludes a subsystem from a set of messages. Thus, *.crit;kern.none indicates all the messages of priority equal to or higher than crit not coming from the kernel.
NOTE Click the following link for more information on rsyslog. https://wiki.debian.org/Rsyslog http://www.rsyslog.com/doc/
49BOpenSSL The UC-8100 supports hardware accelerator with openssl. Type lsmod to make sure the cryptodev module is loaded.
Module Size Used by
cryptodev 30504 1
Check the version of openssl; it should indicate that it was modified by Moxa.
moxa@Moxa:~$ dpkg -l | grep openssl
ii openssl 1.0.1e-2+deb7u7+uc8100 armhf Secure Socket
Layer (SSL) binary and related cryptographic tools on MOXA uc8100
Before enabling hardware accelerator:
After enabling hardware accelerator:
moxa@Moxa:~$ sudo openssl speed -evp aes-128-cbc
[sudo] password for moxa:
Doing aes-128-cbc for 3s on 16 size blocks: 261302 aes-128-cbc's in 0.14s
Doing aes-128-cbc for 3s on 64 size blocks: 222033 aes-128-cbc's in 0.13s
Doing aes-128-cbc for 3s on 256 size blocks: 139516 aes-128-cbc's in 0.16s
Doing aes-128-cbc for 3s on 1024 size blocks: 48524 aes-128-cbc's in 0.09s
Doing aes-128-cbc for 3s on 8192 size blocks: 8126 aes-128-cbc's in 0.00s

UC-8100 Series Linux Software General Debian Package Usage
5-5
OpenSSL 1.0.1e 11 Feb 2013
built on: Mon Apr 21 06:14:54 UTC 2014
options:bn(64,32) rc4(ptr,char) des(idx,cisc,16,long) aes(partial) idea(int)
blowfish(ptr)
compiler: gcc -fPIC -DOPENSSL_PIC -DOPENSSL_THREADS -D_REENTRANT -DDSO_DLFCN
-DHAVE_DLFCN_H -DHAVE_CRYPTODEV -DUSE_CRYPTDEV_DIGESTS -march=armv7-a
-Wa,--noexecstack -DTERMIO -O3 -Wall -DOPENSSL_BN_ASM_MONT -DOPENSSL_BN_ASM_GF2m
-DSHA1_ASM -DSHA256_ASM -DSHA512_ASM -DAES_ASM -DGHASH_ASM
The 'numbers' are in 1000s of bytes per second processed.
type 16 bytes 64 bytes 256 bytes 1024 bytes 8192 bytes
aes-128-cbc 29863.09k 109308.55k 223225.60k 552095.29k infk
OpenSSL supports a number of different cryptographic algorithms, described in the following subsections.
102BCiphers Ciphers support the following cryptographic methods:
AES, Blowfish, Camellia, SEED, CAST-128, DES, IDEA, RC2, RC4, RC5, Triple DES, GOST 28147-89
103BCryptographic Hash Functions MD5, MD4, MD2, SHA-1, SHA-2, RIPEMD-160, MDC-2, GOST R 34.11-94
Public-Key Cryptography RSA, DSA, Diffie–Hellman key exchange, Elliptic curve, GOST R 34.10-2001
NOTE Make sure that the version of openssl was built by Moxa, or the hardware accelerator function will not work with other versions.
50BThe Apache Web Server The Apache HTTP Server Project is an effort to develop and maintain an open-source HTTP server for modern operating systems, including UNIX and Windows NT. The goal of this project is to provide a secure, efficient, and extensible server that provides HTTP services in sync with the current HTTP standards.
APACHE is installed but disabled by default.
To Use Enable apache manually sudo /etc/init.d/apache2 start
Disable apache manually sudo /etc/init.d/apache2 stop
Enable apache insserv -d apache2
Disable apache insserv -r apache2

UC-8100 Series Linux Software General Debian Package Usage
5-6
104BEditing the Server Name in the Configuration File Editing the apache2.conf file:
moxa@Moxa:~$ sudo vi /etc/apache2/apache2.conf
Adding a server name for this device in the apache2.conf file:
ServerName xxx
Restarting the Apache2 server:
moxa@Moxa:~$ sudo /etc/init.d/apache2 restart
NOTE Click the following links for more information on apache. https://wiki.debian.org/Apache http://httpd.apache.org/
51BSFTP The default SFTP daemon will start when the system boots up. The login and password used are the same as the system login and password (moxa/moxa). You can also configure the SFTP account using the following steps:
1. Create a user & group for SFTP access, without a shell.
moxa@Moxa:~$ sudo adduser sftp
[sudo] password for moxa:
Adding user `sftp' ...
Adding new group `sftp' (1003) ...
Adding new user `sftp' (1001) with group `sftp' ...
Creating home directory `/home/sftp' ...
Copying files from `/etc/skel' ...
Enter new UNIX password:
Retype new UNIX password:
passwd: password updated successfully
Changing the user information for sftp
Enter the new value, or press ENTER for the default
Full Name []:
Room Number []:
Work Phone []:
Home Phone []:
Other []:
Is the information correct? [Y/n]
To block the user account “sftp” from being used for normal Linux logins, and only available for sftp programs, we need to assign a special shell for the account. In the example shown below, we assign the shell “/bin/false” to the user account “sftp” and change account’s folder and owner.
moxa@Moxa:~$ sudo usermod -s /bin/false sftp
moxa@Moxa:~$ sudo mkdir /home/sftp/upload/
moxa@Moxa:~$ sudo chown root:root /home/sftp
moxa@Moxa:~$ sudo chown sftp:sftp /home/sftp/upload/

UC-8100 Series Linux Software General Debian Package Usage
5-7
2. Use the following command to append SSHD-related configuration to the /etc/ssh/sshd_config file.
Subsystem sftp internal-sftp
#Subsystem sftp /usr/lib/openssh/sftp-server
Match User sftp
ChrootDirectory /home/%u
ForceCommand internal-sftp
3. Restart the SSHD Daemon:
moxa@Moxa:~$ sudo /etc/init.d/sshd restart
4. At this point, the account and its default path should be configured.
NOTE Click the following link for more information on SSH. https://wiki.debian.org/SSH
52BDNS The UC-8100-LX supports DNS client (but not DNS server). To set up DNS client, you need to edit three configuration files: /etc/hosts, /etc/resolv.conf, and /etc/nsswitch.conf.
105B/etc/hosts This is the first file that the Linux system reads to resolve the host name and IP address.
106B/etc/resolv.conf This is the most important file that you need to edit when using DNS for the other programs. For example, before using the #ntpdate time.nist.goc command to update the system time, you will need to add the
DNS server address to the file. Ask your network administrator which DNS server address you should use. The DNS server’s IP address is specified using the nameserver command. For example, add the following line to the /etc/resolv.conf file if the DNS server’s IP address is 168.95.1.1:
nameserver 168.95.1.1
10.120.53.100 – PuTTY
moxa@Moxa:~$ sudo cat /etc/resolv.conf
#
# resolv.conf This file is the resolver configuration file
# See resolver(5).
#
#nameserver 192.168.1.16
nameserver 168.95.1.1
nameserver 140.115.1.31
nameserver 140.115.236.10
107B/etc/nsswitch.conf This file defines the sequence to resolve the IP address by using /etc/hosts file or /etc/resolv.conf.

UC-8100 Series Linux Software General Debian Package Usage
5-8
53Biptables The iptables tool is an administrative tool for setting up, maintaining, and inspecting the Linux kernel’s IP
packet filter rule tables. Several different tables are defined, with each table containing built-in chains and user-defined chains.
Each chain is a list of rules that apply to a certain type of packet. Each rule specifies what to do with a matching packet. A rule (such as a jump to a user-defined chain in the same table) is called a target.
The UC-8100-LX supports the following three iptables: Filter tables, NAT tables, and Mangle tables
Filter Table—includes three chains:
INPUT chain
OUTPUT chain
FORWARD chain
NAT Table—includes three chains:
PREROUTING chain—transfers the destination IP address (DNAT)
POSTROUTING chain—works after the routing process and before the Ethernet device process to transfer the source IP address (SNAT)
OUTPUT chain—produces local packets
sub-tables
Source NAT (SNAT)—changes the first source packet IP address
Destination NAT (DNAT)—changes the first destination packet IP address
MASQUERADE—a special form for SNAT. If one host can connect to internet, then other computers that connect to this host can connect to the Internet when it the computer does not have an actual IP address.
REDIRECT—a special form of DNAT that re-sends packets to a local host independent of the destination IP address.
Mangle Table—includes two chains, and it has three extensions—TTL, MARK, TOS.
PREROUTING chain—pre-processes packets before the routing process.
OUTPUT chain—processes packets after the routing process.
The following figure shows the iptables hierarchy:

UC-8100 Series Linux Software General Debian Package Usage
5-9
Table Chain Rule
NAT (Network translation translation)
PREROUTING Types of rule • Policy
• Self-defined
Targets of rule • ACCEPT
• DROP
• REJECT
• LOG
• SNAT
• DNAT
• MASQUERADE
POSTROUTING
OUTPUT
Filter (Default) (Packet filtering)
INPUT
OUTPUT
FORWARD
Mangle (Packet header modification)
PREROUTING
INPUT
FORWARD
OUTPUT
POSTROUTING

UC-8100 Series Linux Software General Debian Package Usage
5-10
The UC-8100-LX supports the following sub-modules. Be sure to use the module that matches your application.
The most common modules are already built in to the kernel:
ip6t_eui64.ko ip6t_ipv6header.ko nf_conntrack_ipv6.ko xfrm4_mode_tunnel.ko
ip6t_rt.ko ip6t_LOG.ko xfrm6_mode_beet.ko ah4.ko
ip6table_security.ko ip6t_ah.ko sit.ko xfrm4_mode_beet.ko
ip6table_filter.ko ip6_tables.ko ipv6.ko xfrm4_mode_transport.ko
ip6t_frag.ko ip6table_raw.ko xfrm6_mode_tunnel.ko esp4.ko
ip6t_hbh.ko nf_defrag_ipv6.ko xfrm6_mode_transport.ko ipcomp.ko
ip6t_REJECT.ko ip6t_mh.ko xfrm_ipcomp.ko tcp_diag.ko
inet_lro.ko xfrm4_tunnel.ko inet_diag.ko
The basic syntax to enable and load an iptables module is as follows:
Use lsmod to check if the ip_tables module has already been loaded in the UC-8100-LX series. Use the modprobe command to insert and enable the module.
Use the following command to load the modules (iptable_filter, iptable_mangle, and iptable_nat):
#modprobe iptable_filter
Use the iptables, iptables-restore, iptables-save command to maintain the database.
NOTE The iptables tool plays the role of packet filtering or NAT. Take care when setting up the iptables rules. If the
rules are not correct, remote hosts that connect via a LAN or PPP might be denied access. We recommend using the serial console to set up the iptables tool.
Click on the following links for more information on iptables: http://www.linuxguruz.com/iptables/ http://www.netfilter.org/documentation/HOWTO//packet-filtering-HOWTO.html https://wiki.debian.org/DebianFirewall https://wiki.debian.org/iptables
Since the iptables command is very complex, we have divided our discussion of the syntax rules into three
categories: Observe and erase chain rules, Define policy rules, and Append or delete rules.

UC-8100 Series Linux Software General Debian Package Usage
5-11
108BObserving and Erasing Chain Rules
Usage: # iptables [-t tables] [-L] [-n]
-t tables: Table to manipulate (default: ‘filter’); example: nat or filter. -L [chain]: List all rules in selected chains. If no chain is selected, all chains are listed. -n: Numeric output of addresses and ports.
# iptables [-t tables] [-FXZ]
-F: Flush the selected chain (all the chains in the table if none is listed). -X: Delete the specified user-defined chain. -Z: Set the packet and byte counters in all chains to zero.
Examples: # iptables -L -n
In this example, since we do not use the -t parameter, the system uses the default ‘filter’ table. Three chains are included: INPUT, OUTPUT, and FORWARD. INPUT chains are accepted automatically, and all connections are accepted without being filtered.
#iptables –F #iptables –X #iptables -Z
109BDefining a Policy for Chain Rules
Usage: # iptables [-t tables] [-P] [INPUT, OUTPUT, FORWARD, PREROUTING, OUTPUT, POSTROUTING] [ACCEPT, DROP]
-P: Set the policy for the chain to the given target. INPUT: For packets coming into the UC-8100-LX series. OUTPUT: For locally-generated packets. FORWARD: For packets routed out through the UC-8100-LX series. PREROUTING: To alter packets as soon as they come in. POSTROUTING: To alter packets as they are about to be sent out.
Examples: #iptables –P INPUT DROP #iptables –P OUTPUT ACCEPT #iptables –P FORWARD ACCEPT #modprobe iptable_nat #iptables –t nat –P PREROUTING ACCEPT #iptables –t nat –P OUTPUT ACCEPT #iptables -t nat –P POSTROUTING ACCEPT
In this example, the policy accepts outgoing packets and denies incoming packets.

UC-8100 Series Linux Software General Debian Package Usage
5-12
110BAppend or Delete Rules
Usage: # iptables [-t table] [-AI] [INPUT, OUTPUT, FORWARD] [-io interface] [-p tcp, udp, icmp, all] [-s IP/network] [--sport ports] [-d IP/network] [--dport ports] –j [ACCEPT. DROP]
-A: Append one or more rules to the end of the selected chain. -I: Insert one or more rules in the selected chain as the given rule number. -i: Name of an interface via which a packet is going to be received. -o: Name of an interface via which a packet is going to be sent. -p: The protocol of the rule or of the packet to check. -s: Source address (network name, host name, network IP address, or plain IP address). --sport: Source port number. -d: Destination address. --dport: Destination port number. -j: Jump target. Specifies the target of the rules; i.e., how to handle matched packets. For example, ACCEPT the packet, DROP the packet, or LOG the packet.
Examples: Example 1: Accept all packets from lo interface. # iptables –A INPUT –i lo –j ACCEPT
Example 2: Accept TCP packets from 192.168.0.1. # iptables –A INPUT –i eth0 –p tcp –s 192.168.0.1 –j ACCEPT
Example 3: Accept TCP packets from Class C network 192.168.1.0/24.# iptables –A INPUT –i eth0 –p tcp –s 192.168.1.0/24 –j ACCEPT
Example 4: Drop TCP packets from 192.168.1.25. # iptables –A INPUT –i eth0 –p tcp –s 192.168.1.25 –j DROP
Example 5: Drop TCP packets addressed for port 21. # modprobe xt_tcpudp # iptables –A INPUT –i eth0 –p tcp --dport 21 –j DROP
Example 6: Accept TCP packets from 192.168.0.24 to UC-8100 series’s port 137, 138, 139 # iptables –A INPUT –i eth0 –p tcp –s 192.168.0.24 --dport 137:139 –j ACCEPT
Example 7: Log TCP packets that visit UC-8100 series’s port 25. # iptables –A INPUT –i eth0 –p tcp --dport 25 –j LOG
Example 8: Drop all packets from MAC address 01:02:03:04:05:06. # modprobe xt_mac # iptables –A INPUT –i eth0 –p all –m mac -–mac-source 01:02:03:04:05:06 –j DROP
NOTE: In Example 8 above, run the #modprobe ipt_mac command first to load the ipt_mac module.
54Brsync rsync is a utility software and network protocol that synchronizes files and directories from one location to another while minimizing data transfer by using delta encoding when appropriate. It also has the option to provide encrypted transfer by use of SSH. SSL encrypted transfer can be done via Stunnel wrapping. rsync uses the ‘rsync algorithm’, which provides a very fast method for bringing remote files into sync. rsync can copy or display directory contents and copy files, optionally using compression and recursion.
The rsync command can be used to back up data to the destination location with encryption. The following
example illustrates how to back up data backup from directory1 to directory2:
UC-8100 Series Linux Software General Debian Package Usage
5-13
moxa@Moxa:~$ sudo rsync -avP /Directory1/ /Directory2/
-v, --verbose increase verbosity -a, --archive archive mode; equals -rlptgoD (no -H,-A,-X) -P --progress show progress during transfer --partial keep partially transferred files
111BUsing rsync for External Backups rsync can be configured in several different ways for external backups, but we will go over the most practical (also the easiest and most secure) method of tunneling rsync through SSH. Most servers and even many clients already have SSH, and it can be used for your rsync backups. We will show you the process to get one Linux machine to back up to another on a local network. The process would be exactly the same if one host was somewhere on the Internet; just note that port 22 (or whatever port you have SSH configured on), would need to be forwarded on any network equipment on the server’s side of things.
Other than installing SSH and rsync on the server, all that really needs to be done is to set up the repositories on the server where you would like the files backed up, and make sure that SSH is locked down. Make sure the user you plan on using has a complex password. For additional security, you might also want to switch the port (default port is 22) that SSH listens on.
We will run the same command that we did for using rsync on a local computer, but include the necessary additions for tunneling rsync through SSH to a server on my local network. For user “user” connecting to “192.168.1.1” and using the same switches as above (-avP) we will run the following:
moxa@Moxa:~$ sudo rsync -avP -e ssh /Directory1/ [email protected]:/Directory2/
112BAutomating Rsync Backups Cron can be used on Linux to automate the execution of commands, such as rsync. Using cron, we can have
our Linux system run nightly backups, or however often you would like them to run.
To edit the cron table file for the user you are logged in as, run:
moxa@Moxa:~$ sudo crontab -e
You will need to be familiar with the vi editor to edit this file. Type “I” for insert, and then begin editing the cron table file.
The cron syntax has the following structure:
<minute of the hour>.<hour of the day>.<day of the month>. <month of the year>.<day
of the week>.<command>
The following command will run the rsync command every night at 10 PM:
0 22 * * * rsync -avP /Directory1/ /Directory2/
The first “0” specifies the minute of the hour, and “22” specifies 10 PM. Since we want this command to run daily, we will leave the rest of the fields with asterisks and then paste the rsync command.
NOTE Click the following link for more information on iptables and rsync: http://rsync.samba.org/

UC-8100 Series Linux Software General Debian Package Usage
5-14
55BNAT The NAT (Network Address Translation) protocol translates IP addresses used on one network into IP addresses used on a connecting network. One network is designated the inside network and the other is the outside network. Typically, the UC-8100 series connects several devices on a network and maps local inside network addresses to one or more global outside IP addresses, and un-maps the global IP addresses on incoming packets back into local IP addresses.
ATTENTION
Click on the following link for more information about NAT: http://www.netfilter.org/documentation/HOWTO//packet-filtering-HOWTO.html
113BNAT Example In this example, the IP addresses of all packets leaving LAN1 are changed to 192.168.3.127 (you will need to load the module ipt_MASQUERADE):

UC-8100 Series Linux Software General Debian Package Usage
5-15
114BEnabling NAT at Bootup In most real world situations, you will want to use a simple shell script to enable NAT when the DA-682A-LX boots up. The following script is an example.
#!/bin/bash # If you put this shell script in the /home/nat.sh # Remember to chmod 744 /home/nat.sh # Edit the rc.local file to make this shell startup automatically # vi /etc/rc.local # Add a line in the end of rc.local /home/nat.sh EXIF= “eth0” #This is an external interface for setting up a valid IP address. EXNET= “192.168.4.0/24” #This is an internal network address. # Step 1. Insert modules. # Here 2> /dev/null means the standard error messages will be dump to null device. modprobe ip_tables 2> /dev/null modprobe ip_nat_ftp 2> /dev/null modprobe ip_nat_irc 2> /dev/null modprobe ip_conntrack 2> /dev/null modprobe ip_conntrack_ftp 2> /dev/null modprobe ip_conntrack_irc 2> /dev/null # Step 2. Define variables, enable routing and erase default rules. PATH=/bin:/sbin:/usr/bin:/usr/sbin:/usr/local/bin:/usr/local/sbin export PATH echo “1” > /proc/sys/net/ipv4/ip_forward /sbin/iptables –F /sbin/iptables –X /sbin/iptables –Z /sbin/iptables -F -t nat /sbin/iptables -X -t nat /sbin/iptables -Z -t nat /sbin/iptables -P INPUT ACCEPT /sbin/iptables -P OUTPUT ACCEPT /sbin/iptables -P FORWARD ACCEPT /sbin/iptables -t nat -P PREROUTING ACCEPT /sbin/iptables -t nat -P POSTROUTING ACCEPT /sbin/iptables -t nat -P OUTPUT ACCEPT # Step 3. Enable IP masquerade. #ehco 1 > /proc/sys/net/ipv4/ip_forward#modprobe ipt_MASQUERADE#iptables –t nat –A POSTROUTING –o eth0 –j MASQUERADE

UC-8100 Series Linux Software General Debian Package Usage
5-16
56BNFS (Network File System) The Network File System (NFS) is used to mount a disk partition on a remote machine, as if it were on a local hard drive, allowing fast, seamless sharing of files across a network. NFS allows users to develop applications for the UC-8100 series without worrying about the amount of disk space that will be available. The UC-8100 series supports NFS protocol for clients.
The NFS function is installed but disabled by default. Check the following table for details on commands to enable/disable NFS:
To use the commands
enable NFS manually sudo /etc/init.d/nfs-common start sudo /etc/init.d/nfs-kernel-server start sudo /etc/init.d/rpcbind start
disable NFS manually sudo /etc/init.d/nfs-common stop sudo /etc/init.d/nfs-kernel-server stop sudo /etc/init.d/rpcbind stop
enable NFS insserv -d nfs-common insserv -d nfs-kernel-server insserv -d /etc/init.d/rpcbind
disable NFS insserv -r nfs-common insserv -r nfs-kernel-server insserv -r /etc/init.d/rpcbind
115BSetting Up the UC-8100-LX as an NFS Client The following procedure is used to mount a remote NFS Server.
Step 1: Create a folder to link a mount point on the NFS Client site. #mkdir –p /home/nfs/public
Step 2: Mount the remote directory to a local directory. #mount –t nfs NFS_Server(IP):/directory /mount/point
Example : #mount –t nfs 192.168.3.100/home/public /home/nfs/public
NOTE Click the following links for more information on NFS: http://www.tldp.org/HOWTO/NFS-HOWTO/index.html http://nfs.sourceforge.net/nfs-howto/client.html http://nfs.sourceforge.net/nfs-howto/server.html
57BSNMP The UC-8100 series has SNMP (Simple Network Management Protocol) agent software built in. It supports RFC1317 RS-232 like group and RFC 1213 MIB-II. SNMP daemon is installed but disabled by default. You can activate the daemon manually or set it to be enabled by default.
To start/stop the service, use the following commands:
To use the command
start the snmpd agent manually sudo /etc/init.d/snmpd start
stop the snmpd agent manually sudo /etc/init.d/snmpd stop
enable the snmpd agent insserv -d snmpd
disable the snmpd agent insserv -r snmpd
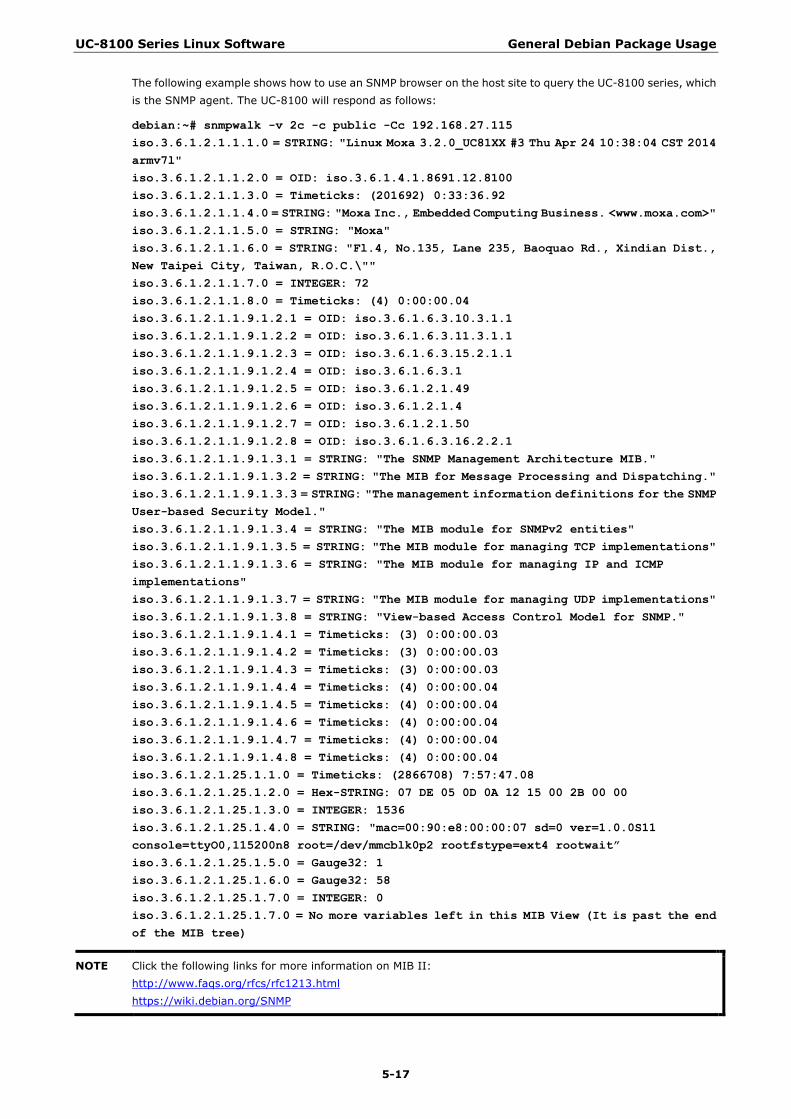
UC-8100 Series Linux Software General Debian Package Usage
5-17
The following example shows how to use an SNMP browser on the host site to query the UC-8100 series, which is the SNMP agent. The UC-8100 will respond as follows:
debian:~# snmpwalk -v 2c -c public -Cc 192.168.27.115 iso.3.6.1.2.1.1.1.0 = STRING: "Linux Moxa 3.2.0_UC81XX #3 Thu Apr 24 10:38:04 CST 2014 armv7l" iso.3.6.1.2.1.1.2.0 = OID: iso.3.6.1.4.1.8691.12.8100 iso.3.6.1.2.1.1.3.0 = Timeticks: (201692) 0:33:36.92 iso.3.6.1.2.1.1.4.0 = STRING: "Moxa Inc., Embedded Computing Business. <www.moxa.com>" iso.3.6.1.2.1.1.5.0 = STRING: "Moxa" iso.3.6.1.2.1.1.6.0 = STRING: "Fl.4, No.135, Lane 235, Baoquao Rd., Xindian Dist., New Taipei City, Taiwan, R.O.C.\"" iso.3.6.1.2.1.1.7.0 = INTEGER: 72 iso.3.6.1.2.1.1.8.0 = Timeticks: (4) 0:00:00.04 iso.3.6.1.2.1.1.9.1.2.1 = OID: iso.3.6.1.6.3.10.3.1.1 iso.3.6.1.2.1.1.9.1.2.2 = OID: iso.3.6.1.6.3.11.3.1.1 iso.3.6.1.2.1.1.9.1.2.3 = OID: iso.3.6.1.6.3.15.2.1.1 iso.3.6.1.2.1.1.9.1.2.4 = OID: iso.3.6.1.6.3.1 iso.3.6.1.2.1.1.9.1.2.5 = OID: iso.3.6.1.2.1.49 iso.3.6.1.2.1.1.9.1.2.6 = OID: iso.3.6.1.2.1.4 iso.3.6.1.2.1.1.9.1.2.7 = OID: iso.3.6.1.2.1.50 iso.3.6.1.2.1.1.9.1.2.8 = OID: iso.3.6.1.6.3.16.2.2.1 iso.3.6.1.2.1.1.9.1.3.1 = STRING: "The SNMP Management Architecture MIB." iso.3.6.1.2.1.1.9.1.3.2 = STRING: "The MIB for Message Processing and Dispatching." iso.3.6.1.2.1.1.9.1.3.3 = STRING: "The management information definitions for the SNMP User-based Security Model." iso.3.6.1.2.1.1.9.1.3.4 = STRING: "The MIB module for SNMPv2 entities" iso.3.6.1.2.1.1.9.1.3.5 = STRING: "The MIB module for managing TCP implementations" iso.3.6.1.2.1.1.9.1.3.6 = STRING: "The MIB module for managing IP and ICMP implementations" iso.3.6.1.2.1.1.9.1.3.7 = STRING: "The MIB module for managing UDP implementations" iso.3.6.1.2.1.1.9.1.3.8 = STRING: "View-based Access Control Model for SNMP." iso.3.6.1.2.1.1.9.1.4.1 = Timeticks: (3) 0:00:00.03 iso.3.6.1.2.1.1.9.1.4.2 = Timeticks: (3) 0:00:00.03 iso.3.6.1.2.1.1.9.1.4.3 = Timeticks: (3) 0:00:00.03 iso.3.6.1.2.1.1.9.1.4.4 = Timeticks: (4) 0:00:00.04 iso.3.6.1.2.1.1.9.1.4.5 = Timeticks: (4) 0:00:00.04 iso.3.6.1.2.1.1.9.1.4.6 = Timeticks: (4) 0:00:00.04 iso.3.6.1.2.1.1.9.1.4.7 = Timeticks: (4) 0:00:00.04 iso.3.6.1.2.1.1.9.1.4.8 = Timeticks: (4) 0:00:00.04 iso.3.6.1.2.1.25.1.1.0 = Timeticks: (2866708) 7:57:47.08 iso.3.6.1.2.1.25.1.2.0 = Hex-STRING: 07 DE 05 0D 0A 12 15 00 2B 00 00 iso.3.6.1.2.1.25.1.3.0 = INTEGER: 1536 iso.3.6.1.2.1.25.1.4.0 = STRING: "mac=00:90:e8:00:00:07 sd=0 ver=1.0.0S11 console=ttyO0,115200n8 root=/dev/mmcblk0p2 rootfstype=ext4 rootwait” iso.3.6.1.2.1.25.1.5.0 = Gauge32: 1 iso.3.6.1.2.1.25.1.6.0 = Gauge32: 58 iso.3.6.1.2.1.25.1.7.0 = INTEGER: 0 iso.3.6.1.2.1.25.1.7.0 = No more variables left in this MIB View (It is past the end of the MIB tree)
NOTE Click the following links for more information on MIB II: http://www.faqs.org/rfcs/rfc1213.html https://wiki.debian.org/SNMP

UC-8100 Series Linux Software General Debian Package Usage
5-18
58BOpenVPN The OpenVPN package is installed on the computer but disabled by default. Use the insserv –d openvpn command to enable OpenVPN on next bootup. You can also use /etc/init.d/openvpn start to enable
OpenVPN service immediately.
OpenVPN supports user/pass, pre-shared key, certificates, etc., to authenticate users. To begin with, check to make sure that the system has a virtual device /dev/net/tun.
An Ethernet bridge is used to connect different Ethernet networks together. The Ethernets are bundled into one bigger, “logical” Ethernet. Each Ethernet corresponds to one physical interface (or port) that is connected to the bridge. Type the following command to load driver “tun”.
# modprobe tun
On each OpenVPN machine, you should generate a working directory, such as /etc/openvpn, where script files and key files reside. Once established, all operations will be performed in that directory.
The OpenVPN daemon is installed but disabled by default.
Enable openvpn manually sudo /etc/init.d/openvpn start
Disable openvpn manually sudo /etc/init.d/openvpn stop
Enable openvpn insserv -d openvpn
Disable openvpn insserv -r openvpn
116BStatic-Key VPN Run the following command in the /etc/openvpn directory to generate a static key:
moxa@Moxa:/etc/openvpn$ sudo openvpn --genkey --secret static.key
Copy this static key to the clients /etc/openvpn directory using a secure channel like scp or sftp.
On the server, create a new /etc/openvpn/tun0.conf file and add the following:
dev tun0
ifconfig 10.9.8.1 10.9.8.2
secret /etc/openvpn/static.key
This is where 10.9.8.x is your VPN subnetwork, 10.9.8.1 is the IP of the server, and 10.9.8.2 the IP of the client.
On the client, copy /etc/openvpn/static.key from the server and create a new /etc/openvpn/tun0.conf file, and then add the following to the file:
remote your-server.org
dev tun0
ifconfig 10.9.8.2 10.9.8.1
secret /etc/openvpn/static.key
Start OpenVPN using the following command:
moxa@Moxa:/etc/openvpn$ sudo openvpn --config /etc/openvpn/tun0.conf --verb 6 //
verbose output.
UC-8100 Series Linux Software General Debian Package Usage
5-19
ATTENTION
When using an OpenVPN-related application, you need to create a firewall policy. On the server’s firewall, open UDP 1194 (default port). If you are using shorewall on both devices, add a new VPN zone to represent tun0 and create a default policy for it. This means adding something to the following files in /etc/shorewall: zone interfaces policy Bear in mind that 90% of all connection problems encountered by new OpenVPN users are firewall-related.
NOTE Click the following links for more information on OpenVPN: https://wiki.debian.org/OpenVPN http://openvpn.net/
59BPackage Management In this section, we explain how you can quickly learn to install, remove, update, and search for software packages using the apt-get and apt-cache commands from the command line. Some useful commands
that will help you handle package management in Debian/Ubuntu based systems are provided in this section.
117Bapt-get The apt-get utility is a powerful and free command line package management program that is used with
Ubuntu’s APT (Advanced Packaging Tool) library to install new software packages, remove existing software packages, upgrade existing software packages, and even upgrade the entire operating system.
118Bapt-cache The apt-cache command line tool is used to search for apt software package cache. That is, the tool is used
to search for software packages, collect package information, and search for which available packages are ready for installation on Debian or Ubuntu based systems.
119BList All Available Packages Use the following command to list all available packages.
moxa@Moxa:~$ sudo apt-cache pkgnames
120BFind Package Name and Software Description To find the package name and description, use the “search” flag. Using “search” with apt-cache will display a list of matched packages with short descriptions. For example, if you would like to find the description of package “vim”, use the following command:
moxa@Moxa:~$ sudo apt-cache search vim
To find and list all packages starting with “vim”, use the following command:
moxa@Moxa:~$ sudo apt-cache pkgnames vim
UC-8100 Series Linux Software General Debian Package Usage
5-20
121BCheck Package Information To get more detailed package information (e.g., version number, check sums, size, installed size, and category) along with a short description of the package, use the show sub command as illustrated below:
moxa@Moxa:~$ sudo apt-cache show vim
122BCheck Dependencies for Specific Packages Use the showpkg sub command to check the dependencies for particular software packages, and whether those dependent packages are installed or not. For example, use the showpkg command along with the
package-name as follows:
moxa@Moxa:~$ sudo apt-cache showpkg vim
123BCheck Cache Statistics The stats sub command displays the overall statistics of the cache. For example, the following command will
show the complete package information of all packages found in the cache:
moxa@Moxa:~$ sudo apt-cache stats
124BUpdate System Packages The update command is used to resynchronize the package index files with their sources specified in the
/etc/apt/sources.list file. The updated commands will fetch the packages from their locations and update the packages to the newer version.
moxa@Moxa:~$ sudo apt-get update
125BInstall or Upgrade Specific Packages Use the install sub command to install or upgrade one or more packages.
moxa@Moxa:~$ sudo apt-get install vim
126BUpgrade All Software Packages The upgrade command is used to upgrade all software packages currently installed on the system.
moxa@Moxa:~$ sudo apt-get upgrade
127BInstall Multiple Packages You can add more than one package name along with the command in order to install multiple packages at the same time. For example, the following command will install the packages vim and goaccess.
moxa@Moxa:~$ sudo apt-get install vim goaccess
129BInstall Packages without Upgrading Use the –no-upgrade sub command to prevent the installed packages from being upgraded.
moxa@Moxa:~$ sudo apt-get install packageName --no-upgrade

UC-8100 Series Linux Software General Debian Package Usage
5-21
130BUpgrade Specific Packages Use the –only-upgrade sub command to NOT install new packages, but only upgrade already installed
packages.
moxa@Moxa:~$ sudo apt-get install packageName --only-upgrade
131BInstall Specific Package Version To install a specific version of a package, use “=” with the package name and append the desired version.
moxa@Moxa:~$ sudo apt-get install wget=1.13.4-3+deb7u2
132BRemove Packages without Configuration To uninstall software packages without removing their configuration files (for reusing the same configuration later), use the remove command:
moxa@Moxa:~$ sudo apt-get remove wget
133BCompletely Remove Packages To remove the software packages and their configuration files, use the purge sub command:
moxa@Moxa:~$ sudo apt-get remove --purge wget
134BClean Up Disk Space Use the clean command to free up the disk space by cleaning retrieved (downloaded) .deb files (packages)
from the local repository.
moxa@Moxa:~$ sudo apt-get clean
135BDownload Only Source Code of Package To download only the source code of a particular package, use the option “–download-only source” with “package-name”, as shown here:
moxa@Moxa:~$ sudo apt-get --download-only source wget
136BDownload and Unpack a Package To download and unpack the source code of a package to a specific directory, type the following command:
moxa@Moxa:~$ sudo apt-get source wget
137BDownload, Unpack, and Compile a Package You can also download, unpack, and compile the source code at the same time, using the “–compile” option, as shown below:
moxa@Moxa:~$ sudo apt-get --compile source wget

UC-8100 Series Linux Software General Debian Package Usage
5-22
138BDownload a Package Without Installing Use the download sub command to download any given package without installing it. For example, the following command will only download the nethogs package to the current working directory.
moxa@Moxa:~$ sudo apt-get download wget
139BCheck the Package Change Log The changelog sub command is used to download the change log for a package and show the version
information for the package.
moxa@Moxa:~$ sudo apt-get changelog wget
140BCheck Broken Dependencies The check command is a diagnostic tool used to update a package cache and check for broken dependencies.
moxa@Moxa:~$ sudo apt-get check
141BSearch and Build Dependencies The build-dep command searches the local repositories in the system and installs the build dependencies for
a package. If the package does not exist in the local repository, it will return an error code.
moxa@Moxa:~$ sudo apt-get build-dep wget
142BAuto Clean Apt-Get Cache The autoclean command deletes all .deb files from /var/cache/apt/archives to free up a significant
volume of disk space.
moxa@Moxa:~$ sudo apt-get autoclean
143BAuto Remove Installed Packages The autoremove sub command is used to automatically remove packages that were installed to satisfy
dependencies on other packages, but are no longer required. For example, the following command will remove the package wget and all dependent packages:
moxa@Moxa:~$ sudo apt-get autoremove wget

6 6. Programmer’s Guide
In this chapter, we briefly introduce the tool-chain and teach you how to program the UC-8100-LX. The programming example package can be downloaded from Moxa’s website.
The following topics are covered in this chapter:
60BLinux Tool Chain Introduction
144BNative Compilation
145BCross Compilation
146BObtaining Help
61BTest Program—Developing Hello.c
147BCompiling Hello.c Using Native Compilation
148BCompiling Hello.c Using Cross Compilation
62BMakefile Example
63BModbus
64BRTC (Real Time Clock)
65BWDT (Watch Dog Timer)
66BCryptographic Hardware Accelerator
67BDiagnostic LED
149BTurning on the LEDs
150BTurning off the LEDs
151BBlinking the LEDs
Using cell_mgmt
Main Page
Automatic Dial-Up
Cellular Module
cell_mgmt at ['AT_COMMAND']
SIM Card
Switching Between Carrier Frequency Bands (MC-7354, MC-9090 only)
GPS
Cellular Management

UC-8100 Series Linux Software Programmer’s Guide
6-2
60BLinux Tool Chain Introduction Linux Tool-Chain contains the necessary libraries and compilers for developing your programs. The UC-8100 series supports both native and cross-compiling. Native compiling is more straightforward since all the coding and compilation can be done directly on the UC-8100-LX, but since you will be constrained by the UC-8100’s ARM CPU resources, the compilation speed is slower. On the other hand, cross compiling can be done on any Linux machine with the correct tool-chain, and the compilation speed is much faster.
144BNative Compilation
Follow these steps to update the package menu.
1. Make sure network connection is available.
2. Use apt-get update to update the Debian package list.
moxa@Moxa:~$ sudo apt-get update
3. Install the native compiler and necessary packages
moxa@Moxa:~$ sudo apt-get install gcc build-essential flex bison automake
145BCross Compilation
Toolchain Source code Binary
Toolchain Source code Binary
Binary

UC-8100 Series Linux Software Programmer’s Guide
6-3
To ensure that an application will be able to run correctly when installed on the UC-8100-LX, you must ensure that it is compiled and linked to the same libraries that will be present on the UC-8100-LX computer. This is particularly true when the RISC Cortex processor architecture of the UC-8100 differs from the CISC x86 processor architecture of the host system, but it is also true if the processor architecture is the same.
The host tool chain that comes with the UC-8100-LX contains a suite of cross compilers and other tools, as well as the libraries and headers that are necessary to compile applications for the UC-8100. The host environment must be running Linux to install the UC-8100 GNU Tool Chain. We have confirmed that the following Linux distributions can be used to install the tool chain:
Redhat 7.3/8.0/9.0, Fedora core 1 to 20, Debian 4/5/6,7 32/64-bit platforms.
The Tool Chain will need about 300 MB of hard disk space on your PC. To install the tool-chain, download the tool-chain file from Moxa’s website.
After you untar the package, run the install script and follow the instructions.
user@Linux:/home#sh arm-linux-gnueabihf_4.7_Build_130415.sh
Welcome to MOXA ARM Linux platform toolchain installer.
This toolchain built with arm-linux-gnueabihf compiler v4.7.3 and glibc v2.15.
Any problem please contact [email protected]
Press the number:
1.Install Linux cross compiler tool.
2.Uninstall Linux cross compiler tool.
3.Exit or CTRL+C
1
usr/local/arm-linux-gnueabihf-4.7-20130415/
usr/local/arm-linux-gnueabihf-4.7-20130415/bin/
usr/local/arm-linux-gnueabihf-4.7-20130415/bin/arm-linux-gnueabihf-gcc-ranlib
usr/local/arm-linux-gnueabihf-4.7-20130415/bin/arm-linux-gnueabihf-ld
usr/local/arm-linux-gnueabihf-4.7-20130415/bin/arm-linux-gnueabihf-objcopy
usr/local/arm-linux-gnueabihf-4.7-20130415/bin/arm-linux-gnueabihf-ld.gold
...
...
usr/local/arm-linux-gnueabihf-4.7-20130415/lib/gcc/arm-linux-gnueabihf/4.7.3/incl
ude/stdbool.h
usr/local/arm-linux-gnueabihf-4.7-20130415/lib/gcc/arm-linux-gnueabihf/4.7.3/incl
ude/mf-runtime.h
usr/local/arm-linux-gnueabihf-4.7-20130415/lib/gcc/arm-linux-gnueabihf/4.7.3/incl
ude/mmintrin.h
usr/local/arm-linux-gnueabihf-4.7-20130415/lib/gcc/arm-linux-gnueabihf/4.7.3/incl
ude/stddef.h
usr/local/arm-linux-gnueabihf-4.7-20130415/20130415-gcc-linaro-arm-linux-gnueabih
f
----------------------------------------------
arm-linux-gnueabihf install complete
Please export these environment variables before using toolchain:
export PATH=$PATH:/usr/local/arm-linux-gnueabihf-4.7-20130415/bin
UC-8100 Series Linux Software Programmer’s Guide
6-4
Wait for a few minutes while the Tool Chain is installed automatically on your Linux PC. Once the host environment has been installed, add the directory /usr/local/arm-linux-gnueabihf-4.7-20130415//bin to your path and the directory /usr/local/arm-linux-gnueabihf-4.7-20130415//man to your manual path. You can do this
temporarily for the current login session by issuing the following commands:
#export PATH=“/usr/local/arm-linux-gnueabihf-4.7-20130415//bin:$PATH” #export MANPATH=“/usr/local/arm-linux-gnueabihf-4.7-20130415//man:$MANPATH”
Alternatively, you can add the same commands to $HOME/.bash_profile to cause it to take effect for all login sessions initiated by this user.
NOTE The toolchain will be installed at /usr/local/arm-linux-gnueabihf-4.7-20130415/. This means that the original /usr/local/arm-linux-gnueabihf-4.7-20130415/ path will be overwritten. If you have installed an old arm-linux toolchain, you will need to rename the original folder before installing the new one.
146BObtaining Help You can use the Linux man utility to get help on many of the utilities provided by the tool chain located at /usr/local/arm-linux-gnueabihf-4.7-20130415/share/doc/gcc-linaro-arm-linux-gnueabihf/man/. For example, to get help on the arm-linux-gnueabihf-gcc compiler, use the following command:
moxa@Moxa:~$ man
/usr/local/arm-linux-gnueabihf-4.7-20130415/share/doc/gcc-linaro-arm-linux-gnueab
ihf/man/man1/arm-linux-gnueabihf-gcc.1
170BCross Compiling Applications and Libraries
To compile a simple C application, use the cross compiler instead of the regular compiler:
#arm-linux-gnueabihf-gcc –o example –Wall –g –O2 example.c #arm-linux-gnueabihf-strip –s example #arm-linux-gnueabihf-gcc -ggdb –o example-debug example.c
61BTest Program—Developing Hello.c In this section, we use the standard “Hello” programming example to illustrate how to develop a program for the UC-8100-LX.
#include <stdio.h>
int main()
{
printf("Hello World\n");
return 0;
}
The following compiler tools are provided:
Tool Description ar Manage archives (static libraries)
as Assembler
c++, g++ C++ compiler
cpp C preprocessor
gcc C compiler
gdb Debugger
ld Linker

UC-8100 Series Linux Software Programmer’s Guide
6-5
Tool Description
nm Lists symbols from object files
objcopy Copies and translates object files
objdump Displays information about object files
ranlib Generates indexes to archives (static libraries)
readelf Displays information about ELF files
size Lists object file section sizes
strings Prints strings of printable characters from files (usually object files)
strip Removes symbols and sections from object files (usually debugging information)
147BCompiling Hello.c Using Native Compilation Follow these steps for native compilation.
apt-get install build-essential sudo gcc –o hello-release hello.c sudo strip –s hello-release
After compiling the program, use the following command to execute the program:
moxa@Moxa:~$ ./hello-release
Hello World
148BCompiling Hello.c Using Cross Compilation Follow these steps for cross compilation.
1. Connect the UC-8100-LX series to a Linux PC.
2. Install Tool Chain (GNU Cross Compiler & glibc).
3. Set the cross compiler and glibc environment variables.
4. Code and compile the program.
5. Download the program to the UC-8100 series via SFTP, NFS, SCP, or RSYNC.
6. Debug the program
If bugs are found, return to Step 4. If no bugs are found, continue with Step 7
7. Back up the user directory (distribute the program to additional UC-8100 series units if needed).
The CD provided with the UC-8100 contains several example programs. Here we use Hello.c as an example to show you how to compile and run your applications. Type the following commands from your PC to copy the files used for this example from the CD to your computer’s hard drive:
# cd /tmp/ # mkdir example # cp –r /mnt/cdrom/example/* /tmp/example
To compile the program, go to the Hello subdirectory and use the following commands:
#cd example/hello #make
You should receive the following response:
[root@localhost hello]# make
arm-linux-gnueabihf-gcc -o hello-release hello.c
arm-linux-gnueabihf-strip -s hello-release
hello-release—an ARM platform execution file (created specifically to run on the UC-8100 series)
UC-8100 Series Linux Software Programmer’s Guide
6-6
171BUploading and Running the “Hello” Program
The program can be uploaded via SFTP, NFS, SCP, or RSYNC.
Use the following command to upload hello-release to the UC-8100 series via SFTP.
From the PC, type: #ftp 192.168.3.127
Use the put command to initiate the file transfer.
sftp> put hello-release
Uploading hello-release to /home/moxa/hello-release
hello-release
From the UC-8100-LX, type: # chmod +x hello-release # ./hello-release
The word Hello will be printed on the screen.
moxa@Moxa:~$ ./hello-release
Hello World
62BMakefile Example The following makefile script is copied from the Hello example on the UC-8100-LX’s example package and
used for cross compilation of code.
CC = arm-linux-gnueabihf-gcc
CPP = arm-linux-gnueabihf-g++
SOURCES = hello.c
OBJS = $(SOURCES:.c=.o)
all: hello
hello: $(OBJS)
$(CC) -o $@ $^ $(LDFLAGS) $(LIBS)
clean:
rm -f $(OBJS) hello core *.gdb
For native compilation make the following changes:
CC = gcc
CPP = g++
63BModbus The Modbus protocol is a messaging structure used to establish master-slave/client-server communication between intelligent devices. It is a de facto standard, truly open, and the most widely used network protocol in industrial manufacturing environments. It has been implemented by hundreds of vendors on thousands of different devices to transfer discrete/analog I/O and register data between control devices.
The libmodbus version in Debian 7 is v3.03. We use libmodbus as our modbus package. Download the source and example code from the following link.
https://github.com/downloads/stephane/libmodbus/libmodbus-3.0.3.tar.gz
NOTE Click the following link for more information about libmodbus: http://libmodbus.org/
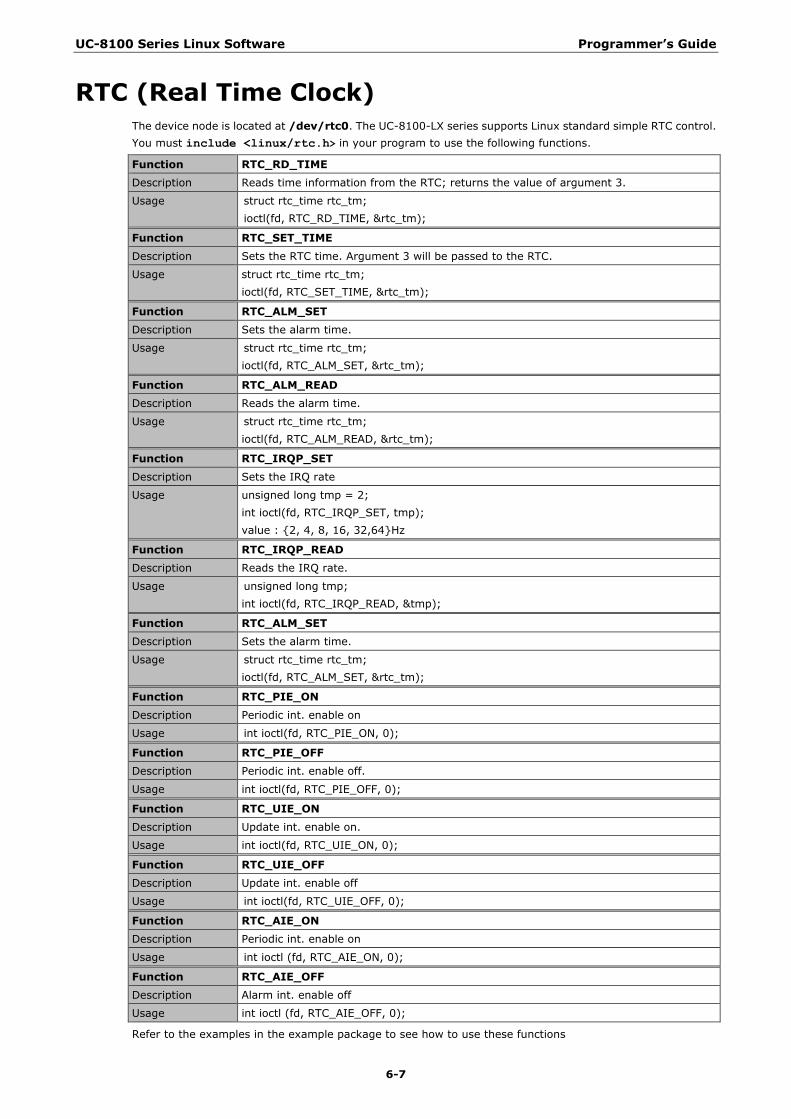
UC-8100 Series Linux Software Programmer’s Guide
6-7
64BRTC (Real Time Clock) The device node is located at /dev/rtc0. The UC-8100-LX series supports Linux standard simple RTC control. You must include <linux/rtc.h> in your program to use the following functions.
Function RTC_RD_TIME Description Reads time information from the RTC; returns the value of argument 3.
Usage struct rtc_time rtc_tm; ioctl(fd, RTC_RD_TIME, &rtc_tm);
Function RTC_SET_TIME
Description Sets the RTC time. Argument 3 will be passed to the RTC.
Usage struct rtc_time rtc_tm; ioctl(fd, RTC_SET_TIME, &rtc_tm);
Function RTC_ALM_SET Description Sets the alarm time.
Usage struct rtc_time rtc_tm; ioctl(fd, RTC_ALM_SET, &rtc_tm);
Function RTC_ALM_READ Description Reads the alarm time.
Usage struct rtc_time rtc_tm; ioctl(fd, RTC_ALM_READ, &rtc_tm);
Function RTC_IRQP_SET
Description Sets the IRQ rate
Usage unsigned long tmp = 2; int ioctl(fd, RTC_IRQP_SET, tmp); value : {2, 4, 8, 16, 32,64}Hz
Function RTC_IRQP_READ Description Reads the IRQ rate.
Usage unsigned long tmp; int ioctl(fd, RTC_IRQP_READ, &tmp);
Function RTC_ALM_SET Description Sets the alarm time.
Usage struct rtc_time rtc_tm; ioctl(fd, RTC_ALM_SET, &rtc_tm);
Function RTC_PIE_ON
Description Periodic int. enable on
Usage int ioctl(fd, RTC_PIE_ON, 0);
Function RTC_PIE_OFF Description Periodic int. enable off.
Usage int ioctl(fd, RTC_PIE_OFF, 0);
Function RTC_UIE_ON Description Update int. enable on.
Usage int ioctl(fd, RTC_UIE_ON, 0);
Function RTC_UIE_OFF
Description Update int. enable off
Usage int ioctl(fd, RTC_UIE_OFF, 0);
Function RTC_AIE_ON Description Periodic int. enable on
Usage int ioctl (fd, RTC_AIE_ON, 0);
Function RTC_AIE_OFF Description Alarm int. enable off
Usage int ioctl (fd, RTC_AIE_OFF, 0);
Refer to the examples in the example package to see how to use these functions
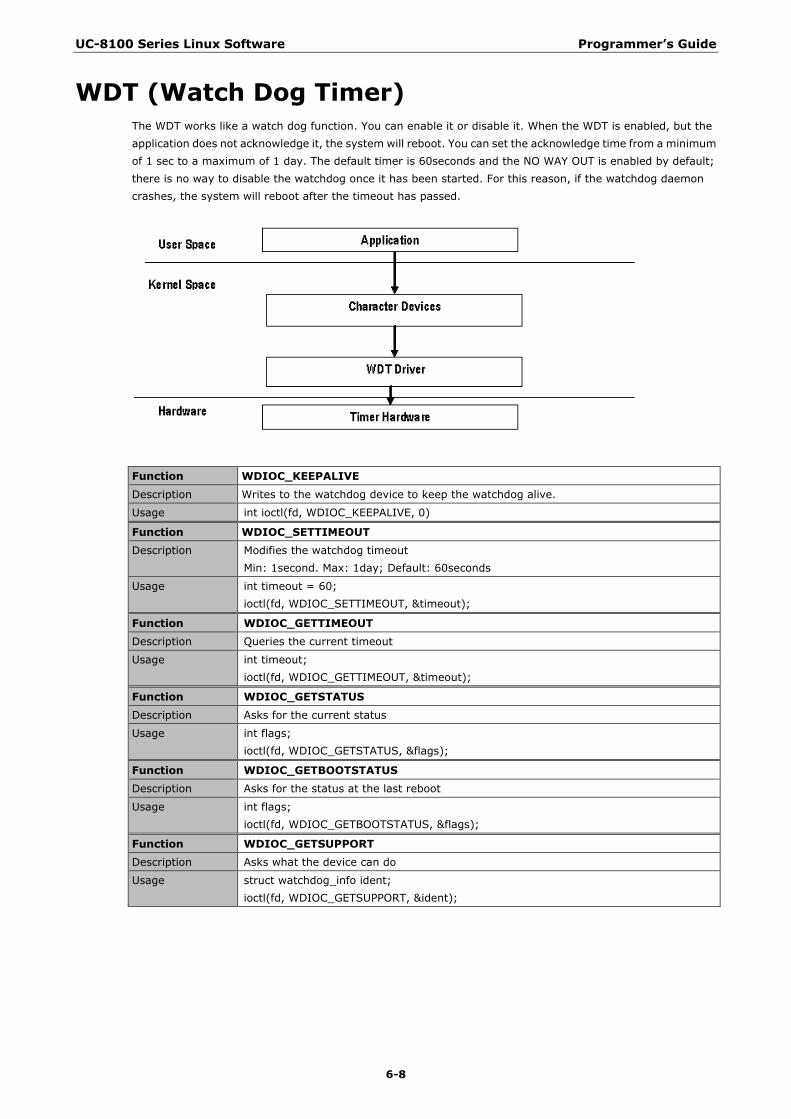
UC-8100 Series Linux Software Programmer’s Guide
6-8
65BWDT (Watch Dog Timer) The WDT works like a watch dog function. You can enable it or disable it. When the WDT is enabled, but the application does not acknowledge it, the system will reboot. You can set the acknowledge time from a minimum of 1 sec to a maximum of 1 day. The default timer is 60seconds and the NO WAY OUT is enabled by default; there is no way to disable the watchdog once it has been started. For this reason, if the watchdog daemon crashes, the system will reboot after the timeout has passed.
Function WDIOC_KEEPALIVE
Description Writes to the watchdog device to keep the watchdog alive.
Usage int ioctl(fd, WDIOC_KEEPALIVE, 0)
Function WDIOC_SETTIMEOUT Description Modifies the watchdog timeout
Min: 1second. Max: 1day; Default: 60seconds
Usage int timeout = 60; ioctl(fd, WDIOC_SETTIMEOUT, &timeout);
Function WDIOC_GETTIMEOUT Description Queries the current timeout
Usage int timeout; ioctl(fd, WDIOC_GETTIMEOUT, &timeout);
Function WDIOC_GETSTATUS
Description Asks for the current status
Usage int flags; ioctl(fd, WDIOC_GETSTATUS, &flags);
Function WDIOC_GETBOOTSTATUS Description Asks for the status at the last reboot
Usage int flags; ioctl(fd, WDIOC_GETBOOTSTATUS, &flags);
Function WDIOC_GETSUPPORT Description Asks what the device can do
Usage struct watchdog_info ident; ioctl(fd, WDIOC_GETSUPPORT, &ident);

UC-8100 Series Linux Software Programmer’s Guide
6-9
66BCryptographic Hardware Accelerator The purpose of cryptographic hardware accelerator is to load off the intensive encryption/decryption and compression/decompression tasks from CPU. You can use the cryptographic hardware accelerator when your application needs to do cryptographic calculations. To use it, you need to make sure that the cryptodev driver is loaded.
Moxa provides examples to show how to use this cryptographic accelerator. Go to the example/cryptodev/ folder for more information.
67BDiagnostic LED A diagnostic LEDs library named libmx_led.so is provided to show the status of device, but we also provide a diagnostic LED API to let your own application use these LEDs.
149BTurning on the LEDs Return code: 0 for OK; a nonzero number indicates an error.
Turn on GREEN LED onoff_led (“GREEN”, 1);
Turn on YELLOW LED onoff_led (“YELLOW”, 1);
Turn on RED LED onoff_led (“RED”, 1);
Turn on all LED on_all_led();
150BTurning off the LEDs Return code: 0 for OK; a nonzero number indicates an error.
Turn off GREEN LED onoff_led (“GREEN”, 0);
Turn off YELLOW LED onoff_led (“YELLOW”, 0);
Turn off RED LED onoff_led (“RED”, 0);
Turn off ALL LED off_all_led();
151BBlinking the LEDs Return code: 0 for OK; a nonzero number indicates an error.
Blink GREEN LED blink_led (“GREEN”);
Blink YELLOW LED blink_led (“YELLOW”);
Blink RED LED blink_led (“RED”);
Blink all LED blink_all_led();
ATTENTION
Be careful when using the diagnostic LEDs Do not use the diagnostic function while own application is controlling the LEDs.

UC-8100 Series Linux Software Programmer’s Guide
6-10
178BExample: Setting the baud rate
#include <termio.h>
#include <fcntl.h>
#include <err.h>
#include <linux/serial.h>
…
struct termios options;
struct serial_struct serinfo;
int fd;
int speed = 0;
static int rate_to_constant(int baudrate) {
#define B(x) case x: return B##x
switch(baudrate) {
B(50); B(75); B(110); B(134); B(150);
B(200); B(300); B(600); B(1200); B(1800);
B(2400); B(4800); B(9600); B(19200); B(38400);
B(57600); B(115200);
default: return 0;
}
#undef B
}
…
/* Open and configure serial port */
if ((fd = open(device,O_RDWR|O_NOCTTY)) == -1)
return -1;
fcntl(fd, F_SETFL, 0);
tcgetattr(fd, &options);
cfsetispeed(&options, speed ?: B115200);
cfsetospeed(&options, speed ?: B115200);
cfmakeraw(&options);
options.c_cflag |= (CLOCAL | CREAD);
options.c_cflag &= ~CRTSCTS;
if (tcsetattr(fd, TCSANOW, &options) != 0)
return -1;
Using cell_mgmt The cell_mgmt utility is used to manage the cellular module in the UC-8100-LX.

UC-8100 Series Linux Software Programmer’s Guide
6-11
Main Page

UC-8100 Series Linux Software Programmer’s Guide
6-12
Automatic Dial-Up The automatic dial-up function will automatically set the DNS and default gateway of the UC-8100-LX.
IMPORTANT Before using the cellular gateway settings, remove the default gateway configuration that you might have set in your UC-8100-LX.
cell_mgmt start
Starts a network connection using the cellular module of the UC-8100-LX.
When you run the cell_mgmt start command, the APN, Username, Password, and PIN details are written
to the configuration file /etc/qmi-network.conf. This information is then used when you run the command without specifying the command options.
Syntax:
cell_mgmt start APN=[APN] Username=[user] Password=[pass] PIN=[pin_code]
cell_mgmt stop
Stops/disables the network connection on the cellular module of the UC-8100-LX.
cell_mgmt restart
Restarts the network connection on the cellular module of the UC-8100-LX.
Cellular Module cell_mgmt reset
Resets the UC-8100-LX cellular module.

UC-8100 Series Linux Software Programmer’s Guide
6-13
cell_mgmt power_on
Turns on the power to the cellular module in the UC-8100-LX.
cell_mgmt power_off
Turns off the power to the cellular module in the UC-8100-LX.
cell_mgmt status
Provides information on the status of the network connection.
cell_mgmt signal
Provides the cellular signal strength.
cell_mgmt set_default
Resets the cellular module to the factory default settings.
cell_mgmt m_info
Provides information on the cellular module (AT Port, GPS Port, Eth Port, and Module Name).
cell_mgmt operator
Provides information on the cellular service provider.
cell_mgmt interface
Used to switch the module slot and check the status after the switch.

UC-8100 Series Linux Software Programmer’s Guide
6-14
cell_mgmt at ['AT_COMMAND'] Used to input an at command. For example, use the at command to run AT+CSQ, as follows:
SIM Card cell_mgmt sim_status
Provides information on the SIM card status.
cell_mgmt set_pin [PIN]
Sets the PIN code for the configuration file and verifies the same.
cell_mgmt pin_protection [PIN|PIN2] [enable|disable] [current_PIN]
Enables or disables PIN protection in the UIM.
enable PIN protection
disable PIN protection

UC-8100 Series Linux Software Programmer’s Guide
6-15
Switching Between Carrier Frequency Bands (MC-7354,
MC-9090 only)
IMPORTANT!
Check the version of the cellular management utility using the cell_mgmt version command to ensure that
it is V1.7.4 or higher. If not, upgrade to the latest firmware available on the Moxa website. If the correct version of the cellular management utility is not used, the carrier switch might not work properly.
cell_mgmt switch_carrier [Name of the carrier]
GPS Automatically enables or disables GPS, when the module’s device node is opened or closed. You can get raw GPS data by just listening on the GPS port: /dev/ttyUSB1.
Cellular Management cell_mgmt version
Provides the cellular management version.
A A. Extending the Lifetime of the SD Card
In this appendix, we describe how to extend the lifetime of the SD card.
The following topics are covered in this appendix:
3BOverview
7BSD Flash Types
4BTips for Running GNU/Linux on an SD Card
8BChoosing an SLC SD Card
9BUsing a Larger Capacity SD Card
10BTweaking GNU/Linux to Write to RAM Instead of the SD card
11BSetting the SD Card to Read-only Mode

UC-8100 Series Linux Software Extending the Lifetime of the SD Card
B-2
3BOverview The UC-8100-LX comes with an SD socket that can provide storage expansion, and you can even store the operating system on the SD card, making it important to choose the best SD card for the UC-8100-LX. Here is some general information about SD cards that are currently available on the market.
7BSD Flash Types
12BSingle-Level-Cell (SLC)
Single-level-cell (SLC) cards have the simplest operation of all flash type cards, in the sense that there is only one bit per cell, and the firmware does not need to negotiate with the data in different levels and states. SLC cards have a longer lifetime than other flash types.
13BMulti-Level Cell (MLC)
Multi-level cell (MLC) cards, as the name suggests, can store multiple bits per cell. The primary benefit of MLC flash memory is the lower cost per unit of storage due to the higher data density.
14BTriple-Level Cell (TLC)
TLC flash (triple level cell flash) is a type of solid-state NAND flash memory that stores three bits of data per cell. TLC flash is less expensive than single-level cell (SLC) and multi-level cell (MLC) solid-state flash memory, and is commonly used in various consumer devices that use solid-state storage.
15BComparison Table for Flash Types
Flash type SLC, Single Level Cell (1 bit)
MLC, Multilevel Cell (2 bits)
TLC, Triple Level Cell (3 bits)
Bits per cell 1 2 3
Program/Erase cycles Generally 100000 write/erase cycles
Anywhere from 3000 to 15000 write/erase cycles
Anywhere from 1000 to 5000 write/erase cycles
Erase time Erase time: 1.5-2 ms Erase time: 2.5-3.5 ms Erase time: 4-5 ms
Operation scenario Industrial Commercial Commercial
We strongly recommend using SLC SD cards in the UC-8100-LX computer.
4BTips for Running GNU/Linux on an SD Card
8BChoosing an SLC SD Card We strongly recommend using SLC SD cards in the UC-8100-LX computer, since this type of card will usually last longer than other types of cards.
9BUsing a Larger Capacity SD Card Using a larger capacity SD card provides more space for reading and writing data, and reduces the chance that the same area of the card will be written over multiple times. Most GNU/Linux distributions for the UC-8100-LX can fit on a 4 GB card, but it is more advisable to use an 8 GB or even a 16 GB card.
UC-8100 Series Linux Software Extending the Lifetime of the SD Card
B-3
10BTweaking GNU/Linux to Write to RAM Instead of the SD card “tmpfs” is a useful GNU/Linux function. “tmpfs” can be used to write to RAM as if it were an ordinary file system, and is fast, efficient, and easy to use.
tmpfs can write to RAM instead of the local disk (in this case, the SD card). All you need to do is add an entry to the /etc/fstab file (to mount the folder you wish to have written to RAM) and reboot (so that each mount is cleanly mounted before services start writing files).
The kernel will do the rest for you by managing the writes to the RAM on this virtual file system. In addition, the kernel will only use the amount of RAM required for writing files, and not the entire size of the mount. If, for example, we add the following line to the /etc/fstab file, the kernel will mount /var/log to RAM.
tmpfs /var/log tmpfs defaults,noatime,nosuid,mode=0755,size=100m 0 0
However, it will not use any RAM until the files are written to /var/log. When files are written to /var/log, the kernel will only save them to RAM. When files are removed from /var/log, the RAM used to store the files will be freed up.
This means it only uses the RAM it needs to store the files, making the process very efficient.
You can also specify the total size to allocate for each mount in /etc/fstab. In the above example, we set “size=100m” so that /var/log can use up to 100 MB of space and no more. This prevents the file system from using up all of the RAM space, which can cause the system to slow down or even crash. By running the mount
command, we can see in the example above that /var/log is mounted as a tmpfs volume to RAM, 100 MB in size.
Filesystem Size Used Avail Use% Mounted on
tmpfs 100M 596K 100M 1% /var/log
GNU/Linux uses a variety of locations to make frequent writes. The following list of entries can be used as a starting point for most distributions.
tmpfs /tmp tmpfs defaults,noatime,nosuid,size=100m 0 0
tmpfs /var/tmp tmpfs defaults,noatime,nosuid,size=30m 0 0
tmpfs /var/log tmpfs defaults,noatime,nosuid,mode=0755,size=100m 0 0
tmpfs /var/run tmpfs defaults,noatime,nosuid,mode=0755,size=2m 0 0
tmpfs /var/spool/mqueue tmpfs defaults,noatime,nosuid,mode=0700,gid=12,size=30m 0 0
Use “size=” parameter to avoid using up huge amounts of RAM in case something tries to save a huge amount of data. The “noatime” and “nosuid” parameters are also recommended for security and performance, and “mode=” together with “gid=” match the permissions and group of the original file system to what was originally located on the SD card.
The tmpfs function can also handle permissions. As usual, entries in /etc/fstab mount over the top of what is on the SD card, as standard Unix/Linux types do. So if for some reason the mounts fail, writes will still work to the SD card.
One additional point to keep in mind is that anything mounted with tmpfs will be lost on a reboot. So, logs in /var/log in the example above will be wiped out if the computer is shut down or rebooted. For this reason, do not use tmpfs to save any files that need to be preserved during reboots.
11BSetting the SD Card to Read-Only Mode Setting the SD card to read-only mode essentially makes GNU/Linux run in read-only mode, similar to how it works when booting from a live CD. This way, you can avoid writing to the SD card, which in theory will extend its life. However, there are some drawbacks to this strategy.
NOTE Click the following link for more information on minicom: http://www.gnu.org/software/coreutils/manual/html_node/dd-invocation.html

B B. Copying Images on an SD/MicroSD Card
In this appendix, we show you how to copy an image from an SD or MicroSD card.
The following topics are covered in this appendix:
5BUsing Win32 Disk Imager
6BUsing the dd command

UC-8100 Series Linux Software Copying Images on an SD/MicroSD Card
C-2
5BUsing Win32 Disk Imager 1. Remove the SD or microSD card from the UC-8100 and insert it into another computer.
2. Start Win32 Disk imager and complete the following steps:
a. From the Device drop-down list, select the drive letter for the SD card (for example, L:\).
b. In the Image File field, enter the location for the image file. Alternatively, you can click the folder icon to locate the image file (for example, D:\Temp\backup.imp).
3. Click Read.
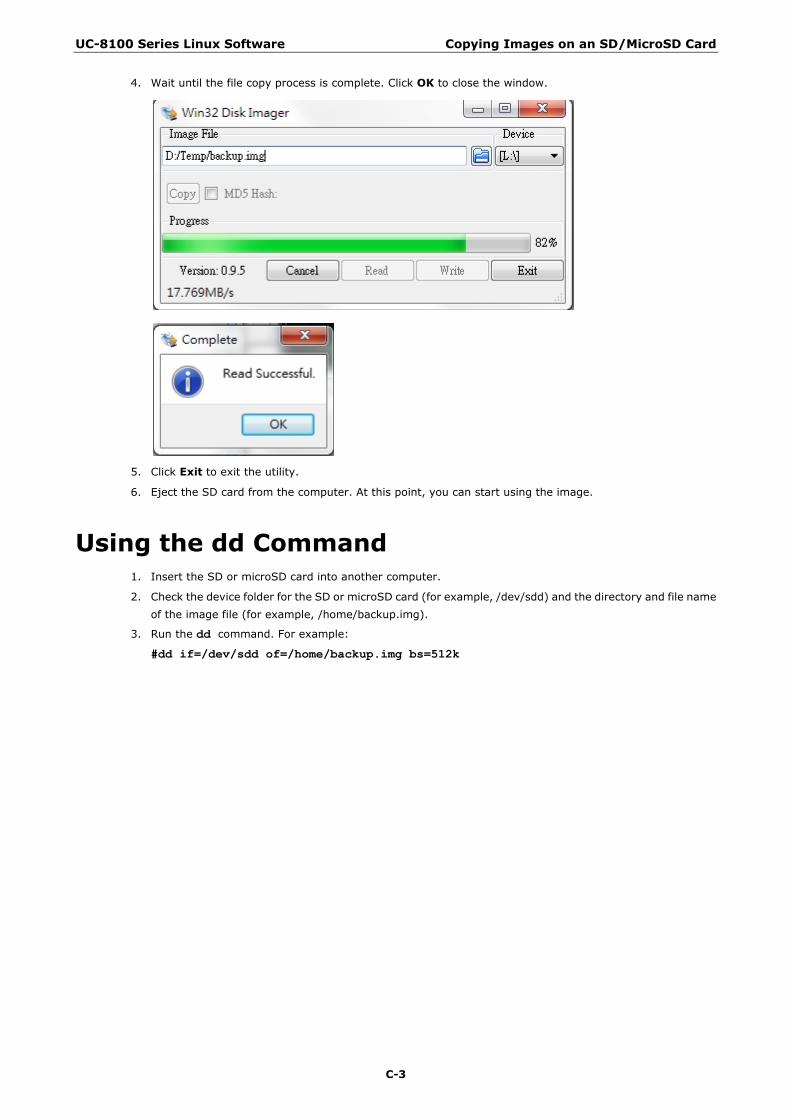
UC-8100 Series Linux Software Copying Images on an SD/MicroSD Card
C-3
4. Wait until the file copy process is complete. Click OK to close the window.
5. Click Exit to exit the utility.
6. Eject the SD card from the computer. At this point, you can start using the image.
6BUsing the dd Command 1. Insert the SD or microSD card into another computer.
2. Check the device folder for the SD or microSD card (for example, /dev/sdd) and the directory and file name of the image file (for example, /home/backup.img).
3. Run the dd command. For example:
#dd if=/dev/sdd of=/home/backup.img bs=512k