ucsf ed us protocol abdominal aorta finaledus.ucsf.edu/sites/edus.ucsf.edu/files/wysiwyg/ucsf ed us...
TRANSCRIPT

UCSF ED Point-‐of-‐Care Abdominal Aorta Ultrasound Protocol
Indications: Concern for abdominal aortic aneurysm. Can also be used to evaluate extension of Type B aortic dissection. Schematic of structures visualized on ultrasound:
Transducer: Low frequency 5-‐2 Mhz curvilinear transducer. Mode set to “Abdomen.” Patient positioning: Supine with head of the bed flat. Sometimes helps if knees are slightly flexed. Technique Guidelines:
1) Apply constant, firm pressure with transducer to displace bowel gas. Even with this, 20% or more of patients’ aortas will not be readily visualized.
2) Saccular aneurysms confined to a short section of the aorta are easily overlooked, so attempt to scan entire aorta as described below.
3) A tortuous or ectatic aorta may cause artifactual exaggeration of the aortic diameter. 4) If a symptomatic AAA is identified, evidence of rupture should be sought. Because the aorta
is retroperitoneal, keep in mind that free intraperitoneal fluid (as seen with a positive FAST in a trauma patient) is not expected in these cases. A periaortic or retroperitoneal hematoma is likely to be present, though these may be challenging to visualize and thus, their absence does not rule out rupture. A CTA should be obtained if the patient is stable.
Scanning protocol:
1) Views #1-‐3 should be images of the aorta in a transverse orientation just below the xiphoid at the level of the celiac artery takeoff as shown below. Adjust your depth so that the anterior aspect of vertebral body is clearly visualized. You will see the aorta and IVC just above the spine. The celiac trunk will appear as a “seagull” silhouette with the body as the celiac artery itself and the common hepatic and splenic arteries as the right and left wings, respectively. Save a still image as View #1. Save a still image with AP and lateral measurements as View #2. Save a video clip of this area as View #3.

Views #1 & 2 = still frame image of celiac trunk as shown above, with and without measurements. View #3 = cine clip of above.
2) Views #4-‐6 should be images of the aorta in a transverse orientation at the level of the superior mesenteric artery (SMA) takeoff. Move down the aorta a centimeter or two to obtain an image like the one shown below. Save a still image without (View #4) and with (View #5) measurements, and a clip of this area (View #6).
Left: Transverse view of the abdominal aorta just below the SMA takeoff. Sometimes referred to as the “French Cyclops” view where the aorta is the head, the SMA is the cyclopean eye, the splenic vein (which becomes the portal vein as it passes over the SMA) is the beret, and the left renal vein is the thin mustache.

Views #4 & 5= still images of above with and without measurements. View #6 = clip of above.
3) Views #7-‐9 should be images of the distal aorta in a transverse orientation at or just above the bifurcation into the common iliac arteries. Move down toward the umbilicus until you obtain an image like the one below. Save a still image without measurements (View #7), with measurements (View #8), and a clip of this area (View #9).
Views #7 & 8 = still images of above. View #9 = cine clip, ideally visualizing bifurcation.
Left: Labeled image of above. SV = Splenic Vein, SMA = Sup Mesenteric Artery, LRV = L Renal Vein, Ao = Aorta, VB = Vertebral Body, GB = Gallbladder, PV = Portal Vein. Note that the pancreas lies just anterior to the PV at this level.
Left: Distal abdominal aorta just proximal to its bifurcation into R and L common iliac arteries.

4) Views #10-‐13 should be images of the abdominal aorta in a sagittal orientation. With the transducer oriented toward the head, obtain an image of the aorta with the celiac and SMA as shown below. View #10 should be a still image without any measurements, view #11 should be a still image with a measurement of the maximal diameter seen, and views #12 and #13 should be a still image and cine clip with color Doppler (Color scale should be usually be set to a high range, ie > 60cm/sec) to confirm patency.
Left: View #10. Sagital sonogram of abdominal aorta with its 2 main branches. Note that the IMA is not usually visible with ultrasound.
Above: View #11. Sagital sonogram with measurement of aortic diameter. Note that in this image, the measurement is not accurate. The calipers are placed outside the lumen, leading to an overestimate of the aortic diameter.
Above: Views #12 & 13. Sagital sonogram with color Doppler to confirm patency. Note that the color scale is set too low (35cm/sec) leading to artifact and aliasing. The color scale should be increased to minimize these problems.

How to correctly measure the diameter of the abdominal aorta: The apparent luminal diameter of the aorta should be measured in both transverse and sagittal orientations as shown below. You do not need to include any of the surrounding soft tissue in your measurement. Note that if the patient actually has a AAA and it contains intraluminal plaque and/or clot (which is common) your measurements should take into account the true lumen including the area with plaque/clot rather than the just the patent inner channel where there is blood flow -‐ see next page. Any segment 3cm in diameter or greater should be considered aneurysmal. Rumack's Diagnostic Ultrasound (3rd ed, p. 470) states "…it is important to obtain an accurate outer-‐layer-‐to-‐outer-‐layer measurement of the aorta in a plane perpendicular to the long axis of the vessel." This "outer to outer" recommendation is intended to ensure that the sonographer includes any plaque and/or thrombus in the measurement as described above. But be careful…this recommendation sometimes leads novice sonographers to include large amounts of adjacent soft tissue within the calipers (as in the example of view #11 above), leading to wildly exaggerated measurements of completely normal aortas. Bottom line is if there is an AAA, include any thrombus and plaque. If the aorta is completely normal, it's really pretty much impossible to differentiate the separate layers of the vessel…you just measure the apparent diameter as shown below and the whole outer-‐to-‐outer thing is basically irrelevant.
Above: Examples of correct AP and lateral measurements in a transverse view (left) and correct AP measurement in a sagittal view in a normal aorta.
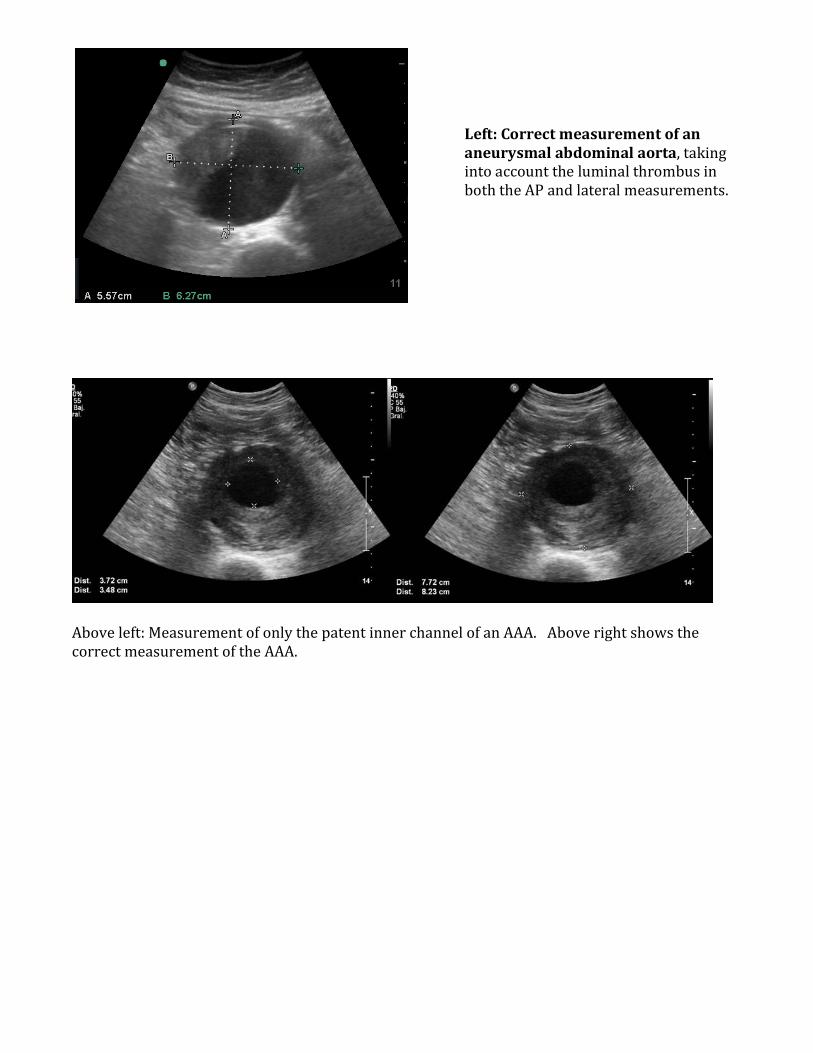
Above left: Measurement of only the patent inner channel of an AAA. Above right shows the correct measurement of the AAA.
Left: Correct measurement of an aneurysmal abdominal aorta, taking into account the luminal thrombus in both the AP and lateral measurements.