ul listed retrofit solution for savant-litetouch systems · revision d – 05/02/2016 3 | p a g e...
TRANSCRIPT

Revision D – 05/02/2016 1 | P a g e
UL Listed Retrofit Solution for Savant-LiteTouch™ Systems
1.0 Overview
This application note demonstrates a retrofit solution for centralized Savant/LiteTouch Lighting systems
involving a HomeWorks QS system. The solutions aim to provide a simple solution without the need for
an infrastructure overhaul.

Revision D – 05/02/2016 2 | P a g e
Table of Contents 1.0 Overview ............................................................................................................................................... 1
2.0 Centralized Lighting Panel Retrofit ....................................................................................................... 3
2.1 Retrofit Solution Diagram ................................................................................................................. 3
2.1.1 Existing Savant/LiteTouch Installation ....................................................................................... 3
2.1.2 HomeWorks QS Retrofit Solution .............................................................................................. 3
2.2 Savant/LiteTouch™ Module Cross Reference Table ......................................................................... 4
2.3 Savant/LiteTouch Dimming and Switching Controls with Surface Mounted Savant/LiteTouch
Panels ........................................................................................................................................................ 4
2.3.1 Designing the Lutron Feed-Through Panel in the HWQS Programming Software..................... 5
2.4 Savant/LiteTouch™ Dimming and Switching Controls with Recess Mounted Savant/LiteTouch
Panels ........................................................................................................................................................ 6
2.4.1 RPM Load Ratings and Software Load Schedule Considerations ............................................... 6
2.4.2 Designing for the Subplate in the HWQS Programming Software ............................................. 7
3.0 Savant/LiteTouch™ Wired Keypads ...................................................................................................... 9
3.1 Using an Auxiliary Power Supply to Power HomeWorks QS RF Keypads ......................................... 9
3.1.1 Wiring Diagram .......................................................................................................................... 9
3.1.2 Maximum Number of Keypads per Supply .............................................................................. 10
3.1.3 Installation ................................................................................................................................ 10
4.0 Warranty ............................................................................................................................................. 11
5.0 Appendix – Importance of Product Standards and UL Listing ............................................................ 12
Revision D – 05/02/2016 3 | P a g e
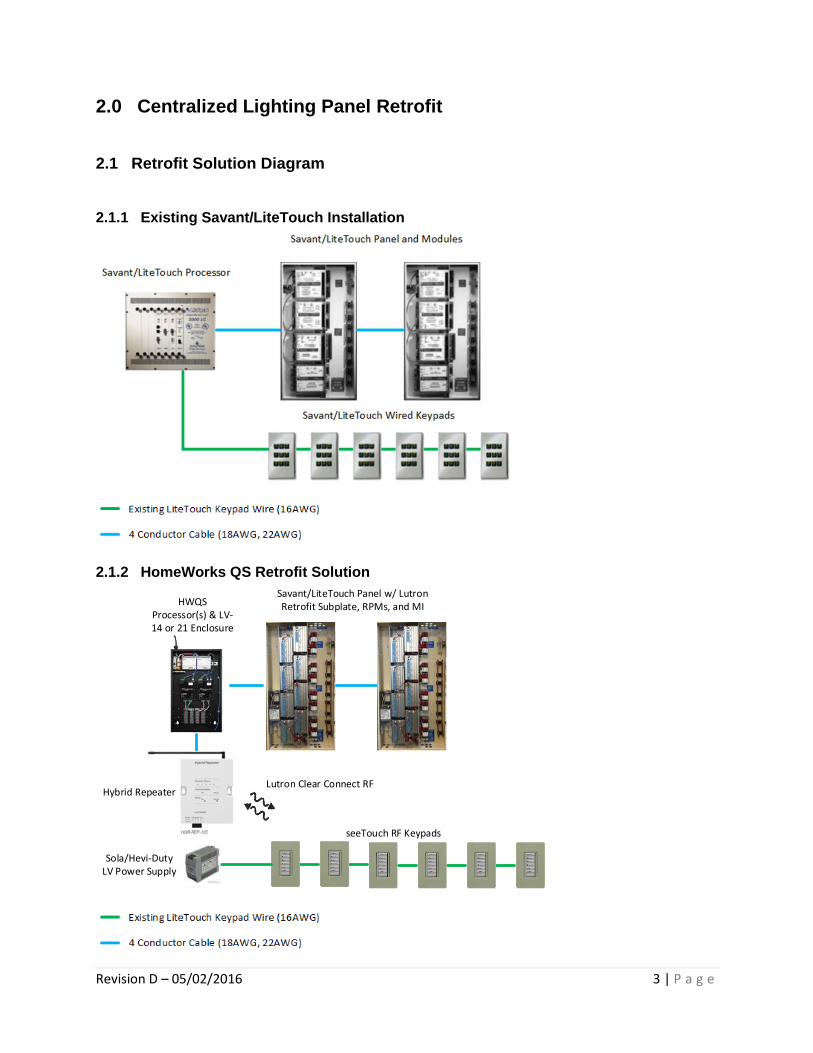
2.0 Centralized Lighting Panel Retrofit
2.1 Retrofit Solution Diagram
2.1.1 Existing Savant/LiteTouch Installation
2.1.2 HomeWorks QS Retrofit Solution
seeTouch RF Keypads
Lutron Clear Connect RF
Sola/Hevi-Duty LV Power Supply
Hybrid Repeater
HWQS Processor(s) & LV-14 or 21 Enclosure
Savant/LiteTouch Panel w/ Lutron Retrofit Subplate, RPMs, and MI
Revision D – 05/02/2016 4 | P a g e
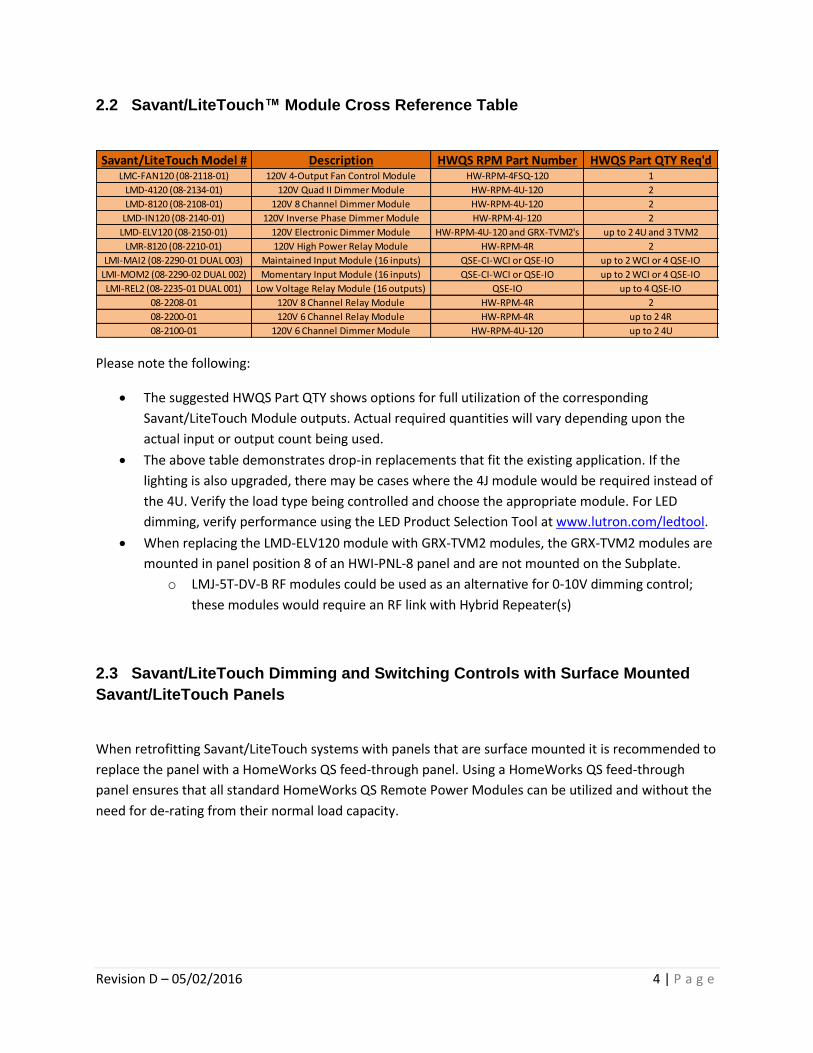
2.2 Savant/LiteTouch™ Module Cross Reference Table
Please note the following:
The suggested HWQS Part QTY shows options for full utilization of the corresponding
Savant/LiteTouch Module outputs. Actual required quantities will vary depending upon the
actual input or output count being used.
The above table demonstrates drop-in replacements that fit the existing application. If the
lighting is also upgraded, there may be cases where the 4J module would be required instead of
the 4U. Verify the load type being controlled and choose the appropriate module. For LED
dimming, verify performance using the LED Product Selection Tool at www.lutron.com/ledtool.
When replacing the LMD-ELV120 module with GRX-TVM2 modules, the GRX-TVM2 modules are
mounted in panel position 8 of an HWI-PNL-8 panel and are not mounted on the Subplate.
o LMJ-5T-DV-B RF modules could be used as an alternative for 0-10V dimming control;
these modules would require an RF link with Hybrid Repeater(s)
2.3 Savant/LiteTouch Dimming and Switching Controls with Surface Mounted
Savant/LiteTouch Panels
When retrofitting Savant/LiteTouch systems with panels that are surface mounted it is recommended to
replace the panel with a HomeWorks QS feed-through panel. Using a HomeWorks QS feed-through
panel ensures that all standard HomeWorks QS Remote Power Modules can be utilized and without the
need for de-rating from their normal load capacity.
Savant/LiteTouch Model # Description HWQS RPM Part Number HWQS Part QTY Req'dLMC-FAN120 (08-2118-01) 120V 4-Output Fan Control Module HW-RPM-4FSQ-120 1
LMD-4120 (08-2134-01) 120V Quad II Dimmer Module HW-RPM-4U-120 2
LMD-8120 (08-2108-01) 120V 8 Channel Dimmer Module HW-RPM-4U-120 2
LMD-IN120 (08-2140-01) 120V Inverse Phase Dimmer Module HW-RPM-4J-120 2
LMD-ELV120 (08-2150-01) 120V Electronic Dimmer Module HW-RPM-4U-120 and GRX-TVM2's up to 2 4U and 3 TVM2
LMR-8120 (08-2210-01) 120V High Power Relay Module HW-RPM-4R 2
LMI-MAI2 (08-2290-01 DUAL 003) Maintained Input Module (16 inputs) QSE-CI-WCI or QSE-IO up to 2 WCI or 4 QSE-IO
LMI-MOM2 (08-2290-02 DUAL 002) Momentary Input Module (16 inputs) QSE-CI-WCI or QSE-IO up to 2 WCI or 4 QSE-IO
LMI-REL2 (08-2235-01 DUAL 001) Low Voltage Relay Module (16 outputs) QSE-IO up to 4 QSE-IO
08-2208-01 120V 8 Channel Relay Module HW-RPM-4R 2
08-2200-01 120V 6 Channel Relay Module HW-RPM-4R up to 2 4R
08-2100-01 120V 6 Channel Dimmer Module HW-RPM-4U-120 up to 2 4U

Revision D – 05/02/2016 5 | P a g e
2.3.1 Designing the Lutron Feed-Through Panel in the HWQS Programming Software
To begin adding the feed-through panel first go to Design > Equipment in the HWQS programming
software.
Proceed to the area of the Area Tree where the Savant/LiteTouch™ Panel is being replaced. Once the
area has been clicked and selected, add an HWI-PNL-8 panel to the space.
The PNL-8 has the ability to house up to two Processors or QS interfaces as well as wired landing boards
and 24V DC din rail power supplies as well as a Module Interface (MIs) and up to 8 Remote Power
Modules (RPMs).
It is important that the module addressed as 1 is designed into the database at position 1 of the PNL-8
placeholder and so on. The numbering of the module in the software is a direct correlation to the
physical address set on each module using the hexadecimal rotary switch.
Revision D – 05/02/2016 6 | P a g e
2.4 Savant/LiteTouch™ Dimming and Switching Controls with Recess Mounted
Savant/LiteTouch Panels
Retrofitting the existing Savant/LiteTouch centralized lighting control equipment to HWQS Remote
Power Modules (RPMs) requires the utilization of either the Field Assembled Subplate option, model
number HWR-PNLS-8S-120FT-CGP2730 or the Lutron Factory Assembled Subplate option, model
number HWR-_R_U_J_M_F-120FT-CGP2745. Installation Guides can be found at www.lutron.com,
offering a complete guide on the installation of the Subplate, installation of the RPMs (Field Assembled
only) and Module Interface (MI), and the wiring. The Installation Guide for the Factory Assembled
Subplate contains a model number builder (model number varies depending on qty and model of RPM
modules used).
Each Subplate has the ability to mount up to eight RPMs
Module Interface (MI) mounts next to the Subplate (sold separately)
HWQS Processors cannot be mounted on the Subplate assembly and will thus require another
panel for mounting (LV14, LV21, or PNL-8 w/ power kit)
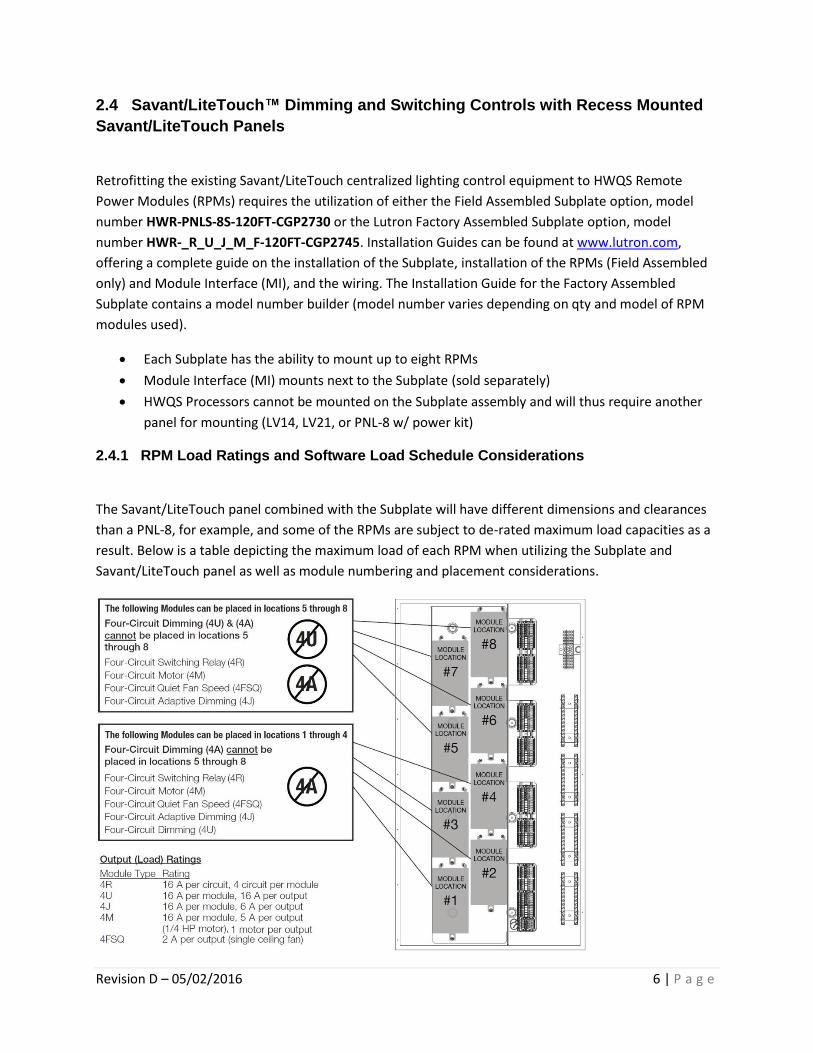
2.4.1 RPM Load Ratings and Software Load Schedule Considerations
The Savant/LiteTouch panel combined with the Subplate will have different dimensions and clearances
than a PNL-8, for example, and some of the RPMs are subject to de-rated maximum load capacities as a
result. Below is a table depicting the maximum load of each RPM when utilizing the Subplate and
Savant/LiteTouch panel as well as module numbering and placement considerations.

Revision D – 05/02/2016 7 | P a g e
NOTE: The 4A module is not recommended for use in the Subplate solution. The 4J module replaces the
4A module in this application.
Be sure to consider the above maximum load capacities when designing your load schedule in the HWQS
programming software. The 4U maximum output ratings are different than the typical ratings when
enclosed within a Lutron PNL-5 or PNL-8 panel. As the Subplate and Savant/LiteTouch™ assembly are
not modeled in the programming software, maximum capacities will assume the typical maximum load.
Subsequently, as a result of typical maximum load assumption, the software may not identify the
necessity for interfaces such as a Power Booster (PHPM-PA) in some applications.
2.4.2 Designing for the Subplate in the HWQS Programming Software
To begin adding the placeholder for the Subplate assembly and Panel Link product first go to Design >
Equipment in the HWQS programming software.
Proceed to the area of the Area Tree where the Savant/LiteTouch Panel with Subplate will reside. Once
the area has been clicked and selected, add an HWI-PNL-8 panel to the space.
The RPM layout of the PNL-8 is different than that of the Subplate. The PNL-8 also has the ability to
house up to two Processors or QS interfaces as well as wired landing boards and 24V DC din rail power
supplies. The Subplate can only house an MI and up to 8 RPMs (no Processors, power supplies, TVM2
modules, lamp de-buzzing coils, or interfaces).
Module position may vary as a result of variables such as the available load wire length within the panel.
It is typically recommended to start in the lower portion of the panel with module 1 and build upwards
from there, similar to the addressing commonly used with a PNL-8 panel, for example.

Revision D – 05/02/2016 8 | P a g e
It is important that the module addressed as 1 is designed into the database at position 1 of the PNL-8
placeholder and so on. The numbering of the module in the software is a direct correlation to the
physical address set on each module using the hexadecimal rotary switch.
When using an HW-RPM-4J-120 module, place a 4A module into the software to represent the 4J.
NOTE: When using the 4A module as the model for the 4J in the programming software, the load
calculations will assume the 10A zone rating maximum of the 4A module, not the 6A rating of the 4J.
Make sure that no zone of a 4J module exceeds 6A.
RPM-4J

Revision D – 05/02/2016 9 | P a g e
3.0 Savant/LiteTouch™ Wired Keypads
Savant/LiteTouch recommended 16 AWG four conductor cable for their wired keypad communication
wiring. There is no shielding within the cable and the communication wires are not twisted or shielded.
HomeWorks QS wired keypads require 4 conductor wire: one pair 22 AWG twisted/shielded for
communication and a pair of 18 AWG (or 12 AWG for longer wire runs) for 24 VDC power and common.
As a result, the existing infrastructure is not recommended for the installation of HomeWorks QS wired
keypads. One of two solutions is recommended:
1. Run new wire to allow for the installation of HWQS wired keypads
or
2. Install HWQS RF keypads and power using a low voltage power supply (Section 3.1)
3.1 Using an Auxiliary Power Supply to Power HomeWorks QS RF Keypads
The recommended auxiliary power supply for this application is the Sola/Hevi-Duty SDP 1-48-100T
power supply. This power supply will output a low voltage DC output that is able to power wall-mounted
RF seeTouch HWQS keypads. The amount of RF seeTouch keypads that can be powered from a single
supply will vary depending on wire length and the cross-sectional area of the wire being used.
3.1.1 Wiring Diagram

Revision D – 05/02/2016 10 | P a g e
3.1.2 Maximum Number of Keypads per Supply
The maximum number of RF HWQS seeTouch keypads that can be powered from a single supply varies
based upon wire run length and the wire gauge.
3.1.3 Installation
The steps for installing this solution are as follows:
1. Remove the fuse or lock the breaker in the OFF position.
2. Install the SDP 1-48-100T power supply in accordance with the manufacturer’s instructions.
3. Wire the black wires of the RF seeTouch keypad(s) to the “+” terminal of the SDP 1-48-100T
power supply.
4. Wire the white wires of the RF seeTouch keypad(s) to the “-” terminal of the SDP 1-48-100T
power supply.
5. Turn on the breaker to the SDP 1-48-100T power supply.
6. Ensure that the “OK” LED is lit on the SDP 1-48-100T power supply.
7. On the SDP 1-48-100T power supply, turn the 48-56 V ADJ screw clockwise to the maximum
output voltage.
8. Verify that all attached keypads are powered.

Revision D – 05/02/2016 11 | P a g e
4.0 Warranty
Lutron's standard warranty policy for HomeWorks QS products is applicable only when following the
exact installation recommendations. Failure to do so will result in a void in warranty coverage. Lutron's
warranty is valid only when installing the entire Lutron system as recommended, including the use of
RPM-4J modules in place of RPM-4A modules. Replacement of all existing Savant/LiteTouch power
modules AND keypads are required for warranty coverage.

Revision D – 05/02/2016 12 | P a g e
5.0 Appendix – Importance of Product Standards and UL Listing
The National Electric Code (NEC), or NFPA® 701, is a regionally adopted standard which aims for safe
installation and wiring of electrical equipment. Underwriter’s Laboratories (UL) is an independent global
standards company focused on safety science. Compliance with both of these standards ensures safe
installation of electrical and electronic equipment within residential spaces.
A listing with UL is important because it indicates to the installer and consumer that UL has received
samples of the product and conducted testing, proving that the product meets UL’s requirements.
As is the case with all electrical products, it is important to meet the regionally accepted NEC which will
direct the installer to follow the manufacturer’s instructions for the listed product being installed, thus
directing the installer to install products and solutions which have been listed via a standards agency
such as UL. It is important to follow the guidelines detailed in this application note and the instruction
sheet for the subplate solution to ensure compliance to the UL Listing and subsequently the locally
adopted code, ensuring a safe, high quality, and high performance solution.
2014 NEC Article 110.3(B) reads:
“Listed or Labeled equipment shall be installed and used in accordance with any instructions included in
the Listing or Labeling.”
Looking back over 20 years, 1993 NEC Article 110.3(B) is essentially the same:
“Installation and Use. Listed or labeled equipment shall be used or installed in accordance with any
instructions included in the listing or labeling.”
Lutron’s LiteTouch Retrofit solution allows the installer to maintain compliance with UL and NEC with a
simple solution that can be implemented into any LiteTouch Installation regardless of whether the
existing LiteTouch enclosures are newer (with pop-rivet fixed barriers) or older (with welded fixed
barriers) and utilizing the existing infrastructure.
1 National Electrical Code, NEC, and NFPA are registered trademarks of the National
Fire Protection Association, Inc. Quincy, MA.