understanding access databases - mcgraw-hill...
TRANSCRIPT
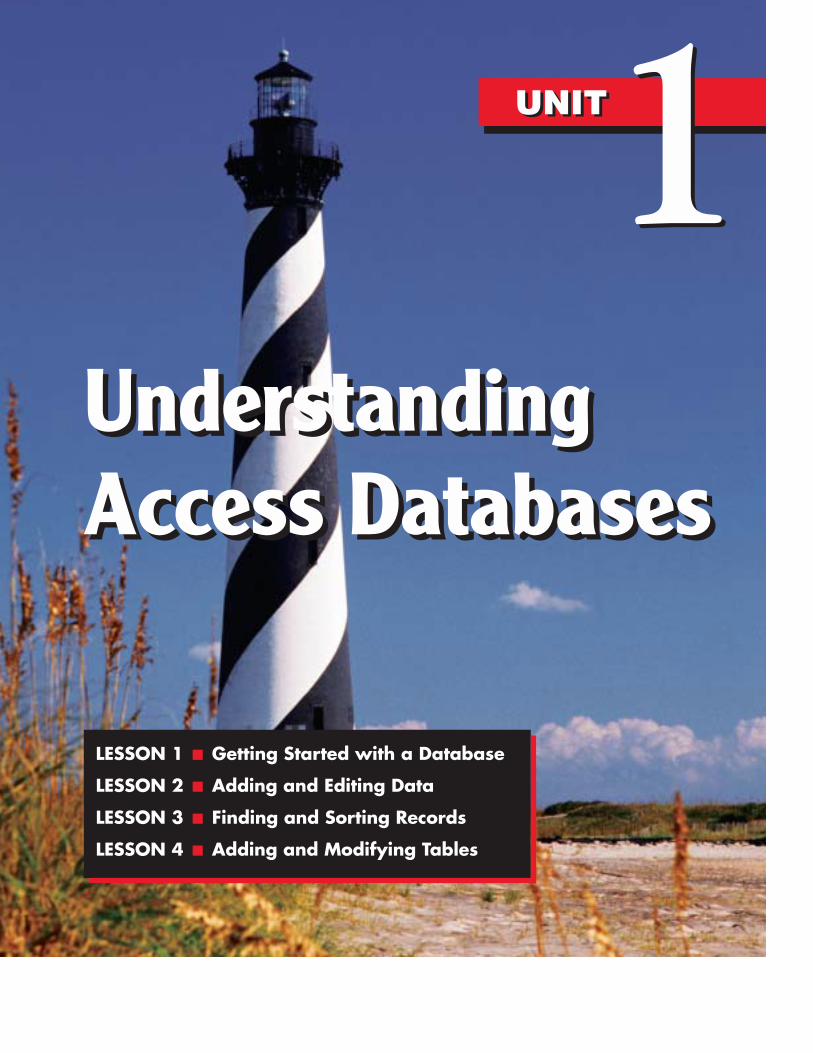
11UnderstandingAccess DatabasesUnderstandingAccess Databases
LESSON 1 ■ Getting Started with a Database
LESSON 2 ■ Adding and Editing Data
LESSON 3 ■ Finding and Sorting Records
LESSON 4 ■ Adding and Modifying Tables
Getting Startedwith a Database11
6
O B J E C T I V E S After completing this lesson, you will be able to:
1. Start Access.2. Identify parts of the Access screen.3. Look at database objects.4. Work with tables.5. Work with queries.6. Open multiple objects.7. Print a table and a query.8. Manage Access files and exit Access.
Estimated Time: 1¾ hours
Microsoft Access is database software that tracks information for businessesor individuals. It’s included in the Microsoft Office suite and is also avail-
able as a stand-alone program.Access is a relational database management system that links tables through com-
mon fields such as a part number, invoice number, or social security number. Rela-tional database management systems can eliminate duplication of data and en-hance data validity by specifying relationships between tables. A relational data-base is different from a flat database. Aflat database is a file that stores data that is notlinked by common fields. For example, you can use Excel to create a flat database.
Everyone uses databases everyday. The telephone book is a database thatdisplays information about people, companies, associations, and other groups.
MICROSOFT OFFICESPECIALIST
A C T I V I T I E SIn this lesson:
AC03S-2-2AC03S-3-4AC03S-4-2AC03S-4-3AC03S-4-4AC03S-4-5AC03S-4-6
See Appendix A.
Point out to students that the learningobjectives show what they will learn in thelesson. Each heading in the lesson correlatesto a learning objective.Required Files:CC-Dat-01, CC-Emp-01
PREPARE
Teaching Resources:This text is supported by ClassroomPresentations in a PowerPoint format.For this lesson, use Access ClassroomPresentation 1.
TEACH

Databases also include information about you. You are part of your school’s da-tabase because the school keeps track of when you enrolled, what coursesyou’ve taken, what grades you’ve received, where you live, and other importantinformation.
NOTE: The database you work with in this course relates to the CaseStudy about Carolina Critters, a fictional company that manufactures stuffed
animals (see pages 1 through 4).
Starting AccessIn this lesson, you work with tables and queries. Tables and queries are objects. Anobject is a database element with a specific purpose. The main database objects in-clude tables, queries, forms, reports, pages, macros, and modules. You use theseobjects to store, display, select, or perform an action in your database.
A table is the major database object that stores all data. Tables created in Accessare similar to tables created in a word processor or spreadsheet program. Withineach table, data is stored as a record. A record is a row in a table that contains re-lated data about one entity or activity. Examples of records include a customer, aninvoice, or a sales transaction. Each data element within a record is a field. A field isan individual piece of information in a record represented by a column in a table.
All data is stored in tables. However, you most often use queries to extract datastored in one or more related tables. Aquery is a major database object that extractsinformation from one or more tables or queries based on specific criteria. Criteriaare required conditions that limit the number of records and fields to be dis-played. A query uses a design grid to set which fields should be displayed andwhat criteria should be met.
Your school has a table of students’ names, social security numbers, and phonenumbers. A student’s name, social security number, and phone number, collec-tively, make up a record of information about a single student. A student’s socialsecurity number is a field in the record.
Your school probably has another table that lists courses for each semester. An-other table might list the students who are enrolled in specific courses. To makethe database manageable, the information is not stored in one big table. Yourschool’s database consists of small, manageable tables that are related to eachother. One reason for creating a relational database is to be able to manage data ef-ficiently and effectively.
Lesson 1 ■ Getting Started with a Database ACCESS 7
Objective 1
FIGURE 1-1Sample table
Record
Field
b
bIn Access Classroom Presentation 1.

TIP: Data is described as “normalized” when it is broken down intoseparate, smaller tables with no repetition of data from table to table.
E X E R C I S E 1-1 Copy a Database and Start Access
There are several ways to start Access, depending on how your system is in-stalled. For example, you can use the Windows taskbar, the Microsoft Officetoolbar, My Computer, or Windows Explorer. If a shortcut is available to start Ac-cess, you can double-click the icon on your desktop.
NOTE: Windows provides many ways to start applications. If you haveproblems, ask your instructor for help.
In this course, you cannot work directly from a CD or a disk. You need to copythe files you need for a particular lesson to a folder on your hard drive or a sharednetwork drive. For example, for Lesson 1, you need the files CC-Dat-01, and CC-Emp-01. If you need help copying files to your computer, ask your instructor orlab manager for assistance.
NOTE: For each lesson, you are required to copy and rename the studentdatabase. You should be comfortable managing all aspects of a file in the
Windows environment.
1.1. Turn on your computer. Windows loads.
2.2. Right-click the Start button on the Windows taskbar. A shortcutmenu opens.
3.3. Click Explore. When the Windows Explorer opens, click the Maximizebutton to maximize the window.
NOTE: When you are told to “click” a menu option or a toolbar button,use the left mouse button. Use the left mouse button unless you are told
explicitly to “right-click.”
4.4. In the left pane, select the Student CD and open the folder Lesson 01. Thefiles contained in the folder appear in the right pane.
NOTE: Your instructor will tell you where the folders and files for thiscourse are located.
5.5. In the right pane, point at the filename CC-Dat-01 and right-click. ChooseCopy from the shortcut menu.
6.6. In the left pane, open the My Documents folder.
NOTE: Check with your instructor to verify where you will store your files.Many times, the My Documents folder is the default folder when you’re
creating or storing files.
8 ACCESS Unit 1 ■ Understanding Access Databases
1
1If you prefer to copy the student startupdatabases to a network directory, you can
remove the Read Only property from each file.Students can copy directly from the network to theirworking folders without having to remove the ReadOnly property in step 9.
2Explain the workstation configuration, whatstudents should do to start Access, and where
the original work files are located.
2
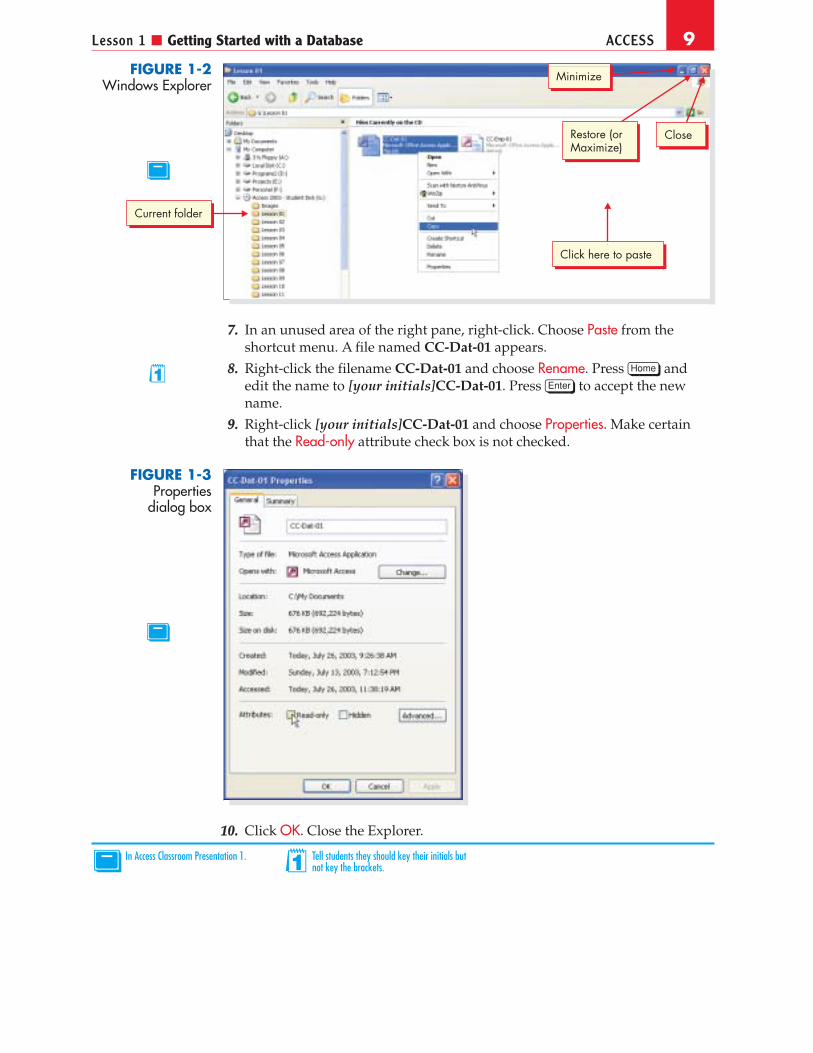
7.7. In an unused area of the right pane, right-click. Choose Paste from theshortcut menu. A file named CC-Dat-01 appears.
8.8. Right-click the filename CC-Dat-01 and choose Rename. Press [Home] andedit the name to [your initials]CC-Dat-01. Press [Enter] to accept the newname.
9.9. Right-click [your initials]CC-Dat-01 and choose Properties. Make certainthat the Read-only attribute check box is not checked.
10.10. Click OK. Close the Explorer.
Lesson 1 ■ Getting Started with a Database ACCESS 9
bIn Access Classroom Presentation 1. 1Tell students they should key their initials butnot key the brackets.
1
b
FIGURE 1-2Windows Explorer
Current folder
Restore (orMaximize)
Minimize
Close
Click here to paste
FIGURE 1-3Properties
dialog box
b
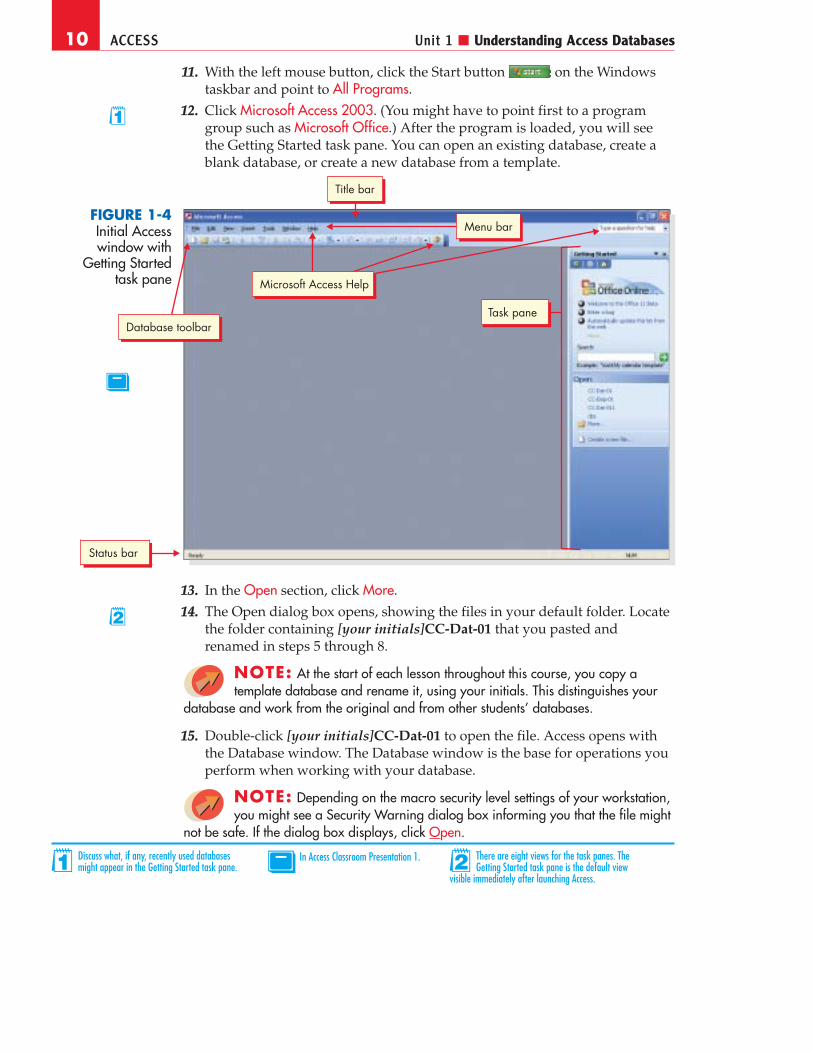
11.11. With the left mouse button, click the Start button on the Windowstaskbar and point to All Programs.
12.12. Click Microsoft Access 2003. (You might have to point first to a programgroup such as Microsoft Office.) After the program is loaded, you will seethe Getting Started task pane. You can open an existing database, create ablank database, or create a new database from a template.
13.13. In the Open section, click More.
14.14. The Open dialog box opens, showing the files in your default folder. Locatethe folder containing [your initials]CC-Dat-01 that you pasted andrenamed in steps 5 through 8.
NOTE: At the start of each lesson throughout this course, you copy atemplate database and rename it, using your initials. This distinguishes your
database and work from the original and from other students’ databases.
15.15. Double-click [your initials]CC-Dat-01 to open the file. Access opens withthe Database window. The Database window is the base for operations youperform when working with your database.
NOTE: Depending on the macro security level settings of your workstation,you might see a Security Warning dialog box informing you that the file might
not be safe. If the dialog box displays, click Open.
10 ACCESS Unit 1 ■ Understanding Access Databases
1
1Discuss what, if any, recently used databasesmight appear in the Getting Started task pane. bIn Access Classroom Presentation 1.
b
FIGURE 1-4Initial Accesswindow with
Getting Startedtask pane
Menu bar
Database toolbarTask pane
Title bar
Status bar
Microsoft Access Help
2There are eight views for the task panes. TheGetting Started task pane is the default view
visible immediately after launching Access.
2
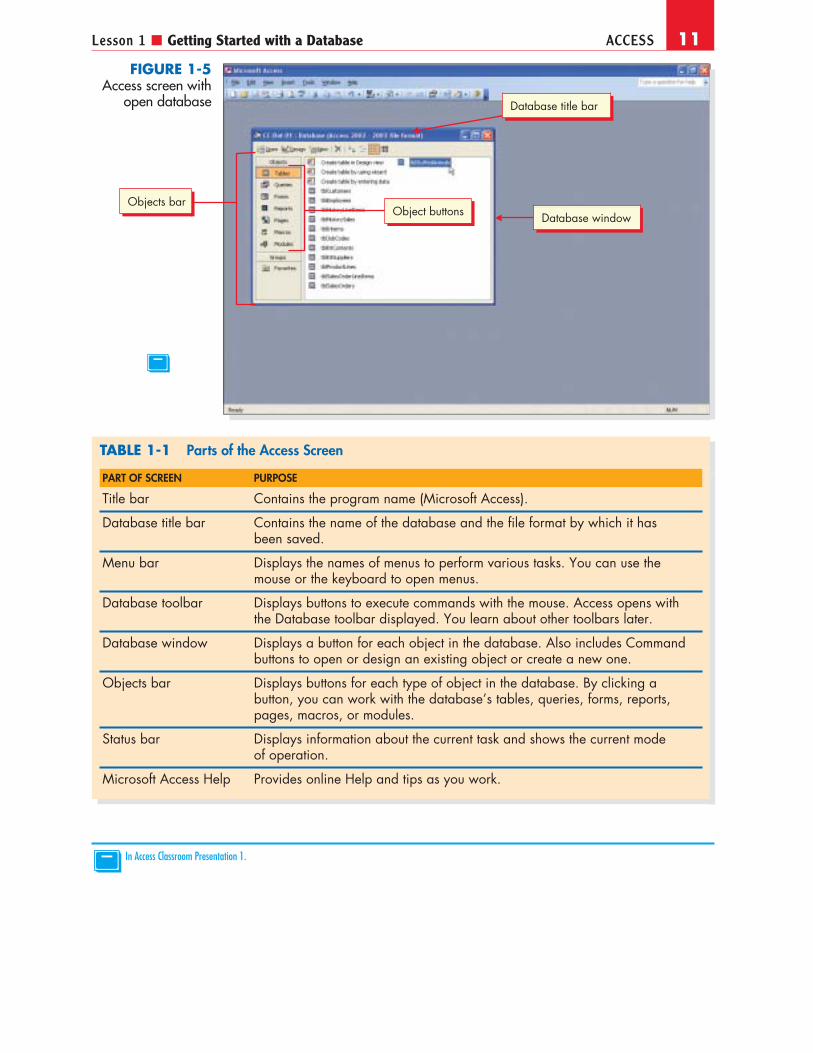
Lesson 1 ■ Getting Started with a Database ACCESS 11
b
bIn Access Classroom Presentation 1.
FIGURE 1-5Access screen with
open database
Objects barDatabase window
Database title bar
PART OF SCREEN PURPOSE
Title bar Contains the program name (Microsoft Access).
Database title bar Contains the name of the database and the file format by which it hasbeen saved.
Menu bar Displays the names of menus to perform various tasks. You can use themouse or the keyboard to open menus.
Database toolbar Displays buttons to execute commands with the mouse. Access opens withthe Database toolbar displayed. You learn about other toolbars later.
Database window Displays a button for each object in the database. Also includes Commandbuttons to open or design an existing object or create a new one.
Objects bar Displays buttons for each type of object in the database. By clicking abutton, you can work with the database’s tables, queries, forms, reports,pages, macros, or modules.
Status bar Displays information about the current task and shows the current modeof operation.
Microsoft Access Help Provides online Help and tips as you work.
TABLE 1-1 Parts of the Access Screen
Object buttons

E X E R C I S E 1-2 Display Database Properties
Database properties are characteristics or attributes that describe and define thedatabase.
1.1. Move the pointer to File on the menu bar. Click to display the menu.
2.2. Move the pointer to Database Properties and click to open the Propertiesdialog box.
NOTE: If you do not see Database Properties in the menu, click the down-pointing arrows at the bottom of the menu to expand the menu. These arrows
indicate more options are available.
3.3. Click the Contents tab to see a list of the tables, queries, forms, reports,pages, macros, and modules in the database.
NOTE: There are no macros, modules, or data access pages in yourdatabase for Lesson 1.
4.4. Click Cancel to close the dialog box.
Identifying Parts of the Access ScreenToolbar buttons are identified by name when you point to them with the mouse.
12 ACCESS Unit 1 ■ Understanding Access Databases
1
1You may have your students include theirnames as a database property. bIn Access Classroom Presentation 1.
FIGURE 1-6Properties dialogbox, Contents tab
b
d Objective 2
dObjective 2 Startup File:You can use the file Objective2-CC-Dat-01 tostart from this point in the Lesson.

E X E R C I S E 1-3 Identify Buttons, Menus, and Menu Items
Access uses buttons and menus similar to other Office applications. Some mightseem familiar and will function the same as in Word or Excel; other buttons andmenus are unique to Access. Hovering a mouse over a button will display itsScreenTip. A ScreenTip is a name or information about an object that displays in ayellow box below the mouse pointer.
1.1. Position the pointer over the New button on the Database toolbar. Thisopens the New File Task Pane. From here you can select from a list ofsample databases or create a blank database.
2.2. Move the mouse pointer over the Open button . Click to open an existingdatabase.
3.3. Because we are only looking at possible databases toopen, click Cancel.
NOTE: Some toolbar buttons are light gray,indicating the command is currently not available.
You can still identify the button by positioning the mousepointer over it.
4.4. Point to other toolbar buttons and identify them.
TIP: The menu shows which commands have keyboard shortcuts. Keyboardshortcuts appear to the right of the menu command. (Your computer might also
show the keyboard shortcut in the ScreenTip.)
5.5. Move the pointer to Edit on the menu bar and click on the word. This opensthe Edit menu. Click Edit to close the menu.
REVIEW: If a down-pointing arrow appears at the bottom of themenu, moving the pointer to the bottom of the menu or clicking on the arrow
will display all the menu options.
6.6. Click View to display the View menu. Move the pointer to the Arrange Iconsmenu option. The right-pointing arrow indicates a submenu. This submenudisplays options for arranging the icons in the Database window. ClickView to close the menu.
TIP: Office 2003 uses adaptive menus to display only the most recentlyused commands. If you wish to always see all commands available on the
menu, select Tools, Customize. In the Options tab of the dialog box, place a checkmark in the box beside Always show full menus and click OK.
Lesson 1 ■ Getting Started with a Database ACCESS 13
FIGURE 1-7Identifying
toolbar button
b
bIn Access Classroom Presentation 1. 1After selecting Edit, you can use the leftand right keyboard arrows to display
complete menus.
1

Looking at Database ObjectsAt the left of the Database window is an Objects bar containing object buttons.You use these buttons to select the elements with which to work. Objects can be atable, a query, or a design element in a form. When you select a button, you see thenames of all the objects related to the button that are in the database. For example,if you select the Tables button , the names of all the tables in this databaseare displayed.
The objects in the databases for this text use the Leszynski Naming Conventions.These conventions are widely recognized and used by software developers andprogrammers to name database objects. Object names are preceded by a prefix.Main words are capitalized with no spaces between words.
NOTE: You can read more about this naming convention in the Preface.
There are seven types of major objects in an Access database:● Tables store information about a person, place, thing, or event. A table
consists of records, which are made up of fields. The information in atable appears in rows (records) and columns (fields), similar to an Excelworksheet.
● Queries are used to find answers to questions about the data in thedatabase. You can design queries to show fields from one or more tables.You can specify criteria or conditions that must be met for a record tobe included. You can use a query to calculate totals or averages frominformation in the table.
● Forms display information in an attractive, easy-to-read screen format.Forms can be used to edit and add records on the computer monitor.
14 ACCESS Unit 1 ■ Understanding Access Databases
dObjective 3 Startup File:You can use the file Objective3-CC-Dat-01 tostart from this point in the Lesson.
d Objective 3
1
1You might wish to explain that namingconventions can become very important in a
database. Maintaining standards is important forefficient modification.
Naming Conventions
PREFIX OBJECT TYPE EXAMPLE
tbl Table tblEmployees
qry Query qryKitSuppliers
frm Form frmStuffedAnimals
rpt Report rptInventoryValue
pge Page pgeCustomers
mcr Macro mcrPreviewReport
bas Module basMyProgram
TABLE 1-2

● Reports display information in a printable page format. You can sortrecords, calculate totals, and add graphics to make the report attractiveand easy to read.
● Pages display information as a Web page. They are formatted to be viewedin a Web browser such as Internet Explorer or Netscape Navigator.
● Macros run tasks through a series of commands. You can write macros forrepetitive activities and to automate procedures you use often.
● Modules contain Visual Basic for Applications (VBA) functions orprocedures.
E X E R C I S E 1-4 Work in the Database Window
The major objects of a database can be displayed in views similar to those in Win-dows Explorer. The major objects, including tables and queries, can be displayedas large icons, small icons, a list, or with details.
1.1. Click the Tables button on the Objects bar. All the tables in thecurrent database are shown. The prefix for a table is tbl.
2.2. Click the Details button in the Database window. Access shows youtable descriptions when you set the window to this view.
TIP: Drag the vertical border between column headings to show more ofthe description.
3.3. Click the Queries button on the Objects bar. All the queries in thedatabase are shown. The prefix for a query is qry.
4.4. Click the Large Icons button and then click the Small Icons button tosee what other views are available.
5.5. Click the List button to return to the original display.
6.6. Click the Tables button . Right-click tblJobCodes. Choose Renamefrom the shortcut menu.
7.7. Key tblMine and press [Enter]. The table names are in alphabetical order inList view.
8.8. Right-click tblMine and choose Rename. Key tblJobCodes and press [Enter].
TIP: You can rename any database object.
Lesson 1 ■ Getting Started with a Database ACCESS 15
1
1Explain that the views in the Database windoware similar to views in many Open dialog boxes,
in My Computer, and in the Explorer.2Stress the importance of renaming the table
correctly. Tables are used in queries, forms, andreports. The table’s name must match the references inthose objects.
2

E X E R C I S E 1-5 Explore Datasheet and Design Views
You can look at tables and queries in several views. You can press [Ctrl]+[<] to scrolldown or [Crtl]+[>] to scroll up through the following table view options.
NOTE: When Keyboard combinations (such as [Ctrl]+[>]) are shown in thistext, hold down the first key as you press the second key. Release the second key
and then release the first key. An example of this entire sequence is: hold down [Ctrl], press[>], release [>], release [Ctrl]. With practice, this sequence becomes easy.
These shortcuts cycle through all four views.● Datasheet View. This view appears when you open a table or query.
Datasheet View resembles an Excel worksheet with rows and columns.Each record is displayed in its own row. Each field is shown in its owncolumn. You can enter and edit data, find and sort records, and resizerows and columns.
● Design View. You use this view to create or modify the layout or structureof a table or query. You do not see the records in this view. DesignView includes field properties with formatting options, default values,validation rules, and other characteristics for each field in the table. (Youlearn more about data types and field properties in later lessons.) In aquery, you see a Field List and a design grid with sorting directions andcriteria. In a table, you see a grid listing field names, the type of datacontained in each field (number, text, currency, and so on), and adescription of the field.
● PivotTable View. You use this view to summarize and analyze data in atable, query, or form. Information is displayed in a table format withcolumns and rows. You can use different levels of detail or organize databy dragging the fields and items or by showing and hiding items in thedrop-down lists for the fields.
● PivotChart View. You use this view to summarize and analyze data in atable, query, or form. Information is displayed in a chart format. You canuse different levels of detail or organize data by dragging the fields anditems or by showing and hiding items in the drop-down lists for thefields.
The maximize button is not in the margin.
1.1. Click tblCustomers. Click the Open button at the top of the Databasewindow to open the Customers table in Datasheet View. Click theMaximize button to maximize the Table window.
16 ACCESS Unit 1 ■ Understanding Access Databases
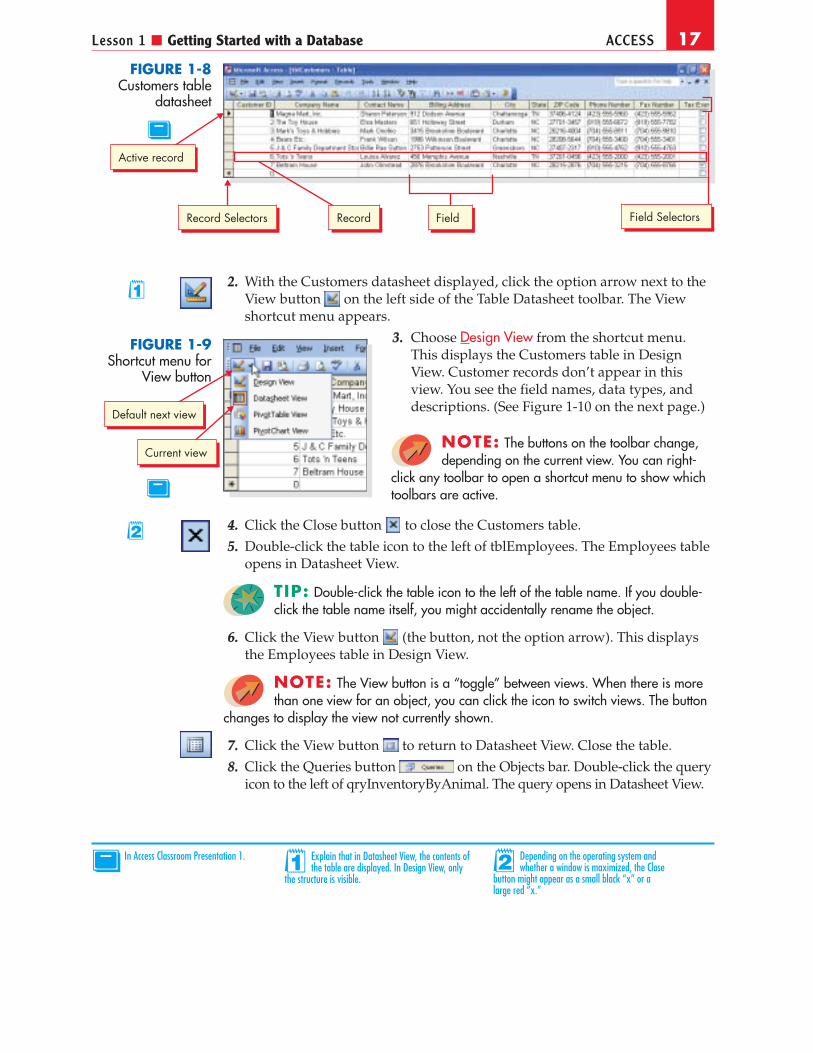
2.2. With the Customers datasheet displayed, click the option arrow next to theView button on the left side of the Table Datasheet toolbar. The Viewshortcut menu appears.
3.3. Choose Design View from the shortcut menu.This displays the Customers table in DesignView. Customer records don’t appear in thisview. You see the field names, data types, anddescriptions. (See Figure 1-10 on the next page.)
NOTE: The buttons on the toolbar change,depending on the current view. You can right-
click any toolbar to open a shortcut menu to show whichtoolbars are active.
4.4. Click the Close button to close the Customers table.
5.5. Double-click the table icon to the left of tblEmployees. The Employees tableopens in Datasheet View.
TIP: Double-click the table icon to the left of the table name. If you double-click the table name itself, you might accidentally rename the object.
6.6. Click the View button (the button, not the option arrow). This displaysthe Employees table in Design View.
NOTE: The View button is a “toggle” between views. When there is morethan one view for an object, you can click the icon to switch views. The button
changes to display the view not currently shown.
7.7. Click the View button to return to Datasheet View. Close the table.
8.8. Click the Queries button on the Objects bar. Double-click the queryicon to the left of qryInventoryByAnimal. The query opens in Datasheet View.
Lesson 1 ■ Getting Started with a Database ACCESS 17
bIn Access Classroom Presentation 1. 1Explain that in Datasheet View, the contents ofthe table are displayed. In Design View, only
the structure is visible.2Depending on the operating system and
whether a window is maximized, the Closebutton might appear as a small black “x” or alarge red “x.”
2
1
FIGURE 1-9Shortcut menu for
View button
b
Current view
Default next view
b
Active record
Field
FIGURE 1-8Customers table
datasheet
Record Selectors Record Field Selectors

9.9. Click the View button to see Design View for a query.
18 ACCESS Unit 1 ■ Understanding Access Databases
b
bIn Access Classroom Presentation 1.
b
FIGURE 1-11Inventory queryin Design View
FIGURE 1-10Customers tablein Design View

10.10. Click the Close button to close the Query window.
Working with TablesIn Datasheet View, the active record is identified by the appearance of a triangle inthe Record Selector. The Record Selector is a small box or bar to the left of a recordthat you can click to select the entire record. You can edit fields in the active record.
A table in Datasheet View has two modes: edit mode and navigate mode. Editmode is the mode in which changes to the contents of a field can be made and theinsertion point is visible. When the insertion point is visible, it looks like an I-beam. Navigation mode is the mode in which an entire field is selected and the in-sertion point is not visible. You can toggle between edit mode and navigationmode by pressing [F2]. Methods of navigating within a table include the followingfour methods.
● Scroll bars frame the right and lower borders of the Table window. Youcan use the scroll bars to bring different parts of your table into view.
NOTE: When you scroll a window, you change what you see on thescreen. You do not move the pointer.
● Navigation buttons are in the lower left corner of the Table window.These buttons include First Record , Previous Record , Next Record
, Last Record , and New Record .● Press [Tab] to move from field to field and [Shift]+[Tab] to move backward.● Click the Record Selector to the left of a record.
E X E R C I S E 1-6 Scroll Through a Table
You can view more data on a table by moving the horizontal scroll bar or by mov-ing the vertical scroll bar. Moving the horizontal scroll bar to the right allows youto see more fields in a record. Moving the vertical scroll bar down allows you tosee more records in a table.
1.1. Click the Tables button on the Objects bar. Double-clicktblEmployees and click the Maximize button to maximize theEmployees table window in Datasheet View.
2.2. On the vertical scroll bar, click below the scroll box to move down one screen.
3.3. Drag the scroll box to the top of the vertical scroll bar.
4.4. Click the down scroll arrow twice to move down two rows.
5.5. Click the right scroll arrow on the horizontal scroll bar once; then click theleft scroll arrow once to return to the original horizontal position.
Lesson 1 ■ Getting Started with a Database ACCESS 19
d Objective 4
dObjective 4 Startup File:You can use the file Objective4-CC-Dat-01 tostart from this point in the lesson.
1
1Distinguish between the navigationbuttons and the scroll bars. It is not
unusual for new users to confuse these.2Review with students how to drag items.
2

6.6. Click the up scroll arrow on the vertical scroll bar twice. Notice thatthroughout this scrolling movement, the pointer in the Record Selectorcolumn remains in the first record
7.7. Close the table.
20 ACCESS Unit 1 ■ Understanding Access Databases
FIGURE 1-12Using scroll bars
b
Up scroll arrow
Scroll box
Vertical scroll bar
Down scroll arrow
Right scroll arrowLeft scroll arrow
Horizontal scroll bar
Record Selectorpointer
Scroll box
bIn Access Classroom Presentation 1.
Scrolling Through a Table
TO MOVE THE VIEW DO THIS
Up one line Click the up scroll arrow.
Down one line Click the down scroll arrow.
Up one screen Click the scroll bar above the scroll box.
Down one screen Click the scroll bar below the scroll box.
To any relative position Drag the scroll bar up or down.
To the right Click the right scroll arrow.
To the left Click the left scroll arrow.
TABLE 1-3
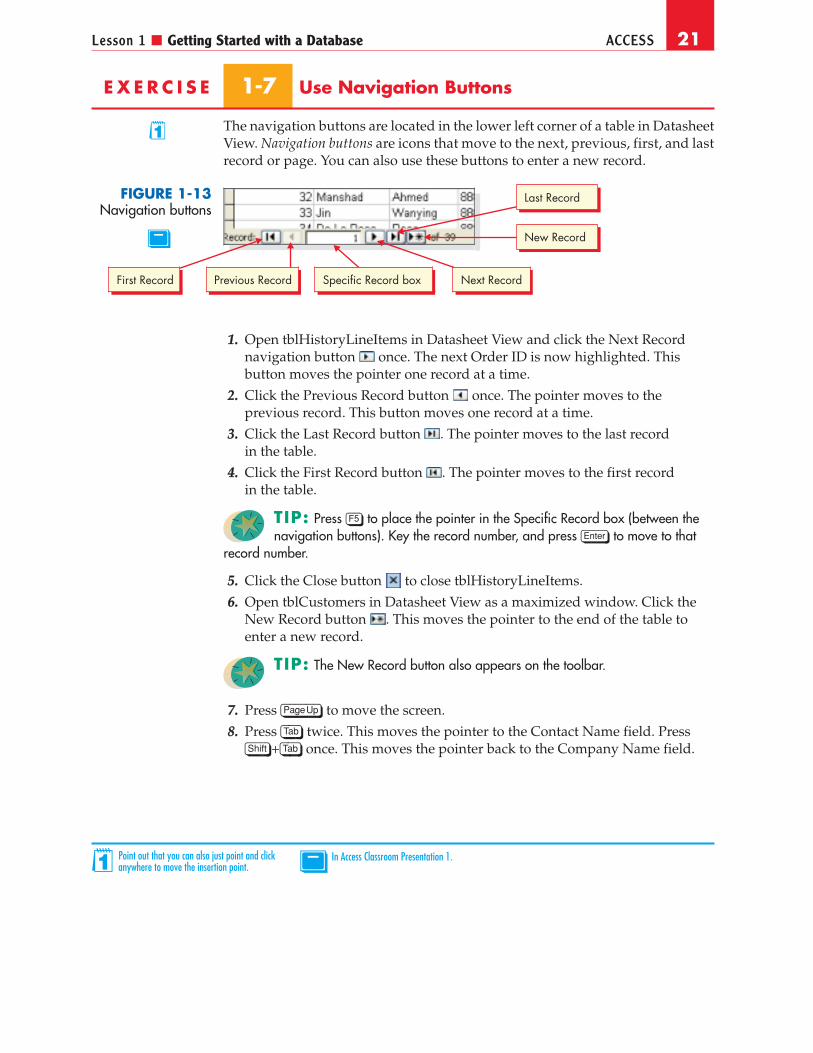
E X E R C I S E 1-7 Use Navigation Buttons
The navigation buttons are located in the lower left corner of a table in DatasheetView. Navigation buttons are icons that move to the next, previous, first, and lastrecord or page. You can also use these buttons to enter a new record.
1.1. Open tblHistoryLineItems in Datasheet View and click the Next Recordnavigation button once. The next Order ID is now highlighted. Thisbutton moves the pointer one record at a time.
2.2. Click the Previous Record button once. The pointer moves to theprevious record. This button moves one record at a time.
3.3. Click the Last Record button . The pointer moves to the last recordin the table.
4.4. Click the First Record button . The pointer moves to the first recordin the table.
TIP: Press [F5] to place the pointer in the Specific Record box (between thenavigation buttons). Key the record number, and press [Enter] to move to that
record number.
5.5. Click the Close button to close tblHistoryLineItems.
6.6. Open tblCustomers in Datasheet View as a maximized window. Click theNew Record button . This moves the pointer to the end of the table toenter a new record.
TIP: The New Record button also appears on the toolbar.
7.7. Press [Page{Up] to move the screen.
8.8. Press [Tab] twice. This moves the pointer to the Contact Name field. Press[Shift]+[Tab] once. This moves the pointer back to the Company Name field.
Lesson 1 ■ Getting Started with a Database ACCESS 21
1
1Point out that you can also just point and clickanywhere to move the insertion point.
FIGURE 1-13Navigation buttons
First Record Previous Record Specific Record box Next Record
Last Record
New Recordb
bIn Access Classroom Presentation 1.
E X E R C I S E 1-8 Change Column Widths, Row Heights,and Fonts
To make your table easier to view, you can increase or decrease column widths. If afield heading is longer than the text, you can adjust the column to accommodatethe heading or entry. You also can make the column narrower if there is too muchblank space.
You can also make the rows appear to be taller. The default font for DatasheetView is 10-point Arial, but you can change that, too. Changes to the column width,the row height, or the font affect the entire table.
1.1. In the Customers table, place the pointer on the vertical border betweenthe Company Name and Contact Name column selectors at the tops of thesecond and third columns. Notice that the pointer changes to a two-headedarrow with a wide vertical bar. This is the resize pointer.
2.2. Drag the pointer to the right approximately half an inch to allow enoughspace for the word “Stores” in Record 5.
TIP: You can set the width of a column to the widest text by double-clickingits column selector’s right vertical border.
3.3. Place the pointer between the Billing Address and City column selectors.
22 ACCESS Unit 1 ■ Understanding Access Databases
FIGURE 1-14Resizing columns
Resizing pointer
b
bIn Access Classroom Presentation 1. 1Explain that double-clicking when the columnselector is a two-headed arrow will set a column
width to the longest item.
1
Keyboard Navigation Shortcuts
PRESS TO DO THIS
[Tab] Move to the next field.
[Shift]+[Tab] Move to the previous field.
[Page{Up] Move up one screen.
[Page{Down] Move down one screen.
[Ctrl]+[Home] Return to the first record.
[Ctrl]+[End] Move to the last record.
TABLE 1-4

4.4. When the pointer changes to a two-headed arrow, drag the pointer to theleft, making the Billing Address column smaller until it just accommodatesthe longest billing address.
5.5. From the Format menu, choose Font. Choose Arial Narrow as the font and 12as the size. Click OK.
6.6. From the Format menu, choose Font again. Choose 10 as the size. Click OK.
7.7. In the Record Selector area, place the pointer on the horizontal line betweenthe first and second row to the left of the first field.
8.8. When the pointer changes to a two-headed arrow, drag the pointer down tomake the row approximately twice its current height.
NOTE: The layout of a table is the way it appears on the screen. Itincludes the size of the columns, the height of the rows, the fonts, the
arrangement of the columns, the colors, and other settings.
9.9. In the Record Selector area, place the pointer on the horizontal line betweenthe first and second rows. Drag the pointer up until the row heightaccommodates the height of all letters.
10.10. Right-click the Record Selector for row one. From the shortcut menu,choose Row Height.
11.11. Make certain that a check appears in the Standard Height check box.
12.12. Click OK. Close the table. A dialog box appears, prompting you to save thelayout of the Customers table. Click Yes to accept the changes.
E X E R C I S E 1-9 Hide and Unhide Columns
Most tables contain more fields than you can view at one time, so you need toscroll the window. There are other times when it is more convenient to see only afew columns, such as names and phone numbers without seeing the addresses.
Lesson 1 ■ Getting Started with a Database ACCESS 23
1
1The font size affects row heights andcolumn widths. You often need to
readjust both after changing the font size.bIn Access Classroom Presentation 1. 2Explain that occasionally sensitive
information, such as social securitynumbers, must be hidden on printouts.
FIGURE 1-15Adjusting
row height
Resizing pointer
b
2

1.1. Click the Tables button on the Objects bar. Double-clicktblKitSuppliers and click the Maximize button to maximize the KitSuppliers table in Datasheet View.
2.2. Click and drag on the column selector for Contact Name and drag throughthe column selector ZIP Code.
3.3. From the Format menu, choose Hide Columns.4.4. To display a hidden column, select the Format menu, choose Unhide
Columns. The Unhide Columns dialog box will appear.
5.5. Select the Contact Name check box.
6.6. Click Close. The Contact Name field reappears in the table.
7.7. From the File menu, choose Close to close the table. A dialog box appears,prompting you to save the layout of the Kit Suppliers table. Click No toreject the changes.
Working with QueriesA query has many of the same characteristics as a table. You can look at all thefields from the table, or you can choose to view only specific fields.
In Datasheet View, all the navigation commands in a query are the same asthose in a table. You can change the font, the column widths, and the row height,and you can hide columns.
E X E R C I S E 1-10 Scroll and Navigate in a Query
Just as in a table, you can use the horizontal and vertical scroll bars to view allfields and records.
1.1. Click the Queries button . Double-click qryItemsByProductID.Make certain that the window is maximized. This query shows threefields from the Stuffed Animals table.
2.2. Click below the vertical scroll box to move down one screen.
3.3. Drag the scroll box to the top of the vertical scroll bar.
4.4. Click the down scroll arrow twice to move down two rows.
NOTE: There is no horizontal scroll bar because the query is not wideenough to need one.
5.5. Click the Next Record button once. The next Product ID is highlighted.
6.6. Click the Previous Record button once.
7.7. Click the Last Record button . The pointer moves to the last recordin the query.
24 ACCESS Unit 1 ■ Understanding Access Databases
dObjective 5 Startup File:You can use the file Objective5-CC-Dat-01to start from this point in the lesson.
d Objective 5
8.8. Click the First Record button .
9.9. Press [F5] to place the pointer in the Specific Record box. Key 28 and press[Enter]. The pointer moves to the twenty-eighth record.
10.10. Click the Close button to close the query.
E X E R C I S E 1-11 View a Multiple-Table Query
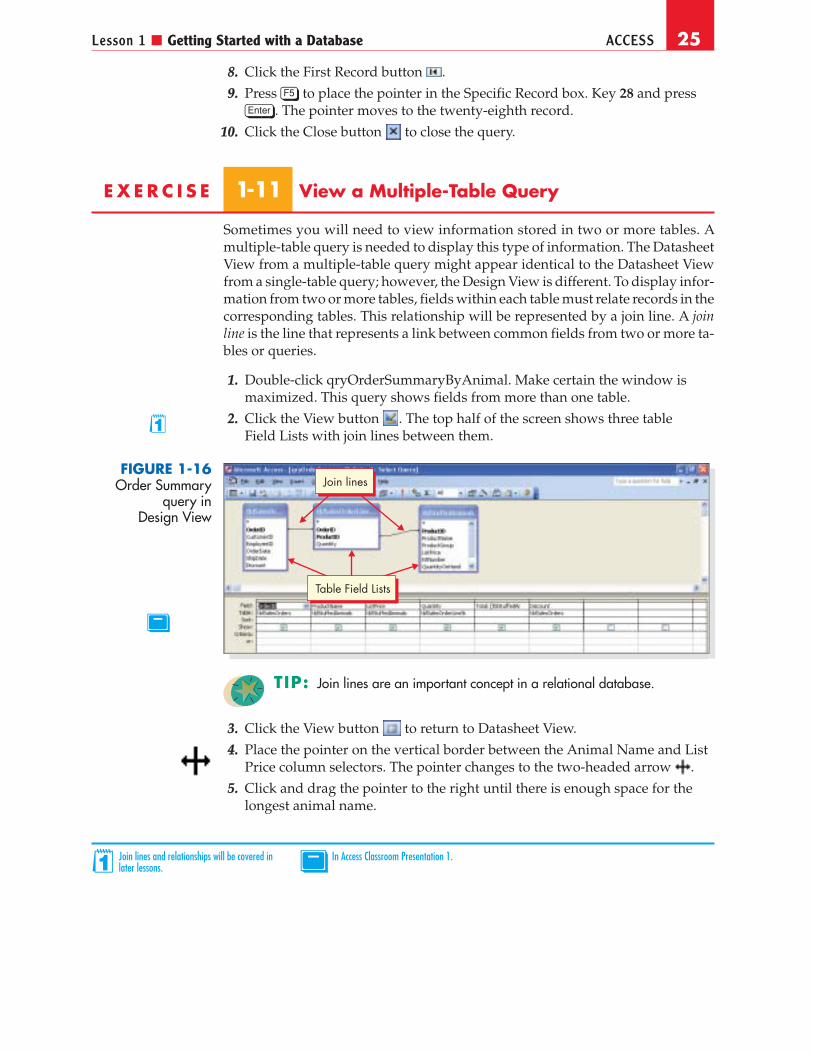
Sometimes you will need to view information stored in two or more tables. Amultiple-table query is needed to display this type of information. The DatasheetView from a multiple-table query might appear identical to the Datasheet Viewfrom a single-table query; however, the Design View is different. To display infor-mation from two or more tables, fields within each table must relate records in thecorresponding tables. This relationship will be represented by a join line. A joinline is the line that represents a link between common fields from two or more ta-bles or queries.
1.1. Double-click qryOrderSummaryByAnimal. Make certain the window ismaximized. This query shows fields from more than one table.
2.2. Click the View button . The top half of the screen shows three tableField Lists with join lines between them.
TIP: Join lines are an important concept in a relational database.
3.3. Click the View button to return to Datasheet View.
4.4. Place the pointer on the vertical border between the Animal Name and ListPrice column selectors. The pointer changes to the two-headed arrow .
5.5. Click and drag the pointer to the right until there is enough space for thelongest animal name.
Lesson 1 ■ Getting Started with a Database ACCESS 25
1
1Join lines and relationships will be covered inlater lessons. bIn Access Classroom Presentation 1.
FIGURE 1-16Order Summary
query inDesign View
b
Join lines
Table Field Lists
6.6. Place the pointer between the Total and Discount field names. When thepointer shows a two-headed arrow, double-click to size the width to the data.
7.7. Choose Format and then choose Font. Key t and choose Times New Roman.Choose 12 as the size. Click OK.
8.8. Choose Format and then choose Font. Key a and choose Arial. Set 10 as thesize. Click OK.
9.9. Place the pointer on the horizontal line between the first and second rowsin the Record Selector column.
10.10. When the pointer changes to a two-headed arrow, drag the pointer downto make the row approximately twice its current height.
11.11. Close the query. A dialog box appears, prompting you to save the layout.Click No to discard the changes.
Working with Multiple ObjectsYou can open more than one table to compare or contrast data in the tables. Youcan also open a query and a table at the same time. When you work with multipleobjects, you can see the data better if you tile the windows.
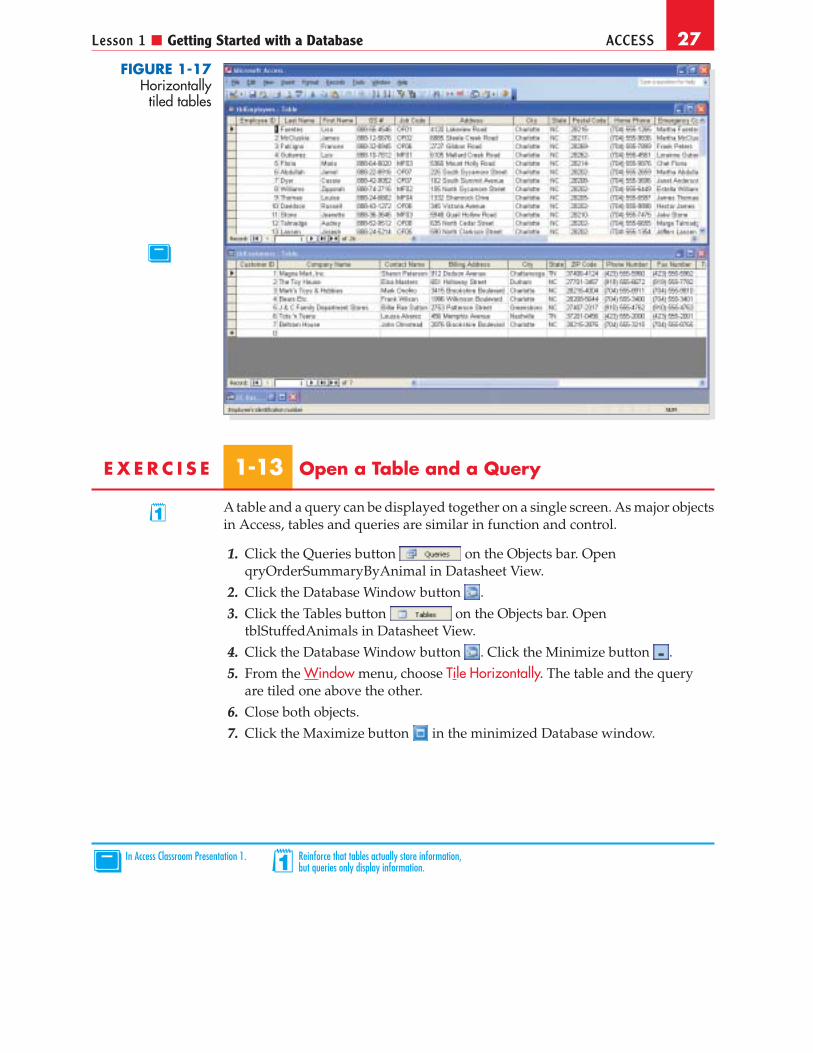
E X E R C I S E 1-12 Open Two Tables
More than one table can be viewed though the window menu option. These win-dows can be displayed as tiled horizontally, tiled vertically, or cascaded.
1.1. Click the Tables button . Open tblCustomers in Datasheet View.
2.2. Click the Window menu to return to the Database window. Choose [yourinitials]CC-Dat-01 database.
3.3. Open tblEmployees in Datasheet View.
4.4. Click the Database Window button on the toolbar. This also switchesyou to the Database window. Click the Minimize button in the Databasewindow to minimize it.
5.5. From the Window menu, choose Tile Vertically. The two tables are tiled sideby side. (See Figure 1-17.)
NOTE: If you do not minimize the Database window, it is tiled along withthe tables.
6.6. Close both tables.
7.7. Click the Maximize button in the minimized Database window.
26 ACCESS Unit 1 ■ Understanding Access Databases
d Objective 6
dObjective 6 Startup File:You can use the file Objective6-CC-Dat-01 tostart from this point in the lesson.
1Discuss with students when viewing twotables simultaneously would be more
efficient for data entry.
1
Lesson 1 ■ Getting Started with a Database ACCESS 27
E X E R C I S E 1-13 Open a Table and a Query
A table and a query can be displayed together on a single screen. As major objectsin Access, tables and queries are similar in function and control.
1.1. Click the Queries button on the Objects bar. OpenqryOrderSummaryByAnimal in Datasheet View.
2.2. Click the Database Window button .
3.3. Click the Tables button on the Objects bar. OpentblStuffedAnimals in Datasheet View.
4.4. Click the Database Window button . Click the Minimize button .
5.5. From the Window menu, choose Tile Horizontally. The table and the queryare tiled one above the other.
6.6. Close both objects.
7.7. Click the Maximize button in the minimized Database window.
b
bIn Access Classroom Presentation 1. 1Reinforce that tables actually store information,but queries only display information.
1
FIGURE 1-17Horizontally
tiled tables

28 ACCESS Unit 1 ■ Understanding Access Databases
Printing Object’s Datasheet ViewYou can print a table or a query as it appears in Datasheet View. You can use any ofthese methods:
● Click the Print button on the Database toolbar.● Choose File, and then choose Print.● Press [Ctrl]+[P].
The menu and keyboard methods open the Print dialog box, where you chooseprinting options. Clicking the Print button uses Access’s default settings andsends the document directly to the printer. The dialog box does not display whenyou use this button.
E X E R C I S E 1-14 Change Page Setup
You can set the page orientation to portrait (vertical) or landscape (horizontal).Landscape is better if a table or query contains many fields and you want to fit thedata on one printed page.
1.1. Click the Tables button on the Objects bar. Open tblCustomers inDatasheet View.
2.2. Choose File and then choose Page Setup to open the Page Setup dialog box.The Margins tab opens by default. This dialog box displays the defaultmargin settings.
3.3. Click the Page tab. This dialogbox displays the orientation,paper, and printer defaultsettings. Click the Landscapeoption button.
4.4. Click OK to close the dialog box.
TIP: Check the orientationfor each table or query beforeyou print.
d Objective 7
dObjective 7 Startup File:You can use the file Objective7-CC-Dat-01to start from this point in the lesson.
1Discuss with students any rules you mighthave regarding printing.
1
bIn Access Classroom Presentation 1.
FIGURE 1-18Page Setup dialog
box, Page tab
b

5.5. Click the Print Preview button to see how your table will print. You canalso see how many pages will print.
6.6. Click the Next Page button in the lower left corner of the screen.
NOTE: Access tiles pages when tables are too wide for the printed page.Only columns that fit on a page print on that page. Columns are not cut
in the middle.
7.7. Click the Close button to close the preview and return to theCustomers table.
TIP: The Close button closes the table, not just the preview.
E X E R C I S E 1-15 Preview and Print a Table
Before printing a table in Access, you should always preview the printout on thescreen. Taking this extra step will prevent wasting paper. In Print Preview, youcorrect erroneous output before committing it to paper.
1.1. To print the Customers table, choose File and then choose Print Preview. Alandscape view of the table will display on the screen.
2.2. Press [Ctrl]+[P] to open the Print dialog box.
3.3. Based on your classroom procedure you can either print the table or cancelthe print process. To cancel, click Cancel. To print the report, click OK. If youare uncertain, ask your instructor.
4.4. To close Print Preview window, click the File menu, and choose Close.
5.5. Close the table.
Lesson 1 ■ Getting Started with a Database ACCESS 29
1Review the navigation iconsin Print Preview. 2Show students how to zoom
in and out in Print Preview.
1 2
3
3Before printing, you might havestudents narrow the columns to fit the
table on a single page. Show students how tocheck that the correct printer is selected. Youneed not save these layout changes.
FIGURE 1-19Print dialog box
b
bIn Access Classroom Presentation 1.

E X E R C I S E 1-16 Preview and Print a Query
Just as when printing a table, you should preview your output before printing aquery.
1.1. Click the Queries button on the Objects bar and openqryOrderSummaryByAnimal in Datasheet View.
2.2. Click the Print Preview button . This query will fit on one page inportrait orientation.
3.3. Press [Ctrl]+[P] to open the Print dialog box.
4.4. Based on your classroom procedure you can either print the table or cancelthe print process. To cancel, click Cancel. To print the report, click OK. If youare uncertain, ask your instructor.
TIP: You can print from the Print Preview window.
5.5. Click the Close button to close only the preview.
6.6. Close qryOrderSummaryByAnimal.
Managing Access Files and Exiting AccessWhen you finish working on a database, you should compact it to save disk space.As you work on a database, Access finds and uses space as quickly as it can. Thedatabase expands and is usually not as efficiently organized on the disk as it couldbe. The Compact and Repair Database command reclaims unused space and savesthe database efficiently.
After you compact the database, you can back it up to a new location, back it upwith a new name, close it and open another database, or exit the program.
NOTE: Compacting a database might be compared to running thedefragment utility on your hard drive.
There are four ways to close a database and exit Access:● Use the Close button in the upper right corner of the window.● Use the File menu, Close.● Use the Database Control icon in the upper left corner of the Database
window title bar, next to the database name. Choose Close from theDatabase Control menu.
● Use keyboard shortcuts. [Ctrl]+[W] or [Ctrl]+[F4] closes a database and [Alt]+[F4]exits Access.
30 ACCESS Unit 1 ■ Understanding Access Databases
d Objective 8
dObjective 8 Startup File:You can use the file Objective8-CC-Dat-01to start from this point in the lesson.
1Explain that in addition to reclaiming inefficientuse of space, compacting realigns indexes.
Remind students to compact their database at the endof each class session.
1
TIP: You can set Access to automatically compact the database each time itis closed by using Tools, Options, General tab.
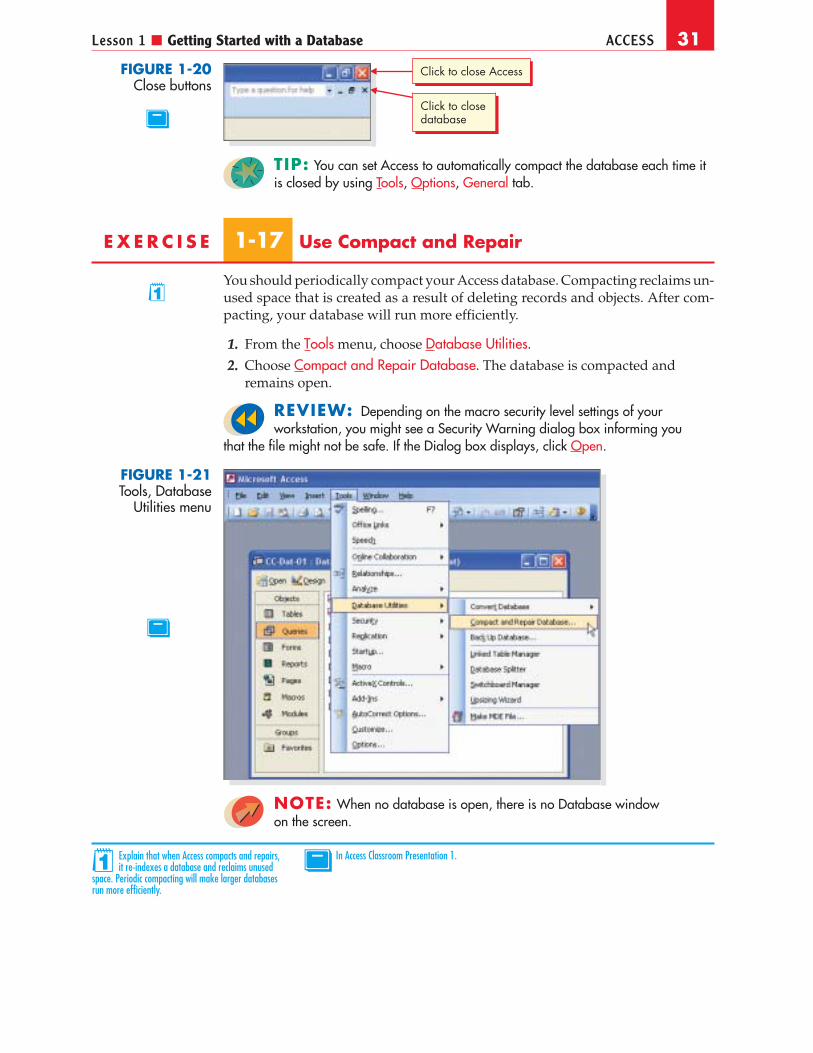
E X E R C I S E 1-17 Use Compact and Repair
You should periodically compact your Access database. Compacting reclaims un-used space that is created as a result of deleting records and objects. After com-pacting, your database will run more efficiently.
1.1. From the Tools menu, choose Database Utilities.2.2. Choose Compact and Repair Database. The database is compacted and
remains open.
REVIEW: Depending on the macro security level settings of yourworkstation, you might see a Security Warning dialog box informing you
that the file might not be safe. If the Dialog box displays, click Open.
NOTE: When no database is open, there is no Database windowon the screen.
Lesson 1 ■ Getting Started with a Database ACCESS 31
1
1Explain that when Access compacts and repairs,it re-indexes a database and reclaims unused
space. Periodic compacting will make larger databasesrun more efficiently.
b
bIn Access Classroom Presentation 1.
FIGURE 1-21Tools, Database
Utilities menu
FIGURE 1-20Close buttons
b
Click to close Access
Click to closedatabase

E X E R C I S E 1-18 Back Up a Database
When backing up a file, you must know three things: file type, location, and data-base name. The default location of the backup file is the same as the location of theoriginal file. The default name of the backup is the original database name withthe current date appended to the end. You can change both of these default values.
Depending on your needs, you will keep a working copy of your file on a re-movable storage device. This storage device might be a floppy drive, a removabledisk drive, USB memory drive or other device.
1.1. From the File menu, choose Back Up Database. The Save Backup As dialogbox appears.
TIP: You can also choose Tools, Database Utilities, Back Up Database.
2.2. Change the Save in location to the location in which you will be storingyour backup copy.
3.3. Click Save to keep the name of the file as the default value. A backup copyof your database is created in the backup location. Your original databaseremains open.
REVIEW: Depending on the macro security level settings of yourworkstation, you might see a Security Warning dialog box informing you
that the file might not be safe. If the Dialog box displays, click Open.
E X E R C I S E 1-19 Close Database and Exit Access
Now that you have compacted and backed up your database, you can close yourdatabase and Access.
1.1. Choose File and choose Close to close your database while keeping theapplication open.
2.2. Click the Close button to close Access.
3.3. After verifying that your database was properly copied to your removablestorage device, delete the copy of your database from the directory in whichyou were working.
USINGONLINE HELP
The Microsoft Access Help system is available at all times and is often the quickestand easiest way to determine how to complete a task or locate information. Fromthe Help menu, choose Microsoft Office Online. Using the on-line help, research
32 ACCESS Unit 1 ■ Understanding Access Databases
1Back Up is a new feature in Access 2003. Thebackup copy of a database is a usable file that
does not need to be restored to be functional.2Distinguish between closing Access and
closing just the database.
1
2
3
3Encourage students to follow the steps in this section.Software companies are increasingly using their Help
programs—rather than paper-based documentation—to trainusers and assist in answering questions.

Creating and Working with Databases and Objects. You will find general informa-tion about databases. Specify your search to Working with Access Files. After look-ing through this section, find the steps necessary to Create a shortcut to an Accessfile in the Favorites folder. Attempt to create a shortcut within one of your folders.
Lesson Summary
➤ After copying a file from a CD, you might need to remove the read-only attribute.➤ The database properties provide useful information regarding specifications,
summary information, statistics, and contents of the file.➤ You can perform actions on a database through buttons and menus.➤ You can select major database objects through the Database window.➤ Tables and queries have four different views: Datasheet View, Design View,
PivotTable View, and PivotChart View.➤ You can view records by scrolling through a Datasheet View.➤ The Datasheet Views of a query and a table appear similar. The Design Views do not.➤ Navigation buttons provide efficient means of moving to different records of a
Datasheet View.➤ You can change column widths, row heights, and fonts in Datasheet View.➤ You can hide and unhide columns in Datasheet View.➤ Multiple tables and queries can be viewed at one time.➤ Changing the page setup lets you print a Datasheet View in landscape format.➤ Printing a table displays the data stored in the table.➤ Use Print Preview to look at a table or query prior to printing.➤ Periodically, you should compact your database.➤ Backing up your database creates a working copy of your file.
Lesson 1 ■ Getting Started with a Database ACCESS 33
1Encourage students to use the Lesson Summaryto review the important concepts in the lesson.
1
11
2Point out that the Command Summarylists a variety of ways to accomplish a
specific task. Students can decide which methodthey prefer to use.
LESSON 1 Command Summary
FEATURE BUTTON MENU KEYBOARD
Close a database File, Close [Ctrl]+[W] or[Ctrl]+[F4]
Column width Format, Column Width
Compact database Tools, Database Utilities,Compact and RepairDatabase
Database Properties File, Database Properties
continues
2
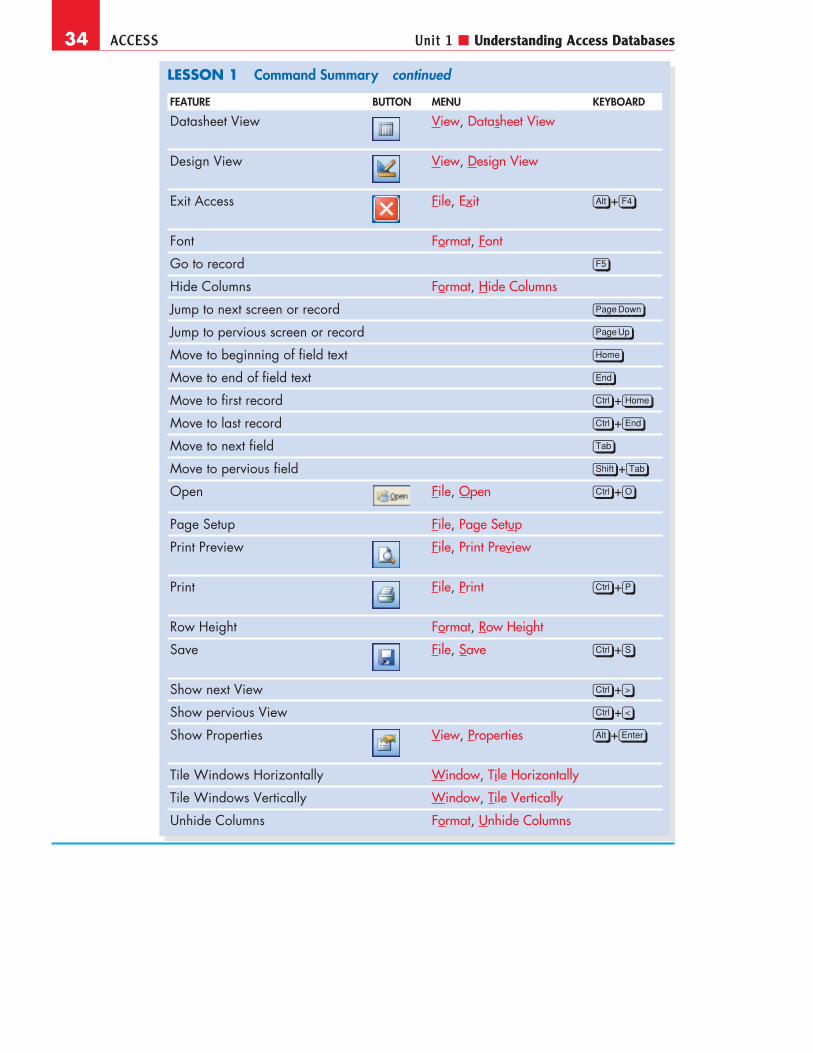
34 ACCESS Unit 1 ■ Understanding Access Databases
FEATURE BUTTON MENU KEYBOARD
Datasheet View View, Datasheet View
Design View View, Design View
Exit Access File, Exit [Alt]+[F4]
Font Format, Font
Go to record [F5]
Hide Columns Format, Hide Columns
Jump to next screen or record [Page{Down]
Jump to pervious screen or record [Page{Up]
Move to beginning of field text [Home]
Move to end of field text [End]
Move to first record [Ctrl]+[Home]
Move to last record [Ctrl]+[End]
Move to next field [Tab]
Move to pervious field [Shift]+[Tab]
Open File, Open [Ctrl]+[O]
Page Setup File, Page Setup
Print Preview File, Print Preview
Print File, Print [Ctrl]+[P]
Row Height Format, Row Height
Save File, Save [Ctrl]+[S]
Show next View [Ctrl]+[>]
Show pervious View [Ctrl]+[<]
Show Properties View, Properties [Alt]+[Enter]
Tile Windows Horizontally Window, Tile Horizontally
Tile Windows Vertically Window, Tile Vertically
Unhide Columns Format, Unhide Columns
LESSON 1 Command Summary continued

Concepts ReviewT R U E / FA L S E Q U E S T I O N S
Each of the following statements is either true or false. Indicate your choice by circlingT or F.
T F 1.1. You can have only one object open at a time.
T F 2.2. An active record can be identified by a triangle in the RecordSelector area for that row.
T F 3.3. A row in a table or query may have a different height thanother rows.
T F 4.4. You can use the navigation buttons to move to a specific record.
T F 5.5. Records in a table or query do not appear in Datasheet View.
T F 6.6. A query can use more than one table.
T F 7.7. You can change the font for individual words in Datasheet View.
T F 8.8. When you hide a column in a table, you actually are deletingthe record from the database.
S H O R T A N S W E R Q U E S T I O N S
Write the correct answer in the space provided.
1.1. What is the Leszynski Naming Convention prefix for table names?
tbl
2.2. Which buttons do you use to move to different records in a table or query?
Navigation buttons
3.3. Which view displays the contents of a table in columns and rows like anExcel worksheet?
Datasheet View
4.4. What Format command displays previously hidden columns?
Unhide Columns
5.5. Name two major objects that can display data without storing data.
Query, Form, Report, Page
Lesson 1 ■ Getting Started with a Database ACCESS 35
e
Concepts Review:Allows students to check their understanding.eConsider using the Test Bank to provide anadditional review of lesson concepts. It mayalso be used as an assessment tool.
CLOSE
•••
•••••

36 ACCESS Unit 1 ■ Understanding Access Databases
6.6. Which button would move the pointer to Record #2 if it is at Record #3?
Previous Record
7.7. What dialog box allows you to change the location or name of the file whencreating a backup copy of the original database?
Save Backup As
8.8. Which database utility improves performance and reduces storagerequirements?
Compact and Repair Database
C R I T I C A L T H I N K I N G
Answer these questions on a separate page. There are no right or wrong answers.Support your answers with examples from your own experience, if possible.
1.1. Why might a person want to open more than one table at a time? Whenwould you need to hide a column before printing a table?
2.2. How are navigation buttons different from scroll bars? When would youuse scroll bars? When would you use navigation buttons?
Skills ReviewE X E R C I S E 1- 2 0
Copy, rename, and open a database. Identify parts of the Access screen.
1.1. Copy and rename a database by following these steps:
a.a. Right-click the Start button on the Windows taskbar.b.b. Choose Explore and maximize the window.c.c. In the left pane, open the folder called Lesson 01. Point at the filename
CC-Emp-01 and right-click.d.d. Choose Copy from the shortcut menu.e.e. In the left pane, open the My Documents folder. Right-click in an unused
area of the right pane and choose Paste from the shortcut menu.f.f. Right-click CC-Emp-01 and choose Rename. Key [your initials]CC-
Emp-01 and press [Enter].g.g. Right-click [your initials]CC-Emp-01 and choose Properties. Make certain
that the Read-only attribute check box is not checked. Click OK.h.h. Close the Explorer.
Critical Thinking Questions:Answers will vary based on students’ preferences,observations, experiences, and research.
Skills Review:Provides guided practice for students.Objectives are indicated for each exercise.Printouts: 01-23-07b
aExercise 1-20:Objectives: 1, 2Required Files: CC-Emp-01
a

2.2. Start Access and open a database by following these steps:
a.a. Click the Start button on the Windows taskbar.b.b. Point to Programs and click Microsoft Access 2003.c.c. Click More.d.d. Locate [your initials]CC-Emp-01 and double-click it.
TIP: The CC-Emp-01 database contains confidential and private data for thecompany. The tables can be imported into or linked to the main database and
still keep this sensitive information separate from everyday use. You learn aboutimporting in later lessons.
3.3. Move the pointer to the Open button and display the button’sScreenTip. Point to the Print Preview button to identify it.
4.4. Click the Queries button . You now only see queries.
E X E R C I S E 1- 2 1
Select and use objects in a Database window.1.1. Change from Datasheet View to Design View by following these steps:
a.a. Click the Tables button . Double-click tblPayroll to open it inDatasheet View.
b.b. Click the Maximize button .c.c. Press [Ctrl]+[<] to change to Design View.d.d. Press [Ctrl]+[>] to return to Datasheet View.e.e. Click the Close button to close tblPayroll.
2.2. Navigate through records by following these steps:
a.a. Click the Queries button . Open qryEmployeeDates inDatasheet View and click the Maximize button .
b.b. Drag the scroll box on the vertical scroll bar to the bottom of the scroll bar.c.c. Click the up scroll arrow twice to move up two rows.d.d. On the vertical scroll bar, click twice above the scroll box.e.e. Click the Next Record button twice to move the pointer forward
two records.f.f. Click the Previous Record button once to move back one record.g.g. Click the Last Record button to move to the last record.h.h. Click the First Record button to move to the first record.
3.3. Change column widths and row heights by following these steps:
a.a. Place the pointer on the vertical border between the Social Security andEmployee ID field names.
b.b. Click and drag the resize pointer to the right until the complete SocialSecurity title fits in the column heading.
c.c. Place the pointer between the Date of Birth and Hire Date columnselectors.
Lesson 1 ■ Getting Started with a Database ACCESS 37
1
1If Access is already running, just click theOpen button on the toolbar.
aExercise 1-21:Objectives: 3, 4, 5Required Files: CC-Emp-01
a
2
2Remind students to check to make sure all datais visible. Depending on font and size, the
column widths might need to be changed.
38 ACCESS Unit 1 ■ Understanding Access Databases
d.d. Double-click to size the Date of Birth field to its longest entry.e.e. Place the pointer on the horizontal line between the first and second rows
in the Record Selector.f.f. Click and drag the horizontal border to make the rows twice as tall.g.g. Resize any rows to approximately its original height.
4.4. Hide and unhide fields in a table by following these steps:
a.a. Click the Social Security # column selector.b.b. Click the Format menu, and choose Hide Columns.c.c. Click the Format menu, and choose Unhide Columns. The Unhide Columns
dialog box will appear.d.d. Select the Social Security # check box.e.e. Click Close. The social security field reappears in the table.f.f. Close the query. When the dialog box appears, click No to discard the
layout changes.
E X E R C I S E 1- 2 2
Open multiple objects.
1.1. With [your initials]CC-Emp-01 open, open multiple tables by followingthese steps:
a.a. Open tblSickDays in Datasheet View.b.b. From the Window menu, choose [your initials]CC-Emp-01.c.c. Open tblVacDays in Datasheet View.d.d. Click the Database Window button . Click the Minimize button to
minimize the Database window.e.e. Click the Window menu, and choose Tile Horizontally.f.f. Close both tables.g.g. Click the Maximize button or your Database window.
2.2. Open a query and a table by following these steps:
a.a. Open tblPayroll in Datasheet View.b.b. Click the Database window button .c.c. Click the Queries button on the Objects bar and open
qryEmployeeDates in Datasheet View.d.d. Click the Database Window button and minimize the database window.e.e. Click the Window menu, and choose Tile Horizontally.f.f. Close both objects.g.g. Click the Maximize button in the minimized Database window.
a
aExercise 1-22:Objectives: 6Required Files: CC-Emp-01
1Discuss how several tables may be open at thesame time. Review how to switch between open
windows. Show students how to return to the Databasewindow and leave a table open.
1

E X E R C I S E 1- 2 3
Print a table, compact and close a database, and exit Access.
1.1. With [your initials]CC-Emp-01 open, right-click tblPayroll and choose Rename.
2.2. Press [End] to position the insertion point behind the last letter of thetable name.
3.3. Key [your initials]. Press [Enter].
4.4. Open tblPayroll[your initials] in Datasheet View.
5.5. Change page orientation by following these steps:
a.a. Choose File and then choose Page Setup. Click the Page tab.b.b. Click the Landscape option button.c.c. Click OK to close the dialog box.
6.6. Preview your table before printing by following these steps:
a.a. Click the Print Preview button .b.b. Click the Close button to return to the table.
7.7. Print a table by following these steps:
a.a. Choose File and then choose Print.b.b. Click OK or press [Enter] to accept the settings.c.c. Close the table.
8.8. Right-click tblPayroll[your last name] and choose Rename.
9.9. Press [End]. Press [Backspace] to remove your last name and any blank spacesafter “tblPayroll.” Press [Enter].
10.10. Compact and close the database and exit Access by following these steps:
a.a. Choose Tools, choose Database Utilities, and then choose Compact andRepair Database.
b.b. Click the Close button to close the database.
Lesson 1 ■ Getting Started with a Database ACCESS 39
a
aExercise 1-23:Objectives: 7, 8Required Files: CC-Emp-01
1Students rename tables by adding their lastnames at the end. This name will print in the
page header for the table.
1

Lesson ApplicationsE X E R C I S E 1- 2 4
Open a database and print a table.1.1. Start Access and open [your initials]CC-Dat-01 in Datasheet View.
REVIEW: Depending on the macro security level settings of yourworkstation, you might see a Security Warning dialog box informing you that
the file might not be safe. If the Dialog box displays, click Open.
2.2. Rename tblKitSuppliers to show [your initials] at the end.
3.3. Open the table. Change the page orientation to Landscape.
4.4. Preview the table. Change the font and column size so all data is visible andso the table will print on one page.
TIP: You can multiple-select all the columns and double-click one of theborders to AutoFit all columns at once.
5.5. Print the table. Close it without saving the layout changes.
6.6. Rename tblKitSuppliers to remove [your initials] and any extra space.
E X E R C I S E 1- 2 5
Open multiple tables. Switch views.1.1. With [your initials]CC-Dat-01 open, open tblStuffedAnimals in
Datasheet View.
2.2. Open tblProductLines in Datasheet View.
3.3. Minimize the Database window and tile the tables.
4.4. What is the name of the product group for “Tula Tiger?” What is the nameof the product group for “Linda Lamb?” Write your answers on a separatesheet of paper and write Step 4 above your answer.
TIP: The Stuffed Animals table includes images that do not display inDatasheet View. Line Code and Product Group represent the same data but
have different field captions listed in the column heading.
5.5. Close both tables.
6.6. Restore the Database window.
7.7. Open tblKitContents in Datasheet View.
8.8. Change to Design View. What data type is the Cost field? Write youranswers on the same sheet of paper you wrote the answer to step 4 andwrite Step 8 next to your new answer.
40 ACCESS Unit 1
Assessment Resources:• Solution Files on CD-ROM• Test Bank on CD-ROM
ASSESS
aExercise 1-24:Objectives: 3, 4, 7Required Files: CC-Emp-01
a
Lesson Applications:Provide independent practice for students and maybe used for assessment. Objectives are indicated foreach exercise.Printouts: 01-24-05, 01-26-05, 01-27-07, Apps-01
aExercise 1-25:Objectives: 3, 4, 6Required Files: CC-Emp-01
a
1Review withstudents how
they will turn in theirwritten answers to thehomework questions.
1
9.9. Close the table. Write your name, class information, and today’s date onyour answer sheet and turn it in to your instructor.
E X E R C I S E 1- 2 6
Edit the layout and print a query.1.1. With [your initials]CC-Dat-01 open, rename qryOrderSummaryByAnimal
to show [your initials] at the end.
2.2. Open the query.
3.3. Size each column so all information can be seen.
4.4. Make the row height approximately twice its current height.
5.5. Print the query.
6.6. Close and save the layout changes.
7.7. Rename the query to remove [your initials] and any spaces.
E X E R C I S E 1- 2 7 Challenge Yourself
Switch views. Change the row height, font, and orientation. Print a table. Compacta database.
1.1. Rename tblStuffedAnimals to include your initials.
2.2. Open the table. These are the products sold to retailers by Carolina Critters.Notice what type of information is contained in this table.
3.3. Switch to Design View for the table. What is the name of the field thatcontains an image of the product? Write your answers on a separate sheetof paper and write Step 3 next to your answer.
4.4. In Datasheet View, change the row height so the table shows approximatelytwice as much space between records.
5.5. Change the font to 11-point Times New Roman. Size the fields so allinformation can be seen.
6.6. Preview the table. While in Print Preview, change to Landscape orientation.Write down the number of pages required to print this table. Write youranswers on the same sheet of paper you wrote the answer to step 3 andwrite Step 6 next to your new answer.
7.7. Print the table. Then close it without saving the layout changes.
8.8. Rename the table to remove [your initials] and any spaces.
9.9. Compact the database, close it, and exit Access. Write your name, classinformation, and today’s date on your answer sheet and turn it in toyour instructor.
Lesson 1 ACCESS 41
a
aExercise 1-26:Objectives: 4, 5, 7Required Files: CC-Emp-01
aExercise 1-27:Objectives: 3, 4, 7, 8Required Files: CC-Emp-01
1Depending on row height, the number ofrecords on each page may vary.
a
1

On Your Own
In these exercises you work on your own, as you would in a real-life work environ-ment. Use the skills you’ve learned to accomplish the task—and be creative.
NOTE: The “On Your Own” exercises in this text are all related. They forma single project. To complete the project, you must do all the “On Your Own”
exercises in each lesson.
EXERCISE 1-28You are forming a new club or professional association. Begin by analyzing yourneeds on paper. Write one or two paragraphs describing the purpose of your clubor association and the information you will need to make your organization runefficiently. After you have completed this exercise, continue to the next exercise.
EXERCISE 1-29Now think specifically about the kind of information your club or association willneed to track membership. Write a bulleted list of information you want to collectfor each member (ex: first name, e-mail address). You should have no fewer thanseven items. Continue to the next exercise.
EXERCISE 1-30Using the list you created in Exercise 1-29, gather information on five potentialmembers. On a single sheet of paper, record the data you collected. Submit yourwork for Exercises 1-28 through 1-30 to your instructor.
42 ACCESS Unit 1
On Your Own Exercises:These exercises are entirely free-form.They do not “hold the student’s hand” orprovide steps. No solutions are provided.Encourage students to be creative. Youmight assign exercises as group projects.
Exercise 1-28:Objectives: N/ARequired Files: N/A
Exercise 1-29:Objectives: N/ARequired Files: N/A
Exercise 1-30:Objectives: N/ARequired Files: N/A
