understanding files & folders - yamaha-club.net 0039.pdf · fact sheet 85 understanding files...
TRANSCRIPT
Understanding Files & Folders
A new way of working
Yamaha Club Ltd. Web: www.yamaha-club.co.uk Email: [email protected] Tel: 01246 290454

FACT SHEET 85
Understanding Files & FoldersUnderstanding Files & FoldersUnderstanding Files & Folders TYROS ; CVP200 series Clavinovas ; TYROS ; CVP200 series Clavinovas ; TYROS ; CVP200 series Clavinovas ;
PSR1000/1000 PSR2000/2100PSR1000/1000 PSR2000/2100PSR1000/1000 PSR2000/2100
Preparation... ♦ Make as many registrations as you need and store them in
the [REGISTRATION MEMORY] buttons. You can store up to eight registrations in one bank, although you do not need to use all eight. When you have stored as many registrations as you require, return to the MAIN display page using the [EXIT] button…
Saving A Bank of Registrations… 1) Press button [J] REGISTRATION BANK at the side of the
side of the screen.
This will take you to the REGISTRATION BANK (USER) screen. When your instrument is new this screen is usually empty, but don’t be alarmed if some files or folders are already displayed. Simply ignore these for the time being. (If you don’t see the display screen illustrated, press VIEW)
2) Press button [6] SAVE below the display screen. 3) A text box appears at the bottom of the screen. Use the
letters and numbers provided to give your bank of registrations a name.
4) Press [OK]
A
B
C
D
E
F
G
H
I
J
1 2 3 4 5 6 7 8
A
B
C
D
E
F
G
H
I
J
1 2 3 4 5 6 7 8
A
B
C
D
E
F
G
H
I
J
1 2 3 4 5 6 7 8
Yamaha’s “Cut & Paste” system... Have you ever kept a scrapbook where you cut your favourite items out of magazines and newspapers and paste them into your own personal book. .? Moving your registration, song, multi-pad, style, custom and organ voice files around Yamaha’s new instruments works in just the same way... you cut your favourite files from a floppy disk and - treating the instrument’s memory like a scrapbook - paste them onto a new page. You can even move files from another page of the ‘scrapbook’ to another. Follow the examples below for cutting, pasting and moving REGISTRATIONS to see how this works...
Tip:
I save a separate bank (set) of registrations for each tune I play… even if I don’t actually use all eight registrations available. This way it’s easy to sort and keep track of FILES - as each can be given the name of the tune the registrations are created for...
2
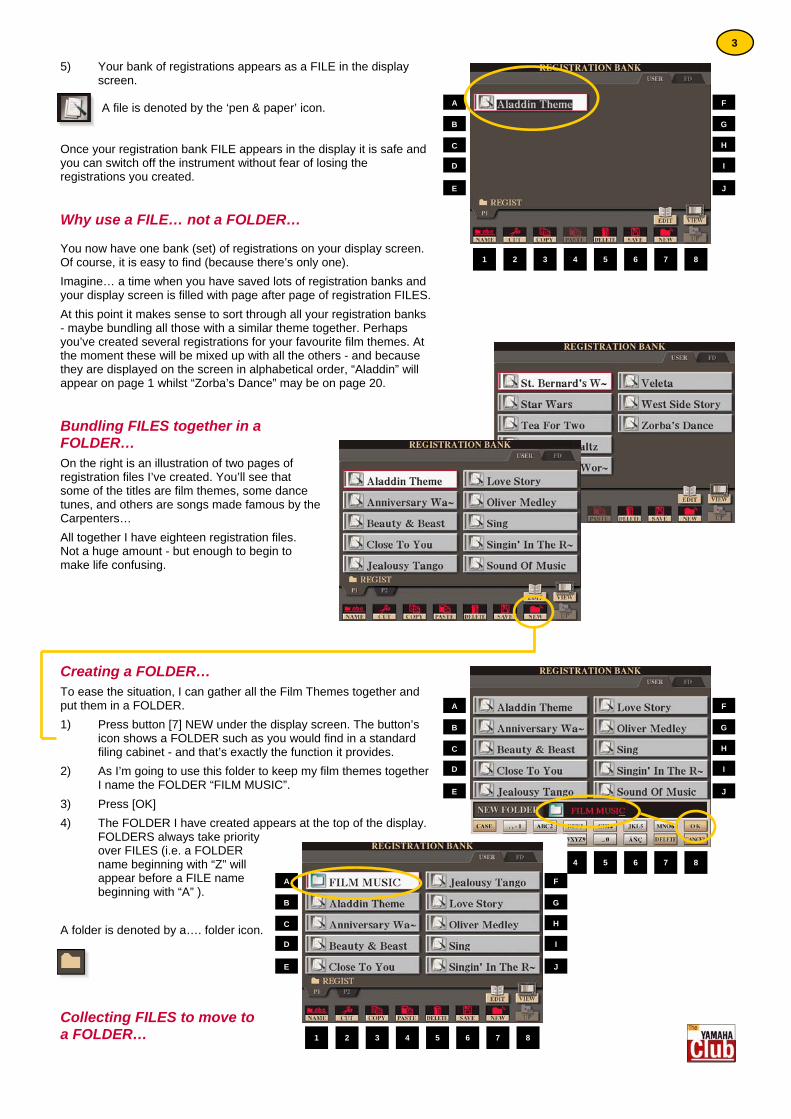
5) Your bank of registrations appears as a FILE in the display screen. A file is denoted by the ‘pen & paper’ icon.
Once your registration bank FILE appears in the display it is safe and you can switch off the instrument without fear of losing the registrations you created. Why use a FILE… not a FOLDER… You now have one bank (set) of registrations on your display screen. Of course, it is easy to find (because there’s only one). Imagine… a time when you have saved lots of registration banks and your display screen is filled with page after page of registration FILES. At this point it makes sense to sort through all your registration banks - maybe bundling all those with a similar theme together. Perhaps you’ve created several registrations for your favourite film themes. At the moment these will be mixed up with all the others - and because they are displayed on the screen in alphabetical order, “Aladdin” will appear on page 1 whilst “Zorba’s Dance” may be on page 20.
Bundling FILES together in a FOLDER… On the right is an illustration of two pages of registration files I’ve created. You’ll see that some of the titles are film themes, some dance tunes, and others are songs made famous by the Carpenters… All together I have eighteen registration files. Not a huge amount - but enough to begin to make life confusing.
Creating a FOLDER… To ease the situation, I can gather all the Film Themes together and put them in a FOLDER. 1) Press button [7] NEW under the display screen. The button’s
icon shows a FOLDER such as you would find in a standard filing cabinet - and that’s exactly the function it provides.
2) As I’m going to use this folder to keep my film themes together I name the FOLDER “FILM MUSIC”.
3) Press [OK] 4) The FOLDER I have created appears at the top of the display.
FOLDERS always take priority over FILES (i.e. a FOLDER name beginning with “Z” will appear before a FILE name beginning with “A” ).
A folder is denoted by a…. folder icon.
Collecting FILES to move to a FOLDER…
A
B
C
D
E
F
G
H
I
J
1 2 3 4 5 6 7 8
A
B
C
D
E
F
G
H
I
J
1 2 3 4 5 6 7 8
A
B
C
D
E
F
G
H
I
J
1 2 3 4 5 6 7 8
3
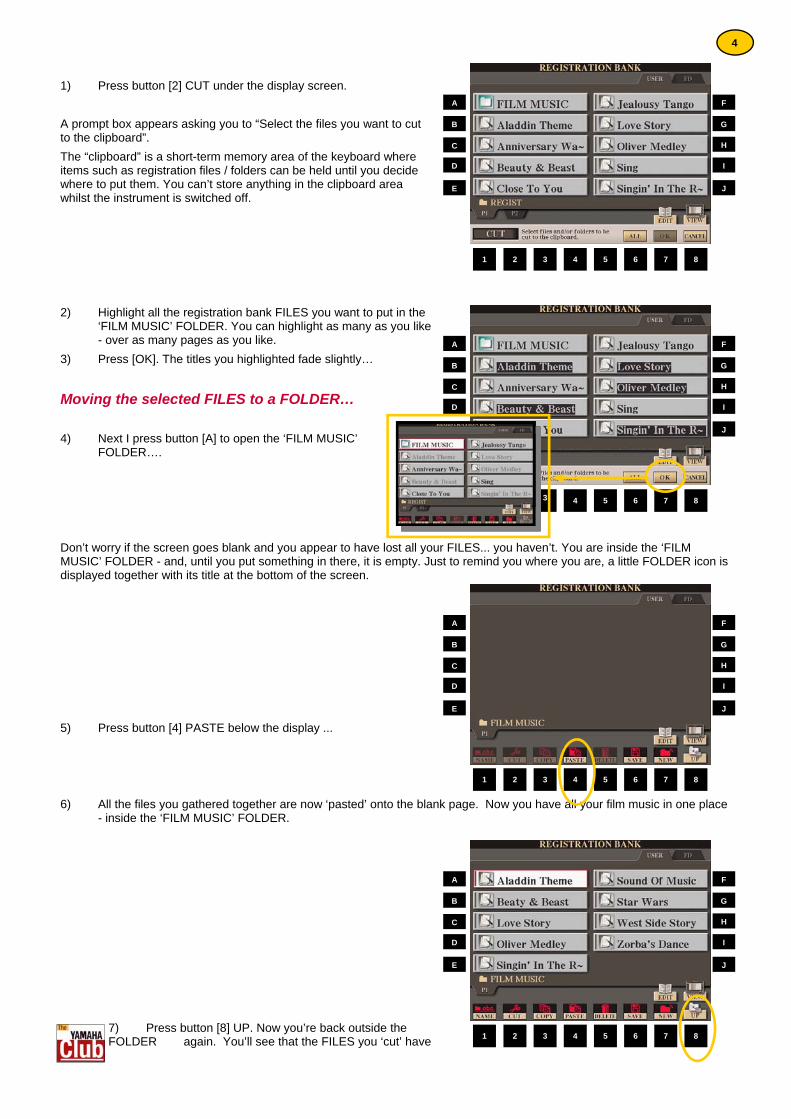
1) Press button [2] CUT under the display screen. A prompt box appears asking you to “Select the files you want to cut to the clipboard”. The “clipboard” is a short-term memory area of the keyboard where items such as registration files / folders can be held until you decide where to put them. You can’t store anything in the clipboard area whilst the instrument is switched off. 2) Highlight all the registration bank FILES you want to put in the
‘FILM MUSIC’ FOLDER. You can highlight as many as you like - over as many pages as you like.
3) Press [OK]. The titles you highlighted fade slightly…
Moving the selected FILES to a FOLDER… 4) Next I press button [A] to open the ‘FILM MUSIC’
FOLDER…. Don’t worry if the screen goes blank and you appear to have lost all your FILES... you haven’t. You are inside the ‘FILM MUSIC’ FOLDER - and, until you put something in there, it is empty. Just to remind you where you are, a little FOLDER icon is displayed together with its title at the bottom of the screen. 5) Press button [4] PASTE below the display ... 6) All the files you gathered together are now ‘pasted’ onto the blank page. Now you have all your film music in one place
- inside the ‘FILM MUSIC’ FOLDER.
7) Press button [8] UP. Now you’re back outside the FOLDER again. You’ll see that the FILES you ‘cut’ have
A
B
C
D
E
F
G
H
I
J
1 2 3 4 5 6 7 8
A
B
C
D
E
F
G
H
I
J
1 2 3 4 5 6 7 8
A
B
C
D
E
F
G
H
I
J
1 2 3 4 5 6 7 8
A
B
C
D
E
F
G
H
I
J
1 2 3 4 5 6 7 8
4
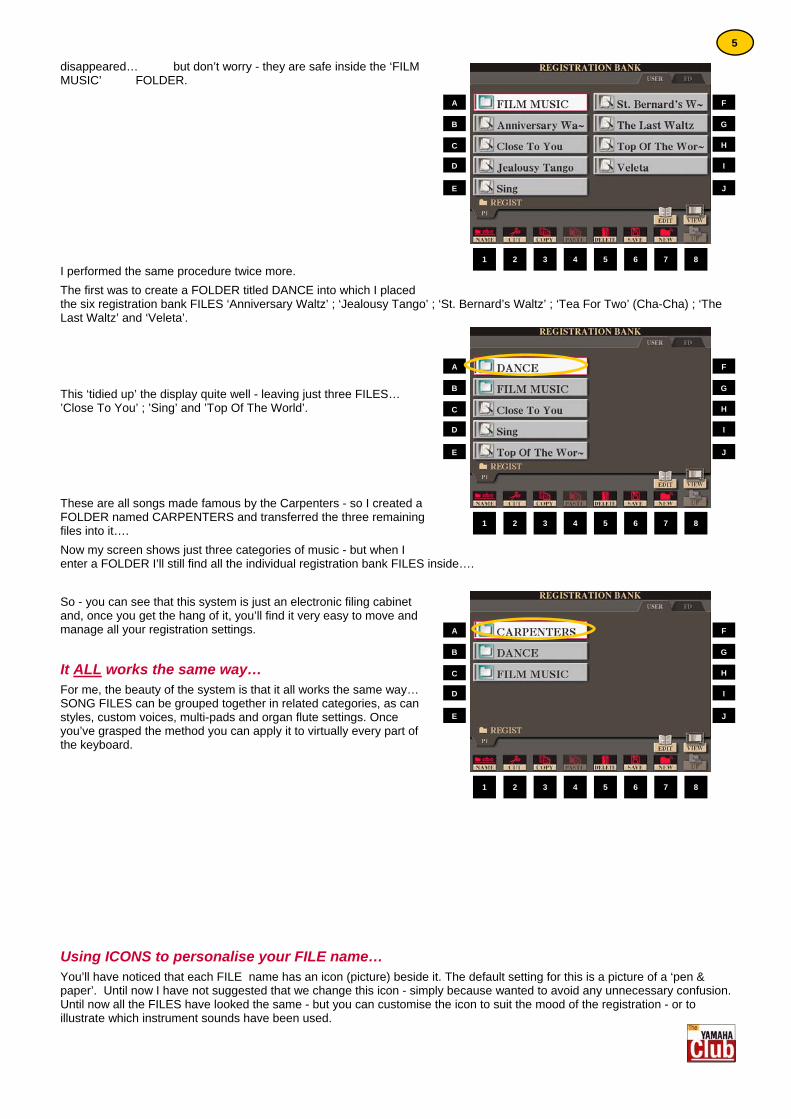
disappeared… but don’t worry - they are safe inside the ‘FILM MUSIC’ FOLDER. I performed the same procedure twice more. The first was to create a FOLDER titled DANCE into which I placed the six registration bank FILES ‘Anniversary Waltz’ ; ‘Jealousy Tango’ ; ‘St. Bernard’s Waltz’ ; ‘Tea For Two’ (Cha-Cha) ; ‘The Last Waltz’ and ‘Veleta’. This ‘tidied up’ the display quite well - leaving just three FILES… ’Close To You’ ; ’Sing’ and ’Top Of The World’. These are all songs made famous by the Carpenters - so I created a FOLDER named CARPENTERS and transferred the three remaining files into it…. Now my screen shows just three categories of music - but when I enter a FOLDER I’ll still find all the individual registration bank FILES inside…. So - you can see that this system is just an electronic filing cabinet and, once you get the hang of it, you’ll find it very easy to move and manage all your registration settings.
It ALL works the same way… For me, the beauty of the system is that it all works the same way… SONG FILES can be grouped together in related categories, as can styles, custom voices, multi-pads and organ flute settings. Once you’ve grasped the method you can apply it to virtually every part of the keyboard.
Using ICONS to personalise your FILE name… You’ll have noticed that each FILE name has an icon (picture) beside it. The default setting for this is a picture of a ‘pen & paper’. Until now I have not suggested that we change this icon - simply because wanted to avoid any unnecessary confusion. Until now all the FILES have looked the same - but you can customise the icon to suit the mood of the registration - or to illustrate which instrument sounds have been used.
A
B
C
D
E
F
G
H
I
J
1 2 3 4 5 6 7 8
A
B
C
D
E
F
G
H
I
J
1 2 3 4 5 6 7 8
A
B
C
D
E
F
G
H
I
J
1 2 3 4 5 6 7 8
5
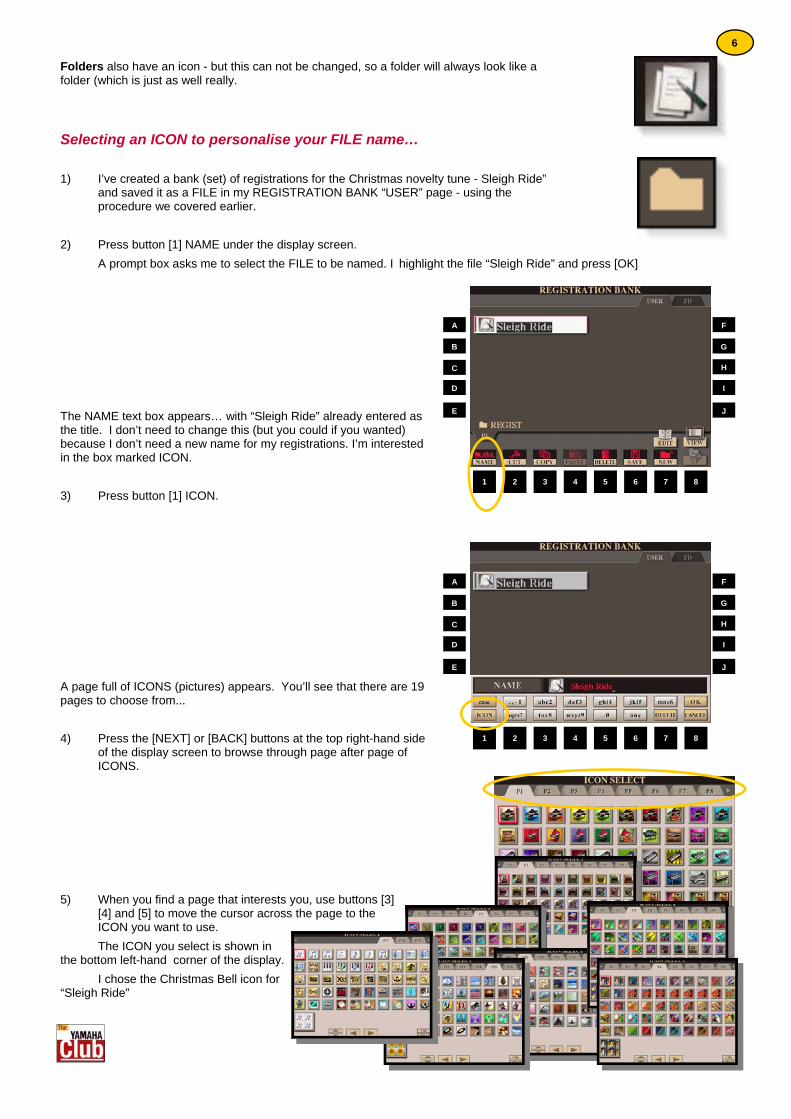
Folders also have an icon - but this can not be changed, so a folder will always look like a folder (which is just as well really.
Selecting an ICON to personalise your FILE name… 1) I’ve created a bank (set) of registrations for the Christmas novelty tune - Sleigh Ride”
and saved it as a FILE in my REGISTRATION BANK “USER” page - using the procedure we covered earlier.
2) Press button [1] NAME under the display screen. A prompt box asks me to select the FILE to be named. I highlight the file “Sleigh Ride” and press [OK] The NAME text box appears… with “Sleigh Ride” already entered as the title. I don’t need to change this (but you could if you wanted) because I don’t need a new name for my registrations. I’m interested in the box marked ICON. 3) Press button [1] ICON. A page full of ICONS (pictures) appears. You’ll see that there are 19 pages to choose from... 4) Press the [NEXT] or [BACK] buttons at the top right-hand side
of the display screen to browse through page after page of ICONS.
5) When you find a page that interests you, use buttons [3]
[4] and [5] to move the cursor across the page to the ICON you want to use.
The ICON you select is shown in the bottom left-hand corner of the display. I chose the Christmas Bell icon for “Sleigh Ride”
A
B
C
D
E
F
G
H
I
J
1 2 3 4 5 6 7 8
A
B
C
D
E
F
G
H
I
J
1 2 3 4 5 6 7 8
6
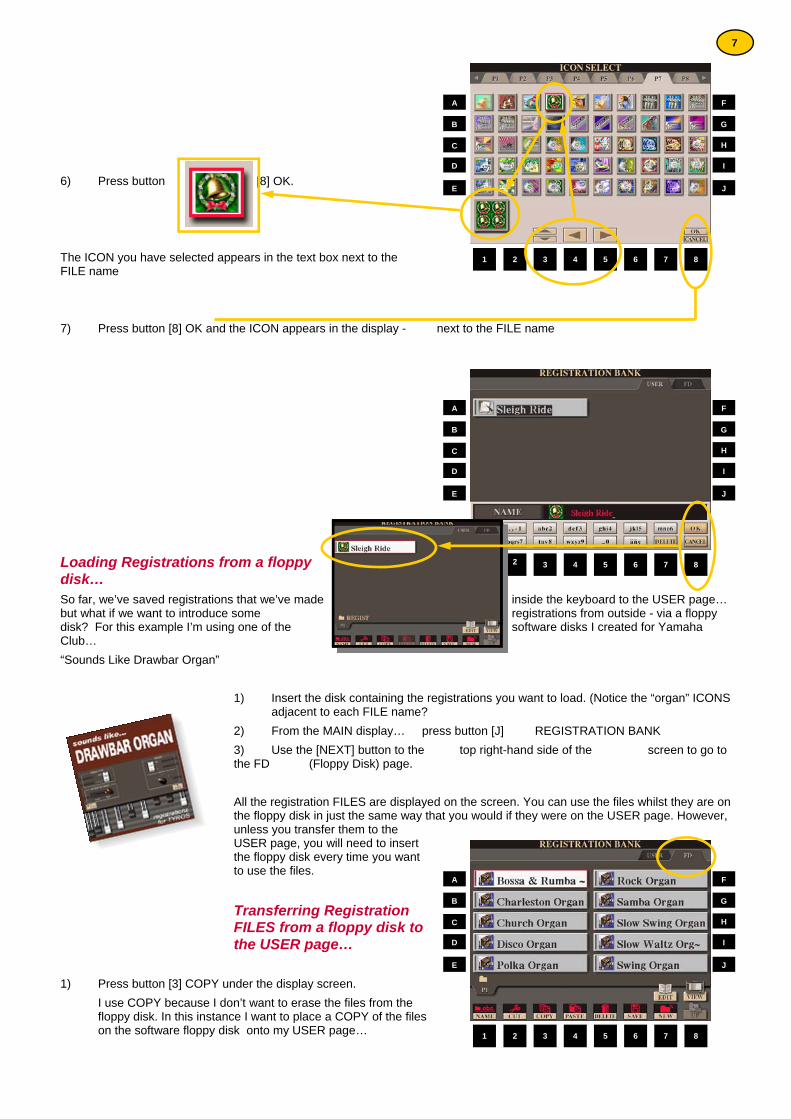
6) Press button [8] OK. The ICON you have selected appears in the text box next to the FILE name 7) Press button [8] OK and the ICON appears in the display - next to the FILE name
Loading Registrations from a floppy disk… So far, we’ve saved registrations that we’ve made inside the keyboard to the USER page… but what if we want to introduce some registrations from outside - via a floppy disk? For this example I’m using one of the software disks I created for Yamaha Club… “Sounds Like Drawbar Organ”
1) Insert the disk containing the registrations you want to load. (Notice the “organ” ICONS adjacent to each FILE name? 2) From the MAIN display… press button [J] REGISTRATION BANK 3) Use the [NEXT] button to the top right-hand side of the screen to go to the FD (Floppy Disk) page. All the registration FILES are displayed on the screen. You can use the files whilst they are on the floppy disk in just the same way that you would if they were on the USER page. However, unless you transfer them to the USER page, you will need to insert the floppy disk every time you want to use the files.
Transferring Registration FILES from a floppy disk to the USER page…
1) Press button [3] COPY under the display screen. I use COPY because I don’t want to erase the files from the floppy disk. In this instance I want to place a COPY of the files on the software floppy disk onto my USER page…
A
B
C
D
E
F
G
H
I
J
1 2 3 4 5 6 7 8
A
B
C
D
E
F
G
H
I
J
1 2 3 4 5 6 7 8
A
B
C
D
E
F
G
H
I
J
1 2 3 4 5 6 7 8
7
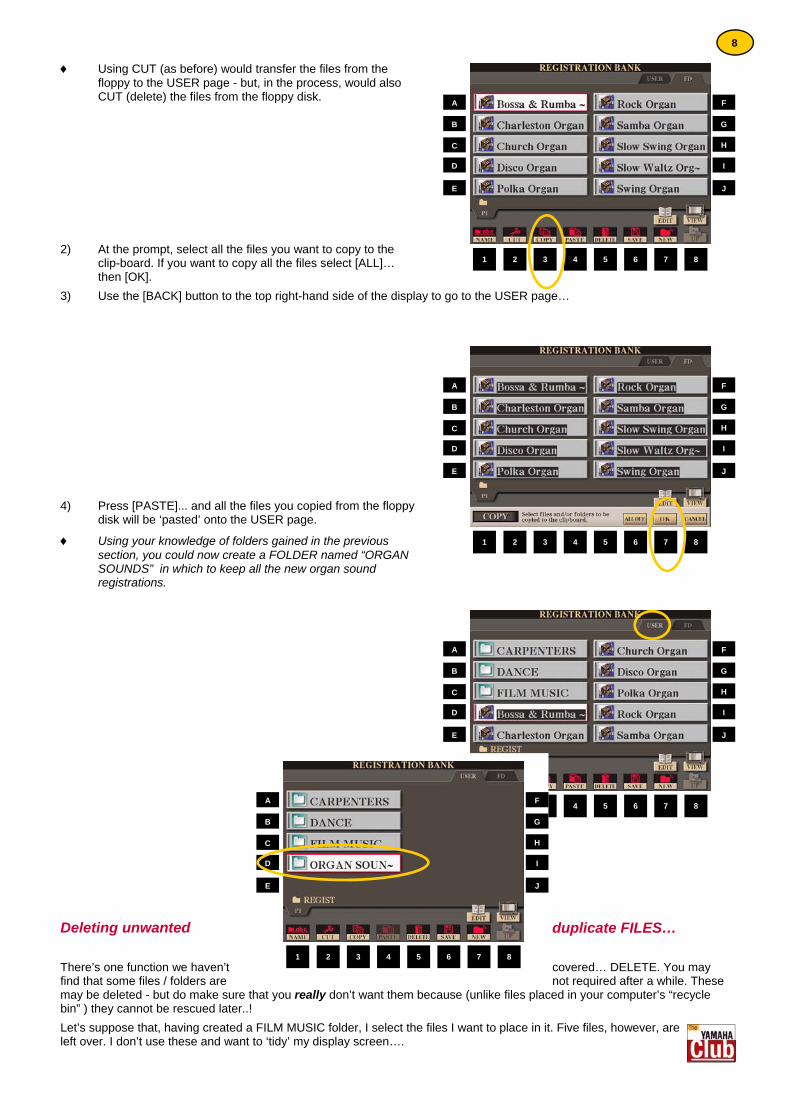
♦ Using CUT (as before) would transfer the files from the floppy to the USER page - but, in the process, would also CUT (delete) the files from the floppy disk.
2) At the prompt, select all the files you want to copy to the
clip-board. If you want to copy all the files select [ALL]… then [OK].
3) Use the [BACK] button to the top right-hand side of the display to go to the USER page… 4) Press [PASTE]... and all the files you copied from the floppy
disk will be ‘pasted’ onto the USER page.
♦ Using your knowledge of folders gained in the previous section, you could now create a FOLDER named “ORGAN SOUNDS” in which to keep all the new organ sound registrations.
Deleting unwanted duplicate FILES… There’s one function we haven’t covered… DELETE. You may find that some files / folders are not required after a while. These may be deleted - but do make sure that you really don’t want them because (unlike files placed in your computer’s “recycle bin” ) they cannot be rescued later..! Let’s suppose that, having created a FILM MUSIC folder, I select the files I want to place in it. Five files, however, are left over. I don’t use these and want to ‘tidy’ my display screen….
A
B
C
D
E
F
G
H
I
J
1 2 3 4 5 6 7 8
A
B
C
D
E
F
G
H
I
J
1 2 3 4 5 6 7 8
A
B
C
D
E
F
G
H
I
J
1 2 3 4 5 6 7 8
A
B
C
D
E
F
G
H
I
J
1 2 3 4 5 6 7 8
8
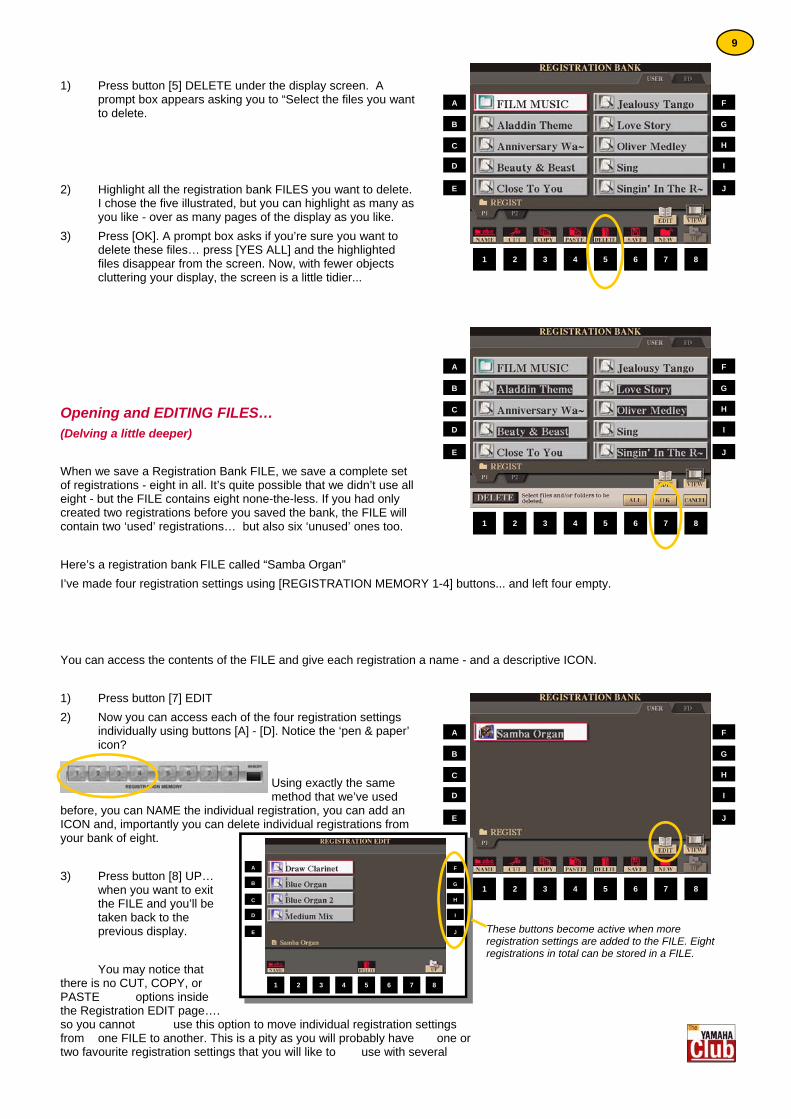
1) Press button [5] DELETE under the display screen. A
prompt box appears asking you to “Select the files you want to delete.
2) Highlight all the registration bank FILES you want to delete.
I chose the five illustrated, but you can highlight as many as you like - over as many pages of the display as you like.
3) Press [OK]. A prompt box asks if you’re sure you want to delete these files… press [YES ALL] and the highlighted files disappear from the screen. Now, with fewer objects cluttering your display, the screen is a little tidier...
Opening and EDITING FILES… (Delving a little deeper) When we save a Registration Bank FILE, we save a complete set of registrations - eight in all. It’s quite possible that we didn’t use all eight - but the FILE contains eight none-the-less. If you had only created two registrations before you saved the bank, the FILE will contain two ‘used’ registrations… but also six ‘unused’ ones too. Here’s a registration bank FILE called “Samba Organ” I’ve made four registration settings using [REGISTRATION MEMORY 1-4] buttons... and left four empty. You can access the contents of the FILE and give each registration a name - and a descriptive ICON. 1) Press button [7] EDIT 2) Now you can access each of the four registration settings
individually using buttons [A] - [D]. Notice the ‘pen & paper’ icon?
Using exactly the same method that we’ve used
before, you can NAME the individual registration, you can add an ICON and, importantly you can delete individual registrations from your bank of eight. 3) Press button [8] UP…
when you want to exit the FILE and you’ll be taken back to the previous display.
You may notice that there is no CUT, COPY, or PASTE options inside the Registration EDIT page…. so you cannot use this option to move individual registration settings from one FILE to another. This is a pity as you will probably have one or two favourite registration settings that you will like to use with several
A
B
C
D
E
F
G
H
I
J
1 2 3 4 5 6 7 8
A
B
C
D
E
F
G
H
I
J
1 2 3 4 5 6 7 8
A
B
C
D
E
F
G
H
I
J
1 2 3 4 5 6 7 8
A
B
C
D
E
F
G
H
I
J
1 2 3 4 5 6 7 8
These buttons become active when more registration settings are added to the FILE. Eight registrations in total can be stored in a FILE.
9
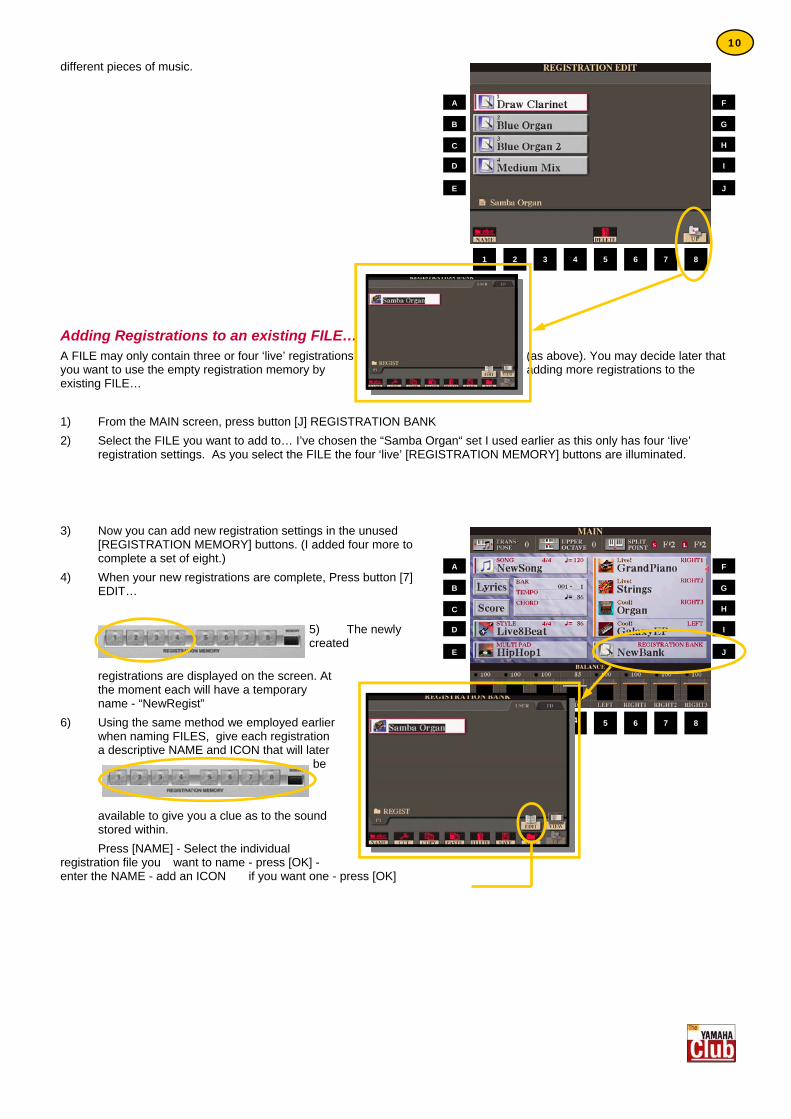
different pieces of music.
Adding Registrations to an existing FILE… A FILE may only contain three or four ‘live’ registrations (as above). You may decide later that you want to use the empty registration memory by adding more registrations to the existing FILE… 1) From the MAIN screen, press button [J] REGISTRATION BANK 2) Select the FILE you want to add to… I’ve chosen the “Samba Organ“ set I used earlier as this only has four ‘live’
registration settings. As you select the FILE the four ‘live’ [REGISTRATION MEMORY] buttons are illuminated. 3) Now you can add new registration settings in the unused
[REGISTRATION MEMORY] buttons. (I added four more to complete a set of eight.)
4) When your new registrations are complete, Press button [7] EDIT…
5) The newly created
registrations are displayed on the screen. At the moment each will have a temporary name - “NewRegist”
6) Using the same method we employed earlier when naming FILES, give each registration a descriptive NAME and ICON that will later
be
available to give you a clue as to the sound stored within.
Press [NAME] - Select the individual registration file you want to name - press [OK] - enter the NAME - add an ICON if you want one - press [OK]
A
B
C
D
E
F
G
H
I
J
1 2 3 4 5 6 7 8
A
B
C
D
E
F
G
H
I
J
1 2 3 4 5 6 7 8
10
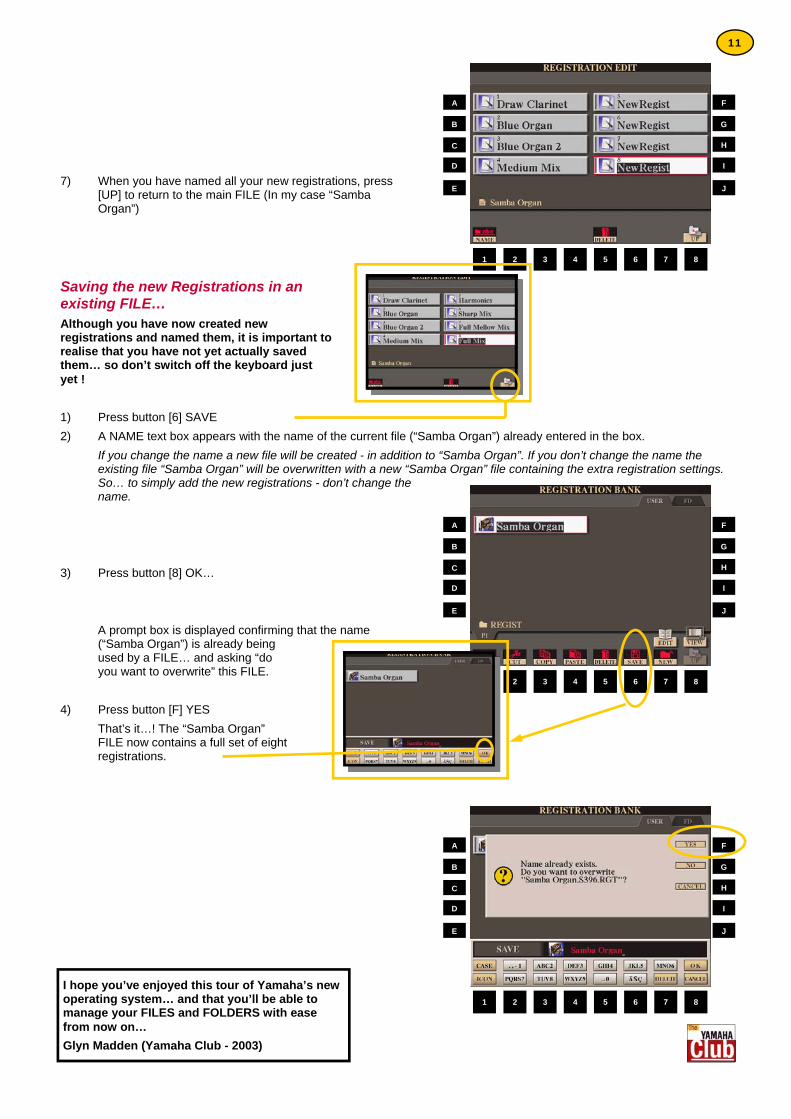
7) When you have named all your new registrations, press
[UP] to return to the main FILE (In my case “Samba Organ”)
Saving the new Registrations in an existing FILE… Although you have now created new registrations and named them, it is important to realise that you have not yet actually saved them… so don’t switch off the keyboard just yet ! 1) Press button [6] SAVE 2) A NAME text box appears with the name of the current file (“Samba Organ”) already entered in the box.
If you change the name a new file will be created - in addition to “Samba Organ”. If you don’t change the name the existing file “Samba Organ” will be overwritten with a new “Samba Organ” file containing the extra registration settings. So… to simply add the new registrations - don’t change the name.
3) Press button [8] OK…
A prompt box is displayed confirming that the name (“Samba Organ”) is already being used by a FILE… and asking “do you want to overwrite” this FILE.
4) Press button [F] YES
That’s it…! The “Samba Organ” FILE now contains a full set of eight registrations.
A
B
C
D
E
F
G
H
I
J
1 2 3 4 5 6 7 8
A
B
C
D
E
F
G
H
I
J
1 2 3 4 5 6 7 8
A
B
C
D
E
F
G
H
I
J
1 2 3 4 5 6 7 8
I hope you’ve enjoyed this tour of Yamaha’s new operating system… and that you’ll be able to manage your FILES and FOLDERS with ease from now on… Glyn Madden (Yamaha Club - 2003)
11
Quick Guide to Saving Registrations Saving registrations inside the instrument 1. Create as many registrations as you need for your song - saving them in the eight REGISTRATION
MEMORY buttons on the instrument’s panel.
2. Press button [J] REGISTRATION BANK
3. Check (at the top of the screen) to make sure the USER page is selected. If not, you can toggle between USER and FLOPPY DISK pages using the [BACK] / [NEXT] buttons.
4. Press button [6] SAVE
5. DELETE the existing name “New Bank” - and replace it with a name of your choice using buttons [1] - [8] under the screen.
6. When you have entered your name, press button [8] OK
7. The registration bank you have created will be displayed on your instrument’s USER page.
Saving registrations to a floppy disk 1. Create as many registrations as you need for your song - saving them in the eight REGISTRATION
MEMORY buttons on the instrument’s panel.
2. Insert a formatted floppy disk in the disk drive.
3. Press button [J] REGISTRATION BANK
4. Check (at the top of the screen) to make sure the FLOPPY DISK page is selected. If not, you can toggle between USER and FLOPPY DISK pages using the [BACK] / [NEXT] buttons.
5. Press button [6] SAVE
6. DELETE the existing name “New Bank” - and replace it with a name of your choice using buttons [1] - [8] under the screen.
7. When you have entered your name, press button [8] OK
8. The registration bank you have created will be displayed on your instrument’s USER page.
Formatting a floppy disk 1. Insert a formatted floppy disk in the disk drive.
2. Press the [FUNCTION] button
3. Use button [I] to select UTILITY from the display.
4. Use the [BACK] / [NEXT] buttons to go to the DISK page in the display.
5. Press button [H] DISK FORMAT - then button [G] at the prompt “Are you sure?”
6. Now Formatting will be displayed until the process is complete when “Completed” will be briefly displayed.
7. The disk is now ready for use.