understanding mercedes chassis...
TRANSCRIPT

Mercedes coil spring identification user guide
Understanding Mercedes chassis numbers
Older style chassis numbers (>1983)
Typical example of an older style chassis no -
WDB 123 223 22 031247
Worldwide Daimler-Benz
Chassis type Ident Number
Model type Orientation and transmission type
Chassis type
This is the 3 digit code given to the general chassis type.
Model Type
This 3 digit code tells us exactly which model the vehicle is (fuel type, body shape, etc).
Orientation and Transmission type
For all vehicles up to & including current production, the first digit translates as follows:
1= Left Hand Drive
2= Right Hand Drive
5= Left Hand Drive Semi-knock down (Chassis and transmission
only, for conversion to special vehicles)
6= Right Hand Drive Semi-knock down (Shipped as a kit, to be
assembled in the far east)
Only for vehicles up to 1983, the second digit translates as follows:
0= Manual Transmission
2= Automatic Transmission
Ident number
This number is sequentially increased as each vehicle is built

Understanding newer style Mercedes chassis Numbers (1983>)
Up to 1983, all Mercedes cars were produced in Sindelfingen. From 1983 more production plants were
constructed & the 8th digit of the chassis number was replaced by a letter that determined the factory of
origin. The serial no’s were also started from 000001 again. So, if given 2 chassis no’s (a) 123 033 2A 001437
and (b) 123 033 22 942183 then (a) will have been produced after (b) and indeed after 1983.
For chassis numbers beginning WDB, known factories of origin & corresponding chassis letters are :-
A,B,C Sindelfingen
F,G Bremen
J Rastatt
N Dusseldorf
T Karmann (same production plant that VAG & Ford have used)
R,S, South Africa
Production plant code letters were grouped in sequence. E.g As you can see from the list above, the
Sindelfingen production plant began inserting an ‘A’ into the chassis numbers. After chassis number A999999
was built, the next chassis number was B000001 & so on.
Some Mercedes vehicles are produced at more than one production plant. For example the W203 C-Class was
built at Sindelfingen (plant code A in chassis number), Bremen (plant code F in chassis number), South Africa
(plant code R in chassis number) & a location unknown to me (plant code E in chassis number).
Ident number break points on the Mercedes EPC & also on TopCat will be listed in the following format (dates
shown in this document are not accurate, they are for illustration purposes only):
Up to ident no.
A 123456 (01/02/02)
F 568921 (06/07/01)
R 444986 (06/09/02)
E 662358 (22/05/01)
As you will see from the above, the production plants need to be treated completely separately. The ident
numbers & dates are all completely different, depending where the vehicle was built. The first task is to see
where the vehicle was built – for example, chassis number WDC 203 006 2R 056010 contains production plant
code ‘R’ & was built in South Africa. Only the information contained in the line highlighted above applies to
this car. In this instance, the other 3 lines in the above list should be completely ignored.

EPC user guide
Go to http://service-parts.mercedes-benz.com/dcagportal/DCAGPortal/portal.action & enter your log-in
credentials.
Click ‘Launch EPC’ from the next screen that appears.
A new window will then open, containg the Mercedes EPC. The internet explorer log-in screen (shown above)
can be closed, this is no longer required.
If the ‘Launch ECP’ button is missing, your licence has expired & will need to be renewed. Your branch
manager will need to email [email protected] with your existing username & password – the licence will
then be renewed. The renewal process must be initiated by your branch manager – or it will be ignored.

Getting in to the EPC
Copy & paste the entire chassis number from either TopCat or DVSE in to the Mercedes EPC & press the
‘enter’ key on your keyboard. Do not worry about the three letters in the dropdown box on the far left, the
letters in the newly pasted chassis number will overwrite these once the chassis number is entered.
Basic icon functions
Along the top of the EPC, towards the right hand side, there is a row of icons which cover the basic functions
available.
Vehicle data card Part number identification filters
Remove shopping list Print
from bottom of screen
Erase chassis number
Software version details
Online user guide
If the ‘vehicle data card’ icon looks like this , the chassis number is not recognised by Mercedes. On
vehicles produced after 1983, this means that the entered chassis number is incorrect.

Once the chassis number has successfully been entered, the following screen will be displayed.
Replacement parts are divided in to various groups, coil springs can always be found in group 32.

Coil spring identification – early vehicles
Coil springs for all pre 2008 vehicles are identified using a points system. Colour markings on these early
vehicles should not be used as this was very unreliable. This situation continued until 2010 on some vehicles.
As a ‘rule of thumb’, if a footnote like those detailed below exists on the Mercedes EPC, it must be used
instead of colour markings.
Example 1
Our first example is for front springs on a SLK350, chassis number WDB1714562F051503. Enter this chassis
number in to the EPC as shown previously, then click on group 32.
Then select the relevant subgroup, in this instance 054

If you just see text subgroups, with no thumbnail images & would like to see the images, contact me (Steve
McDermott) & I will explain which EPC settings you need to change. My contact details are at the end of this
userguide.
Once you have clicked to enter the subgroup, you will be presented with a picture on the right hand side & a
list of part numbers on the left. In this instance, click on item 30 & just the front spring part numbers will be
shown.
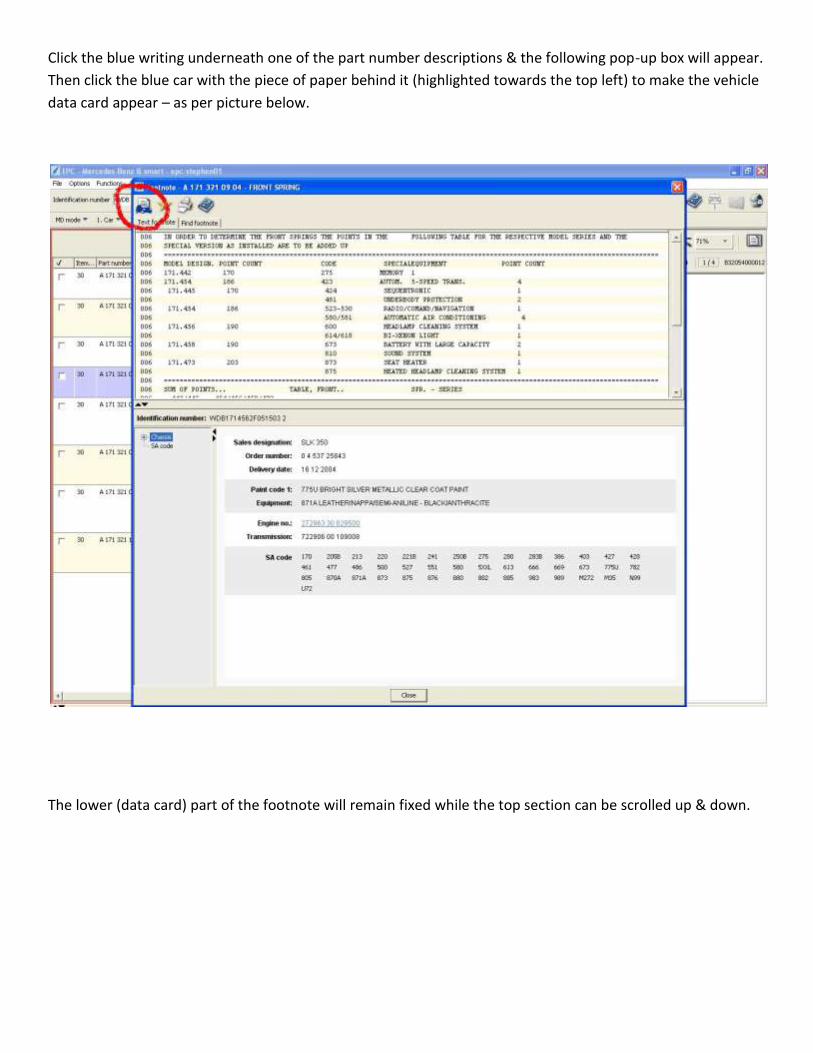
Click the blue writing underneath one of the part number descriptions & the following pop-up box will appear.
Then click the blue car with the piece of paper behind it (highlighted towards the top left) to make the vehicle
data card appear – as per picture below.
The lower (data card) part of the footnote will remain fixed while the top section can be scrolled up & down.
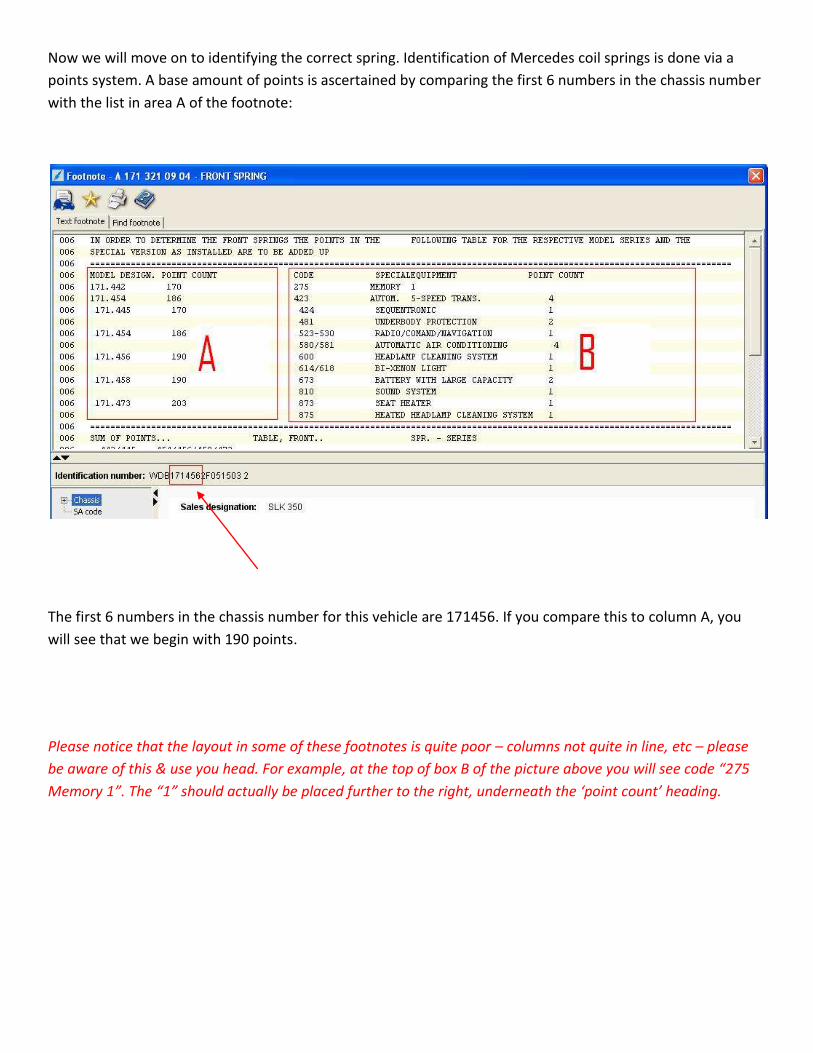
Now we will move on to identifying the correct spring. Identification of Mercedes coil springs is done via a
points system. A base amount of points is ascertained by comparing the first 6 numbers in the chassis number
with the list in area A of the footnote:
The first 6 numbers in the chassis number for this vehicle are 171456. If you compare this to column A, you
will see that we begin with 190 points.
Please notice that the layout in some of these footnotes is quite poor – columns not quite in line, etc – please
be aware of this & use you head. For example, at the top of box B of the picture above you will see code “275
Memory 1”. The “1” should actually be placed further to the right, underneath the ‘point count’ heading.

The area marked B in the picture above is a list of various extras which may or may not have been fitted to the
vehicle while it was being built. On the left of box B you will see the 3 digit sales codes, to the right of these is
a brief description & on the right hand side is the amount of points to be added to the 190 that we started
with, if the sales code (SA code) appears on the data card.
These SA codes must match those in box B exactly in order for the points to be added, for example SA code
870 is not the same as SA code 870A – these are completely different codes.
For this particular vehicle, the following codes appear in both the footnote & datacard. Relevant points which
should be added are:
275 1 point
580 4 points
673 2 points
873 1 point
875 1 point
When added to the original 190 points that we started with, this gives us a total of 199 points.

Now we can scroll the footnote down a little to see which is the correct OE part number that we need.
Once again we are presented with 2 different sections. Section C is for standard springs, section D is for sports
suspension (SA code 486). As our vehicle has SA code 486 on the datacard, we will concern ourselves just with
section D. You will now see a range of points listed on the left side & corresponding OE part numbers on the
right. The left side has 2 columns & we will use the right side column because the fourth, fifth & sixth numbers
of our chassis number are 456 (if these numbers had been 442 or 445 we would have used the left column).
This means that the OE number required for the front springs on this vehicle is A1713211004.
To find our part number for this item, type 1713211004 in to either DVSE or straight in to K8 – without the ‘A’.

Example 2
In this example I have chosen a vehicle with very complicated road spring fitment. If you would like to work
along with me, the chassis number that we will be using is WDB2110162A378546 - enter this in to your EPC.
From the main group list, select group 32 & then select the first sub-group. Select item 20 from the following
screen, then your display should look something like this:
You will see that this gives us a choice of six different springs. Click the blue writing underneath one of the part
numbers & this will then display the footnote that we need to look at.
In the picture below, you will see there are 3 columns on the upper section of this footnote. We will start with
column A which contains a list of chassis types & corresponding amount of points. To see how many points to
start with, compare the first six numbers of the chassis number to the left most column. Our chassis number
begins with ‘211 016’, this gives us a starting point of 208 points.
It is then necessary to see which of the other two columns (B or C) applies to our vehicle. If we look at the top
of column B, it states that the column is applicable to vehicles up to chassis ident A851598. We can see from a
quick look at our chassis number that column B is the column that we need to use.

The next task is to see which of the three digit codes on the left of column B also appear on the vehicle
datacard. The datacard can be shown along with the footnote by clicking the icon of a blue car with a piece of
paper behind it – as shown on the picture below.
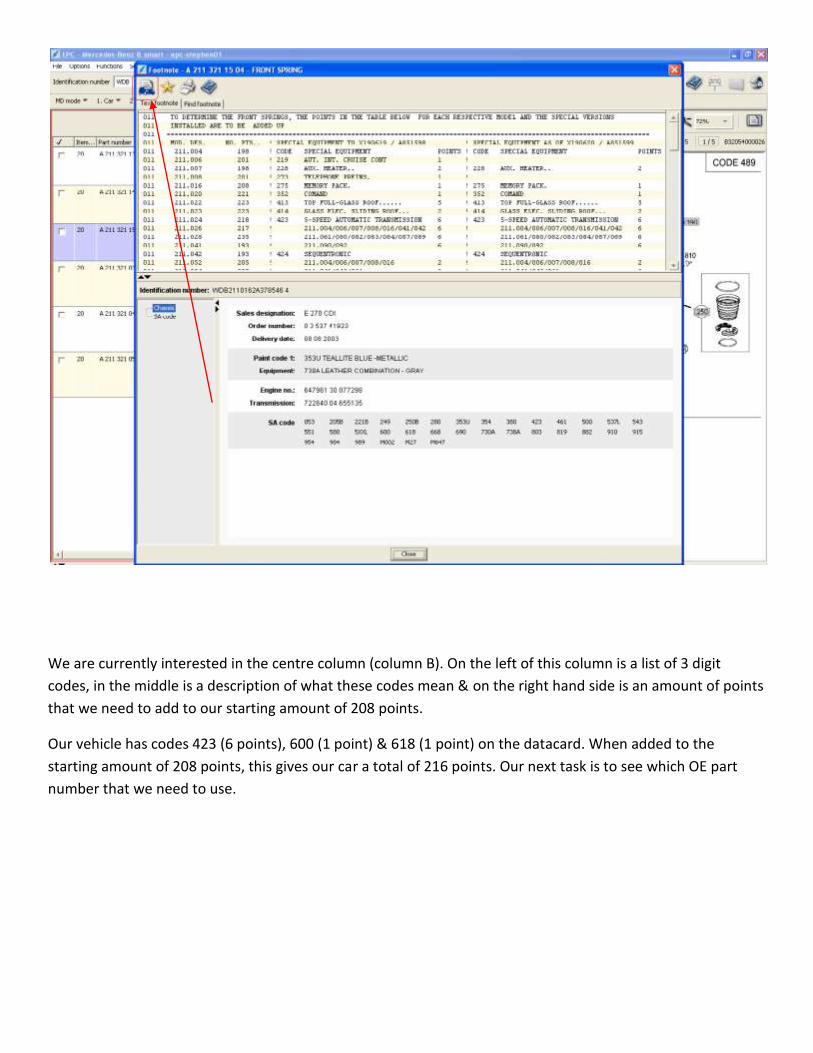
We are currently interested in the centre column (column B). On the left of this column is a list of 3 digit
codes, in the middle is a description of what these codes mean & on the right hand side is an amount of points
that we need to add to our starting amount of 208 points.
Our vehicle has codes 423 (6 points), 600 (1 point) & 618 (1 point) on the datacard. When added to the
starting amount of 208 points, this gives our car a total of 216 points. Our next task is to see which OE part
number that we need to use.
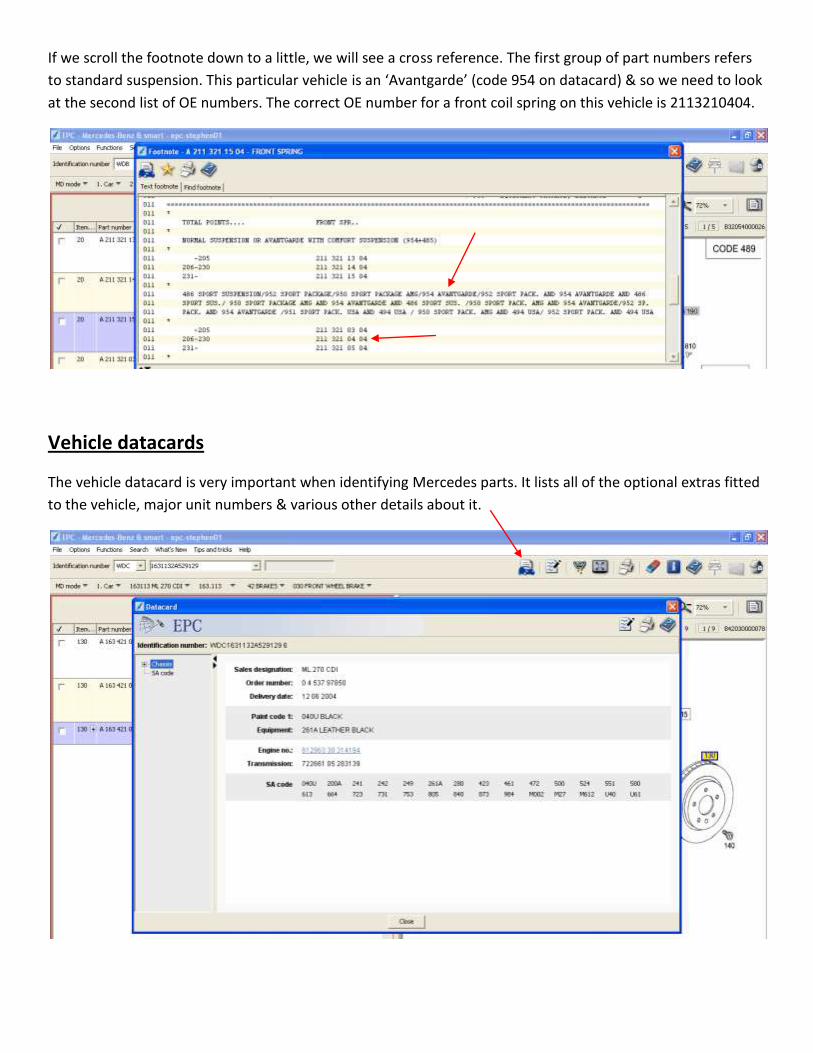
If we scroll the footnote down to a little, we will see a cross reference. The first group of part numbers refers
to standard suspension. This particular vehicle is an ‘Avantgarde’ (code 954 on datacard) & so we need to look
at the second list of OE numbers. The correct OE number for a front coil spring on this vehicle is 2113210404.
Vehicle datacards
The vehicle datacard is very important when identifying Mercedes parts. It lists all of the optional extras fitted
to the vehicle, major unit numbers & various other details about it.

Decoding the datacard
Sales designation vehicle model
Order number 0 = no meaning
4 = last number of the year when the vehicle was built
537 = country code (537 = UK)
97850 = number written on vehicle windscreen as it left the factory
Delivery date date at which the vehicle left the factory
Paint code exterior paint code
Equipment interior trim code
Engine no engine number
Transmission transmission number
SA Code special version codes applicable the vehicle
If you click on SA code at the top left of the datacard, the window will change & give a description of the 3
digit codes applicable to the vehicle – like the picture below:
You will then be able to scroll down through the list of codes & see what they mean.

Any problems, please contact:
Steve McDermott, Marcin Lisowski,
Email: [email protected] Email: [email protected]
Tel: 0208 956 5058 Tel: 0208 782 2549
Cisco: 7001058 Cisco: 7001549