unidesk 2.10 for vsphere - citrix docsmicrosoft windows 10 version 1511, 1607 (build 10586) 64-bit...
TRANSCRIPT

© 1999-2017 Citrix Systems, Inc. All rights reserved. p.1https://docs.citrix.com
Unidesk 2.10 for vSphere
Jun 28 , 2017
This pdf file includes the Unidesk 2.10 documentation. You can save a local copy of this file and use it offline.
Use the built-in Search and Bookmark features to find what you need. Avoid using the links in this file, as
they refer back to the landing page.
Plan
Unidesk infrastructure
Unidesk appliances and datastores
Unidesk 2.x Platform Support
Unidesk Layer storage
Unidesk storage sizing and disk speed
RPO and RTO requirements
Unidesk component availability
Local recovery options
Disaster recovery options
Deploy
Unidesk 2.10 Release notes
Unidesk 2.x Platform Support
Storage and hardware requirements
Conf igure vCenter permissions
Install Unidesk software and tools
Upgrade Unidesk
Conf igure email notif ications
Set a Session Timeout for the Unidesk Management Console Creat e a Secondary CachePoint
Appliance Connect to a Directory Service
Integrate with a broker
Create an OS Layer
Create an Installation Machine
© 1999-2017 Citrix Systems, Inc. All rights reserved. p.2https://docs.citrix.com
Create Application Layers
Create Desktops
Back up appliances
Administer
Unidesk Management Console
Unidesk Layers
Desktops
Appliance Backup Utility
Unidesk broker agent
Users and groups
Monitor Unidesk virtual appliances
Get notif ied of CachePoint service
issues Monitor tasks
Open ports in your f irewall for Unidesk
Logging
VMware hosts and datastores
Move (migrate) Appliances and Desktops
Generate Unidesk reports
Delete Unidesk components

© 1999-2017 Citrix Systems, Inc. All rights reserved. p.3https://docs.citrix.com
Plan
Jun 28 , 2017
Plan
Unidesk infrastructure
Unidesk appliances and datastores
Unidesk 2.x Platform Support
Unidesk Layer storage
Unidesk storage sizing and disk speed
RPO and RTO requirements
Unidesk component availability
Local recovery options
Disaster recovery options

© 1999-2017 Citrix Systems, Inc. All rights reserved. p.4https://docs.citrix.com
Unidesk infrastructure
Jun 28 , 2017
The Unidesk solution provides simplified management, significant storage efficiency, performance, operational agility, and
persistent personalization or customization of desktop virtual machines. The Unidesk environment includes collection of
virtual appliances that run in your existing virtual infrastructure. These appliances work together to dynamically composite
desktops that look and feel just like ordinary virtual desktops.
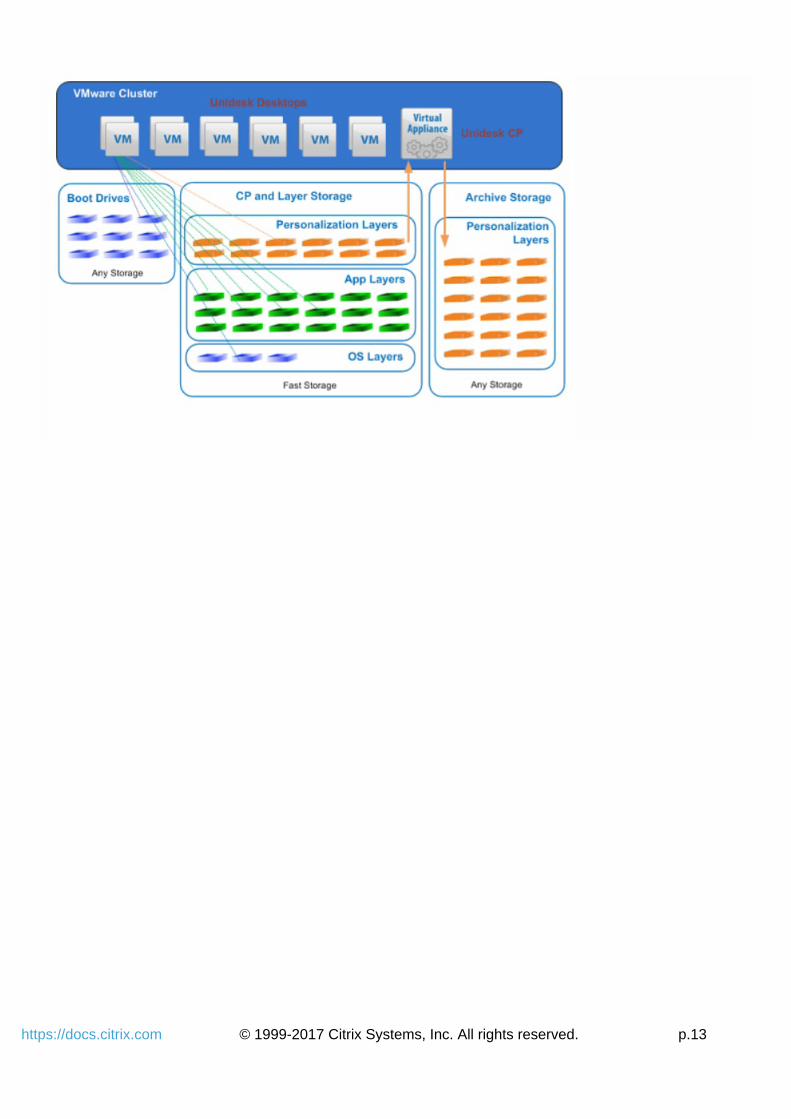
The following diagram shows the logical infrastructure of the Unidesk environment. The Unidesk environment is a grid of
virtual appliances that replicate operating system, application, and user workspace layers across an enterprise network. This
environment uses the Unidesk Composite Virtualization™ technology to synthesize the layers into complete, personalized
desktops.
For the latest information about what platforms Unidesk supports, see Platform Support.
Unidesk layers
A Unidesk desktop is a composite of layers that provide the operating system, applications, and user data. Unidesk stores all
layers as VMware Virtual Machine Disk (VMDK) files in datastores in your virtual infrastructure. Unidesk uses the following
types of layers to create a virtual desktop:

© 1999-2017 Citrix Systems, Inc. All rights reserved. p.5https://docs.citrix.com
Layer Description
Operating
SystemAn Operating System Layer contains an imported copy of the operating system from a gold image.
Application An Application Layer contains one or more applications that you assign to a desktop.
User
A layer that behaves similarly to an Application Layer. This layer collects all of the user's changes to a desktop and persists
those changes through desktop restarts and changes to application and OS layer changes.
The Unidesk software creates this layer when you create a desktop.
Unidesk storage tiers
Unidesk stores content in three distinct tiers. Each tier can have its own datastore or you can assign multiple tiers to the
same datastore.
Tier Description
Boot
The Boot tier contains boot images and page files for your desktops. The boot image serves the kernel for a desktop.
Once a boot image exists for a particular desktop, this tier retains the image as a VMDK file. If a particular desktop
becomes corrupted or lost, Unidesk can simply recreate the boot image for that desktop.
The performance of this tier can affect the performance of desktops.
CachePoint®
and Layers
The CachePoint and Layers tier contains the CachePoint Appliances as well as OS, Application, and User layers for your
desktops. Each layer exists as a discrete VMDK file. A boot image created from the Desktop tier draws additional layers
from this tier to finish creating a desktop. The majority of Input/Output activities take place on this tier.
The performance of this tier can affect the performance of desktops.
Archive
If you have chosen to back up your desktops, this tier stores backup images of the User layer. If you need to repair or
restore a desktop, Unidesk retrieves the archived image from this tier and restores it to the CachePoint and Layers tier.
This tier receives these images from your CachePoint Appliances. This tier does not require a connection to your
desktops.
The performance of this tier does not affect the performance of your desktops.
© 1999-2017 Citrix Systems, Inc. All rights reserved. p.6https://docs.citrix.com
Unidesk appliances and datastores
Jun 28 , 2017
The Unidesk appliances include software for managing the Unidesk environment, master copies of all Layers, and the
configuration data for your Desktops.
Management Appliance
The Management Appliance is a virtual appliance that coordinates the communication between the Unidesk Management
Console, the CachePoint® Appliances, and the virtual infrastructure. The Management Appliance includes these
components.
Component Description
Unidesk Management
Console
The Web-based application that administrators use to manage the following components:
Virtual desktops
Operating System Layers
Application Layers
Directory service integration points
The Unidesk infrastructure
Management
infrastructure
The software that controls the workflow required to manage virtual machines. It includes a database that
stores the following information:
Data about all of the Operating System and Application Layers that exist in the system.
All data from the Unidesk Management Console.
Schemas that implement back-end storage in the virtual infrastructure.
Master CachePoint Appliance
The first CachePoint Appliance that you provision in the Unidesk environment becomes the Master CachePoint Appliance .
This virtual appliance maintains the master copy of all of the Operating System and Application Layers in the Unidesk
environment. The Master CachePoint Appliance stores the layers as VMware VMDK files in its datastore.
The Master CachePoint Appliance automatically replicates Operating System and Application Layers to secondary
CachePoint Appliances that manage desktops that use these layers. Layer replication to secondary CachePoint Appliances
occurs only if one or more desktops associated with a specific CachePoint Appliance needs the layers.
The Master CachePoint Appliance also manages the Installation Machines that you use to create and modify Operating
System and Application Layers . An Installation Machine is a special type of desktop that you use to create Application
Layers or add versions to existing Operating System and Application Layers. The Master CachePoint Appliance stores the
VMDK files for Installation Machines in its datastore.
Secondary CachePoint Appliance
The Secondary CachePoint Appliances are responsible for:

© 1999-2017 Citrix Systems, Inc. All rights reserved. p.7https://docs.citrix.com
The initial deployment of desktops.
Deployment of desktop configuration changes.
These appliances maintain copies of the layers that desktops need in its datastore. They also store the VMDK files
associated with the desktops deployed in the same datastore. All desktops associated with a specific CachePoint Appliance
share the same layers.
The CachePoint file system
Each CachePoint Appliance (including the Master CachePoint Appliance) has a folder in the Virtual Machine File System
(VMFS) in its assigned datastore. This folder contains the following files and subfolders:
CachePoint Appliance folder - contains VMDK files for the CachePoint Appliance (virtual appliance).
UnideskLayers folder - can contain the following subfolders.
UnideskLayersfolder
Contains a VMDK f ile for each
OS Operating System Layer that the CachePoint Appliance needs.
App Application Layer that the CachePoint Appliance.
User
Desktop that the CachePoint Appliance manages. For each desktop, a folder contains two VMDK files:
Folder for the desktop configuration data, for example, data for user-installed application and system
settings.
Folder for the user data. These make up the User Layer.
The following example shows a typical CachePoint Appliance file system.
The CachePoint Appliances and Desktop operation

© 1999-2017 Citrix Systems, Inc. All rights reserved. p.8https://docs.citrix.com
Because the desktop connects directly to its layers, the state of the CachePoint Appliance has no effect on desktop
operation. For example, you can shut down a CachePoint Appliance without affecting active desktops.
To users, desktop virtual machines appear as standard desktop computers.

© 1999-2017 Citrix Systems, Inc. All rights reserved. p.9https://docs.citrix.com
Unidesk 2.x Platform Support
Jun 28 , 2017
Third-party software that the Unidesk 2.x infrastructure either requires or supports includes the following.
Infrastructure software
Supported virtual infrastructure software:
VMware (Enterprise, Enterprise Plus, Desktop)
vSphere, vCenter Server 6.0, 6.0 U1, 5.5, 5.5 U1, 5.5 U2, 5.1, 5.1 U2, 5.0, 5.0 U1, and 5.0 U3. (Support for v 6.0 added in
Unidesk 2.8.3.)
If using high-end VAAI-enabled storage, ESXi 6.0, 5.5 U1, 5.5 U2, 5.1 U2, or 5.0 is required to ensure optimal Desktop
build performance. (Support for v 6.0 added in Unidesk 2.8.3.)
VMware Virtual SAN (vSAN)
vSAN 5.5 is supported
vSAN 6 and later is not supported
If using vSAN with vSphere 5.5, backups must be stored on a non-vSAN storage location. Please see the following
topic for requirements and recommendations: Plan Storage Size
Untested VMware features:
Testing of functionality new in VMware 6, such as vSAN 6 and NVIDIA Grid vGPU has not yet been completed. If you
are interested in using vGPU, please be aware that VMware does not support snapshots, and therefore you cannot
use vGPU in combination with Unidesk’s Desktop Backup functionality.
Unsupported VMware features:
VMware Storage vMotion migrate command, vSphere Storage - Profile-Driven Storage, and Distributed Power
Management.
Virtualization connection broker
The following brokers are directly integrated with Unidesk. Other connection brokers are supported, but without direct
integration.
VMware Horizon ViewHorizon View 7.0-7.2, 6.0-6.2, 5.0-5.3 (If running View 5.1 with Windows XP, please see Windows XP in the Known
Issues sect ion of the Release Notes.)
Horizon View Persona Profile Management 5.x, 6.0. Person Profile Management 6.1 and later is unsupported.
Unsupported feature: Storage Accelerator (Unidesk will not work if Horizon View Storage Accelerator is turned on.)
Citrix XenDesktop
XenDesktop 5.6, 5.5 (Standard, Advanced, Enterprise, Platinum)
XenDesktop 7.6, 7.5, 7.1, 7.0 (VDI, App, Enterprise, Platinum)
Note: You cannot use XenDesktop 7.0 with Windows 8.1 Desktops. Instead, use one of the other supported
XenDesktop versions.
Citrix User Profile Management (UPM)

© 1999-2017 Citrix Systems, Inc. All rights reserved. p.10https://docs.citrix.com
Pano Logic
Pano System 6.0, 5.0
Internet browser
The Unidesk Management Console (UMC) supports any standards-based browser that supports Silverlight 4.0.
Desktop operating system
Unidesk Desktops support the following operating systems:
Microsof t Windows 10 Version 1511, 1607 (Build 10586) 64-bit (Enterprise, Education) – Only supported on ESXi
version 6.0 and above.Microsoft Windows 8.1 Update, 32-bit, 64-bit (Professional, Enterprise)
Microsoft Windows 7 SP1, 32-bit, 64-bit (Professional, Ultimate, Enterprise)
Windows Server 2012 R2 64-bit (Datacenter Edition)
Windows Server 2008 R2, 64-bit (Datacenter Edition)
Microsoft Windows XP SP3, 32-bit (Professional)
NoteSingle-byte language packs are supported for all platforms, except for Windows XP. The language pack is supported in the Gold
image only.
Session Host Operating System
Windows Server 2012 R2 64-bit (Datacenter Edition). See Horizon View RDSH and XenApp integration with Unidesk for
vSphere for details.
Directory service
Unidesk supports these directory services:
Novell eDirectory
Microsoft Active Directory

© 1999-2017 Citrix Systems, Inc. All rights reserved. p.11https://docs.citrix.com
Unidesk Layer storage
Jun 28 , 2017
Unidesk Application and Operating System Layers are stored as separate vmdk files on a VMware-supported datastore.
Desktops mount these files directly from the datastore as independent non-persistent disks, in a many-to-one fashion. This
is similar to linked clones, except in Unidesk there can be up to 50 application layer vmdk files connected to each virtual
desktop.
Master CachePoint Appliance on the datastore
The following image shows the file structure of a Master CachePoint Appliance on the datastore. Note the folders for the
User, Operating System (OS), and Application (App) Layers. These hold the User Personalization Layers, Operating System
Layers, and Application Layers, respectively.
Each deployed desktop also has a folder with files, as shown in the image below. Here you see the VM’s vmx files, virtual
machine vswp swap file, boot drive vmdk, as well as a delta disk and REDO log for each Application or Operating System
Layer attached to the desktop. This file structure provides a great deal of information. For example it is easy to determine
the space used by a particular layer.

© 1999-2017 Citrix Systems, Inc. All rights reserved. p.12https://docs.citrix.com
Each Unidesk Layer version starts as a full clone of the previous layer. Changes are made to the layer and saved. This means
that versions are always the same size or larger than the version before as shown below.
Unidesk storage tiers
Boot drives
CachePoint Appliance and Layer storage
Archive storage
© 1999-2017 Citrix Systems, Inc. All rights reserved. p.13https://docs.citrix.com

© 1999-2017 Citrix Systems, Inc. All rights reserved. p.14https://docs.citrix.com
Unidesk storage sizing and disk speed
Jun 28 , 2017
Maximizing the use of expensive storage resources is one of the key design goals for virtualization architects, and with
Virtual Desktop designs it may be even more important than with other designs due to the number of machines included.
This article explains how a Unidesk Desktop is configured for storage and how to right size your storage when deploying a
Unidesk solution. Use the Unidesk Storage Calculator along with this article to determine your storage needs.
General guidelines
Storage tiers and disk speed
Storage tier Disk speed About
CachePoint Appliance and Layers Fast storage The User Layer is where the majority of desktop writes are made.
Boot Images Slower storage Requires little IO, only during desktop boot.
Archive Slower storage Stores periodic backup of User Layers.
Desktop disk access
Desktops access Layers by connecting to them via the VMware storage stack.
◾ The boot drive – attached as an independent persistent disk.
◾ The two User Layer vmdks – attached as normal disks.
◾ The Operating System Layer and Application Layers – accessed as independent non-persistent disks.
A Desktop can be rebooted when its CachePoint is down. However, any change to the Desktop's settings or layers
requires the CachePoint to be running.
General storage and hardware requirements
Local versus centralized storageYou can use local or centralized storage (or a mixture of both). For the Management Appliance and Master
CachePoint Appliance, we recommend centralized (shared) storage with VMware High Availability (HA) services for the
quickest recovery if a host failure occurs.
Management Appliance storageThe Management Appliance contains the configuration MySQL database and the host's Unidesk Management
Console. You can deploy the Management Appliance on any host in your infrastructure within the same Datacenter.
© 1999-2017 Citrix Systems, Inc. All rights reserved. p.15https://docs.citrix.com
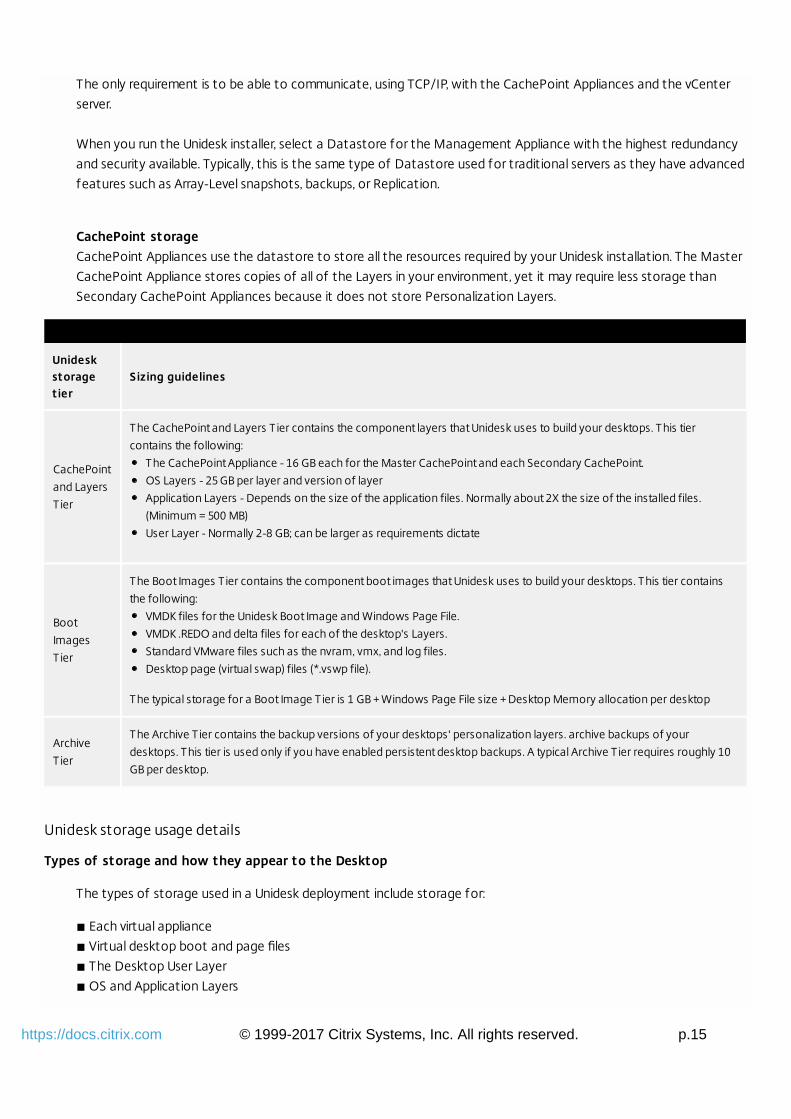
The only requirement is to be able to communicate, using TCP/IP, with the CachePoint Appliances and the vCenter
server.
When you run the Unidesk installer, select a Datastore for the Management Appliance with the highest redundancy
and security available. Typically, this is the same type of Datastore used for traditional servers as they have advanced
features such as Array-Level snapshots, backups, or Replication.
CachePoint storageCachePoint Appliances use the datastore to store all the resources required by your Unidesk installation. The Master
CachePoint Appliance stores copies of all of the Layers in your environment, yet it may require less storage than
Secondary CachePoint Appliances because it does not store Personalization Layers.
Unideskstoragetier
Sizing guidelines
CachePoint
and Layers
T ier
The CachePoint and Layers T ier contains the component layers that Unidesk uses to build your desktops. This tier
contains the following:
The CachePoint Appliance - 16 GB each for the Master CachePoint and each Secondary CachePoint.
OS Layers - 25 GB per layer and version of layer
Application Layers - Depends on the size of the application files. Normally about 2X the size of the installed files.
(Minimum = 500 MB)
User Layer - Normally 2-8 GB; can be larger as requirements dictate
Boot
Images
T ier
The Boot Images T ier contains the component boot images that Unidesk uses to build your desktops. This tier contains
the following:
VMDK files for the Unidesk Boot Image and Windows Page File.
VMDK .REDO and delta files for each of the desktop's Layers.
Standard VMware files such as the nvram, vmx, and log files.
Desktop page (virtual swap) files (*.vswp file).
The typical storage for a Boot Image T ier is 1 GB + Windows Page File size + Desktop Memory allocation per desktop
Archive
T ier
The Archive T ier contains the backup versions of your desktops' personalization layers. archive backups of your
desktops. This tier is used only if you have enabled persistent desktop backups. A typical Archive T ier requires roughly 10
GB per desktop.
Unidesk storage usage details
Types of storage and how they appear to the Desktop
The types of storage used in a Unidesk deployment include storage for:
◾ Each virtual appliance
◾ Virtual desktop boot and page files
◾ The Desktop User Layer
◾ OS and Application Layers
© 1999-2017 Citrix Systems, Inc. All rights reserved. p.16https://docs.citrix.com
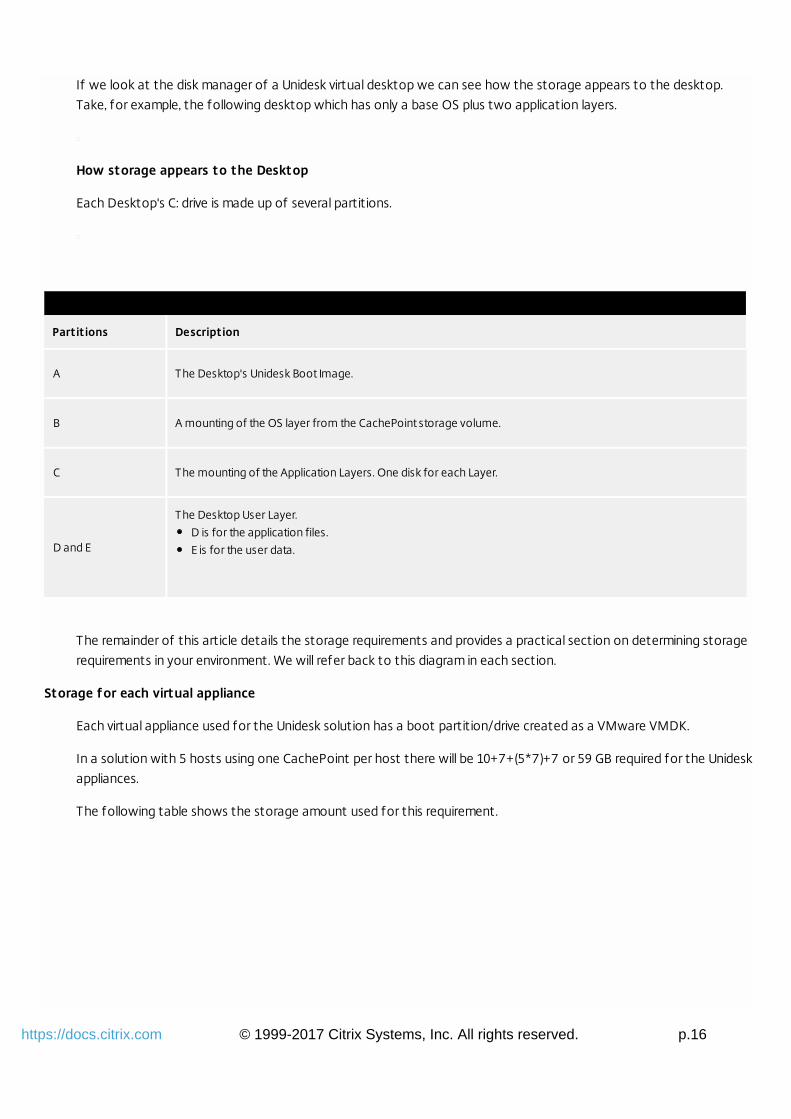
If we look at the disk manager of a Unidesk virtual desktop we can see how the storage appears to the desktop.
Take, for example, the following desktop which has only a base OS plus two application layers.
How storage appears to the Desktop
Each Desktop's C: drive is made up of several partitions.
Partitions Description
A The Desktop's Unidesk Boot Image.
B A mounting of the OS layer from the CachePoint storage volume.
C The mounting of the Application Layers. One disk for each Layer.
D and E
The Desktop User Layer.
D is for the application files.
E is for the user data.
The remainder of this article details the storage requirements and provides a practical section on determining storage
requirements in your environment. We will refer back to this diagram in each section.
Storage for each virtual appliance
Each virtual appliance used for the Unidesk solution has a boot partition/drive created as a VMware VMDK.
In a solution with 5 hosts using one CachePoint per host there will be 10+7+(5*7)+7 or 59 GB required for the Unidesk
appliances.
The following table shows the storage amount used for this requirement.
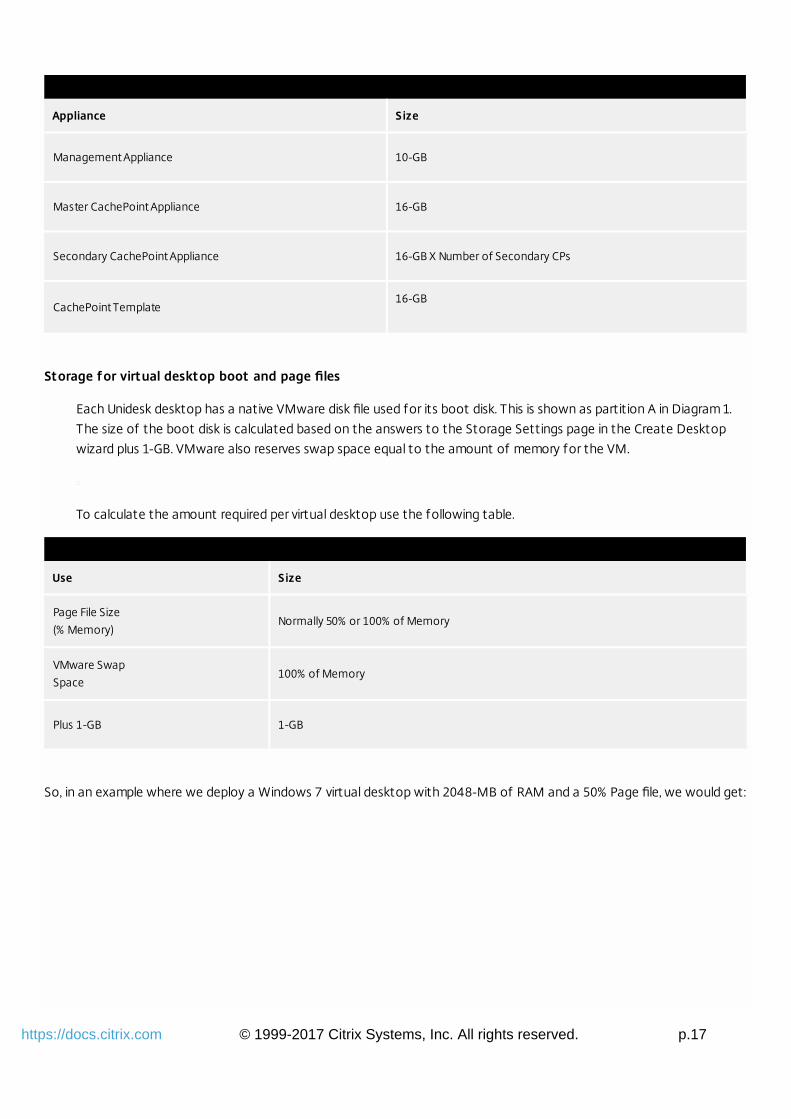
© 1999-2017 Citrix Systems, Inc. All rights reserved. p.17https://docs.citrix.com
Appliance Size
Management Appliance 10-GB
Master CachePoint Appliance 16-GB
Secondary CachePoint Appliance 16-GB X Number of Secondary CPs
CachePoint Template16-GB
Storage for virtual desktop boot and page files
Each Unidesk desktop has a native VMware disk file used for its boot disk. This is shown as partition A in Diagram 1.
The size of the boot disk is calculated based on the answers to the Storage Settings page in the Create Desktop
wizard plus 1-GB. VMware also reserves swap space equal to the amount of memory for the VM.
To calculate the amount required per virtual desktop use the following table.
Use Size
Page File Size
(% Memory)Normally 50% or 100% of Memory
VMware Swap
Space100% of Memory
Plus 1-GB 1-GB
So, in an example where we deploy a Windows 7 virtual desktop with 2048-MB of RAM and a 50% Page file, we would get:

© 1999-2017 Citrix Systems, Inc. All rights reserved. p.18https://docs.citrix.com
Use Size
Page File Size
(% Memory)50% - 1-GB
VMware Swap
Space2048-MB
Plus 1-GB 1-GB
Total
Provisioned Space
4-GB
Storage for the Desktop User Layer
The storage used within each Desktop's User Layer is stored on the Datastore of the CachePoint that the desktop is
deployed to. The amount of storage available to the Desktop is based on the "Storage for User Data (GB)" within the
Create Desktop wizard.
The amount of storage defined here will likely have the greatest impact on the amount of storage used for the
solution. Each desktop is configured with two partitions based on this size. Each disk is the same size. One stores the
"controlled" files associated with applications or plugins installed into the User Layer While the other stores user data
files. The distinction between the two is based on file extensions. Unknown extensions are placed into the User Data
partition. It is possible to fill up both of these disks to their full size allocated. These partitions are shown in Diagram 1
above as D and E.
When a desktop is first deployed the data in the User Layer is very small. As the desktop is first booted and then used,
files that are that are created and modified are stored on these disks.
All files fall into this category including:
◾ User Profile and Documents.
◾ User Installed applications.
◾ Automated updates from antivirus, the OS, etc.
◾ Temp files, including file downloads and browser cache files. Even if you download to a file server, most browsers
create a temp file first on the local disk.
◾ Windows log files and other operating system files that get modified during normal Windows operation.
When files are deleted in NTFS they are marked as available but the file system driver may or may not reuse the
available blocks. NTFS actually looks for available space anywhere on the disk with enough un-fragmented clusters to
store the file. It also assumes the file will need to grow and looks for space for between 2 and 16 times the file size.
This means that often the file system will use never-before-written-to blocks because they have room for the file and
growth. It is best to assume that whatever size is allocated for user storage will be eventually fully utilized. Therefore
© 1999-2017 Citrix Systems, Inc. All rights reserved. p.19https://docs.citrix.com
it ’s important to figure out the smallest amount of user storage that will work for the solution.
A good rule of thumb may be to allocate 5 GB per desktop for user space. If an email ost or pst file will also reside on
the desktop that should be added into the equation as extra space.
Storage for OS and Application Layers
The calculation for OS and Application layers is much more straight forward. When you create a layer the files that
are installed are what are stored. The majority of the storage for applications comes from the application files. For
the operating system the same is true. The files that make up the operating system should be calculated without the
page file as that is accounted for elsewhere.
This storage is added to the amount required in CachePoint storage.
Local versus SAN Storage
Keep in mind when designing your solution that Unidesk can be used with either local or SAN storage. The design of
which to use should be based on service level agreements for desktop availability and cost. If local storage is used the
overall cost will normally be lower than SAN storage but VMware HA and DRS cannot be used.
Calculate Total Storage
If we take each of these sections and add them up we can calculate storage requirements. The best way to look at
storage is to define what is required for the CachePoint Datastores separate from the appliance storage.
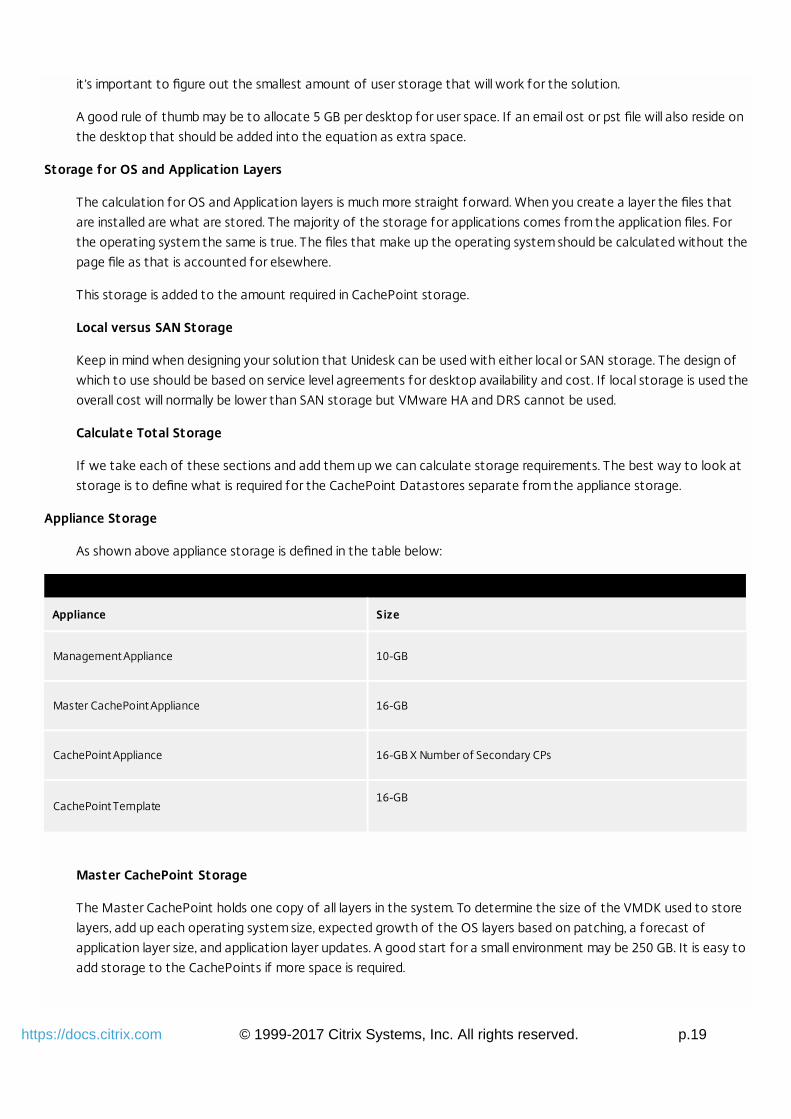
Appliance Storage
As shown above appliance storage is defined in the table below:
Appliance Size
Management Appliance 10-GB
Master CachePoint Appliance 16-GB
CachePoint Appliance 16-GB X Number of Secondary CPs
CachePoint Template16-GB
Master CachePoint Storage
The Master CachePoint holds one copy of all layers in the system. To determine the size of the VMDK used to store
layers, add up each operating system size, expected growth of the OS layers based on patching, a forecast of
application layer size, and application layer updates. A good start for a small environment may be 250 GB. It is easy to
add storage to the CachePoints if more space is required.
© 1999-2017 Citrix Systems, Inc. All rights reserved. p.20https://docs.citrix.com
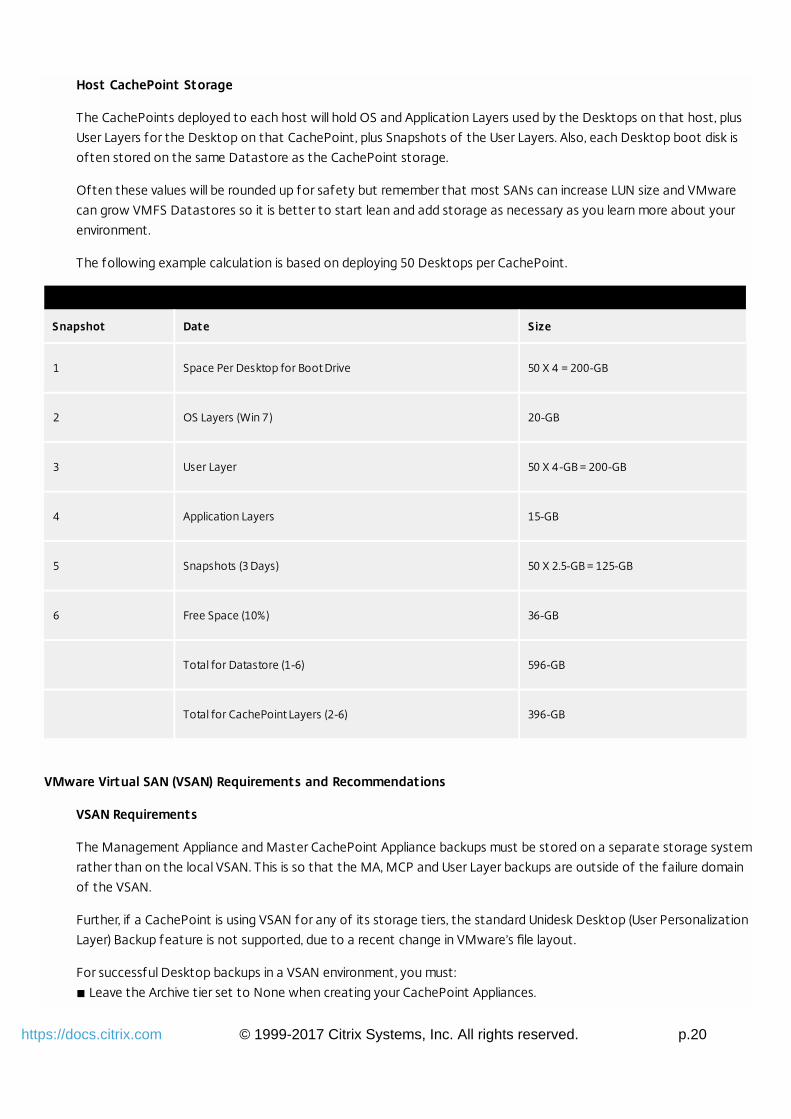
Host CachePoint Storage
The CachePoints deployed to each host will hold OS and Application Layers used by the Desktops on that host, plus
User Layers for the Desktop on that CachePoint, plus Snapshots of the User Layers. Also, each Desktop boot disk is
often stored on the same Datastore as the CachePoint storage.
Often these values will be rounded up for safety but remember that most SANs can increase LUN size and VMware
can grow VMFS Datastores so it is better to start lean and add storage as necessary as you learn more about your
environment.
The following example calculation is based on deploying 50 Desktops per CachePoint.
Snapshot Date Size
1 Space Per Desktop for Boot Drive 50 X 4 = 200-GB
2 OS Layers (Win 7) 20-GB
3 User Layer 50 X 4-GB = 200-GB
4 Application Layers 15-GB
5 Snapshots (3 Days) 50 X 2.5-GB = 125-GB
6 Free Space (10%) 36-GB
Total for Datastore (1-6) 596-GB
Total for CachePoint Layers (2-6) 396-GB
VMware Virtual SAN (VSAN) Requirements and Recommendations
VSAN Requirements
The Management Appliance and Master CachePoint Appliance backups must be stored on a separate storage system
rather than on the local VSAN. This is so that the MA, MCP and User Layer backups are outside of the failure domain
of the VSAN.
Further, if a CachePoint is using VSAN for any of its storage tiers, the standard Unidesk Desktop (User Personalization
Layer) Backup feature is not supported, due to a recent change in VMware’s file layout.
For successful Desktop backups in a VSAN environment, you must:
◾ Leave the Archive tier set to None when creating your CachePoint Appliances.

© 1999-2017 Citrix Systems, Inc. All rights reserved. p.21https://docs.citrix.com
◾ Contact Unidesk Support for a VSAN Desktop Backup script to use until further notice.
VSAN Recommendations
VSAN storage is recommended for environments with minimalLlayers. The maximum number of Desktops per host is
calculated based on the Average number of Application Layers per Desktop.
VSAN limitations
Based on our testing, a 3-host VSAN cluster supports approximately the numbers of Desktops shown below, based
on the number of Layers per Desktop. These numbers are approximate, as the number of VMDKs and files varies
based on the power state of the virtual machines.
A 3-Host VSAN cluster can handle the following numbers of Desktops per host, based on the average number of
Application Layers per Desktop.
These figures are based on Persistent Desktops. Non-persistent Desktops add 2-3 more snapshots per VM---like
adding 1 Application Layer to each VM.
◾ 0 App Layers – 300 total Desktops, 100 Desktops per host (artificial VMware VSAN limit)
◾ 5 App Layers – 150 total Desktops, 50 Desktops per host (limited by number of storage components)
◾ 10 App Layers – 99-100 Desktops total, 33 Desktops per host (limited by number of storage components)
◾ 15 App Layers – 75 total Desktops, 25 Desktops per host (limited by number of storage components)
◾ 20 App Layers – 60 total Desktops, 20 Desktops per host (limited by number of storage components)
These numbers will scale linearly. If you add another host, it will also have a 3000-component limit. Thus a 4-host
cluster with 10 Application Layers will still be limited to about 33 Desktops per host.
To determine the average number of Desktops you can host, open the VSAN Desktop Calculator and enter the
average number of Layers per Desktop.
Errors when the Desktop limit is reached on VSAN
When you exceed the limits of a VSAN, the following errors occur:
◾ No more Desktops will power on. The existing Desktops continue to run, but if you try to add a Layer to 90
Desktops (thus, adding a couple of hundred files to VMFS), once the file limit is reached, any Desktops that are being
rebuilt will not power on, and will be in a Down state after the maintenance window.
◾ The task in Unidesk fails with a "General VM config fault" returned from vCenter.
◾ In vCenter, you see a "failed to make unique file name" when it cannot create or attach the next file, generally a
snapshot on an independent, Non-persistent disk.
◾ For each Layer you add above 10, you lose about 2 Desktops per host.
© 1999-2017 Citrix Systems, Inc. All rights reserved. p.22https://docs.citrix.com
RPO and RTO requirements
Jun 28 , 2017
To design the appropriate architecture for local recovery and Disaster Recovery, you must first define the recovery point
objectives (RPO) and recovery time objectives (RTO) for your virtual desktops. Without an agreement between you and your
users on these values, it can be very hard to make decisions about your approach to Disaster Recovery.
Recovery point objectives (RPO)
The RPO defines the point in time when desktops must be restored after a disaster occurs. This value defines the longest
time allowed between backups.
Recovery time objectives (RTO)
The RTO defines the time it takes to recover a system or data to the desired state. This value defines the worst case for
recovery of a desktop or data within the desktop.
Generally speaking, the shorter the RTO and RPO, the more costly the infrastructure you need to deploy. Values for RTO
and RPO can be different for a single desktop compared to an entire host or a CachePoint Appliance and its desktops.
Typically, these values are different for local recovery and Disaster Recovery.

© 1999-2017 Citrix Systems, Inc. All rights reserved. p.23https://docs.citrix.com
Unidesk component availability
Jun 28 , 2017
Unidesk availability is dependent on the architecture for both Unidesk components and the non-Unidesk (third-party)
components on which Unidesk depends.
Availability
Non-Unidesk component availability
Unidesk is deployed as part of a more complex environment. When discussing the availability and recoverability of
Unidesk, we must also mention the availability and recoverability of the other components in the infrastructure.
VMware vSphere
In VMware vSphere, you must design availability for the following components:
◾vCenter Server
◾vSphere hosts
◾vSphere storage
If the vCenter server is down, Unidesk desktops continue to run. You can also continue to restart them from within
the desktop but not from the Unidesk Management Console. You cannot, however, create desktops and layers. If
Unidesk tries to rebuild desktops, the rebuild fails and the desktop becomes unusable until the vCenter server is
running again and the desktop rebuild occurs.
If the vSphere host fails, the desktops and Unidesk virtual appliances that are running on that host fail. If you are
using SAN storage, Unidesk desktops can take advantage of VMware High Availability Services (HA). VMware HA can
restart desktops when a host failure occurs and sufficient resources are available in the HA cluster to support the
load of the desktops. In Unidesk 2.x the desktops are not reliant on the CachePoints to run. However if the desktops
require a rebuild then they do require the CachePoints are running, so CP’s should also be included in an HA design. For
this reason the CachePoint Appliance should have a higher HA restart priority setting then the desktops so that it
restarts first.
The availability of storage is, of course, critical to the availability of CachePoint Appliances and its desktops. If the
storage they reside on is unavailable, so are the appliances and desktops.
Connection Broker Infrastructure
No matter what connection broker you use to direct users to their desktops, it is important that you design
appropriately for failure of the brokering components. Brokers all have some form of the following components:
◾Remote access infrastructure.
◾Connection broker server.
If parts of your connection broker infrastructure are unavailable, access to your virtual desktops is affected, even if
they are running. Using VMware View as an example, if you use a View Security Gateway in your DMZ, and no running
gateway is available, there is no way for end users to access their desktops for remote access. Similarly, if your View
© 1999-2017 Citrix Systems, Inc. All rights reserved. p.24https://docs.citrix.com
Connection Server is not available, end users cannot connect to their VMware View desktops.
If the connection server you are using for Unidesk integration is not available, you will not be able to deploy Unidesk
desktops that are integrated with VMware View.
Running Unidesk desktops are unaffected by the failure of these components. Whether the user is affected by the
failure of a connection server depends on whether you route the display protocol (PCoIP, HDX or RDP) traffic through
the connection server or just use the connection server to authenticate the user session.
Network Infrastructure
VDI solutions are heavily dependent on network resources for availability of the solution. This dependency applies to
both LAN and WAN components. Many components in a VDI infrastructure stop working if the network is not
available or if it is overloaded.
VDI endpoints
Every VDI solution has one or more endpoints from which users access the virtual infrastructure. Endpoints can be thin
clients, personal computers or smartphones, and tablets. Without an endpoint, end users cannot connect to their
virtual desktops.
Unidesk component availability
Unidesk Management Appliance (MA)
The Unidesk Management Appliance manages the Unidesk solution. The Management Appliance hosts the main
Unidesk database, supports the management interface, and provides much of the business logic and process
management for the Unidesk platform.
If the Management Appliance is not available, running desktops are unaffected except when a rebuild is pending. In
this case, the rebuild does not take place. If you can restart the desktops, they become available.
Unidesk Master CachePoint Appliance (MCP)
The Unidesk Master CachePoint Appliance replicates the Operating System and Application Layers to downstream
(secondary) CachePoint Appliances. If the Master CachePoint Appliance is unavailable, you cannot create layers and
the Master CachePoint Appliance cannot replicate existing layers to other CachePoint Appliances. However, layers
that were already replicated continue to function properly. The Master CachePoint Appliance has no impact on
whether a desktop is running or if you can restart it.
You can continue to create and edit desktops as long as the layers they need already exist on the new desktop’s
CachePoint Appliance.
Unidesk downstream Secondary CachePoint Appliances (SCPs)
The secondary CachePoint Appliances provision Unidesk desktops and manage layer vmdk files for the desktops. If
the secondary CachePoint Appliance is not available, desktops will continue to run. Desktops can be rebooted as long
as they are not required to rebuild during the reboot. If they do rebuild and their CP is down they will not be able to
boot because the rebuild requires drivers from the CP.
Redundancy
VMware vSphere redundancy

© 1999-2017 Citrix Systems, Inc. All rights reserved. p.25https://docs.citrix.com
This section provides a high level view of how organizations design for availability (local availability) of their non
Unidesk virtual infrastructure components.
Common approaches to VMware vSphere redundancy
VMware vSphere is normally designed with a significant amount of redundancy. The vSphere high availability
mechanisms include:
◾ Redundant network interfaces.
◾ Host Bus Adapters (HBAs).
◾ Clustered hosts.
Some of the common approaches for designing VMware vSphere redundancy include:
◾ Creating a vCenter cluster using VMware vCenter Heartbeat (an OEM version of Neverfail).
◾ Backing up the vCenter servers regularly and using the backups to recover the server, if required. Most
organizations use this approach.
◾ Running the vCenter server as a virtual machine to allows the use of High Availability (HA) recovery for the
vCenter server.
Considerations for the Unidesk environment
When planning your approach to vSphere redundancy, consider the following situations that are specific to Unidesk:
◾ If a vSphere host fails, all the Unidesk desktops located on that host stop working.
◾ If a vSphere host has only one NIC, and the NIC fails, all the Unidesk desktops become unavailable to the
client end-point. They desktops might stop working if their assigned CachePoint Appliance is located on a
different host.
◾ If the host has a single HBA and the HBA fails, all the Unidesk desktops stop working.
Redundancy can be expensive. If your organizations RTO/RPO requirements are long, it might be sufficient to have a
less redundant host configuration, but you need to ensure that you have enough capacity in terms of extra hosts to
handle a failure.
Connection Broker redundancy
Connection brokers also allow for considerable redundancy. Using VMware View as an example, a fully redundant
architecture would look similar to the following illustration.
In this example, access to VMware View Connection Servers is achieved in the following ways:
◾ Inside the network, end users have direct access to their virtual desktops, after they establish a connection
through the View Connection Server.
◾ For external access, VMware View Security Servers route connections through the DMZ to the View
Connection Servers.

© 1999-2017 Citrix Systems, Inc. All rights reserved. p.26https://docs.citrix.com
To support this type of configuration, the design requires different View Connection Servers for internal and external
access.
The internal servers provide internal users with direct access to their desktops. A VMware View client on the desktop
uses View Connection Server to establish the initial connection to a desktop. After authentication takes place and
the connection is established, the View client accesses the virtual desktop directly without communicating with the
View Connection Server.
For external servers, you need to configure a separate View Connection Server to allow Secure Tunnel connections
Broker redundancy configuration details
To use this separated solution for internal and external access, as well as redundancy for the View Connection
Servers, four View Connection Servers are required. Since the servers are built as virtual machines, the cost to provide
greater levels of availability is not very high.
You can load balance the external View Security Servers and the internal View Connection Servers to provide a better
experience for end users. If the servers are not load balanced, users would have to switch from one server to another,
if a failure occurs. Load balancing also helps if you require multiple View Connection Servers to handle the traffic load.
If you want to use load balancing, there are many products and outside services that provide this functionality.
Another way to implement load balancing is to purchase two SSL certificates of the same common name and install
one certificate on each View Connection Server. Doing so allows DNS load balancing or DNS round-robin load
balancing to work. The SSL connection goes directly to the View Connection Servers or Security Servers, whichever
the end user access first. However, if one system fails, it must be removed from DNS or other connections fail.
Network Infrastructure redundancy
For the server core, it is normally important to have a redundant switching core with vSphere hosts connected to each
switch in the core.
Server core
For VMware server architectures, a high-speed collapsed backbone core often provides the most redundancy and
best performance between vSphere hosts. You can add access to networks with redundant connections to each
core switch. This approach assumes a smaller data center design, as shown in the following illustration.
If your data center is large enough to require redundant top-of-rack switching which then connects to the network
core, you will probably switch to 10 GB connections for both the top-of-rack switch and the feeder network to the
core.
Again, cost can be a factor. It is critical to understand the RPO/RTO requirements and which design matches those
requirements for the lowest cost.
Endpoint availability for VDI
Maintaining endpoint availability for VDI should be fairly simple to accomplish. If you use thin clients, keep a few extra
© 1999-2017 Citrix Systems, Inc. All rights reserved. p.27https://docs.citrix.com
devices on hand. You can replace them quickly, if required. If you are using desktop or laptop PCs, you can take the
same approach. Keep a few extra old or new PCs that are configured to act as access points for your virtual desktop
infrastructure.

© 1999-2017 Citrix Systems, Inc. All rights reserved. p.28https://docs.citrix.com
Local recovery options
Jun 28 , 2017
If you plan to deploy Persistent Desktops for your users, it is very important to plan for a backup and recovery strategy
that allows users to continue to work if an outage occurs and allows you to recover their Desktops to a relatively recent
state. For Non-persistent Desktops, you will likely have a different backup and recovery strategy based on backing up the
base infrastructure plus your file servers.
The components of a Unidesk solution that you'll need to back up include the MA, MCP, and Desktops. You can also back
up the SCPs, but this is not required for a full recovery.
Unidesk MA and MCP backups
You can recover the MA and the MCP by creating image backups of them using a frequency based on the desired RPO.
Backups required for MA and MCP recovery
The Management Appliance is fairly small and easy to back up.
The size of a Master CachePoint Appliance can be between 120 and 250 GB. Creating full backups for CachePoint
Appliances takes longer than backing up the Management Appliance.
The vmdk files that make up the Layers are created as non-persistent independent disks that are only loosely
attached to any virtual machine. This type of disk cannot be backed up by most backup applications because the disk
is not directly associated with a virtual machine. Hence, the Unidesk Backup Utility.
Unidesk Backup Utility for MA and MCP backups
The Unidesk Backup Utility provides a mechanism to back up the vmdk files created by the Master CachePoint
Appliance to a backup VMware datastore.
The Backup Utility also lets you back up the Master CachePoint and the Management Appliance virtual machines.
◾ If you choose to back up the Management Appliance with the Backup Utility, you can either shut down the
appliances before the backup, or use a snapshot. If you choose to not shutdown the Management Appliance
before backup, the backup will be a “Crash Consistent” backup, which means that it is the same as if you
powered off a server with the power button. This is because a snapshot is taken, then the files are copied
directly from the source, but the snapshots are not copied because they are in use. The Master CachePoint
Appliance is always shut down prior to backup of the appliance virtual machine files. For more information on
this tool, see the Backup Utility documentation.
◾ If you have Desktops deployed to the Master CachePoint, then you will also need to use the Unidesk Archive
Functionality to back up User Layers for repair and recovery.
◾ If you have SAN backup/replication technologies in your environment, you could capture the Unidesk Layers
stored by backing up the entire datastore used for the Master CachePoint Appliance. These technologies
should work with Independent Non-persistent disks.
MCP backup file structure (OS and Application Layer backup files)
When MCP Layer backups are run, the target folder structure will look similar to the following.

© 1999-2017 Citrix Systems, Inc. All rights reserved. p.29https://docs.citrix.com
The scripts create a folder under the target datastore and target folder for the MCP backups and if selected the MA
backups. Under these folders there will be a backup folder named by the date and time the backup is run. Within the
backup folder there will be the appliance itself and a folder called UnideskLayers which holds all of the independent
non-persistent disks created by the MCP.
If you have multiple version of a layer there will be several vmdk files in the application folder.
When we copy the layer vmdk files they are copied as Thin provisioned disks. When we restore them, they are copied
the way they start out so for the MCP layers they stay Thin, for the appliance vmdk’s the are copied out as Thick.
User Layer backups and Desktop repair/restore
User Layer backups
User Layer Backup backups are defined for a Desktop or template to backup at a certain time to the Archive store
defined for the Desktop's CachePoint. Remember that the User layer is created from two separate vmdk files: one for
configuration files, application files, and registry settings, and one for user data. When the backup is taken, VMware
snapshots for the two user layer vmdk files are created and copied to a VMware Datastore we call the Archive store.
The Desktop backup process
The Desktop backup process is as follows:
1. After Desktops are first backed up, there is always a running snapshot for each of the two User layers
2. When the backup is started, a second snapshot is created
3. The original running snapshot is copied to the archive store using the next available revision number in the naming
scheme (see examples below in the Archive Datastore section)
4. The old running snapshot is deleted which merges the changes into the base vmdk files for the User layer
5. The snapshot created when the backup started becomes the new running snapshot for the Desktop
User layer backup file structure
The file structure of the User Layer includes the base UEP vmdk files (shown in the red box) and the running snapshots
(shown in the green box). If no backups are defined, there is no running snapshot.
During a backup there are two more snapshot files, one for each vmdk. These snapshots become xxx.B0.R1.V0-
00000x.vmdk and xxx.B0.R1.V1-00000x.vmdk, as shown in the screen shot on the left. Following the backup, the
original running snapshot is merged, leaving two new running snapshot files, as shown in the screen shot on the right.
But notice the size difference.

© 1999-2017 Citrix Systems, Inc. All rights reserved. p.30https://docs.citrix.com
User Layer backup retention
In the Unidesk Management Console Settings and Configuration section, there is a setting for Backup Retention
(shown below). This defines how many backups will be retained in the Archive store.
There are important performance implications to setting the retention to a number greater than 30. VMware allows
at most 30 snapshots per virtual machine. So, even though you can set retention to more than 30, this will cause the
backup to create a new “backup chain” after every 30 backups. This means that a new copy of the Desktop User
layers will be created in a new folder and another set of snapshots will be started from that base (see the Archive
Datastore Section). This will add extra storage for every 30 backups and the time it takes to do the backup increases
substantially because of the process used to do the backup rebasing steps.
Why can backup re-basing occur?
There are a few reasons that rebasing can occur during a backup:
◾ The number of backups exceeds 30, as discussed above.
◾ An Administrator creates a VMware snapshot using the vCenter Infrastructure Client, or any other application
creates a snapshot so that there is more than one snapshot on the UEP vmdk.
Note: For a point-in-time snapshot of a Desktop, use the Unidesk Management Console to make a manual
backup.
◾ The GUID of the snapshot closest to base (the oldest one,) does not match the GUID of the last snapshot in
the XML archive metadata file, that file is missing, or the archive xml file does not match the disks actually in the
archive.
The User layer Archive datastore
The Archive datastore is very different from the running User layer datastore. On the archive we create a Unidesk
Backups folder that hosts a folder for each CachePoint with backups. Within the CachePoint folder there is a user
folder with a folder for each Desktop on the CachePoint. The Desktop folder can then contain several
UnideskBackupChain folders. The number of these folders will change based on different circumstances but the
folder holds the actual copies of each of the backups plus one copy of the initial full vmdk files for each UEP layer.
In the root folder for each Desktop there is a metadata xml file using the naming format
“ArchiveInfo_Paccc51f0000001a”. This file holds metadata used by the UMC to populate restore point information
for the backups.
If the file is not found, restore is still possible as long as the backup chain folder and archive files exist. But, as shown in
the restore wizard shown below, less information is available about the restore.
© 1999-2017 Citrix Systems, Inc. All rights reserved. p.31https://docs.citrix.com
The normal wizard shows the version information as shown in the following graphic.
In fact the archive store files can be backed up to tape and restored by restoring first to the archive, then to the
Desktop, using the UDMC. It would be best to back up the entire Unidesk Backups Directory, but it is possible to have
just the user Desktop directory under User.
Defining Unidesk Desktop backups
In the Edit Desktop or the Add Template Version wizard, you can set backups to run one to four times a day, or
hourly. When scheduling backups in a Template, if you choose one of the “times a day” entries, you can also define at
what hour each of the backups starts. In this case, it makes sense to stagger the backups among different templates
to even out the backup load on the infrastructure.
Backup throttling
At the start of the backup time for a CP, all of the snapshots are created simultaneously. This creates restore points
at the time of the backup. Then the snapshot files are copied only 3 at a time to the Archive store so that there is
not too much IO generated for the backup process. The more times a day backups are performed the smaller the
snapshots will be and therefore the quicker the backup period. However, overall with more backups more data will be
backed up to the archive store and more total IO will be used. If the backups do not fit in the backup window when
backing up once a day, if the bottleneck is storage bandwidth, then running backups more frequently should help. If
there is still a bandwidth issue after running backups even every hour then more bandwidth would be required.
SAN-Based snapshots of the Secondary CachePoint's datastore
SAN-based snapshots: another backup option for User Layers
Another backup option for Unidesk User Layers is to use SAN-based snapshots to backup the datastore that the
CachePoint is configured to use. Then SAN replication can be used to replicate the datastore to another SAN device.
The drawback to this option is that many SAN snapshot cannot restore only a few files from the datastore so it
would be hard to recover a single Desktop but this varies depending on vendor. If restoring a single Desktop UEP just
the Desktop's USER folder would be restored.
It would also be possible to restore the entire CP folder structure however the layers and Desktops included must
match what the Unidesk Management Appliance has in its database.
Backups for Secondary CachePoint Appliances
How you decide to back up Desktops and CachePoint Appliances depends a great deal on your RTO and whether you can
provide a recovery Desktop immediately while you recover the user’s normal Desktops.
Recovery of a CachePoint Appliance
If a CachePoint is accidentally deleted or becomes corrupted it can be recreated by deploying a new CachePoint,
then restoring the Desktops associated with that CP to the new CP. A Desktop restore can be performed to the
original CP or an alternate CP in the infrastructure.
Recovery of a CachePoint Appliance and its Desktops using SAN snapshots

© 1999-2017 Citrix Systems, Inc. All rights reserved. p.32https://docs.citrix.com
If your organization’s RTO is very short (for example, one hour), recovering an entire CachePoint Appliance and its
Desktops from a backup is impossible. In this case, the only viable option is to use SAN-based snapshot technology
for the CachePoint appliance and its CP and Boot Datastores. This approach allows you to recover back to the latest
snapshot very quickly. Just remember that the Management Appliance database must be in sync with the snapshot.
You should create snapshots on a frequent enough basis to ensure that you don't have to use a very old snapshot,
ensuring that Management Appliance database will still match the database on the CachePoint Appliance after it is
restored.
If you lose Desktops from the CachePoint Appliance after completing a snapshot restore, contact Unidesk Technical
Support to remove the orphaned database objects from the Unidesk database.
Recovery of a CachePoint Appliance and its Desktops using an image backup
To backup a Unidesk CP and Its Desktops you must be able to backup at the datastore level as opposed to the VM
level. This is because the shared layers for a CP are stored as Independent Non-persistent disks. This type of disk is
not attached to a VM in the same way as a normal disk. If your backup application can backup one datastore to
another without affecting the running VM’s it can be used for this purpose. However this type of backup will not be
any faster than the normal Unidesk backup process for UEP backups.
Recovery of Desktops
Customers that use Unidesk backups for Persistent Desktops also have the option of pre-deploying one host or a
CachePoint Appliance worth of “recovery” Desktops. The idea here is to create relatively generic Desktops that
include the most used applications. If a CachePoint Appliance fails and you cannot recover it immediately, users can
use “recovery” Desktop while waiting for you to recover their normal Desktop from a backup.
Recovery of a single Desktop is easy as long as the Desktop is still available in the UDMC. Just select the Desktops and
choose the restore function. You will be able to restore the Desktop from the archive. This works to take the
Desktop back to an earlier state recover a Desktop deleted using your VMware console by accident.
Types of backup devices
As stated previously, backups of Unidesk User Layers require a VMware Datastore as a backup target. You can use any
supported technology including
◾ ISCSI
◾ Fibre Channel
◾ NFS
There are many relatively inexpensive NAS solutions that work well as backup targets however the performance of
these devices will not be state of the art. Several Unidesk customers are using the NetGear ReadyNAS devices for this
purpose. You can also use backup products such as EMC’s Data Domain Deduplication backup devices or any storage
product that VMware supports, such as NetApp, EMC etc.
Just remember that you want the backup device to be separate from the primary storage you are using for the
Desktops so that they will never fail at the same time.

© 1999-2017 Citrix Systems, Inc. All rights reserved. p.33https://docs.citrix.com
Disaster recovery options
Jun 28 , 2017
For the purposes of this article, Disaster Recovery is defined as a catastrophic failure that affects multiple components in
the Unidesk environment.
The first thing to remember for your DR strategy is that in addition to defining a DR strategy for Unidesk components, you
also need to define a DR strategy for the vSphere server and your broker infrastructure.
Before developing your Unidesk DR strategy, it is important to define your DR RTO and RPO requirements.
The options for a Unidesk DR strategy, ranging from very simple to fairly complex, are based on different RTO and RPO
requirements, as well as the use of hot DR or cold DR strategies.
Cold Disaster Recovery
If your only option for DR is to back up to tape and store the backup off site, your options for DR with Unidesk are to
rebuild new desktops, or recreate persistent desktops. The options differ by whether you need to be able to restore each
user’s desktop or you plan to create new desktops instead.
Rebuild new desktops
To back up the Management Appliance and the Master CachePoint Appliance, you can use the Unidesk Backup Utility
to make backups of the appliances, and layers to a VMware datastore. Then you will need a way to backup the entire
datastore to tape. One option for this is if your infrastructure supports NDMP on NFS.
For DR, you:
1. Restore the Management Appliance and the Master CachePoint Appliance Datastores to the recovery site,
following Unidesk procedures to change IP addresses, if necessary, on the appliances (for more information, see
the recovery links at the end of this document).
2. Work with Unidesk Technical Support to remove all the existing desktop objects from the Unidesk database.
3. Deploy new desktops for users using the layers restored when you restored the Master CachePoint
Appliance.
The RTO for this option depends on the equipment you use and the availability of that equipment during your
recovery.
Another consideration is that the desktops you create during DR can be non-persistent, if you want to share a smaller
number of desktops amongst a set of concurrent users. Just be aware of the following benefits and limitations of
non-persistent desktops.
The following table shows the benefits and drawbacks for this DR method.

© 1999-2017 Citrix Systems, Inc. All rights reserved. p.34https://docs.citrix.com
Benef its Drawbacks
Inexpensive – no
hot site required.
Faster than
recovering the
users' actual
desktops.
Less backup
media is required.
Only requires
periodic backup to
tape.
Significant rework required after declaration.
Recovery time includes build time for new desktops, which is approximately 5 minutes per desktop per
CachePoint Appliance. Fifty desktops per CachePoint Appliance could take approximately 8 hours.
CachePoint Appliances build desktops in parallel.
Overall, SAN I/O could limit recovery performance.
Users' customizations are not available.
Recreate persistent desktops (backup to datastore and then to tape)
For this option, you can use Unidesk to back up User Layers to a VMware datastore. You then back up the datastore
to tape, and back up the Management Appliance and Master CachePoint Appliance as described in the previous
section.
During DR, you:
1. Restore the Management Appliance and Master CachePoint Appliance Datastores.
2. Change the appliance IP addresses, if necessary.
If you must change the IP addresses of the virtual appliances, you will have to rebuild all the desktops
3. Restore the desktop archive datastore.
4. Create new CachePoint Appliances and restore the Desktops from the Archive Datastore.
The end result is restoring the users' exact desktops back to the recovery point; however, this type of recovery takes
more time than the new desktop approach in the previous section. RTO is likely to be measured in days, not hours.
The following table shows the benefits and drawbacks for this DR method.
Benef its Drawbacks
Inexpensive – no hot site
required.
Recover users' actual
desktops.
If IP addresses change, you must reconfigure the appliances and rebuild desktops after the restoring
the Unidesk appliances.
Recovery time takes days, not hours.
Substantial effort is required for recovery.
Hot Disaster Recovery
© 1999-2017 Citrix Systems, Inc. All rights reserved. p.35https://docs.citrix.com
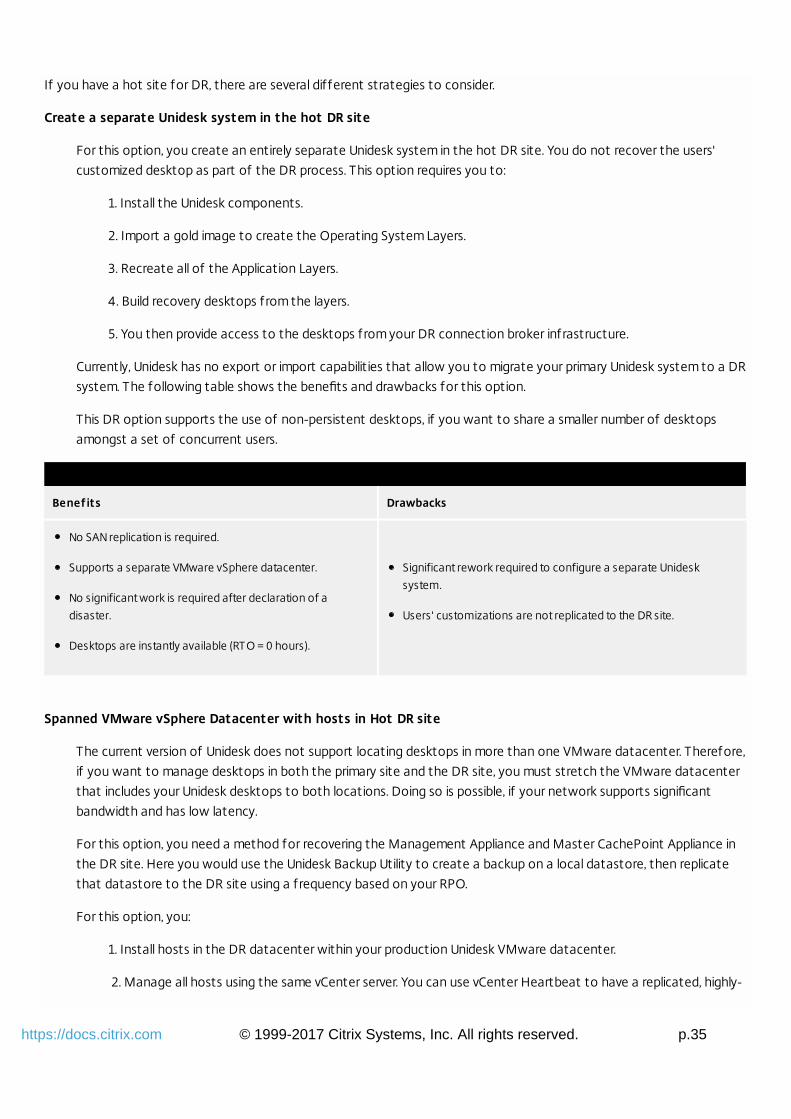
If you have a hot site for DR, there are several different strategies to consider.
Create a separate Unidesk system in the hot DR site
For this option, you create an entirely separate Unidesk system in the hot DR site. You do not recover the users'
customized desktop as part of the DR process. This option requires you to:
1. Install the Unidesk components.
2. Import a gold image to create the Operating System Layers.
3. Recreate all of the Application Layers.
4. Build recovery desktops from the layers.
5. You then provide access to the desktops from your DR connection broker infrastructure.
Currently, Unidesk has no export or import capabilities that allow you to migrate your primary Unidesk system to a DR
system. The following table shows the benefits and drawbacks for this option.
This DR option supports the use of non-persistent desktops, if you want to share a smaller number of desktops
amongst a set of concurrent users.
Benef its Drawbacks
No SAN replication is required.
Supports a separate VMware vSphere datacenter.
No significant work is required after declaration of a
disaster.
Desktops are instantly available (RTO = 0 hours).
Significant rework required to configure a separate Unidesk
system.
Users' customizations are not replicated to the DR site.
Spanned VMware vSphere Datacenter with hosts in Hot DR site
The current version of Unidesk does not support locating desktops in more than one VMware datacenter. Therefore,
if you want to manage desktops in both the primary site and the DR site, you must stretch the VMware datacenter
that includes your Unidesk desktops to both locations. Doing so is possible, if your network supports significant
bandwidth and has low latency.
For this option, you need a method for recovering the Management Appliance and Master CachePoint Appliance in
the DR site. Here you would use the Unidesk Backup Utility to create a backup on a local datastore, then replicate
that datastore to the DR site using a frequency based on your RPO.
For this option, you:
1. Install hosts in the DR datacenter within your production Unidesk VMware datacenter.
2. Manage all hosts using the same vCenter server. You can use vCenter Heartbeat to have a replicated, highly-

© 1999-2017 Citrix Systems, Inc. All rights reserved. p.36https://docs.citrix.com
available vCenter configuration across datacenters, if desired.
3. You will then install CachePoint Appliances on the hosts in the DR Datacenter and deploy “Recovery”
desktops to those hosts. The desktops could be relatively generic with applications based on broker pools or
each user could have a DR desktop defined.
This solution would not provide the desktop personalization in DR. For example user installed applications would not
be available.
This DR option supports the use of non-persistent desktops; if you want to share a smaller number of desktops
amongst a set of concurrent users.
The following table shows the benefits and drawbacks for this option:
Benef its Drawbacks
No rework is required.
No significant work is required after declaration of a disaster.
Desktops are instantly available
(RTO = 0 hours).
Does not support a separate VMware vSphere Datacenter
Users' customizations are not replicated to the DR site.
Layer 2 replicated environment
In this option, SAN replication is used between the primary and DR sites. User desktops can be segregated by the
Host to replicated and non-replicated LUNs to support different service levels for different desktops.
The Management Appliance and Master CachePoint Appliance can share a LUN. They should be replicated together
to the secondary site. In this option, both sites share a switched layer 2 network, therefore IP addresses do not have
to change on the appliances or desktops when the machines are deployed in the secondary site.
The following table shows the benefits and drawbacks of this DR option.
Benef its Drawbacks
Actual user desktops are replicated and available in the
secondary site.
No rework is required.
Little work after declaration of a disaster.
Quickly available (RTO < 1 hour).
Expensive with significant replication bandwidth required.
Requires SAN replications and a switched network.
Replication and DR is at a LUN level which typically means by
CachePoint Appliance.

© 1999-2017 Citrix Systems, Inc. All rights reserved. p.37https://docs.citrix.com
Layer 3 replicated environment
This option is similar to the Layer 2 replicated environment except that the networks are connected using routers
rather than switches. This configuration requires you to change all of the IP addresses in the secondary site before
the systems can function.
To make the IP address changes, you:
1. Deploy the Management Appliance and change its IP address.
2. Deploy all of the CachePoint Appliances and change their IP addresses.
3. Rebuild all of the desktops so that the Management Appliance address that they cache is changed to the
new Management Appliance address.
The amount of time required for this option is dependent on the number of CachePoint Appliances, the number of
desktops, and the complexity of the desktops.
The following table shows the benefits and drawbacks for this DR method.
Benef its Drawbacks
Actual user desktops are replicated and available in the secondary site.
No rework of layers is required.
Some work after declaration of a disaster is required to change the IP
addresses for the Unidesk appliances and to rebuild the desktops.
Fast availability (RTO < approximately 4 hours).
Expensive with significant replication bandwidth
required.
Requires SAN replication.
Replication and DR is at a LUN level which
typically means by CachePoint Appliance.
SAN Replicated Unidesk Archive to DR site
For this option, you use Unidesk to the local archive datastore then you replicate that Datastore to the DR site via
SAN replication. You can segregate by CachePoint Appliance which desktops are available to recover in DR by using a
different backup archive for replicated and non-replicated desktops. Then placing users on CachePoint Appliances
based on whether they need to participate in DR or not.
You will also need a way to recover the Management Appliance and Master CachePoint Appliance in the recovery site
as discussed earlier in this document. The RTO will depend on the speed of the infrastructure as every desktop must
be restored from the archive and REBICed.
The following table shows the benefits and drawbacks for this DR option.
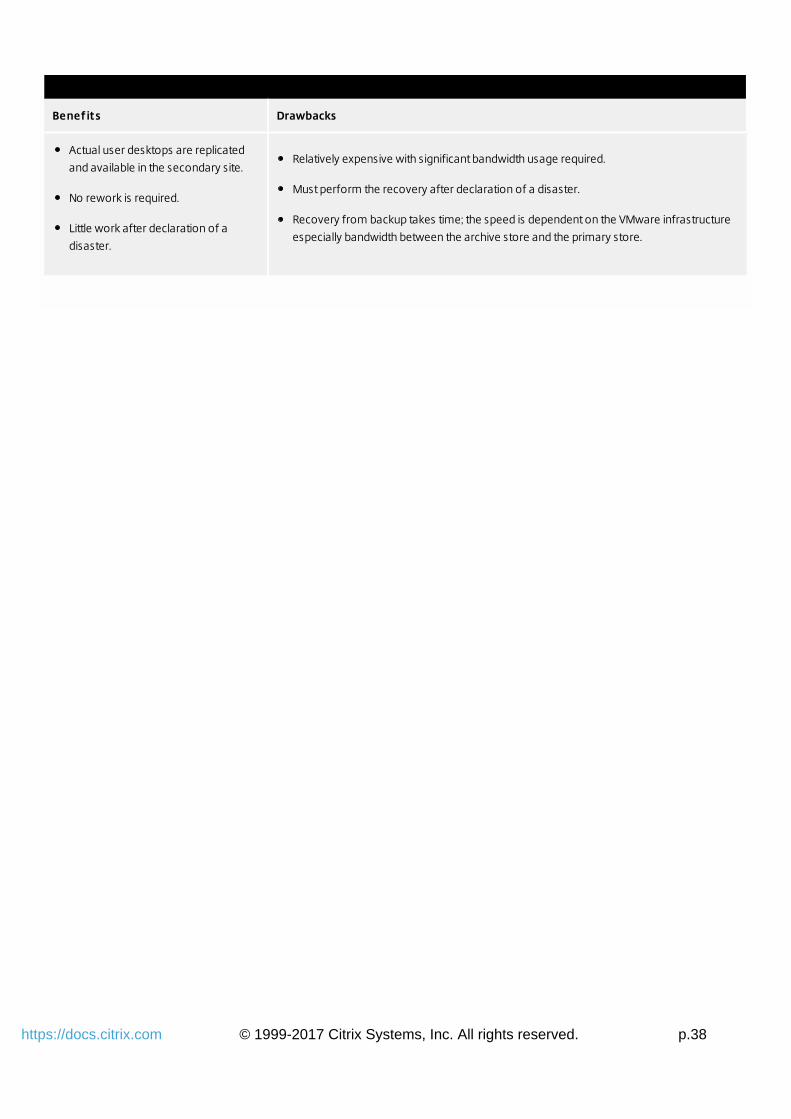
© 1999-2017 Citrix Systems, Inc. All rights reserved. p.38https://docs.citrix.com
Benef its Drawbacks
Actual user desktops are replicated
and available in the secondary site.
No rework is required.
Little work after declaration of a
disaster.
Relatively expensive with significant bandwidth usage required.
Must perform the recovery after declaration of a disaster.
Recovery from backup takes time; the speed is dependent on the VMware infrastructure
especially bandwidth between the archive store and the primary store.

© 1999-2017 Citrix Systems, Inc. All rights reserved. p.39https://docs.citrix.com
Deploy
Jun 28 , 2017
Deploy
Unidesk 2.10 Release notes
Unidesk 2.x Platform Support
Storage and hardware requirements
Configure vCenter permissions
Install Unidesk software and tools
Upgrade Unidesk
Configure email notif ications
Set a Session Timeout for the Unidesk Management Console
Create a Secondary CachePoint Appliance
Connect to a Directory Service
Integrate with a broker
Create an OS Layer
Create an Installation Machine
Create Application Layers
Create Desktops
Back up appliances

© 1999-2017 Citrix Systems, Inc. All rights reserved. p.40https://docs.citrix.com
Unidesk 2.10 Release notes
Sep 21, 2017
Welcome to Unidesk 2.10.3!
The latest Unidesk 2.10 update is now available! For details, see What's new in this release and Issues fixed in this
release below. Issues fixed in previous 2.10.x releases at the end of this article.
What's new in this release
Improved stability for Windows 10 Desktops. This release provides more stability for your Windows 10 Desktops.
Links now go to the Citrix doc site. UI links now take you to the Unidesk Help topics on the Citrix site, docs.citrix.com.
The 2.10.2 and 2.10.3 documentation is now available at http://docs.citrix.com/en-us/unidesk/2-10-vsphere.html.
Changes in how to logs to Support. When opening a Support Case, you can no longer send the log f iles as part of the
case. Log f iles must be exported and then attached to an email. For details about exporting logs and attaching them to
emails, click here.
Issues fixed in this release
Unattend and Optimizer files no longer flagged by some virus scanners
To remedy the issue where the Unattend and Optimizer exe files were being flagged by some virus scanners, both files are
now delivered as .hta file types only. Execute the files from an admin cmd prompt to use the tools.
Software Protection service and Windows Activation
The issue where the Software Protection service (SPPsvc) does not start and Windows does not activate due to empty or
bad WPA keys has been fixed, If you have desktops affected by this issue, you must restart the desktops after upgrading
to the 2.10.2 or later release. (UNI-58506)
VMware vSphere DataCenter objects are visible even when inside of a folder in the vCenter tree
When adding a new VMware vSphere Connector, your vSphere DataCenter object is visible even if it is inside a folder in the
vCenter tree. (UNI-57546 )
Supported platforms
For specifics about Unidesk-supported platforms, click here.
Upgrade paths
This upgrade supports moving from Unidesk 2.6.0, 2.7.0, 2.8.x, 2.9.x, or 2.10.x to the current release.
Known issues in Unidesk 2.10
Compatibility of Unidesk software with Windows 10 1703 Creators Edition is being tested, and what appear to be
compatibility issues have been found. As testing continues, we do not recommend using the WIndows 10 1703 Creators
Edition at this time.
If you want to upgrade to Windows 10, version 1607 (Anniversary Update edition), you must do this one-time step. After
upgrading to this Windows 10 version, you need to add a new Layer Version to each App Layer, and republish the
updated Image Template with the new OS and App Layer Versions. (UNI-54892).
© 1999-2017 Citrix Systems, Inc. All rights reserved. p.41https://docs.citrix.com
After a Windows 10 upgrade, for example after upgrading from 1511 to 1607, you must allow any scheduled system
tasks to complete. This allows existing desktops to gather the networking information required to ensure that the
change in the OS Layer Version does not loose the network. Simply let the virtual machines f inish their task or edit them
immediately to ensure that they are completed before you upgrade your OS Layer to Windows 10 1607 and assign it to
desktops.
The version shown for the Agent Installer and the setup_32/64.exe (included in the
OS Machine Tools installer) is 2.10.2, but the actual version is 2.10.3.
Infrastructure
VMware View Storage Accelerator not supported. Do not enable or turn on View Storage Accelerator. Unidesk
software does not work if this functionality is turned on.
VMware vSphere Profile-Driven Storage and Storage vMotion migration command not supported. Do not use the
VMware vSphere Profile-Driven Storage and Storage vMotion migration command, as these features are not supported.
VMware vSphere Client reports "invalid configuration" when creating multiple Desktops. This message can be ignored. For
details, click here. (UNI-6574)
VMware ESX Host. To avoid issues with a VMware ESX host that is in maintenance mode, postpone Unidesk Management
Console activities until the ESX host is out of inventory. (UNI-11647)
Concurrent Desktop backups from multiple CachePoint Appliances to the same datastore can result in an unresponsive
host ESX server. If this occurs, enter a restart command on the affected ESX host server. For details, click here. (UNI-7335)
VMware View
View Persona Profile Management 6.1 and later. View Persona Profile Management 6.1 and later is not supported.
Persona Manager 6.1 and later fails to create profiles for new users. Profiles created on earlier releases of Persona
Manager continue to work under View Persona 6.1 and 6.2.
After a Desktop is restored, it must be re-added to the VMware View pool. With VMware View integration, when you
restore a Desktop to a different CachePoint Appliance, you must manually remove the Desktop from the VMware View
pool and re-add it. For details, click here. (UNI-8708)
Citrix XenDesktop
Creating Desktops in Citrix XenDesktop catalogs. When you create a Desktop and select XenDesktop broker
integration, and the assigned user has not yet been imported into the database, the Desktop will not appear in the
XenDesktop catalog. To f ix this, delete the Desktop and then re-create it. To avoid the issue in the future, create a
Unidesk Group and add the users to it before creating Desktops. (UNI-15070)
Configuring the Citrix Xen Delivery Groups Access Policy. Once you integrate with XenDesktop and create Unidesk
Collections and Desktops, you will receive an error message if you attempt to edit the Access Policy directly in Citrix
Studio. To make any changes to Group Access Policy, use the Unidesk Management Console to edit the Collection
Entitlements. (UNI-31613)
Microsoft Windows 10
Are Windows updates still running on your desktops? If they are, you can disable Windows Updates via a local GPO.
The process of creating a Desktop hangs in Windows 10. If the process of creating a Desktop in Windows 10 becomes

© 1999-2017 Citrix Systems, Inc. All rights reserved. p.42https://docs.citrix.com
unresponsive, see New SCSI controller causes Windows to prompt for a reboot after installing the device.
After a Windows 10 may result in a new Recovery Volume partition. During a major upgrade, for example when upgrading
from 1511 to 1607, Windows 10 sometimes creates a Recovery Volume as a new partition on the same disk as the OS
Layer Version. This volume should always be removed before you f inalize the OS Layer Version. Otherwise, the recovery
volume can cause desktops to fail to boot correctly. For the steps to safely remove a recovery volume, click here.
Desktops
Desktop Sleep state is not supported. Desktops in sleep state become unresponsive in vCenter and Unidesk
Management Console. For details, click here. (UNI-7014)
Desktop blue screen errors can be caused by an enabled Volume Shadow Copy Service (VSS). Normally, the Unidesk
Optimization script, which is run as part of Gold Image prep, disables VSS. However, If you experience this issue, you
should check VSS, and if it is enabled, manually disable it. To disable VSS, click Start and type services.msc to run
Microsoft Services. In the Services window, scroll to the Volume Shadow Copy service. If it is enabled, right-click the
service and choose Disable.
Issues fixed in previous 2.10 releases
Issues fixed in 2.10.0
Clearing Windows Search Index files when finalizing App and OS Layers
Unidesk now clears Windows Search Index files when you finalize an App or OS layer. If you are having issues with Windows
Search, you can fix the issue by upgrading to 2.10 and creating a new Version of your Layer. (UNI-49902)
Issues fixed in 2.10.1
OfficeActivate script modified
The OfficeActivate.cmd script has been modified to reorder how the script executes to resolve an issue. (UNI-52166)
Network information
Handling of the NIC merge during boot image creation is improved. (UNI-53643, UNI-51569)
Start Menu for Windows 8.1, Windows 10, Windows 2012R2
Issues with the Start Menu when upgrading Windows 10 have been fixed. (UNI-53736)
Issues fixed in 2.10.2
Unattend and Optimizer files no longer flagged by some virus scanners
To remedy the issue where the Unattend and Optimizer exe files were being flagged by some virus scanners, both files are
now delivered as .hta file types only. Execute the files from an admin cmd prompt to use the tools.
Software Protection service and Windows Activation
The issue where the Software Protection service (SPPsvc) does not start and Windows does not activate due to empty or
bad WPA keys has been fixed, If you have desktops affected by this issue, you must restart the desktops after upgrading
to the 2.10.2 or later release. (UNI-58506)

© 1999-2017 Citrix Systems, Inc. All rights reserved. p.43https://docs.citrix.com
Unidesk 2.x Platform Support
May 03, 2018
Infrastructure software
Supported virtual infrastructure software:
VMware (Enterprise, Enterprise Plus, Desktop)
vSphere, vCenter Server 6.0, 6.0 U1, 5.5, 5.5 U1, 5.5 U2, 5.1, 5.1 U2, 5.0, 5.0 U1, and 5.0 U3. (Support for v 6.0 added in Unidesk
2.8.3.)
If using high-end VAAI-enabled storage, ESXi 6.0, 5.5 U1, 5.5 U2, 5.1 U2, or 5.0 is required to ensure optimal Desktop build
performance. (Support for v 6.0 added in Unidesk 2.8.3.)
VMware Virtual SAN (vSAN)
vSAN 5.5 is supported
vSAN 6 and later is not supported
If using vSAN with vSphere 5.5, backups must be stored on a non-vSAN storage location. Please see the following topics
for requirements and recommendations: Plan Storage Size, and vSan Desktop Calculator.
Untested VMware features:Testing of functionality new in VMware 6, such as vSAN 6 and NVIDIA Grid vGPU has not yet been completed. If you are
interested in using vGPU, please be aware that VMware does not support snapshots, and therefore you cannot use vGPU in
combination with Unidesk’s Desktop Backup functionality.
Unsupported VMware features:VMware Storage vMotion migrate command, vSphere Storage - Profile-Driven Storage, and Distributed Power
Management.
Virtualization connection broker
The following brokers are directly integrated with Unidesk. Other connection brokers are supported, but without direct
integration.
VMware Horizon View
Horizon View 7.0, 6.0-6.2, 5.0-5.3 (If running View 5.1 with Windows XP, please see Windows XP in the Known Issues
section of the Release Notes.)
Horizon View Persona Profile Management 5.x, 6.0. Person Profile Management 6.1 and later is unsupported.
Unsupported feature: Storage Accelerator (Unidesk will not work if Horizon View Storage Accelerator is turned on.)
Citrix XenDesktop
XenDesktop 5.6, 5.5 (Standard, Advanced, Enterprise, Platinum)
XenDesktop 7.6, 7.5, 7.1, 7.0 (VDI, App, Enterprise, Platinum)
Note: You cannot use XenDesktop 7.0 with Windows 8.1 Desktops. Instead, use one of the other supported
XenDesktop versions.
Citrix User Profile Management (UPM)
Pano Logic
© 1999-2017 Citrix Systems, Inc. All rights reserved. p.44https://docs.citrix.com
Pano System 6.0, 5.0
Internet browser
The Unidesk Management Console (UMC) supports any standards-based browser that supports Silverlight 4.0.
Desktop operating system
Unidesk Desktops support the following operating systems:
Microsoft Windows 10 Version 1607 64-bit (Professional, Enterprise, Education) – Only supported on ESXi version 6.0 and
above.
Microsoft Windows 8.1 Update, 32-bit, 64-bit (Professional, Enterprise)
Microsoft Windows 7 SP1, 32-bit, 64-bit (Professional, Ultimate, Enterprise)
Windows Server 2012 R2 64-bit (Datacenter Edition)
Windows Server 2008 R2, 64-bit (Datacenter Edition)
Microsoft Windows XP SP3, 32-bit (Professional)
Note: Single-byte language packs are supported for all platforms, except for Windows XP. The language pack is supported
in the Gold image only.
Session Host Operating System
Windows Server 2012 R2 64-bit (Datacenter Edition). See Horizon View RDSH and XenApp integration with Unidesk for
vSphere for details.
Directory service
Unidesk supports these directory services:
Novell eDirectory
Microsoft Active Directory

© 1999-2017 Citrix Systems, Inc. All rights reserved. p.45https://docs.citrix.com
Storage and hardware requirements
Jun 28 , 2017
Use the following guidelines to calculate the data storage and hardware required for your implementation of Unidesk.
Centralized or local storage?
You can use local or centralized storage (or a mixture of both).
For the Management Appliance and the Master CachePoint Appliance, the recommended configuration is centralized
storage with VMware High Availability (HA) services enabled. This configuration provides the fastest recovery time for a
Unidesk environment if a storage failure should occur.
Management Appliance Storage and Hardware Requirements
The Management Appliance maintains a local database and the Unidesk Management Console. You can deploy the
Management Appliance on any host in your infrastructure. The only requirement is that it be able to communicate, using
TCP/IP, with the CachePoint Appliances and the vCenter server.
When you run the Unidesk installer, select datastores that have sufficient space to accommodate the virtual appliance files
for the Management Appliance, the CachePoint Appliances, the shared layer files, and the desktop files.
CachePoint Storage and Hardware Requirements
CachePoint Appliances use the datastore to store all the resources required by your Unidesk installation. The Master
CachePoint Appliance stores copies of all of the layers in use by all of your secondary CachePoint Appliances. As a result, it
may require more storage space than your secondary CachePoint appliances.
Storage tiers
Unidesk uses a three-tiered storage system.
CachePoint and Layers Tier
The CachePoint and Layers T ier contains the component layers that Unidesk uses to build your desktops. This tier contains
the following:
The CachePoint Appliance - 17 GB for both the Master CachePoint and each secondary CachePoint.
OS Layers - 20 GB per layer
Application Layers - 10 GB per layer
User Layer - 10 GB per layer
Desktop tier
The Desktop Tier contains the component boot images that Unidesk uses to build your desktops. This tier contains the
following:
VMDK files for shared layers that desktops are using.
VMDK files for each desktop's User Layer.
© 1999-2017 Citrix Systems, Inc. All rights reserved. p.46https://docs.citrix.com
Standard VMware f iles such as the nvram file and the vmx f ile.
Desktop page (virtual swap) f iles (*.vswp f ile).
NoteThe total storage for a Destkop T ier is 3 GB per desktop.
Archive tier
The Archive Tier contains archive backups of your desktops. This tier exists only if you have enabled archiving. A typical
Archive Tier requires roughly 10 GB per desktop.

© 1999-2017 Citrix Systems, Inc. All rights reserved. p.47https://docs.citrix.com
Configure vCenter permissions
Jun 28 , 2017
Unidesk 2.x software uses the VMware vCenter API to operate and maintain Unidesk Desktops, and VMware VMDKs and
VMware vSphere file APIs to manage layers. It uses:
VMware VMDKs - to hold OS, application, and personalization layers.
VMware vSphere f ile APIs - to copy and delete Unidesk layers on those VMDKs.
Though the above operations do not require VMware vCenter level privileges, monitoring the results of the tasks does.
Unidesk software needs VMware vCenter level privileges to request information about the execution status of the above
tasks, and without those privileges would consider the Unidesk tasks failed.
Set up the vCenter environment
Complete the following tasks to prepare your vCenter environment for Unidesk. The following procedures are based on the
assumption that you are using the vSphere Client.
Set up a vCenter role
You can use your existing Administrator role or you might want to create a vCenter role that is dedicated to Unidesk. If you
decide to create a new role, use the following procedures to create a vCenter role for Unidesk administrators.
Task Procedure
Add a vCenter role
1. In the vSphere Client, navigate to Home > Administration > Roles.
2. Click Add Role.
3. Enter a name (for example, UDAdmin).
4. Set the privileges as shown in the following table.
Set privileges for the vCenter role
Set the following privileges for the account:
Navigate to... And Select...
All Privileges > Datastore
Allocate space
Browse datastore
Low level file operations
All Privileges > FolderCreate folder
Delete folder
All Privileges > Global Cancel task
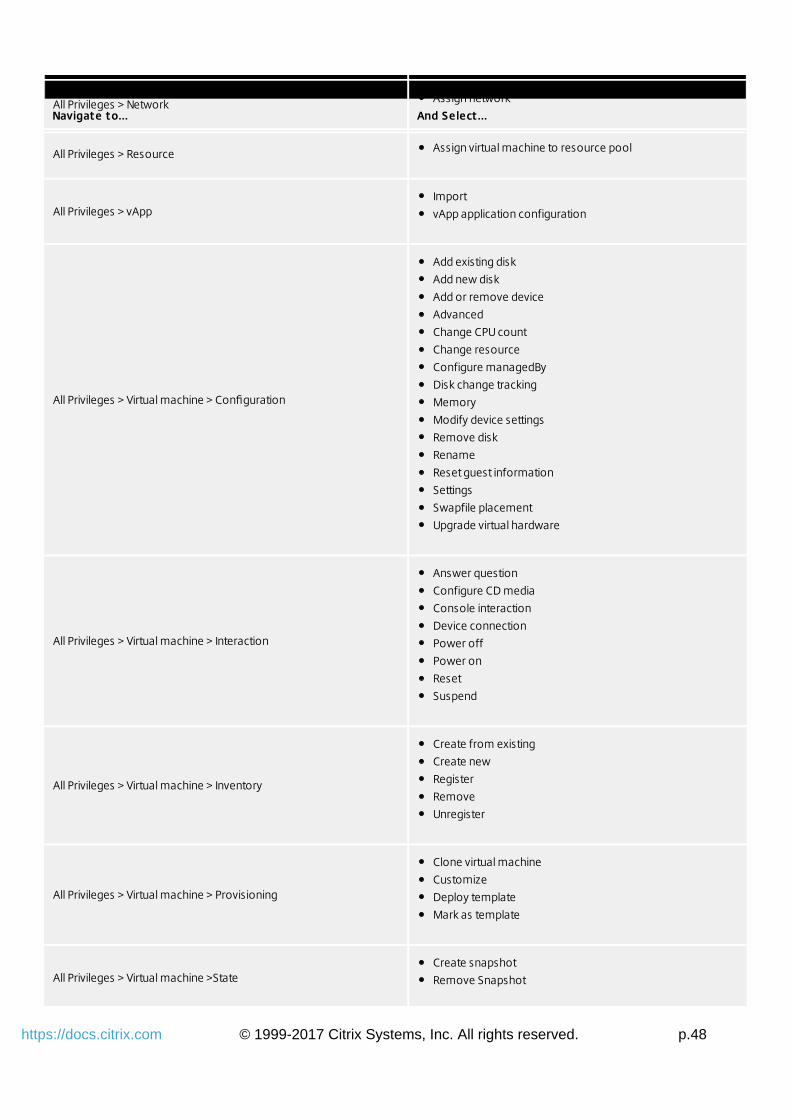
© 1999-2017 Citrix Systems, Inc. All rights reserved. p.48https://docs.citrix.com
All Privileges > Network Assign network
All Privileges > Resource Assign virtual machine to resource pool
All Privileges > vAppImport
vApp application configuration
All Privileges > Virtual machine > Configuration
Add existing disk
Add new disk
Add or remove device
Advanced
Change CPU count
Change resource
Configure managedBy
Disk change tracking
Memory
Modify device settings
Remove disk
Rename
Reset guest information
Settings
Swapfile placement
Upgrade virtual hardware
All Privileges > Virtual machine > Interaction
Answer question
Configure CD media
Console interaction
Device connection
Power off
Power on
Reset
Suspend
All Privileges > Virtual machine > Inventory
Create from existing
Create new
Register
Remove
Unregister
All Privileges > Virtual machine > Provisioning
Clone virtual machine
Customize
Deploy template
Mark as template
All Privileges > Virtual machine >StateCreate snapshot
Remove Snapshot
Navigate to... And Select...

© 1999-2017 Citrix Systems, Inc. All rights reserved. p.49https://docs.citrix.com
Navigate to... And Select...Assign permissions to the vCenter Administrator account
Set the following vCenter permissions:
Task Procedure
Open the Assign Permissions
window
1. In the vSphere Client, navigate to Home > Inventory > Hosts and Clusters.
2. Select the Permissions tab.
3. In the displayed window, right click in any location and select Add Permission from the
displayed menu.
Associate the Unidesk role with the
administrator account
1. Add the administrator account that you plan to use and assign the Unidesk role to it.
2. Allow the permissions to propagate to the entire datacenter.
Note : If you want to restrict this user from accessing specific folders in the datacenter, grant
the user more restrictive permissions for those folders.

© 1999-2017 Citrix Systems, Inc. All rights reserved. p.50https://docs.citrix.com
Install Unidesk software and tools
Oct 03, 2017
Before you start
Before beginning the installation process, be sure to meet the following requirements and prerequisites.
Installer software requirements
The Unidesk installer must be run on a Windows 7 or Windows Server 2008 system.
The .NET Framework 3.5.1 Features must be selected.
vCenter Permission Requirements
Unidesk 2.x software uses the VMware vCenter API to operate and maintain Unidesk Desktops, and VMware VMDKs and
VMware vSphere file APIs to manage layers. It uses:
VMware VMDKs - to hold OS, application, and personalization layers.
VMware vSphere f ile APIs - to copy and delete Unidesk layers on those VMDKs.
Though the above operations do not require VMware vCenter level privileges, monitoring the results of the tasks does.
Unidesk software needs VMware vCenter level privileges to request information about the execution status of the above
tasks, and without those privileges would consider the Unidesk tasks failed.
Set up a vCenter role
You can use your existing Administrator role or you might want to create a vCenter role that is dedicated to Unidesk. If you
decide to create a new role, use the following procedures to create a vCenter role for Unidesk administrators.
Task Procedure
Add a vCenter role
1. In the vSphere Client, navigate to Home > Administration > Roles.
2. Click Add Role.
3. Enter a name (for example, UDAdmin).
4. Set the privileges as shown in the following table.
Set privileges for the vCenter role
Set the following privileges for the account:
Navigate to... And Select...
All Privileges > Datastore
Allocate space
Browse datastore
Low level f ile operations
All Privileges > FolderCreate folder
Delete folder

© 1999-2017 Citrix Systems, Inc. All rights reserved. p.51https://docs.citrix.com
All Privileges > Global Cancel task
All Privileges > Network Assign network
All Privileges > Resource Assign virtual machine to resource pool
All Privileges > vAppImport
vApp application configuration
All Privileges > Virtual machine > Configuration
Add existing disk
Add new disk
Add or remove device
Advanced
Change CPU count
Change resource
Configure managedBy
Disk change tracking
Memory
Modify device settings
Remove disk
Rename
Reset guest information
Settings
Swapfile placement
Upgrade virtual hardware
All Privileges > Virtual machine > Interaction
Answer question
Configure CD media
Console interaction
Device connection
Power off
Power on
Reset
Suspend
All Privileges > Virtual machine > Inventory
Create from existing
Create new
Register
Remove
Unregister
Clone virtual machine

© 1999-2017 Citrix Systems, Inc. All rights reserved. p.52https://docs.citrix.com
All Privileges > Virtual machine > ProvisioningCustomize
Deploy template
Mark as template
All Privileges > Virtual machine >StateCreate snapshot
Remove Snapshot
Add vCenter permissions
Set the vCenter permissions:
Task Procedure
Open the Assign Permissionswindow
1. In the vSphere Client, navigate to Home > Inventory > Hosts and Clusters.
2. Select the Permissions tab.
3. In the displayed window, right click in any location and select Add Permission from
the displayed menu.
Associate the Unidesk role withthe administrator account
1. Add the administrator account that you plan to use and assign the Unidesk role to
it.
2. Allow the permissions to propagate to the entire datacenter.
Note: If you want to restrict this use from accessing specific folders in the
datacenter, grant the user more restrictive permissions for those folders.
Download the Unidesk installer
Download the Unidesk installer and the package from the Unidesk Support Download Center.
Run the Installer
To start the Unidesk installation:
1. Double-click the installer file (unideskinstaller.exe). When the installer opens., select Use an existing package. The
installer checks the Unidesk support site to confirm that it has the current version.
If a newer Unidesk version exists, the installer offers to download it.
If the installer has the current version or cannot access the internet, it proceeds with the installation.
2. Review the resources described in the introduction and click Next . The End User License agreement appears.
3. Read the End User License agreement and click I accept . The End User License agreement closes and the Download and
Install screen appears.
4. Specify whether you want to download the installer package and do an automated installation, or simply download the
package for later use. Click Next . The Download screen appears.
5. Specify a download location for the new installation package, or for an existing installation package if you are installing
a previously downloaded package, and click Next . The Installation Type screen opens.
6. Specify the type of installation you want to perform and click Next .

© 1999-2017 Citrix Systems, Inc. All rights reserved. p.53https://docs.citrix.com
Simple InstallationGood for proofs of concept and evaluations
Allows single datastore
Default Eastern time zone and time server settings
Advanced InstallationGood for production deployment
Allows multiple datastores
Customizable time zone and time server settings
Simple Installation
Use these instructions to complete a simple installation:
1. Enter your Unidesk web site credentials and click Next. The vCenter Credentials screen appears.
2. Make sure the vCenter Administrator account has the permissions described in Configure vCenter permissions.
3. On the vCenter Credential screen, enter the following information and click Next.
Name The name of the account that Unidesk can use to connect to vCenter.
Password The password for the vCenter account.
vCenter DNS/IP The address of your vCenter server.
4. On the Hosts and Storage screen, enter the following information and click Next.
Datacenter
The datacenter for the Unidesk install.
Note: If you subsequently rename the Datacenter, you will need to update Unidesk in the following
manner: select System > Manage Appliances, select your Management Appliance, click EditProperties, select the new Datacenter name, and then reboot your CachePoints.
Virtual
Machine
folder
The location where the installer deploys virtual machines created for use with Unidesk.
Host The host for the Unidesk virtual machines.
Storage The datastore where you want to place the Unidesk storage tiers.
5. On the Management Appliance Settings screen, enter the following and click Next.
The Administrator name and password are: administrator and Unidesk1.
IMPORTANT: Be sure to change the administrator password for the Unidesk Management Console, as described in the

© 1999-2017 Citrix Systems, Inc. All rights reserved. p.54https://docs.citrix.com
last step below.
Management Appliance
Name
A unique name for the Management Appliance.
Network The vSphere virtual network to use for the appliances.
IP Address Specify networking information for the Management Appliance.
6. On the CachePoint Appliance Settings screen, enter the following information and click Next.
CachePoint Appliance
Template Name
Enter a name for the CachePoint Appliance template. The template contains configuration
settings used to configure secondary CachePoint Appliances.
Master CachePoint
Appliance NameEnter a unique name for the Master CachePoint Appliance.
IP Address Specify an address for the Master CachePoint Appliance.
7. Review the installation settings and click Start Installation. The installation begins.
8. Once installation is complete, log into the Unidesk Management Console and change the Administrator password.
9. Then, change the root password on both the new Management Appliance and Master CachePoint Appliance. If you are
comfortable using Linux, use either the vSphere console or SSH to log into the appliance as root (password v9Yx*6uj),and enter Linux commands to change the root password.
If you are not familiar with the Linux commands for changing the root password, please contact the Unidesk Support
team, and they will either walk you through the steps or change it for you.
Advanced Installation
Use these instructions to complete the advanced installation:
1. Enter your Unidesk web site credentials and click Next. The vCenter Credentials screen appears.
2. Make sure the vCenter Administrator account has the permissions described in Configure vCenter permissions.
3. On the vCenter Credentials screen, enter the following information and click Next.
Account The name of the account that Unidesk can use to connect to vCenter.
Password The password for the vCenter account.
vCenter DNS/IP The address of your vCenter server.

© 1999-2017 Citrix Systems, Inc. All rights reserved. p.55https://docs.citrix.com
4. On the vCenter Configuration screen, enter the following information and click Next.
Datacenter The datacenter for the Unidesk install.
Virtual Machine folder The location where the installer deploys virtual machines created for use with Unidesk.
CachePoint Appliance
Template storage folder
The storage location for any templates used by the CachePoint Appliances.
5. On the Management Appliance Settings screen, enter the following and click Next.
Virtual Machine Name A name for the Management Appliance.
Host The host for the Management Appliance.
Storage The datastore used by the Management Appliance.
Administrator User Name A user name for the Unidesk Administrator account.
Password A password for the Administrator account.
Confirm Password The retyped password for the Administrator account
6. On the Management Appliance Network Settings screen, enter the following and click Next.
Network The vSphere virtual network to use for the appliances.
IP Address Specify networking information for the Management Appliance.
Time Zone Select a time zone for the Management Appliance.
NTP Servers Accept the default time servers or specify alternate time servers.
7. On the Master CachePoint Appliance Settings screen, enter the following information and click Next.
CachePoint Appliance
Template Name
Enter a name for the CachePoint Appliance template. The template contains configuration
settings used to configure secondary CachePoint Appliances.
Virtual Machine Name Enter a unique name for the Master CachePoint Appliance.
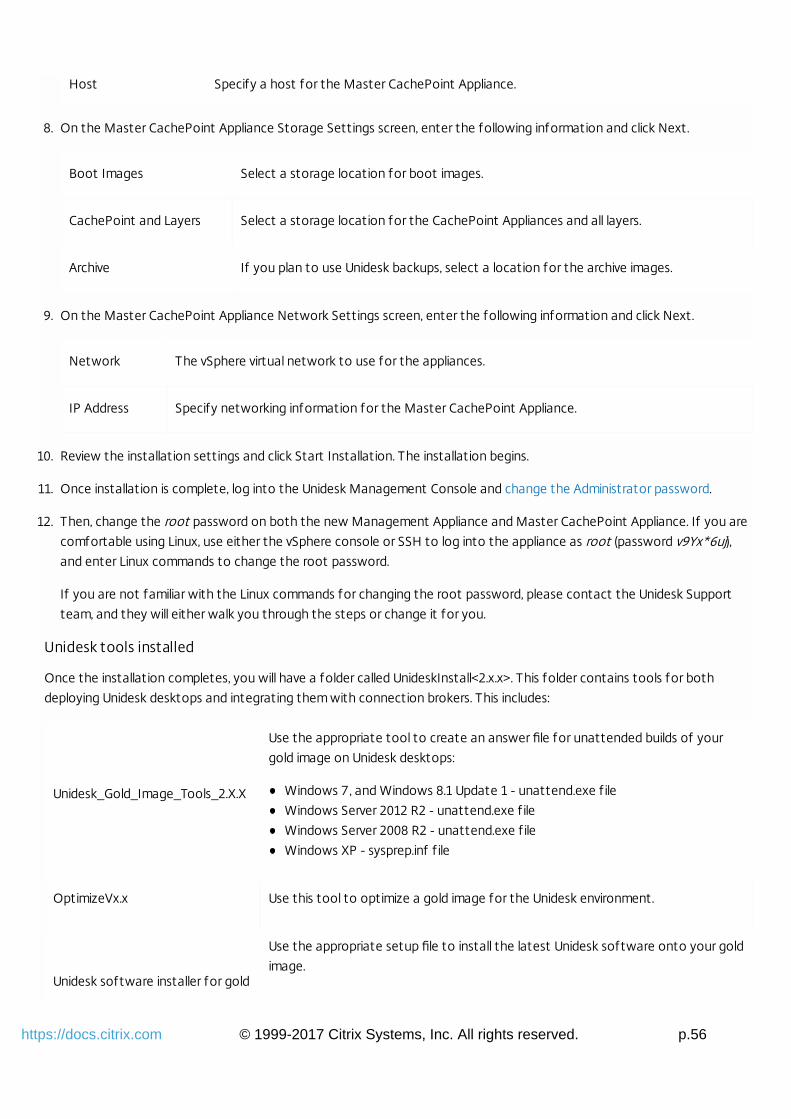
© 1999-2017 Citrix Systems, Inc. All rights reserved. p.56https://docs.citrix.com
Host Specify a host for the Master CachePoint Appliance.
8. On the Master CachePoint Appliance Storage Settings screen, enter the following information and click Next.
Boot Images Select a storage location for boot images.
CachePoint and Layers Select a storage location for the CachePoint Appliances and all layers.
Archive If you plan to use Unidesk backups, select a location for the archive images.
9. On the Master CachePoint Appliance Network Settings screen, enter the following information and click Next.
Network The vSphere virtual network to use for the appliances.
IP Address Specify networking information for the Master CachePoint Appliance.
10. Review the installation settings and click Start Installation. The installation begins.
11. Once installation is complete, log into the Unidesk Management Console and change the Administrator password.
12. Then, change the root password on both the new Management Appliance and Master CachePoint Appliance. If you are
comfortable using Linux, use either the vSphere console or SSH to log into the appliance as root (password v9Yx*6uj),and enter Linux commands to change the root password.
If you are not familiar with the Linux commands for changing the root password, please contact the Unidesk Support
team, and they will either walk you through the steps or change it for you.
Unidesk tools installed
Once the installation completes, you will have a folder called UnideskInstall<2.x.x>. This folder contains tools for both
deploying Unidesk desktops and integrating them with connection brokers. This includes:
Unidesk_Gold_Image_Tools_2.X.X
Use the appropriate tool to create an answer file for unattended builds of your
gold image on Unidesk desktops:
Windows 7, and Windows 8.1 Update 1 - unattend.exe f ile
Windows Server 2012 R2 - unattend.exe f ile
Windows Server 2008 R2 - unattend.exe f ile
Windows XP - sysprep.inf f ile
OptimizeVx.x Use this tool to optimize a gold image for the Unidesk environment.
Unidesk software installer for gold
Use the appropriate setup file to install the latest Unidesk software onto your gold
image.

© 1999-2017 Citrix Systems, Inc. All rights reserved. p.57https://docs.citrix.com
image setup_x86.exe
setup_x64.exe
Unidesk_Broker_Integration_Tools
Use these tools to integrate your Unidesk environment with a connection broker.
via_setup.exe - installs a connection broker agent for integrating Unidesk with
VMware View or Citrix XenDesktop.

© 1999-2017 Citrix Systems, Inc. All rights reserved. p.58https://docs.citrix.com
Upgrade Unidesk
Sep 27, 2017
This release contains updates for the following components:
The Management Appliance
The CachePoint® Appliances
The Unidesk® Tools on the desktops
The Unidesk Virtual Desktop Connection Broker Agent
Component upgrades
Upgrades are supported from Unidesk version 2.6 and higher to the current 2.x release. If you are upgrading from an earlier
release, you must upgrade to Unidesk 2.6.0 first.
To determine which Unidesk version is currently installed, select System > Manage Appliances in the Unidesk Management
Console and open the Information Views for each component.
Before you start
Ensure that your firewall rules meet our requirements as described in Open ports in your firewall for Unidesk.
Make sure to upgrade the appliances in this order, as explained in the steps below:
1. Management Appliance (MA) f irst – let it complete
2. Master CachePoint Appliance (MCP) – let it complete
3. Secondary CachePoint Appliances (SCPs)
Upgrade Steps
It 's important to upgrade the Unidesk environment in the following order:
Back up the Unidesk appliances
Download the Unidesk upgrade package
Upgrade the Connection broker agent
Upgrade the Management Appliance
Upgrade the CachePoint Template
Upgrade the Master CachePoint and Secondary CachePoint Appliances
NOTES:
Some new Unidesk features will not be available until the CachePoint Appliances have been upgraded.
You do not need to update the Unidesk Tools. The upgrade software does this for you.
STEP 1: Back up the Unidesk appliances
1. In VMware vSphere, make a snapshot of the Unidesk Management Appliance and your Master CachePoint Appliance.
You can delete these snapshots once you have upgraded the appliances.
2. Also, make sure the desktop backups are up-to-date.

© 1999-2017 Citrix Systems, Inc. All rights reserved. p.59https://docs.citrix.com
Note: Once the upgrade process is complete, you must delete the snapshots of the Management Appliance and the
Master CachePoint Appliance.
STEP 2: Download the upgrade packages
1. Download the Unidesk Upgrade package, either from the Citrix Download center.
2. Extract the Zip f ile.
3. Check the Unidesk Management Console Taskbar for any pending desktop configuration changes, and if there are any
waiting to be processed as part of a Maintenance Schedule, override the schedule, as follows:
1. Select the affected desktops and choose Edit Desktops.
2. In the Maintenance Schedule tab, select As soon as possible.
3. Complete the wizard.
4. Mount both Unidesk ISO files, one for the Management Appliance and one for the CachePoint Appliance ISO images.
Note: The CachePoint Appliance ISO must be mounted on the Management Appliance.
1. Copy the upgrade images (unidesk_ma_upgrade_2.x.x.iso and unidesk_ca_upgrade_2.x.x.iso) from the extracted
upgrade package to a datastore accessible by the Management Appliance.
2. Connect the CD/DVD devices to both ISO upgrade images (unidesk_ma_upgrade_2.x.x.iso and
unidesk_ca_upgrade_2.x.x.iso) by editing the Management Appliance settings in vCenter. Make sure the CD drive's
Connected checkbox is selected.
STEP 3: Upgrade the connection broker agent
To upgrade the Unidesk Virtual Desktop Connection Broker Agent:
1. When you upgrade the Unidesk Virtual Desktop Connection Broker Agent, any configuration changes you've made will
be overwritten. Therefore, if you have made changes to your configuration f ile, you need to save a copy of the
univiavcs.exe.config f ile to preserve the information. Once the upgrade is done, you will need to edit the new copy of the
configuration f ile, using the saved copy as a reference, to restore the settings.
2. Log into either the View Connection Server or XenDesktop Controller using an account with administrator privileges.
3. Copy the via_setup.exe f ile from the following folder to a convenient location on the server:
UnideskInstall.x.x.x.xxx\Unidesk_Broker_Integration_Tools
4. Double click the via_setup.exe f ile, and when prompted, enter the location where you want to install the Virtual Desktop
Connection Broker Agent. The default is C:\Program Files\Unidesk\UniVIA.
5. Accept the default communication port number (Port 390) for the Virtual Desktop Connection Broker Agent. You can
change the port later, if needed. For details, see the online help instructions for Changing settings for the Unidesk Virtual
Desktop Connection Broker Agent.
6. Click Finish to exit the wizard.
STEP 4: Upgrade the Management Appliance
It is important to upgrade the Management Appliance first, and then the Master CachePoint Appliance. After each of
these is upgraded, you can upgrade the Secondary CachePoint Appliances.
To upgrade the Management Appliance:
1. In the Unidesk Management Console, select System > Upgrade. You might have to wait a few minutes for the list of
upgrades to display.
© 1999-2017 Citrix Systems, Inc. All rights reserved. p.60https://docs.citrix.com
2. In the next Upgrade tab, leave the CachePoint Appliances deselected. We recommend upgrading the CachePoint
Appliance template and the CachePoint Appliances after the MA has been upgraded. For details on upgrading
CachePoint appliances, see the next section.
3. In the Confirm and Complete tab, click Upgrade. The upgrade process closes the current Unidesk Management Console
session and starts upgrading the Management Appliance. During the upgrade, the process displays a status page.
IMPORTANT! Do not refresh the Web browser before the upgrade completes, or the status page closes and you
cannot navigate back to it.
4. After the Management Appliance upgrade completes:
1. Clear the web browser's cache history.
2. Refresh.
3. Log in to the Unidesk Management Console again.
STEP 5: Upgrade the CachePoint Template
Assuming you have upgraded the Management Appliance, you need to upgrade the CachePoint Appliance Template.
1. In VMware vCenter Inventory > VMs and Templates, delete the old CachePoint Appliance Template (the one currently
selected in the System Settings) from the previous version of Unidesk.
2. In the downloaded package, unzip cp-template-2.x.x.zip.
3. Deploy CachePoint Appliance OVF template. Log in to the VMware vSphere client and use the File > Deploy OVF
Template option to import the CachePoint Appliance template (ca-template.2.x.x.ovf). Accept all of the default settings
in the wizard.
4. Convert the newly deployed CachePoint Appliance template to a VMware template. In vCenter, right-click the newly
deployed CachePoint and select Template > Convert to Template.
5. In the Unidesk Management Console select System > Settings and Configuration, and then edit the CachePoint
Settings. Select the template that you just imported and click Save. This ensures that new CachePoint Appliances use
the new template.
STEP 6: Upgrade the Master CachePoint and Secondary CachePoint Appliances
This assumes you have upgraded the Management Appliance and the CachePoint Appliance Template. To upgrade the
CachePoint Appliances, beginning with the Master CachePoint Appliance:
1. Reboot each of your CachePoint Appliances, starting with the Master CachePoint Appliance.
2. In the Unidesk Management Console, select System > Upgrade. You might have to wait a few minutes for the list of
upgrades to display.
3. In the next Upgrade tab, select the CachePoint Appliance you want to upgrade, beginning with the Master CachePoint
Appliance (MCP). (Once the MCP is upgraded, choose each of the remaining CachePoint Appliances until all are up-to-
date.)
4. In the Confirm and Complete tab, you can enter a comment that will appear in the Audit log, and click Upgrade. The
upgrade process starts and displays a status page.
© 1999-2017 Citrix Systems, Inc. All rights reserved. p.61https://docs.citrix.com
5. Upgrade any other CachePoint Appliances you have, and unmount the CD drive by editing the settings for the MA. Click
CD Drive 1, 2 Client Device, and click Ok.
Delete the snapshots of the Management Appliance and Master CachePointAppliance
IMPORTANT! You must delete the snapshots of the Management Appliance and Master CachePoint Appliance. Keeping
these snapshots around could cause issues during certain layering procedures.
1. In VMware vSphere, use the Snapshot Manager to delete the snapshots of the Management Appliance and the Master
CachePoint Appliance.
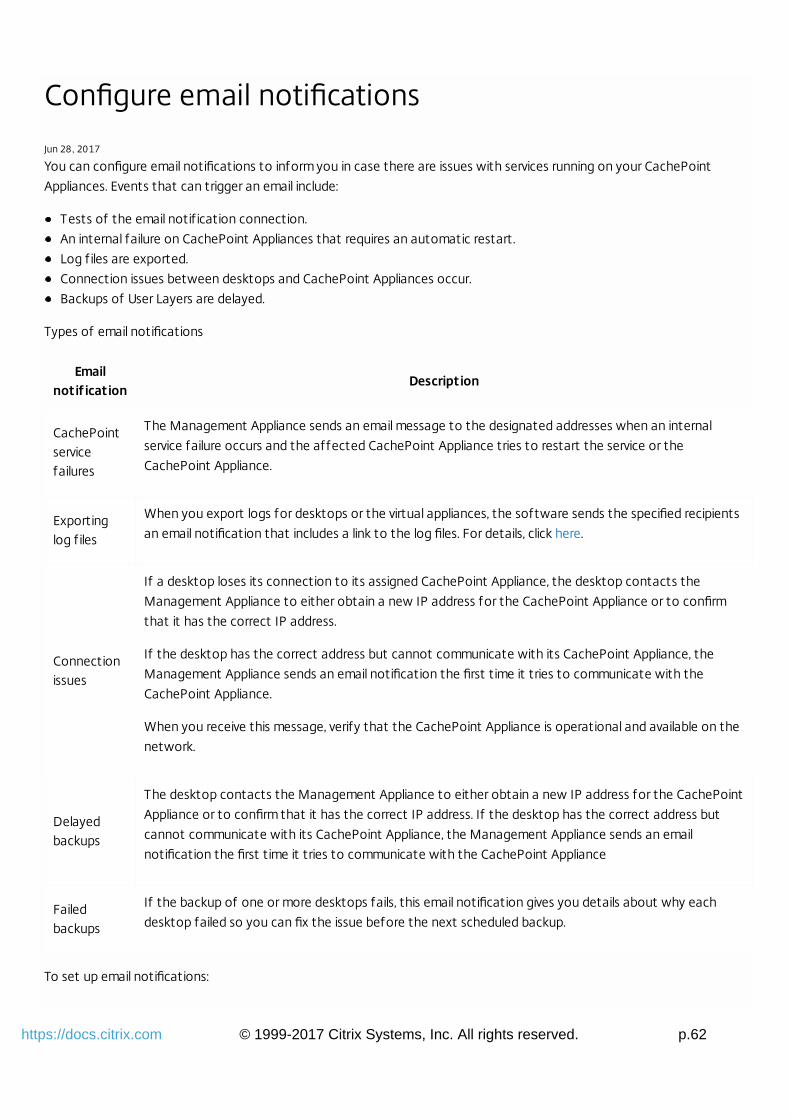
© 1999-2017 Citrix Systems, Inc. All rights reserved. p.62https://docs.citrix.com
Configure email notifications
Jun 28 , 2017
You can configure email notifications to inform you in case there are issues with services running on your CachePoint
Appliances. Events that can trigger an email include:
Tests of the email notif ication connection.
An internal failure on CachePoint Appliances that requires an automatic restart.
Log f iles are exported.
Connection issues between desktops and CachePoint Appliances occur.
Backups of User Layers are delayed.
Types of email notifications
Emailnotif ication
Description
CachePointservicefailures
The Management Appliance sends an email message to the designated addresses when an internal
service failure occurs and the affected CachePoint Appliance tries to restart the service or the
CachePoint Appliance.
Exportinglog f iles
When you export logs for desktops or the virtual appliances, the software sends the specified recipients
an email notification that includes a link to the log files. For details, click here.
Connectionissues
If a desktop loses its connection to its assigned CachePoint Appliance, the desktop contacts the
Management Appliance to either obtain a new IP address for the CachePoint Appliance or to confirm
that it has the correct IP address.
If the desktop has the correct address but cannot communicate with its CachePoint Appliance, the
Management Appliance sends an email notification the first time it tries to communicate with the
CachePoint Appliance.
When you receive this message, verify that the CachePoint Appliance is operational and available on the
network.
Delayedbackups
The desktop contacts the Management Appliance to either obtain a new IP address for the CachePoint
Appliance or to confirm that it has the correct IP address. If the desktop has the correct address but
cannot communicate with its CachePoint Appliance, the Management Appliance sends an email
notification the first time it tries to communicate with the CachePoint Appliance
Failedbackups
If the backup of one or more desktops fails, this email notification gives you details about why each
desktop failed so you can fix the issue before the next scheduled backup.
To set up email notifications:

© 1999-2017 Citrix Systems, Inc. All rights reserved. p.63https://docs.citrix.com
1. Select System > Settings and Configuration.
2. Navigate to Notifications Settings and click Edit.
3. In the Mail Server box, enter the name of your email server or the name of the SMTP relay server.
4. In the Mail Server port, enter the number of the port that the email server uses for communication.
5. In the User Name box, enter the user name for the email account you want to use for sending notifications. For
example, [email protected].
6. In the Password box, enter the password for the email account.
7. In the From box, enter an email address to identify the source of the email message. For example, if you enter
[email protected], the email message displays the following in the From box of the received notification:
Unidesk Management Appliance [[email protected]]
8. In the Recipient List box, enter the email addresses that should receive notifications. Use a comma or semicolon to
separate the email addresses.
9. Click Test Email Configuration to verify that the settings for the email server and account work correctly. If the test
succeeds, the software displays a success message and sends the recipients a confirmation email.
10. Enter a comment, if necessary, and click Save to save the email settings. If you enter comments, they appear in the
Information view Audit History.

© 1999-2017 Citrix Systems, Inc. All rights reserved. p.64https://docs.citrix.com
Set a Session Timeout for the Unidesk ManagementConsole
Jun 28 , 2017
You can set a timeout for the Unidesk Management Console, so that if there is no user-initiated activity for a specified
length of time, the console ends the session.
Session activity includes user interaction with the console, for example, starting tasks and editing settings. Tasks in progress
will not keep a session from timing out, nor will simply selecting an object or clicking inside the console window.
If you have just installed Unidesk software, the Session Timeout is set to 15 minutes by default. If you have upgraded from
an earlier version of Unidesk, the Session Timeout will be set to zero (0) by default, effectively leaving this function turned
off.
To set a session timeout
1. Select System > Settings and Configuration.
2. Scroll to Security Settings.
3. Select Session Timeout, and click the Edit button.
4. Enter the number of minutes after which the session will timeout. Valid values include numbers from 0 - 10000. (A value
of 0 turns off this feature.)
5. Click Save.

© 1999-2017 Citrix Systems, Inc. All rights reserved. p.65https://docs.citrix.com
Create a Secondary CachePoint Appliance
Jun 28 , 2017
You can (and should) create one or more CachePoint Appliances in the Unidesk environment to store Desktop User data.
You can specify either a host or cluster for the CachePoint Appliance
Before you start
You must provision a Master CachePoint Appliance. (This is done during the Unidesk installation.)
About CachePoint properties
Prevent new desktops from being added to a CachePoint
You can stop a CachePoint Appliance from being used for Desktops simply by editing the CachePoint Properties and
deselecting this check box on the first wizard tab: Allow new desktops to be deployed to this CachePoint. This feature
is good for:
Preventing desktops from being added to the Master CachePoint Appliance, a best practice.
Preparing to remove a Secondary CachePoint from the network.
Reserving space on a Secondary CachePoint for a future project.
Use WAN acceleration when copying Layers to this CachePoint
You can turn on the CachePoint's WAN acceleration feature to speed up layer creation on a Secondary CachePoint that
your Management Appliance accesses over a wide are network (WAN).
When WAN acceleration is turned on, the Management Appliance first pushes a full, baseline copy of the layer to the
remote CachePoint, but from then on, sends only incremental layer changes, compressed for transmission. Once the
baseline layer copy is sent to the remote CachePoint (which can take a long time), you will see significant time savings when
updated layers are sent.
Note: The Management Appliance continues to do regular layer copies to CachePoints on the same LAN.
Although WAN acceleration significantly speeds up remote copies, it also requires the Management Appliance to build and
update a usage map whenever you import an operating system or application into a layer and finalize the layer. Therefore, itis strongly recommended that you only enable WAN acceleration on a CachePoint, if it is strictly required. Once you enable
WAN acceleration on one CachePoint, the Unidesk Management Appliance will build and update a usage map any time you
finalize any layer after creating or updating it.
Specify storage tiers used for this CachePoint
You can choose where to store the Boot images for the following:
Desktops managed by a CachePoint
The main CachePoint
The Layers used by the CachePoint's Desktops
The CachePoint Archive
Create a Secondary CachePoint Appliance

© 1999-2017 Citrix Systems, Inc. All rights reserved. p.66https://docs.citrix.com
1. In the Unidesk Management Console, select System > Manage Appliances.
2. In the Action bar, select Create CachePoint. This opens the Create CachePoint Wizard.
3. In the Configuration tab:
1. Specify the name of the CachePoint Appliance.
2. If you want to prevent new Desktops from being deployed to this CachePoint, select this check box.
3. If the Management Appliance communicates with this CachePoint via a WAN, we recommend that you select the
Use WAN acceleration check box. This speeds up the sending of Layer versions to the Secondary CachePoint over a
WAN.
Note: Only enable WAN acceleration on a CachePoint if it is required, because the extra processing will slow creation
and updates for all Layers. For details, see WAN acceleration above.
4. In the Hosts tab, specify the host of the CachePoint Appliance in the virtual infrastructure.
1. Select the host in the virtual infrastructure where the provisioning process will create the CachePoint Appliance.
2. Select the Desktop Hosts to associate with the CachePoint Appliance. A host appears grayed out if it does not share
at least one datastore with the selected CachePoint and all other selected Desktops. To expand a cluster, click on
the cluster name.
5. In the Storage Tiers tab, specify the datastores in the virtual infrastructure that the CachePoint can use to store boot
images layers and archives.
1. Select a boot image datastore. This datastore contains the boot volume belonging to each Desktop.
2. Select a CachePoint and Layers datastore. This datastore contains Application Layer and the CachePoint virtual
machine itself .
3. Select an optional Archive datastore. Unidesk uses this datastore to store backups of the User User Layers. If you do
not specify an Archive datastore, Unidesk does not create or store backups for the CachePoint.
6. In the Network tab, specify IP configuration settings for the CachePoint Appliance.
1. If using a dynamic IP address, select DHCP.
2. If using a static IP address, select Static. When you select static, additional f ields become available for you to specify
address, gateway, and DNS information.
7. In the Confirm and Complete tab review the settings that you have specified and optionally enter a comment. Click
Create CachePoint. The comment you enter is displayed in the audit history in the Information view. The Unidesk
software begins creating the new CachePoint. You can monitor the progress of this task in the Tasks area of the
Management Console.
Change the root password on the new CachePoint Appliance
If you are comfortable using Linux, use either the vSphere console or SSH to log into the appliance as root (password
v9Yx*6uj), and enter Linux commands to change the root password.
If you are not familiar with the Linux commands for changing the root password, please contact the Unidesk Support team,
and they will either walk you through the steps or change it for you.

© 1999-2017 Citrix Systems, Inc. All rights reserved. p.67https://docs.citrix.com
Connect to a Directory Service
Jun 28 , 2017
If you are using a directory service, such as Active Directory or Novell eDirectory, to manage user information, you can
extend the Unidesk directory tree to include user and group information from the remote directory service by creating
directory junctions (connections).
About extending the Unidesk directory to a remote directory service
The Unidesk Management Console directory tree view of the Unidesk environment displays a hierarchical view of all objects,
including users and groups. When you use a directory junction to extend this tree, it includes remote directory services. This
allows you to use existing users and groups for Unidesk desktops.
Example: Extended directory tree
In the following example, the Unidesk directory tree has a Directory Junction that connects to the corporate Active
Directory. Although the attributes for the Marketing users reside on the Active Directory server, the system administrator
can traverse the Unidesk directory tree and see the remote users in the same way that he can see the local users.
What happens when Directory Junctions overlap
Overlapping (or nested) Directory Junctions occur when you create multiple Directory Junctions that contain the same users
and then import the users into the Unidesk directory tree. When overlapping occurs, each Directory Junction contains its
own copy of the duplicate users.
Example: Overlapping directory junctions
Assume you create Directory Junction A that starts at the Marketing folder in a directory service tree. Next, you create
Directory Junction B which starts at a folder above the Marketing folder. If you browse both Directory Junctions, you can
see the Marketing users in both folders.
When user attributes are imported from remote directory services
The Unidesk software imports and caches attributes for users and groups from a remote directory service in the following
situations:
When you assign a desktop to a user or group in a remote directory service.
When you add a user or group from a remote directory service to a local group.
When you assign administrator privileges to a user from a remote directory service.
When the values of the attributes change in the remote directory service.
The attributes that the Unidesk software caches are read only. All changes to the attributes for directory service users
come from the directory server.
Imported attributes are synchronized regularly
The Unidesk software synchronizes the information it caches for directory service users with the remote directory service
every 12 hours. If the software discovers that a user is no longer an object in the directory service, it classifies the user as
© 1999-2017 Citrix Systems, Inc. All rights reserved. p.68https://docs.citrix.com
abandoned (you can view this information in the Information view for the user). You can continue to assign desktops to
this user; however, the attributes that the software originally obtained from the directory service are not updated unless
you change them manually in the Unidesk Management Console. In this case, the directory user is equivalent to a local user.
Directory service user name changes and assigned desktop owners
After you assign a directory service user to a Unidesk desktop, changing the name in the directory service has no effect on
the assigned owner of the desktop. Unidesk continues to display the original user name as the owner of the desktop.

© 1999-2017 Citrix Systems, Inc. All rights reserved. p.69https://docs.citrix.com
Create a directory junction
Jun 28 , 2017
Use the Create Directory Junction action in the Users > Directory Service module to establish a connection to a remote
directory service.
Before you start
Create the folders where you want to place the Directory Junctions or decide which existing folder you want to use. You
can add a Directory Junction folder to any existing folder in the Unidesk Management Console directory tree.
Best Practice: Avoid creating overlapping Directory Junctions, if possible. In some circumstances, deleting an overlapping
Directory Junction can affect your ability to delete another Directory Junction that contains the same users. You can,
however, browse and assign desktops to users that belong to overlapping Directory Junctions.
Create a directory junction
1. Select Users > Directory Service.
2. Select Create Directory Junction in the Action bar. This opens the Create Directory Junction wizard.
3. In the Connection Details tab, specify the details for the directory server.
1. Enter a name for the Directory Junction. This name becomes the name of the folder that you see in the Unidesk
Management Console tree view. You can use any name that you prefer, including the name of a domain in your
directory service tree.
2. Enter the IP address or the DNS name for the server for the directory service.
3. Enter the number of the port that allows communication with the directory server.
4. If you want to use Secure Sockets Layer (SSL) communication, select the SSL check box.
If certificate errors occur, the wizard displays a list of these errors. If you know it is safe to ignore them, select Ignore
Certificate Errors.
5. Click Test Connection to verify that the Management Appliance can connect to the specif ied directory service. If you
chose to use an SSL connection and certif icate errors occur, the wizard prompts you to confirm whether you want to
accept or reject the certif icate.
4. In the Authentication Details tab, enter the authentication details for a user who has permissions to search the
directory service.
1. Enter the ID, user name, or Distinguished Name. This ID is referred to as the Bind Distinguished Name (DN). To
determine the correct syntax for the Bind DN or user name, see the documentation for your directory service.
Examples: The following examples shows some of the ways you can specify a user for the directory service:
domain\username or [email protected].
2. Enter the password for the Bind DN.
3. Click Test Authentication to verify that the connection to the directory server is valid.
5. In the Distinguished Name Details tab, specify where the software should start searching for users and groups in the
remote directory service.
© 1999-2017 Citrix Systems, Inc. All rights reserved. p.70https://docs.citrix.com
1. Select or enter the Base Distinguished Name (DN) from which the software starts searching for users and groups in
the remote directory service. Once you establish a connection to the server for the directory service, the wizard
displays a list of available DNs. You can select a DN from the list or enter the DN directly in the box.
Example: Assume that you want to start the search at the Marketing Organizational Unit at the root of a domain.
You would enter the following Base DN:
OU=marketing, DC=root,DC=mydomain DC=com
2. Click Test Base DN to verify that the Base DN you specif ied is valid.
6. In the Folder Location tab, select the folder in the Unidesk tree where you want to add the directory junction for the
remote directory service.
7. In the Attribute Mapping tab, enter the names of directory service attributes that you want to map to the local
attributes or use the default settings.
Notes:
To change the mapping from local attributes back to default mappings, click Use Defaults.
If using eDirectory, set the GUID mapping to GUID (not objectGUID, which will not work).
8. In the Confirm and Complete tab, verify the Directory Junction settings, enter a comment if required, and click Update
Directory Junction.
If you enter comments, they appear in the Information view Audit History.
Attribute mapping
To ensure that the Unidesk software can find user, group, and folder entities in a directory service, you can map attributes
that the directory service uses to the attributes that the Unidesk software uses.
Note: When you enter attribute values, use the following syntax. The software searches for the first attribute. If it cannot
find the first attribute, it searches for the second one.
attribute:attribute
The following tables describe the local attributes that you can map to directory service attributes.
User
Localattribute
Description
GUID
The Globally Unique Identifier for the user. If the user entity's location in the directory service changes, the
Unidesk software uses this attribute to locate it and retrieve its values.
Note: If using eDirectory, the GUID mapping must be set to GUID (not objectGUID).
DisplayName
A name associated with the user.
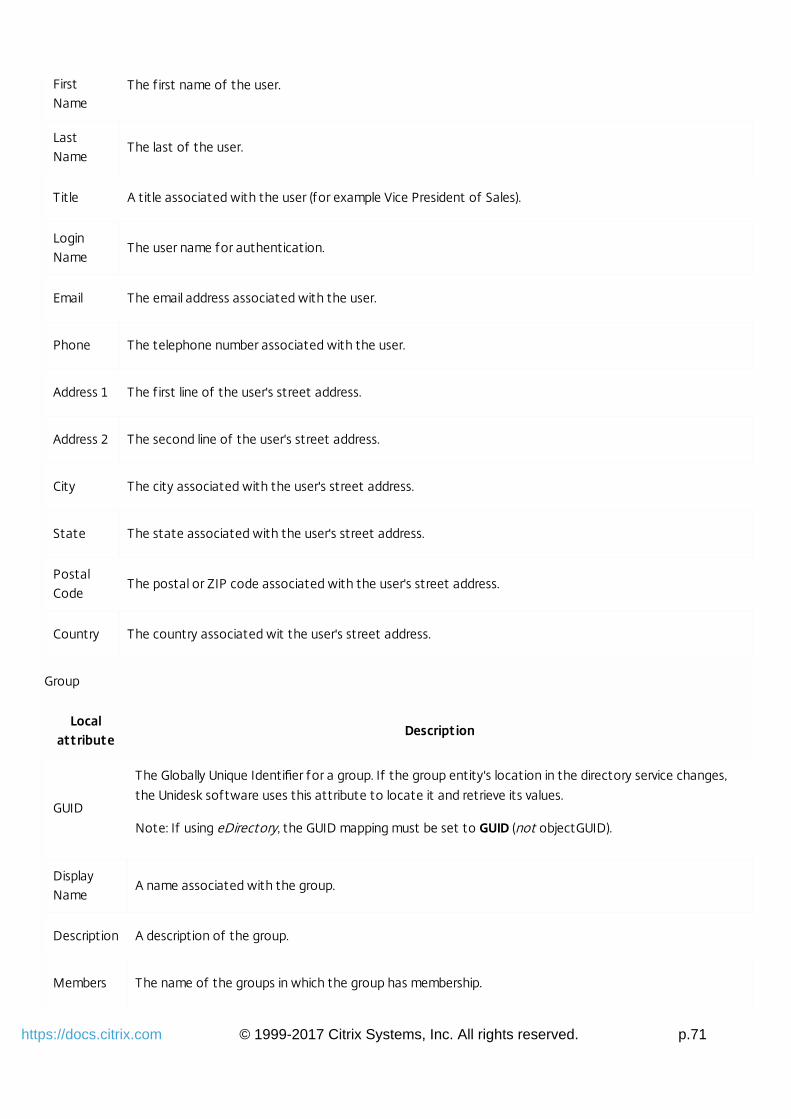
© 1999-2017 Citrix Systems, Inc. All rights reserved. p.71https://docs.citrix.com
FirstName
The f irst name of the user.
LastName
The last of the user.
T itle A title associated with the user (for example Vice President of Sales).
LoginName
The user name for authentication.
Email The email address associated with the user.
Phone The telephone number associated with the user.
Address 1 The f irst line of the user's street address.
Address 2 The second line of the user's street address.
City The city associated with the user's street address.
State The state associated with the user's street address.
PostalCode
The postal or ZIP code associated with the user's street address.
Country The country associated wit the user's street address.
Group
Localattribute
Description
GUID
The Globally Unique Identifier for a group. If the group entity's location in the directory service changes,
the Unidesk software uses this attribute to locate it and retrieve its values.
Note: If using eDirectory, the GUID mapping must be set to GUID (not objectGUID).
DisplayName
A name associated with the group.
Description A description of the group.
Members The name of the groups in which the group has membership.
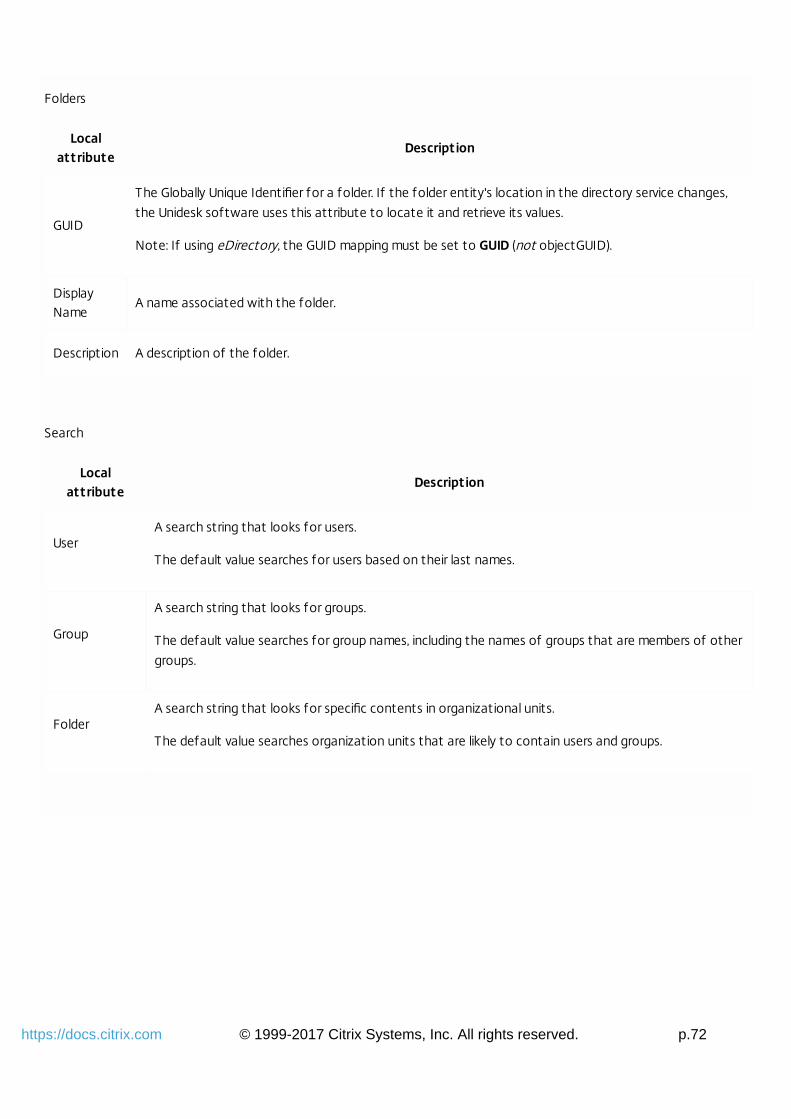
© 1999-2017 Citrix Systems, Inc. All rights reserved. p.72https://docs.citrix.com
Folders
Localattribute
Description
GUID
The Globally Unique Identifier for a folder. If the folder entity's location in the directory service changes,
the Unidesk software uses this attribute to locate it and retrieve its values.
Note: If using eDirectory, the GUID mapping must be set to GUID (not objectGUID).
DisplayName
A name associated with the folder.
Description A description of the folder.
Search
Localattribute
Description
UserA search string that looks for users.
The default value searches for users based on their last names.
Group
A search string that looks for groups.
The default value searches for group names, including the names of groups that are members of other
groups.
FolderA search string that looks for specific contents in organizational units.
The default value searches organization units that are likely to contain users and groups.
© 1999-2017 Citrix Systems, Inc. All rights reserved. p.73https://docs.citrix.com
Connect to a directory service
Jun 28 , 2017
Use the Create Folder and Create Directory Junction actions in the Users module to establish a connection to a remote
directory service, such as Microsoft Active Directory.
1. Select an existing folder or use the Create Folder action to create folders in the Unidesk directory tree structure where
you want to place connections to a remote directory service.
2. Use the Create Directory Junction action to specify the Bind Distinguished name and a Base Distinguished name for a
remote directory service .
The Bind Distinguished Name is the Distinguished Name or ID for a user that has permissions to search the directory
service tree.
The Base Distinguished Name is the starting point that the software uses when searching for users and groups in the
directory service tree.
3. Manage the users. You can assign desktops to the users, add them to local groups, or assign administrator privileges to
them, as if they were local users. When these actions occur, the Unidesk software caches the attributes for each
remote entry. If the connection to the directory service is lost temporarily, the software can use the cached information
for management tasks.
© 1999-2017 Citrix Systems, Inc. All rights reserved. p.74https://docs.citrix.com
Integrate with a broker
Jun 28 , 2017
While you can use Unidesk Desktops with any virtual desktop connection broker, Unidesk supports integrating with VMware
Horizon View and Citrix XenDesktop to simplify desktop management. When you integrate with one of these brokers, you
can easily put Desktops into broker VMware Horizon View pools or XenDesktop groups.
Integrating with a broker requires installing the Unidesk Virtual Desktop Connection Broker Agent on the broker server. For
details about integrating with a broker, see:
Integrate with VMware Horizon View
Citrix XenDesktop
Pano Logic

© 1999-2017 Citrix Systems, Inc. All rights reserved. p.75https://docs.citrix.com
Integrate with VMware Horizon View
Jun 28 , 2017
Once you integrate with VMware Horizon View, you can specify that you want new desktops to belong to a VMware®
Horizon View™ pool. This article lays out what you need to integrate with View, and gives you the detailed steps.
Requirements to integrate with Horizon View
What you need at each step of Horizon View integration
To... You need...
Get started A supported version of the VMware Horizon View Server.
Install the Unidesk broker agentAccess to an account that has administrator privileges on the connection broker
server.
Connect to the View Connection
Server
Unidesk Virtual Desktop Connection Broker Agent installed on the View
connection server.
Create a View pool
VMware View access to the directory service users and groups that you want to
use for desktop entitlements.
At least one valid Directory Junction.
An Operating System Layer or Application Layer that contains the VMware View
Agent software.
Deploy Persistent Desktops in aView pool
A dedicated Manual pool.
Deploy Non-persistent desktops
in a View pool
A Manual floating-assignment pool. (Use a dummy virtual machine to create your
pool, and then remove it.)
Enable the VMware PowerShell and prepare the View Pools
Prepare the VMware PowerShell on View broker system
Enable PowerShell on the View broker system, and set it to Remote signed (or Unrestricted) for PowerShell script
execution, as follows.
1. On the View broker system desktop, click Start > Programs > View PowerCLI. This opens the View PowerCLI.
2. List the View PowerShell script execution policy by entering the command:
get-executionpolicy
© 1999-2017 Citrix Systems, Inc. All rights reserved. p.76https://docs.citrix.com
3. If the policy listed is not RemoteSigned or Unrestricted, enter the following command and choose RemoteSigned as
the new value. For example:
set-executionpolicy RemoteSigned
PowerShell script execution is now enabled.
Prepare the VMware Horizon View Pools
When integrating VMware View pools with Unidesk, you can use two types of VMware pools:
Dedicated manual pools - Support Persistent Desktops. Using this type of pool, a desktop is assigned to a specif ic user.
That user will always use this dedicated desktop.
Floating-assignment manual pools - Support Non-persistent Desktops. Using this type of pool, desktops are assigned,
temporarily, to users on a f irst-come first-served basis. Users could receive different desktops every time they log on.
You cannot use automated pools with Unidesk; they are designed to create virtual machines within vCenter and would
bypass Unidesk. View Composer is never used in conjunction with Unidesk.
Prepare Dedicated View pools for Persistent Desktops
Prepare View floating-assignment manual pools for Non-persistent Desktops
Integrate with Horizon View
Unidesk and View Composer
View Composer does not need to be installed and is not used to deploy or manage virtual machines.
Install or upgrade the Unidesk Virtual Desktop Connection Broker Agent
The Unidesk Virtual Desktop Connection Broker Agent lets you integrate Unidesk desktops with connection brokers.
Integrating with VMware View™ Connection Server lets you:
Create dedicated manual pools and add persistent desktops to those pools.
Add nonpersistent desktops to f loating-assignment manual pools.
Automatically place desktops into maintenance mode during desktop rebuilds.
To install or upgrade the Unidesk Virtual Desktop Connection Broker Agent
1. Determine which port to use for communication between Unidesk and the connection broker server. By default,
Connection Broker Agent uses port 390.
2. If you are planning to integrate with a VMware Horizon View environment, use VMware to create a pool.
3. Log into the View Connection Server using an account with administrator privileges.
4. Copy the via_setup.exe file from the UnideskInstall.x.x.x.xxx\Unidesk_Broker_Integration_Tools folder to a convenient
location on the server.
5. Double click the via_setup.exe file, and when prompted, enter the location where you want to install the Virtual Desktop
Connection Broker Agent. The default is C:\Program Files\Unidesk\UniVIA.
6. Accept the default communications port number (390) for the Virtual Desktop Connection Broker Agent.
© 1999-2017 Citrix Systems, Inc. All rights reserved. p.77https://docs.citrix.com
Note: If you need to change the port number later, remember to change it both on the connection broker server and in
the Unidesk Management Console.
7. Click Finish to exit the wizard.
8. If you are using VMware Security Servers, you should exclude them. See Configure Unidesk Virtual Desktop Connection
Broker Agent to exclude View Security Servers for more information.
Configure a connection to a View Connection Server
You can configure a connection to one or more View Connection Servers so that you can then use the Unidesk
Management Console to add desktops to a View pool. Using pools allows you to create a set of desktops before assigning
the desktops to specific owners.
To establish connections to one or more VMware View Connection Servers:
1. Select System > Settings and Configuration.
2. In View Connection Server Settings, click Edit to enter Edit mode.
3. Click Add.
4. Enter the connection details for the View Connection Server:
1. Enter the address or host name for the View Connection Server.
2. Enter the port that the Management Appliance and the View Connection Server use for communication purposes.
The default port number is 390.
5. Click Test Connection to verify that the connection to the View Connection Server is valid. If the connection is valid, the
Unidesk Management Console retrieves the list of pools that you can select when you create desktops or create and
modify templates.
6. Click Apply to add the server to the list.
7. Enter a comment, if necessary, and click Save to save the settings and exit Edit mode. If you enter comments, they
appear in the Information view Audit History.
Configure View Administrator to support Windows Server 2008 R2 (if applicable)
If you are using Windows Server 2008 R2 for your Desktops, use these steps to configure View Administrator support this
OS:
1. On your View Connection Server host, start the ADSI Edit utility. For more information, see Connecting to the View
ADAM Database (2012377).
2. Navigate to the object:
DC=vdi,DC=vmware,DC=int > OU=Properties > OU=Global > CN=Common
3. In the Attribute Editor for the DC=vdi,DC=vmware,DC=int > OU=Properties > OU=Global > CN=Common object, set the
pae-EnableServerInDesktopMode attribute to 1.
Deploy the VMware View Agent to Desktops
About deploying the VMware View Agent to Desktops
You need to deploy the VMware View agent to Desktops that will belong to the VMware View Desktop pool. You can
install the agent in any of these ways:

© 1999-2017 Citrix Systems, Inc. All rights reserved. p.78https://docs.citrix.com
As an Application layer deployed to the Desktops. (recommended) If you need to change to a new version of the agent,
you can use the layer to perform a new, clean installation instead of doing an upgrade.
As part of the gold image, before importing it into an Operating System Layer. This requires that you update the gold
image any time an agent update is needed.
As a user-installed application on the desktop and stored in the User Layer. This requires a manual installation or using a
separate application delivery method. For testing purposes, this can be the most expedient way to install the agent, but
it is not the recommended method for wide production distribution.
Each of these methods has its benefits and drawbacks. Unidesk has tested all of them, and while they all function, we
recommend deploying the View Agent as part of an Application Layer for ease of both deployment and maintenance.
For steps to deploy the View Agent as an Application Layer, see Deploy the View agent as an Application Layer below.
Deploy the View Agent as an Application Layer (Recommended)
Installing the agent as an Application Layer provides the easiest method for updating and managing the agent.
If you're deploying View Persona, be sure to do steps 5, 7 and 9.
To install the agent, complete the following steps:
1. In the Unidesk Management Console, create an Application Layer or a new Version of the existing Layer.
Note: When upgrading from VMware View 5.1 to 5.2, do not create a new Layer. Instead, create a new Version of the
existing Layer.
2. Allow the Installation Machine to start, then, use the local administrator account to log in to the Installation Machine.
3. Install the VMware View agent as an administrator.
4. Deselect the Composer Agent .
5. If you want to use the View Persona Management feature, make sure Persona Management is selected.
6. If you do not want to use the View Persona Management feature, make sure Persona Management is de-selected.
7. Open the Registry Editor (Start > Run > regedit ) so you can change the required Registry values.
8. Navigate to the InitialBroker key (HKEY_LOCAL_MACHINE\SOFTWARE\VMware, INC.\VMware
VDM\Agent\Configuration\InitialBroker) and set the value to your View Connection Server FDQN.
9. If you have already finalized the Layer, ensure that Unidesk adds the View Persona Folder Redirection driver to the
boot volume during Desktop rebuilds by changing the Start value of VMware View registry keys to zero (0) and then back
to the original values.
1. Edit the most recent Layer Version, or add a new Layer Version.
2. Navigate to the VMWVhub and VMWVvpfsd keys
(HKEY_LOCAL_MACHINE\System\CurrentControlSet\Services\VMWVhub).
3. Note the current Start values, then change the Start values to zero (0).
4. Finally, change the Start values back to the original ones.
10. Exit the Registry Editor.
11. If you are using the Unidesk Optimizer script and you are enabling the View Persona feature, you must go to the section

© 1999-2017 Citrix Systems, Inc. All rights reserved. p.79https://docs.citrix.com
of the Optimizer script called Disable Unnecessary Services to Save Memory and CPU, deselect the option to DisableOffline File Service, and click Save File. This is because View Persona folder redirection requires Offline files to be
enabled, and by default, the Unidesk Optimizer turns off Offline files, which are not a requirement for Unidesk.
12. Restart the Installation Machine, as required.
13. Allow the final restart to occur and leave the Installation Machine in a running state.
14. If you are running non-persistent desktops and Windows XP, see this knowledgebase article on the Unidesk website.
15. Return to the Unidesk Management Console and finalize the layer. This causes the user account to log out and the
machine to shut down cleanly.
16. After the Layer finalization completes, deploy the Layer to any Unidesk desktop.
Deploy Desktops in a Horizon View Pool
Assuming you have installed the View agent on the Desktops, as described above, you can deploy the Desktops on a
Horizon View pool. A convenient way to create Desktops in a pool is to create a Desktop Template with the broker,
Desktop Type, and associated settings preselected.
You can create multiple desktops at a time in a VMware View pool.
When you create Persistent desktops in a VMware View pool, the software adds the desktops to an existing VMware
View dedicated manual pool.
When you create Non-persistent desktops in a VMware View pool, you select a VMware View pool and the number of
desktops to create. By default, the name of the selected pool is used as part of the name generated for each Desktop.
If the VMware View connection server is unreachable
If the pool exists, the desktop deployment task (in the Task Bar) indicates that the deployment completed with errors.
The desktop Information View indicates that a pool assignment is pending, and Unidesk tries to add the desktop to the
pool the next time it is started.
If the pool does not yet exist, the deployment task fails. In this case, Unidesk does not create the desktops or the pool.
© 1999-2017 Citrix Systems, Inc. All rights reserved. p.80https://docs.citrix.com
Integrate with Citrix XenDesktop
Jun 28 , 2017
Once you integrate with Citrix XenDesktop, you can specify that you want new desktops to belong to a XenDesktop
group. This article lays out what you need to integrate with XenDesktop, and explains the steps in detail.
NOTE: This article explains how to integrate Unidesk 2.5.4 or later version with Citrix XenDesktop. If you are using an earlier
version of Unidesk, please use the earlier Solution Guide for Using Unidesk 2.x with Citrix XenDesktop instead.
Requirements to integrate with XenDesktop
What you need at each step of XenDesktop integration
This table explains what you'll need at each step of the integration process.
To... You need...
Get started A supported version of the Citrix XenDesktop software.
Install the Unidesk broker agentAccess to an account that has administrator privileges on the connection
broker server.
Connect to the XenDesktop
Controller
Unidesk Virtual Desktop Connection Broker Agent installed on the XenDesktop
Controller.
Create a XenDesktop Group
XenDesktop Catalog(s) with a machine type of Existing.
XenDesktop access to the directory service users and groups that you want to
use for Desktop entitlements.
At least one valid Directory Junction.
An Operating System Layer that contains the XenDesktop Virtual Agent
software.
Install XenDesktop agent
Operating System Layer on which to install the agent. (You can install the
agent on the Layer or on a new Version of the Layer.)
If Microsoft .NET Framework 4 is not yet installed, it must be installed before
you install the XenDesktop agent.
Deploy Persistent Desktops in aXenDesktop group
A Private XenDesktop group.
XenDesktop's agent installed in a Version of the OS Layer (recommended), or
on the gold image.
Deploy Non-persistent Desktops At least one Shared XenDesktop group.
XenDesktop's agent installed in a Version of the OS Layer (recommended), or
© 1999-2017 Citrix Systems, Inc. All rights reserved. p.81https://docs.citrix.com
in a XenDesktop group on the gold image.
Prepare XenDesktop Controllers, Catalogs, and Groups
Configure XenDesktop Controller communication with vCenter
Use this section if you have not configured XenDesktop Controllers (XDC) to communicate with the VMware vCenter. This
section describes specific settings that may be required if you have not installed a valid SSL certificate on the vCenter server.
Citrix XDCs do not accept SSL communications from vCenter servers without a valid certificate. The process in this section
describes how to configure communication with the vCenter server using HTTP or HTTPS with VMware’s Self-Signed
Certificate.
Note: The settings described in this section apply to a Citrix and VMware configuration; they are not Unidesk requirements.
Customers should follow Citrix XenDesktop guidelines when communicating to VMware vCenter.
Using the VMware’s Self-Signed Certificate
The Citrix documentation for integrating XenDesktop with vSphere can be found here.
http://docs.citrix.com/en-us/xenapp-and-xendesktop/7/cds-integrate-wrapper-rho/cds-vmware-rho.html
The relevant passage from that document
To protect vSphere communications, Citrix recommends that you use HTTPS rather than HTTP. HTTPS requires digital
certificates. Citrix recommends you use a digital certificate issued from a certificate authority in accordance with your
organization's security policy. If you are unable to use a digital certificate issued from a certificate authority, and your
organization's security policy permits it, you can use the VMware-installed self-signed certificate, with vSphere 4 or 4.1. To
do this:
1. Add the fully qualif ied domain name (FQDN) of the computer running vCenter Server to the hosts f ile on that server,
located at %SystemRoot%/WINDOWS/system32/Drivers/etc/. Note that this step is required only if the FQDN of the
computer running vCenter Server is not already present in the domain name system.
2. Open Internet Explorer and enter the address of the computer running vCenter Server as https://FQDN.
3. Accept the security warnings.
4. Click the Certif icate Error in the Security Status bar and select View certif icates.
5. Click Install certif icate, and then click Next.
6. Select Place all certif icates in the following store, and then click Browse.
7. Select the Show physical stores check box.
8. Expand Trusted People and select Local Computer.
9. Click OK, and then click Finish.
Configuring the VMware address on the XenDesktop Controller
When connecting to the VMware vCenter from within the XenDesktop interface, you are prompted to provide an address
similar to the following (note the use of the HTTPS protocol):
https://ServerName/sdk
Because of the change you made to the proxy.xml file, you can now use HTTP to communicate with the vCenter server
from the XenDesktop interface; avoiding the SSL errors that XenDesktop reports, indicating that it cannot locate the
VMware infrastructure. When prompted to provide the VMware address, use the syntax shown in the following example

© 1999-2017 Citrix Systems, Inc. All rights reserved. p.82https://docs.citrix.com
(note the use of HTTP instead of HTTPS).
http://ServerName/sdk
Allowing non-SSL connections to the vCenter services
To allow non-SSL connections, edit the proxy.xml file that contains the configurations for the vCenter web services. This file
is located in the following folder:
C:\Documents and Settings\All Users\Application Data\Vmware\VMware VirtualCenter
1. Open the proxy.xml f ile (you can edit it using Notepad with word wrap turned on) and change the settings in the /SDK
serverNamespace section, as follows:
1. Search for or the following entry:<port>8085</port> to locate the section you need to change The following
example shows the default settings.
<_type>vim.ProxyService.LocalServiceSpec</_type> <accessMode>httpsWithredirect</accessMode>
<port>8085</port>
<serverNamespace>/sdk</serverNamespace>
2. Change the value for the <accessMode> object as shown in the following example, in bold text.
<_type>vim.ProxyService.LocalServiceSpec</_type>
<port>8085</port>
<accessMode>httpAndHttps</accessMode>
<serverNamespace>/sdk</serverNamespace>
3. Save your changes.
2. Restart the vCenter services, including the VMware Virtual Center service and the VMware virtual center web services.
Prepare XenDesktop Catalogs
Before integrating Unidesk and XenDesktop you need to create one or two catalogs for the integration. If you will only
use persistent desktops then you will only need a Private Catalog. If you will also support non-persistent desktops you will
need a Shared catalog.
Private Catalog
You can create the Private catalog using Desktop Studio directly. Choose add catalog, use Existing as the catalog type. Add
any virtual machine; you must pick one to add the catalog. You can remove the virtual machine later. However it is actually
easier to add the catalog using a PowerShell command from the XenDesktop Studio PowerShell Interface as shown in the
next paragraph.
Shared Catalog
To Add a Shared catalog you must use the PowerShell interface because Citrix does not provide a way using Desktop
Studio to add a Shared Desktop Catalog that uses Existing desktops. The commands to add the catalogs are quite easy.
First open Desktop Studio and select the Desktop Studio Icon in the upper left. Then launch PowerShell.

© 1999-2017 Citrix Systems, Inc. All rights reserved. p.83https://docs.citrix.com
PowerShell commands for adding Catalogs
At the PowerShell command line use the following commands to add your catalogs.
#To create a new shared catalog for existing desktops
new-BrokerCatalog -Name "Unidesk Shared" -AllocationType Random
-CatalogKind PowerManaged -Description "Unidesk Shared Desktop Catalog"
#To create a new Private catalog for existing desktops
new-BrokerCatalog -Name "Unidesk Private" -AllocationType Permanent -CatalogKind PowerManaged
-Description "Unidesk Private Desktop Catalog"
Prepare XenDesktop Groups
After you create the catalogs you will want to create Desktop Groups. For persistent desktops one group will be enough
as each user gets their own desktop. For shared groups you can have many Desktop Groups based on need.
Manual Desktop group creation
To manually add a Desktop Group using Desktop Studio you will need to have at least one available Desktop from the
catalog that you created for the group. You can then use Desktop Studio to create the group. XenDesktop will not let you
create an empty group. So use the desktop you used to manually create the catalog and remove it after you have created
the group.
Automated Desktop group creation
If you have a need to create many Desktop Groups you may find it quicker to use the Citrix PowerShell interface to do
that. To use PowerShell to create the group, see the next two sections.
Shared Desktop Group
Private Desktop Groups (all versions)
Integrate with XenDesktop
About XenDesktop integration
When using Unidesk software with Citrix XenDesktop, Unidesk software replaces Provisioning Services (PVS) and Machine
Creation Services (MCS) for Persistent Desktops. The Unidesk Management creates, patches, updates, and manages
Desktops, with Citrix Controllers providing connectivity to the virtual machines.
Currently, one Unidesk system can only be connected to a single group of XenDesktop Controllers. If you require an
architecture where separate groups of controllers are supported, say at separate sites, you can create desktops in Unidesk
and manually add them to other instances of XenDesktop controllers. They will appear in Unidesk as non-XenDesktop
integrated desktops.
Install or upgrade the Unidesk Connection Broker Agent
Once it's installed on your XenDesktop Controllers, the Unidesk Virtual Desktop Connection Broker Agent lets you add
© 1999-2017 Citrix Systems, Inc. All rights reserved. p.84https://docs.citrix.com
Unidesk desktops to XenDesktop groups.
To install or upgrade the Unidesk Virtual Desktop Connection Broker Agent on a XenDesktop Controller:
1. Determine which port to use for communication between Unidesk and the connection broker server. By default,
Connection Broker Agent uses port 390.
2. If you are planning to integrate with a Citrix XenDesktop environment, use Desktop Studio to create a catalog that has
a machine type of Existing.
3. Log into the View Connection Server or XenDesktop Controller using an account with administrator privileges.
4. Copy the via_setup.exe file from the UnideskInstall.x.x.x.xxx\Unidesk_Broker_Integration_Tools folder to a convenient
location on the server.
5. Double click the via_setup.exe file, and when prompted, enter the location where you want to install the Virtual Desktop
Connection Broker Agent. The default is C:\Program Files\Unidesk\UniVIA.
6. Accept the default communications port number (390) for the Virtual Desktop Connection Broker Agent.
Note: If you need to change the port number later, remember to change the port number both on the connection
broker server and in the Unidesk Management Console.
7. Click Finish to exit the wizard.
8. Now you need to set the logon user for the Unidesk Broker Agent. In the Start Menu, select Administrative Tools ->
Services. Then select the Unidesk Virtual Desktop Connection Broker Agent and click Properties. Select the Logon tab
and set your desired user. This can be a local or domain user however the user must be added to the administrators
group on the DDC and it must be added to the XenDesktop Administrators in Desktop Studio as a Full Administrator.
Set up a connection to a Citrix XenDesktop Controller
When you connect to one or more XenDesktop Controllers, you can retrieve a list of available XenDesktop catalogs and
then assign desktops to a XenDesktop group.
1. Select System > Settings and Configuration.
2. In XenDesktop Controller Settings, click Edit to enter Edit mode.
3. Click Add.
4. Enter the connection details for the XenDesktop Controller:
1. Enter the IP address or Fully Qualif ied Domain Name (FQDN) for the Controller.
2. Enter the port number that the Management Appliance and the Controller can use for communication purposes.
The default port number is 390. If you use a different port number, remember to change the port number configured
on the XenDesktop Controller.
3. Unidesk supports communication with one Citrix XenDesktop Controller only.
5. Click Test Connection to verify that the connection to the Controller is valid.
If you created catalogs before you configured the settings for the XenDesktop Controller, clicking Test Connection
allows Unidesk to retrieve a list of Existing catalogs.
6. Click Apply to add the Controller to the list.

© 1999-2017 Citrix Systems, Inc. All rights reserved. p.85https://docs.citrix.com
7. Repeat this procedure for each Controller that you want to add to the configuration.
8. Click Save to save the Controller settings and exit Edit mode.
Install the XenDesktop Virtual Desktop Agent (VDA)
About installing the Virtual Desktop Agent
Next, you need to deploy the Citrix XenDesktop agent to the Desktops that will belong to the Citrix XenDesktop group.
You can install the agent by adding it to a version of the Unidesk OS Layer, though you could also install it on the gold
image. The steps vary based on the VDA version.
Installing VDA 7.x
When you install XenDesktop 7.x, there are several settings you must choose for the software to work correctly with
Unidesk. Please use the instructions in this section when doing the installation.
Before you start
You can install Citrix XenDesktop 7.x on:
the Operating System Layer
a Version of the Operating System Layer that you’ll deploy to Desktops
an Application Layer
Microsoft .NET Framework 4 must be installed before you install XenDesktop 7.
Run the XenDesktop Installer
1. If .NET Framework 4 is not yet installed, install it on a Layer or Layer Version. (.NET Framework 4 is required by Citrix
XenDesktop 7.x.)
2. Start the Citrix XenDesktop 7.x installer and choose Virtual Delivery Agent for Windows Desktop OS.
3. On the Environment step, choose Enable Remote PC Access.
4. On the HDX 3D Pro step, choose the appropriate type for your graphics hardware. For example:
5. On the Delivery Controller step, enter the fully qualified domain name (FQDN) of your XenDesktop 7.x server. (You must
use the FQDN rather than the IP address.) For example:
6. On the Features step, disable both Optimize performance and Personal vDisk. Optionally, select the Remote
Assistance, if it is something that you will be using with your Xen desktops.
7. Continue to the end of the installer steps and start the installation.

© 1999-2017 Citrix Systems, Inc. All rights reserved. p.86https://docs.citrix.com
8. If at any point during the installation a window pops up requesting a reboot and gives you the choice to reboot later,
choose Reboot later. Otherwise, restart and continue the installation when the desktop comes back up.
9. When the installation completes, select Restart machine and click Finish.
NOTE: Steps 10 and 11 are applicable if you have installed VDA on the gold.
10. After the restart, download the latest version of the Unidesk Unattend Builder from the Tools section of the Unidesk
Download Center:
Scroll until you see Tools toward the bottom of the page.
Expand the Tools section, and click the Unattend download.
Unzip the Unattend package and extract the f iles to c:\windows\setup\scripts.
11. Run Unattend.exe as Administrator. Running this script will ensure that deployed Desktops are set up to work with
XenDesktop 7.x.
12. Now either finalize the layer (if you were building an OS version) or shutdown the gold and use it to create an OS layer.
Installing VDA 5.6
Installing VDA 5.6 without the Personal vDisk
VDA must be installed on Unidesk Desktops without Citrix XenDesktop Personal vDisk, but the standard VDA 5.6 installer
includes it automatically. To install VDA without the Personal vDisk:
1. Open the source folder on the XenDesktop ISO as shown below.
2. Then install the XDSAgent version that matches your OS bit level by double clicking the appropriate msi. Do not install
the Personal vDisk.
The installation has no options and finishes quickly.
3. Restart when prompted.
4. Add your DDC to the configuration using the following registry setting.
32-bit computers:
HKLM\Software\Citrix\VirtualDesktopAgent\
REG_SZ: ListOfDDCs
Value: Server.Domain.domain
64-bit computers:
HKLM\Software\Wow6432Node\Citrix\VirtualDesktopAgent\
REG_SZ: ListOfDDCs
Value: Server.Domain.domain
For information about additional Controller options, see the Citrix XenDesktop documentation topic To add a controllerand How registry keys on virtual desktops affect controller discovery at:
http://support.citrix.com/proddocs/topic/xendesktop/xd-library-wrapper.html

© 1999-2017 Citrix Systems, Inc. All rights reserved. p.87https://docs.citrix.com
Installing XenDesktop 5.6 as a new Operating System Layer Version (recommended)
If you add the XenDesktop VDA as an OS version, then on any existing machine that you want to upgrade to the new
version of XenDesktop you must run an additional script to properly configure the Windows Registry. Run the following
PowerShell script on each desktop once you have applied the OS revision:
$acl = Get-Acl "hklm:\system\currentcontrolset\control\terminal server"
$ar = new-object System.Security.AccessControl.RegistryAccessRule("NT SERVICE\WorkstationAgent", "FullControl",
"ContainerInherit", "None","Allow")
$acl.AddAccessRule($ar)
Set-Acl "hklm:\system\currentcontrolset\control\terminal server" -AclObject $acl
If you create new machines with the revision they will already have this setting configured.
Installing VDA 5.5 or earlier
To install the agent, complete the following steps:
1. As an administrator, install the Citrix XenDesktop agent on an Operating System Layer version or on the gold image. .
Note: During installation, the machine must be part of the domain, or desktops will be unreachable. The administrator
can set the desktop controller entries using registry settings or using a GPO.
2. Connect the XenDesktop 5.x ISO image to the virtual machine that you plan to use (the OS Layer or gold image). Then,
open Autoplay for the CD.
3. When the agent installation program opens, select Install Virtual Desktop Agent.
4. Next, select Advanced Install.
5. Deselect Support for XenApp Application Delivery unless it’s required for your environment.
6. On the Controller Location window, either enter the controller locations manually OR select Configure at a later time. In
our testing, we selected the Configure at a later time option. We added the Desktop Delivery Controller (DDC) entry in
the registry manually.
7. In the Virtual Desktop Configuration window, locate the firewall ports it displays and record them. Use a GPO to
configure these ports in Active Directory or, as in Unidesk’s testing, reconfigure or disable the firewall manually. In our
testing, we disabled the firewall to ensure that no communication problems occurred.
8. Click OK on the remaining installation windows to complete the installation.

© 1999-2017 Citrix Systems, Inc. All rights reserved. p.88https://docs.citrix.com
9. If you chose to configure the XenDesktop Controller (XDC) at a later time, create the following registry entry:
32-bit computers:
HKLM\Software\Citrix\VirtualDesktopAgent\
REG_SZ: ListOfDDCs
Value: Server.Domain.domain
64-bit computers:
HKLM\Software\Wow6432\Citrix\VirtualDesktopAgent\
REG_SZ: ListOfDDCs
Value: Server.Domain.domain
The value of the registry entry is a space-delimited list of the FQDNs of Citrix DDCs. In our test environment, the FQDN
was Xendt5.domain.local.
For information about additional Controller options, see the Citrix XenDesktop documentation topic To add a controllerand How registry keys on virtual desktops affect controller discovery at:
http://support.citrix.com/proddocs/topic/xendesktop/xd-library-wrapper.html
Deploy Desktops in XenDesktop Groups
Deploy Persistent Desktops in a XenDesktop Group
To deploy Persistent desktops in a XenDesktop Group:
1. Select Desktops and select Create Desktop in the Action bar.
2. Follow the steps to Create a Persistent Desktop, and when you get to the User Assignment tab of the Create Desktop
wizard, select the connection broker and the users or groups to assign to the desktop.
1. For the broker integration, select XenDesktop Group.
2. Then select the actual XenDesktop group.
3. Select a user assignment option:
Select Assigned to user and select an Active Directory user.
Select Assigned to group and select an Active Directory group. You must specify the number of desktops that are
available to the group when you select this option.
Select Assigned by broker to allow the XenDesktop Controller to assign users to the desktops. You must specify
the number of desktops to create when you select this option.
3. In the Desktop Details tab, follow the usual desktop creation instructions and select Persistent as the Desktop Type.
4. Finish creating the desktop(s).
After desktop creation
Make sure the Windows Firewall is configured to allow the desktops to communicate with the XenDesktop Controller. You
can use a GPO for this purpose after adding the desktops to a domain. For additional details about firewall configuration,
see the Citrix XenDesktop documentation.
Deploy Non-persistent Desktops in a XenDesktop Group
When you create Non-persistent desktops in a XenDesktop Group, you select a Group and the number of desktops to

© 1999-2017 Citrix Systems, Inc. All rights reserved. p.89https://docs.citrix.com
create. By default, the name of the selected XenDesktop Group is used as part of the name generated for each Desktop.
To deploy Non-persistent desktops in a XenDesktop Group:
1. Follow the steps to Create a Non-persistent Desktop, and when you get to the User Assignment tab of the Create
Desktop wizard, select the connection broker and the users or groups to assign to the desktop.
1. For the broker integration, select XenDesktop Group.
2. Then select the actual XenDesktop group.
3. Select a user assignment option:
Select Assigned to user and select an Active Directory user.
Select Assigned to group and select an Active Directory group. You must specify the number of desktops that are
available to the group when you select this option.
Select Assigned by broker to allow the XenDesktop Controller to assign users to the desktops. You must specify
the number of desktops to create when you select this option.
2. In the Desktop Details tab, follow the usual desktop creation instructions and select Nonpersistent as the Desktop
Type.
3. Finish creating the desktop(s).
After desktop creation
Make sure the Windows Firewall is configured to allow the desktops to communicate with the XenDesktop Controller. You
can use a GPO for this purpose after adding the desktops to a domain. For additional details about firewall configuration,
see the Citrix XenDesktop documentation.
Upgrading to Citrix XenDesktop 7.x
Before You Start
Before starting the upgrade you should know:
Citrix XenDesktop 7.x must be installed in a new version of the Operating System layer or on the gold image used in the
Operating System Layer. If a previous version of XenDesktop is currently on an Application layer, you’ll have to change
that using the instructions in this section.
Ensure you have access to an account with administrator privileges on the connection broker server.
Upgrade XenDesktop on the Citrix XenDesktop Controller
Upgrade the Citrix XenDesktop Controller from version 5.x to 7.x, as described in the XenDesktop documentation.
Upgrade the Unidesk Virtual Desktop Connection Broker Agent
You can upgrade the connection broker agent by running the via_setup.exe file as follows.
1. Log into the XenDesktop Controller using an account with administrator privileges.
2. Use the Microsoft Management Console (MMC) to shut down the UniVIA service on the XenDesktop Controller. This
eliminates the need to restart the system to compete the upgrade.
3. Copy the via_setup.exe file from the UnideskInstall.x.x.x.xxx\Unidesk_Broker_Integration_Tools folder to a convenient
location on the server.

© 1999-2017 Citrix Systems, Inc. All rights reserved. p.90https://docs.citrix.com
4. Double click the via_setup.exe file, and when prompted, enter the location where you want to install the Virtual Desktop
Connection Broker Agent. The default is C:\Program Files\Unidesk\UniVIA.
5. Unless you had set a different port for communications with the Unidesk Virtual Desktop Connection Broker Agent,
accept the default port number (390) for the agent.
Note: If you need to change the port number later, see the instructions in the online help for Changing settings for the
Unidesk Virtual Desktop Connection Broker Agent. And, if you change the port number on the connection broker server,
remember to also change the port number in the Unidesk Management Console.
6. Click Finish to exit the wizard.
7. Now you need to set the logon user for the Unidesk Broker Agent. In the Start Menu, select Administrative Tools ->
Services. Then select the Unidesk Virtual Desktop Connection Broker Agent and click Properties. Select the Logon tab
and set your desired user. This can be a local or domain user however the user must be added to the administrators
group on the DDC and it must be added to the XenDesktop Administrators in Desktop Studio as a Full Administrator.
Create an Operating System Layer Version containing XenDesktop 7.x Virtual Desktop Agent
Create an Operating System Layer version, and add the XenDesktop 7.x Virtual Desktop Agent to it using the instructions in
the earlier section about the Virtual Desktop Agent Installation in an OS version. You can either uninstall the earlier version
of the Xen agent or just upgrade it.
Deploy the New Operating System Layer to the Desktops
1. Edit desktops and select new OS layer version.
2. If you had XenDesktop 5.x in an application layer, then make sure that you deselect that application layer as well as
selecting the new OS layer version.
3. To avoid any issues with auto-created printers, make sure users are logged out of their Desktops before deploying the
new XenDesktop 7.x Layer. This is because printer permissions (and printing in general) are different between
XenDesktop versions 5.x and 7.x. An alternative approach is to create a GPO, similar to the one shown below, that
removes auto-created printers.
Set objWMIService = GetObject("winmgmts:\\.\root\cimv2")
Set colInstalledPrinters = objWMIService.ExecQuery _
("Select * from Win32_Printer Where Name like '%(from %)'")
For Each objPrinter in colInstalledPrinters
objPrinter.Delete_
Next
4. Deploy the change(s) to the selected Desktops.

© 1999-2017 Citrix Systems, Inc. All rights reserved. p.91https://docs.citrix.com
Integrate with Pano Logic
Jun 28 , 2017
Prepare to deploy Unidesk Desktops in Pano Logic collections
Use the following Unidesk Solution Guide to prepare to deploy Unidesk Desktops in Pano Logic collections.
Using Unidesk 2.x with Pano Logic 5.x
Connect to a Pano Manager Server
Set up a connection to a Pano Manager server
A connection to a Pano Manager allows you to add Desktops to a Pano Desktop collection.
To edit a connection to a Pano Manager:
1. Select System > Settings and Configuration.
2. In the Pano Manager Server Settings box, click Edit.
3. Enter the connection details for the Pano Manager:
1. Enter the IP address or a Fully Qualif ied Domain Name (FQDN) for the Pano Manager server.
2. Enter the user name for an account that has administrator permissions.
3. If you want to use a secure connection between the Pano Manager and the Management Appliance, select Use SSL.
4. Click Test Connection to verify that the connection to the Pano Manager server is valid.
5. Enter a comment, if necessary and click Save.
If you enter comments, they appear in the Information view Audit History.
Deploy Desktops in a Pano Logic collection
Pano Logic Desktops in the Unidesk environment
When you deploy desktops in the Unidesk environment, you can specify that you want them to be part of a Pano Logic
collection.
Pano Logic collections
A Pano Logic collection is a set of virtual machines that you can manage as a single logical unit. Pano Logic collections
depend on the folder organization in the VMs and Templates view in the VMware vCenter server. When you configure a
Desktop Virtual Machine (DVM) collection, you specify a folder that will contain all of the virtual machines in that collection.
You must use the Pano Logic Administrator to create the collections.
Integration of Pano Logic desktops with the Unidesk environment
To be able to create desktops that the Pano System can recognize, the Management Appliance needs to be able to
communicate with the Pano Manager or Pano Controller to obtain a list of Pano Logic collections. The Pano Manager
Server settings in the Unidesk Management Console allows you to specify the IP address or a Fullly Qualified Domain Name
(FQDN) for the Pano Manager, as well as a user name for an account with administrator privileges.
© 1999-2017 Citrix Systems, Inc. All rights reserved. p.92https://docs.citrix.com
One collection for each folder
Ensure that only Unidesk desktops associated with a single collection reside in a specific vCenter folder. The Unidesk
Management Console cannot manage desktops that are located in folders that contain multiple collections.
If you put a CachePoint Appliance in a folder that you are using for a Pano Logic collection, ensure that you place the
CachePoint Appliance in Maintenance mode. Doing so prevents devices other than the Unidesk components from trying to
communicate with it.
Installation of Pano Logic software
To enable desktops to communicate with the Pano Manager, you must install the Pano Logic software on these desktops.
You can install this software in the following ways:
On a gold image that you import into an Operating System Layer (recommended).
As part of an Application Layer.
As a user-installed application that is stored in the User Layer.
In addition, these desktops must be members of a domain and must have the Windows Firewall configured to allow
communication with the Pano Manager.
Desktop behavior
When you create desktops, you can select the collection where you want to create the desktop. The CachePoint
Appliance that is hosting the desktop creates a virtual machine in the vCenter folder that is associated with the collection.
After deploying these desktops, you can see the desktop when logged in to the Pano Manager.
A Pano Logic desktop that you deploy from the Unidesk Management Console behaves in the same manner as any other
desktop, with the following exception:
When changes to the desktop configuration result in the need to rebuild the bootable image, the desktop deployment
process places the desktop in Maintenance Mode while the rebuild is in progress.
If you use the Unidesk Management Console Restore feature to restore a desktop, you have to add the desktop to the
Pano Logic collection, manually.
In addition, you cannot create a Pano Logic collection using the Unidesk Management Console.
Deploy Persistent Desktops for a Pano Logic System
If you are using a Pano Logic System, you can use the Unidesk Management Console to create a desktop that the Pano
Manager recognizes as a member of one of its collections.
Before you start
Configure the Pano Manager Server settings in the System > Configuration and Settings module.
Using the Pano Manager, configure one or more collections.
Determine how you want to install the Pano Logic software on the desktops. You can:
Install the Pano Logic software on the gold image that you plan to use for the Operating System Layer.
Install the software in an Application Layer that you assign to the desktops.
Install the software directly on individual desktops.
© 1999-2017 Citrix Systems, Inc. All rights reserved. p.93https://docs.citrix.com
Note: Installing the Pano Logic software on a gold image and importing that gold image into an Operating System
Layer is the recommended method for installing the Pano Logic software on desktops. Installing the agent on the
gold image provides the easiest method for updating and managing the agent.
However, you can also install the Pano Logic software as an Application Layer or as a user-installed application on an
individual desktop.
Create Persistent Desktops for a Pano Logic System
1. In the User Assignment tab select a Pano Logic collection and the users or groups to assign to the desktop.
1. Select Pano Logic Collection for the broker integrations.
2. Select a Pano Logic collection.
3. For the user assignment, select Assigned to user or Assigned to group. If you select Assigned to group, select the
number of desktops to create.
2. In the Desktop Details tab, follow the usual desktop creation instructions and select Persistent as the Desktop Type.
3. Finish creating the desktop(s).
After Desktop creation
Make sure the Windows Firewall is configured to allow the desktops to communicate with the Pano Manager. You can use
a GPO for this purpose after adding the desktops to a domain. For additional details about firewall configuration, see the
Pano Manager online Help.
Deploy Non-persistent Desktops for a Pano Logic System
If you are using a Pano Logic System, you can use the Unidesk Management Console to create a desktop that the Pano
Manager or Pano Controller recognizes as a member of one of its collections.
Before you start
Configure the Pano Manager Server settings in the System > Configuration and Settings module.
Using the Pano Manager, configure one or more collections.
Determine how you want to install the Pano Logic software on the desktops. You can:
Install the Pano Logic software on the gold image that you plan to use for the Operating System Layer.
Install the software in an Application Layer that you assign to the desktops.
Install the software directly on individual desktops.
Note: Installing the Pano Logic software on a gold image and importing that gold image into an Operating System
Layer is the recommended method for installing the Pano Logic software on desktops. Installing the agent on the
gold image provides the easiest method for updating and managing the agent.
Ensure that the Operating System Layer that you want to assign to the desktop is available.
Ensure that the Application Layers that you want to assign to the desktop are available and use the same Operating
System Layer as the Desktop(s).
Create Nonpersistent Desktops for a Pano Logic System
1. In the User Assignment tab, select a Pano Logic collection and the users or groups to assign to the desktop.
1. Select Pano Logic Collection for the broker integration.
2. Select a Pano Logic collection.

© 1999-2017 Citrix Systems, Inc. All rights reserved. p.94https://docs.citrix.com
3. Select Assigned to user or Assigned to group for the user assignment. If you select Assigned to group, select the
number of desktops to create.
2. In the Desktop Details tab, follow the usual desktop creation instructions and select Nonpersistent as the Desktop
Type.
3. Finish creating the desktop(s).
After Desktop creation
Make sure the Windows Firewall is configured to allow the desktops to communicate with the Pano Manager. You can use
a GPO for this purpose after adding the desktops to a domain. For additional details about firewall configuration, see the
Pano Manager online Help.

© 1999-2017 Citrix Systems, Inc. All rights reserved. p.95https://docs.citrix.com
Create an OS Layer
Jun 28 , 2017
An Operating System Layer includes the software and settings for the operating system that you deploy to Desktops. To
create an Operating System Layer, you import the operating system software and settings from your gold image. The gold
image must include the Unidesk Tools and it should be optimized for the Unidesk environment.
Before creating an Operating System Layer
Make sure there's a gold image in a directory the Management Appliance can access, and that the Unidesk software is
installed on the image.
© 1999-2017 Citrix Systems, Inc. All rights reserved. p.96https://docs.citrix.com
Prepare the gold image
Jun 28 , 2017
This topic explains how to prepare a gold image for the Unidesk environment, including:
Creating an answer f ile for unattended OS setup.
Optimizing the OS for the Unidesk environment.
Installing Unidesk tools on the image.
(Windows 8.1) Removing Metro apps to speed up f irst-login times, especially for Non-persistent Desktops. (Optional, but
especially recommended for Non-persistent Desktops.)
In the Unidesk environment, a gold image is a VMware virtual machine that contains the base operating system that you
deploy to Desktops. You can import this gold image into a Unidesk Operating System Layer and use it to build Desktops for
all your users.
Use the tools included in the Unidesk installer download to prepare a Windows gold image for the Unidesk environment.
Notes:
The Unidesk installation package must be downloaded to a machine that the gold image can access.
Using Third-party optimization scripts can have adverse effects in Unidesk, as they can change services and features that
Unidesk uses, for example, Universal Plug and Play and the 8.3 f ile names setting. Use the optimization tools in the
Unidesk Installer download to optimize your image.
The gold image should not be in a domain
The gold image should get its IP address from DHCP
The Paravirtual SCSI controller is not supported. You must use the default controller (SCSI BusLogic) for the OS to be
functional. Unidesk supports the LSI Logic SAS controller type. If you subsequently change the SCSI controller type to
anything else, such as VMware Paravirtual SCSI controller, the OS Layer import will fail.
Supported operating systems
Unidesk Desktops support the following operating systems:
Microsoft Windows 10 Version 1511 (Build 10586) 64-bit (Professional, Enterprise, Education) – Only supported on ESXiversion 6.0 and above.Microsoft Windows 8.1 Update, 32-bit, 64-bit (Professional, Enterprise)
Microsoft Windows 7 SP1, 32-bit, 64-bit (Professional, Ultimate, Enterprise)
Windows Server 2012 R2 64-bit (Datacenter Edition)
Windows Server 2008 R2, 64-bit (Datacenter Edition)
Microsoft Windows XP SP3, 32-bit (Professional)
Note: Single-byte language packs are supported for all platforms, except for Windows XP. The language pack is supportedin the Gold image only.
Which operating system are you using?
Choose the operating system you are using for the gold image:
Windows 8.1, and Windows 10
Windows 7

© 1999-2017 Citrix Systems, Inc. All rights reserved. p.97https://docs.citrix.com
Windows Server 2012 R2 (Desktops)
Windows Server 2008 R2 (Desktops)
Windows XP
Prepare a Windows 8.1 or Windows 10 gold image
STEP 1: Set up a Windows 8.1 or Windows 10 gold image on a virtual machine
In the vSphere client:
1. Create a gold image that you want all your desktops to use.
2. Configure the virtual machine hardware settings, for example, the NIC and video memory.
3. Disable Windows System Restore and Windows Automatic Updates. The Unidesk system handles restore points for you,
and Unidesk layer versions allow you to control when updates occur.
4. Make sure you have installed VMware Tools on the gold operating system.
STEP 2: Mount or copy the Unidesk Tools onto the gold image
1. Mount the Unidesk_Gold_Image_Tools ISO or copy the Unidesk_Gold_Image_Tools ZIP f ile onto the gold image. You
can f ind these tools in the Unidesk Installer download.
2. Open the ISO or extract the ZIP.
3. In the extracted Unidesk_Gold_Image_Tools_x.x.x folder, extract Unidesk_Windows_Gold_Image_Tools.zip to
c:\windows\setup\scripts.
STEP 3: Create an answer file for unattended installation on Unidesk Desktops
1. In the c:\windows\setup\scripts folder, right-click the unattend.exe tool and choose Run as administrator. The
unattend builder form opens.
2. Complete the unattend form.
Product key activation
For KMS activation, select KMS Server.
For KMS with a Multiple Activation Key (MAK), select KMS with MAK and enter the MAK.
For Retail Licensing with a MAK, select Retail with MAK, and the MAK.
Domain Join
Select Enable if you want to configure the unattend.xml file to join Desktops to a specific domain. If you plan to use AD
join scripts, ensure Enable is not selected.
You can add Desktops to the Computer's container in Active Directory by deleting the OU entry. However, we
recommend that you use an alternate OU for Unidesk Desktops, both to segregate the Desktop from other machines

© 1999-2017 Citrix Systems, Inc. All rights reserved. p.98https://docs.citrix.com
and to avoid applying virtual Desktop-specific GPOs to other types of machines.
If you are supporting multiple OUs within one or more domains, you can join machines in different Domains or OUs by
creating different unattend.xml files in different application layers.
Local Administrator account
You can enable the Administrator account on each Unidesk Desktop by selecting Enable. Remember to also enable this
account in your gold image or Operating System Layer version. You can also enable the Administrator account for your
gold image and then have it disabled in the deployed Desktops by clearing the check box.
If you want to add an alternate Administrator account, select Enable and enter the account information. This account
cannot be preconfigured in the gold image.
You can create a Desktop where the Administrator is disabled and the alternate administrator is created and enabled.
However for this to work, the Administrator account must be enabled in the gold image and it cannot be renamed.
T ime Zone
If your time zone is not listed, you can add it to the Other box. Be sure to use the time zone, not the display setting.
Disabling automatic activation
Select this option if you plan to use the Microsoft Volume Activation Management Tool.
3. Click Save File.
STEP 4: Optimize the gold image for the Unidesk environment
1. In the c:\windows\setup\scripts folder, right-click the optimizations.exe tool and choose Run as administrator. This
creates a .cmd file (optimizations.cmd) that will be run during Desktop creation to optimize the image.
2. Follow the instructions to run the optimizations.cmd file on the gold image. This removes installation-specific drivers and

© 1999-2017 Citrix Systems, Inc. All rights reserved. p.99https://docs.citrix.com
settings.
If you are using the Unidesk Optimizer script and you are enabling the View Persona feature, you must go to the section
of the Optimizer script called Disable Unnecessary Services to Save Memory and CPU, deselect the option to DisableOffline File Service, and click Save File. This is because View Persona folder redirection requires Offline files to be
enabled, and by default, the Unidesk Optimizer turns off Offline files, which are not a requirement for Unidesk.
STEP 5: Create a backup copy of the gold image
Once the gold image is ready, create a copy of it so you can return to this state at any time.
Important: It is critical to create a backup copy before installing the Unidesk software onto the gold image. Without this
backup copy, returning to this state requires rebuilding the image.
STEP 6: Install the Unidesk software onto the gold image
1. Run setup_x64.exe from c:\Windows\setup\scripts.
Once this is done, you are ready to create a Unidesk Operating System Layer.
Tips
Tips for deploying Windows 8.1
Improving Windows 8.1 login times
If you want to speed up login times for Windows 8.1 Desktops, especially Non-persistent Desktops, you can disable some
of the more costly and less necessary GUI actions.
Turn off new user arrows
You can turn off new user arrows, by making the following Registry edits:
HKEY_CURRENT_USER\Software\Policies\Microsoft\Windows\EdgeUI
HKEY_LOCAL_MACHINE\SOFTWARE\Policies\Microsoft\Windows\EdgeUI
DisableHelpSticker DWORD
0 = Enable help tips
1 = Disable help tips
Turn off startup animation
You can turn off startup animation with these Registry edits:
HKEY_LOCAL_MACHINE\SOFTWARE\Microsoft\Windows\CurrentVersion\Policies\System
EnableFirstLogonAnimation DWORD
0 = Disable first sign-in animation
1 = Enable first sign-in animation
© 1999-2017 Citrix Systems, Inc. All rights reserved. p.100https://docs.citrix.com
Disable bootlog and boot animation
You can disable bootlog and boot animation.
1. Open a command window.
2. Enter these commands:
bcdedit /set {default} bootlog no
bcdedit /set {default} quietboot yes
Disable lock screen
Disable lock screen:
1. Open the Group Policy Editor by right-clicking Computer.
2. Select Conf iguration > Administrative Templates > Control Panel > Personalization3. Set Do not display the lock screen to Enabled.
If you prefer to make this change by editing the Registry:
1. In the Registry, under HKEY_LOCAL_MACHINE\SOFTWARE\Policies\Microsoft\Windows\Personalization create a new
DWORD (32-bit) Value named NoLockScreen with a value of 1.
2. Restart the system.
Deploying Windows 8.1 applications
For steps to deliver Windows 8.1 applications in Unidesk Layers, see Deploying Windows 8.1 applications.
T ips for deploying Windows 10
When preparing the gold image for import into a Unidesk Operating System Layer, you can speed up start times by removing
Windows 10 built-in applications. If you do, we recommend removing these applications either on the gold image itself, or
on the Operating System Layer.
Prepare a Windows 7 gold image
STEP 1: Set up a Windows 7 gold image on a virtual machine
In the vSphere client:
1. Create a gold image that you want all your desktops to use.
2. Configure the virtual machine hardware settings, for example, the NIC and video memory.
3. Disable Windows System Restore and Windows Automatic Updates. The Unidesk system handles restore points for you,
and Unidesk layer versions allow you to control when updates occur.
4. Make sure you have installed VMware Tools on the gold operating system.
STEP 2: Mount or copy the Unidesk Tools onto the gold image
1. Mount the Unidesk_Gold_Image_Tools ISO or copy the Unidesk_Gold_Image_Tools ZIP f ile onto the gold image. You
can f ind these tools in the Unidesk Installer download.

© 1999-2017 Citrix Systems, Inc. All rights reserved. p.101https://docs.citrix.com
2. Open the ISO or extract the ZIP.
3. In the extracted Unidesk_Gold_Image_Tools_x.x.x folder, extract Unidesk_Windows_Gold_Image_Tools.zip to
c:\windows\setup\scripts.
STEP 3: Create an answer file for unattended installation on Unidesk desktops
1. In the c:\windows\setup\scripts folder, right-click the unattend.exe tool and choose Run as administrator. The
unattend builder form opens.
2. Complete the unattend form.
Product key activation
For KMS activation, select KMS Server.
For KMS with a Multiple Activation Key (MAK), select KMS with MAK and enter the MAK.
For Retail Licensing with a MAK, select Retail with MAK, and the MAK.
Domain Join
Select Enable if you want to configure the unattend.xml f ile to join desktops to a specif ic domain. If you plan to
use AD join scripts, ensure Enable is not selected.
You can add desktops to the Computer's container in Active Directory by deleting the OU entry. However, we
recommend that you use an alternate OU for Unidesk desktops, both to segregate the desktop from other
machines and to avoid applying virtual desktop-specif ic GPOs to other types of machines.
If you are supporting multiple OUs within one or more domains, you can join machines in different Domains or OUs
by creating different unattend.xml f iles in different application layers.
For information about domain join scripts,see the following Support articles:
Debugging Domain Join Problems in Windows 7 and Windows 2008 R2
Using PowerShell for Advanced Domain Join Operations
Local Administrator account
If you want to use the unattend.xml f ile to enable the Administrator account on each Unidesk desktop, select
Enable. Remember to also enable this account in your gold image or Operating System Layer revision. It is possible
to enable the Administrator account for your gold image and then have it disabled in the deployed desktops by
clearing the check box.
If you want to add an alternate Administrator account, select Enable and enter the account information. This
account cannot be pre-configured in the gold image.
You can create a desktop where the Administrator is disabled and the alternate administrator is created and
enabled. However for this to work, the Administrator account must be enabled in the gold image and it cannot be
renamed.
Time zone
Select the time zone. If your time zone is not listed, you can add it to the Other box. Be sure to use the time zone,
not the display setting. A list of time zone settings can be found here.
Disabling automatic activation
Select this option if you plan to use the Microsoft Volume Activation Management Tool.
3. Click Save File.
STEP 4: Optimize the gold image for the Unidesk environment
© 1999-2017 Citrix Systems, Inc. All rights reserved. p.102https://docs.citrix.com
1. In the c:\windows\setup\scripts folder, run the Optimize executable to create a .cmd file (optimize.cmd) that will be run
to optimize the image during desktop creation.
2. Follow the instructions to run the optimize.cmd file on the gold image. This removes installation-specific drivers and
settings.
If you are using the Unidesk Optimizer script and you are enabling the View Persona feature, you must go to the section
of the Optimizer script called Disable Unnecessary Services to Save Memory and CPU, deselect the option to DisableOffline File Service, and click Save File. This is because View Persona folder redirection requires Offline files to be
enabled, and by default, the Unidesk Optimizer turns off Offline files, which are not a requirement for Unidesk.
STEP 5: Create a VMware snapshot of the gold image
Once the gold image is ready, create a VMware snapshot of it so you can return to this state at any time.
Important: It is critical to create a snapshot before installing the Unidesk software onto the gold image. Without this
snapshot, returning to this state requires rebuilding the image.
STEP 6: Install the Unidesk software onto the gold image
1. In the Unidesk_Gold_Image_Tools folder, run the Unidesk setup_x86.exe (32-bit) or setup_x64.exe (64-bit).
2. The installation prompts for the location of the Management Appliance IP address and the location of the unattend.xml
file (the default location is c:\windows\panther).
Once this is done, you are ready to create a Unidesk Operating System Layer.
Prepare a Windows Server 2012 R2 gold image (Desktops)
STEP 1: Set up a Windows Server 2012 R2 gold image on a virtual machine
In the vSphere client:
1. Create a gold image that you want all your desktops to use. It should be a new Generation 1 virtual machine.
2. Configure the virtual machine hardware settings, for example, the NIC and video memory.
Note: You can have just one network device in your gold image. If using VMware Horizon View, you must select the
VMXNET 3 network adapter for the virtual machine. Selecting the default E1000 adapter can cause customization
timeout errors on the virtual machine.
3. Configure a virtual hard disk that is large enough for a Windows operating system installation, and make sure it is
accessible by the Unidesk Management Appliance.
4. Install Windows Server 2012 R2.
5. Disable Windows System Restore and Windows Automatic Updates. The Unidesk system handles restore points for you,
and Unidesk layer versions allow you to control when updates occur.
6. Make sure you have installed VMware Tools on the gold operating system.
STEP 2: Configure Windows Server as a desktop operating system
Use this section as a guide to configuring Windows Server 2012 R2 as a desktop operating system for your users. This
section is not required. It is included for your convenience.
Disable Shutdown event tracker

© 1999-2017 Citrix Systems, Inc. All rights reserved. p.103https://docs.citrix.com
The shutdown event tracker asks for the reason the system is being shut down before it allows the shutdown to continue.
To disable this feature, follow these steps.
Important: You must run the Group Policy Editor as Administrator, or it will appear as if the values are being changed, but
the Desktops will remain the same.
1. Run the group policy editor as Administrator.
1. Click Start .
2. Type gpedit.msc in the Search box.
3. Right-click gpedit.msc and choose Run as Administrator.Running the editor this way ensures that you are running it as Administrator.
2. Browse to Computer Configuration /Administrative Templates/System.
3. Scroll down to, then double-click Display Shutdown Event Tracker.4. Select Disabled and click OK.
Stop Server Manager from running automatically at logon
1. Run the group policy editor as Administrator.
1. Click Start .
2. Type gpedit.msc in the Search box.
3. Right-click gpedit.msc and choose Run as Administrator.Running the editor this way ensures that you are running it as Administrator.
2. Browse to Local Computer Policy/Computer Configuration/Administrative Templates/System/Server Manager.
3. Scroll down to, then double-click Do not display Server Manager automatically at logon.
4. Select Enabled and click OK.
Grant users shutdown rights
By default, only administrators will have the right to shut down or restart the machine. By following the steps below, other
users and/or groups can be granted the right to shut down the machine.
Important: You must run the Group Policy Editor as Administrator, or it will appear as if the values are being changed, but
the Desktops will remain the same.
1. Run the group policy editor as Administrator.
1. Click Start .
2. Type gpedit.msc in the Search box.
3. Right-click gpedit.msc and choose Run as Administrator.Running the editor this way ensures that you are running it as Administrator.
2. Browse to Computer Configuration /Windows Settings/Security Settings/Local Policies/User Rights Assignment.
3. Double click Shut down the system.
4. Click Add User or Group.
5. Click Object Types.
6. Select Groups.
7. Click OK in the Object Types dialog.
© 1999-2017 Citrix Systems, Inc. All rights reserved. p.104https://docs.citrix.com
8. Type “Users” for the object name.
9. Click OK in the Select Users or Groups dialog.
10. Click OK in the Shut down the system Properties dialog.
Change the function of the Power button on the Start menu
By default, the Power button on the start menu is set to Log Off. If you would like a different setting for the desktops,
follow the steps below to change it.
Important: You must run the Group Policy Editor as Administrator, or it will appear as if the values are being changed, but
the Desktops will remain the same.
Group Policy method
This method sets the button for all users and does not let individual users override the setting.
1. Run the group policy editor as Administrator.
1. Click Start .
2. Type gpedit.msc in the Search box.
3. Right-click gpedit.msc and choose Run as Administrator.Running the editor this way ensures that you are running it as Administrator.
2. Browse to User Configuration /Administrative Templates/Start Menu and Taskbar.
3. Double click Change Start Menu Power Button.
4. Change the setting to Enabled.
5. Select which option to display on the start menu and click OK.
Copy Profile method
This method will set the button for all users and allow individual users to override the setting. This will only work if copy
profile is selected when creating the unattend file.
1. Right click on the task bar and select properties.
2. Click the Start Menu tab.
3. Select the desired Power button action in the drop down.
4. Click OK.
Disable IE Enhanced Security configuration
The IE Enhanced Security feature severely limits what can be done with IE with sites that are not part of the trusted sites
zone. To disable this feature, follow the steps below.
1. Open the Server Manager (right-click This PC on the start menu and select Manage).
2. Choose Local Server.3. In the Properties panel, scroll to the right to f ind IE Enhanced Security Conf iguration.
4. Select Off for both Administrators and Users.
5. Click OK. Note that the Properties panel refreshes slowly, so the change may not be visible immediately
Install .Net 3.5 feature
The .Net feature is installed by default on workstation operating systems, but not on Windows Server 2012 R2. It is a
software framework provided by Microsoft that is required for many 3rd party applications to run. To install this feature,
© 1999-2017 Citrix Systems, Inc. All rights reserved. p.105https://docs.citrix.com
follow the steps below.
1. On the Start menu, right-click This PC, and select Manage.
2. Select Add Roles and Features. If this opens the Before you begin page, select Next .
3. Select Role-based or feature-based installation, then select Next .
If not already selected, select the correct local server from the server pool.
4. In the right panel, select Features.
5. Click Add Features.
6. Expand .NET Framework 3.5 Features.
7. Check .NET Framework 3.5.
8. Click Next .
9. Click Install.10. When the installation is done, click Close.
Install Desktop Experience Feature
The Desktop Experience feature includes several options that are installed by default on workstation operating systems.
These features include, among others, Themes, audio and video support, Windows Media player, and phone management.
Use these steps to install the Desktop Experience feature.
Installation
Here's how to install the Desktop Experience feature.
1. Open the Server Manager (right-click This PC on the start menu and select Manage).
2. In the left panel select Features.
3. In the right panel, click Add Features.
4. Scroll down the Features list to User Interfaces and Infrastructure (2 of 3 installed), and expand that entry.
5. Check Desktop Experience.
6. If you are prompted to add features that are required by the Desktop Experience feature, click Add Required Features.
7. Click Next , and then Install.8. When the installation is done, click Close.
9. Restart when prompted.
Enable themes
The following steps describe how to enable themes after the Desktop Experience feature is installed.
1. Click Start > Control Panel > Administrative Tools > Services.
2. Double click the Themes service.
3. Set Startup type to Automatic.
4. Click OK.
Assign default theme
It is possible to assign the default theme for new users by performing the following steps. Individual users will be able to
override the default theme.
Important: You must run the Group Policy Editor as Administrator, or it will appear as if the values are being changed, but
the Desktops will remain the same.

© 1999-2017 Citrix Systems, Inc. All rights reserved. p.106https://docs.citrix.com
1. Run the group policy editor as Administrator.
1. Click Start .
2. Type gpedit.msc in the Search box.
3. Right-click gpedit.msc and choose Run as Administrator.Starting the editor this way ensures that you are running it as Administrator.
2. Browse to User Configuration /Administrative Templates/Control Panel/Personalization.
3. Double click Load a specif ic theme.
4. Select Enabled.
5. Enter the path to the theme file. “%windir%\Resources\Themes\aero.theme” is the path to the aero theme. More
themes can be downloaded from the Microsoft website.
6. Click OK.
Install Windows Search service
The Windows Search service is not installed by default in Windows Server 2012. Microsoft Outlook depends on this service
for searching emails. To install this service, follow the steps below.
1. Open the Server Manager (right-click This PC on the start menu and select Manage).
2. In the left panel select Features.
3. In the right panel, click Add Features.
4. In the Features list, scroll down to Windows Search Service, and select it.
5. Click Install on the Confirmation page.
6. Once the installation has completed, click Close.
Enable audio
By default, audio is not enabled. To enable audio, follow the steps below.
1. Click Start > Control Panel > Administrative Tools > Services.
2. Double click the Windows Audio service.
3. Set Startup type to Automatic.
4. Click OK.
Adjust performance for programs
By default, the operating system is optimized to run background services rather than user programs. To change this, follow
the steps below.
1. On the Start menu, right click This PC and select Properties.
2. Click Advanced system settings in the left pane.
3. Click the Settings button in the Performance section.
4. Click the Advanced tab.
5. Select Programs.
6. Click OK.
STEP 3: Mount or copy the Unidesk Tools onto the gold image
1. Mount the Unidesk_Gold_Image_Tools ISO or copy the Unidesk_Gold_Image_Tools ZIP f ile onto the gold image. You

© 1999-2017 Citrix Systems, Inc. All rights reserved. p.107https://docs.citrix.com
can f ind these tools in the Unidesk Installer download.
2. Open the ISO or extract the ZIP.
3. In the extracted Unidesk_Gold_Image_Tools_x.x.x folder, extract Unidesk_Windows_Gold_Image_Tools.zip to
c:\windows\setup\scripts.
STEP 4: Create an answer file for unattended installation on Unidesk desktops
1. In the c:\windows\setup\scripts folder, right-click the unattend.exe tool and choose Run as administrator. The
unattend builder form opens.
2. Complete the unattend form.
Product key activation
For KMS activation, select KMS Server.
For KMS with a Multiple Activation Key (MAK), select KMS with MAK and enter the MAK.
For Retail Licensing with a MAK, select Retail with MAK, and the MAK.
Domain Join
Select Enable if you want to configure the unattend.xml f ile to join desktops to a specif ic domain. If you plan to
use AD join scripts, ensure Enable is not selected.
You can add desktops to the Computer's container in Active Directory by deleting the OU entry. However, we
recommend that you use an alternate OU for Unidesk desktops, both to segregate the desktop from other
machines and to avoid applying virtual desktop-specif ic GPOs to other types of machines.
If you are supporting multiple OUs within one or more domains, you can join machines in different Domains or OUs
by creating different unattend.xml f iles in different application layers.
For information about domain join scripts,see the following Support articles:
Debugging Domain Join Problems
Local Administrator account
If you want to use the unattend.xml f ile to enable the Administrator account on each Unidesk desktop, select
Enable. Remember to also enable this account in your gold image or Operating System Layer revision. It is possible
to enable the Administrator account for your gold image and then have it disabled in the deployed desktops by
clearing the check box.
If you want to add an alternate Administrator account, select Enable and enter the account information. This
account cannot be pre-configured in the gold image.
You can create a desktop where the Administrator is disabled and the alternate administrator is created and
enabled. However for this to work, the Administrator account must be enabled in the gold image and it cannot be
renamed.
Time zone
Select the time zone. If your time zone is not listed, you can add it to the Other box. Be sure to use the time zone,
not the display setting. A list of time zone settings can be found here.
Disabling automatic activation
Select this option if you plan to use the Microsoft Volume Activation Management Tool.
3. Click Save File.
STEP 5: Optimize the gold image for the Unidesk environment
1. In the c:\windows\setup\scripts folder, run the Optimize executable to create a .cmd file (optimization.cmd) that will be
run to optimize the image during Desktop creation.
© 1999-2017 Citrix Systems, Inc. All rights reserved. p.108https://docs.citrix.com
2. Follow the instructions to run the optimize.cmd file on the gold image. This removes installation-specific drivers and
settings.
If you are using the Unidesk Optimizer script and you are enabling the View Persona feature, you must go to the section
of the Optimizer script called Disable Unnecessary Services to Save Memory and CPU, deselect the option to DisableOffline File Service, and click Save File. This is because View Persona folder redirection requires Offline files to be
enabled, and by default, the Unidesk Optimizer turns off Offline files, which are not a requirement for Unidesk.
STEP 6: Create a snapshot of the gold image
Once the gold image is ready, create a VMware snapshot of it, so that you can return to this state at any time.
Important: It is critical to create a snapshot before installing the Unidesk software onto the gold image. Without this
snapshot, returning to this state requires rebuilding the image.
STEP 7: Install the Unidesk tools onto the gold image
1. In the Unidesk_Gold_Image_Tools folder, run the Unidesk setup_x86.exe (32-bit) or setup_x64.exe (64-bit).
2. The installation prompts for the location of the Management Appliance IP address and the location of the unattend.xml
file (the default location is c:\windows\panther).
Once this is done, you are ready to create a Unidesk Operating System Layer.
Prepare a Windows 2008 R2 gold image (Desktops)
STEP 1: Set up a Windows Server 2008 R2 gold image on a virtual machine
In the vSphere client:
1. Create a gold image that you want all your desktops to use.
2. Configure the virtual machine hardware settings, for example, the NIC and video memory.
Important: If using VMware Horizon View, you must select the VMXNET 3 network adapter for the virtual machine.
Selecting the default E1000 adapter can cause customization timeout errors on the virtual machine.
3. If you are using VMware Horizon View, install Windows Server 2008 R2 Service Pack 1 (SP1).
Note: If you do not install SP1, an error occurs when you try to install View Agent in the virtual machine.
4. Disable Windows System Restore and Windows Automatic Updates. The Unidesk system handles restore points for you,
and Unidesk layer versions allow you to control when updates occur.
5. Make sure you have installed VMware Tools on the gold operating system.
STEP 2: Configure Windows Server as a desktop operating system
Use this section as a guide to configuring Windows Server 2008 R2 as a desktop operating system for your users. This
section is not required. It is included for your convenience.
Disable Shutdown event tracker
The shutdown event tracker asks for the reason the system is being shut down before it allows the shutdown to continue.
To disable this feature, follow these steps.
© 1999-2017 Citrix Systems, Inc. All rights reserved. p.109https://docs.citrix.com
Important: You must run the Group Policy Editor as Administrator, or it will appear as if the values are being changed, but
the Desktops will remain the same.
1. Run the group policy editor as Administrator.
1. Click Start .
2. Type gpedit.msc in the Search box.
3. Right-click gpedit.msc and choose Run as Administrator.Running the editor this way ensures that you are running it as Administrator.
2. Browse to Computer Configuration /Administrative Templates/System.
3. Double click Display Shutdown Event Tracker.4. Select Disabled and click OK.
Grant users shutdown rights
By default, only administrators will have the right to shut down or restart the machine. By following the steps below, other
users and/or groups can be granted the right to shut down the machine.
Important: You must run the Group Policy Editor as Administrator, or it will appear as if the values are being changed, but
the Desktops will remain the same.
1. Run the group policy editor as Administrator.
1. Click Start .
2. Type gpedit.msc in the Search box.
3. Right-click gpedit.msc and choose Run as Administrator.Running the editor this way ensures that you are running it as Administrator.
2. Browse to Computer Configuration /Windows Settings/Security Settings/Local Policies/User Rights Assignment.
3. Double click Shut down the system.
4. Click Object Types.
5. Select Groups.
6. Click OK in the Object Types dialog.
7. Type “Users” for the object name.
8. Click OK in the Select Users or Groups dialog.
9. Click OK in the Shut down the system Properties dialog.
Change the function of the Power button on the Start menu
By default, the Power button on the start menu is set to Log Off. If you would like a different setting for the desktops,
follow the steps below to change it.
Important: You must run the Group Policy Editor as Administrator, or it will appear as if the values are being changed, but
the Desktops will remain the same.
Group Policy method
This method sets the button for all users and does not let individual users override the setting.
1. Run the group policy editor as Administrator.
1. Click Start .

© 1999-2017 Citrix Systems, Inc. All rights reserved. p.110https://docs.citrix.com
2. Type gpedit.msc in the Search box.
3. Right-click gpedit.msc and choose Run as Administrator.Running the editor this way ensures that you are running it as Administrator.
2. Browse to User Configuration /Administrative Templates/Start Menu and Taskbar.
3. Double click Change Start Menu Power Button.
4. Change the setting to Enabled.
5. Select which option to display on the start menu and click OK.
Copy Profile method
This method will set the button for all users and allow individual users to override the setting. This will only work if copy
profile is selected when creating the unattend file.
1. Right click on the task bar and select properties.
2. Click the Start Menu tab.
3. Select the desired Power button action in the drop down.
4. Click OK.
Disable IE Enhanced Security configuration
The IE Enhanced Security feature severely limits what can be done with IE with sites that are not part of the trusted sites
zone. To disable this feature, follow the steps below.
1. Open the Server Manager (right click on Computer on the start menu and select Manage).
2. Under Server Summary \ Security Information of the root page, select Configure IE ESC.
3. Select Off for both Administrators and Users.
4. Click OK.
Install .Net 3.5.1 feature
The .Net feature is installed by default on workstation operating systems, but not on Windows Server 2008 R2. It is a
software framework provided by Microsoft that is required for many 3rd party applications to run. To install this feature,
follow the steps below.
1. On the Start menu, right click Computer and select Manage. This opens the Server Manager.
2. In the left panel select Features.
3. In the right panel, click Add Features.
4. Expand .NET Framework 3.5.1 Features.
5. Check .NET Framework 3.5.1.
6. Click Next .
7. Click Install.8. When the installation is done, click Close.
Install Desktop Experience Feature
The Desktop Experience feature includes several options that are installed by default on workstation operating systems.
These features include, among others, Themes, audio and video support, Windows Media player, and phone management.
Use these steps to install the Desktop Experience feature.
Important: If you are using VMware Horizon View and you do not install the Desktop Experience feature, VMware Horizon
View HTML Blast access does not work correctly. For installation instructions, see the Microsoft TechNet article, Desktop

© 1999-2017 Citrix Systems, Inc. All rights reserved. p.111https://docs.citrix.com
Experience Overview.
Installation
Here's how to install the Desktop Experience feature.
1. On the Start menu, right click Computer and select Manage. This opens the Server Manager.
2. In the left panel select Features.
3. In the right panel, click Add Features.
4. Check Desktop Experience.
5. If you are prompted to add features that are required by the Desktop Experience feature, click Add Required Features.
6. Click Next , and then Install.7. When the installation is done, click Close.
8. Restart when prompted.
9. Close the dialog after restart.
Enable themes
The following steps describe how to enable themes after the Desktop Experience feature is installed.
1. Click Start > Administrative Tools > Services.
2. Double click the Themes service.
3. Set Startup type to Automatic.
4. Click OK.
Assign default theme
It is possible to assign the default theme for new users by performing the following steps. Individual users will be able to
override the default theme.
Important: You must run the Group Policy Editor as Administrator, or it will appear as if the values are being changed, but
the Desktops will remain the same.
1. Run the group policy editor as Administrator.
1. Click Start .
2. Type gpedit.msc in the Search box.
3. Right-click gpedit.msc and choose Run as Administrator.Starting the editor this way ensures that you are running it as Administrator.
2. Browse to User Configuration /Administrative Templates/Control Panel/Personalization.
3. Double click Load a specif ic theme.
4. Select Enabled.
5. Enter the path to the theme file. “%windir%\Resources\Themes\aero.theme” is the path to the aero theme. More
themes can be downloaded from the Microsoft website.
6. Click OK.
Enable H.264 video and AAC audio support
The Desktop Experience feature does not include support for H.264 video and AAC audio formats. You can add this
support using these steps.
1. Download the Desktop Experience Decoder Update from Microsoft (http://support.microsoft.com/kb/2483177).

© 1999-2017 Citrix Systems, Inc. All rights reserved. p.112https://docs.citrix.com
2. Run the downloaded installer.
3. When asked if the installation of the update is desired, click Yes.
4. Read and accept the license terms.
5. Close the dialog when installation completes.
Install Windows Search service
The Windows Search service is not installed by default in Windows Server 2008 R2. Microsoft Outlook depends on this
service for searching emails. To install this service, follow the steps below.
1. On the Start menu, right click Computer and select Manage. This opens the Server Manager.
2. In the left panel select Roles.
3. In the right panel, click Add Roles.
4. Click Next on the Before You Begin page.
5. Select File Services on the next page and click Next .
6. Click Next on the Introduction to File Services page.
7. Select Windows Search Service on the next page.
8. Deselect File Server (unless you want to add this service).
9. Click Next .
10. On the Select Volumes to Index for Windows Search Service do not select any volumes, just click Next .
11. Click Install on the Confirmation page.
12. Click Close once the installation has completed.
Enable audio
By default, audio is not enabled. To enable audio, follow the steps below.
1. Click Start > Administrative Tools > Services.
2. Double click the Windows Audio service.
3. Set Startup type to Automatic.
4. Click OK.
Adjust performance for programs
By default, the operating system is optimized to run background services rather than user programs. To change this, follow
the steps below.
1. On the Start menu, right click Computer and select Properties.
2. Click Advanced system settings in the left pane.
3. Click the Settings button in the Performance section.
4. Click the Advanced tab.
5. Select Programs.
6. Click OK.
STEP 3: Mount or copy the Unidesk Tools onto the gold image
1. Mount the Unidesk_Gold_Image_Tools ISO or copy the Unidesk_Gold_Image_Tools ZIP f ile onto the gold image. You
can f ind these tools in the Unidesk Installer download.
2. Open the ISO or extract the ZIP.
© 1999-2017 Citrix Systems, Inc. All rights reserved. p.113https://docs.citrix.com
3. In the extracted Unidesk_Gold_Image_Tools_x.x.x folder, extract Unidesk_Windows_Gold_Image_Tools.zip to
c:\windows\setup\scripts.
STEP 4: Create an answer file for unattended installation on Unidesk desktops
1. In the c:\windows\setup\scripts folder, right-click the unattend.exe tool and choose Run as administrator. The
unattend builder form opens.
2. Complete the unattend form.
Product key activation
For KMS activation, select KMS Server.
For KMS with a Multiple Activation Key (MAK), select KMS with MAK and enter the MAK.
For Retail Licensing with a MAK, select Retail with MAK, and the MAK.
Domain Join
Select Enable if you want to configure the unattend.xml f ile to join desktops to a specif ic domain. If you plan to
use AD join scripts, ensure Enable is not selected.
You can add desktops to the Computer's container in Active Directory by deleting the OU entry. However, we
recommend that you use an alternate OU for Unidesk desktops, both to segregate the desktop from other
machines and to avoid applying virtual desktop-specif ic GPOs to other types of machines.
If you are supporting multiple OUs within one or more domains, you can join machines in different Domains or OUs
by creating different unattend.xml f iles in different application layers.
Local Administrator account
If you want to use the unattend.xml f ile to enable the Administrator account on each Unidesk desktop, select
Enable. Remember to also enable this account in your gold image or Operating System Layer revision. It is possible
to enable the Administrator account for your gold image and then have it disabled in the deployed desktops by
clearing the check box.
If you want to add an alternate Administrator account, select Enable and enter the account information. This
account cannot be pre-configured in the gold image.
You can create a desktop where the Administrator is disabled and the alternate administrator is created and
enabled. However for this to work, the Administrator account must be enabled in the gold image and it cannot be
renamed.
Time zone
Select the time zone. If your time zone is not listed, you can add it to the Other box. Be sure to use the time zone,
not the display setting.
Disabling automatic activation
Select this option if you plan to use the Microsoft Volume Activation Management Tool.
3. Click Save File.
STEP 5: Optimize the gold image for the Unidesk environment
1. In the c:\windows\setup\scripts folder, run the Optimize executable to create a .cmd file (optimize.cmd) that will be run
to optimize the image during desktop creation.
2. Follow the instructions to run the optimize.cmd file on the gold image. This removes installation-specific drivers and
settings.
If you are using the Unidesk Optimizer script and you are enabling the View Persona feature, you must go to the section
of the Optimizer script called Disable Unnecessary Services to Save Memory and CPU, deselect the option to Disable
© 1999-2017 Citrix Systems, Inc. All rights reserved. p.114https://docs.citrix.com
Offline File Service, and click Save File. This is because View Persona folder redirection requires Offline files to be
enabled, and by default, the Unidesk Optimizer turns off Offline files, which are not a requirement for Unidesk.
STEP 6: Create a VMware snapshot of the gold image
Once the gold image is ready, create a VMware snapshot of it so you can return to this state at any time.
Important: It is critical to create a snapshot before installing the Unidesk software onto the gold image. Without this
snapshot, returning to this state requires rebuilding the image.
STEP 7: Install the Unidesk tools onto the gold image
1. In the Unidesk_Gold_Image_Tools folder, run the Unidesk setup_x86.exe (32-bit) or setup_x64.exe (64-bit).
2. The installation prompts for the location of the Management Appliance IP address and the location of the unattend.xml
file (the default location is c:\windows\panther).
Once this is done, you are ready to create a Unidesk Operating System Layer.
Prepare a Windows XP gold image
This topic explains how to prepare a gold image for the Unidesk environment. This includes:
Creating an answer f ile for unattended OS setup.
Optimizing the OS for the Unidesk environment.
Installing Unidesk tools on the image.
Use the tools included in the Unidesk Installer download to prepare a Windows 7 gold image for the Unidesk environment.
The Unidesk installation package should be downloaded to a machine that the gold image can access.
STEP 1: Set up a Windows XP gold image on a virtual machine
IMPORTANT: WindowsXP must be installed in C:\Windows. Installing the OS in C:\WINNT is not supported.
In the vSphere client:
1. Create a gold image that you want all your desktops to use.
2. Configure the virtual machine hardware settings, for example, the NIC and video memory.
3. Disable Windows System Restore and Windows Automatic Updates. The Unidesk system handles restore points for you,
and Unidesk layer versions allow you to control when updates occur.
4. Install VMware Tools.
5. Shut down the gold OS.
6. Add a 1-MB virtual hard disk with Virtual Device Node set to SCSI.
1. Right-click the image and choose Edit settings.
2. Click Add, choose Hard Disk, and click Next.
3. Select Create a new virtual disk, and click Next.
4. Set the Disk Size to 1 MB, and click Next.
5. Under Advanced Options, select SCSI, and click Next.
Note: You must use the default controller (SCSI BusLogic) for the OS to be functional. Unidesk supports the LSI Logic
© 1999-2017 Citrix Systems, Inc. All rights reserved. p.115https://docs.citrix.com
SAS controller type. If you subsequently change the SCSI controller type to anything else, such as VMware Paravirtual
SCSI controller, the OS Layer import will fail.
6. Click Finish, the click OK.
Note: Your boot drive will still be an IDE drive.
7. Configure the virtual machine hardware settings, for example, the NIC and video memory.
8. Make sure you have installed VMware Tools on the gold OS.
9. Power on the gold OS virtual machine, and in the Console tab use Windows to:
Disable Windows System Restore and Windows Automatic Updates.
Activate the operating system.
STEP 2: Mount or copy the Unidesk setup program onto a drive the gold image can access
1. Mount the Unidesk_Gold_Image_Tools ISO or copy the Unidesk_Gold_Image_Tools_x.x.x ZIP f ile onto the gold image.
2. Open the ISO or extract the ZIP.
3. Extract Unidesk_Gold_Image_Tools ZIP.
4. In the extracted Unidesk_Gold_Image_Tools folder, extract Unidesk_WindowsXP_Gold_Image_Tools.zip to a local
directory.
5. Copy disablesysrestore.cmd to c:\windows\system32\.
STEP 3: Create a sysprep answer file for unattended installation on a Unidesk desktop
1. From the Microsoft site, download the sysprep.cab file that matches the version of Windows XP you're using, for
example, this cab file for Windows XP SP3.
2. On your gold image, unpack the cab f ile into the c:\Sysprep folder.
3. Take a snapshot of the gold image.
4. Run c:\Sysprep\setupmgr.exe, a wizard for creating and editing the sysprep.inf f ile.
5. If you have a sysprep.inf answer file, choose Modify existing. If not, choose Create new.
6. When prompted to specify the type of setup, select Sysprep Setup, Windows XP Professional, and Yes, fullyautomate installation.
7. In the Setup Manager, choose the settings to configure on the left and enter values on the right.
General Settings:
Enter the Name and Organization.
Enter standard Display Settings that work for all of your users.
Enter your Product Key.
Network Settings:
For Computer Name you can enter a placeholder name, the Unidesk build process replaces it.

© 1999-2017 Citrix Systems, Inc. All rights reserved. p.116https://docs.citrix.com
Administrator Password can remain blank, or enter one of your choice.
For Networking Components, add the correct settings for your organization.
Set Workgroup or Domain to have the system join a domain.
Advanced Settings, Run Once:
Add c:\windows\system32\disablesysrestore.cmd - to disable system restore settings.
Add any scripts to customize the OS, for example, domain.cmd to add the system to an Organizational Unit (OU)
other than the computer's container in Active Directory.
8. Click Finish and Save. This saves the Sysprep.inf f ile to the sysprep folder.
STEP 4: Create a VMware snapshot of the gold image
Once the gold image is ready, create a VMware snapshot of it so you can return to this state at any time.
Important: It is critical to create a snapshot before installing the Unidesk software onto the gold image. Without this
snapshot, returning to this state requires rebuilding the image.
STEP 5: Install the Unidesk software onto the gold image
This step installs the Unidesk software onto the gold image.
1. Run the 32-bit driver installer, setup_x86.exe, and when the Welcome screen appears, click Next. You are prompted for
the Management Appliance address.
Note: The Unidesk setup program requires a SCSI bus controller. If you did not add this setting as described in Step 1, you
receive the message shown in the screen shot below. To fix this issue, complete Step 1: 5 and 6, and the run setup again.
2. Enter the IP address for the Management Appliance (MA) you created during installation. You can see the IP address in
vSphere, by selecting the appliance and clicking the Summary tab.
3. Click Install to complete image preparation, then click Finish.
4. Shut down the gold image.
5. In vSphere, remove the SCSI driver settings:
1. Right-click the image and choose Edit settings.
2. Select the SCSI hard disk, click the Remove, button, and click OK.
3. Click Finish, the click OK.
Once this is done, you are ready to create a Unidesk Operating System Layer.
More about preparing a Windows XP gold image
How to use the Sysprep tool to automate successful deployment of Windows XP (Microsoft website)
Sample disablesysrestore.cmd script
@rem disable the system restore service in the registry
reg add "HKLM\Software\Microsoft\Windows NT\CurrentVersion\SystemRestore" /v DisableSR /t REG_DWORD /d 1 /f

© 1999-2017 Citrix Systems, Inc. All rights reserved. p.117https://docs.citrix.com
@rem stop the service
sc stop srservice
@rem disable the system restore tab in Control Panel -> System
@rem
@rem note that the type and data of this registry value don't matter,
@rem the mere existence of this value of any type disables the System Restore tab
reg add "HKLM\Software\Policies\Microsoft\Windows NT\SystemRestore" /v DisableConfig /t REG_DWORD /d 1 /f
Sample sysprep.inf file
This sample sysprep.inf file includes a generic product key for Windows XP Professional that allows 8 days of activation.
If you are using volume licensing, enter the volume license key in the ProductKey setting.
If you are using retail licensing, use the generic product key and specify the retail key in the activate script described in the
following section.
Sample va51.cmd and va51.vbs files
For Non-persistent XP Desktops in a Unidesk environment that is integrated with VMware View 5.1 or later, a script needs
to be applied to the gold image OS Layer or OS Layer revision. Otherwise, the Desktop will have the status ‘View agent
unavailable’ and cannot connect to the View pool. Here are the steps for using these files to integrate Desktops correctly
with VMware View 5.1 or later:
1. Copy the two attached scripts into c:\Windows\System32:
va51_xp.cmd
va51_xp_.vbs
Note: The file va51_xp_.vbs will be saved as va51_xp_0.vbs. Be sure to rename it va51_xp_.vbs.
2. Edit sysprep.inf and add the following lines:
[GuiUnattended] section:
AutoLogon=Yes
AutoLogonCount=1
[GuiRunOnce] section:
"c:\windows\system32\cmd.exe /c start c:\windows\system32\va51_xp.cmd"
3. Run regedit and navigate to:
HKEY_LOCAL_MACHINE\SYSTEM\CurrentControlSet\Services\UniService

© 1999-2017 Citrix Systems, Inc. All rights reserved. p.118https://docs.citrix.com
4. Add a DWORD value called "BlockReadyMessage" and set it to 1.
5. Shutdown the gold and import it, or finalize the new OS revision.
Note: If you use this same OS layer to create persistent XP desktops, when the desktop create completes, you will be
left with the Administrator user logged in. Restart these desktops before connecting with the VMware View client.
Sample va51.cmd file
Sample va51.vbs file
Customizing the sysprep.inf file
When Mini-Setup completes, you can configure sysprep to run a shell script in the Administrator context. You can use this
script to perform significant customization tasks. For example, if you want to add the machine to an OU other than the
Computers Container, you can complete the following steps to define a cmd file in the sysprep.inf file that runs a VB script
to perform this task.
In the Setup Manager wizard for the sysprep.inf file, select Advanced Settings > Run Once.
In the specified command file, add the commands that you want to run after Mini-Setup completes and the system starts
for the first time. For example, you could add the following commands to the domain.cmd file.
cscript c:\windows\system32\disablesysrestore.cmd – This command runs the disablesysrestore.cmd script, which
disables system restore on the desktop.
regedit /s c:\windows\system32\postProcess.reg – This command imports a Registry file that adds a vbs script. The vbs
script adds a user to the local Administrators group by adding an entry to the Run Once key in the Registry.
cscript c:\windows\system32\adddomain.vbs – This command runs the adddomain.vbs script, which adds the desktop to
a specified OU and reboots the system.
cscript c:\windows\system32\va51_xp.cmd (or, cscript c:\windows\system32\va51_xp.vbs) – This command runs the
va51_xp.cmd (or va51.vbs) script, which integrates Unidesk with VMware View.
© 1999-2017 Citrix Systems, Inc. All rights reserved. p.119https://docs.citrix.com
Create an Operating System Layer
Jun 28 , 2017
Once you have prepared a gold image and taken a VMware snapshot of it, you can:
Create a Unidesk OS layer.
Import the gold image into the Operating System Layer
Importing the software and settings from the gold image can take approximately 45 minutes or more to complete,
depending on the size of the gold image.
To create an OS Layer and import the gold image into it:
1. Make sure the gold image is shut down.
2. In the Unidesk Management Console, click Layers > OS Layers.
3. Click Create OS Layer.
4. Complete the wizard, specifying the gold image that you just created.
1. On the Layer Details tab, enter an OS Layer name, for example, Win764sp1Gold.
2. Enter an OS Layer Version, for example NoScripts to signify that this is the base gold with no additional scripts to run
when you use this OS Layer to create a desktop.
3. Select the gold image from the drop-down that lets you choose from any gold images on your Management
Appliance (MA).
4. On the Icon Assignment tab, choose an icon for this OS Layer.
5. On the Confirm and Complete tab, verify your settings and click Create Layer.
Creating a Windows Operating System Layer can take up to 20-30 minutes to complete. When the OS layer is complete,
you can verify that it's working as planned when you create your first desktop.
Layer integrity check
When finalizing a Layer, Unidesk checks the integrity of the Layer, and waits until any Windows operations that are in
progress on the Installation Machine have completed. If the following message is displayed, one or more pending tasks on
the Installation Machine must be completed before the Layer can be finalized. Otherwise, any Layers that use this
Installation Machine would have issues.
Layer integrity message
As described in the following message, you can expedite the completion of any of these queued tasks:
The new version version-name of Layer layer-name on Installation Machine (IM) im-name can only be finalized when the
following conditions have been addressed:
A reboot is pending to update drivers on the boot disk - please check and reboot the IM.
A post-installation reboot is pending - please check and reboot the IM.
A Microsoft NGen operation is in progress in the background - (Click here for help with this condition).
An MSI install operation is in progress - please check the IM.
How to investigate Microsoft NGen operations

© 1999-2017 Citrix Systems, Inc. All rights reserved. p.120https://docs.citrix.com
NGen is the Microsoft "Native Image Generator". It is part of the .NET system, and basically recompiles .NET byte code into
native images and constructs the registry entries to manage them. Windows will decide when to run NGen, based on what
is being installed and what Windows detects in the configuration. When NGen is running, you must let it complete. An
interrupted NGen operation can leave you with nonfunctioning .NET assemblies or other problems in the .NET system.
You have the choice of waiting for the NGen to complete in the background or you can force the NGen to the foreground.
Forcing the NGen to the foreground will allow you to view the progress and once the output has completed you should be
able to finalize the layer.
Force an NGen operation to the foreground
Normally, NGen is a background operation and will pause if there is foreground activity. Bringing the task into the
foreground can help the task to complete as quickly as possible.
1. Open a command prompt as Administrator.
2. Go to the Microsoft .NET Framework directory for the version currently in use:
cd C:\Windows\Microsoft.NET\FrameworkNN\vX.X.XXXXX
3. Enter the NGen command to execute the queued items:
ngen update /force
This brings the NGen task to the foreground in the command prompt, and lists the assemblies being compiled.
Note: It ’s okay if you see several compilation failed messages!
4. Look in the Task Manager to see if an instance of MSCORSVW.EXE is running. If it is, you must allow it to complete,or
re-run ngen update /force. Do not reboot to stop the task. You must allow it to complete.
Check the status of an NGen operation
If you would prefer to wait for the NGen to complete you can check the status as described here. However, every time you
check the queue status, you are creating foreground activity, which might cause the background processing to temporarily
pause.
1. Open a command prompt as Administrator.
2. Check status by running this command:
ngen queue status
3. When you receive the following status, the NGen is complete, and you can finalize the Layer.
The .NET Runtime Optimization Service is stopped
© 1999-2017 Citrix Systems, Inc. All rights reserved. p.121https://docs.citrix.com
Create a Desktop to verify the OS Layer
Jun 28 , 2017
A Desktop is a virtual machine that you can deploy to a user. It contains an operating system, virtual machine settings, and
any applications you deploy to it.
By creating a Desktop, you can verify that your Operating System Layer is in good working order. You can then use this
tested Layer to create the Application Layers your users need. Application Layers are compatible with only one Operating
System Layer (and all of its Layer Versions).
Before creating the Operating System Layer, be sure to prepare your gold image for the Unidesk environment. For a video
overview, click here.
Create the Desktop
Create your first Unidesk Desktop
1. In the Unidesk menu bar select Desktops , then click Create Desktop in the Action bar. This opens the Create Desktop
wizard with the available templates displayed.
2. (Optional) In the Template Selection tab, you can select a template. The User Assignment wizard tab is displayed.
Versions).
3. In the User Assignment tab, specify the user or group to assign to the Desktop.
Note: If you choose a group, it must not be empty.
1. Leave Broker Integration set to None, unless you have integrated with one of the supported connection brokers,
VMware View or XenDesktop.
2. Select Assigned to User, and choose the user you specif ied when preparing the gold image.
Notice your choices displayed in the Desktop Visualization panel to the right.
4. In the Desktop Details tab, enter a name for the Desktop and choose the network.
1. Choose a cluster or server on which to host the Desktop.
2. Enter a name for the Desktop.
3. Enter a description of the Desktop (optional).
4. Select a network in the virtual infrastructure to which the Desktop will connect.
5. Specify the type of Desktop that you want to create: persistent or nonpersistent. A persistent Desktop maintains all
of a user's changes in the User Layer. A nonpersistent Desktop discards its User Layer and reverts to a pristine backup
every time it restarts.
5. In the OS Assignment tab, select the Operating System (OS) layer.
6. In the Desktop Settings tab, choose a value for each field.
7. In the Confirm and Complete tab, confirm that the settings are correct (in the Desktop Visualization panel to the right),
and click Create Desktops to start creating the Desktop.

© 1999-2017 Citrix Systems, Inc. All rights reserved. p.122https://docs.citrix.com
A Desktop icon appears, its status displayed in the lower right corner of the icon. The Desktop status cycles through
Stopped, Powering on, Starting, and Running. For more status information, click the Expander tab in the bottom center
of the console to open the Tasks panel.
Verify the Desktop
After you create a Desktop, log in to the Desktop using the account you created in the gold OS.
To log in to the Desktop:
1. Using either a vSphere Client or an RDP session, log into the Desktop.
Note: If you need the IP address assigned to the Desktop, hover over the Desktop icon and click the information
indicator (i). This displays the IP Address assigned to the Desktop.
The first time someone logs into a Desktop, the Desktop composite is created. This takes longer than a typical login.
To create Application layers that you can give to the different Desktops you create, see Creating an Application Layer.
If Desktop startup times seem slow on Windows 8.1 or Windows 10, please see the tips for deploying Windows on that
platform.

© 1999-2017 Citrix Systems, Inc. All rights reserved. p.123https://docs.citrix.com
Create an Installation Machine
Jun 28 , 2017
An Installation Machine is a virtual machine that acts as a staging area for the creation of Layers and new Layer Versions.
You need an Installation Machine to create an Application Layer, a new Version of an Application Layer, or an Operating
System Layer Version. The Master CachePoint Appliance hosts all Installation Machines.
About Installation Machines
When to use an Installation Machine
You'll need an Installation Machine whenever you want to create a new Application Layer or when you add a new Version
to an existing Application or Operating System Layer. You do not need an Installation Machine for the initial creation of an
Operating System Layer, just for any Versions you add to it. Here's how to use an Installation Machine when creating a
Layer or Layer Version.
The role of an Installation Machine in Layer creation
Before you start, you need to have created a Unidesk Operating System Layer with your gold image on it. Then you:
Create an
Installation
Machine
Do the initial creation of the Installation Machine using the Unidesk Management Console.
Note: The operating system you associate with this virtual machine is for vSphere's use and it is
not yet bootable. This is not the OS on which the Applications for the Unidesk Layer will be
installed.
Create an
Application Layer,
or a new version
of an Application
or OS Layer
Create an Application Layer, selecting an Operating System Layer and Installation Machine. The
Unidesk software boots the Installation Machine VM with the selected Operating System.
Note: If you are adding a version to an operating system, the Unidesk software installs the
operating system that matches the one referenced in the Operating System Layer automatically.
Install applications
on the Installation
Machine
After the Unidesk software boots the Installation Machine, the software prompts you to install
applications on the Installation Machine. You log in to the Installation Machine (using your virtual
infrastructure management software or a remote desktop connection) and install the applications
or OS update for the Layer or Layer Version you are creating.
Finalize the Layer
or new Layer
Version
Finalize the layer. You select the Layer and the software creates the application image and adds it
to the layer. It also shuts down the Installation Machine. The Installation Machine is powered off
and returns to a non-bootable state.
Before you start
Determine the configuration for memory, CPUs, and network adapters based on the applications that you plan to use with

© 1999-2017 Citrix Systems, Inc. All rights reserved. p.124https://docs.citrix.com
the Installation Machine.
Choose an Operating System type that matches the type of at least one of the Operating System layers that you will be
using in the Unidesk environment. For example, if you plan to create Application Layers that require two CPUs, ensure you
provision an Installation Machine with this setting. If you plan on using 64-bit Windows 7 only, be sure to select that as the
Operating System type for all of your Installation Machines.
Create the Installation Machine (IM)
You cannot change the virtual machine settings after you create the Installation Machine. This includes the Operating
System type, so you must create at least one Installation Machine for each type of Operating System that you are using.
1. Select System > Installation Machine
2. Select Create Installation Machine in the Action bar. This opens the Create Installation Machine wizard.
3. In the Desktop Information tab, specify the virtual machine settings for the Installation Machine, including:
Name for the
Installation Machine
The Installation Machine name (IM Name) should be 15 characters or less, and unique on
the Master CachePoint Appliance.
Operating system type vSphere will use to power this virtual machine.
Memory Amount of memory (in megabytes) to allocate to the Installation Machine.
Virtual CPUs Number of virtual CPUs to allocate to the Installation Machine.
4. In the Confirm and Complete tab, optionally, enter a comment that describes the Installation Machine, and click Create
Installation Machine.If you enter comments, they appear in the Information view Audit History.
© 1999-2017 Citrix Systems, Inc. All rights reserved. p.125https://docs.citrix.com
Create Application Layers
Jun 28 , 2017
An Application Layer includes one or more applications that you can assign to a desktop.
About creating an Application Layer
Before you start, you need to have created a Unidesk Operating System Layer with your gold image on it. Then you:
Create an
Installation
Machine
Do the initial creation of the Installation Machine using the Unidesk Management Console.
Note: The operating system you associate with this virtual machine is for vSphere's use and it is
not yet bootable. This is not the OS on which the Applications for the Unidesk Layer will be
installed.
Create an
Application Layer,
or a new version
of an Application
or OS Layer
Create an Application Layer, selecting an Operating System Layer and Installation Machine. The
Unidesk software boots the Installation Machine VM with the selected Operating System.
Note: If you are adding a version to an operating system, the Unidesk software installs the
operating system that matches the one referenced in the Operating System Layer automatically.
Install applications
on the Installation
Machine
After the Unidesk software boots the Installation Machine, the software prompts you to install
applications on the Installation Machine. You log in to the Installation Machine (using your virtual
infrastructure management software or a remote desktop connection) and install the applications
or OS update for the Layer or Layer Version you are creating.
Finalize the Layer
or new Layer
Version
Finalize the layer. You select the Layer and the software creates the application image and adds it
to the layer. It also shuts down the Installation Machine. The Installation Machine is powered off
and returns to a non-bootable state.
Before you start
Application Layer requirements
To create an Application Layer, you need:
Installation software for the application(s) you're including in the Layer.
An available Installation Machine.
Any prerequisite Application Layers.
Special considerations for Windows 8.1 Applications
To deliver applications on Windows 8.1 via Unidesk Layers, you need to build the applications so they can be centrally
managed. This is because Windows Store Apps are managed via each user's profile and can only be deployed to one user.
Regular Windows Store apps, like Bing Finance and Weather, cannot be sideloaded or layered. You can, however, deliver
centrally managed applications on Windows 8.1 by sideloading Enterprise applications, also called Line of Business (LoB)
© 1999-2017 Citrix Systems, Inc. All rights reserved. p.126https://docs.citrix.com
applications. For details, please see Sideloading Line of Business applications.
Create an Application layer
1. Select Layers > Application Layersand select Create Layer in the Action bar. This opens the Create Layer wizard.
2. In the Layer Details tab, specify the details that describe the layer.
1. Enter a name for the Application Layer.
2. Optionally, enter a description of the layer
3. Enter a version. The version can be the version of the application or a version you assign to the layer.
Note: The Unidesk Management Console displays the information in the details view of the layer.
4. Optionally, enter a description of the version.
5. Optionally, enter the path for a custom script that runs once after the desktop restarts.
6. Specify the default size for the layer, in gigabytes. In most cases, the default value of 10 gigabytes is sufficient. If the
application you are installing requires more space, change this value accordingly.
Note: Each 4 gigabytes of storage that you add uses an additional 512 kilobytes of memory. Make sure that the
Installation Machine you select is configured appropriately to accommodate the memory requirements.
3. In the Installation Machine Details tab, specify the operating system and the Installation Machine. The Application Layer
becomes associated with the Operating System Layer that you use to create it. .
1. Select an Operating System Layer. The layer defaults to the most current version. To select an earlier version, you can
expand the layer to display all versions.
2. Select an Installation Machine
4. In the Prerequisite Layers tab, select one or more layers from the displayed list, if required. Only applications created from
the specified Operating System Layer are available.
1. Select an Application Layer in the Prerequisite Layers box.
2. Select the version of the Application Layer in the Application Details box.
3. Click Add Layer5. In the Icon Assignment tab, select an icon to assign to the layer. This layer displays this image in the Icon and List views
of the Layers Module.
To use an existing image, select an image in the image box.
To import a new image, click Browse and select an image in PNG or JPG format. For additional information about
uploaded images, see the article about how to Assign icons.
6. In the Confirm and Complete tab, review the details of the Application Layer, enter a comment if required, and click
Create Layer.If you enter comments, they appear in the Information view Audit History.
7. When prompted to do so in the Tasks bar, install the application and the prerequisite applications on the Installation
Machine.
Install the application(s) on the Installation Machine
During the creation process for Application Layers, the software prompts you to install the applications you want to use in
the Layer on the selected Installation Machine. Keep in mind that the state of the Installation Machine before you finalize
a layer is what users experience when they access the desktop.
To install the applications on the Installation Machine:

© 1999-2017 Citrix Systems, Inc. All rights reserved. p.127https://docs.citrix.com
1. Log in to the Installation Machine.
2. Install the applications, along with any drivers, boot-level applications, templates, or files that the user wil need with it.
If an application installation requires a system restart, restart it manually. The Installation Machine does not restart
automatically.
3. Make sure the Installation Machine is in the state you want it to be for the user:
If the applications you install require any post-installation setup or application registration, complete these steps now.
Remove any settings, configurations, f iles, mapped drives, or applications that you do not want to include on the user's
desktop.
Finalize the Application Layer
It is not necessary to log off or disconnect from the Installation Machine before you finalize the Application Layer. During
the finalization step, the software will shut down the Installation Machine properly.
After installing the applications on the Installation Machine, complete the following steps:
1. Return to the Unidesk Management Console
2. Select the Application Layer in the Layers module.
3. Select Finalize.
4. Monitor the Task bar to verify that the action completes successfully and that the Application Layer is deployable.
Layer integrity check
When finalizing a Layer, Unidesk checks the integrity of the Layer, and waits until any Windows operations that are in
progress on the Installation Machine have completed. If the following message is displayed, one or more pending tasks on
the Installation Machine must be completed before the Layer can be finalized. Otherwise, any Layers that use this
Installation Machine would have issues.
Layer integrity message
As described in the following message, you can expedite the completion of any of these queued tasks:
The new version version-name of Layer layer-name on Installation Machine (IM) im-name can only be finalized when the
following conditions have been addressed:
A reboot is pending to update drivers on the boot disk - please check and reboot the IM.
A post-installation reboot is pending - please check and reboot the IM.
A Microsoft NGen operation is in progress in the background - (Click here for help with this condition).
An MSI install operation is in progress - please check the IM.
How to investigate Microsoft NGen operations
NGen is the Microsoft "Native Image Generator". It is part of the .NET system, and basically recompiles .NET byte code into
native images and constructs the registry entries to manage them. Windows will decide when to run NGen, based on what
is being installed and what Windows detects in the configuration. When NGen is running, you must let it complete. An
interrupted NGen operation can leave you with nonfunctioning .NET assemblies or other problems in the .NET system.
You have the choice of waiting for the NGen to complete in the background or you can force the NGen to the foreground.
© 1999-2017 Citrix Systems, Inc. All rights reserved. p.128https://docs.citrix.com
Forcing the NGen to the foreground will allow you to view the progress and once the output has completed you should be
able to finalize the layer.
Force an NGen operation to the foreground
Normally, NGen is a background operation and will pause if there is foreground activity. Bringing the task into the
foreground can help the task to complete as quickly as possible.
1. Open a command prompt as Administrator.
2. Go to the Microsoft .NET Framework directory for the version currently in use:
cd C:\Windows\Microsoft.NET\FrameworkNN\vX.X.XXXXX
3. Enter the NGen command to execute the queued items:
ngen update /force
This brings the NGen task to the foreground in the command prompt, and lists the assemblies being compiled.
Note: It ’s okay if you see several compilation failed messages!
4. Look in the Task Manager to see if an instance of MSCORSVW.EXE is running. If it is, you must allow it to complete,or
re-run ngen update /force. Do not reboot to stop the task. You must allow it to complete.
Check the status of an NGen operation
If you would prefer to wait for the NGen to complete you can check the status as described here. However, every time you
check the queue status, you are creating foreground activity, which might cause the background processing to temporarily
pause.
1. Open a command prompt as Administrator.
2. Check status by running this command:
ngen queue status
3. When you receive the following status, the NGen is complete, and you can finalize the Layer.
The .NET Runtime Optimization Service is stopped
Considerations
About setting a script to run the first time the user logs in
When you create a Layer or Layer Version, you can specify a script, called a Run Once script, to run the first time a user logs
in after the Desktop starts (restarts). For example, you can use a Run Once script to complete the setup for an application.
A Run Once script is a .cmd or .bat file installed on the Installation Machine.
User permissions - When an Application Layer that has a Run Once script runs for the first time, Microsoft Windows
attempts to delete the RunOnce key before running the script. The Desktop user must have the rights to delete the
RunOnce key, or the script doesn't run. If you need a Run Once script to be run by any user, set the permissions on the

© 1999-2017 Citrix Systems, Inc. All rights reserved. p.129https://docs.citrix.com
Run Once folder accordingly. For details, see http://support.microsoft.com/kb/314866.
New Layer Versions - When you create a new Layer Version, the new Version does not inherit the script from the
original Layer. If you want to include the script from the original Layer, you need to set the Run Once script for the Layer
Version.
RunOnce registry key - When a Run Once script runs on a Desktop, the operating system adds an entry to the
Desktop's RunOnce registry key:
HKEY_LOCAL_MACHINE\Software\Microsoft\Windows\CurrentVersion\RunOnce
How to set a Run Once script
How to set a Run Once script to run more than once
© 1999-2017 Citrix Systems, Inc. All rights reserved. p.130https://docs.citrix.com
Use Open Console to log in
Jun 28 , 2017
For quick access to desktops, Installation Machines, Operating System Layers, or Application Layers, you can launch an
Open Console window from the Unidesk Management Console. The Unidesk Management Console uses Remote Desktop
Protocol (RDP) to open an Open Console window for the Desktop or Installation Machine you specify. If you access an
Operating System or Application Layer, the console connects to the virtual machine for the appropriate Installation
Machine.
Prerequisites
Before you can use the Open Console feature, the remote machine must meet the following requirements.
Prerequisite Description
Remote Access
enabled
The gold image for the desktop or Installation Machine must have Remote Access enabled:
In the System Properties dialog box, under Remote Desktop, click one of the options to allow
connections from other computers, and then click OK
Virtual machine
operational
Whether accessing a Desktop, Installation Machine, or a layer, you will ultimately connect to a
Desktop or Installation Machine, and it must be in one of these states:
In Use — The Desktop is in use by a Unidesk user.
Running — The Desktop is ready for use.
Use Open Console to access Unidesk Desktops, Layers, and Installation Machines
The following table explains how to use Open Console to access a Desktop, Installation Machine, Operating System Layer,
or Application Layer.
1. Access Open Console:
For... Use...
Desktop Desktops > Open Console
Installation Machine System > Installation Machines > Open Console
Operating System Layer's Installation Machine Layers > Operating System Layer > Open Console
Application Layer's Installation Machine Layers > Application Layer > Open Console
2. Depending on your Web browser settings, you might need to change the security settings to proceed.

© 1999-2017 Citrix Systems, Inc. All rights reserved. p.131https://docs.citrix.com
3. In the Open Console window, enter your login credentials for the desktop or Installation Machine. This opens the
console window.

© 1999-2017 Citrix Systems, Inc. All rights reserved. p.132https://docs.citrix.com
Assign an App Layer to Desktops
Jun 28 , 2017
A Desktop includes the applications that users require for their work. The Unidesk Management Console lets you add,
remove, or reinstall applications on deployable Desktops.
Before you start
Check the Layers module to make sure that the required Application Layers are available.
Assign applications
1. Select Desktops and select one or more desktops.
2. Select Edit Desktops. This opens the Edit Desktop wizard.
3. In the Application Assignment tab, select one or more applications from the Available Layers list to add it to the
desktop. By default, the software selects the most recent version. To add or remove a specif ic version, complete the
following steps:
1. Expand an application to view the available versions.
2. Select the box next to a version you want to use.
3. Clear the box next to a version that you want to remove.
4. If you want to reinstall a previously-assigned application, select Reinstall.
4. In the Maintenance Schedule tab, select a method for deployment of the configuration changes. You can deploy them
in any of the following ways:
Select or create a maintenance schedule. A maintenance schedule deploys changes during a specif ied time frame.
As soon as possible. This option deploys the configuration changes after you shut down the desktops. Selecting this
option overrides the current maintenance schedule.
Defer deployment until a specif ied date and time. This option defers deployment of configuration changes until the
specif ied time elapses. At that time, Unidesk deploys the configuration changes if the desktops are shut down.
Selecting this option overrides the current maintenance schedule.
When the user logs out or reboots the desktop. This option defers deployment util the user logs out or reboots
the desktop.
5. In the Confirm and Complete tab, verify that the application assignment details are correct, and click Update Desktop.
Unidesk deploys the configuration changes as specified by your Maintenance Schedule selection.
© 1999-2017 Citrix Systems, Inc. All rights reserved. p.133https://docs.citrix.com
Deploy anti-virus software
Jun 28 , 2017
You can deploy some of the most commonly-used anti-virus products in a Unidesk environment, including products from
Symantec, McAfee, Trend Micro, Sophos, Kaspersky, and AVG.
General Guidelines
Anti-virus software update options
When deploying anti-virus software in a Unidesk layer, one of the considerations is how to handle the anti-virus updates.
You can either:
Turn on auto updates, and let the updates get stored in the user's Personalization Layer. If auto updates happen daily,
this might be the most convenient approach. Note that whenever there is a major product update, you'll need to reinstall
on the UEP by redeploying the layer to the desktop with the Reinstall the layer checkbox selected.
Turn off auto updates, and redeploy the layer for each update. This requires updating the layer whenever you want to
push out new updates.
We generally recommend using the method with which you're most comfortable. This probably means continuing to do
whatever you've been doing.
Before you start
When deploying any anti-virus software package in the Unidesk environment, you may need to:
Start the Remote Registry Service for any of the remote installations.
Disable the f irewall on the desktop before installing to allow the products to install.
Disable Simple File sharing.
Enable/disable User Account Control (UAC).
Read the installation instructions for Virtual Desktop Infrastructure (VDI) deployments on the web site for the product
you are installing.
AVG software
About deploying AVG in a Unidesk environment
You can use a gold image or an Application Layer to deploy the AVG Business Edition anti-virus software in the Unidesk
environment.
Deployment methods
Use either of the following methods to deploy the AVG anti-virus software:
Install the software on a gold image and import it to a new Operating System Layer.
Install the software on an Application Layer and assign the layer to new or existing desktops.
Tested versions
The following version of AVG anti-virus software has been tested:
AVG 2013 Business Edition.

© 1999-2017 Citrix Systems, Inc. All rights reserved. p.134https://docs.citrix.com
Install the software on a gold image
To deploy AVG software on a gold image:
1. If using Windows XP, stop all Citrix applications.
2. Install the AVG software on the gold image.
3. Open the AVG application and select AVG Settings Manager.
4. Select Edit AVG Settings.
5. Select System Services, and disable all AVG Services.
6. Select AVG Advanced Settings, Anti-Virus, Cache Server, and disable file caching.
7. Delete cache files:
On Windows 7, delete the following files:
C:\ProgramData\AVG2013\Chjw\*.*
On Windows XP, delete the following files:
C:\Documents and Settings\All Users\Application Data\AVG2013\Chjw\*.*
8. Enable all the AVG Services again.
9. Shut down the gold image.
10. Create an Operating System Layer using this gold image.
11. On newly deployed desktops, it is recommended that you enable the Caching option again. You can do this
automatically through integration with AVG Remote Administrator.
Install the software on an Application Layer
1. If using Windows XP, stop all Citrix applications.
2. Install the AVG software on the Application Layer.
3. Deploy the AVG layer to desktops.
Issues with AVG in the Unidesk environment
When AVG is deployed as an Application Layer on Windows XP, SSL detection is not immediate. To workaround this issue,
you can either install AVG on the gold image, or enable the Scan files on close option.
To enable the Scan files on close option:
1. Open Advanced settings (F8).
2. Select Antivirus > Resident Shield.
3. Select the Scan f iles on close option, and save the setting.
Kaspersky anti-virus software
About deploying Kaspersky software in a Unidesk environment

© 1999-2017 Citrix Systems, Inc. All rights reserved. p.135https://docs.citrix.com
This section provides Kaspersky installation information that is specific to the Unidesk environment. See the Kaspersky
documentation for additional instructions about deploying the software in a VDI environment. And, for details about using
Kaspersky for non-persistent desktops in a VDI environment, please read the section on Dynamic VDI Support in this
Kaspersky article.
Deployment methods
Use the following methods to deploy the Kaspersky anti-virus software:
Install the software on an Application Layer or Application Layer revision.
Install the software on the gold image you import into an Operating System Layer.
Install the software on an Operating System Layer revision.
Tested versions
The following versions of Kaspersky Anti-Virus software have been tested.
Kaspersky Endpoint Security 10.1.0.867(a) (Windows 7 only; Kaspersky 10.1 does not support Windows XP).
Note: See the special Kaspersky 10.1 requirement below (applies to version 10.1 only).
Kaspersky Endpoint Security 10.2 (Windows 7 only; Kaspersky 10.2 does not support Windows XP).
Note: Encryption with Kaspersky 10.2 is not supported. Kaspersky 10.2 Encryption uses a form of disk virtualization that
bypasses the Unidesk virtualization, and as such is incompatible with Unidesk. When deploying Kaspersky 10.2 make sure
to deselect the Encryption options before deploying the application.
Kaspersky Administration Server version 8.0.2163.
Kaspersky Anti-Virus for Windows Workstations, version 6.0.4.1424.
Requirements
If you plan to use a new Operating System Layer to deploy the Kaspersky software, install the software on the gold
image BEFORE you install the Unidesk Tools.
If you plan to use the Kaspersky Administration Server to manage the desktop, install both Kaspersky Anti-Virus for
Workstations and Kaspersky NetAgent on the Installation Machine (for Application Layers or layer revisions) or on a gold
image (for a new Operating System Layer).
If you do not plan to use the Kaspersky Administration Server, install Kaspersky Anti-Virus for Workstations only on the
Installation Machine or the gold image.
When you install the Kaspersky NetAgent, clear the selection for the start application during install option.
When you install the Kaspersky Anti-Virus for Workstations in a stand-alone configuration, do not enable password
protection for any of the administrative options. The password you enter on the Installation Machine or gold image
does not work on the desktop after you deploy the software.
After you install the Kaspersky software on an Installation Machine (for Application Layers or layer revisions), a system
restart (and desktop image rebuild) is required.
Kaspersky 10.1 special requirement
Before adding Kaspersky 10.1 to either the gold image or to a layer, you need to add a value to the Unifltr service in the
registry. Here's how:
1. Run regedit.

© 1999-2017 Citrix Systems, Inc. All rights reserved. p.136https://docs.citrix.com
2. Navigate to the HKLM\System\CurrentControlSet\Services\Unif ltr key.
3. Right click in the right hand pane and a DWORD value.
4. Set the name of the value to MiniFilterBypass.
5. Set the value to 1.
6. Exit regedit.
7. Reboot the machine, as the setting is only read at boot time.
Special steps for installing the software on an Application Layer
Complete the following steps when you install the Kaspersky software on an Application Layer:
1. Install the Kaspersky software on the Installation Machine.
Note: If you will be deploying non-persistent desktops running Kaspersky, you need to mark the image as a Dynamic VDI
so that the Kaspersky Administration Server considers the clones of this image dynamic, and when a clone is turned off,
its information is automatically deleted from the database. To mark the image of a dynamic VDI, install the Kaspersky
Network Agent with the Enable dynamic mode for VDI parameter enabled. For details, see the section of this article
on Dynamic VDI Support.
2. Restart the Installation Machine using the vSphere client.
When you restart the Installation Machine, it might display the STOP message 0x75640001 several times. The
Installation Machine will then restart normally; no intervention is necessary. When you deploy this layer, the desktops
restart normally and do not display the STOP message.
3. Finalize the layer in the usual way.
If you assign the Application Layer with the Kaspersky software to a desktop when you create it, the Kaspersky NetAgent
might not start the first time a user logs in to the desktop. Restart the desktop to start the NetAgent software.
Possible issues
Kaspersky interoperability with Unidesk
The following interoperability issues can occur on Unidesk desktops that have Kaspersky anti-virus software installed.
Kasperky NetAgent startup
If you use an Application Layer to deploy the Kaspersky NetAgent software to a desktop, the NetAgent software might
not start the first time the desktops restarts. When this occurs, the Windows Event Viewer might display the following
error:
#1266 (0) Transport level error while connection to : authentication failure
If the NetAgent software doesn't start, restart the desktop. The NetAgent software should start properly at that time.
Kasperky 10 - End-user Pause causes Network Attack Blocker to stop working
When using Kaspersky 10, the end-user Pause causes the Network Attack Blocker to stop working. To fix this issue, restart
the Kaspersky software. The Network Attack Blocker will continue running as expected.
McAfee anti-virus software
About deploying McAfee in a Unidesk environment

© 1999-2017 Citrix Systems, Inc. All rights reserved. p.137https://docs.citrix.com
The following procedures describe how to use an Operating System Layer or an Application Layer to deploy the McAfee
anti-virus software in a Unidesk environment. These procedures are based on the McAfee Product Guides.
You can find McAfee documentation at the following locations:
ePolicy Orchestrator 4.5: https://kc.mcafee.com/corporate/index?page=content&id=KB65897
ePolicy Orchestrator 4.6: https://kc.mcafee.com/corporate/index?page=content&id=KB71037
Deployment method
Use either of the following methods to deploy the McAfee anti-virus software:
Install the software on a gold image that you import into an Operating System Layer.
Install the software on an OS Layer version.
Install the software on an Application Layer and assign the layer to new or existing desktops.
Tested versions
The following versions of McAfee anti-virus software have been tested:
ePolicy Orchestrator (ePO), version 4.6, 5.3.
McAfee Agent, version 4.5.0.1810, 5.0.2.188.
VirusScan Enterprise, version 8.8.0.777, 8.8.0.1445.
Notes: The ePolicy Orchestrator server was used to create the McAfee Agent installation package, as described in
"Creating custom agent installation packages" in the McAfee ePolicy Orchestrator Product Guide.
The ePolicy Orchestrator server was used to create the McAfee Agent installation package, as described in "Creating
custom agent installation packages" in the McAfee ePolicy Orchestrator Product Guide.
For ePO 5.3.1, - The Agent Contact Method priority should be set to 1 - IP Address 2 - FQDN 3 - NetBIOS Name to
communicate correctly with IM in workgroup and the 'Enable self protection' for the McAfee Agent policy should be
unchecked.
VirusScan Enterprise, version 8.8.0.1247, 8.8.0.1445.
Installation requirements
The requirements for installing the McAfee anti-virus software in a Unidesk gold image or Application Layer are the same as
those for Including the agent on an image outlined in the McAfee ePO product guide.
Depending on the McAfee version, you might need to remove the Globally Unique Identifier (GUID) for the McAfee Agent
after you install it . Refer to the McAfee documentation for the version of the software you are using to determine if this
step is recommended or required.
Install the software on a gold image
Use this procedure if you plan to use an Operating System Layer to deploy the McAfee anti-virus software on Unidesk
desktops.
1. Install the McAfee Agent software on the gold image. The gold image becomes visible in the ePolicy Orchestrator
System Tree systems list.

© 1999-2017 Citrix Systems, Inc. All rights reserved. p.138https://docs.citrix.com
2. Install the McAfee VirusScan Enterprise software on the gold image:
1. When prompted to remove Windows Defender, click Yes.
2. Allow the McAfee Agent Updater to complete an update. This step can take several minutes to complete.
3. Click Finish to complete the installation.
3. When the installation completes, the first scan begins. Allow the scan to complete.
4. Change the McAfee Start value:
1. Open the McAfee VirusScan Console, and disable the AccessProtection.
2. Open the registry editor (regedit), go to [HKEY_LOCAL_MACHINE\System\CurrentControlSet\Services\mfehidk], and
change the Start value from 0 to a 1.
3. Back in the McAfee VirusScan Console, re-enable the AccessProtection.
5. If McAfee requires it for your VDI setup, remove the GUID for the Agent (check the McAfee documentation to
determine if this step is necessary):
1. Open the registry editor (regedit).
2. Locate the following registry key and delete it:
32-bit: HKEY_LOCAL_MACHINE\SOFTWARE\Network Associates\ePolicy Orchestrator\Agent\AgentGUID
64-bit: HKEY_LOCAL_MACHINE\SOFTWARE\WoW6432Node\Network Associates\ePolicy
Orchestrator\Agent\AgentGUID
6. When prompted to do so, restart the gold image to allow McAfee to install its drivers.
7. Shut down the gold image and import it in to an Operating System Layer.
Install the software on an Application Layer
Use this procedure if you plan to use a layer to deploy the McAfee anti-virus software on Unidesk desktops.
1. In the Unidesk Management Console, complete the Create Layer wizard.
2. If you are layering McAfee on the Windows 8.1 OS, turn off Windows Defender.
3. When prompted to install the software, install the McAfee Agent software on the Installation Machine. After this
installation completes, the Installation Machine is visible in the ePolicy Orchestrator System Tree systems list.
4. Install the McAfee VirusScan Enterprise (VSE) software on the Installation Machine.
1. If prompted to remove Windows Defender, click Yes.
2. If layering McAfee on Windows 8.1, re-install the VSE software on the Installation Machine using f iles from the
McAfee EPO server. Otherwise, allow the McAfee Agent Updater to complete an update. This step can take several
minutes to complete.
3. Click Finish to complete the installation.
5. Change the McAfee Start value:
1. Open the McAfee VirusScan Console, and disable the AccessProtection.
2. Open the registry editor (regedit), go to [HKEY_LOCAL_MACHINE\System\CurrentControlSet\Services\mfehidk], and
change the Start value from 0 to a 1.
3. Back in the McAfee VirusScan Console, re-enable the AccessProtection.

© 1999-2017 Citrix Systems, Inc. All rights reserved. p.139https://docs.citrix.com
6. If McAfee requires it for your VDI setup, remove the GUID for the Agent (check the McAfee documentation to
determine if this step is necessary):
1. Open the registry editor (regedit).
2. Locate the following registry key and delete it:
32-bit: HKEY_LOCAL_MACHINE\SOFTWARE\Network Associates\ePolicy Orchestrator\Agent\AgentGUID
64-bit: HKEY_LOCAL_MACHINE\SOFTWARE\WoW6432Node\Network Associates\ePolicy
Orchestrator\Agent\AgentGUID
7.
8. Finalize the Application Layer and deploy the layer in the usual way.
Possible interoperability issues
The following interoperability issues can occur on Unidesk desktops that have McAfee anti-virus software installed.
Delays in opening video files
If the McAfee anti-virus software on a Unidesk desktop is configured to scan script files, you can experience long delays
when you try to open video files in the Microsoft Internet Explorer web browser.
When you try to open these files, the McAfee software and Unidesk try to perform operations on these files at the same
time. This conflict causes a delay in running the video file. All other windows and applications continue to function normally.
If you encounter this type of delay, wait for the video file to run. Eventually, the McAfee operation times out and the
Unidesk operation completes.
This issue has no affect on the ability of the anti-virus software to check the video files for viruses.
Desktops with McAfee layer are not visible from ePolicy Orchestrator
If desktops with a McAfee layer are not visible from ePolicy Orchestrator, you can fix the issue by using the steps outlined
in the following McAfee knowledge base article:
https://kc.mcafee.com/corporate/index?page=content&id=KB56086
McAfee MOVE AntiVirus software
About deploying McAfee MOVE AntiVirus software in a Unidesk environment
The following procedures describe how to deploy the McAfee MOVE AntiVirus software in a Unidesk environment.
Note: These instructions assume that you have installed and configured McAfee MOVE AntiVirus software on McAfee
ePolicy Orchestrator (ePO).
Deployment method
Use the following method to deploy the McAfee MOVE AntiVirus software.
Install the software on an Application Layer and assign the layer to existing desktops.
Tested versions
The following versions of McAfee MOVE AntiVirus software have been tested:

© 1999-2017 Citrix Systems, Inc. All rights reserved. p.140https://docs.citrix.com
McAfee Agent for Windows, version 4.8.0.1938
McAfee AV MOVE Multi-Platform client, version 3.6.0.347
McAfee VirusScan Enterprise, version 8.8.0.1247
McAfee AV MOVE Multi-Platform Offload Scan Server, version 3.6.0.347
McAfee VirusScan Enterprise, version 8.8.0.1445
McAfee AV MOVE Multi-Platform Offload Scan Server, version 3.6.1.141
Note: The McAfee Agent does not start for RDS sessions.
Installation requirements
Ensure that the following condition is met before deploying McAfee MOVE AntiVirus software.
For Windows 7 and 8.1: Windows Defender is turned off .
Create a McAfee Agent MOVE AV CLIENT Application layer
Use these steps to create a McAfee Agent MOVE AV CLIENT Application layer in Unidesk.
1. In the Unidesk Management Console (UMC), select Layers > Application Layer > Create Layer. The Create Layer Wizard
appears.
2. Complete the Create Layer Wizard and click Create Layer on the Confirm and Complete tab.
3. View the current tasks in the UMC. At f irst, the Create Application Layer <layer_name> task has a "Running" status.
When the status of the Create Application Layer <layer_name> task changes to 'Action Required', log in to the
Installation Machine (IM) as Administrator.
4. Push the McAfee Agent software to the IM using the McAfee ePolicy Orchestrator. The IM becomes visible in the ePO
System Tree list and the McAfee icon appears in the taskbar of the IM.
5. Use the Product Deployment task on the ePO to install the McAfee MOVE AV [Multi-Platform] Client on the IM.
6. Restart the IM and log in to it again as Administrator.
7. On the IM, delete the value for the registry key named AgentGUID from one of the following locations, depending on
your Windows operating system:
1. 32-bit: HKEY_LOCAL_MACHINE\SOFTWARE\Network Associates\ePolicy Orchestrator\Agent
2. 64-bit: HKEY_LOCAL_MACHINE\SOFTWARE\Wow6432Node\Network Associates\ePolicy Orchestrator\Agent
8. Shut down the IM.
9. Finalize the Application layer.
Microsoft Security Essentials
About deploying Microsoft Security Essentials in a Unidesk environment
The following procedures describe how to use an Operating System Layer or an Application Layer to deploy the Microsoft
Security Essentials anti-virus software in a Unidesk environment.
Deployment method
Use one of the following methods to deploy the Microsoft Security Essentials anti-virus software:
Install the software on a gold image that you import into an Operating System Layer.
Install the software on an OS Layer Version.
Install the software on an Application Layer.
Tested versions
© 1999-2017 Citrix Systems, Inc. All rights reserved. p.141https://docs.citrix.com
The following version of Microsoft Security Essentials anti-virus software has been tested:
Microsoft Security Essentials 2012
Antimalware Client Version: 4.2.223.0
Engine Version: 1.1.9901.0
Antivirus definition: 1.159.324.0
Antispyware definition: 1.159.324.0
Network Inspection System Engine Version: 2.1.9900.0
Network Inspection System Definition Version: 108.1.0.0
Installation requirements
The Microsoft Security Essentials anti-virus software in a Unidesk gold image, Operating System Layer Version, or
Application Layer.
You must enable the Windows Update service, but do not use the windows updates themselves. The updates themselvesmust remain disabled.
Configure Microsoft Security Essentials for Windows 7 on a Unidesk Layer Version
Use these steps to configure Microsoft Security Essentials on Windows 7 (32- or 64-bit). For Windows XP, these steps are
not required.
By default, the Windows Update service is disabled by the Unidesk Optimization scripts, so to correctly deploy Microsoft
Security Essentials as either an Operating System or Application Layer on Windows 7, you must do the following.
1. Create a new Operating System or Application Layer version.
2. Go to C:\windows\setup\scripts and re-run the Unidesk Optimization Script Builder (if it was deleted, download it again).
3. In the Unidesk Optimization Script Builder, deselect Disable Windows Update Service.
4. Finalize the Layer.
The Update service startup type will change from Disabled to Manual. Windows updates will not be enable, which is a
Unidesk requirement.
During installation, check services.msc and make sure that the Windows Update Service startup type is set to Manual. Ifit’s not, changethe Windows Update Service startup type to Manual and restart Windows.
Troubleshooting failed Microsoft Windows Essentials updates
If the Microsoft Security Essentials update fails on a Desktop because Windows updates are turned off, try the following.
Unless you have disabled Windows Updates using the Local Group Policy Editor, turn Windows Updates on using the
Control Panel. This allows Microsoft Security Essentials to update on the Desktop.
If you disabled Windows Updates using the Local Group Policy Editor, you need to:
1. Run regedit and remove the Local Group Policy.
2. Reboot the machine.
3. Enable Windows Updates from Control Panel.
Sophos Cloud Anti-Virus - All supported Operating Systems
Before you start
© 1999-2017 Citrix Systems, Inc. All rights reserved. p.142https://docs.citrix.com
Create and activate your Sophos Cloud account, as described in the Sophos documentation:
https://www.sophos.com/en-us/products/cloud.aspx
Install the Sophos Cloud software on a new version of the Operating System Layer
1. In the Unidesk Management Console, select Layers > OS Layers > Add Version.
2. When the task status changes to Action Required, prepare your Installation Machine (IM) according to the General
Guidelines for deploying anti-virus software (at the top of this topic).
3. Join the Installation Machine to the domain.
Note: The Sophos installer creates Groups and puts users to them, so the Installation Machine must be in the domain.
4. On the Installation Machine, log into your Sophos Cloud console (https://cloud.sophos.com/login ).
5. Download SophosInstall.exe from your Sophos Cloud account.
Important: Do not use the emailed installer for this installation.
6. Install the Sophos Cloud software onto the Installation Machine.
7. When the task to install Sophos has completed (or indicates that an Action is required), restart the Installation Machine.
8. In your Sophos Cloud console, click Reports > Events and ensure that the computer is managed in Sophos Cloud and
up-to-date before continuing.
9. Stop and disable the following Windows services:
Sophos MCS Client
Sophos MCS Agent
10. Delete the following f iles:
Windows 7 | Windows 8.1 | Windows Server 2008 R2
C:\ProgramData\Sophos\Management Communications System\Endpoint\Persist\Credentials
C:\ProgramData\Sophos\Management Communications System\Endpoint\Persist\EndpointIdentity.txt
C:\ProgramData\Sophos\Management Communications System\Endpoint\Persist*.xml
C:\ProgramData\Sophos\AutoUpdate\data\machine_ID
Windows XP
C:\Documents and Settings\All Users\Application Data\Sophos\Management Communications
System\Endpoint\Persist\Credentials
C:\Documents and Settings\All Users\Application Data\Sophos\Management Communications
System\Endpoint\Persist\EndpointIdentity.txt
C:\Documents and Settings\All Users\Application Data\Sophos\Management Communications
System\Endpoint\Persist\Persist*.xml
C:\Documents and Settings\All Users\Application Data\Sophos\AutoUpdate\data\machine_ID
11. Edit the Sophos configuration:
1. Navigate to the Sophos configuration folder for your operating system:
Windows 7 | Windows 8.1 | Windows Server 2008 R2
C:\ProgramData\Sophos\Management Communications System\Endpoint\Config\

© 1999-2017 Citrix Systems, Inc. All rights reserved. p.143https://docs.citrix.com
Windows XP
C:\documents and Settings\All Users\Application Data\Sophos\Management Communications
System\Endpoint\Config\
2. Create or open a file called registration.txt, and add the following lines to this file:
[McsClient]
Token=value_of_MCS_REGISTRATION_TOKEN
where value_of_MCS_REGISTRATION_TOKEN is the value of the MCS_REGISTRATION_TOKEN, which identifies
your Sophos Cloud account. You must extract the value of this token from SophosInstall.exe, as described in Sophos
Article ID: 119699.
12. Edit the Sophos setup f ile:
1. In the folder listed below, create a file called SophosSetup.cmd.
Windows 7 | Windows 8.1 | Windows 2008 R2 Datacenter
C:\Windows\Setup\scripts\kmsdir
Windows XP
C:\sysprep\i386\$oem$
2. Add the following lines to this file, including the double quotes:
sc config "Sophos MCS Client" start= auto
sc config "Sophos MCS Agent" start= auto
net start "Sophos MCS Client"
net start "Sophos MCS Agent"
13. Edit the commands to run each time Sophos is started:
1. Edit the f ile c:\Windows\Setup\scripts\kmsdir\kmssetup.cmd.
2. Add the following script to the section labeled, Commands to run every boot. This script runs the SophosSetup.cmd
file. Script details:
REM Change Sophos Service to Automatic - once
If EXIST SophosSetup.cmd (
echo !date!-!time!-kmssetup.cmd:Call SophosSetup.cmd >> SophosSetuplog.txt
Call SophosSetup.cmd >> SophosSetuplog.txt
Copy SophosSetup.cmd SophosSetupCMD.txt >> SophosSetuplog.txt
Del SophosSetup.cmd >> SophosSetuplog.txt
)
Windows XP only
1. Create a f ile named CmdLines.txt and place it in the folder C:\sysprep\i386\$oem$.

© 1999-2017 Citrix Systems, Inc. All rights reserved. p.144https://docs.citrix.com
2. Add the following lines to this file:
[Commands]
"SophosSetup.cmd"
14. Join the Installation Machine back to the workgroup.
15. Finalize the Operating System Layer in usual way.
Sophos Anti-Virus - Windows 7, Windows 8.1, and Windows 2008 R2 Desktops
About deploying Sophos to new Windows 7 Desktops
This section explains how to deploy the Sophos anti-virus software on new or existing Desktops. You can add Sophos Anti-
virus to either the gold image or to a Version of the Operating System Layer.
These procedures are based on the Sophos knowledge base article that describes how to configure a Desktop to
communicate with the Enterprise Console when the Desktops are used in a VDI environment.
Deployment method
You must always use a gold image or an Operating System Layer Version to deploy Sophos software. You cannot deploy
Sophos software as an Application layer. This is because Sophos creates a user account that it uses for updates on the
desktops it manages, and Unidesk supports these user accounts in the gold image or Operating System Layer Version.
Tested versions
The following version of Sophos anti-virus software has been installed:
Sophos Enterprise Console version 5.1.
Sophos Endpoint Security and Control version 10.3.15
Sophos Endpoint Security and Control version 10.
Note: If Sophos is unable to update the Sophos Auto Update module, all virus signature updates will also fail. To allow
Sophos to update its own updater, edit your OS Layer and delete this directory:
C:\ProgramData\Sophos\AutoUpdate\Cache\sau
Configure the gold image or the Operating System Layer Version
To deploy Sophos in the Unidesk environment:
1. Install the Sophos software on the gold image or Operating System Layer Version.
2. If using a gold image, make sure the Unidesk Tools are installed on the image. If using an Operating System Layer Version,
you can skip this step.
When prompted, allow the system to restart, but do not shut down the gold image after installation finishes. Instead,
complete the rest of this procedure first.
3. Stop and disable only the Sophos services listed in this step. When you deploy the desktops, a Mini-Setup runs. Disabling
the specif ied services ensures that the Sophos services do not start until the Mini-Setup completes.
Sophos Agent
Sophos AutoUpdate Service

© 1999-2017 Citrix Systems, Inc. All rights reserved. p.145https://docs.citrix.com
Sophos Message Router
4. Open the registry editor (using regedit) and delete the pkc and pkp values for the following keys:
Windows 32-bit systems
HKLM\Software\Sophos\Messaging System\Router\Private\
HKLM\Software\Sophos\Remote Management System\ManagementAgent\Private\
Windows 64-bit systems
HKLM\Software\Wow6432Node\Sophos\Messaging System\Router\Private\
HKLM\Software\Wow6432Node\Sophos\Remote Management System\ManagementAgent\Private\
5. Delete the following files:
C:\ProgramData\Sophos\AutoUpdate\data\machine_ID.txt
C:\ProgramData\Sophos\AutoUpdate\data\status\status.xml
6. Rename the directories:
From: C:\ProgramData\Sophos\AutoUpdate\Cache\savxp
To: C:\ProgramData\Sophos\AutoUpdate\Cache\savxp.copy
From: C:\ProgramData\Sophos\AutoUpdate\Cache\rms
To: C:\ProgramData\Sophos\AutoUpdate\Cache\rms.copy
This step is required because Unidesk blocks attempts to rename directories that exist on a gold image and the Sophos
update requires it to rename these directories.
7. Create a file named SophosSetup.cmd and place it in the C:\Windows\Setup\scripts\kmsdir folder. (If the folder doesn't
exist, create it).
8. Add the following lines to SophosSetup.cmd (include the double quotes as shown below):
cd "c:\ProgramData\Sophos\AutoUpdate\Cache"
xcopy savxp.copy\*.* savxp\*.* /s/y
xcopy rms.copy\*.* rms\*.* /s/y
sc config "Sophos Agent" start= auto
sc config "Sophos AutoUpdate Service" start= auto
sc config "Sophos Message Router" start= auto
net start "Sophos Agent"
net start "Sophos AutoUpdate Service"
net start "Sophos Message Router"
cd "c:\Windows\Setup\scripts\kmsdir"
9. Edit the c:\Windows\Setup\scripts\kmsdir\kmssetup.cmd file, and add the following script to the section labeled,
'Commands to run every boot'. This script runs the SophosSetup.cmd file. Script details
Example of kmssetup.cmd with Sophos script
REM Change Sophos Service to Automatic - once
If EXIST SophosSetup.cmd (
echo !date!-!time!-kmssetup.cmd:Call SophosSetup.cmd >> SophosSetuplog.txt

© 1999-2017 Citrix Systems, Inc. All rights reserved. p.146https://docs.citrix.com
Call SophosSetup.cmd >> SophosSetuplog.txt
Del SophosSetupCMD.txt >> SophosSetuplog.txt
Copy SophosSetup.cmd SophosSetupCMD.txt >> SophosSetuplog.txt
Del SophosSetup.cmd >> SophosSetuplog.txt
)
10. If you are using a gold image, shut down the gold image, and use the Unidesk Management Console to create a new
Operating System Layer. This imports the gold image into the new Operating System Layer.
If you are using an Operating System Layer Version, finalize the version in the usual way.
11. To become protected, Persistent Desktops need to be restarted an extra time. Use the Unidesk Management Console
to restart the Desktop.
Optional: Adjust the security identifier
After importing the gold into an Operating System Layer, you might need to create a new version for the Operating System
Layer to update the security identifier (SID) values in one of the Sophos configuration files. The following Sophos
knowledge base article explains how to update the security identifier (SID) values in one of the Sophos configuration files.
When do I need to adjust the SID?
If you deploy a desktop using the Operating System Layer with the Sophos software and the user cannot open the
Sophos Endpoint Security and Control user interface, you need to adjust the SID.
SID adjustment procedure
You can do these steps either before or after importing the gold image into the Unidesk environment. Before you have
imported the gold image into the Unidesk environment, you can do these steps on the gold image. If you have already
imported the gold image, you may do these steps by either editing the latest Operating System Layer revision, or by
creating a new revision of the Operating System Layer.
1. Download the script f ile called UpdateSID.vbs from the Sophos web site. Place this f ile in the C:\Windows\Setup\Scripts
directory. This script is required to f ix the machine ID after a desktop has been deployed.
2. Edit the C:\Windows\Setup\Scripts\SophosSetup.cmd file, and add the following two lines to the end of the file:
cd \Windows\setup\scripts
cscript.exe UpdateSID.vbs //B
3. If this is a an OS layer version, finalize the version in the usual way.
You can now create desktops using this version of the Operating System Layer. The desktops should be able to connect to
the Enterprise Console, register, and update according to the update schedule.
Sophos Anti-Virus - New Windows XP Desktops
About deploying Sophos to new Windows XP Desktops
The following procedures apply to deploying the Sophos anti-virus software on new Desktops only. For instructions about
deploying this software on existing Desktops, see the next section.
These procedures are based on the Sophos knowledge base article that describes how to configure a Desktop to
© 1999-2017 Citrix Systems, Inc. All rights reserved. p.147https://docs.citrix.com
communicate with the Enterprise Console when the Desktops are used in a VDI environment.
Deployment method
To deploy Sophos in the Unidesk environment:
1. Install the software on a gold image or an OS revision.
2. Import the gold image or OS revision into an Operating System Layer.
Tested versions
The following version of Sophos anti-virus software has been tested:
Sophos Enterprise Console version 5.1.
Sophos Endpoint Security and Control version 10.
Configure the gold image or the Operating System Layer Version
You must always use a gold image or an OS revision to deploy Sophos software. You cannot deploy Sophos software as an
Application layer. This is because Sophos creates a user account that it uses for updates on the desktops it manages, and
Unidesk supports these user accounts in the gold image or OS revision.
1. Install the Sophos software on the gold image or OS revision.
2. If using a gold image, install the Unidesk Tools on the image. If using an OS revision, you can skip this step.
When prompted, allow the system to restart, but do not shut down the gold image after installation finishes. Complete
the rest of this procedure first.
3. Stop and disable only the Sophos services listed in this step. When you deploy the desktops, a Mini-Setup runs. Disabling
the specified services ensures that the Sophos services do not start until the Mini-Setup completes.
Sophos Agent
Sophos AutoUpdate Service
Sophos Message Router
4. Open the registry editor (using regedit) and delete the pkc and pkp values for the following keys:
HKLM\Software\Sophos\Messaging System\Router\Private\
HKLM\Software\Sophos\Remote Management System\ManagementAgent\Private\
5. Delete the following files:
C:\Documents and Settings\All Users\Application Data\Sophos\AutoUpdate\data\machine_ID.txt
C:\documents and Settings\All Users\Application Data\Sophos\AutoUpdate\data\status\status.xml
6. Rename the directories:
From: C:\documents and Settings\All Users\Application Data\Sophos\AutoUpdate\Cache\savxp
To: C:\documents and Settings\All Users\Application Data\Sophos\AutoUpdate\Cache\savxp.copy
From: C:\documents and Settings\All Users\Application Data\Sophos\AutoUpdate\Cache\rms
To: C:\documents and Settings\All Users\Application Data\Sophos\AutoUpdate\Cache\rms.copy

© 1999-2017 Citrix Systems, Inc. All rights reserved. p.148https://docs.citrix.com
This step is required because Unidesk blocks attempts to rename directories that exist on a gold image and the Sophos
update requires it to rename these directories.
7. Edit the answer file (sysprep.inf):
1. If you do not have an answer f ile (sysprep.inf) prepared , log in to the Support area on the Unidesk website, download
the sample answer f ile, and copy it to the C:\sysprep folder.
2. Locate the [Unattended] section.
If this section doesn't exist, add the following line to the file:
[Unattended]
3. Add the following line to the [Unattended] section, if it 's not already there:
InstallFilesPath=C:\sysprep\i386
8. Create a file named SophosSetup.cmd and place it in the c:\sysprep\i386\$oem$ folder (create the folder if it doesn’t
already exist).
9. Add the following lines to SophosSetup.cmd (include the double quotes as shown below):
cd "C:\documents and Settings\All Users\Application Data\Sophos\AutoUpdate\Cache"
xcopy savxp.copy\*.* savxp\*.* /s/y
xcopy rms.copy\*.* rms\*.* /s/y
sc config "Sophos Agent" start= auto
sc config "Sophos AutoUpdate Service" start= auto
sc config "Sophos Message Router" start= auto
net start "Sophos Agent"
net start "Sophos AutoUpdate Service"
net start "Sophos Message Router"
cd "c:\Windows\Setup\scripts\kmsdir"
10. Edit the CmdLines.txt file in the c:\sysprep\i386\$oem$ folder (create this file if it doesn’t exist).
11. If the file does not include a [Commands] section, create one. Then, add the following line to the [Commands] section.
Include the quotation marks, as shown:
"SophosSetup.cmd"
Important: Ensure that this entry is on its own line by moving the cursor to the end of the line and pressing Enter.
12. If you are using a gold image, shut down the gold image, then use the Unidesk Management Console to create a new
Operating System Layer. This imports the gold image into the new OS layer.
If you are using an OS revision, finalize the version in the usual way.
13. To become protected, Persistent Desktops need to be restarted an extra time. Use the Unidesk Management Console
to restart the Desktop.
Optional: Adjust the security identifier
After importing the gold into an Operating System Layer, you might need to create a new version for the Operating System

© 1999-2017 Citrix Systems, Inc. All rights reserved. p.149https://docs.citrix.com
Layer to update the security identifier (SID) values in one of the Sophos configuration files. The following Sophos
knowledge base article explains how to update the security identifier (SID) values in one of the Sophos configuration files.
When do I need to adjust the SID?
If you deploy a desktop using the Operating System Layer with the Sophos software and the user cannot open the
Sophos Endpoint Security and Control user interface, you need to adjust the SID.
Adjust the SID
You can do these steps either before or after importing the gold image into the Unidesk environment. Before you have
imported the gold image into the Unidesk environment, you can do these steps on the gold image. If you have already
imported the gold image, you may do these steps by either editing the latest Operating System Layer revision, or by
creating a new revision of the Operating System Layer.
1. Download the script f ile called UpdateSID.vbs from the Sophos web site at http://www.sophos.com/en-
us/support/knowledgebase/113207.aspx.
2. Place this f ile in the C:\Program Files\Sophos directory. This script is required to f ix the machine ID after a desktop has
been deployed.
3. Create a file in the C:\Program Files\Sophos directory called SophosUpdateSID.cmd and place the following lines in the
file:
cd C:\Program Files\Sophos
cscript.exe UpdateSID.vbs //B
4. Edit the c:\Sysprep\sysprep.inf file:
1. If the section [GuiRunOnce] doesn’t exist, create it at the bottom of the f ile.
2. Add this line to the above section. (Include the double quotes, as shown.)
"C:\Program Files\Sophos\SophosUpdateSID.cmd"
3. Save the f ile.
5. If this is a an OS layer version, f inalize the version in the usual way.
You can now create desktops using this version of the Operating System Layer. The desktops should be able to connect to
the Enterprise Console, register, and update according to the update schedule.
Sophos Anti-Virus - Existing Windows XP Desktops
Create the Sophos Application Layer that activates the Sophos services on each Windows XP Desktop
The purpose of this layer is to execute a run-once script that starts the Sophos services correctly on desktops using the
Microsoft Windows XP operating system.
For existing Desktops, the script runs the first time a user logs in to the Desktop and does not run during subsequent logins.
For new Desktops, the script runs after it 's been restarted once. After the first login, remove this layer at your convenience.
1. In the Unidesk Management Console, select Layers >Application Layer.
2. Select Create Layer in the Action bar. This opens the Create Layer wizard.
3. In the Layer Details tab, enter the following path in the Script Path. (Include the double quotes as shown below):
© 1999-2017 Citrix Systems, Inc. All rights reserved. p.150https://docs.citrix.com
"C:\Program Files\Sophos\SophosSetup.cmd"
4. In the Installation Machine Details tab, select the Operating System Layer that contains the Sophos software.
5. Complete the wizard.
6. When prompted to install software on the Installation Machine, copy the file c:\sysprep\i386\$oem$\SophosSetup.cmd
to C:\Program Files\Sophos.
7. Select Finalize in the Action bar.
Edit the Windows XP Desktops
Use the following procedure to deploy the Sophos anti-virus software to existing Windows XP Desktops.
1. In the Unidesk Management Console, select the desktops that need the Sophos software.
2. Select Edit Desktops in the Action bar.
3. In the OS Assignment tab, select the Operating System Layer that contains the Sophos software.
4. In the Application Assignment tab, select the Application Layer that defines the run-once script.
5. Complete the wizard.
When the deployment task completes, users can login, the Sophos run once script runs, and the Sophos anti-virus
software is active.
Symantec Endpoint Protection software
About deploying Symantec Endpoint Protection software in a Unidesk environment
You can deploy the Symantec™ Endpoint Protection application using any of the following methods.
Install the application on a gold image, then import the gold image into an Operating System Layer.
Install the application as an OS Layer version.
Install the application as part of an Application Layer.
Note: On-access scanning is recommended in Unidesk Deployments. You can use the Symantec Shared Insight Cache to
improve performance by avoiding the rescan of files in a Layer after the files have been marked 'clean.'
Symantec Endpoint Protection behavior on Unidesk desktops
The following table describes virus scan behavior on Unidesk desktops.
Scantype
Behavior
On-access
Microsoft Windows XP and Microsoft Windows 7: On-access scans work as expected on all Unideskdesktops.
Microsoft Windows XP: A manual virus scan examines only the files on the virtual machine's boot volume.
The boot volume contains the parts of the operating system that start the desktop and a basic network

© 1999-2017 Citrix Systems, Inc. All rights reserved. p.151https://docs.citrix.com
Manual stack that allows the desktop to access its layers on the CachePoint Appliance.
Microsoft Windows 7: If you turn off User Account Control (UAC), a manual virus scan examines only the files
on the virtual machine's boot volume. You should keep UAC enabled when you install the software.
Tested versions
Symantec Endpoint Protection Client and Manager support:
v 12 and 12.1 (supported)
v 12.1.2 and 12.1.3 (not supported)
v 12.1.4 (supported)
v 12.1.5 (supported)
v 12.1.6 (supported)
Important: Symantec Endpoint Protection 12.1.2 and 12.1.3 are not supported due to a Symantec issue that prevents
Unidesk from working correctly. Use Symantec 12, 12.1, 12.1.4, 12.1.5, or 12.1.6 with Unidesk.
Symantec Endpoint Protection and Windows compatibility
Although Symantec Endpoint Protection supports the Windows 8.1 64-bit operating system, it does not work with
Windows 8.1 32-bit.
Install software using Symantec Endpoint Protection Manager
If you are using the Symantec Endpoint Protection Manager to install the Symantec Endpoint Protection Client onto a
gold image or an Installation Machine, follow these steps.
This procedure uses Computer Mode as the deployment method.
1. In the Symantec Endpoint Protection Manager, locate the gold image (if you are using an Operating System Layer) or
the Installation Machine (if you are using an Application Layer or layer revision).
1. Select Clients > Find Unmanaged Computers.
2. Enter the appropriate search criteria in the displayed window.
3. Install the software.
2. Log into the Installation Machine and turn Tamper Protection off .
3. Turn off the registry entry for “Stealth” protection (shown below). This allows scanning to work even if User Account
Control (UAC) is turned on.
For 32-bit machines:
[HKEY_LOCAL_MACHINE\SOFTWARE\Symantec\Symantec Endpoint Protection\AV\Common]
"ScanStealthFiles" = (REG_DWORD) 0
For 64-bit machines:
[HKEY_LOCAL_MACHINE\SOFTWARE\Wow6432Node\Symantec\Symantec Endpoint Protection\AV\Common]
"ScanStealthFiles" = (REG_DWORD) 0

© 1999-2017 Citrix Systems, Inc. All rights reserved. p.152https://docs.citrix.com
4. Using regedit, change the Group and Tag values for each ccSettings GUID.
1. Go to [HKEY_LOCAL_MACHINE\System\CurrentControlSet\Services\ccSettings_{GUID}]. If there is more than one
ccSettings_{GUID}, start with the first one.
Note: When you first install Symantec, there is one ccSettings_{GUID}, and each time you upgrade the application,
another GUID is added.
2. For each ccSettings_{GUID}, change the Group value from FSFilter Bottom to FSFilter Virtualization.
3. Then change the Tag value to an 8 for the first GUID, and add 1 to the value for each succeeding GUID. So, for the
next GUID the value will be 9, the one after that will be 10, etc.
5. Restart the Installation Machine or Gold image, then restart the Installation Machine as often as necessary until the
post-installation reboot request no longer appears in the Unidesk Manager Console.
6. Turn Tamper Protection back on.
7. For SEP 12.1.x, use the instructions in the following knowledge base article to prepare the machines to deploy the
software in a VDI environment.
How to prepare a Symantec Endpoint Protection 12.1 client for cloning:
http://www.symantec.com/docs/HOWTO54706
8. Shut down the Gold image and import it in to an Operating System Layer or Finalize IM.
Installation considerations
When you deploy the Symantec Endpoint Protection application, the Unidesk software needs to rebuild the desktop or
Installation Machine image several times during deployment (depending on how you deploy this application). This behavior is
expected, as the Symantec Endpoint Protection software does not complete the full configuration of boot-level
components during the initial installation.
For client-server deployments
The Symantec Endpoint Protection software:
Installs some of the required drivers and restarts the desktop or Installation Machine.
Updates additional components and restarts the desktop or Installation Machine again.
Completes the installation and restarts the desktop or Installation Machine one more time.
Deploying to desktops
If you are deploying the Symantec software to Non-persistent Desktops, it must be included when creating the desktop. If
you add an Application Layer containing Symantec Endpoint Protection to an existing Non-persistent Desktop, two entries
per Desktop will show up in the Symantec Endpoint Protection Manager.
If you create a Persistent Desktop on Windows 2008 R2 with a SEPM Application Layer or assign the SEPM Application
Layer to an existing Desktop, two instances of the same machine with different names appear in the SEPM console. One
name is correct. The second name (UNIDESKxxxxx) is a temporary name that should have been deleted. To fix this issue you
can delete clients that have not connected for X number of days:
1. In the SEPM console, go to the Admin page, and select Domains.
2. Under Tasks, select Edit Domain Properties.

© 1999-2017 Citrix Systems, Inc. All rights reserved. p.153https://docs.citrix.com
3. In the Edit Domain Properties window, on the default General tab, note the option to Delete clients that have notconnected for specif ied time. A recommended value for large enterprise environments would be 7 to 14 days.
4. For details, see Solution 2 in this SEP article.
Symantec Help (SymHelp) diagnostic tool considerations
If you plan to deploy Symantec Endpoint Protection in a layer please note that the Symantec Help (SymHelp) diagnostic
tool requires that 2 files be placed in the UEP. In order to do, create a script with the following lines and place the path to it
in a script path when applying the Symantec layer.
pushd "C:\ProgramData\Symantec\Symantec Endpoint Protection\CurrentVersion\Data\IRON"
copy Iron.db Iron.db.save
copy Iron.db.save Iron.db /y
copy RepuSeed.irn RepuSeed.irn.save
copy RepuSeed.irn.save RepuSeed.irn /y
popd
Trend Micro OfficeScan anti-virus software
About deploying Trend Micro OfficeScan software in a Unidesk environment
The following procedures describe how to use an Operating System Layer or an Application Layer to deploy the Trend
Micro™ OfficeScan anti-virus software in the Unidesk environment. These procedures are based on the Trend Micro
documentation for deploying desktops in a VDI environment.
Please refer to the following Trend Micro document, as it is important to understand their recommendations when
installing the software:
http://esupport.trendmicro.com/solution/en-us/1056314.aspx
For Knowledge base articles and Forum discussions on other Trend Micro products, search the Unidesk site.
Deployment methods
Use any of the following methods to deploy the Trend Micro anti-virus software:
Install the software on a gold image and import it to a new Operating System Layer.
Install the software on an OS Layer version.
Install the software on an Application Layer and assign the layer to new or existing desktops.
Important
If you install Trend Micro OfficeScan on a gold image or OS Layer version, you must run the OfficeScan TCacheGen.exe file
on the gold image or Operating System Layer, and on every Application Layer that uses that gold image or Operating
System Layer.
In addition, whenever you create an Application Layer or layer version, you must run TCacheGen.exe again on every layer
that uses the Operating System Layer containing Trend Micro OfficeScan.
Once you run TCacheGen.exe, do not run the Installation Machine again.
You can copy TCacheGen.exe from the OfficeScan server, as specified in the Trend Micro documentation. Typically, this file
is located in the \\<TrendServerName>\ofcscan\Admin\Utility\TCacheGen folder.
© 1999-2017 Citrix Systems, Inc. All rights reserved. p.154https://docs.citrix.com
Tested versions
The following version of Trend Micro anti virus has been tested:
Trend Micro OfficeScan Client and Server version 11.0.4150 (on Windows 7, Windows, 10, and Windows Server 2008)
Trend Micro OfficeScan Client and Server version 11.
Trend Micro OfficeScan Client and Server version 10.6.
Install the software on a gold image
1. Install the Unidesk Tools on the gold image.
This procedure requires that the Globally Unique Identifier (GUID) for the Trend Micro software is removed before you
import the gold image in to an Operating System Layer (see step 4). When you install the Unidesk Tools, a system restart
is required, which creates a new GUID. Therefore, you must install the Unidesk Tools first, allow the installation to restart
the machine, and then remove the GUID that the restart created.
2. Install the Trend Micro Micro OfficeScan Client.
3. Copy the TCacheGen.exe file from the OfficeScan server, as documented in step 1 in the Trend Micro documentation.
Typically, this file is located in the \\<TrendServerName>\ofcscan\Admin\Utility\TCacheGen folder.
4. Run the TCacheGen.exe as described in Step 2 of the Trend Micro documentation.
5. Click Remove GUID from the Template and click OK.
6. Shut down the gold image.
7. Create an Operating System Layer using the gold image in the usual way.
Important: Any time you add a version to this layer, you must run the TCacheGen.exe and remove the GUID again. This
ensures that the desktops that use this layer operate correctly.
Install the software on an Application Layer
1. In the Unidesk Management Console, complete the Create Layer Wizard in usual way.
2. When prompted to do so, install the Trend Micro OfficeScan Client on the Installation Machine.
Note: If you are installing Trend Micro OfficeScan 11, when the task status becomes Action Required, you must disablethe Unauthorized Change Prevention service, as follows:
1. On the OfficeScan server, double-click the OfficeScan Web Console (HTML) link on the Desktop to open the
OfficeScan Web Console.
2. In the OfficeScan Web Console, select Agents > Agent Management .
3. Right-click OfficeScan Server and select Settings > Additional service settings. This opens the Additional service
settings window.
4. Under Unauthorized Change Prevention service, clear the Enable service on the following operating systemscheck box.
5. In the web console, select Agents > Agent Installation > Remote.

© 1999-2017 Citrix Systems, Inc. All rights reserved. p.155https://docs.citrix.com
6. In the Search for endpoints field, specify the IP address of your Installation Machine, and press Enter.
7. Type the Installation Machine's local administrator user name and password, and click Log in.
8. Click Install to install the OfficeScan Agent to target computers, and click OK in the confirmation box. A confirmation
message confirms the number of agents to which notifications were sent and the number that verified the receipt of
those notices.
9. On the Console go to Agents > Agent Management . Select Workgroup, and then the Installation Machine name.
10. Make sure, all groups you are going to use, have disabled Unauthorized Change Prevention service, by right-clicking
the Installation Machine and selecting Settings > Additional service settings. This opens the Additional servicesettings window.
3. Under Unauthorized Prevention Service, clear the Enable service on the following operating systems check box.
4. If prompted, restart the Installation Machine to allow the boot image to rebuild..
5. After the Installation Machine restarts, copy the TCacheGen.exe file from the OfficeScan server, as documented in step
1 in the Trend Micro documentation. Typically, this file is located in the folder:
\\TrendServerName\ofcscan\Admin\Utility\TCacheGen folder.
6. Run the TCacheGen.exe as detailed in Step 2 of the Trend Micro documentation.
7. Click Remove GUID from the Template and click OK.
8. Finalize the layer.
Important: Any time you add a version to this Layer, you must run the TCacheGen.exe and remove the GUID again. This
ensures that the Desktops that use this Layer operate correctly.

© 1999-2017 Citrix Systems, Inc. All rights reserved. p.156https://docs.citrix.com
Deploy Windows 8.1 applications in Layers
Jun 28 , 2017
To deliver applications on Windows 8.1 via Unidesk Layers, you need to build the applications so they can be centrally
managed. This is because Windows Store Apps are managed via each user's profile and can only be deployed to one user.
Regular Windows Store apps, like Bing Finance and Weather, cannot be sideloaded or layered. You can, however, deliver
centrally managed applications on Windows 8.1 by sideloading Enterprise applications, also called Line of Business (LoB)
applications.
Before you start
Requirements to run Windows 8.1 Enterprise Line of Business (LoB) apps include:
Apply a Security Certif icate.
Enable app Sideloading.
Join a domain.
Create your Windows 8.1 Line of Business (LoB) apps
Microsoft provides several resources for building Windows Store LoB apps, including:
Design case study: Enterprise line of business Windows Runtime app
Building Windows Store Line-of-Business Applications
Building Windows 8 Line of Business Apps
Sideload Line of Business apps in Unidesk Layers
Microsoft lets you deploy an LoB app by sideloading it for all users or for one user, and you can do either with Unidesk.
Sideloading an app is done by running a few commands in Windows PowerShell.
Sideload the app for all users
You can sideload an app for all users by using the Deployment Image Servicing and Management (DISM) tool. DISM is a
command-line tool that you can use to service a Windows image, either online or offline. You can use DISM to provision a
Windows Store app in an online Windows image for all users who share the computer. To do that, you use the DISM Add-
ProvisionedAppxPackage option, as follows:
1. Log on using an account with administrative privileges on the computer. You must use an administrator account here,
because you are provisioning an app in the image.
2. On the Start screen, type PowerShell and press Ctrl/Shif t/Enter.
3. On the User Account Control dialog box, click Yes.
4. At the Windows PowerShell prompt, run the following command, where SampleApp is the path and file name of the
package file you created (e.g., c:\myapps\MySample_1.0.0.0_AnyCPU_Debug.appx):
DISM /Online /Add-ProvisionedAppxPackage /PackagePath:“SampleApp” /skiplicense
5. Monitor the installation, and close the Windows PowerShell window after it finishes.

© 1999-2017 Citrix Systems, Inc. All rights reserved. p.157https://docs.citrix.com
For more about DISM, see the Microsoft Deployment Image Servicing and Management Technical Reference.
Sideload the app for a user
You can sideload the app for the current user account. If another user were to log onto the computer, the app would not
be available to them.
Here are the steps to sideload an app for a user:
1. Log onto the domain using the target account, because you cannot run the sample app by using the built-in local or
domain Administrator account. You can use a standard user account.
2. On the Start screen, type PowerShell and press Enter.
3. At the Windows PowerShell prompt, run the following commands, where SampleApp is the path and name of the
package file you created (e.g., c:\myapps\MySample_1.0.0.0_AnyCPU_Debug.appx):
import-module appx
add-appxpackage “SampleApp”
4. Monitor the installation, and close the Windows PowerShell window after it finishes.
Launch the LoB app
On the Start screen, click the app's tile. You will find it on the far right side of the Start screen. You can also type the app’s
name, and click the tile.
For example, we named our app MySample. On the Start screen, we just type MySample, and then click the MySample tile.
Of course, there is not much to the app, but you have successfully sideloaded it, and sideloading other Windows Store apps
works the same way.
Remove an LoB app from a Unidesk Application Layer
If installed as an Application Layer, removing the Layer from a Desktop will cause the LoB app to stop working, but will still
appear on the start page. When the Layer is removed, the app will no longer be applied to new users, since the DISM action
is no longer executing.
If installed on an Operating System Layer Version:
1. Use the usual provisionapp removal procedures, for example:
Remove-AppxProvisionedPackage -Online -PackageName MyAppxPkg
Or, at a command prompt, type:
DISM.exe /Online /Remove-ProvisionedAppxPackage /PackageName:microsoft.app1_1.0.0.0_neutral_en-
us_ac4zc6fex2zjp
Microsoft resources: Sideloading Windows Store Apps
Try It Out: Sideload Windows Store Apps
Sideload Apps with DISM

© 1999-2017 Citrix Systems, Inc. All rights reserved. p.158https://docs.citrix.com
Packaging your Windows Store app using Visual Studio 2012
Create an app package
Managing apps

© 1999-2017 Citrix Systems, Inc. All rights reserved. p.159https://docs.citrix.com
Troubleshoot application layering
Jun 28 , 2017
This article explains how to troubleshoot typical issues with Application Layers.
Quick review of the basics
When a user opens a file on their Unidesk Desktop, the Unidesk software directs Microsoft Windows to open the file from
the Layer with the highest priority. The User Layer, which contains files created or modified on the Desktop, is always
highest priority, so Windows will be directed to the User Layer as the source for those files. If the file isn't found in the User
Layer, the Unidesk software looks for it in the Application Layers. If Windows finds the file in an more than one Application
Layer or Layer Version, it uses the file in the most recently created Application Layer Version. Finally, if neither the User Layer
nor an Application Layer has the file, Unidesk uses the version of the file that’s in the Operating System Layer, the Layer
with the lowest priority.
Note: By default, Application Layer priority is determined by the Layer/Version creation date or modification date. There are
ways override the default priority, as explained later in this article. However, in most cases, this prioritization works well.
Imagine a scenario where the user has installed an application on their desktop. Because the application is user-installed, it
is stored in the person's User Layer. The application has an old version of foo.dll. If an IT-delivered application (in an
Application Layer) needs a later version of that same dll (foo.dll), the IT-delivered application will not work correctly on that
user’s Desktop. That's because Windows finds the User Layer version of the file and uses that one instead of the newer
version in the Application Layer. The good news is that you can fix an issue like this, as Unidesk gives you a few ways to
control where a file will be delivered from.
When I create a new desktop, one or more applications do not work correctly
Administrators often create all of the Application Layers and just start deploying new desktops with all of the layers. This
can work fine but if it doesn’t, step back and take an incremental approach to isolate the issue.
Can you create a desktop with just the Operating System Layer and the failing Application Layer? If that doesn’t work
then you have an issue with that particular application. Check the Application Layer Recipes page for details on specif ic
applications. If you don't see your application in the recipes, open a support case.
If you have a clear conflict between 2 layers you have several choices for resolving that conflict. You can:
Combine the conflicting applications in a single Layer, often the simplest solution.
Create one of the Layers using the conflicting Layer as a prerequisite Layer. This is best in case where you need to
deploy and update the applications separately. When you specify a prerequisite layer, the Installation Machine will be
created with both the specif ied OS and the prerequisite Layer installed. You will need to remember to always include
that prerequisite Layer when you update your application.
If you know which file is causing the conflict and which application should deliver that file, use layer priorities to ensure
that the file will always come from the correct layer. For details, use the following steps to Manage Layer priorities:
Manage Application Layer priorities
An application is not working correctly on an existing desktop
If the application used to work on the desktop and now it isn’t the solution is often a simple reinstall. Editing the desktop
and selecting the reinstall checkbox for the failing application simply removes any files from the user layer that are part of
the application layer.
© 1999-2017 Citrix Systems, Inc. All rights reserved. p.160https://docs.citrix.com
When I deploy a new version of an application to a desktop it does not workcorrectly
Try a reinstall of the application; edit the desktop and check the reinstall flag on the application that is not working. If that
works this was due to some change on the user desktop that is incompatible with the new application version. Ask the user
to check that all of their self installed applications are working.
If reinstall did not work, the issue is probably not specific to that user’s desktop. (Keep in mind that you can roll the desktop
back to an earlier version of the application to keep the user productive while you do further troubleshooting. Try deploying
the new version of the application to a newly created desktop. If it works in the newly created desktop then you know
there is some conflict with another application layer that was deployed on the user’s desktop or possibly with something
that the user has installed themselves.
When creating a new layer version the install machine says that Windows needs tobe activated
If this is not impacting your layer update, just ignore it! Microsoft is detecting a change in the activation information of the
OS layer and of the application layer that you are updating. This will not have any impact when the application is deployed
to a desktop because the activation information is in the user layer on the desktop. If you do require activation to
complete your new layer version (possible if you are installing MSFT patches) then go ahead and activate in the install
machine.
© 1999-2017 Citrix Systems, Inc. All rights reserved. p.161https://docs.citrix.com
Create Desktops
Jun 28 , 2017
You can create one Desktop at a time, or as many as you want at once. You can name Desktops individually, or generate
the names based on an expression of your choosing. You can create Desktops in a broker pool or group, or add them
manually after you create them. You can create Desktops using templates of pre-configured choices to ensure consistency,
for example, so that all users within a department receive the same applications.
You can deploy a desktop to one or more users. If you deploy to one user, you can specify a name for the desktop. If you
deploy to more than one user, the Unidesk software creates a desktop with a generated name for each user, based on the
naming convention you specify.
Creating Persistent versus non-persistent desktops
Once you create a desktop, you cannot change its type.
If you choose Persistent Desktops
Creating Persistent Desktops is typically straight-forward, regardless of the number of Desktops you are creating, whether
you are creating them in a broker pool or group, and whether or not you are using a template. Go for it!
If you choose Non-Persistent Desktops
Creating Non-Persistent Desktops involves a few extra considerations. It 's worth getting familiar with these
before you start.
The owner of a Non-persistent Desktop will be the Group. Since Non-Persistent Desktops do not have an individual
"owner" per se, the group name with a number appended to it becomes the name of the owner.
You can set the number of Desktops to keep powered on and ready for use if you use a template to createthem. You can create nonpersistent desktops using the Create Desktop wizard, and if you choose a Template that's
associated with a broker pool or group, you can set a power policy for the minimum number of unassigned desktops to
keep powered on and ready for use. For details, see Create Non-persistent Desktops governed by a power policy.
When a desktop restarts, it will power down and sometimes back on, based on the Power Policy. When a user
logs off of a Non-persistent Desktop, the Desktop restarts automatically or according to the Desktop Power Policy if
you have defined one. The Power Policy specif ies how many Non-persistent Desktops should remain powered on and
ready for use.
Non-persistent Desktops cannot be backed up or restored. To return a Non-persistent desktop to its original state,
you can simply restart it.
When the user logs out or reboots, any f iles or applications they've added are discarded. Users can install
applications, as long as the installation does not require the desktop to restart. Every time the desktop restarts, it reverts
to its original state, which did not include user-installed applications or f iles. Any f iles and applications that a user has
added are discarded.
Desktop names
You can use a variety of built-in aides when naming Desktops, for example, a list of naming conventions and automatically
generated names. There are just a few things to keep in mind.
Desktop naming requirements

© 1999-2017 Citrix Systems, Inc. All rights reserved. p.162https://docs.citrix.com
Desktop names must meet the these basic naming requirements, or the Desktop will not start.
Names can include one to 15 of these characters:◾Letters a through z, and A through Z
Numbers 0 through 9
Hyphen (-) and Underscore (_)
Names cannot include Spaces, the characters / \ * , . " @, or a sequence of two hyphens (--) or underscores (__)
Names cannot start with a number, hyphen (-), or underscore (_)
Names cannot end with a hyphen (-) or an underscore (_)
Built-in Desktop naming conventions
When creating Desktops, you can ensure that naming is consistent by choosing one of the built-in naming conventions, or
by defining (and then choosing) a naming convention of your own.
This convention... Creates a name that contains the... Example
FirstnameLastname First name and last name of the selected user. JoeyHartley
LastnameFirstInitial Last name and first initial of the selected user. HartleyJ
FirstInitialLastname First initial and last name of the selected user. JHartley
GroupnameIncrementSelected group name. Also appends a sequential numeric value to the end of each
desktop name.
Support1,
Support2
Auto-generate Desktop names
When you create more than one Desktop at a time, the system generates the names for you. You can also choose to have
the system generate a name for an individual Desktop.
You can either use the predefined naming conventions, or create a custom naming convention for the current operation.
Example
You need to create a pool of 15 desktops for contractors to use. You can:
1. Create a resource pool in the virtual infrastructure for deploying the desktops to contractors, as needed.
2. Log into the and create a group called Contractor-pool.
3. Create the desktops, using the GroupnameIncrement naming convention. The name of each desktop in the pool will
have the same name with a number appended to it. For example, the name of the f irst desktop will be Contractor-pool1,
the name of the next desktop will be Contractor-pool2, and so forth.
4. Finally, import the virtual machines associated with the desktops into the resource pool in the virtual infrastructure.
Change the built-in Desktop naming conventions

© 1999-2017 Citrix Systems, Inc. All rights reserved. p.163https://docs.citrix.com
1. Select System > Settings and Configuration.
2. Select Desktop Naming Convention Settings and click Edit.
3. In the Expression box for the naming convention that you want to change, edit the displayed expression.
In addition to using the naming expressions, you can enter additional characters as long at they follow the host naming
standards.
Example: If you wanted desktop names to use a format such as, MKTG-FirstnameLastname, you could enter an
expression similar to the following one:
MKTG-%F%L
4. Click Save.
Define your own custom Desktop naming conventions
1. Select System > Settings and Configuration.
2. Select Desktop Naming Convention Settings and click Edit.
3. Click Add Naming Convention.
4. In the Convention Name box, enter a name that you want to associate with the naming convention. The Create
Desktop wizard displays this name as a selection in the Desktop Assignment tab.
5. Enter an expression that defines the syntax for the name. In addition to using the built-in naming expressions, you can
enter additional characters as long at they follow the host naming standards.
6. Click Add and click Save.
Expressions for defining your own naming conventions
Naming convention expressions define how the system displays the naming conventions. The following table describes the
syntax for the valid expressions that the system uses to generate names.
Use... To include... Examples
%[n]F
The first name of the selected user.
The n variable indicates the number of characters to include. If you do not specify a character length, the
software uses the full name.
%F = Joey
%3F = Joe
%[n]L
The last name of the selected user.
The n variable indicates the number of characters to include. If you do not specify a character length, the
software uses the full name.
%L =
Hartley
%4L = Hart
%[n]G
The name of a selected group.
The n variable indicates the number of characters to include. If you do not specify a character length, the
software uses the full name.
%G =
Marketing
%3G =Mar
[%I]
A unique number at the end of a generated name. The number starts at 1 and increments sequentially for each
desktop that the software creates. The software applies this expression if the generated name is not unique and
if you include it in a custom expression.
%3G%I =
Mar1,
Mar2,
Mar3, ...
Desktop storage and CachePoint management
© 1999-2017 Citrix Systems, Inc. All rights reserved. p.164https://docs.citrix.com
When you create one or more desktops, the Unidesk software chooses the datastore on which to store each Desktop,
and the Secondary CachePoint Appliance that will manage the Desktop. The goal is to achieve an even distribution of
desktops across datastores and Secondary CachePoints.
Datastore - The Unidesk software uses the datastore that best meets the space requirement for each Desktop when it
is created.
CachePoint - The software compares the number of Desktops on the CachePoints that have access to the datastore
and chooses the CachePoint most.
Let’s say you are creating 50 desktops and you have five CachePoints for the chosen datastore. If one of the CachePoints
already has 50 desktops, the new desktops would be added to one or more of the other CachePoints.
Note: You can prevent a Secondary CachePoint Appliance from being used for new desktops, by editing the CachePoint
Properties. You would deselect "Allow new desktops to be deployed to this CachePoint" on the first wizard tab. For details,
click here.
Once a desktop is created, it remains on the same CachePoint, unless you back up the desktop and restore it to a different
CachePoint.
Desktop templates
Templates let you quickly create desktops in standard configurations, for example, desktops that include the same layers
and default settings. If you select a template while creating a desktop, the wizard uses the settings from the template as
the starting point.
Default templates
The Unidesk Management Console provides default templates for desktops using the Microsoft® Windows® XP or
Microsoft® Windows® 7 operating system. These templates include default values for the virtual machine settings. They do
not include default values for layers or desktop details, such as the hosting CachePoint Appliance or the virtual network.
You can use these templates as a starting point, specifying custom settings as needed, instead of creating a new template.
Create a desktop using a template
1. Select Desktops > Create Desktop to create one or more desktops.
2. In the Template Selection tab, select a template. The template-specif ied settings become the default settings for the
desktops.
Once you select a template, the Desktop Visualization panel displays all of the layer assignments and desktops settings
as specif ied in the template. Also, the selections made in the template are shown, but grayed in the Desktop wizard tabs.
3. Complete the wizard in the usual, making changes to the template-specif ied layer assignments and settings, as
necessary. In addition, if the template did not include selections for all of the desktop settings, you must specify values
these settings.
You can override most template settings
When creating a desktop using a template, you can specify different settings than the template defaults. These custom
settings override any settings or layer assignments that the saved template includes. For example, you can set a different
backup schedule for a desktop, and this new schedule will override the original backup schedule.
Settings that cannot be overridden
© 1999-2017 Citrix Systems, Inc. All rights reserved. p.165https://docs.citrix.com
Although most settings can be overridden when using a template to create desktops, the following settings will be grayed
out:
Desktop Type - Once you've created a desktop using a template, you can never change the template's desktop type .
Desktop Power Policy - If you want to create desktops that use a different power policy than specif ied in the
template, you can edit this setting in Template Properties and then create the new desktops. The change will apply to
any desktops created using the new template version, but desktops created previously will not be changed.
Connection Broker - If you need to create desktops with different broker settings, you can change them in Template
Properties. Desktops you create after editing this setting will have the new broker setting. Any desktops that you
created previously, will not be moved to the new broker, and the power policy will only apply to those desktops once you
move them to the new pool/collection/group. You will need to move the desktops manually using the connection broker.
View template setting overrides
When you select a template while creating a desktop, the Desktop Visualization panel displays the settings from the
template. If you deselect layers or specify settings that are different from the template settings, the Desktop Visualization
panel uses special indicators to indicate that a selection is not a template-specified setting.
The Desktop Visualization panel shows custom settings in the following ways:
If you deselect a layer included in the template, the layer is grayed out.
If you select a setting that is not included in the template or a layer version that is different from the template, a
custom setting indicator appears next to it. To see the original template layer or setting, you can move the cursor over
the indicator.

© 1999-2017 Citrix Systems, Inc. All rights reserved. p.166https://docs.citrix.com
Create your first Desktop to verify the OperatingSystem Layer
Jun 28 , 2017
A Desktop is a virtual machine that you can deploy to a user. It contains an operating system, virtual machine settings, and
any applications you deploy to it.
By creating a Desktop, you can verify that your Operating System Layer is in good working order. You can then use this
tested Layer to create the Application Layers your users need. Application Layers are compatible with only one Operating
System Layer (and all of its Layer Versions).
Before creating the Operating System Layer, be sure to prepare your gold image for the Unidesk environment.
Creat e your first Unidesk Deskt opCreat e your first Unidesk Deskt op
1. In the Unidesk menu bar select Deskt ops Deskt ops , then click Creat e Deskt opCreat e Deskt op in the Action bar. This opens the Create Desktop
wizard with the available templates displayed.
2. (Optional) In the Template Selection tab, you can select a template. The User Assignment wizard tab is displayed.
Versions).
3. In the User Assignment tab, specify the user or group to assign to the Desktop.
Note: If you choose a group, it must not be empty.
1. Leave Broker Integration set to None, unless you have integrated with one of the supported connection brokers,
VMware View or XenDesktop.
2. Select Assigned to User, and choose the user you specif ied when preparing the gold image.
Notice your choices displayed in the Desktop Visualization panel to the right.
4. In the Desktop Details tab, enter a name for the Desktop and choose the network.
1. Choose a cluster or server on which to host the Desktop.
2. Enter a name for the Desktop.
3. Enter a description of the Desktop (optional).
4. Select a network in the virtual infrastructure to which the Desktop will connect.
5. Specify the type of Desktop that you want to create: persistent or nonpersistent. A persistent Desktop maintains all
of a user's changes in the User Layer. A nonpersistent Desktop discards its User Layer and reverts to a pristine backup
every time it restarts.
5. In the OS Assignment tab, select the Operating System (OS) layer.
6. In the Desktop Settings tab, choose a value for each field.
7. In the Confirm and Complete tab, confirm that the settings are correct (in the Desktop Visualization panel to the right),
and click Creat e Deskt opsCreat e Deskt ops to start creating the Desktop.
© 1999-2017 Citrix Systems, Inc. All rights reserved. p.167https://docs.citrix.com
A Desktop icon appears, its status displayed in the lower right corner of the icon. The Desktop status cycles through
Stopped, Powering on, Starting, and Running. For more status information, click the Expander tab in the bottom center
of the console to open the Tasks panel.
Verif y t he Deskt opVerif y t he Deskt op
After you create a Desktop, log in to the Desktop using the account you created in the gold OS.
To log on to the Desktop:
1. Using either a vSphere Client or an RDP session, log into the Desktop.
Not e: Not e: If you need the IP address assigned to the Desktop, hover over the Desktop icon and click the information
indicator (i). This displays the IP Address assigned to the Desktop.
The first time someone logs into a Desktop, the Desktop composite is created. This takes longer than a typical login.
To create Application layers that you can give to the different Desktops you create, see Creating an Application Layer.
If Desktop startup times seem slow on Windows 8.1 or Windows 10, please see the tips for deploying Windows on that
platform.

© 1999-2017 Citrix Systems, Inc. All rights reserved. p.168https://docs.citrix.com
Create Desktop templates
Jun 28 , 2017
Desktop templates are a convenience for deploying new Desktops quickly and with consistent settings. You can create a
template for one or more standard desktop configuration(s). You can choose to start with a blank template and specify all
of the settings and layers, or use an existing template as a starting point and modify values, as needed.
When you use a template to create desktops, the values in the template become the default values for desktops. You can
override many of these values when you create the desktop(s).
The Create Template wizard displays your selections in the Template Visualization panel. The Template Visualization panel
shows layers in the order in which the desktop deployment process applies them.
Unlike Desktops, you cannot use a template to create new broker Pools or groups. You can, however, use a template to
select a specific pool or group. Templates are most important when creating Non-persistent Desktops, as they are required
if you want to use the Unidesk Desktop Power Management feature, as described in the next section.
Templat e Set t ingsTemplat e Set t ings
Any settings you enter in a template will not have to be entered when you create desktops using the template.
Layers
The template settings can include:
One version of an Operating System Layer.
Multiple Application Layers.
Virtual machine
Virtual machine settings can include:
Number of CPU Sockets
Cores per Socket
Memory
Backup frequency
Amount of storage for user data
Page file size (% Memory)
Core Dump type
CachePoint Appliance to host the desktop
Network
Desktop Type
Connection
brokerThe virtual desktop connection broker and the pool or group.
The Unidesk Management Console provides a default template for each supported operating system when you create or
modify desktops. The default settings in these templates are based on Microsoft and VMware recommendations. As with
any template, you can:
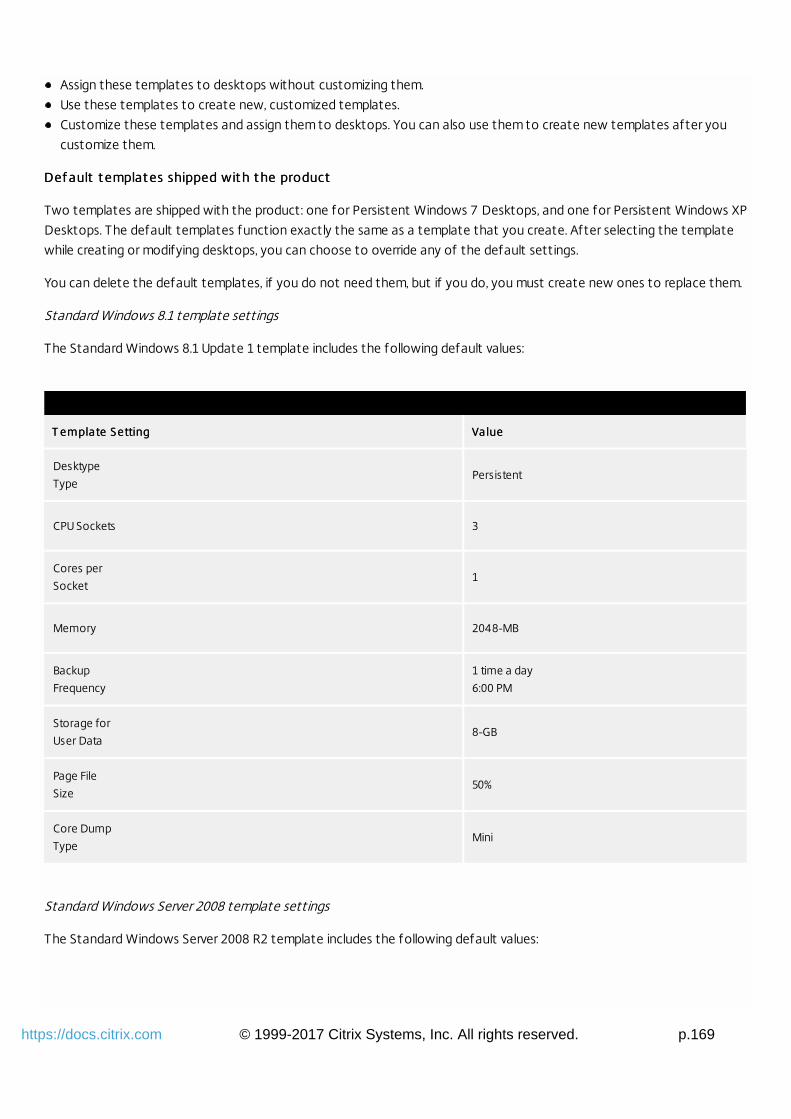
© 1999-2017 Citrix Systems, Inc. All rights reserved. p.169https://docs.citrix.com
Assign these templates to desktops without customizing them.
Use these templates to create new, customized templates.
Customize these templates and assign them to desktops. You can also use them to create new templates after you
customize them.
Def ault t emplat es shipped wit h t he productDef ault t emplat es shipped wit h t he product
Two templates are shipped with the product: one for Persistent Windows 7 Desktops, and one for Persistent Windows XP
Desktops. The default templates function exactly the same as a template that you create. After selecting the template
while creating or modifying desktops, you can choose to override any of the default settings.
You can delete the default templates, if you do not need them, but if you do, you must create new ones to replace them.
Standard Windows 8.1 template settings
The Standard Windows 8.1 Update 1 template includes the following default values:
T emplate SettingT emplate Setting ValueValue
Desktype
TypePersistent
CPU Sockets 3
Cores per
Socket1
Memory 2048-MB
Backup
Frequency
1 time a day
6:00 PM
Storage for
User Data8-GB
Page File
Size50%
Core Dump
TypeMini
Standard Windows Server 2008 template settings
The Standard Windows Server 2008 R2 template includes the following default values:
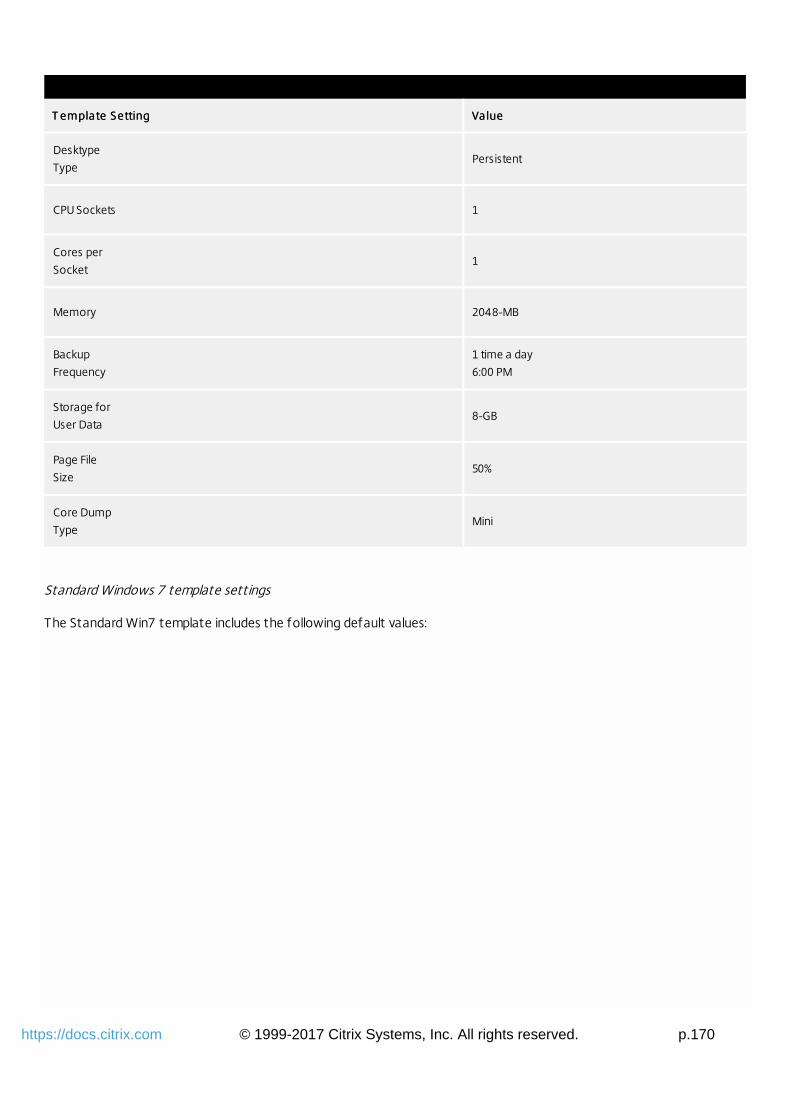
© 1999-2017 Citrix Systems, Inc. All rights reserved. p.170https://docs.citrix.com
T emplate SettingT emplate Setting ValueValue
Desktype
TypePersistent
CPU Sockets 1
Cores per
Socket1
Memory 2048-MB
Backup
Frequency
1 time a day
6:00 PM
Storage for
User Data8-GB
Page File
Size50%
Core Dump
TypeMini
Standard Windows 7 template settings
The Standard Win7 template includes the following default values:

© 1999-2017 Citrix Systems, Inc. All rights reserved. p.171https://docs.citrix.com
T emplate SettingT emplate Setting ValueValue
Desktype
TypePersistent
CPU Sockets 1
Cores per
Socket1
Memory 1024-MB
Backup
Frequency
1 time a day
6:00 PM
Storage for
User Data8-GB
Page File
Size50%
Core Dump
TypeMini
Standard XP template settings
The Standard XP template includes the following default settings:
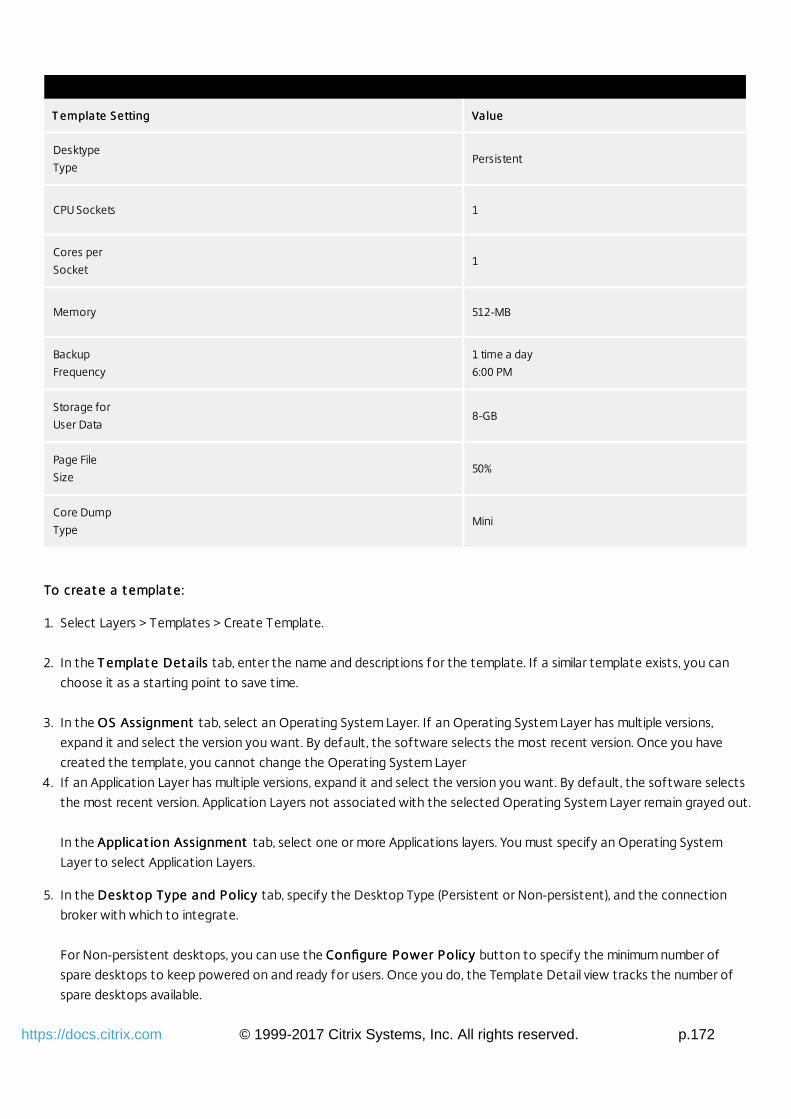
© 1999-2017 Citrix Systems, Inc. All rights reserved. p.172https://docs.citrix.com
T emplate SettingT emplate Setting ValueValue
Desktype
TypePersistent
CPU Sockets 1
Cores per
Socket1
Memory 512-MB
Backup
Frequency
1 time a day
6:00 PM
Storage for
User Data8-GB
Page File
Size50%
Core Dump
TypeMini
To creat e a t emplat e:To creat e a t emplat e:
1. Select Layers > Templates > Create Template.
2. In the T emplat e Det ailsT emplat e Det ails tab, enter the name and descriptions for the template. If a similar template exists, you can
choose it as a starting point to save time.
3. In the OS AssignmentOS Assignment tab, select an Operating System Layer. If an Operating System Layer has multiple versions,
expand it and select the version you want. By default, the software selects the most recent version. Once you have
created the template, you cannot change the Operating System Layer
4. If an Application Layer has multiple versions, expand it and select the version you want. By default, the software selects
the most recent version. Application Layers not associated with the selected Operating System Layer remain grayed out.
In the Applicat ion Assignment Applicat ion Assignment tab, select one or more Applications layers. You must specify an Operating System
Layer to select Application Layers.
5. In the Deskt op Type and PolicyDeskt op Type and Policy tab, specify the Desktop Type (Persistent or Non-persistent), and the connection
broker with which to integrate.
For Non-persistent desktops, you can use the Configure Power PolicyConfigure Power Policy button to specify the minimum number of
spare desktops to keep powered on and ready for users. Once you do, the Template Detail view tracks the number of
spare desktops available.
© 1999-2017 Citrix Systems, Inc. All rights reserved. p.173https://docs.citrix.com
Note: Power Policy is available for Non-persistent desktops only, and you must specify a broker pool, group, or collection
specifically intended for shared desktops. This can be a VMware View manual floating pool, a Citrix XenDesktop shared
group, or an equivalent Pano Logic collection.
6. In the Deskt op Set t ingsDeskt op Set t ings tab, specify the virtual machines and desktop settings. If you leave a value blank in the
template, you can specify it when you create a desktop using the template.
a. CPU Sockets and Cores per Socket - You can select the number of CPU Sockets and Cores per Socket to assign to
the template. If you configure one of these settings, you must configure both. Valid combinations are those supported
by VMware vSphere for the hardware version of the Operating System Layer.
b. Memory - Specify the amount of memory, in megabytes, that you want to assign to desktops that use this template.
◾Divisible by 4.
◾Greater than or equal 256 MB.
◾Less than or equal to 65536 MB (64 GB).
c. Backup Frequency - How often to back up the desktop, and if applicable, the specif ic times of day.
◾1, 2, 3 or 4 times a day - Unidesk software creates backups for the specif ied number of times each day. If you choose
one of these options, also specify the times when you want the backups to occur.
◾Every Hour - Backups occur every hour, on the hour. For example, 10:00, 11:00, 12:00, and so forth.
◾Never - Unidesk software never creates backups for the selected desktops.
d. Storage for User Data - The maximum size of disk storage to allocate to the data in the User Layer. This data includes
user-installed applications, custom settings, and user-created documents.
e. Page File Size - The size of the page f ile (virtual memory) as a percentage of the RAM allocated to the desktops that
use this template. The default size is 50% of the amount of RAM that you allocated to the desktop in the Desktop
Settings tab.
f . Core Dump Type - The type of core dump file you want the system to create when system problems occur. You can
specify None, Mini (to create a small, or mini-dump file), Kernel (to create a kernel memory dump file), or Full (to create a
full crash dump file). If you select Full, the size for the page f ile must be a minimum of 100%.
7. In the Icon AssignmentIcon Assignment tab, select an icon to assign to the template. This template displays this image in the Icon and
List views of the Templates module. To use an existing image, select an image in the image box. To import a new image,
click Browse and select an image in PNG or JPG format. For additional information about uploaded images, see Assign
icons.
8. In the Confirm and Complete tab, confirm the settings are correct, enter a comment if required, and click Create
Template.
You can override most t emplat e set t ingsYou can override most t emplat e set t ings
When creating a desktop using a template, you can specify different settings than the template defaults. These custom

© 1999-2017 Citrix Systems, Inc. All rights reserved. p.174https://docs.citrix.com
settings override any settings or layer assignments that the saved template includes. For example, you can set a different
backup schedule for a desktop, and this new schedule will override the original backup schedule.
Settings that cannot be overridden
Although most settings can be overridden when using a template to create desktops, the following settings will be grayed
out:
Desktop Type - Once you've created a desktop using a template, you can never change the template's desktop type .
Desktop Power Policy - If you want to create desktops that use a different power policy than specif ied in the template,
you can edit this setting in Template Properties and then create the new desktops. The change will apply to any
desktops created using the new template version, but desktops created previously will not be changed.
Connection Broker - If you need to create desktops with different broker settings, you can change them in Template
Properties. Desktops you create after editing this setting will have the new broker setting. Any desktops that you
created previously, will not be moved to the new broker, and the power policy will only apply to those desktops once you
move them to the new pool/collection/group. You will need to move the desktops manually using the connection broker.

© 1999-2017 Citrix Systems, Inc. All rights reserved. p.175https://docs.citrix.com
Create Persistent Desktops
Jun 28 , 2017
You can create one or more Persistent Desktops at a time in a broker pool or group, and you can do so with or without
using a Desktop template.
If you are using Windows 8.1, see the section below to improve login times.
NoteNote: When you create desktops for a VMware View pool, the software adds the desktops to an existing VMware View dedicated
manual pool. Or, you can create a new dedicated manual pool while you create the desktops. When you create desktops for a
VMware View pool, you select a pool and the number of desktops to create. By default, the software uses the name of the selected
pool as part of the name it generates for each desktop.
1. Select Deskt opsDeskt ops and then Creat e Deskt opCreat e Deskt op in the Action bar. The Create Desktop wizard opens.
2. (Optional) In the T emplat e Select ionT emplat e Select ion tab, you can choose a template to use as a starting point for your desktop(s).
3. In the User AssignmentUser Assignment tab, select a connection broker, one or more user(s), or a group to associate with the desktop.
Note: If Broker Integration and the pool or group are specif ied in the template, you have selected for this desktop,
these values are grayed out.
◾If you choose a connection broker, choose the pool, group, or catalog. For View floating pools and XenDesktop public
groups, the Desktop owner will be the pool/group.
◾ If you select more than one user or a group, a Desktop will be created for each user.
4. In the Deskt op Det ailsDeskt op Det ails tab, specify the assignment details for the desktop, including where to deploy the desktops, a
naming convention for them, and a network.
a. Cluster or Host - The cluster or server on which the desktop(s) will be hosted. Only ESX Hosts that are not in
maintenance mode are available for Desktop creation.
b. Generate Name Automatically - If you specify one or more users or a group (not a connection broker), you can check
this option to have Unidesk software generate the Desktop name(s).
c. Desktop Name or Convention Name:
◾Desktop Name - If you are not using a connection broker or generating the Desktop name automatically, you can type
the name in this f ield. The name must be unique to the host that you choose for the desktop. If the name exceeds 14
characters, the software truncates the name
© 1999-2017 Citrix Systems, Inc. All rights reserved. p.176https://docs.citrix.com
If you assigned a group or broker to the Desktop, the Convention Name field appears instead.
◾Convention Name - The naming scheme used to generate the desktop name(s). The default desktop naming
convention (FirstnameLastname) is f illed in for you. You can specify your own naming convention instead of using the
default. You can adjust this convention by selecting Custom and specifying an expression.
d. Description - (Optional) Enter anything you need to remember about the desktop(s).
e. Network - Choose a network for the desktop.
f . Desktop Type - Specify Persistent Desktop type.
Note: If the Desktop Type is specif ied in a template you have selected for this desktop, these values are grayed out.
5. In the OS Assignment OS Assignment tab, select the Operating System Layer to assign to the desktop.
To select an operating system version, expand it and select the version you want. By default, the software selects the
most recent version.
6. In the Applicat ion AssignmentApplicat ion Assignment tab, select the application layer(s) to add to the desktop. To select a specif ic version of
the application, expand it and select the version you want. By default, the software selects the most recent version.
7. In the Deskt op Set t ingsDeskt op Set t ings tab, specify the virtual machine settings.
◾CPU Sockets - Number of virtual processor sockets (vCPUs) that you want to allocate to the Desktop.
◾Cores per Socket - The number of cores per socket. Valid socket/core combinations are those supported by VMware
vSphere for the hardware version of the Operating System Layer.
◾Memory - Amount of memory (in megabytes) that you want to allocate to the desktop.
◾Divisible by 4.
◾Greater than or equal 256 MB.
◾Less than or equal to 65536 MB (64 GB).
◾Backup Frequency - How often to backup the desktop, and if applicable, the specif ic time(s) of day.
◾Storage for User Data - Space in GB to allow for this desktop's user data, above and beyond space allotted for
application data.
◾Page File Size - Percentage of memory to use for the page f ile size.
◾Core Dump Type - The type of core dump file you want the system to create when system problems occur. You can
specify None, Mini (to create a small, or mini-dump file), Kernel (to create a kernel memory dump file), or Full (to create a
full crash dump file). If you select Full, the size for the page f ile must be a minimum of 100%.
◾Select the desktop type, either Persistent or Nonpersistent.
© 1999-2017 Citrix Systems, Inc. All rights reserved. p.177https://docs.citrix.com
8. In the Maint enance ScheduleMaint enance Schedule tab, select a maintenance window for tasks that require the user to log off , for
example, adding a new layer version.
9. In the Conf irm and Complet eConf irm and Complet e tab, confirm the settings are correct, and click Creat e Deskt opCreat e Deskt op.
10. In the broker administrator, verify that the desktops were added correctly to the pool or group.
If the Agent software is not installed on the desktops, the status in the broker Administrator indicates that it is waiting
for the Agent.
I f t he VMware View connect ion server is unreachableIf t he VMware View connect ion server is unreachable
◾If the pool exists, the desktop deployment task (in the Task Bar) indicates that the deployment completed with
errors. The desktop Information View indicates that a pool assignment is pending, and Unidesk tries to add the
desktop to the pool the next time it is started.
◾If the pool does not yet exist, the deployment task fails. In this case, Unidesk does not create the desktops or the
pool.
If you want to speed up login times for either Persistent or Non-persistent Windows 8.1 Desktops, you can disable some of
the more costly and less necessary GUI actions.
Turn of f new user arrowsTurn of f new user arrows
You can turn off new user arrows, by making the following Registry edits:
HKEY_CURRENT_USER\Software\Policies\Microsoft\Windows\EdgeUI
HKEY_LOCAL_MACHINE\SOFTWARE\Policies\Microsoft\Windows\EdgeUI
DisableHelpSticker DWORD
0 = Enable help tips
1 = Disable help tips
Turn of f st art up animat ionTurn of f st art up animat ion
You can turn off startup animation with these Registry edits:
HKEY_LOCAL_MACHINE\SOFTWARE\Microsoft\Windows\CurrentVersion\Policies\System
EnableFirstLogonAnimation DWORD
0 = Disable first sign-in animation
1 = Enable first sign-in animation
Disable boot log and boot animat ionDisable boot log and boot animat ion
1. Open a command window.
2. Enter these commands:
bcdedit /set {default} bootlog no
bcdedit /set {default} quietboot yes
© 1999-2017 Citrix Systems, Inc. All rights reserved. p.178https://docs.citrix.com
Disable lock screenDisable lock screen
1. Open the Group Policy Editor by right-clicking Computer.
2. Select Configuration > Administrative Templates > Control Panel > Personalization
3. Set Do not display the lock screen to Enabled.
If you prefer to make this change by editing the Registry:
1. In the Registry, under HKEY_LOCAL_MACHINE\SOFTWARE\Policies\Microsoft\Windows\Personalization create a new
DWORD (32-bit) Value named NoLockScreen with a value of 1.
2. Restart the system.

© 1999-2017 Citrix Systems, Inc. All rights reserved. p.179https://docs.citrix.com
Create Non-persistent Desktops
Jun 28 , 2017
A non-persistent desktop in the Unidesk environment is a desktop that returns to a known state whenever a user logs out.
Users receive a new desktop every time they log in, and their changes are discarded when they log off.
Broker pool or group requirement sBroker pool or group requirement s
Before you create Non-persistent Desktops, use the broker administrator to create the pool or group. (Because VMware
View cannot create an empty pool, you need to use a dummy Desktop to create your pool, and then remove it.)
Create a Manual pool. Configure this pool to be a f loating-assignment pool.
Creat e Non-persist ent Deskt ops in a broker pool or groupCreat e Non-persist ent Deskt ops in a broker pool or group 1. Select Deskt ops Deskt ops and then Creat e Deskt opCreat e Deskt op in the Action bar. The Create Desktop wizard opens.
2. (Optional) In the T emplat e Select ionT emplat e Select ion tab, you can choose a template to use as a starting point for your desktop(s).
3. In the User AssignmentUser Assignment tab, select a connection broker, one or more user(s), or a group to associate with the desktop.
Note: If Broker Integration and the pool or group are specif ied in the template, you have selected for this desktop,
these values are grayed out.
◾If you choose a connection broker, choose the pool, group, or catalog. For View floating pools and XenDesktop public
groups, the Desktop owner will be the pool/group.
◾ If you select more than one user or a group, a Desktop will be created for each user.
4. In the Desktop Details tab, specify the virtual machine settings and desktop type.
a. Cluster or Host - The cluster or server on which the desktop(s) will be hosted. Only ESX Hosts that are not in
maintenance mode are available for Desktop creation.
b. Generate Name Automatically - If you specify one or more users or a group (not a connection broker), you can check
this option to have Unidesk software generate the Desktop name(s).
c. Desktop Name or Convention Name:
◾Desktop Name - If you are not using a connection broker or generating the Desktop name automatically, you can type
the name in this f ield. The name must be unique to the host that you choose for the desktop. If the name exceeds 14
characters, the software truncates the name. If you assigned a group or broker to the Desktop, the Convention Name
field appears instead.
◾Convention Name - The naming scheme used to generate the desktop name(s). The default desktop naming
convention (FirstnameLastname) is f illed in for you. You can specify your own naming convention instead of using the
default. You can adjust this convention by selecting Cust omCust om and specifying an expression.

© 1999-2017 Citrix Systems, Inc. All rights reserved. p.180https://docs.citrix.com
d. Description - (Optional) Enter anything you need to remember about the desktop(s).
e. Network - Choose a network for the desktop.
f . Desktop Type - Specify Persistent Desktop type.
Note: If the Desktop Type is specif ied in a template you have selected for this desktop, these values are grayed out.
5. In the OS Assignment OS Assignment tab, select the Operating System Layer to assign to the desktop. To select an operating system
version, expand it and select the version you want. By default, the software selects the most recent version.
6. In the Applicat ion AssignmentApplicat ion Assignment tab, select the application layer(s) to add to the desktop. To select a specif ic version of
the application, expand it and select the version you want. By default, the software selects the most recent version.
7. In the Deskt op Set t ingsDeskt op Set t ings tab, specify the virtual machine settings.
◾CPU Sockets - Number of virtual processor sockets (vCPUs) that you want to allocate to the Desktop.
◾Cores per Socket - The number of cores per socket. Valid socket/core combinations are those supported by VMware
vSphere for the hardware version of the Operating System Layer.
◾Memory - Amount of memory (in megabytes) that you want to allocate to the desktop.
◾Divisible by 4.
◾Greater than or equal 256-MB.
◾Less than or equal to 65536-MB (64-GB).
◾Backup Frequency - How often to backup the desktop, and if applicable, the specif ic time(s) of day.
◾Storage for User Data - Space in GB to allow for this desktop's user data, above and beyond space allotted for
application data.
◾Page File Size - Percentage of memory to use for the page f ile size.
◾Core Dump Type - The type of core dump file you want the system to create when system problems occur. You can
specify None, Mini (to create a small, or mini-dump file), Kernel (to create a kernel memory dump file), or Full (to create a
full crash dump file). If you select Full, the size for the page f ile must be a minimum of 100%.
◾Select the desktop type, either Persistent or Nonpersistent.
8. In the Maint enance ScheduleMaint enance Schedule tab, select a maintenance window for tasks that require the user to log off , for
example, adding a new layer version.
9. In the Conf irm and Complet eConf irm and Complet e tab, confirm the settings are correct, and click Creat e Deskt opCreat e Deskt op.
10. In the broker administrator, verify that the desktops were added correctly to the pool or group.
© 1999-2017 Citrix Systems, Inc. All rights reserved. p.181https://docs.citrix.com
If the Agent software is not installed on the desktops, the status in the broker Administrator indicates that it is waiting
for the Agent.
I f t he VMware View connect ion server is unreachableIf t he VMware View connect ion server is unreachable
◾If the pool exists, the desktop deployment task (in the Task Bar) indicates that the deployment completed with
errors. The desktop Information View indicates that a pool assignment is pending, and Unidesk tries to add the
desktop to the pool the next time it is started.
◾If the pool does not yet exist, the deployment task fails. In this case, Unidesk does not create the desktops or the
pool.
About Deskt op Power ManagementAbout Deskt op Power Management
You can set the minimum number of Non-persistent desktops to keep powered on and ready for use, and then track the
number of spare desktops available. During hours of heavy use, if there are not enough desktops to meet the minimum
number of unassigned desktops that you've set, you will receive warning messages to tell you if there aren't enough
unassigned desktops to meet the minimum.
Example: Deskt op Power PolicyExample: Deskt op Power Policy
For example, if you have 100 desktops in a lab, you can configure the power policy so that there are 20 spare desktops
powered on and ready for use at all times.If users are logged into 81 desktops, you'll receive a message to let you know
that there aren't enough unassigned desktops to keep 20 spares powered on. By default, the desktop power policy is off
(not set).
To configure a desktop power policy, you will need to:
Create a template with the correct Power Policy.
Create the desktops using this template.
Configure the minimum number of unassigned desktops to keep powered on and ready for use.
Configure the connection broker correctly.
The following sections detail the steps for creating desktops governed by a power policy.
Creat e a t emplat e wit h t he correct power policyCreat e a t emplat e wit h t he correct power policy
Create a template that meets the following requirements:
The Desktop Type must be Non-persistent.
Broker Integration must be specif ied, and with it a pool/group designed specif ically for non-persistent, reusable
desktops:
Manual Floating Pool (VMware View), a Shared Group (Citrix XenDesktop), or the equivalent Collection type (Pano Logic),
.
To create the template:
1. Select Layers > Templates > Create Template.
2. Complete the Create Template wizard as usual.

© 1999-2017 Citrix Systems, Inc. All rights reserved. p.182https://docs.citrix.com
3. On the Desktop Type and Policy tab:
a. Choose the Desktop Type Nonpersistent. A power policy is only available for nonpersistent desktops.
b. To integrate with a connection broker, select a Broker, and choose a f loating pool, shared group, or your broker's
equivalent collection designed for non-persistent desktops.
c. Click Configure Power Policy, select Keep at least ... unassigned desktops powered on and available for users, and
specify the minimum number of desktop spares.
4. Complete the remaining tabs, and create the template.
Use t he t emplat e t o creat e deskt ops governed by t his power policyUse t he t emplat e t o creat e deskt ops governed by t his power policy
1. Select Desktop > Create Desktop.
2. On the Template Selection tab, choose the template (the template that has the correct Power Policy).
3. On the User Assignment tab, the broker and pool should be the same as specif ied in the template.
4. On the Desktop Details tab, the Desktop Type should be Nonpersist entNonpersist ent , as specif ied in the template.
5. Complete the remaining tabs, and create the Desktops.
Track t he number of spare deskt opsTrack t he number of spare deskt ops
To see how many spare desktops are powered on and ready for use:
1. Select Layers > Templates.
2. Select the template associated with the View Pool or XenDesktop Group whose spare desktops you want to track, and
click the i for detailed information.
3. Check the Desktop Power Policy settings at the bottom of the panel for the Minimum Number of Spares configured,
and the Actual Number of Spares available.
Configure Power Management settings in the Unidesk Management Console and in your connection broker. The next
section explains how.
Configure t he Connect ion Broker f or Unidesk-based Deskt op Power ManagementConfigure t he Connect ion Broker f or Unidesk-based Deskt op Power Management
Assuming that you’ve configured Floating-Assignment pools for power management within Unidesk and you’ve set a
minimum number of desktops to keep powered on and ready for users:
Configure VMware for Unidesk-based Desktop Power Management
1. Set the VMware Remote Desktop Power Policy to T ake no power act ionT ake no power act ion.
2. Configure VMware View Floating-Assignment pools.
Use the View Administrator to configure the pool settings.

© 1999-2017 Citrix Systems, Inc. All rights reserved. p.183https://docs.citrix.com
Configure.. .Configure.. . Setting.. .Setting.. .
Pool Type Manual Pool
User Assignment Floating Assignment
Desktop Source vCenter
Remote Desktop Power Policy Take no power action
Configure XenDeskt op Shared Deskt op groupsConfigure XenDeskt op Shared Deskt op groups
Assuming that you’ve configured Shared Desktop Groups for power management within Unidesk and you’ve set a minimum
number of desktops to keep powered on and ready for users:
1. Automate Shared Desktop Group Creation.
Use the Citrix PowerShell interface to create a Shared Desktop Group, configuring Desktop Power Management
settings as you do.
2. For any existing Shared Desktop Groups, modify the Power Management commands using the following PowerShell
commands:
For a Shared Desktop Group in Unidesk 2.5, the setting called AutomaticPowerOnForAssigned is ignored. This is used
only for Private Groups. Therefore, the way to disable power management for a shared group is to set the pool size to -
1 for all times of day in the Power Scheme.
#First Get the Desktop Group by name
$DTGID = Set-DesktopBrokerGroup "Call Center Desktop"
#Now Modify the PowerTimeScheme to disable power management for each time period. Substitute settings that
match your power management time scheme. If you are not sure of the name you can use the
#Get-BrokerPowerTimeScheme CMDLET
set-brokerpowertimescheme -Name "Call Center Desktop_Weekdays" -DisplayName 'Weekdays' -DaysOfWeek
Weekdays -DesktopGroupUid $DTGID.uid -PoolSize (1..24|%{-1})
set-brokerpowertimescheme -Name "Call Center Desktop_Weekend" -DisplayName 'Weekend' -DaysOfWeek Weekend
-DesktopGroupUid $DTGID.uid -PoolSize (1..24|%{-1})
3. Create a Shared Desktop Group using PowerShell commands. Modify the following commands to suit your needs. Check
all bolded entries to see if they should be modif ied.

© 1999-2017 Citrix Systems, Inc. All rights reserved. p.184https://docs.citrix.com
#Name the Desktop Group
$DTG = "Unidesk-Shared"
#Create Shared Desktop Group
new-brokerdesktopgroup $DTG -PublishedName $DTG -DesktopKind Shared
#Set T ime zone for Desktop Group
set-brokerdesktopgroup $DTG -TimeZone "Eastern Standard Time"
#Get the desktop group object
$DTGID = get-brokerdesktopgroup $DTG
#Create an Access Policy for this group Not Via Access Gateway
new-brokeraccesspolicyrule -name "Unidesk-Shared _NotViaAG" -AllowedConnections NotViaAG -AllowedProtocols
@('RDP','HDX') -AllowedUsers AnyAuthenticated -Enabled $true -AllowRestart $true -IncludedSmartAccessFilterEnabled
$true -IncludedDesktopGroupFilter $true -IncludedDesktopGroups $DTGID
# Create an Access Policy for this group Via Access Gateway
new-brokeraccesspolicyrule -name "Unidesk-Shared _ViaAG" -AllowedConnections ViaAG -AllowedProtocols
@('RDP','HDX') -AllowedUsers AnyAuthenticated -Enabled $true -AllowRestart $true -IncludedSmartAccessFilterEnabled
$true -IncludedDesktopGroupFilter $true -IncludedDesktopGroups $DTGID
#To entitle a User Group to the AD users you want to be able to provide access to. Should be an AD group
new-brokerEntitlementPolicyRule -name "Unidesk-Shared_Users_EP" -DesktopGroupUid $DTGID.uid -IncludedUsers
("YourDomain\Unidesk Users") -PublishedName " Unidesk-Shared _Users_EP"
#To Create a New PowerTimeScheme and assign it to the Group
new-brokerpowertimescheme -Name "Unidesk-Shared_Weekdays" -DisplayName 'Weekdays' -DaysOfWeek Weekdays -
DesktopGroupUid $DTGID.uid -PoolSize (1..24|%{-1}) -PeakHours (-1..23 | %{$_ -gt 7 -and $_ -lt 2-1})
new-brokerpowertimescheme -Name "Unidesk-Shared_Weekend" -DisplayName 'Weekend' -DaysOfWeek Weekend -
DesktopGroupUid $DTGID.uid -PoolSize (1..24|%{-1}) -PeakHours (-1..23 | %{$_ -gt 7 -and $_ -lt 2-1})
OPT ION 1: Allow an Aut ologon UserOPT ION 1: Allow an Aut ologon User
One way to speed up user logins into Windows 8.1 Non-persistent Desktops is to use the Unidesk Optimizer.exe when
preparing the gold image (or when creating a new version of an existing Operating System Layer) to allow an Autologon
© 1999-2017 Citrix Systems, Inc. All rights reserved. p.185https://docs.citrix.com
User. When you run the Optimizer, select the check box B B in the top section to allow an Aut ologon Userallow an Aut ologon User. This will add
some time to the initial Desktop creation, but it will greatly speed up every Desktop login for all users.
OPT ION 2: Disable t he Microsof t App Readiness serviceOPT ION 2: Disable t he Microsof t App Readiness service
One way to reduce the time it takes to sign into Windows 8.1 at the Welcome Screen is to disable the Microsoft App
Readiness service, which in turn disables the Windows Store. This achieves almost the same savings as removing the
Windows Store Apps (described in the next option), and allows you to turn the service back on at a later date, if you decide
you want users to have any of the bundled Windows Store Apps.
1. Use msconfig's Select ive St art upSelect ive St art up.
2. Under the ServicesServices tab uncheck App ReadinessApp Readiness .
Whenever you do a Windows Update, you'll need to turn this service back on during the update.
OPT ION 3: Removing bundled Windows St ore Apps t o speed up first -login t imesOPT ION 3: Removing bundled Windows St ore Apps t o speed up first -login t imes
An optional step, but an important consideration for Non-persistent Desktops, is removing the bundled Windows Store
Apps from the Windows 8.1 gold. During our testing we found we could significantly reduce login times on Non-persistent
Desktops by removing these apps.
Removing the bundled Windows Store apps does not disable the store, as does the previous option, so you can still use it.
And, if users require one or more of the originally bundled Windows Store apps, they can reinstall the application from the
Windows Store.
If you do decide to remove the bundled applications, it 's a good idea to do this in a separate OS Layer that you create for
Non-persistent Desktops.
To remove the bundled Windows Store Apps from Windows 8.1:
1. Use the following Powershell command to remove any bundled Windows Store Apps:
Get-AppxPackage -AllUsers | Remove-AppxPackage
2. To prevent these apps from being reinstalled when the next user logs in, enter this Powershell command to remove the
provisioning for them:
Get-AppXProvisionedPackage -online | Remove-AppxProvisionedPackage -online.
If you want to speed up login times for both Persistent and Non-persistent Windows 8.1 Desktops, you can disable some
of the more costly and less necessary GUI actions.
Turn of f new user arrowsTurn of f new user arrows
You can turn off new user arrows, by making the following Registry edits:
HKEY_CURRENT_USER\Software\Policies\Microsoft\Windows\EdgeUI
HKEY_LOCAL_MACHINE\SOFTWARE\Policies\Microsoft\Windows\EdgeUI

© 1999-2017 Citrix Systems, Inc. All rights reserved. p.186https://docs.citrix.com
DisableHelpSticker DWORD
0 = Enable help tips
1 = Disable help tips
Turn of f st art up animat ionTurn of f st art up animat ion
You can turn off startup animation with these Registry edits:
HKEY_LOCAL_MACHINE\SOFTWARE\Microsoft\Windows\CurrentVersion\Policies\System
EnableFirstLogonAnimation DWORD
0 = Disable first sign-in animation
1 = Enable first sign-in animation
Disable boot log and boot animat ionDisable boot log and boot animat ion
1. Open a command window.
2. Enter these commands:
bcdedit /set {default} bootlog no
bcdedit /set {default} quietboot yes
Disable lock screenDisable lock screen
1. Open the Group Policy Editor by right-clicking Computer.
2. Select Configuration > Administrative Templates > Control Panel > Personalization
3. Set Do not display the lock screen to Enabled.
If you prefer to make this change by editing the Registry:
1. In the Registry, under HKEY_LOCAL_MACHINE\SOFTWARE\Policies\Microsoft\Windows\Personalization create a new
DWORD (32-bit) Value named NoLockScreen with a value of 1.
2. Restart the system.
© 1999-2017 Citrix Systems, Inc. All rights reserved. p.187https://docs.citrix.com
Back up appliances
Jun 28 , 2017
Assuming you have scheduled your Desktops for backup, you can fully restore your environment as long as you also back up
these two key appliances:
Management Appliance (MA)
Master CachePoint Appliance (MCP)
It is not necessary to back up your Secondary CachePoint Appliances.
To back up your MA and MCP, you'll need to download and install the Unidesk Backup Utility. For details, see the following
topics:
Install the Unidesk Backup Utility
Back up the Unidesk MA and MCP

© 1999-2017 Citrix Systems, Inc. All rights reserved. p.188https://docs.citrix.com
Administer
Jun 28 , 2017
Administer
Unidesk Management Console
Unidesk Layers
Desktops
Appliance Backup Utility
Unidesk broker agent
Users and groups
Monitor Unidesk virtual appliances
Get notif ied of CachePoint service issues
Monitor tasks
Open ports in your f irewall for Unidesk
Logging
VMware hosts and datastores
Move (migrate) Appliances and Desktops
Generate Unidesk reports
Delete Unidesk components
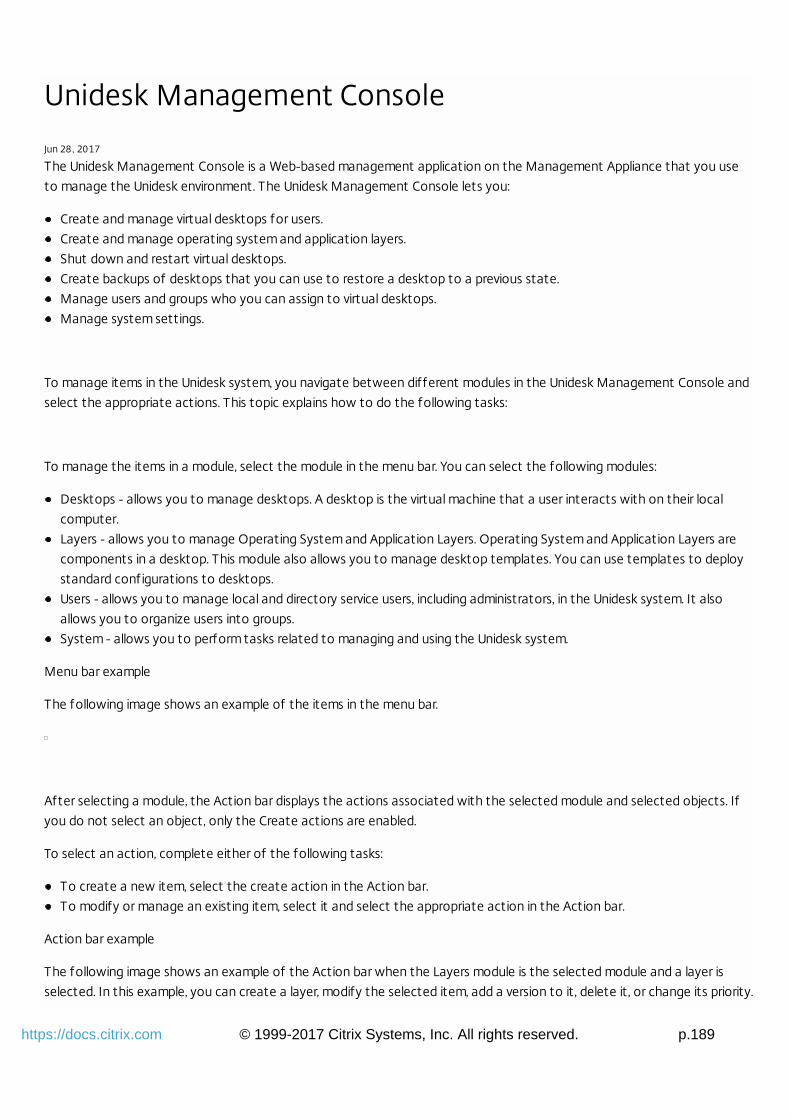
© 1999-2017 Citrix Systems, Inc. All rights reserved. p.189https://docs.citrix.com
Unidesk Management Console
Jun 28 , 2017
The Unidesk Management Console is a Web-based management application on the Management Appliance that you use
to manage the Unidesk environment. The Unidesk Management Console lets you:
Create and manage virtual desktops for users.
Create and manage operating system and application layers.
Shut down and restart virtual desktops.
Create backups of desktops that you can use to restore a desktop to a previous state.
Manage users and groups who you can assign to virtual desktops.
Manage system settings.
To manage items in the Unidesk system, you navigate between different modules in the Unidesk Management Console and
select the appropriate actions. This topic explains how to do the following tasks:
To manage the items in a module, select the module in the menu bar. You can select the following modules:
Desktops - allows you to manage desktops. A desktop is the virtual machine that a user interacts with on their local
computer.
Layers - allows you to manage Operating System and Application Layers. Operating System and Application Layers are
components in a desktop. This module also allows you to manage desktop templates. You can use templates to deploy
standard configurations to desktops.
Users - allows you to manage local and directory service users, including administrators, in the Unidesk system. It also
allows you to organize users into groups.
System - allows you to perform tasks related to managing and using the Unidesk system.
Menu bar example
The following image shows an example of the items in the menu bar.
After selecting a module, the Action bar displays the actions associated with the selected module and selected objects. If
you do not select an object, only the Create actions are enabled.
To select an action, complete either of the following tasks:
To create a new item, select the create action in the Action bar.
To modify or manage an existing item, select it and select the appropriate action in the Action bar.
Action bar example
The following image shows an example of the Action bar when the Layers module is the selected module and a layer is
selected. In this example, you can create a layer, modify the selected item, add a version to it, delete it, or change its priority.

© 1999-2017 Citrix Systems, Inc. All rights reserved. p.190https://docs.citrix.com
The Finalize action is not active because you need to start to create an Application Layer or add a version first.
Tool bar example
The tool bar provides options that allow you to change the view for each module.
Refresh: Refreshes the displayed view with the most current information.
List view: Displays a text-based list of desktops or layers that match the selected sort category.
Icon view: Displays icons representing desktops or layers that match the selected sort category.
Sort list: Organizes the display by a selected category.The categories change depending on the selected module.
View flagged items: Displays a collection of all desktops or layers that are f lagged and match the selected sort category.
The number value indicates the number of objects in the collection.
Search: Lets you search for items in the selected module.
More about List view
The List view displays a list of information about items in the following modules:
Desktops
Layers
Templates
System > Installation Machines
To display the List view, click in the tool bar.
List view for desktops and Installation Machines
Unidesk component information
List view for layers and templates
More about Icon view
The Icon view displays icons for each item in the following modules:
Desktops
Layers
System > Installation Machines
To display the Icon view, click in the tool bar. The Icon view is the default view.
The following diagram identifies the types of information that an icon displays.
View user assignments for desktops in VMware View pools
© 1999-2017 Citrix Systems, Inc. All rights reserved. p.191https://docs.citrix.com
When you create desktops for VMware View pools, the Unidesk Management Console displays the pool name as the
original user name assigned to the desktop.
For example, if you created a desktop in a pool named MJA-MA1, the desktop icon in the Desktops module would display
MJA-MA as the desktop user name, if no user is assigned to the desktop.
Because the pool is a persistent pool, the first time a user logs in to the desktop, the View Connection Server assigns the
desktop to that user. When the Unidesk Management Console synchronizes its information with the View Connection
Server, the Unidesk Management Console changes the user name in the Desktop icon and list views to display the name of
the assigned user.
If the assigned owner is a user who is imported into the Unidesk directory tree (for example, a member of a known
Directory Junction), the Information view for the user displays the name of the pool desktop that is assigned to that user.
To see user assignments for desktops in VMware pools, look at the following views:
The icon or list view in the Desktops module.
If the user is imported into the Unidesk tree, open the Information view for the user.
Open the Information view for the desktop.
If you think that the displayed user assignments for VMware View pools is incorrect, you can wait for the automatic
synchronization with the View Connection Server to occur (once every three hours) or you can synchronize the information
with the View Connection Server manually.
The following table describes the types of information and messages that you can view in an icon.
Displayed in the Desktop icon view only.
Name of the desktop owner, logged in user, or View pool or Xen group (when no one is logged in). A desktop that is
owned by a specific user, always displays the owner. Desktops owned by group (AD or Unidesk) or by a pool (View pool or
Xen group), show the logged in user, or the group or pool when no one is logged in.
The status of a desktop, Installation Machine, or layer.
Displays additional information about the item including status, configuration, and audit details.
The software displays the information button in the following ways:
If an alert is active, the software displays the button and its color changes to orange. Click it to display the alert
information.
If an alert is not active, hover the mouse cursor on the icon to display the button. Click the button to display the
Information view.
Desktop Alerts

© 1999-2017 Citrix Systems, Inc. All rights reserved. p.192https://docs.citrix.com
The software displays an alert when any of the following conditions exist for a desktop:
A deployment is scheduled to start after a specif ic time.
The desktop is using a configuration that does not match one that is assigned to the desktop. This situation occurs
when a change to the desktop configuration occurred but the desktop has not restarted yet. Changes to desktop
configurations do not take effect until the desktop restarts.
If selected (the color of the Flag changes to green), the item is flagged - it is part of a temporary collection of items.
To display the Flag, hover the mouse cursor on the icon.
Organize layers and desktops into temporary collections
You can organize desktops and layers into temporary collections that you can view quickly without having to search or
scroll through a page in the application. These temporary collections exist only until you log out of the Unidesk
Management Console.
For example, if you want to work with a group of desktops that use the Windows XP operating system, you can create a
collection of these items. Or, if you create a new Application Layer and deploy it to a department's desktops, you can flag
those desktops in case you need to make adjustments after the users start the updated desktops.
Use the flag check box to create a temporary collection of desktops, Operating System Layers, Application Layers, or
Installation Machines.
To create a collection of flagged items, complete the following steps:
1. In the icon view, hover the mouse cursor on a desktop, layer, or Installation Machine icon to display the flag check box. In
list view, locate the checkbox next to the item you want to add to the collection. The following illustration shows an
example of the flag check box:
2. Select the f lag check box to place the item in a collection. The color of the f lag check box is green when it is selected.
1. Select a module and click in the tool bar to display the f lagged items in the module.
2. To return to the main display, click .
3. To remove all items from a collection of f lagged items, click in the tool bar.
You can find information about using the product, or contact Unidesk for help by using the links and Search field on the top
right side of the menu bar:
Help linkHelp link – Opens the UMC Help, which explains Unidesk concepts, and includes detailed How To's.
Search support f ieldSearch support f ield – Does a full-text search of Unidesk support information, and displays the results in a browser.
Support information includes a Knowledge base of troubleshooting information, along with in-depth explanations of
how the product works and how it integrates with other software.

© 1999-2017 Citrix Systems, Inc. All rights reserved. p.193https://docs.citrix.com
Support linkSupport link – Opens the Unidesk Support home page in a browser.

© 1999-2017 Citrix Systems, Inc. All rights reserved. p.194https://docs.citrix.com
Change the Administrator password
Jun 28 , 2017
Use these steps to change the password for the original Administrator account created for the Unidesk Management
Console.
1. Log into the Unidesk Management Console.
2. Select User > Administ rat orsUser > Administ rat ors .
3. In the list of Administrators select Administ rat orAdminist rat or and click Edit Propert iesEdit Propert ies .
4. Enter the new password and type it again in the Conf irm PasswordConf irm Password f ield.
5. On the Confirm and Complete tab, click Update User.

© 1999-2017 Citrix Systems, Inc. All rights reserved. p.195https://docs.citrix.com
Upload the Unidesk License
Jun 28 , 2017
If you receive a message that you need a license when you start the Unidesk Management Console, there are two options
for getting the license. You can upload the license directly from the Unidesk website, or obtain a license file from Unidesk
Support, and upload the license from a local drive on the Unidesk Management Appliance.
1. In the License Expired message, Click License.
2. If your Management Appliance has web access:
1. Select the f irst choice, Download your license f rom t he Unidesk websit eDownload your license f rom t he Unidesk websit e .
2. Enter your credentials for the Unidesk website.
3. If your Management Appliance does not have web access:
1. Obtain a license f ile from Unidesk Sales or Support, and move the f ile to a drive that the Management Appliance can
access.
2. Select the second choice, Upload your license f ile f rom a local driveUpload your license f ile f rom a local drive .
3. Click BrowseBrowse , and select the license f ile.
4. On the Confirm Your License tab, click Finish.
5. You can return to the Licensing wizard at any time by clicking AboutAbout , and then the LicenseLicense tab.

© 1999-2017 Citrix Systems, Inc. All rights reserved. p.196https://docs.citrix.com
Unidesk tasks
Jun 28 , 2017
Every time you complete an action that affects the contents or state of a desktop or layer, you initiate a task that you
can monitor in the Task bar. For example, if you add a version to a layer or shut down a desktop, the Task bar displays a task
for that action.
T ask t ypeT ask t ype
User tasksMost tasks are tasks that an administrator initiates. You can filter the Task view to see only the tasks
that the currently logged-in user initiated or you can view tasks that all users initiated.
System
tasks
Tasks that occur automatically, for example, synchronization with a directory service, are system tasks.
Because a system task is not a task that the current user initiates, you must display the All Users view to
see these tasks in the Task bar.
Interrupted
tasks
If a system or connectivity occurs, the software maintains information about the state of active tasks
before the interruption occurred. When the problem resolves, the software tries to complete all
interrupted tasks.
The Task bar displays information about the status of tasks. This includes tasks that are running, and those that have
completed; tasks initiated by the logged in user, or tasks belonging to all users, including the system. System tasks are tasks
that result from scheduled backups and maintenance.
Task status bar, minimized
A minimized Task status bar is displayed across the bottom of the console.
T askT askst at usst at us
barbar
Task in
progressA rolling marquee of recently completed tasks.
Status
indicator
The color icon next to each task indicates whether the task is progressing or completed normally, or if there
are issues with it. For details, see the Status Indicator table below.
Expander
tabOpens and closes the expanded view of Task status.
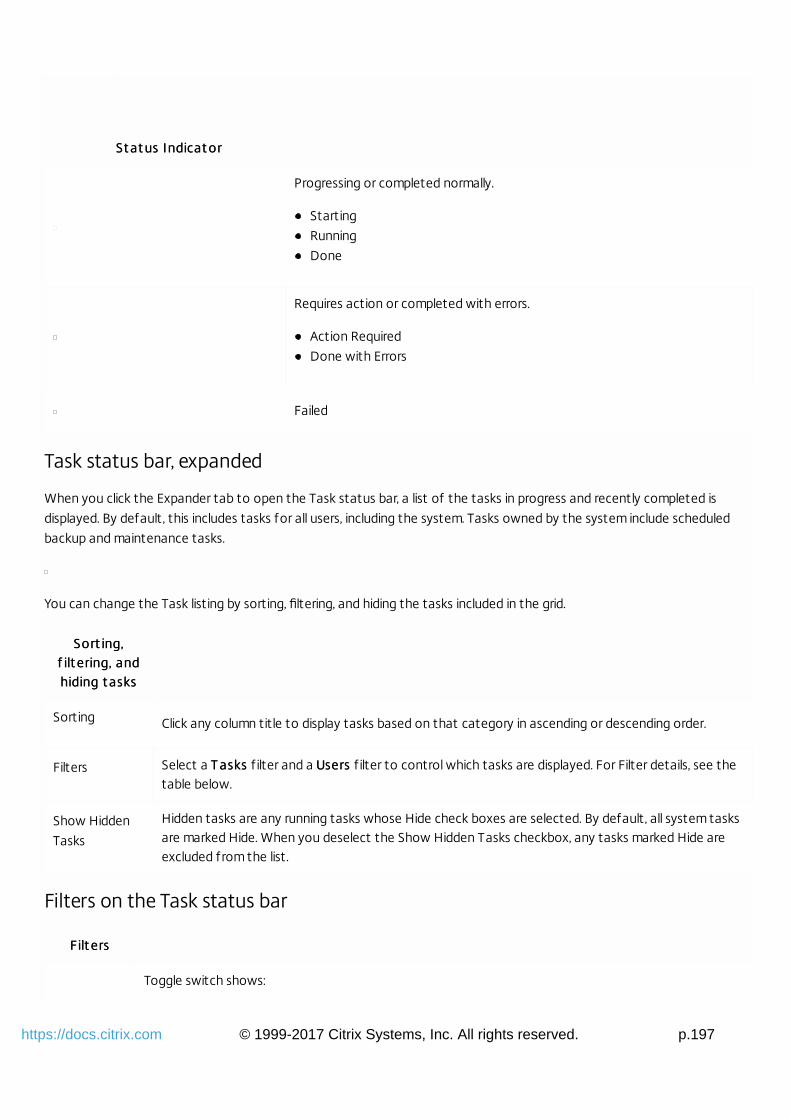
© 1999-2017 Citrix Systems, Inc. All rights reserved. p.197https://docs.citrix.com
St at us Indicat or St at us Indicat or
Progressing or completed normally.
Starting
Running
Done
Requires action or completed with errors.
Action Required
Done with Errors
Failed
Task status bar, expanded
When you click the Expander tab to open the Task status bar, a list of the tasks in progress and recently completed is
displayed. By default, this includes tasks for all users, including the system. Tasks owned by the system include scheduled
backup and maintenance tasks.
You can change the Task listing by sorting, filtering, and hiding the tasks included in the grid.
Sort ing,Sort ing,f ilt ering, andf ilt ering, andhiding t askshiding t asks
Sorting Click any column title to display tasks based on that category in ascending or descending order.
Filters Select a T asksT asks f ilter and a UsersUsers f ilter to control which tasks are displayed. For Filter details, see thetable below.
Show Hidden
Tasks
Hidden tasks are any running tasks whose Hide check boxes are selected. By default, all system tasksare marked Hide. When you deselect the Show Hidden Tasks checkbox, any tasks marked Hide areexcluded from the list.
Filters on the Task status bar
Filt ersFilt ers
Toggle switch shows:
© 1999-2017 Citrix Systems, Inc. All rights reserved. p.198https://docs.citrix.com
All tasks currently or recently running, stopped, or completed.
Completed tasks only.
Toggle switch shows:
Tasks for the logged in user only.
Tasks for all users, including the system.
Task status details
To see more information about a task, for example what is happening during a desktop rebuild, you can open a detailed
status window on the task.
Click the Info button next to the task to open a window with details on Task status.
The task status details window lists any subtasks required to complete a task. Like the Task status bar, you can reorganize
the list by clicking any of the column titles.
You can cancel subtasks individually or all at once:
Cancel subt asksCancel subt asks
Cancel individual subtasks, for example, one of many desktop backups.
Cancel All subtasks that are not yet completed.
Most tasks include one or more subtasks. While a task is in progress, you can cancel one or more subtasks, for example, if a
system problem occurs and the subtask is unlikely to complete.
1. Open the Task bar and view the active tasks.
2. Open the information view for a task (click .)
3. Click next to the subtask you want to cancel (in some cases, the information view displays more than one subtask .
4. When the subtask stops, the Task bar changes its status to Failed.

© 1999-2017 Citrix Systems, Inc. All rights reserved. p.199https://docs.citrix.com
Log into a Unidesk virtual machine using the OpenConsole
Jun 28 , 2017
For quick access to desktops, Installation Machines, Operating System Layers, or Application Layers, you can launch an
Open Console window from the Unidesk Management Console. The Unidesk Management Console uses Remote Desktop
Protocol (RDP) to open an Open Console window for the Desktop or Installation Machine you specify. If you access an
Operating System or Application Layer, the console connects to the virtual machine for the appropriate Installation
Machine.
Before you can use the Open Console feature, the remote machine must meet the following requirements.
Prerequisit ePrerequisit e Descript ionDescript ion
Remote Access
enabled
The gold image for the desktop or Installation Machine must have Remote Access enabled:
In the Syst em Propert iesSyst em Propert ies dialog box, under Remot e Deskt opRemot e Deskt op, click one of the options to allow
connections from other computers, and then click OKOK
Virtual machine
operational
Whether accessing a Desktop, Installation Machine, or a layer, you will ultimately connect to a
Desktop or Installation Machine, and it must be in one of these states:
In Use — The Desktop is in use by a Unidesk user.
Running — The Desktop is ready for use.
The following table explains how to use Open Console to access a Desktop, Installation Machine, Operating System Layer,
or Application Layer.
1. Access Open Console:
For...For... Use...Use...
Desktop Desktops > Open Console
Installation Machine System > Installation Machines > Open Console
Operating System Layer's Installation Machine Layers > Operating System Layer > Open Console
Application Layer's Installation Machine Layers > Application Layer > Open Console

© 1999-2017 Citrix Systems, Inc. All rights reserved. p.200https://docs.citrix.com
2. Depending on your Web browser settings, you might need to change the security settings to proceed.
3. In the Open Console window, enter your login credentials for the desktop or Installation Machine. This opens the
console window.

© 1999-2017 Citrix Systems, Inc. All rights reserved. p.201https://docs.citrix.com
Types of user views
Jun 28 , 2017
The user views let you view and manage both local users and groups that you create using the Unidesk Management
Console, and users from a remote directory service.
With regard to remote directory service users, you can add these users to local groups or assign roles to them. To change
the attributes for these users, you must change them on the remote directory server.
The Unidesk Management Console includes several ways to view and edit users.
ViewView Descript ionDescript ion Act ionsAct ions
Tree
The Tree view displays folders for users and groups.
You can add folders to any existing folder in the directory tree, including
the root folder.
Directory service users and groups
This view also displays users and groups from directory services if you add
them to the Unidesk directory tree.
In this view, you can:
Create a local user.
Create a local group.
Create a folder in the
tree view.
Delete a selected
object.
Edit a selected object.
Add a user or group to
another group.
Users
The Users view displays all local users and the groups to which they
belong.
This view displays users from a remote directory service if any of the
following conditions exist:
A desktop is currently assigned to a user or was assigned to the user
at some time in the past.
The user is a member of a local group.
The user has administrative privileges.
In this view, you can:
Create a local user.
Create a local group.
Delete a local user.
Edit a local user.
Administrators
The Administrators view displays all users who have Administrator
privileges assigned to them.
In this view, you can:
Create a local user.
Delete a local user.
Edit a local user.
Directory
Service
The Directory Service view displays the connections to remote directory
services.
In this view, you can:
Create a directory
junction.
Edit a directory junction.

© 1999-2017 Citrix Systems, Inc. All rights reserved. p.202https://docs.citrix.com
Delete a directory
junction.
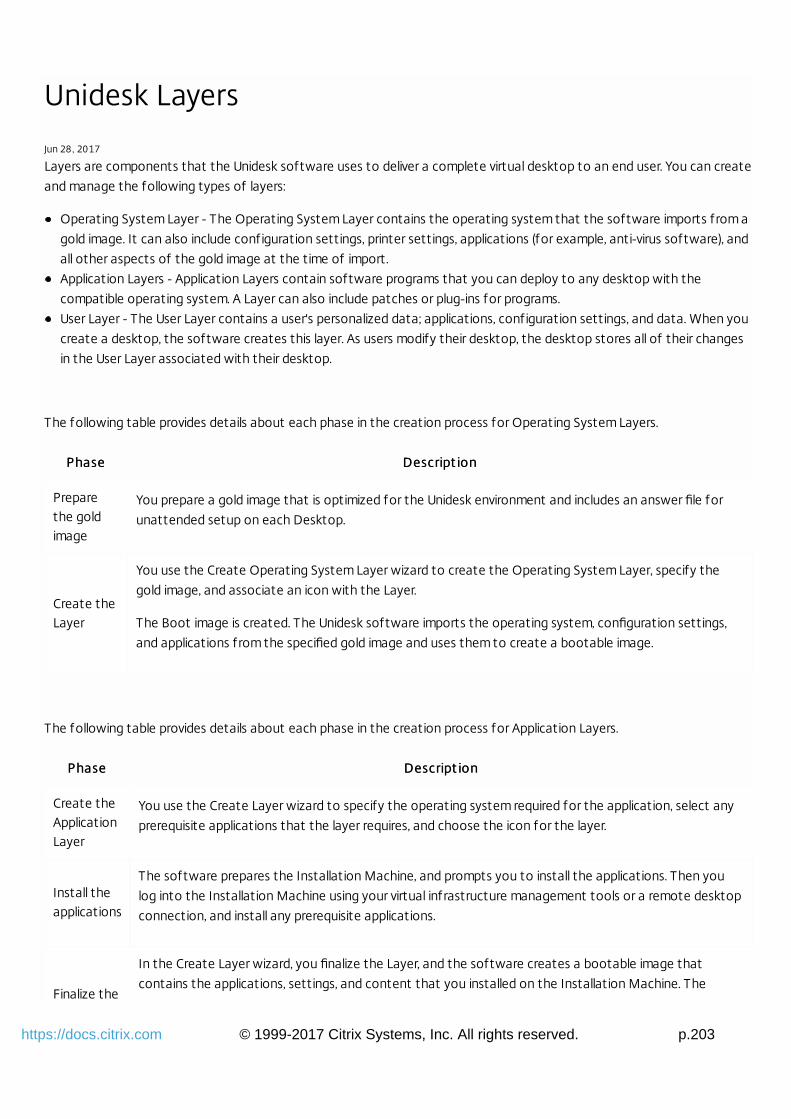
© 1999-2017 Citrix Systems, Inc. All rights reserved. p.203https://docs.citrix.com
Unidesk Layers
Jun 28 , 2017
Layers are components that the Unidesk software uses to deliver a complete virtual desktop to an end user. You can create
and manage the following types of layers:
Operating System Layer - The Operating System Layer contains the operating system that the software imports from a
gold image. It can also include configuration settings, printer settings, applications (for example, anti-virus software), and
all other aspects of the gold image at the time of import.
Application Layers - Application Layers contain software programs that you can deploy to any desktop with the
compatible operating system. A Layer can also include patches or plug-ins for programs.
User Layer - The User Layer contains a user's personalized data; applications, configuration settings, and data. When you
create a desktop, the software creates this layer. As users modify their desktop, the desktop stores all of their changes
in the User Layer associated with their desktop.
The following table provides details about each phase in the creation process for Operating System Layers.
PhasePhase Descript ionDescript ion
Preparethe goldimage
You prepare a gold image that is optimized for the Unidesk environment and includes an answer file for
unattended setup on each Desktop.
Create theLayer
You use the Create Operating System Layer wizard to create the Operating System Layer, specify the
gold image, and associate an icon with the Layer.
The Boot image is created. The Unidesk software imports the operating system, configuration settings,
and applications from the specified gold image and uses them to create a bootable image.
The following table provides details about each phase in the creation process for Application Layers.
PhasePhase Descript ionDescript ion
Create theApplicationLayer
You use the Create Layer wizard to specify the operating system required for the application, select any
prerequisite applications that the layer requires, and choose the icon for the layer.
Install theapplications
The software prepares the Installation Machine, and prompts you to install the applications. Then you
log into the Installation Machine using your virtual infrastructure management tools or a remote desktop
connection, and install any prerequisite applications.
Finalize the
In the Create Layer wizard, you finalize the Layer, and the software creates a bootable image that
contains the applications, settings, and content that you installed on the Installation Machine. The

© 1999-2017 Citrix Systems, Inc. All rights reserved. p.204https://docs.citrix.com
Layer Unidesk software also performs an orderly shut down of the Installation Machine and returns it to a non-
bootable state.
The Unidesk Management Console displays the status of Layers in the Icon and List views of the Layers modules, as well as
in the Information view for the Layer. Following are the status messages for layers that the software displays in the Task
bar, the Icon view,
St at usSt at us Descript ionDescript ion
Not
deployable
The layer is not ready for assignment to desktops.
Either the software is in the process of preparing the layer for deployment or a system problem occurred
that is preventing the layer from becoming deployable.
Check the status in the Task bar and in the layer's information view for additional information about the
layer's status.
Editing
The software is in the process of creating or changing the layer.
If you are creating an Application Layer, this status usually indicates that the system is waiting for you to
install the application on an Installation Machine and finalize the layer.
Deployable The layer is ready for assignment to desktops.
The following table describes the status messages for layer versions. To see these status messages, open the Information
view for the layer.
St at usSt at us Descript ionDescript ion
Waiting to
Edit
One of these conditions exist:
Application Layers - The software is preparing the Installation Machine for installation of the
application.
Operating System Layers - The software is importing the f iles from a gold image before it creates the
bootable image.
EditingThis status applies to new Application Layers and all layer versions that you add. The software is waiting
for an administrator to install the software on an Installation Machine.
FinalizingThis status applies to Application Layers and all layer versions. The software is importing the application

© 1999-2017 Citrix Systems, Inc. All rights reserved. p.205https://docs.citrix.com
software into the layer.
Deployable The layer is available for use when you create desktops and Application Layers.
When you create or edit a desktop, you assign an Operating System Layer and, optionally, Application Layers to it. The
Unidesk software assigns priorities to each assigned layer and applies them in order, from the lowest priority to the highest.
In some situations, the order in which you install applications can cause conflicts to occur on the desktop. To address these
issues, the Unidesk Management Console allows you to change the order in which the software applies layers when it
composites a desktop.
Priorit yPriorit y LayerLayer
High UserThe User Layer always has the highest priority - the software applies this layer last. The
contents of the User Layer overwrites files or settings from previously-applied layers.
Application
The software sets priorities on Application Layers based on the layer creation time. The newest
Application Layers have a higher priority than older layers. This action also applies to specific
versions of Application Layers.
For example, if you assign two Application Layer versions to a desktop, one that you created
yesterday and one that you created today, the software applies the Application Layer version
that you created yesterday first because it has a lower priority.
If Application Layers use the same settings or files, the Application Layer with the higher priority
(the newer layer) overwrites these settings or files only. Applying the higher-priority layer first
does not affect any files or settings from the lower-priority layer that are different from the
ones that the higher-priority layer uses.
LowOperatingSystem
Operating System Layers always have the lowest priority. The software always applies theOperating System Layer to the desktop f irst. Any changes from a higher-priority Application orUser Layer overwrites settings or f iles that exist in the Operating System Layer.
Application priority selection
If you know that a lower-priority Application Layer must take precedence over a higher-priority Application Layer, the Layers
> Change Layer Priority action lets you change the priorities of the Application Layers. You can change the order of all
versions associated with an Application Layer, or you can change the priority for specific versions for selected Application
Layers. For details, see Manage Layer priorities.

© 1999-2017 Citrix Systems, Inc. All rights reserved. p.206https://docs.citrix.com
Assign the new version of an OS Layer to Desktops
Jun 28 , 2017
You can assign the new version of an Operating System Layer to one or more Desktops, as described below.
Note: Desktops are locked to the OS layer on which they were created. You cannot switch a Desktop to a different
operating system layer, even if the Layer has the same OS as the one on which the Desktop was created.
1. Add the version you want to deploy to an existing Operating System Layer.
2. Click the Desktops module, and select the Desktop to deploy to.
3. Select Edit Desktops in the Action bar. This opens the Edit Desktop wizard.
4. In the Operating System Layer tab, select the version of the operating system that you want to use.
5. In the Confirm and Complete tab, verify that the details are correct, enter a comment if required, and click Update
Desktop.
If you enter comments, they appear in the Information view Audit History.
6. Restart the desktops that you updated to have the changes take effect.
1. Add the version you want to deploy to an existing Operating System Layer.
2. Select Desktops and then select one or more desktops that you want to upgrade.
3. Select the Edit Desktops action in the Action bar.
Result: This action opens the Edit Desktop wizard.
4. In the OS Assignment tab, select the operating system and version that you want to assign to the desktops.
5. In the Confirm and Complete tab, verify that the details are correct, enter a comment if required, and click Update
Desktop.
6. Restart the Desktops that you updated to have the changes take effect.

© 1999-2017 Citrix Systems, Inc. All rights reserved. p.207https://docs.citrix.com
Update an Operating System Layer
Jun 28 , 2017
To upgrade an operating system, add a new version to the Operating System Layer. When you assign the Operating
System Layer to a desktop, you can select the new version that you created.
Ensure that the following items are available:
An Installation Machine.
The installation program for the service pack or operating system upgrade.
Optionally, shut down the desktop you are changing. Changing the operating system requires the software to create a
new bootable image for the desktop. The desktop must be in a stopped state for this task to complete. You can choose
to restart the desktops after you f inish the application assignment.
1. Select Layers > OS Layers and then select the Operating System Layer for which you are adding a new Version.
2. Select Add Version in the Action bar. This opens the Add Version wizard.
3. In the Version Details tab, enter a version identifier and select an Installation Machine.
4. If you want a script to run the first time the user runs this operating system version, enter a version description and a
path for the script.
5. In the Confirm and Complete tab, review the version details, enter a comment if required, and click Finish. If you enter
comments, they appear in the Information view Audit History.
6. Monitor this task in the Task bar. When prompted to do so, install the new operating system service pack or upgrade on
the Installation Machine.
7. After installing the service pack or upgrade, select the Operating System Layer and select Finalize in the Action bar.
After you create the new version, assign it to the Desktops that require the operating system upgrade. You must restart
the Desktops before the changes take effect.
When finalizing a Layer, Unidesk checks the integrity of the Layer, and waits until any Windows operations that are in
progress on the Installation Machine have completed. If the following message is displayed, one or more pending tasks on
the Installation Machine must be completed before the Layer can be finalized. Otherwise, any Layers that use this
Installation Machine would have issues.
Layer integrity message
As described in the following message, you can expedite the completion of any of these queued tasks:
The new version version-name of Layer layer-name on Installation Machine (IM) im-name can only be finalized when the
following conditions have been addressed:
© 1999-2017 Citrix Systems, Inc. All rights reserved. p.208https://docs.citrix.com
A reboot is pending to update drivers on the boot disk - please check and reboot the IM.
A post-installation reboot is pending - please check and reboot the IM.
A Microsoft NGen operation is in progress in the background - (Click here for help with this condition).
An MSI install operation is in progress - please check the IM.
How to investigate Microsoft NGen operations
NGen is the Microsoft "Native Image Generator". It is part of the .NET system, and basically recompiles .NET byte code into
native images and constructs the registry entries to manage them. Windows will decide when to run NGen, based on what
is being installed and what Windows detects in the configuration. When NGen is running, you must let it complete. An
interrupted NGen operation can leave you with nonfunctioning .NET assemblies or other problems in the .NET system.
You have the choice of waiting for the NGen to complete in the background or you can force the NGen to the foreground.
Forcing the NGen to the foreground will allow you to view the progress and once the output has completed you should be
able to finalize the layer.
Force an NGen operation to the foreground
Normally, NGen is a background operation and will pause if there is foreground activity. Bringing the task into the
foreground can help the task to complete as quickly as possible.
1. Open a command prompt as Administrator.
2. Go to the Microsoft .NET Framework directory for the version currently in use:
cd C:\Windows\Microsoft.NET\FrameworkNN\vX.X.XXXXX
3. Enter the NGen command to execute the queued items:
ngen update /force
This brings the NGen task to the foreground in the command prompt, and lists the assemblies being compiled.
Not e:Not e: It’s okay if you see several compilation failed messages!
4. Look in the Task Manager to see if an instance of MSCORSVW.EXE is running. If it is, you must allow it to complete,or
re-run ngen update /force. Do not reboot to stop the task. You must allow it to complete.
Check the status of an NGen operation
If you would prefer to wait for the NGen to complete you can check the status as described here. However, every time you
check the queue status, you are creating foreground activity, which might cause the background processing to temporarily
pause.
1. Open a command prompt as Administrator.
2. Check status by running this command:
ngen queue status
3. When you receive the following status, the NGen is complete, and you can finalize the Layer.
The .NET Runtime Optimization Service is stopped

© 1999-2017 Citrix Systems, Inc. All rights reserved. p.209https://docs.citrix.com
About setting a script to run the first time the user logs in
When you create a Layer or Layer Version, you can specify a script, called a Run Once script, to run the first time a user logs
in after the Desktop starts (restarts). For example, you can use a Run Once script to complete the setup for an application.
A Run Once script is a .cmd or .bat file installed on the Installation Machine.
User permissionsUser permissions - When an Application Layer that has a Run Once script runs for the first time, Microsoft Windows
attempts to delete the RunOnce key before running the script. The Desktop user must have the rights to delete the
RunOnce key, or the script doesn't run. If you need a Run Once script to be run by any user, set the permissions on the
Run Once folder accordingly. For details, see http://support.microsoft.com/kb/314866.
New Layer VersionsNew Layer Versions - When you create a new Layer Version, the new Version does not inherit the script from the
original Layer. If you want to include the script from the original Layer, you need to set the Run Once script for the Layer
Version.
RunOnce regist ry keyRunOnce regist ry key - When a Run Once script runs on a Desktop, the operating system adds an entry to the
Desktop's RunOnce registry key:
HKEY_LOCAL_MACHINE\Software\Microsoft\Windows\CurrentVersion\RunOnce
How to set a Run Once script
How to set a Run Once script to run more than once
© 1999-2017 Citrix Systems, Inc. All rights reserved. p.210https://docs.citrix.com
Upgrade an application
Jun 28 , 2017
You can upgrade an application by installing a new version of is on a new Application Layer Version. An Application Layer can
include several Layer Versions, each containing a different application version. You can deploy different Layer Versions to
selected desktops.
Before you start
You'll need:
A compatible Installation Machine.
The installation program for the new version of the application.
Application Layers that the new version requires (prerequisite layers.)
If applications affect boot-level components
Installing applications such as service packs, hot fixes, and antivirus applications can affect boot-level components, which
means you'll need to restart the Installation Machine. This will generate a system task to rebuild the Desktop's boot image.
Once Unidesk rebuilds the boot image, it shuts down the Installation Machine copies the boot-level components to the
boot volume, and restarts the Installation Machine. You can then finalize the layer or version.
Note: If the Installation Machine restarts before the boot image rebuild is complete, you will see a STOP message screen.
This is temporary.
About setting a script to run the first time the user logs in
When you create a Layer or Layer Version, you can specify a script, called a Run Once script, to run the first time a user logs
in after the Desktop starts (restarts). For example, you can use a Run Once script to complete the setup for an application.
A Run Once script is a .cmd or .bat file installed on the Installation Machine.
User permissionsUser permissions - When an Application Layer that has a Run Once script runs for the first time, Microsoft Windows
attempts to delete the RunOnce key before running the script. The Desktop user must have the rights to delete the
RunOnce key, or the script doesn't run. If you need a Run Once script to be run by any user, set the permissions on the
Run Once folder accordingly. For details, see http://support.microsoft.com/kb/314866.
New Layer VersionsNew Layer Versions - When you create a new Layer Version, the new Version does not inherit the script from the
original Layer. If you want to include the script from the original Layer, you need to set the Run Once script for the Layer
Version.
RunOnce regist ry keyRunOnce regist ry key - When a Run Once script runs on a Desktop, the operating system adds an entry to the
Desktop's RunOnce registry key:
HKEY_LOCAL_MACHINE\Software\Microsoft\Windows\CurrentVersion\RunOnce
How to set a Run Once script
To set a Run Once script for a Layer or Layer Version:
1. Add the script file to the Installation Machine you are using to create the Layer or Layer Version.

© 1999-2017 Citrix Systems, Inc. All rights reserved. p.211https://docs.citrix.com
Not e:Not e: To see whether a Layer Version already has a Run Once script configured, check by opening the Layer's
Information view and expand the Version entries.
2. Enter the script's path in the Layer or Layer Version's Script Path field. For example, enter C:\Scripts\SpecialScript.bat in
the Script Path field.
Once the script runs on a Desktop, it will not run again because of the entry in the RunOnce registry key.
How to set a Run Once script to run more than once
To run a script more than once, you can:
Remove the Layer from the Desktop and then re-add it.
Click Deskt ops > Edit Deskt opsDeskt ops > Edit Deskt ops, select the Applicat ion AssignmentApplicat ion Assignment tab, and select Reinst allReinst all for the layer.
Upgrade an application
1. Select Layers > Application Layers and select an Application Layer.
2. Select Add Version in the Action bar. This opens the Create Layer Version wizard.
3. In the Version Details tab, enter a version identif ier. This can be the application version, or anything you choose.
4. (Optional) Type a description of the version.
5. (Optional) Enter a path for a RunOnce script that will run the f irst time the user logs in after the desktop restarts.
1. In the Installation Machine Details tab, select the Operating System Layer. The Operating System Layer used to create
the Application Layer appears.
2. Select any version of the Operating System Layer.
3. Select an Installation Machine.
4. In the Prerequisite Layers tab, select any Layers required to install the new Application Layer Version.
5. In the Confirm and Complete tab, verify your choices, and click Finish.
6. Monitor this task in the Task bar. When prompted to do so, install the new operating system service pack or upgrade on
the Installation Machine.
7. After installing the upgrade, select the Application Layer and select Finalize in the Action bar.
When the task is done, you can deploy the new Application Layer Version to Desktops that have a compatible Operating
System Layer.
When finalizing a Layer, Unidesk checks the integrity of the Layer, and waits until any Windows operations that are in
progress on the Installation Machine have completed. If the following message is displayed, one or more pending tasks on
the Installation Machine must be completed before the Layer can be finalized. Otherwise, any Layers that use this
Installation Machine would have issues.
Layer integrity message
As described in the following message, you can expedite the completion of any of these queued tasks:
The new version version-name of Layer layer-name on Installation Machine (IM) im-name can only be finalized when the
following conditions have been addressed:

© 1999-2017 Citrix Systems, Inc. All rights reserved. p.212https://docs.citrix.com
A reboot is pending to update drivers on the boot disk - please check and reboot the IM.
A post-installation reboot is pending - please check and reboot the IM.
A Microsoft NGen operation is in progress in the background - (Click here for help with this condition).
An MSI install operation is in progress - please check the IM.
How to investigate Microsoft NGen operations
NGen is the Microsoft "Native Image Generator". It is part of the .NET system, and basically recompiles .NET byte code into
native images and constructs the registry entries to manage them. Windows will decide when to run NGen, based on what
is being installed and what Windows detects in the configuration. When NGen is running, you must let it complete. An
interrupted NGen operation can leave you with nonfunctioning .NET assemblies or other problems in the .NET system.
You have the choice of waiting for the NGen to complete in the background or you can force the NGen to the foreground.
Forcing the NGen to the foreground will allow you to view the progress and once the output has completed you should be
able to finalize the layer.
Force an NGen operation to the foreground
Normally, NGen is a background operation and will pause if there is foreground activity. Bringing the task into the
foreground can help the task to complete as quickly as possible.
1. Open a command prompt as Administrator.
2. Go to the Microsoft .NET Framework directory for the version currently in use:
cd C:\Windows\Microsoft.NET\FrameworkNN\vX.X.XXXXX
3. Enter the NGen command to execute the queued items:
ngen update /force
This brings the NGen task to the foreground in the command prompt, and lists the assemblies being compiled.
Not e:Not e: It’s okay if you see several compilation failed messages!
4. Look in the Task Manager to see if an instance of MSCORSVW.EXE is running. If it is, you must allow it to complete,or
re-run ngen update /force. Do not reboot to stop the task. You must allow it to complete.
Check the status of an NGen operation
If you would prefer to wait for the NGen to complete you can check the status as described here. However, every time you
check the queue status, you are creating foreground activity, which might cause the background processing to temporarily
pause.
1. Open a command prompt as Administrator.
2. Check status by running this command:
ngen queue status
3. When you receive the following status, the NGen is complete, and you can finalize the Layer.
The .NET Runtime Optimization Service is stopped

© 1999-2017 Citrix Systems, Inc. All rights reserved. p.213https://docs.citrix.com
© 1999-2017 Citrix Systems, Inc. All rights reserved. p.214https://docs.citrix.com
Edit a Layer version
Jun 28 , 2017
You can apply a hotfix or patch to an existing software version, but only if that layer version has not yet been assigned to
any Desktops. This is useful if your IT policies require you to submit new versions for management approval.
Ensure you have the software for the version you are changing.
Ensure that an Installation Machine is available.
1. Select Layers > Application Layersor Layers > OS Layers and select either the Operating System or Application Layer that
has the version you need to change.
2. Select Edit Latest Version in the Action bar.
The Edit Latest Version action is active only if the latest version for the selected layer is not assigned to a desktop.
Result: This action opens the Edit Latest Version wizard.
3. In the Version Details tab, enter a description of the change, if required, in the Version Description box.
4. In the Layer Size tab, specify the storage space allocated to the layer.
1. Specify the default size for the layer, in gigabytes.
2. Optionally, specify the amount of storage space you want to allocate for layers on individual drive volumes.
5. Select an Installation Machine in one of the following ways:
For Operating System Layers, select the Version Details tab and select an Installation Machine from the list.
For Application Layers, select the Desktop Settings tab and select an Installation Machine from the list.
6. In the Prerequisite Layers tab, select one or more layers from the displayed list, if required.
1. Select an Application Layer in the Prerequisite Layers box.
2. Select the version of the Application Layer in the Application Details box.
3. Click Add LayerAdd Layer.
7. In the Confirm and Complete tab, review the details, enter a comment if required, and click Update Layer. If you enter
comments, they appear in the Information view Audit History.
8. Monitor this task in the Task bar. When prompted to do so, install the required software on the Installation Machine.
Note: Canceling the Edit Version task does not remove any of the changes you made to the Installation Machine. You
have to delete the version to remove these changes.
9. After installing the software, select the updated layer and select Finalize in the Action bar.
When this step is complete, you can assign the version to desktops.
When finalizing a Layer, Unidesk checks the integrity of the Layer, and waits until any Windows operations that are in
progress on the Installation Machine have completed. If the following message is displayed, one or more pending tasks on
the Installation Machine must be completed before the Layer can be finalized. Otherwise, any Layers that use this
Installation Machine would have issues.

© 1999-2017 Citrix Systems, Inc. All rights reserved. p.215https://docs.citrix.com
Layer integrity message
As described in the following message, you can expedite the completion of any of these queued tasks:
The new version version-name of Layer layer-name on Installation Machine (IM) im-name can only be finalized when the
following conditions have been addressed:
A reboot is pending to update drivers on the boot disk - please check and reboot the IM.
A post-installation reboot is pending - please check and reboot the IM.
A Microsoft NGen operation is in progress in the background - (Click here for help with this condition).
An MSI install operation is in progress - please check the IM.
How to investigate Microsoft NGen operations
NGen is the Microsoft "Native Image Generator". It is part of the .NET system, and basically recompiles .NET byte code into
native images and constructs the registry entries to manage them. Windows will decide when to run NGen, based on what
is being installed and what Windows detects in the configuration. When NGen is running, you must let it complete. An
interrupted NGen operation can leave you with nonfunctioning .NET assemblies or other problems in the .NET system.
You have the choice of waiting for the NGen to complete in the background or you can force the NGen to the foreground.
Forcing the NGen to the foreground will allow you to view the progress and once the output has completed you should be
able to finalize the layer.
Force an NGen operation to the foreground
Normally, NGen is a background operation and will pause if there is foreground activity. Bringing the task into the
foreground can help the task to complete as quickly as possible.
1. Open a command prompt as Administrator.
2. Go to the Microsoft .NET Framework directory for the version currently in use:
cd C:\Windows\Microsoft.NET\FrameworkNN\vX.X.XXXXX
3. Enter the NGen command to execute the queued items:
ngen update /force
This brings the NGen task to the foreground in the command prompt, and lists the assemblies being compiled.
Not e:Not e: It’s okay if you see several compilation failed messages!
4. Look in the Task Manager to see if an instance of MSCORSVW.EXE is running. If it is, you must allow it to complete,or
re-run ngen update /force. Do not reboot to stop the task. You must allow it to complete.
Check the status of an NGen operation
If you would prefer to wait for the NGen to complete you can check the status as described here. However, every time you
check the queue status, you are creating foreground activity, which might cause the background processing to temporarily
pause.
1. Open a command prompt as Administrator.
© 1999-2017 Citrix Systems, Inc. All rights reserved. p.216https://docs.citrix.com
2. Check status by running this command:
ngen queue status
3. When you receive the following status, the NGen is complete, and you can finalize the Layer.
The .NET Runtime Optimization Service is stopped
To deploy the updated software, complete the following steps:
1. Select Desktops and select one or more desktops.
2. Select Edit Desktops in the Action bar.
3. Select the appropriate tab, either OS Assignment or Application Assignment, select the new layer version, and update the
desktop.
A task runs to rebuild the bootable image. This task completes only after the desktop shuts down. The desktop shuts
down for maintenance based on its maintenance schedule.

© 1999-2017 Citrix Systems, Inc. All rights reserved. p.217https://docs.citrix.com
Edit Layer properties
Jun 28 , 2017
You can change the following properties for an Operating System or Application Layer, including:
The name of the Layer.
The description of the Layer.
The version and description of each Layer Version.
The image associated with the Layer.
To edit Layer properties:
1. Select Layers and select the Operating System or Application Layer that you want to edit.
2. Select Edit Properties. This opens the Edit Layer wizard.
3. In the Layer Details tab, change the name or description of the Layer.
4. In the Version Details tab, expand a version and change the version identif ier or the description, as needed.
5. In the Icon Assignment tab, select a new icon from the Layer Icon box or upload a new one.
6. In the Confirm and Complete tab, enter a comment, if required, and click Update Layer. If you enter comments, they
appear in the Information view Audit History.
The Desktops that include this Layer must restart before the changes can take effect.

© 1999-2017 Citrix Systems, Inc. All rights reserved. p.218https://docs.citrix.com
Assign icons to Layers and templates
Jun 28 , 2017
When you create or edit an Operating System Layer, Application Layer, or Template you can assign an icon to the layer.
Icons help to identify these items in the Unidesk Management Console.
When using the Create or Edit wizard for any Layer or Template, the Icon Assignment tab gives you the opportunity to:
Choose an icon: Use the default icon,choose another icon from the included samples, or upload a custom icon.
Delete an icon you no longer need.
Unidesk uses the following icon by default when you create a layer or template, or delete an icon that is in use.
The following image specifications are recommended for Unidesk icons. Although other sizes and resolutions are supported,
the file type must be PNG or JPG.
Specif icat ionSpecif icat ion Det ailsDet ails
File type PNG or JPG
Size 64 x 64 pixels
Resolution 96 DPI
Preview an icon
You can preview a custom icon before applying it:
1. For best results, adjust your icon image to conform to the Recommended icon specifications above.
2. In the Icon Assignment tab, click BrowseBrowse .
3. Select the icon image you want to upload, and click OpenOpen. The image appears along with the other icons, and a preview
is displayed on the right.
Upload an icon
You can upload a custom icon to add to your collection:
1. Adjust your icon image to conform to these Recommended icon specifications above.

© 1999-2017 Citrix Systems, Inc. All rights reserved. p.219https://docs.citrix.com
2. In the Icon Assignment tab, click BrowseBrowse .
3. Select the icon image you want to upload, and click OpenOpen. The image appears in the icon collection, and a preview of
the icon as it will appear on the selected layer is displayed on the right.
Note: If you browse and select an icon, but then choose a different one for you layer, the first one you had selected will
not be uploaded. The icon is only uploaded once you have finalized the Confirm and Complete tab.
4. To complete the upload, use the Confirm and Complete tab to finalize the wizard.
Delete an icon
You can delete an icon, and it will be removed from the database.
Note: The software does not let you delete the following icons shipped with the system:
If the icon is in use by any layer or template, you will receive a warning, and the default icon will be used in its place.
1. In the Icon Assignment tab, select the icon you want to delete.
2. Click the Delete button. This immediately removes the icon from the database, even if you do not complete the wizard.

© 1999-2017 Citrix Systems, Inc. All rights reserved. p.220https://docs.citrix.com
Manage an Installation Machine
Jun 28 , 2017
An Installation Machine is a virtual machine that acts as a staging area for the creation of Layers and new Layer Versions.
You need an Installation Machine to create an Application Layer, a new Version of an Application Layer, or an Operating
System Layer Version. The Master CachePoint Appliance hosts all Installation Machines
When you first create an Installation Machine it is powered off. When you select an Installation Machine to use in creating
an Application Layer, the Installation Machine is powered on and you can use the Unidesk Open Console to log into it and
install the Applications you want to include in the Application Layer.
Log into an Installation Machine
To log into an Installation Machine:
1. Select System > Installation Machines.
2. Select the Installation Machine you want to log into and select Open Console . The vSphere authentication window
opens.
3. Enter your directory service (Active Directory or Novell) credentials. The Windows login screen appears.
4. Enter your Windows Administrator password.
You can now install applications on the Installation Machine.
Change the name of an Installation Machine
To change the name of an Installation Machine:
1. Select System > Installation Machines.
2. Select the Installation Machine(s) that you want to change and select Edit Properties. The Edit Installation Machine
wizard opens.
3. In the General Settings tab, change the name of the Installation Machine.
Select a name that is unique on the Master CachePoint Appliance. Unidesk does not prevent you from using a name that
is already in use by another Installation Machine.
Note: Changing the name in the Unidesk Management Console affects the local display only, not the virtual machine in
the virtual infrastructure. You must also change the name of the virtual machine using your virtual infrastructure
management tools to ensure the names match in both places.
4. In the Confirm and Complete tab and click Update Installation Machine.
Shut down an Installation Machine
You can shut down one or more Installation Machines at a time. Shutting down an Installation Machine can be useful when
troubleshooting an issue.
For a clean shutdown of an Installation Machine:
1. Select System > Installation Machines.

© 1999-2017 Citrix Systems, Inc. All rights reserved. p.221https://docs.citrix.com
2. Select one or more Installation Machines and select Restart/Shut Down in the Action bar.
Result: This action opens the Shut Down Installation Machines wizard.
3. In the Confirm and Complete tab, verify that the correct Installation Machines are selected, enter a comment if required,
and click Restart/Shut Down. If you enter comments, they appear in the Information view Audit History.
Delete an Installation Machine
You can delete an Installation Machine from the virtual infrastructure. The Delete action is only active if the Installation
Machine is not in use.
1. Select System > Installation Machines.
2. Select one or more Installation Machines to delete and select Delete from the Action bar.
Result: This action opens the Delete Installation Machines wizard.
3. In the Confirm and Complete tab, verify that you selected the correct Installation Machines, enter a comment if
required, and click Delete Installation Machines. If you enter comments, they appear in the Information view Audit
History.
© 1999-2017 Citrix Systems, Inc. All rights reserved. p.222https://docs.citrix.com
Reinstall an application
Jun 28 , 2017
As users customize their Desktops, they can change or remove files that affect how an application functions. Or, users may
uninstall applications that need to be part of the Desktop, based on corporate requirements.
To resolve these issues, you can reinstall the original application as it is configured in an Application Layer.
The Edit Desktop wizard lets you specify applications to reinstall for one or more selected Desktops.
If you select Reinstall in the Edit Desktop wizard's Application Assignment tab, the following actions occur the next time
the Desktop shuts down:
1. The software removes all of the changes for the selected applications from the User Layer, with the exception of
changes made to the Registry hive HKEY_LOCAL_MACHINE\SYSTEM.
2. The software creates a new bootable image for the desktop that contains the selected application versions.

© 1999-2017 Citrix Systems, Inc. All rights reserved. p.223https://docs.citrix.com
Search for Desktops, Layers, or users
Jun 28 , 2017
The Search feature lets you to find desktops, users, layers, and templates:
Desktops Select the Desktops module or the System > Installation Machines module.
Users
Select the Desktops module.
Use the search feature in the User Assignment tab of the Create or Edit Desktop wizard.
Select the Users module.
Layers Select the Layers > OS Layers or Layers > Application Layers module.
Templates Select the Layers > Templates module.
The Search box is located in the Display tool bar in the Desktops, Layers, and System > Installation Machines modules.
To start a search, enter a letter, a word, or a phrase in the Search box and click Search.
The Unidesk Management Console displays the search results in the selected icon or list view.
To refine the search results, use Desktop search keywords .
Avoid using the desktop search keywords in the names of any Unidesk object. Using these keywords in names can cause
inaccurate search results.
To use advanced search, select the arrow next to the Search box. Advanced search is available in the Desktops module
only.
To clear the search result and redisplay the default display click next to the Search box.
When you search for items, the search results match the text and keywords that you enter in the Search box.
The following table provides information about the search criteria for each module.
For t his module:For t his module: Your search crit eria can mat ch any of t hese propert ies:Your search crit eria can mat ch any of t hese propert ies:
Desktop name.
The login and/or domain name for the user logged into the desktop.
First or Last name of the user assigned to the desktop.
© 1999-2017 Citrix Systems, Inc. All rights reserved. p.224https://docs.citrix.com
Desktops
Phone number of the user assigned to the desktop.
Email address of the user assigned to the desktop.
Name of a template associated with the desktop.
Version of a template associated with the desktop.
Name of a layer assigned to the desktop.
Version of a layer assigned to the desktop.
Maintenance schedule that the desktop is using.
For information about using keywords for desktop searches, see Desktop search
keywords .
Layers (OS, Applications, and
Templates)Layer name and version.
System > Installation Machines Installation Machine name.
The following table provides information about the search rules.
RuleRule ExampleExample
All searches are case-insensitive, including words or phrases enclosed in
double quotes (" ").
Searching for Firefox or firefox displays all
items whose names contain either word.
Searching for words or phrases enclosed in double quotes results in an
exact match.
Searching for "MS Word," displays items
whose names include the words MS Word but
not WordPerfect.
If, in a keyword search, you specify a name that includes words
separated by spaces, search finds only the items whose names include
the same words separated by spaces.
If you specify a name that includes words separated by spaces and
then enclose any part of the name in double quotes, search finds only
the items whose names include the same words separated by spaces
as long as they also include the double quotes.
Searching for Layer: antivirus t displays items
whose names include the words antivirus test
and antivirus trial, but not antivirustest.
Searching for Layer:"antivirus" test displays
items whose names include the words
"antivirus" test but not antivirus test.
AND is implied in all searches except for those enclosed in double
Searching for Windows SP, the search looks
for words or phrases that include Windows
AND SP. Therefore, the search results could
include both of the following layers:
Windows 7 SP1.
© 1999-2017 Citrix Systems, Inc. All rights reserved. p.225https://docs.citrix.com
quotes. Windows XP SP2.
Windows XP SP3.
The search results would not include a layer
named Windows for Finance because its
name does not include "SP."
Search uses an implied wildcard at the beginning and end of the words
you enter in the Search box.
Searching for Word displays all items whose
names include MS Word, Word for Windows,
and WordPerfect.
Desktop search keywords
To refine the search display, use any or all of the following filters:
Filter list: The Filter list allows you to select a category that defines the type of items the Unidesk Management Console
displays when a search matches your search criteria. The options in the Filter list change depending on the displayed
page.
View Flagged Items: If you select View Flagged Items before starting a search, the search displays only those items that
match the search criteria and are also f lagged items.
The Desktops module includes Advanced desktop search that lets you locate desktops using complex search queries.
Search criteria
Advanced desktop search lets you to find desktops using one or more of the criteria described in the table below. If you
specify more than one criteria, the search will be treated as an AND.
AdvancedAdvancedsearchsearchcrit eriacrit eria
Descript ionDescript ion
Containthese words
One or more words (or partial words) included in any of the desktop search properties.
To match a specific word or phrase exactly, enclose the value in double quotes (" ").
Have ownersin this group
Full or partial name of the group that includes the desktop owners. If you type a portion of the name,
all groups containing this string will be included in the results, whether they are local Unidesk or
LDAP groups. For example, if you search on CHI, desktops with owners in both the LDAP group
CHIGROUP and the Unidesk group ICHI will be included in the results.
You can use the Browse button to select the group. If you select an LDAP group, the group's
Distinguished Name appears in the field. For example, if you select CHIGROUP, a name like the following

© 1999-2017 Citrix Systems, Inc. All rights reserved. p.226https://docs.citrix.com
would appear in the field:
CN=CHIGROUP,OU=CHI,DC=mycompanydom3,DC=local
Are hostedonCachePoint
Full or partial name of the CachePoint Appliance assigned to the desktop.
Use thismaintenanceschedule
Full or partial name of a maintenance schedule.
Are using thistemplate
Full or partial name of a template.
Are using thislayer
Full or partial name of a layer. You can specify a version.
To add more layers to the query, click And.
When you specify multiple layers, the search results display the desktops that contain ALL of the
specified layers.
Have pendingconfigurationchanges
Yes - finds desktops that need to restart because they have pending configuration changes.
No - finds desktops that do not have pending configuration changes.
N/A - this criteria is not applicable to your search.
Using advanced search
1. In the Desktops module, click the down arrow next to the Search box.
2. Specify values for any or all of the advanced search criteria.
3. Click Search.
Advanced search example
Assume that you've assigned new versions of the QuickQuote and AddUp Application Layers to all of the Sales desktops in
the New York territory. You want to find the desktops that have not yet restarted and received the new configuration.
To find these desktops only, you specify the following advanced search criteria:
For t his search crit eria:For t his search crit eria: You ent er...You ent er...
Contain these words Sales-
Have owners in this group Albany
© 1999-2017 Citrix Systems, Inc. All rights reserved. p.227https://docs.citrix.com
Are hosted on CachePoint NYO
Use this layer
Quickquote Version 2
Addup Version 2
Have pending configuration changes Yes
This search query finds all of the desktops that:
Have the word, Sales- in their name. For example, Sales-BobWilson and Sales-SallySeashell.
Have owners who are members of the Albany group.
Are hosted on CachePoint Appliances that have NYO in their names. For example, NYO-CP-Master and NYO-CP1.
Use version 2 of the layers, QuickQuote and AddUp.
Have pending configuration changes and need to restart — that is, the desktop have not yet restarted after you
assigned new layers to them.
The following example shows how Unidesk constructs a search query based on the search criteria specified in the advanced
search example.
Sales- Group:AlbanyCachePoint:NYO Layer:quickquote;C=Version:2 Layer:addup;Version:2 NeedsRestart:yes

© 1999-2017 Citrix Systems, Inc. All rights reserved. p.228https://docs.citrix.com
Enable support for 3D graphics applications
Jun 28 , 2017
If you want to deploy applications that require 3D graphics support, use the following procedures to enable a Unidesk
desktop to support VMware View Media Services for 3D graphics.
You must use VMware View 5 to take advantage of 3D graphics support.
1. Before you start to create the Application Layer, edit the video card settings for the Installation Machine:
1. In VMware vSphere, right click the Installation Machine and select Edit settings from the displayed menu.
2. Select the video card and select Enable 3D support in the 3D graphics box.
3. Click OK.
2. In the Unidesk Management Console, create the Application Layer in the usual way.
3. Assign the Application Layer to the appropriate desktops.
Before you deploy desktops that require support for 3D applications to a VMware View pool, use the following procedure
to configure the pool correctly.
1. Create the pool, using the Unidesk Management Console or the VMware View Administrator.
2. In the Add Pool window, click Pool Settings and configure the following settings:
Default display protocol: PCoIP
Allow users to choose protocol: No
Windows 7 3D Rendering: Enabled.
3. Optionally, click Configuration in the Windows 7 3D Rendering setting to allocate the amount of video RAM that you
want to assign to the Guest Operating System.
4. Click OK.

© 1999-2017 Citrix Systems, Inc. All rights reserved. p.229https://docs.citrix.com
Desktops
Jun 28 , 2017
A desktop is a hosted virtual machine that is a local composite of the layers assigned to it and a User Layer. The User Layer
includes all of the desktop changes that a user makes.
Unidesk Desktops can be persistent or non-persistent. In a persistent desktop all changes that the user makes are saved,
just like on a physical desktop. In a non-persistent desktop, the desktop is rebooted to its original state when the user logs
off. Non-persistent desktops are often used in labs or kiosks.
The Unidesk software lets you make the following choices when deploying a new desktop(s):
Choose a connection broker, user, or group for the desktop.
Specify a cluster or server where the desktop will be hosted, and a network.
Assign an OS Layer.
Assign one or more Application Layers.
Specify desktop settings, for example CPUs, memory, storage allowance for user data, backup frequency, and page f ile
size, and core dump type.
Maintenance schedule for updating layers and other tasks that may require rebooting the desktop.
A desktop that you deploy from the Unidesk Management Console behaves in the same manner as any other desktop
virtual machine, with the following exceptions:
When changes to the desktop configuration result in the need to rebuild the bootable image, Unidesk places the
desktop in Maintenance Mode while the rebuild is in progress.
If you use the Unidesk Management Console Restore feature to restore a desktop, you have to add the desktop to the
broker pool/group, manually.
© 1999-2017 Citrix Systems, Inc. All rights reserved. p.230https://docs.citrix.com
Change desktop layers or attributes
Jun 28 , 2017
About managing a Desktop's bootable image
The components that comprise a desktop come from a variety of layers. For example:
An Operating System Layer includes the operating system that the software imports from a gold image. The gold image
might include applications, as well.
Individual Application Layers include applications that you create as separate components.
When you create a desktop, you specify virtual machine settings for CPUs, memory, network adapters and disk storage.
Each desktop has a configuration associated with it. The configuration references all of the components and versions that
define what end users interact with when they use the desktops. If the configuration changes, the software needs to
create a new bootable image that matches the new configuration.
A Desktop receives new bootable image when it is shut down or during a restart. The Unidesk software uses the new
configuration to create a new bootable image.
Any time a user makes a change to a desktop, the desktop sends this information to the server or cluster that is hosting it.
Based on the content of the messages it receives, the server or cluster determines whether it needs to create a new
bootable image for the desktop.
A desktop requires a new bootable image when you change the configuration, or when a change to the desktop affects
system-level files, for example, when adding new services, changing services to start automatically, or modifying system
boot files.
Note: Typically, changes to keys in the HTLM\SYSTEM\CurrentControlSet\Services key cause the desktop to receive a new
bootable image.
The configuration for a desktop changes when any of the following events occur:
Changes to the desktop affect system-level f iles. (for example, adding new services, changing services to start
automatically, or modifying system boot f iles).
You assign a new application to a desktop.
You remove an application from a desktop.
You add a new version of an existing application.
You update a version of an existing application or the operating system.
You change the operating system.
You change the priority order of applications assigned to one or more desktops.
You restore a desktop using a backup of an earlier version.
If a desktop requires a new bootable image, the desktop must remain in a shut down state while the CachePoint Appliance
creates the image. If an end user initiates a system restart and the desktop requires a new bootable image, the desktop
© 1999-2017 Citrix Systems, Inc. All rights reserved. p.231https://docs.citrix.com
remains in a shut down state until the CachePoint Appliance finishes creating the bootable image. While this action is in
progress, end users can experience a one minute delay in the system restart. They may also notice that the desktop is in a
powered-off state during this time.
It is important that no one attempts to power on the desktop while the CachePoint Appliance is creating the bootable
image. Attempting to start the desktop while the CachePoint Appliance is creating the image can result in the desktop not
being able to restart.
Example
IP address assignment for desktops
When you create a desktop, the software uses DHCP to acquire an IP address for it. If you look at the settings for the
desktop, however, the Internet Protocol settings for the desktop show that a specific IP address is assigned to it, as shown
in the following illustration. This assignment is normal behavior. Do not change these settings.
How desktops obtain IP addresses
Each time a desktop boots, a custom DHCP client runs during the early stages of the start-up process. This client is
responsible for renewing or rebinding the current IP address, if possible. If the current IP address is not available, the custom
DHCP client obtains a new address for the desktop. There is no need for you to change any of the Internet Protocol
properties.
Because the software uses an internal ID, not the IP address, to identify the desktop, communication is not affected if the
desktop's IP address changes.
Desktop visualization panel
The Desktop Visualization panel provides a graphic display of a desktop configuration while you create and edit a desktop.
As you select layers and settings for the desktop configuration, the Desktop Visualization panel displays the layers, in order
of priority, and all of the desktop settings.
The priority order for layers is the order in which the desktop deployment process applies the layer, from the highest priority
(applied last) to the lowest.
Desktop views
In this example, the Desktop Visualization panel shows that the Windows 7 Operating System Layer is the first layer that
the deployment process applies to desktops. Next, the deployment process applies the Adobe Reader Application Layer.
Custom setting indicator
© 1999-2017 Citrix Systems, Inc. All rights reserved. p.232https://docs.citrix.com
Before you start
If you are adding applications to the desktops, make sure the Application Layers you need are available in the Layers >
Application Layers module, and that they use the same OS Layer as the desktops to which you want to assign them.
Changing a Desktop's properties will create a new bootable image for the Desktop, and it must be in a stopped state for
this task to complete. You can shut down the Desktops either before you start editing their properties, or restart the
desktops after you select the new properties.
A Desktop edit will be prevented from completing if a Repair task is in progress..
Assign a new Operating System Layer Version to Desktops
You can update the operating system assigned to multiple desktops by creating a new layer version containing the
operating system update and assigning the new version of the layer to the desktops. As part of this process, the Unidesk
software creates a new bootable image for the Desktop. The Desktop must be stopped for this task to complete.
Assuming the layer version containing the operating system update exists:
1. Select Desktops and select all of the desktops whose operating system you want to update.
2. Select Edit Desktops from the Action bar. This opens the Edit Desktop wizard.
3. In the OS Assignment tab, select the version of the Operating System Layer you want to assign to the selected
desktops.
Note: If you do not select a version, the software select the latest version, by default.
4. In the Maintenance Schedule tab, select a deployment method for configuration changes.
Use a maintenance schedule. A maintenance schedule determines when Unidesk deploys desktop configuration
changes. You can select an existing schedule, modify the selected schedule, or create a new one. Click for more about
using maintenance schedules.
As soon as possible. Overrides the current maintenance schedule. Unidesk shuts down the desktops and deploys the
configuration changes, even if users are still logged on..
At a specified date and time. Overrides the current maintenance schedule. This option defers deployment of
configuration changes until the specified time. After the specified time, Unidesk shuts down the desktops and deploy
the configuration changes, even if users are still logged on.
Wait for a user to log off or restart the desktop. Overrides the current maintenance schedule. This option allows the
desktop user to control when Unidesk deploys configuration changes. Unidesk waits for the first time when a user
logs off or restarts the desktop, instead of waiting for a maintenance window to occur.
Note: Once you select a maintenance schedule override, desktops use the override until Unidesk rebuilds the desktop
bootable images. Once a desktop is rebuilt, it resumes using the current maintenance schedule. You can edit the
desktops before a rebuild occurs to change the override selection, if necessary.
5. In the Confirm and Complete tab, verify the correct desktops and operating system version are selected and click Update
Desktop. Unidesk deploys the configuration changes as specified by your Maintenance Schedule selection.
Assign Desktops with new and updated applications

© 1999-2017 Citrix Systems, Inc. All rights reserved. p.233https://docs.citrix.com
Use the Edit Desktops action in the Desktops module to upgrade desktops with new applications or new versions of
applications. You must restart the desktops for the changes to take effect.
Note: A Desktop edit will be prevented from completing if a Repair task is in progress.
1. Create a new Application Layer or Layer Version.
2. Select Desktops and select one or more desktops that you want to upgrade.
3. Select Edit Desktops in the Action bar.
4. In the Applicat ion AssignmentApplicat ion Assignment tab, expand the item for the application that you want to upgrade and select the
appropriate version.
5. In the Maint enance ScheduleMaint enance Schedule tab, select a deployment method for the configuration changes. You can deploy them
in any of the following ways:
Select or create a maintenance schedule. A maintenance schedule deploys changes during a specif ied time frame. For
more about maintenance schedules, click here.
As soon as possible. This option deploys the configuration changes after you shut down the desktops.
Selecting this option overrides the current maintenance schedule.
Defer deployment until a specified date and time. This option defers deployment of configuration changes until the
specified time elapses. At that time, Unidesk deploys the configuration changes if the desktops are shut down.
Selecting this option overrides the current maintenance schedule.
6. In the Confirm and Complet eConfirm and Complet e tab, enter a comment about the upgrade, if required, and click Update Desktop.If you
enter comments, they appear in the Information view Audit History. Unidesk deploys the configuration changes as
specified by your Maintenance Schedule selection.
Before you start
Modifying desktop properties requires the software to create a new bootable image for the desktop, and the desktop
must be in a stopped state for this task to complete. You can either shut down the desktops you are planning to modify
before you start editing their properties, or you can choose to restart the desktops after you select the new properties.
A Desktop edit will be prevented from completing if a Repair task is in progress..
Desktop settings you cannot change
You cannot change the following settings when you modify a desktop:
The size of the storage for user data (the User Layer).
The desktop type, persistent or nonpersistent.
The broker pool or collection associated with the desktop.
If you select a template whose values for these settings differ from the original ones, the original values remain in place and
the Desktop Visualization panel displays a custom setting indicator next to these values to indicate that they do not
match the template-specified settings.
Change the owner of a desktop
Use the Edit Desktops action in the Desktops module to change the owner of a desktop.

© 1999-2017 Citrix Systems, Inc. All rights reserved. p.234https://docs.citrix.com
1. In the Desktops module, select a desktop.
2. Select Edit Desktops in the Action bar.
3. In the User Reassignment tab, select Reassign Desktop and select a user from the displayed list.
You can see the current owner in the Desktop Visualization panel.
4. In the Confirm and Complete tab, verify that the correct user is selected and click Update Desktop.
Change the Desktop name
When you create desktops, you either enter a name for it or allow the system to generate names for you. The desktop
name must be unique to the host that is storing it and adhere to the following standards: When the software creates the
desktop, it uses the specified or generated name as follows:
Uses the name for the desktop that the Unidesk Management Console displays.
Creates a virtual machine with the specif ied name.
Uses the name as the DNS name assigned to the virtual machine in the virtual infrastructure.
Uses the name as the Windows machine name.
If you change the name of a desktop after you create it, the change affects only the name that the Unidesk Management
Console displays. The virtual machine name, the DNS name associated with the desktop, and the Windows machine name
do not change. If you want the names to match, you must change the names manually.
To change the name of a Desktop:
1. In the Unidesk Management Console, select the Deskt opsDeskt ops module.
2. Select the Desktop and click Edit Deskt opsEdit Deskt ops.
3. Select the Deskt op Det ailsDeskt op Det ails tab, and change the Deskt op NameDeskt op Name.
4. Select the Conf irm and Complet eConf irm and Complet e tab, and click Updat e Deskt opUpdat e Deskt op.
Change the Physical Attributes of a Desktop
You can change the physical settings of the virtual desktop at any time. For example, if you are installing an application that
requires additional memory, you can adjust these settings, as required.
1. Select Desktops and select the Desktop whose settings you want to change.
2. Select Edit in the Action bar. The Edit Desktop wizard opens.
3. Select the Desktop Settings tab and change the settings as necessary.
Configure a network connection for desktops
By default, the setting for a desktop's network connection is the same as the network assigned to the gold image that
you used to create the Operating System Layer.
Depending on the organization of your virtual infrastructure, you may want to configure specific desktops to use different
network connections.
You can set the network connection when you create desktops or you can change the network connection for deployed
desktops.
1. In the Desktops module, select Create desktop to create desktops or select existing desktops and click Edit.
2. In the Desktop Details tab, select one of the displayed networks in the Network list.

© 1999-2017 Citrix Systems, Inc. All rights reserved. p.235https://docs.citrix.com
3. Complete the create or edit task.
4. If you modif ied an existing desktop, restart it to ensure the changes take effect.
Restart Desktops
Use the Restart/Shut Down action in the Desktops module to start a desktop that is shut down or to have changes to the
desktop take effect.
During the restart process, the Unidesk software instructs the virtual infrastructure to perform a clean shut down of the
virtual machine, if it is still running, and then starts it again.
Before restarting a desktop, verify that the screen saver is disabled. The desktop does not shut down properly if the screen
saver is enabled.
If you make changes to a desktop while it is running (for example, you change the application assignment), the software
will wait for the desktop to shut down before completing the tasks required to create a new bootable image for the
desktop.
When you initiate a restart of a desktop, the software deploys the queued changes once the desktop shuts down. After
building the new bootable image, the software initiates the restart.
You can monitor the detailed view of the Restart task in the Task bar to see the sub tasks related to creating the new
bootable image.
1. Select Deskt ops Deskt ops and select one or more desktops.
2. Select Rest art /Shut DownRest art /Shut Down in the Action bar. This opens the Restart/Shut Down wizard.
3. In the Shutdown or Restart tab, select the Restart option.
4. In the Confirm and Complete tab, enter a comment that explains why the restart is necessary, if required.If you enter
comments, they appear in the Information view Audit History.
5. Click Rest art /Shut downRest art /Shut down. The Unidesk software causes the virtual infrastructure to restart the appropriate virtual
machines.
6. Monitor the Task bar to see when this task completes. If the software needs to create a new bootable image for the
desktop, the restart takes a few extra minutes to complete.
7. When the restart task completes, notify the end users that their desktops are available for use.
Shut down Desktops
Use the Restart/Shut Down action in the Desktops module to shut down a desktop.
You may need to shut down desktops for maintenance purposes, to update a desktop's configuration, or to prevent end
users from selecting a specific desktop.

© 1999-2017 Citrix Systems, Inc. All rights reserved. p.236https://docs.citrix.com
Before shutting down a desktop, verify that the screen saver is disabled. The desktop does not shut down properly if the
screen saver is enabled.
If you are shutting down desktops that are integrated with connection brokers, the Restart/Shut Down wizard displays an
option to put the desktops in Maintenance Mode.
By default, this option is selected. Putting desktops in Maintenance Mode prevents connection brokers from restarting the
desktops while a desktop rebuild is in progress — restarting the desktop is not advisable.
The Maintenance Mode option is available only if the selected desktops are integrated with a connection broker.
In most cases, you should accept the default setting for Maintenance Mode, however, you can choose to shut down the
desktops without putting them in Maintenance Mode. If the desktops have no outstanding configuration changes, it is
usually safe to shut them down without putting them in Maintenance Mode.
The desktop rebuild process removes desktops from Maintenance Mode automatically when it completes.
Note: If the selected desktops are integrated with VMware View, the connection broker restarts the desktops after the
desktop rebuild completes.
1. Select Deskt ops Deskt ops and select the desktops you want to shut down.
2. Click Rest art /Shut DownRest art /Shut Down in the Action bar.
Result : Result : This action opens the Shutdown Wizard.
3. In the Shutdown or Restart tab, select Shut Down .
If the selected desktops are integrated with a connection broker, the tab displays the Put in Maintenance Mode option.
4. If you do not want to put the desktops in Maintenance Mode, clear Put in Maintenance Mode.
5. Enter a comment, if required, that describes why the shutdown is necessary.
If you enter comments, they appear in the Information view Audit History.
6. Click Rest art /Shut DownRest art /Shut Down.
If you make changes to a desktop while it is running (for example, you change the application assignment), the software
will wait for the desktop to shut down before completing the tasks required to create a new bootable image for the
desktop.
When you initiate a shutdown of a desktop, the software deploys the queued changes once the desktop shuts down. You
can monitor the detailed view of the Shut Down task in the Task bar to see the sub tasks related to creating the new
bootable image.

© 1999-2017 Citrix Systems, Inc. All rights reserved. p.237https://docs.citrix.com
What if a Desktop doesn't start?
If a user reports that a desktop is not starting as expected, log in to the Unidesk Management Console and check the
status of the desktop.
If the status indicates the creation of a new bootable image is in progress, ask the user to wait for a few minutes. A
bootable image can take 5 - 30 minutes to rebuild. Do not try to power on the machine or take any other action in the
virtual infrastructure.
If the desktop does not restart within a reasonable amount of time, contact Technical Support.
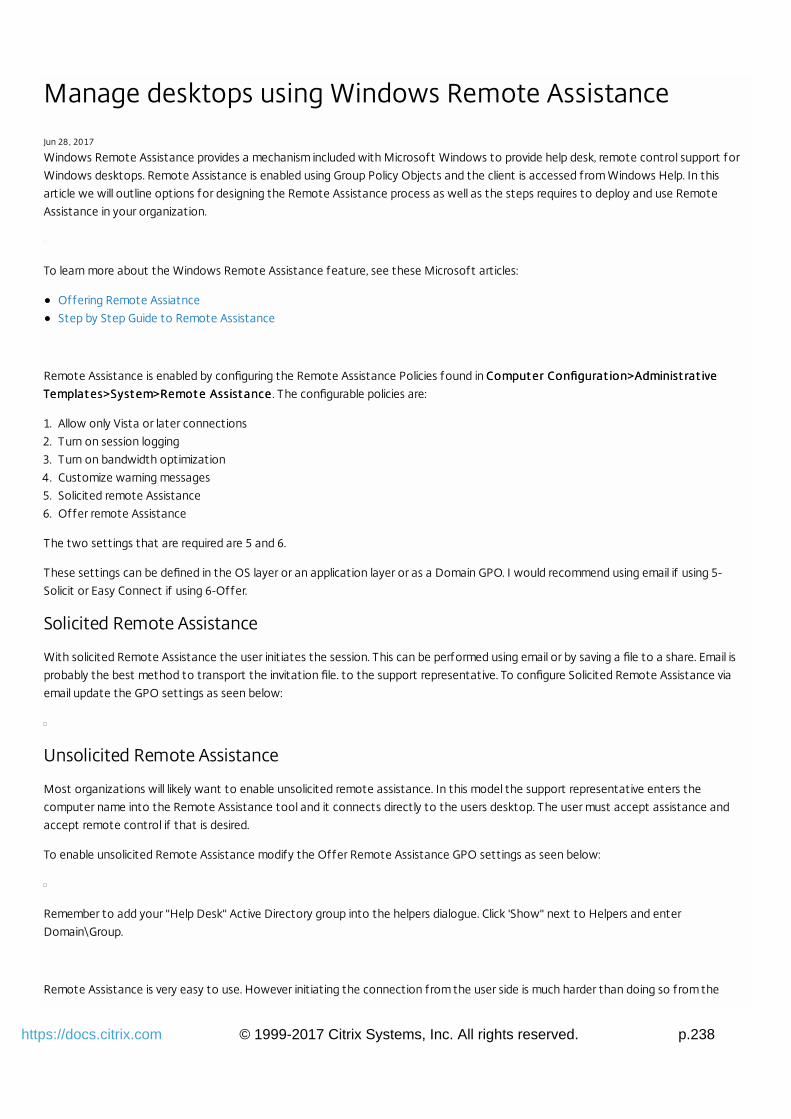
© 1999-2017 Citrix Systems, Inc. All rights reserved. p.238https://docs.citrix.com
Manage desktops using Windows Remote Assistance
Jun 28 , 2017
Windows Remote Assistance provides a mechanism included with Microsoft Windows to provide help desk, remote control support for
Windows desktops. Remote Assistance is enabled using Group Policy Objects and the client is accessed from Windows Help. In this
article we will outline options for designing the Remote Assistance process as well as the steps requires to deploy and use Remote
Assistance in your organization.
To learn more about the Windows Remote Assistance feature, see these Microsoft articles:
Offering Remote Assiatnce
Step by Step Guide to Remote Assistance
Remote Assistance is enabled by configuring the Remote Assistance Policies found in Comput er Configurat ion>Administ rat iveComput er Configurat ion>Administ rat ive
Templat es>Syst em>Remot e Assist anceTemplat es>Syst em>Remot e Assist ance . The configurable policies are:
1. Allow only Vista or later connections
2. Turn on session logging
3. Turn on bandwidth optimization
4. Customize warning messages
5. Solicited remote Assistance
6. Offer remote Assistance
The two settings that are required are 5 and 6.
These settings can be defined in the OS layer or an application layer or as a Domain GPO. I would recommend using email if using 5-
Solicit or Easy Connect if using 6-Offer.
Solicited Remote Assistance
With solicited Remote Assistance the user initiates the session. This can be performed using email or by saving a file to a share. Email is
probably the best method to transport the invitation file. to the support representative. To configure Solicited Remote Assistance via
email update the GPO settings as seen below:
Unsolicited Remote Assistance
Most organizations will likely want to enable unsolicited remote assistance. In this model the support representative enters the
computer name into the Remote Assistance tool and it connects directly to the users desktop. The user must accept assistance and
accept remote control if that is desired.
To enable unsolicited Remote Assistance modify the Offer Remote Assistance GPO settings as seen below:
Remember to add your "Help Desk" Active Directory group into the helpers dialogue. Click 'Show" next to Helpers and enter
Domain\Group.
Remote Assistance is very easy to use. However initiating the connection from the user side is much harder than doing so from the
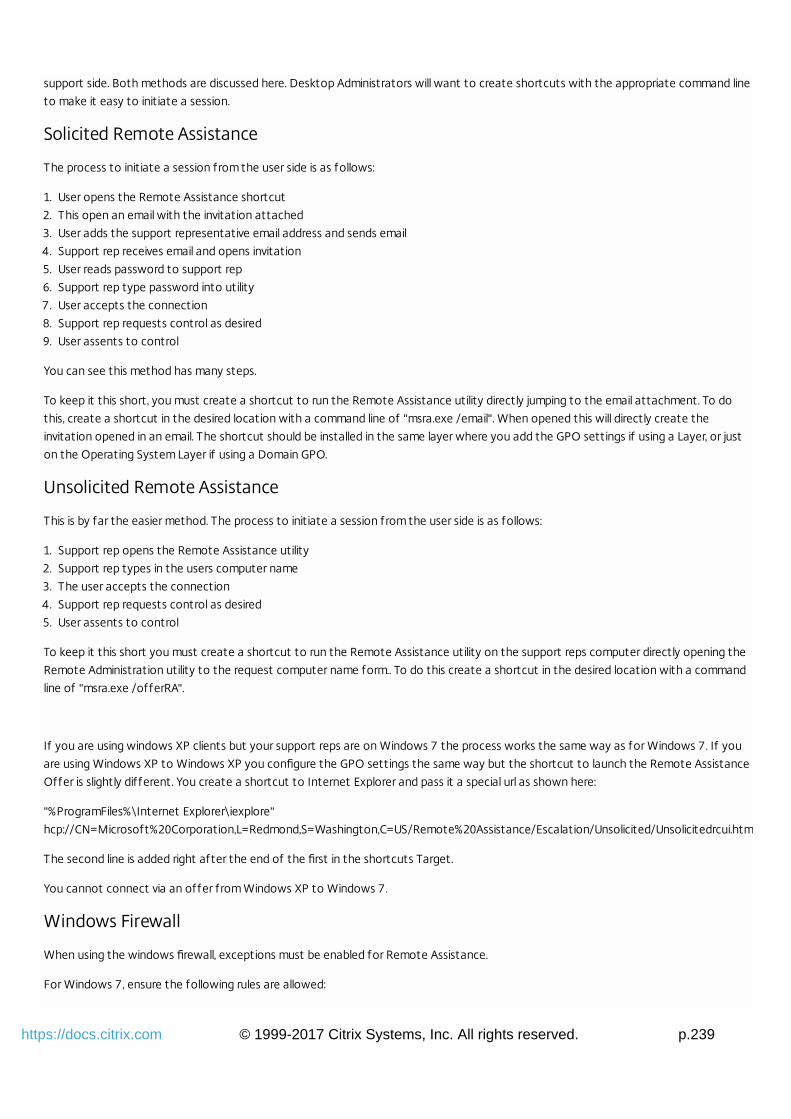
© 1999-2017 Citrix Systems, Inc. All rights reserved. p.239https://docs.citrix.com
support side. Both methods are discussed here. Desktop Administrators will want to create shortcuts with the appropriate command line
to make it easy to initiate a session.
Solicited Remote Assistance
The process to initiate a session from the user side is as follows:
1. User opens the Remote Assistance shortcut
2. This open an email with the invitation attached
3. User adds the support representative email address and sends email
4. Support rep receives email and opens invitation
5. User reads password to support rep
6. Support rep type password into utility
7. User accepts the connection
8. Support rep requests control as desired
9. User assents to control
You can see this method has many steps.
To keep it this short, you must create a shortcut to run the Remote Assistance utility directly jumping to the email attachment. To do
this, create a shortcut in the desired location with a command line of "msra.exe /email". When opened this will directly create the
invitation opened in an email. The shortcut should be installed in the same layer where you add the GPO settings if using a Layer, or just
on the Operating System Layer if using a Domain GPO.
Unsolicited Remote Assistance
This is by far the easier method. The process to initiate a session from the user side is as follows:
1. Support rep opens the Remote Assistance utility
2. Support rep types in the users computer name
3. The user accepts the connection
4. Support rep requests control as desired
5. User assents to control
To keep it this short you must create a shortcut to run the Remote Assistance utility on the support reps computer directly opening the
Remote Administration utility to the request computer name form.. To do this create a shortcut in the desired location with a command
line of "msra.exe /offerRA".
If you are using windows XP clients but your support reps are on Windows 7 the process works the same way as for Windows 7. If you
are using Windows XP to Windows XP you configure the GPO settings the same way but the shortcut to launch the Remote Assistance
Offer is slightly different. You create a shortcut to Internet Explorer and pass it a special url as shown here:
"%ProgramFiles%\Internet Explorer\iexplore"
hcp://CN=Microsoft%20Corporation,L=Redmond,S=Washington,C=US/Remote%20Assistance/Escalation/Unsolicited/Unsolicitedrcui.htm
The second line is added right after the end of the first in the shortcuts Target.
You cannot connect via an offer from Windows XP to Windows 7.
Windows Firewall
When using the windows firewall, exceptions must be enabled for Remote Assistance.
For Windows 7, ensure the following rules are allowed:

© 1999-2017 Citrix Systems, Inc. All rights reserved. p.240https://docs.citrix.com
For Windows XP there is a single check box to allow Remote Assistance.

© 1999-2017 Citrix Systems, Inc. All rights reserved. p.241https://docs.citrix.com
Manage desktop templates
Jun 28 , 2017
Windows Remote Assistance provides a mechanism included with Microsoft Windows to provide help desk, remote control support for
Windows desktops. Remote Assistance is enabled using Group Policy Objects and the client is accessed from Windows Help. In this
article we will outline options for designing the Remote Assistance process as well as the steps requires to deploy and use Remote
Assistance in your organization.
To learn more about the Windows Remote Assistance feature, see these Microsoft articles:
Offering Remote Assiatnce
Step by Step Guide to Remote Assistance
Remote Assistance is enabled by configuring the Remote Assistance Policies found in Comput er Configurat ion>Administ rat iveComput er Configurat ion>Administ rat ive
Templat es>Syst em>Remot e Assist anceTemplat es>Syst em>Remot e Assist ance . The configurable policies are:
1. Allow only Vista or later connections
2. Turn on session logging
3. Turn on bandwidth optimization
4. Customize warning messages
5. Solicited remote Assistance
6. Offer remote Assistance
The two settings that are required are 5 and 6.
These settings can be defined in the OS layer or an application layer or as a Domain GPO. I would recommend using email if using 5-
Solicit or Easy Connect if using 6-Offer.
Solicited Remote Assistance
With solicited Remote Assistance the user initiates the session. This can be performed using email or by saving a file to a share. Email is
probably the best method to transport the invitation file. to the support representative. To configure Solicited Remote Assistance via
email update the GPO settings as seen below:
Unsolicited Remote Assistance
Most organizations will likely want to enable unsolicited remote assistance. In this model the support representative enters the
computer name into the Remote Assistance tool and it connects directly to the users desktop. The user must accept assistance and
accept remote control if that is desired.
To enable unsolicited Remote Assistance modify the Offer Remote Assistance GPO settings as seen below:
Remember to add your "Help Desk" Active Directory group into the helpers dialogue. Click 'Show" next to Helpers and enter
Domain\Group.
Remote Assistance is very easy to use. However initiating the connection from the user side is much harder than doing so from the

© 1999-2017 Citrix Systems, Inc. All rights reserved. p.242https://docs.citrix.com
support side. Both methods are discussed here. Desktop Administrators will want to create shortcuts with the appropriate command line
to make it easy to initiate a session.
Solicited Remote Assistance
The process to initiate a session from the user side is as follows:
1. User opens the Remote Assistance shortcut
2. This open an email with the invitation attached
3. User adds the support representative email address and sends email
4. Support rep receives email and opens invitation
5. User reads password to support rep
6. Support rep type password into utility
7. User accepts the connection
8. Support rep requests control as desired
9. User assents to control
You can see this method has many steps.
To keep it this short, you must create a shortcut to run the Remote Assistance utility directly jumping to the email attachment. To do
this, create a shortcut in the desired location with a command line of "msra.exe /email". When opened this will directly create the
invitation opened in an email. The shortcut should be installed in the same layer where you add the GPO settings if using a Layer, or just
on the Operating System Layer if using a Domain GPO.
Unsolicited Remote Assistance
This is by far the easier method. The process to initiate a session from the user side is as follows:
1. Support rep opens the Remote Assistance utility
2. Support rep types in the users computer name
3. The user accepts the connection
4. Support rep requests control as desired
5. User assents to control
To keep it this short you must create a shortcut to run the Remote Assistance utility on the support reps computer directly opening the
Remote Administration utility to the request computer name form.. To do this create a shortcut in the desired location with a command
line of "msra.exe /offerRA".
If you are using windows XP clients but your support reps are on Windows 7 the process works the same way as for Windows 7. If you
are using Windows XP to Windows XP you configure the GPO settings the same way but the shortcut to launch the Remote Assistance
Offer is slightly different. You create a shortcut to Internet Explorer and pass it a special url as shown here:
"%ProgramFiles%\Internet Explorer\iexplore"
hcp://CN=Microsoft%20Corporation,L=Redmond,S=Washington,C=US/Remote%20Assistance/Escalation/Unsolicited/Unsolicitedrcui.htm
The second line is added right after the end of the first in the shortcuts Target.
You cannot connect via an offer from Windows XP to Windows 7.
Windows Firewall
When using the windows firewall, exceptions must be enabled for Remote Assistance.
For Windows 7, ensure the following rules are allowed:

© 1999-2017 Citrix Systems, Inc. All rights reserved. p.243https://docs.citrix.com
For Windows XP there is a single check box to allow Remote Assistance.
© 1999-2017 Citrix Systems, Inc. All rights reserved. p.244https://docs.citrix.com
Assign icons to layers and templates
Jun 28 , 2017
When you create or edit an Operating System Layer, Application Layer, or Template you can assign an icon to the layer.
Icons help to identify these items in the Unidesk Management Console.
When using the Create or Edit wizard for any Layer or Template, the Icon Assignment tab gives you the opportunity to:
Choose an icon: Use the default icon,choose another icon from the included samples, or upload a custom icon.
Delete an icon you no longer need.
Unidesk uses the following icon by default when you create a layer or template, or delete an icon that is in use.
The following image specifications are recommended for Unidesk icons. Although other sizes and resolutions are supported,
the file type must be PNG or JPG.
Specif icat ionSpecif icat ion Det ailsDet ails
File type PNG or JPG
Size 64 x 64 pixels
Resolution 96 DPI
Preview an icon
You can preview a custom icon before applying it:
1. For best results, adjust your icon image to conform to the Recommended icon specifications above.
2. In the Icon Assignment tab, click BrowseBrowse .
3. Select the icon image you want to upload, and click OpenOpen. The image appears along with the other icons, and a preview
is displayed on the right.
Upload an icon
You can upload a custom icon to add to your collection:
1. Adjust your icon image to conform to these Recommended icon specifications above.

© 1999-2017 Citrix Systems, Inc. All rights reserved. p.245https://docs.citrix.com
2. In the Icon Assignment tab, click BrowseBrowse .
3. Select the icon image you want to upload, and click OpenOpen. The image appears in the icon collection, and a preview of
the icon as it will appear on the selected layer is displayed on the right.
Note: If you browse and select an icon, but then choose a different one for you layer, the first one you had selected will
not be uploaded. The icon is only uploaded once you have finalized the Confirm and Complete tab.
4. To complete the upload, use the Confirm and Complete tab to finalize the wizard.
Delete an icon
You can delete an icon, and it will be removed from the database.
Note: The software does not let you delete the following icons shipped with the system:
If the icon is in use by any layer or template, you will receive a warning, and the default icon will be used in its place.
1. In the Icon Assignment tab, select the icon you want to delete.
2. Click the Delete button. This immediately removes the icon from the database, even if you do not complete the wizard.
© 1999-2017 Citrix Systems, Inc. All rights reserved. p.246https://docs.citrix.com
Back up desktops
Jun 28 , 2017
You can back up desktops on demand, or schedule backups as part of creating or editing desktops. You can also include
these settings in any templates you create.
Before setting Desktop backups, be sure you've set up archives for storing the backups, and that you have allocated
enough space for the backup archive.
Archive set t ingArchive set t ing - Make sure a backup archive is specified using the following setting:
System > Edit Properties > Storage Tiers tab > Archive setting
Backup Ret ent ion Set t ingsBackup Ret ent ion Set t ings - Check the maximum number of desktops you've specified to keep. This setting affects
how much space will be required for backup storage, and may also influence other decisions you make when scheduling
desktop backups.
System > Settings and Configuration > Backup Retention Settings > Maximum backups to keep per desktop
To back up a desktop(s) on demand:
1. In the Unidesk Management Console select the desktop(s) you want to back up, and click BackupBackup. The Backup wizard
opens.
2. Confirm that the correct desktops are selected and excluded from this operation, and click Creat e Backup NowCreat e Backup Now.
You can schedule desktop backups when creating new desktops, or editing existing ones. You can also specify a backup
schedule in your templates.
1. In the Unidesk Management Console open one of the following wizards, depending on whether you are creating or
editing a desktop or template:
Cont extCont ext WizardWizard
Creating or editing a desktop
Desktops > Create Desktop
Desktops > Edit Desktop(s)
Creating or editing a template
Layers > Templates > Create Template
Layers > Templates > Edit Latest Version
2. In the wizard you've opened, select the Deskt op Set t ingsDeskt op Set t ings tab.

© 1999-2017 Citrix Systems, Inc. All rights reserved. p.247https://docs.citrix.com
3. Configure the Backup FrequencyBackup Frequency setting, including the number of times a day, and if applicable, the specific times of
day to backup the desktop.
4. Confirm and complete the wizard to save the new settings.
To restore the desktop(s) from backup, use the Desktop Repair feature.

© 1999-2017 Citrix Systems, Inc. All rights reserved. p.248https://docs.citrix.com
Repair desktops
Jun 28 , 2017
You can use the Desktop Repair feature to:
Rebuild (with pending changes)
Restore User Layer to current CachePoint*
Restore User Layer to a different CachePoint*
Reset (clear) User Layer
* You can only Restore Desktops that have been backed up, and when there are no Desktop Edit tasks in progress.
Rebuild (include pending changes)
Rebuilds the Desktop, including any pending Operating System Layer and Application Layer updates.
Note: A Desktop rebuild process is different than a Desktop restart. A restart does not apply any pending changes to the
Desktop, but a rebuild process does.
Restore a Desktop's User Layer
A Desktop's User Layer includes the user's Application settings and/or User data
Returns a Desktop's User Layer to a backed up version.
When restoring a single Desktop, you can return the User Layer to any backup in the archive.
When restoring multiple Desktops, you can restore to the most recent backup of each Desktop.
Example
Restore to a different CachePoint
Moves one or more Desktops, including both application settings and User data, to a different CachePoint.
For a single Desktop, you can move any backed up copy in the archive.
For multiple Desktops, you can move the most recent backup of each Desktop.
Notes:
The new CachePoint must be at the same (or later) Unidesk software version, but the new host does not need to share
the same datastores or settings as the previous one.
Any Unidesk configuration settings, such as which Layers are assigned, are preserved, even if they were set after the last
backup. Unidesk configuration settings that are not affected by repairs, such as which Layers are assigned to the
Desktop, can be restored by editing the Desktop in the Unidesk Management Console. There you can change the
assigned Layers and other Desktop settings.
If the CachePoints are part of a broker pool or catalog, the restored Desktop(s) must be removed from the broker
pool/group and re-added.

© 1999-2017 Citrix Systems, Inc. All rights reserved. p.249https://docs.citrix.com
Reset/Clear User Layer
Returns a Desktop's User Layer, including all of the user's application preferences and/or data files, to the original state of
the Desktop when it was created. This is useful when applications or data become corrupted. (Not available for multiple
Desktops.)
When restoring or clearing a Desktop, you can choose to repair one or both types of data in the User Layer (see Data
Preferences in the table below). For more about the structure of the User Layer, see this article:
When moving Desktops to a different CachePoint Appliance, allall User Layer data is restored. When resetting or clearing a
Desktop without changing the CachePoint, you have several options. This is because the User Layer is made up of two
volumes, one for data and one for configuration. For an explanation of the structure of the User Layer, see this article:
Rest ore user's:Rest ore user's: Dat a includedDat a included
Application
settings
The Desktop's User Layer, including personalized settings and user-installed applications. The
Desktop's user data (the content the user has created) does not change.
Data filesThe Desktop's user data only. This includes only the content that the user created. Any
personalized settings or user-installed applications do not change.
Application
settings and Data
files
The entire Desktop, including all user-personalized settings, user-installed applications, and user
content.
Repair a Desktop's User Layer: What happens behind the scenes
When you restore a Desktop, Unidesk uses a Unideskbackup file to create a new virtual machine for the Desktop. During a
restore task, Unidesk uses the selected backup, and:
1. Creates a temporary virtual machine.
2. Attaches the VMDK file for the backup you selected to the temporary virtual machine.
3. Clones the temporary virtual machine which collapses the backup chain associated with the backup f ile into a single
VMDK file.
4. Detaches the VMDK file from the temporary virtual machine.
5. Deletes the temporary virtual machine.
6. Copies the new VMDK file to the original folder where the Unidesk Desktop was located.
7. When the Desktop starts, it uses the new VMDK file that the restore task created.
When restoring Desktops, ensure that you have at least one backup for each Desktop you want to restore.
Note: If the Desktop > Repair > Restore options are grayed out, and Desktop > Backup is also grayed out, check to see if
the CachePoint where the Desktop(s) are stored has an Archive Storage Tier configured. You can configure the Archive

© 1999-2017 Citrix Systems, Inc. All rights reserved. p.250https://docs.citrix.com
Storage Tier in CachePoint's Edit Properties St orage T iersSt orage T iers tab, and then manually back up the Desktop(s) using the
Backup action.
To rebuild one or more Desktops, including any pending changes:
1. In the Unidesk Management Console, click the Desktops module. The Desktops in your environment are displayed.
2. Select the Desktop(s) and click RepairRepair. The Repair wizard is displayed.
3. Under T ype of RepairT ype of Repair, select RebuildRebuild.
4. In the Confirm and Complete tab, verify your selections and click Repair Desktop(s).
Restoring a Desktop returns all or part of the Desktop's User Layer to a previous state available in a backup. When restoring
one Desktop at a time, you can choose which backup to use. When restoring more than one Desktop, they will all be
returned to the most recent backup.
1. In the Unidesk Management Console, click Desktops. The Desktops in your environment are displayed.
2. Select the Desktop(s) you want to restore, and click RepairRepair:
If Repair is grayed out, check to see whether there are backups of the Desktop(s) from which to do the restore. If
backups are available, check to see if other tasks are in progress or if the MA database has the wrong status f lags.
If both Repair and Backup are grayed out, the CachePoint where the Desktop is stored does not have an Archive
Storage Tier configured. You can change this setting on the CachePoint's Edit Properties, Storage Tiers tab, and then
manually back up the Desktop(s) using Backup.
If a message like the following is displayed, there is no backup available for at least one of the selected Desktops.
! Only n of the nn selected Desktops will be restored.
3. Under Type of RepairType of Repair, select Rest ore Deskt op's User LayerRest ore Deskt op's User Layer.
If you are restoring one Desktop, select the backup to restore from.
If you are restoring more than one Desktop, they will all be restored to the most recent backup.
4. In the Confirm and Complete tab, verify your selections and click Repair Desktop(s). The repair process begins. To avoid
performance issues when a large number of Desktops are selected, no more than four Desktops at a time are restored.
One way to "move" a Desktop to a different CachePoint is to restore a backup of the Desktops' User Layer to a different
CachePoint and rebuild the Desktop on that CachePoint using the current Operating System Layer and Application Layers.
When restoring a Desktop to a different CachePoint, the most recent backup of the Desktop's User Layer will be used.
To restore Desktops to a different CachePoint:
1. In the Unidesk Management Console, click Desktops. The Desktops in your environment are displayed.
2. Select the Desktop(s) you want to restore, and click RepairRepair:
If Repair is grayed out, check to see whether there are backups of the Desktop(s) from which to do the restore. If
backups are available, check to see if other tasks are in progress or if the MA database has the wrong status f lags.
If both Repair and Backup are grayed out, the CachePoint where the Desktop is stored does not have an Archive
© 1999-2017 Citrix Systems, Inc. All rights reserved. p.251https://docs.citrix.com
Storage Tier configured. You can change this setting on the CachePoint's Edit Properties, Storage Tiers tab, and then
manually back up the Desktop(s) using Backup.
If a message like the following is displayed, there is no backup available for at least one of the selected Desktops.
! Only n of the nn selected Desktops will be restored.
3. Under Type of RepairType of Repair, select Rest ore Deskt op's User LayerRest ore Deskt op's User Layer.
If you are restoring one Desktop, also select the backup to restore from.
If you are restoring more than one Desktop, they will all be restored to the most recent backup.
4. In the Confirm and Complete tab, verify your selections and click Repair Desktop(s). The repair process begins. To avoid
performance issues when a large number of Desktops are selected, no more than four Desktops at a time are restored.
5. After moving the Desktop(s) to a different CachePoint, if the Desktop(s) are part of a broker pool or catalog, you must
remove the Desktop(s)s from the broker pool or group, and re-add them to the broker.
You can clear a user's Application settings and/or User data by Resetting the Desktop's User Layer.
Note: The Reset option is only available if you have one Desktop selected. You cannot reset more than one Desktop at a
time.
To rebuild a Desktop's User Layer:
1. In the Unidesk Management Console, click the Desktops module. The Desktops in your environment are displayed.
2. Select the Desktop and click RepairRepair. The Repair wizard is displayed.
3. Under T ype of RepairT ype of Repair, select Reset (clear) User LayerReset (clear) User Layer.
4. In the Confirm and Complete tab, verify your selections and click Repair Desktop(s).
© 1999-2017 Citrix Systems, Inc. All rights reserved. p.252https://docs.citrix.com
Schedule desktop maintenance
Jun 28 , 2017
A maintenance schedule controls when a Unidesk administrator deploys layer assignment changes or configuration changes
that require a rebuild of a desktop's bootable image. A maintenance schedule includes one or more maintenance windows,
or time periods, within which Unidesk can shut down Desktops and deploy configuration changes to them. When
configuring this window, you can specify whether or not to wait for users to log off before shutting down the desktops.
Unless you configure the settings, Unidesk assigns a default maintenance schedule to all desktops when you create them.
You can modify the system default maintenance schedule but you cannot delete it. If you don't want to use the default
maintenance schedule, you can create custom maintenance schedules and use them instead.
The time that maintenance schedules use is based on the system clock of the Management Appliance. The system clock
on desktops or CachePoint Appliances does not affect maintenance schedules.
What happens during a maintenance window?
During a maintenance window, Unidesk:
Determines whether any of the desktops using the maintenance schedule have outstanding configuration changes.
Unidesk includes all outstanding configuration changes when it rebuilds the desktop's bootable image. Therefore, if you
edit the desktop multiple times before a maintenance window occurs, Unidesk incorporates all of these changes into the
new bootable image.
Starts to shut down these desktops (if they are not already shut down) and rebuild their bootable images.
Unidesk shuts down three desktops at a time on each CachePoint Appliance and starts rebuilding the bootable images
for these desktops. As one desktop rebuild completes, Unidesk shuts down the next desktop in its queue and starts to
rebuild its bootable image.
When a maintenance window ends, deployment tasks that are already in progress continue until complete. If Unidesk did
not have sufficient time to start all of the outstanding deployment tasks, it waits until the next maintenance window
occurs and starts those tasks during that time.
Maintenance schedule overrides
You can override a maintenance schedule in the following ways:
Deploy changes as soon as possible.
Unidesk tries to start the deployment tasks as soon as it can, instead of waiting for a maintenance window to occur.
Unidesk shuts down the desktops and deploys the configuration changes, even if users are still logged on to the
desktops.
Deploy changes at a specified time.
Unidesk deploys the changes after the specified time occurs instead of waiting for a maintenance window to occur. At
that time, Unidesk shuts down the desktops and deploys the configuration changes, even if users are still logged on to

© 1999-2017 Citrix Systems, Inc. All rights reserved. p.253https://docs.citrix.com
the desktops.
Deploy changes after the user logs off or restarts a desktop.
This option allows the desktop user to control when Unidesk deploys configuration changes. Unidesk waits for the first
time when a user logs off or restarts the desktop, instead of waiting for a maintenance window to occur. Unidesk
deploys the configuration changes as soon as the user logs off or restarts the desktop.
After you select a maintenance schedule override, it remains in effect until the next time Unidesk rebuilds the bootable
images for the desktops. Afterward, the selected maintenance schedule applies to future changes.
User changes are exempt from maintenance schedules
Some configuration changes are exempt from maintenance schedules. Unidesk deploys end-user initiated changes that
affect boot-level files as soon as possible after a desktop shuts down. For example, if an end user installs an application or
an automatic update changes boot-level files, Unidesk does not wait for a maintenance window to occur before it deploys
these changes.
The Task bar in the Unidesk Management Console displays these tasks as system tasks, as shown in the following example.
Effect of shutting down desktops outside of a maintenance schedule
If you shut down desktops outside of the time periods specified in a maintenance schedule, Unidesk does not deploy
pending configuration changes unless you select one of the maintenance schedule override options. Instead, Unidesk waits
until the next maintenance window in the schedule occurs before starting the deployment tasks.
For example, if the maintenance schedule for a desktop specifies that deployment tasks should occur between 6 PM and
11 PM and you shut down the desktop at 5 PM, Unidesk waits until 6 PM occurs before starting deployment tasks for that
desktop.
Create a maintenance schedule
In the Create and Edit Desktop wizards, use the Maintenance Schedule tab to add a new maintenance schedule for the
selected desktops.
Once created, you can assign a maintenance schedule to any desktop and manage the schedule using System > Settings
and Configuration.
To create a maintenance schedule.
1. In the Create Desktop or the Edit Desktop wizard, go to the Maintenance Schedule tab and select Add New Schedule
from the schedule list. This opens the Create Maintenance Schedule window.
2. Enter a name for the schedule.
3. Click Add.
4. Select the days of the week and the time frames for the maintenance window.
If you want constrain the maintenance window to a single day, select that day in both day lists. For example, selecting
Monday through Monday defines a maintenance window for that day only.

© 1999-2017 Citrix Systems, Inc. All rights reserved. p.254https://docs.citrix.com
5. Click Apply.
6. Click Create.
7. Complete the wizard to save the new maintenance schedule.
Note: The wizard does not save the new maintenance schedule until you complete the wizard.
Create a custom maintenance schedule for selected desktops
In the Create or Edit Desktop wizard, use the Maintenance Schedule tab to create a custom maintenance schedule for the
selected desktops.
After you create a custom maintenance schedule, you can assign it to any desktop in the Unidesk environment and manage
it in the System > Settings and Configuration module.
1. In the Create Desktop or the Edit Desktop wizard, go to the Maintenance Schedule tab and select Add New Schedule
from the list.
Result: This action opens the Create Maintenance Schedule window.
2. Enter a name for the schedule.
3. Add a maintenance window.
1. Click Add below the Maintenance Windows box.
2. Select the start and end day for the maintenance window.
If you want to constrain the maintenance window to a single day, select that day as both the start and end day. For
example, selecting Monday through Monday defines a maintenance window for that day only.
3. Select the start and end time for each day in the maintenance window.
4. Click Apply.
5. Repeat these steps to add additional maintenance windows.
4. Specify when you want Unidesk to deploy configuration changes during a maintenance window:
After the user is logged off for at least 10 minutes.
If you select this option, logged-on users must log off and remain logged off for at least 10 minutes before Unidesk
deploys configuration changes to those desktops. If a user remains logged in, Unidesk waits for the next maintenance
window before it tries to deploy the configuration changes. Unidesk deploys configuration changes to any selected
desktop that has no active users.
As soon as possible.
If you select this option, Unidesk shuts down desktops and deploys the changes, even if users are still logged on.
5. Click Create.
6. Complete the wizard to save the new maintenance schedule. The wizard does not save the new maintenance schedule
until you complete the wizard.
View maintenance schedules
1. Select System > Settings and Configuration.
2. Navigate to Maintenance Schedule Configuration.

© 1999-2017 Citrix Systems, Inc. All rights reserved. p.255https://docs.citrix.com
3. Select a maintenance schedule from the list. The schedule displays the Maintenance schedule name and the
Maintenance windows.
Schedule desktop maintenance
Once created, you can assign a maintenance schedule to any desktop, and manage the schedule using System > Settings
and Configuration.
Modify a maintenance schedule
Use the following procedure to modify the maintenance windows in a maintenance schedule.
1. In the Create Desktop or the Edit Desktop wizard, go to the Maintenance Schedule tab and select a schedule from the
schedule list.
When you select a schedule, the wizard displays the maintenance windows that are defined for that schedule. Each
maintenance window contains the days when maintenance activities occur and a time frame that defines the duration
of the window.
2. Click Modify.
This action opens the Modify Maintenance Schedule window.
3. If you want to change the name for the schedule, enter a new name for the schedule.
4. Select a maintenance window that you want to change and click Modify.
5. Select the days of the week and the time frame for the maintenance window.
If you want constrain the maintenance window to a single day, select that day in both day lists. For example, selecting
Monday through Monday defines a maintenance window for that day only.
6. Click Apply.
7. Click SaveSave .
8. Complete the Desktop Wizard to save your changes.
Add maintenance windows to a maintenance schedule
Use the following procedure to add maintenance windows to a maintenance schedule.
1. In the Create Desktop or the Edit Desktop wizard, go to the Maintenance Schedule tab and select a maintenance
schedule from the schedule list.
2. Click Modify.
This action opens the Edit Maintenance Schedule window.
3. Click Add.
4. Select the days of the week and the time frame for the new maintenance window.
If you want constrain the maintenance window to a single day, select that day in both day lists. For example, selecting
Monday through Monday defines a maintenance window for that day only.
5. Click Apply.

© 1999-2017 Citrix Systems, Inc. All rights reserved. p.256https://docs.citrix.com
6. Click Save.
7. Complete the Desktop Wizard to save your changes.
Delete a maintenance window in a maintenance schedule
Use the following procedure to delete a maintenance window in a maintenance schedule.
1. In the Create Desktop or the Edit Desktop wizard, go to the Maintenance Schedule tab and select a schedule from the
schedule list.
2. Click Modify.
3. Select one or more maintenance window windows and click Delete.
4. When prompted to confirm whether you want to delete the selected windows, click Save.
5. Complete the wizard to save the changes.

© 1999-2017 Citrix Systems, Inc. All rights reserved. p.257https://docs.citrix.com
Monitor desktop tasks
Jun 28 , 2017
Once a Desktop task begins, you can monitor its progress to ensure that it completes as expected.
About Task priorities
Depending on task priorities, it 's possible that some of your Desktop backups and restores might not complete, as
expected, when other tasks start or are in progress. For example, in most cases, a backup task has a lower priority that
other tasks, such as a restore or a rebuild of the desktop bootable image.
The following table describes some of the conditions that cause Unidesk to cancel a backup task.
IF ...IF ... AND...AND... T HEN...T HEN...
A scheduled or on-demand backup is inprogress
A desktop restore or rebuild startsUnidesk cancels the currently runningbackup..
A desktop restore or rebuild is inprogress
An scheduled backup starts Unidesk cancels the backup.
A desktop restore or rebuild is inprogress
An administrator starts an on-demand backup
Unidesk cancels the backup.
When Unidesk cancels a scheduled backup, it tries to back up the desktop at the next scheduled time.
Avoid configuring maintenance schedules that overlap your backups schedules. If a backup is running or tries to start during
a maintenance window activity, Unidesk cancels the backup. Overlapping the two schedules can result in Unidesk not
creating all of the backups that you expect.
Monitor a Desktop Backup or Restore
Use the Task bar to monitor the restore tasks. Each restore task includes subtasks for each affected desktop.
1. Open the Task bar and locate the restore task.
2. Click next to the Restore or Backup task to open the Subtask view.
The Subtask view contains a subtask for each desktop that the software is restoring or backing up. You can monitor the
different steps in the processes as they occur.
For details about monitoring tasks, see Monitor Tasks.
Cancel a Desktop Restore subtask
Use the Subtask view in the Task bar to cancel the Restore task for the User Layer of a Desktop.
1. In the Task bar, locate the Restore task.

© 1999-2017 Citrix Systems, Inc. All rights reserved. p.258https://docs.citrix.com
2. Click next to the Restore task to open the Subtask view.
3. Locate the restore subtask that you want to cancel.
4. Click Cancel.The selected restore task stops. The remaining subtasks continue to run.
© 1999-2017 Citrix Systems, Inc. All rights reserved. p.259https://docs.citrix.com
Desktop diagnostic tools
Jun 28 , 2017
Use the Edit action in the Desktops module to generate log files or run the chkdsk utility on a desktop. Typically, you use
these functions when you are trying to resolve problem with a desktop.
The chkdsk utility
Select the chkdsk option if you suspect that volume problems are causing operational issues on a desktop. The chkdsk
utility tries to repair problems such as bad sectors, lost clusters, cross-linked files, and directory errors.
When you select this function, the software notifies the desktop that it needs to run the chkdsk utility the next time it
restarts and displays a message for this task in the Task bar. After the desktop runs the chkdsk utility, the Task bar displays
a message that indicates the status of this task.
Desktop diagnostic log files
Technical Support may request these files when they are trying to determine the root cause of a problem.
When you select this function, the software locates and exports the relevant log files from the desktop and the
Management Appliance. The software creates a gzipped tar file that contains all of the log files.
When the log export is complete, the following events occur:
The software sends an email notif ication to all recipients, if email notif ication is configured.The email message contains
links to the gzipped tar f iles on the desktop and the Management Appliance.
The software displays a task in the Task bar that includes links to the gzipped tar f iles on the desktop and the
Management Appliance.
To view the log files, download them and extract them using a file compression utility such as the WinZip® product.
1. In the Desktops module, select a desktop and select Edit Desktops from the Action bar. This opens the Edit Desktop
wizard.
2. In the Diagnostic Selection tab, select Run Advanced Feature. Here you can select a diagnostic function.
3. If the status of the selected desktop is Running, select the Run Chkdsk Ut ilit yRun Chkdsk Ut ilit y function.
4. If the status of the selected desktop is Stopped, select the Export deskt op logsExport deskt op logs function.If you select this function,
enter one or more email recipients who receive the exported logs. To enter multiple recipients, separate each address
with a comma (,) or a semi-colon (;).
5. In the Confirm and Complete tab, enter a comment, if required, and click Update Desktop. If you enter comments, they
appear in the Information view Audit History.
This topic describes possible desktop and Installation Machine status messages. You can see these messages by selecting
Deskt opsDeskt ops in the Unidesk Management Console, or by opening a desktop's Information view.

© 1999-2017 Citrix Systems, Inc. All rights reserved. p.260https://docs.citrix.com
St at usSt at usmessagemessage
Descript ionDescript ion
Creatingbackup
The desktop is creating a backup of its current configuration and f iles.
Creatingimage
The software is creating a new bootable image for the desktop.
Creatingmachine
The software is in the process of creating the desktop. This process involves creating a virtual machine inthe virtual infrastructure.
Deleting The software is in the process of deleting the desktop.
In Use
A user is logged into the desktop.
Note: Whether the desktop is owned by a user, or by a pool/group, the In Use status is displayed when a
user is logged into the desktop.
Invalid StateA system error is preventing the creation or changing of a desktop. Verify that the CachePoint Appliancethat is hosting the desktop is operating normally.
No machine
This state occurs when
The virtual infrastructure has not yet created a virtual machine during a desktop creation task
The virtual infrastructure deleted the virtual machine during a desktop deletion task.
This state exists for a short time only, unless a system error occurs.
Poweringon
The virtual machine associated with the desktop is powering on and preparing to start the guestoperating system.
Rebuildrequired
The last Desktop reconfiguration task did not complete, so Unidesk is not booting the Desktop. Retry
the last reconfiguration task, and if that doesn’t work, rebuild the Desktop. For detailed steps, click here:
RestoringThe software is restoring the desktop to a previous configuration or to a different CachePointAppliance.
Running The desktop is powered on and ready for use.
ShuttingDown
The desktop is shutting down the guest operating system and powering off .
Starting The desktop is starting the guest operating system on the virtual machine.
Stopped The desktop is powered off .

© 1999-2017 Citrix Systems, Inc. All rights reserved. p.261https://docs.citrix.com
Unrecovered A failure occurred that affected the CachePoint Appliance that was hosting the desktop. Restoring thedesktop to another CachePoint Appliance is required.
© 1999-2017 Citrix Systems, Inc. All rights reserved. p.262https://docs.citrix.com
Appliance Backup Utility
Jun 28 , 2017
Backup of the Master CachePoint (MCP) is problematic using standard backup applications because the layers created by
the MCP are independent non-persistent disks that are only loosely associated with a virtual machine. Almost all backup
applications only backup dependent disks associated with a virtual machine.
The Unidesk Appliance Backup Utility provides a mechanism to back up the vmdk files created by the MCP to a backup
VMware datastore. Also, it provides the ability to back up the Master Cachepoint virtual machine and the Management
Appliance virtual machine at the same time.
During the backup the MCP virtual machine will be shut down prior to and started up after the backup. This ensures that
the MCP appliance and the shared layers will be safely backed up. For the MA you have a choice to shut down the MA prior
to backup or create a snapshot for the backup. If you choose to not shutdown the appliance before backup, the backup
will be a “Crash Consistent" backup which means that it will be in the same state as if you powered off a server with the
power button. This is because a snapshot is taken, then the VM’s files are copied directly from the source but the snapshot
is not copied.
Requirements and limitations
In order to use this backup utility to back up the MCP Layers, MCP Appliance and Management Appliance
• The MA and MCP must be in the same vCenter Server
• You must have an Administrator account for vCenter
• The backup datastore(s) must be accessible from at least one host in the vCenter
• Windows 7 Client or Windows 2008 R2 Server to run the backup utility (backup host)
• VMware PowerCLI 5 or later installed on the backup host
• Mail Relay to receive warning and status email messages
• When restoring the appliance names and IP addresses must remain exactly the same, therefore document appliance and
datastores names
Note it is possible to use normal virtualization backup applications like vRanger and Veeam to back up the MA, However, the
MA should be backed up at approximately the same time as the MCP to ensure their data is in sync.
How the Backup Utility works
The utility has an HTA application acting as the front end interface to several PowerShell/PowerCLI scripts. The application
calls the scripts passing configuration information and the scripts carry out the backups on the vCenter server.
What it backs up
This utility can be used to back up the MCP appliance virtual machine and the shared MCP layers which include OS layers
and Application layers. You can also back up the Management Appliance virtual machine.
© 1999-2017 Citrix Systems, Inc. All rights reserved. p.263https://docs.citrix.com
This utility does not back up the desktops or personalization layers for desktops installed on the MCP. If you use the MCP
in a POC environment without secondary CP’s you should also configure Unidesk personalization layer backups for the
Master CachePoint. These will back up the personalization layers for any desktops that you create on the MCP.
This utility will backup snapshot files but having snapshots on the MCP for any length of time not recommended. If
snapshots are taken prior to an upgrade, remove them as soon as the upgrade proves to be stable. Do not use snapshots
for long periods of time on Unidesk CPs.
This application will not back up your Gold Images. You should create backups of gold images using a VM aware backup tool
or by exporting an OVF file of the gold image to a safe location.
The Unidesk Appliance Backup Utility uses HTTPS to send status information to the Management Appliance. The machine
where the Appliance Backup Utility is running must have HTTPS access through any firewalls to the Management Appliance.
The first thing you must do to use the utility is to download and install the VMware PowerCLI software onto your backup
console machine. This link will take you to the download page at the time this document was written: Powercli Download
Installation of the backup utility is very easy. Create a folder in a path with no spaces for example c:\unideskMcpBackupc:\unideskMcpBackup.
Unfortunately spaces make it hard to include in a cmd file if you want to schedule a task to run the backup regularly. Then
unpack the source zip file into this directory. Before unpacking check the properties of the zip file to see if they may be
blocked as shown on the below. If they are click unblock. This will unblock all of the files as long as you unblock the zip
before you extract the files.
Then Open the executable and you will see the following screen.
The table at the top is used to configure the settings required to run the backups. The information is split into sections as
follows. Note the plus signs toggle the section between hidden and visible.
Section 1 Connection Information
Enter your vCenter Server, account and password and click Save Credentials. Then click to Get the Datacenter and choose
the appropriate entry. Lastly click "Get VMs and Datastores" to obtain a list for the utility drop downs.
This will create a file in the source directory called cred.xml as shown here.
The password is encrypted based on the logged in user and the desktop and cannot be moved to another machine or used
by another login. Therefore if you choose to run the backup as a scheduled task you must be logged on as the user you will
define to run the scheduled task on the machine that you will run the scheduled task when you create the cred file.
Section 2 Appliance Inclusion

© 1999-2017 Citrix Systems, Inc. All rights reserved. p.264https://docs.citrix.com
Here you define whether you will move the MA and MCP appliances along with the CP Layer datastore items. You can also
define whether or not you want to shut down the MA before the move or use a snapshot. If this is a one-time copy we
recommend shutting down the MA.
Note: if the MA is shutdown during this process this can interrupt other management tasks the MA performs such as
desktop backups.
Section 3 Appliance MCP Information
Here you enter the MCP VM and target datastore.
Section 4 MA Information
Here you enter the MA VM and target datastore.
Sect ion 5 Misc. Backup Inf ormat ionSect ion 5 Misc. Backup Inf ormat ion
In this section you set the target folder and define the configuration for old backup removal. You also define the number of
backups to keep, whether to remove backups before or after the current backup and whether to compare the number of
files backed up to the number that should have been backed up and only remove the old backups if these match.
Note: if the Manage/Remove Old backups setting is not checked then old backups will never be removed by the utility.
Section 6 Scheduled Task
This section allows you to create a scheduled task on the machine you are running the backup utility on. It is very important
to choose appropriate times for the backup.
CAUTION: This utility will shut down the MCP when the backup runs and can be configured to shut down the MA. If these
appliances are performing rebuild activities when they are shut down there could be unintended consequences. Try to
schedule the backups when you are not performing other administrative tasks with the MA or MCP.
Choose whether to run the task daily or weekly, if weekly select the day of the week. Define the time to start the task and
the account to run the task under. Remember that you must create the cred.xml file using the same account on the same
desktop that will run the task or it will not be able to decrypt the password to connect to the host.
If you use a domain account use Domain\account if local use Desktop_Name\account.
If you want to have a different schedule than daily or weekly, create the task then go into the Task Scheduler and
change the schedule.
To create the task press Creat e TaskCreat e Task.
Section 7 Email Configuration
© 1999-2017 Citrix Systems, Inc. All rights reserved. p.265https://docs.citrix.com
This section is used to configure mail relay settings and a warning email. If mail is configured, the utility will send a warning
message when starting the backup process. Based on item E below the utility will wait “x" minutes before starting the
backup. This will allow the administrators to cancel the backup if they determine that shutting down the MCP and
optionally the MA will cause issues with current activity. The value for “x" can be 0,5,10,20, or 30 minutes. The default value
is 10 minutes. If this section is configured the application will also mail the backup log following the backup.
To configure and use this functionality:
1. Enter the appropriate mail relay and mail address information. Relays have different requirements.
If the relay is “open", then the “From Address" can be any desired text string; it does not have to be a real email
address, though it can be.
If the relay requires authentication, check the “Use Auth" and if you want to use ssl, check the "Use SSL" box in D and
enter the account and password. Typically these will be the Active Directory Account and Password.
2. In either case, enter the “To Address" information which can be a single address or multiple addresses delimited using a
comma.
3. Modify F and G as appropriate.
4. In the Body, be sure to modify the wait time to match what is chosen in E. It is also advisable to add which machine the
backup is running on. The message body is html. Therefore normal html tags can be used for bold (<b></b>) and line
breaks (</br>) etc.
5. When the settings are completed press the “Save and Test Email Config" button. This will save the configuration to a
text file and send a test email.
6. Ensure the test email is successful. If a password is used it is saved in encrypted form based on the logged in user.
Therefore the settings must be made and saved using the account that will run the backups just like section 1.
When the configuration is complete save by pressing the Save Configuration button. This will update the CMDLINE in
section 6 and create a text file in the source directory called config.txt and this configuration will be loaded whenever you
open the backup utility.
If you are upgrading from an older version
Create a new folder on the root of the c drive with no spaces and unpack the utility. Then configure as defined above but
enter the same destination datastore as used in the older version. Then copy the contents of the log folder from your old
version to the new version.
© 1999-2017 Citrix Systems, Inc. All rights reserved. p.266https://docs.citrix.com
Back up the Management Appliance
Jun 28 , 2017
It 's important to back up the Management Appliance (MA) and the Master CachePoint Appliance (MCP) so you can restore
your Desktops in a pinch. You should back up your MA and MCP as often as you want your Layers and Desktops to be
saved. This is so important, you'll receive a warning each time you log into the Unidesk Management Console until you've
backed up these appliances for the first time. And, you can configure reminders to help you remember to run the backups as
often as you need to.
Not e:Not e: Secondary CachePoint Appliances do not require backups, because you can restore your entire environment from
the backups of your MA and MCP.
Check the Backup status for the MA and MCP
In the UMC, you can easily see when the MA and MCP were last backed up.
1. Log into the UMC and select Syst em > Manage AppliancesSyst em > Manage Appliances.
2. Next to the MA and the MCP, check the Last BackupLast Backup column for the last successful backup.
3. If you want to see the last 3 backup attempts (whether the backups were successful or not), you can click the appliance
“i” and look at the Appliance Backups section.
Configure Backup Reminders in the UMC
In the UMC, you can set reminders to help you remember to back up the MA and MCP.
Not e:Not e: You can also disable the reminder for the MA and/or MCP by setting the reminder values to 0.
To set this reminder:
1. Log into the UMC and select Syst em > Set t ings and Conf igurat ionSyst em > Set t ings and Conf igurat ion.
2. Click the EditEdit icon for Appliance Backup Settings.
3. Set the number of days until the next Backup Reminder for the MA and for the MCP.
4. Click SaveSave .
Do snapshots of the MA and MCP
If you do not check the option to shut down the MA appliance before the backup is taken the script will create a snapshot
of the appliance before copying the disk files. If you look at the snapshot manager after the snapshot has been taken it
will look similar to this. If you see a snapshot when no backups are running you should troubleshoot why it would still be
there and delete it using the VIC.
Run a backup on demand
If you want to run a backup on demand click the Run Backup button. This will launch the backup PowerShell script and you

© 1999-2017 Citrix Systems, Inc. All rights reserved. p.267https://docs.citrix.com
will see the backup running interactively.
Not eNot e : At the bottom of the Backup Utility page, there is a section for MA backups and restores. When you run a backup
from the user interface or a scheduled task it updates the text files that drive this interface. If you think the files are out of
sync with the actual backups stored on the datastore just click the Update Backup Information button and the utility will
query the datastore and reload any backups if finds on the backup store.
After a backup is run the backup list will be updated and you can view the backup logs by clicking the Info button. You will
only be able to view logs on the same machine the backup is run from.
Check the log files
The logs are stored in the source log directory on the system running the backups. They can be moved to another backup
machine but you must delete the cred.xml file and reset credentials if you move to another machine.
Below is an example of a partial backup log. Note if you backup the MCP and MA they will be listed in separate sections but
the log is the same for both. Log files look like this.
The log files are never removed automatically so they will grow in the source directory. Keep them or remove them as
desired.
If the email relay is configured, logs will be emailed to the address list after each backup. If any errors are logged during the
backup, this will be noted in the status email and the errors shown in the log file.
Near the top of the log there is a section called Warnings, it’s listed before Errors. Currently warnings will be shown for any
appliance that has a VMware snapshot applied to it prior to a backup just to ensure that administrators know when they
have a snapshot running on the MA or MCP.
Stop a running backup
A running backup can be stopped by either closing the PowerShell CMD window or stopping the scheduled task depending
on whether the backup was started interactively or as a task. Remember the copy commands are running on the vCenter
Server and when you stop the backup the last task started will run until it finishes. If desired the task can be canceled using
the VIC.
Delete a backup
You can delete a backup by clicking delete and answering YesYes to the prompt.
Restore from a backup
There are three scenarios possible for the restore operation:
© 1999-2017 Citrix Systems, Inc. All rights reserved. p.268https://docs.citrix.com
1. Restore to the same datastore
2. Restore to a new datastore
3. Restore to a new vCenter
We will provide the steps necessary to perform the install for each case in the following sections.
CAUTION: When restoring the appliances names and IP addresses should remain the same as they were originally.
Therefore good documentation is suggested.
Restore to the same datastore
You restore by clicking Rest oreRest ore from the backup table.
If you have previously restored to a different vCenter you will be prompted to keep the previously created credential file. If
this is indeed the vCenter you want to restore to now say yes. If not say no.
You will then be presented with the restore interface:
When restoring to the same datastore just click run restore. The default datastore and target folder should be correct.
Not e t hat t o perf orm a rest ore, t he f older f or t he appliance on t he source dat ast ore must not exist .Not e t hat t o perf orm a rest ore, t he f older f or t he appliance on t he source dat ast ore must not exist . If you
want to keep the current version you must first shut down the appliance and move it to a temporary folder using the VIC
datastore browser. If you try to restore with the folder still there you will get the following error.
After the restore is complete, power on the appliances MA first. Allow the MA to boot to the logon prompt then start the
MCP.
If the installation machines were on the failed host or storage and they do not exist, delete them from the UDMC and
recreate them. If they are still intact they should work fine.
Now the recovery should be complete.
To refresh the restore tables in the main interface after a restore click Refresh Page. This will allow you to then review the
restore log.
Restore to a new datastore
The following process can be used to restore the appliances to new host and new datastore.
1. Remove MA and/or MCP from inventory if they are still there.
2. Restore f iles using the restore function of the appliance backup application.
3. Add the Machines to inventory.
4. Start the MA.
5. Fix the network interface (if required).
© 1999-2017 Citrix Systems, Inc. All rights reserved. p.269https://docs.citrix.com
6. Reboot MA.
7. Edit MA properties in Unidesk to allow new host and new datastore for Unidesk.
8. Start MCP.
9. Synchronize Infrastructure.
10. Edit MCP Properties in Unidesk to define proper storage.
11. Reinstall Install Machines if necessary.
Here we will define each step in more detail:
1. Remove MA/and or MCP from inventory if they are still there.
In this scenario where we are changing datastores, you will have to remove the old virtual machine from inventory
because we will be adding them from the new datastore.
2. Then restore the MCP and MA. Choose Change for the Target Datastore and select the new datastore. If it is not in
the list refresh the list with the Get New button.
3. When the correct datastore is assigned run the restore. When you press the Run Restore button the restore starts
immediately, there is no further prompting. This will copy all of the files from the backup folders to the production
folders.
4. Then Add the Machines to Inventory by Browsing to their vmx file using the VIC Datastore Browser, right clicking and
selecting add to inventory. It is a good practice when you add them back in to inventory that you use the EXACT same
name within vCenter.
5. Power on the MA. You will be prompted to say whether this system has been moved or copied. Choose moved.
6. Edit the Ethernet rules file the MA using the vCenter Console if necessary.
In some cases the NIC will change on restore, to eth1. We will want to change this back to eth0. The symptom to know
when this happens is that you cannot ping the appliance.
1. vi /etc/udev/rules.d/70-persistent-net.rules.
2. Delete the first block entry and change the eth1 to eth0 in the second block.
3. The resulting file will look like the figure here.
7. Reboot the MA; let the MA fully start up.
8. Modify the Management Appliance Properties to allow the new datastore for all the hosts and remove the datastore
for the old host if it will no longer be used.
9. If required Edit the eth0/1 interface as in step 6 for the MCP.
10. Logon to the UDMC and modify the Master CP Properties to enable the new datastore.

© 1999-2017 Citrix Systems, Inc. All rights reserved. p.270https://docs.citrix.com
11. Power on the MCP. You will be prompted to say whether this system has been moved or copied. Choose movedChoose moved.
12. Log onto the UDMC and synchronize Infrastructure to re-acquire the VM-ID for the Master CP which will have changed
because we added the VM back to inventory.
1. Synchronize Infrastructure is accessed from the Management AppliancesManagement Appliances Action Menu. When you run the utility it
matches up Unidesk Desktops and CachePoints to their VM-ID’s. Note if you do not remove the original appliance
VM’s from inventory the synchronization will fail.
2. After it analyzes the information click next to see the following screen. It should find the MCP, select the check box
to remap.
13. Remove and Reinstall Install Machines if necessary.
Now the recovery should be complete.
Restore to a new vCenter
It is possible to restore the MA and MCP to a new vCenter in order for example to recover from a major SAN failure. The
steps are pretty much the same as the steps to restore to a new datastore with a few additional steps.
1. You do not have to change the backup application configuration to do this. Select the restore, then when the restore
interface comes up, change the vCenter to restore to here first. Click Change vCenter then enter the connection
information and “save credentials”. You will need administrator credentials to perform the restore. Both the source and
target datastores need to be available in the new vCenter. If the datastore name remains the same it’s easier to restore
but you can change the name if required.
When you choose “save credentials” script will be run to get the new list of Datacenters, and Datastores
2. Then restore the MA and MCP. Configure the source and target datastores as required. It will default to the same name
as defined in the backup utility. You can also change the Datacenter, Target Datastore and Target Folder if required.
3. Follow the directions as outlined in the previous section just remember to reconfigure the vCenter connection to
connect to the new vCenter and to choose the new datacenter.
Not eNot e : If you need to change the appliance IP addresses follow the guidelines here “Changing IP addresses for Unidesk
virtual appliances”
User Layers on the MCP are not backed up
User Layers are not backed up or restored by this utility. If you have desktops managed by the Master CachePoint, you
must use the User Layer Backups and Restore the desktops using that facility after recovering the MCP and MA.
Installation Machines
© 1999-2017 Citrix Systems, Inc. All rights reserved. p.271https://docs.citrix.com
After recovery you should delete and recreate your installation machines.
Target folder
When backups are run, the target folder structure will look similar to the following.
The scripts create a folder under the target datastore and the target folder for the MCP backups, and if selected, the MA
backups. Under these folders there will be a backup folder named by the date and time the backup is run. Within the backup
folder there will be the appliance itself and a folder called UnideskLayers which holds all of the independent non-persistent
disks created by the MCP.
VMDK files for multiple versions of Layers
If you have multiple versions of a layer there will be several vmdk files in the application folder.
When we copy the layer vmdk files they are copied as Thin provisioned disks. When we restore them, they are copied the
way they start out so for the MCP layers they stay Thin, for the appliance vmdk’s the are copied out as Thick.
Status indicators in the Backup Utility
In the Datastore information we show free space and capacity for the source and target datastore. This value is updated
after every backup. You can manually update the information by clicking on Update FreeSpace. Also to reload the backups
or restores use Refresh Page.
The free space is color coded based on the amount of space, and the amount of the largest backup currently on the
backup store. The color coding is based on the following:
Green = > 2.5 times space of largest backup
Yellow < 2.5 times space of largest backup
Red < 1.3 times space of largest backup
The expected storage required by backups is calculated using the largest backup size. In the current backup list time the
number of backups to keep plus one because we don’t delete until after the backup is taken. This is also color coded based
on whether there is enough capacity on the target volume for the expected storage.

© 1999-2017 Citrix Systems, Inc. All rights reserved. p.272https://docs.citrix.com
Tasks in the VMware Virtual Infrastructure Client (VIC)
The tasks run by this utility will show up in vCenter and can be cancelled there.
© 1999-2017 Citrix Systems, Inc. All rights reserved. p.273https://docs.citrix.com
Configure the Management Appliance
Jun 28 , 2017
You can configure the Management Appliance settings, as follows. .
ApplianceApplianceset t ingsset t ings
SummarySummary
Hosts andstorage
1. Log into the Unidesk Management Console (UMC).
2. Click Syst em > Manage AppliancesSyst em > Manage Appliances.
3. Select the appliance, and click Edit propert iesEdit propert ies .
Infrastructuresettings
1. Log into the UMC.
2. Click Syst em > Manage AppliancesSyst em > Manage Appliances.
3. Select the appliance, and click Set Up Inf rast ruct ureSet Up Inf rast ruct ure .
HTTPCertif icates
1. Log into the UMC.
2. Click Syst em > Set t ings and Conf igurat ionSyst em > Set t ings and Conf igurat ion.
3. Scroll to HT T PHT T P , and click the pencil icon.
4. Use the UploadUpload and Generat eGenerat e buttons to upload an existing certif icate or generate a new one.
IP address
1. Enter the URL of the appliance at port 5480:
https://appliance-ip-address:5480
2. Click Net workNet work > AddressAddress .
3. Choose St at icSt at ic from the IPv4 Address T ypeIPv4 Address T ype menu.
4. Edit network addresses.
5. Click Save Settings.
6. Restart the appliance.
7. Change the MA IP address on each CachePoint.
T ime Zone
1. Enter the URL of the appliance at port 5480:
https://appliance-ip-address:5480
2. Click T ime ZoneT ime Zone.
3. Select the Syst em T ime ZoneSyst em T ime Zone.
4. Click Save Settings.
5. Restart the appliance.
1. In vSphere, select the appliance, and if it is not running, power it on.
2. Using either the vSphere console or SSH, log into the appliance as administrator (default password
Unidesk1) This opens the Setup Utility.
3. At the Setup utility's Action prompt, enter PP (for Password change), and press Ret urnRet urn.
© 1999-2017 Citrix Systems, Inc. All rights reserved. p.274https://docs.citrix.com
Administratorpassword
4. When prompted, enter the new password, and then confirm the password. A message confirms
that the ** Password changed successfully.
5. Press the Ent erEnt er key to continue.
6. At the Action prompt, enter QQ to quit.
Rootpassword*
If you are comfortable using Linux, use the vSphere console or SSH to log into the appliance as root(for the default password, please contact Support), and enter Linux commands to change the rootpassword. If you are not comfortable changing the root password via Linux commands, the UnideskSupport team would be happy to help.
NTPconfiguration*
1. Using the vSphere console or SSH, log into the appliance as root (for the default password, please
contact Support). This brings you to the Linux command line.
2. Disable or enable the NTP daemon, by running the chkconfig nt pdchkconfig nt pd command with the value set to
of fof f or onon. For example, this command enables the NTP daemon:
# chkconfig ntpd onon
3. Open the NTP configuration file (/etc/ntp.conf) for editing using either emacs or vi. For example:
# emacs /etc/ntp.conf
4. Edit the NTP clock server(s) to use by adding and subtracting servers in the list at the bottom of the
configuration file.
# Use public servers from the pool.ntp.org project.
# Please consider joining the pool (http://www.pool.ntp.org/join.html).
server 0.centos.pool.ntp.org
server 1.centos.pool.ntp.org
server 2.centos.pool.ntp.org
5. Type Ct rl-XCt rl-X Ct rl-CCt rl-C, and choose YY to save the file.
6. Reboot the appliance.
For more about configuring NTP
1. Register with the Redhat Customer Portal.
2. See the RedHat NTP documentation.
Time andDate*
1. Using the vSphere console or SSH, log into the appliance as root (for the default password, please
contact Support). This brings you to the Linux command line.
2. Enter the date command. For example:
# date 03271327
* This procedure requires you to log into the appliance as root, use the Linux command line, and/or edit a Linux .config file.
If you are not familiar with Linux, our Support team will be happy to do this for you.

© 1999-2017 Citrix Systems, Inc. All rights reserved. p.275https://docs.citrix.com
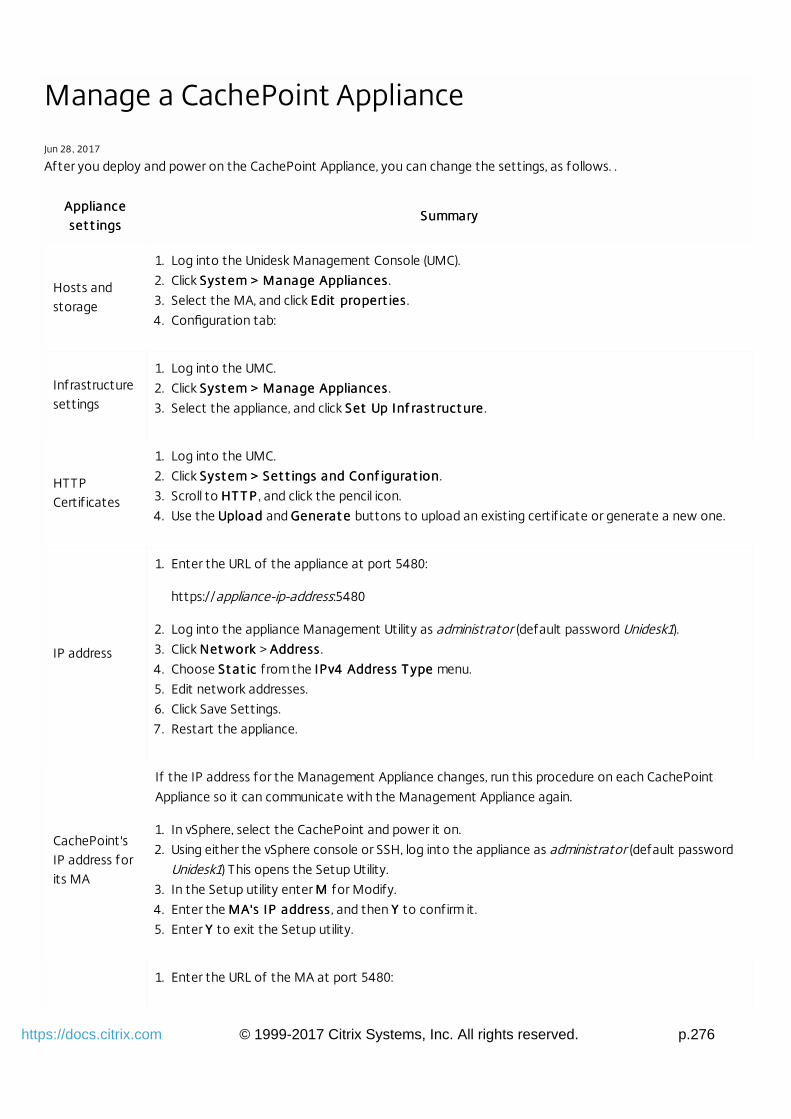
© 1999-2017 Citrix Systems, Inc. All rights reserved. p.276https://docs.citrix.com
Manage a CachePoint Appliance
Jun 28 , 2017
After you deploy and power on the CachePoint Appliance, you can change the settings, as follows. .
ApplianceApplianceset t ingsset t ings
SummarySummary
Hosts andstorage
1. Log into the Unidesk Management Console (UMC).
2. Click Syst em > Manage AppliancesSyst em > Manage Appliances.
3. Select the MA, and click Edit propert iesEdit propert ies .
4. Configuration tab:
Infrastructuresettings
1. Log into the UMC.
2. Click Syst em > Manage AppliancesSyst em > Manage Appliances.
3. Select the appliance, and click Set Up Inf rast ruct ureSet Up Inf rast ruct ure .
HTTPCertif icates
1. Log into the UMC.
2. Click Syst em > Set t ings and Conf igurat ionSyst em > Set t ings and Conf igurat ion.
3. Scroll to HT T PHT T P , and click the pencil icon.
4. Use the UploadUpload and Generat eGenerat e buttons to upload an existing certif icate or generate a new one.
IP address
1. Enter the URL of the appliance at port 5480:
https://appliance-ip-address:5480
2. Log into the appliance Management Utility as administrator (default password Unidesk1).
3. Click Net workNet work > AddressAddress .
4. Choose St at icSt at ic from the IPv4 Address T ypeIPv4 Address T ype menu.
5. Edit network addresses.
6. Click Save Settings.
7. Restart the appliance.
CachePoint'sIP address forits MA
If the IP address for the Management Appliance changes, run this procedure on each CachePoint
Appliance so it can communicate with the Management Appliance again.
1. In vSphere, select the CachePoint and power it on.
2. Using either the vSphere console or SSH, log into the appliance as administrator (default password
Unidesk1) This opens the Setup Utility.
3. In the Setup utility enter MM for Modify.
4. Enter the MA's IP addressMA's IP address , and then YY to confirm it.
5. Enter YY to exit the Setup utility.
1. Enter the URL of the MA at port 5480:
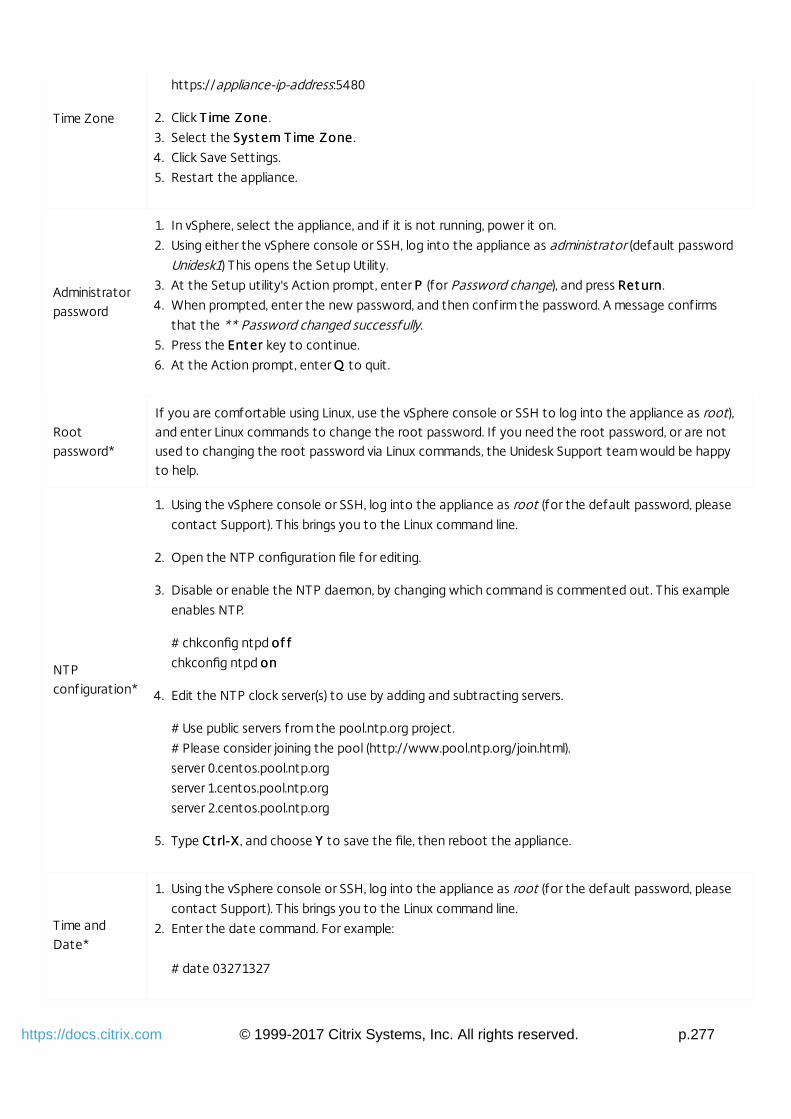
© 1999-2017 Citrix Systems, Inc. All rights reserved. p.277https://docs.citrix.com
Time Zone
https://appliance-ip-address:5480
2. Click T ime ZoneT ime Zone.
3. Select the Syst em T ime ZoneSyst em T ime Zone.
4. Click Save Settings.
5. Restart the appliance.
Administratorpassword
1. In vSphere, select the appliance, and if it is not running, power it on.
2. Using either the vSphere console or SSH, log into the appliance as administrator (default password
Unidesk1) This opens the Setup Utility.
3. At the Setup utility's Action prompt, enter PP (for Password change), and press Ret urnRet urn.
4. When prompted, enter the new password, and then confirm the password. A message confirms
that the ** Password changed successfully.
5. Press the Ent erEnt er key to continue.
6. At the Action prompt, enter QQ to quit.
Rootpassword*
If you are comfortable using Linux, use the vSphere console or SSH to log into the appliance as root),and enter Linux commands to change the root password. If you need the root password, or are notused to changing the root password via Linux commands, the Unidesk Support team would be happyto help.
NTPconfiguration*
1. Using the vSphere console or SSH, log into the appliance as root (for the default password, please
contact Support). This brings you to the Linux command line.
2. Open the NTP configuration file for editing.
3. Disable or enable the NTP daemon, by changing which command is commented out. This example
enables NTP.
# chkconfig ntpd of fof f
chkconfig ntpd onon
4. Edit the NTP clock server(s) to use by adding and subtracting servers.
# Use public servers from the pool.ntp.org project.
# Please consider joining the pool (http://www.pool.ntp.org/join.html).
server 0.centos.pool.ntp.org
server 1.centos.pool.ntp.org
server 2.centos.pool.ntp.org
5. Type Ct rl-XCt rl-X, and choose YY to save the file, then reboot the appliance.
Time andDate*
1. Using the vSphere console or SSH, log into the appliance as root (for the default password, please
contact Support). This brings you to the Linux command line.
2. Enter the date command. For example:
# date 03271327
© 1999-2017 Citrix Systems, Inc. All rights reserved. p.278https://docs.citrix.com
* This procedure requires you to log into the appliance as root, use the Linux command line, and/or edit a Linux .config file.
If you are not familiar with Linux, our Support team will be happy to do this for you.
You can receive email messages regarding issues with a CachePoint Appliance. To receive these messages, configure the
Management Appliance to send email messages to the designated addresses whenever there is an issue with a CachePoint
service.
If you configure email notifications in the Unidesk Management Console, the Management Appliance sends email
notifications to the designated addresses when an internal service failure on a CachePoint Appliance causes desktops to
become unusable. When these types of failures occur, the affected CachePoint Appliance initiates a restart of the
affected service. If the service continues to fail, the CachePoint Appliance initiates a complete restart of the virtual
appliance. In most cases, you do not need to take additional actions to correct this problem. Usually, restarting the service
or the affected CachePoint Appliance is sufficient.
The CachePoint Appliance tries to restart the service three times during a 60-minute time frame. If the service continues to
fail, the CachePoint Appliance tries to restart itself. If the restarts do not resolve the issue, you receive an email notification
indicating that an issue still exists.
Messages sent
The CachePoint Appliance sends the following types of email notifications for service failures:
Int ernal Int ernal CachePoint Appliance f ailure f ailure — When an internal service failure on one or more CachePoint Appliances
occurs, an email notif ication alerts you to the problem and informs you that a restart of the service or CachePoint
Appliance is going to occur.
Rest art complet ionRest art complet ion — After the restart completes, an email notif ication informs you that the restart of the affected
service or CachePoint Appliance completed successfully.
Rest art f ailedRest art f ailed — If the service or CachePoint Appliance restarts do not resolve the issue, an email notif ication alerts
you that the issue still exists and human intervention is required to resolve it.
Backup f ailedBackup f ailed — If a CachePoint Appliance backup fails, an email notif ication alerts you that you need to take action
to resolve the issue.
Actions to take
After being notif ied about a restart, monitor the CachePoint Appliances in the Unidesk Management Console and the
virtual infrastructure to verify that the CachePoint Appliances are operational before trying to access the affected
desktops.
If you encounter any problems with one or more desktops after the restart completes, use the Desktops > Restore
action in the Unidesk Management Console to return the desktop to a previous, operational state.
If you want to change the number of times the Management Appliance tries to restart the CachePoint Appliances,
contact Technical Support.
If the service or CachePoint Appliances restarts fail to resolve the issue, contact Technical Support for assistance.

© 1999-2017 Citrix Systems, Inc. All rights reserved. p.279https://docs.citrix.com
Synchronize virtual machine values
Jun 28 , 2017
Unidesk components use virtual machine identifiers (VMIDs) to locate and communicate with each other. When you
provision or create the Management Appliance, CachePoint Appliances, Installation Machines, and desktops, the Unidesk
software stores these values in its database.
If changes to the virtual infrastructure cause these values to change, these components become unusable until you update
the Unidesk database with new values.
Virtual infrastructure changes that can affect VMIDs
Virtual infrastructure changes that can affect VMIDs include:
Migration of the vCenter to a new version that results in the creation of a new vCenter database.
Removal of virtual machines from the vCenter inventory that you add back into the inventory.
Removal of ESX servers from the vCenter inventory that you add back into the inventory.
About synchronizing the database and virtual machine values
The Synchronize Infrastructure wizard in the Unidesk Management Console compares the virtual machine values in the
Unidesk database with the values of virtual machines in the virtual infrastructure. When the comparison is complete, the
wizard lets you address any issues for virtual machines whose names match names in the Unidesk database but have
different VMIDs.
Options for correcting issues with VMIDs
To correct situations where virtual machine values in the database are different from those in the virtual infrastructure, you
can:
Map the new values to the existing values in the database.
Create new virtual machines for existing Unidesk components when the software cannot f ind the virtual machines that
used to be associated with these components.
Create new virtual machines for existing Install Machines when the software cannot f ind the virtual machines that used
to be associated with these Install Machines.
Database updates
If you are sure that a virtual machine whose name is stored in the Unidesk database is the same virtual machine that the
comparison process discovered, you can use the Synchronize Infrastructure wizard to update the database with the new
VMID. Once the update completes, the virtual machines should become usable again.
Creation of new virtual machines
If the database comparison cannot find virtual machines that match the names stored in the Unidesk database or if you
are unsure that a discovered virtual machine is the same as the unusable one in the Unidesk environment, you can use the
Synchronize Infrastructure wizard to recreate the virtual machine. The new virtual machine has the same name as the one
stored in the database, but it will be a completely new virtual machine. The Unidesk databases stores the VMID for the new
virtual machine. Once the creation of the new virtual machine completes, it should be usable again.

© 1999-2017 Citrix Systems, Inc. All rights reserved. p.280https://docs.citrix.com
Creation of new Installation Machines
If the database comparison cannot find Installation Machines that match the names stored in the Unidesk database or if
you are unsure that a discovered Installation Machine is the same as the unusable one in the Unidesk environment, you can
use the Synchronize Infrastructure wizard to recreate the Installation Machine. The new Installation Machine has the same
name as the one stored in the database, but it will be a completely new virtual machine. The Unidesk databases stores the
VMID for the new virtual machine. Once the creation of the new Installation Machine completes, it should be usable again.
Run the Synchronize Infrastructure wizard
You must complete the wizard for synchronization to occur.
1. Select System > Manage Appliances.
2. Select the CachePoint(s) you want to compare and click Synchronize Infrastructure. This opens the Synchronize
Infrastructure wizard. The selected CachePoint(s) are displayed, along with the desktop count for each one.
3. In the Compare Virtual Machines tab, click Compare Virtual Machines. This compares the virtual machine names, VMIDs,
and MAC addresses in the Unidesk database with the virtual machines in the virtual infrastructure. This can take several
minutes.
If differences exist, go to step 4 of this procedure.
If no differences exist, click to exit the wizard. If the desktops or other components continue to be unusable,
contact Technical Support for assistance.
4. Select any or all of the following tabs if the virtual machine comparison indicates that changes are required::
Note: If you need to recreate a CachePoint Appliance, use the standard provisioning process for creating new
CachePoint appliances and restoring the User Layers. For instructions, see Create a CachePoint Appliance.
Remap CachePoint Appliances — Use this tab to map values from the virtual infrastructure to values for CachePoint
Appliances in the Unidesk database.
If a displayed virtual machine is the same as the original virtual machine associated with a CachePoint Appliance, map
the new values to the existing values for this virtual machine.
If the displayed virtual machine is not the same as the original one, you have to recreate it.
Remap Desktops — Use this tab to map values from the virtual infrastructure to the desktop values in the Unidesk
database.
If a displayed virtual machine is the same as the original virtual machine associated with a desktop, map the new
values to the existing values for this virtual machine.
Remap Installation Machines — Use this tab to map values from the virtual infrastructure to the Installation Machine
values in the Unidesk database.
If a displayed virtual machine is the same as the original virtual machine associated with an Installation Machine, use
this tab to map the new values to the existing values for this virtual machine.
If the displayed virtual machine is not the same as the original one, use the Recreate Installation Machines tab to
recreate it.
© 1999-2017 Citrix Systems, Inc. All rights reserved. p.281https://docs.citrix.com
Recreate Installation Machines — Use this tab to create a new virtual machine for an existing Installation Machine.
Selecting this tab allows you to create a new virtual machine for a Installation Machine that exists in the Unidesk
database but does not exist in the virtual infrastructure.
5. In any of the Remap tabs, select the check box next to a specific component whose values you want to map or select
Remap All to map the values for all of the listed components.
Note: If you choose to not remap the values for a specific virtual machine, the wizard displays that virtual machine in the
appropriate Recreate tab. At that point, you have the option to recreate the virtual machine instead of mapping the
new values.
6. In any of the Recreate tabs, select the check box next to a specif ic component that you want to recreate or select
Recreate All to create new virtual machines for all of the listed components.
7. In the Confirm and Complete tab, verify that the selected actions for the displayed components are correct and
clickSynchronize to start the specified actions.
To save the displayed action list to the system clipboard, click Copy to Clipboard.
8. Check the progress of the synchronization task by expanding the Task panel, and then the task called Reconnecting
CachePoint Appliances and desktops to virtual machines.

© 1999-2017 Citrix Systems, Inc. All rights reserved. p.282https://docs.citrix.com
Unidesk broker agent
Jun 28 , 2017
The Unidesk Virtual Desktop Connection Broker Agent lets you integrate Unidesk desktops with connection brokers:
Int egrat ing wit h t his broker:Int egrat ing wit h t his broker: Let s Unidesk...Let s Unidesk...
VMware View™ Connection Server
Create dedicated manual pools and add persistent desktops to those pools.
Add nonpersistent desktops to f loating-assignment manual pools.
Automatically place desktops into maintenance mode during desktop rebuilds.
Citrix® XenDesktop® ControllerAdd Unidesk desktops (persistent and nonpersistent) to XenDesktop catalogs.
Automatically place desktops into maintenance mode during desktop rebuilds.
For a list of supported connection brokers see Platform Support on the Unidesk Support website.
Ensure you have access to an account with administrator privileges on the connection broker server.
To install or upgrade the Unidesk Virtual Desktop Connection Broker Agent
1. Determine which port to use for communication between Unidesk and the connection broker server. By default,
Connection Broker Agent uses port 390.
2. If you are planning to integrate with a Citrix XenDesktop environment, use Desktop Studio to create a catalog that has
a machine type of Existing.
3. Log into the View Connection Server or XenDesktop Controller using an account with administrator privileges.
4. Copy the via_setup.exe file from the UnideskInstall.x.x.x.xxx\Unidesk_Broker_Integration_Tools folder to a convenient
location on the server.
5. Double click the via_setup.exe file, and when prompted, enter the location where you want to install the Virtual Desktop
Connection Broker Agent. The default is C:\Program Files\Unidesk\UniVIA.
6. Accept the default communications port number (390) for the Virtual Desktop Connection Broker Agent.
Note: If you need to change the port number later, see the instructions in Edit settings for the Unidesk Virtual Desktop
Connection Broker Agent. And, if you change the port number on the connection broker server, remember to also change
the port number in the Unidesk Management Console.
7. Click Finish to exit the wizard.
If you need to remove the Virtual Desktop Connection Broker Agent and its service, complete the following steps to

© 1999-2017 Citrix Systems, Inc. All rights reserved. p.283https://docs.citrix.com
uninstall them:
1. Log in to the VMware View Connection Server or XenDesktop Controller using an account with administrator privileges.
2. Run the via_setup.exe install program.
3. When prompted to select an installation option, select Remove. The install program removes all of the f iles in the
Unidesk folder.
If you need to reinstall the agent software, first use the Microsoft Management Console (MMC) to stop the UniVIA service
on the View Connection Servers or XenDesktop Controllers. This eliminates the need to restart the system to complete the
installation.

© 1999-2017 Citrix Systems, Inc. All rights reserved. p.284https://docs.citrix.com
Edit the Unidesk Virtual Desktop Connection BrokerAgent settings
Jun 28 , 2017
If you are experiencing network performance issues that are affecting communication between a VMware View
Connection Server or a Citrix® XenDesktop® Controller and Unidesk you can adjust settings for the Unidesk Virtual Desktop
Connection Broker Agent that extend the default timeout settings or change replication behavior for the View Connection
Server.
You can also change the port number that Unidesk uses to communicate with the connection broker server.
1. Log in to the View Connection Server or XenDesktop Controller where you installed the agent software.
2. Navigate to the agent installation folder.
Note: The default location for the installation folder is C:\Program Files\Unidesk\UniVIA.
3. Open the UniVIACS.exe.config f ile in a text editor.
4. Change any or all of the following settings:
Set t ingSet t ing Descript ionDescript ion
Port
The port number that the agent uses to communicate with the View Connection
Server or the XenDesktop Controller.
Default value: 390.
If you change the port on the connection broker server, remember to also change the
port setting in the Unidesk Management Console.
WaitTimeSecs
The amount of time, in seconds, that the agent waits for a request to the
connection broker to complete before accepting the next request.
Default value: 30 seconds.
KillT imeSecs
The amount of time, in seconds, that the agent waits after the WaitTimeSecs time
elapses for the connection broker to respond to a request.The agent cancels the
request after this time elapses.
Default value: 120 seconds.
Example: if WaitTimeSecs = 30 and KillT imeSecs = 120, the agent cancels requests
that take longer than 150 seconds to complete. (WaitTimeSecs + KillT imeSecs).
This setting applies to VMware View Connection Servers only.
Determines whether replication of the ADAM database to View Connection Server

© 1999-2017 Citrix Systems, Inc. All rights reserved. p.285https://docs.citrix.com
SyncAdamOnSetMaintMode
replicas occurs when Unidesk places a desktop in Maintenance Mode.
Set the value to true to force replication to occur when Unidesk changes the
desktop state.
Set the value to false if you do not want replication to occur when Unidesk
changes the desktop state.
Default value: true
Unidesk places VMware View desktops in Maintenance Mode when it needs to
rebuild the desktop in order to change the desktop configuration.
SyncAdamExcludedServers
This setting applies to VMware View Connection Servers only.
Specifies one or more View Connection Server replicas that you want to exclude from
replication of the ADAM database.
Use a comma to separate enter each server name, for example,
server1,server2,server3.
If you are using View Connection Server replicas, you can choose to not have the
ADAM database replicated from the source View Connection Server when Unidesk
places a desktop in Maintenance Mode. You might want to use this setting if your
network is experiencing delays that are affecting the communication between
Unidesk and the View Connection Server.
5. Save the f ile.

© 1999-2017 Citrix Systems, Inc. All rights reserved. p.286https://docs.citrix.com
Synchronize user assignments from connectionbrokers
Jun 28 , 2017
Unidesk synchronizes its information about user assignments for desktops integrated with VMware View and Citrix
XenDesktop once every three hours. When it updates the desktop assignments, the Unidesk Management Console
changes the user names in the Desktop icon and list views. It also changes the Information views for desktops and users to
indicate that they have a desktop assigned to them.
You can synchronize this information on demand instead of waiting for the automatic synchronization to occur.
About synchronizing Citrix XenDesktop user assignments
The Unidesk connection broker synchronization interacts with Citrix XenDesktop as follows:
If the Unidesk synchronization discovers more than one user is assigned to a desktop, the Unidesk Management Console
displays the f irst user it f inds as the desktop owner. Although Citrix XenDesktop supports the assignment of multiple
users, Unidesk supports the assignment of a single user only.
If the synchronization process discovers that a Unidesk desktop is no longer in a catalog, Unidesk disassociates the
desktop from the XenDesktop integration. In this situation, the desktop is no longer integrated with XenDesktop.
If you change the catalog settings in the Unidesk XenDesktop Controller settings, Unidesk continues to synchronize user
assignments for previously deployed desktops. Changing catalog settings affects new desktops only.
Synchronize connection broker user assignments on demand
1. Select System > Settings and Configurations.
2. To synchronize user assignments for desktops in VMware View pools:
Go to View Connection Server Settings and click Synchronize Pools.
The Management Appliance connects to the View Connection Server, obtains the most recent information about user
assignments for desktops in the current list of pools, and updates the appropriate displays in the Unidesk Management
Console.
3. To synchronize user assignments for desktops in Citrix XenDesktop catalogs and groups:
Go to Citrix XenDesktop Controller settings and click Synchronize Catalogs.
The Management Appliance connects to the Citrix XenDesktop Controller, obtains the most recent information about
user assignments for desktops in the XenDesktop catalogs and groups, and updates the appropriate displays in the
Unidesk Management Console.

© 1999-2017 Citrix Systems, Inc. All rights reserved. p.287https://docs.citrix.com
Manage VMware Horizon View integration
Jun 28 , 2017
Once you integrate with VMware View, you can edit the pool details and manage the connection to the View Connection
Server via the Unidesk Management Console.
Configure pool details
You can change the names and descriptions for pools that the Unidesk Management Console displays. These changes are
also visible when you use your virtual infrastructure management tools to manage the virtual desktop pools.
Requirement
You must authenticate a connection to the connection broker before you can view pools and change their details.
Edit pool details
To edit pool details
1. Select System > Settings and Configuration.
2. In the Broker Settings box, click Edit.
3. In the Pools box, select a pool and click Modify.
4. In the displayed details box, change the name or description, as necessary.
Note: You cannot change the desktop ID. If you need to change this value, use the virtual management tools for this
purpose.
5. Click Save.
Edit connection details for a View Connection Server
You can change the details, such as the port number and server address for an existing connection to a VMware View
Connection Server.
To edit connection details:
1. Select System > Settings and Configuration.
2. In View Connection Server Settings, click Edit to enter Edit mode.
3. Select the View Connection Server that you want to modify and click Modify.
4. Change the server address or host name, if necessary.
5. Change the port number, if necessary.
6. Click Test Connection to verify that the connection is valid.
7. Click Apply to update the View Connection Server details. The changes are displayed in the list; however, they do not
take effect until you complete the next step.
8. Click Save to save your changes and exit Edit mode.
Deleting a connection to a View Connection Server
To delete a connection to a VMware View Connection Server:

© 1999-2017 Citrix Systems, Inc. All rights reserved. p.288https://docs.citrix.com
1. Select System > Settings and Configuration.
2. In View Connection Server Settings, click Edit to enter Edit mode.
3. Select the View Connection Server that you want to delete and click Delete. The software removes the selected
connection from the list, but it does not delete the connection permanently until you complete the next step.
4. Click Save to delete the selected View Connection Server and exit Edit mode. Click Cancel to return to the last saved
settings.

© 1999-2017 Citrix Systems, Inc. All rights reserved. p.289https://docs.citrix.com
Manage Citrix XenDesktop integration
Jun 28 , 2017
Once you integrate with Citrix XenDesktop, you can edit the default catalog selection and manage the connection to the
Citrix XenDesktop Controller via the Unidesk Management Console.
Edit a Citrix XenDesktop default catalog selection
You can edit XenDesktop Controller settings to change the selection for the default catalog. If the original catalog that
you selected no longer exists in the XenDesktop® infrastructure, the catalog selection is blank.
1. Select System > Settings and Configuration.
2. In XenDesktop Controller Settings, click Edit to enter Edit mode.
3. Click to refresh the current listing of valid catalogs.
4. Change the catalog selection for private or shared groups.
5. Click Save to save your changes and exit Edit mode.
Edit a connection to a Citrix XenDesktop Controller
To change the details for a connection to a Citrix® XenDesktop® Controller:
1. Select System > Settings and Configuration.
2. In XenDesktop Controller Settings, click Edit to enter Edit mode.
3. Select the Controller whose settings you want to modify and click Modify.
4. Change the IP address or host name, if necessary.
5. Change the port number, if necessary.
6. Click Test Connection to verify that the connection is valid.
7. Click Apply to update the Controller details. The changes display in the list; however, they do not take effect until you
complete the next step.
8. Click Save to save your changes and exit Edit mode.
Delete a connection to a Citrix XenDesktop Controller
To delete an existing connection to a Citrix® XenDesktop® Controller:
1. Select System > Settings and Configuration.
2. In XenDesktop Controller Settings, click Edit to enter Edit mode.
3. Select the XenDesktop Controller that you want to delete and click Delete. The software removes the selected
connection from the list, but it does not delete the connection permanently until you complete the next step.
4. Click Save to delete the settings for the selected XenDesktop Controller and exit Edit mode. Click Cancel to return to
the last saved settings.

© 1999-2017 Citrix Systems, Inc. All rights reserved. p.290https://docs.citrix.com
Manage Pano Logic integration
Jun 28 , 2017
se the information in this topic and in the following Solutions Guide to manage integration with Pano Logic:
Using Unidesk 2.x with Pano Logic 5.x
Edit the connection to a Pano Manager server
A connection to a Pano Manager allows you to add Desktops to a Pano Desktop collection.
To edit a connection to a Pano Manager:
1. Select System > Settings and Configuration.
2. In the Pano Manager Server Settings box, click Edit.
3. Enter the connection details for the Pano Manager:
1. Enter the IP address or a Fully Qualif ied Domain Name (FQDN) for the Pano Manager server.
2. Enter the user name for an account that has administrator permissions.
3. If you want to use a secure connection between the Pano Manager and the Management Appliance, select Use SSL.
4. Click Test Connection to verify that the connection to the Pano Manager server is valid.
5. Enter a comment, if necessary and click Save.
If you enter comments, they appear in the Information view Audit History.

© 1999-2017 Citrix Systems, Inc. All rights reserved. p.291https://docs.citrix.com
Users and groups
Jun 28 , 2017
The Unidesk environment can include directory service users and groups, and local users that you create using the Unidesk
Management Console.
Directory service users and groups
The software retrieves information about these users and groups from a remote directory service. To add these users and
groups to the Unidesk directory tree, establish a connection (referred to as a Directory Junction) to a directory server. After
establishing this connection, you can assign desktops to the directory service users and groups, add them to local groups, or
assign Administrative roles to users. If you want to change any of the attributes for these users and groups, you must do
so on the directory server.
Local users and groups
Local users and groups exist in the Unidesk environment only. Use the Unidesk Management Console to create local users
and groups.

© 1999-2017 Citrix Systems, Inc. All rights reserved. p.292https://docs.citrix.com
Manage users and groups
Jun 28 , 2017
About users and groups
Types of users and groups
The Unidesk environment can include directory service users and groups, and local users that you create using the Unidesk
Management Console.
Directoryserviceusersandgroups
The software retrieves information about these users and groups from a remote directory service. To add
these users and groups to the Unidesk directory tree, establish a connection (referred to as a Directory
Junction) to a directory server. After establishing this connection, you can assign desktops to the directory
service users and groups, add them to local groups, or assign Administrative roles to users.
If you want to change any of the attributes for these users and groups, you must do so on the directory
server.
Localusersandgroups
Local users and groups exist in the Unidesk environment only. Use the Unidesk Management Console tocreate local users and groups.
Manage users and directory junctions
Create users
Directory service users
If you are using a directory service, such as Active Directory or Novell eDirectory, to manage user information, you can
extend the Unidesk directory tree to include user and group information from the remote directory service by creating
directory junctions (connections).
Local users
To deploy desktops, you must associate them with a user that Unidesk recognizes. You can use local users or users that are
associated with directory services.
Best Practice: For easier management of a large number of users, create groups and add the users as members to these
groups.
1. Select Users and select Create User. This opens the Create New User wizard.
2. In the General tab, specify the personal information for the user.
1. Enter the f irst and last name for the user.
2. Enter a title for the user.
3. If the user needs Administrator permissions, select the Administrator check box and enter the user name and
password for the user. These login credentials allow the user to log in to the Unidesk Management Console.
3. In the Contact Information tab, specify the contact information for the user.
4. In the Group Membership tab, select one or more groups to which you want to add the user as a member.

© 1999-2017 Citrix Systems, Inc. All rights reserved. p.293https://docs.citrix.com
5. In the Confirm and Complete tab, verify that the user settings are correct, enter a comment if required, and click Create
User.If you enter comments, they appear in the Information view Audit History.
Edit users
You can edit local users to change the information associated with them.
Directory service users
The only change you can make for a directory service user is assigning or removing roles and changing their membership in
local groups. To change all other user attributes, edit them on the remote directory server.
Edit a local user
1. Select one of the following views:
Users > Tree.
Users > Users.
Users > Administrators.
2. Select a user and select Edit Properties in the Action bar. This opens the Edit User wizard.
3. In the General tab, change the user's name or title, if necessary. You can also change the role for the user on this tab, if
you are logged in as a Full Administrator.
4. In the Contact Information tab, change the user's contact information.
5. In the Group Membership tab, change the user's membership in one or more groups.
6. In the Confirm and Complete tab, verify the changes are correct, enter a comment if required, and click Update User. If
you enter comments, they appear in the Information view Audit History.
Delete users
The way to delete users depends upon whether the user is a directory service user, or a local Unidesk user.
Deleting directory service users
To delete a directory service user, remove them from directory server. You cannot use the Unidesk Management Console to
delete directory service users.
Deleting local Unidesk users
1. In the Unidesk Management Console, select Users and click any tab except for Directory Service.
2. Select one or more users and click Delete in the Action bar. This opens the Delete wizard.
3. In the Confirm and Complete tab, verify that the correct users are selected, optionally, enter a comment, and click
Delete User. If you enter comments, they appear in the Information view Audit History.
Edit a directory junction
To change the settings for a directory junction:
1. Select Users > Directory Service.
2. Select Edit Properties in the Action bar.
Result: This action opens the Edit Directory Junction wizard.
3. In the Directory Services Detail tab, change any of the connection details for the directory server.
1. Change the name for the Directory Junction. This name becomes the name of the folder that you see in the Unidesk
© 1999-2017 Citrix Systems, Inc. All rights reserved. p.294https://docs.citrix.com
directory tree view.
2. Change the IP address for the directory server.
3. Change the number of the port that allows communication with the directory server.
4. If you want to use Secure Sockets Layer (SSL) communication, select the SSL checkbox.
5. Click Test Connection to verify that the connection to the directory server is valid. If you chose to use an
SSL connection and certif icate errors occur, the wizard prompts you to confirm whether you want to accept or reject
the certif icate.
4. In the Authentication Details tab, change the credentials for a user who has permissions to search the directory server.
1. Enter the ID or distinguished name for a user who has permissions to search the directory server. This ID is the Bind
distinguished name (DN). To determine the correct syntax for the Bind DN, see the documentation for your directory
service.
2. Enter the password for Bind DN.
3. Click Test Authentication to verify that you entered the correct values.
5. In the Attribute Mapping tab, enter the names of directory service attributes that you want to map to local attributes.
6. In the Confirm and Complete tab, verify the Directory Junction settings are correct, enter a comment if required, and click
Update Directory Junction.
If you enter comments, they appear in the Information view Audit History.
Delete a directory junction
Deleting a Directory Junction deletes all of the cached information in the local database that the software retrieved from
the remote directory service.
Conditions for deletion
You can delete a Directory Junction if :
The Directory Junction does not contain any directory service objects that are imported into the Unidesk directory tree.
No desktops are assigned to any of the directory service users.
The Directory Junction overlaps another Directory Junction (that is, the same users exist in multiple Directory Junctions). In
this case, you can delete the Directory Junction even if the users are imported or have assigned desktops as long as they
still exist in another Directory Junction.
When you delete an overlapping Directory Junction, you continue to see the imported users if they exist in other
Directory Junctions.
Delete a directory junction
1. Delete all directory service objects that are members of the Unidesk directory tree. Deleting these objects from the
Unidesk directory tree does not affect the objects in the directory service tree.
Use the following icons to identify these objects:
Icon Object
A directory service user whose information is cached in the Unidesk environment.
A folder that contains directory service groups or users whose information is cached in the Unidesk
environment.

© 1999-2017 Citrix Systems, Inc. All rights reserved. p.295https://docs.citrix.com
A group from a directory service whose information is cached in the Unidesk environment. For example, users in
the group have desktops assigned to them.
2. Select Users > Directory Service.
3. Select a Directory Junction and select Delete in the Action bar.
Result: This action opens the Delete wizard.
4. In the Confirm and Complete tab, verify that the correct directory junction is selected, and click Delete Directory
Junction.
Manage Groups
Create groups
You can create local groups and add both local and directory service users to these groups. This is useful if you have a large
number of users that you need to manage.
1. Select the Tree or Users view in the Users module and select Create Group in the Action bar. This opens the Create
Group wizard.
2. In the General tab, enter a name and description for the group.
3. In the Group Membership tab, select one or more groups to which you want to add the group as a member.
4. In the Add Members tab, select one or more users from the list to add them as members of the group. You can select
local and directory service users.
Directory service users: For information about a directory service user, place the cursor on the user to display the user's
Distinguished Name and any available information, including: login ID, email address, and telephone number.
5. In the Confirm and Complete tab, verify that the group settings are correct, and click Create Group.
Add members to groups
Use groups to help you manage large numbers of local users or groups. A user or group can be a member of multiple groups.
You can do the following tasks:
Add local or directory service users to groups.
Add groups to other groups.
Add users to groups
1. Select Users > Tree and expand the GroupsFolder in the directory tree view.
2. Select a group and select Add Members in the Action bar. The Add Members wizard opens.
3. In the Add Member tab, navigate to the groups or users that you want to add as members and select the check box
next to them. You can add local and directory service users to the group.
Directory service users: For information about a directory service user, place the cursor on the user to display the user's
Distinguished Name and any available information, including: login ID, email address, and telephone number.
© 1999-2017 Citrix Systems, Inc. All rights reserved. p.296https://docs.citrix.com
4. In the Confirm and Complete tab, verify that the correct users and groups are selected, enter a comment if required, and
click Add Member. If you enter comments, they appear in the Information view Audit History.
Edit groups
To change a group's properties or the members in the group:
1. Select Users > Tree.
2. Select a group and select Edit Properties in the Action bar.
Result: This action opens the Edit Group wizard.
3. In the Group Details tab, change the group name and description.
4. In the Membership tab, change the group's membership in other groups.
5. In the Add Members tab, add or remove local or directory service users from the group.
Directory service users: For information about a directory service user, place the cursor on the user to display the user's
Distinguished Name and any available information, including: login ID, email address, and telephone number.
6. In the Confirm and Complete tab, verify the group changes are correct, and click Update Group.
Manage group membership
The Users module in the Unidesk Management Console provides multiple methods for managing membership in groups.
Add group memberships to users
1. Select Usersand select a user in the User view.
2. Select Edit.
Result: This action opens the Edit User wizard.
3. In the Membership tab, select one or more groups.
4. In the Summary tab, click Edit User.
Add group membership to groups
1. Select Usersand select a group in the Group view.
2. Select Edit.
Result: This action opens the Edit Group wizard.
3. In the Membership tab, select one or more groups.
4. In the Summary tab, click Edit Group.
Delete groups
To delete a local group:
1. Select Users > Tree.
2. Select one or more groups and select Delete in the Action bar. This opens the Delete wizard.
3. In the Confirm and Complete tab, verify that the correct groups are selected, and click Delete Group.
The software deletes the selected groups immediately without prompting for confirmation.Verify that you selected the

© 1999-2017 Citrix Systems, Inc. All rights reserved. p.297https://docs.citrix.com
correct groups before clicking Delete Group.
Use folders to organize groups and users
Create folders
You can create folders for organizing Unidesk users and groups.
To create a folder:
1. Select Users > Tree.
2. Click Create Folder in the Actions tab.
3. In the Folder Details tab, type the folder name and a description for it, as needed.
4. In the Folder Location tab, select the folder where you want to create it.
5. In the Confirm and Complete tab, verify that the information is correct and click Create Folder.
Edit folders
You can change the name of a folder or its description.
Note: If you need to change the location of a folder, delete it and create a new one in the appropriate location.
To edit a folder:
1. Select Users > Tree.
2. Select a folder and click Edit Properties in the Actions tab.
3. In the Folder Details tab, change the name or description, as needed.
4. In the Confirm and Complete tab, verify that the changes are correct and click Update Folder.
Delete folders
You can delete a folder you've created for users and groups.
Note: The Delete action is only active if the folder is empty. Delete all subfolders and directory junctions before you try to
delete a folder.
To delete a folder:
1. Select Users > Tree
2. Select the folder you want to delete and click Delete in the Action bar. This opens the Delete Folder wizard.
3. In the Confirm and Delete tab, verify that the correct folder is selected, enter a comment if required, and click Delete
Folder. If you enter comments, they appear in the Information view Audit History.
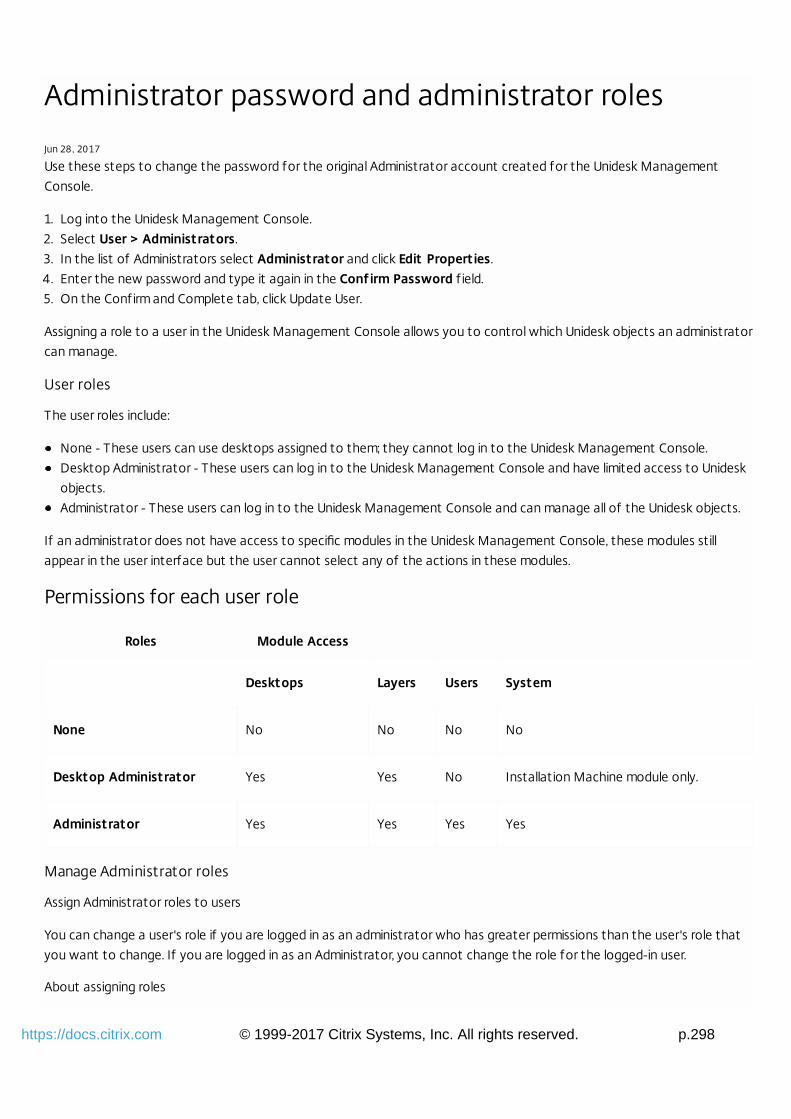
© 1999-2017 Citrix Systems, Inc. All rights reserved. p.298https://docs.citrix.com
Administrator password and administrator roles
Jun 28 , 2017
Use these steps to change the password for the original Administrator account created for the Unidesk Management
Console.
1. Log into the Unidesk Management Console.
2. Select User > Administrators.
3. In the list of Administrators select Administrator and click Edit Properties.
4. Enter the new password and type it again in the Conf irm Password f ield.
5. On the Confirm and Complete tab, click Update User.
Assigning a role to a user in the Unidesk Management Console allows you to control which Unidesk objects an administrator
can manage.
User roles
The user roles include:
None - These users can use desktops assigned to them; they cannot log in to the Unidesk Management Console.
Desktop Administrator - These users can log in to the Unidesk Management Console and have limited access to Unidesk
objects.
Administrator - These users can log in to the Unidesk Management Console and can manage all of the Unidesk objects.
If an administrator does not have access to specific modules in the Unidesk Management Console, these modules still
appear in the user interface but the user cannot select any of the actions in these modules.
Permissions for each user role
Roles Module Access
Desktops Layers Users System
None No No No No
Desktop Administrator Yes Yes No Installation Machine module only.
Administrator Yes Yes Yes Yes
Manage Administrator roles
Assign Administrator roles to users
You can change a user's role if you are logged in as an administrator who has greater permissions than the user's role that
you want to change. If you are logged in as an Administrator, you cannot change the role for the logged-in user.
About assigning roles

© 1999-2017 Citrix Systems, Inc. All rights reserved. p.299https://docs.citrix.com
The roles that you assign to users control whether they can log in to the Unidesk Management Console and manage some
or all of the components in the Unidesk environment.
You can assign roles to users in the following ways:
Create local users.
Edit existing users (local or directory service users).
Assign user roles
1. Select Users > Users.
2. Do either of the following:
1. To create a new user, select Create User. This opens the Create User wizard.
2. To modify an existing user, select a user and select Edit Properties. This opens the Edit wizard.
3. Select one of the following roles from the list:
None — These users can use desktops assigned to them. They have no management permissions and cannot log in
to the Unidesk Management Console.
Desktop Administrator — These users have limited access to management tasks in the Unidesk Management
Console.
Administrator — These users have full access to all management tasks in the Unidesk Management Console.
4. If you selected any role other than None AND the user is a local user, enter a user name and password. User names are
case insensitive; passwords are case sensitive.
If the user is a directory service user, you cannot specify a user name and password. When you assign roles to directory
service users, they use their login credentials from the directory service to log in to the Unidesk Management Console.
5. In the Confirm and Complete tab, verify that the correct users are selected, optionally, enter a comment, and click Create
User. If you enter comments, they appear in the Information view Audit History.
Change Administrator user names and passwords
You can change user names and passwords for local users with Administrative privileges.
To change user names and passwords for directory service users, modify these attributes on the directory server. You
cannot use the Unidesk Management Console to change these attributes.
To change Administrator user names and passwords for local users:
1. Select Users > Users.
2. Locate the local user whose login credentials you want to change
Best Practice: Create a group for users who have a similar function or belong to the same organization. You can search
for the group and then expand it to locate a specific user in that group. If you have a large amount of users, using this
type of search can be faster than searching for an individual user.
3. Select the user name and click Edit Properties in the Action bar. This opens the Edit User wizard.
4. In the General tab, change the user name or password,
5. In the Complete and Confirm tab, verify the changes are correct, and click Update User.

© 1999-2017 Citrix Systems, Inc. All rights reserved. p.300https://docs.citrix.com

© 1999-2017 Citrix Systems, Inc. All rights reserved. p.301https://docs.citrix.com
Search for users assigned to desktops
Jun 28 , 2017
The user assignment search feature is available in the Create Desktops and the Edit Desktop wizards.
Using the Search box
1. To use the search feature, enter a full or partial name in the Search box in either of the following locations:
1. The User Assignment tab in the Create Desktop wizard.
2. The User Reassignment tab in the Edit Desktop wizard.
2. Click to start the search. The tree view displays the objects that match your search criteria. You may need to expand an
item in the search results to find or select the user, group, or folder that you want.
3. To clear the search result and redisplay the default display that you can browse, click next to the Search box to clear it.
Search criteria
The user assignment search feature allows you to search for the name of a user, group, or folder.
You can enter a full or partial name for local objects that you created using the Unidesk Management Console or directory
service objects that are members of a Directory Junction.
Search filter
You can use the search filter to display only specific types of objects in the search results. Using a filter is useful if you have
a large number of users, groups or folders to search. To use the search filter:
1. Enter the search criteria in the main Search box.
2. Click next to the Search box.
3. In the displayed list, select the object type: user, group, or folder.
All items are selected by default.
4. Click to start the search. The wizard displays the objects that match your search criteria AND the selected f ilter.
5. To close the f ilter menu, click next to the Search box.
Search rules
When you search for items, the search results match any of the search criteria that you enter in the Search box. The
following table provides information about the search criteria for user assignment searches.
Rule Example
All searches are case-insensitive,
including words or phrases enclosed in
double quotes (" ").
Searching for Roberts or roberts displays all items that contain either word.
Searching for words or phrasesSearching for "Marketing Europe" displays items that include the words
© 1999-2017 Citrix Systems, Inc. All rights reserved. p.302https://docs.citrix.com
enclosed in double quotes results in an
exact match.
Marketing Europe but not Marketing-Europe.
AND is implied in all searches except
for those enclosed in double quotes.
Searching for Accounting Department, the search looks for words or phrases
that include Accounting AND Department. Therefore, the search results could
include both of the following groups:
Accounting Department Chicago
Accounting Department London
The search results would not include an item named Accounting Management
because its name does not include "Department."
Search uses an implied wildcard at the
beginning and end of the words you
enter in the Search box.
Searching for Smith displays all items that include Smith in their names. For
example, the search result could display entries for Robert Smith, John Smith,
and Mary Smith.

© 1999-2017 Citrix Systems, Inc. All rights reserved. p.303https://docs.citrix.com
Monitor Unidesk virtual appliances
Jun 28 , 2017
Unidesk checks Appliance Status each hour, and updates the Status column on the System > Manage Appliances page.
Every three hours Unidesk also checks to see if any appliance's health has changed, and if so, sends an email to
administrators.
Unidesk appliances run a service to evaluate their own health and report health status. The results indicate whether an
appliance might be in need of attention.
Check appliance status
To see the status of your appliances:
1. Select System > Manage Appliances. The Status column lists the status of each virtual appliance.
2. If the Status is Needs Attention, you can learn more about why the appliance has been f lagged by clicking the next to
the appliance name. Click Needs Attention status for more about what can cause this status.
Appliance status conditions
Here are the possible appliance conditions:
Status Description
Not
provisioned
A virtual appliance does not exist yet, and there may be a configuration issue.
This status can occur for the following reasons:
The f irst time you log in to the Unidesk Management Console, the initial provisioning tasks for the
Master CachePoint Appliance are still in progress.
The task that creates the virtual appliance fails. In that situation, you need to edit the CachePoint
Appliance to f inish provisioning it.
Never
started
A virtual appliance exists but provisioning is not complete and the virtual appliance is not running. This
status indicates that the final provisioning steps are not complete or an operational issue may exist.
This condition can occur during provisioning while the CachePoint Appliance is formatting its cache and
preparing to start for the first time.
Started, no
health
status
The CachePoint Appliance was running for less than three hours, which is not enough time to collect and
report meaningful performance information.
Running Performance for this Appliance is within acceptable operational limits.
Any of the following appliance health factors indicate that the appliance may need attention:
High swap memory usage - If an appliance is using more than 50% of its swap memory, the appliance is
© 1999-2017 Citrix Systems, Inc. All rights reserved. p.304https://docs.citrix.com
Needs
attention
flagged as Needs attention. For help with this issue, contact Unidesk Support.
Low disk space - If an appliance has less than 5% of its disk space free, its Status is listed as Needsattention. For help with this issue, contact Unidesk Support.
Connectivity failure - Unidesk evaluates connectivity between the Management Appliance and your
CachePoints every five minutes, and if there is a failure, changes the Status to Needs attention.
If one CachePoint is having a connectivity issue, reboot the appliance. If all of your CachePoints are
having connectivity issues, reboot the Management Appliance. If the problem persists, contact Unidesk
Support.
Powered
Off
The CachePoint Appliance is powered off or nonfunctional. No other Unidesk components can
communicate with it.

© 1999-2017 Citrix Systems, Inc. All rights reserved. p.305https://docs.citrix.com
Get notified of CachePoint service issues
Jun 28 , 2017
You can receive email messages regarding issues with a CachePoint Appliance. To receive these messages, configure the
Management Appliance to send email messages to the designated addresses whenever there is an issue with a CachePoint
service.
If you configure email notifications in the Unidesk Management Console, the Management Appliance sends email
notifications to the designated addresses when an internal service failure on a CachePoint Appliance causes desktops to
become unusable. When these types of failures occur, the affected CachePoint Appliance initiates a restart of the
affected service. If the service continues to fail, the CachePoint Appliance initiates a complete restart of the virtual
appliance. In most cases, you do not need to take additional actions to correct this problem. Usually, restarting the service
or the affected CachePoint Appliance is sufficient.
The CachePoint Appliance tries to restart the service three times during a 60-minute time frame. If the service continues to
fail, the CachePoint Appliance tries to restart itself. If the restarts do not resolve the issue, you receive an email notification
indicating that an issue still exists.
Messages sent
The CachePoint Appliance sends the following types of email notifications for service failures:
Internal CachePoint Appliance failure — When an internal service failure on one or more CachePoint Appliances occurs,
an email notif ication alerts you to the problem and informs you that a restart of the service or CachePoint Appliance is
going to occur.
Restart completion — After the restart completes, an email notif ication informs you that the restart of the affected
service or CachePoint Appliance completed successfully.
Restart failed — If the service or CachePoint Appliance restarts do not resolve the issue, an email notif ication alerts you
that the issue still exists and human intervention is required to resolve it.
Actions to take
After being notif ied about a restart, monitor the CachePoint Appliances in the Unidesk Management Console and the
virtual infrastructure to verify that the CachePoint Appliances are operational before trying to access the affected
desktops.
If you encounter any problems with one or more desktops after the restart completes, use the Desktops > Restore
action in the Unidesk Management Console to return the desktop to a previous, operational state.
If you want to change the number of times the Management Appliance tries to restart the CachePoint Appliances,
contact Technical Support.
If the service or CachePoint Appliances restarts fail to resolve the issue, contact Technical Support for assistance.

© 1999-2017 Citrix Systems, Inc. All rights reserved. p.306https://docs.citrix.com
Monitor tasks
Jun 28 , 2017
Use the Task bar to monitor active and completed tasks in the Unidesk environment.
Task bar refresh
The status information in the Task bar updates every 10 seconds, automatically. To update the Task bar status manually,
click
Task bar actions
The Task bar allows you to take the following actions:
View the status of completed tasks and tasks requiring user action.
View a list of all active and complete tasks.
View subtasks in a task.
Hide tasks.
Cancel subtasks.
Example
AJ Wright, the Tier 2 Desktop Administrator at Mythical Healthcare Corporation starts the process of creating a new
Application Layer. While this action is in progress, he watches the messages in the Task bar. When the Unidesk Management
Console displays an Action Required message, he knows he can log on to the Installation Machine and install the software
for the Application Layer.
After he finishes this task, he clicks the message in the quick view of the Task bar, which removes the message from the
display. AJ continues to monitor the Task bar so he knows when the Application Layer is deployable.
Status indicators
The Task bar uses the following status indicators.
A task is active or completed successfully; no user action is required.
User action or attention is required.
A task failed or a user canceled a task.
View tasks and subtasks
The following table describes the different ways you use the Task bar to view tasks and subtasks.
To do this: Use this:
Task status bar.
The software displays tasks when they complete or when user action is required in the
© 1999-2017 Citrix Systems, Inc. All rights reserved. p.307https://docs.citrix.com
View the status of
completed tasks or tasks
requiring user action.
status area at the top of the Task bar.
If more than one message is available, use the arrow keys on the right side of the task
bar to scroll through the messages.
Click a message to clear the display. This action removes all messages in the Task
status bar.
View a list of all tasks,
completed and active.
Main task view.
The software displays all tasks in the Main task view.
Expand the Task bar to view a list of tasks.
Use the f ilters to refine the display results.
To view additional details about the subtasks in a task, click .
View a list of subtasks for aspecif ic task.
Subtask view.
Click next to a task in the Main task view to open the Subtask view.
Each entry (or row) in the Information view represents a subtask for the selected task.
Hide active tasks
You can hide tasks for the current session, for example if a large number of tasks are
active, or if there is one that will take a long time. Once you log out and log back in, the
Task bar displays all tasks again.
To hide a task, select Hide next to the task.
To display all hidden tasks, select View Hidden Tasks at the top of the Tasks bar. To
hide these tasks again, clear View Hidden Tasks.
To change a task from hidden to displayed, select View Hidden Tasks to display hidden
tasks and clear the Hide checkbox next to the task.
Cancel tasks
Most tasks include one or more subtasks. While a task is active you can cancel one or more of the subtasks that are still in
progress. The main task remains active until all subtasks are completed or canceled.
For example, you might want to cancel a task if a system problem occurs and the task is unlikely to complete successfully.
1. Open the Task bar and view the active tasks.
2. Open the Subtask view for a task (click .)
3. Select a subtask and click .
4. When the subtask stops, the Task bar changes the status of the subtask to Canceled by user.
© 1999-2017 Citrix Systems, Inc. All rights reserved. p.308https://docs.citrix.com
Open ports in your firewall for Unidesk
Jun 28 , 2017
When setting up the Unidesk environment, you need to open the following ports in your firewall for internal connections,
including those between:
The Unidesk Admin User and the management consoles you'll use.
Each virtual appliance and the various appliances and services with which it needs to communicate.
Admin User
Open the following ports in your firewall for the Unidesk Admin User to use when connecting to the Unidesk and VMware
Studio Management consoles.
Destination Activity Protocol Ports
Any Unidesk Appliance (2.6 or later) VMware Studio Console TCP 5480
Management Appliance Unidesk Management Console TCP 80,443
vSphere server and ESX hosts Upgrades TCP 443
Management Appliance
Internal connections
Open the following ports in your firewall for internal connections between the Unidesk Management Appliance and each
of the destinations listed below.
Destination Activity Protocol Ports
CachePoint Appliance ActiveMQ Service TCP 61616
CachePoint Appliance NFSTCP,UDP
111, 2049, 892,662
NFS TCP 32803
NFS UDP 32769
Management Appliance ActiveMQ Console TCP 8161
AD-DC/LDAP LDAP TCP 389, 636

© 1999-2017 Citrix Systems, Inc. All rights reserved. p.309https://docs.citrix.com
vCenter, ESX HostVIC, Backups,
Unidesk 2.6 Upgrade
TCP 80, 443, 53*
VMware View, XenDesktop ConnectionServer
Unidesk Virtual Desktop Connection BrokerAgent
TCP 390**
Pano Manager Pano Logic Integration TCP 80, 443
Mail Server Notif ications TCP 25**
* If you use a DNS alias in the vCenter field (in the Set Up Infrastructure settings) and DNS is not reachable internally by
default, you must open port 53 between the MA and your DNS servers, and between the CachePoints and your DNS
servers.
** Configurable
External connection
By default, Unidesk uses the following port in your firewall for external connections between the Unidesk appliance and the
destination listed below.
Destination Activity Protocol Ports
api.unidesk.com Logs and Phone Home data uploads from the Unidesk ELM (optional) TCP 443
CachePoint Appliance
Open the following ports in your firewall for internal connections between each CachePoint and the destinations listed
below.
Destination Activity Protocol Ports
Management Appliance ActiveMQ Service TCP 61616
Management Appliance NFS TCP, UDP 111, 2049, 892, 662
NFS TCP 32803
NFS UDP 32769
CachePoint Appliance
ActiveMQ Console TCP 8161
Log Delivery TCP 8888
© 1999-2017 Citrix Systems, Inc. All rights reserved. p.310https://docs.citrix.com
CachePoint Appliance Unidesk Virtual Desktop Connection Broker Agent TCP 390
vCenter, ESX hostVIC, Backups,
Unidesk 2.6 UpgradeTCP 80, 443, 53*
* If you use a DNS alias in the vCenter field (in the Set Up Infrastructure settings) and DNS is not reachable internally by
default, you must open port 53 between the MA and your DNS servers, and between the CachePoints and your DNS
servers.
Gold Image virtual machine
Open the following port in your firewall for internal connections between the Unidesk Gold Image virtual machine and the
Unidesk Management Appliance.
Destination Activity Protocol Ports
Management Appliance Unidesk Tools TCP 80
Desktop
Open the following port in your firewall for internal connections between each Unidesk Desktop and the destination
Management Appliance and CachePoint Appliances.
Destination Activity Protocol Ports
CachePoint Appliance,
Management Applianceuniservice TCP 61616

© 1999-2017 Citrix Systems, Inc. All rights reserved. p.311https://docs.citrix.com
Logging
Jun 28 , 2017
You can configure the number of days to keep log files and audit logs for appliances.
Configure Log file retention
To change the settings for the virtual appliance log files:
1. Select System > Settings and Configuration.
2. In the Logging Settings box, click Edit.
3. Enter the number of days to retain logs on the system.
4. Optionally, enter a comment that describes the changes you made. If you enter comments, they appear in the
Information view Audit History.
5. Click Save to save the new changes or click Cancel to exit Edit mode without saving any changes.
Configure Audit Log retention
You can set the length of time that the system keeps an Audit log. After that time elapses, the software begins to
overwrite the audit log.
1. Select System > Settings and Configuration.
2. In the Auditing Settings box, click Edit.
3. To change the configuration so that comments are required, select the Comments Required check box. If the check box
is cleared, comments in the wizards are optional.
4. Enter the number of days to retain audit logs on the system.
5. Optionally, enter a comment that describes the changes you made. If you enter comments, they appear in the
Information view Audit History.
6. Click Save to save the new changes or click Cancel to exit Edit mode without saving any changes.
© 1999-2017 Citrix Systems, Inc. All rights reserved. p.312https://docs.citrix.com
VMware hosts and datastores
Jun 28 , 2017
To make new VMware hosts and datastores available to the Unidesk environment, you must enable them in the
Management Appliance configuration. Once you enable the hosts and dastatores this way, you can change the
configurations of your CachePoint Appliances so they can use the new hosts or datastores.
Add new hosts and datastores to the Management Appliance configuration
1. Log in to the Unidesk Management Console.
2. Select System and select the Management Appliance.
3. Select Edit Properties.
4. In the Hosts and Storage tab, select the new hosts that you want to use.
5. Expand each host that you selected in the previous step and select the new datastores,
6. Complete the wizard.
Change CachePoint Appliance configurations to use new hosts and datastores
1. In the Unidesk Management Console, select System.
2. Select a CachePoint Appliance and select Edit Properties.
3. In the Hosts and Storage tab, select the new hosts that you want to use.
4. Expand each host that you selected in the previous step and select the new datastores.
5. Complete the wizard.

© 1999-2017 Citrix Systems, Inc. All rights reserved. p.313https://docs.citrix.com
Move (migrate) Appliances and Desktops
Jun 28 , 2017
You can move the Unidesk appliances and Desktops to a new datastore using these steps.
Note: Moving Unidesk CachePoint (CP) from one datastore to another using standard VMware tools is problematic
because the layers created by the CP are non-persistent, independent disks. If these are moved with a storage vMotion
they will be transformed into normal disks attached to the CP and, consequently, all the desktops using the CP will have the
wrong path to the layer files. In addition, these disks will also be converted from Thin to Thick during the move. Instead of
using standard VMware tools, Unidesk recommends using the Unidesk Move Appliance utility as described in the following
procedure.
1. Management Appliance - Migrate the Management Appliance using the vSphere Migrate function (also called Storage
vMotion).
2. Master CachePoint Appliance - Use the Unidesk Appliance Move utility to move the Master CachePoint Appliance to a
new datastore:
Unidesk Appliance Move utility
CAUTION: If you attempt to use Storage vMotion to move a CachePoint, the VM directory that contains all of the
Layers (called UndieskLayers) will be left behind. The UndieskLayers folder must be in the same directory as the
CachePoint Appliance.
3. Secondary CachePoint Appliances and Desktops - Use the Unidesk Appliance Move utility to move a Secondary
CachePoint Appliance and its Desktops to the new datastore.
CAUTION: Desktops cannot be moved using Storage vMotion because Desktops have connections to independent disks
that will not migrate correctly. If you attempt to use Storage vMotion to move a Desktop, VMware will clone all the
Layer disks from the CachePoint to the new Desktop location, breaking the links to the Unidesk Layers.

© 1999-2017 Citrix Systems, Inc. All rights reserved. p.314https://docs.citrix.com
Generate Unidesk reports
Jun 28 , 2017
You can generate and export several reports to help you manage and troubleshoot issues in the Unidesk environment.
Summary of Unidesk reports
Report Contains information about...
Applications The Application Layers that are assigned to users.
CachePoint Status The last reported status for one or more CachePoint Appliances.
Current Desktop Activity The last time desktops restarted.
Desktop Specif ications Configuration information for one or more desktops.
Operating Systems The Operating System Layers that are assigned to users.
Priority Override The layer priority overrides assigned to Application Layers.
Storage Savings Your typical desktop storage needs and your storage needs using Unidesk.
Create and export reports
Create a report
Before you start
The Unidesk Management Console displays the reports in a separate browser window. If you are using a popup blocker,
configure the Web browser to allow popups for the Unidesk Management Console
Generate the report.
1. Select System > Manage Appliances > View Reports from the Action bar.
Result: This action opens the Reporting Selection page in a new browser window.
2. In the left pane, select the report that you want to generate.
3. In the right pane, optionally select f ilters to refine the report contents. To use all f ilters, select Select All.
4. Click Generate Report to display the selected report.
Export reports
After you generate a report, you can export it to a Comma Separated Values (CSV) file or you can print it.
In the top of the report display window:
© 1999-2017 Citrix Systems, Inc. All rights reserved. p.315https://docs.citrix.com
Click to export the report to a f ile.
Click to send the report to a printer.
Unidesk report details
Applications report
Use this report to determine which Application Layer versions are assigned to users. This report is useful when you are
planning upgrades or when resolving end-user issues.
Report filter use
Use the report filters to refine the contents of the report. Selecting filters is optional. If you do not select a filter, the report
contains details about the Application Layer assignments for all users.
Creating the report
1. Select System > View Reports.
2. In the left pane, select Applications.
3. In the right pane, select some or all of the following report f ilters:
1. Select Select All to use all of the report f ilters.
2. In the Applications box, select one or more Application Layers.
3. To select a specif ic layer version, expand an Application Layer name and select one or more versions. If you do not
select a version, the report includes details for all of the versions.
4. To display only the desktops that have new configurations that are not yet deployed, select Include Desktops with
Outdated Configurations Only. These desktops require a restart to receive the new configurations.
5. To clear f ilter selections, place the cursor on a f ilter box or check box and click .
4. Click Generate Report.
Information in this report
The following table describes the information that this report provides:
Detail Description
Application Layer The name of the Application Layer.
Version The version of the Application Layer.
User The names of the desktop owners that have this layer assigned to them.
Desktop The name of the desktop associated with the user.
CachePoint Disk Usage report
Use this report to view details about:
The disk space that each desktop is using for its User Layer.
The disk space that each copy of a layer uses on specif ic CachePoint Appliances.

© 1999-2017 Citrix Systems, Inc. All rights reserved. p.316https://docs.citrix.com
Report filter use
Use the report filters to refine the contents of the report. Selecting filters is optional. If you do not select a filter, the report
contains details about the Application Layer assignments for all users.
Creating the report
1. Select System > View Reports.
2. In the left pane, select Applications.
3. In the right pane, do the following to select report f ilters:
1. In the Applications box, select one or more Application Layers.
2. To select a specif ic layer version, expand an Application Layer name and select one or more versions. If you do not
select a version, the report includes details for all of the versions.
3. To display only the desktops that have new configurations that are not yet deployed, select Include Desktops with
Outdated BOMs Only. These desktops require a restart to receive the new configurations.
4. Click Generate Report.
Information in this report
The following table describes the information that this report provides:
Detail Description
Application Layer The name of the Application Layer.
Version The version of the Application Layer.
User The names of the desktop owners that have this layer assigned to them.
Desktop The name of the desktop associated with the user.
CachePoint Status report
Use this report to obtain details about the configuration, state, and resource usage for one or more CachePoint Appliances.
This report is useful for planning upgrades for software and storage.
Report filter use
Use the report filters to refine the contents of the report. Selecting filters is optional. If you do not select a filter, the report
contains details about all of the CachePoint Appliances in the Unidesk environment.
Creating the report
1. Select System > Manage Appliances > View Reports.
2. In the left pane, select CachePoint Status.
3. In the right pane, select some or all of the report f ilters:
1. Select Select All to use all of the report f ilters.
2. In the CachePoint box, select one or more CachePoint Appliances.
3. To clear f ilter selections, place the cursor on a f ilter box or check box and click .

© 1999-2017 Citrix Systems, Inc. All rights reserved. p.317https://docs.citrix.com
4. Click Generate Report.
Information in this report
The following table describes the information that this report provides.
Detail Description
CachePoint The name of a CachePoint Appliance
Software Version The version of the software installed on a specific CachePoint Appliance.
Rollup StatusThe status of a specif ic CachePoint Appliance the last time it reported its status to theManagement Appliance.
Host The path in the virtual infrastructure for the CachePoint Appliance.
Boot ImageStorage
The datastore that the CachePoint uses for boot images.
Layers Storage The datastore that the CachePoint uses for layer storage.
Archive Storage The datastore that the CachePoint uses for desktop archives.
Current desktops activity report
Use this report to retrieve details about whether desktops restarted during a specific period of time. This report is useful in
determining whether desktops restarted after you changed their configurations.
Report filter use
Use the report filters to refine the contents of the report. Selecting filters is optional. If you do not select a filter, the report
contains details about all desktops in the specified time frame.
Creating the report
1. Select System > Manage Appliances > View Reports.
2. In the left pane, select Current desktop activity.
3. In the right pane, select some or all of the following report f ilters:
1. Select Select All to use all of the report f ilters.
2. In the Desktop box, select one or more desktops.
3. In the CachePoint box, select one or more CachePoint® Appliances.
4. In the Last Restart T ime boxes, select a start and end time to define the timeframe to use for the report.
5. To exclude the selected desktops from the report, select Exclude Desktops In Range. The report contains details
about all desktops except the selected ones.
6. To clear f ilter selections, place the cursor on a f ilter box or check box and click .
4. Click Generate Report.
Information in this report
© 1999-2017 Citrix Systems, Inc. All rights reserved. p.318https://docs.citrix.com
The following table describes the information that this report provides.
Detail Description
Desktop The name of the desktop.
CachePoint The name of the CachePoint Appliance that is hosting the desktop.
Detailed Running State The current state of the desktop.
Last Restart T ime The date and time when the desktop last restarted .
Desktop Specification report
Use this report to view the following types of information for one or more desktops in the Unidesk environment:
Desktop configuration information.
Statistics for the User Layer.
Report filter use
Use the report filters to refine the contents of the report. Selecting filters is optional. If you do not select a filter, the report
contains details about the desktops on all of the CachePoint Appliances.
Creating the report
1. Select System > View Reports.
2. In the left pane, select Desktop Specif ication.
3. In the right pane, select some or all of the following report f ilters:
1. Select Select All to use all of the report f ilters.
2. In the Desktop box, select one or more desktops.
3. In the CachePoint box, select one or more CachePoint Appliances.
4. To clear f ilter selections, place the cursor on a f ilter box or check box and click .
4. Click Generate Report.
Information in this report
The following table describes the information that this report provides.
Detail Description
Desktop Name The name of the desktop as displayed in the Unidesk Management Console.
UserThe name of the user assigned to the desktop. If the desktop is not assigned to a user, this f ielddisplays the default ID of Install.
Description The description associated with the desktop, if one exists.
© 1999-2017 Citrix Systems, Inc. All rights reserved. p.319https://docs.citrix.com
Last Restart The most recent date and time when the desktop restarted.
CachePoint The name of the CachePoint Appliance that is hosting the desktop.
Host The name of the host where the layers for the desktop are stored.
OperatingSystem
The operating system that the desktop uses.
OS Layer The name and version of the Operating System Layer assigned to the desktop.
CPU Sockets The number of virtual processor sockets (vCPUs) allocated to the Desktop.
Cores per Socket The number of cores per socket.
Memory (MB) The amount of memory (in megabytes) allocated to the desktop.
Boot Disk (MB) The current size (in megabytes) of the boot disk assigned to the desktop.
User Data (MB)
The current size (in megabytes) of the User Layer.
A value of N/A indicates that Unidesk has not yet gathered this information or a User layer does not
exist for the desktop.
User DataMaximum (MB)
The maximum allowed size (in megabytes) for the User Layer. This value is twice the originallyconfigured size of the User Layer for the desktop.
Archive Size (MB)
The total size (in megabytes) of all of the archive backups for the User Layer.
A value of N/A indicates that Unidesk has not yet gathered this information or no archive backups
exist for the desktop.
Last UpdateThe time indicating when the Management Appliance last received information for the desktop.
Typically, the Management Appliance receives this information at three hour intervals.
Operating Systems report
Use this report to determine which Operating System Layer versions are assigned to users. This report is useful when you
are planning upgrades or when resolving end-user issues.
Report filter use
Use the report filters to refine the contents of the report. Selecting filters is optional. If you do not select a filter, the report
contains details about the Operating System Layer assignments for all users.

© 1999-2017 Citrix Systems, Inc. All rights reserved. p.320https://docs.citrix.com
Creating the report
1. Select System > Manage Appliances > View Reports.
2. In the left pane, select Operating Systems.
3. In the right pane, select some or all of the following report f ilters:
1. Select Select All to use all of the report f ilters.
2. In the Operating System box, select one or more Operating System Layers.
3. To select a specif ic layer version, expand an Operating System Layer name and select one or more versions. If you do
not select a version, the report includes details for all of the versions.
4. To display only the desktops that have new configurations that are not yet deployed, select Include Desktops with
Outdated Configurations Only. These desktops require a restart to receive the new configurations.
5. To clear f ilter selections, place the cursor on a f ilter box or check box and click .
4. Click Generate Report.
Information in this report
The following table describes the information that this report provides.
Detail Description
OperatingSystemLayer
The name of the Operating System Layer.
Version The revision of the Operating System Layer currently assigned to the desktop.
ConfiguredVersion
The currently configured revision of the assigned Operating System Layer. If the Configured Version andVersion are different, the desktop receives the configured version the next time that the desktop is rebuiltfor deployment.
Users The names of the desktop owners that have this Operating System Layer assigned to them.
Desktop The name of the desktop associated with the user.
Priority Override report
Use this report to view the all of the priority overrides assigned to the Application Layers. This report is useful when trying
to resolve end-user issues with applications that are not working properly.
Creating the report
1. Select System > View Reports.
2. In the left pane, select Priority Override.
3. In the right pane, click Generate Report.
Information in this report
The following table describes the information that this report provides.
Detail Description
© 1999-2017 Citrix Systems, Inc. All rights reserved. p.321https://docs.citrix.com
High Priority Layer The Application Layer that the software applies to desktops before it applies the low priority layer.
Low Priority Layer The Application Layer that the software applies to desktops after it applies the high priority layer.
Storage Savings report
Use this report to view a comparison of the amount of storage your desktops typically use and how using the Unidesk
software reduces your use of storage.
Use the Web browser's print function to print this report, as you cannot export or print it from the Unidesk Management
Console.
Unidesk refreshes its layer size data every three hours, starting from the time that you last restarted the Management
Appliance. Any changes to desktops, Application Layers, and Operating System Layers that took place following the last
refresh are not reflected in the report.
Creating the report
To view this report, select Desktops > Storage Report.
Information in this report
The following table describes the information that this report provides.
Detail Description
StorageAllocation
This section compares the total amount of storage you would use for the current number of hostedvirtual desktops (HVDs) and the amount you actually use after implementing the Unidesk solution. Thetop of this section shows the total amount of storage that you save by using this solution.
CurrentDesktops
The number of desktops currently deployed.
CachePoints The number of CachePoint Appliances currently deployed.
Storage
Usage
Before
Unidesk
(HVDs)
This section provides a detailed view of the estimated storage required for desktops before you
implement the Unidesk solution. It provides details for the following categories:
Required Storage: This column lists the layers that require storage.
Range (GB): This column shows the range of storage required for all of the currently deployed
desktops.
Average Storage: This column shows the average storage required per desktop (based on the number
of currently deployed desktops).
Total Storage required: This column shows the total storage required for all desktops.
This section provides a detailed view of the storage required for desktops after implementing the
Unidesk solution. It provides details for the following categories:

© 1999-2017 Citrix Systems, Inc. All rights reserved. p.322https://docs.citrix.com
Storage
Usage With
Unidesk
(HVDs)
Assigned Layers and User Space: This column lists every Operating System Layer, Application Layer, and
User Layer that is currently deployed.
Storage (GB): This column lists the storage used for each layer. User Layers vary in size, therefore the
report shows a range for this item.
Copies stored: This column lists the number of copies that the system stores for each layer. Each
desktop usually has a User layer, therefore the report shows the total number of User layers that the
CachePoint Appliances are storing.
Total storage required: This column lists the total storage required for each layer, based on the
number of copies that exist.
© 1999-2017 Citrix Systems, Inc. All rights reserved. p.323https://docs.citrix.com
Delete Unidesk components
Jun 28 , 2017
You can delete Unidesk Desktops, templates, Layers, Layer Versions, and CachePoint Appliances.
Delete Desktops
When you delete a desktop layer, the software deletes all versions, backups, and resources associated with the desktop
from the CachePoint® Appliance and the Management Appliance. If the desktop is part of a broker pool or group, the
desktop will be deleted from the pool or group. If one or more of the selected desktops is in a running state, the software
shuts down the desktop first and then deletes it.
To delete Desktops
1. Select Desktops and select one or more Desktops.
2. Select Delete from the Action bar. The Delete Desktops wizard opens.
3. In the Confirm and Complete tab, verify that the displayed list of desktops are the ones you want to delete, enter a
comment, if required, and click Delete Desktops. If you enter comments, they appear in the Information view Audit
History.
4. When prompted to confirm that you want to delete the desktop, click OK to continue or click Cancel to return to the
wizard without deleting the desktops.
Delete Desktop templates
You can delete a single version of a template or the entire template.
Before you delete a template
You can delete any template version, as long as it is not being used by a desktop that is deployed.
To delete a template or template version
1. Select Layers >Templates and select one or more templates to delete.
2. Select Delete in the Action bar. This opens the Delete Template wizard.
3. In the Version Selection tab, select the version you want to delete or select the Delete Template check box to delete
the entire template.
4. In the Confirm and Complete tab, verify that the correct version is selected for deletion, enter a comment if required, and
click Delete Versions.If you enter comments, they appear in the Information view Audit History.
Delete Layers and Layer versions
You can delete Operating System Layers or Layer versions and Application Layers or Layer versions, as long as the Layer or
version is not being used by another Unidesk Layer, Desktop, or Template. Deleting an Operating System Layer removes all
backups, versions, volumes, and resources from the CachePoint Appliance where it is stored.
Before you can delete a Layer or Layer Version

© 1999-2017 Citrix Systems, Inc. All rights reserved. p.324https://docs.citrix.com
You can delete an entire layer or a layer version if it is:
Not deployed to a desktop.
Not used by a template.
Not the required Operating System Layer (or Layer Version) for any compatible Application Layers.
Not a prerequisite for another Layer that is deployed to a desktop.
If there are more than two versions of a Layer, you can delete the f irst or last version only.
OS and Application layer Compatibility
An Application Layer can only be deployed to Desktops that have a compatible Operating System Layer. And the only
compatible Operating System Layer is the one where the Application Layer was created, or one of this Operating System
Layer's Versions. This compatibility restriction prevents you from inadvertently deploying Application Layers that are
incompatible with a Desktop's Operating System.
Note: Layer compatibility is between Application Layers and Operating System Layers, not Installation Machines. If you
have multiple Installation Machines running the same Operating System Layer, the Application Layers created on those
Installation Machines are all compatible with that Operating System Layer.
Check to see if the Layer is in use
To determine whether a Layer (or Layer version) is deployed to a desktop, in use by a or a template:
1. Click the to open the Information view for the Layer.
2. Find out whether the Layer is used in any templates by checking Template Assignment in the Layer Information section.
3. Find out whether the Layer is deployed to any desktops, by expanding the entry in the Version Information section and
look at Assigned Desktops.
4. Find out whether there are compatible Application Layers that would be left without an operating system.
Delete a Layer or Layer Version
1. In the Unidesk Management Appliance, select Layers.
2. Select one or more Application or Operating System Layers to delete.
3. Select Delete in the Action bar. This opens the Delete Version Layer wizard.
4. In the Version Selection tab, select the Version you want to delete, or select the Delete Layer check box to delete the
entire Layer.
5. In the Confirm and Complete tab, verify that the correct Version (or Layer) is selected for deletion, enter a comment if
needed, and click Delete Versions.If you enter comments, they appear in the Information view Audit History.
Delete CachePoint Appliances
You can use the Unidesk Management Console to delete a Secondary CachePoint Appliances, but not the Master
CachePoint Appliance. Deleting a CachePoint Appliance removes all of the data (including the user's personalized data) and
the virtual appliance from the virtual infrastructure. Once you delete a CachePoint Appliance, you cannot recover the
personalized data in the User Layer.
Before you delete a CachePoint Appliance
Before you can delete a CachePoint Appliance, you must delete any Desktops on the CachePoint.
To delete a CachePoint Appliance
© 1999-2017 Citrix Systems, Inc. All rights reserved. p.325https://docs.citrix.com
1. Select System > Manage Appliances.
2. Select a CachePoint Appliance and select Delete in the Action bar. This opens the Delete CachePoint wizard.
3. In the Confirm and Complete tab, verify that the correct CachePoint Appliance is selected, enter a comment if required,
and click Delete CachePoint.If you enter comments, they appear in the Information view Audit History.
© 1999-2017 Citrix Systems, Inc. All rights reserved. p.326https://docs.citrix.com
Troubleshoot
Jun 28 , 2017
Troubleshoot
Export log f iles
Layers
Error messages

© 1999-2017 Citrix Systems, Inc. All rights reserved. p.327https://docs.citrix.com
Export log files
Jun 28 , 2017
You can export logs for your Unidesk appliances, and send them to the Unidesk Support team via HTTPS or to yourself and
others by email. You can also export logs for an individual Desktop or Installation Machine.
This topic explains what log files are available for export, and which log files are useful for what kinds of issues. It then
explains how to export each of the logs.
About exporting Unidesk logs
Unidesk log files are text files that contain useful information for the Unidesk Support Team when helping you to resolve an
issue. The log files contain details about the operation of each Unidesk virtual machine (VM) and its communication with
other VMs in the Unidesk environment. The exported logs are stripped of any passwords and encryption keys, so none of
your credentials can be compromised.
What virtual machine files are exported?
Each export includes the logs for the selected VM, along with the MA logs. The Database Crash Dump file export is
optional. When you export logs, the Unidesk software creates a gzipped tar file (.tgz) containing the log files for the
selected VM. A task with the URL for each tar file appears in the Task bar.
Virtual Machine Exported f iles
Management Appliance (MA)
The gzipped tar file (.tgz) with:
MA logs
Crash Dump files (optional)
CachePoint Appliance
The gzipped tar file (.tgz) with:
CachePoint logs
Crash Dump files (optional)
MA logs
Desktop
The gzipped tar file (.tgz) with:
Desktop logs
Crash Dump files (optional)
MA logs
Installation Machine (IM)
The gzipped tar file (.tgz) with:
IM logs
Crash Dump files (optional)
MA logs and database dump

© 1999-2017 Citrix Systems, Inc. All rights reserved. p.328https://docs.citrix.com
To view the log files, download them and extract them using a file compression utility such as the WinZip® product.
What logs should I export for which issues?
The MA logs are included in the export for any CachePoint(s), Desktop, or Installation Machine, because no matter what
problem you're having, you'll need them. When you export logs, you can choose to send them to Unidesk Support and/or to
an email recipient.
For issues with... Export logs for the...
One Desktop Desktop
Multiple Desktops CachePoint Appliance(s) for the problem Desktops only
Building a Layer Installation Machine (IM)
Management Applianceor database Management Appliance (MA)
Before you start
Before you can... You must...
Send logs to UnideskSupport
Have an open Support Case. Create a Support Case explaining the issue you're seeing.
Send email noticesSpecify your email server in the System > Settings and Configuration > Notif icationsSettings box.
Export logsMake sure the Log File Retention Settings are configured to keep the logs you need for the
length of time you need.
Export and send CachePoint Appliance and Management Appliance logs
When you have a problem with more than one Desktop, you'll need the logs from the CachePoint(s) that they're on. If you
have several CachePoints, don't export them all, as they are large and only the ones with the problem Desktops will be
helpful. The MA logs that you need will automatically be exported with the CachePoint logs.
When configuring an export, you can choose to send a copy of the logs to Unidesk Support via HTTPS, or to yourself or
others who need access to the logs via email.
1. In the Unidesk Management Console, select System > Manage Appliances and click Export Logs. The Export Logs
Wizard opens to the Send Options tab.
2. If you want to send the logs to Unidesk via HTTPS and you have a Unidesk Support Case open, click Send to UnideskSupport , choose the support case, and type a description in the Contents field.
© 1999-2017 Citrix Systems, Inc. All rights reserved. p.329https://docs.citrix.com
Note: This option is only available if you have an open Support Case. You can open one and come back to this screen to
select the option.
3. If you want to send the files to yourself or others who need access to the logs, select the Email check box and type the
addresses in the Recipients field. (Use a comma (,) or semi-colon (;) between addresses.)
Note: This field is only active if you've configured an email Notification.
4. In the Log Selection tab, the MA is selected by default. Select only the CachePoint(s) that have problem Desktops, and if
you need to include the Crash Dumpfiles, select the check box to include those.
Shortcut: If you need to select all or most of the appliances in the list, select the first one and press CTRL-A, then
deselect the ones you don't need. However, we recommend selecting only the relevant CachePoints.
5. In the Confirm and Complete tab, click Export Logs to start the export process. The software locates the log files on
each of the selected appliances and exports them to a gzipped archive file (*.tgz) on the appliance.
Export Desktop logs
If you are having an issue with a Desktop, you can export the log files from it. If you are having the same issue with more
than one Desktop, you can save time by exporting the logs for the CachePoint(s) involved instead.
1. Select Desktops and the Desktop whose log files you want to export.
2. Select Restart/Shut Down and the Shut down option. If the Desktop is integrated with a connection broker, also
select the Put in Maintenance Mode check box.
Putting the Desktop in Maintenance Mode ensures that the desktop remains in a shut down state while Unidesk is
exporting the logs. If the connection broker restarts the Desktop, the export task does not complete.
3. Select the desktop and select Edit Desktops in the Action bar. This opens the Edit Desktop wizard.
4. In the Diagnostic Selection tab, select Export Desktop Logs. The options for sending the logs are displayed.
5. If you want to send the logs to Unidesk via HTTPS and you have a Unidesk Support Case open, click Send to UnideskSupport , choose the support case, and type a description in the Contents field.
Note: This option is only available if you have an open Support Case. You can open one and come back to this screen to
select the option.
6. If you want to send the files to yourself or others who need access to the logs, select the Email check box and type the
addresses in the Recipients field. (Use a comma (,) or semi-colon (;) between addresses.)
Note: This field is only active if you've configured an email Notification.
7. In the Confirm and Complete tab, click Update Desktop. The software locates the log files from the desktop and
the Management Appliance and exports them to a gzipped archive file (*.tgz).
Export Installation Machine (IM) logs
If you are having issues creating a Layer, export the logs from the IM you're using.
Before you start: You must be using the IM to create a Layer, and the IM must be in a Stopped state.

© 1999-2017 Citrix Systems, Inc. All rights reserved. p.330https://docs.citrix.com
1. In the System > Installation Machines module, verify that the IM is Stopped (not in a running state).
2. Select the IM and click Edit Properties.
3. In the Diagnostic Selection tab, select Export Desktop Logs. The options for sending the logs are displayed.
4. If you want to send the logs to Unidesk via HTTPS and you have a Unidesk Support Case open, click Send to UnideskSupport , choose the support case, and type a description in the Contents field.
Note: This option is only available if you have an open Support Case. You can open one and come back to this screen to
select the option.
5. If you want to send the files to yourself or others who need access to the logs, select the Email check box and type the
addresses in the Recipients field. (Use a comma (,) or semi-colon (;) between addresses.)
Note: This field is only active if you've configured an email Notification.
6. In the Confirm and Complete tab, enter a comment, if necessary, and click Update Installation Machine. The software
locates the log files from the Installation Machine and the Management Appliance and exports them to a gzipped
archive file (*.tgz).

© 1999-2017 Citrix Systems, Inc. All rights reserved. p.331https://docs.citrix.com
Layers
Jun 28 , 2017
How layering works
When a user opens a file on their Unidesk Desktop, the Unidesk software directs Microsoft Windows to open the file from
the Layer with the highest priority. The User Layer, which contains files created or modified on the Desktop, is always
highest priority, so Windows will be directed to the User Layer as the source for those files. If the file isn't found in the User
Layer, the Unidesk software looks for it in the Application Layers. If Windows finds the file in an more than one Application
Layer or Layer Version, it uses the file in the most recently created Application Layer Version. Finally, if neither the User Layer
nor anApplication Layer has the file, Unidesk uses the version of the file that’s in the Operating System Layer, the Layer with
the lowest priority.
Note: By default, Application Layer priority is determined by the Layer/Version creation date or modification date. There are
ways override the default priority, as explained later in this article. However, in most cases, this prioritization works well.
Imagine a scenario where the user has installed an application on their desktop. Because the application is user-installed, it
is stored in the person's User Layer. The application has an old version of foo.dll. If an IT-delivered application (in
an Application Layer) needs a later version of that same dll (foo.dll), the IT-delivered application will not work correctly on
that user’s Desktop. That's because Windows finds the User Layer version of the file and uses that one instead of the
newer version in the Application Layer. The good news is that you can fix an issue like this, as Unidesk gives you a few ways
to control where a file will be delivered from.
What if one or more applications do not work correctly on a new desktop?
Administrators often create all of the Application Layers and just start deploying new desktops with all of the layers. This
can work fine but if it doesn’t, step back and take an incremental approach to isolate the issue.
Can you create a desktop with just the Operating System Layer and the failing Application Layer? If that doesn’t work
then you have an issue with that particular application. Check the Application Layer Recipes page for details on specif ic
applications. Iif you don’t see your application in the recipes, open a support case.
If you have a clear conflict between 2 layers you have several choices for resolving that conflict. You can:
Combine the conflicting applications in a single Layer, often the simplest solution.
Create one of the Layers using the conflicting Layer as a prerequisite Layer. This is best in case where you need to
deploy and update the applications separately. When you specify a prerequisite layer, the Installation Machine will be
created with both the specif ied OS and the prerequisite Layer installed. You will need to remember to always include
that prerequisite Layer when you update your application.
If you know which file is causing the conflict and which application should deliver that file, use layer priorities to ensure
that the file will always come from the correct layer. For details, use the following steps to Manage Layer priorities:
Manage Application Layer priorities
To manage the order in which the Unidesk software applies applications to a desktop, use the steps below. This lets
you to override the default priorities of the Application Layers or Layer Versions. Unidesk uses the creation date of a
Layer or Version to determine its priority.
You can change the priority for a selected Application Layer or for all Versions of the Layer.

© 1999-2017 Citrix Systems, Inc. All rights reserved. p.332https://docs.citrix.com
Change priorities for a selected Layer Version
1. Select Layers and select an Application Layer.
2. Select Change Layer Priority in the Action bar. This opens the Change Priority wizard.
3. In the Version Selection tab, complete the following steps:
1. Select the version of the currently selected Application Layer that you want to deploy on one or more desktops.
2. Select an Application Layer to compare with the currently selected Layer.
3. Select the version of the Application Layer whose priority could cause a conflict with the currently selected layer
4. In the Priority Order tab, click Switch to change the default priority for the displayed application versions. The
greater-than sign (>) indicates that the current Application Layerhas a higher priority than the selected Application
Layer, and vice versa.
If the software determines that the change results in conflicts with the priority rules for other layers, it displays a
warning message.
If no conflicts exist, go to step 6 in this procedure.
If conflicts exist, select the Conflict Resolution tab and go to the next step.
5. In the Conflict Resolution tab, complete the following steps:
1. Expand each entry in the displayed list to view the conflicts.
2. Click Delete next to one or more entries in the list. This action changes the priority order for the selected item.
3. Click Retry. If no other conflicts exist, go to the next step in this procedure. Otherwise, repeat these steps until
all no conflicts exist.
6. In the Confirm and Complete tab, verify the priority settings are correct, enter a comment if required, and click Set
Priority. If you enter comments, they appear in the Information view Audit History.
Change priorities for all layer versions
1. Select Layers and select an Application Layer.
2. Select Change Layer Priority in the Action bar.
Result: This action opens the Change Priority wizard.
3. In the Version Selection tab, complete the following steps:
1. Select Override All Versions.
2. Select the Application Layer whose priority could cause a conflict with the previously selected layer.
4. In the Priority Order tab, select Set Highest Priority for the Application Layer that should have the highest priority.
Result: This action specifies that all of the versions of the selected layer should override the priority of all of the
versions of the other Application Layer.
If the software determines that the change results in conflicts with the priority rules for other layers, it displays a
warning message. For example: Application A has a higher priority than Application B. Application B has a higher
priority than Application C. If you set the priority of Application C to be higher than Application A, the software will
indicate that a conflict exists with the priority setting for Application C.
If no conflicts exist, go to step 6 in this procedure.
If conflicts exist, select the Conflict Resolution tab and go to the next step.
© 1999-2017 Citrix Systems, Inc. All rights reserved. p.333https://docs.citrix.com
5. In the Conflict Resolution tab, complete the following steps:
1. Expand each entry in the displayed list to view the conflicts.
2. Click Delete next to one or more entries in the list. This action changes the priority order for the selected item.
3. Click Retry. If no other conflicts exist, go to the next step in this procedure. Otherwise, repeat these steps until
all no conflicts exist.
6. In the Confirm and Complete tab, verify the priority settings are correct, enter a comment if required, and
click Change Priority.
What if an application is not working correctly on an existing desktop?
If the application used to work on the desktop and now it isn’t the solution is often a simple reinstall. Editing the desktop
and selecting the reinstall checkbox for the failing application simply removes any files from the user layer that are part of
the application layer.
What if I deploy a new version of an application to a desktop and it does not work correctly?
Try a reinstall of the application; edit the desktop and check the reinstall flag on the application that is not working. If that
works this was due to some change on the user desktop that is incompatible with the new application version. Ask the user
to check that all of their self installed applications are working.
If reinstall did not work, the issue is probably not specific to that user’s desktop. (Keep in mind that you can roll the desktop
back to an earlier version of the application to keep the user productive while you do furt. Try deploying the new version of
the application to a newly created desktop. If it works in the newly created desktop then you know there is some conflict
with another application layer that was deployed on the user’s desktop or possibly with something that the user has
installed themselves.
What if when creating a new layer version the install machine says that Windows needs to be activated?
If this is not impacting your layer update, just ignore it! Microsoft is detecting a change in the activation information of the
OS layer and of the application layer that you are updating. This will not have any impact when the application is deployed
to a desktop because the activation information is in the user layer on the desktop. If you do require activation to
complete your new layer version (possible if you are installing MSFT patches) then go ahead and activate in the install
machine.
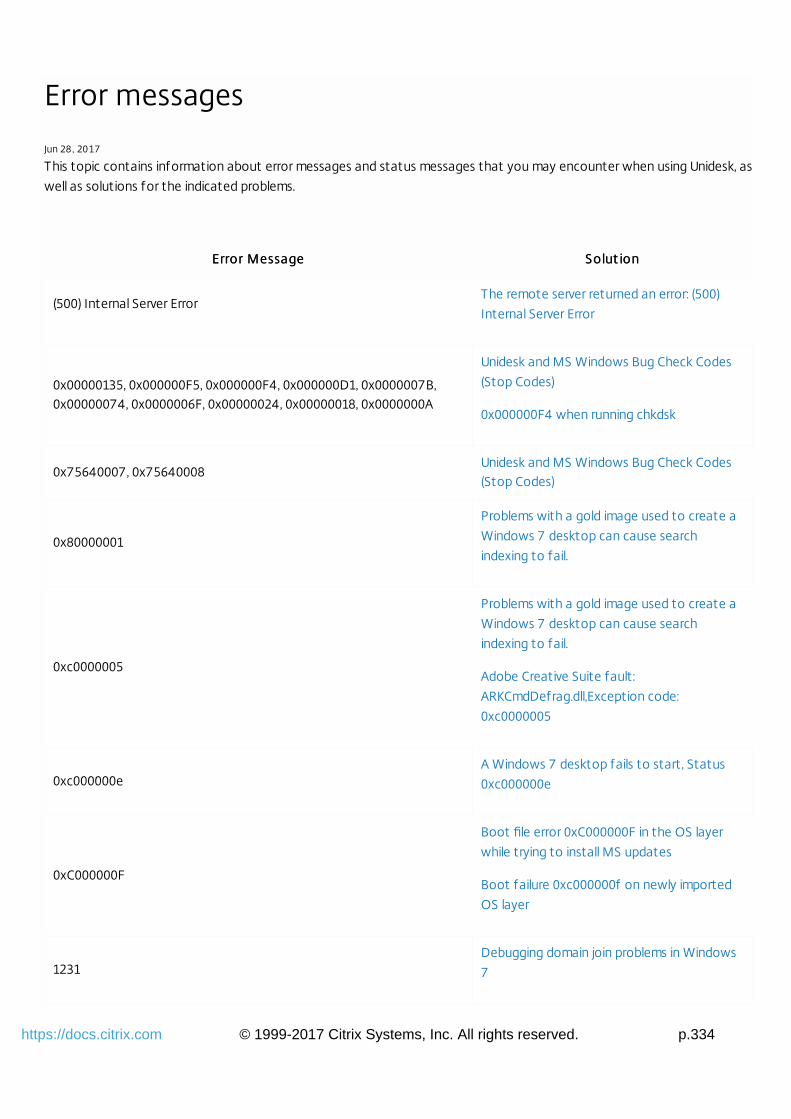
© 1999-2017 Citrix Systems, Inc. All rights reserved. p.334https://docs.citrix.com
Error messages
Jun 28 , 2017
This topic contains information about error messages and status messages that you may encounter when using Unidesk, as
well as solutions for the indicated problems.
Error MessageError Message Solut ionSolut ion
(500) Internal Server ErrorThe remote server returned an error: (500)
Internal Server Error
0x00000135, 0x000000F5, 0x000000F4, 0x000000D1, 0x0000007B,0x00000074, 0x0000006F, 0x00000024, 0x00000018, 0x0000000A
Unidesk and MS Windows Bug Check Codes
(Stop Codes)
0x000000F4 when running chkdsk
0x75640007, 0x75640008Unidesk and MS Windows Bug Check Codes(Stop Codes)
0x80000001
Problems with a gold image used to create a
Windows 7 desktop can cause search
indexing to fail.
0xc0000005
Problems with a gold image used to create a
Windows 7 desktop can cause search
indexing to fail.
Adobe Creative Suite fault:
ARKCmdDefrag.dll,Exception code:
0xc0000005
0xc000000eA Windows 7 desktop fails to start, Status
0xc000000e
0xC000000F
Boot file error 0xC000000F in the OS layer
while trying to install MS updates
Boot failure 0xc000000f on newly imported
OS layer
1231Debugging domain join problems in Windows
7

© 1999-2017 Citrix Systems, Inc. All rights reserved. p.335https://docs.citrix.com
1326
Debugging domain join problems in Windows
XP
Debugging domain join problems in Windows
7
1721, 1722Cannot select Create OS Layer action,cannot select gold image, or installer error1721/1722
1909
Debugging domain join problems in Windows
XP
Debugging domain join problems in Windows
7
4003Debugging domain join problems in Windows
7
8007000e, 80070BC9, 80071a91, or 80079c59
Microsoft updates fail: 80071a91, 80070BC9,
80079c59, 8007000e, or prompt for restart
forever
A configuration error exists
Desktop task fails: 'Couldn't find the current
boot disk in the list of disk' or 'A configuration
error exists'
a function was called with an invalid paramater.Desktop boot fails: The CachePoint
Appliance could not create the boot image
A general system error occurred: Unrecognized handle propertyidentif ier
"Error: Could not integrate the desktop with
the specified connection broker at this time.
A Unidesk command failed to execute."
A service on the CachePoint Appliance returned an unexpected error;check the CachePoint log f iles for more details.
Corruption in the User Layer causing desktop
rebuilds to fail
Address already in use
Installation fails: "Invalid URI: A port was
expected because of there is a colon(':')
present but the port could not be parsed"
agent unreachable
Desktop backup fails: "The hypervisor could
not create a new virtual machine. Unable to
locate ServiceHost"
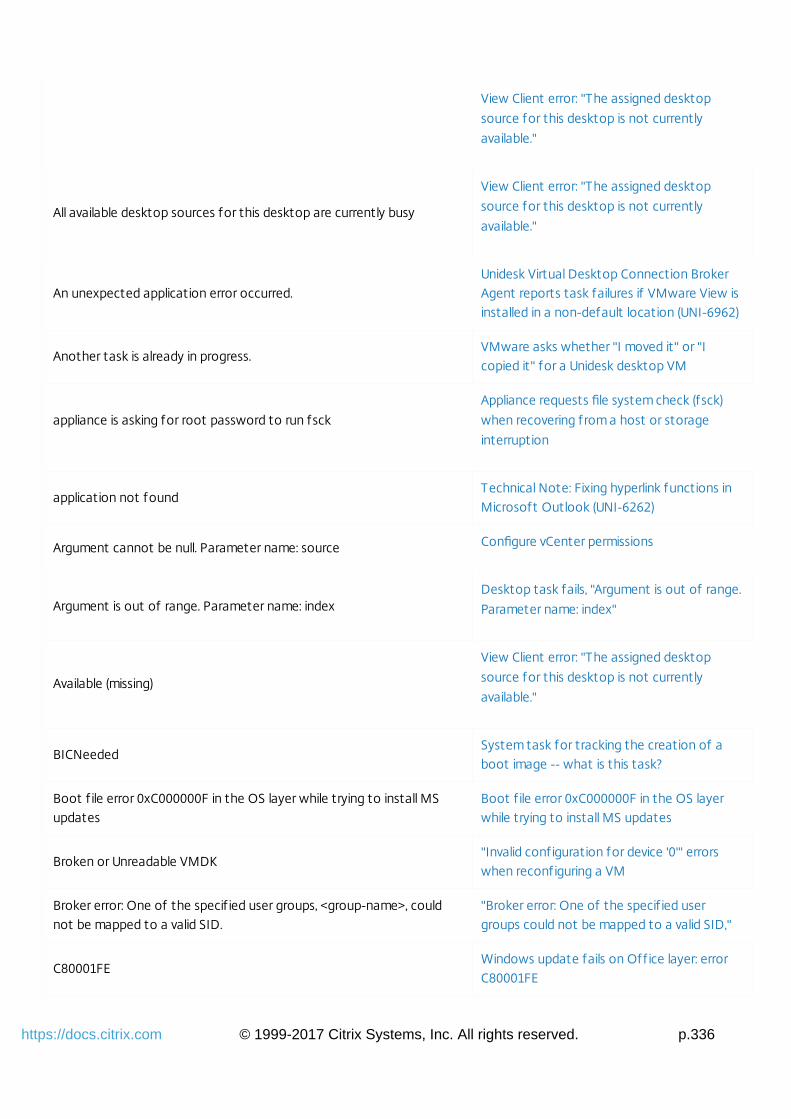
© 1999-2017 Citrix Systems, Inc. All rights reserved. p.336https://docs.citrix.com
View Client error: "The assigned desktop
source for this desktop is not currently
available."
All available desktop sources for this desktop are currently busy
View Client error: "The assigned desktop
source for this desktop is not currently
available."
An unexpected application error occurred.Unidesk Virtual Desktop Connection BrokerAgent reports task failures if VMware View isinstalled in a non-default location (UNI-6962)
Another task is already in progress.VMware asks whether "I moved it" or "Icopied it" for a Unidesk desktop VM
appliance is asking for root password to run fsck
Appliance requests file system check (fsck)
when recovering from a host or storage
interruption
application not foundTechnical Note: Fixing hyperlink functions inMicrosoft Outlook (UNI-6262)
Argument cannot be null. Parameter name: source Configure vCenter permissions
Argument is out of range. Parameter name: indexDesktop task fails, "Argument is out of range.
Parameter name: index"
Available (missing)
View Client error: "The assigned desktop
source for this desktop is not currently
available."
BICNeededSystem task for tracking the creation of aboot image -- what is this task?
Boot f ile error 0xC000000F in the OS layer while trying to install MSupdates
Boot f ile error 0xC000000F in the OS layerwhile trying to install MS updates
Broken or Unreadable VMDK"Invalid configuration for device '0'" errorswhen reconfiguring a VM
Broker error: One of the specif ied user groups, <group-name>, couldnot be mapped to a valid SID.
"Broker error: One of the specif ied usergroups could not be mapped to a valid SID,"
C80001FEWindows update fails on Office layer: errorC80001FE
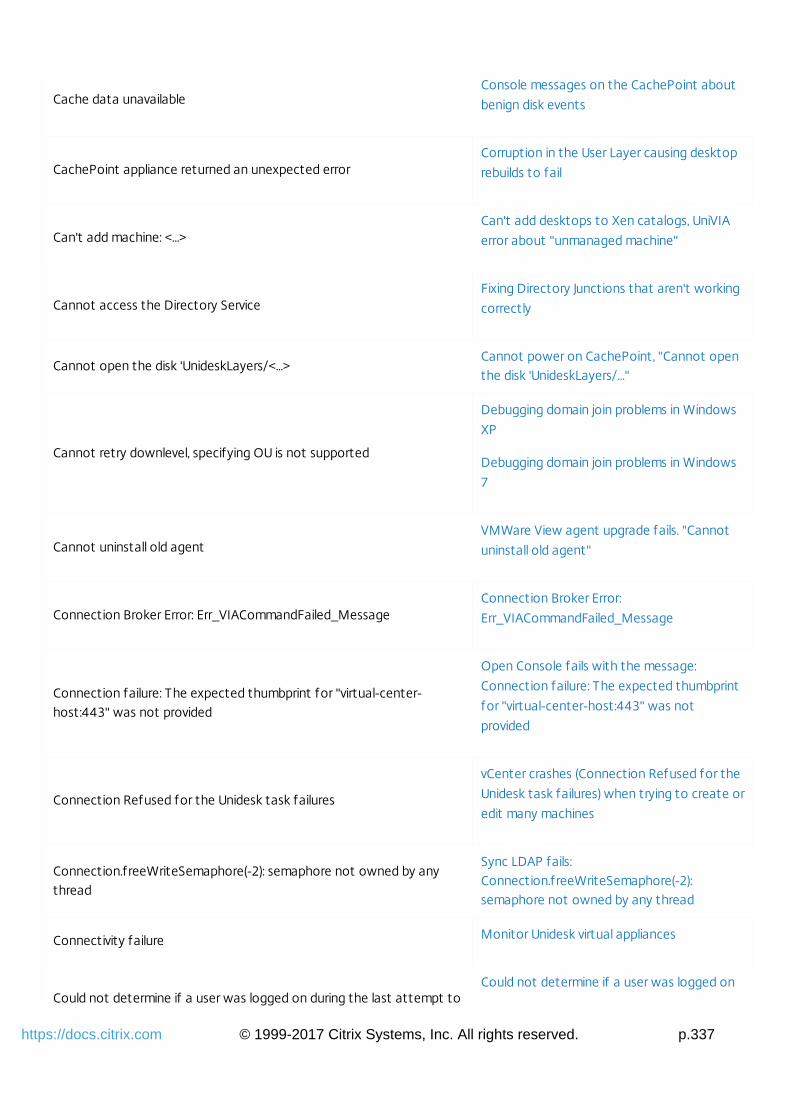
© 1999-2017 Citrix Systems, Inc. All rights reserved. p.337https://docs.citrix.com
Cache data unavailableConsole messages on the CachePoint about
benign disk events
CachePoint appliance returned an unexpected errorCorruption in the User Layer causing desktop
rebuilds to fail
Can't add machine: <...>Can't add desktops to Xen catalogs, UniVIA
error about "unmanaged machine"
Cannot access the Directory ServiceFixing Directory Junctions that aren't working
correctly
Cannot open the disk 'UnideskLayers/<...>Cannot power on CachePoint, "Cannot openthe disk 'UnideskLayers/..."
Cannot retry downlevel, specifying OU is not supported
Debugging domain join problems in Windows
XP
Debugging domain join problems in Windows
7
Cannot uninstall old agentVMWare View agent upgrade fails. "Cannot
uninstall old agent"
Connection Broker Error: Err_VIACommandFailed_MessageConnection Broker Error:
Err_VIACommandFailed_Message
Connection failure: The expected thumbprint for "virtual-center-host:443" was not provided
Open Console fails with the message:
Connection failure: The expected thumbprint
for "virtual-center-host:443" was not
provided
Connection Refused for the Unidesk task failures
vCenter crashes (Connection Refused for the
Unidesk task failures) when trying to create or
edit many machines
Connection.freeWriteSemaphore(-2): semaphore not owned by anythread
Sync LDAP fails:Connection.freeWriteSemaphore(-2):semaphore not owned by any thread
Connectivity failure Monitor Unidesk virtual appliances
Could not determine if a user was logged on during the last attempt toCould not determine if a user was logged on

© 1999-2017 Citrix Systems, Inc. All rights reserved. p.338https://docs.citrix.com
rebuild the desktop during the last attempt to rebuild the
desktop
Could not f ind a necessary layer. Failed.Failed to reattach disks to the desktop thatwere temporarily attached to the CachePointAppliance
Could not integrate the desktop with the specif ied connection brokerat this time. A Unidesk command failed to execute.
"Error: Could not integrate the desktop with
the specified connection broker at this time.
A Unidesk command failed to execute."
Could not integrate the desktop with the
specified connection broker at this time. A
Unidesk command failed to execute.
Could not load f ile or assembly 'PowershellServiceCmdlets, Version=<...>
Connection Broker Error:
Err_VIACommandFailed_Message
Unidesk Virtual Desktop Connection Broker
Agent reports task failures if VMware View is
installed in a non-default location (UNI-6962)
Couldn't find the current boot disk in the list of disk
Desktop task fails: 'Couldn't find the current
boot disk in the list of disk' or 'A configuration
error exists'
Drive 'C' on Unit 0 is ambiguous, cannot do the import'.Error: 'Drive 'C' on Unit 0 is ambiguous, cannotdo the import'.
Drive C on unit xxxxxx not found, cannot do the import
Error when importing an O/S layer: The virtual
infrastructure failed to stop a virtual machine.
Error is: internal web service error: Drive C on
unit xxxxxx not found, cannot do the import.
DsGetDCName failedDebugging domain join problems in Windows
7
Encountered an error while attempting to mount a disk
Recovering files directly from the User Layer
disks when a desktop machine cannot boot
Corruption in the User Layer causing desktop
rebuilds to fail
Encountered an error while trying to listen for a kcXfer connectionCreating or editing Desktop triggers kcXfer
error

© 1999-2017 Citrix Systems, Inc. All rights reserved. p.339https://docs.citrix.com
Encountered an error while trying to register with the ManagementAppliance at address
When importing your Gold, your MA/MCP
must be in the same vCenter as the Gold
Image
Troubleshooting the Unidesk Gold Image
Tools (setup_x86.exe, setup_x64.exe)
Encountered an error with accessing, reading, or using the snapshotinformation f ile. Not Found
Backup fails: Encountered an error with
accessing, reading, or using the snapshot
information file. Not Found
Desktop rebuild failed: "Encountered an error
accessing, reading or using the snapshot
information file."
EnumeratorCancel JobStepInterceptor
Appliance requests file system check (fsck)
when recovering from a host or storage
interruption
Err_VIACommandFailed_MessageConnection Broker Error:
Err_VIACommandFailed_Message
ERROR 21
Unidesk Virtual Desktop Connection Broker
Agent reports task failures if VMware View is
installed in a non-default location (UNI-6962)
ERROR 28 AddDesktopsToPoolCommandHandler:AddDesktopsToPoolCommandHandler.Handle() - EXCPSystem.Exception: VM <...> is already a member of a pool
Could not integrate the desktop with the
specified connection broker at this time. A
Unidesk command failed to execute.
Error 1721. There is a problem with this Windows Installer package. Aprogram required for this install to complete could not be run. Contactyour support personnel or package vendor. Action MakeImportable,location C:\...\importwsclient.exe
Cannot select Create OS Layer action,
cannot select gold image, or installer error
1721/1722
Error 1722. There is a problem with this Windows Installer package. Aprogram run as part of the setup did not f inish as expected. Contactyour support personnel or package vendor. Action MakeImportable,location C:\...\importwsclient.exe <IP address of managementappliance>
Cannot select Create OS Layer action,
cannot select gold image, or installer error
1721/1722
Error code: 4Troubleshooting the Unidesk Gold ImageTools (setup_x86.exe, setup_x64.exe)
Generating the Storage Report fails if
multiple desktop deployment tasks are in

© 1999-2017 Citrix Systems, Inc. All rights reserved. p.340https://docs.citrix.com
Error Generating Report progress (UNI-4675)
Error received from VMWare while waiting for requested data.Repair Desktop fails, "FaultType: FileFault"
and "Message: Error caused by file ..."
Exception Message: The username or password is incorrect.
Hyper-V: Unidesk Installer failed with
'Exception Message: The username or
password is incorrect."
Failed to add disk <...>
Failed to reattach disks to the desktop that
were temporarily attached to the CachePoint
Appliance
Error when creating a new desktop or Repair
to a different CachePoint -- Failed to create
a desktop, CannotCreateFile, Cannot
complete file creation operation
Failed to add disk ... Reason: Hot-add of
digest enabled disk not supported
Failed to complete a desktop restore. The hypervisor could not clone avirtual machine.
Repair Desktop fails, "FaultType: FileFault"
and "Message: Error caused by file ..."
Failed to complete a desktop restore. The hypervisor could not create anew virtual machine.
Desktop backup fails: "The hypervisor couldnot create a new virtual machine. Unable tolocate ServiceHost"
Failed to connect to the connection brokerConnection Broker pools/groups not listed in
UMC
Failed to copy a file.
Desktop Backup error: Invalid virtual machine
state. Unexpected snapshots found
Corruption in the User Layer causing desktop
rebuilds to fail
Backup fails: Failed to copy a file,
NetworkCopyFault
Failed to copy a version. Error is: Encountered an error while trying tolisten for a kcXfer connection
Creating or editing Desktop triggers kcXfer
error
Failed to create a desktop, CannotCreateFile, Cannot complete f ileError when creating a new desktop or Repairto a different CachePoint -- Failed to create

© 1999-2017 Citrix Systems, Inc. All rights reserved. p.341https://docs.citrix.com
creation operation a desktop, CannotCreateFile, Cannotcomplete f ile creation operation
Failed to detach disks from the desktop and reattach to theCachePoint Appliance
Failed to reattach disks to the desktop thatwere temporarily attached to the CachePointAppliance
Failed to get hardware information from the virtual machineError: Failed to get hardware information
from the virtual machine
Failed to mount a remote machine locally
Error: The CachePoint Appliance could not
create the boot image. Error is: Failed to
mount a remote virtual machine locally
Operating System Layer import fails: “Failed
to mount a remote machine locally”
Failed to lock the f ileFailed to reattach disks to the desktop thatwere temporarily attached to the CachePointAppliance
Failed to reattach disksBackup failure: "Failed to reattach disks", "The
host can access datastores"
Failed to reattach disks to the desktop that were temporarily attachedto the CachePoint Appliance
Failed to reattach disks to the desktop that
were temporarily attached to the CachePoint
Appliance
Failed to synchronize owners of desktops in pool
Failed to synchronize owners of desktops in
pool PoolName. Error is: Unable to find user:
'CN=...' in domain: 'domainname'
Failed to synchronize with directory service changes: exception string'Connection.freeWriteSemaphore(-2): semaphore not owned by anythread'.
Sync LDAP fails:Connection.freeWriteSemaphore(-2):semaphore not owned by any thread
FaultType: CannotCreateFile Message: Cannot complete f ile creationoperation.
Error when creating a new desktop or Repair
to a different CachePoint -- Failed to create
a desktop, CannotCreateFile, Cannot
complete file creation operation
FaultType: FileFault Message: Error caused by f ile <...>Repair Desktop fails, "FaultType: FileFault"
and "Message: Error caused by file ..."
FaultType: FileLocked Message: Unable to access file <...> since it is Desktop Backup error: Invalid virtual machine

© 1999-2017 Citrix Systems, Inc. All rights reserved. p.342https://docs.citrix.com
locked state. Unexpected snapshots found
FaultType: GenericVmConfigFault Message: Too Many users.Failed to reattach disks to the desktop thatwere temporarily attached to the CachePointAppliance
FaultType: InvalidHostState Message: The operation is not allowed inthe current connection state of the host.
Desktop backup fails: "The hypervisor couldnot create a new virtual machine. Unable tolocate ServiceHost"
FaultType: NetworkCopyFault Message: Could not complete networkcopy for f ile <...>
Backup fails: Failed to copy a f ile,NetworkCopyFault
FaultType: SystemError - Message: A general system error occurred: Thesystem returned an error.
Task failure: FaultType: SystemError -
Message: A general system error occurred:
The system returned an error. Communication
with the virtual machine might have been
interrupted.
File Not FoundFailed to reattach disks to the desktop thatwere temporarily attached to the CachePointAppliance
FileLockedDesktop Backup error: Invalid virtual machine
state. Unexpected snapshots found
Free space is 0Insufficient space to create a desktop or anInstallation Machine
Full host domain name required (eg. Host.domain.com)
Could not integrate the desktop with the
specified connection broker at this time. A
Unidesk command failed to execute.
General System Error
Task failure: FaultType: SystemError -
Message: A general system error occurred:
The system returned an error. Communication
with the virtual machine might have been
interrupted.
High swap memory usage Monitor Unidesk virtual appliances
Hot-add of digest enabled disk not supported
Failed to add disk ... Reason: Hot-add of
digest enabled disk not supported
Failed to reattach disks to the desktop that
were temporarily attached to the CachePoint

© 1999-2017 Citrix Systems, Inc. All rights reserved. p.343https://docs.citrix.com
Appliance
hrtimer: interrupt took ####### nsBenign Management Appliance and
CachePoint console messages
importwsclient.exe has stopped working
When importing your Gold, your MA/MCP
must be in the same vCenter as the Gold
Image
Troubleshooting the Unidesk Gold Image
Tools (setup_x86.exe, setup_x64.exe)
In UseDesktop backup fails: "The hypervisor couldnot create a new virtual machine. Unable tolocate ServiceHost"
Incorrect Windows PowerShell version 3.0Appliance Backup error: Incorrect WindowsPowerShell version 3.0.
Input/Output ErrorFailed to reattach disks to the desktop thatwere temporarily attached to the CachePointAppliance
Internal service failure occurred; preparing for restart."Internal service failure occurred; preparing for
restart" e-mail: what does it mean?
internal web service error: Drive C on unit xxxxxx not found, cannot dothe import.
Error when importing an O/S layer: The virtual
infrastructure failed to stop a virtual machine.
Error is: internal web service error: Drive C on
unit xxxxxx not found, cannot do the import.
Invalid configuration for device '0'
"Invalid configuration for device '0'" errors
when reconfiguring a VM
vSphere client reports "invalid configuration"
when creating multiple desktops (UNI-6574)
Invalid credentials Error: Invalid Credentials
Invalid URI: A port was expected because of there is a colon(':') presentbut the port could not be parsed
Installation fails: "Invalid URI: A port was
expected because of there is a colon(':')
present but the port could not be parsed"
Invalid Video Memory"Invalid configuration for device '0'" errors
when reconfiguring a VM
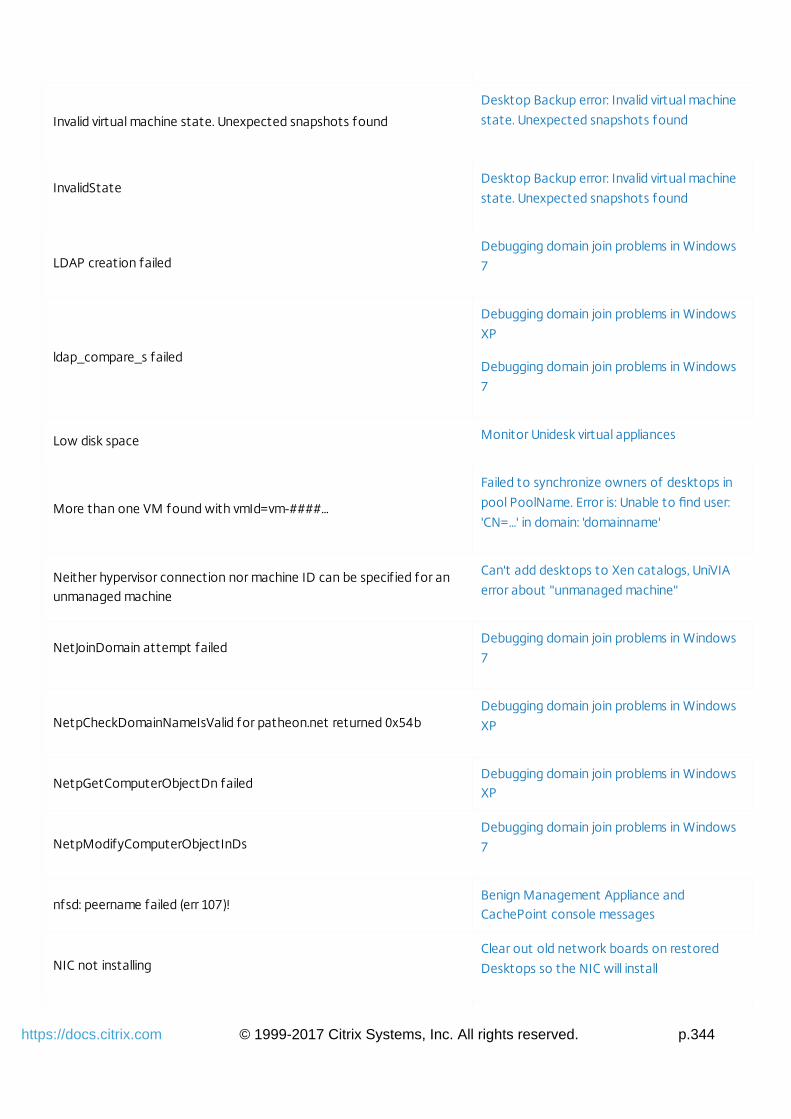
© 1999-2017 Citrix Systems, Inc. All rights reserved. p.344https://docs.citrix.com
Invalid virtual machine state. Unexpected snapshots found
Desktop Backup error: Invalid virtual machine
state. Unexpected snapshots found
InvalidStateDesktop Backup error: Invalid virtual machine
state. Unexpected snapshots found
LDAP creation failedDebugging domain join problems in Windows
7
ldap_compare_s failed
Debugging domain join problems in Windows
XP
Debugging domain join problems in Windows
7
Low disk space Monitor Unidesk virtual appliances
More than one VM found with vmId=vm-####...
Failed to synchronize owners of desktops in
pool PoolName. Error is: Unable to find user:
'CN=...' in domain: 'domainname'
Neither hypervisor connection nor machine ID can be specif ied for anunmanaged machine
Can't add desktops to Xen catalogs, UniVIA
error about "unmanaged machine"
NetJoinDomain attempt failedDebugging domain join problems in Windows
7
NetpCheckDomainNameIsValid for patheon.net returned 0x54bDebugging domain join problems in Windows
XP
NetpGetComputerObjectDn failedDebugging domain join problems in WindowsXP
NetpModifyComputerObjectInDsDebugging domain join problems in Windows
7
nfsd: peername failed (err 107)!Benign Management Appliance andCachePoint console messages
NIC not installingClear out old network boards on restored
Desktops so the NIC will install
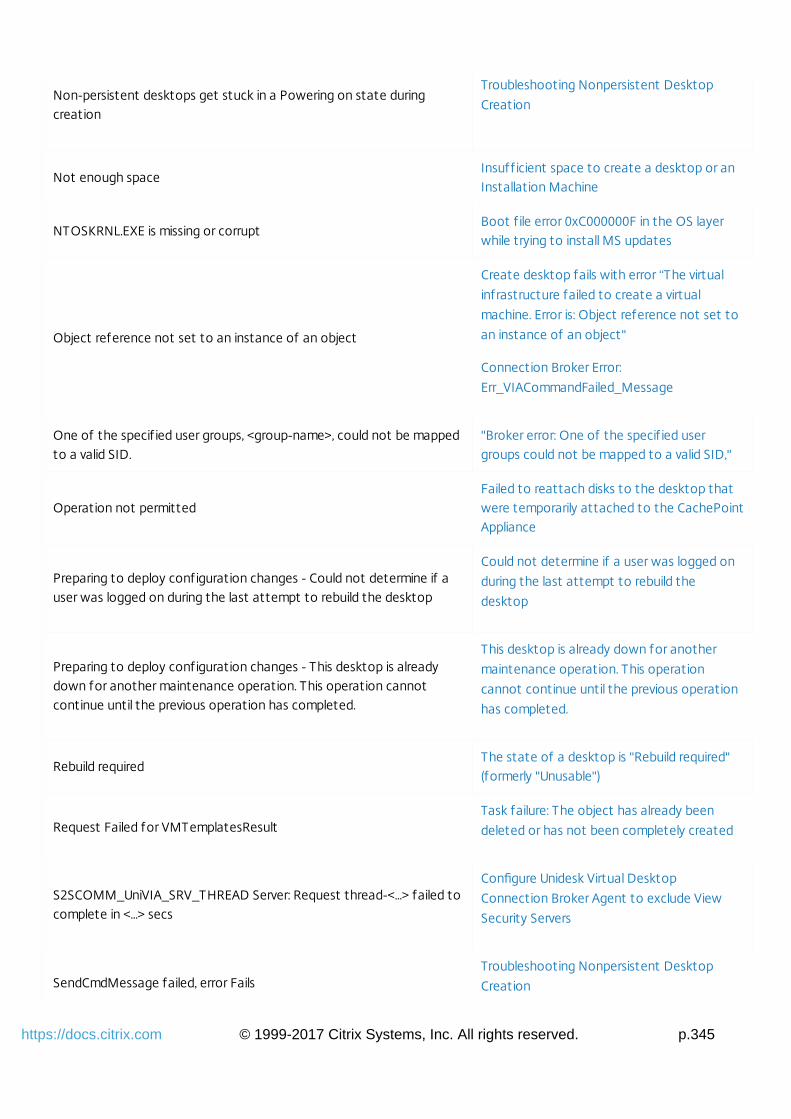
© 1999-2017 Citrix Systems, Inc. All rights reserved. p.345https://docs.citrix.com
Non-persistent desktops get stuck in a Powering on state duringcreation
Troubleshooting Nonpersistent Desktop
Creation
Not enough spaceInsufficient space to create a desktop or anInstallation Machine
NTOSKRNL.EXE is missing or corruptBoot f ile error 0xC000000F in the OS layerwhile trying to install MS updates
Object reference not set to an instance of an object
Create desktop fails with error “The virtual
infrastructure failed to create a virtual
machine. Error is: Object reference not set to
an instance of an object"
Connection Broker Error:
Err_VIACommandFailed_Message
One of the specif ied user groups, <group-name>, could not be mappedto a valid SID.
"Broker error: One of the specif ied usergroups could not be mapped to a valid SID,"
Operation not permittedFailed to reattach disks to the desktop thatwere temporarily attached to the CachePointAppliance
Preparing to deploy configuration changes - Could not determine if auser was logged on during the last attempt to rebuild the desktop
Could not determine if a user was logged on
during the last attempt to rebuild the
desktop
Preparing to deploy configuration changes - This desktop is alreadydown for another maintenance operation. This operation cannotcontinue until the previous operation has completed.
This desktop is already down for another
maintenance operation. This operation
cannot continue until the previous operation
has completed.
Rebuild requiredThe state of a desktop is "Rebuild required"(formerly "Unusable")
Request Failed for VMTemplatesResultTask failure: The object has already been
deleted or has not been completely created
S2SCOMM_UniVIA_SRV_THREAD Server: Request thread-<...> failed tocomplete in <...> secs
Configure Unidesk Virtual Desktop
Connection Broker Agent to exclude View
Security Servers
SendCmdMessage failed, error FailsTroubleshooting Nonpersistent Desktop
Creation

© 1999-2017 Citrix Systems, Inc. All rights reserved. p.346https://docs.citrix.com
set_rtc_mmss: can't update from 59 to 0Benign Management Appliance andCachePoint console messages
"Setup is preparing your computer for f irst use" on every bootWindows installation cannot proceed duringsystem preparation
Stalled task Resolving stalled tasks that do not complete
state manager failed on NFSv4 server <IP address> with error 13Benign Management Appliance andCachePoint console messages
Storage vMotion
Do not enable Storage DRS, or perform a
Storage vMotion, on any Unidesk desktop or
CachePoint
Recovering from Storage vMotion on a
CachePoint
System task for tracking the creation of a boot imageSystem task for tracking the creation of a
boot image -- what is this task?
System.IO.FileNotFoundExceptionUnidesk Virtual Desktop Connection BrokerAgent reports task failures if VMware View isinstalled in a non-default location (UNI-6962)
Task In ProgressFailed to reattach disks to the desktop thatwere temporarily attached to the CachePointAppliance
The assigned desktop source for this desktop is not currently available.View Client error: "The assigned desktopsource for this desktop is not currentlyavailable."
The CachePoint Appliance could not create the boot image.
Failed to reattach disks to the desktop that
were temporarily attached to the CachePoint
Appliance
Desktop boot fails: The CachePoint
Appliance could not create the boot image
Error: The CachePoint Appliance could not
create the boot image. Error is: Failed to
mount a remote virtual machine locally
"The computer restarted unexpectedly or
encountered an unexpected error. Windows
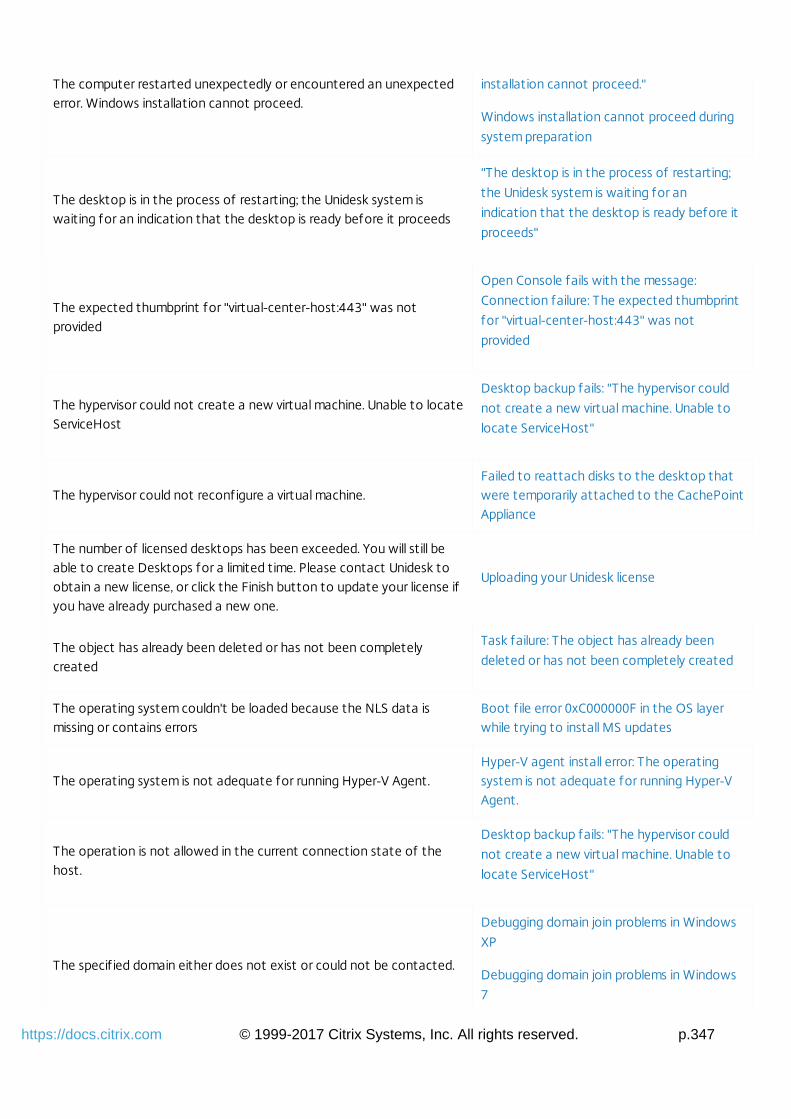
© 1999-2017 Citrix Systems, Inc. All rights reserved. p.347https://docs.citrix.com
The computer restarted unexpectedly or encountered an unexpectederror. Windows installation cannot proceed.
installation cannot proceed."
Windows installation cannot proceed during
system preparation
The desktop is in the process of restarting; the Unidesk system iswaiting for an indication that the desktop is ready before it proceeds
"The desktop is in the process of restarting;
the Unidesk system is waiting for an
indication that the desktop is ready before it
proceeds"
The expected thumbprint for "virtual-center-host:443" was notprovided
Open Console fails with the message:
Connection failure: The expected thumbprint
for "virtual-center-host:443" was not
provided
The hypervisor could not create a new virtual machine. Unable to locateServiceHost
Desktop backup fails: "The hypervisor could
not create a new virtual machine. Unable to
locate ServiceHost"
The hypervisor could not reconfigure a virtual machine.Failed to reattach disks to the desktop thatwere temporarily attached to the CachePointAppliance
The number of licensed desktops has been exceeded. You will still beable to create Desktops for a limited time. Please contact Unidesk toobtain a new license, or click the Finish button to update your license ifyou have already purchased a new one.
Uploading your Unidesk license
The object has already been deleted or has not been completelycreated
Task failure: The object has already been
deleted or has not been completely created
The operating system couldn't be loaded because the NLS data ismissing or contains errors
Boot f ile error 0xC000000F in the OS layerwhile trying to install MS updates
The operating system is not adequate for running Hyper-V Agent.Hyper-V agent install error: The operatingsystem is not adequate for running Hyper-VAgent.
The operation is not allowed in the current connection state of thehost.
Desktop backup fails: "The hypervisor could
not create a new virtual machine. Unable to
locate ServiceHost"
The specif ied domain either does not exist or could not be contacted.
Debugging domain join problems in Windows
XP
Debugging domain join problems in Windows
7

© 1999-2017 Citrix Systems, Inc. All rights reserved. p.348https://docs.citrix.com
The system cannot f ind the f ile specif iedCannot power on CachePoint, "Cannot open
the disk 'UnideskLayers/..."
The trust relationship between this workstation and the primarydomain failed
Technical Note: Disabling automatic
password change for nonpersistent desktops
The username or password is incorrect.
Hyper-V: Unidesk Installer failed with
'Exception Message: The username or
password is incorrect."
The virtual infrastructure failed to create a virtual machine. Error is:Object reference not set to an instance of an object
Create desktop fails with error “The virtual
infrastructure failed to create a virtual
machine. Error is: Object reference not set to
an instance of an object"
The virtual infrastructure failed to reconfigure a virtual machine. Error is:Argument is out of range. Parameter name: index
Desktop task fails, "Argument is out of range.
Parameter name: index"
The virtual infrastructure failed to stop a virtual machine. Error is:internal web service error: Drive C on unit xxxxxx not found, cannot dothe import.
Error when importing an O/S layer: The virtual
infrastructure failed to stop a virtual machine.
Error is: internal web service error: Drive C on
unit xxxxxx not found, cannot do the import.
This desktop currently has no desktop sources available.View Client error: "The assigned desktopsource for this desktop is not currentlyavailable."
This desktop is already down for another maintenance operation. Thisoperation cannot continue until the previous operation has completed.
This desktop is already down for another
maintenance operation. This operation
cannot continue until the previous operation
has completed.
USB or Audio devices disappear after a
desktop or layer boots without the Broker
Agent
This virtual machine might have been moved or copied.VMware asks whether "I moved it" or "I
copied it" for a Unidesk desktop VM
Too Many users.Failed to reattach disks to the desktop thatwere temporarily attached to the CachePointAppliance
© 1999-2017 Citrix Systems, Inc. All rights reserved. p.349https://docs.citrix.com
Unable to access file <...> since it is locked Desktop Backup error: Invalid virtual machine
state. Unexpected snapshots found
Unable to contact the Hyper-V host machine. Make sure that the hostis online and the credentials are valid.
Converting a vSphere gold image in order to
be used with Hyper-V
Unable to f ind user: <...> in domain <...>
Failed to synchronize owners of desktops in
pool PoolName. Error is: Unable to find user:
'CN=...' in domain: 'domainname'
Unable to locate a Disk at Unit # '0'
Desktop task fails: 'Couldn't find the current
boot disk in the list of disk' or 'A configuration
error exists'
Unable to locate VirtualMachine (vm-nnnn), while trying to determine
the parent folder.
Unable to locate VirtualMachine (vm-nnnn),
while trying to determine the parent folder
Unexpected Exception Occurred
Hyper-V: Unidesk Installer failed with
'Exception Message: The username or
password is incorrect."
UNEXPECTED INCONSISTENCY: RUN fsck MANUALLY.
Appliance requests file system check (fsck)
when recovering from a host or storage
interruption
Unidesk denied an attempt to rename a directory from one of the readonly portions of the f ile system.
Unifiltr EventID 3: Unidesk denied an attempt
to rename a directory
Unknown (Invalid)Debugging domain join problems in Windows
7
VM was not in a valid state for operation DeleteVMCommand
Task failure: FaultType: SystemError -
Message: A general system error occurred:
The system returned an error. Communication
with the virtual machine might have been
interrupted.
VMware asks whether "I moved it" or "I copied it" for a Unidesk desktopVM
VMware asks whether "I moved it" or "Icopied it" for a Unidesk desktop VM
vmware tools not running
Desktops in sleep state become unresponsive
in vCenter and Unidesk Management Console
(UNI-7014)
© 1999-2017 Citrix Systems, Inc. All rights reserved. p.350https://docs.citrix.com
Waiting for an operation for the Personalization Layer to completebefore creating a boot image.
Waiting for an operation for the
Personalization Layer to complete before
creating a boot image
Waiting for f inal provisioning of the CachePoint Appliance
Create CachePoint task hung at "Waiting for
final provisioning of the CachePoint
Appliance"
Waiting for the CachePoint Appliance to complete a boot image taskfor the desktop before starting the Personalization Layer operation
"Waiting for the CachePoint Appliance to
complete a boot image task for the desktop
before starting the Personalization Layer
operation"
Waiting for the desktop to disconnect from the Unidesk system beforeit can proceed to the next step
"Waiting for the desktop to disconnect from
the Unidesk system before it can proceed to
the next step"
Waiting to receive an IP address for the CachePoint Appliance. Problems deploying CachePoint Appliances
Windows could not parse or process the unattend answer file for pass
[specialize]. The settings specified in the answer file cannot be applied.
The error was detected while processing settings for component
[Microsoft-Windows-Shell-Setup].
Mini-setup fails with error: Windows could
not parse or process the unattend answer file
for pass [specialize]
Desktop create fails: "Windows could not
parse or process unattend answer file
[C:\Windows\Panther\unattend.xml] for pass
[specialize]. The answer file is invalid."
Windows failed to load because the kernel is missing, or corrupt.Boot file error 0xC000000F in the OS layer
while trying to install MS updates
Windows failed to startBoot file error 0xC000000F in the OS layer
while trying to install MS updates
Windows installation cannot proceed.Windows installation cannot proceed during
system preparation
Windows is not Genuine Windows is not Genuine
Windows updates error out with 80071a91, 80070BC9, 80079c59,8007000e, or prompt for restart forever
Microsoft updates fail: 80071a91, 80070BC9,
80079c59, 8007000e, or prompt for restart

© 1999-2017 Citrix Systems, Inc. All rights reserved. p.351https://docs.citrix.com
forever
You must restart your computer to apply these changes
New SCSI controller causes Windows to
prompt for a reboot after installing the
device
CPU differences in ESX cluster causes
Windows to prompt for a reboot after
detecting a new CPU