unit 1 customizing outlook 2007 1s3.amazonaws.com/careertec/manuals and texts/s&c...table of...
TRANSCRIPT

OUTLOOK 2007 INTERMEDIATE
TABLE OF CONTENTS
INTRODUCTION ..................................................................................... VII!
About This Course ................................................................................... viii!
Using This Manual ................................................................................... viii!
What You’ll Find in Each Unit ................................................................... ix!
What You’ll Find in Each Lesson ................................................................ x!
How to Use the Student Data Files ............................................................. xi!
How To Proceed .......................................................................................... xi!
MICROSOFT CERTIFIED APPLICATION SPECIALIST (MCAS)XIII!
How This Course Can Help You Prepare ................................................ xiii!
Exam Requirements ................................................................................. xiii!
UNIT 1 CUSTOMIZING OUTLOOK 2007 ............................... 1!
LESSON 1 CUSTOMIZING VIEWS .......................................................... 3!
Introduction To Views ................................................................................. 4!
Creating Views ............................................................................................. 7!
Customizing Fields For Views ................................................................... 11!
Customizing Groups and Filtered Views ................................................... 16!
Customizing Automatic Formatting Views ............................................... 19!
Lesson Review Exercise ............................................................................ 21!
LESSON 2 CUSTOMIZING MENUS AND TOOLBARS ..................... 23!
Customizing Toolbars ................................................................................ 24!
Customizing The Menu Bar ....................................................................... 30!
Creating a Custom Toolbar ........................................................................ 32!
Customizing The Quick Access Toolbar ................................................... 34!
Lesson Review Exercise ............................................................................ 37!

Table of Contents Outlook 2007 Intermediate
Page ii O2K7I-MBT/1109
LESSON 3 CONFIGURING E-MAIL ACCOUNTS .............................. 39!
Creating An E-mail Account ..................................................................... 40!
Managing E-mail Accounts ....................................................................... 44!
Lesson Review Exercise ............................................................................ 50!
INDEPENDENT PRACTICE ACTIVITY .............................................. 53!
UNIT 2 TRACKING ITEMS AND ACTIVITIES WITH THE
JOURNAL ................................................................................... 57!
LESSON 1 THE JOURNAL ...................................................................... 59!
Using The Journal to Record Entries ........................................................ 60!
Changing The Journal View And Timeline .............................................. 66!
Removing Entries And Closing The Journal ............................................. 70!
Lesson Review Exercise ............................................................................ 72!
INDEPENDENT PRACTICE ACTIVITY .............................................. 75!
UNIT 3 USING RULES AND ALERTS ................................... 77!
LESSON 1 FILTERING E-MAIL USING RULES ................................ 79!
Creating A Rule From a Template ............................................................ 80!
Creating A Rule From An E-mail ............................................................. 84!
Managing Rules ......................................................................................... 86!
Lesson Review Exercise ............................................................................ 90!
LESSON 2 OUT OF OFFICE ASSISTANT AND PUBLIC FOLDER
RULES ......................................................................................................... 93!
Out of Office Assistant Rules .................................................................... 94!
Public Folder Rules ................................................................................... 98!
Lesson Review Exercise .......................................................................... 100!
LESSON 3 USING ALERTS ................................................................... 101!
Desktop Alerts ......................................................................................... 102!
Desktop Alert Settings ............................................................................. 104!

Outlook 2007 Intermediate Table of Contents
O2K7I-MBT/1109 Page iii
SharePoint Alerts ..................................................................................... 106!
Lesson Review Exercise .......................................................................... 110!
INDEPENDENT PRACTICE ACTIVITY ............................................. 111!
UNIT 4 MANAGING JUNK E-MAIL .................................... 113!
LESSON 1 INTRODUCING THE JUNK E-MAIL FILTER ............... 115!
Junk Mail Filtering ................................................................................... 116!
E-Mail Postmarking ................................................................................. 120!
Lesson Review Exercise .......................................................................... 122!
LESSON 2 CONTROLLING JUNK E-MAIL ....................................... 123!
Configuring Protection ............................................................................. 124!
Filtering E-mail With Lists ...................................................................... 126!
Managing the Junk E-mail Folder ............................................................ 130!
Lesson Review Exercise .......................................................................... 132!
INDEPENDENT PRACTICE ACTIVITY ............................................. 135!
UNIT 5 USING SHAREPOINT WITH OUTLOOK 2007 .... 137!
LESSON 1 WORKING WITH SHAREPOINT FILES ........................ 139!
Using SharePoint With Outlook .............................................................. 140!
Opening SharePoint Files From Outlook ................................................. 142!
Disconnecting Outlook From SharePoint ................................................ 144!
Lesson Review Exercise .......................................................................... 145!
LESSON 2 MANAGING SHAREPOINT TASKS AND CONTACTS 147!
Using Outlook to Manage SharePoint Tasks ........................................... 148!
Using Outlook to Add an Appointment to SharePoint ............................ 150!
Managing Your SharePoint Contacts in Outlook .................................... 151!
Lesson Review Exercise .......................................................................... 153!

Table of Contents Outlook 2007 Intermediate
Page iv O2K7I-MBT/1109
INDEPENDENT PRACTICE ACTIVITY ............................................ 155!
UNIT 6 USING GROUP SCHEDULES AND INTERNET
CALENDARS ............................................................................ 157!
LESSON 1 CREATING AND USING A GROUP SCHEDULE ......... 159!
Creating Group Schedules ....................................................................... 160!
Customizing Group Schedules ................................................................ 162!
Sending a Group Schedule Meeting Request .......................................... 164!
Lesson Review Exercise .......................................................................... 166!
LESSON 2 USING INTERNET CALENDARS .................................... 167!
Internet Calendars .................................................................................... 168!
Viewing Calendar Snapshots ................................................................... 169!
Subscribing to Internet Calendars ........................................................... 171!
Publishing The Default Calendar ............................................................ 172!
Publishing an Additional Calendar .......................................................... 175!
Lesson Review Exercise .......................................................................... 177!
LESSON 3 SHARING THE CALENDAR ............................................. 179!
Calendar Sharing ..................................................................................... 180!
Opening a Shared Calendar ..................................................................... 181!
Adding a Delegate ................................................................................... 182!
Lesson Review Exercise .......................................................................... 186!
INDEPENDENT PRACTICE ACTIVITY ............................................ 187!
UNIT 7 CREATING CUSTOM FORMS ............................... 189!
LESSON 1 INTRODUCTION TO FORMS .......................................... 191!
Introduction To Forms ............................................................................. 192!
Designing and Customizing Forms ......................................................... 195!
Opening a Built-in Form ......................................................................... 199!
Lesson Review Exercise .......................................................................... 201!

Outlook 2007 Intermediate Table of Contents
O2K7I-MBT/1109 Page v
LESSON 2 CREATING AND PUBLISHING FORMS ........................ 203!
Opening a Form in Design Mode ............................................................. 204!
Adding Fields to a Form .......................................................................... 208!
Adding Controls to a Form ...................................................................... 211!
Configuring Form Actions ....................................................................... 215!
Testing a Form ......................................................................................... 217!
Publishing a Form to a Library ................................................................ 218!
Lesson Review Exercise .......................................................................... 222!
INDEPENDENT PRACTICE ACTIVITY ............................................. 225!
INDEX......................................................................................................... 229!
NOTICES ................................................................................................... 231!
Copyright .................................................................................................. 231!
Trademark Notices ................................................................................... 231!
Disclaimer ................................................................................................ 231!


INTRODUCTION
In this introduction, you will find the following information:
! About this course
! Using this manual
! What you’ll find in each unit
! What you’ll find in each lesson
! How to use the student data files
! How to proceed

Introduction Outlook 2007 Intermediate
Page viii O2K7I-MBT/1109
ABOUT THIS COURSE
Welcome to the Outlook 2007 Intermediate course. Upon
completion of this course, you will be able to:
! Create and customize views
! Customize toolbars and the menu bar
! Create and manage e-mail accounts
! Use the Journal
! Create and manage rules
! Use Out of Office Assistant and Public Folder rules
! Configure desktop and SharePoint alerts
! Configure protection from Junk E-mail
! Use SharePoint with Outlook
! Use Outlook to manage SharePoint tasks and contacts
! Create and customize a group schedule
! Use and publish Internet calendars
! Design and customize forms
! Add fields and contacts to forms
! Configure form actions
! Publish a form to a library
USING THIS MANUAL
This course is delivered in a self-paced training environment. This
method of delivery is designed to meet the varying needs and
learning styles of adult learners.
The student course manual provided with the course is yours to
keep. This manual will guide you through the course using a step-
by-step approach. Because we believe that it is just as important
for you to learn concepts as it is for you to learn procedures, each
topic begins with a conceptual overview of the feature you are

Outlook 2007 Intermediate Introduction
O2K7I-MBT/1109 Page ix
learning. Then, details and procedures are presented in small, easy-
to-absorb segments. People generally learn best by doing, so most
of the course will consist of step-by-step exercises at the computer.
Our teaching philosophy is reflected in the way we organize the
material in this manual. Following is an orientation to the manual’s
structure.
! A Table of Contents followed by this introduction.
! Lessons containing Objectives, Discussions, Procedures, Step-
by-Step Exercises, Lesson Review Exercises, and Independent
Practice Activities.
! An Index.
Each course is comprised of a number of units and lessons. The
units group together the functions that comprise a given skill set
that you will be learning in the course. Each lesson comprises the
topics that describe how to perform these functions. We feel that
the best approach to maximize your understanding of the concepts
and proficiency in the skill sets is to break the material into
manageable learning bites. This enables you to thoroughly
understand a piece of information before moving on to the next.
You should strive to complete a lesson before ending your training
session to maintain the continuity of the lesson. Ending a session in
the middle of a lesson will cause an interruption in the presentation
of the material.
WHAT YOU’LL FIND IN EACH UNIT
Units are the largest structural component of the course content. A
unit begins with a title page that lists each lesson within the unit.
Within each lesson there are multiple topics that contain conceptual
and explanatory information. The conceptual information takes the
form of text, exhibits, screen shots, lists, and tables.
Each topic ends with Step-by-Step exercises which enable you to
practice what you’ve learned. Each lesson then ends with a Lesson
Review Exercise which enables you to practice skills you have
learned throughout the lesson. Finally, units conclude with an
Introduction Outlook 2007 Intermediate
Page x O2K7I-MBT/1109
Independent Practice Activity that gives you an opportunity to
practice the collective skills you’ve learned in the entire unit.
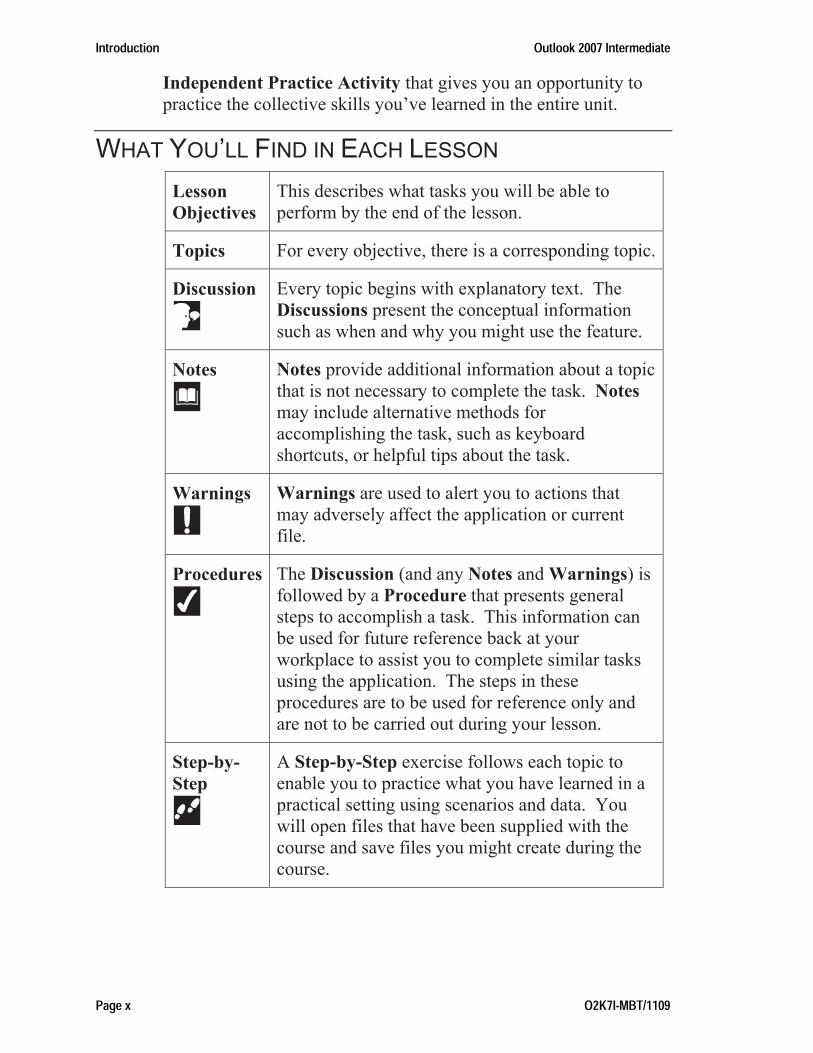
WHAT YOU’LL FIND IN EACH LESSON
Lesson
Objectives
This describes what tasks you will be able to
perform by the end of the lesson.
Topics For every objective, there is a corresponding topic.
Discussion
!"Every topic begins with explanatory text. The
Discussions present the conceptual information
such as when and why you might use the feature.
Notes
#Notes provide additional information about a topic
that is not necessary to complete the task. Notes
may include alternative methods for
accomplishing the task, such as keyboard
shortcuts, or helpful tips about the task.
Warnings
$Warnings are used to alert you to actions that
may adversely affect the application or current
file.
Procedures
%The Discussion (and any Notes and Warnings) is
followed by a Procedure that presents general
steps to accomplish a task. This information can
be used for future reference back at your
workplace to assist you to complete similar tasks
using the application. The steps in these
procedures are to be used for reference only and
are not to be carried out during your lesson.
Step-by-
Step
&
A Step-by-Step exercise follows each topic to
enable you to practice what you have learned in a
practical setting using scenarios and data. You
will open files that have been supplied with the
course and save files you might create during the
course.

Outlook 2007 Intermediate Introduction
O2K7I-MBT/1109 Page xi
Task
'Each lesson ends with a Lesson Review Exercise,
and each unit ends with an Independent Practice
Activity. These exercises pool the concepts and
procedures taught during the lesson or unit,
allowing you to reinforce the skills you have
learned and assimilate the concepts into a cohesive
whole.
HOW TO USE THE STUDENT DATA FILES
Many of the step-by-step and review exercises require that you
open files that have been created for the exercises. These files are
provided for you in a folder called Student Data Folder.
After you open a file, you might be instructed to make changes to
the file. As you work with the file, you will be instructed to save
the modified file using a different name. In doing so, if you make a
mistake, you can simply retrieve the original file from the Student
Data Folder and try again.
Note that when you are ending your session for the day, you should
save your work and exit the application in which you are working.
If you are proceeding on to the next lesson you may remain in the
application.
HOW TO PROCEED
Now that you understand the components that make up a lesson,
you should proceed as follows:
! Start by reviewing the title pages of the first unit and lesson,
paying particular attention to the Lesson Objectives. The
objectives provide you with an overview of the skills you will
learn during the first lesson.
! Next, go through the corresponding topics for that lesson in the
media-based program.
! As you go through the program, follow along by reading the
Discussions (and any Notes and Warnings) for the topic to gain
an understanding of the topic and its application. Also review
the Procedures used to apply the feature.

Introduction Outlook 2007 Intermediate
Page xii O2K7I-MBT/1109
! Complete the Step-by-Step Exercise for the first topic. This
will provide you with hands-on experience in the application
you are learning. Make sure that you observe what is happening
on your screen as you complete the steps.
! Repeat the process for the remaining topics until you complete
the topics in the first lesson.
! Complete the Lesson Review Exercise at the end of the lesson.
! Repeat the process for the remaining lessons until you complete
the unit. Upon completion of the unit, take the media-based
Post Assessment. Use this to check your proficiency using the
skills learned in the course, and to identify areas that require
additional review and practice.
! Upon completion of the Post Assessment, complete the
Independent Practice Activity in your manual. This will
further check your proficiency in a hands-on environment in the
application you are learning.
Enjoy your course!

Outlook 2007 Intermediate Microsoft Certified Application Specialist (MCAS)
O2K7I-MBT/1109 Page xiii
MICROSOFT CERTIFIED APPLICATION SPECIALIST (MCAS)
A Microsoft Certified Application Specialist is an individual who
has passed exams for certifying his or her skills in one or more of
the Microsoft Office desktop applications. Upon completion of this
courseware, you may be prepared to take exam number 77-604:
Using Microsoft Office Outlook.
To obtain Microsoft Certified Application Specialist (MCAS)
certification, you must obtain certification in Microsoft Word 2007,
Microsoft Excel 2007, Microsoft PowerPoint 2007, or Microsoft
Outlook 2007.
HOW THIS COURSE CAN HELP YOU PREPARE
The Outlook 2007 Basic, Outlook 2007 Intermediate, and
Outlook 2007 Advanced courses are designed to prepare you for
the Microsoft Outlook 2007 (77-604) exam.
EXAM REQUIREMENTS
The chart on the next page summarizes the topics you will need to
master to pass the Microsoft Outlook 2007 (77-604) exam. Topics
that are covered in this Outlook 2007 Intermediate course are
bolded. The remaining topics are covered in Outlook 2007 Basic
and Outlook 2007 Advanced.

Microsoft Certified Application Specialist (MCAS) Outlook 2007 Intermediate
Page xiv O2K7I-MBT/1109
Exam 77-604: MCAS: Using Microsoft Office Outlook 2007
Skill Sets Exam Skill Standards
Managing
Messaging! Create and send an e-mail message
! Create and manage your signature and
automated messages
! Manage e-mail message attachments
! Configure e-mail message sensitivity and
importance settings
! Configure e-mail message security settings
! Configure e-mail message delivery options
! View e-mail messages
Managing
Scheduling! Create appointments, meetings, and events
! Send meeting requests
! Update, cancel, and respond to meeting
requests
! Customize calendar settings
! Share your calendar with others
! View other calendars
Managing
Tasks ! Create, modify, and mark tasks as complete
! Accept, decline, assign, update, and respond
to tasks
Managing
Contacts and
Personal
Contact
Information
! Create and modify contacts
! Edit and use an electronic business card
! Create and modify distribution lists
! Create a secondary address book
Organizing
Information! Categorize Office Outlook 2007 items by
color
! Create and manage Office Outlook 2007 data
files
! Organize mail folders
! Locate Office Outlook 2007 items by using
Search
! Create, modify, and remove rules to
manage e-mail messages
! Customize your Office Outlook 2007
experience

UNIT 1 CUSTOMIZING OUTLOOK 2007
The following lessons are contained in Unit 1:
Lesson 1 Customizing Views
Lesson 2 Customizing Menus and Toolbars
Lesson 3 Configuring E-mail Accounts


LESSON 1 CUSTOMIZING VIEWS
In this lesson, you will learn how to:
! Learn about views
! Create views
! Customize fields for views
! Customize groups and filtered views
! Customize automatic formatting views

Unit 1 Customizing Outlook 2007 Outlook 2007 Intermediate
Page 4 O2K7I-MBT/1109
INTRODUCTION TO VIEWS
! Discussion
A view is a specific layout in Outlook. For example, the Inbox
folder displays its messages in a view, providing the subject,
sender, date, and size of the messages.
Views in Outlook 2007 determine the arrangement and layout of
items in a folder.
Outlook provides a number of default views for different types of
folders. These views are dynamic, and change according to the
folder that is open at the time.
You can customize these views to display your data in a different
way or to display only data that meets certain criteria.
Views only change the way information looks – you can't use views
to modify data in a folder.
Examples of alternate views
The various folders each display a different view.

Outlook 2007 Intermediate Lesson 1 Customizing Views
O2K7I-MBT/1109 Page 5
Examples of Views by Folder
Folder Example
Mail The Mail folder contains a Message
Timeline view, which enables you to
keep track of your messages day by day.
This view displays the current month at
the top of the screen and the dates below
it. Each message is placed under the
relevant date.
Calendar The Calendar folder contains a
Day/Week/Month view, which enables
you to easily move between different
views such as day, week, or month.
This view displays a monthly calendar, as
well as day, week, and month buttons.
Contacts The Contacts folder contains an Address
Cards view, which enables you to view a
particular contact's details on a thumbnail.
This view displays the contacts name and
e-mail address.
Tasks The Tasks folder contains a Simple List
view, which enables you to view certain
information about a particular task such as
its subject and its due date.
This view displays the subject and due
date in two separate columns.
Notes The Notes folder contains an Icons view,
which enables you to view all notes that
you made as Icons. Other views include
Notes List, Last Seven Days, By
Category, and Outlook Data Files.
You can alter a number of the settings that views are composed of
to give you different ways to look at items in a folder. These
include:

Unit 1 Customizing Outlook 2007 Outlook 2007 Intermediate
Page 6 O2K7I-MBT/1109
View Settings
Setting Description
View Types A view type is the basic structure of a
view. This determines how information is
arranged and formatted in a folder.
The view types that are available for a
particular folder – table, timeline,
day/week/month, card, or icon – depend
on the Outlook items that are stored in
that folder.
Fields A field is an element of a table that
contains a particular item of information,
such as a title or last name.
Colors You can change the color of a number of
elements of a view, such as the text, flags,
and appointments and meetings.
Fonts You can change the default fonts when
customizing a view.
For example, by default, new e-mail
messages appear in bold in your Inbox,
but you can create a rule to have the text
simply appear in a bigger font size
% Procedures
There are no procedures for this topic.
& Step-by-Step
There are no step-by-step exercises for this topic.

Outlook 2007 Intermediate Lesson 1 Customizing Views
O2K7I-MBT/1109 Page 7
CREATING VIEWS
! Discussion
In Outlook 2007, you can create a new view from scratch or you
can create a view based on an existing view.
The Custom View Organizer
You use the Can be used on section to change where the view will
be available. You can make it available to everyone in your
organization, to you only, or to all the Mail and Post folders.
The Create a New View dialog box
Unit 1 Customizing Outlook 2007 Outlook 2007 Intermediate
Page 8 O2K7I-MBT/1109
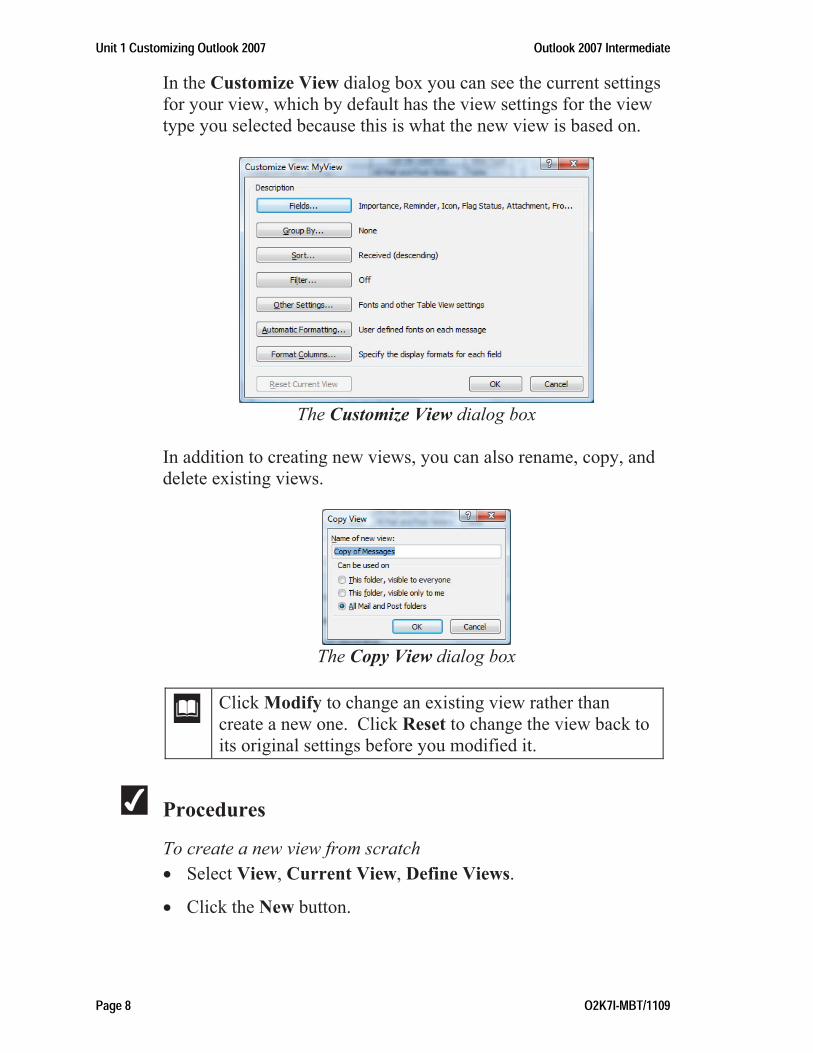
In the Customize View dialog box you can see the current settings
for your view, which by default has the view settings for the view
type you selected because this is what the new view is based on.
The Customize View dialog box
In addition to creating new views, you can also rename, copy, and
delete existing views.
The Copy View dialog box
#Click Modify to change an existing view rather than
create a new one. Click Reset to change the view back to
its original settings before you modified it.
% Procedures
To create a new view from scratch
! Select View, Current View, Define Views.
! Click the New button.

Outlook 2007 Intermediate Lesson 1 Customizing Views
O2K7I-MBT/1109 Page 9
! In the Create a New View dialog box, specify a name for your
new view, select the view type that you want, and choose who
can use the view.
! Click OK.
! In the Customize View dialog box, change settings as desired
and click OK.
! To use the new view immediately, click Apply View.
Otherwise, click Close.
To rename a view
! Select View, Current View, Define Views.
! Select the view you want to rename.
! Click the Rename button.
! In the Rename View dialog box, type the new name and click
OK.
! To use the view immediately, click Apply View. Otherwise,
click Close.
To copy a view
! Select View, Current View, Define Views.
! Select the view you want to copy.
! Click the Copy button.
! In the Copy View dialog box, specify a name for your new view
and choose who can use the view.
! In the Customize View dialog box, change settings as desired
and click OK.
! To use the new view immediately, click Apply View.
Otherwise, click Close.
To delete a view
! Select View, Current View, Define Views.
! Select the view you want to delete.
! Click the Delete button.
! Click OK to confirm and click Close.

Unit 1 Customizing Outlook 2007 Outlook 2007 Intermediate
Page 10 O2K7I-MBT/1109
& Step-by-Step
! Objective: To create, rename, copy, and delete views.
" Before you begin: Start Outlook 2007 and go to the Inbox.
1. Click View, Current View, Define Views.
The Custom View Organizer dialog box appears.
2. Click the New button.
The Create a New View dialog box appears.
3. In the Name of new view text box, type My First View.
The text appears.
4. In the Type of view list, choose Table.
The option is selected.
5. In the Can be used on section, choose This folder, visible
only to me.
The option is selected.
6. Click OK.
The Customize View: My First View dialog box appears.
7. In the Customize View: My First View dialog box, click
OK.
The Custom View Organizer dialog box reappears with the
new view selected.
8. With My First View selected, click Copy.
The Copy View dialog box appears.
9. In the Name of new view text box, type My Next View and
click OK.
The Customize View: My Next View dialog box appears.
10.In the Customize View: My Next View dialog box, click
OK.
The Custom View Organizer dialog box reappears with the
new view selected.
11.With My Next View selected, click Rename.
The Rename View dialog box appears.

Outlook 2007 Intermediate Lesson 1 Customizing Views
O2K7I-MBT/1109 Page 11
12.In the Name of new view dialog box, type My Second View
and click OK.
The view is renamed.
13.With My Second View selected, click Delete.
A confirmation dialog box appears.
14.Click OK.
The view is deleted.
" Before you move on: Click Close to close the dialog box.
CUSTOMIZING FIELDS FOR VIEWS
! Discussion
You can customize views to add and remove fields from a view.
Fields are also known as columns.
The typical Outlook Mail view has a number of columns.
• Importance
• Reminder
• Icon
• Attachment
• From and Subject
• Received and Size
• Categories and Flag Status
You can add fields to the views by:
• Using the Field Chooser dialog box
• Using the Customize View dialog box
The Field Chooser dialog box presents a list of available fields that
you can use to view information about a message.
Using the Customize View dialog box, you can customize the
fields that are visible in the view by changing the font, formatting,
and field groupings.

Unit 1 Customizing Outlook 2007 Outlook 2007 Intermediate
Page 12 O2K7I-MBT/1109
The Field Chooser dialog box
The Customize View dialog box contains several buttons that you
can use to modify a view.
Customize View Buttons
Button Description
Fields You use the Fields button to add or remove
fields from a view, or to change the order in
which they display.
Group By The Group By button allows you to group
items based on up to four different fields, in
ascending or descending order.
This option is only available in the Mail and
Tasks folders.
Sort You use the Sort button to sort items in
ascending or descending order, based on up to
four different fields.
This option is not available in the Calendar
folder.
Filter You use the Filter button to apply a filter to
your view so that it only displays those items
that meet conditions you specify.
For example, you can specify that the Inbox
should only display unread messages. The other
items in the folder will not be deleted – to see
them again, you simply remove the filter.

Outlook 2007 Intermediate Lesson 1 Customizing Views
O2K7I-MBT/1109 Page 13
Customize View Buttons
Button Description
Other
Settings
You use the Other Settings button to view and
customize fonts for columns and rows, and for
other Table view settings.
Automatic
Formatting
The Automatic Formatting button enables you
to configure default formatting settings for
items that meet a specified condition.
For example, you can format overdue items in a
different font and color than unread items.
Format
Columns
You use the Format Columns button to specify
the display format for each field.
This option is only available in the Mail and
Tasks folders.
The Show Fields dialog box lists the available fields.
The Show Fields dialog box
The fields are arranged in different field sets, which you can
specify. By default, the dialog box displays the most frequently-
used fields.
#You can also remove a field by dragging it off of the field
header section and letting go when you see a large X.

Unit 1 Customizing Outlook 2007 Outlook 2007 Intermediate
Page 14 O2K7I-MBT/1109
% Procedures
To add a field to a view using the Field Chooser
! Right-click anywhere in the field header section.
! Click Field Chooser from the shortcut menu.
! Click the field you want to add.
! Drag the field to the position in the field headers where you
want the new field to appear.
To remove a field from the header
! Right-click the field you want to remove.
! Click Remove This Column from the shortcut menu.
To add a field using the Customize View dialog box
! Click View, Current View, Customize Current View.
! Click the Fields button.
! In the Available Fields list, click the field you want to add.
! Click Add.
! Click Move Up or Move Down buttons to change the field’s
position, if necessary.
! Click OK twice.
& Step-by-Step
! Objective: To add and remove fields using the Field Chooser
and Customize View dialog boxes.
" Before you begin: Choose View, Current View, My First
View to select the view you created in the last exercise. Choose
View, Reading Pane, Off to switch the Inbox to a table format.
1. Right-click anywhere in the field header section.
The shortcut menu appears.
2. Click Field Chooser from the shortcut menu.
The Field Chooser dialog box appears.
Outlook 2007 Intermediate Lesson 1 Customizing Views
O2K7I-MBT/1109 Page 15
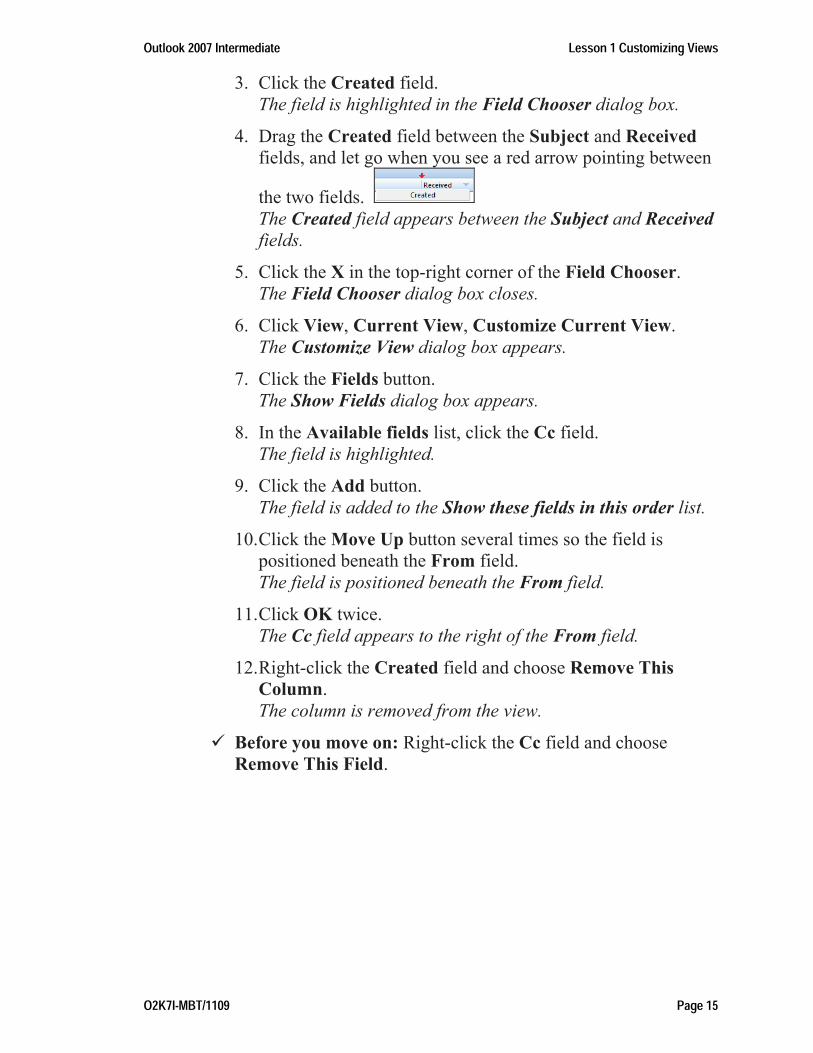
3. Click the Created field.
The field is highlighted in the Field Chooser dialog box.
4. Drag the Created field between the Subject and Received
fields, and let go when you see a red arrow pointing between
the two fields.
The Created field appears between the Subject and Received
fields.
5. Click the X in the top-right corner of the Field Chooser.
The Field Chooser dialog box closes.
6. Click View, Current View, Customize Current View.
The Customize View dialog box appears.
7. Click the Fields button.
The Show Fields dialog box appears.
8. In the Available fields list, click the Cc field.
The field is highlighted.
9. Click the Add button.
The field is added to the Show these fields in this order list.
10.Click the Move Up button several times so the field is
positioned beneath the From field.
The field is positioned beneath the From field.
11.Click OK twice.
The Cc field appears to the right of the From field.
12.Right-click the Created field and choose Remove This
Column.
The column is removed from the view.
" Before you move on: Right-click the Cc field and choose
Remove This Field.

Unit 1 Customizing Outlook 2007 Outlook 2007 Intermediate
Page 16 O2K7I-MBT/1109
CUSTOMIZING GROUPS AND FILTERED VIEWS
! Discussion
You can keep related information together in a view by grouping
items.
The Group By dialog box
Once you've specified the primary grouping, you can specify the
sub-groups. There are three "Then by" drop-down lists, each
specifying a successively lower grouping priority.
You can use the Ascending and Descending options for each field
to group items starting from the first letter of the alphabet, the
lowest number, or the earliest date.
The Filter dialog box lets you specify the criteria by which you
want to filter your view. For example, you can display only
messages containing specified text in the subject or message body.
#You can uncheck Show field in view in the Group By
dialog box to prevent the field you are grouping by from
appearing in the table. This can be useful because the
field title will always appear in the group header.

Outlook 2007 Intermediate Lesson 1 Customizing Views
O2K7I-MBT/1109 Page 17
% Procedures
To group items
! Click View, Current View, Customize Current View.
! Click the Group By button.
! Deselect the Automatically group according to arrangement
check box.
! Click the Group items by drop-down list.
! Choose the field you want to group by.
! If necessary, change Ascending to Descending.
! If necessary, uncheck the Show field in view check box.
! Repeat these steps for any Then by options you need to add.
! Click OK and OK.
To filter the view so it displays only messages containing specified
text
! Click View, Current View, Customize Current View.
! Click the Filter button.
! In the Search for the word(s) text box, type the text you want
to filter for.
! In the In drop-down list, choose the fields where the text should
appear (subject field only, subject field and message body, or
frequently-used text fields).
! Click OK twice.
& Step-by-Step
! Objective: Group and filter items.
" Before you begin: Complete the previous exercises.
1. Click View, Current View, Customize Current View.
The Customize View dialog box appears.

Unit 1 Customizing Outlook 2007 Outlook 2007 Intermediate
Page 18 O2K7I-MBT/1109
2. Click the Group By button.
The Group By dialog box appears.
3. Deselect the Automatically group according to
arrangement check box.
The box is unchecked and other options become available.
4. Click the Group items by drop-down list.
The list of fields appears.
5. Click Attachment.
The Attachment field appears in the list and additional
options become available.
6. Click the Then by drop-down list.
The list of fields appears.
7. Scroll down and click the From field.
The From field appears in the list and additional options
become available.
8. Click the Descending button next to the From field.
The option is selected.
9. Click OK and then OK again.
The list appears grouped first by the Attachment field and
then by the From field.
10.Click View, Current View, Customize Current View.
The Customize View dialog box appears.
11.Click the Filter button.
The Filter dialog box appears.
12.In the Search for the word(s) text box, type Goods.
The text appears.
13.Leave other options at their default settings and click OK
twice.
The emails disappear and only one category remains, With
Attachments. The category is collapsed.
" Before you move on: Click the + next to Attachment: With
Attachments and then again next to From: (none). The two
emails with the word Goods in the subject appear.

Outlook 2007 Intermediate Lesson 1 Customizing Views
O2K7I-MBT/1109 Page 19
CUSTOMIZING AUTOMATIC FORMATTING VIEWS
! Discussion
You can change the font and other elements in a view by
customizing the automatic formatting settings.
In the Automatic Formatting dialog box, the Rules for this view
list box contains specific conditions for the items in your view.
For each of these conditions, you can specify a particular font to be
used for displaying items that meet that condition.
The Automatic Formatting dialog box
#You can click the Add button to add a new rule.
% Procedures
To customize automatic formatting views
! Click View, Current View, Customize Current View.
! Click the Automatic Formatting button.
! Select the condition you want to customize.
! Click the Font button.
! Enter the desired font settings and click OK three times.

Unit 1 Customizing Outlook 2007 Outlook 2007 Intermediate
Page 20 O2K7I-MBT/1109
& Step-by-Step
! Objective: Customize the font of an automatic view.
" Before you begin: Right-click each of the emails in the current
view and choose Mark as Unread.
1. Click View, Current View, Customize Current View.
The Customize View dialog box appears.
2. Click the Automatic Formatting button.
The Automatic Formatting dialog box appears.
3. Click Unread messages (NOTE: do not click the check
box).
The rule is highlighted.
4. Click the Font button.
The Font dialog box appears.
5. In the Font Style list, click Bold Italic.
The option is selected.
6. Click OK three times.
The unread messages appear in Bold Italic format instead of
Bold.
" Before you move on: Right-click each of the emails in the
current view and click Mark as Read.
Click View, Current View, Messages. The default view
reappears.
Click View, Current View, Define Views. Click My First
View. Click Delete and confirm the deletion.
Exit Outlook 2007.

Outlook 2007 Intermediate Lesson 1 Customizing Views
O2K7I-MBT/1109 Page 21
LESSON REVIEW EXERCISE
'"Task
! Objective: To create, rename, copy, and delete views, add and
remove fields, group and filter items, and customize the font of
an automatic view.
" Before you begin: Start Outlook 2007 and go to the Inbox.
1. Create a new view called My Practice View. It should be a
Table view and should be usable on all Mail and Post
folders. Don’t customize the view at this time.
2. Copy the view and call the new copy My Practice View 2.
3. Rename the first view you created My Practice View 1.
4. Apply the My Practice View 1 view (NOTE: no changes
will occur at this time).
5. Turn the Reading Pane off.
6. Using the Field Chooser, drag the Message field between
the Subject and Received fields.
7. Using the Customize Fields dialog box, add the Read field
and move it above the Categories field.
8. Group the list by the From field in ascending order.
9. Filter the list by the word conference in either the subject or
body of the e-mail. Expand each of the categories.
10.Mark one email from Coup Degras and one email from Sally
Smith as unread.
11.Customize the automatic formatting of Unread group
headers by making the font size 12 points. Your screen
should look like the image on the next page.

Unit 1 Customizing Outlook 2007 Outlook 2007 Intermediate
Page 22 O2K7I-MBT/1109
" Before you move on: Mark the two emails that you marked
unread as read again.
Remove the Message field from the header.
Change the view back to Messages view. If necessary, turn the
Reading Pane back on (choose Right).
Delete the My Practice View 1 and My Practice View 2 views.
Exit Outlook 2007.

Outlook 2007 Intermediate Notices
O2K7I-MBT/1109 Page 231
NOTICES
COPYRIGHT
Copyright 2009 by Career Tech Services. All rights reserved.
Information in this document is subject to change without notice
and does not represent a commitment on the part of Career Tech
Services.
TRADEMARK NOTICES
All product names and services identified throughout this book are
trademarks or registered trademarks of their respective companies.
They are used throughout this book in editorial fashion only and for
the benefit of such companies. No such use, or the use of any trade
name, is intended to convey endorsement or other affiliation with
the book.
DISCLAIMER
While Career Tech Services takes great care to ensure the accuracy
and quality of these materials, all material is provided without any
warranty whatsoever, including, but not limited to, the implied
warranties of merchantability or fitness for a particular purpose.