unit 13 investigating a crime scene: contents · lesson plans . 1 introduction . 2 recording a...
TRANSCRIPT

BTEC First Applied Science © HarperCollinsPublishers Ltd 2010 1
Unit 13 Investigating a Crime Scene: Contents
Overview Setting up a crime scene Lesson Plans 1 Introduction 2 Recording a crime scene I 3 Recording a crime scene II 4 Recording a crime scene III 5 Recording a crime scene IV 6 Recording a crime scene V 7 Recording a crime scene VI 8 Planning forensic analysis 9 Analysing hair from a crime scene I 10 Analysing hair from a crime scene II 11 Analysing hair from a crime scene III 12 Analysing fingerprints from a crime scene I 13 Analysing fingerprints from a crime scene II 14 Analysing fingerprints from a crime scene III 15 Analysing blood from a crime scene I 16 Analysing blood from a crime scene II 17 Analysing blood from a crime scene III 18 Analysing DNA from a crime scene I 19 Analysing DNA from a crime scene II 20 Analysing DNA from a crime scene III 21 Analysing insects from the crime scene 22 Analysing human remains from a crime scene I
23 Analysing human remains from a crime scene II 24 Analysing marks and impressions from a crime scene I 25 Analysing marks and impressions from the crime scene II 26 Analysing fibres from a crime scene I 27 Analysing fibres from a crime scene II 28 Analysing fibres from a crime scene III 29 Analysing glass from a crime scene I 30 Analysing glass from a crime scene II 31 Analysing paint from a crime scene I 32 Analysing paint from a crime scene II 33 Analysing drugs from a crime scene I 34 Analysing drugs from a crime scene II 35 Analysing poisons from a crime scene I 36 Analysing poisons from a crime scene II 37 Analysing alcohol from a crime scene I 38 Analysing alcohol from a crime scene II 39 Your day in court I 40 Your day in court II 41 Your day in court III
Assignment 13.1: Recording a crime scene Help Sheet 1.1: Producing a poster of a crime scene Help Sheet 1.2: How to collect fingerprints Help Sheet 1.3: How to collect shoeprints Help Sheet 1.4: How to collect blood Help Sheet 1.5: How to collect trace evidence Help Sheet 1.6: How to label evidence Help Sheet 1.7: How to package and store evidence Help Sheet 2: Appendix I: SOCO report Help Sheet 3: Appendix II and III: SOCO report Task Sheet 1.1: Risk Assessment Task Sheet 1.2: Scene of crime officer report Checklist
FOR
EV
ALU
ATIO
N O
NLY
Contents
Assignment 13.2: Planning the analysis of crime scene evidence Help Sheet 1: Detailed analysis Task Sheet 1: First part of the Forensic Scientist’s Report Checklist Assignment 13.3: Analysing evidence from the crime scene Help Sheet 1.1: Analysing hair Help Sheet 1.2: Identifying the ridge characteristics of fingerprints Help Sheet 1.3: The Kastle-Meyer test for blood Help Sheet 1.4: Analysing blood groups Help Sheet 1.5: Effect of temperature on maggot size Help Sheet 1.6: Making casts of toolmarks Help Sheet 1.7: Examining fibres Help Sheet 1.8: Properties of fibre Help Sheet 1.9: Measuring the refractive index of glass Help Sheet 1.10: Analysing paint evidence Help Sheet 1.11: The chromatography of drugs Help Sheet 1.12: Chemical tests for ions Help Sheet 1.13: Results for chemical tests for ions Help Sheet 1.14: Testing for alcohol Help Sheet 1.15: The short-term effects of alcohol Task Sheet 1.1: Risk Assessment Task Sheet 1.2: Forensic scientist’s report Task Sheet 1.3: The National Fingerprint Form Task Sheet 1.4: Results of analysing blood groups Task Sheet 1.5: DNA analysis Task Sheet 1.6: Estimating the date of death using forensic entomology Task Sheet 1.7: Dental records Task Sheet 1.8: The refractive index of glass Checklist Assignment 13.4: My day in court Checklist Worksheets 1 Wordsearch 2 Quiz 3 Wordsearch 4 Crossword 5 Blood spatter analysis Technician Sheets 1 – 13 Tracking Documents
Scheme of Work Functional Skills and PLTS
© HarperCollinsPublishers Ltd 2010 BTEC First Applied Science 2
FOR
EV
ALU
ATIO
N O
NLY
BTEC First Applied Science © HarperCollinsPublishers Ltd 2010 1
Unit 13: Investigating a crime scene
Overview
Assessment and grading criteria
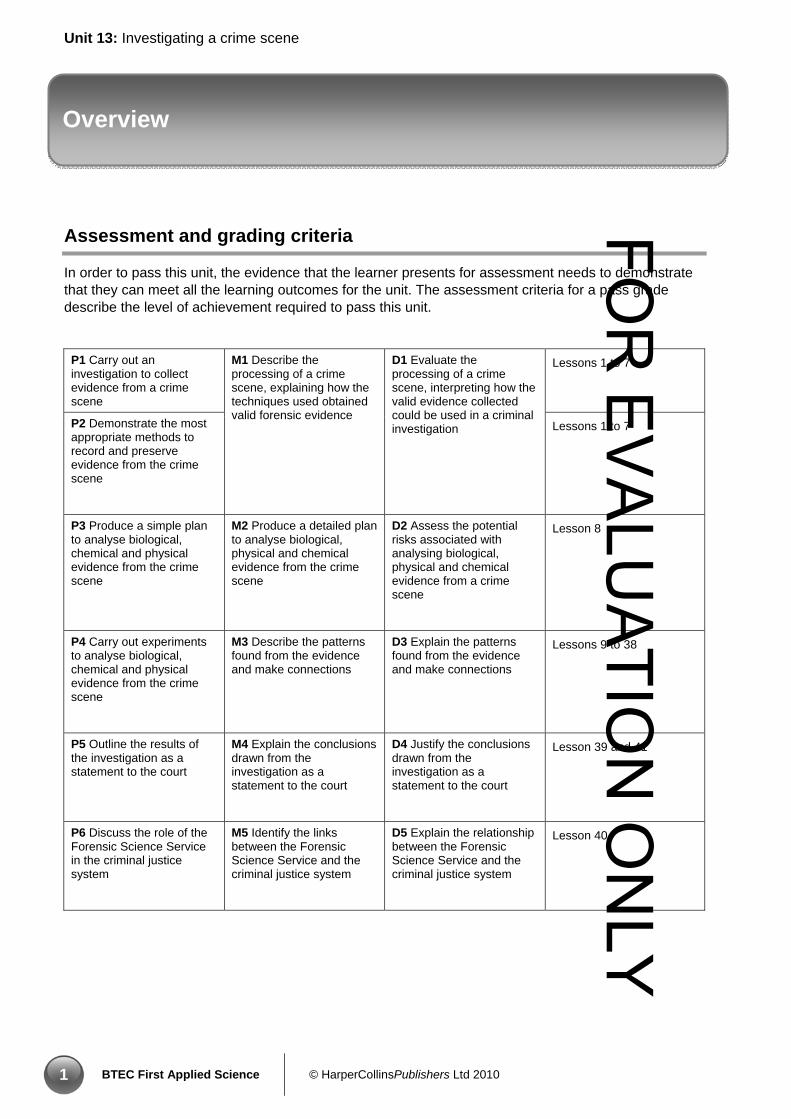
In order to pass this unit, the evidence that the learner presents for assessment needs to demonstrate that they can meet all the learning outcomes for the unit. The assessment criteria for a pass grade describe the level of achievement required to pass this unit.
P1 Carry out an investigation to collect evidence from a crime scene
Lessons 1 to 7
P2 Demonstrate the most appropriate methods to record and preserve evidence from the crime scene
M1 Describe the processing of a crime scene, explaining how the techniques used obtained valid forensic evidence
D1 Evaluate the processing of a crime scene, interpreting how the valid evidence collected could be used in a criminal investigation
Lessons 1 to 7
P3 Produce a simple plan to analyse biological, chemical and physical evidence from the crime scene
M2 Produce a detailed plan to analyse biological, physical and chemical evidence from the crime scene
D2 Assess the potential risks associated with analysing biological, physical and chemical evidence from a crime scene
Lesson 8
P4 Carry out experiments to analyse biological, chemical and physical evidence from the crime scene
M3 Describe the patterns found from the evidence and make connections
D3 Explain the patterns found from the evidence and make connections
Lessons 9 to 38
P5 Outline the results of the investigation as a statement to the court
M4 Explain the conclusions drawn from the investigation as a statement to the court
D4 Justify the conclusions drawn from the investigation as a statement to the court
Lesson 39 and 41
P6 Discuss the role of the Forensic Science Service in the criminal justice system
M5 Identify the links between the Forensic Science Service and the criminal justice system
D5 Explain the relationship between the Forensic Science Service and the criminal justice system
Lesson 40
FOR
EV
ALU
ATIO
N O
NLY

Unit 13: Investigating a crime scene
© HarperCollinsPublishers Ltd 2010 BTEC First Applied Science 2
Introduction to this unit
Assignment 13.1: Lessons 1 to 7 (approximately 13 hours)
Students are Scene of Crime Officers (SOCOs) working for the local police station. A person has been found dead in the science lab. The crime desk sends a police officer to the incident scene, and he then calls for a SOCO.
For P1, having first carried out a Risk Assessment, students must process the crime scene; they will carefully record the crime scene, and then collect and document evidence from it. They will record the processing of the crime scene in their SOCO’s Report.
For M1, students will add to their SOCO’s Report a detailed description of how they processed the crime scene, explaining how the techniques they used ensured they obtained valid forensic evidence. For D1, students will evaluate their processing of the crime scene, and show how the evidence collected could be used in the investigation.
See the folder Setting up a crime scene, file U13_CS, for guidance on setting up a crime scene in your laboratory.
Assignment 13.2: Lesson 8 (approximately 3 hours)
In this assignment, the students continue their investigation of the crime. They are now working as forensic scientists. The SOCO has sent the evidence collected from the crime scene to them. The students must plan how they will analyse the evidence. Their investigation of the crime must include the analysis of biological evidence, physical evidence, and chemical evidence. They will produce their plans and present them as part of their Forensic Scientist’s Reports. Students should analyse at least four biological, two chemical and two physical types of evidence.
For P3, students will produce an outline plan of how they will analyse the evidence, while for M2, they will present a detailed plan. For D2, students will assess fully the potential risks associated with analysing the evidence from the crime scene.
Assignment 13.3: Lessons 9 to 38 (approximately 30 hours)
Working as forensic scientists, students must now analyse the evidence, for P4. Their investigation of the crime must include the analysis of pieces of biological evidence, pieces of physical evidence, and pieces of chemical evidence. Students should analyse at least four biological, two chemical and two physical types of evidence.
They must present their findings, describing patterns found in the evidence for M3, and explaining these for D3, making connections between these patterns in their findings and the crime. For D3, students must also evaluate the qualitative and quantitative data obtained.
Assignment 13.4: Lessons 39 to 41 (approximately 6 hours)
Having completed the investigation of the death of a person in the science lab, students must now present and explain their conclusions. They must, first of all, complete a statement in their Forensic Scientist’s Report, for P5 (they can later use this statement when ‘testifying’ in court). For M4, students must explain fully the conclusions they have drawn for each piece of evidence analysed, and for the investigation as a whole. Students must justify these conclusions for D4.
Before appearing in court, students must learn more about how the criminal justice system (CJS). The will present a leaflet on the CJS, and its relationship with the Forensic Science Service (FSS). They will discuss the role of the FSS within the CJS for P6, identify links between the two for M5, and explain the relationship for D5.
FOR
EV
ALU
ATIO
N O
NLY
BTEC First Applied Science © HarperCollinsPublishers Ltd 2010 1
Unit 13: Investigating a crime scene
Setting up a crime scene
A crime scene needs to be set up in the lab or alternative location. A store room or prep room may be preferable, because groups of students (‘SOCO teams’) could be given staggered, rather than unlimited, access to the mock crime scene.
Each group should be supervised when collecting evidence to ensure that each collects a representative sample only and leaves some for other groups.
The crime scene should include an area marked out on the floor where a body has been found. Students need to be provided with a range of evidence for collection and later analysis. These could include some or all of the following:
• surface as source of fingerprints
• traces of chemical on the floor
• a wine glass containing a liquid
• a bottle of paracetamol
• muddy shoeprint leading to the position of the body
• fabric-covered chair with hair and fibres
• blood (mammalian or fake) spots and spatters.
It is important that students collect a range of types of evidence, but note that these can be supplemented with additional types for analysis later on.
An alternative selection may be provided if the centre feels that this is more appropriate. Please note, however, that students have to record and collect (Assignment 13.1), plan their methods (Assignment 13.2) and analyse (Assignment 13.3) biological, chemical and physical types of evidence to complete the assessment criteria. At least four biological, two chemical, and two physical types of evidence should be analysed, depending on your facilities and areas of expertise.
Fingerprints on a hard surface
Fingerprints should be provided on a hard surface so that students can collect them by powdering. It is important that there are enough fingerprints for each of the teams to analyse. Application to a flat surface, such as a sheet of glass, is preferable to a curved object, such as a glass or a beaker. If groups of students are allowed to access the crime scene in turn, these can be replenished each time between group visits.
It is also suggested that students get the opportunity to sample fingerprints from a porous surface, such as a sheet of paper.
Trace of unknown chemical on the floor
A small amount of a chemical (10 g) should be placed on the floor close to the position where the body was found. Students will subsequently carry out qualitative tests on collected samples. A household chemical should be selected, e.g. sodium chloride, sodium carbonate or potassium chloride.
A wine glass containing fluid
The wine glass should be placed on a table or similar surface close to the position of the body. It is suggested that the glass contains around 50 cm3 of a suitable pale white wine (ABV 10–13%). Each team of students will collect a representative sample of the liquid from the glass.
FOR
EV
ALU
ATIO
N O
NLY
Unit 13: Investigating a crime scene
© HarperCollinsPublishers Ltd 2010 BTEC First Applied Science 2
A bottle of paracetamol
A labelled bottle of paracetamol should be placed on a table or similar surface close to the position of the body. It is recommended that only one or two tablets are removed from the bottle so that the medicine cannot be implicated in the death. Students will later analyse the tablets by chromatography (preferably thin-layer) to confirm the presence of paracetamol.
Muddy shoeprint leading to the position of the body
A series of shoeprints leading from the door to the position of the body should be provided. Students will record these photographically. In order for students to use a casting technique for the collection of shoeprint evidence, it is recommended that an outside location close to an access point to the school is also chosen. A series of shoeprints should be made in the earth, using the same shoe as the one used to make the muddy shoeprints at the crime scene.
Garment removed from the victim, with hair and fibres
A garment that has been removed from the victim will be left for students to collect evidence from.
It is recommended that hair samples (sufficient for one hair per group) from two people are placed onto the garment, along with hair from another mammal. One of the people providing the hair samples will be the victim and one will be the perpetrator of the crime. Students will examine hair samples from the crime scene, a series of suspects and the victim. Fibres should include natural, e.g. cotton, linen or silk, and synthetic.
Blood spots and spatters
Blood spots and/or spatters should be added to the crime scene close to the position of the body. Students will:
• investigate patterns of the blood
• carry out blood-group typing
• carry out a simple chemical (presumptive) test to indicate the spots are blood.
One or two types of blood pattern could be provided. Spots falling vertically onto the floor will produce circles. Within certain limits, the height from which they’ve fallen can be estimated. It is also suggested that these are supplemented with blood spatters. Students will make measurements at the crime scene and higher level candidates could calculate the angle at which the blood hit the floor. It may be appropriate to implicate that the spots of blood and the blood spatter pattern came from different people (as will be indicated by the blood group analysis), so this should be considered carefully before setting up the crime scene.
Blood spatters can be made with a syringe. It is recommended that teachers or technicians practise producing blood spatters of the appropriate shape before producing them at the crime scene.
Mammalian blood should be used to carry out the presumptive testing for blood. Like other mammalian tissue, this may be a potential source of infection and it should be handled with reasonable care; the risks are much the same as those of handling meat in the kitchen (CLEAPSS, 2009). Mammalian blood can be purchased from scientific suppliers, e.g. Blades Biological and Timstar or be obtained from a local butcher. Alternatively, fake blood with a few drops of the enzyme peroxidase, freshly added, may be a preferable substitute.
Note that a centre may use this crime scene to provide students with an opportunity of developing the relevant practical techniques and then use a subsequent crime scene scenario for the students’ assignment work if it feels this is more appropriate.
FOR
EV
ALU
ATIO
N O
NLY
BTEC First Applied Science © HarperCollinsPublishers Ltd 2010 1
Unit 13: Investigating a crime scene
9 Analysing hair from a crime scene I
Learning outcome LO2 Be able to use appropriate scientific techniques to analyse evidence which has been collected from the scene-of-
crime
Assessment criteria P4 Carry out experiments to analyse biological, chemical and physical evidence from the crime scene
M3 Describe the patterns found from the evidence and make connections
D3 Explain the patterns found from the evidence and make connections
Planning and resources
Students must carry out analyses of biological, chemical and physical evidence collected from the crime scene. Guide students to carry out the practical work in Lessons 9−38, adapted as necessary to suit your facilities and areas of expertise. Note that to successfully complete their assessment in Assignment 13.3 they should carry out at analyses of at least four biological, two chemical, and two physical types of evidence.
This lesson will take two hours.
Some centres may use this lesson for students to develop skills in the microscopy of hair and then return to it later in the unit.
You will need the following resources:
• hair samples from the crime scene (students will have collected these as part of Lessons 4 to 6; they could include hair from the victim, hair from one of the suspects, hair from another mammal)
• hair samples from various mammals, depending on availability
• hair samples from four or five suspects for comparison
• additional hair samples of various colours, natural and dyed (a local hairdresser would be a good source of these)
• glycerol
• ethanol (HIGHLY FLAMMABLE)
• Pasteur pipettes
• microscope slides
• cover slips
• microscopes (up to x400 desirable but not essential)
• (optional) eyepiece graticules
• mounted needles
• clear nail varnish
• tissues
• access to Internet
• Student Book pages 252−253
• Help Sheet A13.3 HS1.1
• Task Sheet A13.3 TS1.1
• Task Sheet A13.3 TS1.2 (Part E)
• Technician Sheet 2
Real-life links It may be possible to engage a forensic scientist to give an introduction to students on analytical techniques in forensic science. Alternatively, or in addition, a local hairdresser might talk to students about the structure of hair and the effect of different treatments on hair structure.
Setting the scene
• Students will have collected hair from the crime scene. In Lesson 9 they learn about the structure of hair and differences in hairs from different animals and how to identify these. They then carry out analyses in Lessons 10 and 11.
FOR
EV
ALU
ATIO
N O
NLY
Unit 13: Investigating a crime scene
Class activity
• Students will appreciate obvious variation in human hair, such as colour and texture. The lesson could begin with a class discussion about the possible forensic relevance of hair in crime scenes.
• Discuss with students: o In which animals is hair found? Students should draw on their knowledge of mammals at Key
Stage 3. o What is the structure of hair? Students could find this out as a short research project using
Student Book page 253 and/or the Internet to help them. Alternatively, a practitioner from a local hairdressing salon could provide the introduction, manufacturers of hair care products are also often a useful source of information, e.g. http://www.schwarzkopf-consumer.com
• The class should then go on to discuss how to examine the features of human hair. Hair is mounted in glycerol for viewing with a microscope, because glycerol has a similar refractive index to hair. Impressions of the hair surface called scale patterns can be important in identifying the hair of other mammals. The techniques could be demonstrated towards the end of the lesson.
Assignment activity P4
In this lesson students begin work on Task 1 (biological sample: hair) of Assignment 13.3.
• Students must analyse the biological evidence they collected from the crime scene. They can use Help Sheet A13.3 HS1.1 to help them. The piece of evidence they must analyse is hair.
• Before beginning work, students must complete a new Risk Assessment on Task Sheet A13.3 TS1.1 and you may wish to add an authorising signature to this before allowing them to proceed. Students should be encouraged to record all potential hazards, even if they consider that these are of low or minimal risk.
• Students must record the results of their analysis in Part E of the Forensic Scientist’s Report on Task Sheet A13.3 TS1.2.
Teacher guidance
• This topic should run over three lessons, but may take longer. The topic forms part of a sequence in which students analyse different types of evidence, e.g. biological, chemical and physical, collected from a crime scene. The running order of this topic in the lesson plans follows that in the specification, but this can be modified according to centre requirements.
• Note that the information in Part E of their Forensic Scientist’s Report will be needed later on in the topic for students’ Statement to the Court, which fulfils criterion P5 (Lesson 39).
Pass: • Students must use microscopy to examine samples of human and other hair from the crime scene.
Students must examine sufficient samples in order to make valid judgements.
Delivering PLTS and functional skills PLTS Creative thinkers – asking questions to extend their thinking; connecting own and others’ ideas and experiences in inventive ways; Team workers – co-operating with others to work towards common goals; reaching agreements, managing discussions to achieve results
Functional skills ICT – selecting and using a variety of sources of information independently for a complex task; English – participating in group discussions
Useful websites http://www.schwarzkopf-consumer.com/index.php?id=777 – Schwarzkopf site includes scientific information on hair and hair treatments
http://www.hair-science.com/_int/_en/topic/topic_sousrub.aspx?tc=root-hair-science%5Eportrait-of-an-unknown-element%5Esuperb-chemistry&cur=superb-chemistry – L’ORÉAL website includes scientific information on hair and hair treatments
http://www.fbi.gov/hq/lab/fsc/backissu/july2000/deedric1.htm – FBI’s Forensic Science Communications on Hair and Fibres
© HarperCollinsPublishers Ltd 2010 BTEC First Applied Science 2
FOR
EV
ALU
ATIO
N O
NLY
BTEC First Applied Science © HarperCollinsPublishers Ltd 2010 1
Unit 13: Investigating a crime scene
40 Your day in court II
Learning outcome LO3 Understand the relationship of forensic science to the law, including the criminal justice system
Assessment criteria P6 Discuss the role of the Forensic Science Service in the criminal justice system
M5 Identify the links between the Forensic Science Service and the criminal justice system
D5 Explain the relationship between the Forensic Science Service and the criminal justice system
Planning and resources
This lesson is one of a series where students, as forensic scientists and appropriate lawyers, bring their findings to court and act out the court case.
This lesson will take one hour. Lesson 40 includes time for students to begin Assignment 13.4, although much of the preliminary work for this will have been completed as part of Assignments 13.1 and 13.3.
You will need the following resources:
• Internet access
• evidence collected from crime scene (Lessons 4–6)
• Student Book pages 284–285
• SOCO Report (Task Sheet A13.1 TS1.2)
• Forensic Scientist’s Report (Task Sheet A13.3 TS1.2)
Real-life links It may be possible to engage a SOCO, forensic scientist, police officer, magistrate, judge or other member of the criminal justice system to talk to students.
Setting the scene
• Students have recorded and collected evidence from a crime scene, analysed the evidence and drawn conclusions and must now prepare to present their evidence in court.
• It is likely that they will have some knowledge of the criminal justice system (CJS), but they may have misconceptions, so an important preliminary to their preparation will be to clarify the role of the CJS in detecting crime and bringing the perpetrators to justice.
Class activity
• Students should research the structure of the criminal justice system (Student Book pages 286–289) and its component parts: the Police Service; the Crown Prosecution Service (CPS); Her Majesty's Court Service; The National Offender Management Service (which includes prisons and probation); the Youth Justice Board.
• Students should discuss the role of the CJS in bringing crime to justice.
• Students should then focus on events in court. All students should ascertain the roles of the key players in court (it is suggested that having established the structure of the system, they focus on the Crown Court), the role of adversarial justice and the sequence of events in court, through examination by prosecution lawyers, cross examination and re-examination.
FOR
EV
ALU
ATIO
N O
NLY
Unit 13: Investigating a crime scene
© HarperCollinsPublishers Ltd 2010 BTEC First Applied Science 2
• Students should prepare an information leaflet about the relationship of the Forensic Science Service (FSS) and the CJS. This will constitute the ‘a’ tasks of Assignment 13.4, and act as an aide-mémoire for their preparation for court.
Assignment activity P6 M5 D5
In this lesson students start work on Tasks 1a, 2a and 3a of Assignment 13.4.
• Students must prepare an information leaflet about the relationship of the FSS and the CJS. This will act as an aide-mémoire for their preparation for court.
• M students must add to their leaflet on the CJS a section that identifies how the work of the FSS links to the component parts of the CJS.
• D students must explain fully the relationship between the work of the FSS and CJS and how it is relevant to the investigation of crime.
Teacher guidance
Pass: • Students should produce, working individually, a leaflet on the CJS that includes a discussion of the
role of the FSS in the system.
Merit: • Students should discuss how aspects of criminal investigation by the FSS are linked to the activities
of the CJS.
Distinction: • Students should explain fully the relationship between the work of the FSS and CJS.
Delivering PLTS and functional skills PLTS Independent enquirers – identifying questions to answer and problems to resolve; planning and carrying out
research, appreciating the consequences of decisions; analysing and evaluating information, judging its relevance and value
Functional skills ICT – recording evidence by taking and printing photographs and using appropriate software to create presentations
Mathematics – analysing data from results English – participating in group discussions, producing coherent written notes for the Forensic Scientist’s Report
FOR
EV
ALU
ATIO
N O
NLY
BTEC First Applied Science © HarperCollinsPublishers Ltd 2010 1
Assignment 13.3: Analysing evidence from the crime scene
P4 (part)
Help Sheet 1.1 Analysing hair Hair is often left at crime scenes and can be valuable evidence. The structure of hair can be examined under a light microscope.
Examining the internal structure of hair
You are going to make temporary slides of one of the hair samples you collected as evidence and examine them under a microscope.
You will need:
• hair evidence from the crime scene • control hairs • hair from four or five suspects • clean microscope slide and cover slip • access to microscope • glycerol • Pasteur pipette • (optional) digital camera with means to print photographs • (optional) eyepiece graticule • clear plastic ruler
Microscopy method to make a drawing or take a photograph:
1 Complete a Risk Assessment on this piece of evidence before you analyse it. Use Task Sheet 1.1 to record the risks. Get your Risk Assessment checked by your teacher for each piece of evidence before you start to examine it.
2 Put the strand of hair to be examined on a clean microscope slide (remove any lifting tape first). The piece you use should include the root.
3 Place 1 or 2 drops of glycerol on the hair.
4 Gently lower a cover slip onto the hair, taking care to avoid trapping any air bubbles.
5 Examine the hair at x100 magnification.
6 Locate the hair root. Record its structure by drawing or photographing it. You can use the diagram of hair structure overleaf to help you.
7 View the rest of the hair at a magnification of x400. Record and label the hair. Indicate on the diagram the magnification you used to view the hair. Look for the layers that make up the hair, the colour of the hair and the presence of pigment granules.
8 Also examine and record hairs using this method from controls and suspects.
FOR
EV
ALU
ATIO
N O
NLY

© HarperCollinsPublishers Ltd 2010 BTEC First Applied Science 2
Assignment 13.3: Analysing evidence from the crime scene
P4(part)
Help Sheet 1.1 Analysing hair (continued)
Microscopy methods to calculate width and medullary index of hair:
1 If you have an eyepiece graticule, calculate the actual width of the hair. Alternatively, place a clear plastic ruler on the stage of the microscope to find the diameter of the field of view. You can find the width of the hair by estimating the proportion of the field of view it fills.
2 Measure the width of the medulla and calculate the medullary index using the equation:
medullary index = width of the medulla
width of the hair
The structure of hair
FOR
EV
ALU
ATIO
N O
NLY
BTEC First Applied Science © HarperCollinsPublishers Ltd 2010 3
Assignment 13.3: Analysing evidence from the crime scene
P4 (part)
Help Sheet 1.1 Analysing hair (continued)
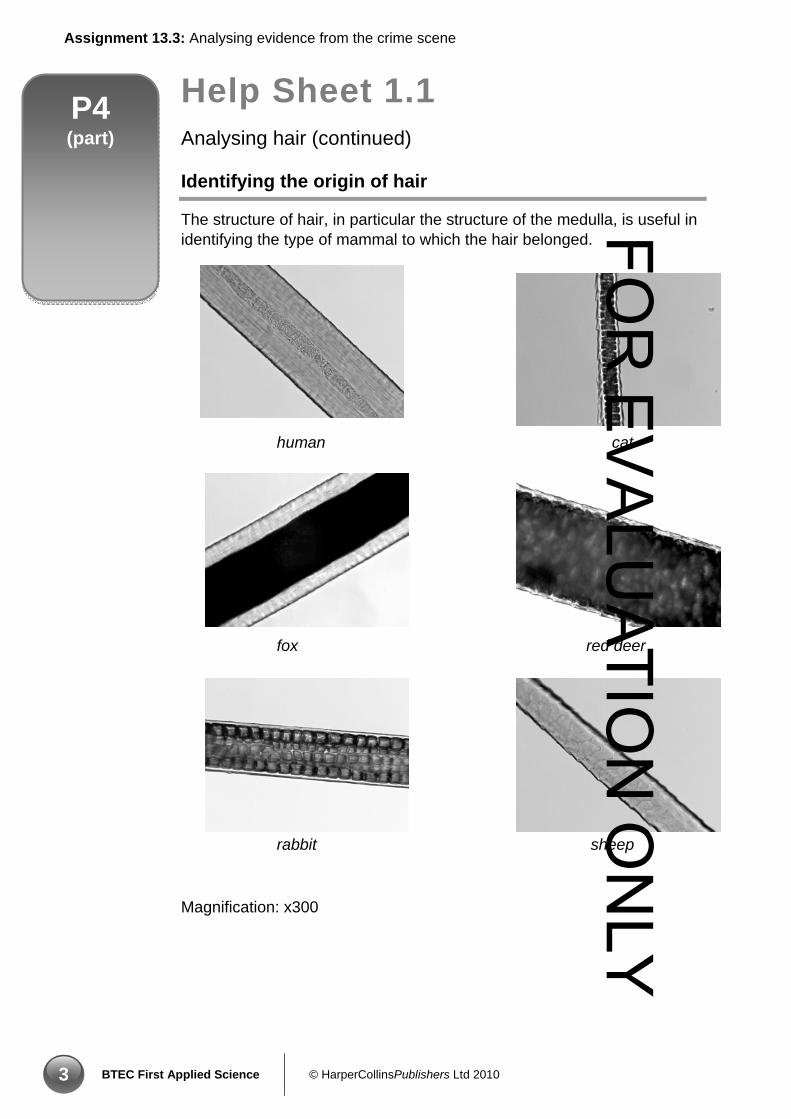
Identifying the origin of hair
The structure of hair, in particular the structure of the medulla, is useful in identifying the type of mammal to which the hair belonged.
human cat
fox red deer
rabbit sheep
Magnification: x300
FOR
EV
ALU
ATIO
N O
NLY
© HarperCollinsPublishers Ltd 2010 BTEC First Applied Science 4
Assignment 13.3: Analysing evidence from the crime scene
P4(part)
Help Sheet 1.1 Analysing hair (continued)
Identifying scale patterns of hair
In humans, the scales that make up the cuticle of the hair overlap smoothly. In other mammals, the way the scales overlap creates a rougher surface. Patterns made by the scales are often useful in identifying the hair of different types of animals.
You are going to prepare some casts of scale patterns and examine them under a microscope.
You will need:
• hair evidence from the crime scene • control hairs • hair from four or five suspects • tissue • ethanol (HIGHLY FLAMMABLE) • microscope slide • clear nail varnish
Examining scale patterns method:
1 Complete a Risk Assessment on this piece of evidence before you analyse it. Use Task Sheet 1.1 to record the risks. Get your Risk Assessment checked by your teacher for each piece of evidence before you start to examine it.
2 Moisten a tissue with ethanol. Fold the tissue around the hair sample. Pull the hair through the tissue to remove oil from its surface.
3 Paint an area about 10 mm square at the centre of a microscope slide with clear nail varnish.
4 Before the nail varnish dries, place the hair on the nail varnish on the slide.
5 When the surface of the nail varnish has become partly solid, but before it dries completely, lift the hair from the slide.
6 Examine the microscope slide and draw the scale pattern of the hair. Record the magnification you have used.
7 Also examine and record hairs using this method from controls and suspects.
FOR
EV
ALU
ATIO
N O
NLY

BTEC First Applied Science © HarperCollinsPublishers Ltd 2010 5
Assignment 13.3: Analysing evidence from the crime scene
P4 (part)
Help Sheet 1.1 Analysing hair (continued)
Identifying number of scales
1 Count the number of scales along the hair length in the field of view.
2 Calculate the number of scales per mm of hair (using your measurements or field of view calculations from earlier).
FOR
EV
ALU
ATIO
N O
NLY